

AOC L26W831 Service Manual
26″LCD TV AOC L26W831
Service
Service
Service
31.5~60 kHz
Description Page Description Page
Table Of Contents.......……..............................…........1
Important Safety Notice.......................................……......2
Revision List…………………………………………………3
1. General Specification..............................………........4
2. Operating Instructions…………………….……….......5
2.1. The Use Of Remote Control…….………….…….......5
2.2. To Use The Menu…...…………………….……….......6
2.3. How To Connect…….…………………….……….....11
2.4. Front Panel Control Knobs……………….……….....13
3. Input/Output Specification…………....................…....14
4. Mechanical Instructions…………………….................15
5. Repair Flow Chart ……………………….…….…….....18
6. PCB Layout ………………..………………....….......23
ANY PERSON ATTEMPTING TO SERVICE THIS CHASSIS MUST FAMILIARIZE HIMSELF WITH THE CHASSIS
TABLE OF CONTENTS
6.1.Main Board…………..……………...……….......23
6.2.Power Board……………..………….……….......26
6.3.Key Board………………………..……….......27
6.4.IR Board…………………………..……….......27
7.Adjustment……………………………….................28
8. Block Diagram.……...........................................29
9. Schematic……………...…………..………………...30
9.1 Main Board…………………………………...….......31
9.2.Power Board…………….…………...………….......41
9.3.Key Board……………….……….………….......42
10. Exploded View………………………………….…...43
11. BOM List……………….…………………………….44
12.Different Parts List…………………………………...63
SAFETY NOTICE
Horizontal Frequency
AND BE AWARE OF THE NECESSARY SAFETY PRECAUTIONS TO BE USED WHEN SERVICING
ELECTRONIC EQUIPMENT CONTAINING HIGH VOLTAGES.
CAUTION: USE A SEPARATE ISOLATION TRANSFOMER FOR THIS UNIT WHEN SERVICING
1

26″LCD TV AOC L26W831
Important Safety Notice
Proper service and repair is important to the safe, reliable operation of all AOC Company Equipment. The service
procedures recommended by AOC and described in this service manual are effective methods of performing service
operations. Some of these service operations require the use of tools specially designed for the purpose. The
special tools should be used when and as recommended.
It is important to note that this manual contains various CAUTIONS and NOTICES which should be carefully read in
order to minimize the risk of personal injury to service personnel. The possibility exists that improper service
methods may damage the equipment. It is also important to understand that these CAUTIONS and NOTICES ARE
NOT EXHAUSTIVE. AOC could not possibly know, evaluate and advise the service trade of all conceivable ways in
which service might be done or of the possible hazardous consequences of each way. Consequently, AOC has not
undertaken any such broad evaluation. Accordingly, a servicer who uses a service procedure or tool which is not
recommended by AOC must first satisfy himself thoroughly that neither his safety nor the safe operation of the
equipment will be jeopardized by the service method selected.
Hereafter throughout this manual, AOC Company will be referred to as AOC.
WARNING
Use of substitute replacement parts, which do not have the same, specified safety characteristics might create
shock, fire, or other hazards.
Under no circumstances should the original design be modified or altered without written permission from AOC.
AOC assumes no liability, express or implied, arising out of any unauthorized modification of design.
Servicer assumes all liability.
FOR PRODUCTS CONTAINING LASER:
DANGER-Invisible laser radiations when open AVOID DIRECT EXPOSURE TO BEAM.
CAUTION-Use of controls or adjustments or performance of procedures other than those specified herein may
result in hazardous radiation exposure.
CAUTION -The use of optical instruments with this product will increase eye hazard.
TO ENSURE THE CONTINUED RELIABILITY OF THIS PRODUCT, USE ONLY ORIGINAL MANUFACTURER'S
REPLACEMENT PARTS, WHICH ARE LISTED WITH THEIR PART NUMBERS IN THE PARTS LIST SECTION OF
THIS SERVICE MANUAL.
Take care during handling the LCD module with backlight unit
-Must mount the module using mounting holes arranged in four corners.
-Do not press on the panel, edge of the frame strongly or electric shock as this will result in damage to the screen.
-Do not scratch or press on the panel with any sharp objects, such as pencil or pen as this may result in damage to
the panel.
-Protect the module from the ESD as it may damage the electronic circuit (C-MOS).
-Make certain that treatment person’s body is grounded through wristband.
-Do not leave the module in high temperature and in areas of high humidity for a long time.
-Avoid contact with water as it may a short circuit within the module.
-If the surface of panel becomes dirty, please wipe it off with a soft material. (Cleaning with a dirty or rough cloth may
damage the panel.)
2
26″LCD TV AOC L26W831
Revision List
Version Release Date Revision Instructions TPV Model
A00 Jul-14-2008 Initial Release E268MANSW8AC3N
E268MANSW8AGNN
A01 Sep.-17-2008 Add new BOM
A02 Feb.-16-2009 Add new BOM
E268MANSW8ACNN
E268MANSW8AENN
E26RMANSW8AC3N
E26RMANSW8ACNN
E26RMANSW8AENN
3
26″LCD TV AOC L26W831
1. General Specification
Items Specification
Panel Type V260B1-L01 C2 NB CMO panel
Driving system TFT-LCD CMO Panel
Aspect Ratio 16: 10
Resolutions 1366 x 768
LCD Panel
TV Function
Video Inputs
Audio Output Audio Output: L / R
OSD language English, etc
Wall Mount VESA 200 mm x 100 mm
Power
Brightness
Contrast 800:1
Pixel Pitch 0.4215mm x0.4215 mm
Display colors 16.2 million
Color Temperature Cool / Warm/normal
TV Standard NTSC-M/PAL-M/PAL-N
Color systems NTSC-M/PAL-M/PAL-N
AV RCA x 1 Audio L/R x 1
S-Video S-Video x 1 Audio L/R x 1
COMPONENT Y,Cb,Cr x 1 Audio channel L / Rx 1
HDMI 720p,1080i,480p,480i
Power Supply AC100V~240V, 50/60Hz
Power Consumption
500 cd/㎡
Speaker (built-in): Two 5W speakers
Headphone Mini-jack for stereo (3.5ø)
< 150W
<3W (in standby mode)
Environment
Operating 0°C ~ 40 °C
Storage
Operating 10% ~ 85%
﹣10 °C ~ 50 °C
4
26″LCD TV AOC L26W831
2. Operating Instructions
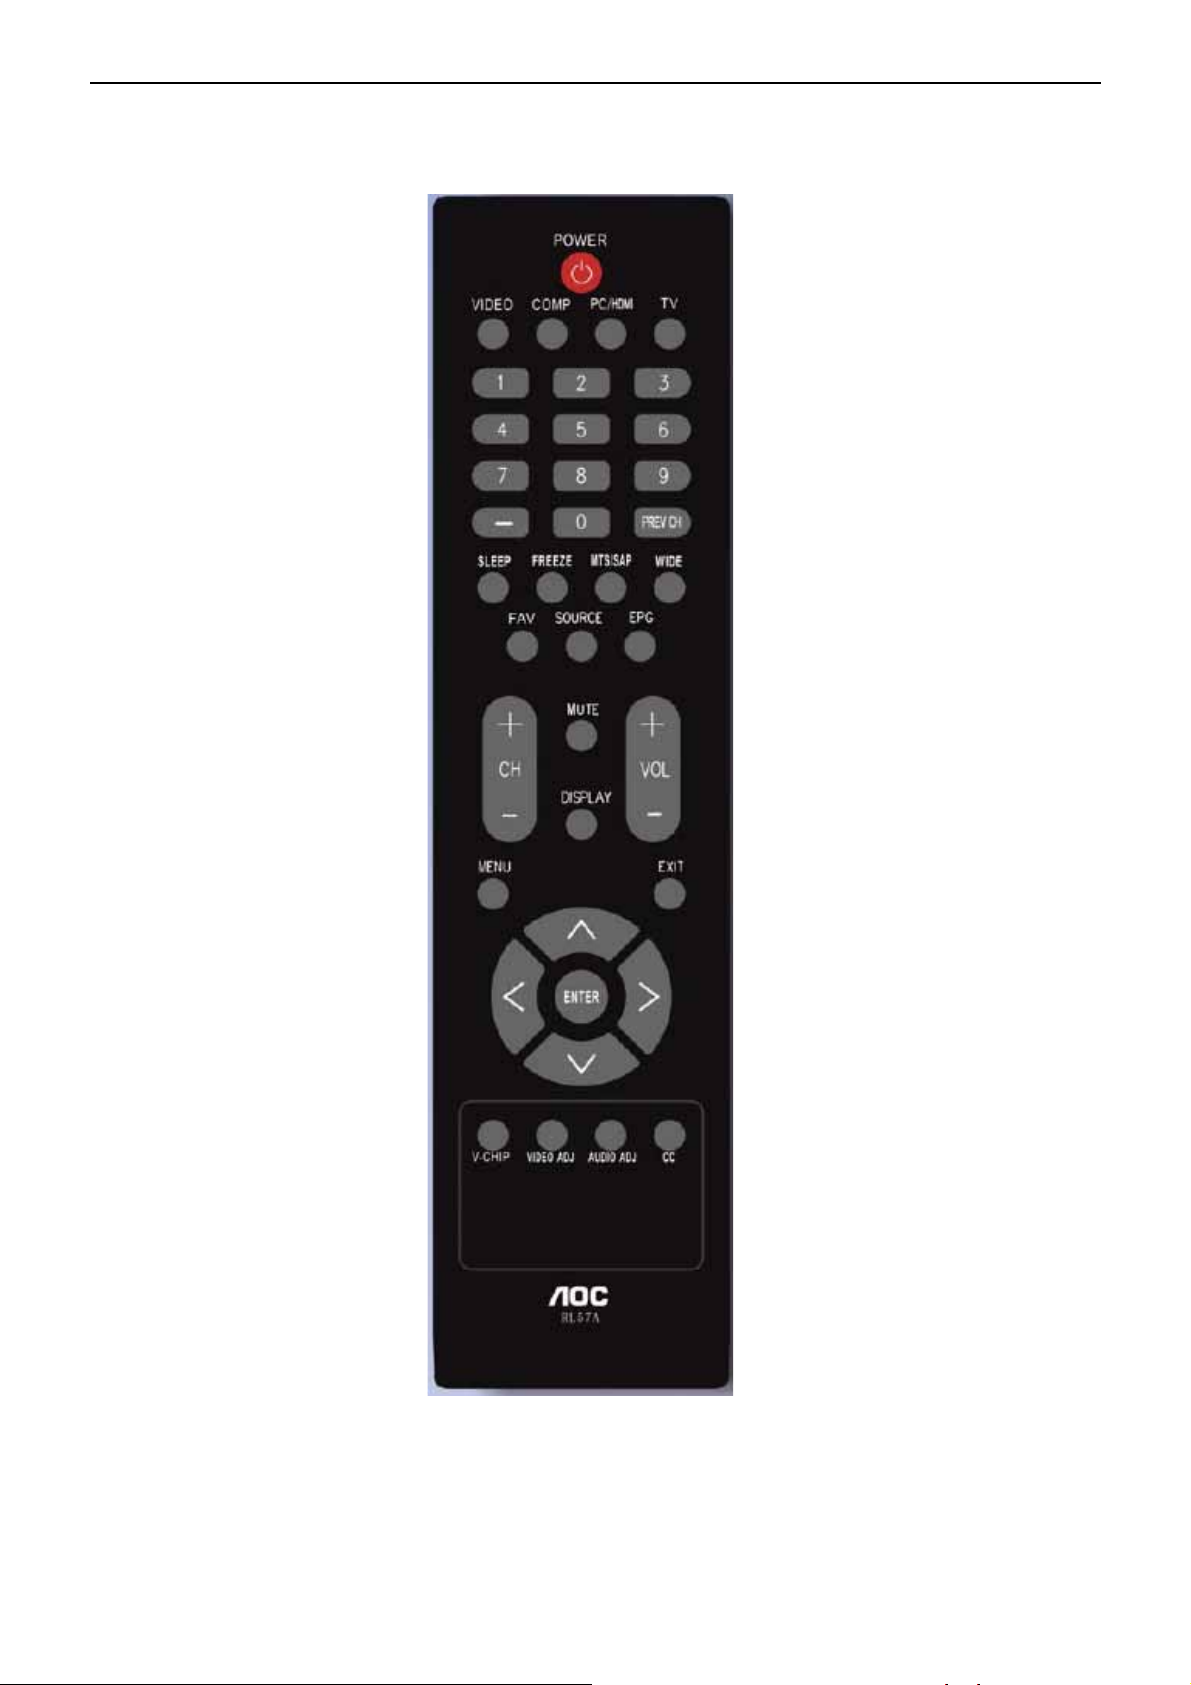
2.1 The Use of Remote Control
POWER
Press to power ON/OFF
(standby) TV. (Note: TV is
never completely power off
unless physically unplugged.)
VIDEO
Press to display source menu,
then move focus by ∧ or , ∨
and select by ENTER.
COMP
Press to choose Component
source mode directly.
PC/HDMI
Press repeatedly to toggle
between PC and HDMI so
urce modes
TV
Press to select TV source
mode.
0 ~ 9 number
Press to enter channel
numbers
SLEEP
Press to set sleep timer, setting
a mount of time before your TV
turn off automatically.(you can
set as 5min /10min /15min
/30min/ 45min/ 60min/ 90min/
120min/ 180min /240min or
Off)
VOL- / VOL+
Press + or - to adjust the
volume
MENU
Press to open or exit menu.
“”,“∧ ”,“∨ <”,“>”,
“ENTER”
Press to adjust the various
function items on the menu.
DISPLAY
Press to show the information
about the input source or TV
channel.
MUTE
Press to mute the sound.
Press again to restore sound.
PREV CH
Press to display the previous
channel.
MTS/SAP
Press to activate the TV sounds,
such as: Stereo, SAP or Mono
tone.
WIDE
Press to choose the display aspect
as: Normal, Zoom and Wide mode.
SOURCE
Press to display source
information.
CH-/ CH +
Press to change TV channel up or
down
EXIT
Press to exit menu or OSD.
VIDEO ADJ
Press to switch the preset of video
preset mode.
AUDIO ADJ
Press to switch the preset of audio
preset mode.
CC
Press repeatedly to select closed
caption channel or set it off. You
can set as CC1, CC2, CC3, CC4,
TT1 / TT2, TT3, TT4 and off
FREEZE
No support for this product
FAV
No support for this product
EPG
No support for this product
V-CHIP
No support for this product
5
26″LCD TV AOC L26W831
2.2 To Use the Menus
1. Press the MENU button to display the main menu
2. Use the cursor left/right to select a menu item.
3. Use the cursor Up/Down to enter a submenu.
4. Press the OK button to enable/disable the function.
5. Press the MENU or EXIT button to exit the menu.
MAIN MENU
Press the MENU button to enter the main OSD (On Screen Display). Adjust the items including Picture menu,
Sound menu, advanced menu, Installation menu, PC setup menu and System menu.
When the input source is TV mode, Picture menu, Sound menu, advanced menu, Installation menu and
System menu can be selected.
When the input source is AV, S-video, Component or HDMI mode, only the Picture menu, Sound menu, Advanced
menu and System menu can be selected.
When the input source is PC mode, Picture menu, Sound menu, PC setup menu and System menu can be
selected.
6
26″LCD TV AOC L26W831
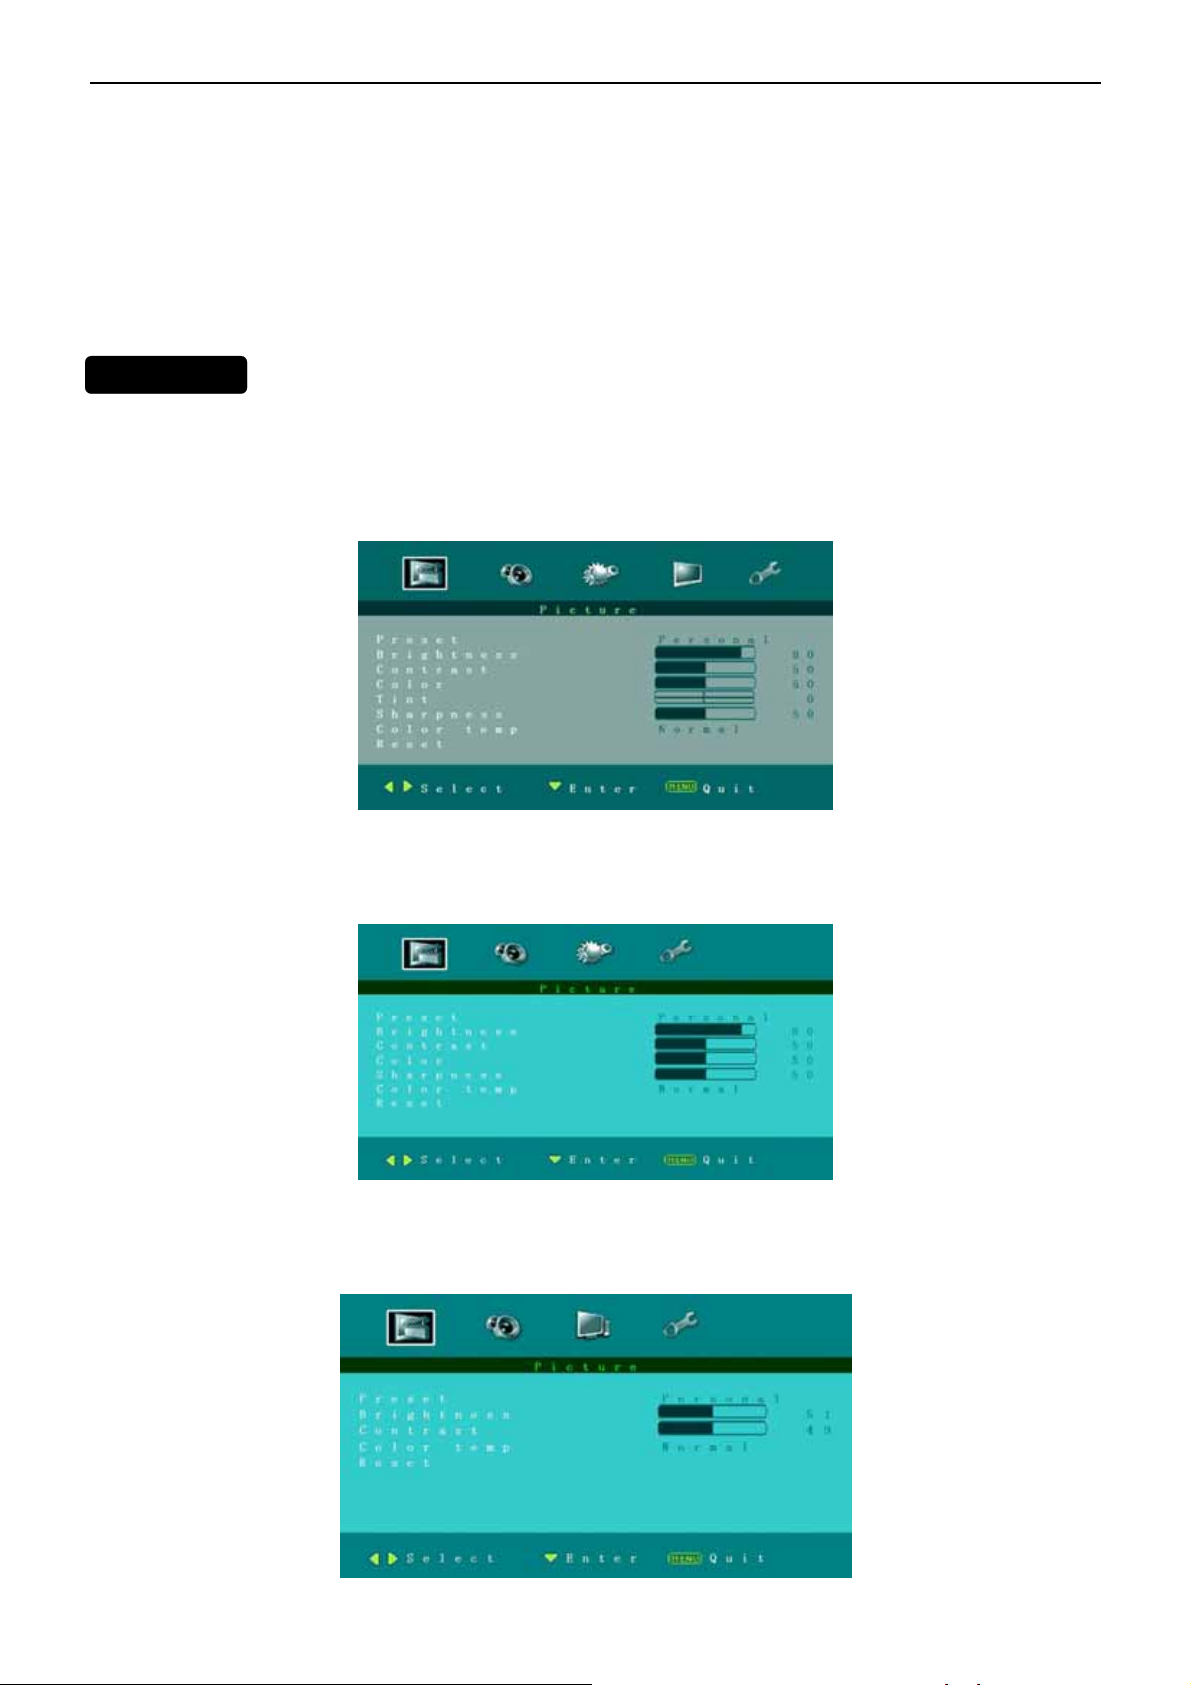
Picture Menu
1. Preset: Designed for different types of video mode. Can select Personal, Vivid, Standard and Mild
2. Brightness: Video brightness adjustment, can adjust only when Preset is setted as Personal. The tuning range
is 0 ~ 100.
3. Contrast: Video contrast adjustment, can adjust only when Preset is setted as Personal. The tuning range is 0
~ 100.
4. Color: Video color chroma adjustment, can adjust only when Preset is setted as Personal. The tuning range is
0 ~ 100.
5. Tint: Video tint adjustment, Can only select with NTSC signal. The tuning range is -50 ~ +50.
6. Sharpness: Video sharpness adjustment, the tuning range is 0 ~ 100.
7. Color temp: There are three options of colour temperature provided for users - warm, normal and cool.
8. Reset: Restore the default video settings.
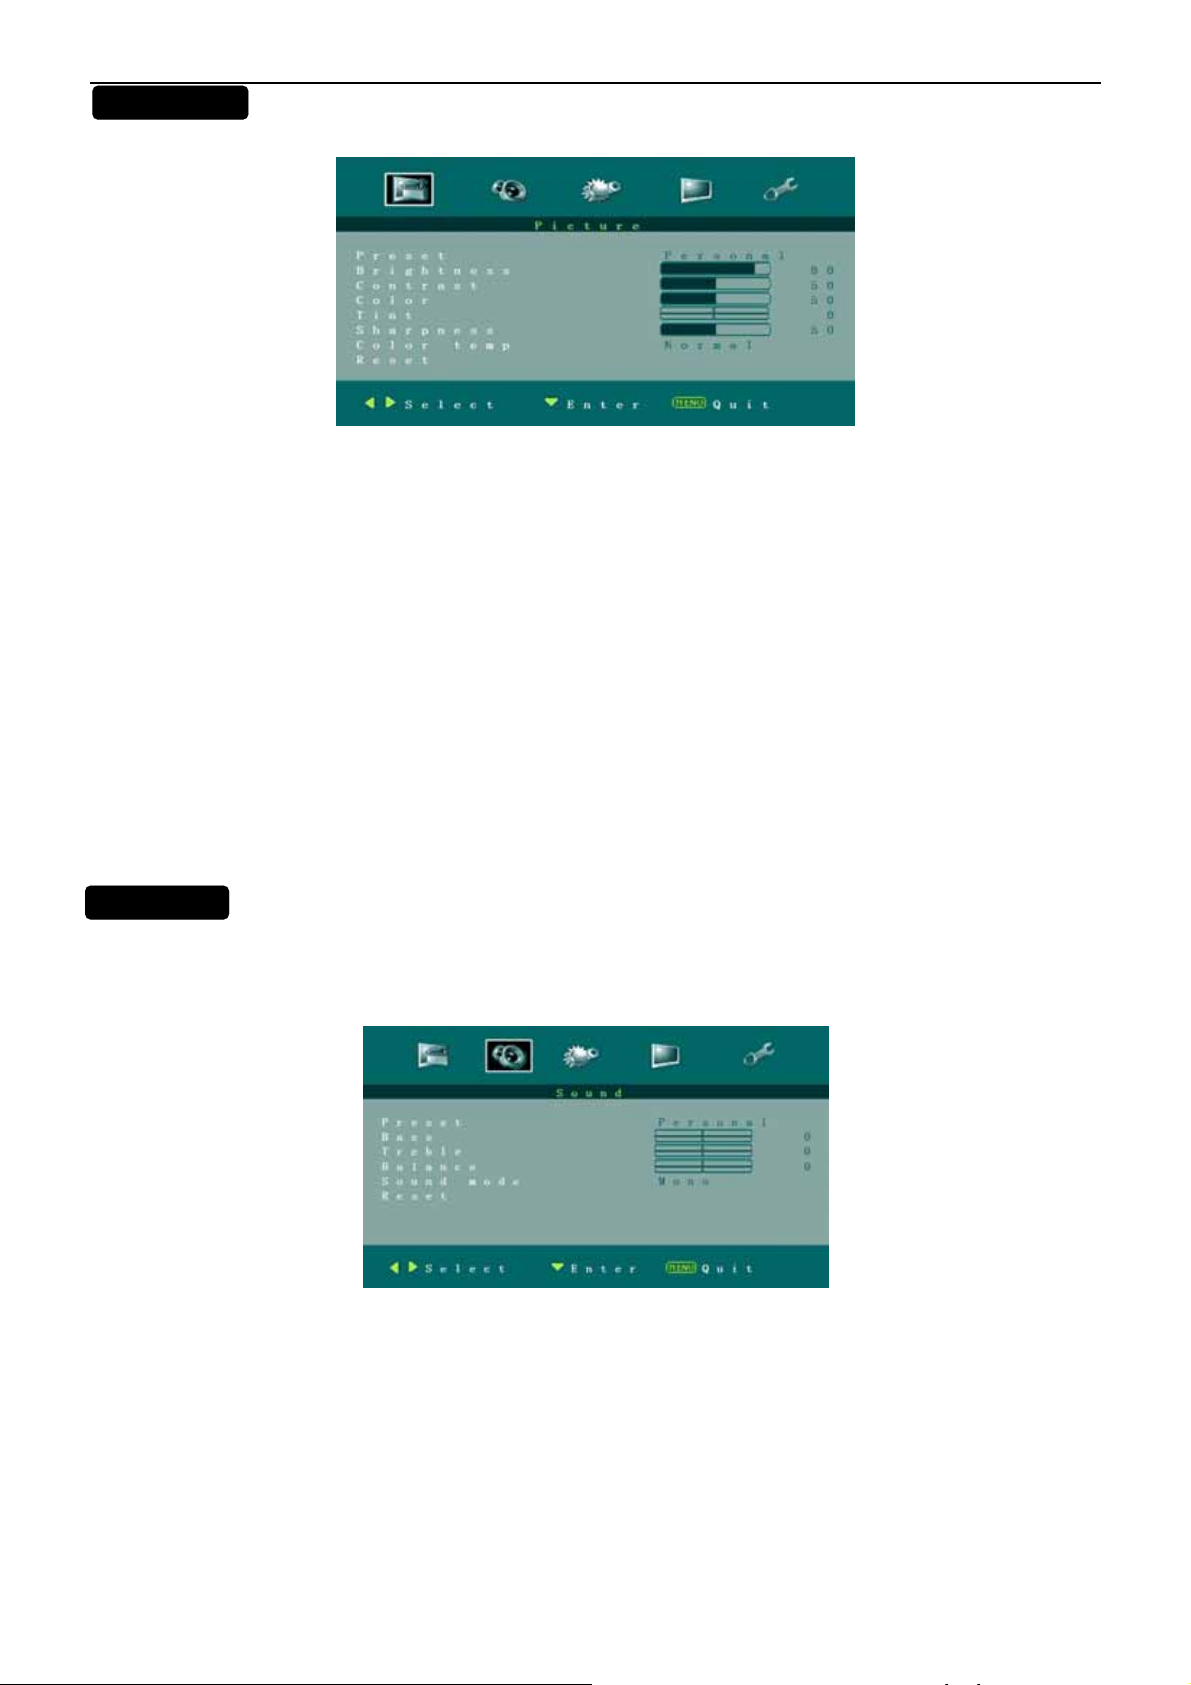
Sound Menu
The Sound menu shows as below. It provides audio adjustment for user to modify the audio setting.
1. Preset: Designed for different types of sound mode. Can select Personal, Voice, Music and Theatre.
2. Bass: Bass tone adjustment, can adjust only when Preset is setted as Personal. The tuning range is -50 ~50.
3. Treble : Treble tone adjustment, can adjust only when Preset is setted as Personal. The tuning range is -50~50.
4. Balance: Audio balance adjustment, the tuning range is -50~50.
5. Reset: Restore the default audio settings.
7
26″LCD TV AOC L26W831
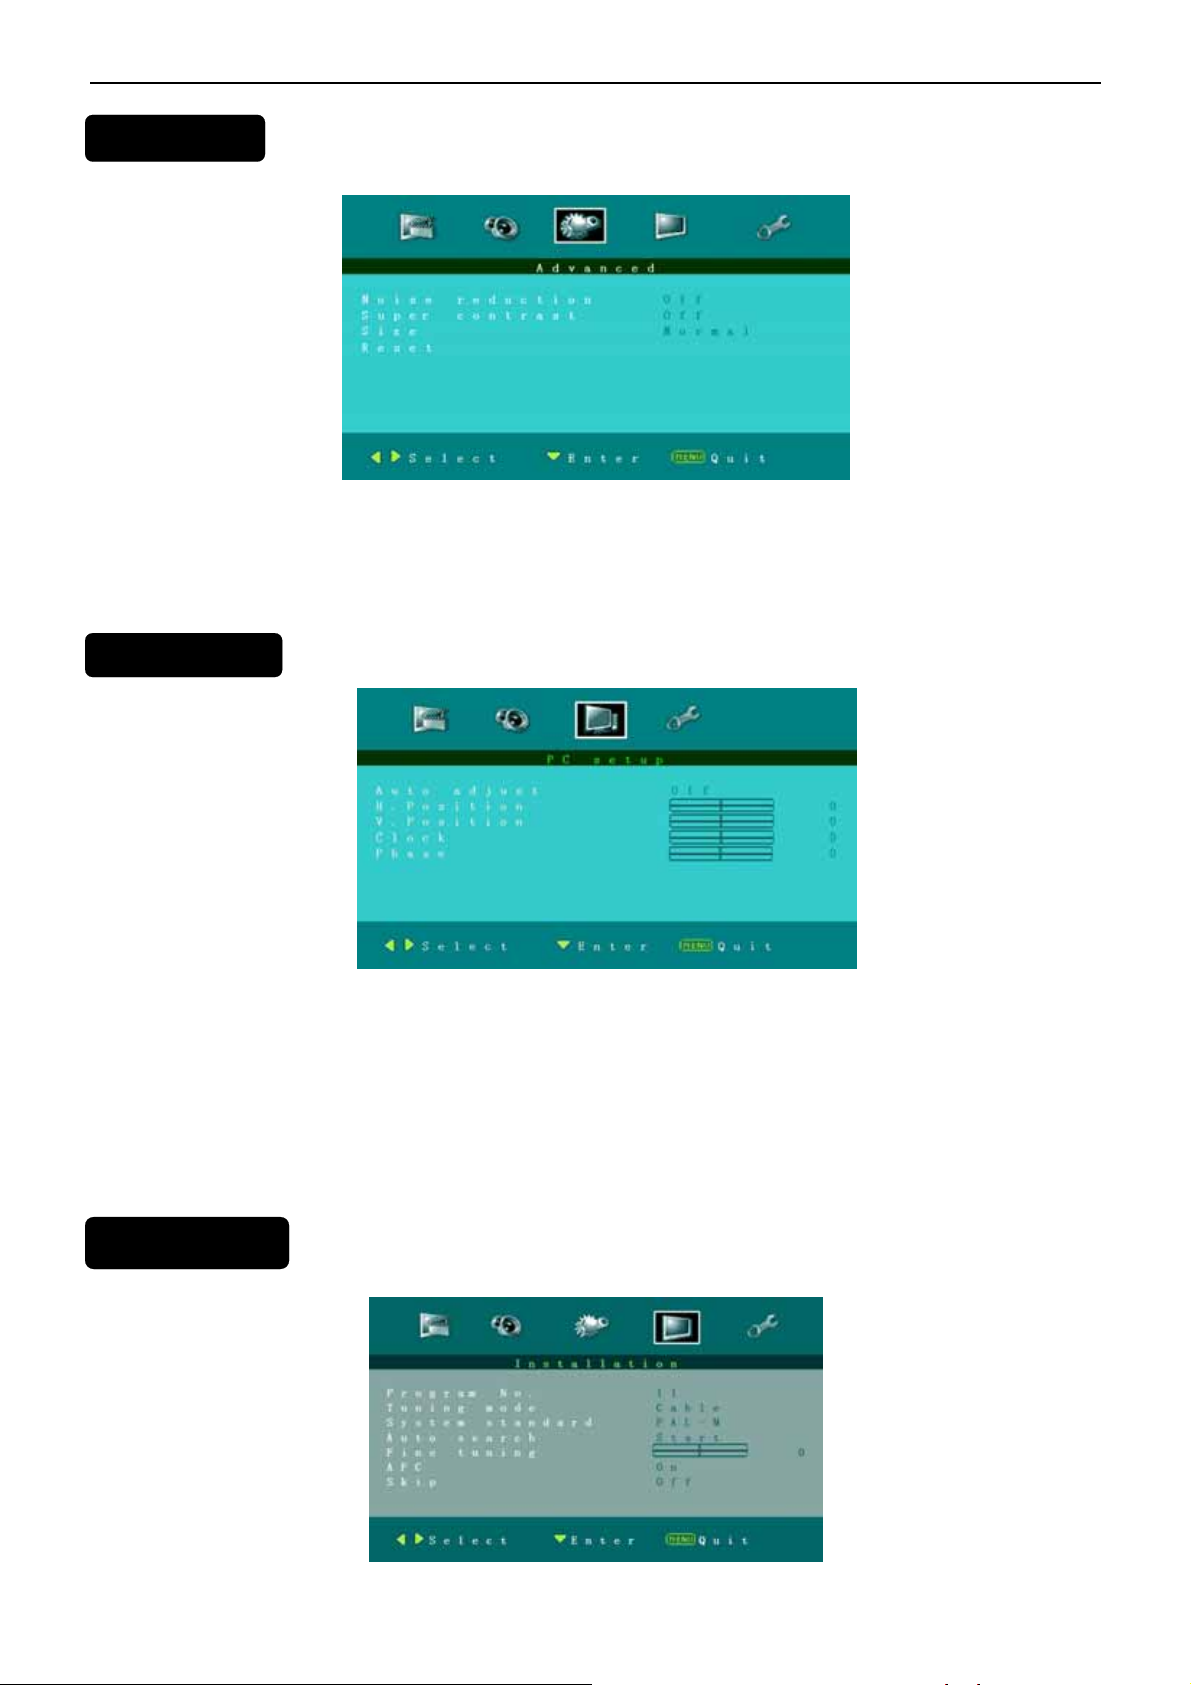
Advanced Menu
1. Noise reduction:Designed for different noise reduces effect, user can select off, Low, Normal and High.
2.
Super contrast: Enhance the contrast of color. Default setting is On.
3. Size: There are various functions provided for zoom in or zoom out. Can select Normal, Zoom, and Wide.
4. Reset: Restore the default video settings.
PC Setup Menu
1. Auto adjust: Automatically adjust PC input to the optimal screen size.
2. H.Position: Adjust Horizontal position of picture from -50~50.
3. V.Position: Adjust Vertical position of picture from -50~50.
4. Clock: Adjust clock of signal. The tuning range is -50~50.
5. Phase: Adjust phase of signal. The tuning range is -50~50.
se
Installation Menu
8
26″LCD TV AOC L26W831
1. Program No.: Shows the current channel number.
2. Tuning mode: Select the mode of TV signal as Cable or Air.
3. System standard: Can set as NTSC-M, PAL-M or PAL-N. Advise please do not change this item after auto
search action.
4. Auto search: Select "Auto Search" to search all signaled channel; when the searching is complete, it stays at
the first channel with signal and all channels that have been located are stored. If you would like to stop "Auto
Search" during the process, simply by pressing the MENU or EXIT button.
5. Fine tuning: Fine tune the frequency of current channel.
6. AFC: AFC can be set to ON or OFF. Set to ON, the TV will search signal automatically; when there is any offset
in the signal, will automatically adjust the channel to the correct frequency.
7. Skip: Skip can be set to ON or OFF. When it is set to ON, a channel can be skipped by pressing the switching
button on the remote control or on the front panel.
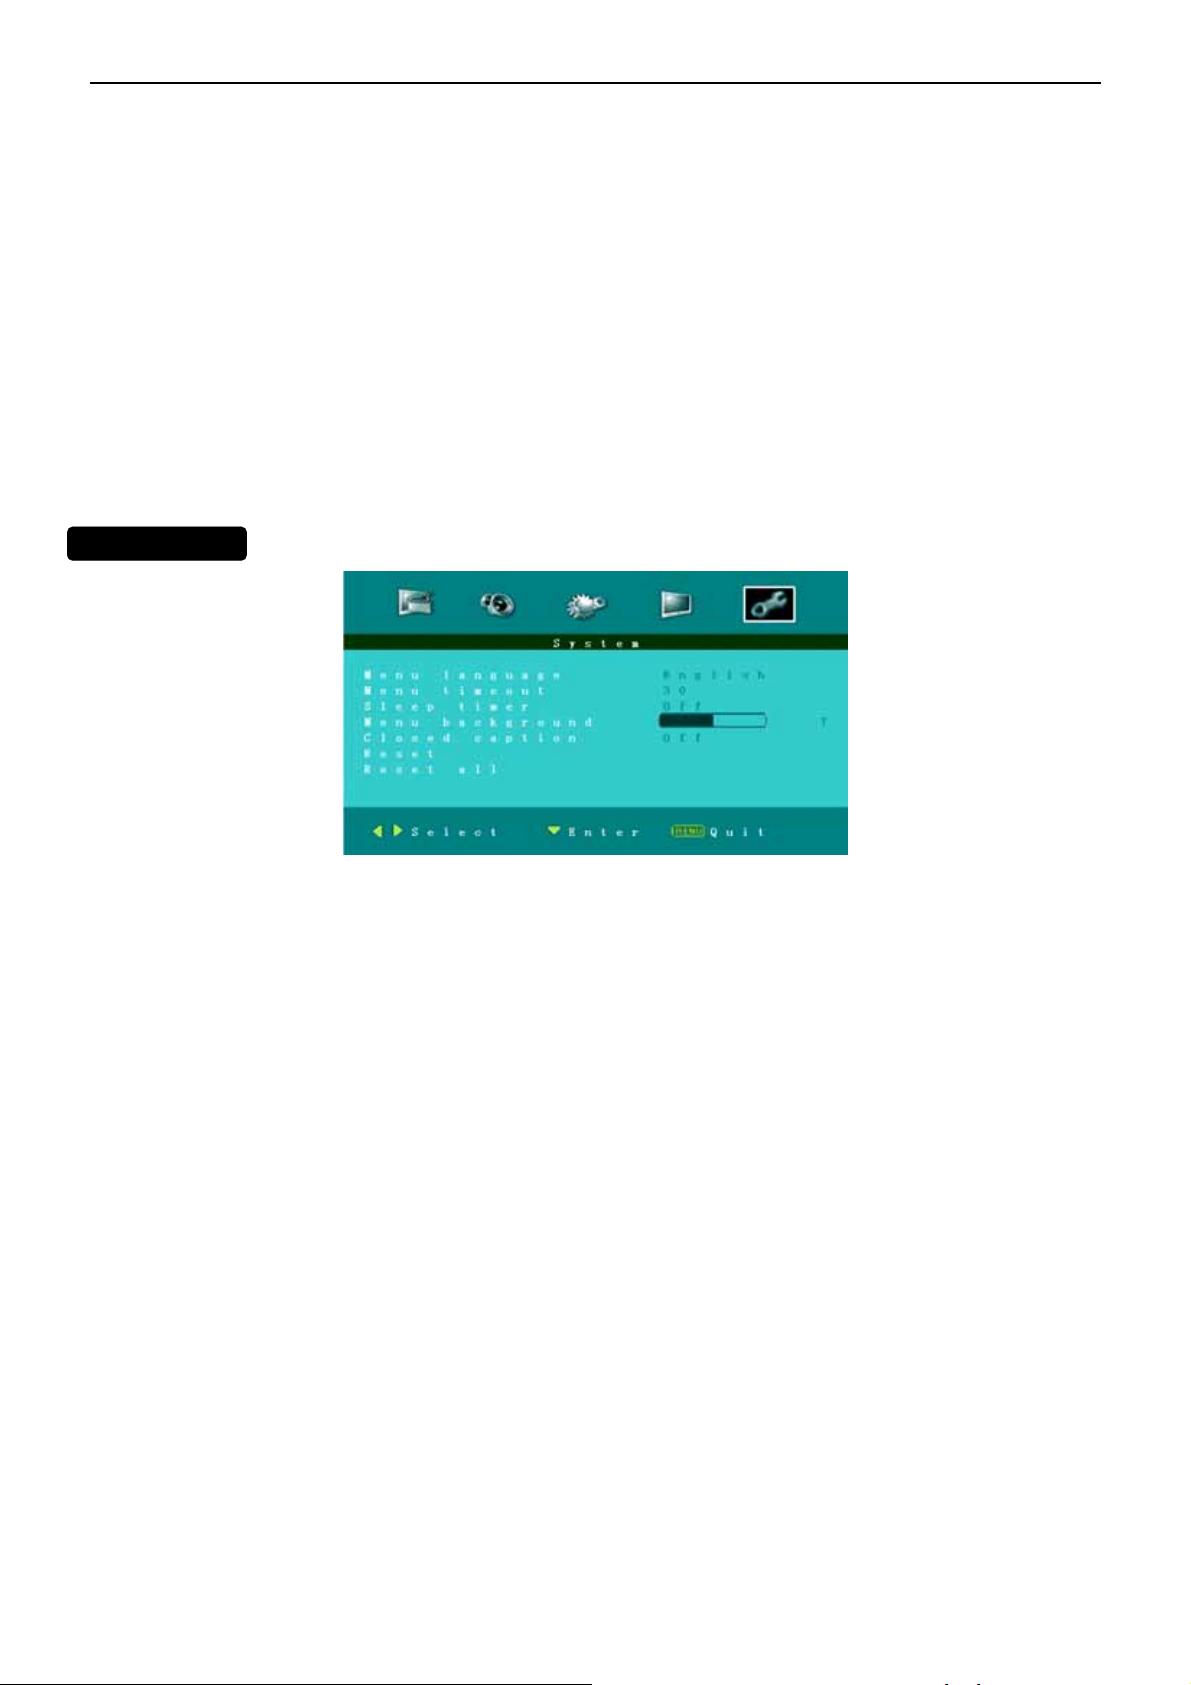
System Menu (
1. Menu language: There are four language options provided - English, French, Spanish and Portuguese.
2. Menu timeout: Adjust the time of menu display.
3. Sleep timer: Function with which you can set a time period after which the TV should turn itself off. You can set
it as 5, 10, and 15.30,45,60,90,120,180,240 and off.
4. Menu background: Adjust the background of OSD menu. The tuning range is 0 ~ 100.
5. Closed caption: Select CC channel as CC1~CC4, TT1~TT4 or Off.
6. Reset: Restore the default System settings.
7. Reset all: Reset all OSD setting to default value.
9
26″LCD TV AOC L26W831
2.3 How to Connect
Connecting your TV to a power outlet
• Plug the power cord into a power outlet.
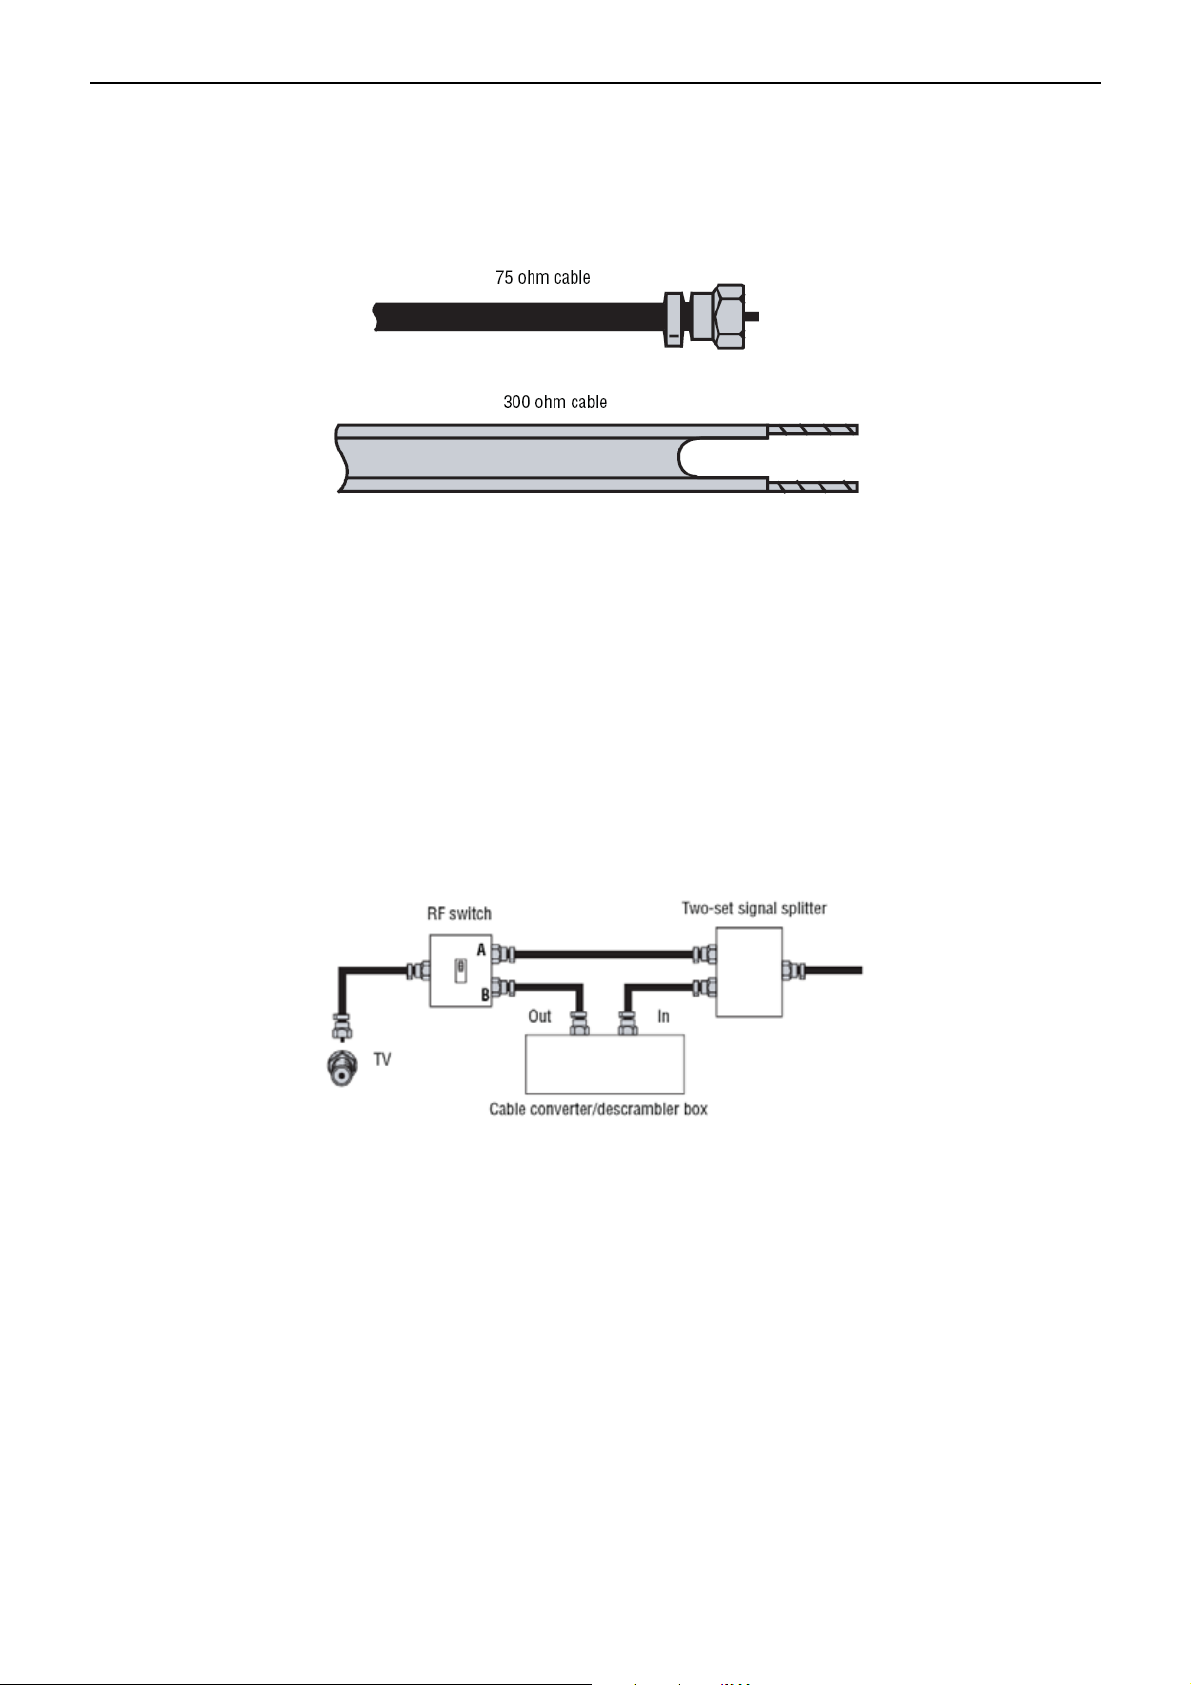
Connecting an outside antenna
Antenna cables come in two types: 75 ohm and 300 ohm.
• If your antenna cable has a 75 ohm connector, connect the cable to the coaxial jack on the back of your TV.
• If your antenna cable has a 300 ohm connector, connect the cable to a 300-75 ohm adapter (not included), connect
the adapter to a 75 ohm cable, then connect the other end of the 75 ohm connector to the coaxial jack on the back of
your TV.
To connect cable TV without a converter/descrambler box:
1 Connect one end of a 75 ohm cable to the coaxial jack on the back of your TV.
2 Connect the other end of the cable to the cable TV wall outlet.
To connect cable TV with a converter/descrambler box:
• Use the following illustration to connect a converter/descrambler box. (The RF switch and the signal splitter are not
provided.) Set the RF switch to the A position to watch unscrambled channels using your TV remote control. Set the
RF switch to the B position to watch scrambled channels using the converter/descrambler controls.
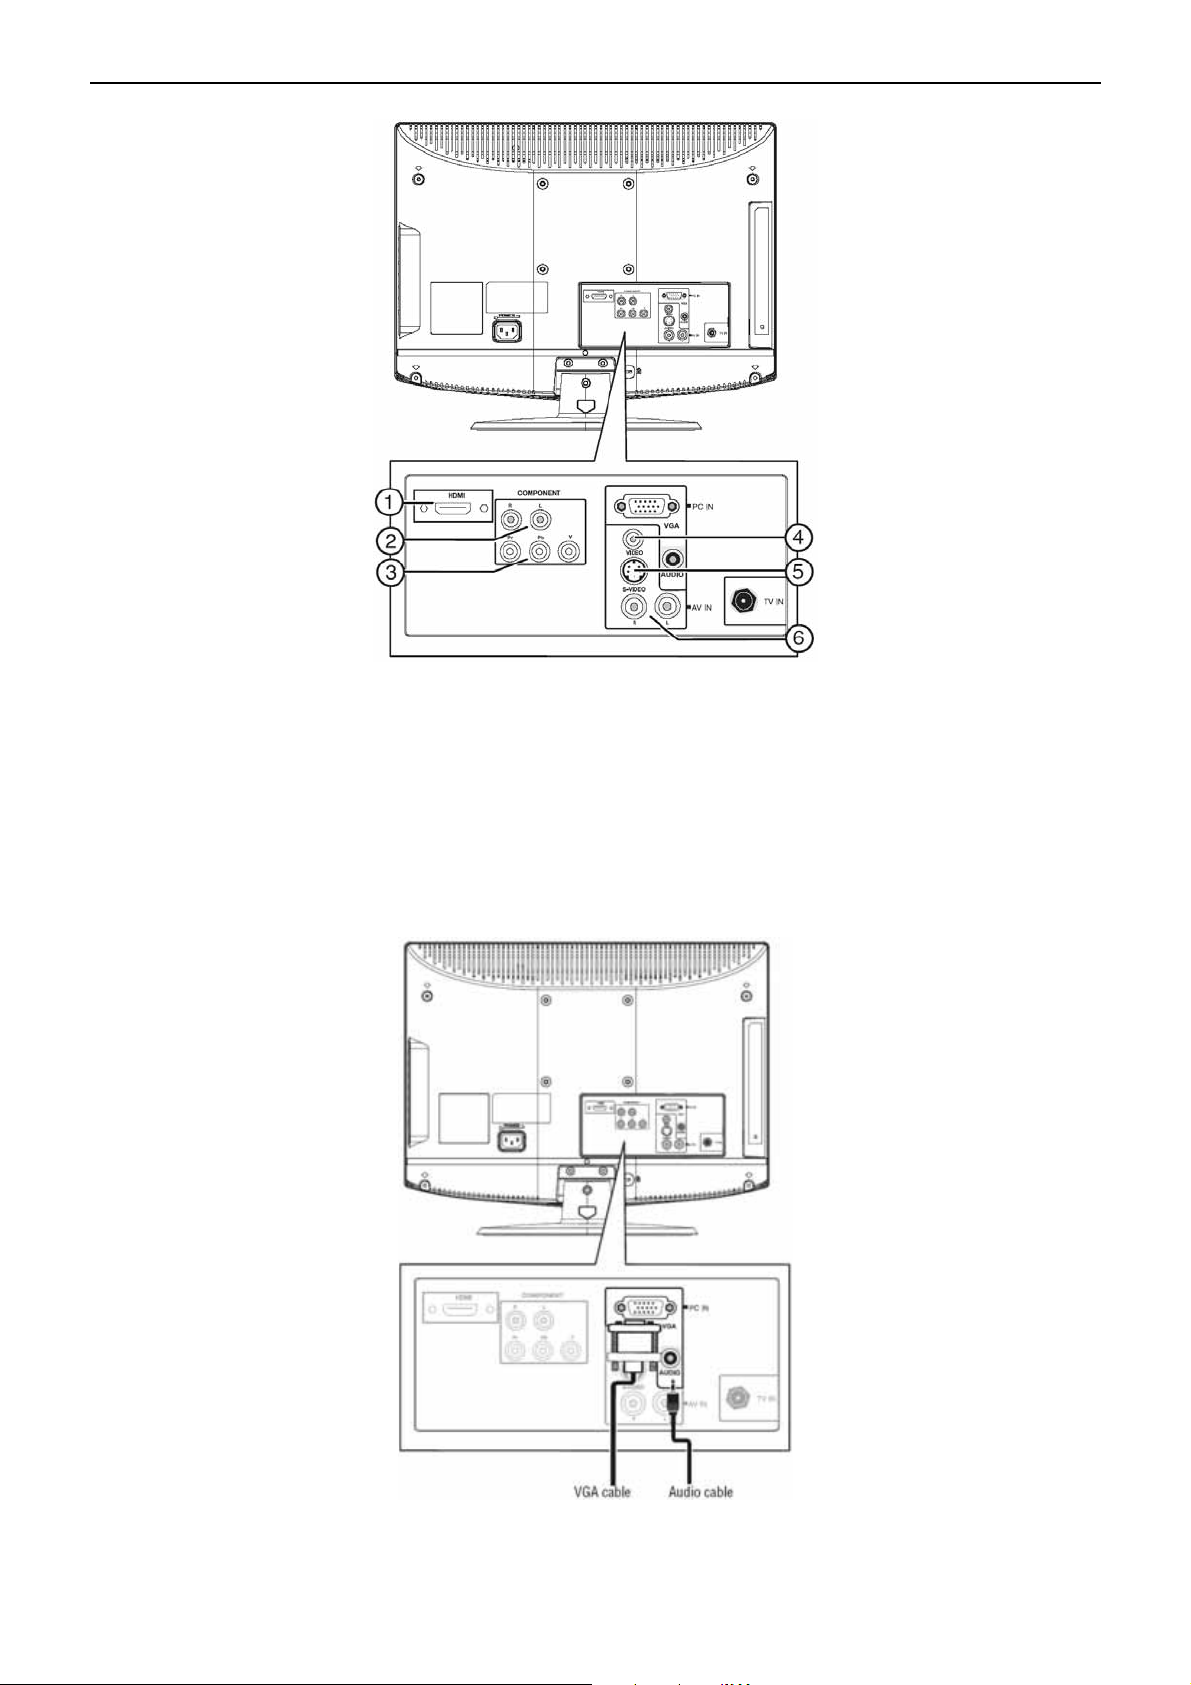
To connect an external signal source:
1 For composite video—plug the audio/video cable into the AV IN L and R jacks (6), and AV IN VIDEO (4) jacks
on the back of your TV, then connect the other ends to the corresponding jacks on the external signal source- OR
–For S-Video—Plug in the audio cables as described above, then plug one end of an S-Video cable into the AV IN
S-Video(5) jack on the back of your TV and the other end into the S-Video jack on external signal source.
- OR - For component video—Plug the Y, Pb, and Pr video (3)cables into the component input jacks, and the
Audio L and Audio R cables into the COMPONENT (2) audio jacks on the back of your TV, then plug the other ends
of the cables into the corresponding jacks on the external signal source.
- OR - For HDMI—plug one end of an HDMI (1) cable into the back of the TV and the other end into an HDMI device.
2 Turn on your TV.
3 Press the INPUT to open the input source menu, press v or ^ to select the external signal source you want to
watch, and then press ENTER.
4 Turn on external signal source.
10
26″LCD TV AOC L26W831
5 Insert a disc or videotape into the external signal source, and then press the PLAY button.
To connect a computer using VGA:
1 Plug a VGA cable from your computer into the VGA jack on the back of your TV.
2 Plug an audio cable from your computer’s audio out jack into the AUDIO jack on the back of your TV.
3 Plug in and turn on your TV.
4 Press the INPUT to open the input source menu, press v or ^ to select VGA, and then press ENTER.
To connect a computer using HDMI:
• Plug an HDMI cable into the HDMI INPUT jack on the back of your TV and into the HDMI Out jack on the back of
the computer.
11
26″LCD TV AOC L26W831
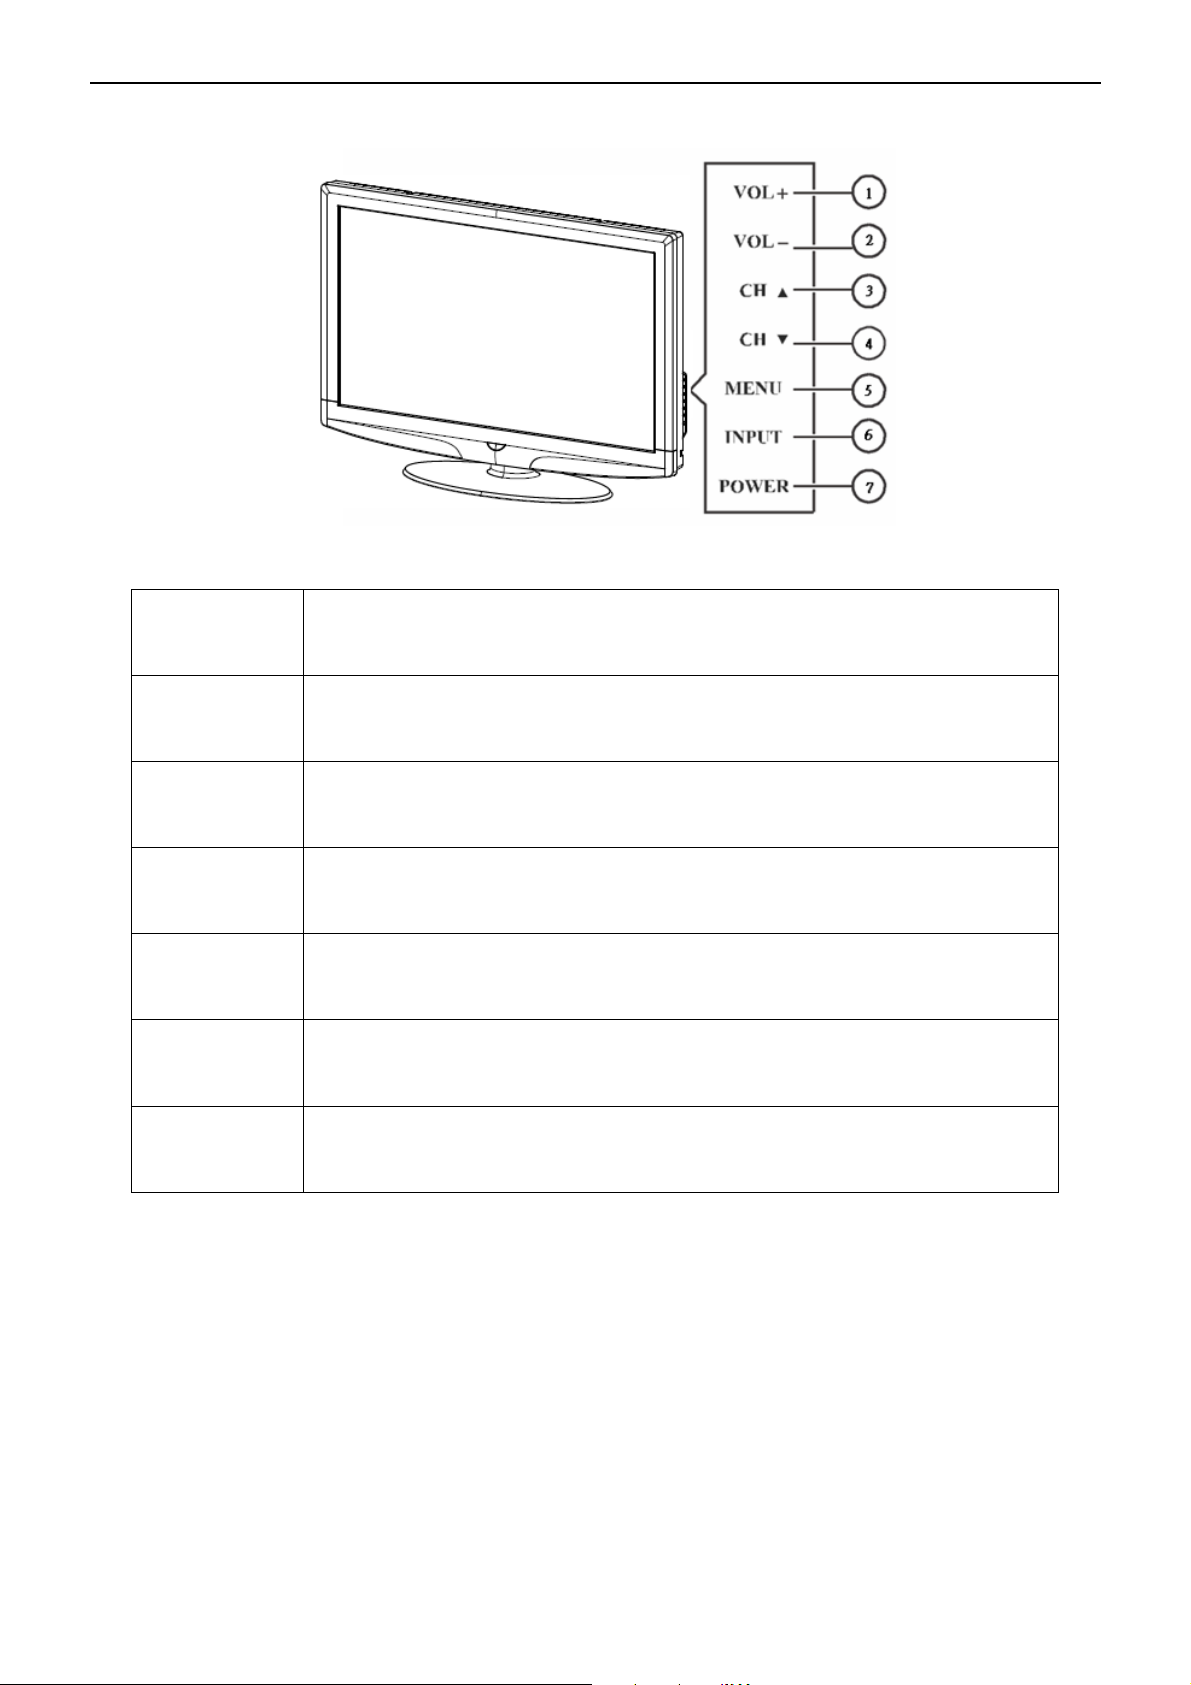
2.4 Front Panel Control Knobs
1 VOL▲
2 VOL▼
3 CH ▲
4 CH ▼
5 MENU
6 INPUT
VOL +: Press to increase the volume. In Menu mode, functions as right arrow to
go to a next menu or increase a setting.
VOL - : Press to decrease the sound volume level. In Menu mode, functions as
left arrow to go to a previous menu or decrease a setting.
CH +: Press to select the next higher Program number.
CH - : Press to select the next lower Program number.
Menu key: Press
Source key: Press to select the input source.
to open or exit the OSD menu.
7 POWER
Power key: Press to turn on / off (standby) the TV set.
12
26″LCD TV AOC L26W831
3. Input/Output Specification
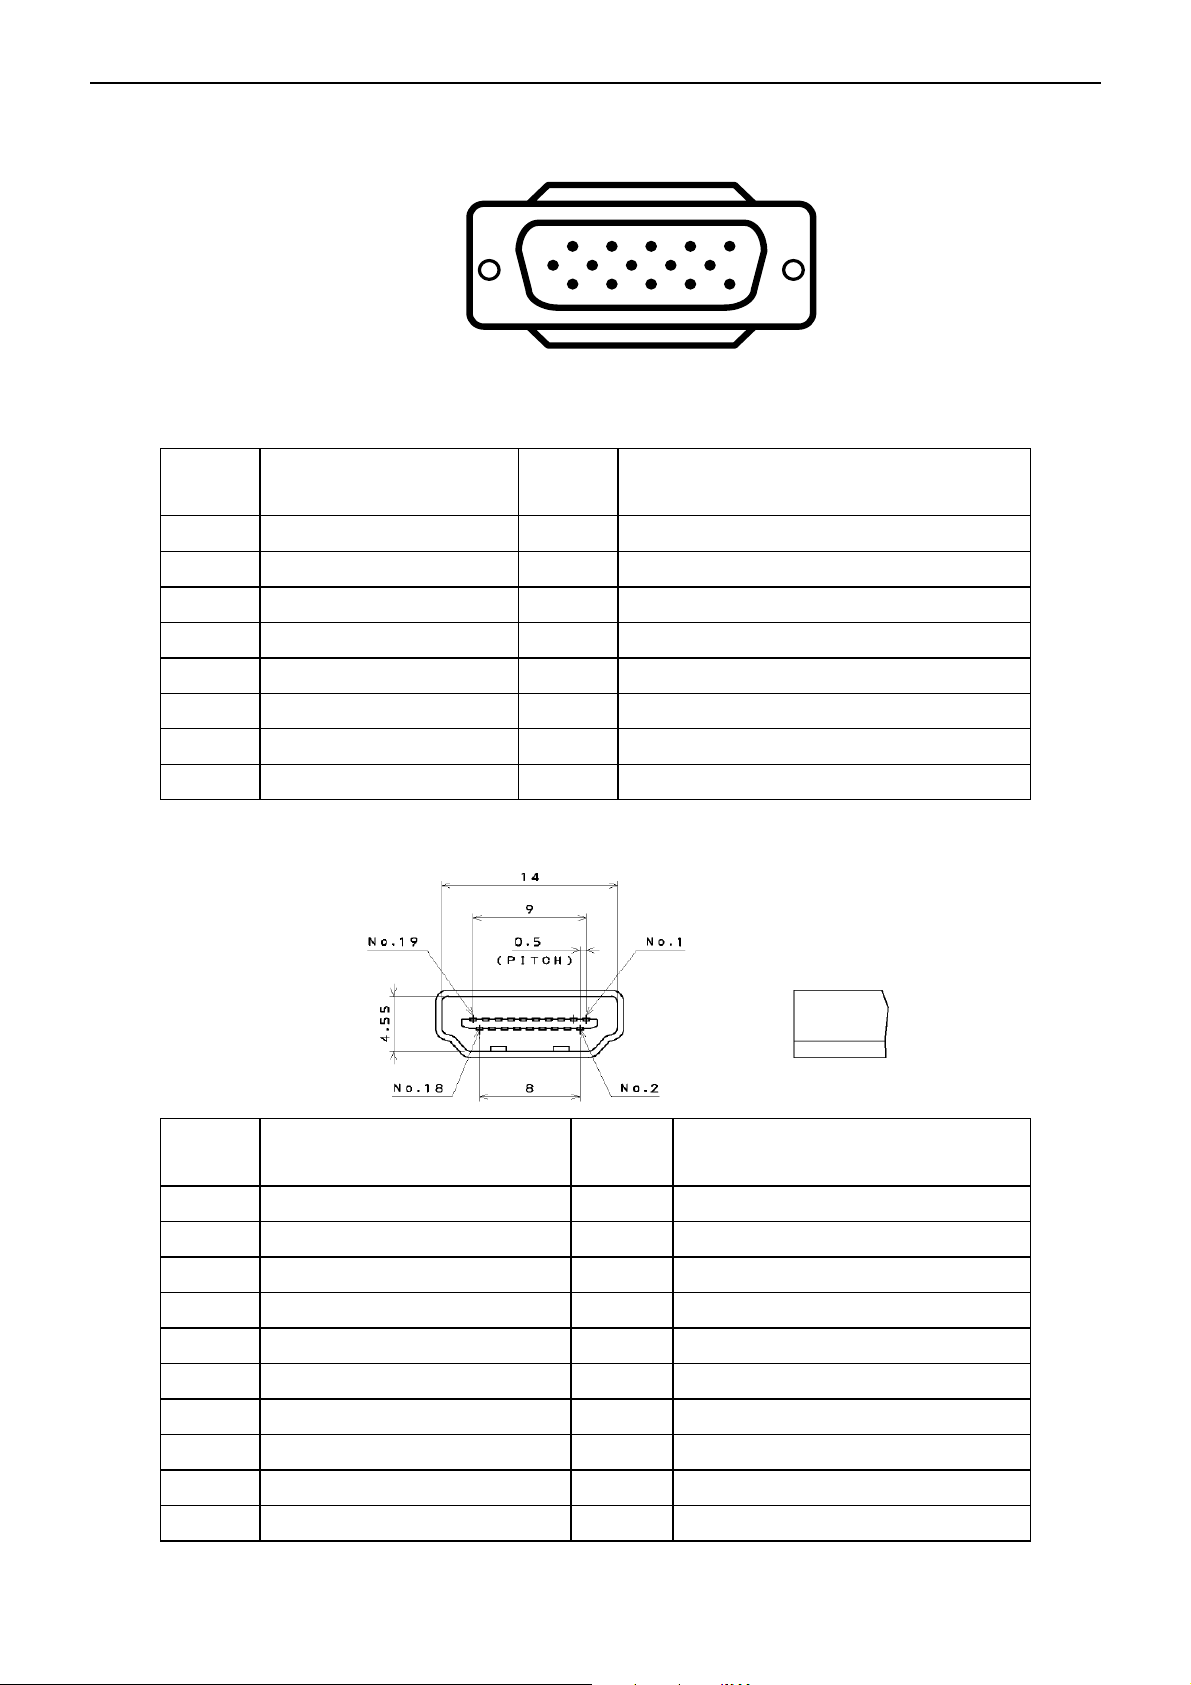
3.1 RGB Signal input
15 - Pin Color Display Signal Cable
Pin No. Description Pin No. Description
1 Red Video 9 No Pin
2 Green Video 10 Sync Ground
3 Blue Video 11 RXD
4 TXD 12 Serial Data for DDC
1
6
11 15
5
10
5 Ground 13 H-Sync.
6 Red Video Ground 14 V-Sync.
7 Green Video Ground 15 Serial Clock for DDC
8 Blue Video Ground
3.2 HDMI Digital connector pin assignments
Pin No. Description Pin No. Description
1 TMDS Data2+ 2 TMDS Data2 Shield
3 TMDS Data2- 4 TMDS Data1+
5 TMDS Data1 Shield 6 TMDS Data1-
7 TMDS Data0+ 8 TMDS Data0 Shield
9 TMDS Data0- 10 TMDS Clock+
11 TMDS Clock Shield 12 TMDS Clock-
13 CEC 14 NC
15 SCL 16 SDA
17 DDC/CEC Ground 18 +5V Power
19 Hot Plug Detect
13
26″LCD TV AOC L26W831
3.3 AV/S-Video/Component Video Inputs
AV (Composite Video input)
Video1
Amplitude 1.0 V (p-p), negative sync.
Impedance 75 ohm terminated
S-Video (Y / C input)
S-Video2
System NTSC
Y signal amplitude 1.0Vpp (including sync)
C signal amplitude 0.286Vpp
Impedance 75 ohm terminated
Component (Y, Pb/Cb, Pr/Cr input)
Video3
Y signal amplitude 1.0Vpp (including sync)
Impedance 75 ohm terminated
3.4 Compatible Mode Table
System NTSC
System 1080i, 480p, 720p, 480i
Cr, (R-Y) / Cb, (B-Y)
Signal amplitude
VESA MODES
±0.35Vpp, 75 ohm
Horizontal Vertical
Nominal
Pixel
Clock
(MHz)
Mode Resolution Total
640x480@60Hz 800 x 525 31.469 N 59.940 N 25.175
VGA
SVGA
XGA
640x480@72Hz 832 x 520 37.861 N 72.809 N 31.500
640x480@75Hz 840 x 500 37.5 N 75 N 31.500
720x400@70Hz 900 x 449 31.469 N 70.087 P 28.322
800x600@56Hz 1024 x 625 35.156 P 56.25 P 36.000
800x600@60Hz 1056 x 628 37.879 P 60.317 P 40.000
800x600@72Hz 1040 x 666 48.097 P 72.188 P 40.000
800x600@75Hz 1056 x 625 46.875 P 75 P 49.5
1024x768@60Hz 1344x806 48.363 N 60.004 N 65.000
1024x768@70Hz 1328x806 56.476 N 70.069 N 75.000
1024x768@75Hz 1312x800 60.023 P 75.029 P 78.750
Nominal
Frequency
(KHz)
Sync
Polarity
Nominal
Freq.
(Hz)
Sync
Polarit
y
WXGA 1360x768@60Hz 1792x795 47.712 P 60.015 P 85.5
14
26″LCD TV AOC L26W831
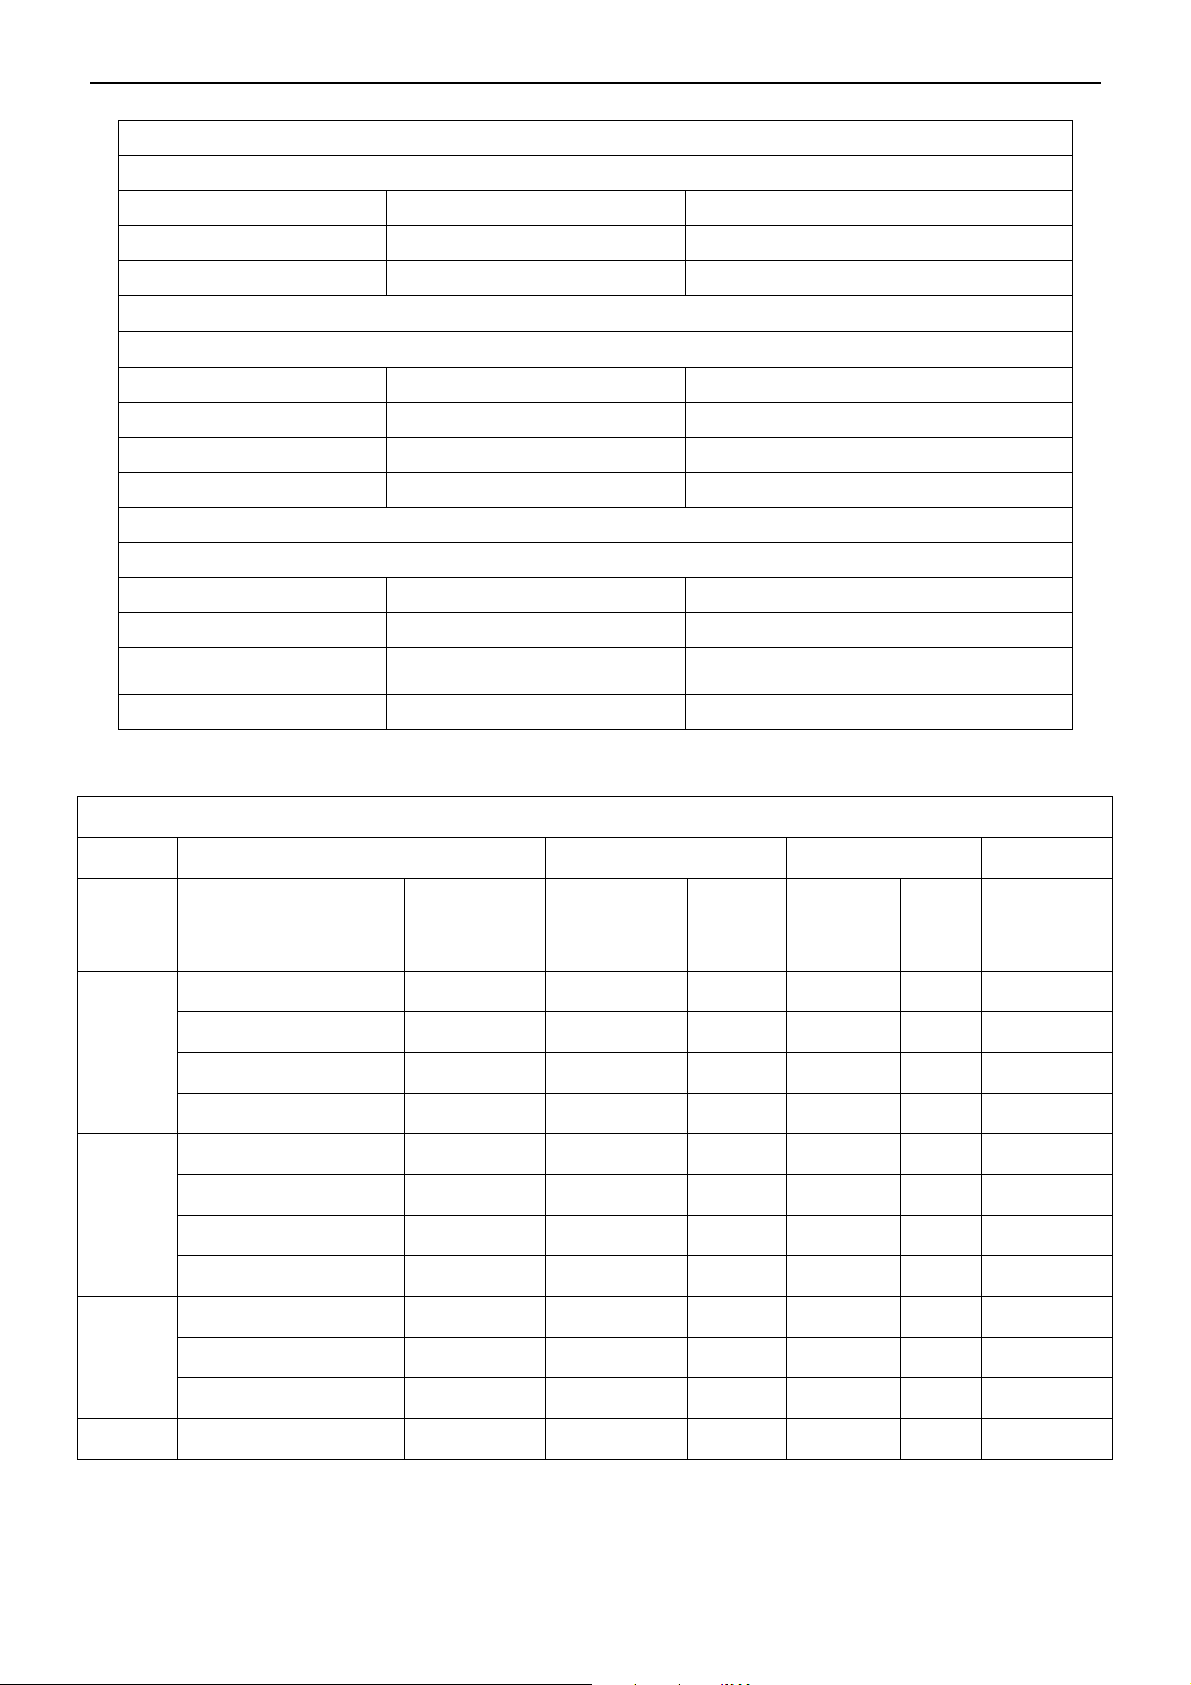
4. Mechanical Instructions
1. Remove the 3 screws to remove the stand base.
2. Remove the screws to remove the rear cover.
3. Remove the screws & connectors to Remove speakers & key board.
.
15
26″LCD TV AOC L26W831
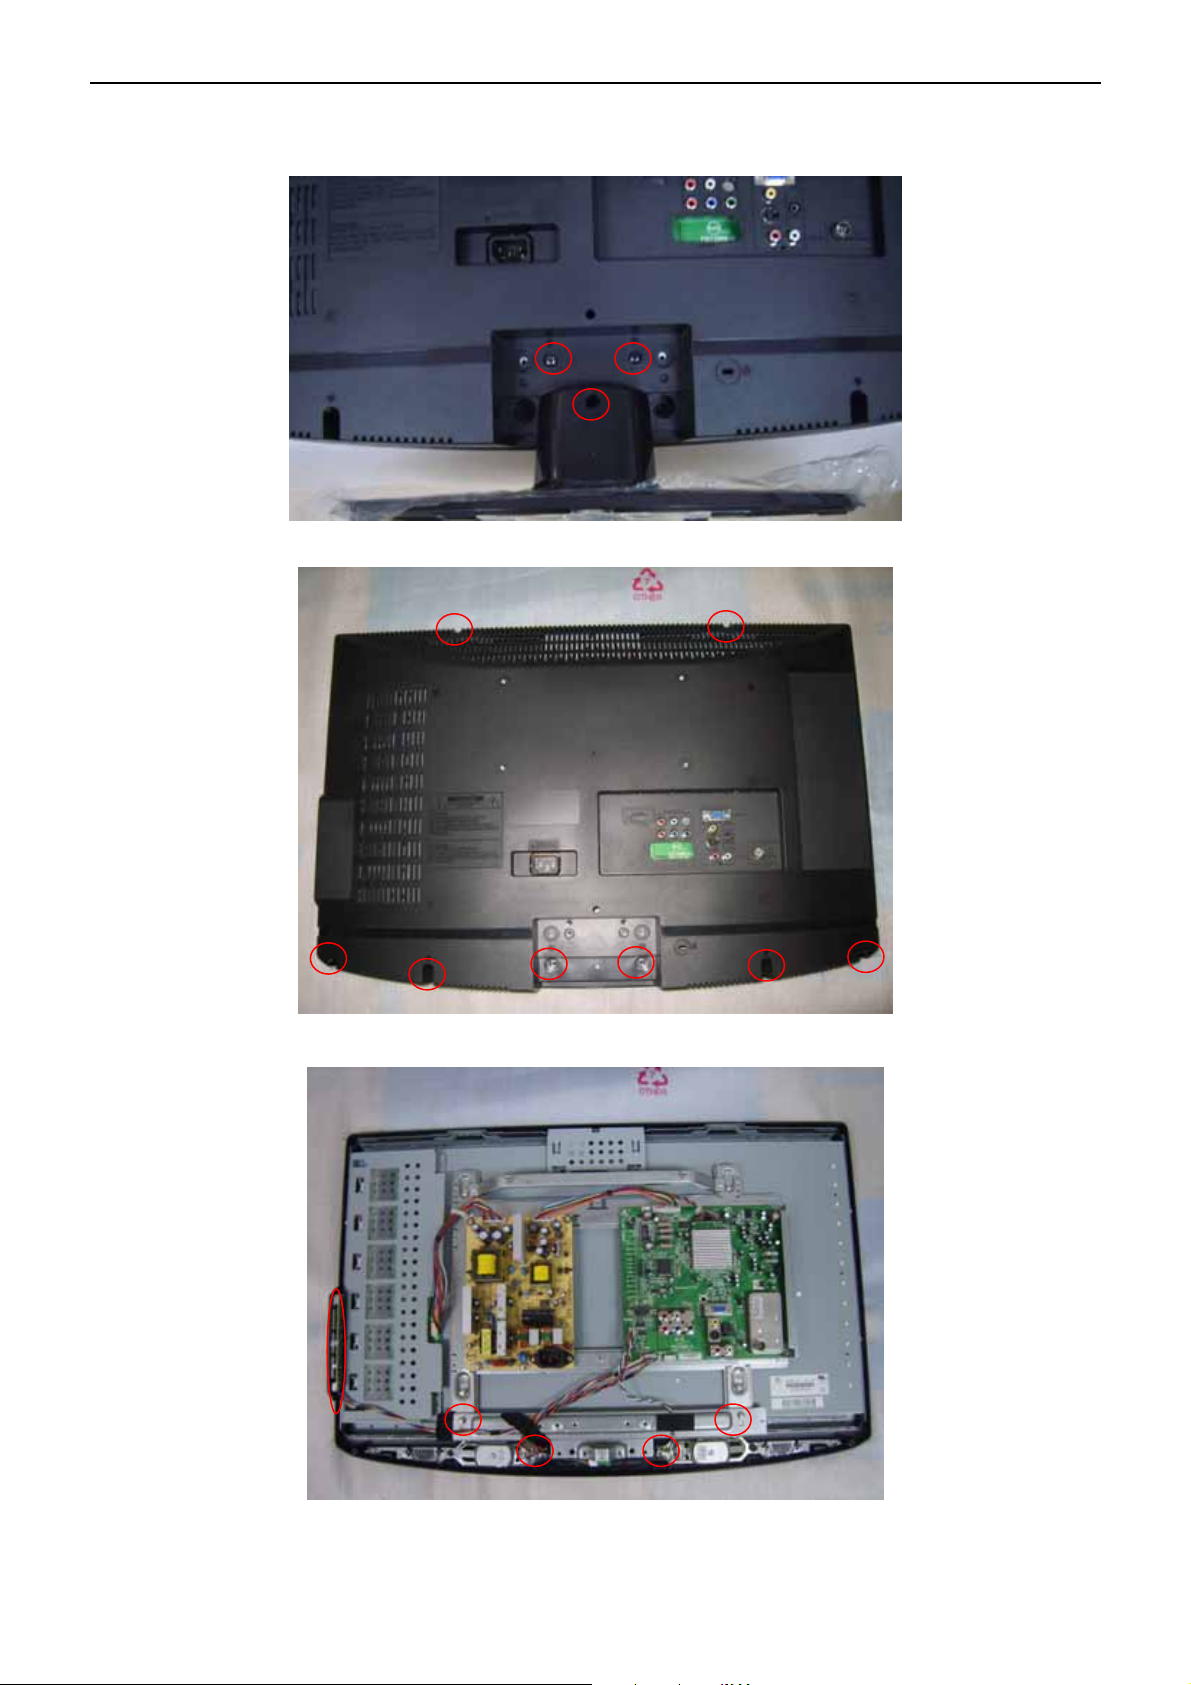
5. Remove IR board..
5. Remove the screws to remove the main board, power board..
6. Remove the 8 screws to remove the 26bkt-cmo-panel-support&26bkt-pcb-holder-top&26bkt-pcb-holder-btm
16
26″LCD TV AOC L26W831
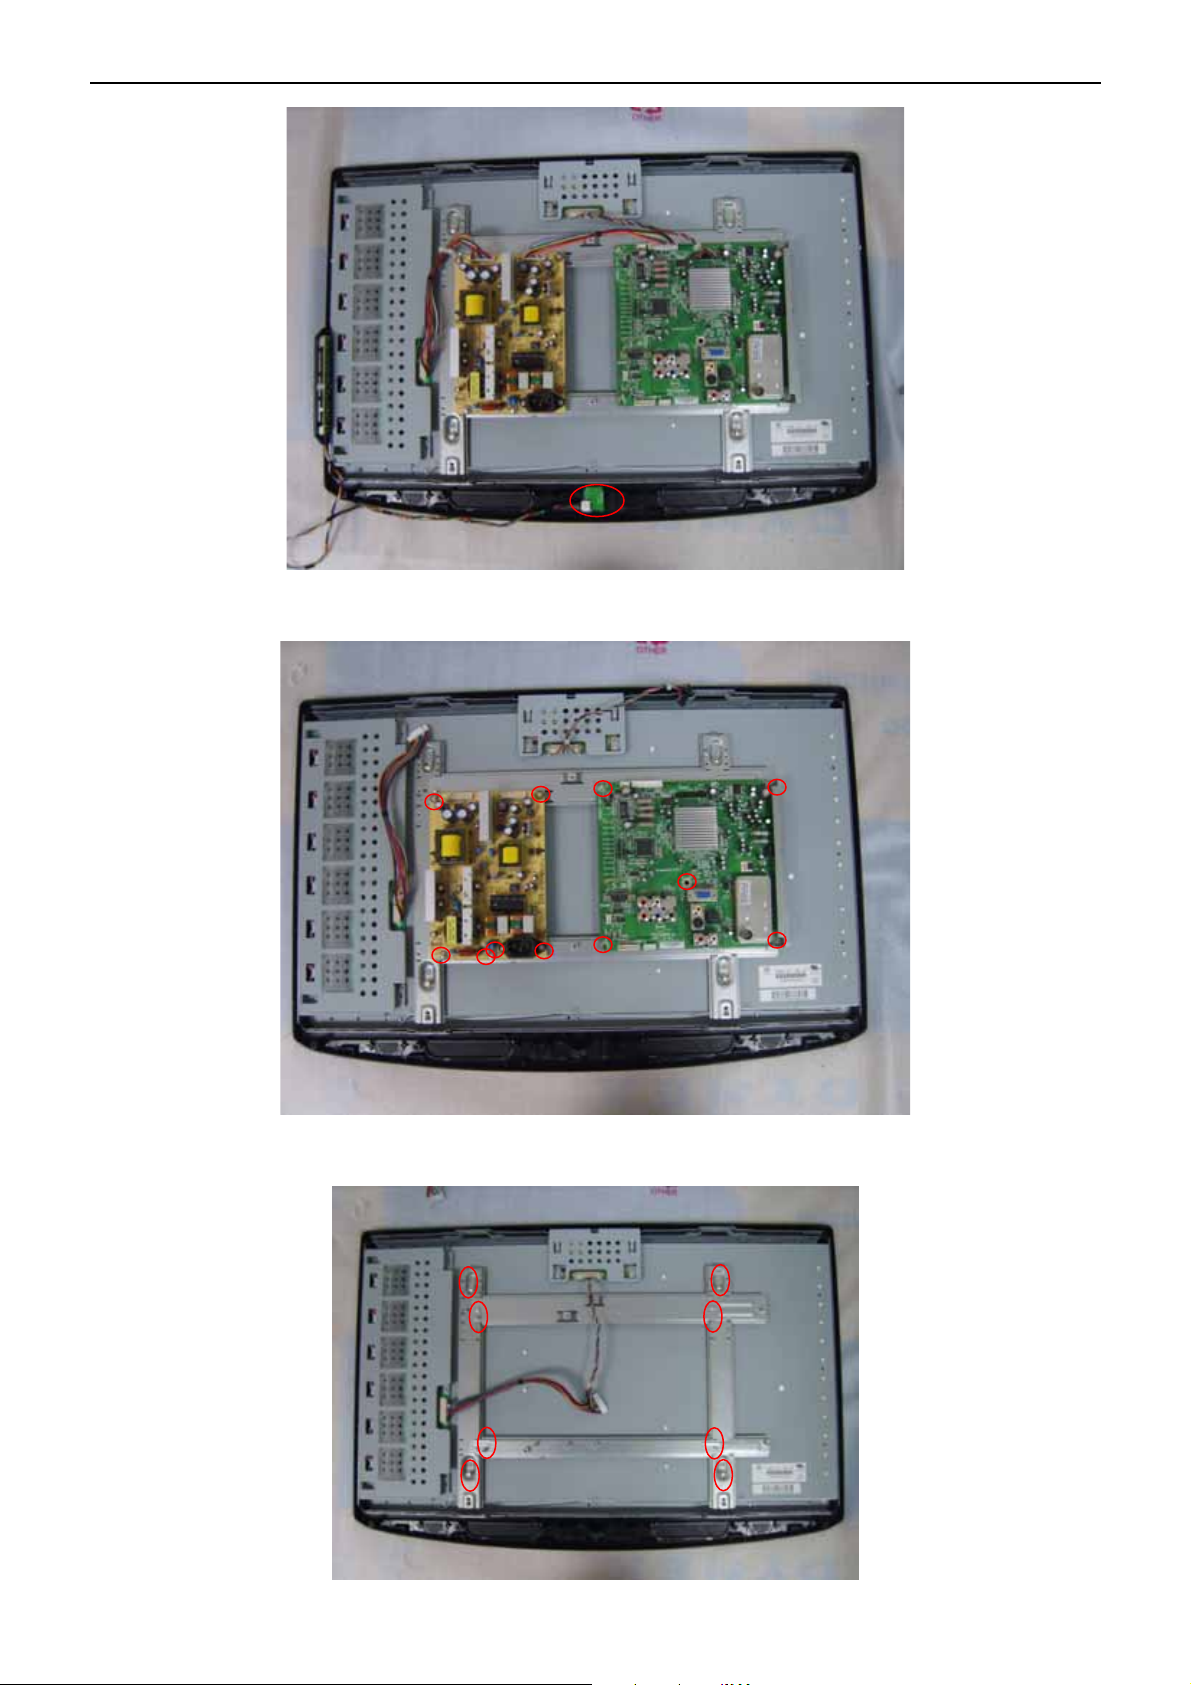
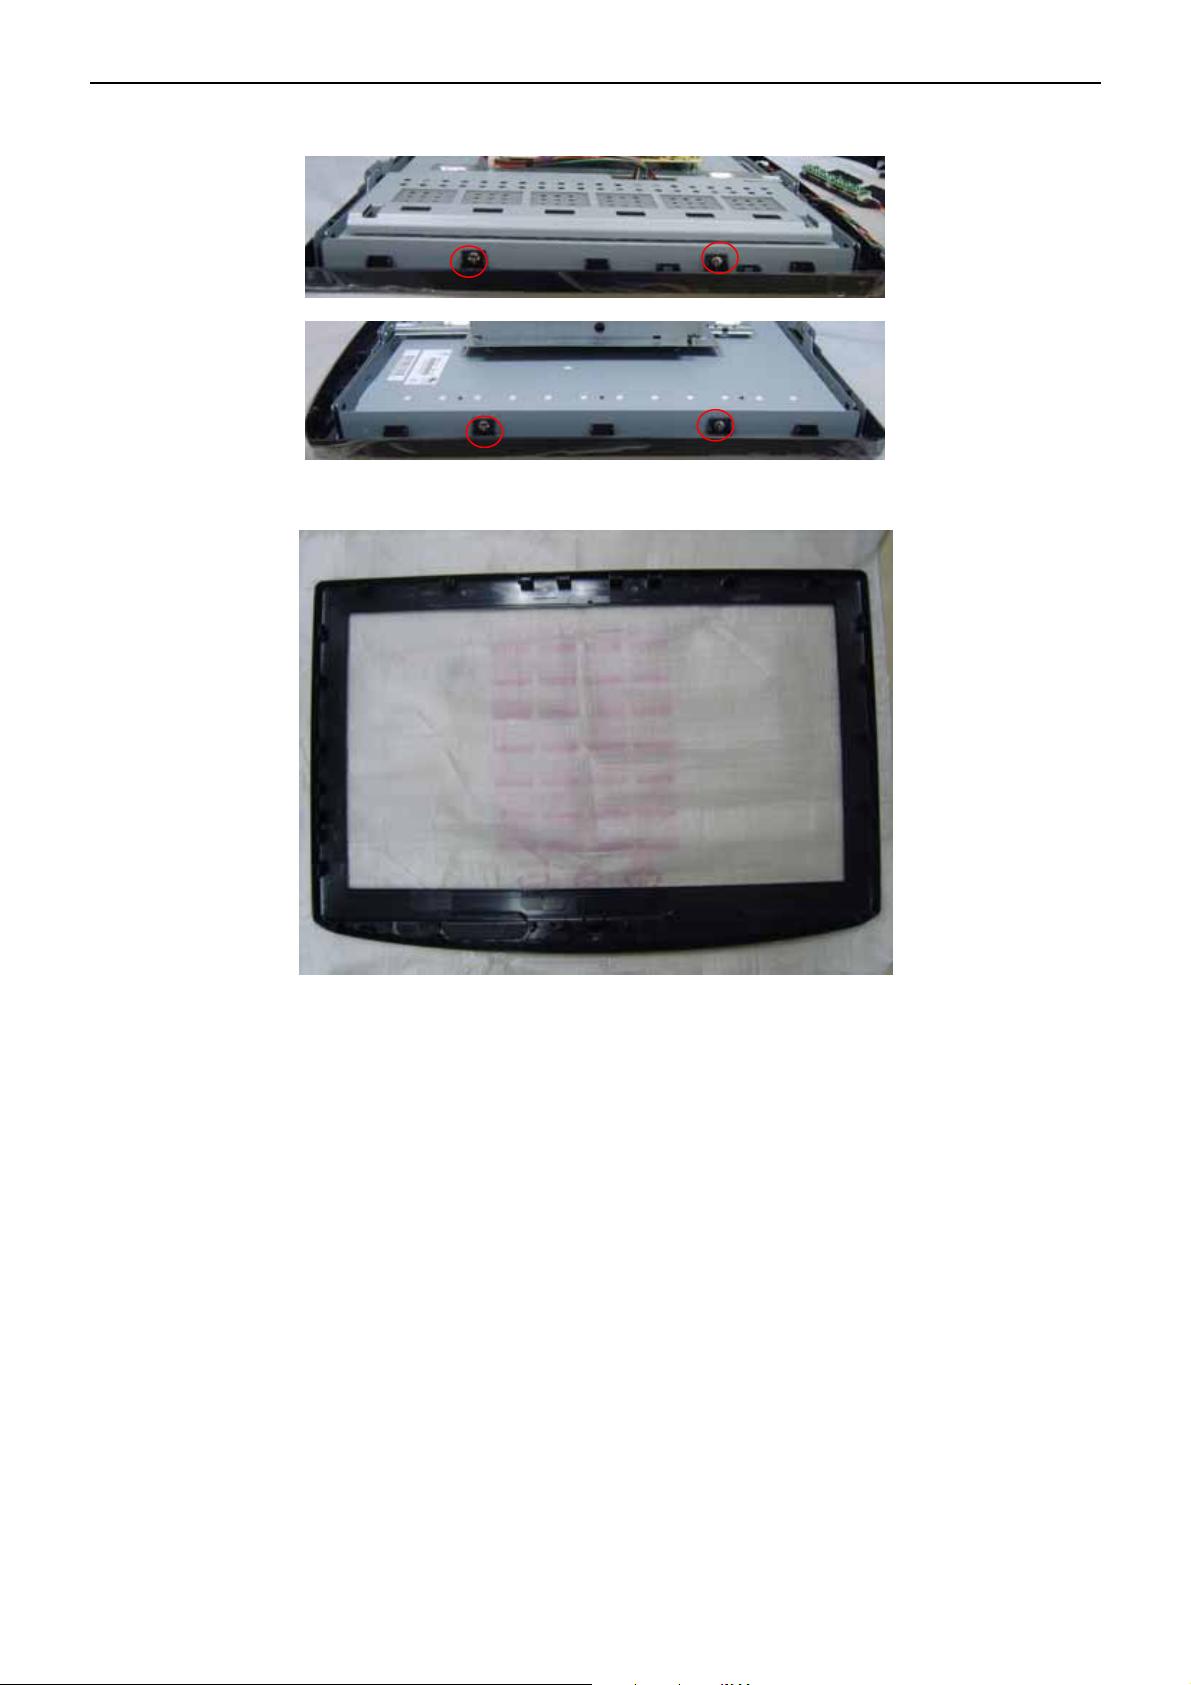
7. Remove the screws to remove the bezel.
8. The bezel.
17
26″LCD TV AOC L26W831
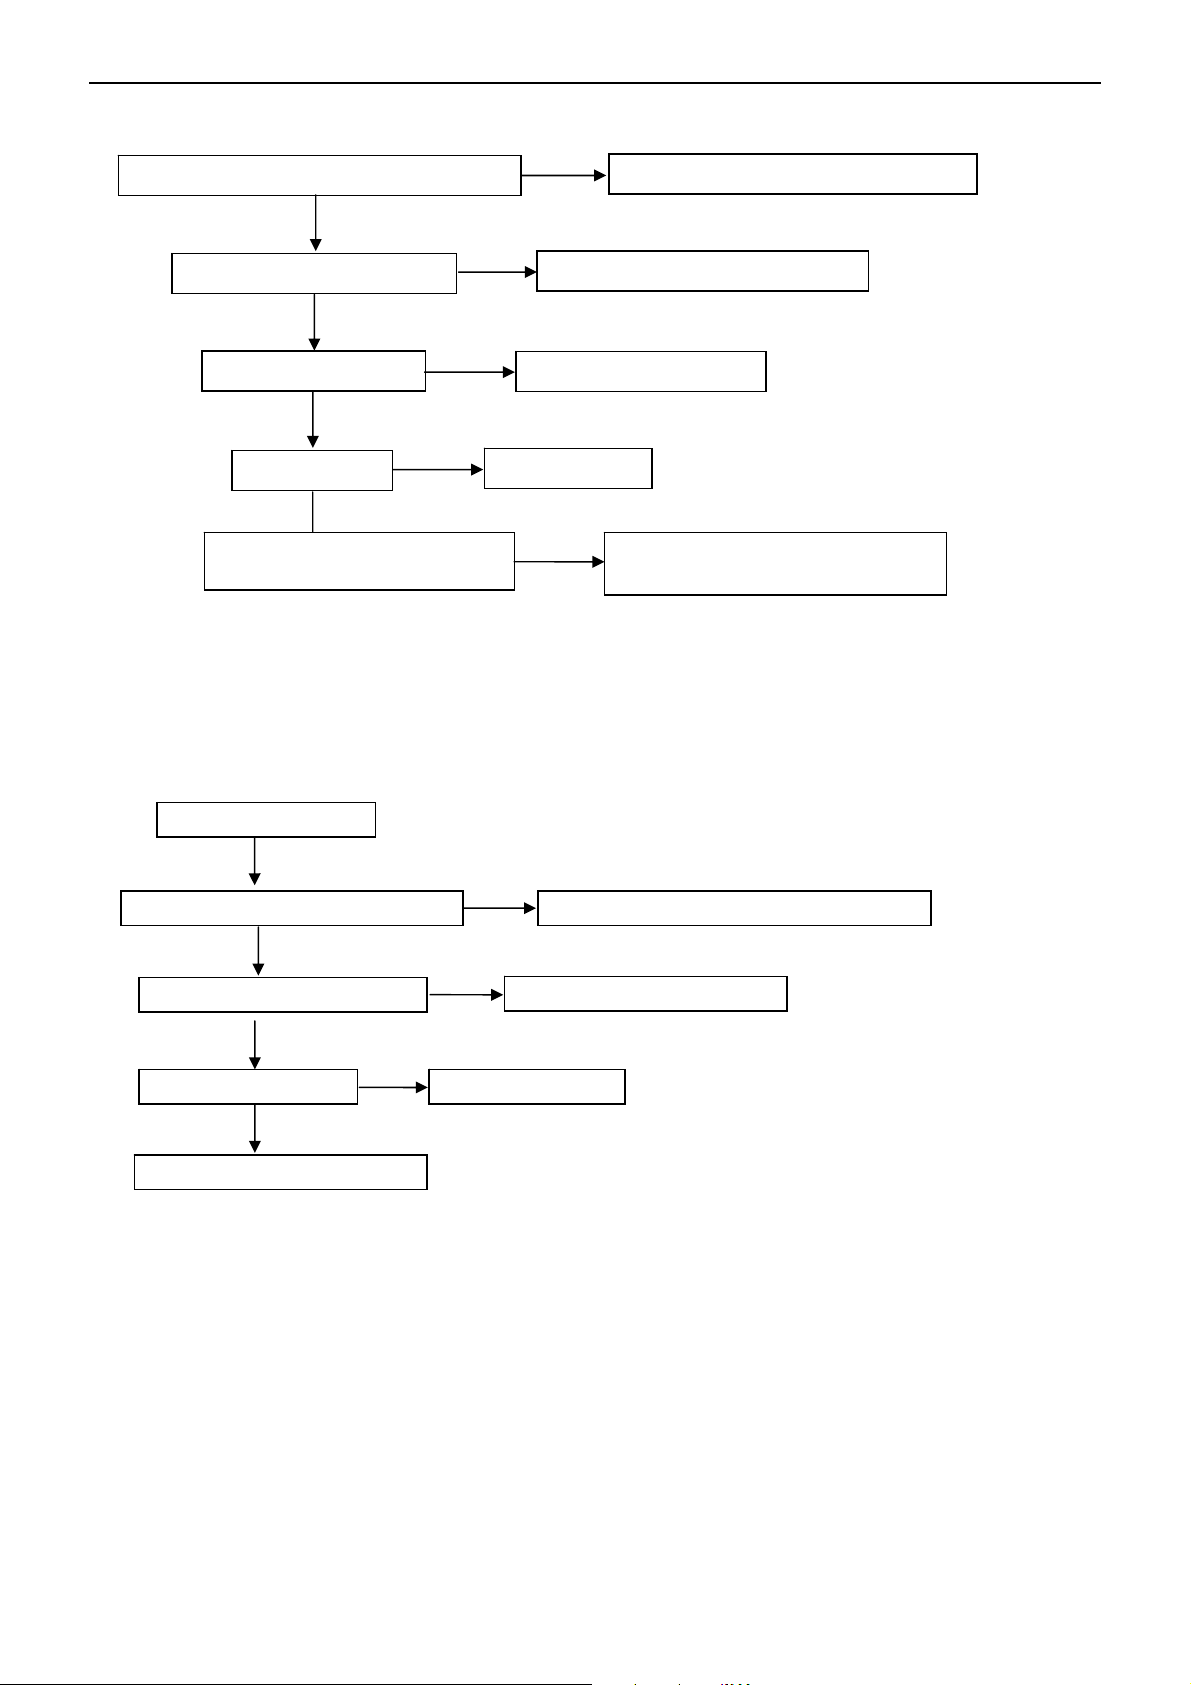
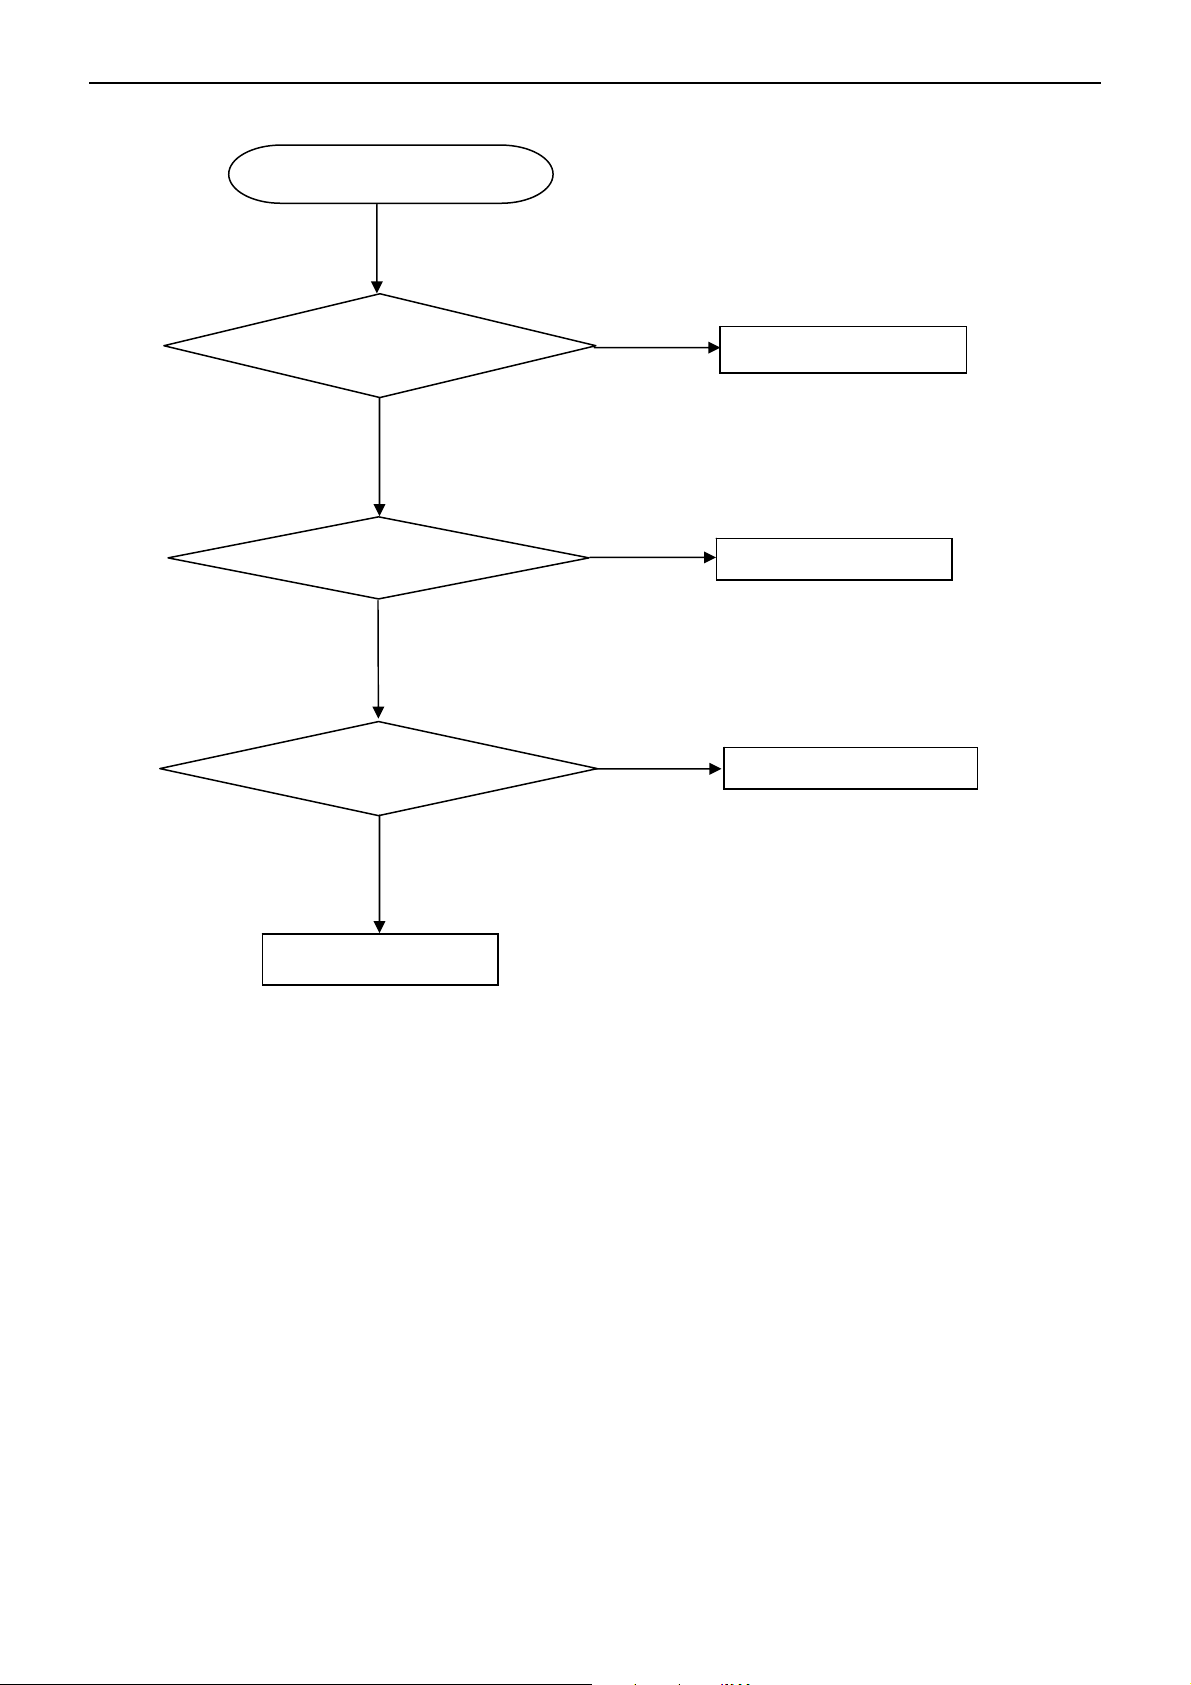
5. Repair Flow Chart
1. No Power (No LED indicator)
Check power cord and board interface
OK
NG
Plug in power cord and interface
Check F901, BD901, C910
OK
Check D902, C920
OK
Check T901
OK
Check D950, C952,C953,C954
NG
NG
2. Can not start (LED indicator yellow)
Can not start
NG
Replace F901 or BD901 or C910
Replace D902 or C920
Replace T901
Replace D950 or C952 or C953 or
C954
OK
Check key board or remote control
OK
Check U701, U702, U703
OK
Check U400
OK
Check I2C communication
NG
NG
NG
Replace U400
Repair key board or remote control
Replace U701, U702, U703
18
26″LCD TV AOC L26W831
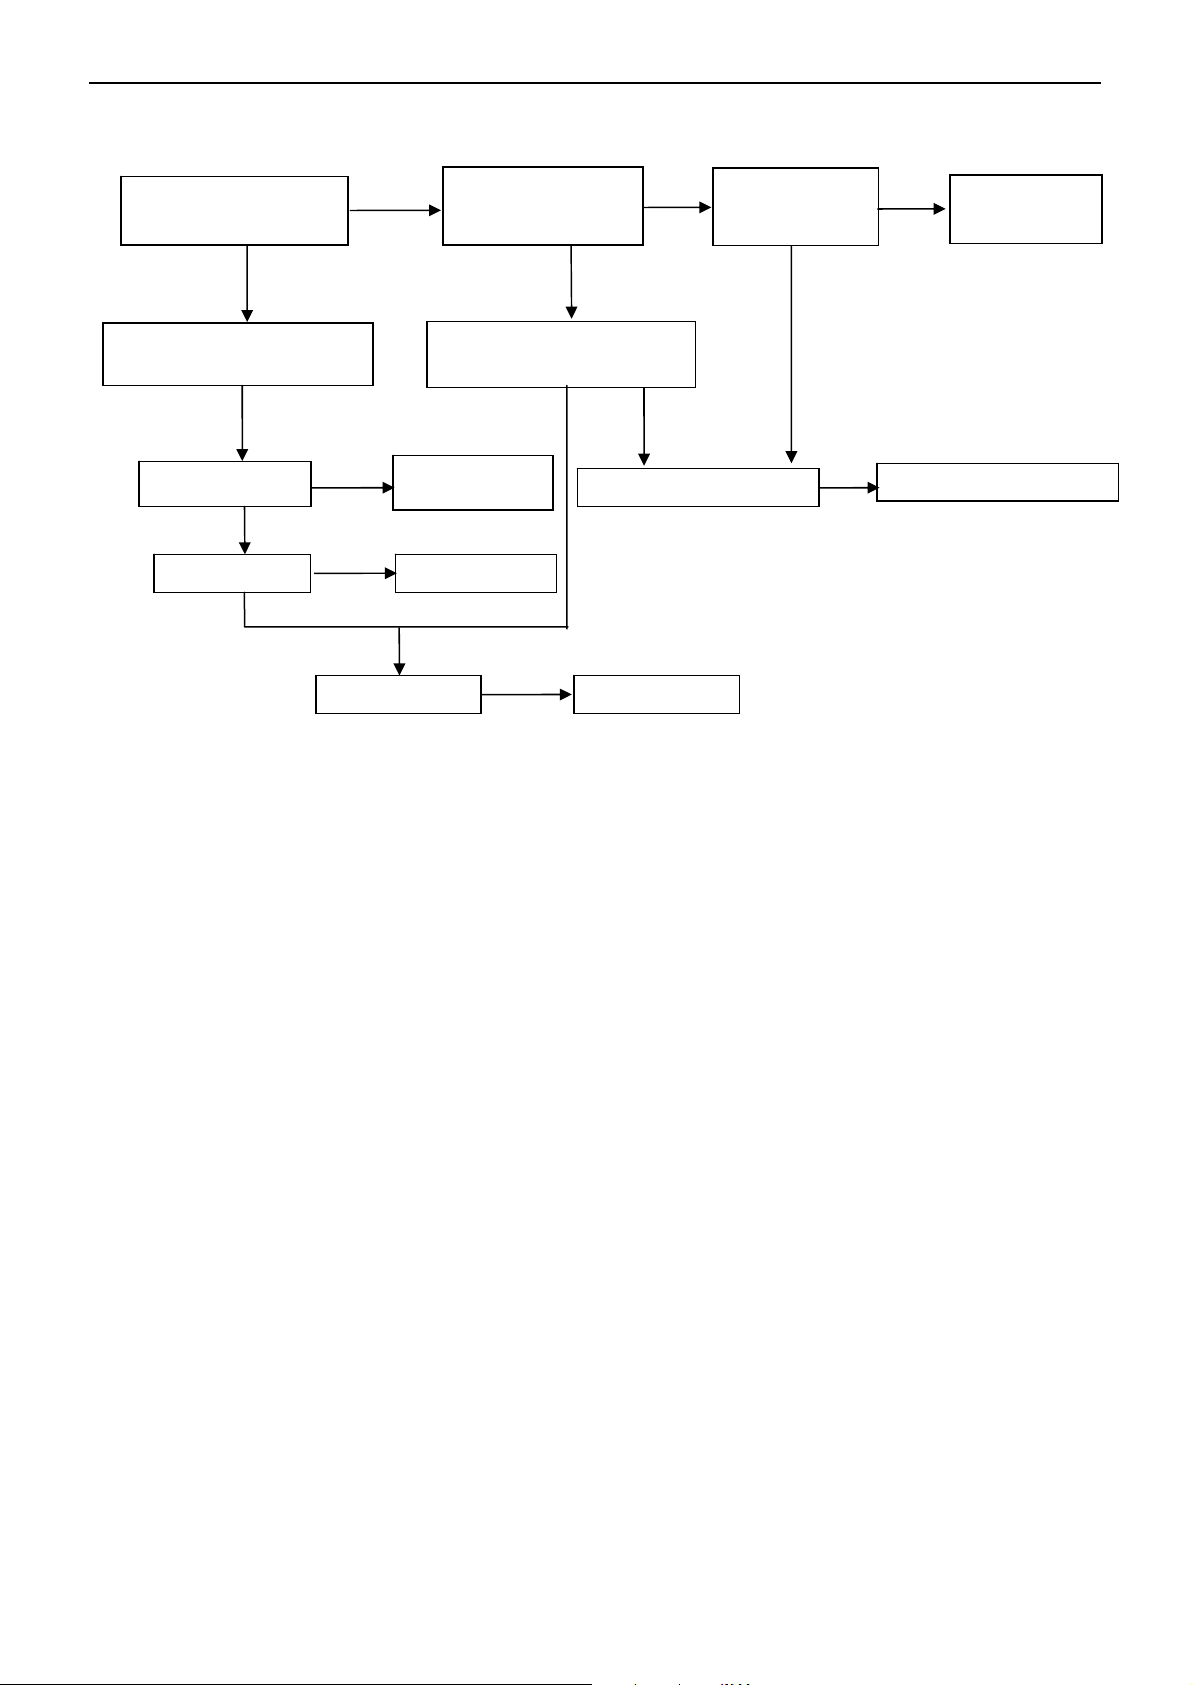
UH200
3. No display (LED indicator green)
Check back light is OK
OK
Check LVDS cable
and connector
OK
Check UH200
OK
Check U202
NG
NG
NG
OK
Check Panel
Replace
Replace U202
Check 12V
power supply
OK
Check BL-ON/OFF signal
NG
Replace Panel
NG
NG
Check Q705、Q706
Check PS
signal
NG
NG
OK
Replace Q705、Q706
Check power
board
19
26″LCD TV AOC L26W831
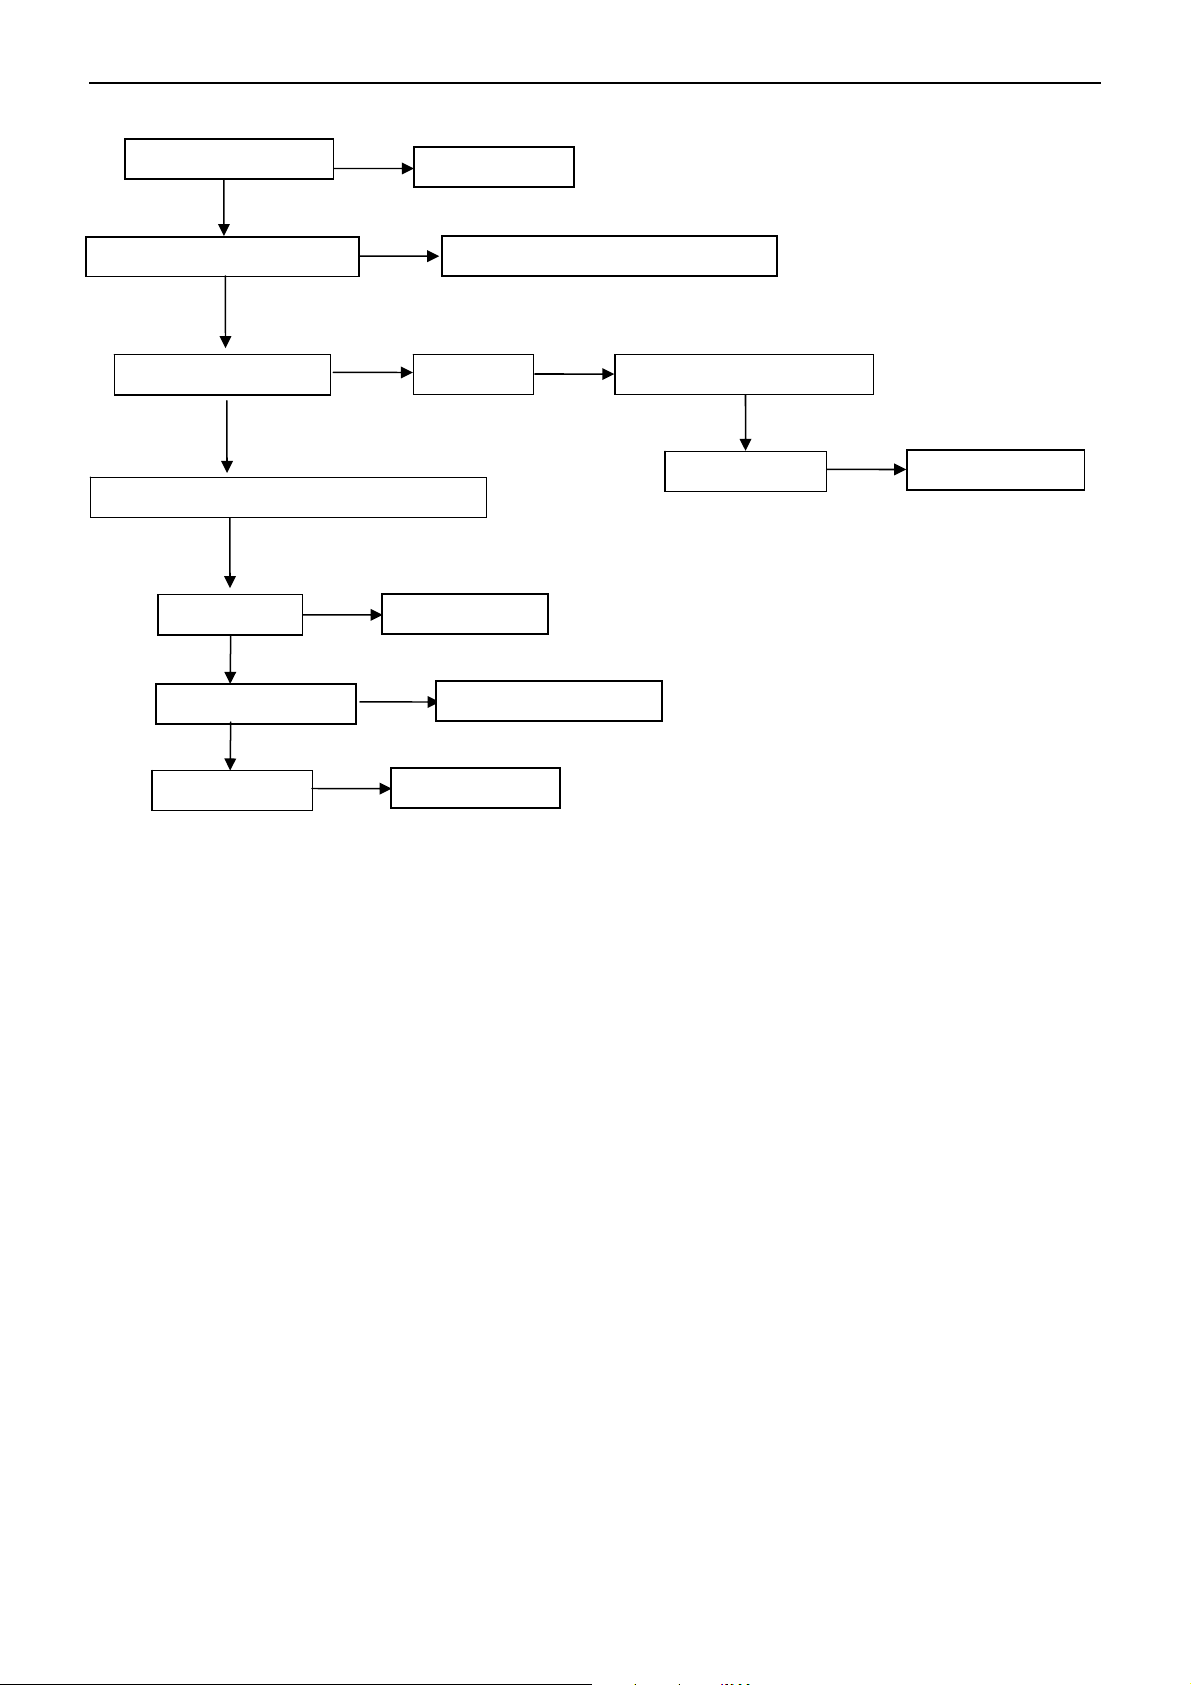
A
4. Abnormal display
Check the source
OK
NG
Reset source
NG
NG
Replace U400
NG
Replace panel
Check signal filter circuit
OK
Check input signal
V, S-video, Comp,PC,HDMI signal
OK
Check U400
OK
Check LVDS cable
OK
Check panel
NG
Replace the filter or inductance
TV signal Check TV system setup
OK
Check TU101
Replace LVDS cable
NG
Replace TU101
20
26″LCD TV AOC L26W831
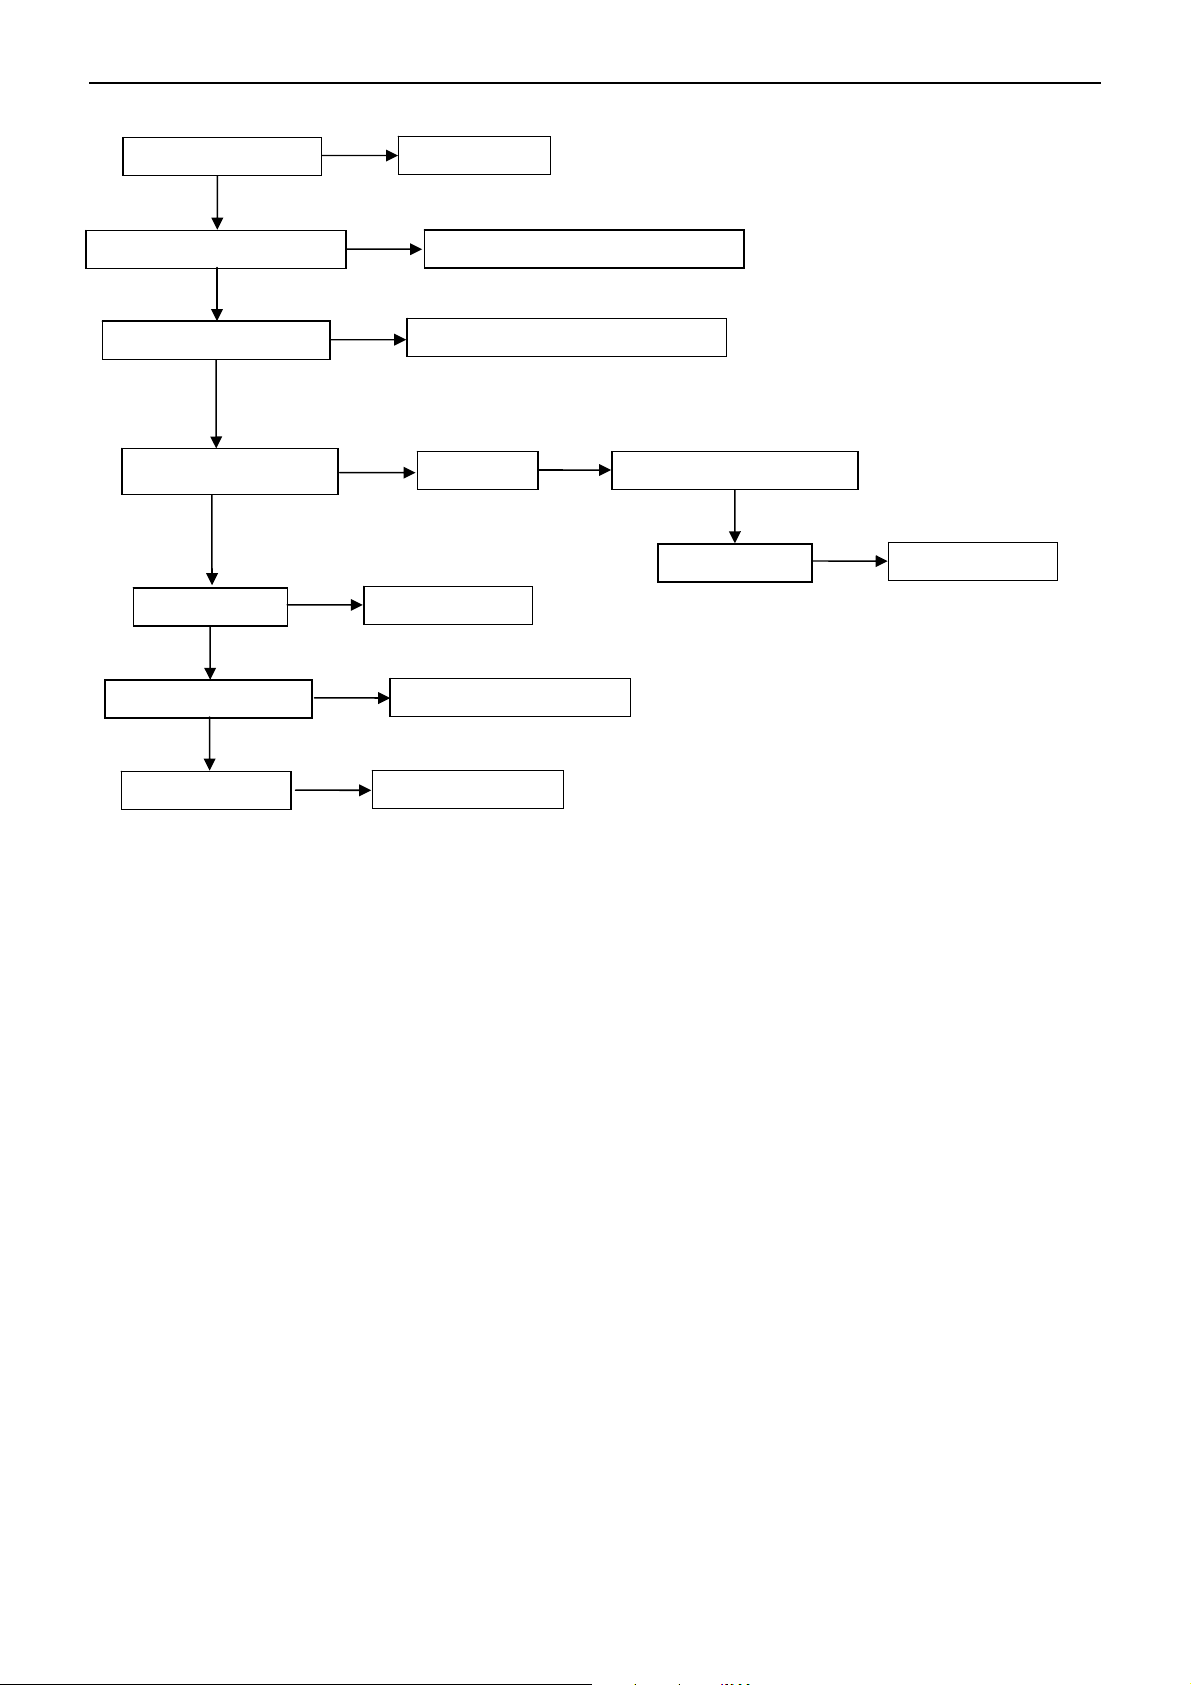
p
5. No sound
Check the source
OK
Reset source
Check signal filter circuit
Check Earphone jack
OK
Check input signal
OK
Check U600
OK
Check U602, U603
OK
Check speaker
NG
NG
NG
NG
NG
Replace the Earphone jack
SIF signal Check TV system setu
Replace U600
Replace U602 or U603
Replace speaker
Replace the filter or inductance
Check TU101
OK
NG
Replace TU101
21
26″LCD TV AOC L26W831
6. Key Board
OSD is unstable or not working
Is Key Pad Board connecting normally?
Y
Is Button Switch normally?
Y
Is Key Pad Board Normally?
Y
Check Main Board
N
Connect Key Pad Board
N
N
Replace Button Switch
Replace Key Pad Board
22
 Loading...