

Page 1

USER’S MANUAL
A42W64AT4
Thank you very much for choosing the Envision Series Plasma TV.
We recommend that you take a few minutes to read carefully through this manual before
installing and using the TV.
Page 2

CONTENT
IMPORTANT SAFETY INSTRUCTIONS.....................................................................................1
Precautions and Reminders……………………………………………………………………………..2
Features and Function………………………………………………………….…………………….….4
Front Panel Control……………………………………………………………………………………….5
Basic Installation…………………………………………………………………………………………..6
Connection to other equipment………………………………………………………………………….7
Remote Control Function.............................................................................................................9
OSD Menu Descriptions
Main Menu.......................................................................................................................…10
Setup Menu .....................................................................................................................…10
Video Menu..........................................................................................................................11
Audio Menu……………………………………………………………………………………….…11
Feature Menu ........................................................................................................…......….12
EPG……………………………………………………………………………………………….….13
TVChannel ……………………………………………………………………..………………..….13
Specifications..............................................................................................................................14
Troubleshooting ........................................................................................................................15
0
Page 3

r
IMPORTANT SAFETY INSTRUCTIONS
M
Read before operating equipment
1. Read and follow all instructions.
2. Do not operate this apparatus near water.
3. Do not install near any heat sources such as radiators, heat registers,
stoves, or other apparatus (including amplifiers) that produce heat.
4. Do not block any of the ventilation openings.
5. Clean only with a dry cloth.
6. Do not defeat the safety purpose of the polarized or grounding-type
plug. .A polarized plug has two blades with one wider than the other. A
grounding type plug has two blades and third grounding prong. The
wide blade or third prong are provided for your safety. When the
provided plug does not fit into your outlet, consult an electrician for
replacement of the obsolete outlet..
7. Protect the power cord from being walked on or pinched particularly at
plugs, convenience receptacles, and the point where they exit from the
apparatus.
8. Only use attachments/accessories specified by the manufacturer.
9. Use only with a cart, stand, tripod, bracket, or table specified by the
manufacturer, or sold with the
apparatus. When a cart is used, use caution when moving
the cart/apparatus combination to avoid injury from tip-over.
10. Unplug this apparatus during lightning storms or when
unused for long periods of time.
11. Refer all servicing to qualified service personnel. Servicing is required
when the apparatus has been damaged in any way, such as
power-supply cord or plug is damaged, liquid has been spilled or
objects have fallen into apparatus, the apparatus has been exposed to
rain or moisture, does not operate normally, or has been dropped.
12. This product may contain lead and mercury. Disposal of these
materials may be regulated due to environmental considerations. For
disposal or recycling information, please contact your local authorities
or the Electronic Industries Alliance: www.eiae.org
13. Damage Requiring Service -The appliance should be serviced by
qualified service personnel when:
• The power supply cord or the plug has been damaged; or
• Objects have fallen, or liquid has been spilled into the appliance;
or
• The appliance has been exposed to rain; or
• The appliance does not appear to operate normally or exhibits a
marked change in performance; or
• The appliance has been dropped, or the enclosure damaged.
14. Tilt/Stability- All televisions must comply with recommended
international safety standards for tilt and stability properties of its
cabinet design.
• Do not compromise these design standards by applying
excessive pull force to the front, or top, of the cabinet which
could ultimately overturn the product.
• Do not endanger yourself, or children, by placing electronic
equipment/toys on the top of the cabinet. Such items could
unsuspectingly fall from the top of the set and cause product
damage and/or personal injury.
15. Wall or Ceiling Mounting- The appliance should be mounted to a wall
or ceiling only as recommended by the manufacturer.
16. Power Lines- An outdoor antenna should be located away from power
lines.
17. Outdoor Antenna Grounding- If an outside antenna is connected to
the receiver, make sure the antenna system is grounded so as to
provide protection against voltage surges and built up of static
charges.
Section 810 of the National Electric Code, ANSI/NFPA No.70-1984,
provides information with respect to proper grounding of the mast and
supporting structure, grounding of the lead-in wire to an antenna
discharge unit, size of grounding connectors, location of
antenna-discharge unit, connection to grounding electrodes, and
requirements for the grounding electrode. See Figure below.
18. Object and Liquid Entry- Care should be taken so that objects do not
fall and liquids are not spilled into the enclosure through openings.
19. Battery Usage CAUTION –To prevent battery leakage that may result
in bodily injury, property damage, or damage to the unit:
• Install all batteries correctly, with + and - aligned as marked on
the unit.
• Do not mix batteries (old and new or carbon and alkaline, etc.).
• Remove batteries when the unit is not used for a long time.
20. Keep this manual for future reference
Example of Antenna Grounding as per
NEC - National Electric Code
Note to the CATV system installer: This
reminder is provided to call the CATV
system installer's attention to Article 820-40
of the NEC that provides guidelines fo
proper grounding and, in particular,
specifies that the cable ground shall be
connected to the grounding system of the
building, as close to the point of cable entry
as practical.
GROUND CLAMP
(NEC SECTION 810-20)
(NEC SECTION 810-21)
ELECTRIC SERVICE EQUIPMENT
ANTENNA LEAD IN WIRE
ANTENNA DISCHARGE UNIT
(NEC SECTION 810-20)
GROUNDING CONDUCTORS
(NEC SECTION 810-21)
GROUND CLAMPS
POWER SERVICE GROUNDING ELECTRODE SYSTE
(NEC ART 250, PART H)
1
Page 4
Precautions and Reminders
2
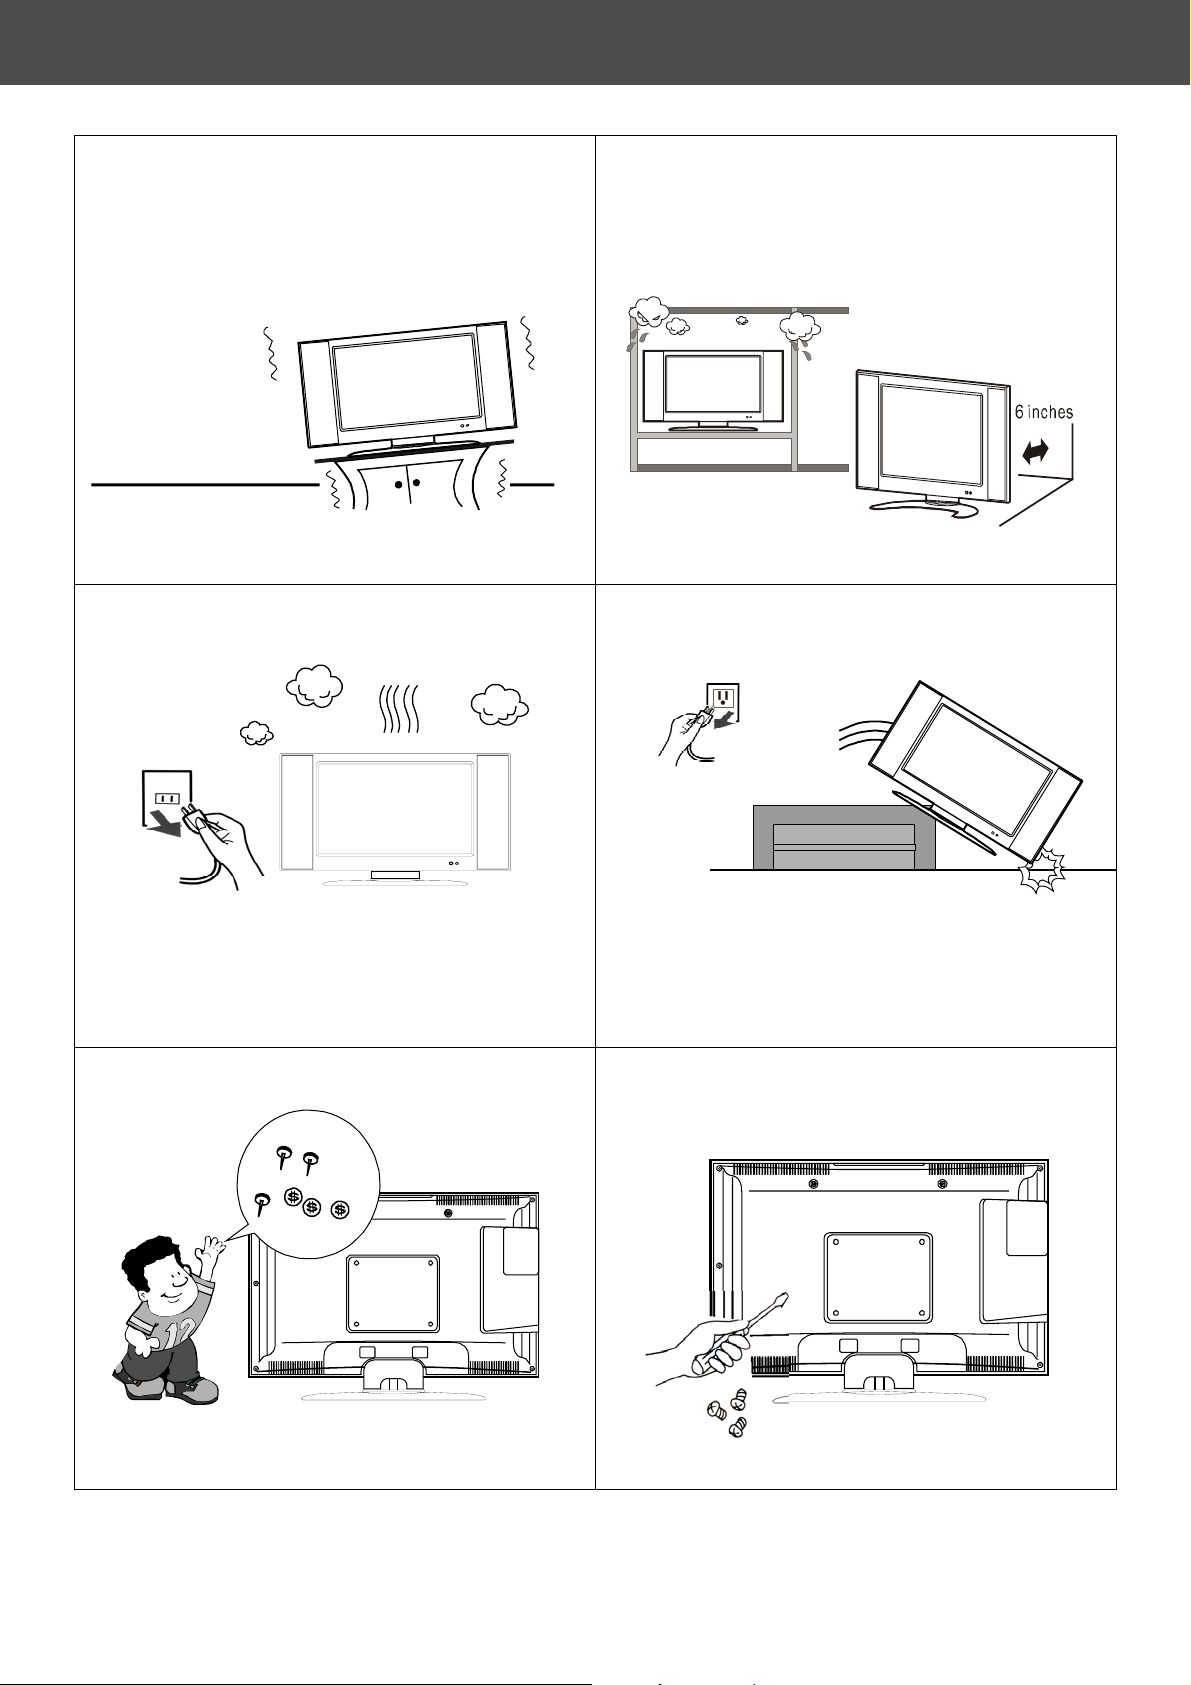
Do not place unit on uneven surfaces.
3
2
Do not place the TV in confined
spaces or in a box when using it.
3
Unplug immediately if there is any malfunction,
like no video, no audio, smoke or a bad odor.
2
Do not throw any object like metals or
flammable materials into the TV set.
Unplug immediately if other foreign materials
are put inside TV box or if the TV fell down.
2
Prohibit/Avoid opening TV cabinet
2
Page 5
Precautions and Reminders
2
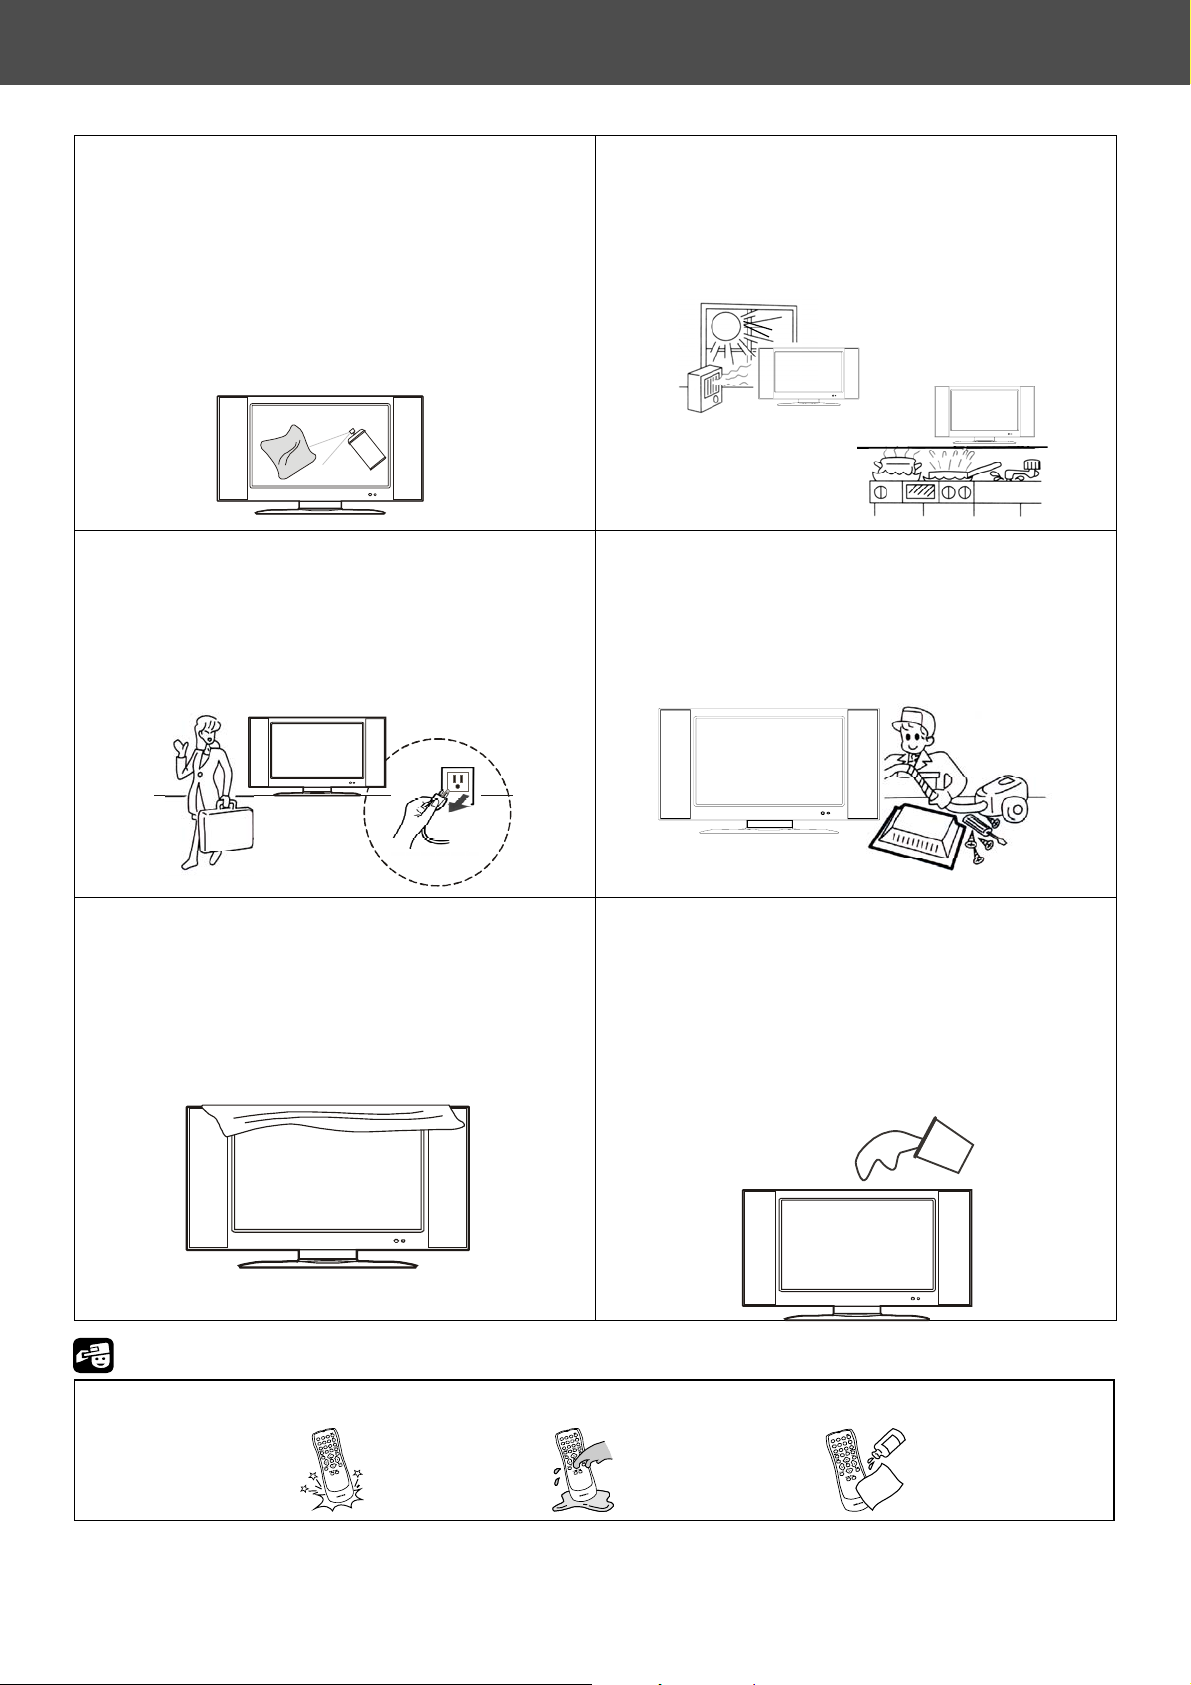
DO NOT use liquid cleansers or aerosol
cleansers to clean the plasma display. Dilute a
neutral detergent with water and wipe with a
soft cloth or gently clean with some absorbent
cotton. Remember to unplug the AC mains
cord before cleaning the display.
3
Make sure to unplug the unit when not in use
for a long period of time (2 days).
2
Avoid direct sunlight, dusty, high humidity and
smoky areas.
3
Call service personnel to clean the internal part
of the TV once a year.
2
Do not cover or block any vents and openings.
Inadequate ventilation may shorten the life of
the display unit and cause overheating.
Notice for Remote Control
Avoid Dropping
Avoid Dropping Avoid Liquids Avoid Aerosol Cleaners
3
2
1
6
5
4
9
8
7
0
3
2
1
6
5
4
9
8
7
0
2
Do not place the unit near water, such as
bathtub, washbasin, kitchen sink laundry tub,
swimming pool or in a damp basement.
3
2
1
6
5
4
9
8
7
0
3
Page 6

Features and Function
42 inch(107cm)Large Screen Flat Panel Plasma Display
Panel Resolution: WVGA 852 x 480 Pixels
MAX Brightness of Panel: 1500 Cd/m2
MAX Contrast Ratio of Panel: 10000:1
View Angle: Greater than 160°
Internal TV Tuner, Air:69 channels Cable:135 channels
Frequency Range:55.25MHz to 859.25MHz
ATSC receiver, MPEG-2 decoder
NTSC receiver, Video decoder
Dual Video, Dual S-Video
Dual Y Pb Pr (480i, 480P, 720P, 1080i)HDTV Ready
PC D-SUB 15Pin INPUT
D-SUB Vertical refresh rate 50Hz to 85 Hz
D-SUB Horizontal frequency 31KHz to 80KHz
DVI-D Signal(TMDS)INPUT, Support HDTV, SDTV
MIPS controller technology
Auto Scan TV Channels
Factory Presets
Universal Power Supply designed for worldwide application
≤ 350 W (Power consumer)
Closed Caption / V-chip For USA
4
Page 7

Front Panel Control
⑦
⑥
⑤
④
③
②
①
① MODE
② MENU
③- VOL +
- CH + - VOL +
Mode: Press to select input signal modes or use as Enter in Menu operation.
Menu: Press to enter Menu or exit Menu.
Left: Press to decrease the sound volume level or move Left in Menu operation.
Right: Press to increase the sound volume level or move Right in Menu operation.
MENU MODE
④ - CH +
⑤
⑥ ●
⑦
Down: Press to select the next lower Programme number or move Down in Menu operation.
Up: Press to select the next higher Programme number or move up in Menu operation
Power switch: Press to power on or power off the TV set .
LED: Power Indicator.
IR: Remote Control Sensor.
5
Page 8

Basic Installation
1. Connect TV Cable and Power Cord to this PDP TV Set.
2. Plug Power Cord to your home power outlet.
3. Check front panel LED for proper power connection:
Blue color indicates this TV set is powered on;
Red color indicates this TV set is in standby state.
4. Push POWER KEY on Remote Control or Power key on
Front panel controls to switch the TV from stand by state
to ON state.
This TV will power on and you can see display on screen
within a few minutes.
5. Once you see information displayed on screen,
press Digital button on Remote Control or MODE
key on front panel continuously to select TV as
input source. TV channel information will be
displayed.
6. Use Auto channel search in “Setup Menu” to
search all channels in your location. Refer to page
8 for “Setup Menu” operation procedure.
7. After Auto channel search is completed, press
“CHup” or “CHdown” key on remote control to
select the next lower or higher channel.
Refer to the following pages for operating
procedures:
y Remote Control – page 9.
y Setup Menu – page 10.
y TV Channel Arrangement – page 13.
POWER KEY
Ch14.0 12:00AM
TV channel information
6
Page 9

Connection to other equipment
Please connect this TV Set to other equipment as picture below.
You may have many types of equipment as: DVD, VCD, VCR, Set Top Box, X-Box and so on.
(View from back of the TV set,left to right)
INPUT CONNECTION OF VIDEO SIGNAL(DVD/VCD/VCR)
s-video Y R W B
AV1-INPUT
s-video Y R W
7
Page 10

j
r
Connection to other equipment
G B R R W
We have 2 component signal input
acks: Y Cb Cr and Y Pb Pr. The R / L is
Audio input for every Y Cb Cr and Y Pb Pr.
If your DVD or Set Top Box have Y Cb
Cr or Y Pb Pr output, you can connect it to
Y Cb Cr or Y Pb Pr input jack. And select to
Y Cb Cr or Y Pb Pr source input. (Some
DVD or Set Top Box need to set to Y Cb C
or Y Pb Pr output)
Notice: If you see that display abnormality
in screen, you need to check the cable
connection and DVD setup.
INPUT CONNECTION OF PC SIGNAL(PC/DVD)
Notice: If you see that display abnormality in screen, you need to check the cable
connection and DVD setup.
24PIN DVI R/L INPUT 15PIN DVI R/L INPUT
● D-SUB 15 Pin:
Connect D-SUB signal cable(VGA cable)from PC to D-SUB jack at the back of this display.
And connect the earphone cable from PC earphone output jack to AUDIO input jack near to the
D-SUB jack.
Setup:
Use the key “Digital”in Remote Control Transmitter or “MODE”key on Front panel controls
to select source to “VGA”state. Then turn on the PC.
● DVI-D:
Connect DVI-D 24 Pin signal cable(TMDS cable)from equipment with DVI-D jack to the back
of this display. And connect earphone cable from equipment with earphone output jack to
AUDIO input jack near the DVI-D jack.
Setup:
Use the key “Digital”in Remote Control Transmitter or “MODE”key on Front panel controls
to select source to “DVI”state. Then turn on the equipment.
▲ Notice: The PC output can not set out of
range.The highest resolution input is
1280 X 1024 / 60Hz.
Some PC models cannot be connected to
the set.
8
Page 11

y
f
r
r
r
r
Remote Control Function
Normal, Zoom ,Wide, Cinema
Display the state, source
TV source select, into TV state
Select timer into power down
state. off→30→60→90→of
To select close caption options
To enter sub Menu or sub item .
Press Vol up/ Vol down key to
To enter TV channel numbe
To enter sub channel number fo
“
Wide Mode
”
display select
“
EPG
”
“TV”
“
SLEEP
”
“CC”
(CC1,CC2……)
“
ENTER
“
MENU
”
Remote Control Function
”
To enter Menu mode .
“
MUTE
”
Mute the sound
“
Vol up / Vol down
”
adjust volume .
“
0~9 number
“
z
”
”
digital channels .
Wide Mode
TV
C
C
left
M
e
n
u
Vol u p
Vol down
1
4
EPG
Vide o
SLEEP
Up
Enter
Down
Mute
2
5
8
“
POWER”
The TV Set turn on /turn off ke
POWER
“
Video”
Digital
AV1 CVBS Rear /AV1 S-Video
Rear/ AV2 CVBS Side/ AV2
S-Video Side / AV3 component 1/
AV4 component 2
M
T
S
“
Digital”
right
VGA/DVI source input
“
MTS ”
To select audio program options
T
I
X
E
“Up▲
/Down
▼”
Move the cursor up and down
CH up
CH down
on the Menu
“
left ◄ / right ►”
Use left ◄/ right ► to select o
adjust an item.
3
“
EXIT”
6
97
To exit Menu or other OSD .
“
CH up / CH down”
Press to select the next lower o
Pre-CH
higher Program number.
“
Pre-CH”
TV channel return, see last
TV channel .
9
Page 12

r
OSD Menu Descriptions
Main Menu
1. Press “MENU” key on remote
control or front panel controls to
bring up Main Menu.
2. Press “” or “” to move the curso
up and down the sub menu list.
3. Press “
item.
” or “” to select sub menu
4. Press "Enter" to enter sub-item
then use “
” or “” to adjust.
Setup Menu
1. Tuning Band: Select TV signal source
between Air and Cable. Select Cable if
you are connecting to a cable box and
select Air if you are directly connecting to
the antenna.
2. DTV Signal: Display signal strength to aid
antenna adjustment.
3. Auto Ch Search: Automatically scan and
store all TV channels.
4. Manual Ch Set: Enter channel setup table.
5. Channel Labels: Display and edit channel
names.
6. Menu Language: Select language for menu
(EnglishEspañolFrançaisPortuguese)
.
y
DTV signal menu indicates signal
strength in real-time.
y
Auto channel scan menu displays
channel number being scanned.
y
Manual Channel Set Menu
Displays all the channel numbers that
are found.
Tune either to ATSC or NTSC channels.
Add or delete Channel number.
y
Channel Labels Menu allows user labeling.
10
Page 13

OSD Menu Descriptions
Video Menu
.
1. Press “” or “” to move the cursor
up or down the sub-item list.
2. Press "Enter" to enter the
highlighted sub-item menu.
3. Press “
of the sub-item.
4. Press "Enter" again to exit the
sub-item.
Contrast: Contrast adjustment, 0 ~ 100.
Brightness: Brightness adjustment, 0 ~ 100.
Color: Color chroma adjustment, 0 ~ 100.
Tint: Tint adjustment, 0 ~ 100.
Aspect Ratio: Aspect Ratio selection.
Normal Zoom Wide Cinema.
Settings: Restore default setting.
Audio Menu
1. Press “” or “” to move the cursor
up or down the sub-item list.
2. Press "Enter" to enter the
highlighted sub-item menu.
3. Press “
of the sub-item.
4. Press "Enter" again to exit the
sub-item.
Audio Language:
English Spanish FrenchPortuguese.
Bass: Bass adjustment, 0 ~ 100.
Treble: Treble adjustment, 0 ~ 100.
Balance: Balance adjustment, 0 ~ 100.
Restore Default: Restore Audio Language,
Treble, Bass, and Balance setting to default.
” or “” to adjust the value
” or “” to adjust the value
11
Page 14

r
r
t
r
OSD Menu Descriptions
Feature Menu
1. Press “” or “” to move the curso
up or down the sub-item list.
2. Press "Enter" to enter the
highlighted sub-item menu.
3. Press “
of the sub-item.
4. Press "Enter" again to exit the
sub-item.
Time Set : The default time when you firs
set up theTV is 12:00 midnight. The
internal clock starts from 12:00am. In the
time set menu, first select the time zone
you are in and manually change the time
to the present time. Press Enter to confirm
the time and exit the menu. Note that
whenever you switch the MAINS off, you
need to set the time again when you turn
the TV on.
Sleep Timer: Select minutes into standby
Off 30 60 90.
Password Set: Enter and change
Parental Control Password.
Parental Control: Setup TV and Movie
rating controls.
White Screen:Press “Enter”to white
screen.
Parental Control Menu: Controls viewing
of rated TV and Movie programs.
Note:Need password to change settings.
Initial Default password is: 0000.
Important : If you have forgotten you
Password
Use the code [0711] to enter into the
Password Set menu item to change you
password.
You can also use the code [0711] to
change your Parental Controls settings.
” or “” to adjust the value
12
Page 15

OSD Menu Descriptions
Closed Captions section
1. Press “CC” key on remote
control to select closed
captions mode.
NTSC TV: Off..CC1 ..CC2 .. …
ATSC TV: Off ..CS1 ..CS2.. …
2. Select desired closed caption
mode.
3.Closed captioning for analog
NTSC channels is transmitted
as CC1/CC2/CC3/CC4.Closed
captioning for digital channels is
transmitted as CS1/CS2/CS3
/CS4/CS5/CS6 or occasionally
CC1/CC2/CC3/CC4. You need
to select the option you want for
analog channels and digital
channels separately.
EPG
Press the “EPG” key on the remote
control to display the Electronic
Program Guide (EPG). A message
window will be displayed on screen.
TV channel arrangement
Analog NTSC channels are
Numbered as2.0, 5.0, 11.0 etc.
Digital ATSC channels are numbered as 2.1, 5.1, 5.2, 11.1, 11.2
etc depending on your local transmittors. Note that each digital
channel may comprise of several sub-channels. For your convenience,
this television groups all analog channels together followed by all digital channels
together.
To select a digital channel using the remote control:
1. To go to channel 5.2, enter main channel number (5).
2. Press the “•” key.
3. Enter the sub-channel number (2).
CC1
NTSC TV
CS1
ATSC TV
EPG Message Window
Ch 5.2
13
Page 16

Panel
Spec
TV Mode
Specifications
Item Specification
Screen size 42 inch plasma display panel
Aspect 16:9
Display pixels 852 x 480 (WVGA)
Effective display size 932mm x 532mm
Number of color 16.7 million colors
Contrast Ratio 10000:1 (in dark room)
Peak brightness 1500 cd/㎡
TV Tuning 1 Tuners, Air:69 channels Cable:135 channels
Sound system M
Color system ATSC / NTSC
AV1 ( S_Video/Video)
AV2 ( S_Video/Video)
Video Mode
AV3 / AV4
COMPONENT X 2
(Y Cb Cr/Y Pb Pr)
Signal input Analog:D-Sub 15 pin
Plug and play DDC / 2B
Support Frequency FH:31KHz to 80KHz , FV:50Hz to 85Hz
PC Mode
D-Sub Mode
D-Sub Audio Earphone (3.5ø)
Signal input Digital:DVI-D 24 pin
Plug and play DDC / 2B
DVI Mode
Power
Environment
Dimension Width x Height x Thickness 1038 x 726.5 x 240 (mm)
Net weight With Stand 34Kg
Accessory
DVI Mode
DVI Audio Earphone (3.5ø)
Power input sources AC 100-240V , 50/60Hz
Power consumption
Operation Temperature + 0 °C ~ + 40 °C
Storage Temperature - 10 °C ~ + 50 °C
Humidity 10% -- 85%
Remote Control Transmitter, Battery X 2, Power Cord, User’s Manual, RCA Cable,
D-SUB Cable,DVI Cable.
Video RCA x 1 NTSC
S-Video1 x 1 NTSC
Video RCA x 1 NTSC
S-Video2 x 1 NTSC
480i
YCbCr/YPbPrx 2
VESA: 640 x 480
VESA: 800 x 600
VESA: 1024 x 768
VESA: 1280 x 1024
720P
1080i
480P
1080i
480P
720P
≤350W
Audio: L/R x 1
Audio: L/R x 1
Audio: L/R x 2
14
Page 17

A
Troubleshooting
Symptoms
Picture freezes in antenna mode.
The TV does not react to remote
controller commands.
Picture breaks up in DVI mode,
especially when a set top box is
connected.
The picture is jerky or is
corrupted (multiple small square
boxes seen) in ATSC mode.
Some channels are missing
/ are not found.
No Picture, No Sound
Interference,Noisy
Checks
•Please ensure the antenna is properly connected.
•Please switch off the mains and switch on again.
•Re-install the channels if needed.
•The TV is trying to read the HDCP code sent by the set top
box.
•Please switch off the set top box and switch on again.
•The signal could be weak. Check the DTV signal via Menu
--> Setup --> DTV Signal.
Adjust the direction of your antenna to improve the
signal. Re-install the channels if needed.
•Press the channel number to check if the channel exists, if yes,
go to the Manual Channel Set Menu (Menu-->
Manual ch set), and add the channel.
•Go to the Setup Menu (Menu-->
channels again, searching Air/Cable as appropriate.
•
Check the power cord and power outlet.
•
Check whether the TV power switch is on.
•
Verify the front panel LED is showing blue color.
•
Check connections for the selected input source.
•
Verify that external signal for the selected input is active.
•
Check Video/Audio settings.
•The signal could be weak. Check the DTV signal via Menu
--> Setup --> DTV Signal
djust the direction of your antenna to improve the signal
Re-install the channels if needed.
•
Check antenna connection, aerial location, and
direction.
•
Check and relocate nearby electrical appliances.
•
Check fluorescent lights.
•
Check cars/motorcycles.
Setup
Setup) and install the
-->
Distorted picture,Noisy
No Colour,Normal Sound
Normal Colour,No Sound
•
Check antenna connection, aerial location, and direction
Re-scan Channels.
•
Check whether colour setting is at minimum.
•
Adjust video menu picture settings or reset to default.
•
Check audio input connections.
•
Check whether TV audio is in MUTE mode.
•
Adjust audio volume to audible level.
15
Page 18

Troubleshooting
Some parts of the
screen do not light up
After-images appear
DVD
DTV signal jumps from 0 to
100 and back.
The plasma TV panel is manufactured using an extremely
high level of precision technology, however, sometimes
some parts of the screen may be missing picture elements
or have luminous spots. This is not a malfunction.
Do not allow a still picture to be displayed for an extended
period, as this can cause a permanent after-image to
remain on the Plasma TV.
Examples of still pictures include logos, video games,
computer images, and Teletext.
Note:
The permanent after-image on the Plasma TV resulting
from fixed image use is not an operating defect and as such
is not covered by the Warranty.
This product is not designed to display fixed images for
extended periods of time.
•The signal is too weak to display a picture. Try to re-orient
the antenna to a suitable direction and auto-tune again.
No closed captioning seen when
the TV is connected to a set top
box.
•Press the CC button on the remote controller to switch off
the closed captioning. Then switch it on again.
16
Page 19

Envision Peripherals Inc.
47490 Seabridge Dr.
Fremont, CA 94538
www.AOCdisplay.com
Tech Support: 1-888-662-9888
 Loading...