

Page 1

A2.141005
Page 2

Page 3

CONTENTS
FUNCTIONS & FEATURES .............................................................................................................................................................1
STANDARD ACCESSORIES ...........................................................................................................................................................1
INSTALLATION ................................................................................................................................................................................2
GETTING ACQUAINTED .................................................................................................................................................................3
HOW TO USE YOUR RADIO ..........................................................................................................................................................5
KEYPAD FUNCTION .......................................................................................................................................................................5
CHANNEL FUNCTION MENU OPERATOIN ...................................................................................................................................7
PUBLIC DATA FUNCTION MENU OPERATION ............................................................................................................................7
BACKGROUND FUNCTION MENU OPERATION ..........................................................................................................................8
SPECIFICATIONS ...........................................................................................................................................................................10
Page 4

FUNCTIONS & FEATURES STANDARD ACCESSORIES
Big LCD displays frequency and all kinds of information1.
FM2.
Frequency Tuning Step 100Hz, 1KHz, 10KHz, 100KHz, 1MHz3.
± 1.5KHz Clarier4.
Flexiable menu function and PC programming software5.
ECHO Function6.
SQ, ASQ Function (FM and AM mode only)7.
RF GAIN Adjustment8.
RF PWR Adjustment9.
SCAN Function10.
Programmable RB Function11.
NB/ANL Function12.
DW DUAL-WATCH Function13.
BEEP Voice Prompt14.
+10KHZ Function15.
SWR16.
TOT function17.
HI-CUT Function18.
EMG CALL19.
SWR PROTECTION20.
Power Supply Voltage Protection21.
Key-Lock Function22.
Seven (7) Color LCD Display23.
Six(6) Groups Memory Channel24.
CTCSS/DCS Code(Optional)25.
DTMF Function26.
USB、LSB 、PA mode
、AM、
S/RF function
、
Radio
Screws
Microphone Hanger
Microphone
Pads Adjusting screws
non-slip mat Fuse(15A 250V)
Install bracket
1
Page 5
2
INSTALLATION
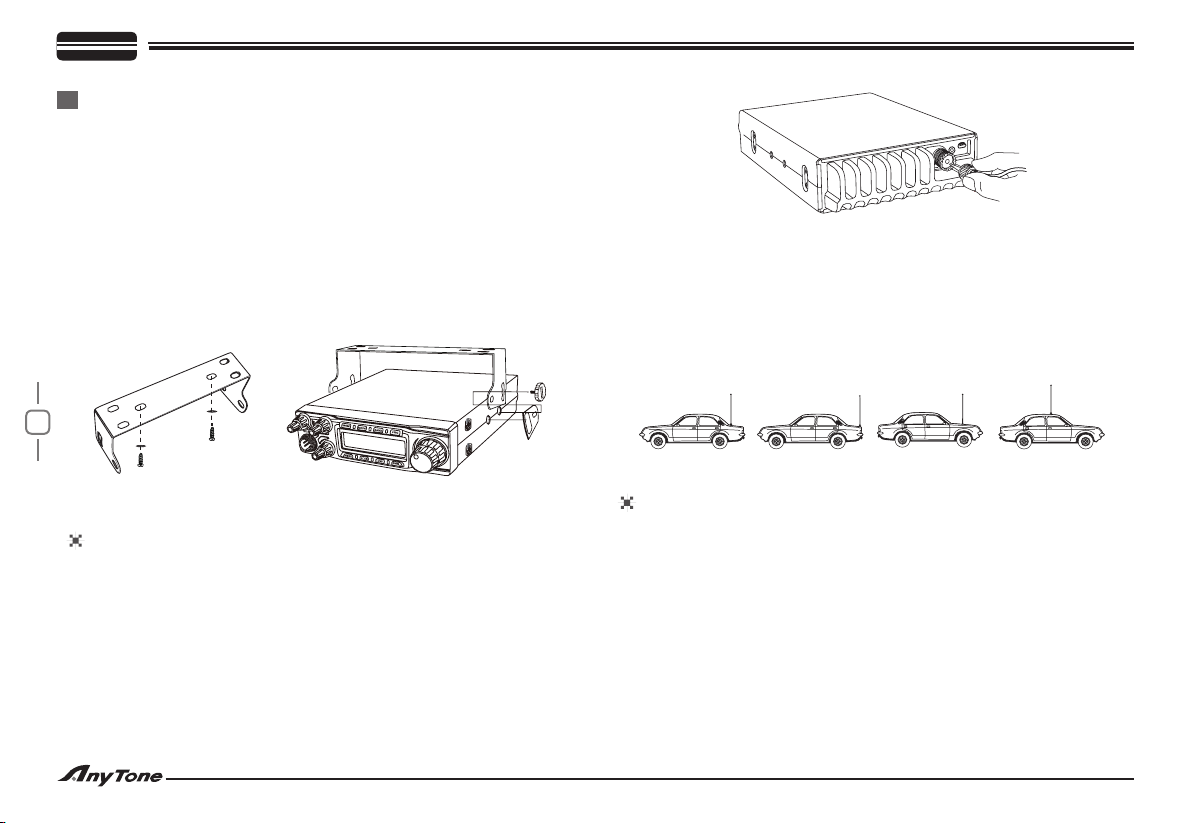
Choose the most appropriate setting from a simple and practical point of
view. Your radio should not interfere with the driver or crash the driver's
knee or leg when rush brake.
Using the self-tapping screws and pads(2 sets) to x the bracket.1.
Put the Non-slip mat on the 2 ends of the bracket and put in the 2.
radio.Then insert the adjusting screws and check carefull each
screws, make sure the screws and machine will not loose when the
car shaking.
Choose suitable angle by the 3 screw holes in the two ends of 3.
bracket.
ANTENNA INSTALLATION
Before using this radio, please install a high efcent and harmonious
adjusted CB antenna, suitable antenna type and correct installation
will bring excellent communication.
To mat c h with the r a d io, t h e ant e n na an d cabl e shal l with
characteristic impedance of 50ohm, or the antenna system will not
efcient enough and will disturb TV, radio or other electronics.
Screw the antenna connector into the antenna jack.1.
Grounding the antenna system to ensure best performance of 2.
this radio.
WARNING:
▲ Connect antenna rstly before transmiting, or it might damage the
radio.
▲ To avoid the risk of fire, electric shock, radio damage, all base
station shall equip of lightning protector
▲ Be sure choose a matching antenna, you may enquiry our dealers.
The position of antenna can be put as following example:3.
POWER CONNECTION
This radio adopt 13.8V power supply, never connect it to 24V battery,
And the 13.8V car battery shall with sufcient current, or the LCD will
become dark and Transmit power will drop down.
Connect positive red power cable with the + terminal of the battery.1.
Connect negative black power cable with the - terminal of the 2.
battery.
▲ We suggest not use cigar lighter as it often bring down the voltage.
▲ Locate the power cable away from high temperature,moisture,
portre and cable insulator.
▲ Use a full power cable even it is longer than need, do not take off
the fuse holder from the cable.
Page 6
3
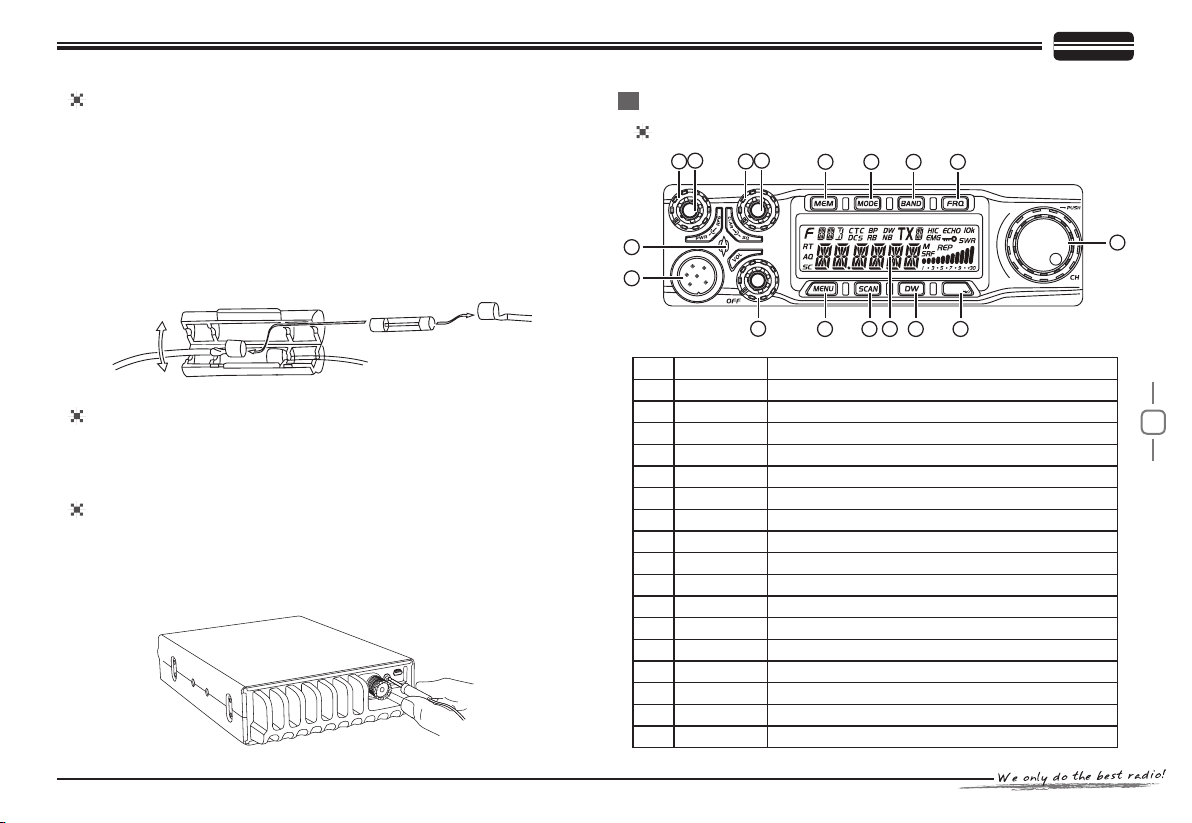
Replacing Fuse
This radio adopt 15A, 250V fuse.
If the fuse blows, determine the reason, then correct the problem.
After the problem is resolved, replace the fuse. If newly installed
fuses continue to blow, disconnect the power cable and contact your
autho-rized dealer or an authorized servicecenter.
Pull the two fuse cover in difference direction and open it.1.
Replace the broke fuse with good one, and close the fuse holder.2.
Be sure to use suggested fuse, or it might damage the radio.3.
GETTING ACQUAINTED
Front Panel
10 12
9 11
15
16
1 2 3 4
14
EMG
Install Microphone Hanger
Choose a ideal location which will not interfere the driver. Using
supplied self-tapping screws and pads(2 sets) to x the hanger
Install External Speaker
If use an external speaker, please choose 8 ohm speaker with
3.5mm mono band (doulbe cable) plug.
Locate the external speaker in a suitable place.1.
Plug into the speaker jack.2.
No.
Key Functions
1
MEM
2
MODE
3
BAND
4
FRQ
5
MENU
6
SCAN
7
DW
8
EMG
9
PWR
10
RFG
11
SQ
12
CLAR
13
VOL/OFF
14
CH
15
16
17
13
5 6 17 7 8
Use, store or delete memory channel
Switch mode: FM、AM、USB、LSB、PA
Switch band: A-I
Switch between channel mode and frequency mode
Function Menu key
Scan, Scan add, Scan delete
Dual-watch scan, Dual-watch setup
Emergy Channel; Keypad lock.
RF Power Control
RF Gain Control
Squelch Control
SSB Clarifier switch
Power On/Off; Volume Control.
Channel Switch, Push key.
RX/TX Indicator
Microphone Jack
LCD Display
Page 7
4
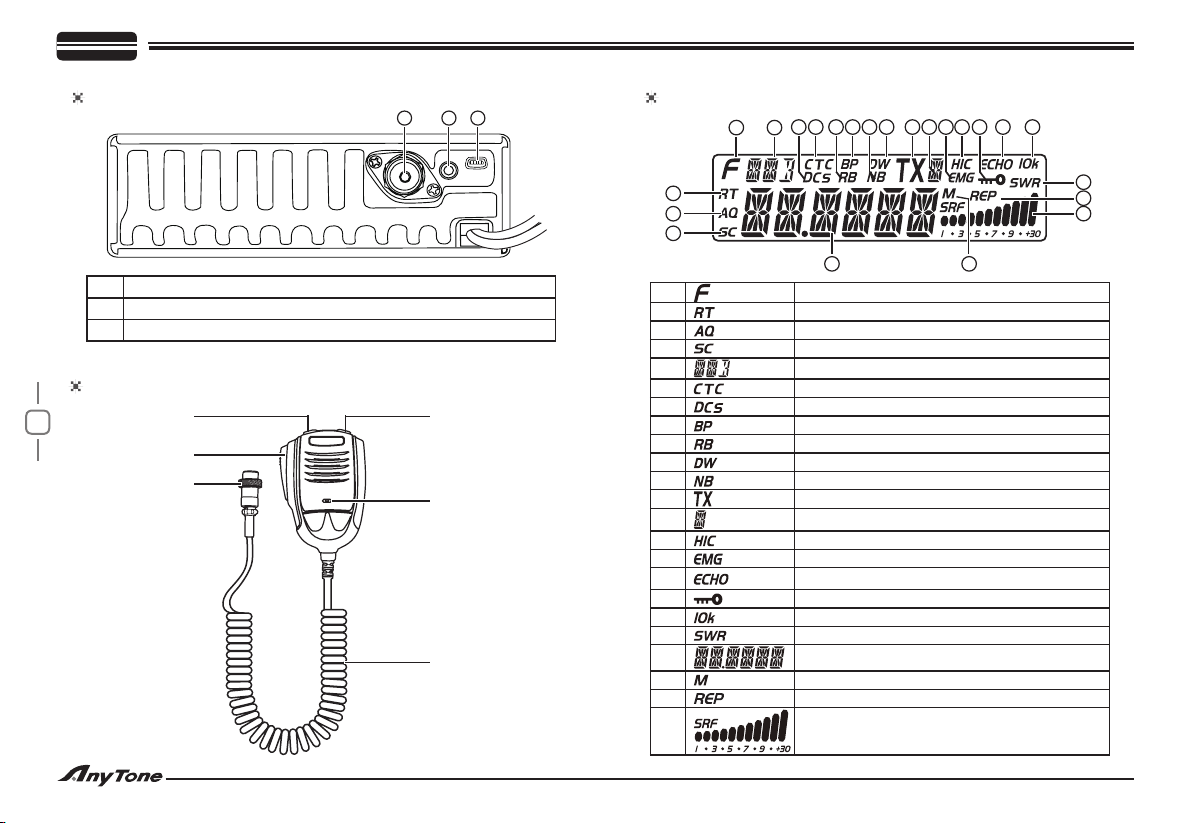
Rear Panel
20
18 PC Cable Jack
19 External Speaker Jack
20 Antenna Jack
Microphone
Channel Down Channel UP
PTT
Connector
18
19
ANT
EXT SP
DATA
Mic
Microphone cable
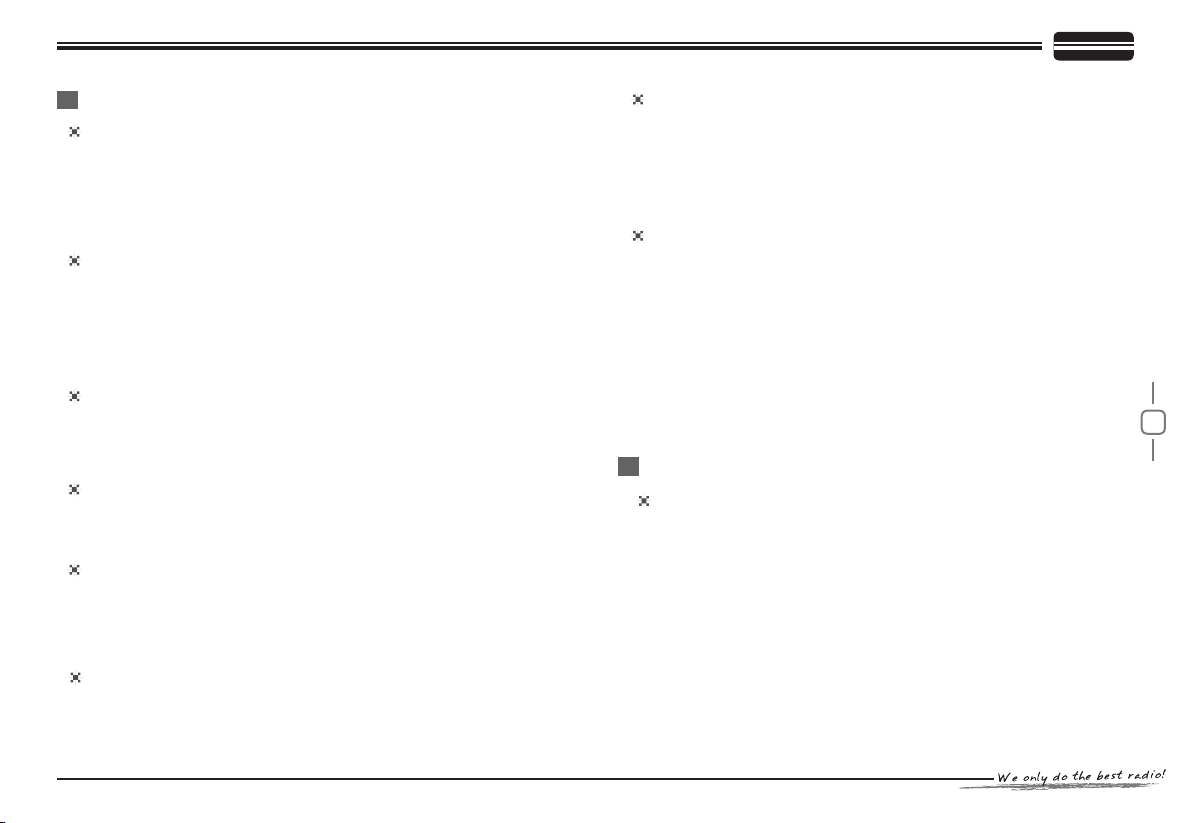
LCD Display
1 5
2
3
4
1
2
3
4
5
6
7
8
9
10
11
12
13
14
15
16
17
18
19
20
21
22
23
6 8 10 12 16 187 11 15 14 1713
9
20
21
Appears when press MENU key.
Appears when adjust SSB clarifier frequency.
Appears when use ASQ.
Appears during scan function.
Indication of working mode.
Appears when set with CTCSS code.
Appears when set with DCS code.
Appears when Beep voice is ON.
Appears when RB function is ON.
Appears when Dual-watch function is ON.
Appears when adjust Noise Blanker is ON.
Appears during transmiting.
Indiation of working band.
Appears when Hi-cut function is ON.
Appears when using Emergency channel.
Appears when Echo function is ON.
Appears when the Keypad lock function is ON.
Appears when +10Khz function is ON.
Indication of SWR level.
Display of frequency and channel.
Appears when using memory channels
Appears when repeater function is ON.
Display of TX/RX Signal strength.
19
22
23
Page 8
5
HOW TO USE YOUR RADIO
OFF/ON Radio
Turn VOL clockwise to switch on the radio, the radio emit a beep.1.
When the LCD displays frequency or channel, the radio is on.
Turn VOL anti-clockwise to switch off the radio, the radio is OFF 2.
when hear Ka Ta from the switch.
Volume Control
When the radio is turned on, turn VOL clockwise will increase the
volume, turn VOL anti-clockwise will reduce the volume. The LCD
displays VOL: XX (XX stands for the volume level, total 1-36 levels).
Note: Adjust the volume during communication to get suitable level.
RF Power Control
When the radio is transmitting, turn PWR outer shaft to adjust power.
Turn it clockwise to increase power, anti-clockwise to reduce power.
RF Gain Control
When the radio is receiving, turn RFG inner shaft to adjust RF gain.
Turn it clockwise to increase gain, anti-clockwise to reduce gain.
SQUELCH Control
When the radio is standby, turn SQ outter shaft clockwise to adjust
squelch level. The LCD displays SQ: XX. (XX stands for the squelch
level, total 1-36 levels).
SSB Clarier control
When the radio is transmitting or receiving, turn CLAR inner shaft to
adjust USB/LSB TX or RX frequency. Turn it clockwise to increase
frequency, anti-clockwise to reduce frequency.
Channel Selection
When radio in channel mode, turn channel knob to select desired
channel. Clockwise to increase, anti-clockwise to reduce channel.
Note: In channel display mode, each press【PUSH】key will
increase the frequency by 10 times of channel step size.
Frequency control
In frequency mode, press1.
PUSH】key, then you can adjust
【
frequency for present channel.
When the frequency is flashing, turn CH clockwise to increase 2.
frequency, anti-clockwise to reduce frequency.
When the frequency is flashing, press3.
PUSH】again to adjust
【
frequency step size.
KEYPAD FUNCTION
MEM
【
】
Using memory channel:
Short press1.
choose memory channel.M1-M6, Total 6 memory channels.
Short press2.
Store/Delete memory channel:
Store memory channel:1.
When the radio is not in memory channel mode, choose the
channel to be stored, and hold【MEM】enter storage mode,
the channel number ashes, Turn Channel switch to choose
the location to be stored (M1-M6), then hold【MEM】until the
ashing channel number disappear, the storage is done.
MEM】to enter memory channel, turn CH to
【
MEM】again to exit memory channel mode.
【
Page 9
6
Delete memory channel:2.
In channel mode, hold【MEM】for over 2 seconds, the memory
channel number flashes, turn the CH switch to choose the
memory to be deleted. Then hold【MEM】until the fl ashing
channel number disappear, the delete is done.
MODE
【
Short press【MODE】to choose mode FM-AM-USB-LSB-PA.
】
Add/delete scan list
In channel mode, Long press【SCAN】for over 2 seconds will add
or delete present channel from scan list.
When LCD displays "1. SC", present channel added to scan list.
When LCD does not displays "2. SC", present channel is not
added to scan list.
Note: This f un ction is equal the o peration in Channel data
function No.05 menu.
BAND
【
Short press【BAND】to choose band A-B-C-D-E-F-G-H-I.
【
Short press【FRQ】to switch between frequency display mode and
channel display mode.
【
【
】
FRQ
】
MENU
】
Short press1.
PUSH】 to enter channel function menu list.
【
Long press2.
Function menu.
SCAN
】
Scan function
Short press1.
the LCD.
In sca n m o de, Tur n Ch anne l sw itc h wi l l c h ang e sc a n 2.
direction.
Short press3.
MENU】, the top left of LCD display "F", Press
【
MENU】for 2 seco nds to en ter Back gro und
【
SCAN】to start scan function, "SC" ashes in
【
SCAN】again to exit scan.
【
【DW】
Dual-Watch function
Short press1.
Short press2.
Dual-Watch channel setup
Choose rst Dual-Watch channel.1.
Hold2.
【DW】
Turn Channel switch to choose second dual watch channel.3.
Long press DW again to store and exit.
EMG
【
】
Choose EMG channel:
Short press【EMG】 to use Emergency channel, LCD displays "EMG".
Short press1.
Short press2.
Short press3.
Keypad Lock Function:
Long press1.
Long press2.
Note: When this function is turned on, only PTT button is valid.
to turn on Dual watch, LCD displays "DW";
【DW】
again or press PTT to exit DW mode;
【DW】
for 2 seconds, LCD displays "DW";
EMG】once to choose CH9;
【
EMG】again to choose CH19;
【
EMG】thrice to return to last normal channel.
【
EMG】to lock keys, LCD displays "
【
EMG】again to unlock the keys.
【
";
Page 10
7
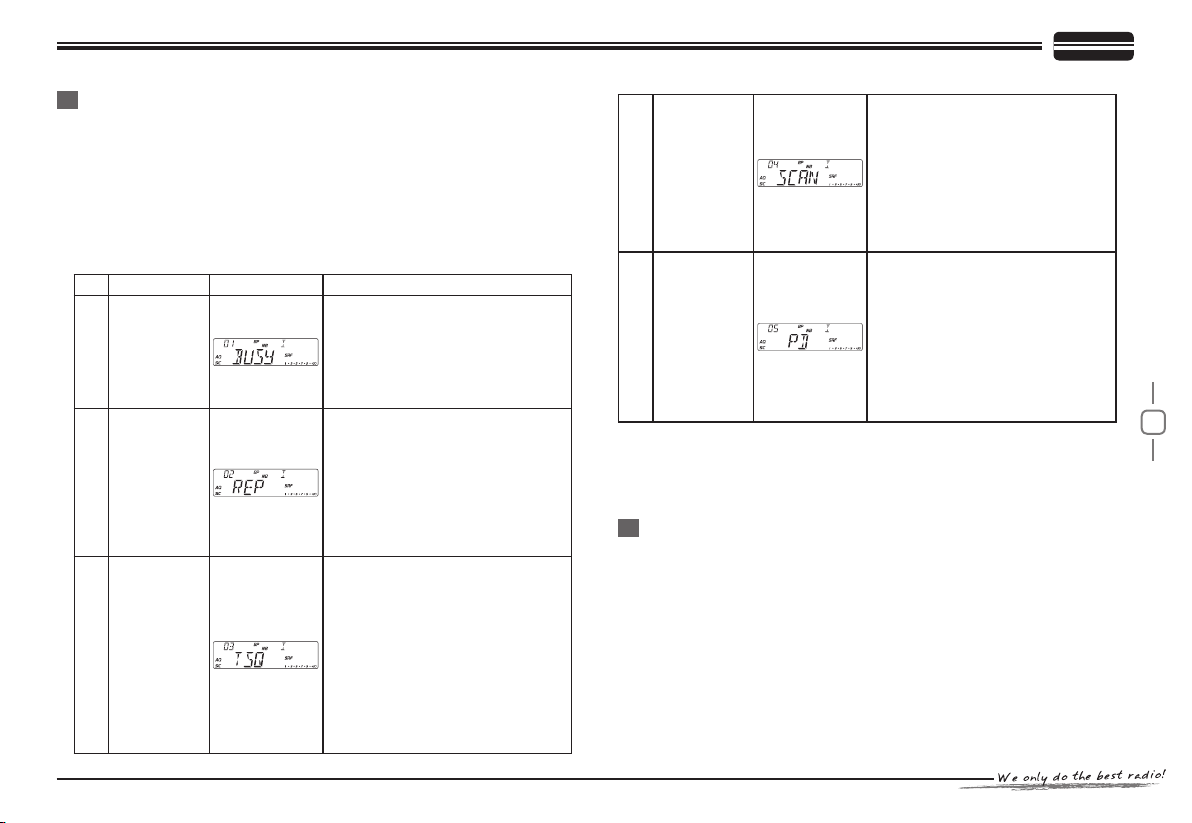
CHANNEL FUNCTION MENU OPERATION
Press1.
MENU】, the top left of LCD display "F", Press【PUSH
【
to enter menu list.
Turn Channel switch to nd No.1- No.5 menus.2.
Press3.
PUSH】to choose the menu.
【
Turn Channel switch to choose wanted value.4.
Press5.
PUSH】to return to previous menu, press any other key
【
or wait 5 seconds, the setting will be stored and exit.
No. Function LCD Display Values and Descriptions
OFF: Shut busy channel lockout
Busy Channel
1
Lockout
Offset
2
Direction
CTCSS/DCS
3
function;
ON: Open busy channel lockout
function;
Default: OFF.
REP+: Open offset direction
function, TX frequency> RX
frequency;
REP-: Open offset direction function,
RX frequency> TX frequency;
OFF: Shut offset direction function
Default: OFF.
CTCSS: 67.0~250.3Hz, Total 38
groups;
DCS: D023N~D754N, Total 104
groups;
OFF: Shut CTCSS/DCS code
function.
Default: OFF
Note: This function is available only
when install Optional CTC board.
】
Add/delete
4
Scan list
Public Data
5
ADD: LCD displays "SC", present
channel is added to scan list.
DEL: LCD does not display "SC",
present channel is not added
to scan list.
Default: OFF
OFF: Choose independent channel
menu;
ON: Choose public channel menu;
Default: ON
Note: If choose OFF, The hidden
channel menu 6-11 will appear.
This 6 menus are same as the
6 menus in Public data menus.
Note: Channel funciton menu is used to edit the setting for current
channel.
PUBLIC DATA FUNCTION MENU OPERATION
Hold1.
PUSH】for 2 seconds to enter menu list;
【
Turn Channel switch to nd menu 1-6;2.
Press3.
PUSH】to choose the menu;
【
Turn channel switch to choose wanted value.4.
Press5.
PUSH】to return to previous menu, press any other key
【
or wait 5 seconds, the setting will be stored and exit.
Page 11
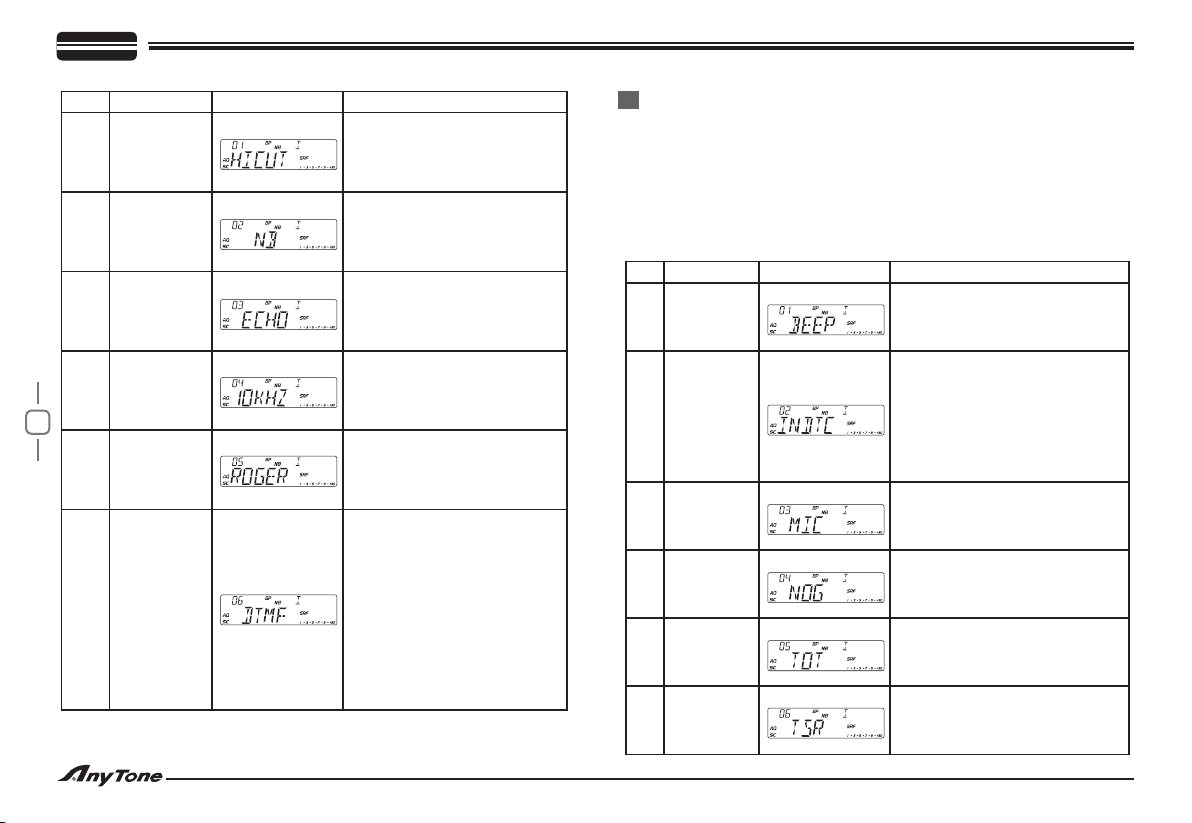
8
No. Function LCD Display Values and Descriptions
OFF: Shut HI-CUT function;
Hi-cut
1
NB/ANL
2
ECHO
3
10KHz
4
ROGER
5
DTMF PTT
6
ID
ON: Open HI-CUT function;
Default : OFF.
OFF: Shut NB/ANL function;
ON: Open NB/ANL function;
Default : ON.
OFF: Shut ECHO function;
ON: Open ECHO function;
Default : OFF
OFF: Shut +10KHz function;
ON: Open +10KHz function;
Default: OFF
OFF- 5, Total 6 groups.
Default: OFF,Off means shut
off Roger.
BOT: Press PTT to send DTMF
encode;
EOT: Release PTT to send
DTMF encode;
CALL: Hold PTT+EMG to send
DTMF encode;
Note: If the M1-M16 storage
has no PTT ID, DTMF function
is defaulted OFF. Users able to
choose the DTMF group only
when programmed with code.
Note: Public function menu offer one-time setting for all channels.
BACKGROUND FUNCTION MENU OPERATION
Hold1.
MENU】for 2 seconds to enter menu list;
【
Turn Channel switch to ind menu No.1 to No.15;2.
Press3.
PUSH】to choose the menu;
【
Turn channel switch to choose wanted value;4.
Press5.
PUSH】to return to previous menu, press any other key
【
or wait 5 seconds, the setting will be stored and exit.
No. Function LCD Display Values and Descriptions
1 BEEP
LCD display
2
in TX mode
3 Mic Gain
Monitor
4
Gain
5 TOT
SWR
6
Protection
OFF: Shut BEEP function;
ON: Open BEEP function;
Default: ON.
OFF: Displays TX frequency when
TX;
SWR: Displays SWR value when TX
TOT: displays TOT remain time
when TX;
DC: Displays voltage when TX;
Default: OFF.
1-36, Total 36 levels available.
Default: 30.
1-32, OFF, Total 33 levels
available;
Default: OFF (Shut NOG function)
1-600s, OFF, Total 10minutes
available;
Default: 180S (Shut TOT function)
OFF: Shut SWR function;
ON: Open SWR function;
Default: ON
Page 12
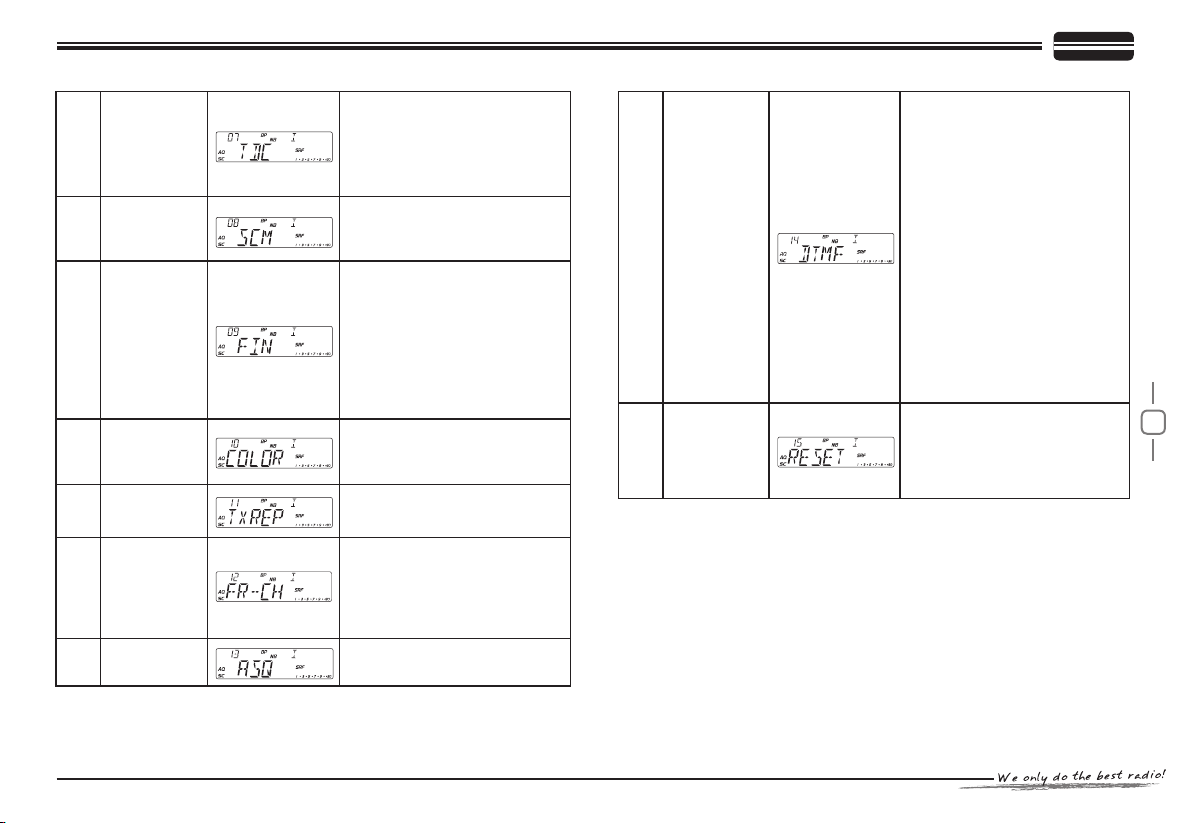
9
Voltage
7
Protection
8 Scan Type
9 Clarier
10 Backight
REP
11
frequency
OFF: Shut voltage protection
function;
ON: Open voltage protection
function;
Default: ON
SQ: SQ scan function;
TI: Time scan function;
Default: SQ
OFF: Shut frequency adjustment
R: Open RX frequency
adjustment;
T: Open TX frequency
adjustment;
RT: Open TX/RX frequency
adjustment;
Default: R
WHITE,BLUE,GREEEN,
YELLOW, RED,PURPLE,CYAN
Default: WHITE
Frequency Range: 100Hz-5MHz
Default: 100KHz
DTMF
14
Encode
15 Reset
S TIME: DTMF transmit time;
FDELAY: First digital time;
C TIME: Pre-carrier time;
*# TIME: *and # delay time;
D CODE: D code setting time;
TXDIS: Display setting for DTMF
transmit;
MEM: DTMF encode storage
list;
Note: In the DTMF encode
storage list (M1-M16), press
PUSH to edit DTMF code, then
turn channel knob to choose
desired value, press PUSH
again to edit next list, after nish
setting, hold PUSH to store it
and back to main menu.
OPT: All function setup resume
default;
ALL: All channels and setup
resume default;
Default: OPT
12
13
Channel
Switch Setup
ASQ level
CHAN: Choose to adjust channel
FREQ: Choose to adjust
frequency
Default: FREQ
01-09, total 9 level available
Default: 05
Page 13
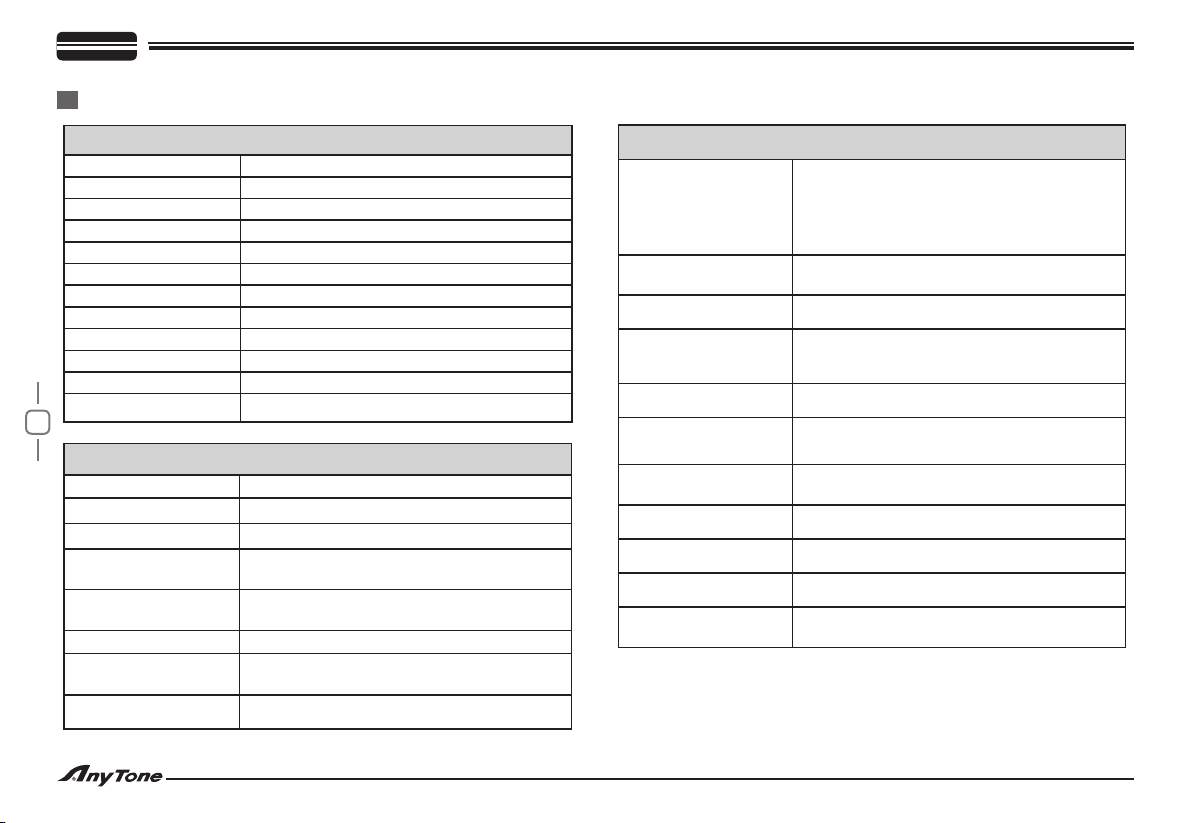
SPECIFICATIONS
GENERAL
Frequency Range 28.000-29.700MHz(Programmable)
Frequency Band A/B/C/D/E/F/G/H/I
Channel 40channels(programmable)in each band
Frequency Control Phase-Locked-Loop Synthesizer
Frequency Step 100Hz、1KHz、10KHz、100KHz、1MHz
Frequency Tolerance ±5.0 ppm
Temperature Range -20℃to +50℃
Microphone with push-to-talk /UP/DN and coiled cord
Input Voltage 13.8V
Dimensions (in mm) 245(L) x 158(W) x 48(H)
Weight 1.5kg
Antenna Connector UHF,SO239
10
TRANSMITTER
Power Output AM: 15W / FM:45W / SSB: 60W(PEP)
Drain 12A(with modulation)
Modulation FM/AM/USB/LSB
Inter-modulation
Distortion
SSB Carrier
Suppression
Unwanted Sideband 50dB
Frequency Response
Output Impedance 50ohms, unbalanced
SSB: 3rd order, more than -25dB; 5th order,
more than -35dB
55dB
AM/FM: 300 to 3000Hz
SSB: 450 to 2500Hz
RECEIVER
SSB: 0.25μV for 10dB(S+N)/N
Sensitivity
Adjacent-Channel
Selectivity
Image Rejection More than 65dB
IF Frequency
RF Gain Control 45dB adjustable for optimum signal reception
Automatic Gain
Control(AGC)
Squelch
Audio Output Power 3 watts into 8 ohms
Frequency Response AM/FM: 300 to 3000Hz SSB: 450 to 2500Hz
Built-in Speaker 8 ohms, round.
External Speaker(Not
Supplied)
AM:1.0μV for 10dB(S+N)/N
FM: 1.0μV for 20 dB (S+N)/N
(All at greater than 1/2 watt of audio output)
AM/FM: 60dB SSB: 70dB
AM/FM: 10.695MHz 1st IF, 455KHz 2nd IF
SSB: 10.695MHz
Less than 10dB change in audio output for
inputs from 10 to 100,000 microvolt.
Adjustable; threshold less than 1.0μV.
Automatic Squelch Control(only AM/FM)1.0μV
8 ohms; disables internal speaker when
connected.
 Loading...