

Page 1
SURFACE STEAMER
Testing & Certification
ITS
geprufte
Sicherheit
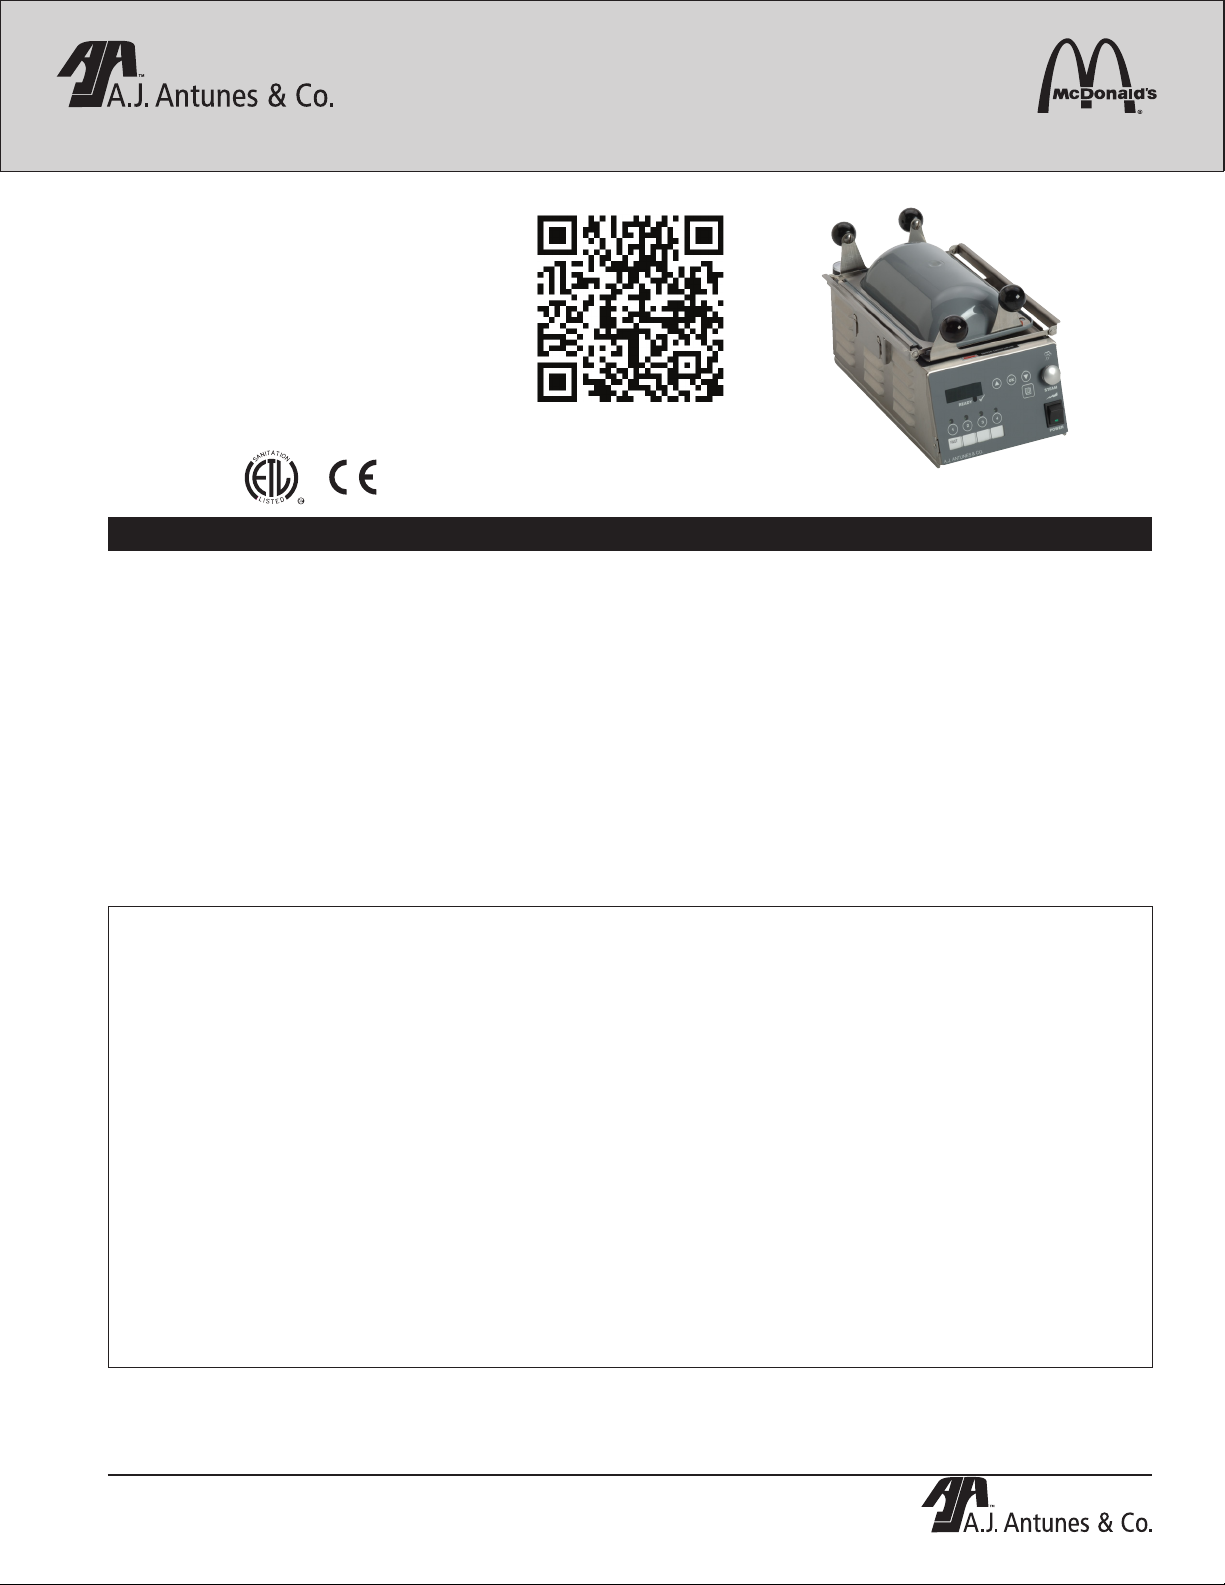
MODEL SS-200TT
Manufacturing Number 9100907 & 9100908
A.J. Antunes & Co.
Place this manual in the Toaster section
of your Equipment Manual.
Manufactured exclusively for
McDONALD’S®
BY
A.J. ANTUNES & CO.
180 KEHOE BLVD.
CAROL STREAM, ILLINOIS 60188, U.S.A.
PHONE: 1-630-784-1000
TOLL FREE: 1-877-392-7854
FAX: 1-630-784-1650
www.ajantunes.com
A
T
T
I
I
O
N
N
A
S
L
CM
D
I
S
E
T
TABLE OF CONTENTS
Owner Information .....................................................2
General ......................................................................2
Warranty Information .................................................2
Service/Technical Assistance ...................................2
Specifications .............................................................3
Dimensions ................................................................3
Electrical Ratings and Plug Configuration .................3
Important Safety Information ....................................4
Installation ...................................................................5
Unpacking ..................................................................5
Equipment Setup .......................................................6
SS-200 & SS-400
Scan with mobile device or enter URL
for product and service information.
http://tiny.cc/ajaprodSS
SURFACE STEAMER SS-200TT
Installing the Surface Steamer ..................................6
Connecting a Water Pressure Regulator ...................6
Operating Instructions ...............................................7
Programming ..............................................................8
Programming the Surface Steamer ...........................8
Maintenance ................................................................9
Daily Cleaning ...........................................................9
Quarterly Cleaning (or as needed) ..........................10
Troubleshooting .......................................................11
Wiring Diagrams .......................................................14
Replacement Parts ...................................................15
Notes..........................................................................17
LIMITED WARRANTY
The Antunes Food Service Equipment Division of A.J. Antunes & Co. provides the following limited warranty to the original purchaser of all McDonald’s Equipment.
All components are warranted against defects in the material and workmanship for a period of two (2) years from date of original installation.
If any part becomes defective during period of this Warranty, Antunes Food Service will pay negotiated straight time labor costs to an Authorized Service Agent to
replace the part, plus travel expenses up to 50 miles/80 km, 1 hour each way (100 miles/160 km, 2 hours round trip).
WARRANTY EXCLUSIONS
• The cost of Installation.
• Equipment that has been damaged due to shipment. Purchaser should
make damage claim directly upon carrier.
• Alteration, misuse, abuse.
• Improper storage or handling.
• Improper maintenance.
• Failure to follow proper Installation instructions, including electrical connection.
• Improper or unauthorized repairs.
Antunes Food Service reserves the right to make changes in design or add improvements on any products. The right is always reserved to modify Equipment
because of factors beyond our control and government regulation. Changes to Equipment do not constitute a warranty charge.
This warranty is exclusive and is in lieu of all other warranties, expressed or implied, including any implied warranty of merchantability or fitness for a particular purpose, each of which is expressly disclaimed. The remedies described above are exclusive, and in no event shall A.J. Antunes & Co. or any of its Divisions be liable
for special consequential or incidental damages for the breach or delay in the performance of this warranty.
This manual is for the exclusive use of licensees and employees of McDonald’s Systems, Inc.
© McDonald’s Corporation All Rights Reserved
P/N 1011072 Rev. H 12/13
McDonald’s
• Scheduled Maintenance procedures as outlined in your MRC Card.
• This Warranty does not cover Consumable items.
• Water pressure problems or contamination problems such as foreign material
in water lines or inside solenoid valves due to an incoming water source.
• Overtime or Holiday charges.
• Mileage over 50 miles/80 km (100 miles/160 km round-trip), or travel time
over two (2) hours.
• Freight, foreign, excise, municipal or other sales or use taxes.
• Consequential damages such as loss of profit, loss of time, the cost of repairing or replacing other property which is damaged, or any other incidental
damage of any kind.
1
Page 2
SURFACE STEAMER SS-200TT
OWNER INFORMATION
General
This manual is produced for the Surface Steamer.
The Surface Steamer is designed for the quick steaming
and heating of buns. This design allows the operator to
place buns on both sides of Surface Steamer at the same
time. Water is superheated into steam, which penetrates
the bun to heat it quickly and efficiently.
This manual provides the safety, installation, and operating
procedures for the Surface Steamer. We recommend that
this manual be read prior to installing and operating the
unit.
SERVICE/TECHNICAL ASSISTANCE
If you experience any problems with the installation
or operation of your unit, contact A.J. Antunes & Co.
Technical Support at 1-877-392-7854.
Fill in the information below and have it handy when
calling your Authorized Service Agency for assistance.
The serial number is on the specification plate located
on the side of the unit.
Purchased From:
Date of Purchase:
Model No.:
Serial No.:
The Surface Steamer is manufactured from the finest
materials available and is assembled to Roundup’s strict
quality standards. This unit has been tested at the factory
to ensure dependable trouble-free operation.
Warranty Information
Please read the full text of the Limited Warranty in this
manual. If the unit arrives damaged, contact the carrier
immediately and file a damage claim with them. Save all
packing materials when filing a claim. Freight damage
claims are the responsibility of the purchaser and are not
covered under warranty.
Refer to the service agency directory packaged with
your manual and fill in the information below:
Authorized Service Agency
Name:
Phone No.:
Address:
Use only genuine Roundup replacement parts in this
unit. Use of replacement parts other than those supplied by the manufacturer will void the warranty. Your
Authorized Service Agency has been factory trained
and has a complete supply of parts for this toaster.
Mfg. No.:
WARNING
ELECTRICAL SHOCK HAZARD. FAILURE TO
FOLLOW THE INSTRUCTIONS IN THIS MANUAL
COULD RESULT IN SERIOUS INJURY OR DEATH.
• Electrical ground is required on this appliance.
• Do NOT modify the power supply cord plug. If
it does not fit the outlet, have a proper outlet
installed by a qualified electrician.
• Do NOT use an extension cord with this unit.
• Check with a qualified electrician if you are
unsure if the appliance is properly grounded.
IMPORTANT! Keep these instructions for future reference. If the unit changes ownership,
be sure this manual accompanies the equipment.
You may also contact the factory at 1-877-392-7854
(North America only), or 630-784-1000 if you have trouble locating your local Authorized Service Agency.
To locate your nearest International Authorized Service
Agency: log onto the McDonald’s web site: www.
mcdonalds.com and follow the on-screen directions.
CAUTION
All electrical connections must be in accordance
with local electrical codes and any other applicable codes.
2
P/N 1011072 Rev. H 12/13
McDonald’s
Page 3

Dimensions
A
SURFACE STEAMER SS-200TT
SPECIFICATIONS
B
WITHOUT BUN CAP & FLIPPER ASSEMBLY
Model &
Mfg. No.
SS-200TT
9100907 &
9100908
Width
(A)
8"
(203 mm)
Depth
(B)
7 1/4"
(184 mm)
Height
(C)
17 3/8”
(441 mm)
Electrical Ratings and Plug Configuration
Model &
Mfg. No.
SS-200TT
9100907
SS-200TT
9100908
P/N 1011072 Rev. H 12/13
McDonald’s
Volt Watts Amps Hz Plug Description
230 2400 10.4 50/60
208 2400 10.4 50/60 20 Amp. Pin & Sleeve
C
Plug
Configuration
IEC-309, 16 Amp., 250 Volt
Pin & Sleeve
(Assembly only)
P/N 0700437
3
Page 4
SURFACE STEAMER SS-200TT
IMPORTANT SAFETY INFORMATION
Throughout this manual, you will find the following safety words and symbols that signify important safety
issues with regards to operating or maintaining the equipment.
WARNING
GENERAL WARNING. Indicates information
important to the proper operation of the equipment. Failure to observe may result in damage
to the equipment and/or severe bodily injury or
death.
CAUTION
GENERAL CAUTION. Indicates information important to the proper operation of the equipment.
Failure to observe may result in damage to the
equipment.
In addition to the warnings and cautions in this manual,
use the following guidelines for safe operation of the unit:
• Read all instructions before using equipment.
• For your safety, the equipment is furnished with
a properly grounded cord connector. Do NOT
attempt to defeat the grounded connector.
• Install or locate the equipment only for its intended use as described in this manual. Do NOT use
corrosive chemicals in this equipment.
• Do NOT operate this equipment if it has a damaged cord or plug, if it is not working properly, or
if it has been damaged or dropped.
• This equipment should be serviced by qualified
personnel only. Contact the nearest Authorized
Service Agency for adjustment or repair.
• Do NOT block or cover any openings on the unit.
• Do NOT immerse cord or plug in water.
• Keep cord away from heated surfaces.
• Do NOT allow cord to hang over edge of table or
counter.
• Do NOT clean the unit with a water jet.
• Do NOT submerse the unit in SolidSense
Sanitizer or water.
WARNING
ELECTRICAL WARNING. Indicates information
relating to possible shock hazard. Failure to
observe may result in damage to the equipment
and/or severe bodily injury or death.
WARNING
HOT SURFACE WARNING. Indicates information
important to the handling of equipment and parts.
Failure to observe may result in personal injury.
The following warnings and cautions appear throughout
this manual and should be carefully observed.
• Turn the power off, disconnect the power source,
and allow unit to cool down before performing any
service or maintenance.
• The procedures in this chapter may include the
use of chemical products. These chemical products will be highlighted with bold face
letters followed by the abbreviated HCS (Hazard
Communication Standard). See Hazard
Communication Standard manual for the appropriated Material Safety Data Sheets (MSDS).
• The equipment should be grounded according to
local electrical codes to prevent the possibility of
electrical shock. It requires a grounded receptacle with separate electrical lines, protected by
fuses or circuit breaker of the proper rating.
CAUTION
All electrical connections must be in accordance
with local electrical codes and any other applicable codes.
This appliance is not intended for use by persons
(including children) with reduced physical, sensory or
mental capabilities, or lack of experience and knowledge, unless they have been given supervision or
instruction concerning use of the appliance by a person
responsible for their safety.
Children should be supervised to ensure that they do
not play with the appliance.
4
P/N 1011072 Rev. H 12/13
McDonald’s
Page 5
INSTALLATION
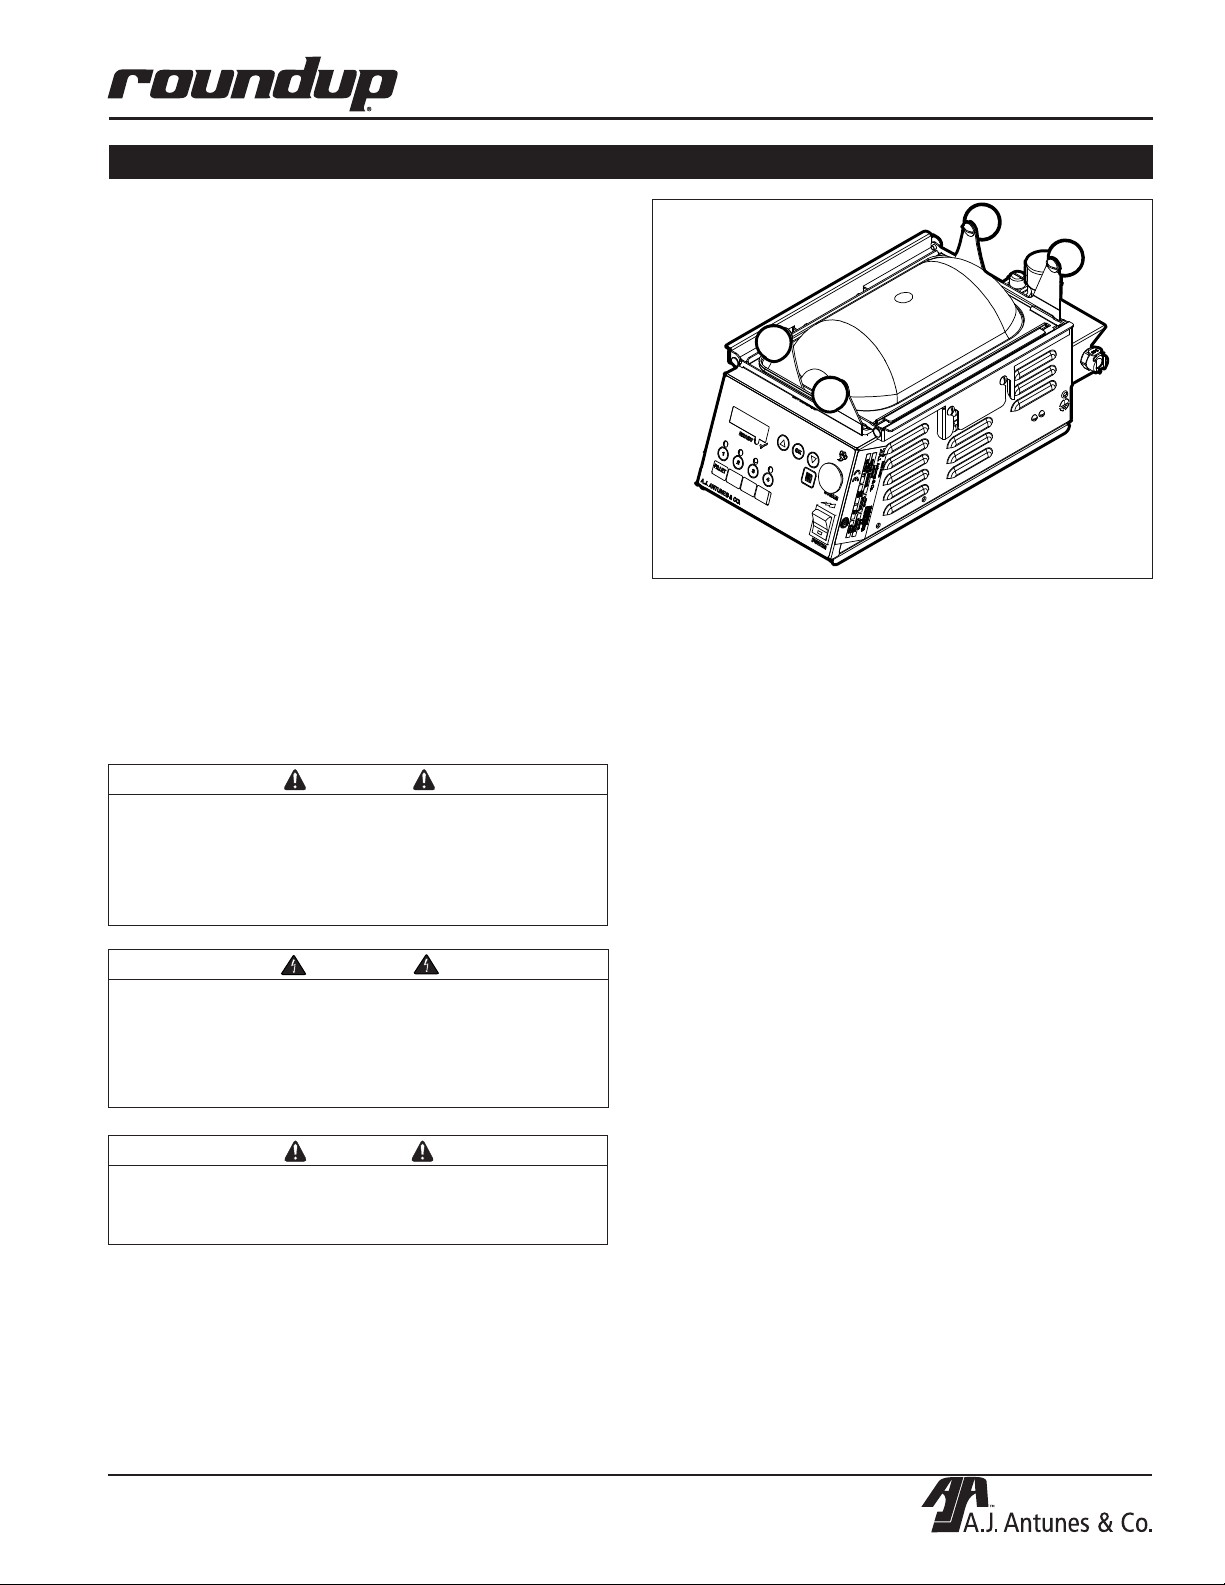
Unpacking
1. Remove unit and all packing materials from
shipping carton. The main carton should contain:
• Surface Steamer unit (Figure 1)
• Water Regulator
2. Remove all packing materials and protective
coverings from the unit and parts.
NOTE: If any parts are missing or damaged, contact
A.J. Antunes Technical Service IMMEDIATELY at
1-877-392-7854 (North America only), or 630-784-
1000.
3. Remove and wash the Steamer Mesh Covering
at the three compartment sink, and allow the unit
to air dry.
4. Wipe down the unit with a clean damp cloth and
allow to air dry.
SURFACE STEAMER SS-200TT
Figure 1. SS-200TT Surface Steamer
5. Re-install the Steamer Mesh Covering.
CAUTION
This equipment is to be installed to comply with
the basic plumbing code of the Building Officials
and Code Administrators, Inc. (BOCA) and the
Food Service Sanitation Manual of the Food and
Drug Administration (FDA).
WARNING
For a replacement power cord, use manufacturersupplied Type Y attachment with specially prepared
cord. It must be replaced by the manufacturer, its
service agent, or a similarly qualified person in
order to avoid a hazard.
CAUTION
All electrical connections must be in accordance
with local electrical codes and any other
applicable codes.
P/N 1011072 Rev. H 12/13
McDonald’s
5
Page 6
SURFACE STEAMER SS-200TT
INSTALLATION (continued)
Equipment Setup
When placing the steamer into service, pay attention to
the following guidelines.
• Make sure power is off and the unit is at room
temperature.
• Do NOT block or cover any openings on the unit.
• Do NOT immerse the cord or plug in water.
• Keep the cord away from heated surfaces.
• Do NOT allow the cord to hang over edge of table
or counter.
Installing the Surface Steamer
1. Be sure to place the Surface Steamer onto the
Prep Surface so that the Bun Cap and Flipper
open in the direction of food prep flow.
2. Ensure that the line voltage corresponds to the
stated voltage on the unit’s specification label and
power cord warning tag.
3. Plug the power cord into the appropriate outlet.
NOTE: Route the power cord in a safe manner so
that it is out of the way. Ensure the power cord is
away from the housing to prevent damage.
Connecting a Water Pressure Regulator
The Surface Steamer requires the use of a Water
Pressure Regulator (included) set to 10 PSI. Follow
these steps to install the Water Pressure Regulator.
1. Turn off the water valve (not supplied) that supplies water to the unit.
2. Connect the water source to the Quick Disconnect
closest to the regulator.
3. Turn the water valve on.
4. Hold the other Quick Disconnect over a bucket,
then press and hold the white plastic tip until
there’s a good, steady water flow. This purges all
air out of the line.
5. Release the plastic tip and check the pressure on
the Water Pressure Regulator. It should read 10
PSI.
a.) If it reads less, increase the water pressure by
loosening the locknut and turning the knob clockwise.
b.) If it reads more, decrease the water pressure
by loosening the locknut and turning the knob
counter clockwise.
NOTE: When adjusting the knob, you must relieve
the existing pressure by pressing the white plastic
tip on the Quick Disconnect Insert for 3 seconds.
The Water Pressure Regulator will then show the
new pressure.
6. Once the regulator reads 10 PSI, secure the locknut to lock it in place.
7. Push the Quick Disconnect Insert into the fitting
on the unit it clicks.
NOTE: Incoming water is controlled by a normally
closed (NC) solenoid valve located inside the
Steamer’s electrical housing.
CAUTION
Inlet water line pressure should be between 20 PSI
(137 kPa) and 35 PSI (241 kPa). The water pressure
regulator must be set to 10 PSI (69 kPa). Higher
water pressure may cause poor performance
or flooding. It is recommended to use Reverse
Osmosis water for better performance of unit and
reduced PM.
CAUTION
Do NOT re-use old hose sets with the SS-200.
Only use new hose sets with the unit.
6
P/N 1011072 Rev. H 12/13
McDonald’s
Page 7

OPERATION
Operating Instructions
1. Turn the power on and allow the unit to heat up.
NOTE: The display indicates “LO” until the preset
operating temperature is reached. Once the unit is
heated up, the unit displays the cycle time.
2. When the unit is ready, select the desired steam
channel by pressing the appropriate button for
that channel.
3. Open the Bun Cap and place the heel and crown
cut side down onto Flipper. Close the Bun Cap.
4. Press the Activation button to begin a steam
cycle. The display counts down to zero and an
audio sound signals the end of the cycle.
NOTE: A new cycle cannot be started until the
audio signal is finished. To adjust the number
of repetitions of the audio signal, see the
Programming section of this manual.
SURFACE STEAMER SS-200TT
CAUTION
Buns will be hot after steaming! Lift the Flipper to
remove buns. Use caution to avoid burns.
OK
Unit
Display
Channels 1
through 4
Up
Arrow
Button
READY
1 2 3 4
Program
Button
Figure 2. Primary Control Panel View
Button
OK
Down
Arrow
Button
STEAM
POWER
Steam
Activation
Button
Power
Button
4. Open the Bun Cap and then lift the Flipper to
remove the buns from the steam area.
5. Complete the assembly of the sandwich.
Open Bun Cap and Place
Buns on Flipper.
Close Bun Cap and Press
the Activation Switch to Steam.
Figure 3. Steaming Buns
NOTE: The steamer returns to the default program
channel of #1 (See Figure 3) after completing a
steam cycle. For example, If you run a steam cycle
on channel 4, the steamer returns to channel 1 once
the steam cycle completes.
When Steam Cycle ends, open
Bun Cap, and Flip the Buns
into Sandwich Box as shown.
P/N 1011072 Rev. H 12/13
McDonald’s
7
Page 8

SURFACE STEAMER SS-200TT
PROGRAMMING
Programming the Surface Steamer
1. Press and hold the PROGRAM button until “CYC”
appears on the display (Figure 5) then release the
Program button.
2. Press the OK button. The unit displays the cur-
rently programmed cycle time.
3. Press the UP or DOWN arrow buttons to increase
or decrease the cycle time in one second increments (from 1 to 60). Release all buttons at the
desired setting. Then press the PROGRAM button
to save changes.
NOTE: To save Programming changes, be sure to
press the PROGRAM button (Figure 5) as soon as
changes are made.
NOTE: During programming mode, the display
returns to operation mode after 5 seconds of
inactivity.
4. To program values listed in Table 1, repeat Step 1
but press UP until the desired value is displayed.
Then press OK and use the UP or DOWN arrows
to adjust . Press the PROGRAM button to save
changes, press the UP or DOWN arrow buttons
to move to the next value (Table 1).
Table 1 describes programmable features and parameters of the Surface Steamer: All four steam channels
are programmed to these default values at the factory.
OK
Unit
Display
Channels 1
through 4
READY
1 2 3 4
Up
Arrow
Button
Program
Button
Button
OK
Down
Arrow
Button
STEAM
POWER
Steam
Activation
Button
Power
Button
Figure 4. Primary Control Panel View
Factory Resets
Follow these steps to restore the system to the factory
preset setting
1. Turn the power switch OFF.
2. Press and hold the UP and DOWN arrow buttons
simultaneously and turn the power switch ON.
3. Do not release the buttons until after 3 seconds.
Generator Temperature
To view the actual temperature for the front generators,
press and hold the UP arrow button.
To view the actual temperature for the rear generators,
Default Values
press and hold the DOWN arrow button.
Value Description Defaults
CYC
SHOT
Length of the steam cycle in seconds. Available ranges are from 1 to .60 seconds
adjustable in 1 second increments.
Regulates the amount of water volume injected at each solenoid valve opening. A higher value equals more water; a lower value equals less water. Available ranges are .05
12 seconds
0.20
to 1.00 seconds adjustable in .05 second increments.
Intr
SETP
RPT
DEGF/
DEGC
Interval - Time between injections of water. Available ranges are 0 to 10 seconds in
increments of 1 second.
Setpoint temperature of the unit. Available ranges are 350 F (176ºC) to 400ºF (204ºC).
Increments: 1
Repeat - Number of times the audio signal repeats at the conclusion of a steam cycle
(1 to 255). Increments: 1
Allows the user to select whether the unit displays temperatures in degrees Fahrenheit
or Celsius.
4
400
2
DEG F
Table 1. Programmable Features
8
P/N 1011072 Rev. H 12/13
McDonald’s
Page 9

SURFACE STEAMER SS-200TT
MAINTENANCE
WARNING
Turn the power off, unplug the power cord, and
allow the unit to cool down before performing any
service or maintenance.
Daily Cleaning
1. Turn off unit. Turn the steamer’s power switch to
the off position. Unplug the power cord from the
outlet. Allow the unit to cool down for 30 minutes.
NOTE: Daily Cleaning should be performed after
close or during the breakfast menu (for 24-hour
stores).
2. Clean the Bun Caps. Open the Bun Caps. Clean
both sides of the Bun Caps with a clean, sanitized towel sprayed with EXCEED. Wipe the Bun
Caps with a clean, sanitized towel sprayed with
SolidSense Sanitizer Solution.
NOTE: Do NOT use no-scratch pads or steamer
brushes on plastic parts.
3. Clean the Flipper. Open the Flipper. Clean both
sides of the Flipper with a clean, sanitized towel
sprayed with EXCEED. Wipe the Flipper with a
clean, sanitized towel sprayed with SolidSense
Sanitizer solution. If required, use a no-scratch
pad to clean the flipper.
4. Remove and clean the steamer Heat Shield
Pad. Remove the steamer Heat Shield Pad.
Clean one side of the pad with a clean, sanitized
towel sprayed with EXCEED. Next, wipe the
steamer Heat Shield Pad with a clean sanitized
towel sprayed with SolidSense Sanitizer. Repeat
this step on the other side of the steamer Heat
Shield Pad.
CAUTION
Clean the Steam Generators with a damp paper
towel only. Do NOT use oily or dirty towels,
5. Clean the Steam Generators and Diffusers. Put
on neoprene gloves. Remove the diffusers. Clean
the Steam Generators with a paper towel dampened with water. Make sure all crumbs and seeds
are removed from the generators. Clean the
diffusers with a clean, sanitized towel sprayed
with EXCEED. Wipe the diffusers with a clean,
sanitized towel sprayed with SolidSense Sanitizer.
OK
READY
1
A.J. ANTUNES & CO.
2
3
Power Switch
(On/Off)
STEAM
4
POWER
Figure 5. Control Panel and Power Switch
Heat Shield
Pad
Diffusers
Flipper
Steam
Generators
Top
Steamer
Surface
Bun Cap
Figure 6. Cleaning the Steamer
6. Clean the top steamer surface. Wipe the top
steamer surface with a clean, sanitized towel
sprayed with EXCEED. Wipe the top steamer
surface with a clean, sanitized towel sprayed with
SolidSense Sanitizer.
7. Clean outside of steamer. Wipe the entire out-
side of the steamer with a clean, sanitized towel
sprayed with EXCEED. Wipe the entire outside of
the steamer with a clean, sanitized towel sprayed
with SolidSense Sanitizer.
8. Install the steamer Heat Shield Pad and
Diffusers. Place the steamer Heat Shield Pat
on top of the steamer, reversing sides. Place the
Diffusers into the Steam Generators.
9. Close the Flipper and Bun Caps. Close the
Flipper and Bun Caps.
P/N 1011072 Rev. H 12/13
McDonald’s
9
Page 10

SURFACE STEAMER SS-200TT
MAINTENANCE (continued)
QUICK RECOVERY FOR POOR STEAM OUTPUT
The SS-200 uses an open Heat/Steam Generator.
Water sprayed onto the Generator surface flashes into
steam immediately, but the minerals in the water stay
on the Generator surface. A small amount of mineral
deposits are needed for proper operation, but excessive
deposits cause poor steaming efficiency and excessive
moisture, which eventually hinders the steam action.
If the unit is not steaming correctly, follow this procedure to improve steaming quality.
1. Pour 59 ml (2 ounces) of tap water into a clean
beverage cup.
2 Pour the water into both Steam Generators and
let it boil off.
NOTE: If needed, repeat steps 1 and 2 a few times.
This should result in a fine covering of minerals on the
steam generator.
Quarterly Cleaning (or as needed)
Check the steamer each quarter to ensure the generators are properly seasoned and the unit is operating
correctly. Over time, product spills may hinder steaming. Follow these steps to ensure the steamer is working properly.
1. Check for proper operation. Turn the unit on
and let it warm up. Steam 2 or 4 buns. If the unit
steams the buns correctly, you do not need to
continue. If the buns are not steamed correctly,
continue with this procedure.
2. Turn off unit. Turn the steamer’s power switch to
the off position. Unplug the power cord from the
outlet. Allow the steamer to cool for at least 30
minutes.
3. Open the Bun Caps, Flipper, and remove the
steamer Heat Shield Pad. Open the Bun Caps
and Flipper. Remove the Steamer Heat Shield
Pad. Replace the Heat Shield Pad if torn.
4. Wipe down the steam generators. Put on neo-
prene gloves. Remove the diffusers. Wipe the
Steam Generators with a paper towel dampened
with water. Be sure to remove all crumbs and
seeds from the steam Generator.
5. Turn the unit on. Plug the power cord into the
outlet. Turn the unit on and let it warm up.
6. Season the Steam Generators if too Silver. Fill a
clean beverage cup or any clean container with tap
water. Put on neoprene gloves carefully pour a small
amount of the water into the steam generators.
Allow the water to boil off. Do not press any buttons.
Repeat this step as needed.
NOTE: The water heats up quickly as it boils off.
Use caution.
7. Test the unit. Press the activation button to run a
steam cycle. If the unit does not steam correctly,
repeat steps 6 and 7. If the unit still does not
steam correctly, contact your Authorized Service
Agency. Turn the unit off when there is no more
water in the Steam Generators.
8. Turn off unit. Turn the unit off when there is no
more water in the steam generators.
NOTE: Once seasoned, the steam generators will
have a thin covering of minerals. This is required
for proper steaming.
9. Wipe down the unit. Put on neoprene gloves.
Wipe down the top steam surface and entire
exterior of the unit with a clean towel sanitized
with an egg,
10. Install the steamer Heat Shield Pad and
Diffusers. Place the steamer Heat Shield Pad on
the top of the steamer, reversing sides. Place the
diffusers in the generators.
11. Close the Flipper and Bun Caps. Close the
Flipper and Bun Caps.
CLEANING THE WATER INLET TUBE(S)
Follow this procedure as needed if the Water Inlet
Tubes become clogged.
1. With the unit cool, insert a straightened paper clip
into the Water Inlet Tube opening no more than
1 1/2 inches deep (Figure 7).
2. Turn the unit on and allow it to warm up.
3. Run two or three steam cycles to force out any
obstructions from the tube.
4. Repeat steps 1 through 3 as needed.
Water Inlet
Tube
Figure 7. Water Inlet Tube
10
P/N 1011072 Rev. H 12/13
McDonald’s
Page 11

SURFACE STEAMER SS-200TT
TROUBLESHOOTING
WARNING
To avoid possible personal injury and/or damage to the unit, inspection, test and repair of electrical equipment should be performed by qualified service personnel. The unit should be unplugged when servicing,
except when electrical tests are required.
If the troubleshooting steps listed do not solve your machine problem, contact a Roundup Authorized
Service Agency for further assistance or service.
Problem Possible Cause Corrective Action
Control Display is blank
(Power Switch is in the On
position but indicator light is
off).
Unit does not heat up (Power
Switch is in the On position
and the indicator light is on).
Main electrical panel circuit
breakers trips.
The power cord is not correctly plugged
in.
The power cord and/or electrical plug is
damaged.
The main electrical panel circuit breaker
is off or is tripped.
Power Switch is inoperable. Contact your maintenance person or
Hi-Limit Thermostat is tripped or
inoperable.
Solid State Relay is inoperable.
Thermocouple is inoperable.
Main Control Board is inoperable.
Steam Generator is inoperable.
Loose, burnt, or broken wires in heat
circuit.
Damaged receptacle, plug, or cord or a
loose connection or an internal
component failure.
Circuit breaker is overloaded.
Plug the power cord into the
appropriate outlet.
Inspect electrical wire, plug, and receptacle.
Reset circuit breaker. Contact your
maintenance person or Authorized
Service Agency if it trips again.
Authorized Service Agency for service.
Contact your maintenance person or
Authorized Service Agency for service.
Contact your maintenance person or
Authorized Service Agency if the condition repeats.
Water leaking inside electrical
housing.
Water leaking at Water
Pressure Regulator.
“Hi” appears on the display. If this occurs during heavy use, the unit
P/N 1011072 Rev. H 12/13
McDonald’s
Pinhole leak in rubber hoses. Replace hoses.
Loose or damaged water line tubes and/
or fittings inside electrical housing.
The O-rings are damaged. Replace O-ring.
is not getting enough water pressure.
Pinched/kinked internal water lines or
clogged injection tube.
Inoperable Solid State Relay. Contact your maintenance person or
Inoperable Main Control Board.
11
Tighten or replace tubes and/or
fittings.
Check and adjust the water pressure
regulator to 10 psi and adjust and
reprogram values back to factory settings. See “Factory Resets.”
Check for kinked water lines and
clogs.
Authorized Service Agency for service.
Page 12

SURFACE STEAMER SS-200TT
TROUBLESHOOTING (continued)
Problem Possible Cause Corrective Action
Unit heats but there is
little or no steam
produced
and/or
The product requires
more steaming than
usual.
“Lo” appears on the
display during operation.
“HOT” appears on the
display during operation.
“OPEN” appears on the
display during operation.
Water Line Valve is closed. Check that the Water Line Valve is open.
Water injection tube is restricted.
Quick Disconnect Fittings are
not fully engaged at the Water
Pressure Regulator.
Low or no water pressure in
the water line.
Improper water pressure to
unit.
Unit is not being cleaned
properly (daily/monthly).
Programming and/or SHOT,
Intr values were adjusted/
changed improperly.
Insufficient or excessive calcium/mineral deposits on the
Generator surface.
Generator surface is bare
(little or no traces of mineral
deposits).
The internal rubber hoses are
pinched or kinked.
Generator Diffusers are
missing.
Generator surface temperature is too low.
Water Pressure is too high
and/or out of range.
Normal for several minutes
during heat up period.
The temperature inside the
electrical compartment is
above 160ºF (71ºC).
The front and/or rear thermocouple is disconnected or
open.
Faulty main Control Board.
Check and clean the Injection Tube as described in the
Maintenance section of this manual.
Remove and re-engage the Quick Disconnect Fittings
firmly until it clicks into place. Replace if damaged.
If pressure is low, contact your maintenance person or
plumber. Check incoming water line for water pressure.
Verify that a Water Pressure Regulator is installed and
set to 10 psi.
Clean the unit daily and monthly as described in the
Maintenance section of this manual.
Reprogram the SHOT and Intr values as described in
the Programming section of this manual. See “Factory
Resets.”
Verify that a thin layer of calcium/mineral deposits is
present on the Generator
surface. Refer to the Maintenance
section of this manual.
The Generator surface must have a thin coating of calcium/mineral deposits for proper steaming. Refer to the
Maintenance section of this manual.
Straighten and reposition the rubber hoses.
Install Generator Diffuser or replace if missing.
Verify that the Generator set point temperature is 400°F
(204°C). See “Factory resets.”
Adjust the water pressure to 10 psi and reprogram values back to factory settings.
Wait 10 minutes. If Lo is still displayed, adjust the water
pressure to 10 psi and reprogram values back to factory
settings. See “Factory Resets.” If Lo is still displayed,
contact your maintenance person or Authorized Service
Agency for service.
Make sure there is enough air flow around the unit.
Relocate the unit if necessary.
Verify that the Insulation and Heat Shield are installed
correctly around the heat/steam generators (items 22
and 15 in the “Replacement Parts” section.
Contact your maintenance person or Authorized Service
Agency if the condition repeats.
12
P/N 1011072 Rev. H 12/13
McDonald’s
Page 13

SURFACE STEAMER SS-200TT
TROUBLESHOOTING (continued)
Problem Possible Cause Corrective Action
Excessive
condensation in
Food Compartment.
Excessive Steam
escapes from front
or sides of steamer.
Steam Generator’s
surface becomes
flooded (fills with
excess water).
Water pressure is too high. Verify that the Water Pressure Regulator is set to
10 psi. Adjust accordingly.
Programming and or SHOT and Intr
values were adjusted improperly
(Timer Models only).
Worn or damaged Bun Caps. Replace Bun Caps.
Water Pressure Regulator is faulty or
not properly installed.
Programming and/or the SHO value
was adjusted or changed improperly.
Solenoid Valve is leaking due to
debris trapped inside the plunger.
Improper Daily/Monthly cleaning. Follow the Daily/Monthly cleaning procedures
The Generator surface temperature
is too low.
Insufficient or excessive calcium/
mineral deposits on the Generator
surface.
Solenoid Valve is installed incorrectly. If the Solenoid Valve was replaced, verify that the
Reprogram the SHO and H2O values as described
in the Programming section of this manual to factory
settings. See “Factory Resets.”
Verify that a Water Pressure Regulator is installed
and set to 10 psi. Adjust accordingly or replace.
Reprogram the Control Board to the recommended
settings. Refer to the Programing section of this
manual. See “Factory Resets.”
Attempt to flush the debris out of the valve by
operating the unit on a number of cycles and then
letting it rest. If the unit still leaks, disassemble
the Solenoid Valve and clean out the plunger.
Reassemble the unit and test again. If a leak is still
present, replace the Solenoid Valves. Contact your
maintenance person or Authorized Service Agency.
carefully.
Verify that the Generator set point temperature is
between 400°F (204° C). See “Factory Resets.”
Verify that a thin layer of calcium/mineral deposits
is present on the Generator surface. Refer to the
Maintenance section of this manual.
”IN” and “OUT” labels on the valve correspond to
the water flow.
P/N 1011072 Rev. H 12/13
McDonald’s
13
Page 14

SURFACE STEAMER SS-200TT
WIRING DIAGRAMS
14
P/N 1011072 Rev. H 12/13
McDonald’s
Page 15

SURFACE STEAMER SS-200TT
REPLACEMENT PARTS
3
4
5
38
7
33
32
31
30
26
29
25
24
36
37
6
9
2
1
8
10
12
34
11
28
Inset A
45
23
13
22
18
27
14
15
16
39
40
41
43
44
45
42
20
17
19
See Inset A
21
P/N 1011072 Rev. H 12/13
McDonald’s
15
Page 16

SURFACE STEAMER SS-200TT
REPLACEMENT PARTS (continued)
Item Part No. Description Qty. Item Part No. Description Qty.
1 0012498 Bun Cap Kit incl. 2 - 8 1
2 2180286 Bun Cap 1
3 306P152 Nut, Acorn #6-32 Low 2
Crown w/ Centerlock
4 325P132 Screw, Mach 1/4-20 x 1/2" 4
5 2100138 Knob Ball 4
6 306P125 Screw Mach 6-32 x 3/8" 4
7 306P162 Washer Flat # 6, 3/8" OD X 5/32" 4
ID X .030" THK"
8 0021663 Bun Cap Rivetment 1
9 0021661 Flipper Weldment 1
10 0400408 Heat Shield Pad SS-200TT 1
11 0400354 Strain Relief Elbow 90 degree 1
12 0506040 Bracket, Regulator 1
13 0012508 Display Bracket Assy. SS-200TT 1
14 4010215 Momentary Switch with Wiring 1
15 7000542 Rocker Switch Kit (Power On/Off) 1
16 7000370 Relay, Solid State 1
17 0021664 Heat Shield Plate Relay 1
18 4060304 Terminal Block 3-Pole 1
19 0012500 Solenoid Valve Assembly 1
230V, SS-200TT
20 4070147 Front Control Board 1
21 0400409 Insulation, Fiberglass SS-200TT
22 0012504 Heat shield cover Assembly 1
23 0400410 Insulation Bottom SS-200TT 1
24 7000927 Generator Kit 1
(Mfg. No. 9100907 only)
7000926 Generator Kit 1
(Mfg. No. 9100908 only)
25 0012503 Diffuser 2
26 0506027 Heat Shield SS-200TT 1
27 7000436 Rubber Head Screw Bumper (4-Pack) 4
28 0506037 False Bottom Plate SS-200TT 1
29 0400265 Bushing, Open/Close-3/8 1
30 0021665 Bottom Cover 1
31 4051001 Line Filter, Power 1
(Mfg. No. 9100907 only)
32 4070149 Main Control Board 1
33 304P105 Nut, Hex ‘KEPS’ #4-40
34 7000761 Water Regulator Kit SS-200TT 1
35 0700437 Power Cord Assy (not shown) 1
(Mfg. No. 9100907 only) 1
0700724 Power Cord Assy. (not shown)
(Mfg. No. 9100908 only)
36 4050214 Thermocouple Type K 3/16" 1
Diameter Open End
37 4030404 Thermostat, 1/2" Disc, Auto Reset 1
38 040P119 Bushing, Shorty 5/8" 2
39 2080117 Quick Disconnect 1/8" NPT 1
40 0506041 Quick Disconnect Plate 1
41 362P102 Lockwasher (10-Pack) 1
42 4040192 Solenoid Valve - 230 VAC 1
(Mfg. No. 9100907 only)
0012848 Solenoid Assembly, 208 Volt 1
(Mfg. No. 9100908 only)
43 2190178 Nipple Pipe 1/8" 1
44 2190180 Female Tee 1/8” NPT 1
45 2190179 Elbow 1/8" NPT x 3/16" Barb 2
16
P/N 1011072 Rev. H 12/13
McDonald’s
Page 17

NOTES
SURFACE STEAMER SS-200TT
P/N 1011072 Rev. H 12/13
McDonald’s
17
Page 18

SURFACE STEAMER SS-200TT
NOTES (continued)
18
P/N 1011072 Rev. H 12/13
McDonald’s
Page 19

SURFACE STEAMER SS-200TT
NOTES (continued)
P/N 1011072 Rev. H 12/13
McDonald’s
19
Page 20

 Loading...