

Page 1
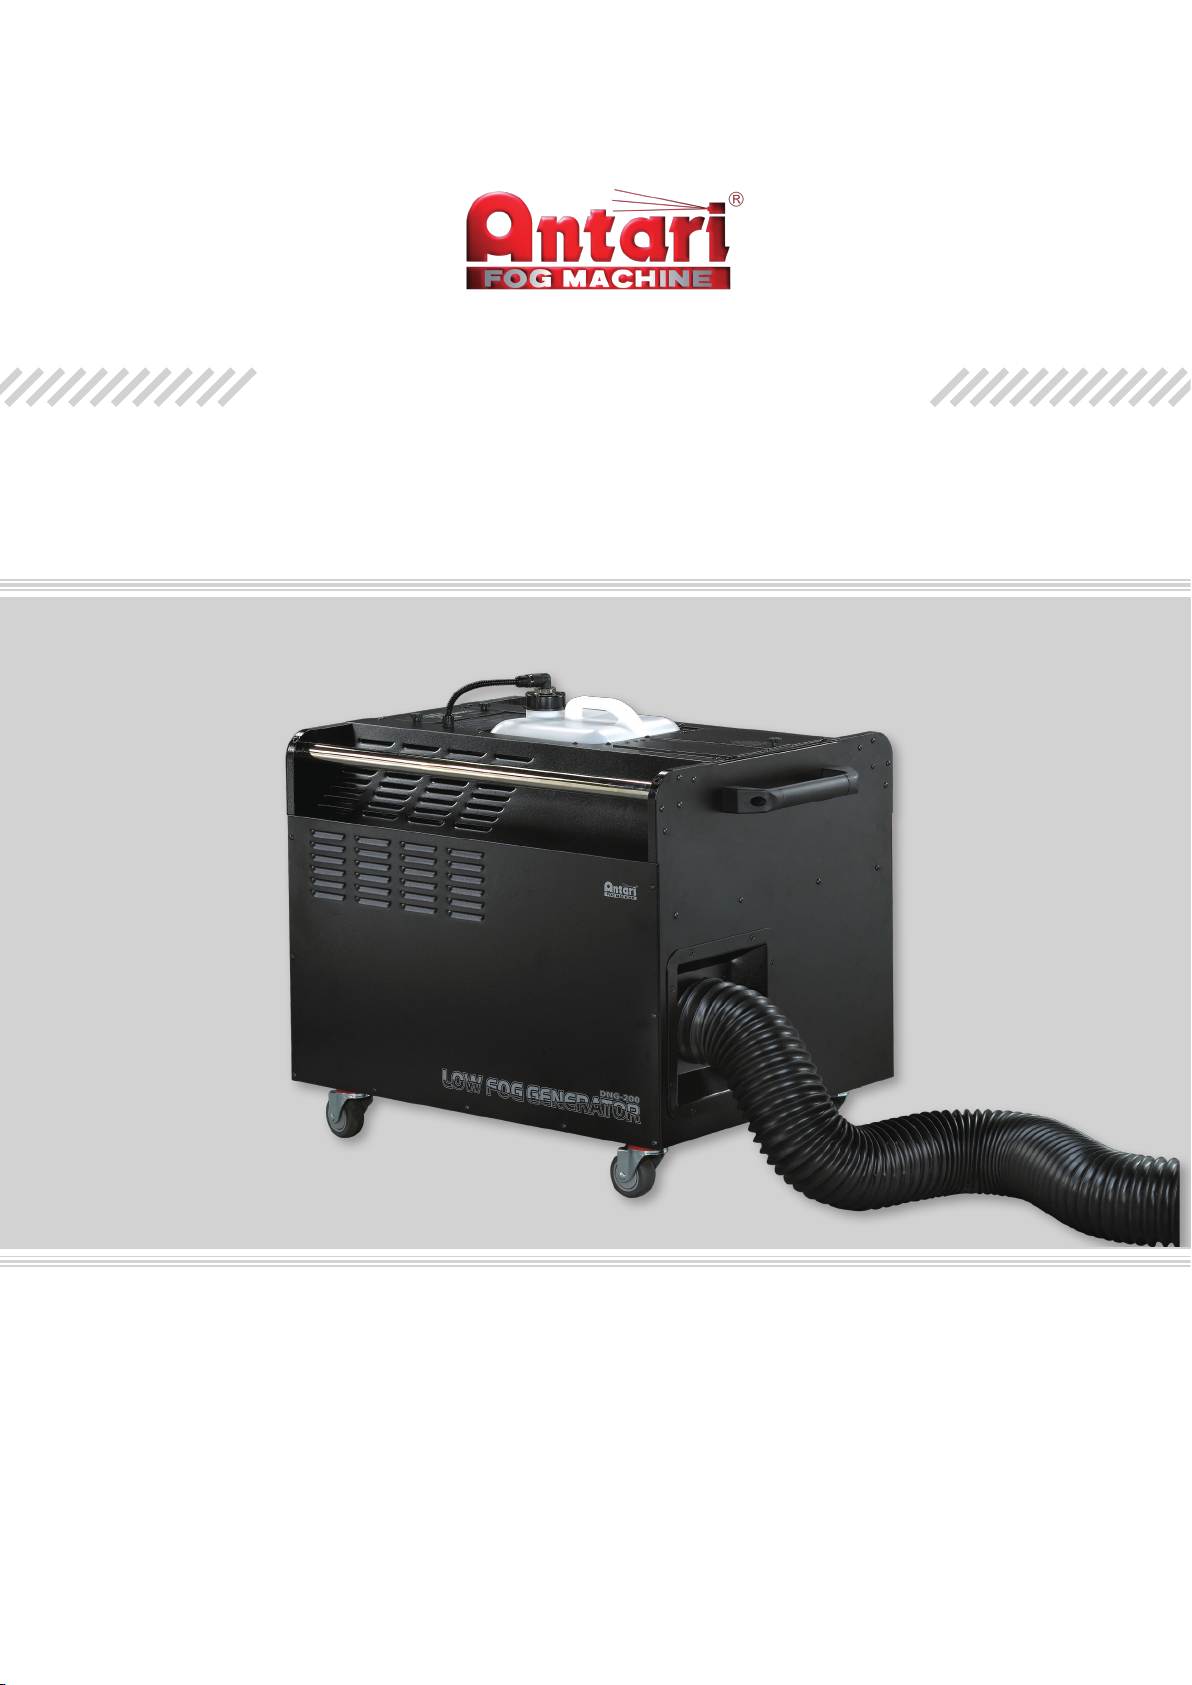
DNG-200 LOW FOG GENERATOR
USER MANUAL
DNG-200
低煙機使用說明書
Read and save these insturctions
2008 Antari Lighting & Effects Ltd.
Page 2

User Manual
Antari DNG-200 Low fog Generator
Congratulations on the purchase of your new
ANTARI DNG-200 Low Fog Generator
Thank you for choosing this DNG-200 of ANTARI! There are some new terric features of this machine on top
of the fog cooling provided by the DNG-100 originally. The fog generator is integrated into this new machine
to make sure the machine will not take too much space in order to maximize the usage of the entire stage.
Different from others, Antari ‘s fogging machines do not use Carbon Dioxide, no pollution to environment and
to any human body. It is a great machine that offers low fog special effects as well as environmental-friendly
features, a true green machine.
DNG-200 User Manual
01
Please follow these operation, safety and maintenance instructions to ensure a long and safe life for your
Low Fog Machine.
Pay attention to all warning labels and instructions printed on the exterior of your ANTARI DNG-200
1. CAUTION
♦ Keep this device dry.
♦ For indoor use only. Not designed for outdoor use.
♦ Ideal operating temperature is between 10 - 30 degrees Celsius.
♦ Two sets of professional power cord are used by this machine. It is important to conrm the electrical
voltage before plugging the power cord into the power outlet and use three-plug ground connecting type
power cord shall be used.
♦ If the machine is moved or transported, it shall be stationed for one hour to allow the coolant in the cooler
to be stabilized before using it again.
♦ If the machine is moved horizontally, please station it for 5 minutes before starting the operation again.
♦ Please unplug the power cord or Turn off if the machine is not in-use.
♦ This machine is not water-proof. If moisture, water, or fog uid gets inside the housing, immediately
unplug the unit and clean it. If liquid seepage into machine and not easy to clean, please contact a
service technician or your ANTARI dealer before using it again.
♦ No user serviceable parts inside. Refer to your ANTARI dealer or other qualied service personnel.
♦ For adult use only. DNG-200 must be installed out of the reach of children. Never leave the unit running
unattended.
♦ Locate the DNG-200 in a well-ventilated area. Never cover the unit’s vents. The DNG-200 is best
installed 1 meter away from all objects.
♦ It is important to place the machine in a at surface instead of a surface with slope to prevent any moving
of the machine .
♦ If your ANTARI DNG-200 Low Fog Generator fails to work properly, please turn off the power for ve
minutes and turn it on again, if the problem still exists, contact with your ANTARI dealer for service.
♦ Always allow your ANTARI Low Fog Generator to cool down before attempting to clean or service it.
♦ Please use Antari FLR Light Fog Fluid Only. Please do not ll in any other uid into the tank to ensure
the quality of the fog and the life of the machine.
Page 3
2. Unpacking & Inspection
Open the shipping carton and verify that all equipment necessary to operate the system has arrived intact.
The shipping carton should contain the following items:
1. One unit DNG-200 Machine
2. One unit of D-20 LCD controller (installed in the machine already)
3. Two power cords for connecting to Neutrik Powercon connector.
4. Three meters of fog conducting hose.
5. One user’s manual
( item 3-5 placed in the storage box on the top of the machine)
6. One water collection tray (installed in the machine already)
7. Three meters of 6mm PU tube
3. Procedures of Installation
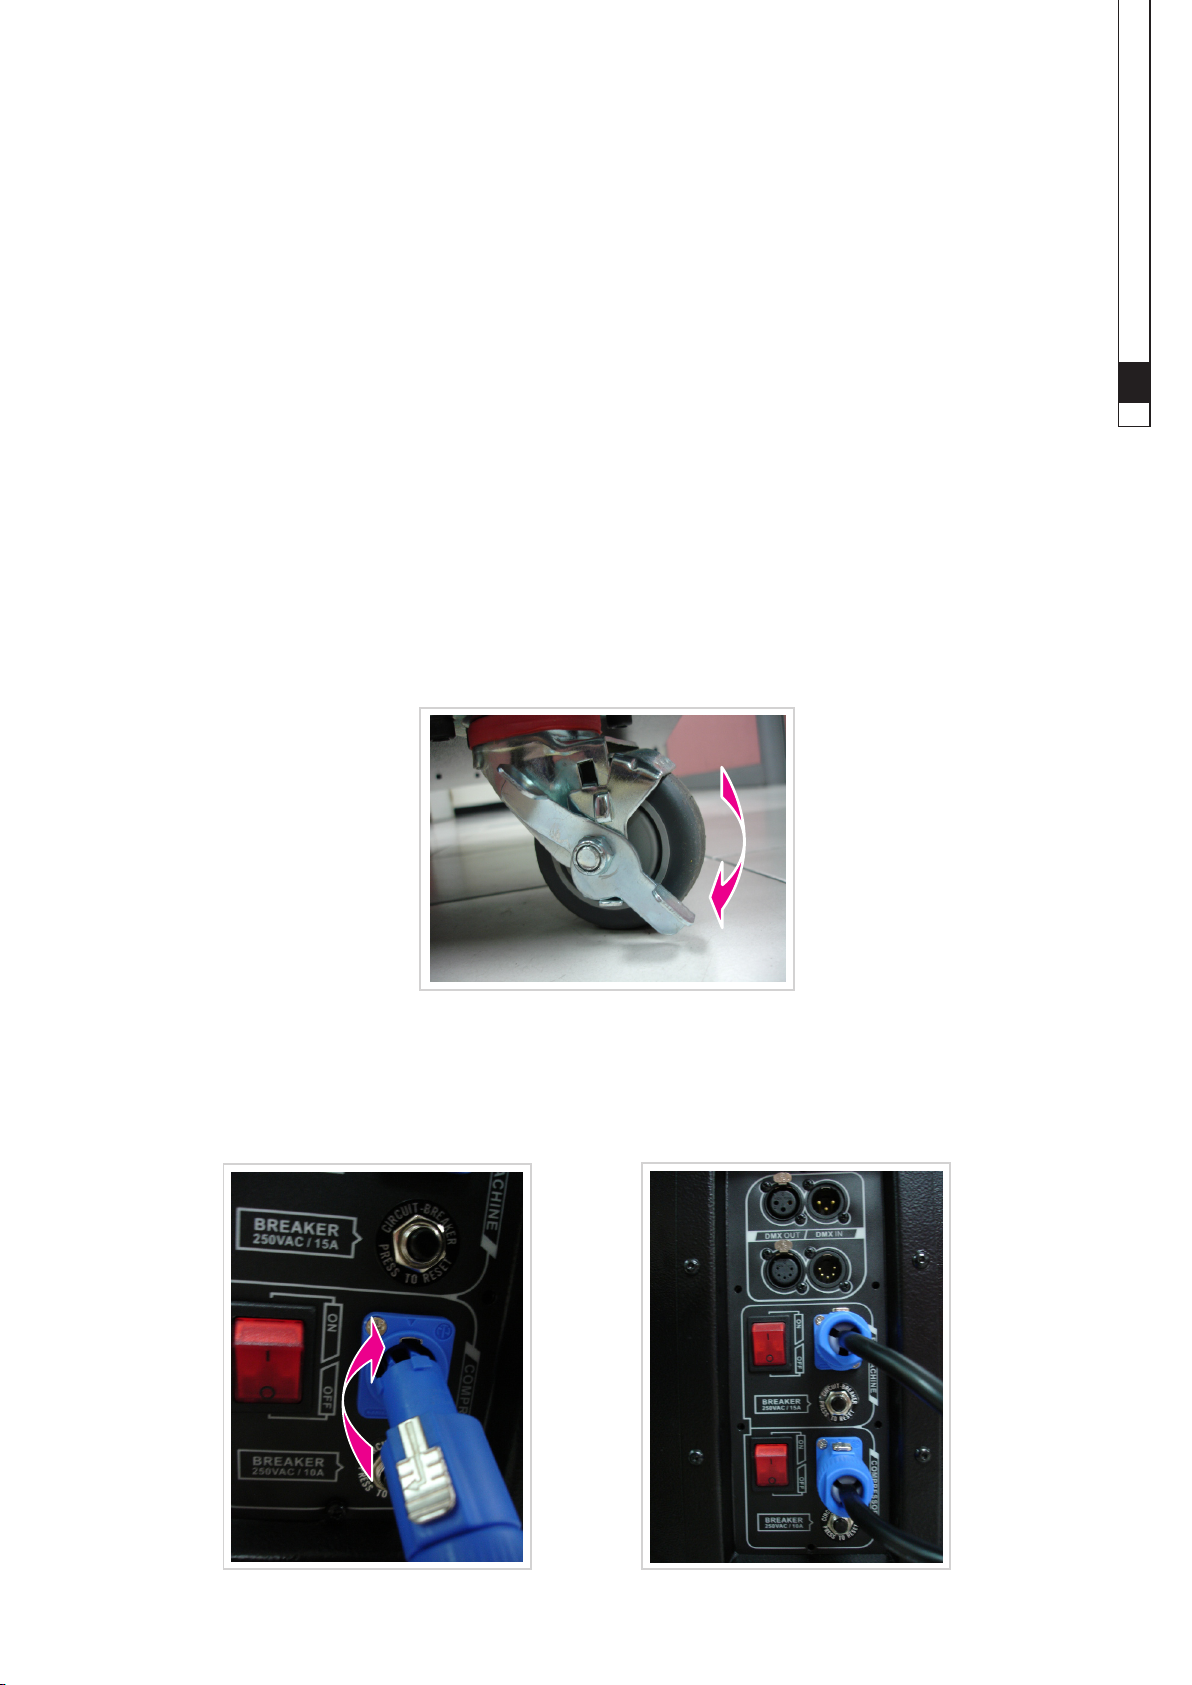
3-1. The wheels at the bottom of DNG-200 help to move the machine, wheel xing mechanisms are
located at the diagonal line. Position the machine at a spot, press down the xing mechanism to
prevent it from moving. To move the machine, press the opposite side of the xing mechanism to
release it. Please note that the machine is not allowed to place on a slope due to its big size.
( refer to the gure 1.)
DNG-200 User Manual
02
◄ Figure 1
3-2. Please aim the key on the Powercon terminal of the power cord to the slot of the connector on the
machine, plug in and turn about 10 degrees clockwise until the power cord is completely xed. Two
power cords shall be plugged to the machine in the same fashion. The upper power cord is for fog
generator and the bottom one is for the compressor. ( refer to the gure 2&3)
◄ Figure 2 ◄ Figure 3
Page 4
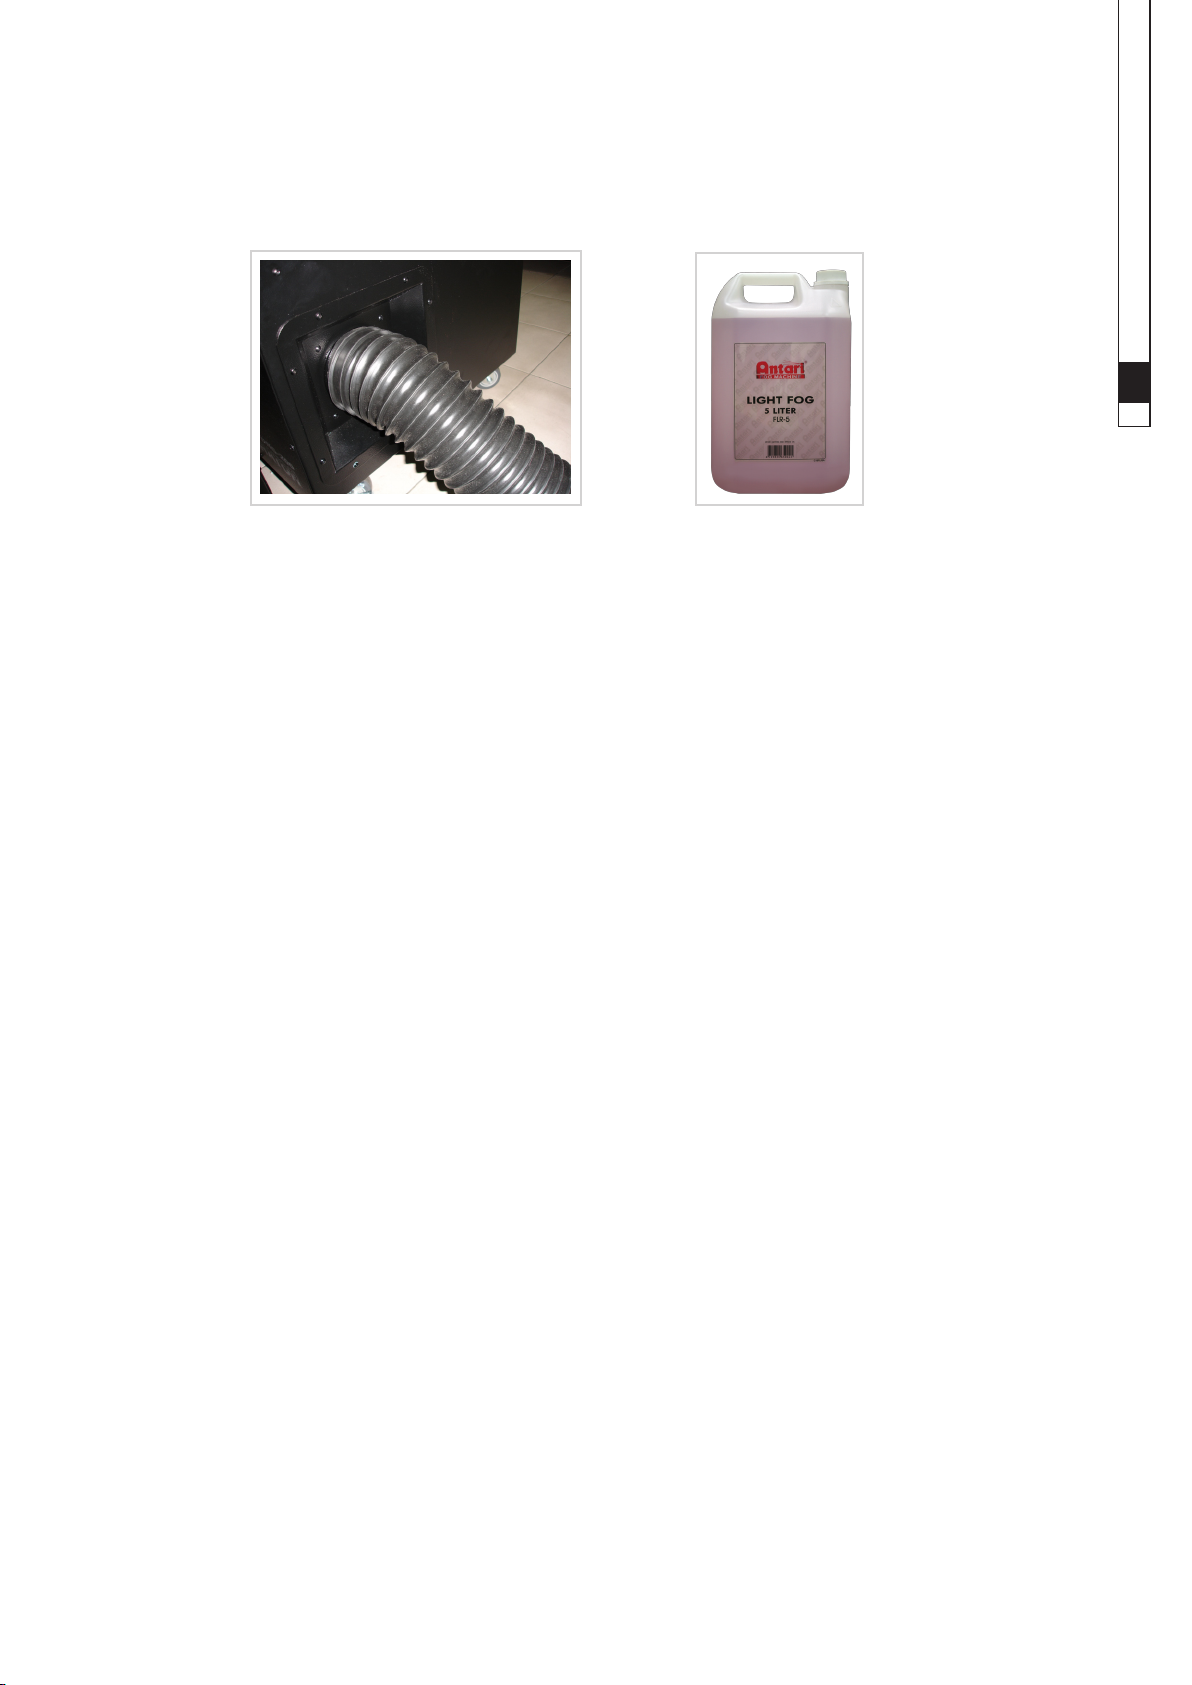
3-3. Connecting the machine with the black fog conducting hose, it is a three-meter pipe. The actual
length of the pipe can be adjusted to t the actual need. (refer to the gure 4)
3-4. Fill Antari FLR light fog uid to the tank, tighten the tank cap. (refer to the gure5)
◄Figure 4 ◄ Figure 5
4. Operation
4-1. Connect the power cord to a grounded outlet, press down two sets of power switches located at
the back side of the machine. Please press power switch of compressor below rst and then
power switch of fog machine to start warming up. The LCD screen on the D-20 controller will
show “Warming up”. Please wait till the LCD screen shows “Ready To Fog “.
DNG-200 User Manual
03
4-2. Set all required output modes on the controller. Please refer to D-20 controller operation
description.
4-3. DNG-200 is equipped with DMX 512 system, a 3-pin and a 5-pin DMX connectors are located at
the back panel of the machine for optional use. Please refer to DMX operation description for more
DMX information.
4-4. For the rst time operation, after the warming up period and the controller screen displays “Ready
To Fog”, press down Manual button for a few seconds to initiate the machine to output fog in order
to drain out the air in the liquid pipe. Once the fog comes out smoothly, D-20 controller can be set.
If the machine is not frequently used, please follow this procedure every time it is used to drain out
the air.
4-5. The heater average temperature of DNG-200 is 220°C.
5. D-20 LCD screen controller
D-20 controller is equipped with a 2-meter line, a 5-pin XLR connector and a LCD display panel. It is
able to fully display the operation status of the machine. Its interface allows the operator to customize fog
machine functions by adjusting fogging duration, interval, volume and DMX. The controller can be easily
used by pushing six function buttons on the panel. Its LCD displays current operating parameters, which
are automatically stores in non-volatile memory, allowing the machine to be powered down without losing
function settings.
Controller panel and function button description: (refer to gure)
Page 5
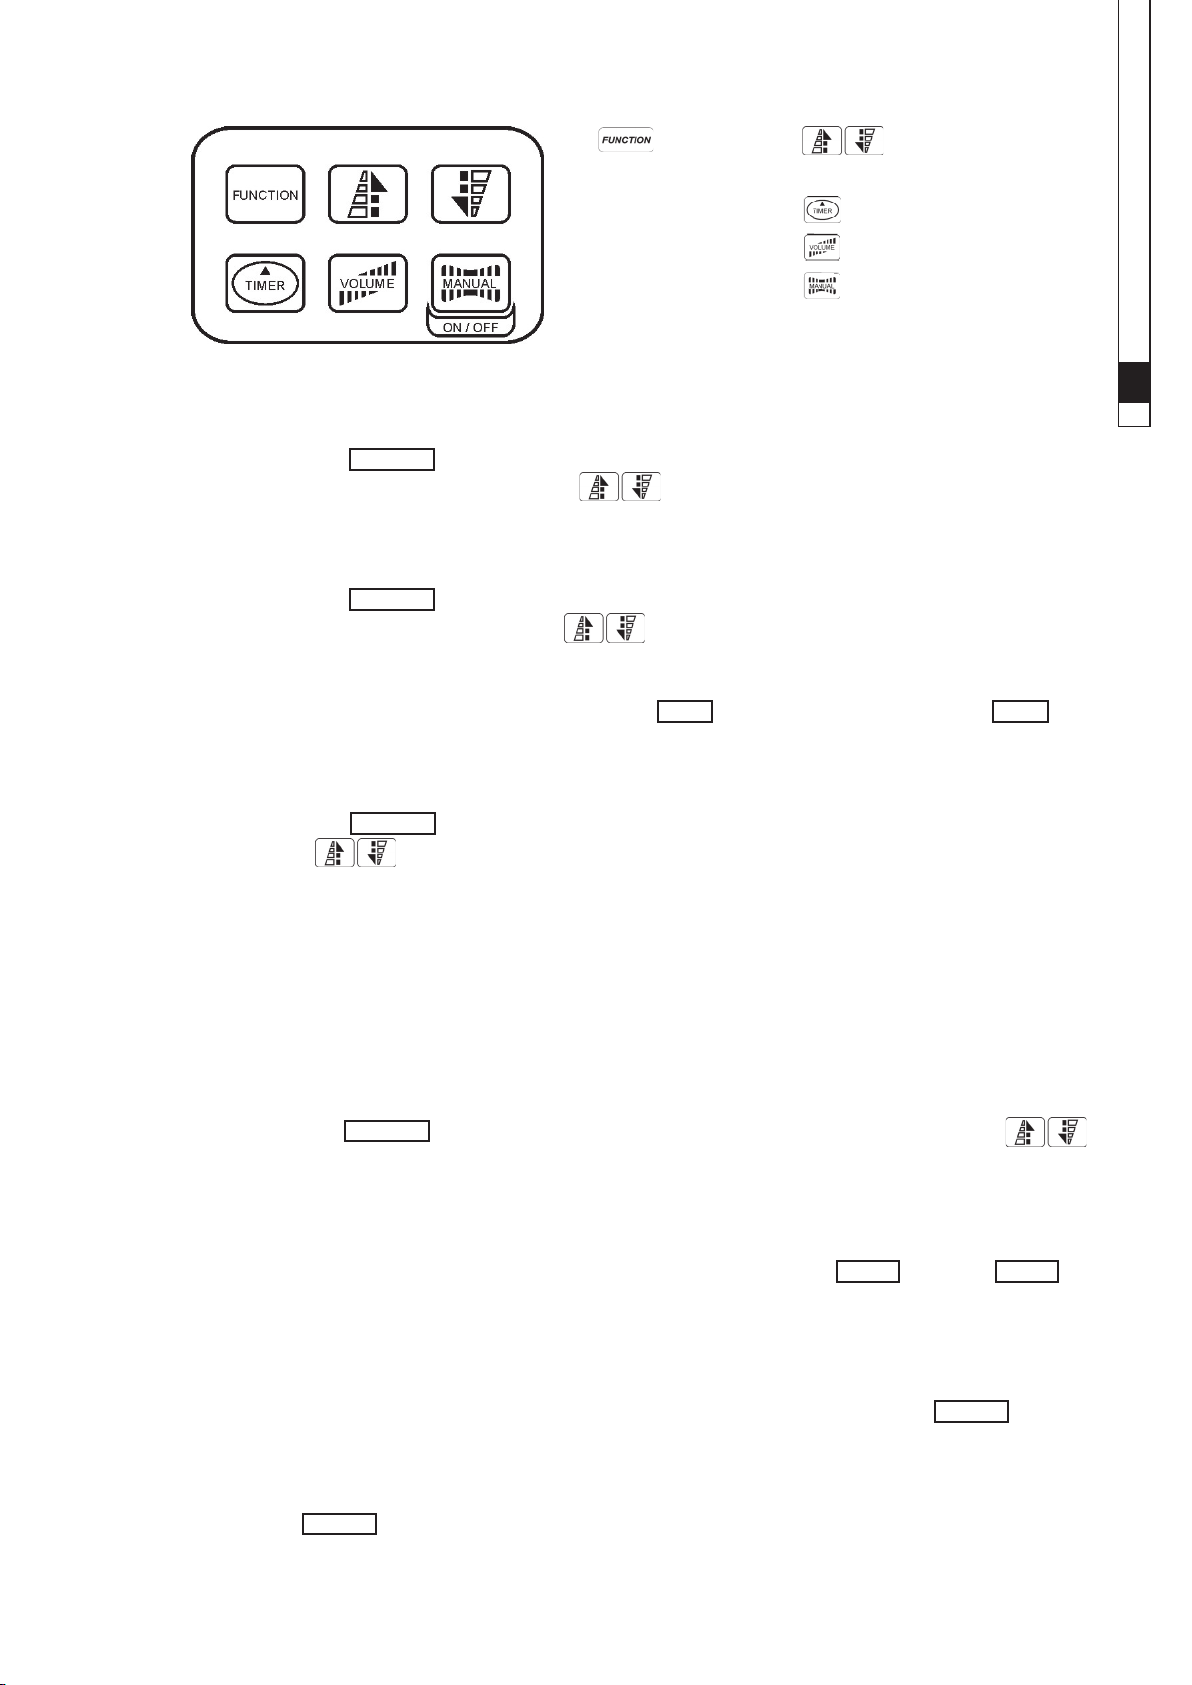
DNG-200 User Manual
1.
Sub-menus:
-->Interval Set
-->Duration Set
-->Volume Out
-->Nonstop Burst
-->High Volume
-->Medium Volume
-->Low Volume
-->DMX 512 Add
2.
Up-/Down-button
3. Timer-button
4. Volume-button
5. Manual-button
5-1. Function button
5-1-1. Setting of fog output interval:
Press the Function button once, the screen will display “Interval Set”. Under the time
counting mode of the timer , press Up/Down keys to adjust the interval of fog
output. The setting range is between 10 to 300 seconds.
5-1-2. Setting of fog output duration:
Press the Function button twice, the screen will display “Duration Set”. Under the time
counting mode of the timer, press Up/Down keys to adjust the duration of fog
output. The setting range is between 10 to 100 seconds.
To release the setting of Interval and Duration, press Timer button one time after initiating Timer
button and entering into work mode.
04
5-1-3. Setting of fog output volume:
Press the Function button three times, the screen will display four settings of “Volume Out”,
press Up/Down keys to select the setting of fog output volume.
Four volume settings:
Nonstop Burst -- The machine will continue to output low fog, the volume is automatically
adjusted by the machine based on the working temperature.
High Volume -- About 60% output volume.
Medium Volume -- About 52% output volume.
Low Volume -- About 35% output volume.
5-1-4. Setting of DMX 512 address
Press the Function button four times, the screen will display “DMX 512 Add “, press
Up/Down keys to set the machine address the same as that of DMX console.
Please refer to DMX setting description for more DMX setting information.
5-2. Timer function key
Initiate timer function to enter Interval and Duration function mode, press Timer one more Timer
to release the function.
5-3. Volume function key
Used for setting Volume Out (Fog volume output), a total of four setting values. After initiating the
machine will request for the fog volume according to the setting output mode, press Volume key
one more time to release the function.
5-4. Manual function key
Press down Manual key the screen will display “Manual Output”, under this function the low fog
has the biggest fog output volume.
Page 6

6. Other important notes
6-1. A water collection tray is equipped at the rear of DNG-200, when the compressor is running for
condensed fog, some water drops will ow into the tray. Please check if the water in the tray is full
and drain it routinely.(refer to the gure 6)
If the machine is to be used for long time or the water drops can not be checked momentarily, the
water collection tray can be removed and a 6 mm PU hose can be connected to the water draining
hole located at the upper of the water collection tank to directly drain out the water drops. After
nishing draining, push up the upper red button to remove the hose. (refer to the gure 7)
DNG-200 User Manual
05
◄Figure 6 ◄ Figure 7
6-2. DNG-200 is equipped with a pump temperature sensor, when the fog uid is used up in the tank,
pump will stop running due to the rising of the temperature. When the machine temperature
drops down, the pump will resume to run. Please check to see if the fog oil is sufcient in the uid
tank.
6-3. A black square metal mesh is located at the back of the machine. It is the air inlet of the fan, please
do not block it and clean it routinely to keep the cleanness.
6-4. If the fog volume is too low, the machine generates noise during operation or the fog cannot be
smoothly sprayed, please turn off the power immediately and check if the fog oil is sufcient,
whether the external fuse, controller connection or power supply has any problem. If none of the
above shows any problem, insert the power plug again, if the machine still cannot normally operate,
please check whether the hose connecting to the fog oil tank is blocked, any uid is owing. If
the cause cannot be identied, please do not allow the machine to operate to avoid the damage of
it. The machine shall be turn off immediately to cooling down, please contact Antari dealer or the
designated service center. Do not disassemble it by youself.
6-5. The feature of DNG-200 is to allow the fog owing along the surface of the oor after outputting,
after using it for a long time, the oor will become slippery due to the moisture. Please note the
material of the oor and pay special attention to the safety of the performers or walking on it.
6-6. DNG-200 is a low fog special effect machine that does not use dry ice. It is very environmental
friendly and safe. However, the output fog is easily to be blown away by wind. Please pay attention
to the impact caused by fan or air conditioning while in use.
Page 7

7. Maintenance of the machine
7-1. Please routinely clean your DNG-200 Low Fog Generator, it will effectively help you to lower the
parts replacing rate or maintenance cost.
7-2. Please do not contaminate fog oil, put the cap on the oil tank at all time and the cap of the fog oil
tank equipped on the machine.
7-3. Prior to the storing of the machine when not in use, please clean it rst and to make sure the oil
tank is emptied. Disconnect and store the fog pipe and power cord, store the machine and parts into
the parts tank located in front of the machine. Warm up the machine once a month, it can be
protected from the moisture.
7-4. Please store the machine in a cool area.
8. DNG-200 Low Fog Generator Specications
Power AC 100~120V/ 50~60Hz AC 220~240V / 50~60Hz
Power Consumption (Compressor) 750 W 600 W
DNG-200 User Manual
06
Refrigerant R-404A, 1.75LB R-404A, 1.75LB
Rated Current 6.7A 3.2A
Start Current 61 A 21 A
Capacity 3200 BTU/ hr 2745 BTU/ hr
Compressor's Breaker 15A 250V 10A 250V
Heater 1450W 2500W
Output 12,000 cu.ft / min 12,000 cu.ft / min
First Heat-Up Time 24 min 12 min
Fog Machine's Breaker 15A 250V 15A 250V
Tank Capacity 10 liters 10 liters
Fluid Consumption Rate 11 min/ liter (High output) 11 min/ liter (High output)
Remote Included D-20 (LCD Timer Panel Controller; 2 m)
Accessory Included 3m Fog Conducting Hose
Weight 120 Kg
Dimensions (mm) L 780 W 608 H 686 ( mm )
Liquid Used Antari FLR (Light Fog Liquid) Only
DMX Channel DMX One Channel
Additional information Self Contained Unit-- No CO2 / Dry Ice Required
Floor-Mount installations ( 4 wheels)
Page 8

Antari DNG-200 Built-in DMX 512 Setting
DNG-200 is featured with built-in DMX 512 function and equipped with a 3-pin and a 5-pin male-female
connectors. When the machine is in use, either 3-pin or 5-pin connector can be selected to connect to DMX
controller. DNG-200 only uses one control channel, the output value of each channel is between 0-255.
After DMX-200 controller is connected, the time of action, volume of fog output and interval of fog output are
all controlled by DMX controller, they will not be controlled by D-20 of the machine anymore.
By using the same DMX system you are able to easily connecting fog generators, lighting and other special
effect machine to have a whole system performance.
DNG-200 User Manual
07
High Volume
192-255
Medium Volume
127-191
Low Volume
32-126
Off
0-31
If the value is set between 0-31, then the machine is not able to have sufcient output volume to run.
If the value is set between 32 to 126, then the machine is able to output a minimum output volume 35%.
If the value is set between 127 to 191, then the machine is able to output a median output volume 35%.
If the value is set between 191 to 255, then the machine is able to output a maximum output volume 60%.
192-255 = High Volume ( 60 % Output )
127 – 191 = Medium Volume ( 52% Output )
32 – 126 = Low Volume ( 35% Output )
0 - 31 = Off
Please save this user manual carefully
Page 9

DNG-200
使用說明書
DNG-200
低煙機使用說明書
LOW FOG GENERATOR
恭喜您擁有了這部
謝謝您選擇這部
加上煙霧產生器設計為一個整體,效果上較過去的
空間的動線運用更加得以發揮。
人體造成污染及負擔。是一部特效功能卓越又能肩負環保使命的機器。
為確保您機器的使用壽命及輸出效果的完美,
在操作機器前,請詳細閱讀這份使用說明書以便操作機器時更加安全且得心應手。
注意事項
1.
請保持機器的乾燥。
機器設計在室內使用,請勿在戶外使用本機器。
理想的機器操作溫度,在室溫攝氏
這部機器使用兩組專業用電源線,在安裝好插頭要連結電源供應前,請確認您使用的電壓伏特數並採用接
地型插座。
在上下搬運或運輸過機器後,需將機器靜置
若是水平的移動機器,請於機器安置定位後,靜置
當機器不使用的時候,請關掉電源或拔下電源插頭。
本機器並未做防水設計,如遇有潮濕,潑水或煙霧油外溢的現象,請先關掉電源,並將機器擦拭乾淨後,
再重新開啟電源,如果液體進入機器內部,無法清除,請連繫
本機器出厰時並未附有自行維修零件,遇有機器問題時,請連繫
器。
請由成人操作機器,小童請勿操作使用,請勿讓機器在沒有工作人員的情況下單獨運轉。
請將機器置放於通風良好的地方,不要在機器上方堆積或覆蓋物品,最好保留機器四周邊有ㄧ公尺以上的
空間。
請勿將機器安置在傾斜的斜披上,以免機器滑動。
如果您的
存在,請聯繫
在清潔或保養您的機器前,請確認機器的電源已經關閉,並且機器溫度已經冷卻。
請使用
體使用,有可能導致機器電熱管堵塞或內部零件的腐蝕。
Antari DNG -200
DNG-200
Antari
Antari FLR
出現工作異常,請先關閉電源開關,靜置
代理商。
淡煙霧油,並請勿添加其他液體進入油桶,以確保煙霧品質及機器使用壽命。不當的液
低煙機,這部機器的設計除了以往
Antari DNG-200
請在使用
DNG-200
度~30 度之間。
10
Antari DNG-200
DNG -100
低煙機不同於乾冰機,不使用二氧化碳,完全不會對環境及
前先注意機器上印刷的警語說明。
小時,讓冷卻器中的冷煤平穩後,再開始操作機器。
1
5
更加完美外,使用時佔用很小的空間,讓舞台
分鐘再開始操作。
Antari
5
低煙機
Antari DNG-100
的代理商。
Antari
分鐘後,重新開啟電源,若異常現象仍然
代理商,請勿自行拆卸或維修機
的煙霧冷卻功能外,並
01
打開包裝及檢視機器
2.
請拆開包裝,移除機器上所有的包覆部份,並確認機器是否完整,所有的配件是否齊備,機器出厰時包含
的物件有:
Page 10

DNG-200
1. DNG-200
2. D-20
連結
3.
黑色煙霧導管
4.
使用說明書一份(
5.
集水盤一個(已安裝在機器上)
6.
mm PU 管
7. 6
安裝機器的步驟
3.
低煙機一部
液晶控制器一部(已安裝在機器上)
Neutrik Powercon
公尺
3
公尺
3
接頭的電源線兩條
項放置在機器前上方的儲存盒中)
3. 4. 5.
3-1 DNG-200
器以固定機器避免滑動 (參考圖ㄧ),需要移動機器時,只要在反方向壓下將固定器鬆開即可移動機
器。
底部的輪子可以協助移動,對角線上的輪子置有固定器,將機器放置在定點,壓下固定
注意!由於機器體積龐大,請勿將機器固定於斜坡上。
使用說明書
02
圖一
◄
3-2
器連接座凹槽,插入後順時針旋轉約
要照此步驟安裝好,上方的電源線是供應煙霧機的電源,下方的電源是供應壓縮機的電源。
(參考圖三)
將電源線帶有
Power con
的一端連結機器(請確認電源開關在關閉
度(參考圖二),將電源線完全固定為止。兩條電源線都需
10
的情況下),請將卡榫對準機
/OFF
◄
圖二
◄
圖三
Page 11

連結機器與黑色煙霧導管,此煙霧導管長度為三米,可依照實際需要長度伸縮使用。 (參考圖四)
3-3
3-4
倒入
Antari FLR
淡煙霧油至機器上的油桶中,並旋緊油桶蓋。 (參考圖五)
DNG-200
使用說明書
03
圖四
◄
操作機器
4.
4-1
壓縮機電源,再行啟動上方煙霧機電源
"
輸出準備就緒)為止。
可自行選擇使用,更多的
能鍵數秒,讓機器的幫浦
始設定
5. D-20 LCD
確認電壓後,將機器電源線連結有接地的插座上,機器背後有兩組紅色的電源開關,
,開始溫機。此時
Warming Up
在控制器上設定所有需要的輸出模式,請參考
4-2
4-3 DNG-200
首次操作機器時,請在機器加溫完成,控制器面板顯示 "
4-4
D-20
4-5 DNG-200
“(加溫準備中)直到
機器內鍵有
DMX512
系統,在機器後方面板上設有
資訊,請參考
DMX
運轉,輸出煙霧以排除掉油管中的空氣。當煙霧順利輸出後,即可開
Pump
控制器。若機器不常使用,每次要開始使用時,請先以這個步驟將空氣排除。
的內部電熱管平均運作溫度是攝氏
控制器上的
D-20
D-20
220
DMX
控制器的操作說明。
度。
控制器上的
D-20
螢幕上顯示 "
LED
3Pin
的操作說明。
Ready To Fog
及
5Pin
“ 後,先按壓
螢幕控制器
螢幕會顯示
LCD
Ready To Fog
的兩組
圖五
◄
請先啟動下方的
“ (煙霧
連接座,
DMX
Manual
功
D-20
控制器線長 2 米,採用
5Pin 的 XLR
連接頭,
液晶顯示面板,適用於
LCD
Antari DNG -200
低
煙機,是智慧型控制器。使用者可隨需要設定煙霧機運轉功能,只需操作面板按鈕就可以輕易設定並自
動儲存在內部記憶體內,使得機器即使關機也能在下次開機後保存前一次的設定紀錄。其液晶顯示面
板,會顯示機器目前運作的情況。
控制器面板及功能鍵說明如下
5-1. Function
5-1-1
按
功能鍵
煙霧輸出間距設定
Function
功能鍵一次,螢幕上會出現
1.
Sub-menus:
-->Interval Set
-->Duration Set
-->Volume Out
-->Nonstop Burst
-->High Volume
-->Medium Volume
-->Low Volume
-->DMX 512 Add
Interval Set
(煙霧輸出間距設定)在此功能下可以運用
2.
Up-/Down-button
3. Timer-button
4. Volume-button
5. Manual-button
Page 12

DNG-200
300
按
以運用
設定範圍在
以上
後,進入工作模式,再按一次
按
5-1-2
5-1-3
Nonstop Burst
輸出量大小會由機器工作溫度自動調整。
High Volume
Medium Volume
Low Volume
上下鍵來調整在
秒之間。
煙霧輸出持續時間設定
Function
Interval
煙霧輸出量設定
Function
上下鍵來調整煙霧輸出量的設定。四段設定值說明如下:
兩次,螢幕上會出現
上下鍵來調整在
10 秒 ~ 100
(輸出間距)和
三次,螢幕上會出現
(持續煙霧輸出) 機器會持續輸出低煙霧,
(大輸出量) 約
(中輸出量) 約
(小輸出量) 約
Timer
秒之間。
Duration
計時功能模式下,煙霧輸出的間隔時間。設定範圍在
“ Duration Set ”
Timer
(輸出時間)的功能在設定好後需在
Timer
鍵,即可解除功能。
Volume Out
60 %
計時功能模式下,煙霧輸出的持續時間。
52 %
35%
(煙霧輸出持續時間設定)在此功能下,可
Timer
(煙霧輸出量)的四段功能設定,運用
的煙霧輸出量。
的煙霧輸出量。
煙霧輸出量。
10 秒 ~
鍵啟動
使用說明書
04
按
用
更多的
5-2 Timer
啟動
鍵,即可解除功能。
5-3 Volume
使用在選擇
啟動時機器會依設定模式輸出要求煙量,再按一次
5-4 Manual
按住
大的煙霧量輸出。
其他重要注意事項
6.
6-1 DNG-200
的水量是否滿溢,並適時傾倒
DMX 512
5-1-4
(定時)功能鍵
Timer
(煙霧輸出量)功能鍵
(手動強制輸出)功能鍵
Manual
位址設定
Function
DMX
功能,就能進入
Volume (
鍵,螢幕會出現
後方設有集水盤,當壓縮機運轉冷凝煙霧時,會有些許水滴流入集水盤,請注意集水盤
四次,螢幕上會出現
上下鍵來設定機器與
設定資訊,請參考
Interval (
煙霧輸出量) 的功能設定,設定值共有四段:持續輸出、大、中以及小輸出量。
Manual Output
參考圖六
(
“ DMX 512 Add “ ( DMX
控台相同位址碼。
DMX
設定說明:
DMX
輸出間距) 和
。
)
Duration (
Volume
的設定
手動強制輸出
(
輸出時間) 的功能模式,再按一次
鍵,即可解除功能。
位址設定) 在此功能下,可以運
Timer
,在此功能下,低煙機會有最
)
需要長時間使用機器,或無法隨時注意滴水狀況時,可以取下集水盤,將一條
連結機器集水槽上方的排水孔
鈕往上推,即可退出排水管。
參考圖七
(
由水管直接將滴水導流出。用完後只需將上方紅色按
)
6 mm 的 PU
管,
Page 13

DNG-200
圖六
6-2 DNG-200
器,待機器溫度降低時,
6-3
6-4
足夠的煙霧油,連結煙霧油桶的管子是否通暢,有無液體流通、檢查控制器連結,以上皆無問題,
再開啟電源。持續無法正常運作,若無法辨識原因,請勿繼續讓機器運轉,以免損壞機器,應即關
機冷卻,並連絡
6-5 DNG-200
意地面的材質,並請特別注意在上面行走或表演者的安全。
6-6 DNG-200
在使用時,注意風扇或空調對效果的影響。
機器後方有黑色四方型金屬網片,此為風扇進氣口,請勿遮擋住,並定期清潔,保持乾靜。
倘若發生煙霧量過少、機器運轉時產生噪音或無法順暢噴煙的動作,請立即關閉電源,檢查是否有
裝置有
Antari
的特性是讓低煙霧輸出後貼地而行,在長時間使用後,地面會因為水汽而產生濕滑,請注
是一種不使用乾冰的低煙特效機器,非常的環保及安全,但輸出的煙霧較易被風吹散。請
溫度感應器,當油桶內煙霧油耗盡時,
Pump
會繼續開始工作,但請隨時注意油桶內是否有足夠的煙霧油。
Pump
代理商或指定的服務處檢視,請勿自行拆卸。
◄
會因為溫升而停止運轉機
Pump
◄
圖七
使用說明書
05
機器的維護保養方式
7.
7-1
7-2
7-3
請定期的清潔您的
請勿污染煙霧油,隨時蓋上油桶的瓶蓋,及煙霧機上所裝置煙霧油桶的蓋子。
在機器不使用需收起來之前請先清潔機器並確定將油桶清空,並拆下煙導管與電源線收好,整套機
器與配件請存放於機器前方配件槽中,每月固定溫機一次,可保護機器較不受潮。
請放置機器於陰涼處
7-4
DNG-200
低煙機,將可有效的協助您降低零件更換率或維修的費用。
Page 14

DNG-200
8. DNG-200
Power
Power Consumption (Compressor) 750 W 600 W
壓縮機消耗功率
Refrigerant
Rated Current
Start Current
Capacity
Compressor's Breaker 15A 250V 10A 250V
壓縮機復歸式電流保險絲
Heater
Output
First Heat-Up Time
Fog Machine's Breaker 15A 250V 15A 250V
煙霧機復歸式電流保險絲
Tank Capacity
Fluid Consumption Rate
電源
低煙機規格說明
AC 100~120V/ 50~60Hz AC 220~240V / 50~60Hz
冷煤
R-404A, 1.75LB R-404A, 1.75LB
電流
6.7A 3.2A
機器瞬間啟動電流
容積
3200 BTU/ hr 2745 BTU/ hr
電熱管功率
煙霧輸出量
1450W 2500W
12,000 cu.ft / min 12,000 cu.ft / min
首次熱機時間
油桶容量
耗流量
61 A 21 A
24 min 12 min
10 liters 10 liters
11 min/ liter (High output) 11 min/ liter (High output)
使用說明書
06
Remote Included
Accessory Included
Weight
Dimensions (mm)
Liquid Used
DMX Channel DMX
Additional information
Floor-Mount installations ( 4 wheels)
重量
控制器
包含配件
120 Kg
尺寸
L 780 W 608 H 686 ( mm )
使用煙霧油
Antari FLR (Light Fog Liquid) Only
頻道
One Channel
其他資訊
D-20 (LCD Timer Panel Controller; 2 m)
3m Fog Conducting Hose
Self Contained Unit-- No CO2 / Dry Ice Required
Page 15

DNG-200
Antari DNG-200
DNG -200
選擇機器上
出量數值在
DMX
使用相同的系統您可以輕易的連結煙霧機、燈光、其他的特效機器做全系統的演出。
DMX
低煙機已內鍵有
3 Pin 或 5 Pin
0 ~ 255
控台控制,不再受機器原本的
數值說明:
High Volume
192-255 =
Medium Volume
127-191=
Low Volume
32-126 =
DMX 512
連結座以連結
之間。連結
大輸出量
中輸出量
小輸出量
的功能,並設有
DMX
D-20
內鍵式
DMX
控台後,有關於動作的時間、噴煙量的大小及噴煙量的間距都由
192-255 = High Volume
127 – 191 = Medium Volume
32 – 126 = Low Volume
控台,
控制器控制。
DMX
3 Pin
DNG-200
設定說明
及
兩組公母連接座。使用時可以隨意
5 Pin
只使用一個控制頻道,每一個頻道的輸
大輸出量
小輸出量
(60 %)
中輸出量
( 35% )
(52%)
使用說明書
07
Off
關
0-31 =
如果頻道的設定數值在
煙霧輸出量的設定數值在
煙霧輸出量的設定數值在
煙霧輸出量的設定數值在
0 ~ 31
0 - 31 = Off /
之間,這台機器將無法有足夠的輸出量運作。
32 到 126
127 到 191
191 到 255
之間,機器能啟動的最小的輸出量
之間,機器能啟動的中等的輸出量
之間,機器能啟動的最大的輸出量
關
35%
52%
60%
。
。
。
請妥善保存此說明書
Page 16

2008 Antari Lighting & Effects Ltd.
For current product information visit Antari at :
www.antair.com / www.antari.com.tw
For information requesits please contact us at :
sales@antari.com
C08DNG200
 Loading...