

Page 1
English Français Deutsch • • • 中文
AF-3
Compact Special Effects Fan
User Manual
© 2014 Antari Lighting and Effects Ltd.
1
Page 2

2
Page 3
Antari AF-3 Compact Special Effects Fan User Manual
Congratulations on the purchase of your new Antari AF-3 Compact Special Effects Fan.
Prior to use, we suggest that you carefully read all of the instructions. By following the
suggestions found in this user manual, you can look forward to the reliable and satisfactory
performance of your Antari AF-3 Compact Special Effects Fan for years to come.
Caution
1. Operate only with adult supervision.
2. Keep hands off and do not insert any objects into the fan.
3. This fan is not water-resistant. Avoid splash water.
4. Unplug the machine when it is not in use or unattended.
5. Prevent the vents from being blocked by anything.
Wind Speed Control
The wind speed of the fan can be adjusted linearly using the rotary switch, the wireless
remote control, or a DMX controller.
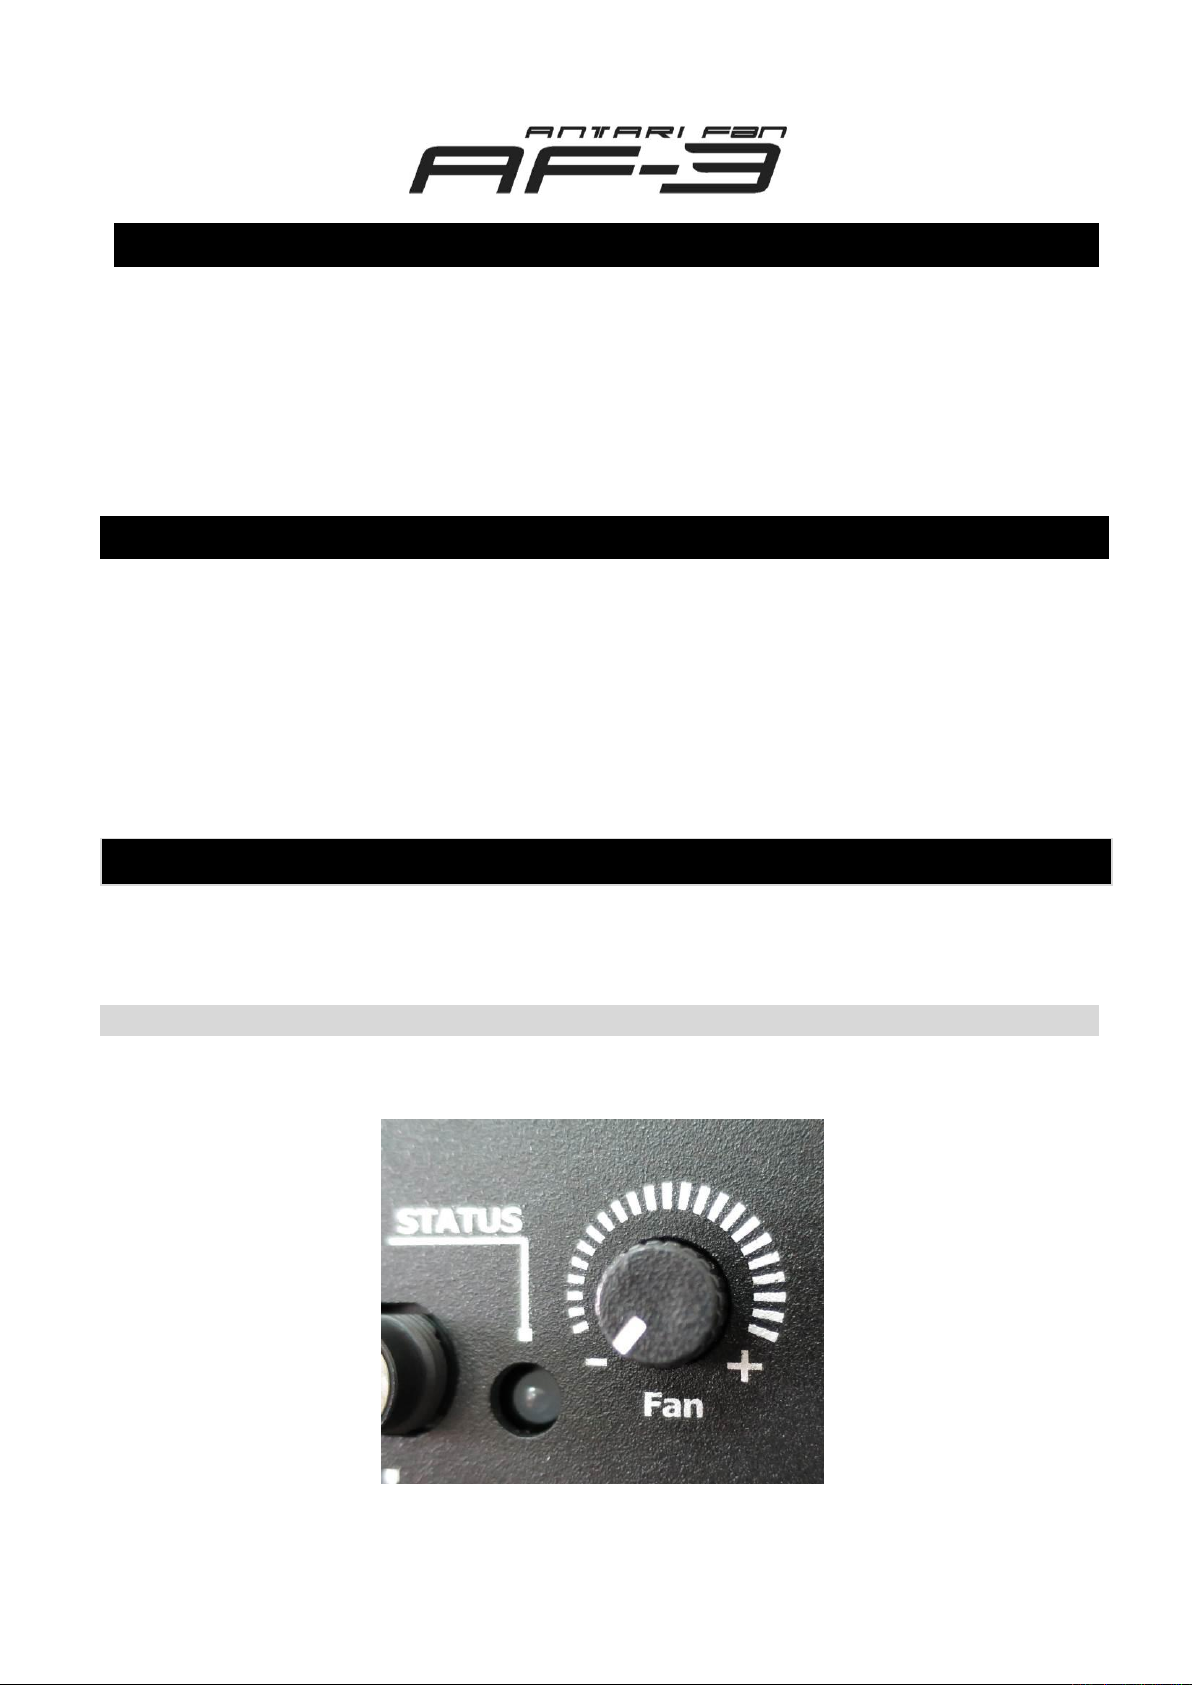
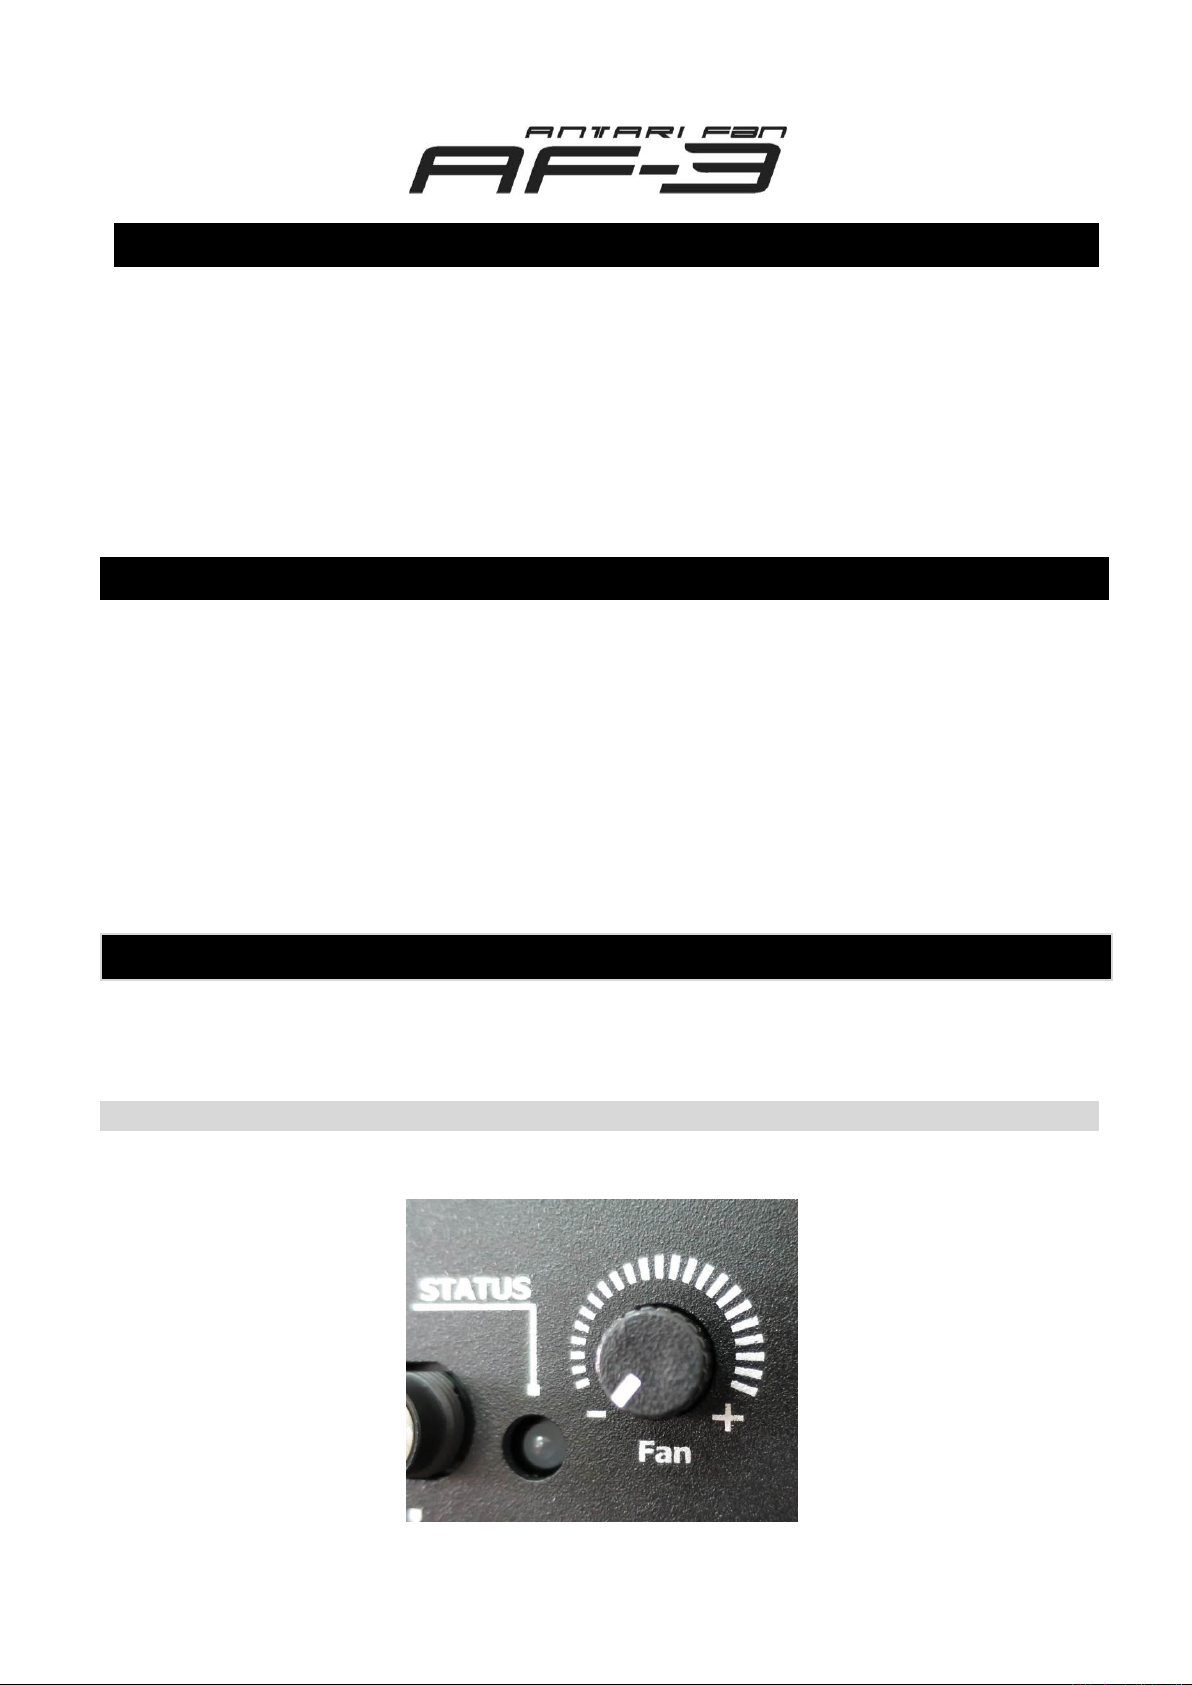
1. Manual Control
Manual Control Knob
3
Page 4
For manual control, turn the rotary knob to linearly adjust the wind output from minimum
(-) to maximum (+).
The flashing green light indicates the fan is in stand-by state. When the orange light is
on, the fan is running.
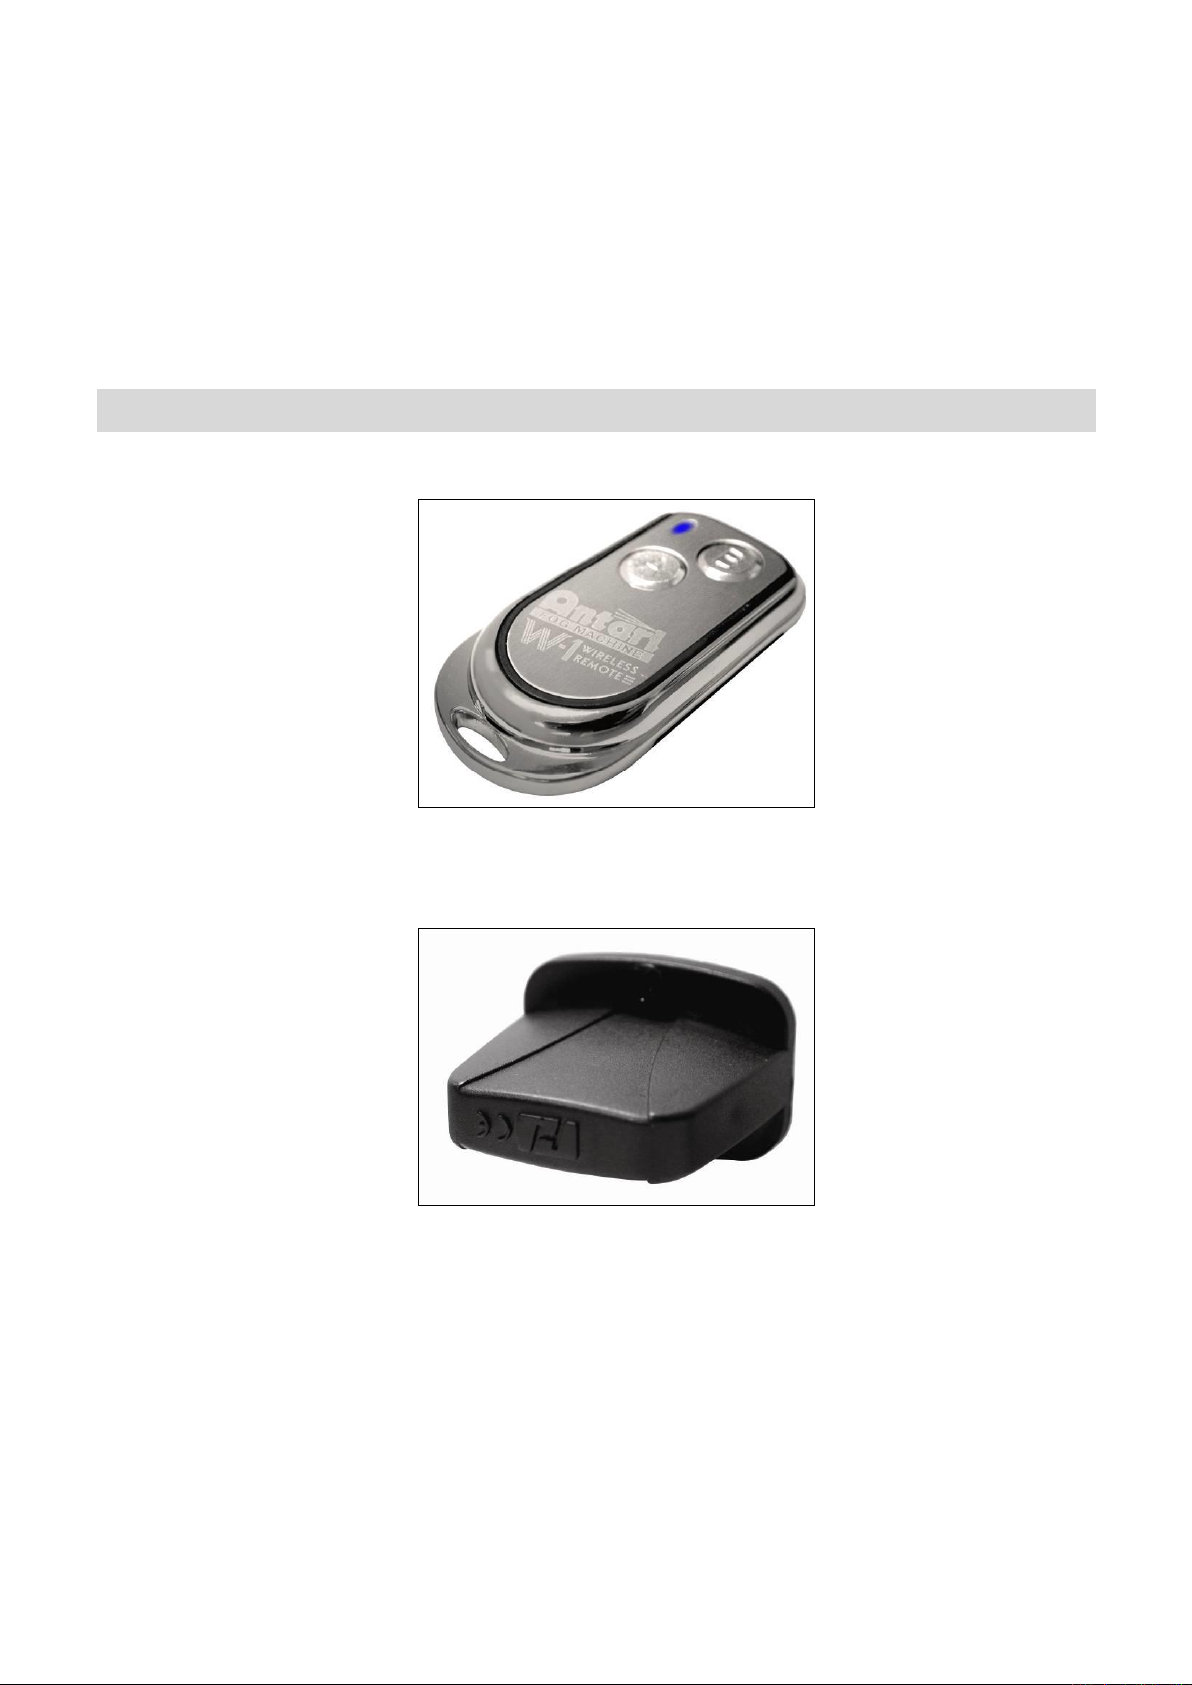
2. Wireless Control (For AF-3R and AF-3XR versions only)
W-1 Wireless Remote Control
Receiver
For wireless remote control, set DIP switch no. 10 to position ON.
All wireless transmitters included in the boxes, have been paired with the wireless
receiver during production at the factory. Users can press button A on the transmitter to
run the fan. Pressing button B stops the fan. Please note, under wireless remote control
mode, the wind output is still controlled by the rotary knob.
4
Page 5
If you wish to pair additional wireless transmitters on the same fan, please follow the
instructions below:
1. Plug in the fan.
2. Set DIP switch no. 10 to position OFF.
3. And then set DIP switch no. 10 to position ON. At this moment, the red light is on for
about 10 seconds. During the 10 seconds, you can press any button (A or B) on the
transmitter to pair it. When the wireless receiver has the signal, the green light will
flash to confirm the registration.
4. When the light starts flashing green, the wireless transmitters are good to go.
Please note that wireless remote function is optional, and it is only applicable to AF-3R or
AF-3XR versions.
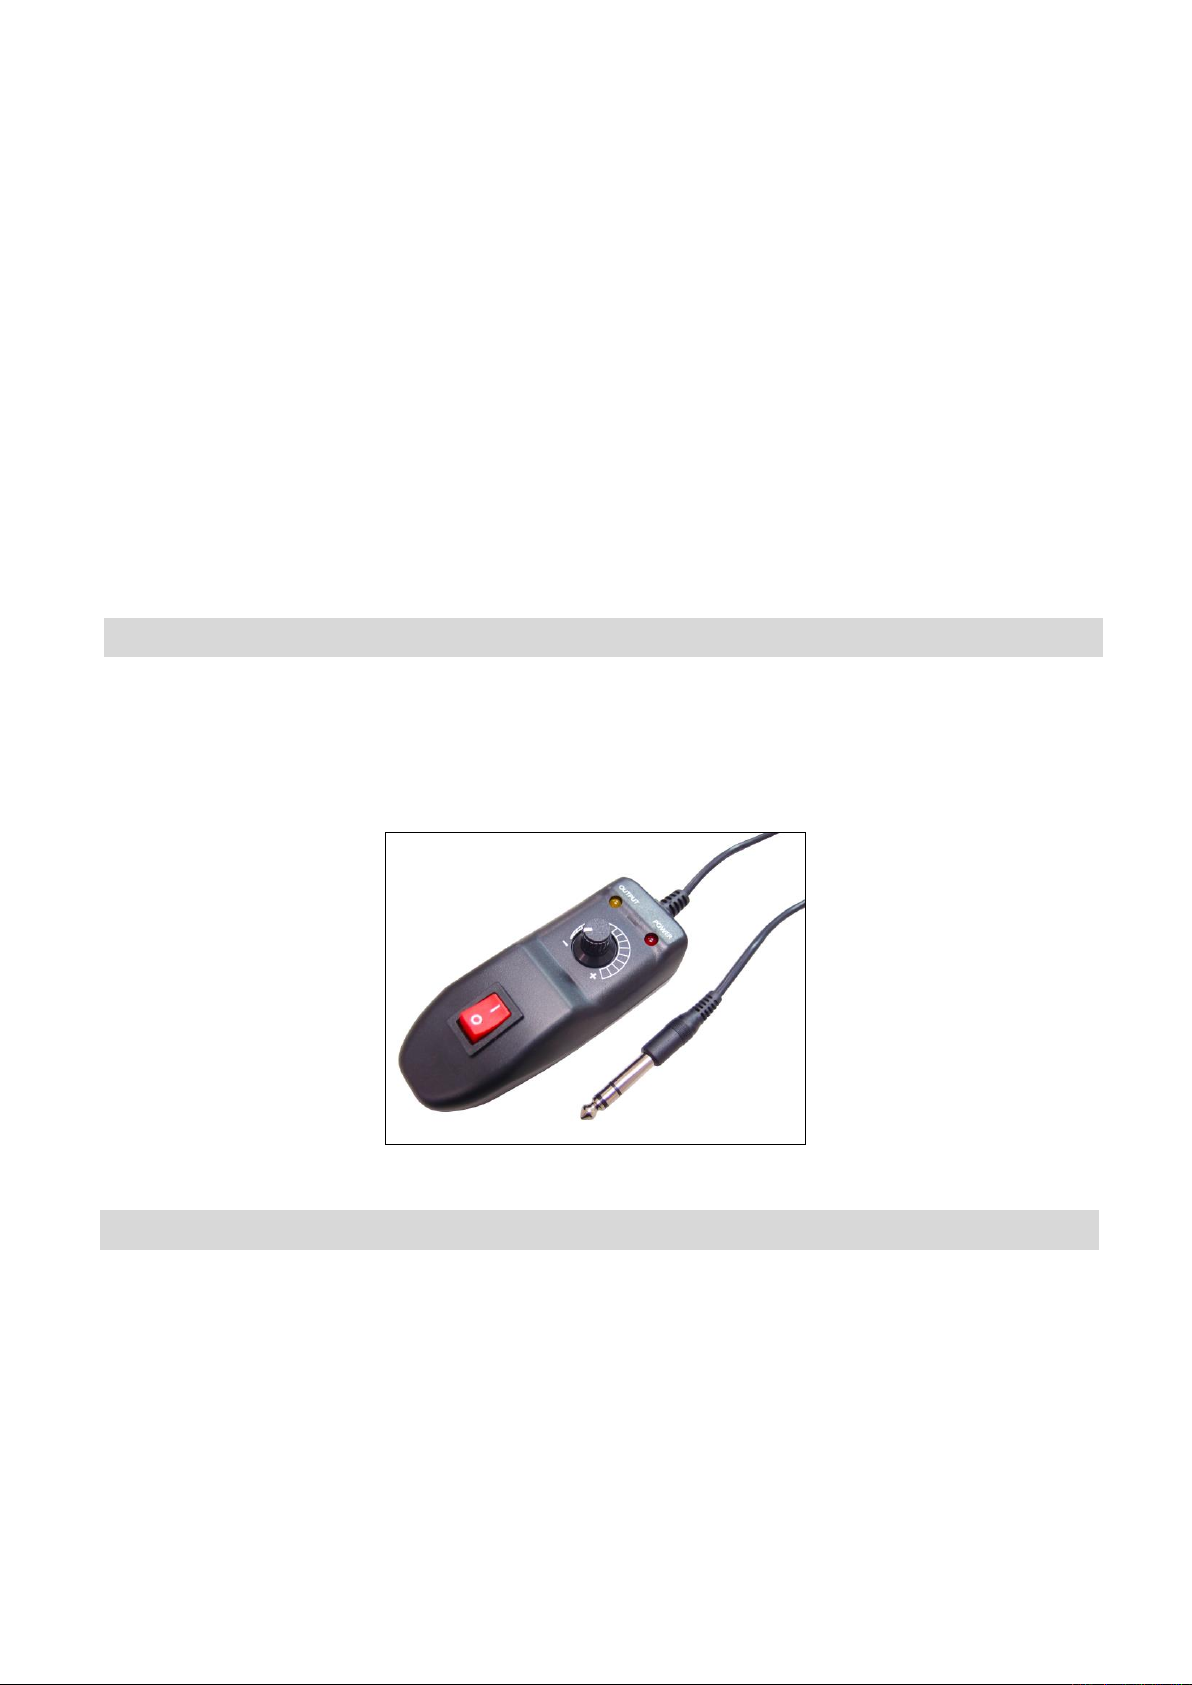
Z-3 Remote Control Operation (Optional)
To operate the machine by remote control, connect the remote to the microphone jack
located on the rear of machine. Use the switch to turn wind on/off, and use the rotary knob
to adjust the output volume from 0~100%.
3. DMX Control
DMX Connector Pin Assignment
The machine provides 3-pin or 5-pin XLR connectors for DMX connection. Please advise
the DMX specifications requested while ordering. The diagram below indicates pin
assignment information.
5
Page 6
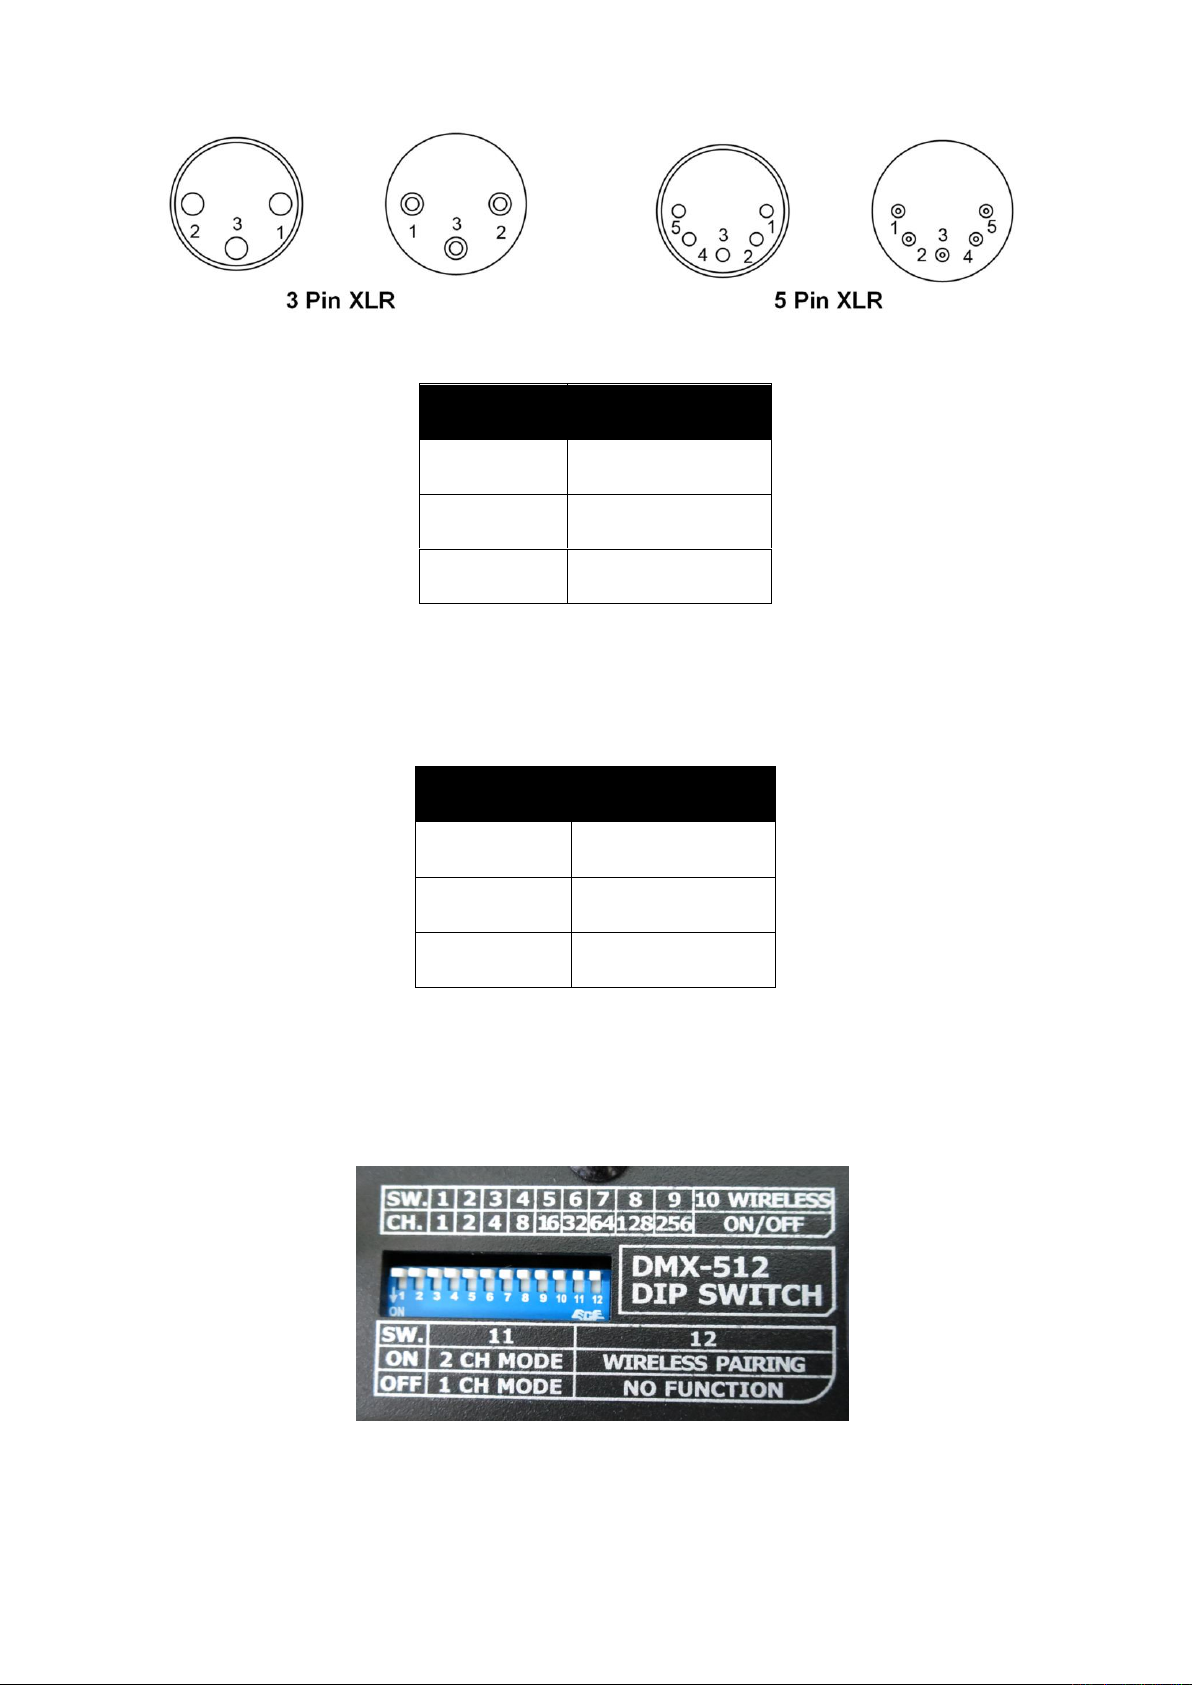
Pin
Function
1
Ground
2
Data-
3
Data+
DMX value
Function
0~5
Fan off
6~254
Speed up linearly
255
Maximum speed
The machine uses one DMX channel for adjusting the fan speed.
DMX setting:
DMX control will override both manual and wireless control functions.
DMX addressing by DIP switches:
6
Page 7

DIP
1 2 3 4 5 6 7 8 9
10
Ch.
1 2 4 8 16
32
64
128
256
Wireless pairing,
control on/off
SW.
11
12
ON
2 CH Mode
Wireless Pairing
OFF
1 CH Mode
No Function
The AF-3 features a Powercon output connector (not available
for model AF-3X) for the joint application with another effect
machine without occupying an extra electric socket.
4. Optional Remote Control
There is a 1/4 inch jack socket available on each AF-3 fan. This allows users to choose
optional Z-3 remote to control the wind output.
Power Output Connector
7
Page 8
Technical Specifications
Model
AF-3 / AF-3R
Voltage
AC-100V/120V/220V/230V/240V, 50Hz-60Hz
Power Consumption
AC-120V/230V, 100W
Maximum Airflow
900m3/hr, 530CFM (50Hz)
1020m3/hr, 600CFM (60Hz)
Fan Speed
750~2550 rpm (50Hz)
750~2800 rpm (60Hz)
DMX Mode
1 Channel (0-5 Off, 6-255 speed up linearly)
2 Channel (0-127 Off , 128-255 On)
Dimensions (mm)
332.9 (W) x 370 (H)
Weight
6.3 kg
*Please read and save these instructions*
8
Page 9
Antari AF-3 Compact Special Effects Fan Mode d'emploi
Nous vous félicitons pour l'achat de votre nouvelle Antari AF-3 Compact Special Effects
Fan. En vue d'utiliser correctement votre nouvel appareil, veuillez lire attentivement ce
mode d'emploi. Si vous respectez les instructions suivantes, vous profiterez d'une
performance solide et convaincante de votre Antari AF-3 Compact Special Effects Fan pour
de nombreuses années.
Attention
1. L'usage de cet appareil n'est prévu que pour les adultes.
2. Éloigner les mains et ne jamais insérer des objets au ventilateur.
3. L’appareil a été conçu pour un emploi dans des locaux clos. Ne pas utiliser à l’extérieur.
Évitez les projections d'eau.
4. Mettre la machine hors de service quand vous n'utilisez pas la machine.
5. Ne jamais desservir les ouvertures de la machine.
Ajuster la vitesse de vent
La vitesse du ventilateur est ajustable en trois pas grâce au commutateur rotatif, la
télécommande sans fil, ou un contrôleur DMX.
1. Opération manuelle
Commutateur rotatif
9
Page 10

Ajustez la vitesse comme souhaité avec le commutateur rotatif entre minimum (-) et
maximum (+).
En mode stand-by, la LED est allumée en verte. Quand le ventilateur est mis en service,
la LED est allumée en orange.
2. Opération sans fil (modèles AF-3R et AF-3XR seulement)
W-1 Télécommande sans fil
Récepteur
Pour choisir l'opération sans fil, 10 à ON.
La télécommande inclus est registré avec la machine avant la livraison. Pour actionner
le ventilateur, appuyez sur le bouton A sur la télécommande. Pour désactiver le
ventilateur, appuyez sur le bouton B. Ajustez la vitesse comme souhaité avec le
commutateur rotatif.
10
Page 11

Pour le fonctionnement de la machine avec un transmetteur différent que livré,
procédez de la manière suivante.
5. Mettez l'appareil en service.
6. Mettez l'interrupteur DIP 10 à OFF.
7. Mettez l'interrupteur DIP 10 à ON. L'indicateur LED clignote pendant environ 10
secondes. Pendant l'intervalle de 15 seconds, l'usager peut registrer un ou
plusieurs de transmetteurs en pressant le bouton “A” ou “B” sur chaque
transmetteur. Quand le signal d'enregistrement est bien reçu du récepteur, la LED
verte clignote.
8. Quand la LED verte clignote, les transmetteurs sont activés.
Veuillez observer que la fonctionne télécommande sans fil est optionnelle et disponible
seulement pour les versions AF-3R et AF-3XR.
Z-3 Télécommande (Accessoire)
Pour contrôler la machine avec la télécommande, branchez la fiche jack à la prise jack à
l’arrière de la machine. Utilisez le bouton pour marche/arrêt le ventilateur, et ajustez la
vitesse avec le régulateur rotatif.
3. Opération DMX
Configuration de la connexion DMX
La machine possède fiches XLR 3 pôles et 5 pôles pour connecter un contrôleur DMX. Le
graphique ci-dessous montre la configuration des fiches.
11
Page 12

Contact
Fonction
1
Masse
2
Signal-
3
Signal+
Valeur DMX
Fonction
0~5
ventilateur arrêt
6~254
vitesse linéaire
255
vitesse maximal
L'appareil a un canal de contrôle pour le réglage de la vitesse du ventilateur.
Réglages DMX :
En mode contrôle par DMX, il n'est plus possible de contrôler la machine manuellement
ou sans fil avec la télécommande.
Ajustez l'adresse DMX par interrupteurs DIP :
12
Page 13

DIP
1 2 3 4 5 6 7 8 9
10
canal
1 2 4 8 16
32
64
128
256
Connexion sans
fil, marche/arrêt
DIP
11
12
ON
Mode 2 canaux
Connexion sans fil
OFF
Mode 1 canal
Sans fonction
La machine possède une sortie Powercon (sauf modèle AF-3X)
pour l’alimentation d’un second appareil.
4. Télécommande (Accessoire)
La machine possède une prise jack pour connecter la télécommande Z-3 (facultatif).
Vous pouvez sélectionner la télécommande Z-3 pour contrôler le débit d’air.
Sortie d'alimentation
13
Page 14

Caractéristiques Techniques
Modèle
AF-3 / AF-3R
Alimentation
AC-100V/120V/220V/230V/240V, 50Hz-60Hz
Puissance de
rendement
AC 120V/230V, 100W
Débit d'air max
900 m³/h, 530 CFM (50 Hz)
1020 m³/h, 600 CFM (60 Hz)
Vitesse du ventilateur
750~2550 tr/min (50 Hz)
750~2800 tr/min (60 Hz)
Mode DMX
1 canal (0-5 arrêt, 6-255 vitesse progressive)
2 canaux (0-127 arrêt, 128-255 marche)
Dimensions (mm)
332.9 (L) x 370 (H)
Poids
6.3 kg
*Lisez et gardez ces instructions.*
14
Page 15

Antari AF-3 Compact Special Effects Fan Bedienungsanleitung
Vielen Dank, dass Sie sich für einen Antari AF-3 Compact Special Effects Fan entschieden
haben. Vor Benutzung der Maschine bitte unbedingt diese Bedienungsanleitung sorgfältig
lesen. Wenn Sie die Hinweise in dieser Bedienungsanleitung beachten, können Sie sich in
den nächsten Jahren auf eine zuverlässige und überzeugende Leistung Ihrer
Antari-Maschine freuen.
Achtung
1. Nur für Erwachsene. Betreiben Sie das Gerät niemals unbeaufsichtigt.
2. Hände fernhalten. Es dürfen keine fremden Gegenstände in das Gebläse gelangen.
3. Diese Maschine ist nicht wasserdicht. Vermeiden Sie Spritzwasser.
4. Trennen Sie bitte die Maschine nach dem Betrieb vom Netz.
5. Decken Sie niemals die Luftöffnungen der Maschine ab.
Windgeschwindigkeit einstellen
Die Windgeschwindigkeit des Gebläses lässt sich linear mit dem Drehschalter, der
Funkfernbedienung oder einem DMX-Controller einstellen.
1. Manueller Betrieb
Drehschalter
15
Page 16

Stellen Sie mit dem Drehschalter die gewünschte Leistungsstufe für das Gebläse von
Minimum (-) bis Maximum (+) ein.
Im Standby-Betrieb blinkt die grüne Kontrollanzeige. Bei Betrieb des Gebläses leuchtet sie
orange.
2. Funkfernsteuerung (Nur bei Modell AF-3R und AF-3XR)
W-1 Funkfernbedienung
Empfänger
Stellen Sie für die Funksteuerung DIP-Schalter Nr. 10 auf ON.
Die mitgelieferte Funkfernbedienung ist vor der Auslieferung auf den Empfänger
adressiert worden. Taste A schaltet das Gebläse ein. Taste B schaltet das Gebläse aus.
Die Windgeschwindigkeit des Gebläses lässt sich weiterhin mit dem Drehschalter
einstellen.
16
Page 17

Befolgen Sie folgende Schritte, um weitere Funkfernbedienungen auf die Maschine zu
adressieren:
9. Schließen Sie die Maschine ans Netz an.
10. Stellen Sie DIP-Schalter Nr. 10 auf OFF.
11. Stellen Sie DIP-Schalter Nr. 10 wieder auf ON. Die Kontrollanzeige leuchtet jetzt für
10 Sekunden rot. Drücken Sie während dieses Zeitraums zur Adressierung die
Taste A oder B. Zur Bestätigung der Adressierung blinkt die Kontrollanzeige
wiederholt grün.
12. Die Funkfernbedienungen können jetzt verwendet werden.
Hinweis: Die Funkfernbedienung ist separat erhältliches Zubehör für die Modelle AF-3R
und AF-3XR.
Z-3 Kabelfernbedienung (Zubehör)
Schließen Sie die Fernbedienung an die 6,3-mm-Klinkenbuchse an. Verwenden Sie den
Kippschalter, um das Gebläse ein- und auszuschalten und den Drehregler, um die
Windgeschwindigkeit des Gebläses anzupassen.
3. DMX-Steuerung
Belegung der DMX-Anschlüsse
Die Maschine verfügt über 3-polige und 5-polige XLR-Anschlüsse für den DMX-Anschluss.
Die nachfolgende Grafik zeigt die Belegung der Buchsen.
17
Page 18

Kontakt
Funktion
1
Masse
2
Data-
3
Data+
DMX-Wert
Funktion
0~5
Gebläse aus
6~254
Windgeschwindigkeit
zunehmend
255
Maximale
Geschwindigkeit
Die Leistung des Gebläses kann über einen DMX-Steuerkanal reguliert werden.
DMX-Einstellungen:
Die DMX-Steuerung hat Vorrang gegenüber dem manuellen Betrieb und der
Funksteuerung.
DMX-Adressierung mit den DIP-Schaltern:
18
Page 19

DIP
1 2 3 4 5 6 7 8 9
10
Kanal
1 2 4 8 16
32
64
128
256
Funkverbindung,
an/aus
Schalter
11
12
ON
2-Kanal-Modus
Funkverbindung
OFF
1-Kanal-Modus
keine Funktion
4. Kabelfernbedienung (Zubehör)
Die Maschine verfügt über eine 6,3-mm-Klinenbuchse für den Anschluss einer
Kabelfernbedienung. Hier kann die als Zubehör erhältliche Fernbedienung Z-3
angeschlossen werden.
19
Page 20

Netzanschluss
Zum Weiterleiten der Stromversorgung verfügt die Maschine
über einen Powercon-Ausgang (außer Modell AF-3X).
Modell
AF-3 / AF-3R
Spannungsversorgung
AC-100 V/120 V/220 V/230 V/240 V, 50 Hz - 60 Hz
Gesamtanschlusswert
AC 120 V/230 V, 100 W
Maximaler
Luftdurchsatz
900 m³/h, 530 CFM (50 Hz)
1020 m³/h, 60 CFM (60 Hz)
Drehzahl
750~2550 U/Min. (50 Hz)
750~2800 U/Min. (60 Hz)
DMX-Kanäle
1-Kanal-Modus (0-5 Aus, 6-255 Geschwindigkeit
zunehmend)
2-Kanal-Modus (0-127 Aus, 128-255 An)
Maße (mm)
332,9 (B) x 370 (H)
Gewicht
6,3 kg
Technische Daten
*Bitte lesen Sie diese Anweisungen und bewahren Sie sie gut auf.*
20
Page 21

Antari AF-3 輕巧型特效風扇使用說明書
恭喜您成為 Antari AF-3 輕巧型特效風扇的使用者。
在開始使用之前,我們建議您先仔細地閱讀此說明書,遵循手冊中的說明,這可讓您達到最
安全且最佳的效果,也使機器的使用年限更為延長。
警告
1. 請在有成人監督的情況下操作此機器。
2. 請勿將手或任何的異物伸入風扇。
3. 此機器不防水,請勿使其遭水潑濺。
4. 無人監控的情況下,請切斷電源。
5. 請避免進風口和出風口遭異物堵塞。
風速控制
此風扇可用以下 4 種方式控制風速
1. 手動控制:
手動控制旋鈕
手動控制時,使用控制旋鈕可以線性調節風速從最小到最大。
當綠燈亮起時,代表機器為待機狀態;當橘燈亮起時,代表機器正在運作。
21
Page 22

2. 無線控制:適用於 AF-3R 與 AF-3XR 機型 (選配)
AF-3R 與 AF-3XR 內建有無線控制系統,設定方式如下:
W-1 無線發射器
無線接收器
將指撥開關(DIP Switch)的 10 號撥到”On”的位置,可以使用 W-1 無線發射器控制風扇。
所有的 W-1 無線發射器都包裝在盒子中,在生產時已與無線接收器對頻完成。使用者可
按下 W-1 無線發射器上的 A 鍵,來使機器運作,按下 B 鍵停止機器運轉。請注意,當使
用無線控制模式時,風速仍可以透過手動旋鈕控制。
若您想要與其他的無線控制器對頻,請按照以下步驟完成對頻:
13. 將風扇接上電源
14. 將指撥開關 10 號撥到”off”的位置。
15. 再將指撥開關 10 號撥到”on”的位置。此時紅燈會亮起約十秒。在這十秒內,請按下
W-1 無線發射器的 A 鍵或 B 鍵來完成對頻。當無線接收器收到訊號,綠燈會閃爍代表
收到訊號。
22
Page 23

16. 綠燈閃爍時,無線發射器已完成對頻可以使用。
Pin
功能
1
接地
2
數據-
3
數據+
請注意,無線控制器是選配,只有 AF-3R 與 AF-3XR 能使用無線控制模式。
Z-3 控制器操作(選配)
使用控制器操作機器時,請將 Z-3 控制器連結位於機器背面的麥克風插座。使用開/關來啟動
風扇,使用旋鈕調節輸出量從 0~100%。
3. DMX 控制:
DMX 連接 Pin 的接點說明
AF-3 提供 3-pin 或 5-pin XLR 的 DMX 連接選擇。 (請在下訂單前通知您的代理商所需規格,以
便向 Antari 原廠作需求。) 下方為 Pin 的接點說明:
23
Page 24

此機器佔用一個 DMX 頻道來調節風速。
DMX 數值
功能
0~5
風扇停止運轉
6~254
線性調節風速
255
最大風速
SW. 1 2 3 4 5 6 7 8
9
10
Ch. 1 2 4 8
16
32
64
128
256
無線控制
無線發射器對頻
開/關
SW.
11
12
ON
使用 2 個頻道(頻道 1 為設定風扇
啟動,頻道 2 為設定風量輸出)
無線發射器對頻
OFF
使用 1 個頻道(風量輸出固定)
不運作
DMX 設定:
DMX 控制為最優先,也就是說接上 DMX 訊號時,無法以手動和無線控制風扇.
DMX 位址則以指撥開關(DIP switches)來做設定,如下:
24
Page 25

4. 選配控制器
AF-3 配有 Powercon 電源輸出功能(AF-3X 沒有) ,可與其他特效機器
搭配使用,而不佔用額外的電源插座。
注意: 此電源輸出端最大電流不得超過 13 安培 (13A)
注意:この電源出力は 100V 13A までの機器が接続できます
型號
AF-3 / AF-3R
電源
AC-100V/120V/220V/230V/240V,50Hz-60Hz
功率
AC-120V/230V,100瓦
最大風量
900m3/hr, 530CFM (50Hz)
1020m3/hr, 600CFM (60Hz)
風速
750~2550 rpm (50Hz)
750~2800 rpm (60Hz)
DMX模式
頻道1 (0-5 關閉 ,6-255線性調節風速)
頻道2 (0-127 關閉 , 128-255 開啟)
尺寸 (mm)
332.9 (W) x 370 (H)
重量
6.3 kg
在每台 AF-3 風扇上都有 1/4 英吋的插孔,可與 Z-3 控制器連接,控制 AF-3 的風速。
電源輸出功能
規格說明
*請妥善保存此說明書*
25
Page 26

________________________________________
________________________________________
________________________________________
________________________________________
________________________________________
________________________________________
________________________________________
________________________________________
________________________________________
________________________________________
________________________________________
________________________________________
________________________________________
________________________________________
________________________________________
________________________________________
________________________________________
________________________________________
________________________________________
________________________________________
26
Page 27

________________________________________
________________________________________
________________________________________
________________________________________
________________________________________
________________________________________
________________________________________
________________________________________
________________________________________
________________________________________
________________________________________
________________________________________
________________________________________
________________________________________
________________________________________
________________________________________
________________________________________
________________________________________
________________________________________
________________________________________
27
Page 28

C08AF3001
28
 Loading...