

Page 1
Smart Fan with Wi-Fi
User Manual
Model No.: HEGSM40
Rev 2
Note: The specifi cations and/or com ponents of this appliance are subject to change without prior notice.
Page 2

Page 2 of 28
Page 3

1 Safety Instructions ....................................................................... 4
2 Components ................................................................................. 6
3 Assembly ...................................................................................... 7
3.1 Base and Stand ........................................................................................... 7
3.2 Attach Head to Stand .................................................................................. 8
3.3 Safety Grille and Fan Blade ........................................................................ 9
4 Instructions for Use ................................................................... 13
4.1 Head Tilt ......................................................................................................13
4.2 Height Adjustment .....................................................................................13
5 Remote Control .......................................................................... 14
6 Smartphone Control App Setup ............................................... 15
7 Wi-Fi Pairing ............................................................................... 16
7.1 How to Reset the Fan Wi-Fi........................................................................17
8 Operation .................................................................................... 18
8.1 Using the Fan Remote Control and Fan Control Panel.............................18
8.2 Fan Modes ..................................................................................................19
8.2.1 Normal Mode........................................................................................................ 19
8.2.2 Nature Mode ........................................................................................................ 19
8.2.3 Sleep Mode .......................................................................................................... 19
8.3 Timer ...........................................................................................................20
8.4 Oscillating (Swing) Function .....................................................................20
8.5 Using the Smart Phone App ......................................................................20
9 Using Google Home Device ...................................................... 22
9.1 Link TuyaSmart account in Google Home Control .................................23
9.2 Control your Fan through Google Home ..................................................23
10 Using Amazon Echo Device ...................................................... 24
10.1 Control your Fan through Echo .................................................................24
11 Shared Device ............................................................................ 25
12 Care and Cleaning ..................................................................... 25
13 Storage........................................................................................ 25
14 Troubleshooting ......................................................................... 26
15 Warranty Against Defect ........................................................... 27
Page 3 of 28
Page 4

1 Safety Instructions
When using electrical appliances, basic safety precautions should always be followed,
including the following:
• Carefully read this instruction manual before using appliance.
• Ensure that the fan is switched off from the supply mains before removing the guard.
• Keep appliance out of reach of young children.
• This appliance is not intended for use by persons (including children) with reduced
physical, sensory or mental capabilities, or lack of experience and knowledge, unless
they have been given supervision or instruction concerning use of the appliance by a
person responsible for their safety.
• Children should be supervised to ensure that they do not play with the appliance.
• Ensure children and babies do not play with plastic bags or any packaging materials.
• Do Not disassemble the appliance. There are no user serviceable parts inside.
• VERY IMPORTANT:
Ensure that appliance does not get wet (water splashes etc.).
Do not use appliance with wet hands.
Do not immerse appliance in water or other liquids or use near sinks, baths or showers.
• Always operate the appliance from a power source of the same voltage, frequency and
rating as indicated on the product identification plate.
• Position the power supply lead properly so that they will not be walked on or pinched
by items placed on or against them.
• Use appliance only for its intended use. Appliance is intended for household use only
and not for commercial or industrial use.
• Do not use appliance if it has been dropped or any part of appliance (including cord or
plug) has been damaged.
• If the supply cord is damaged, it must be replaced by the manufacturer, its service
agent or similarly qualified persons in order to avoid a hazard.
• The use of accessories not intended for use with this appliance may cause injuries to
the user or damage to the appliance.
• Do not install the unit on other appliances, on uneven surfaces or where it could be
subject to: heat sources (e.g. radiators or stoves), direct sunlight, excessive dust or
mechanical vibrations.
Page 4 of 28
Page 5

• Appliance should not be used outdoors, placed near a hot gas or electrical burner or
placed in a heated oven.
• Do not install near any heat sources such as radiators, heat registers, stoves, or other
apparatus that produce heat.
• Do not hang or wall-mount the appliance.
• Do not operate appliance underneath or near flammable or combustible materials (e.g.
curtains). Keep at least 300mm clearance around sides, back, front and top.
• Do not allow curtains, drapes or any other items to drape across the appliance or
openings.
• Unplug this apparatus during lightning storms or when unused for long periods of time.
• Do not block any ventilation openings.
• Never insert fingers or any other objects through the fan guard and ventilation
openings.
• Do not use the product in oily or dirty areas (e.g. the kitchen, smoky place, etc), as the
air vents may becom e blocked.
• Turn off and unplug before cleaning or storing.
• There are no user serviceable parts in this appliance.
• If this appliance is used by a third party, please supply the instruction manual with it.
• Do not misuse the cord. Never carry the appliance by the cord or pull to disconnect it
from the outlet. Instead, grasp the plug and pull to disconnect.
• Do not insert or allow foreign objects to enter the grille openings as this may cause
damage to the appliance and/or injury to the user.
• No liability can be accepted for any damage caused by non-compliance with these
instructions or any other improper use or mishandling of appliance.
Additional Safety Instructions
If using an extension cord:
• The technical specifications of the extension cord must match or exceed the technical
specifications of this appliance.
Page 5 of 28
Page 6
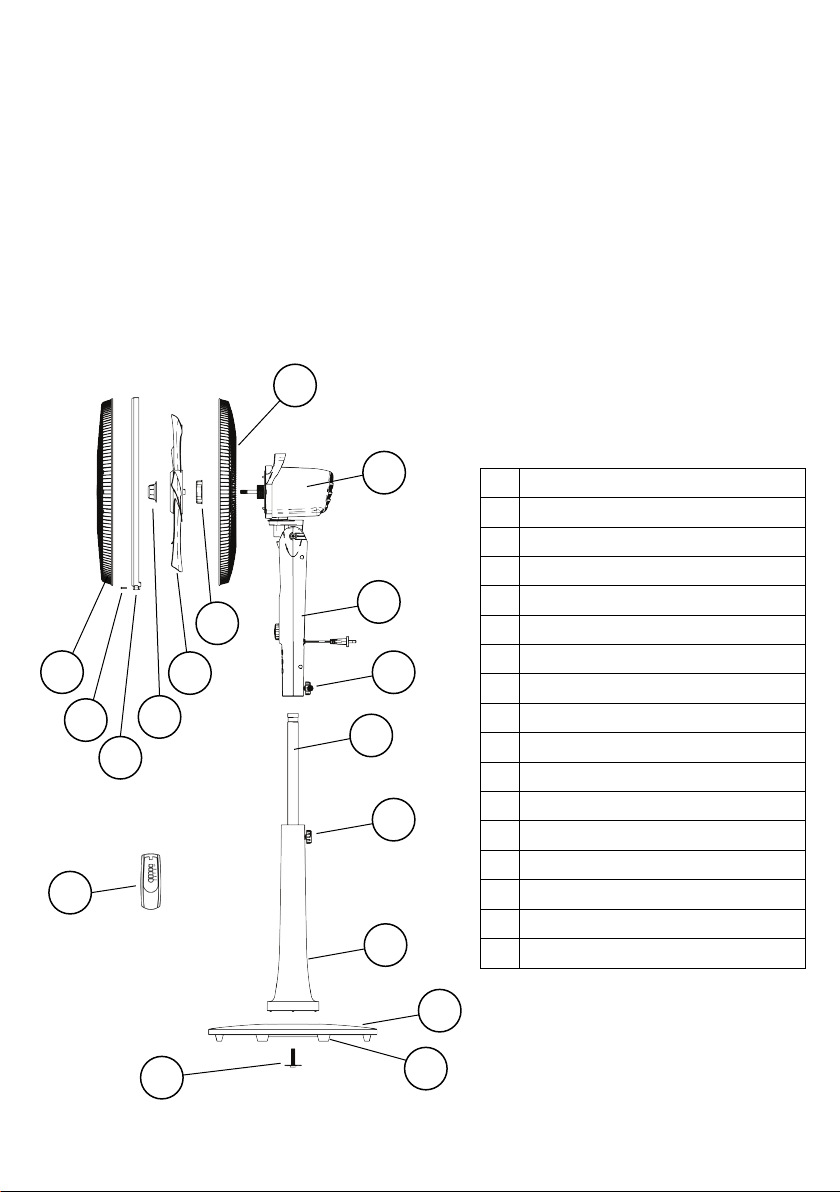
1 2 3 4 5
6 7 8
9
11
10
12
13
14
16
15
17
• Do not allow the cord to hang over the edge of the work surface or to come into contact
with stoves or other hot surfaces.
• If the cord or plugs are worn or damaged, do not use.
• Unplug from the power socket by grasping the plug body - Do Not pull on the cord.
Read and Save These Instructions
2 Components
1 Front Grille
2 Locking Screw
3 Fan Grille Lock / Band
4 Fan Blade Spinner N ut
5 Fan Blade
6 Rear Grille Nut
7 Rear Grille
8 Motor Head Assembly
9 Control Body
10 Head to P ost Locking Screw
11 Inner chrome tube
12 Height Adjustment Locking Screw
13 Stand Post
14 Bas e C over
15 Bas e W eight
16 Screw and Was her
17 Remote C ontrol
Page 6 of 28
Page 7
3 Assembly
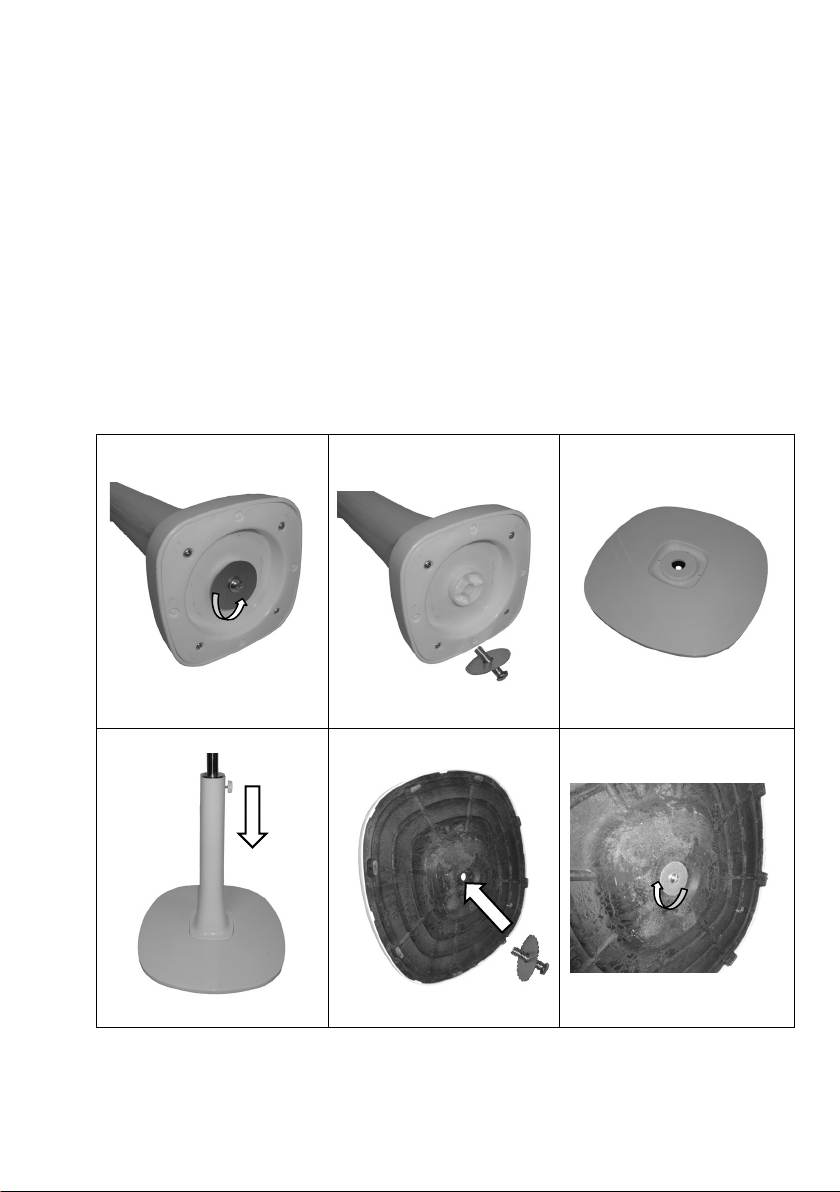
3.1 Base and Stand
Your Fan has been boxed unassembled to minimise packaging waste. Each part is
designed to fit together and be disassembled easily for cleaning or storage.
• First, with the aid of a Philips Head screwdriver, unscrew the Screw and Washer
from the bottom of the stand post. (Anticlockwise).
• Place the base flat on the floor and fit the post into the recess in the top of the base.
• Whilst holding the post and base together, tip up so that the underneath of the base
is accessible.
• Place the Screw and Washer through the hole and with the aid of a Philips Head
screwdriver, tighten the Screw and Washer. (Clockwise).
Page 7 of 28
Page 8
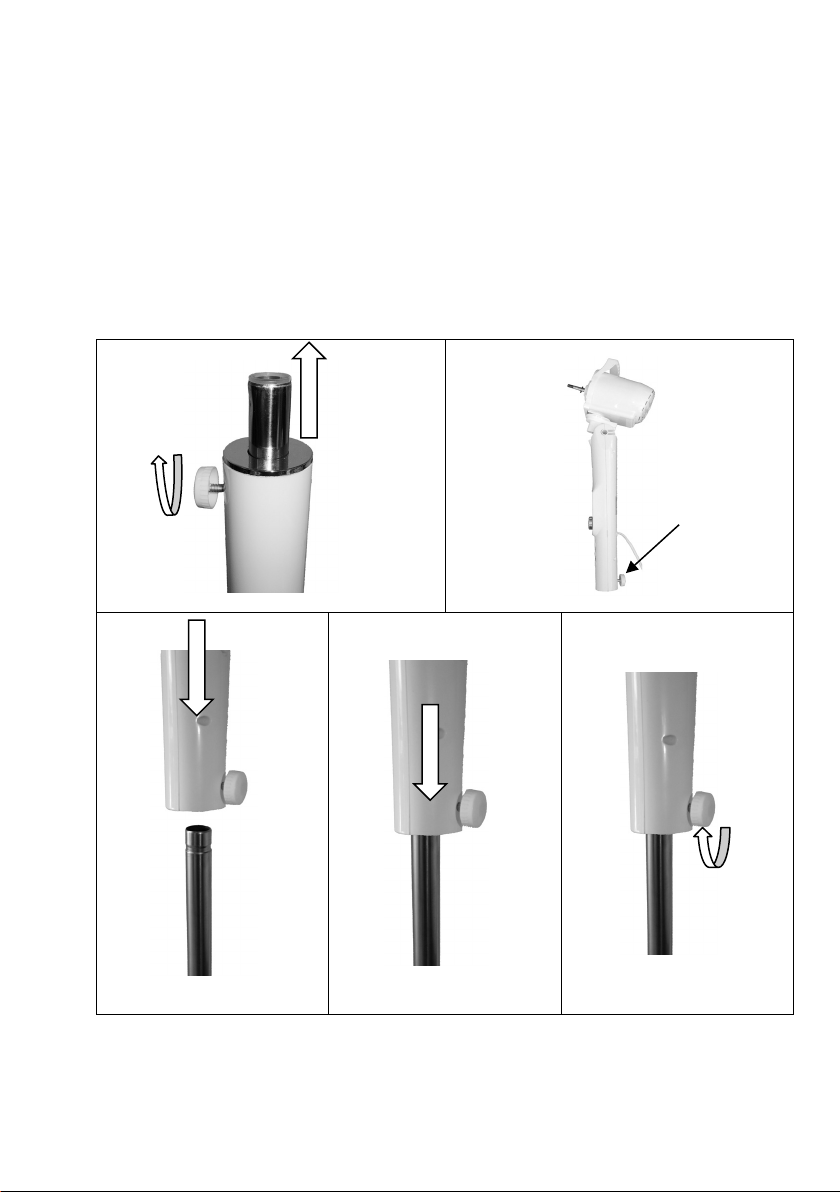
3.2 Attach Head to Stand
• Stand the Base with attached post on the floor.
• Loosen (anticlockwise) the post Height Adjustm ent Locking Screw, pull out the
inner chrom e tube to the desired height and then retighten the locking screw.
• Place Motor assembly at the top of the Stand Post and lower down all the way.
Note: if the motor assembly will not slide down the chrom e post, loosed the Head
to Post Locking Screw on the back of the motor assembly until it can slide down.
• Tighten the Head to Post Locking Screw (Clockwise). Do Not overtighten.
Page 8 of 28
Page 9
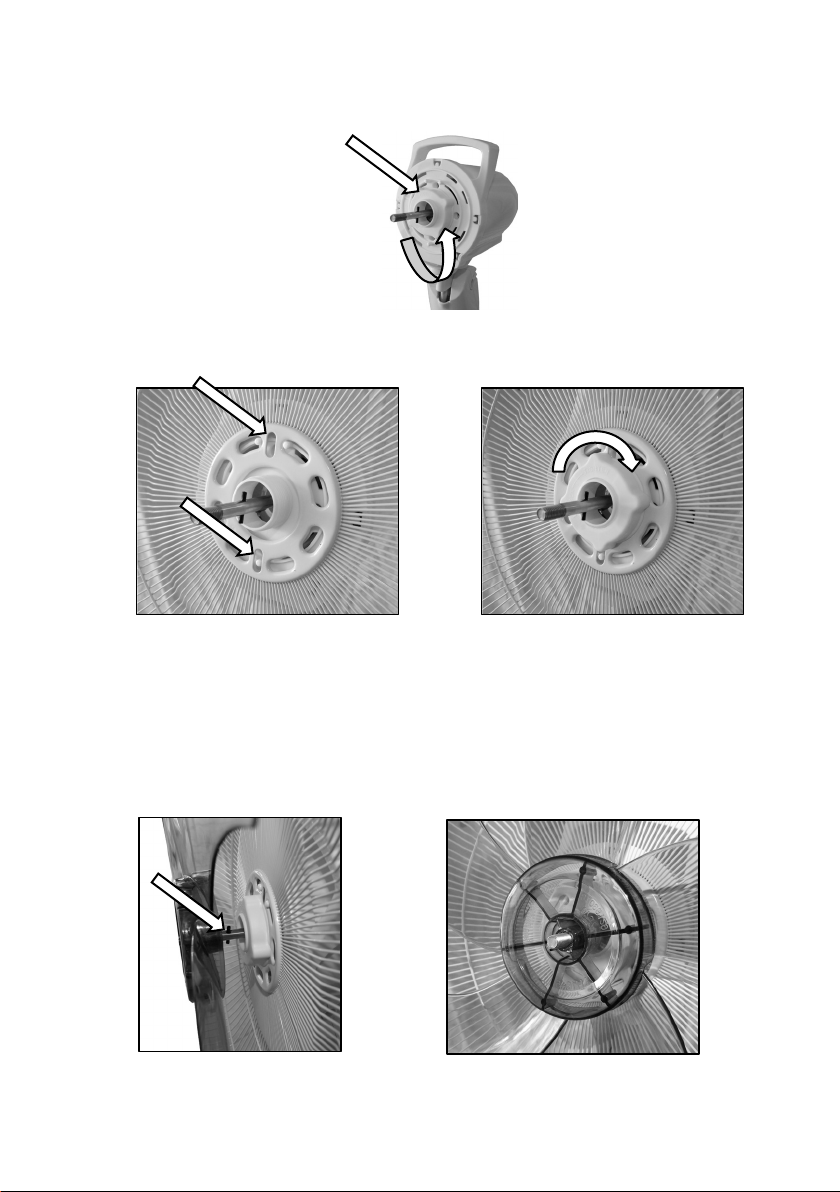
3.3 Safety Grille and Fan Blade
• To assemble the safety grille and blade assembly, first remove the Rear Grille Nut
(Anticlockwise) from the front of the fan motor housing.
• Fit the rear safety grille into position with the slots in the 12 and 6 o’clock position
ensuring the location pins are located as shown below, and refit the Nut and tighten.
• If Fitted, remove the protective plastic sleeve from the motor spindle shaft and
discard.
• Place the Fan Blade onto the motor spindle.
Note: The groove in the rear centre of the fan blade aligns with a T-bar on the motor
spindle to ensure correct positioning.
Page 9 of 28
Page 10

• Secure the blade into place by gently hand tightening the spinner nut
anticlockwise onto the end of the motor spindle. The spinner nut is self-tightening
when the motor starts, so do not over-tighten the spinner nut, just nip it up.
NOTE: The Spinner Nut screws on in the opposite way to a normal nut.
It tightens when rotated Anticlockwise.
• Take the front grille and using a Philips Head screwdriver, unscrew and remove the
small screw in the locking mechanism at the bottom of the grille.
Page 10 of 28
Page 11

• Swing open the lever
• Place the safety grille into position by lining up the location hook, at the top of the
front grille, over the top and on to the centre spoke of the rear grille as shown and
push down.
Page 11 of 28
Page 12

• Swing down the front grille and press the plastic band onto the rear grille rim and
squeeze the grille rims together ensuring the plastic band, front grill and rear grille
are fully clipped together.
• Secure the grilles by closing the lever to lock in place. Then refit the small screw
and use a Philips screwdriver to tighten.
Page 12 of 28
Page 13

4 Instructions for Use
Remove the cable tie and unravel the cordset before operation.
DO NOT run the power cord under the stand
4.1 Head Tilt
The Fan Head can be adjusted Up and Down so as to blow air at the
required angle.
Turn off and unplug prior to adjusting.
To adjust, grasp the Fan Grills and tilt the head either upward or
downward to your desired angle.
4.2 Height Adjustment
The height of the fan can be adjusted.
Unscrew the Height Adjustm ent Locking Screw (Anticlockwise) on the back of the stand
post, slide the inner post up or down and then tighten the Height Adjustment Locking
Screw (Clockwise) again to lock in place.
Page 13 of 28
Page 14

5 Remote Control
The fan comes with a remote control with the basic functions for your convenience.
The remote control must be pointed towards the receiver, which is located inside the
fan control panel, in order to work.
Do not block the line of sight between the remote control and the fans control panel.
Do not drop the remote control onto the floor or knock it against hard objects.
• To install the batteries, first slide the back battery cover off. (Batteries not included)
• Insert the batteries inside the battery compartment, matching polarity icons with those
in the battery compartment and then refit the cover.
• Battery Type: “1.5V 2 x AAA”. Alkaline Batteries work best (Batteries not included)
• Do not mix new and old batteries in the remote control.
• To prevent corrosion, remove the batteries if the remote control will not be used over
a lengthy period.
Page 14 of 28
Page 15

6 Smartphone Control App Setup
For technical queries and difficulties in operating the product contact H.E. Group
customer service 1300 105 888 (Australia) or 09 8870 447 (New Zealand).
Note: The Smart Home Pedestal Fan and TuyaSmart App only supports a 2.4GHz WiFi network. It will not work on a 5GHz network.
To download the TuyaSmart App, either search your smartphone App store for
TuyaSmart, search this link smartapp.tuya.com/tuyaSmart in your smartphone web
browser or scan this QR code (below), and follow the instruction on how to download,
install and register.
If the “Allow” message appears, press” Allow” TuyaSmart to access your location.
Note:
If you get a Network Error Message during the registration setup, this means it has timed
out as the information was not entered quick enough.
You will need to close the App, restart it and input the information again.
You can register either by email address or mobile phone number.
If registering by mobile phone number, you need to select your country first, then enter
your mobile phone number then press the “Obtain verification code”.
A text message will be sent to your mobile phone with the code num ber.
Note: if you choose to register with an email address, a code will be sent to your email
address instead.
Input this code number and then this will take you to the “Set Password” page.
Enter a Password of your choice. Note: The Password must contain 6 – 20 characters,
including alphabets and numbers, then press Complete.
If the “Allow” message appears, press ”Allow” TuyaSmart to access your location.
Press the “Create Family” button.
Enter your Family nam e or nickname then select “Done”.
Page 15 of 28
Page 16

7 Wi-Fi Pairing
Note: The Smart Home Pedestal Fan and TuyaSmart App only supports a 2.4GHz WiFi network. It will not work on a 5GHz network.
After downloading, installing the TuyaSmart App to your smart phone and registering, you
need to pair your Smart Fan and Smart Phone to operate the fan through your phone.
1. Plug your fan into a power point and switch on.
2. The Num ber Display and Icons on the fan control panel will illuminate for a second
and will then turn off.
3. If this is your first tim e pairing these devices, after approximately 5 seconds, the Wi-Fi
indicator light will illuminate and will blink rapidly (approx. 2 times per second).
4. Open your TuyaSmart App and log in.
5. On the Welcome page, press the button “Add Device”
6. Select the “Home Appliance” menu in the left column. Note: there may be more than
one “Home Appliance” menu so you will need to look through them all until you see
“Fan”.
7. Press the “Fan” icon and this will then ask you to confirm that the Wi-Fi indicator light
is rapidly blinking in the Fan Control Panel. Press the button to confirm.
8. If you haven’t already logged into your Wi-Fi network, you can do that on the next
page, then press “OK”.
9. You will now see a progress % circle while connecting.
10. Once connected, it will state “Device added successfully”.
11. You can change the name of your fan if you desire. To do this, press the small pencil
icon next to the Fan image then change the name. The default name is “Smart Fan”.
For example, you can rename it “Living Room Fan” then press save.
Refer to “Using the Smart Phone App” section in this instruction manual for more
information.
12. On this same page, you can select the room in which the Fan will be used then press
the “Completed” button.
You are now connected and ready to operate the fan through your smart phone.
To learn more about what the TuyaSmart App can do, or if you have any questions,
please visit TuyaSmart website
https://smartapp.tuya.com/tuyasmart/faq
Page 16 of 28
Page 17

7.1 How to Reset the Fan Wi-Fi.
Should you for any reason find that you are unable to pair the fan with your
smartphone, or that the Wi-Fi indicator light does not blink rapidly, or you are changing
the smartphone, you may need to reset the Wi-Fi to get it to pair properly.
• Wi-Fi Indicator blinking rapidly: means ready to pair to Smartphone.
• Wi-Fi Indicator on permanently:
means the fan has been paired and connected with the phone / network successfully.
• Wi-Fi Indicator not illuminated:
means no Wi-Fi signal is available or the Wi-Fi is turned off. Make sure the smart fan and
your phone is near your router and your router has a strong Wi-Fi signal.
To reset: Plug the fan into the power point and switch on.
Press the knob to turn the fan on then immediately Press and hold the knob for 2 seconds
until you hear three squeals “ee.., ee.., ee..”
Wait until the Wi-Fi indicator light illuminates and starts to blink rapidly and then you can
press and immediately release the knob again to turn the fan motor off.
You have now reset the Wi-Fi and the Wi-Fi indicator light will be blinking rapidly.
You can now follow the instructions on Wi-Fi Pairing in this instruction Manual.
Note: When you press the knob again, the fan will turn off, but the Wi-fi function is still
working, you can switch on the fan with your smartphone App.
When you press the knob again for approximately 8 seconds until you hear the long
squeal “ee---”, the fan will completely turn off, including the Wi-Fi signal. You will no
longer be able to control the fan with your smartphone App until you turn the Wi-Fi back
on.
Page 17 of 28
Page 18

8 Operation
Remote Control
Fan Control Panel
Wi-Fi
Indicator
Timer
Indicator
Oscillating
Indicator
Sleep Mode
Indicator
Nature Mode
Indicator
Normal Mode
On/Off
Speed /
Oscillating
Timer
Mode
The fan function can be operated 4 ways, using the supplied remote control, Fan control
panel, smartphone App or smart device (such as Amazon Echo dot or Google home).
Note: Not all fan functions can be operated through the Smart Devices.
8.1 Using the Fan Remote Control and Fan Control Panel
• After ensuring the Fan has been assembled correctly and you have a strong Wi-Fi
signal, plug into the power point and switch on.
• All the Indicator lights will ill uminate (as shown below) for a second and will then turn
off. Approximately 5 seconds later, the Red “Wi-Fi” symbol indicator light will illuminate
and blink rapidly indicating it is in Wi-Fi pairing Mode. Refer to Wi-Fi setup for more
information.
Note: If the Fan is already paired to your smartphone, this indicator symbol will remain
light solid
Timer
Display
Indicator
On/Off
Button
Button
and
Speed
Knob
Button
Page 18 of 28
Page 19

• Press the “ON/OFF” button on the remote control once, or the knob on the fan control
panel. The “Fan” indicator light and Speed display number will illuminate. The fan will
start to spin at Speed setting 5.
• Press the “SPEED” button on the remote control, or rotate the knob on the fan control
panel one notch and the speed will increase to number 4.
• Repeat above steps to cycle the speed up to speed 8 and then onto speed 1 then 2
etc.
• To turn the fan off, press the “ON/OFF” button on the remote control or press the knob
on the fan control panel.
8.2 Fan Modes
The Fan has three modes being: Normal, Nature, and Sleep.
With the Fan running in “Normal” mode (neither of the Sleep Mode or Nature Mode
Indicator lights illuminated), press the “MODE” button on the remote control or Fan
control Panel and the mode will change to “Nature” mode (The Nature Mode indicator
light will illuminate).
Press the “MODE” button again and the mode will change to “Sleep” mode
Mode Light will turn Off and the Sleep Mode indicator light will illuminate).
Press the “MODE” button again, and it will cycle back to “Normal” mode. (both of the
Sleep Mode and Nature Mode Indicator lights will turn off)
8.2.1 Normal Mode
The “Normal” Mode is set by default when the unit is first turned on. The wind remains
a constant flow.
8.2.2 Nature Mode
The “Nature” mode creates variable Wind Patterns so as to simulate the variable wi nds
that you would experience outdoors.
In this mode the speed of the fan continually cycles through a mixed selection of low,
medium, high and off in set intervals.
Depending on which Fan Speed is selected, the wind pattern will be different.
8.2.3 Sleep Mode
In “Sleep” mode, when the fan is set to either Medium or High Speeds, the fan speed
will drop a speed level after approximately 30 minutes.
After approximately a further 30 minutes, the fan will automatically drop down to a lower
fan speed.
The fan will continue to run in a Low Speed until manually turned off.
Note: To have the fan automatically turn off at your desired time in this mode, use the
“Timer” function to select the auto off timer.
Page 19 of 28
(Nature
Page 20

8.3 Timer
Use this power-saving feature if you want the appliance to turn off automatically.
To select the Off time, press the “TIMER” button on the remote control or fan control
panel once. It will advance to 1 hour as indicated by the number display, the “Timer”
indicator symbol will illuminate and the fan will turn off after approximately 1 hour.
Each consecutive press of the “TIMER” button will advance the tim er in 1-hour
increments until it reaches a maximum tim e of 9 hours.
To reset to a new time, continue to press the “TIMER” button until it cycles back to
where the hour number you desire is displayed.
After the Auto Off time has been set, the display will change back to the fan speed
setting number and will then display the tim er setting and Timer indicator light every 5
seconds.
To turn off the timer, continue to press the “TIMER” button until it cycles back to where
“0” is displayed.
If you want to turn the fan off, Press the “ON/OFF” button.
8.4 Oscillating (Swing) Function
The fan is fitted with an Oscillating function where when activated, the fan head will
swing from side to side.
Press the “OSC” button on the remote control or fan control panel to activate the
oscillating function. The fan head will swing from side to side whilst blowing air.
To stop the oscillation at any direction, Press the “OSC” button again.
Note: Do Not force the head to rotate by hand. Always use the control buttons.
8.5 Using the Smart Phone App
Note: The Smart Home Pedestal Fan and TuyaSmart App only supports a 2.4GHz
Wi-Fi network. It will not work on a 5GHz network.
• After pairing your fan and phone, and with the smart phone App open you can turn the
fan on by pressing the “Switch” button at the bottom left of the screen.
• The fan will start in the default speed setting and in “Normal” mode. (refer to Modes in
the section “Fan Modes” in this instruction manual to understand what the modes do).
• With the fan on, you can adjust the fan speed by either tapping on the speed slider or
by dragging the slider to your desired position.
Page 20 of 28
Page 21

Showing which
are connected
You can change the
any nickname you
Fan”
You can share the fan
Edit
Button
Oscillating
(Swing) Button
Settings (Auto Off)
Timer Button
Mode
Switch
ON/OFF
Fan Speed
Slider
Osc
Button
Button
• You can select the Fan Mode you desire by pressing the “Mode” button at the bottom
of the screen and then select which mode you desire. (refer to Modes in the section
“Fan Modes” in this instruction manual to understand what the modes do).
• You can turn on the Fan Head Oscillating function by pressing the “Osc” button at the
bottom of the screen. Refer to the Oscillating (Swing) Function section in this
instruction manual for more information.
• By pressing the “Settings” button in the lower right corner, you will access the Auto Off
timer (countdown timer). Here, you can select the hours until the fan automatically turns
off. Refer to the “Timer” section in this instruction manual for more information.
• At the top right corner of the screen, there is a small icon of a Pencil. This is the Edit
function. Press this and you can change the name of your fan, the fan location within
your home and other settings including resetting or removing the fan from the App.
name of the Fan to
smart devices
and can control
your fan
e.g. Alexa and
Google
like. e.g. “Living Room
with your family, you
just add your family’s
phone no. inside, then
they can control the
fan at the same time.
Page 21 of 28
Page 22

• The Smartphone App allows you to set the tim e to automatically switch the device On.
Edit
Button
Countdown
Button
Switch
Fan in
This is set up when the Fan is set to Off within the smartphone App.
When in the Off State, in the lower right corner of the screen, there is an icon
“Countdown”.
OFF
State
ON/OFF
Button
Press the Countdown button and it will open a selection from 1 to 9 hours.
Select the number in hours that you want your fan to turn on.
e.g. If you want your fan to turn on in 2 hours, press the number 2, then press the
“Done” button.
You fan will now turn on automatically in 2 hours.
Important: It is strongly recommended never to leave electrical appliance switched on
or in use when not attended.
9 Using Google Home Device
Set up your Google Device as per the device’s instructions and make sure you meet
the following conditions:
• You have a Google Home device, or Android phone with Google Assistant.
• Latest Google Home App.
• Latest Google App (Android only)
• You have set up a Google account
• The device display language must be set to English (Australian)
• TuyaSmart App and a registered account already set up.
• One W i-Fi Fan
If you have not installed the Google Home App or the Google Assistant App. please do
so by following the instructions in these apps.
Page 22 of 28
Page 23

9.1 Link TuyaSmart account in Google Home Control
ATTENTION: Due to the Google Home App’s known bug, you could only use one
Google account to control “Home Control Action”. If you sign in to Google Home
App with several Google accounts, only the first Google account you signed in
with can be used for “Home Control”.
Please also note that Google device will only turn the fan on and off, and set the fan
speed. It cannot be used to operate all other functions.
• Open the Google Home App.
• Click the (account) button in the lower right corner.
• Scroll down and select "More Settings".
• Under the heading "ASSISTANT" select "Home Control", and then click the plus sign
in the lower right corner.
• Scroll through the list to find TuyaSmart and the select it.
• Enter your TuyaSmart account phone number or email address and password (which
is what you used to register in the TuyaSmart App), then tap “Link Now”.
• Press “Authorize”.
• You will see the Fan show up in the “Choose Device” page. Select the fan then press
“Next”
• In the “Choose a Home” page, select your home or create a new home, then press
“Next”
• Assign a room, or create a new room, to where the fan will be placed then press “Next”
• Your fan will now be listed in the Hom e page.
9.2 Control your Fan through Google Home
• Now you can control your smart devices through Google Home using three commands
as follows:
To operate by voice, say in a clear precise voice:
Hey Google, turn on the Smart fan
Hey Google, turn off the Smart fan
Hey Google, set Smart fan to Speed 1~ 9 (speed from 1 to 9)
Please note the key words when you talk to Google device
“turn on”
“turn off”
set + device name (Smart Fan) + to + speed (one, two, three…..)
Page 23 of 28
Page 24

10 Using Amazon Echo Device
Set up your Amazon Echo Device as per the device’s instructions and make sure you
meet the following conditions:
• You have an Echo device, such as Echo, Echo Dot, Echo Plus, Echo
Connect and Echo Spot.
• You have set up an Amazon account through Amazon Alexa App.
• TuyaSmart App and a registered account already set up.
• One W i-Fi Fan
If you have not installed the Amazon Alexa App, please do so by following the
instructions in the App.
• After you have set up and logged in to the Alexa App, whilst in the Home page, tap the
hamburger menu icon on the top left corner.
• Select "Skills & Games"
• Tap the “Search” icon at the top right corner of the screen and type in Tuya Smart
• Select the Tuya Smart App then press “Enable to use”
• You will be redirected to the account link page. Enter your TuyaSmart account phone
number or email address and password (which is what you used to register in the
TuyaSmart App), then tap “Link Now”.
• Press “Authorize”. Then press “Done” and close the pages.
10.1 Control your Fan through Echo
Echo needs to discover your Fan before it controls it.
• You can say "Alexa, discover devices" to Echo and then follow the prompts from Alexa.
• Echo will discover devices which have already been added in the TuyaSmart App.
• In the Alexa App, in the Home page, tap the hamburger menu icon on the top left corner.
• Select "Add Devices”
• Scroll to the bottom of the list and select “Other”, then press “Discover Devices”
• After the Device has been discovered, press “Set Up Device”. You can either add to a
group or skip this option.
• It will confirm that your device (Smart Fan) is ready to use. Press “Continue” then
“Done”.
Note: if you change the device's name on TuyaSmart App, Echo must re-discover
before you can control them again
Page 24 of 28
Page 25

• Now you can control your smart devices through the Echo device using three
commands as follows:
To operate by voice, say in a clear precise voice:
Alexa, turn on the Smart fan
Alexa, turn off the Smart fan
Alexa, set Smart fan to Speed 1~ 9 (speed from 1 to 9)
Please note the key words when you talk to the Echo device
“turn on”
“turn off”
set + device name (Smart Fan) + to + speed (one, two, three…..)
11 Shared Device
You can share the fan operation with your family, you just add your family members
phone number inside the TuyaSmart phone App, then they can control the fan at the
same tim e.
Refer to the section in this instruction manual “Using the Smart Phone App” and follow
the instructions.
12 Care and Cleaning
• Ensure that the fan is switched off from the supply mains before removing the guard.
• Turn off and unplug the unit prior to cleaning.
• Clean the motor housing and body assembly with a clean, damp cloth and wipe dry.
• Never spray with liquids or submerge the Fan in water or any other liquid.
• Do not use flammable liquids, chemicals, abrasive creams, steel wool or scouring pads
for cleaning.
13 Storage
Switch off and unplug the fan.
Coil the cable loosely. Do not kink or pull the cable tight.
Store your fan in a cool, dry location.
Page 25 of 28
Page 26

14 Troubleshooting
follow the setup
You have set the Auto Off timer either within the smartphone
Ref er to s ection “Timer” f or further instructions.
Will Not Switch On
No W i-Fi Indicator Light
eit her not rapidly blinking
or not on permanently.
The W i-Fi light blinks
rapidly
Fan turns On A utomatically
Unable to connect to the
Net work
Fan turns Off Automatically
Check that the power point is functional and that the Fan is fully
plugged in and switc hed on.
If the W i-Fi Indic ator light does not tur n on within 15 seconds of
turning the power on to the fan, this would indicate that the W iFi function has been turned off.
To turn back on, Press the Knob on the Fan control panel to
start the Fan, wait 5 seconds, then
the Fan of f, then Press the Knob again to start the Fan. The
Wi-Fi will now stay on permanently.
Fan is not Paired to your s martphone device.
Ref er to s ection “W i-Fi Pairing” and
instructions.
You have set the Auto On timer within the smartphone device.
Refer to section “Using t he Smart Phone App” f or further
instructions.
The Smart Home Pedestal Fan and TuyaSmart App only
supports a 2.4GHz Wi-Fi network. It will not work on a 5GHz
net work.
device, the remote control or on the Fan control Panel.
Refer to section “Using t he Smart Phone App” f or further
instructions.
Ref er to s ecti on “Operation” f or further instructions.
Press the Knob again to turn
Unable to control some
Fan functions using
Google D evice or Amazon
Alexa Device.
Normal Remote Control
does not function
Only the Fan “On”, “Off” and f an speed setting functions can be
controller through thes e devices.
Ref er to secti on “Using Google Home Devic e” and “Using
Amazon Alexa D evice” for further inf ormation.
Ensure the batteries are installed the correct way around. e.g.
Positive (+) is to Positive (+) and N egative (-) is to Negative (-).
Ensure batteries ar e not flat or corroded.
Replace with new batteries and ensure the batter y contacts ar e
clean.
Page 26 of 28
Page 27

15 Warranty Against Defect
12 Month Warranty
Thank you for your purchase from Kmart.
Kmart Australia Ltd warrants your new product to be free from defects
in materials and workmanship for the period stated above, from the date
of purchase, provided that the product is used in accordance with
accompanying recommendations or instructions where provided. This
warranty is in addition to your rights under the Australian Consumer
Law.
Kmart will provide you with your choice of a refund, repair or exchange
(where possible) for this product if it becomes defective within the
warranty period. Kmart will bear the reasonable expense of claiming
the warranty. This warranty will no longer apply where the defect is a
result of alteration, accident, misuse, abuse or neglect.
Please retain your receipt as proof of purchase and contact our
Customer Service Centre 1800 124 125 (Australia) or 0800 945 995
(New Zealand) or alternatively, via Customer Help at Kmart.com.au for
any difficulties with your product. Warranty claims and claims for
expense incurred in returning this product can be addressed to our
Customer Service Centre at 690 Springvale Rd, Mulgrave Vic 3170.
Our goods come with guarantees that cannot be excluded under the
Australian Consumer Law. You are entitled to a replacement or refund
for a major failure and compensation for any other reasonably
foreseeable loss or damage. You are also entitled to have the goods
repaired or replaced if the goods fail to be of acceptable quality and the
failure does not amount to a major failure.
For New Zealand customers, this warranty is in addition to statutory
rights observed under New Zealand legislation.
IMPORTANT!
For all technical queries or difficulties in operating the product
and for spare parts, contact H.E. Group customer service 1300 105
888 (Australia) and 09 8870 447 (New Zealand).
Page 27 of 28
Page 28

Page 28 of 28
 Loading...