

Page 1
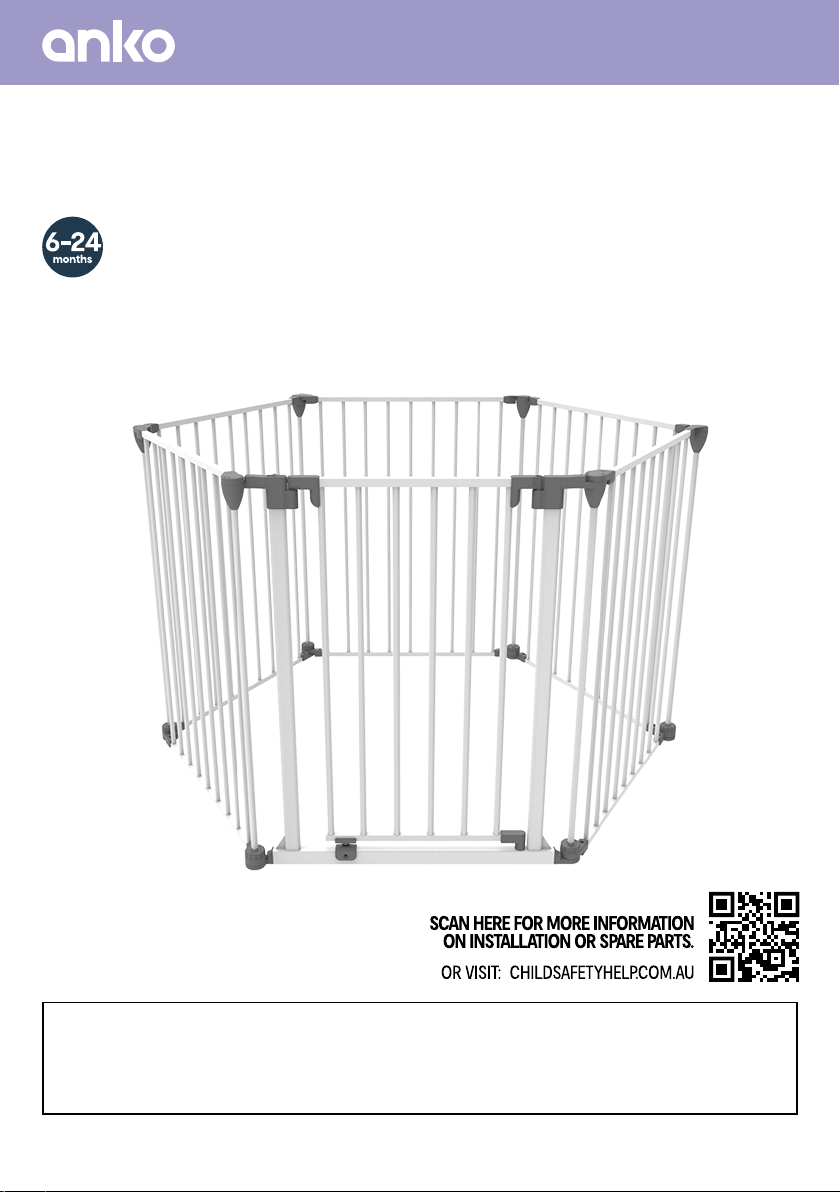
3-In-1 Playpen
• fits openings: 73cm - 376cm
Instruction Manual
IMPORTANT! READ AND FOLLOW THESE INSTRUCTIONS
CAREFULLY AND KEEP FOR FUTURE REFERENCE.
THIS PRODUCT CONFORMS TO EN1930:2011
Page 2

WARNINGS
WARNING
WARNING
WARNING
WARNING
WARNING
WARNING
WARNING
WARNING
WARNING
To prevent serious injury or death, securely install
gate or enclosure and use according to manufacturer’s
instructions.
Never leave child unattended when using this product.
Incorrect installation can be dangerous.
Do not use the safety barrier if any components are
damaged, missing or disassembled.
The safety barrier must not be fitted across windows.
Never use with a child able to climb over or dislodge/open
the safety barrier which may cause danger.
Never install this product on glass doors. Install this
product against reliable doors or walls.
To prevent falls, never use this product at the top of
stairs.
If the safety barrier is used at the bottom of the stairs,
it should be positioned at the front of the lowest tread
possible.
WARNING
WARNING
WARNING
WARNING
WARNING
2
To prevent injury, do not put any goods which can be
grabbed by children or pets near this product.
Before using this product, carefully inspect for any loose
parts and whether any parts need to be tightened.
Ensure the product to be installed is horizontal and flat on
the floor.
This product is intended for use with children from 6 to 24
months or small to medium pets.
Regularly check that the safety barrier is properly
installed and secure.
Page 3

WARNINGS
WARNING
WARNING
WARNING
WARNING
WARNING
WARNING
WARNING
WARNING
WARNING
WARNING
Any additional or replacement parts should be obtained
from Kmart Australia Ltd.
Barrier must be fitted between rigid surfaces such as
plaster board, timber or hardwall.
Always check that the safety barrier is correctly closed.
Use only with the locking/latching mechanism securely
engaged.
This safety barrier is for domestic use only.
Never use without wall brackets.
This safety barrier has a manual closing system.
This safety barrier must be fitted between a rigid surface
such as doorways or walls along with wall brackets
secured with screws.
A maximum of 6 panels including gate can be used as a
safety barrier.
Check regularly that all assembly fittings are tightened
properly.
WARNING
WARNING
WARNING
Do not use the playpen close to an open fire or other heat
source.
Do not leave anything in the playpen which may
provide a foothold or create a danger of suocation or
strangulation.
Ensure that the playpen is fully erected and all the locking
mechanisms engaged before placing your child in the
playpen.
3
Page 4

PARTS
INCLUDES
3 x
Topside Barrier Panels
1 x
Gate Panel
4
Underside Barrier Panels
2 x
Page 5
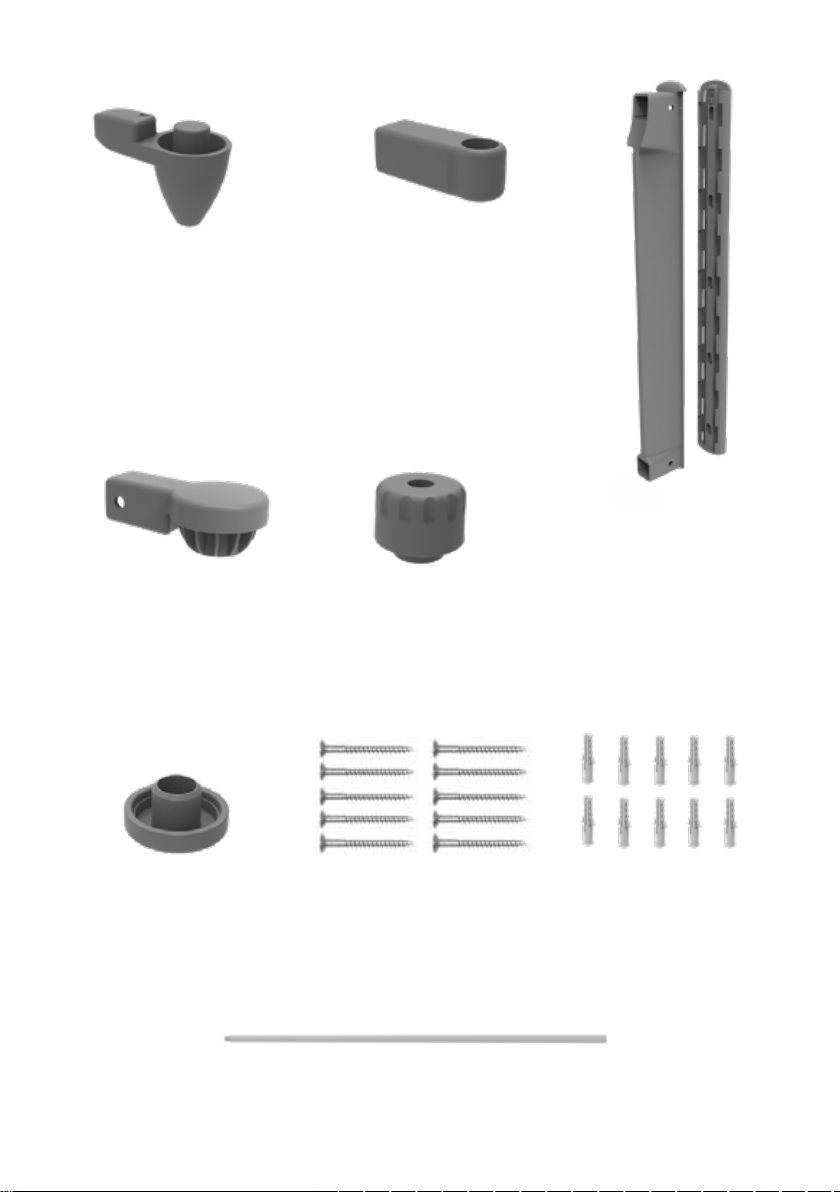
1 x
Top Underside
Hinge Adapter
2 x
Topside
Hinge Adapters
2 x
Bottom Hinge
Adapters
2 x
Top Caps
2 x
Wall Brackets
2 x
Wall Bracket Covers
1 x
Bottom Cap
10 x
Screws
7 x
Corner Tubes
10 x
Wall Plugs
5
Page 6

INS TA LL ATION
UNDERSIDE BRACKET WALL ASSEMBLY
Place the Bottom Hinge Adapter over Corner Tube, and then put
1.
the Corner Tube into the Top Underside Hinge Adapter.
Compress the spring into the top hole and slide the base of the
2.
Corner Tube into the Top Cap.
6
Page 7

Place Wall Bracket over Wall Bracket Covers. Clip Cover to hinges -
3.
Top Underside Hinge Adapter and Bottom Hinge Adapter.
Ensure the small silver studs on the adapters are positively
engaged in cover.
7
Page 8

Place the assembled barrier against the wall and mark position.
4.
Remove Wall Bracket from cover, hold in marked location, and
mark screw positions.
8
Screw into surface with the appropriate fixing method.
5.
Page 9

Slide Wall Bracket Cover into the Wall Bracket, and then push Top
6.
Underside Hinge Adapter and Bottom Hinge Adapter into the Wall
Bracket Cover.
9
Page 10

INS TA LL ATION
TOPSIDE BRACKET WALL ASSEMBLY
Place the Bottom Hinge Adapter over Corner Tube, and then put
1.
the Corner Tube into the Topside Hinge Adapter.
Compress the spring into the top hole and slide the base of the
2.
Corner Tube into the Bottom Cap.
10
Page 11

Place Wall Bracket over Wall Bracket Covers. Clip cover to hinges -
3.
Topside Hinge Adapter and Bottom Hinge Adapter.
Ensure the small silver studs on the adapters are positively
engaged in cover.
11
Page 12

Place the assembled barrier against the wall and mark position.
4.
Remove Wall Bracket from cover, hold in marked location, and
mark screw positions.
12
Screw into surface with the appropriate fixing method.
5.
Page 13

Slide Wall Bracket Cover into the Wall Bracket, and then push Top
6.
Underside Hinge Adapter and Bottom Hinge Adapter into the Wall
Bracket Cover.
13
Page 14

INS TA LL ATION
ROOM DIVIDER OR SAFETY BARRIER
Up to 6 panels including the gate may be used in open configurations
providing the 2 end panels are securely fixed to a wall with the fixings
provided.
14
Page 15

INS TA LL ATION
PLAYPEN ASSEMBLY
Align the Gate Panel and one of the other panels together. Place
1.
the Corner Tube into the top hole first, pull the Corner Tube up
so you can position the bottom of the Corner Tube into the base
knob. Align arrow with hexagon icon.
Repeat step 1 for all sides and corners.
2.
Turn base knob and align lock icon with dot on panel to lock and
3.
unlock panels.
LOCKED
UNLOCKED
15
Page 16

INS TA LL ATION
TO ADD EXTRA PANELS
Align opposite ends of panels, place the Corner Tube into the top
1.
hole first, then pull the Corner Tube up so you can position the
bottom of the Corner Tube into the base knob.
16
UNLOCKED
LOCKED
Page 17

INS TA LL ATION
TO REMOVE PANELS
Turn base knob to the unlocked position, pull up on the Corner
1.
Tube and slide the bottom of the Corner Tube out from the base
knob. With the Corner Tube removed, you can lift and remove the
unwanted panel.
LOCKED
UNLOCKED
17
Page 18

18
Page 19

19
Page 20

 Loading...