

Page 1
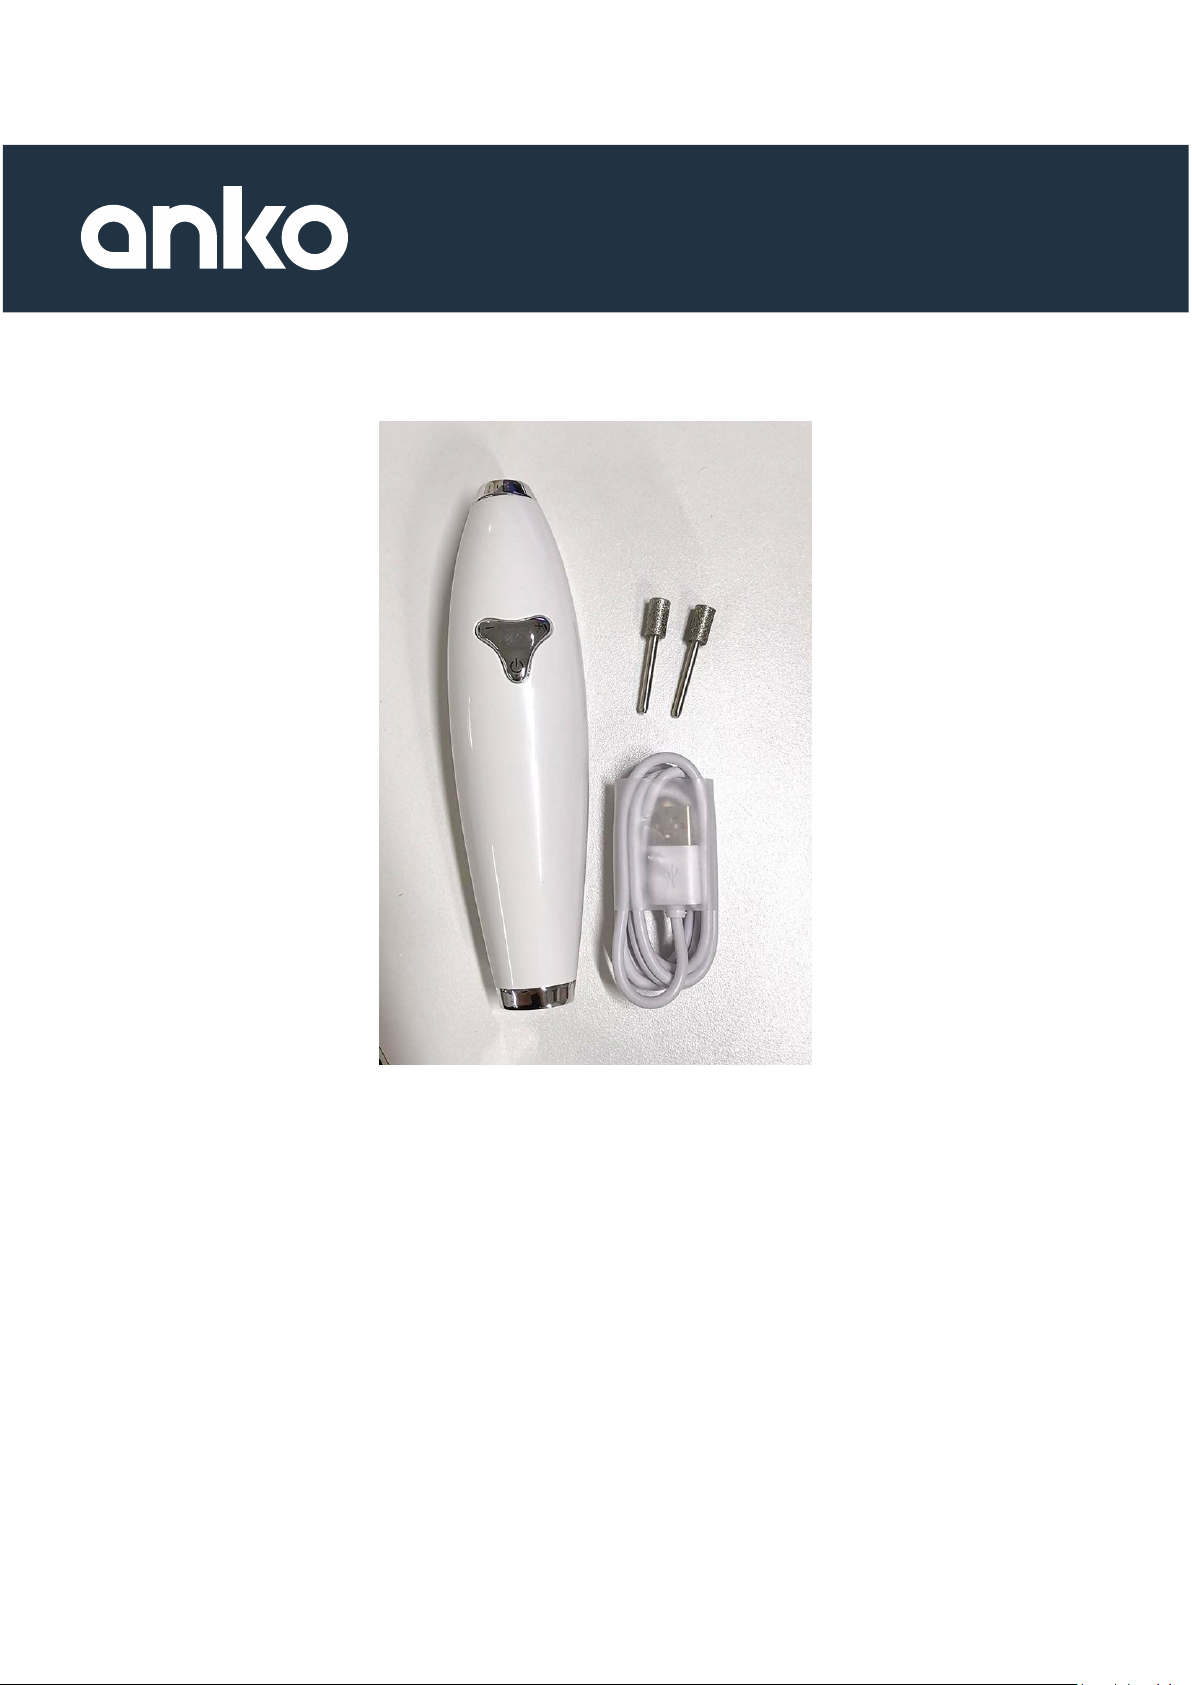
Pet Electric Nail File
Keycode: 42957638
To ensure proper operation of this device, please read this instruction manual carefully before using
the device and keep it for further reference.
Page 2
SAFETY INSTRUCTIONS
To ensure proper operation of this device, please read this instruction manual carefully
before using the device and keep it for further reference.
WARNING!
This device is not a toy, keep out of reach of children.
Please verify the device before you start using it. Do not use if there is any
damage.
Please keep the USB cable and the device charging port dry.
Do not use the device while charging.
Regularly clean the device and the accessories to extend its lifetime.
Do not share the same device with others.
Do not attempt to disassemble, repair or modify the device by yourself to avoid
accidents.
This device has a lithium battery. Do not place or store the device for long
periods under a hot or humid environment. If you do not intend to use the device
for a long time, store it after it is fully charged. Do not throw the device into a fire
or put it in the general household waste. Please dispose of this device in an
official recycling point.
WARNING: Do not recharge non-rechargeable batteries.
WARNING: Before charging the product, please make sure your
hands are dry.
SPECIFICATIONS
Input: 5V /0.5A
Type of Battery: Li-ion 3.7V 800mAh
Charging time: 4hrs
Working time: 1hr
Page 3

PARTS
1.
Speed increase button +
4.
Emery Head (coarse & fine)
2.
Speed decrease button -
5.
USB cable
3.
ON/OFF switch with charging
indicator
6.
Charging port
CHARGING THE DEVICE
Please charge the device before you start using it.
Make sure the device is turned off.
Insert the USB cable into the USB charging port, then connected the USB port to
a DC 5V 500mA power source.
While charging, the charging indicator lights flashes RED. When the battery is
fully charged, all the charging indicator turns BLUE.
Charging the device takes approximately 4 hours. When the battery is fully
charged, the device can be used consecutively for about 60 minutes.
NOTE: When battery is low, the charging indictor will flash RED 3 times, then
automatically turned off.
Page 4

FEATURES
Turn ON and OFF the device: Press and hold the ON/OFF switch to turn on the
device, press and hold the switch again to turn off the device.
Change Rotation Direction: With the device turned on, press the on/off switch to
change the rotating direction clockwise or counter-clockwise.
Adjust the Speed Intensity: Press and hold the speed increase or decrease button
to adjust the speed intensity. The speed button will keep flashing until maximum or
minimum speed had reached. Select speed according to the hardness of pet nails.
HOW TO USE
1. Make sure the device is OFF.
2. Select the attachment and push it into the devise. It is recommended to select
the head from coarse to fine.
Emery Head (Coarse): Suitable to grind the front edge and the sides of nails.
Emery Head (Fine): Suitable to repair nails; can be used to smooth down
sharp nails.
3. Turn ON the device for a while, to let the pet adapt to the sound of the nail file
before applying.
When trimming the nail, stay far enough from the Quick to avoid
causing pain or drawing blood!
4. For long nails, use a nail clipper to trim down nail prior to applying the nail file.
5. Grind the nail 2mm away from the Quick.
6. Use no more than 10 seconds each time, to allow your pet to adapt the
environment alternately.
7. Turn off the unit when finished.
Page 5

CLEANING AND MAINTENANCE
Before and after each single use, please clean the device body and emery head to
ensure the best performance of this device.
Turn off device before you start cleaning.
Clean the emery head with a brush or tissue after used.
Clean the main body with wet cloth or tissue. Do not wash with water.
Do not immerse the device in water.
Do not use alcohol, steel wool, abrasive cleansers, chemicals, or corrosive
liquids to clean the device.
Do not use lubricants, detergents, polishing agents, or air fresheners on this
device.
BATTERY DISPOSAL
If the nail file is to be disposed the batteries should be removed from the appliance
before it is scrapped. The massage gun must be disconnected from the charger
when removing the battery. The battery should be disposed safely. Used batteries
should be taken to a recycling facility and not disposed with normal household
waste.
IMPORTANT: Always fully discharge the batteries before removal and ensure
the charger is disconnected from mains power.
TROUBLE SHOOTING
Problem
Possible Cause
Solution
The device does not
work properly.
The battery is running low or
out of power.
Charge the device as
guided.
Abnormal Noise.
The brush was installed
incorrectly.
Turn off the device and
install the brush correctly
as guided.
The charging indicator
does not light up.
The USB cable is not
plugged correctly.
Insert the USB cable
correctly into the power
supply.
Note: If the device still does not work properly after using the above solutions,
please stop using the device and contact your local dealer.
 Loading...