

Page 1
Digital Camera
Page 2

1
Please read this manual carefully before using this unit and keep it for future reference
Table of content
Key Features ...................................................................................................................................................................2
What Your Camera Includes ............................................................................................................................................2
Computer System Requirement for Windows 7/XP.........................................................................................................2
Computer System Requirement for Windows Vista ........................................................................................................3
Computer System Requirements for Macintosh .............................................................................................................3
Quick Look at Your Digital Camera .................................................................................................................................4
Main Icons on the LCD ....................................................................................................................................................5
Prepare Your Camera for use ..........................................................................................................................................7
Install battery ...................................................................................................................................................................7
Charging your lithium battery .........................................................................................................................................7
Install a SD memory card ................................................................................................................................................7
Starting Your Digital Camera ...........................................................................................................................................8
Camera Mode ..................................................................................................................................................................9
Taking Photos..................................................................................................................................................................9
Video Mode ......................................................................................................................................................................15
Playback Mode ................................................................................................................................................................16
Download photos and videos to your computer……………………………………………………………………………… …….19
Appendix A: Technical Specifications .............................................................................................................................19
Appendix B: Troubleshooting .........................................................................................................................................21
Page 3

2
Key Features
Digital Video resolutions- 1280x720 HD , 640x480 VGA, 320x240 QVGA.
18 mega pixels camera with choice of 10 digital camera resolutions- (18M) 4896x3672, (14M) 4416x3312,
(12M) 4000x3000, (10M) 3648x2736, (8M) 3264x2448, (7M HD) 3648x2048,(5M) 2592x1944
(3M) 2048x1536, (2M HD) 1920x1080, (VGA)640x480
2.7-inch TFT LCD
8X digital zoom
Anti-shake function
Face detection
Smile Capture
Continue Shot
SD memory card slot accepts SD compatible memory card up to 32GB.
Built in Flash
What Your Camera Includes
Digital Camera
USB cable for sync and charge
User’s manual
Strap
Camera bag
Li-ion battery
Computer System Requirement for Windows 7/XP
To be able to download photos and videos to your PC you will need the following minimum configuration:
Pentium processor or above with Windows XP SP3, Windows 7,8,10
128 MB RAM, more than 150MB free disk space.
Available USB Port
CD-ROM Drive
Recommended screen resolution 1024 X 768 pixels or higher.
Page 4

3
Computer System Requirement for Windows Vista
To be able to download photos or videos to your PC you will need the following minimum configuration:
20GB hard driver with at least 15GB of available space
Computer System Requirements for Macintosh
Power Macintosh G3 500 MHz or higher
Mac OS X version 10.5.X or later
128 MB or more available system RAM (256 MB recommended), 150 MB free disk space
800 x 600 or higher-resolution monitor displaying millions of colors
Note: This hardware is plug and play compatible when used on a Mac.
Page 5
4
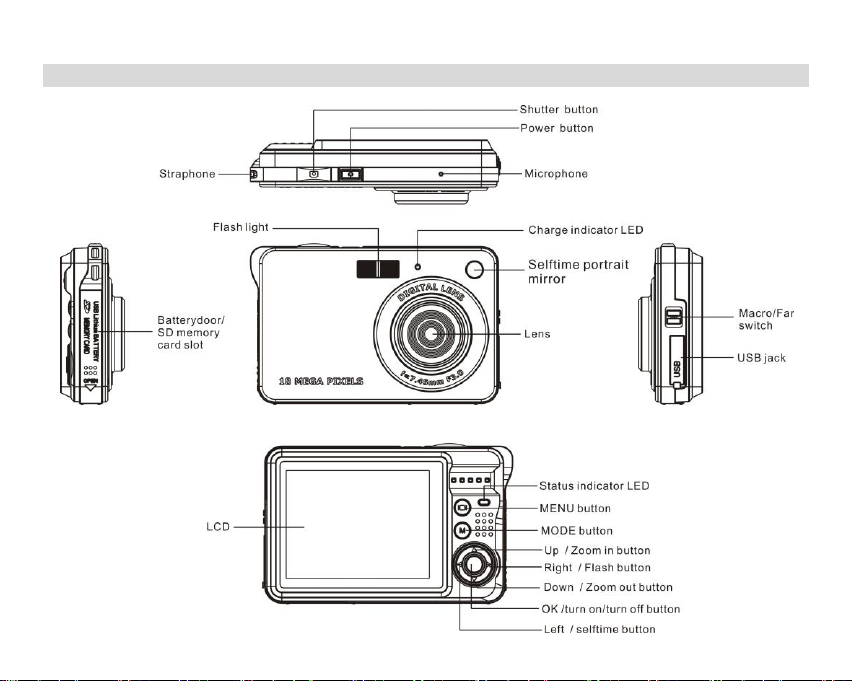
Quick Look at Your Digital Camera
Page 6
5
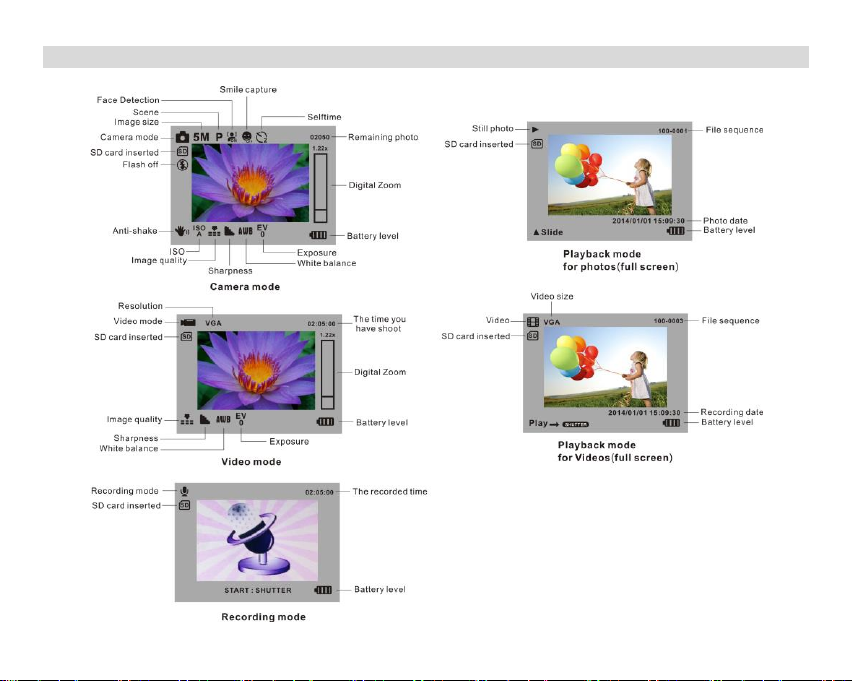
Main Icons on the LCD
Page 7
6
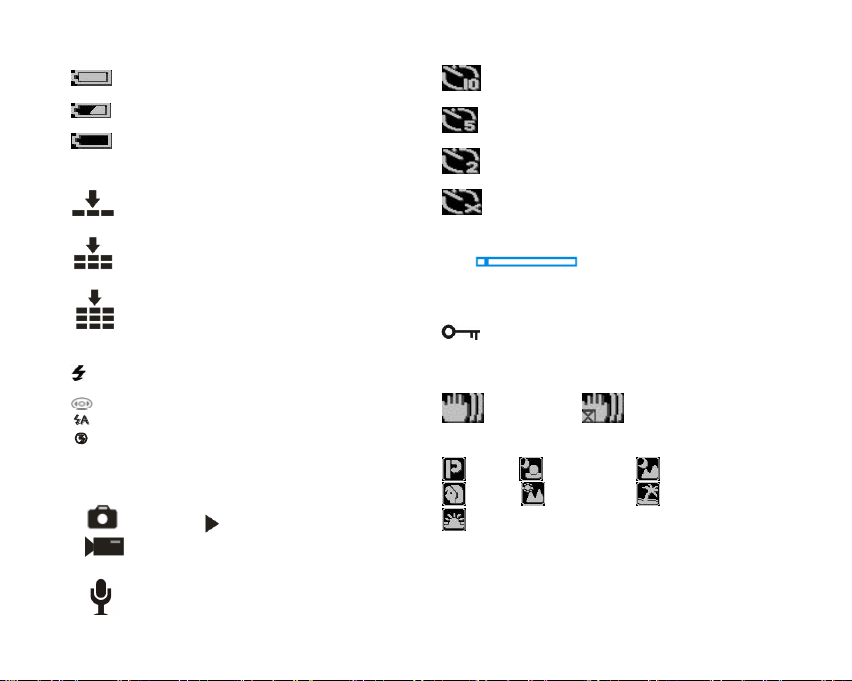
Battery power level
Full battery power
Medium battery power
Low battery power
Photo quality
Normal quality
Fine quality
Super quality
Flash
Force Flash
Red Eye Reduction
Auto
No Flash
Modes
Camera Playback
Video
Recording
Self-timer On 10 seconds
Self-timer On 5seconds
Self-timer On 2 seconds
Self-timer off
Digital Zoom
1.00X 8.00X
Protect
Protect
Anti-Shake
Anti-Shake on Anti-Shake off
Scenes
Auto Night Portrait Night Scenery
Portrait Scenery Beach
High Sensitivity
Page 8

7
Prepare Your Camera for use
Install battery
Your camera supplied with a lithium battery, please refer to the following illustration as correct installation method:
1. Slide and open the battery compartment.
Install Lithium Battery
2. Insert the lithium battery correctly as the correct polarity facing up.
3. Close the battery compartment.
Note: Please remove the battery when you don’t intend to use your camera for a long time.
Charging your lithium battery
To charge your battery, connect your camera to PC or a USB Adaptor (DC 5V, 500mA) with supplied USB cable
correctly. The LED light will light up and it will be off after full charge.
Install a SD memory card
This camera supports any compatible SD memory card up to 32GB. Limited internal memory is only for you to take
test photo, these photo will be lost when you turn off your camera or remove away the battery. So that insert a SD
memory card is normally for use. Please refer to the below diagram for correct installation.
Page 9

8
Locate the SD memory card slot, insert a SD memory card as above, until you hear a “Click” sound, it indicates
your SD card is installed with an icon “SD” appear on the LCD screen.
Note:
1. After the SD memory is inserted successful, the photos/videos you have taken will be stored on the SD
memory card.
2. Formatting will delete all data on the SD memory card including protected data.
3. Don’t remove the SD card during formatting as this may damage the card and render it unusable.
Starting Your Digital Camera
Your digital camera is included 4 modes-Camera mode, Video mode , Recording mode and Playback mode.
Camera mode is for you to take still photos. You can shoot video file/recording file in Video mode/in Recording
Mode. And you can preview photos/videos/records, delete, rotate, protect, crop and printing your photos in
playback mode.
Power on
Press Power button once to turn on your camera. The LCD will light up and it will sound “beep”, this indicates your
camera is turned on and ready for use.
Power off
Press Power button once to turn off your camera. When there is insufficient battery power, your camera will show
“Low Battery” on the LCD screen and power off automatically after a moment.
Page 10

9
Camera Mode
After you power on your camera, icon will appear on your LCD screen, indicating your camera is in Camera
Mode.
Taking Photos
You can compose your shot using LCD screen. Hold the camera steady and press Shutter button to take photo.
There will be a short delay while the camera saves the photo to memory.
After each photo is shot (when the camera returns to icon mode) the numbers of photos left to shoot at this
resolution will be displayed on the LCD screen.
When the camera's memory is full, the LCD screen will display “Memory Full Insert a SD memory Card to
Transfer and Take More Photos!” when you attempt to press Shutter button to take photo, now you need to
download these photos to PC or delete them for taking more photos, alternatively you can insert a SD memory card
for expanding the memory.
Digital Zoom function
You can magnify your subject up to 8 times using the digital zoom. Press UP button to zoom in the object and press
the Down button to zoom back out. The icon1.00X 8.00X will show on your LCD screen.
Flash
In low light conditions it is best to use the built-in flash. You can also use the flash to compensate for backlight
conditions.
To set the flash:
Note: Please move the Macro/Far switch to Far mode, otherwise you will be reminded “Macro Mode No Flash”
indicating you can only use the flash function in Far shooting mode.
Press Flash button repeatedly. Select the icon shown on the LCD screen. This will activate the automatic flash.
Press Flash button repeatedly. The icon will appear on the LCD screen. This means the flash function has been
"forced on" (manual flash). If the flash is not ready, a red LED will light up beside the LCD screen and the icon will
flash repeatedly- wait until the flash is ready before taking a photo. A “low battery” warning will appear on the LCD
screen if there is insufficient battery power to operate the flash.
Press Flash button repeatedly. Select the icon shown on the LCD screen.This will activate the Red-eye
reduction
Page 11

10
Press the Flash button repeatedly until the icon appears. This will turn off the flash function.
Scene
Your camera supplies scenes for you to take photos in any environment nearly, there is abundant scene included
with your camera. Such as Auto, Night Portrait, Night Scenery, Portrait, Scenery, Beach, High Sensitivity. You can
choose your best scenery according to your light and environment conditions.
Press Power button to turn on your camera – the icon will appear on the top left of your LCD screen.
1. Press Menu button.
2. Press Right/Left button to select the icon .
3. Press Up/Down button to select: Auto/Night Portrait/Night Scenery/Portrait/Scenery/Beach/High Sensitivity.
4. Press OK button to confirm.
Note:
1. After you selected your scenery, the corresponding scenery icon will be appeared on the LCD.
2. Press Up/Left/Right/Down button to select the scene and press OK button to confirm.
Image Size
The image size and quality settings determine the number of photos can be saved and the amount of memory
required for each photo. The higher quality photo will take the more memory. The image size and quality will also
affect the maximum size, you can print your photo effectively. To set the Image size:
1. Press Menu button.
2. Press Right/Left button to select the icon .
3. Press Up/Down button to select: 4896x3672 (18M), 4416x3312 (14M), 4000x3000 (12M), 3648x2736 (10M),
3268X2448 (8M), 3648x2048 (7M HD), 2592x1944 (5M), 2048x1536 (3M), 1920x1080 (2M HD),
640x480 (VGA).
4. Press OK button to confirm and to exit in each menu.
The image size icon will show on the LCD screen.
Anti-Shake
Your Digital Camera has a function that prevents some blurry photos from trembling when taking photo. Because of
this function, you are not required to use a tripod for steady shooting photos. To set as below:
1. Press Menu button.
Page 12

11
2. Press Right/Left button to select the icon .
3. Press Up/Down button to select: On/Off.
4. Press OK button to confirm and exit the menu. The icon will appear on the LCD screen if you select
“On”.
Face Detect
Your camera supports face detecting that allows you to take best photos.
1. Press Menu button.
2. Press Right/Left button to select the icon .
3. Press Up/Down button to select: On/Off.
4. Press OK button to confirm and exit the menu.
Smile Capture
1. Press Menu button.
2. Press Right/Left button to select the icon .
3. Press Up/Down button to select: On/Off.
4. Press OK button to confirm and exit the menu.
Continue Shot
You can take 6 photos continuously after pressing Shutter button only once with this function on.
1. Press Menu button.
2. Press Right/Left button to select the icon .
3. Press Up/Down button to select: On/Off.
4. Press OK button to confirm and exit the menu.
Note: The image size will automatically become VGA when select continue shot on , if you try to change the image
size “Continue Shot Mode Off” information will remind you that you can only use continue shot function when the
image size is VGA.
Page 13

12
Self Timer
You can include yourself in a photo by using this feature to delay the time between your pressing Shutter button and
when the photo is actually taken.
1. Press Menu button.
2. Press Right/Left button to select icon , the function menu as below:
3. Press Up/Down button to select 2, 5 or 10 seconds count down shooting or you can select Off to turn off.
4. Press OK button to confirm and exit the menu
Setup
You can set Exposure, ISO, White Balance, Sharpness, Image Quality, Effect, Date, Auto Power Off, Sound Effect ,
Language, Frequency , Format, Default Setting
To operate it as below:
1. Press Menu button.
2. Press Right/Left button to select icon .
Exposure
This setting allows you to control the brightness of your images.
1. Press Up/Down button to select Exposure option in Setup menu.
2. Press OK enter the Exposure submenu.
3. Press Up/Down button to select an exposure value (from+3 to -3).
4. Press OK button to confirm and return to the Camera mode. The corresponding icon of exposure will appear
on the LCD screen.
ISO
This is a special function that allow you to compensate the light conditions when the light source is not good and
also you are not admit to use flash light or tripod. And you will know the flash light or a tripod is best to compensate
the light conditions for your primal choice, and then ISO. When you want to use ISO sensitization, please choose
the low value ISO to forbid mottles appears on your photo.
1. Press Up/Down button to select ISO in Setup menu.
2. Press OK button to enter the ISO option submenu.
3. Press Up/Down button to select: Auto/100/200/400.
4. Press OK to confirm and return to the Camera mode. The corresponding icon of ISO will appear on the LCD
screen.
Page 14

13
White Balance
This setting allows the camera to adjust the color of your photos according to the color of your light source.
1. Press Up/Down button to select White balance option in Setup menu.
2. Press OK button to enter the White Balance submenu.
3. Press Up/Down button to choose the best option: Auto/Daylight/Cloudy/Incandescent/Fluorescent.
4. Press OK button to confirm and return to the Camera mode.
Sharpness
This setting allows you to adjust the sharpness of your images, making edges more or less distinct.
1. Press Up/Down button to select Sharpness option in Setup menu.
2. Press OK button to enter the Sharpness submenu.
3. Press Up/Down button to select: Sharp/Normal/Soft.
4. Press OK to confirm and return to the Camera mode.
Quality
The quality of your photos also affects the number of shots you can take. The Super setting means you can take
fewer photos, but they will be better quality.
1. Press Up/Down button to select Quality option in Setup menu.
2. Press OK button to enter the Quality submenu.
3. Press Up/Down button to select: Super Fine/Fine/Normal.
4. Press OK button to confirm and return to the Camera mode. The corresponding icon of Quality will appear
on the LCD screen.
Effect
1. Press Up/Down button to select Effect option in Setup menu.
2. Press OK button to enter the Effect submenu.
3. Press Up/Down button to choose the best option: Normal/ B&W/ Sepia / Red / Green / Blue/ Sunset /
Warm/ Cool .
4. Press OK button to confirm and return to the Camera mode.
Date
This allows you to set system time which will be displayed on the photos if you selected date on.
1. Press Up/Down button to select Date option in Setup menu.
2. Press OK button to enter the Date submenu.
Page 15

14
3. Press Up/Down button to select: “On”-display date on the photo you take and LCD screen, “Off”- won’t show
date on photos and LCD screen, “Set Date”-set the system date.
4. If choose the ON or OFF option, press OK button to confirm and return the Camera mode. Or
Press OK button enter the Set Date submenu.
1). Press Right/Left button select value, and press Up/Down button to set the Date, time and format.
2). Press OK button to confirm and return to the Camera mode.
Auto Power off
The default setting will be automatically power off if your camera is idle for 3 minutes.
1. Press Up/Down button to select Auto Power Off option in Setup menu.
2. Press OK button to enter the Auto Power Off submenu.
3. Press Up/Down button to select: 1 Minute/2Minutes/3 Minutes/None.
4. Press OK button to confirm and return to the Camera mode.
Note: If you select “None”, the camera will not be powered off until the battery power using up or turn off it manually.
Sound Effect
Sets the button sound on/off.
1. Press Up/Down button to select beep sound option in Setup menu.
2. Press OK button to enter the Beep sound submenu.
3. Press Up/Down button to select on/off.
Press OK button to confirm and return to the Camera mode.
Language
You can select your language per your request.
1. Press Up/Down button to select Language option in Setup menu.
2. Press OK button to enter the Language submenu.
3. Press Up/Down button to select the language you want.
4. Press OK to confirm and return to the Camera mode.
Frequency
1. Press Up/Down button to select Frequency option in Setup menu.
2. Press OK button to enter the Frequency submenu.
3. Press Up/Down button to select: 50Hz/60Hz.
4. Press OK button to confirm and return to the Camera mode.
Page 16

15
Format
This function reformats the memory card and will erase all files in memory including protected files, please operate
it cautiously.
1. Press Up/Down button to select Format option in Setup menu.
2. Press OK button to enter the Format submenu.
3. Press Up/Down button to select: OK/Cancel.
4. If you select Cancel ,Press OK to confirm and return camera mode ,or press OK button to enter the
OK submenu..
5. Press Up/Down button to select “Yes” to format or “No” to exit if you select OK
6 . Press OK button to confirm and “please wait” tip will show on the LCD screen.The camera will
Return camera moder automatically after the format operation is finished
Default Setting
If your camera setting is in a confused status, you can execute this function to your camera original setting.
1. Press Up/Down button to select Default Setting option in setup menu.
2. Press OK button to enter the Default Setting submenu.
3. Press Up/Down button to select: “OK”-set to default setting, “Cancel”- to exit.
4 If you select Cancel ,Press OK to confirm and return camera mode ,or press OK button to enter the
OK submenu..
5. Press Up/Down button to select “Yes” to format or “No” to exit if you select OK
Yes: set to default
No: exit the menu
6. Press OK button to confirm and return camera mode.
Cancel
This is for you to exit the menu manually, select it in setup menu and press Menu button to exit.
Video Mode
Note: The camera has limited internal memory and does not allow recording videos without a SD card inserted. A
SD card (up to 32GB) needs to be inserted in order to use the video mode normally.
Press Mode button to enter the Video mode and start shooting videos, an icon will appear on the LCD
screen and a red spot will be flashing on the LCD screen.Press Shutter button to stop shooting ,the elapsed time
will be shown on the LCD screen.
Page 17

16
1. You can play this AVI file in playback mode or Quick time and Windows Media player.
Note:
1. The file you recorded will be saved as AVI format.
2. When the camera's memory is full, the “Card Full” message will appear on the LCD screen when you attempt
shoot more videos. Download the test file from the internal memory to the PC or delete them to shoot more
videos. Alternatively, you can insert a SD memory card to expand the memory to record longer videos.
Recording Mode
Note: The camera has limited internal memory and does not allow recording without a SD card inserted. A SD card
(up to 32GB) needs to be inserted in order to use the record mode normally.
Press Mode button twice to enter the recoding mode Press shutter button to start recording, a red spot will be
flashing on the LCD screen.Press Shutter button again to stop recording , the elapsed time will be shown on the
LCD screen.
Note:
1. You can not play this WAV file in playback mode ,because there is a speaker in the camera.
2. You can play WAV file in Quick time and Windows Media player.
3. The file you recorded will be saved as WAV format.
Playback Mode
Press mode button to switch Playback mode. You can playback the photos and videos in your camera. In Playback
mode you can rotate, protect, delete and crop your photos and you can play, protect and delete video clips. You can
also print photos directly from your camera using PictBridge.
NOTE:
1. The message, “No File Exist” will be displayed on the LCD screen if there are no photos/videos in the camera.
Press Mode button to return to the camera mode.
2. Please go to the camera mode for setting video parameters for shooting videos, such as Video size, White
balance and so on.
Thumbnail display
When the camera is in the Playback Mode, press Down button will take you to the thumbnail display.
Page 18

17
Select a JPG file, Press OK button to display the files in full screen.
In full screen display mode, you can press up button to enter slide show mode.
Note: when you select a file is JPEG file, then the icon will display on the LCD screen.
Photo to enlarge
When the camera is in playback mode, press the OK button to enter the picture to enlarge interface, press up
button to enlarge the picture, press down to decrease the picture. When the picture to enlarge and then press the
OK button, press up, down, left, right can be up, down, left, or right to move the enlarged picture, press the OK
button to return to photo playback mode.
Operation for still photos
Select a still photo (an icon will show on the LCD) you can rotate, protect, delete, crop or print.
Rotate
1. Press Menu button in playback mode .
2. Press Right/Left button to select the icon .
3. Press Up/Down button to select:90°/180°/270°/Cancel
4. Press OK button to save current photo and return the playback mode.
Note: a “Saving” will show on the LCD after you pressed OK button to confirm.
Protect
You can protect your photos/videos from accidental deletion.
1. Press Menu button.
2. Press Right/Left button to select the icon .
3. Press Up/Down button to select: Lock/Unlock.
4. Press OK button to confirm. A lock icon will be shown on the LCD if you select “Lock”.
At step 3, select “Unlock” and press OK button to unlock the current file.
Delete
Delete unwanted photos and videos at any time to free up memory. You can delete one image or video clip at a time
or delete all the unprotected photos and videos that are currently recorded on the memory card at once.
1. Press Menu button.
2. Press Right/Left button to select the icon
3. Press Up/Down button to select: This image/This Video (depends on your file selection): delete current photo
you selected; ALL: delete all unprotect photos; Format : format SD Card ;Cancel to exit.
Page 19

18
4. Press OK button to enter delete submenu.
5. Press Up/Down button to select “Yes” or “No”.
6. Press OK to confirm deletion.
Crop Image
Crop your photos to show only a specific portion of an image or to highlight certain focal points. The Crop feature
lets you zoom in on an image and then save that part of the image as a new photo.
1. Press Menu button.
2. Press Right/Left button to select the icon .
3. Press Up/Down button to select: Crop/Cancel.
4. If you select the corp option, press ok button to enter crop submenu.
5. Press Up/Down/Left/Right button to select an area you want to crop.
6. Press OK button to confirm the operation.or press shutter button to exit without corpping;
7. Press OK button again to save or you can press shutter button to exit without saving.
Print
Your camera allows you to print the photos with printer. The operation as below:
1. Select a photo you want to print.
2. Press Menu button.
3. Press Right/Left button to select the icon .
4. Press Up/Down button to select: “Pictbridge”-to print photo, “Cancel”-to exit menu.
5. Press OK button to enter Pictbridge mode and the LCD will show: “Please connect to device”.
6. Connect your camera to compatible printer with USB cable correctly for printing.
Operation for AVI file
Select an AVI file you want to play.
1. Press Menu button.
2. Press Up button to play the file ,and play right button to stop and again to play.
Note: For how to protect, delete videos, please refer to Operation of still photos.
Page 20

19
Download photos and videos to your computer
1. Plug the camera into an available USB port and connect to computer, Turn on the camera.
2. Click on the MY COMPUTER Icon on the desktop, a new drive should mount on the
desktop which stores any photos or videos that have been taken.
3. Your memory card will appear as a REMOVABLE STORAGE DEVICE.
4. Click on the REMOVABLE STORAGE DEVICE to view the images and videos. the images and
Videos are stored in the subfolder called DCIM.
5. You can now copy and paste the images to any directory you choose.
Appendix A: Technical Specifications
Image Sensor
CMOS Sensor
Image Resolution
(18MP 4896x3672, 14MP 4416x3312, 12MP 4000x3000, 10MP 3648x2736,
8MP 3264x2448, 7MP HD 3648x2048, 5MP 2592x1944 via interpolation)
(3M) 2048x1536, (2M HD) 1920x1080, (VGA) 640x480
Video Resolution
1280x720 HD , 640x480 VGA, 320x240 QVGA
LCD Display
2.7” TFT LCD
External Memory
SD card(Up to 32GB)
Digital Zoom
8X Digital Zoom
Exposure
EV-3---EV+3
White Balance
Auto/Daylight/Cloudy/Incandescent/Fluorescent
Scene
Auto/Night Portrait/Night Scenery/Portrait/Scenery /Beach/High sensitivity
ISO
Auto/100/200/400
Page 21

20
Self-timer
Off/2s/5s/10s
File Format
JPEG / AVI
Anti-shake
YES
Flash
Auto/Force/Red-eye reduction/Off
PictBridge
YES
Face Detection
YES
Smile Capture
YES
Continue Shot
YES (VGA 6PCS)
Microphone
YES
Optical Viewfinder
N/A
TV out
N/A
Interface
USB 2.0
System Requirements
Windows XP/VISTA/7/MAC
Battery
Li-ion Battery
Working Temperature
0-40 ℃
Page 22

21
Appendix B: Troubleshooting
Q: I have taken photos but my computer does not recognize my camera. What do I do?
A:
First, ensure that you have in fact taken photos. Press the Shutter button a few times to take some sample photos
and then try downloading them again.
It is also recommended that you have a SD card inserted in the camera.
Secondly, always use the USB cable that came together in the package with the camera.
The USB cable needs to be inserted in a free USB slot on your computer.
Thirdly, give your computer time to recognize that the device is inserted. If need be, refresh the device options list
until you see the removable device appearing.
If the computer does not recognize your device it may mean that your computer does not meet the minimum
system requirements.
Please see the System Requirements section of this manual. If your computer does not matches these
requirements then it is possible that you will not be able to transfer the photos and videos from your camera.
Page 23

22
12 Month Warranty
Thank you for your purchase from Kmart.
Kmart Australia Ltd warrants your new product to be free from defects in materials and workmanship for the period
stated above, from the date of purchase, provided that the product is used in accordance with accompanying
recommendations or instructions where provided. This warranty is in addition to your rights under the Australian
Consumer Law.
Kmart will provide you with your choice of a refund, repair or exchange (where possible) for this product if it
becomes defective within the warranty period. Kmart will bear the reasonable expense of claiming the warranty.
This warranty will no longer apply where the defect is a result of alteration, accident, misuse, abuse or neglect.
Please retain your receipt as proof of purchase and contact our Customer Service Centre on 1800 124 125
(Australia) or 0800 945 995 (New Zealand) or alternatively, via Customer Help at Kmart.com.au for any difficulties
with your product. Warranty claims and claims for expense incurred in returning this product can be addressed to
our Customer Service Centre at 690 Springvale Rd, Mulgrave Vic 3170.
Our goods come with guarantees that cannot be excluded under the Australian Consumer Law. You are entitled to
a replacement or refund for a major failure and compensation for any other reasonably foreseeable loss or damage.
You are also entitled to have the goods repaired or replaced if the goods fail to be of acceptable quality and the
failure does not amount to a major failure.
For New Zealand customers, this warranty is in addition to statutory rights observed under New Zealand legislation.
CAUTION
RISK OF EXPLOSION IF BATTERY IS
REPLACED BY AN INCORRECT TYPE.
DISPOSE OF USED BATTERIES ACCORDING
TO THIS INSTRUCTIONS.
 Loading...