

Angelcare Monitors AC520, AC527 User Manual
OWNER’S MANUAL
Model AC520
Baby Monitor,
with Video
Model AC527
Baby Movement Monitor,
with Video
WARNING
Keep user’s guide for future reference. Please read the warnings and
safety instructions carefully before assembling & using the product.
Failure to follow the warnings and the instructions could result in serious
injury or death or damage to the product.
IMPORTANT
CFO2_ANGE_Manuel_AC527_NA_Complet.indd 1 19-02-06 12:44
is baby monitor is compliant with all relevant standards regarding electromagnetic fields and is,
when handled as described in the User’s Guide, safe to use
WARNINGS
1. Because of the serious strangulation risk to infant & toddlers, parents & caregivers should
note the following Warnings
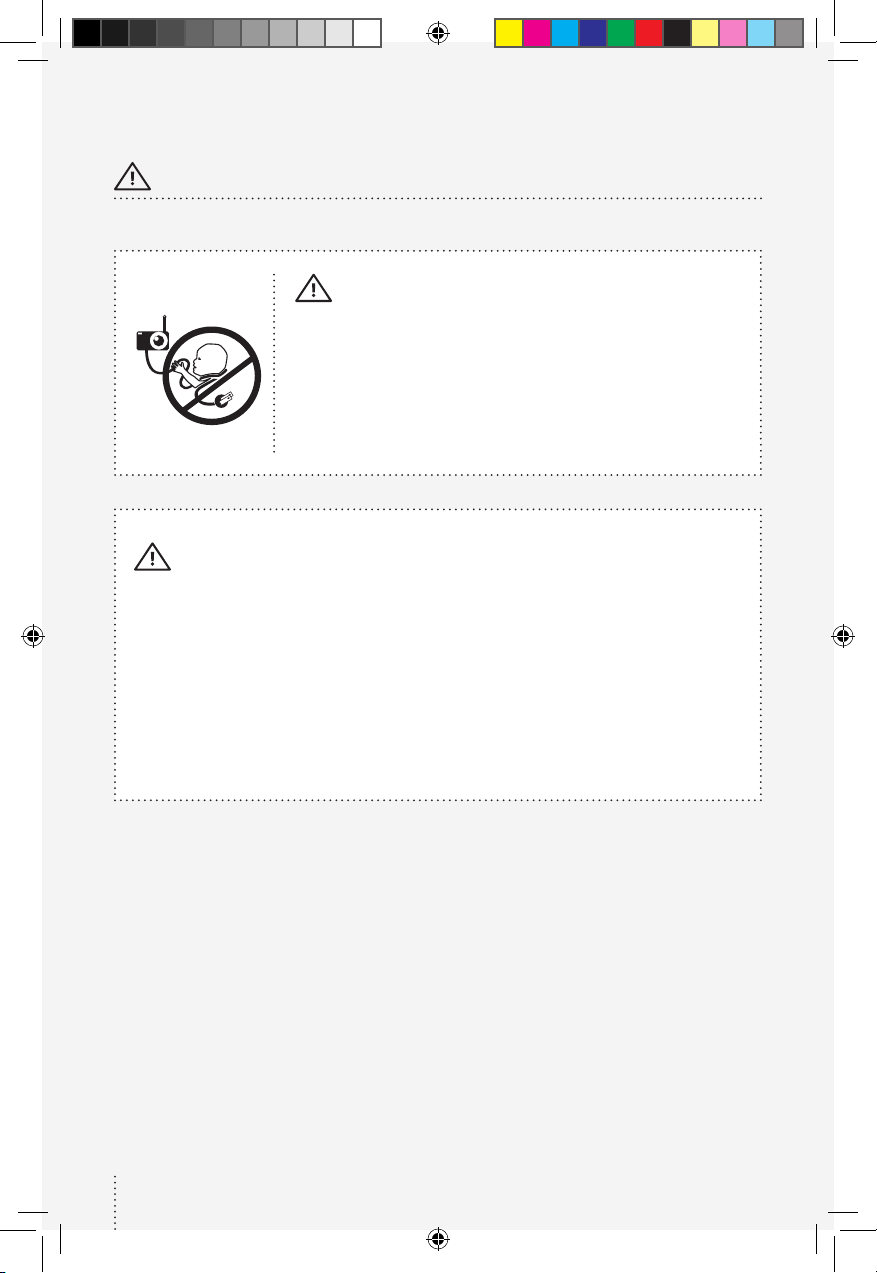
WARNING
- Strangulation Hazard –
Children have STRANGLED in cords
• KEEP the Nursery Unit and adapter cords OUT of the
reach of children more than 3 feet or 1 meter away
• NEVER use extension cords with adapters. ONLY use
adapters provided
• is product is NOT a Toy. NEVER allow children to
play with it
2.
WARNING
- MOVEMENT SENSOR PAD - NO ALARM
• Sources of vibration & movement, other than your baby’s, can be detected by
the Sensor Pad and interfere with the performance of your Angelcare monitor
• e alarm will not sound if it detects movement other than your baby’s
• High sensitivity settings can pick up other sources of vibration & movement please read instructions on sensitivity setting to adjust accordingly
• Other active and older babies (toddlers) in the same room can be detected and
the alarm will not sound
• Ensure the baby’s environment is FREE from any movements or vibrations when
using the Sensor Pad - see below warnings 3 to 11
3. DO NOT use a crib mobile and other crib accessories
that may produce movements or vibrations
4. Fans (including ceiling), washing machines, floor
boards, central heating or loud music are all forms
of movement and vibration and may interfere and be
detected by the Sensor Pad
5. If an additional Nursery Unit is added then it must
be positioned at least 6.5 feet (2 metres) minimum
from Nursery Unit 1 and Sensor Pad as this could
interfere with performance
6. DO NOT use with bedside crib touching parent’s/
carer’s bed as the Sensor Pad will detect your
movements
7. DO NOT place the crib against a wall or skir ting
board as vibrations may be detected
8. Following removal of baby from the crib, some
mattresses may still detect mattress movement
due to it forming back into shape and alarm may not
sound
9. Ensure crib is stable to eliminate any movement
2
2
10. Crib should not be placed in reaching distance of
another crib or bed
11 . DO NOT use other wireless devices in the same
room as the monitor (including mobile phones,
microwaves...). ey may interfere with signal and
performance
12 . e Sensor Pad is made of plastic and does
not permit air to circulate. erefore, mildew
build up could develop underneath the mattress in
the Sensor Pad area
We suggest rotating & airing /drying the mattress
regularly to prevent any mildew. AVOID CONTACT
WITH MOISTURE. Clean - wipe with a dry lint free
cloth
13. e Sensor Pad is not suitable for use
above age 24 months
14. is product cannot replace responsible
adult supervision
• is product is designed to aid in the monitoring of
your child. When using the monitor, you must still
CFO2_ANGE_Manuel_AC527_NA_Complet.indd 2 19-02-06 12:44

E
N
provide the supervision necessary for the continued
safety of your child
• Use this appliance ONLY for its intended use as
described in this manual
15. e Sensor Pad is not intended to be used
to determine if a child is out of the crib
16. ALWAYS be sure to immediately check on
baby whenever an alarm sounds
17. Keep cords out of the reach of ANY
children
18. ONLY use the chargers and power
adapters provided. Do not use other types as
this may damage the device and battery pack
(if included in your model)
19. Adult assembly required. Keep small parts
away from children when assembling
20. Follow instructions and test this monitor
and its functions so you are familiar with it
prior to actual use. ALWAYS be sure that both the
transmitter and receiver are working properly and
are within range of each other – check periodically
and when changing location of the Nursery Unit
21 . DO NOT touch the plug contacts especially
with sharp or metal objects
22 . DO NOT use the baby monitor near water
Care should be taken so that objects DO NOT fall
onto units and that liquids are not spilled into either
unit or Sensor Pad through its openings
CAUTION
RISK OF ELECTRIC SHOCK
DO NOT OPEN
DO NOT EXPOSE TO RAIN OR MOISTURE
23. Keep monitor AWAY from heat sources
(such as stoves, radiators, etc.). Heat can
damage the case or electrical parts
24. ALWAYS place both the Nursery Unit and
the Parent Unit on a flat solid sur face in
an upright position that allows for proper
VENTILATION. DO NOT place on sofas, cushions,
beds, etc. which may block ventilation or anywhere
that would muffle the sound or interfere with the
normal flow of air
25. e baby monitor can only be used
between 10°C and 40°C (50°F and 104°F)
WARNINGS AND SAFETY
INSTRUCTIONS BATTERY
SPECIFIC
26. A LWAYS keep all batteries away from children
27. e Parent Unit battery is a replaceable
Li-Ion battery. e Wireless Sensor Pad uses
a replaceable Button Cell Lithium Battery.
Only use the Angelcare recommended
replacement battery (see Technical
Specification)
• Danger of explosion if the wrong battery is used
or if replaced incorrectly. Refer to User’s Guide for
correct battery installation
• DO NOT short circuit supply terminals
28. DO NOT mix old and new batteries and only
use Angelcare recommended replacement
batteries (see Technical Specification)
29. is product contains a Button Cell Battery
and if swallowed can cause internal chemical
burns in as little as two hours and lead to
death. Dispose of used batteries immediately.
Keep new and used batteries away from
children. If you think batteries might have
been swallowed or placed inside any of the
body, seek medical attention.
30. e Button Cell Battery represents a small part
and a choking hazard – KEEP away from children!
31. Exercise care in handling batteries in order
not to short out the batteries with conducting
materials such as rings, bracelets and keys
32. Overcharging, short circuiting, reverse
charging, mutilation, or incineration of
batteries must be avoided to prevent one or
more of the following occurrences: release of toxic
materials, release of hydrogen and/or oxygen, g as
and rise in surface temperature
33. DO NOT attempt to recharg e batteries
provided with or identified for use with this
product that are not intended to be charged
e batteries may leak corrosive electrolyte or
explode
34. Incorrect polarity installation of the
batteries in the end product must be avoided
Reverse insertion of batteries can cause charging,
and that may result in leakage or explosion
35. Remove batteries from units if you store
the product over 30 days because the batteries
could leak and damage the product
36. Discard ‘dead’ batteries as soon as possible
since ‘dead’ bat teries are more likely to leak in a
product. If a bat tery has leaked or vented, discard
product responsibly
37. DO NOT store this product, or the
batteries provided with or identified for use
with this product, in high-temperature &
high humidity environments and avoid direct
sunlight
IMPORTANT SAFETY INSTRUCTIONS
38. Sensor Pad –
• If your crib does not have a solid, stationary,
completely flat, firm surface including a spring or
slat base, place a hard board between the crib base
and the Sensor Pad, to ensure correct operation
(see specification on STEP 2)
• e Sensor Pad functions with standard crib sprung
and foam mattresses and not memory foam (partial
or full), hollow frame construction mattresses and
water beds. Please consult Angelcare if unsure of
mattress compatibility
39. is monitor uses public airwaves to transmit
signals. e Parent Unit may pick up signals or
inter ference from other nursery monitors in your
area. Your monitor may even be picked up by other
households. To protect your privacy, make sure both
3
3
E
N
CFO2_ANGE_Manuel_AC527_NA_Complet.indd 3 19-02-06 12:44
units are turned OFF when not in use
40. Power cord protection - Protect the
Adapter’s power cord from being walked on
or pinched by furniture or other items – Power
supply cords should be routed so that they are not
likely to be walked on or pinched by items upon or
against them, paying particular attention to cords
and plug s, convenience receptacle, and the point
where they exit from the product. e socket outlet
should be installed near the equipment and should
be easily accessible. Make sure to plug the adapter
to the socket outlet nearest to the equipment and
that is easily accessible. To disconnect from mains,
unplug the adapter
41. Only use attachments/accessories
and replacement parts specified by the
manufacturer. Any mounting of the product
should follow the manufacturer’s instructions
• DO NOT position this product on an unstable cart,
stand, tripod, bracket or table. e product may fall,
causing serious injury to a child or adult and serious
damage to the product
• Use ONLY the stand sold with the product
• Be sure replacement parts are supplied by Angelcare
SET UP REQUIREMENTS
and have the same characteristics as original
part. Unauthourised substitution may result in fire,
electric shock or fire
42. Unplug this appliance during lightning
storms or when not used for long periods of
time
43. Servicing - DO NOT attempt to service
this product yourself as opening or removing
covers (except battery door) may expose you
to dangerous voltage or other hazards
• Power Supply – see Technical Specification within
this guide
44. Overloading - DO NOT overload wall
outlets, extension cords or integral
convenience receptacles as this can result in a
risk of fire or electric shock
45. Nursery Unit Antenna - e antenna used
for this transmitter must be installed to provide a
separation distance of at least 8’’ (20 cm) from all
persons and must not be collocated or operating in
conjunction with any other antenna or transmitter
46. Cleaning - Disconnect all units before
cleaning. DO NOT immerse any part of the monitor in
water. Clean only with a dry cloth
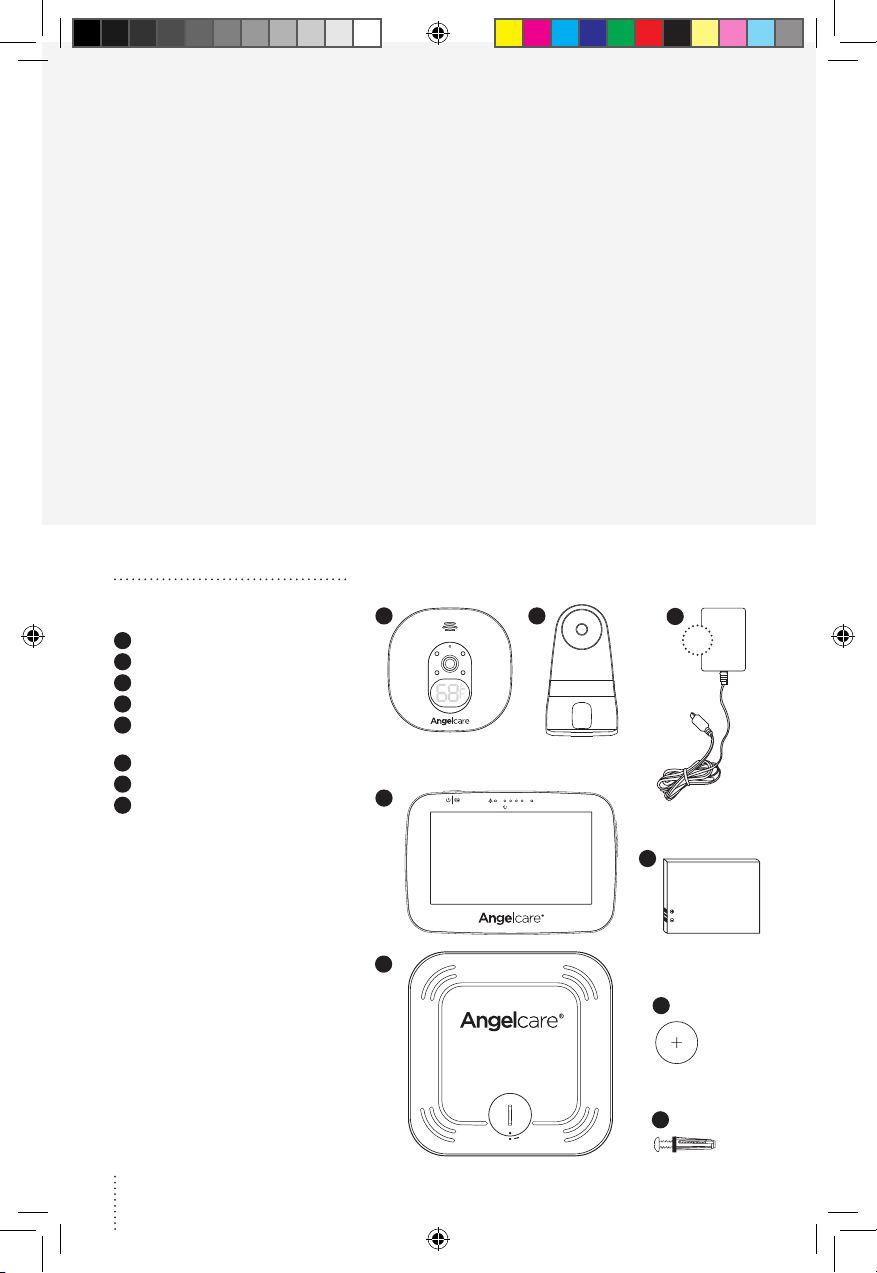
WHAT’S IN THE BOX
1
Nursery Unit
2
Stand (for Nursery Unit)
3
2 x AC Adapters
4
Parent Unit
5
Lithium Ion Battery Pack
(for Parent Unit)
6
Sensor Pad
7
CR2450 Battery (for Sensor Pad)
8
Hardware (for wall mounting)
WHAT YOU NEED
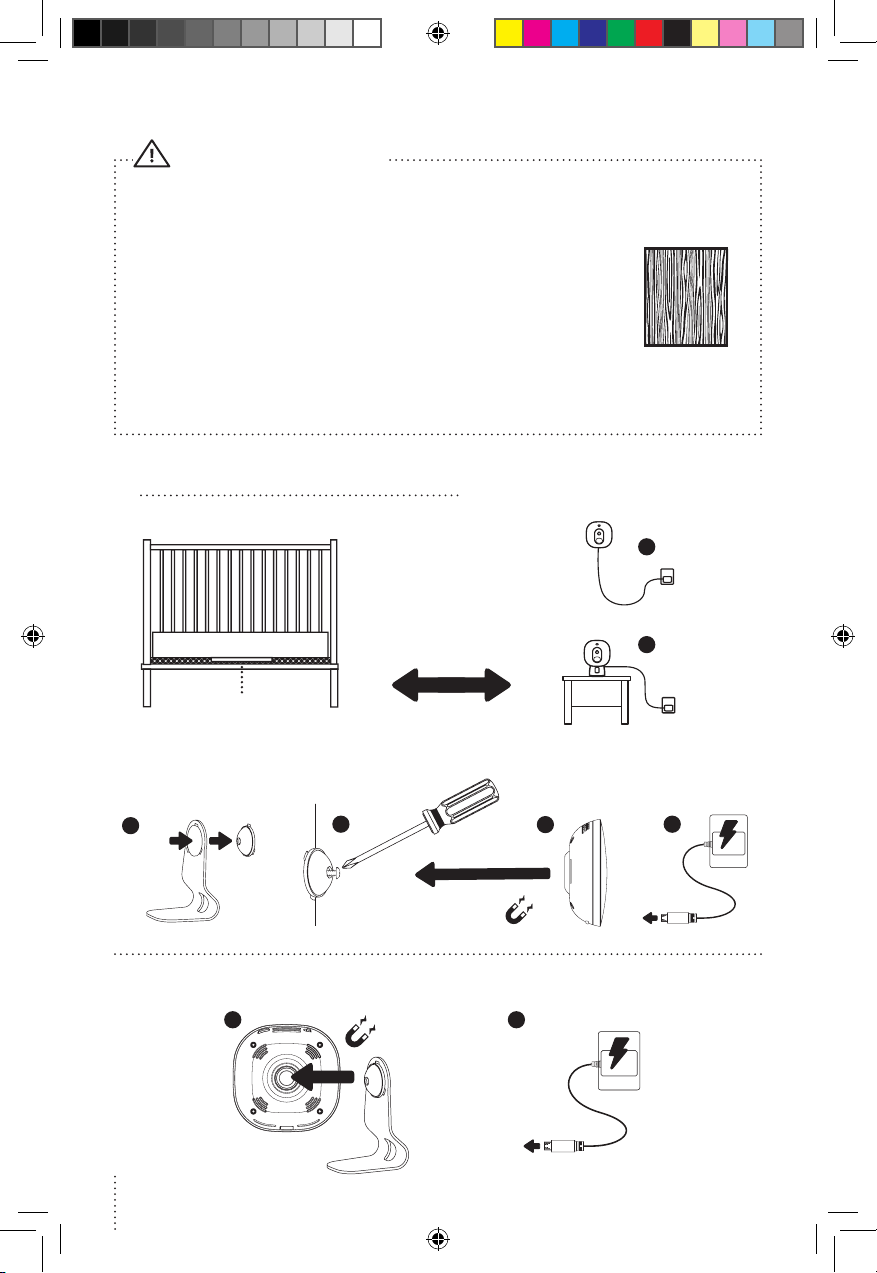
Hardboard, if the crib does not have
a firm surface
(see specification on STEP 2)
4
1
2
3
2X
4
5
6
7
8
CFO2_ANGE_Manuel_AC527_NA_Complet.indd 4 19-02-06 12:44
E
N
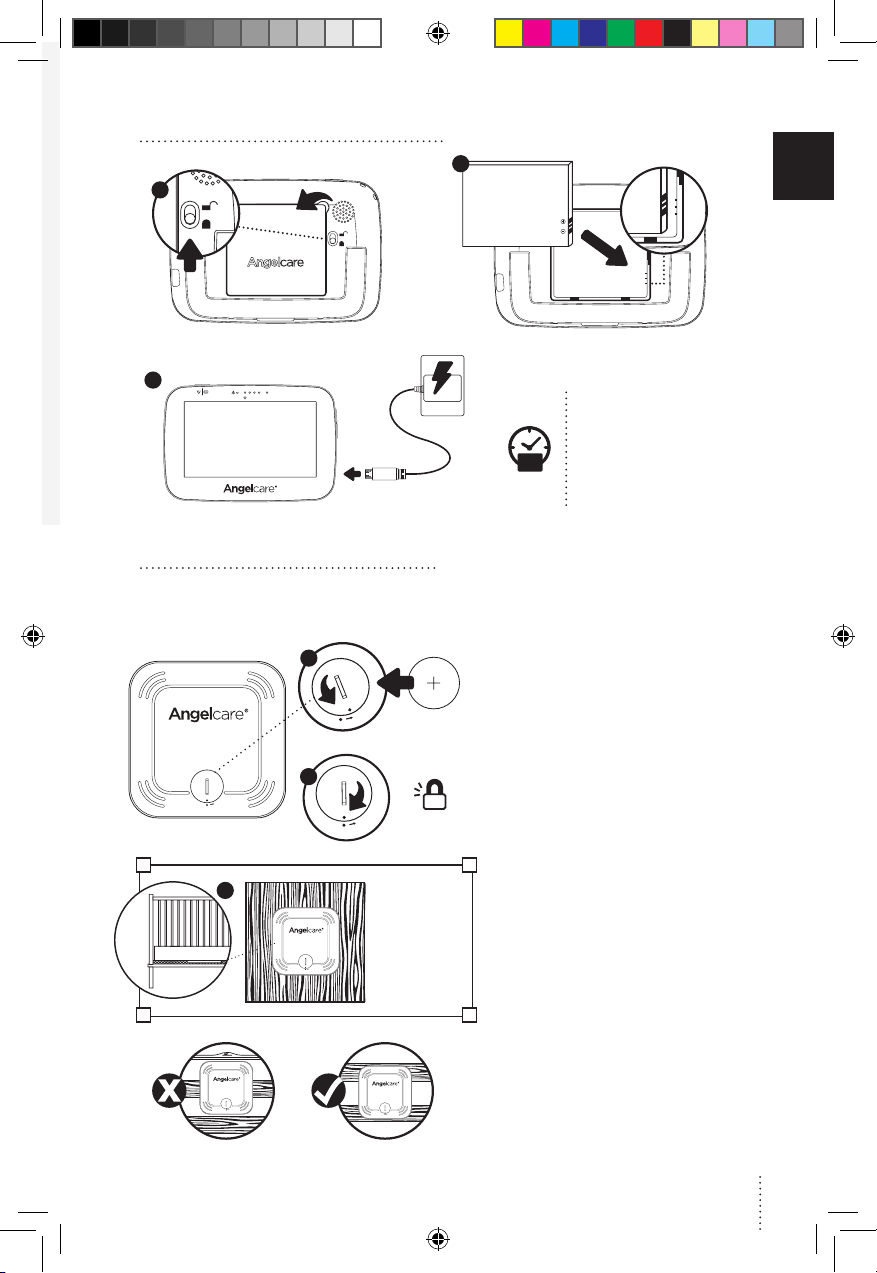
1 SETTING UP THE PARENT UNIT
2
1
3
Charge the Parent
Unit 8 hours
8H
prior to first use
Regular charging time
is 4 hours
2 SETTING UP THE SENSOR PAD
e Sensor Pad is designed to detect subtle baby movements on the surface of the
mattress.e alarm will only sound if NO movement is detected for 20 seconds.
1
1. Remove the battery cover
and insert the battery face
with + face up
2. Replace the battery cover,
align 2 dots and click to secure
2
3. Remove the mattress from
3
the crib, place Sensor Pad
- Angelcare® logo side
up - on base in approximate
centre of mattress. It should
be centred on the hardboard if
your crib requires a hardboard
support (see ‘IMPORTANT’ note
below)
4. Replace the mattress
Correct positioning
for slatted base
5
CFO2_ANGE_Manuel_AC527_NA_Complet.indd 5 19-02-06 12:44
IMPORTANT
• If your crib does not have a solid, stationary, completely flat, firm
surface including a spring or slat base, place a hardboard between
the crib base and the Sensor Pad, to ensure correct operation. e
hardboard support must measure at least 30 x 30 cm (12” x 12”)
and 6 mm (1/4”) thick. is hardboard support must be larger than
the Sensor Pad surface area
• e Sensor Pad functions with standard crib sprung and foam
mattresses and not memory foam (partial or full), hollow frame
construction mattresses and water beds. Please consult Angelcare if
unsure of mattress compatibility. e hardboard maintains a constant
pressure on the Sensor Pad, enabling it to detect the baby’s movements
even when the baby is at the edges of the crib
3 SETTING UP THE NURSERY UNIT
Place the Nursery
Unit and Adapter cord at
least 3 feet (1 meter)
from the crib
Sensor Pad
Wall-Mounted
1
2
Tabletop
WALLMOUNTED
1
2 4
3
TABLETOP
1 2
6
CFO2_ANGE_Manuel_AC527_NA_Complet.indd 6 19-02-06 12:44
E
N
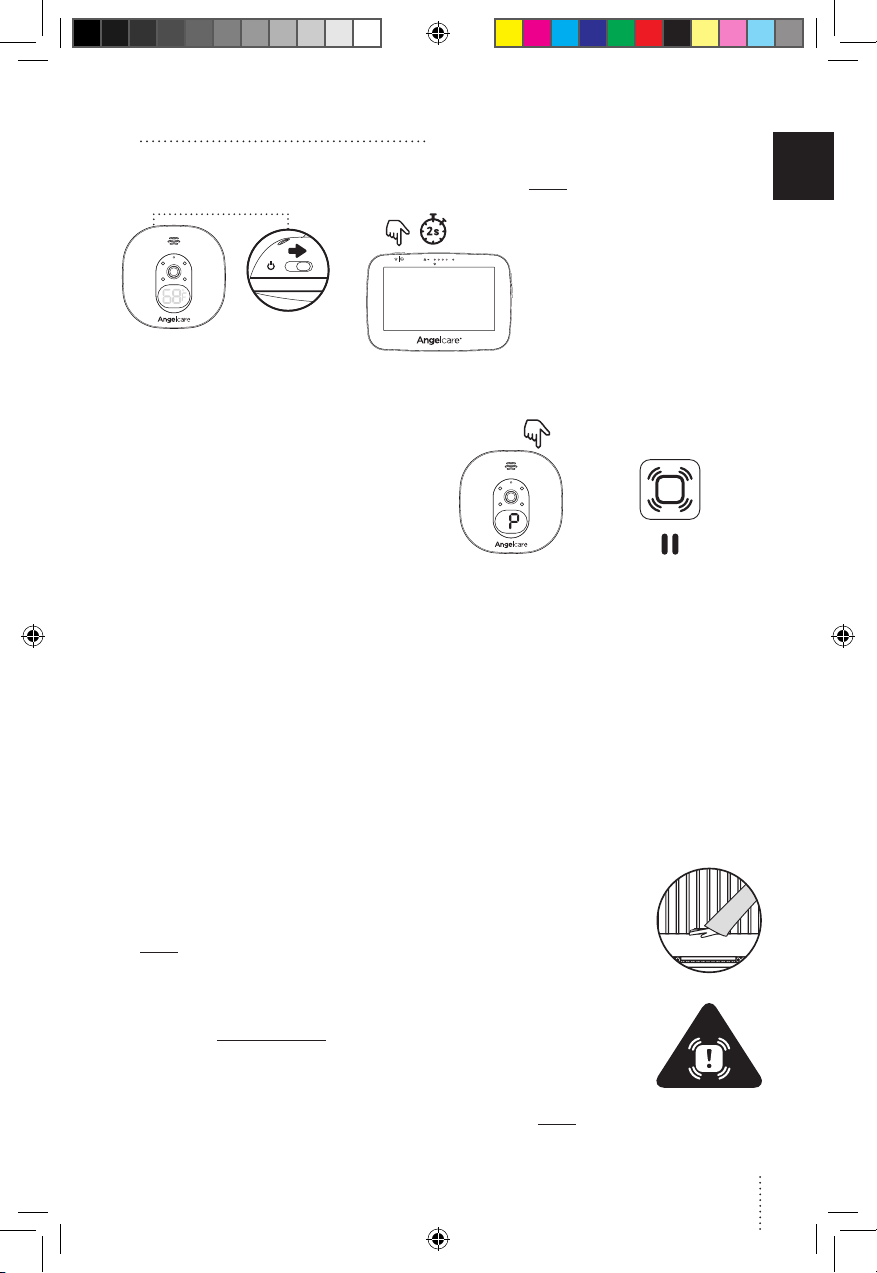
4 TURNING ON YOUR MONITOR
NURSERY UNIT PARENT UNIT
Note:
• Your Nursery Unit and Parent Unit
come pre-paired
• Each time you power ON your
Nursery Unit, the internal
thermometer will need to
calibrate to ensure accuracy.
is automatic process will take
approximately 30 minutes
NURSERY UNIT PARENT UNIT
PAUSING AND RESTARTING THE
SENSOR PAD
• Allows you to pause the Sensor Pad if you
remove baby from the crib, e.g. for feeding or
comforting. Ensure to un-pause the Sensor
Pad before putting baby in the crib
TEST THE SENSOR PAD
1. Sources of vibration & movement other than your baby’s can be detected by the Sensor Pad and
interfere with the performance of your Angelcare monitor. e alarm will not sound if it detects
movement other than your baby’s
2. ere are 4 sensitivity settings. e unit is set at level 3 (default) and can be adjusted
accordingly
3. e Sensor Pad will detect false movements if you are touching the crib
4. e monitor will produce a Rouse alarm single beep tone designed to stir baby if no movement
has been detected for 15 seconds. If no further movement is detected, the main alarm will sound
at 20 seconds – a series of continuous beeps
SENSOR PAD FOUR CORNER TEST
1. Place the Sensor Pad at the approximate centre of baby’s sleeping area and put the mattress
back in place
2. Switch ON both Nursery & Parent Units – check both units are paired (connected)
3. Immediately pat your hand lightly and continuously on a corner of the mattress
twice for Sensor to detect movement. If movement is detected you will hear a
TIC sound every 5 seconds and PU will flash green for a single sensor pad
4. Step away from the crib
5. e alarm will sound from the Nursery and Parent Unit after 20 seconds.
If the Alarm does not sound, ensure everything is setup correctly and try
again; check battery levels on all units, follow the manual for ‘NO ALARMS’
– the sensitivity setting may require lowering by a single level due to other
vibrations/movements
6. If the alarm sounds, pat your hand lightly on a corner of mattress twice for Sensor to detect
movement. It may take up to 8 seconds to recognise movement and for alarm to stop.
7. If the alarm continues, even after lightly patting the corner of your mattress twice, adjust the
sensitivity higher and repeat this test
CFO2_ANGE_Manuel_AC527_NA_Complet.indd 7 19-02-06 12:44
7
IMPORTANT
• Test your monitor before first use
• Prior to use and on a regular basis (before placing your child in the crib) always check the
Sensor Pad is detecting no movements or vibrations in its environment
• Test your monitor every time you move the Sensor Pad to a different place
5 GETTING TO KNOW YOUR MONITOR
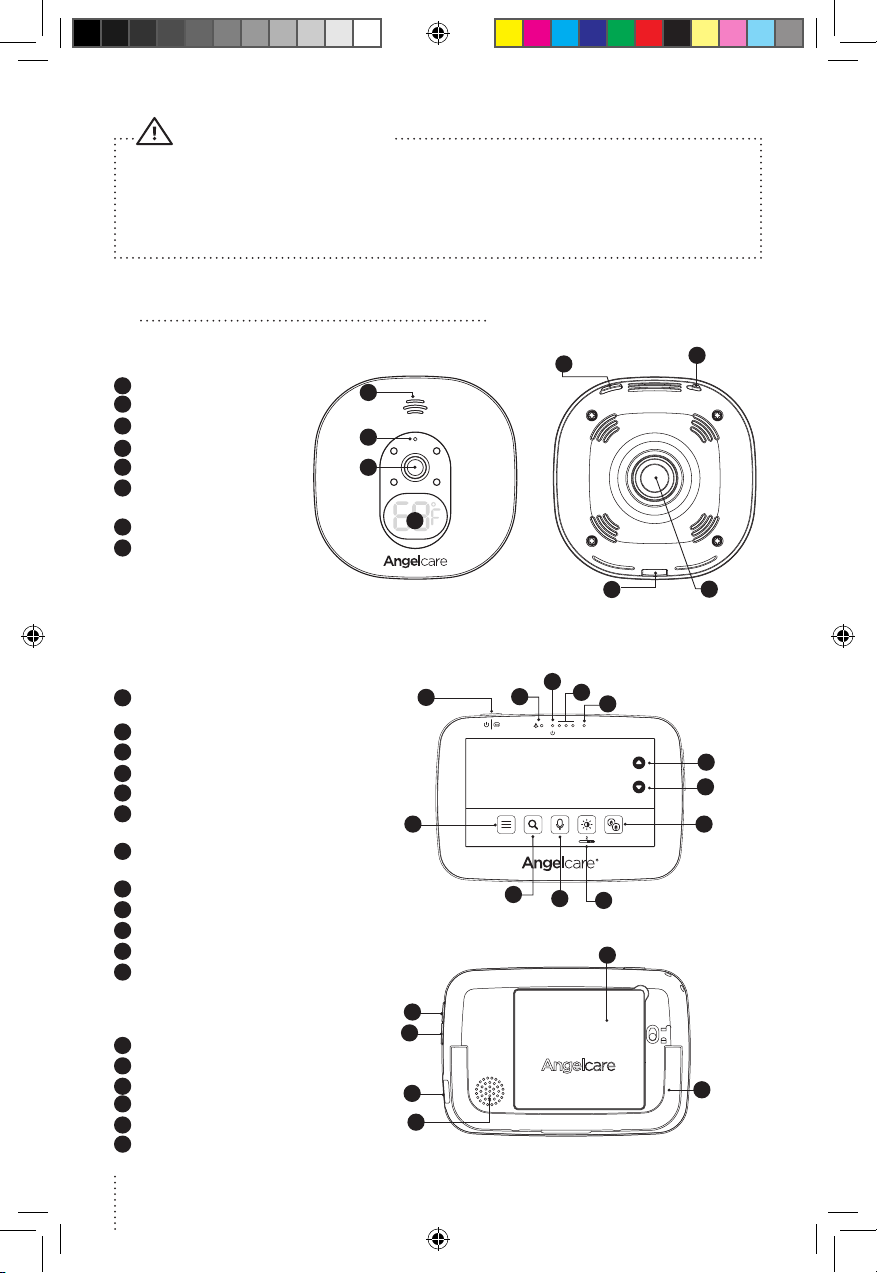
NURSERY UNIT
Speaker
1
2
Microphone
3
Camera Lens
Temperature Indicator
4
5
Micro USB port
6
Pause Sensor Pad
/ Pairing button
7
Power ON/OFF
8
Magnet for tabletop stand
and wall mount
PARENT UNIT
Power ON/OFF (Press & Hold)
1
/ Sleep mode (Quickly press & release)
2
Movement indicator (TIC function)
3
Power indicator
4
Visual sound indicator
5
Microphone
6
Navigation up (appear only for
certain functions)
7
Navigation down (appear only for
certain functions)
8
Main Menu
9
Zoom & pan feature
10
Talk-back
11
Screen brightness
12
View mode
(only if there are 2 Nursery Units
connected)
Volume up
13
Volume down
14
Micro USB charging port
15
16
Speaker
17
Rechargeable battery compartment
18
Folding stand
8
6
1
2
3
4
FRONT SIDE
3
1
8 12
2
9
4
10
11
FRONT SIDE
17
13
14
15
16
REAR SIDE
5
REAR SIDE
5
7
8
6
7
18
CFO2_ANGE_Manuel_AC527_NA_Complet.indd 8 19-02-06 12:44

E
N
TOP STATUS BAR
11
16 17 18
1
2
3
4
5
6
7
Sensor Pad movement
1
detection is activated
Sensor Pad alert
2
3
Sensor Pad lost link
4
Sensor Pad movement
detection is OFF
5
Sensor Pad is paused
6
Sensor Pad is low battery
MAIN MENU
12
9 10
8
7
Sensor Pad has never been paired
8
Nursery Unit selected and
13
14
broadcasting sound
9
“TIC” function is activated
10
“VOX” function is activated
11
Temperature alert is activated
12
Temperature alert: too hot
13
Temperature alert: too cold
VOX
ON ON 3 MINOFF
21 3 4 5 6 7
15
14
Night vision is activated
15
Second Sensor Pad is low
battery (only shown if you
have 2 Sensor Pads paired)
16
Volume level indicators
17
Reception quality indicators
18
Parent Unit battery level
indicators
1
Confirm settings and go back to previous menu
2
Movement Sensor Pad Activation:
ON: e Parent & Nursery Units will alarm if there
is no movement after 20 seconds
PAUSE: Allows you to pause the Sensor Pad if
you remove baby from the crib, e.g. for feeding or
comforting. e Pause icon in the status bar will
flash and the Nursery Unit temperature indicator
will show a pause “P” symbol. Ensure to un-pause
the Sensor Pad before putting baby in the crib (Turn
movement detection ON)
OFF: When your baby gets older, allows you to turn
4
VOX Activation: ‘Sound Activated’ (VOX ON)
means that it will transmit sounds only when
it detects them, based on the setting of the
sensitivity level. To save power, after 10 seconds,
the sound transmission will stop if no sound is
detected. Once sound is detected transmission
will automatically activate. ‘Continuous Sound’
(VOX OFF) means the sound monitoring is
continuously ON, picking up all sounds
5
Sleep Mode Set-Up
6
Temperature Settings
7
General Settings
movement detection OFF and use your monitor for
video only
3
Tic Activation:
If movement detection is activated, allows you
to hear a Tic sound every 5 seconds. In the event
you have two Sensor Pads connected, the Tic
indication will flash green for Sensor Pad 1 and
blue for Sensor Pad 2
9
CFO2_ANGE_Manuel_AC527_NA_Complet.indd 9 19-02-06 12:44
IMPORTANT
• To confirm your settings, you’ll always need to press the icon. A confirmation icon will then
appear on the screen: Settings have been saved Settings have not been saved
• If you have 2 Nursery Units & 2 Sensor Pads paired with your monitor, you can only change the
settings of the viewing Nursery Unit
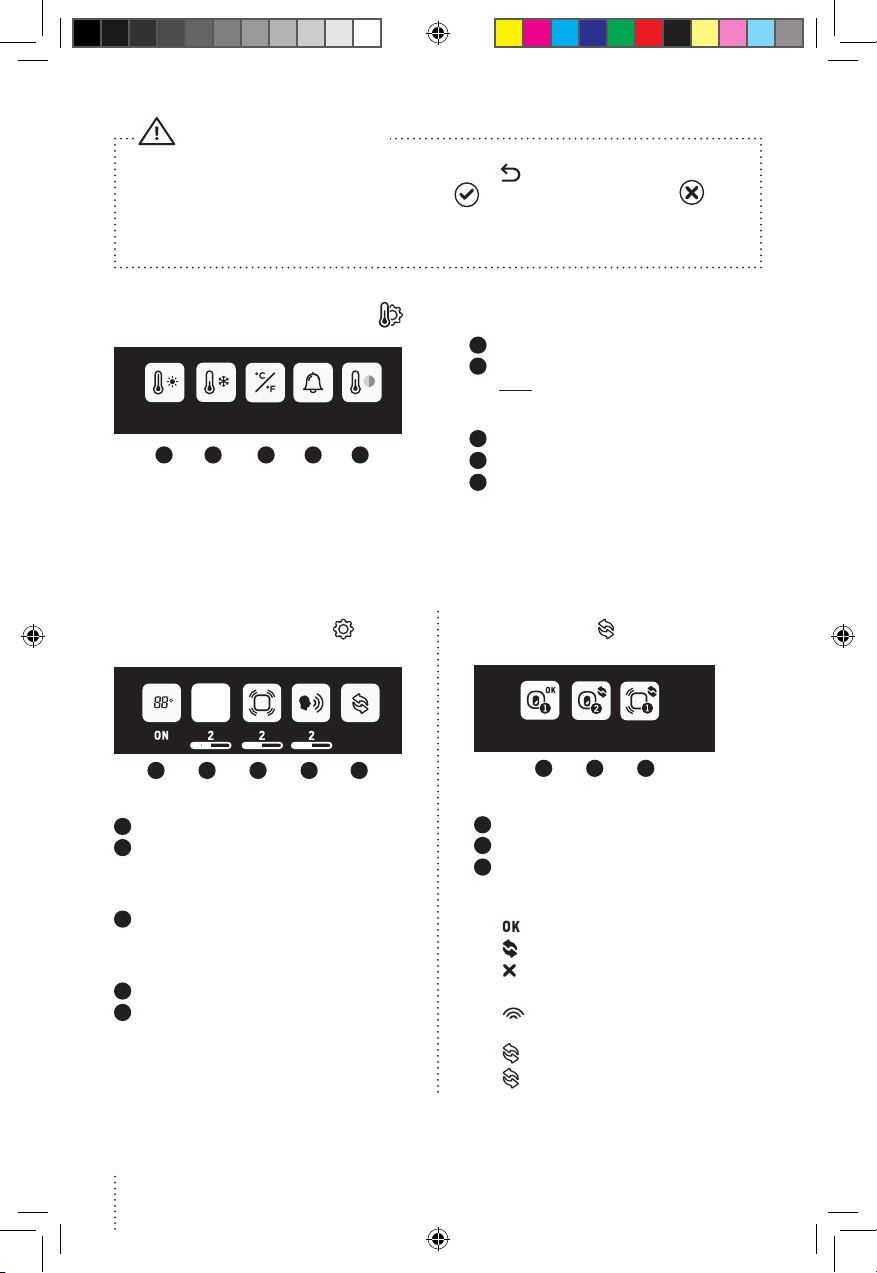
TEMPERATURE SETTINGS MENU
72 60 OFF ON
1 2 3 4 5
o
C
GENERAL SETTINGS MENU
VOX
1 2 3 4 5
1
Activate Nursery Unit display
2
Set VOX sensitivity: e sensitivity of the
microphone is adjustable and has 4 levels (the
most sensitive is level 4). is means that sound
will only transmit based on the level that you set
3
Set Sensor Pad sensitivity:
To ensure adequate monitoring of your child’s
movements, you can adjust the sensitivity of
the Sensor Pad
4
Set Nursery Unit speaker volume
5
Pairing Menu
1
Set warmer temperature alarm
2
Set colder temperature alarm
Note: e range between the minimum and
maximum temperature can not be less than
4°C / 7°F
3
Set Celsius or Fahrenheit display
4
Activate the temperature alarm
5
Activate the Nursery temperature
color code display
White: Temperature is normal
Red: Temperature is too hot
Blue: Temperature is too cold
PAIRING MENU
1 2 3
1
Nursery Unit 1 Status
2
Nursery Unit 2 Status
3
Sensor Pad 1 Status
Nursery Unit and Sensor Pad Status
Icons:
Green: Connected/Paired
Blue: Add a Nursery Unit or Sensor Pad
Red: Remove Nursery Unit or Sensor Pad
Confirmation process ON THE SCREEN:
Blue: ‘’Link’’ icon animation when
pairing (Linking timeout: 60s)
Green: Successful pairing
Red: Failed pairing, please try again
10
CFO2_ANGE_Manuel_AC527_NA_Complet.indd 10 19-02-06 12:44
 Loading...