

Angelcare Monitors AC1100 Users Manual
Baby Monitor with video, sound & Movement Sensor Pad .......................................................................2
Moniteur pour bébés avec vidéo, sons et détecteur de mouvements ....................................................10
Platinum edition
AC1100

WARNINGS
Failure to follow these warnings and the assembly instructions
could result in serious injury or death.
This product is designed to aid in the monitoring of your child.
When using the monitor, you must still provide the supervision
necessary for the continued safety of your child. Always be sure
that both the transmitter and receiver are working properly and
are within range of each other.
This product is NOT a substitute for direct supervision of
your baby. Check your baby’s activities at regular intervals.
Monitoring of premature babies, or those considered to be at
risk, should always be carried out under the supervision of a
health professional.
STRANGULATION HAZARD. Keep the adapter cords out of the
reach of children. Do not use with extension cords.
DO NOT place the Nursery Unit or its cord within your child’s
reach. Do not put the Nursery Unit inside a crib or playard.
Use ONLY with 110-120 volt AC electrical outlets.
Allow for proper ventilation when units are in use. Do not cover
the Nursery Unit or Parent Units with any object such as a blanket. Do not place it in a drawer or in any location which would
muffle the sound or interfere with the normal flow of air.
DO NOT immerse any part of the Nursery Unit, Parent Unit, Sensor Pad, adapters or docking station in water or any other liq-
E
uid. Clean only with a dry cloth.
N
DO NOT place unit near water and moisture. Do not use the
Nursery Unit outdoors. Do not use the Nursery Unit near possible wet areas, such as a bathtub, shower, wash basin, sink,
laundry tub, swimming pool, wet basement, etc.
Keep Nursery Unit away from heat sources, such as fireplaces,
radiators, stoves, and TVs or other appliances. Heat can damage the case or electrical parts.
WARNING: This product is not a toy.
Do not use the Nursery Unit if:
- The adapter cords or plugs have been damaged.
- The unit has been exposed to liquids.
- Unit has been dropped or is damaged.
DO NOT OPEN the Nursery Unit, Parent Unit, Parent Unit base,
Sensor Pad or adapters. No user-serviceable parts inside. Risk
of electrical shock, fire or death.
The antenna used for this transmitter must be installed to provide a separation distance of at least 20 cm (7.9”) from all persons and must not be collocated or operating in conjunction
with any other antenna or transmitter.
IMPORTANT: You must use only rechargeable batteries in the
Parents Unit. DO NOT use alkaline batteries or you will severely
damage the unit. Charge the batteries for 16 hours prior to first
use. Be sure to have the monitor in the OFF position during this
period. Only use the AC adapters included with your monitor.
DO NOT use these adapters with any other equipment.
When unplugging the AC adapter from the Nursery Unit, be sure
it is switched to the off position. If it isn’t, the unit will revert to
battery mode if batteries are installed.
You can use rechargeable batteries in the Nursery Unit, however, they will not be recharged by plugging in the AC adapter.
To recharge, remove the batteries and use an external charger.
Always place both the Nursery Unit and Parents Unit on a flat
surface in an upright position and allow for proper ventilation.
Avoid damage to the Sensor Pad cord and to the adapter cords.
Route cords so that they are not likely to be walked on or
pinched by items placed on or against them.
DO NOT use this monitor if the Sensor Pad cord and/or the
adapters cords are damaged.
Route Sensor Pad cord only below crib mattress and out of
reach of children.
Use ONLY AAA (LR03) rechargeable batteries and/or the AC
adapters provided for the Parents Unit.
During long periods of non-use remove all batteries from their
compartments and unplug the AC adapters.
This monitor uses public airwaves to transmit signals. The Parents Unit may pick up signals or interference from other nursery monitors in your area. Your monitor may even be picked up
by other households. To protect your privacy, make sure both
units are turned off when not in use.
When the monitor is in use, do not use a crib mobile or other
crib accessories that may produce vibrations. Other sources of
vibrations may include fans, washing machines, loud music,
etc. These sources of vibration may interfere with the performance of your Angelcare® monitor and the alarm will not sound
if it continues to detect any movement other than your baby’s.
Be sure all vibration sources are eliminated before using the
monitor.
You may experience false alarms for several reasons. The most
common reason is the Nursery Unit has not been turned off
after you have removed your baby from the crib. Another reason
is if the Sensor Pad has not been placed under the mattress
properly. Be sure the Sensor Pad is on a flat, firm surface with
the printed side facing up. The sensitivity level may also need
to be adjusted. Refer to the Movement Sensitivity Adjustment
section.
Always be sure to immediately check on baby whenever an
alarm sounds.
Your monitor can be used in any crib that is stationary and designed to safely hold a baby. If your crib has a spring or slat base
you will need to place a piece of Masonite board under the Sensor Pad. This support must be at least 13 inches long on all four
sides and 1/4 inch thick. Only use your Angelcare® monitor in
a stationary sleeping environment such as a crib where the Sensor Pad can rest on a completely flat, firm surface.
FCC WARNINGS
Modifications not authorized by the manufacturer may void
users authority to operate this device.
NOTE: This equipment has been tested and found to comply
with the limits for a Class B digital device, pursuant to Part
15 of the FCC Rules. These limits are designed to provide
reasonable protection against harmful interference in a residential installation. This equipment generates, uses and
can radiate radio frequency energy and, if not installed and
used in accordance with the instructions, may cause harmful interference to radio communications.
However, there is no guarantee that interference will not
occur in a particular installation. If this equipment does
cause harmful interference to radio or television reception,
which can be determined by turning the equipment off and
on, the user is encouraged to try to correct the interference
by one or more of the following measures:
-Reorient or relocate the receiving antenna.
-Increase the separation between the equipment and
receiver.
- Connect the equipment into an outlet on a circuit different
from that to which the receiver is connected.
- Consult the dealer or an experienced radio/TV technician
for help.
This device complies with part 15 of the FCC Rules.
Operation is subject to the following two conditions:
(1) This device may not cause harmful interference, and
(2) This device must accept any interference received, including interference that may cause undesired operation.
2
Owner’s Manual
Table of content
Keep instructions for future reference
Installation in the Baby’s room...............................................................................................................................................................................................3
Nursery Unit set up ...............................................................................................................................................................................................................4
Parents Unit set up................................................................................................................................................................................................................4
Testing our Angelcare® monitor............................................................................................................................................................................................4
Parents Unit settings .............................................................................................................................................................................................................5
Troubleshooting.....................................................................................................................................................................................................................8
Warranty ..............................................................................................................................................................................................................................9
Maintenance of your Angelcare® monitor .............................................................................................................................................................................9
Factory settings and technical specifications.........................................................................................................................................................................9
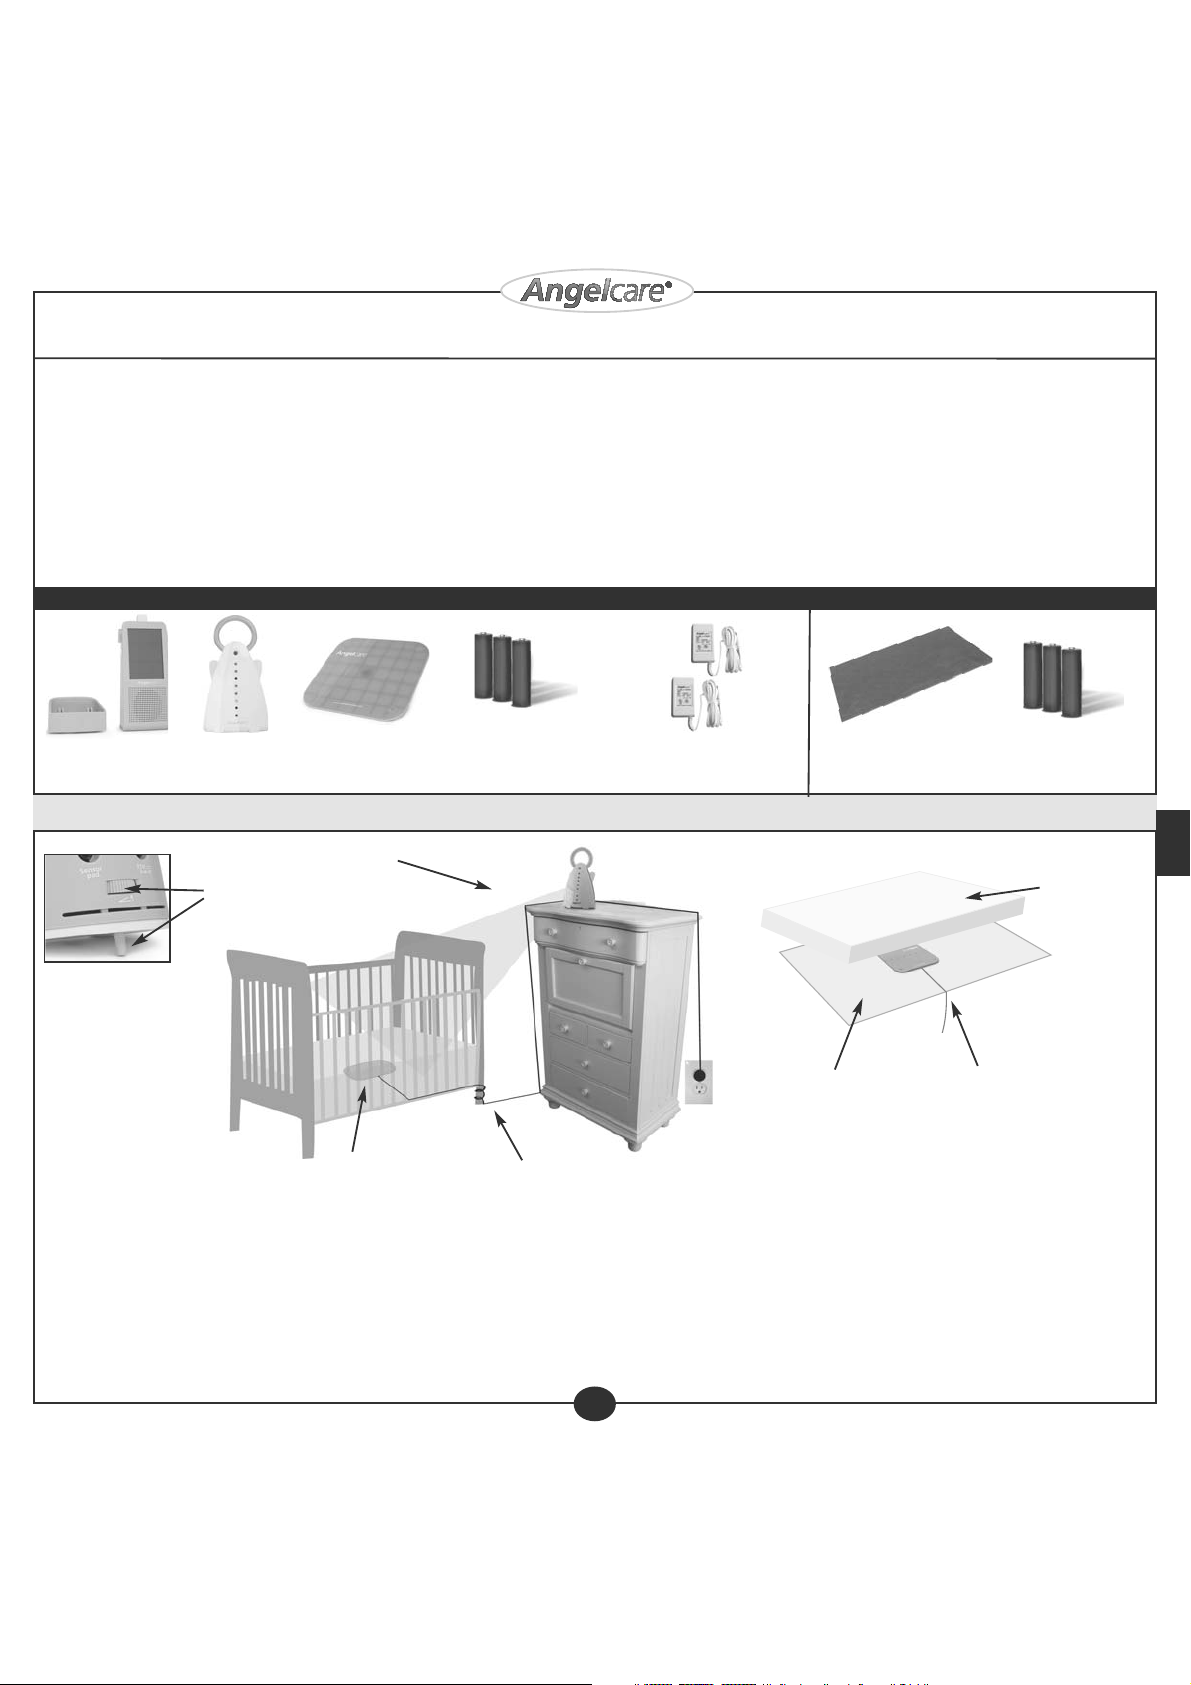
INCLUDED
Rechargeable Parents
Unit and charger
Nursery Unit
Sensor Pad
STEP 1 - Installation in the Baby’s room
• Position the Nursery Unit facing
the crib.
• Adjust camera angle with
rotating dial.
Sensor Pad
Secure the Sensor Pad cord
3 AAA rechargeable
batteries for Parents Unit
2 AC adapters for Nursery Unit
and for Parents Unit charger
Hard fiberboard
(Masonite)
Masonite fiberboard
(not included)
NOT INCLUDED
3 AAA regular batteries for
Nursery Unit battery back-up
E
N
Mattress
Sensor Pad cord
•The Sensor Pad must rest on a completely flat and rigid surface. Place a 6mm (1/4'') thick Masonite board to cover the full size of the crib or with minimum dimensions of
28cm (11'') X 28cm (11'') X 6mm (1/4'') between the crib base and mattress,when using one Sensor Pad. The board will push the Sensor Pad into the mattress and keep
the contact between the Sensor Pad and the mattress, should the baby move around. Make sure the Sensor Pad’s cord passes underneath the mattress as shown.
•Position the Sensor Pad as shown, in the center of the crib. Make sure the printed Angelcare logo faces up. Do not place any bedding between the mattress and the Sensor Pad.
•Secure the Sensor Pad cord to the crib using a tie wrap. Run the cord on the floor to ensure it is out of the baby’s reach.
• The Sensor Pad works with all baby bed sizes and all mattresses, except memory foam mattresses or mattresses with a hollow frame. You will need to test your Sensor Pad after
the set-up is completed.
• The Nursery Unit can also be installed on a tripod (not included).
3
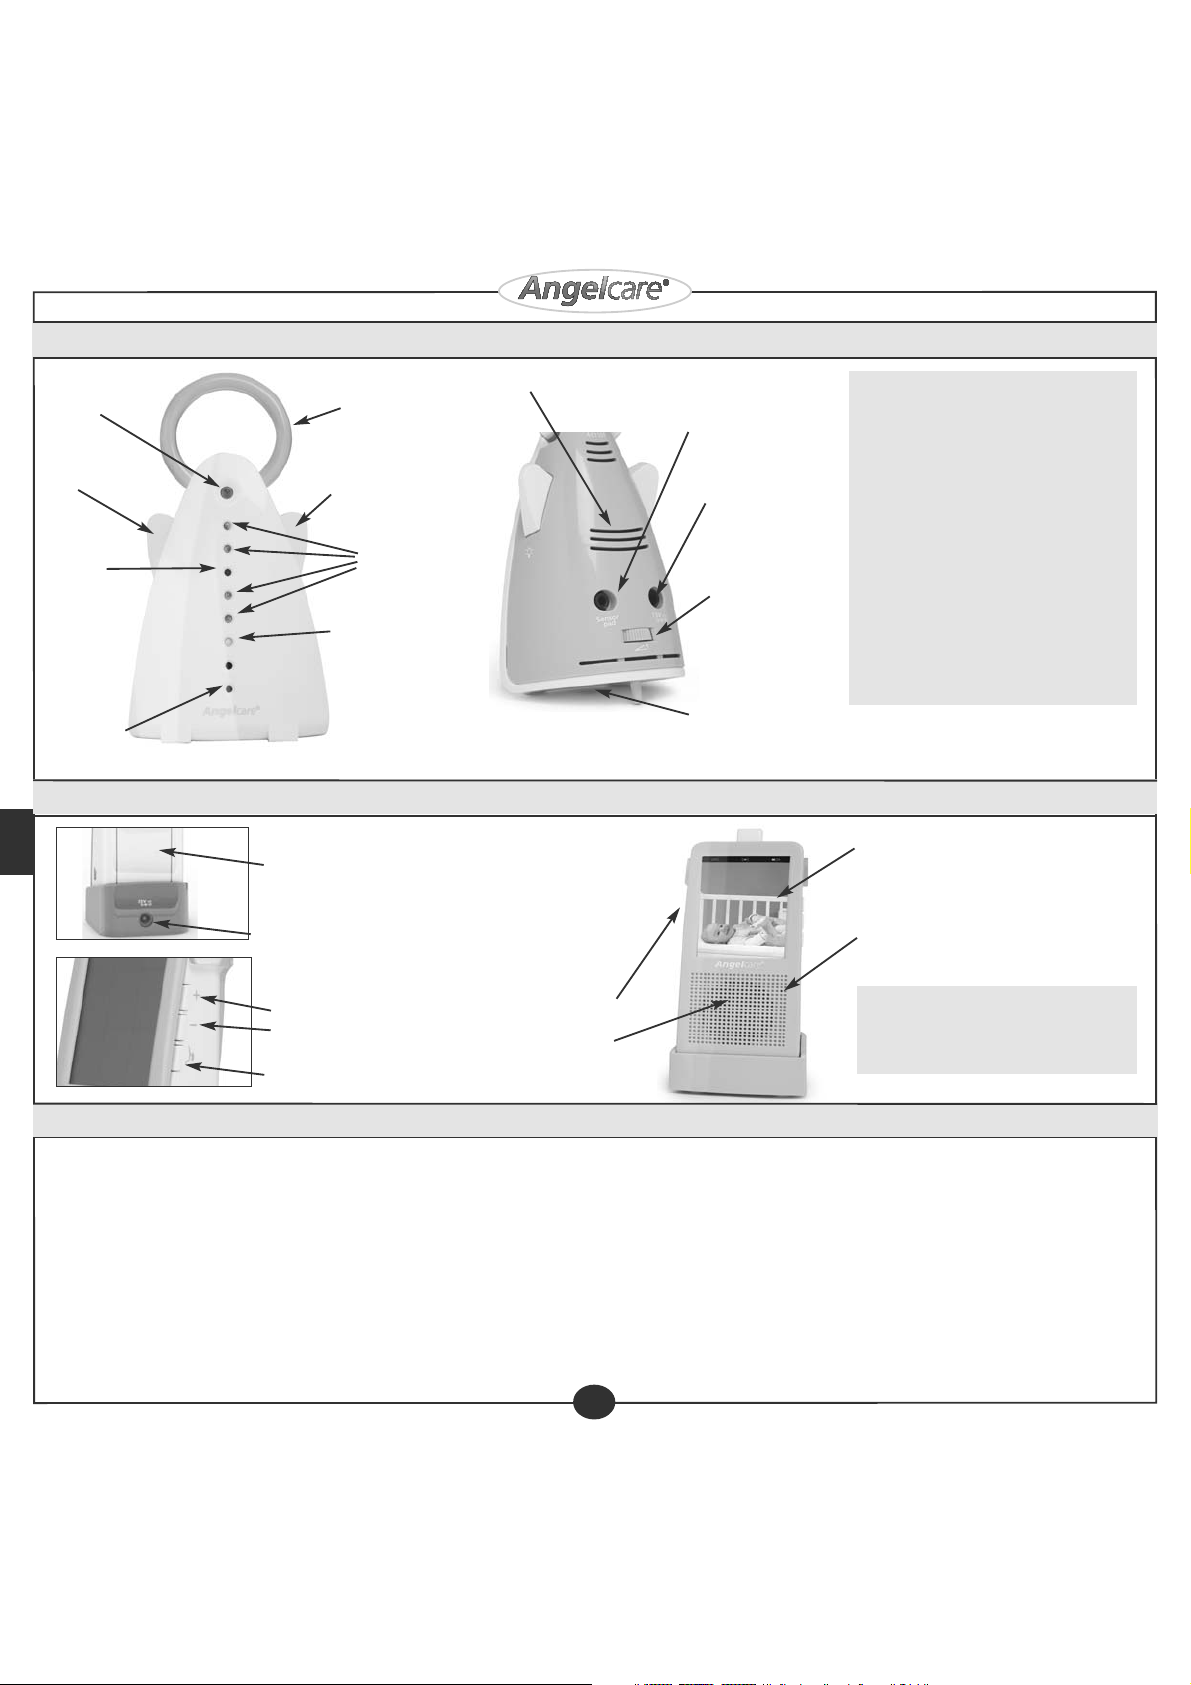
STEP 2 - Nursery Unit set-up
Push button
POWER
On/Off wing
Video
camera
Microphone
STEP 3 - Parents Unit set up
E
N
Night light
Night light
ON/OFF
4 Infrared LEDs
Power indicator
LED (green)
Low battery indicator
LED (red)
•Remove the belt clip and insert 3 AAA NIMH rechargeable
batteries (included) into Parents Unit. NEVER use regular
alkaline batteries, they may explode.
•Connect AC adapter to Parents Unit charger and plug
adapter into an electrical outlet. Let charge for 15
continuous hours before using the monitor for the
first time.
Speaker sound UP
Speaker sound DOWN
Press and hold for MUTE
Talk - Press and hold
Speaker
POWER On/Off
Speaker
Sensor Pad
cable entry
AC adapter entry
Rotating knob for
camera angle
Back up battery
compartment and
Tripod connector
ACTIONS
•Connect the Sensor Pad cord to the
Nursery Unit.
•Insert 3 AAA regular batteries (not
included) in the Nursery Unit (for battery
backup in case of power failure).
•Connect AC adapter to Nursery Unit and
plug adapter to an electrical outlet in the
baby’s room.
•Push and hold the left wing for 2 seconds
to put the Nursery Unit power ON.
LCD Touchscreen
Microphone
ACTION
Leave on charger for 15 continuous
hours before using your monitor.
STEP 4 - Testing your Angelcare®monitor
• Test your monitor BEFORE using it for the first time
• The Angelcare Monitor can be used with the factory settings or you can modify them in the menu.
Note: Test your Angelcare® monitor BEFORE using it for the first time and then on a regular basis to make sure that it is functioning properly.The Angelcare® monitor can be used
outside of the crib in a different sleeping area.Test your monitor when moving the Sensor Pad to a new location to ensure sensitivity is adjusted correctly to the new padding or
mattress. Refer to the movement sensitivity adjustment section.
1.TEST THE SOUND Make sure the sound mode is ON. Have someone else speak into the Nursery Unit or place a radio near the Nursery Unit. You should hear sound from the
Parents Unit. If there is no sound,refer to the Troubleshooting section.
2.TEST YOUR MONITOR TO DETECT MOVEMENT Make sure the Sensor Pad's cord is plugged into the Nursery Unit then turn both units ON. Make sure the movement function is
ON. Gently move your hand on the mattress.The pendulum symbol will move with your every movement. Remove your hand from the mattress. Due to the lack of movement, a
pre-alarm “Tic”sound will be emitted after 15 seconds and 5 seconds later, the alarm will sound.
4
3. TEST THE STOPPING OF THE ALARM To stop the alarm, place your hand lightly on the mattress so that the Sensor Pad starts detecting movement again.The pendulum icon on
the Parents Unit will start moving again, as movement is detected by the Sensor Pad. You may also press the alarm icon on the Parents Unit, press the push button on top of the
Nursery Unit or shut the Nursery Unit OFF to stop the alarm.
NOTE: If the alarm does not sound, the Sensor Pad may be detecting a continuous vibration from the floor, a strong draft or the crib being touched. Avoid contact with the crib when
the monitor is in use. Place the crib near a solid supporting wall and away from strong air currents. The sensitivity of the Sensor Pad may need to be reduced,consult the movement
sensitivity adjustment.
4.VERIFYING THE BATTERY MODE Verify that the battery mode is functional by operating both units without the AC adapters. If the green light on the Nursery Unit does not light up,
the batteries need to be replaced. If the Parents Unit doesn’t light up and the screen does not appear, it needs to be recharged.
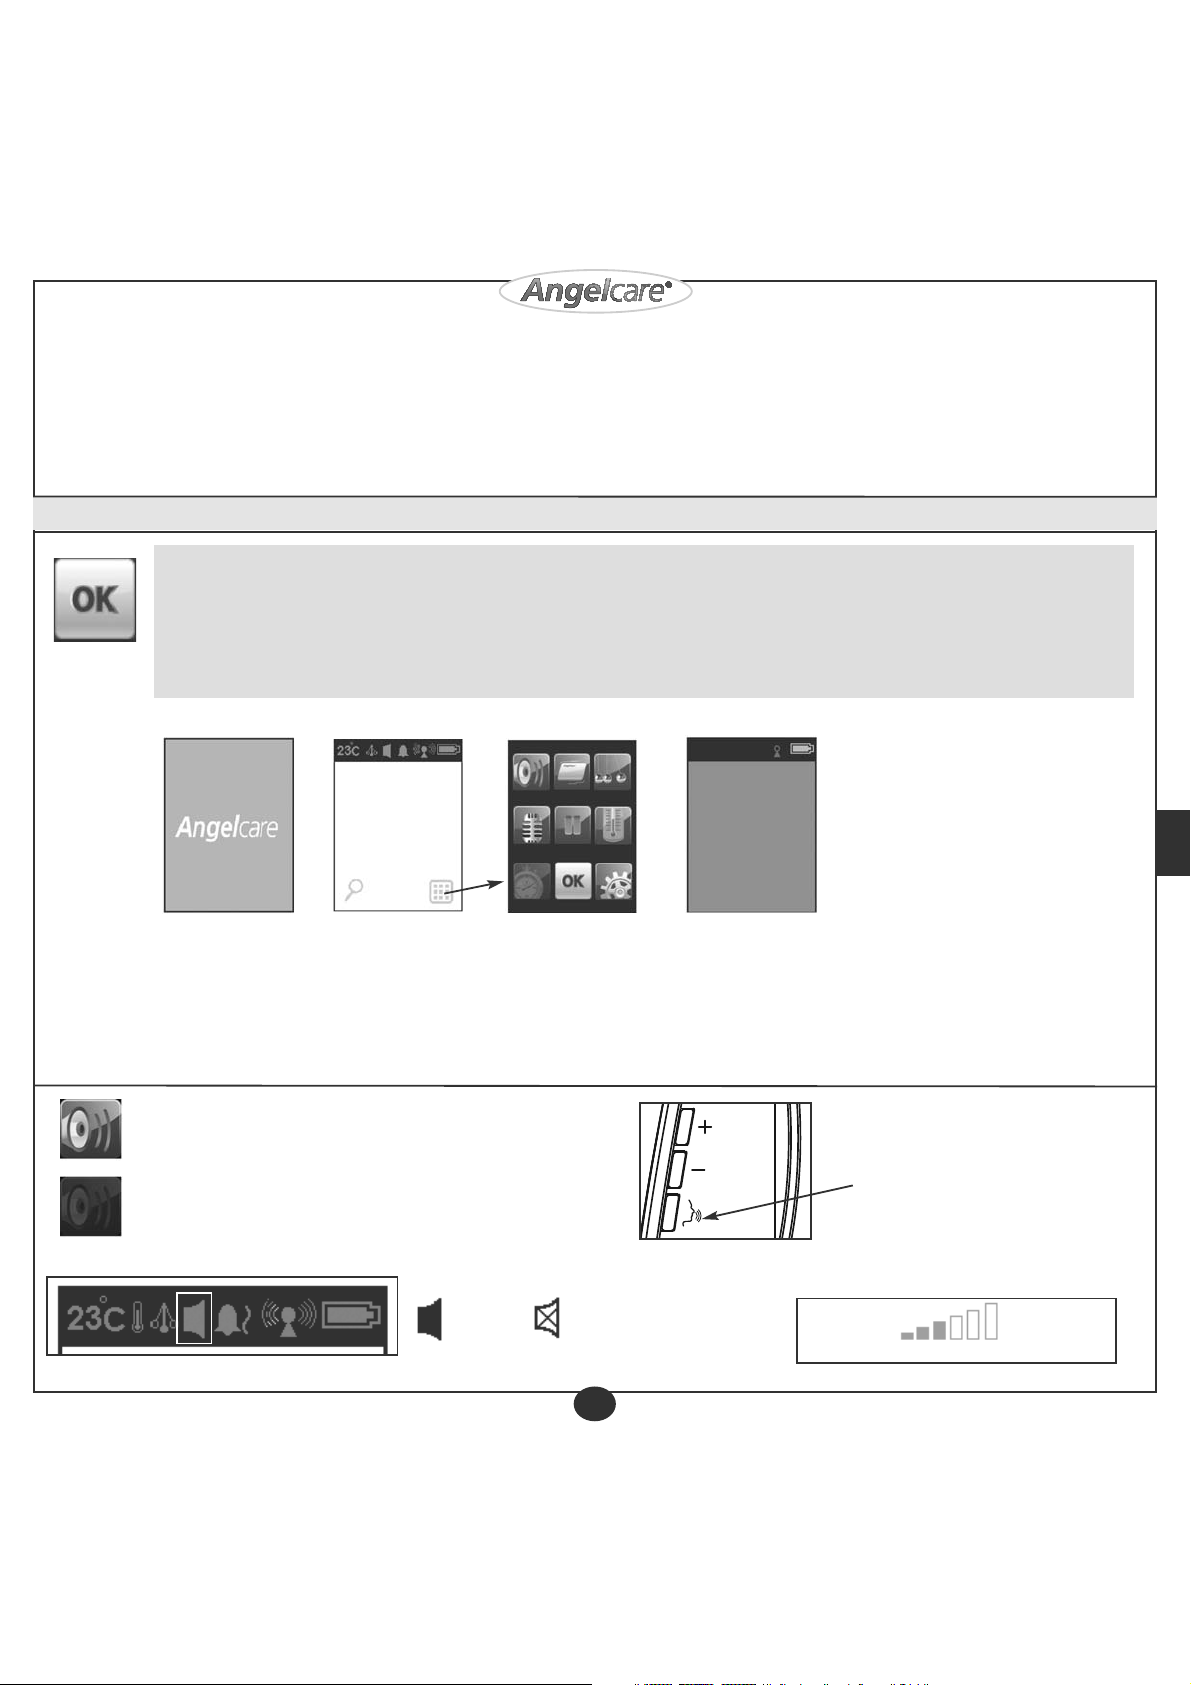
STEP 5 - Parents Unit settings
IMPORTANT NOTE : All settings and adjustments done in the main menu and sub-menu screens will not be updated if they are not confirmed by
pressing the OK (Confirm/Exit) key.
In the main menu or sub-menu screens, if there is no action done to icon keys for 1 minute, the screen will automatically return to video display. In such
case, all settings just adjusted in main and sub-menu will not be saved.
Note: When you are in the main menu or settings menu, the sound transmission from the Nursery Unit to the Parent unit is temporarily desactivated. Movement
detection will remain on if this option was enabled.
A
• Press and hold the POWER key on the Parents Unit until a blue window with the Angelcare logo appears (A).
• The Parents Unit will then show the screen B with the video capture of the baby’s room.
• Touch the small icon at the right bottom to access the menu screen (C).
• If the Nursery Unit is OFF, screen D will appear and the Parents Unit will automatically shut down after 1.5 minutes.
In this case, turn ON the Nursery Unit and then turn ON the Parents Unit again.
B
C
5.1 - Sound
Sound transmission from the Nursery Unit can be ON or OFF.
ON
Adjust the sound level with the UP (+) and DOWN (-) buttons.
Press and hold the DOWN (-) button for at least 2 seconds to MUTE
OFF
the sound.
Sound icon will appear on the top bar of the video screen when the sound is activated.
D
UP
DOWN
/ MUTE
E
N
TALK : Press and hold to talk to your baby.
Level bars will appear on the video screen for a few
seconds when you are changing the speaker volume.
Sound ON
MUTE
5
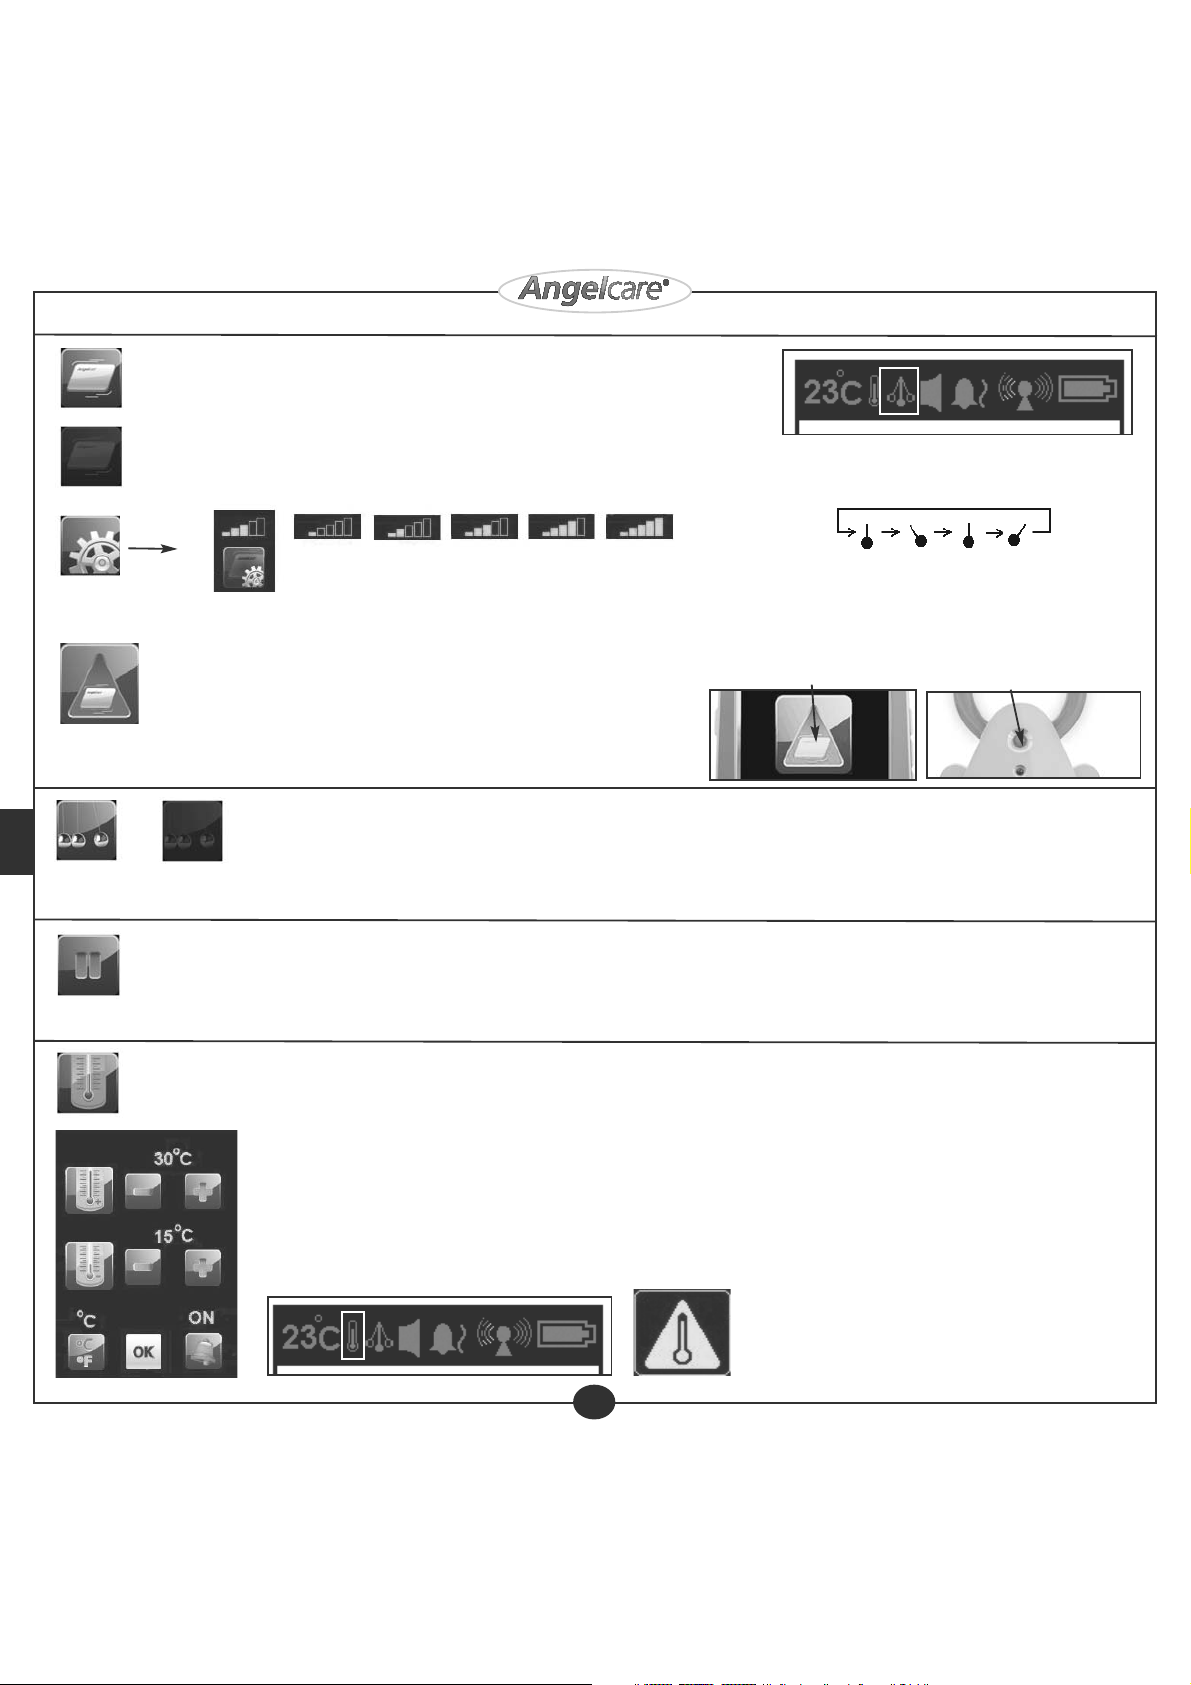
5.2 - Movement
ON
OFF
Movement detection is provided by the under-the-mattress Sensor Pad. This function can
be enabled (ON) or disabled (OFF). When enabled, an alarm will be triggered when no
movement is detected for 20 seconds. If you are receiving false alarms, you will have to
adjust the Sensor Pad sensitivity by pressing the settings icon.
SENSITIVITY ADJUSTMENT
When you are using the movement function, you can adjust the Sensor Pad sensitivity in
the settings menu, if necessary.
Press the Sensor Pad sensitivity key to the desired level 1 (lowest)
to 5 (highest)
Movement icon will appear on the top bar of the video
screen when the Movement is activated and the small pendulum will be doing a balance movement.
5.3 - Tic
E
N
ON OFF
5.4 - Hold
5.5 - Temperature
NO MOVEMENT ALARM
• Triggered when no movement is detected by Sensor Pad for 20 seconds
• Parents Unit and Nursery Unit speakers will emit a loud warning alarm.
• LCD screen display will show the alarm icon on a black background instead
of the video display.
• Check your baby immediately.
• To stop the alarm: press the alarm icon on parent LCD or press and hold
the top button of the Nursery Unit and the alarm will stop as shown.
The Tic sound is related to the movement Sensor Pad. It emits a sound on the Parents Unit with every movement of the pendulum telling you
that the movement function is on.
This function is only available if Movement monitoring is activated.
Press center “hold” icon key to put your monitor on a pause. When the unit is set into 'hold' mode, movement detection and alarm is disabled. Parents Unit speaker
emits 3 consecutive beep every 30 seconds as a reminder that the monitor in on 'HOLD' mode. Press icon key to return to normal operation. LCD then returns to
normal video display. You can also put the unit on HOLD by pushing the top button of the Nursery Unit and return to normal operations by pushing it again.
Your monitor will always indicate the baby’s room temperature. You can be alerted if the temperature is too cold or too hot. If the temperature goes out of the range
you have chosen, an alarm will be triggered. Press this icon in the main menu to reach the temperature settings menu.
• Press '+', '-' icons at the top row of display to adjust high temperature alarm. (High temperature alarm set range: 22 to 40° Celsius / 72
to 104° Fahrenheit.)
• Press '+', '-' icons in the middle of display to adjust low temperature alarm. (Low temperature alarm set range: 5 to 19° Celsius/ 41 to
66° Fahrenheit)
• Press key at the left bottom corner of screen to switch the temperature scale to Fahrenheit or Celsius. The scale you selected will be
indicated above the key.
• If the temperature alarm is set ON, the word “ON” will appear above the alarm icon and the thermometer will appear on top of the video
screen bar.
6
• To stop the alarm: press the alarm icon on parent LCD or press and
hold the top button of the Nursery Unit and the alarm will stop.
Press alarm Icon
When the temperature detected by the Nursery Unit reaches
the limit (high or low) that you have set, the temperature alarm
will be triggered: 4 consecutive beeps will be heard every 5
seconds and the temperature alarm icon will be displayed in
the center of the LCD screen.
Press and hold
 Loading...