

Page 1
Andrew Corporation
10500 West 153rd Street
Orland Park, IL U.S.A. 60462
Telephone: 708-349-3300
FAX (U.S.A.): 1-800-349-5444
Internet: http://www.andrew.com
Customer Service, 24 hours: U.S.A. • Canada • Mexico: 1-800-255-1479
U.K.: 0800 250055 • Republic of Ireland: 1 800 535358
Other Europe: +44 1592 782612
Printed in U.S.A. 7/02
Copyright © 2002 by Andrew Corporation
Operation and Maintenance
Bulletin OM24SNG-RC
Type ES24SNG-LTE-( )
2.4-Meter SNG
2.4-Meter SNG Earth Station Antenna
Page 2

Introduction
Description
Maintenance
Emergency
Procedures
Component
Replacement
Specifications
Purpose . . . . . . . . . . . . . . . . . . . . . . . . . . . . . . . . . . . . . . . . . . . . . . . . . . . . . . . . . . . . . . . . . . . . . . . . . . 3
Proprietary Data . . . . . . . . . . . . . . . . . . . . . . . . . . . . . . . . . . . . . . . . . . . . . . . . . . . . . . . . . . . . . . . 3
Information and Assistance . . . . . . . . . . . . . . . . . . . . . . . . . . . . . . . . . . . . . . . . . . . . . . . . . . . . . . 3
Notice . . . . . . . . . . . . . . . . . . . . . . . . . . . . . . . . . . . . . . . . . . . . . . . . . . . . . . . . . . . . . . . . . . . . . . . 3
Technical Assistance . . . . . . . . . . . . . . . . . . . . . . . . . . . . . . . . . . . . . . . . . . . . . . . . . . . . . . . . . . . 4
Safety Summary . . . . . . . . . . . . . . . . . . . . . . . . . . . . . . . . . . . . . . . . . . . . . . . . . . . . . . . . . . . . . . . 5
Antenna . . . . . . . . . . . . . . . . . . . . . . . . . . . . . . . . . . . . . . . . . . . . . . . . . . . . . . . . . . . . . . . . . . . . . . . . . . . 6
General . . . . . . . . . . . . . . . . . . . . . . . . . . . . . . . . . . . . . . . . . . . . . . . . . . . . . . . . . . . . . . . . . . . . . . . . . . 7
Introduction . . . . . . . . . . . . . . . . . . . . . . . . . . . . . . . . . . . . . . . . . . . . . . . . . . . . . . . . . . . . . . . . . . . 7
Antenna Drive System Cable Inspection . . . . . . . . . . . . . . . . . . . . . . . . . . . . . . . . . . . . . . . . . . . . 7
Cable Replacement . . . . . . . . . . . . . . . . . . . . . . . . . . . . . . . . . . . . . . . . . . . . . . . . . . . . . . . . . . . . . 8
Azimuth Rotational Limits . . . . . . . . . . . . . . . . . . . . . . . . . . . . . . . . . . . . . . . . . . . . . . . . . . . . . . . 8
Azimuth Drive Cable Tension Adjustment. . . . . . . . . . . . . . . . . . . . . . . . . . . . . . . . . . . . . . . . . . . 10
Elevation Drive Cable Tension Adjustment . . . . . . . . . . . . . . . . . . . . . . . . . . . . . . . . . . . . . . . . . . 13
Controls and Power Failure. . . . . . . . . . . . . . . . . . . . . . . . . . . . . . . . . . . . . . . . . . . . . . . . . . . . . . . . . . . 14
Azimuth Drive . . . . . . . . . . . . . . . . . . . . . . . . . . . . . . . . . . . . . . . . . . . . . . . . . . . . . . . . . . . . . . . . . 14
Elevation Drive . . . . . . . . . . . . . . . . . . . . . . . . . . . . . . . . . . . . . . . . . . . . . . . . . . . . . . . . . . . . . . . . 16
Replacement
Azimuth Brake Replacement . . . . . . . . . . . . . . . . . . . . . . . . . . . . . . . . . . . . . . . . . . . . . . . . . . . . . 17
Elevation Brake Replacement . . . . . . . . . . . . . . . . . . . . . . . . . . . . . . . . . . . . . . . . . . . . . . . . . . . . . 21
Antenna Electrical . . . . . . . . . . . . . . . . . . . . . . . . . . . . . . . . . . . . . . . . . . . . . . . . . . . . . . . . . . . . . . . . . 22
Antenna Mechanical . . . . . . . . . . . . . . . . . . . . . . . . . . . . . . . . . . . . . . . . . . . . . . . . . . . . . . . . . . . . 23
Antenna Dimensions . . . . . . . . . . . . . . . . . . . . . . . . . . . . . . . . . . . . . . . . . . . . . . . . . . . . . . . . . . . . 24
Table of Contents
2
Table of Contents
Page 3

Purpose
Proprietary Data
Information and
Assistance
Notice
The purpose of this manual is to provide installation and preventive maintenance
required to support the 2.4M SNG Antenna Assembly and Motor Drive System. This
manual is subdivided into six sections to provide convenient reference for operator/service personnel requiring technical information on general system and equipment.
A separate user’s manual is provided with each RCI 3000 or 3050 control system.
The technical data contained herein is proprietary to Andrew Corporation. It is intended
for use in operation and maintenance of Andrew supplied equipment. This data shall not
be disclosed or duplicated in whole or in part without express written consent of Andrew
Corporation.
Andrew Corporation provides a world-wide technical support network. Refer to the technical assistance portion of this this manual for the contact numbers appropriate to your
location.
The installation, maintenance, or removal of antenna systems requires qualified, experienced personnel. Andrew installation instructions have been written for such personnel.
Antenna systems should be inspected by qualified personnel to verify proper installation,
maintenance and condition of equipment.
Andrew Corporation disclaims any liability or responsibility for the results of improper or
unsafe installation and maintenance practices.
All designs, specifications, and availabilities of products and services presented in this
manual are subject to change without notice.
Copyright © 1998, Andrew Corporation
3
Introduction
Introduction
Page 4

Technical
Assistance
24-hour Technical Assistance
For technical assistance, call the following numbers at anytime.
Call From Call To Telephone Fax
North America (toll free) U. S. A. 1-(800)-255-1479 (800)-349-5444
Any Location U. S. A. (708)-349-3300 (708)-349-5410
(International)
Customer Service Center
The Andrew Customer Service Center gives you direct access to the information and
personnel service you need, such as the following:
• Place or change orders
•
Check price and delivery information
• Request technical literature
You can call from any of the following:
Call From Telephone Fax
North America 1-800-255-1479 (toll free) 1-(800)-349-5444 (toll free)
United Kingdom 00-800-0-255-1479 (toll free) 00-800-0-349-5444 (toll free)
Australia 0011-800-0-255-1479 (toll free) 0011-800-0-349-5444 (toll free)
China 00-800-0-255-1479 (toll free) 00-800-0-349-5444 (toll free)
New Zealand 00-800-0-255-1479 (toll free) 00-800-0-349-5444 (toll free)
Hong Kong 001-800-0-255-1479 (toll free) 001-800-0-349-5444 (toll free)
4
Introduction
Page 5

Safety Summary
The following general safety precautions are not related to any specific procedures and,
therefore, do not appear elsewhere in this publication. Personnel must understand and
apply these precautions during all phases of operation and maintenance.
Keep Away From Live Circuits
Personnel must observe all applicable safety regulations at all times. Ensure power is
removed from unit before replacing components. Potential hazards may exist even
though the power control is in the off position. Capacitors retain charges. Always remove
power and use test equipment to confirm that a circuit is at ground potential before
touching it. Never reach into or enter an enclosure to service or adjust the equipment
until the absence of power has been confirmed.
Do Not Service Or Adjust Alone
Under no circumstances should any person reach into the enclosure for the purpose of
servicing or adjusting the equipment except in the presence of someone who is capable
of rendering aid.
Resuscitation
Personnel working with or near high voltage should be familiar with modern methods of
resuscitation. Such information may be obtained from local medical personnel.
ESD Precaution
This equipment contains electrostatic discharge (ESD) sensitive devices. Equipment
handling methods and materials must be used to prevent equipment damage.
5
Introduction
Page 6
Antenna
The 2.4-meter transportable SNG antenna from Andrew has been designed to be more
compact and lighter. This new design results in an antenna whose total assembly weight
has decreased by 33%.
This antenna design reduces overall windloading, is easier to install and is less costly to
ship. The stow height is at 24” for more overall clearance for the truck.
The vehicle mountable 2.4-meter prime focus offset fed antenna from Andrew incorporates performance and optional characteristics particularly suited for television broadcast
industry satellite news gathering applications.
The exclusively designed prime focus, beam-shaping feed configuration, together with
the precision hydroformed aluminum reflector assembly, produces extremely high gain,
superior efficiency and closely controlled pattern characteristics.
A motorized cable drive system provides a reliable, precise and smooth running system.
The SNG antenna options are the RCI 3000 and 3050 control systems.
Antenna travel is stow to +65° (optional 90°) in elevation and ±175° in azimuth.
Each SNG antenna is fully-integrated and pretested before leaving the factory to reduce
vehicle installation time and costs.
6
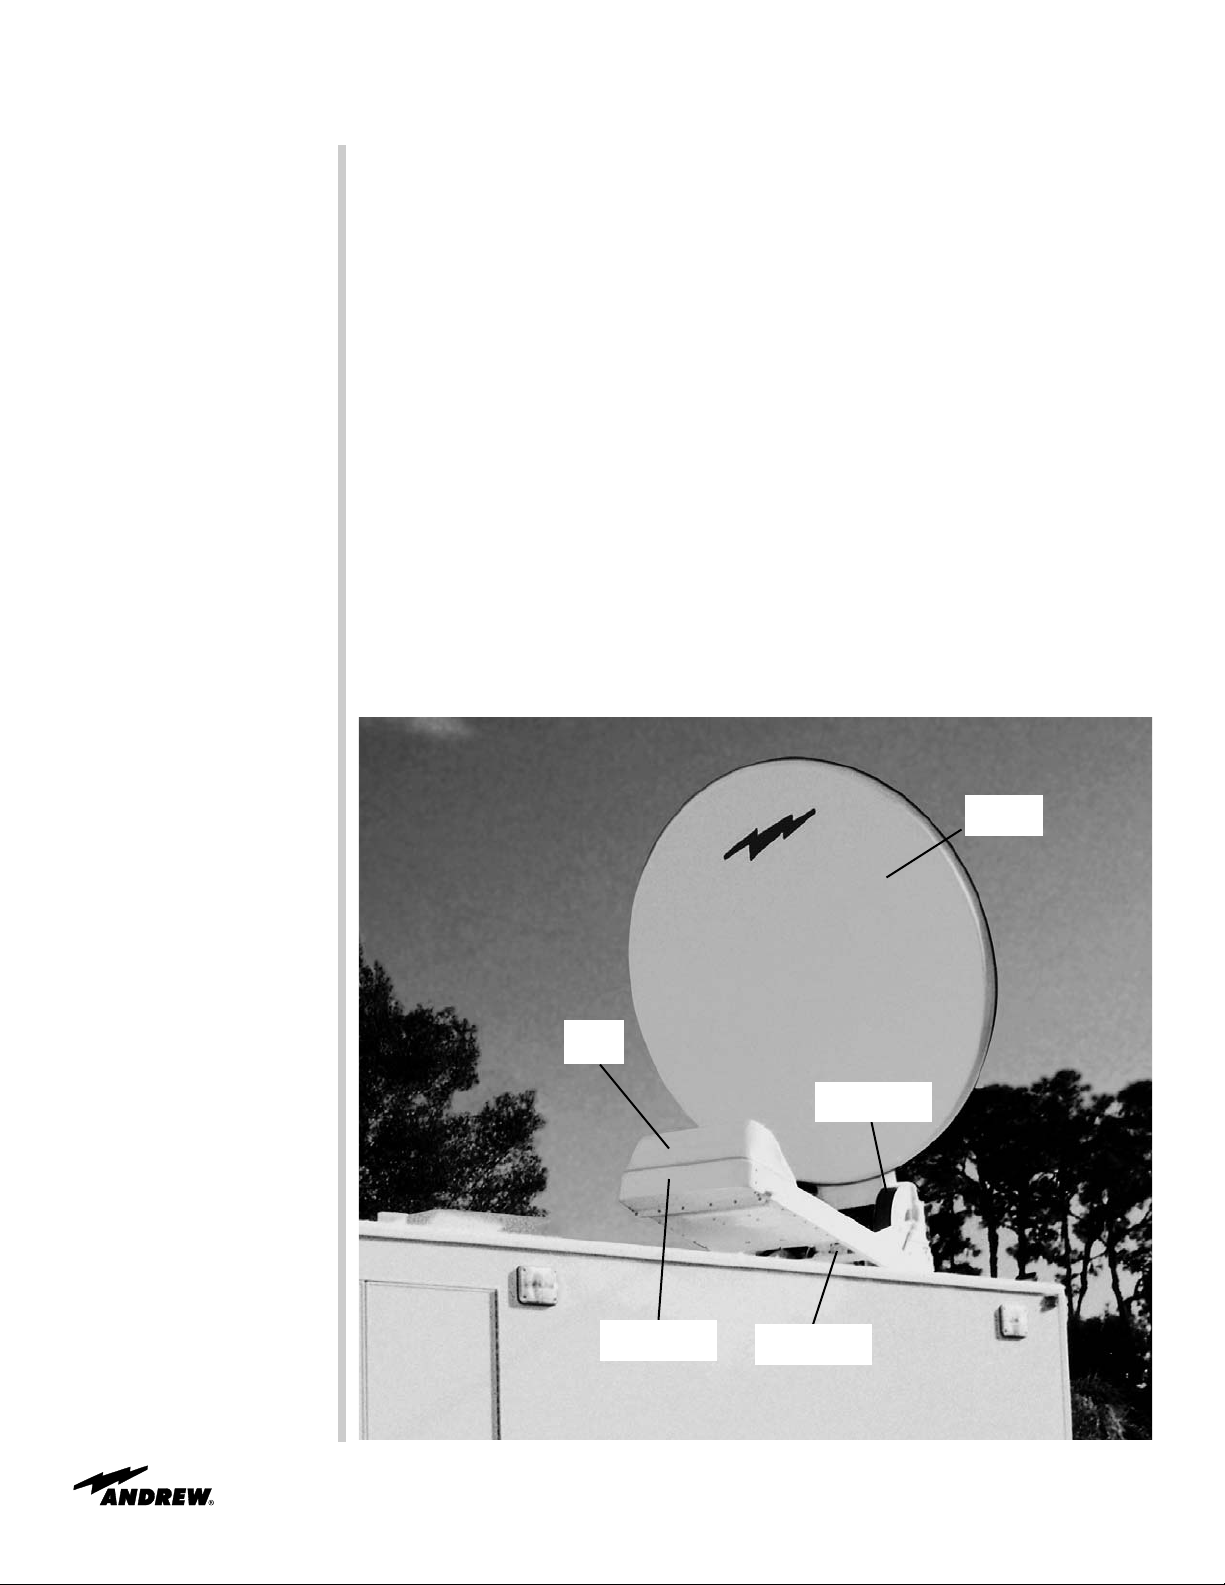
Reflector
Assembly
Feed
System
Polarization
Drive Assembly
Azimuth
Drive Assembly
Elevation
Drive Assembly
Description
Description
Page 7

General
Introduction
Antenna Drive
System Cable
Inspection
7
Maintenance
Maintenance
The antenna and feed boom/reflector assembly incorporates self lubricating bearing
assemblies throughout its construction, eliminating the need for any additional lubrication
for the life of the antenna.
The feed system is factory precision aligned for optimum performance, moving or repositioning feed system will only reduce performance capabilities. Do not move the feed system.
The polarization drive system does not require any periodic maintenance; however
replacement of the polarization drive chain may be necessary after extended use (usually several years).
Periodic maintenance of the Roto-Lok®drive normally requires only visual inspection for
misalignment or damaged cables. In the event that a cable(s) may require replacement,
the drive design incorporates sufficient clearance between the capstan and drum, allowing removal and installation of individual cables. In the event the drive has become disabled due to broken/tangled cables and cannot be driven safety to a stow/repair position, the margin of safety in the drive design, will allow for a cable(s) to be removed to
enable the drive to be rotated to a safe stow/repair position for cable replacement.
Operation with less than the total number of cables is not recommended as normal operational mode, however the drive will function with reduced stiffness temporarily while
awaiting replacement cable installation.
Drive cables should be periodically checked for cable misalignment or visible damage
that might lead to broken wires and or tangled cables. Look for frayed/broken cable
wires that might occur due to normal wear after extended lifetime, or through contact
with foreign objects, such as hand tools during servicing of the antenna. In the event of
frayed/broken wires are discovered, they should be replaced as soon as possible to prevent damage to neighboring cable assemblies.
Check cables every four weeks for the first six months of operation (cable tension,
frayed/broken wires). Thereafter, monitor cables biannually. For continuous use of antenna drive system, shorten the above recommended periodic interval by one half.
The rated capacity/stiffness of the Roto-Lok®drive system is directly related to tension
within the cables configuring the azimuth and elevation drive system. Proper cable tension is essential for the antenna drive system to perform as specified. How to verify and
maintain proper cable tension is considered in the following discussion.
CAUTION!
Do Not Over Tension the Cable When Tightening the Cable Tension Adjusting
Nuts. It is Possible to Break a Cable With the Mechanical Advantage of the
Threaded End!
Page 8

Cable
Replacement
Azimuth
Rotational Limits
8
Maintenance
The two adjustment locations for the five azimuth cables are 224° apart on the azimuth
ring. To reach these adjustment locations the antenna must be rotated so the azimuth
cable access port is over the adjustment location. Rotation to the counter-clockwise
(CCW) adjustment location may be hindered by hardware and software limits.
This document primarily addresses azimuth cable tension requirements and also
includes elevation cable tension requirements for completeness.
Cable replacement is beyond the scope of normal maintenance, please consult Andrew
Corporation for assistance.
Depending on how the azimuth hard limits are currently configured, a hard limit override
may need to be made to allow sufficient rotation of the antenna for azimuth cable tension adjustment to be made. The "hard limits" are small, limit switch, trip blocks located
inside the azimuth ring. The azimuth hard limits may be configured for ±175°, ±135° or
±90° of travel by simply changing the hard limits actuation blocks installed position (one
hard limit for clockwise and one hard limit for counterclockwise rotation). The azimuth
hard limits are factory configured for ±175° of travel in both clockwise and counter-clockwise directions.
During the installation of the antenna onto the truck, the azimuth hard limits may
have been changed by the integrator to less than ±175° of rotation. If the azimuth
hard limits are at ±175° the following procedure WILL
NOT
be necessary. Skip
down the following Procedure and start at section marked CABLE TENSION
ADJUSTMENT,
AZIMUTH DRIVE. If the azimuth hard limits are configured for
±135°, or ±90° the following provisions will need to be made prior to starting
azimuth cable tensioning procedure.
The counter-clockwise hard limit must be set to the 175° CCW position during the cable
tension adjustment procedure, then later re-configured. The clockwise hard limit will not
need to be removed/changed from any position of operation during the azimuth cable
tensioning procedure, only the CCW hard limit.
Review the overhead view of the antenna to determine the location of the CCW azimuth
hard limit and re-position the hard limit actuation block to the 175° CCW location (position #3). Each actuation block is held in place by two #4-40 UNC x 1/2, SST, Flat Head
Screws. The retaining screws are installed with Loctite
®
, persistence may be required to
remove them. Careful inspection of the interior of the azimuth ring will reveal marked,
steel stamped degree and orientation information on the surface of the ring (i.e. 135°
CCW, 90° CCW, 175° CW etc.) use these marked locations to confirm correct position of
the azimuth hard limits.
After the counter-clockwise hard limit has been relocated to 175° CCW position, a second level of protection for azimuth rotation will need to be addressed.
Page 9

9
Maintenance
Note
AZ East = AZ Counter-clockwise (as viewed from above)
AZ West = AZ Clockwise (as viewed from above)
Azimuth Hard Limit Positions:
1=90° CCW Az Limit
2=135° CCW Az Limit
3=175° CCW Az Limit
4=175° CW Az Limit
5=135° CW Az Limit
6=90° CW Az Limit
Azimuth Cable Tension Access Port
Azimuth Ring
Azimuth Limit Switch Location
Reflector Assembly
Azimuth Drive Motor
Antenna Panning Frame
Overhead View of Antenna
Note: Resolver assembly and associated
mounting bracketry not shown for clarity.
Page 10

Azimuth
Drive Cable
Tension
Adjustment
Step 1
Step 2
Step 3
Step 4
10
Maintenance
CAUTION!
Before/during the initial azimuth rotation of the re-calibrated antenna, verify by
inspection that there are no pinch points with any antenna accessories (example:
waveguide, cables, etc.) passing through the center of the antenna mount.
With the Software and hardware limits reset for to 175° azimuth counter-clockwise rotation the following azimuth cable tension adjustment will now be possible.
Required Tools
• Precision 1/8-inch key stock, at least 6 inches long (supplied with antenna)
• ¼-inch drive ratchet with 7/16 standard or thin walled socket (not supplied with antenna)
Check cables around drum for proper alignment. Cables should be evenly spaced from
one another as they wrap around the drum (height/centering). Rotate drum if necessary
to align cables.
Remove the rear rain shield, which covers the azimuth axis opening.
Remove cable tension access port cover, located near azimuth drive gear reducer.
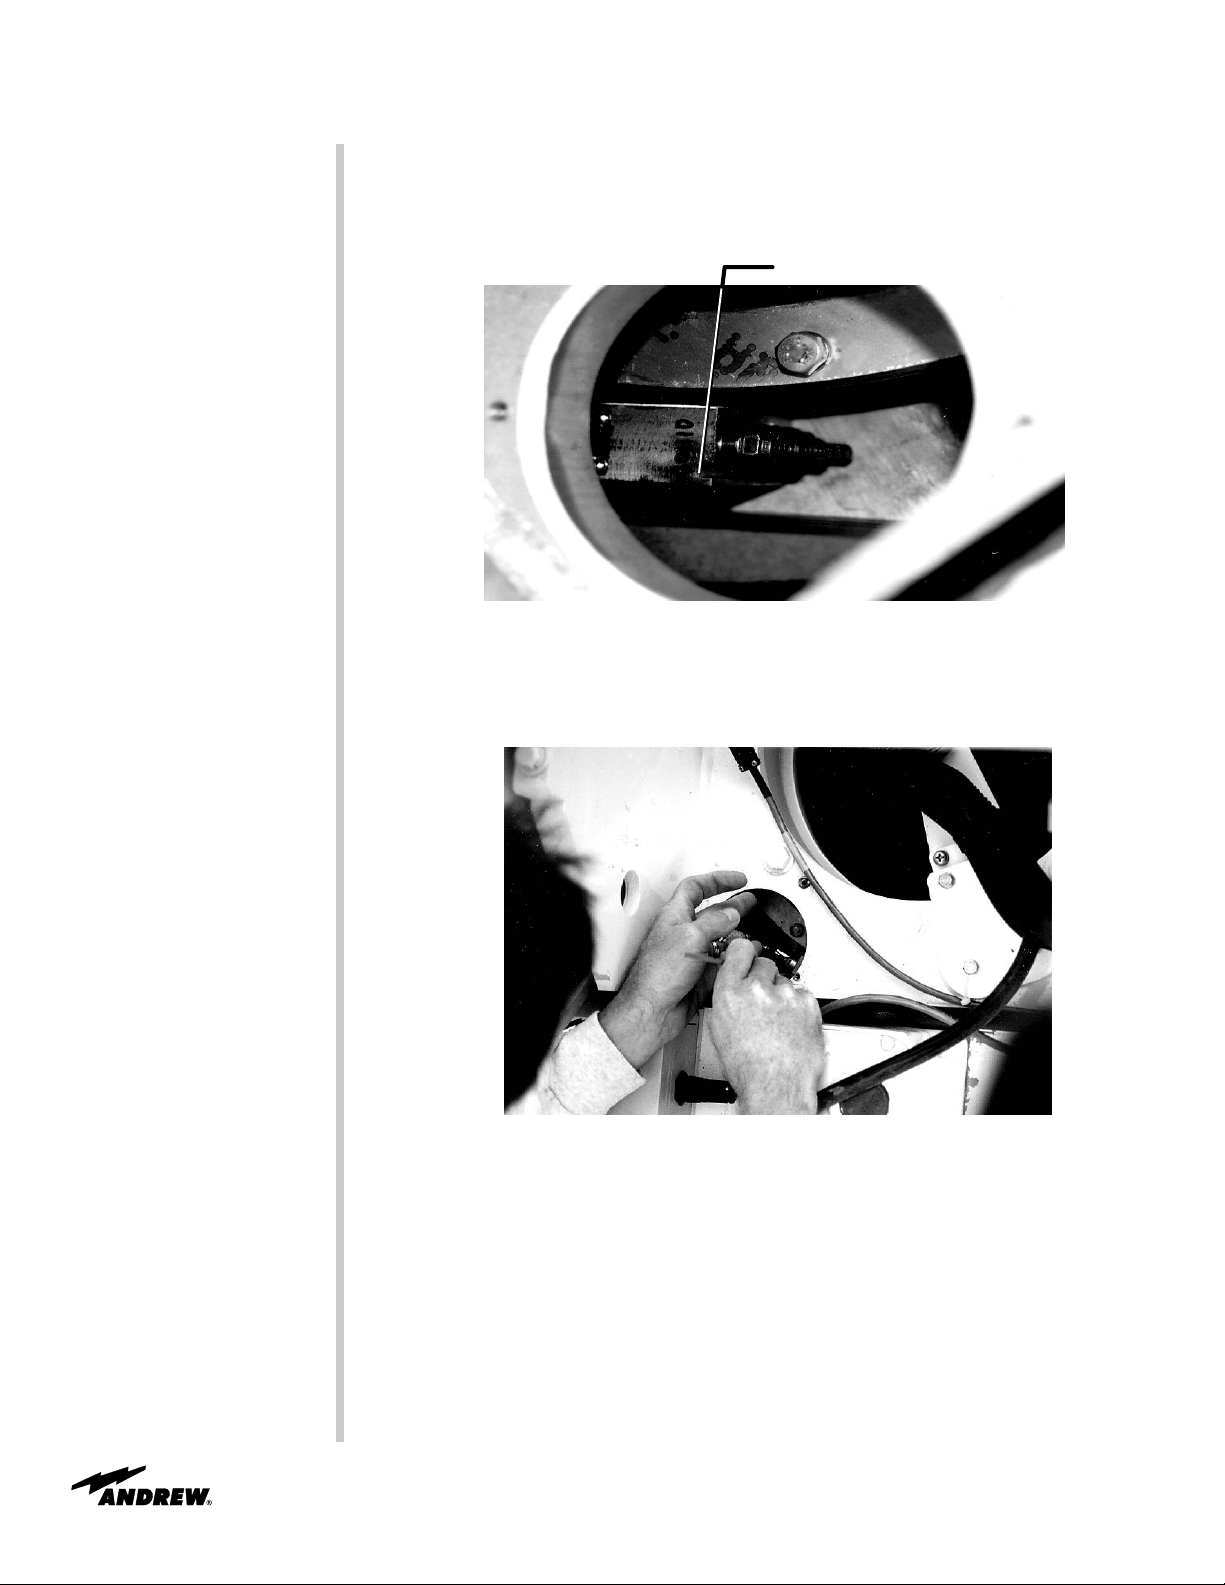
Starting from the stowed position, deploy antenna and rotate in azimuth approximately
80° clockwise to align access port on panning frame with spring end of cables, until
directly under access port (Figure 1).
CAUTION!
Be sure no interference is present in and around the azimuth axis opening during
antenna rotation.
Figure 1. Azimuth Access Port Positioned Over Cable Adjusting Nuts
Note
To ensure that the cables are not tensioned beyond the design value, the precision key
stock must be used to detect when the cable tension adjusting nut has been tightened
so that the "Thrust Sleeve" is 0.005 to 0.010 inches from contacting the spring housing.
This will ensure the nominal spring compression and cable tension.
Page 11
Step 5
Step 6
Step 7
Step 8
Step 9
11
Maintenance
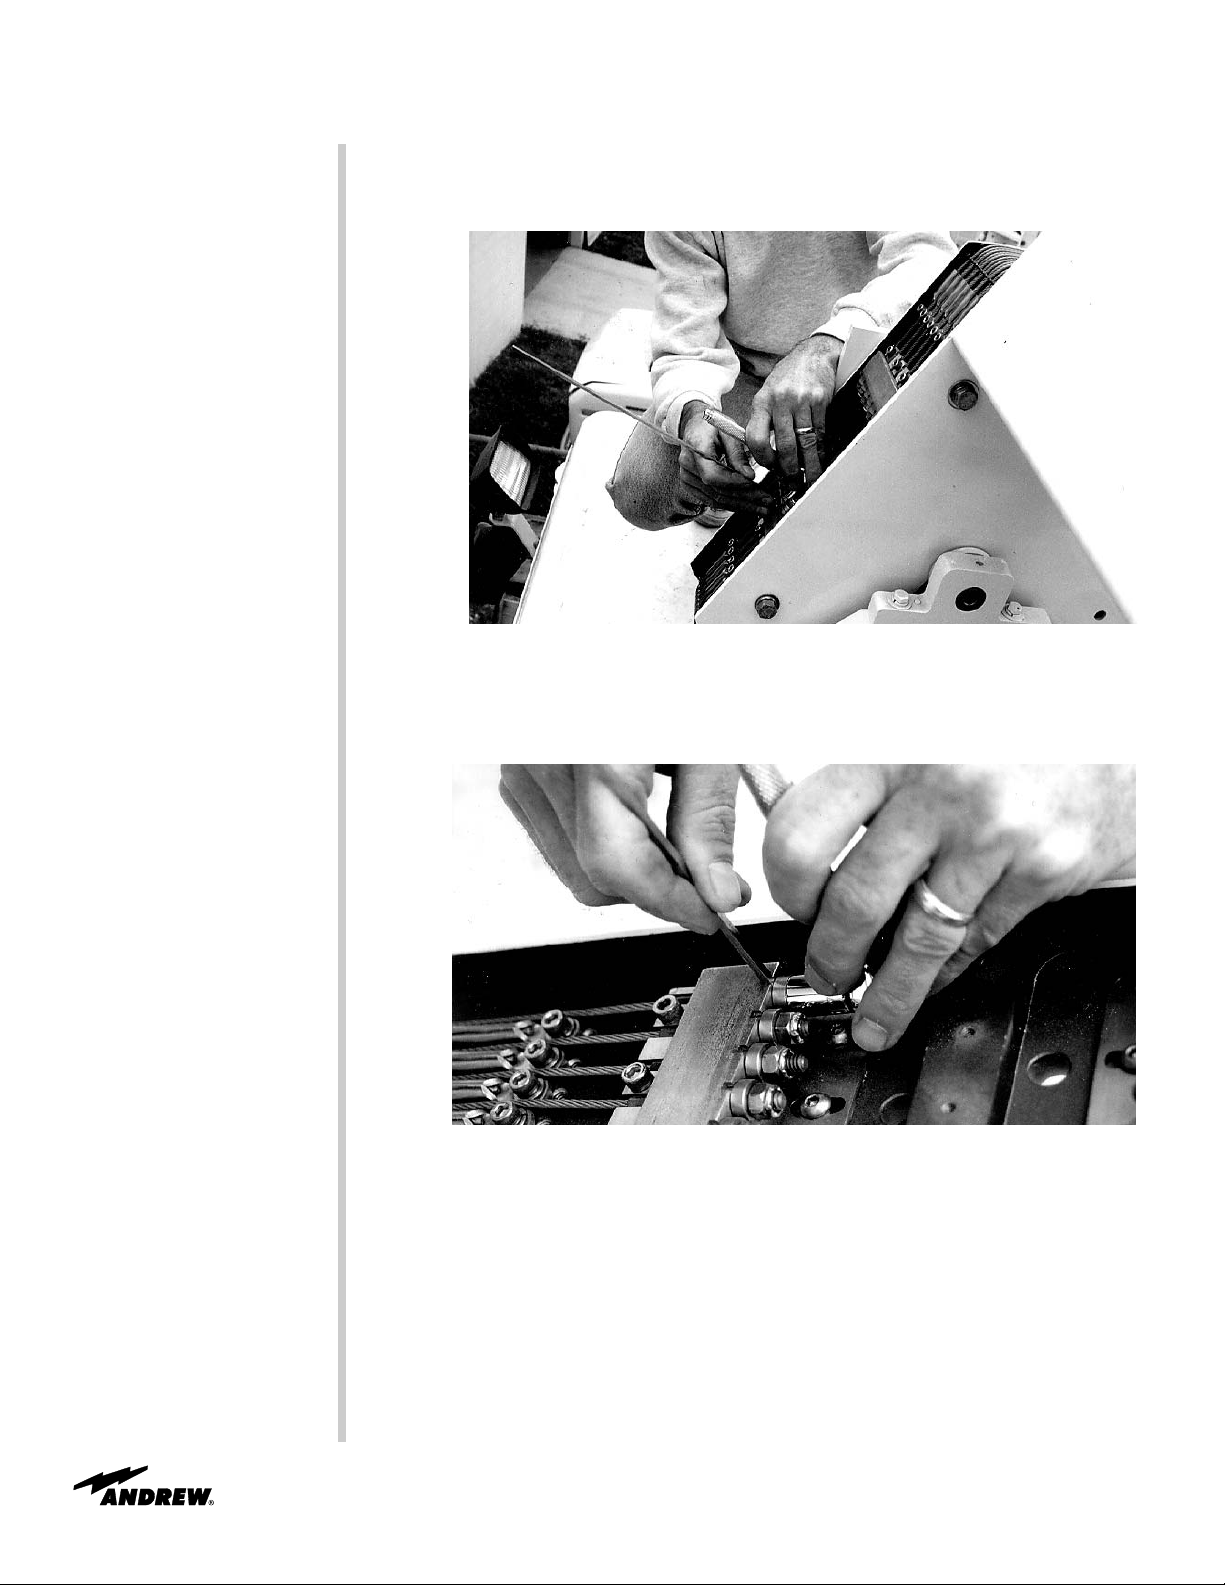
Insert the precision key stock into the vertical slot in the azimuth spring housing, see
Figure 2 (the key stock acts as a thickness (feeler) gauge) then starting with the lowest
cable tension adjusting nut, (nearest the bottom of the antenna mount) tighten each
cable until the key stock is just snug but can be slid up and down.
Key stock insertion
Key Stock Insertion
Figure 2. Detail View of Access Port
Showing Location of Precision Key Stock Insertion Point
Loosen the adjusting nut just slightly so that the key stock will move freely up and down
and allow setting clearance on subsequently adjusted cables (Figure 3).
Figure 3. Adjusting Azimuth Cable Tension
Repeat step #5 for the next cable adjusting nut(s).
Return antenna to azimuth stowing position while maintaining current antenna elevation.
From the stow position, begin counter-clockwise rotation approximately 150°. The
access port on the panning frame should now be positioned over the opposite end of the
unadjusted cable assemblies. Repeat steps 5 and 6 for the cable tension adjusting nuts
now accessible.
Page 12

Step 10
Step 11
Step 12
Step 13
Step 14
12
Maintenance
CAUTION!
Be sure no interference is present in and around the azimuth axis opening during
antenna rotation.
After tensioning both ends of azimuth cable assembly, rotate azimuth to limits of travel
(clockwise and counterclockwise) several times to distribute cable tension evenly.
Recheck/verify cable tension at both ends of azimuth cable(s) in accordance with the
above recommended procedure. Repeat above cable tensioning procedure if necessary.
If changed earlier, reset the software limits and reconfigure the hardware limits for
counter-clockwise azimuth rotation to their previous value/location. Return antenna to
stow position before relocating any hard limit actuation blocks (see section titled
Azimuth Rotational Limits for more detail).
Verify proper software and hardware limit switch operation.
Replace cable tension access port cover and rear rain shield.
Page 13
Elevation
Drive Cable
Tension
Adjustment
Step 1
Step 2
Step 3
Step 4
13
Maintenance
Adjustment of the elevation cable tension does not require a unique elevation angle,
only an elevation angle that allows convenient access to cable tension adjusting nuts
(Figure 4).
Figure 4. Elevation Cable Tension Adjustment
Cable tension adjustment for the elevation drive is similar to the azimuth drive, except
there are individual slots for the precision key stock at each cable location in the elevation spring housing, (Figure 5).
Figure 5. Individual Slots for Precision for Precision Key Stock
After verifying/performing elevation cable tension procedure on both ends of each cable
and each elevation drum cable assembly, the following steps two through four will complete this procedure.
Run elevation drive system through entire range of movement (0° to 66° elevation) several times to distribute cable tension evenly along the length of each cable.
Recheck/verify cable tension at both ends of each of the elevation cable(s) in accordance with the above recommended procedure.
Repeat above elevation cable tensioning procedure if necessary.
Page 14

Controls and
Power Failure
Azimuth Drive
Step 1
Step 2
Step 3
In the event of power loss or controller failure with antenna deployed, the following procedure will allow the antenna to be returned manually to stow position.
Notice!
Stowing antenna without power requires two personnel to safely return antenna
to stowed position. Failure to follow this requiement may cause personal injury
and/or damage to antenna.
To return azimuth to a stow heading, first determine direction of rotation to return antenna to stow position.
Locating the brake cover, on the azimuth drive motor, located on the free hanging end of
the drive motor assembly (Figure 6) is the brake cover. Carefully remove the brake
cover attached with two wing nuts, being careful to retain the nylon washers under the
wing nuts (required for watertight seal).
Figure 6. Location of Azimuth Brake Assembly
With the brake assembly exposed, locate the manual release screws (2) on the brake
assembly. The brake can be released by turning the manual release screws counterclockwise, allowing the motor to free-wheel.
14
Brake Cover
Emergency Procedures
Emergency Procedures
Page 15

Step 4
Step 5
Step 6
Step 7
Using a 5/32” Allen wrench, turn the two manual release screws counter-clockwise until
the brake releases (Figure 7).
Figure 7. Brake Release Procedure.
(azimuth gear motor shown, elevation gear motor similar)
When the brake is released, a black/red disk assembly (brake/clutch mechanism ) will
begin to rotate as the motor free-wheels. This may be used as a visual sign that brake
disengagement has been achieved.
Release the brake and rotate in azimuth to achieve azimuth stowing position. The end
of the feed boom may be used as a push point for azimuth rotation (only during power
loss).
Install the brake cover with the nylon washers and wing nuts.
15
Emergency Procedures
Brake Release
Screws
Page 16

Elevation Drive
Step 1
Step 2
Step 3
With the azimuth orientation of the antenna correctly oriented for stowing, locate the
brake cover on the elevation drive motor, (the same size and type of motor is used for
both elevation and azimuth drives) and follow the same procedure required for azimuth
brake release.
CAUTION!
When Elevation Brake is Released, Feed Boom/Reflector Will Be Unrestricted. At
Extremely High Look Angles the Feed Boom/Reflector May Need to be Guided in
the Pproper Direction by a Second Person. As the Feed Boom Approaches a
Horizontal Position Care Must be Taken During Manual Brake Release as the
Stowing Boom Will Pass Through the Access Area to the Brake. Coordinating
With a Second Person Assisting/Guiding Reflector to Stow Position, Brake
Release Operator Will Need to Work Carefully Around Closing Reflector Assembly,
Avoiding Scissor Action of Closing Assembly.
Release the brake and carefully lower the reflector/boom assembly into stowed position.
Install brake cover with nylon washers and wing nuts (orientation of drain/weep hole in
brake cover should be near the 6 o'clock position).
16
Emergency Procedures
Page 17

Azimuth Brake
Replacement
Purpose
Required Tools
(Customer-
Supplied)
Caution
Step 1
Provide instruction to remove and replace the azimuth and/or elevation brake assembly
used on the ESA24SNG-LTE-XX Series 2.4M SNG Antenna.
• No. 2 Phillips Screwdriver (Must have good tip that fits screw head well)
• Small propane torch (or equivalent).
• Small (4-8 inch) Adjustable Wrench.
• Single edge razor blade or sharp knife.
• 2 X 4 Lumber 5-foot long.
• 5/32” Allen Wrench
This Procedure Should Only Be Performed In Non-Windy Conditions (Winds
Under 15 mph). When the Brake Is Removed the Antenna Will Be Allowed to
"Freewheel". Two Persons Are Required To Safely Remove and Reinstall the
Brake Assembly. One Person To Perform the Replacement and the Other To Hold
the Antenna In Position.
Turn Off Main Power Source To the Controller System Prior To Proceeding!
Locate the azimuth brake at the rear of the azimuth panning frame. Refer to
Figure 1.
Figure 1
17
Azimuth
Brake
Azimuth
Motor
Panning
Frame
Component Replacement
Component Replacement
Page 18

Step 2
Step 3
Remove the two wingnuts and two nylon washers attaching the brake cover.
Refer to Figure 2. Retain removed hardware for later use.
Figure 2
Remove the two 8-32 nuts securing the brake body to the brake base. Once the
brake body is removed a large nut attached to the motor shaft and the motor
shaft will be revealed. The nut/shaft will be allowed to move freely. If wind or
gravity force is present on the antenna the nut/shaft may start to turn. If it turns,
the second person should steady the antenna movement until the new brake is
installed. Lay aside the brake body, brake cover, and connecting wire until later
instructions. Refer to Figure 3. Retain removed hardware for later use.
Figure 3
18
Brake Release
Hardware
Brake
Body
8-32
Nuts
Brake
Cover
Brake
Wires
Azimuth
Motor
8-32
Stud
Brake
Nut
Motor
Shaft
Brake
Body
Brake
Cover
Component Replacement
Page 19
Caution
Step 4
Step 5
New Threadlocker Must Be Applied To the Brake Nut Setscrews To Prevent
Premature Brake Failure!
Install new brake body on 8-32 studs until seated on brake nut and flush as
detailed in Figure 4. After disc is centered brake nut may be rotated slowly
to allow brake nut to line up with brake disc. Install 8-32 nuts and tighten threadlocker is not required on these nuts.
Figure 4
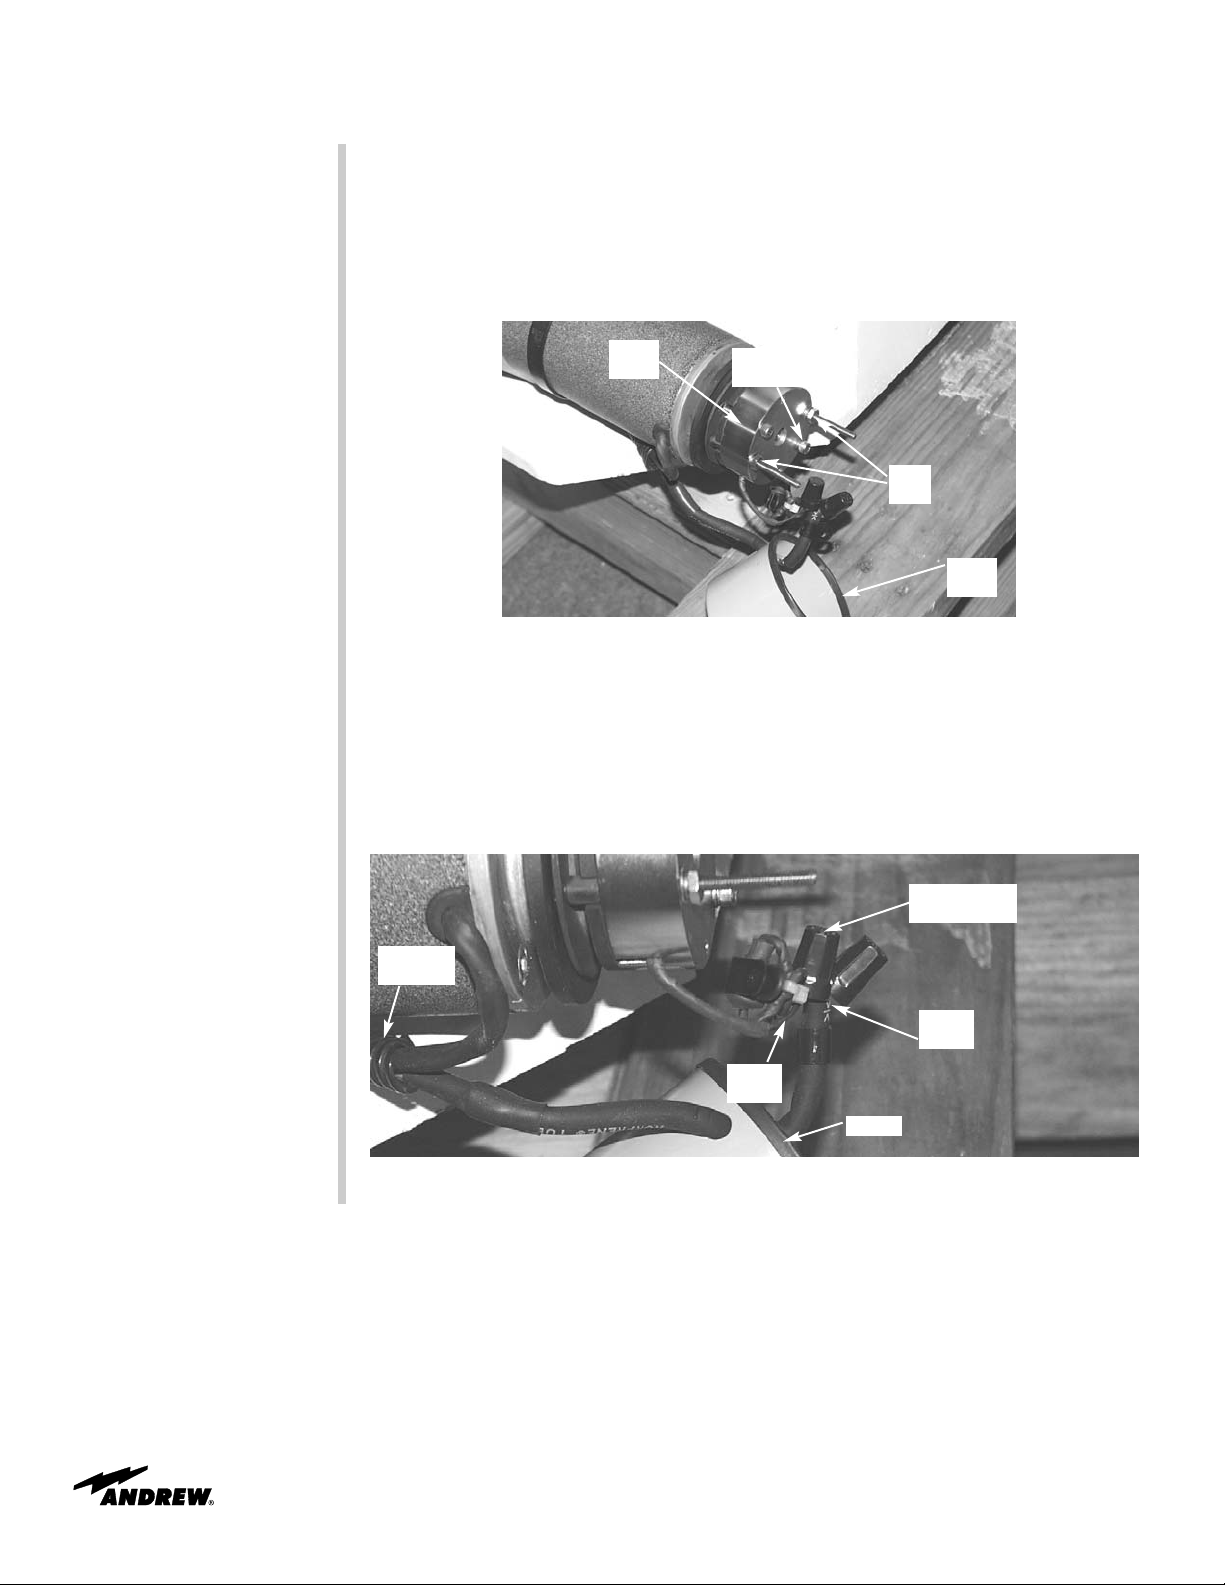
Remove the two black wires from the old brake body from their wirenuts
(attached to the red and black wires). Install the new brake body wires in the
same manner as the old ones were removed. Either black brake wire may be
connected to either the red or black wires - polarity is not important. Be sure not
to reverse the wiring of the diode. (POLARITY DOES MATTER ON THE
DIODE). Be sure wire nut setscrews are secure. Refer to Figure 5 for details of
this step.
Figure 5
19
Component Replacement
Brake Release
Hardware
Brake
Body
8-32
Nuts
Brake
Cover
Squeeze-Tight
Fitting
Protective
Tubing
Cover
Black
Wire
Red
Wire
Page 20

Step 6
Step 7
Locate the small weep hole in the brake cover near the hole for the protective
tubing. It may be painted closed and easier to locate from inside the cover. Use
the 1/16 inch drill bit to drill a 1/16 inch hole enlarging and cleaning out this
existing hole. This weep hole is essential to allow equalization of pressure
inside the brake. After drilling, wipe inside of cover removing any shavings or
debris. Refer to Figure 6.
Figure 6
There are two ways the cover may be installed. Install the brake cover with the
weep hole facing down. Use the nylon washers under the wing nuts to provide a
water-tight seal as detailed in Figure 7.
Figure 7
This completes the replacement of the azimuth brake assembly. The antenna
control power should now be turned back on and the azimuth axis rotated to
verify proper brake release and operation.
20
Component Replacement
Brake
Cover
1/16”
Weep Hole
Protective
Tube
Brake
Cover
8-32 Wing
Nuts
Nylon
Washers
Weep
Hole
Page 21

Elevation Brake
Replacement
Caution
Step 1
Step 2
The elevation brake replacement procedure is identical to the azimuth brake
replacement. Refer to the previous azimuth procedure for details.
This Procedure Should Only Be Performed In Non-Windy Conditions (Winds
Under 15 mph). When the Brake Is Removed the Antenna Will Be Allowed to
"Freewheel". Two Persons Are Required To Safely Remove and Reinstall the
Brake Assembly. One Person To Perform the Replacement and the Other To Hold
the Antenna In Position.
Locate the elevation brake at the front of the azimuth panning frame. Refer to
Figure 8.
Figure 8
Due to the weight of the boom the elevation boom and reflector must be supported during the elevation brake replacement process. The antenna elevation
axis should be driven to an angle high enough to provide clearance to work
under the boom on the brake assembly. A 2 X 4 inch piece of lumber (or equivalent) should be used to support the boom and reflector as detailed in Figure
9. The elevation axis should be driven down until the boom and reflector are
resting on the 2 X 4.
Figure 9
21
Component Replacement
Elevation
Brake
Reflector
Boom
2 X 4
Lumber
Page 22

Antenna Electrical
Operating Frequency Band
Ku-Band Receive Ku-Band Transmit
10.95-12.75 GHz 14.0-14.5 GHz
Gain at circular waveguide flange of feed
2-Port
Rx Frequency Rx Gain Tx Frequency Tx Gain
11.950 GHz 47.7 14.25 GHz 49.2
4-Port
Rx Frequency Rx Gain Tx Frequency Tx Gain
11.950 GHz 47.4 14.25 GHz 48.9
Polarization Linear
Polarization Discrimination, on axis >35 dB
across 1dB contour 27 dB
Beamwidth, at Midband Ku-Band
3 dB Receive (Transmit) 0.72° (0.61°)
15 dB Receive (Transmit) 1.42° (1.33°)
Antenna Noise Temperature under clear sky conditions, at 68° F
(20° C), at the circular waveguide flange of the feed.
Elevation Ku-Band (2-Port) Ku-Band (4-Port)
10° 44° 72°
30° 33° 61°
Antenna VSWR, Transmit and Receive <1.3:1
Radiation Pattern Performance PE’s #4471 and #4472
Tx Power Handling Capability
2-Port Network, maximum, W 2000
4-Port Network, maximum, W 600
Feed Interface Flanges, Receive/Transmit WR75
Isolation, minimum, Tx into Rx, dB 40 (2-Port) 85 (4-Port)
Power Density Data
Projected Width of Reflector 96 in
Area of Feed Horn Aperature 10.65 in
2
Focal Length 60 in
Optional Cross Axis Kit, loss, 1 dB 1XAK-LTE (1 run) 2XAK-LTE (2 runs)
All designs, specifications and availabilities of products and services
presented in this Bulletin are subject to change without notice.
22
Specifications
Specifications
Page 23

Antenna Mechanical
Configuration ESA24SNG-LTE
Feed Type Prime Focus, Offset
Reflector Material Precision-Formed Aluminum
Reflector Segments 1
Mount Type El over Az, Pedestal
Material/Finish
Reflector Aluminum
Feed Brass
Positioner Aluminum
Feed Arm
Capacity 180 lbs
Area 29.5” x 36.5” x 12” High (8.3 ft
3
)
Antenna Pointing Range, Continuous
Elevation 65°
(optional 90°)
Azimuth 180°, 270°, 350°
Polarization ±90°
Wind Loading, Survival
65 mph (105 km/h) in any position of operation
Wind Loading, Operational (motor drives)
45 mph (72 km/h), gusting to 65 mph (105 km/h)
Temperature, Operational -40° to 125° F (-40° to 52° C)
Rain 4 in (102 mm) per hour
Solar Radiation 360 BTU/hr/ft
2
(1135 Watts/m2)
Relative Humidity 100%
Atmospheric Conditions Moderate coastal/industrial
areas. Severe conditions require
additional protection.
Positioner Travel Rates, degrees per second
Elevation 0.25° to 1.0°/second
Azimuth 0.25° to 1.0°/second
Polarization 0.5° to 2.0°/second
Weight, Net 690 lbs
Electrical Requirements
Local Unit Clean/Conditioned
Voltage 190-250 Vac, 1ø, 50/60 Hz
Power 1.5 kVa, total
Remote Unit Clean/Conditioned
Voltage 100-240 Vac, 1ø, 50/60 Hz
Power 1.3 A, maximum
Maximum Branch-Circuit,
Short-Circuit and Ground-Fault Protection Device:
1ø Input 20 A inverse time breaker
23
Specifications
Page 24

Antenna Dimensions
24
Specifications
Antenna Overall Dimensions - Top View
10’-0”
8’-3”
Elevation and
Articulation Axis
Note:
Antenna Shown
in Stowed Position
X
Y
Antenna Overall Dimensions - Side View
Azimuth
Axis
9’-11”
2’-7”
7’-4”
5”
1’-6”
2”
12”
15”
2’-0”
8 x ø .562”
ø 11.5”
ø 16.25”
11.25°
45°
Stowed
Antenna
Position
Mounting Pattern on Truck
Approximate Antenna Weight Distribution
4’-9”
4’-6”
Elevation and
Articulation
Axis
2’-2”
2”
Antenna CG 690 lbs
Reflector Only 177 lbs
1’-9”
9”
Boom Only
CG 126 lbs
(no electronics)
Mount Only
CG 387 lbs
Azimuth
Axis
1”
12”
16”
9”
Page 25

Antenna Dimensions
25
Specifications
Antenna Clearance Envelope and Center of Gravity - Side View
16’-10”
10’-0”
7’-7”
Elevation
and
Articulation
Axis
1”
11’-4”
8’-8”
6’-11”
Elevation
and
Articulation
Axis
8’-4”
6”
5”
Azimuth Axis
1’-6”
3’-1”
2’-0”
Note:
Antenna Shown
at 65° Elevation
7’-7” R
4’-9” R
Azimuth
Axis
1’-8” R
Elevation
and
Articulation
Axis
Antenna Clearance Envelope - Top View
1.5”
1.5”
Boom Stop (2)
(2” x 3” x 1/4” x 6” lg)
Azimuth
Axis
Elevation
and
Articulation
Axis
1”
10’-7”
15”
8.5°
7’-6”
6”
67.7°
Antenna Clearance Envelope - Side View
Note:
Antenna Shown
at 0° Elevation
X
 Loading...