

Page 1
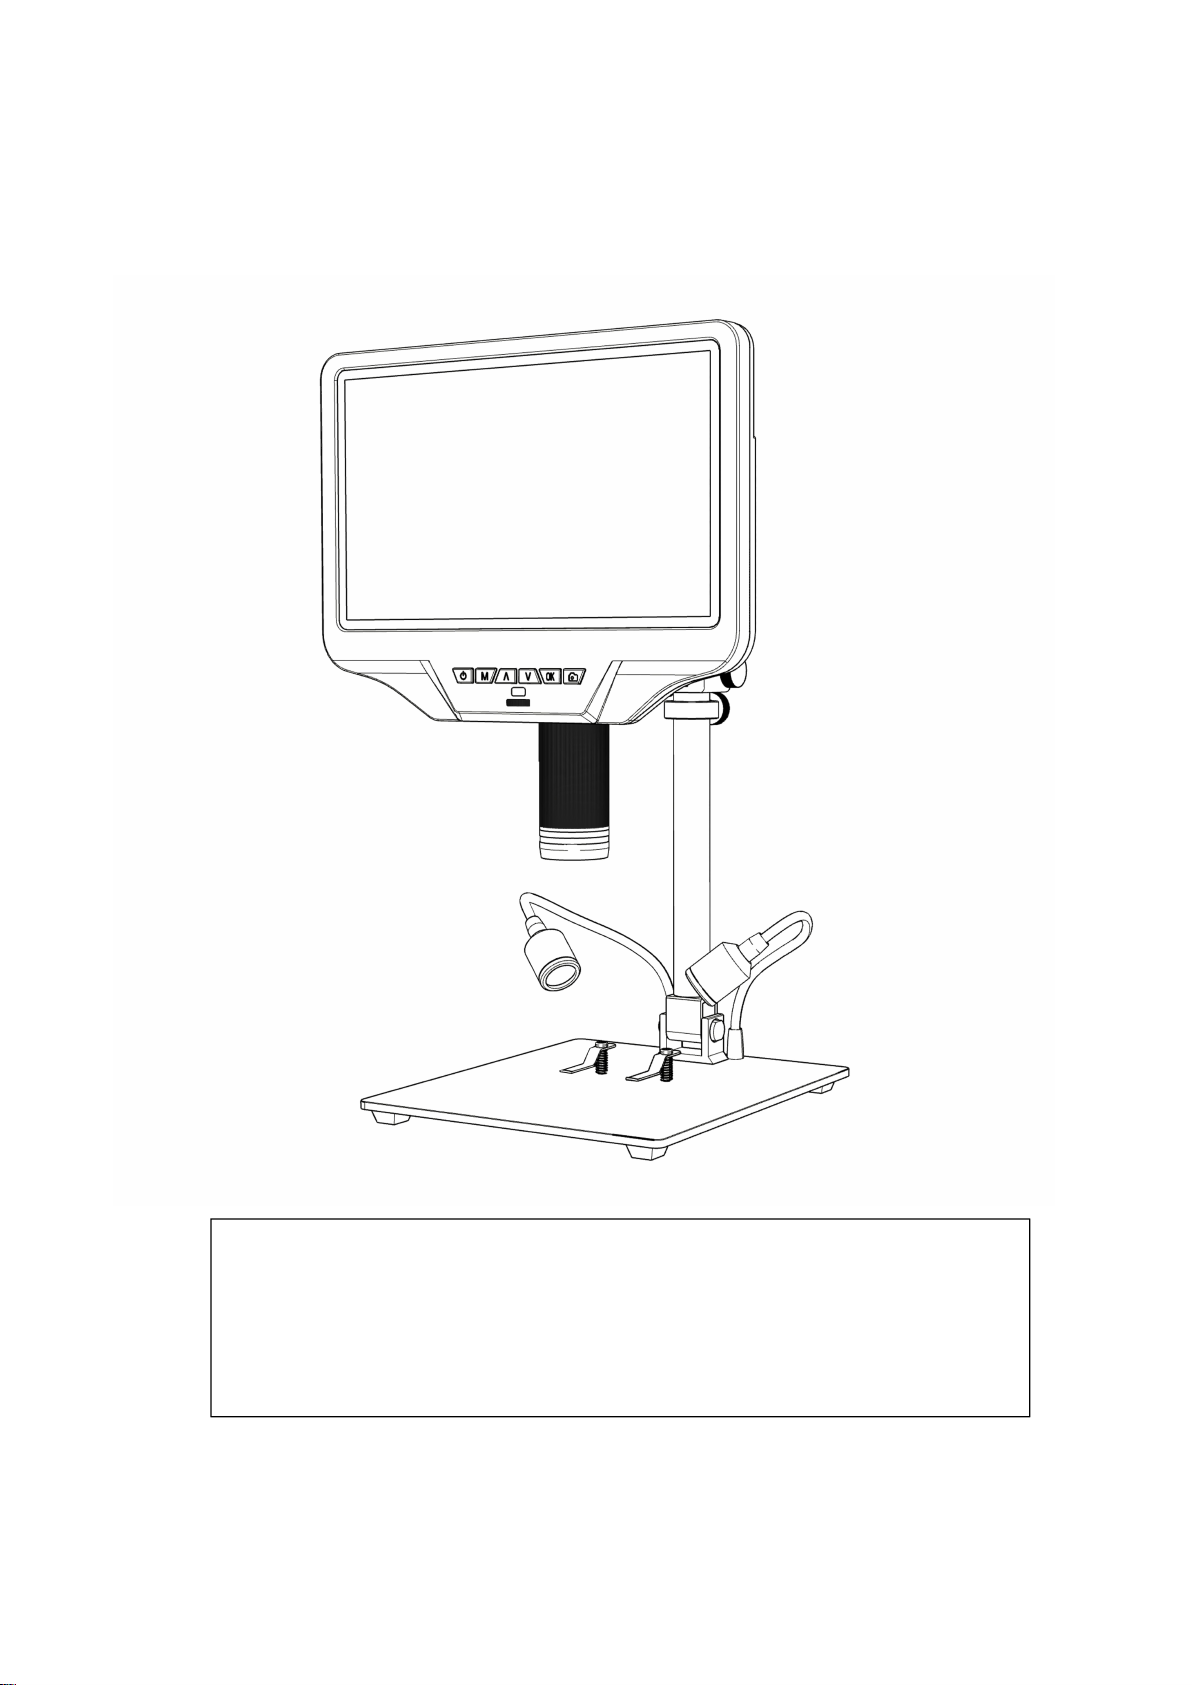
Digital Microscope AD409-Pro
Thank you for purchasing our products! To facilitate your use and maintenance, please
read the users manual carefully before use. If you have any questions, please feel free to
contact us, we will reply within 24H (there may be a delay on holidays). We appreciate
the opportunity to serve you, your satisfaction is our utmost priority!
Customer service:[email protected]
Users Manual
Page 2

1
CONTENTS
Basic Parameters................................................................................................................................. 2
What’s in the box................................................................................................................................. 3
Installation............................................................................................................................................. 4
Button Instructions............................................................................................................................ 5
Quick Start..............................................................................................................................................6
Adjust Magnification & Focus.................................................................................................6
Save Picture and Video.............................................................................................................. 6
Review and Manage Images....................................................................................................7
Remote Control Instructions..........................................................................................................8
Settings.....................................................................................................................................................8
Gridline Setting............................................................................................................................. 9
Save Setting..................................................................................................................................10
Three Output Modes........................................................................................................................10
①HDMI Output......................................................................................................................... 10
②USB Output.............................................................................................................................11
③WIFI Output (Test function)........................................................................................... 16
Safety and Maintenance.................................................................................................................18
FAQ..........................................................................................................................................................18
Warranty Card....................................................................................................................................19
Page 3
2
Basic Parameters
Image sensor
4 Mega Pixels HD Sensor
Video output
UHD 2880X2160 24FPS; FHD1920X1080 60FPS/30FPS,
HD1280X720 120FPS,
Video format
MP4
Magnification Ratio
Up to 300X (27 inch HDMI monitor output)
Photo resolution
Max 24M (5600*4200)
Photo format
JPG
Minimum focus distance
5cm
Frame Rate
Max 120f/s (under 600 Lux Brightness& HDP120)
Storage
Micro-SD card up to 64G (not included, Class10 high-speed card is
recommended)
PC support
Yes, for Windows XP/7/8/10, PC software with Measurement
Mobile phone & tablet terminal
Support WiFi connection
HDMI Output
Support
Power source
USB 5V 2A DC
Stand size
18*20*32cm
Screen size & Resolution
10.1 inch, 1280*800
Language support
10 types, English/French/German/Italian/Portuguese/Spanish
/Russian/Simplified Chinese/Traditional Chinese/Japanese
Package contents
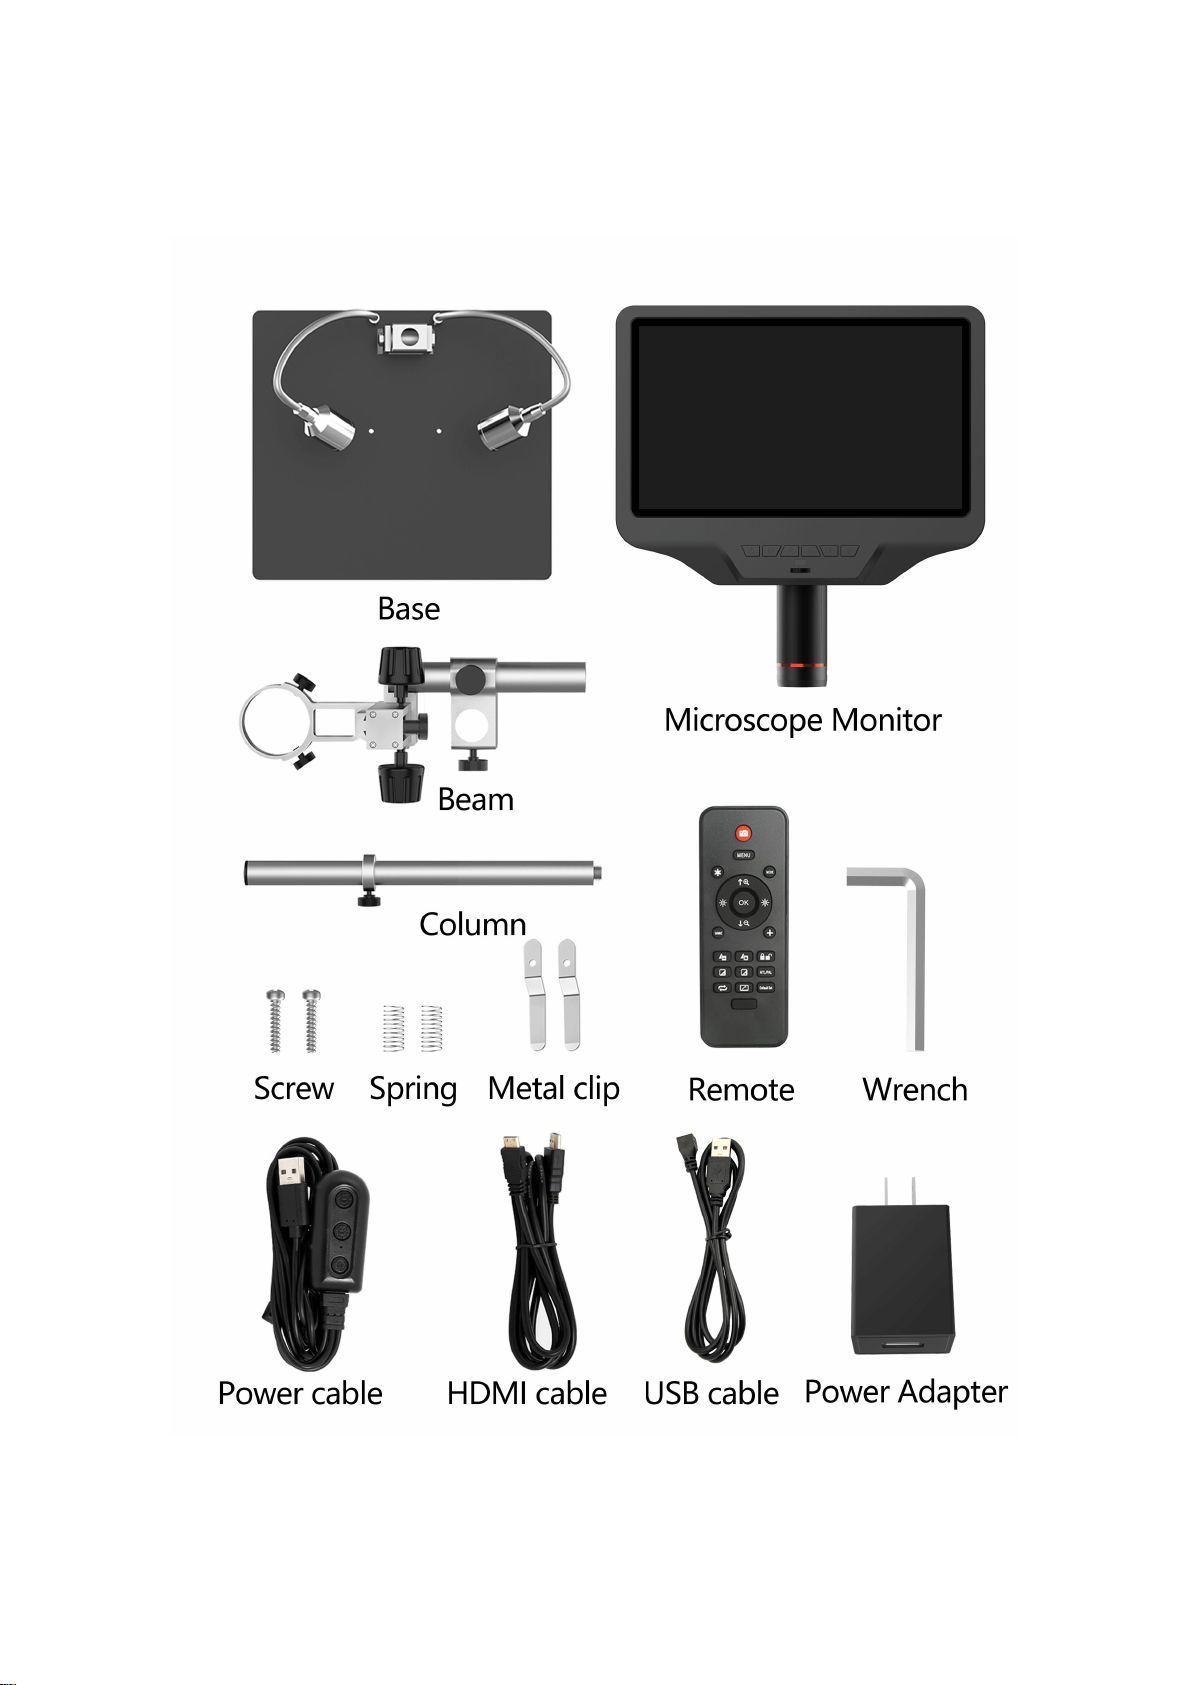
Microscope monitor, Base(with light), Column, Beam,
UV filter(assembled), Power cable, HDMI cable, USB cable, Power
adapter, Metal clip×2, Wrench, Remote, Users Manual
Page 4
3
What’s in the box
(P1: What’s in the box)
Page 5
4
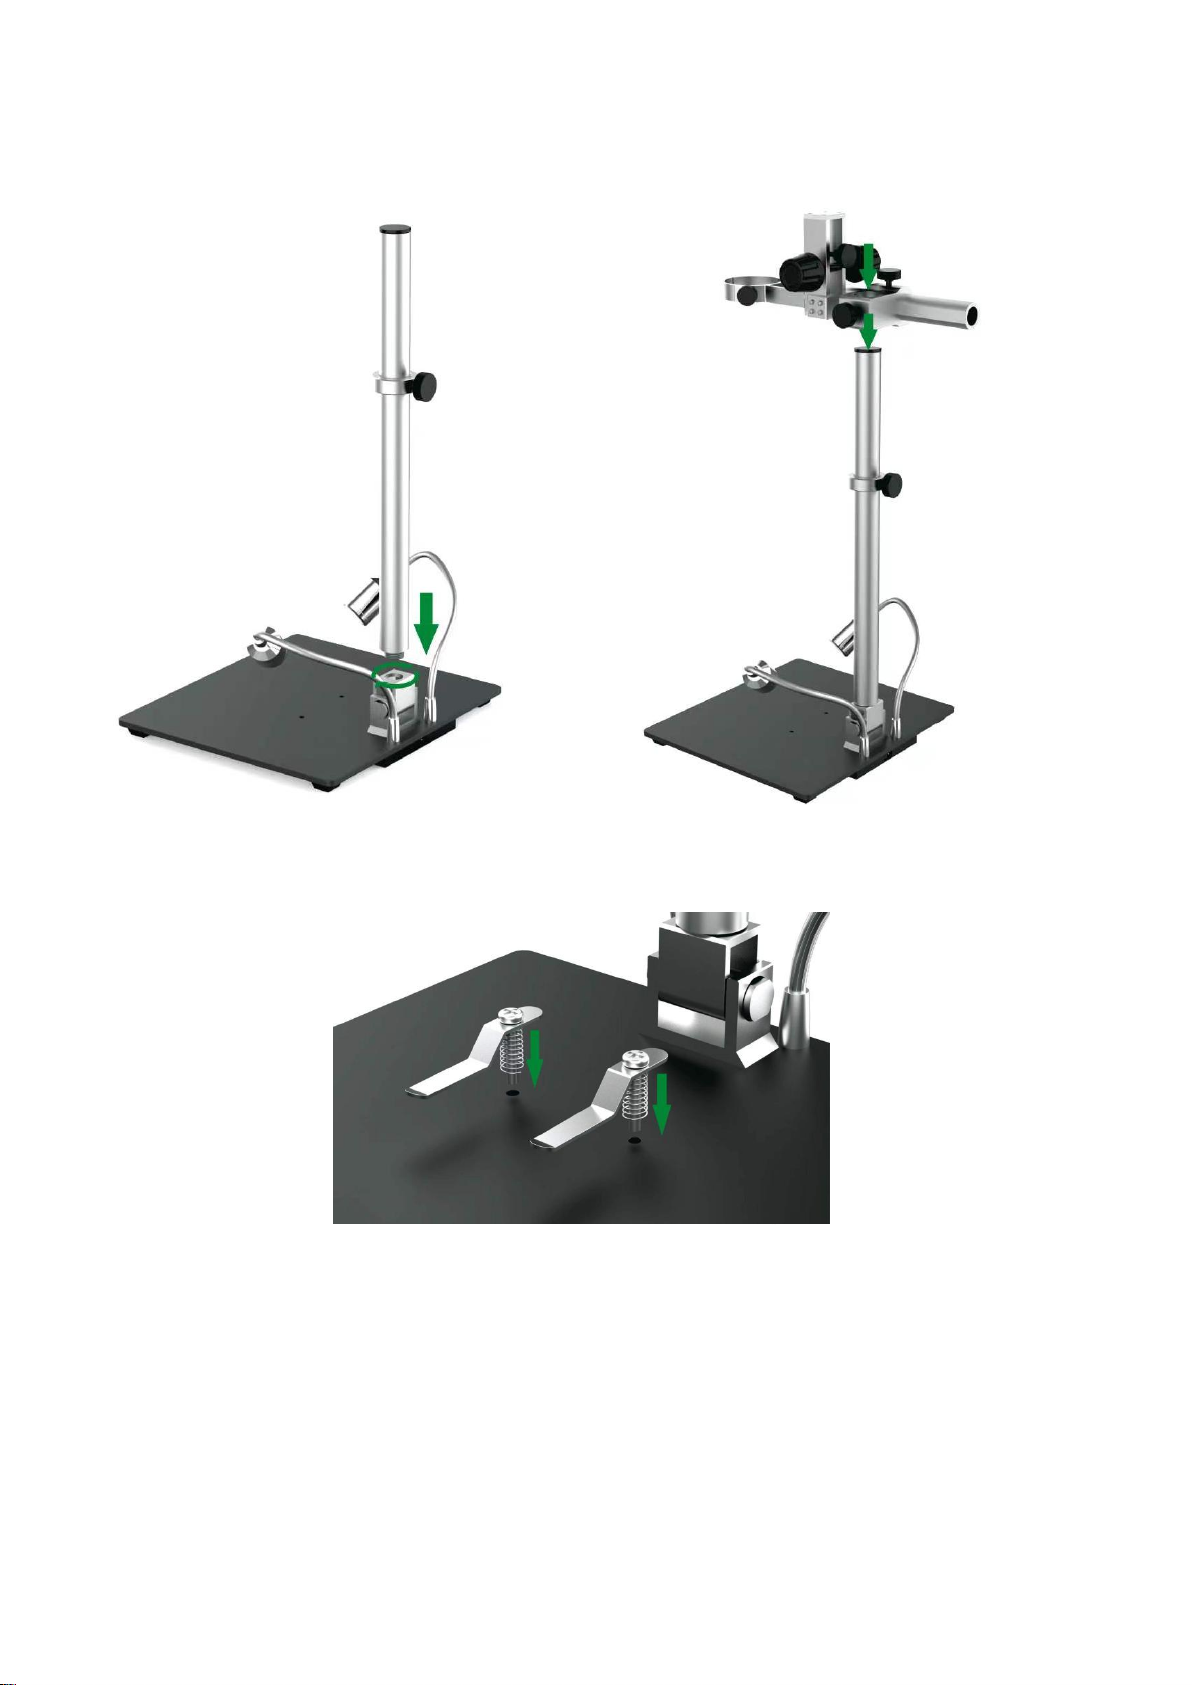
Installation
P2: Install the bracket
(
(P3: Install the metal clips)(optional)
)
Page 6
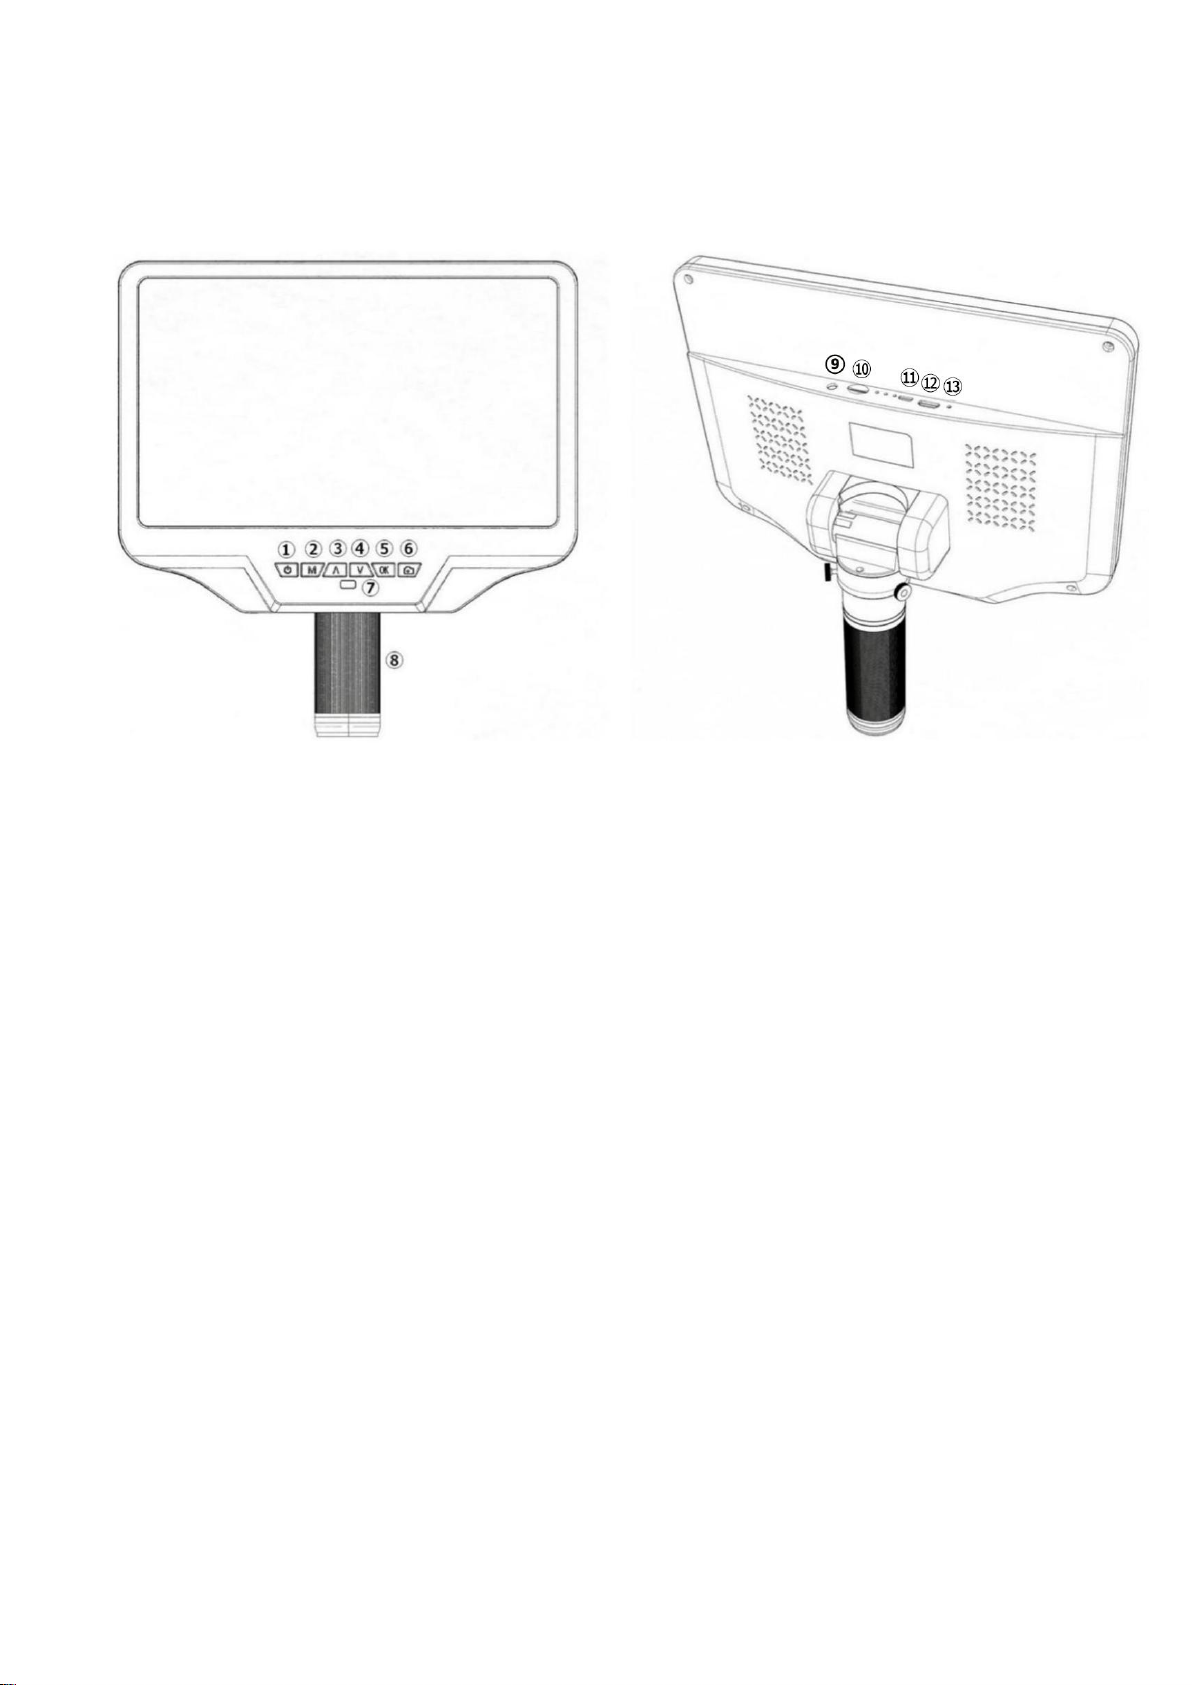
5
Button Instructions
(P4: Button Instructions)
①Power on/off ②Menu/Mode(Long press Menu/press Mode)
③Up(Zoom+
⑤OK/Start video record ⑥Picture capture
⑦Infrared sensor ⑧Focus controller
⑨Endoscope interface (optional) ⑩Memory card slot
⑪USB port ⑫HDMI port
⑬Reset hole
)
④Down(Zoom-
)
Page 7
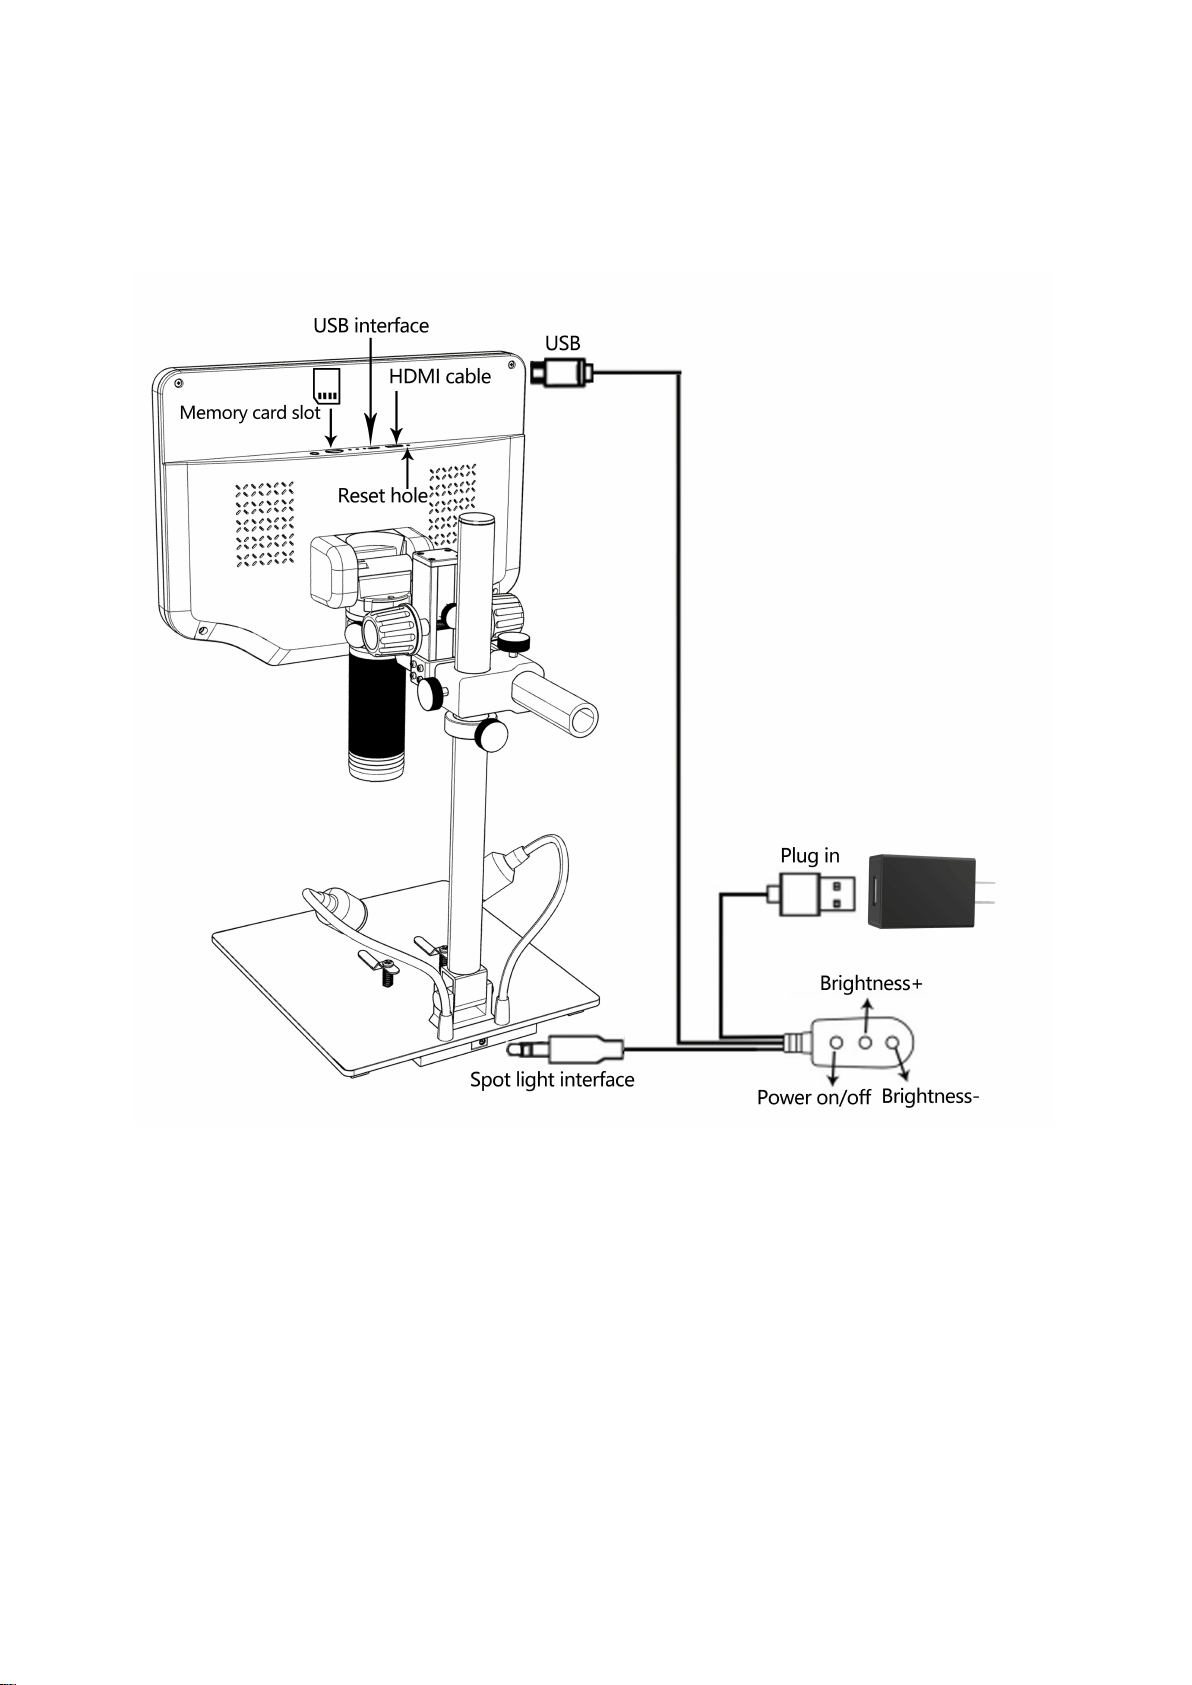
6
Quick Start
P5: Connection
(
)
Adjust Magnification & Focus
Lift the monitor to adjust the object distance, and turn the focus controller (P4/⑧) to focus.
Save Picture and Video
Insert the memory card in the direction shown in P5, the memory card does not support hot swap.
Page 8
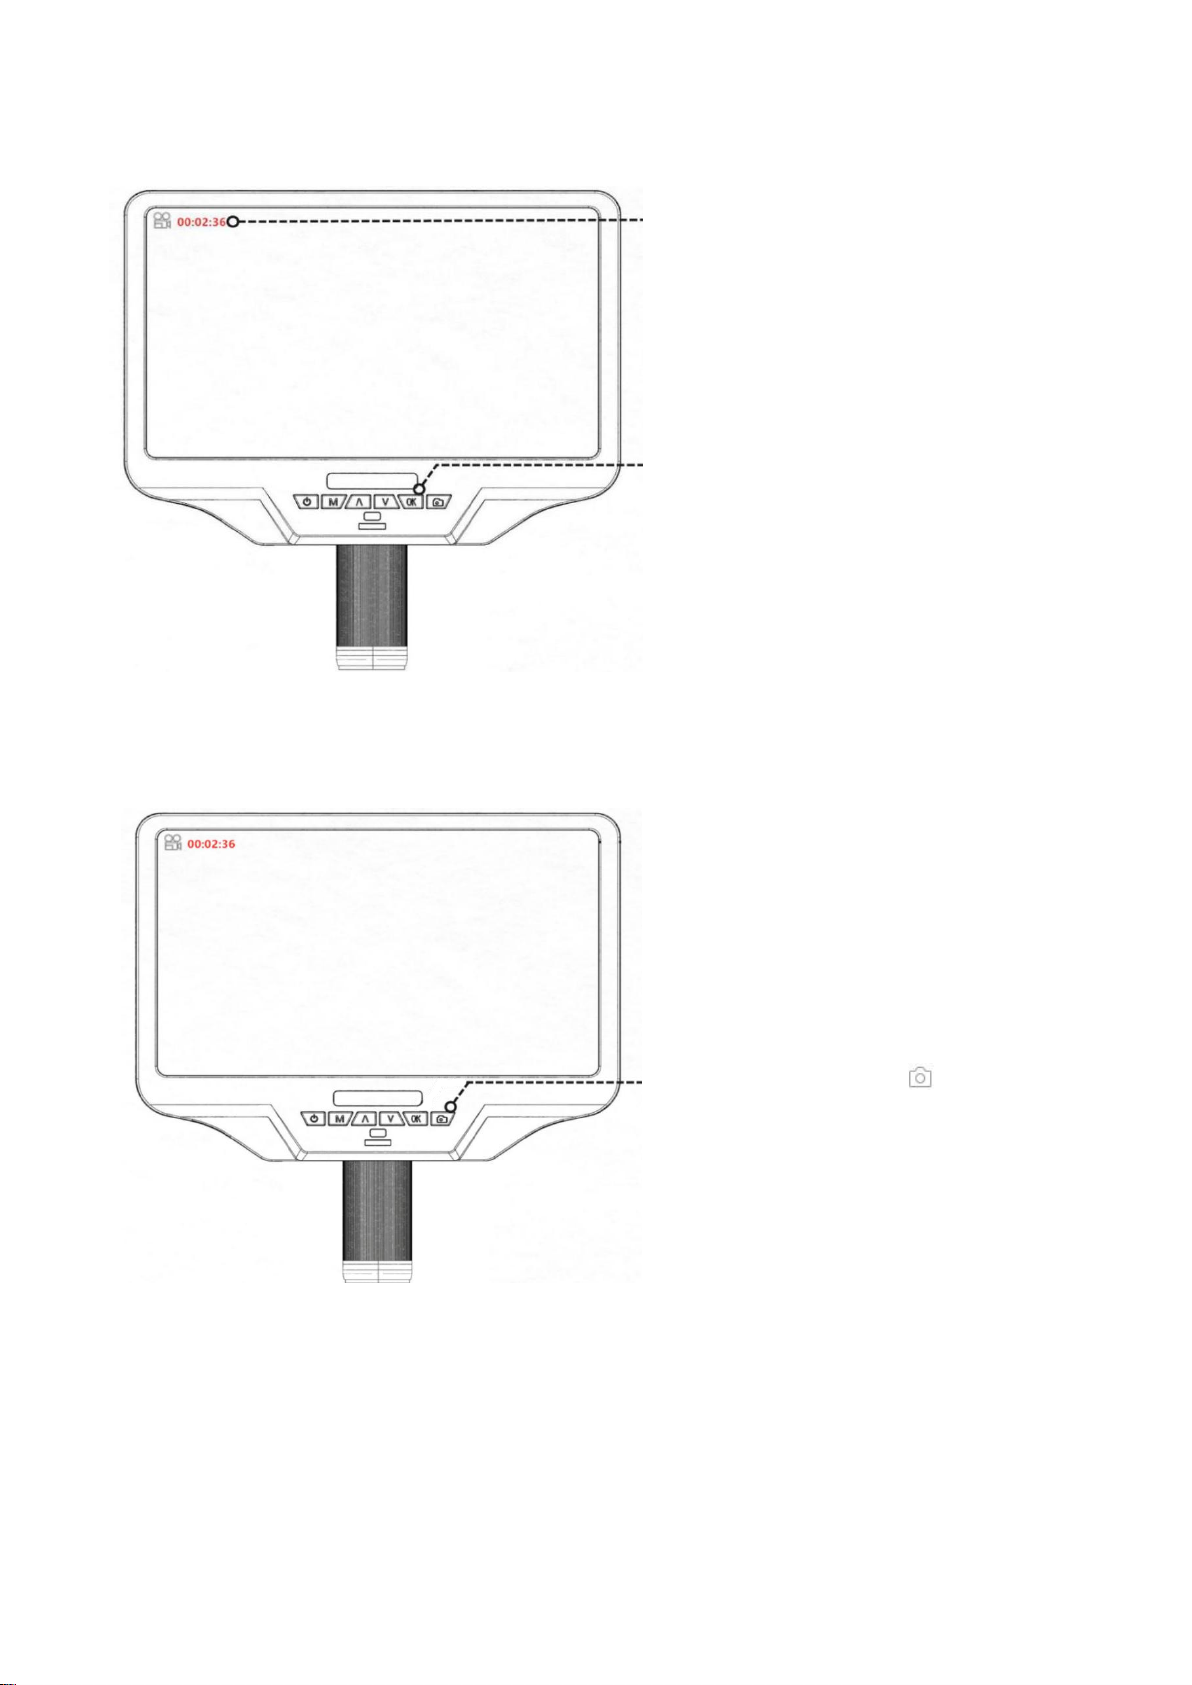
7
Record Videos
Video recording
Press the "OK" button to start recording. Press
the "OK" button again to stop recording.
Press the"capture" button( )to take photos.
Take photos
Review and Manage Images
Press the "MODE" (M) button to enter playback mode. Press the “Up” and “Down” keys to cycle through
pictures and videos. When reviewing pictures or videos, long press the "MENU" (M) button to manage files.
Page 9
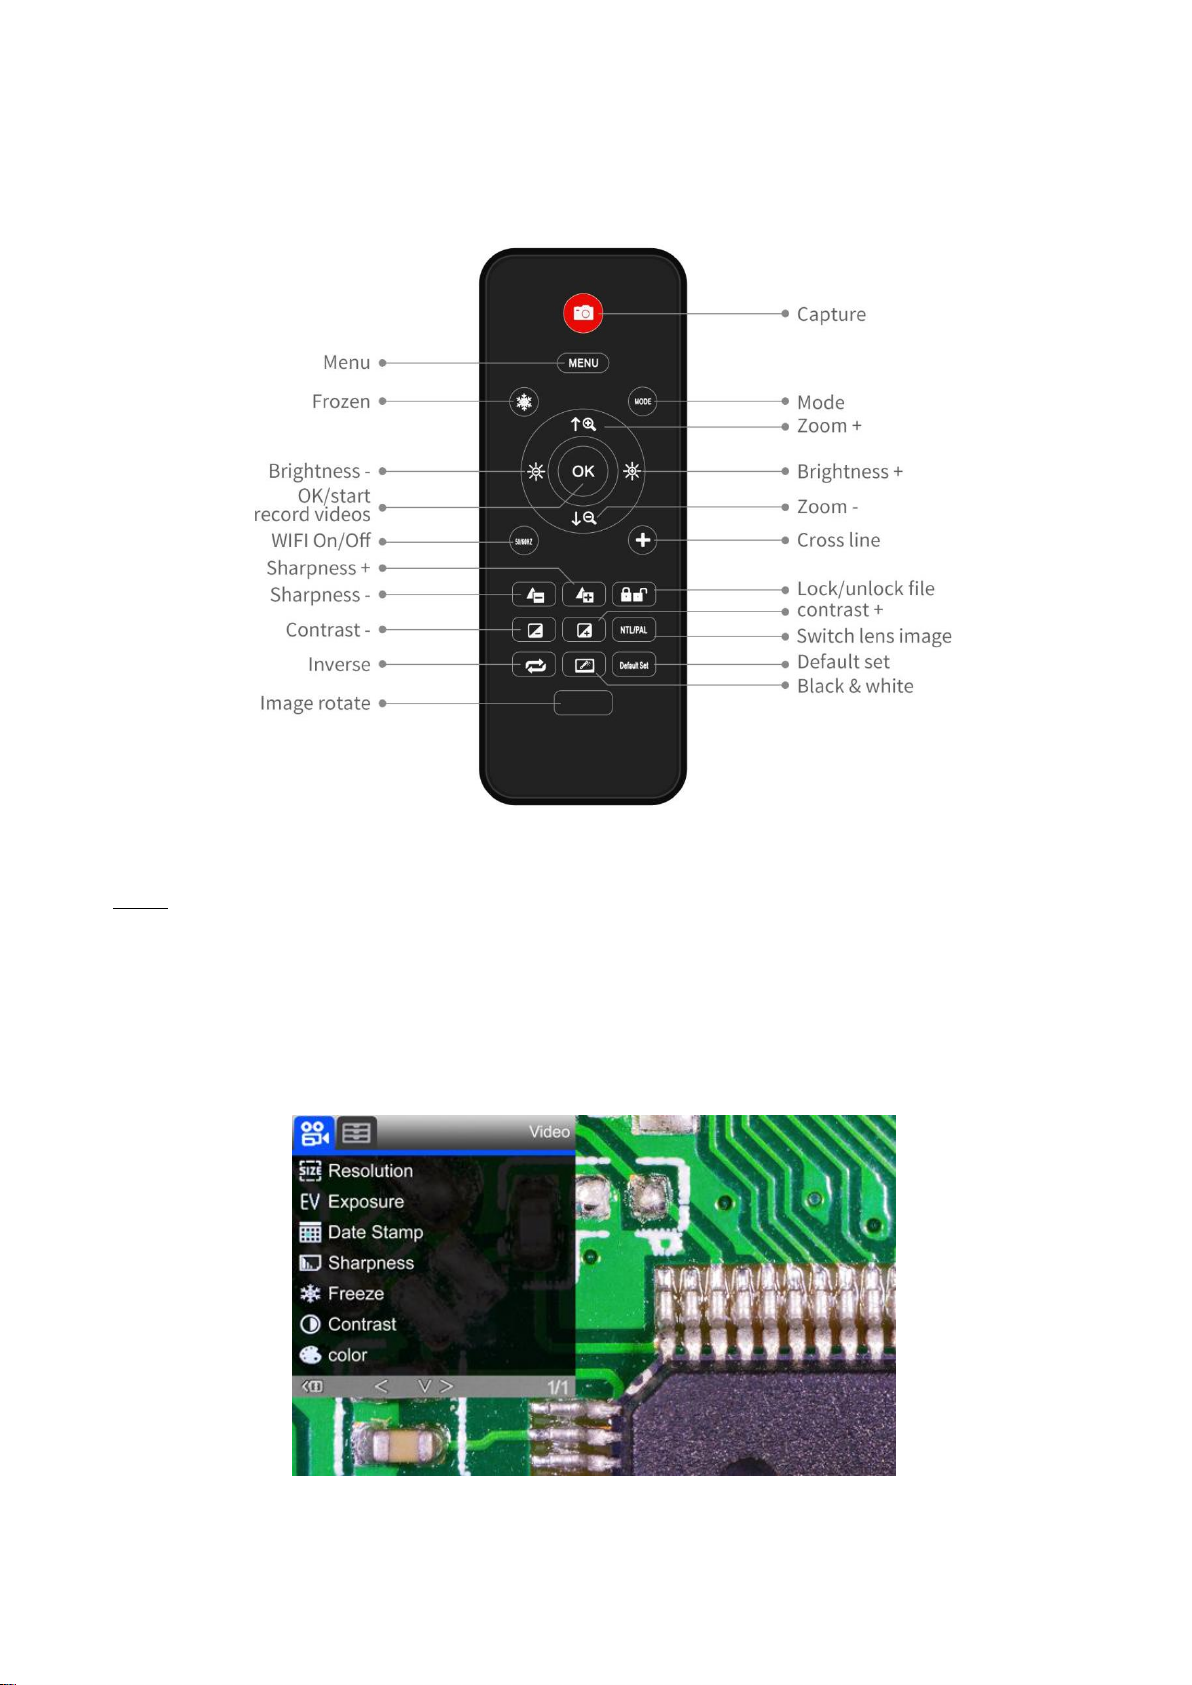
8
Remote Control Instructions
(P6: Remote Control Instructions)
Note: The “Switch lens image” button is only available after inserting the endoscope
Settings
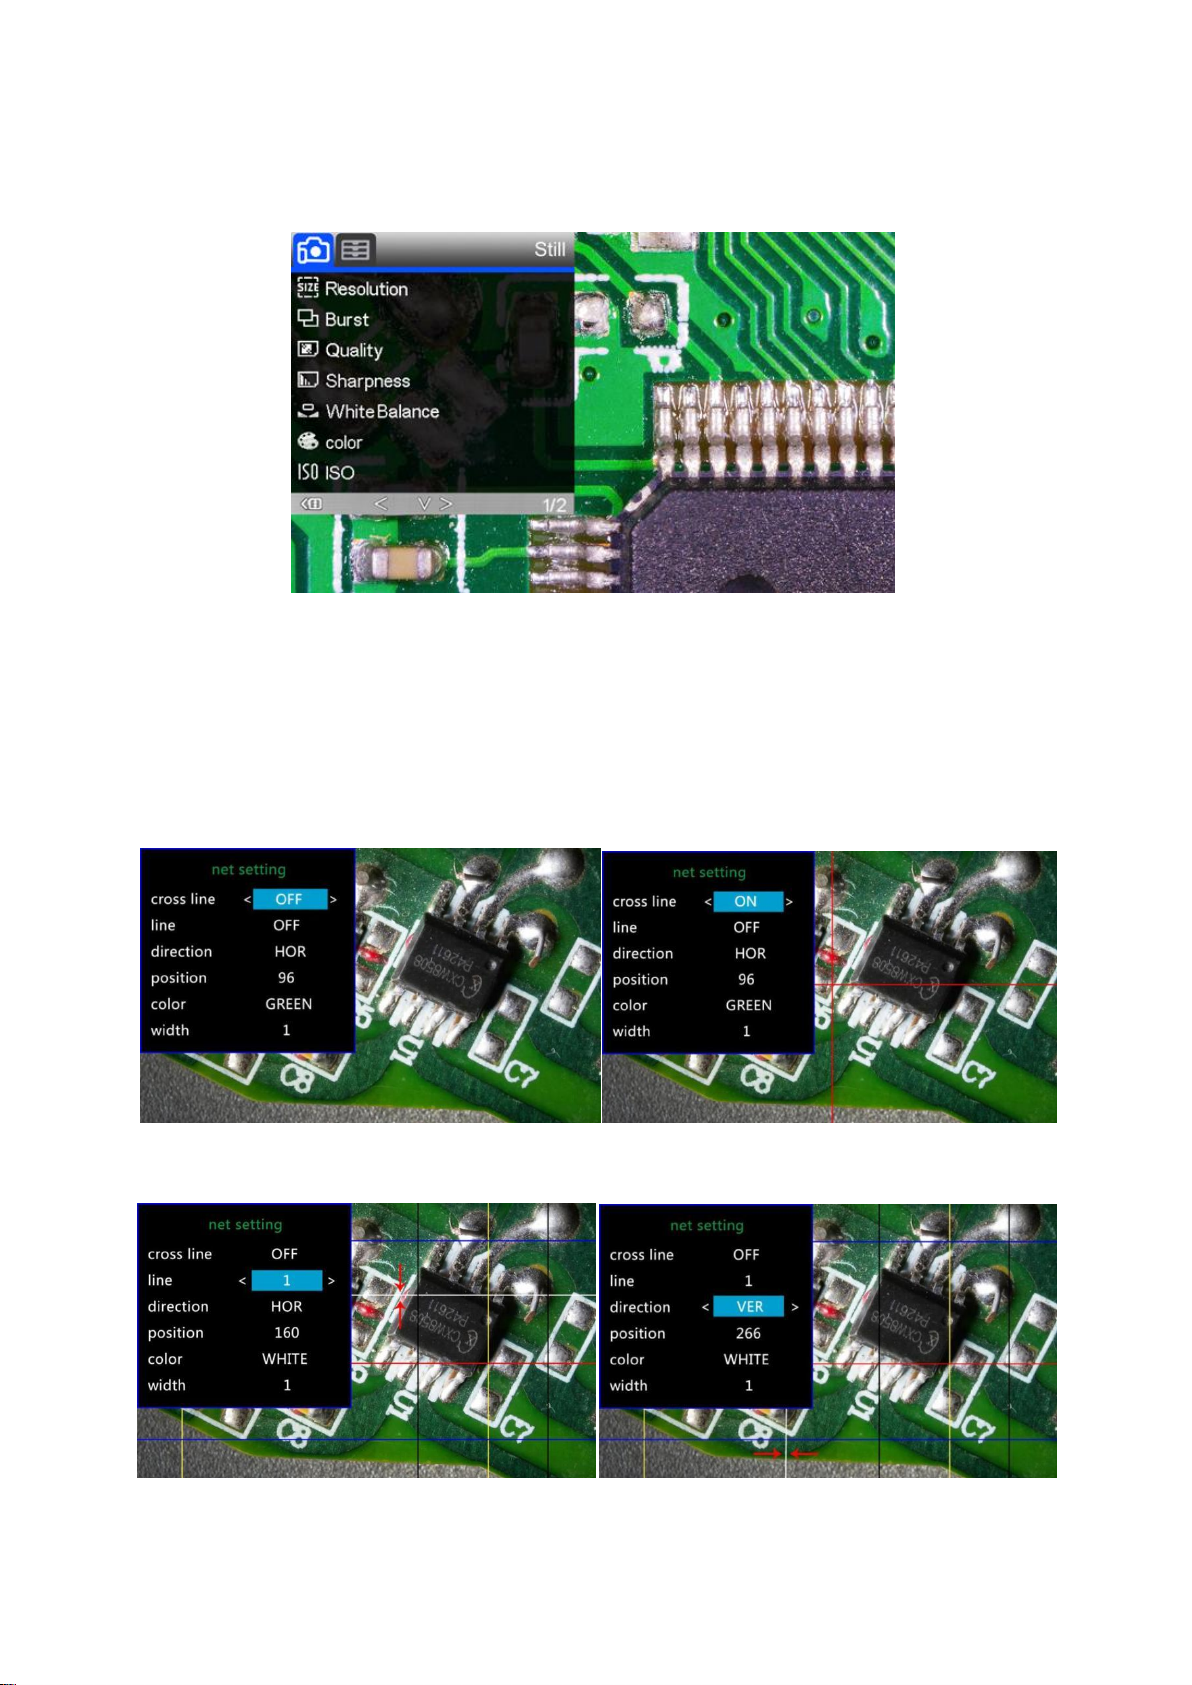
①Long press the "M" button to enter the video menu of video standby mode:
(P7: Video menu)
Page 10
9
②press the "M"button to switch to the photo mode, and then long press the "M" button to enter the picture
menu of photo mode
:
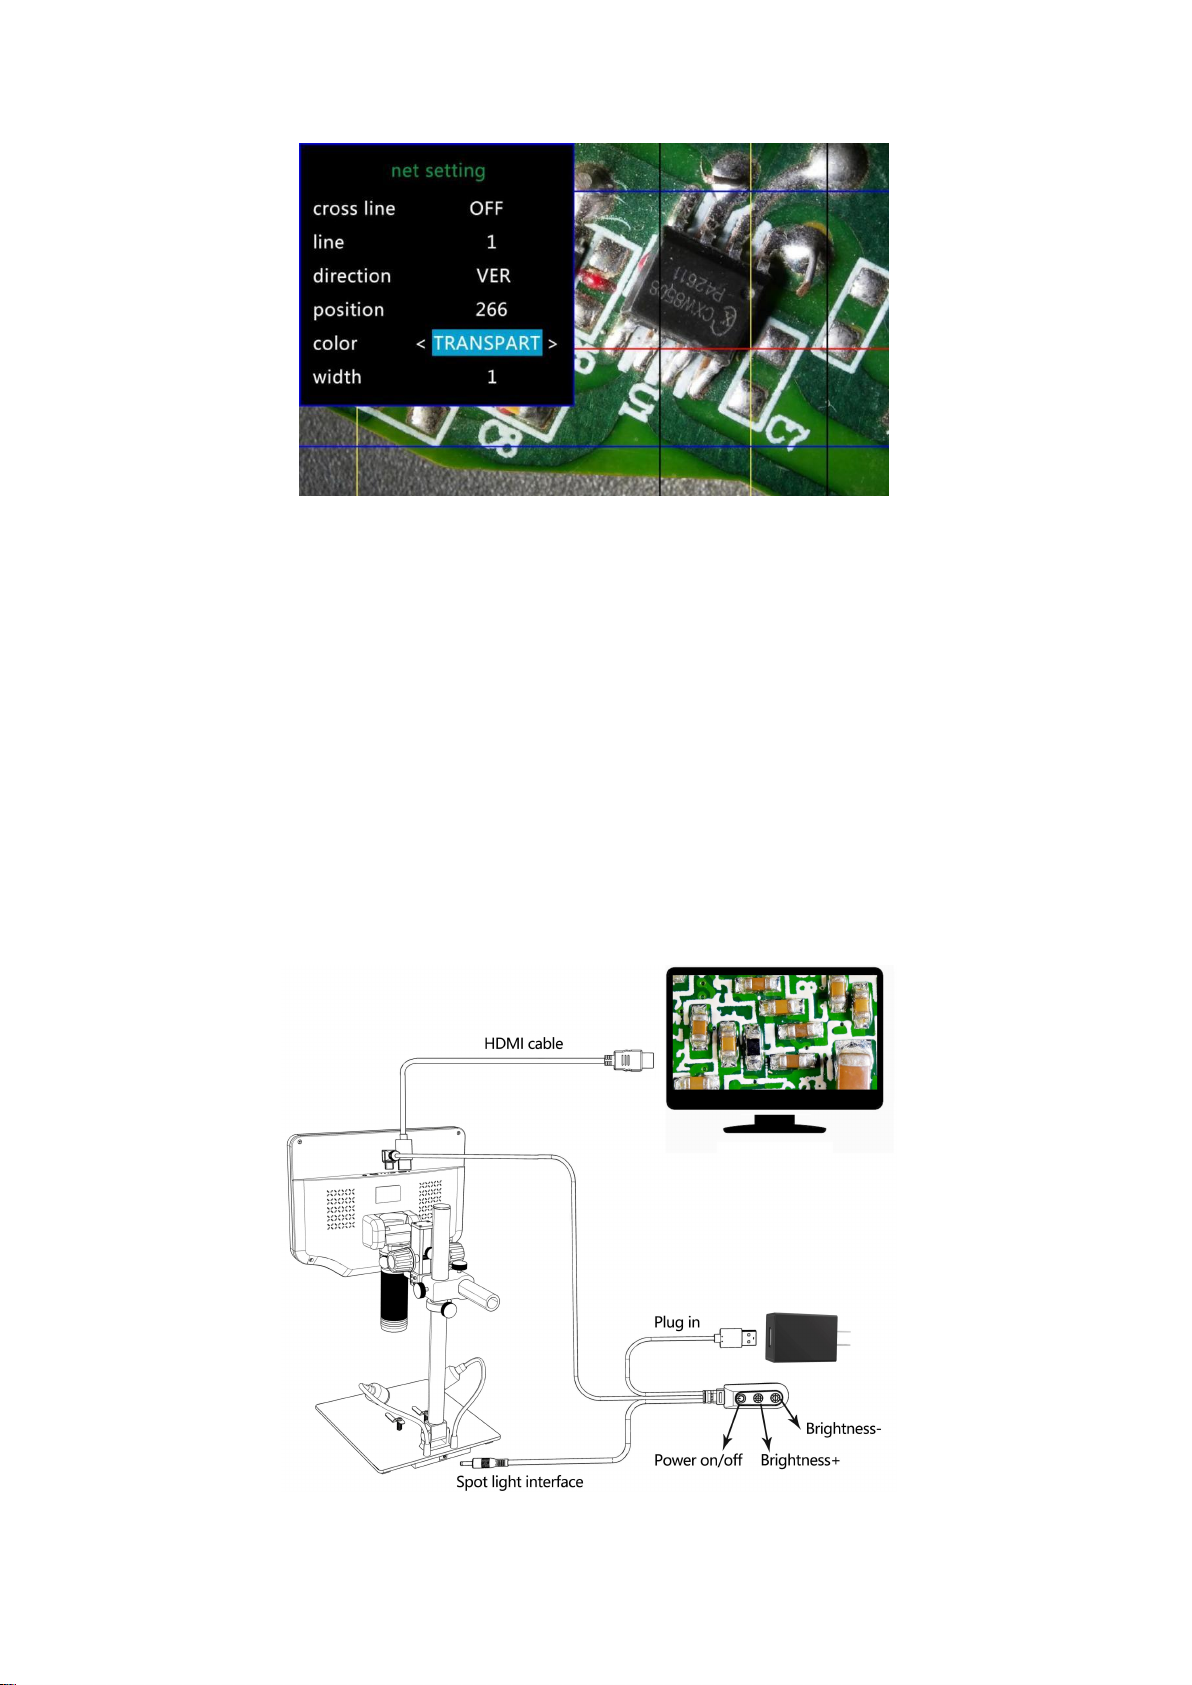
Gridline Setting
(P8: Picture menu)
Press the “Up” and “Down” keys on the remote to select among “cross line”, “line”, “direction”, “position”,
“color”and “width”. Use “Left” and “Right”keys on the remote to change the settings.
P9: Gridline Setting menu
(
) (
P10: cross line on
)
P11: line1, HOR&160
(
) (
P12: line1, VER&266
)
Page 11
10
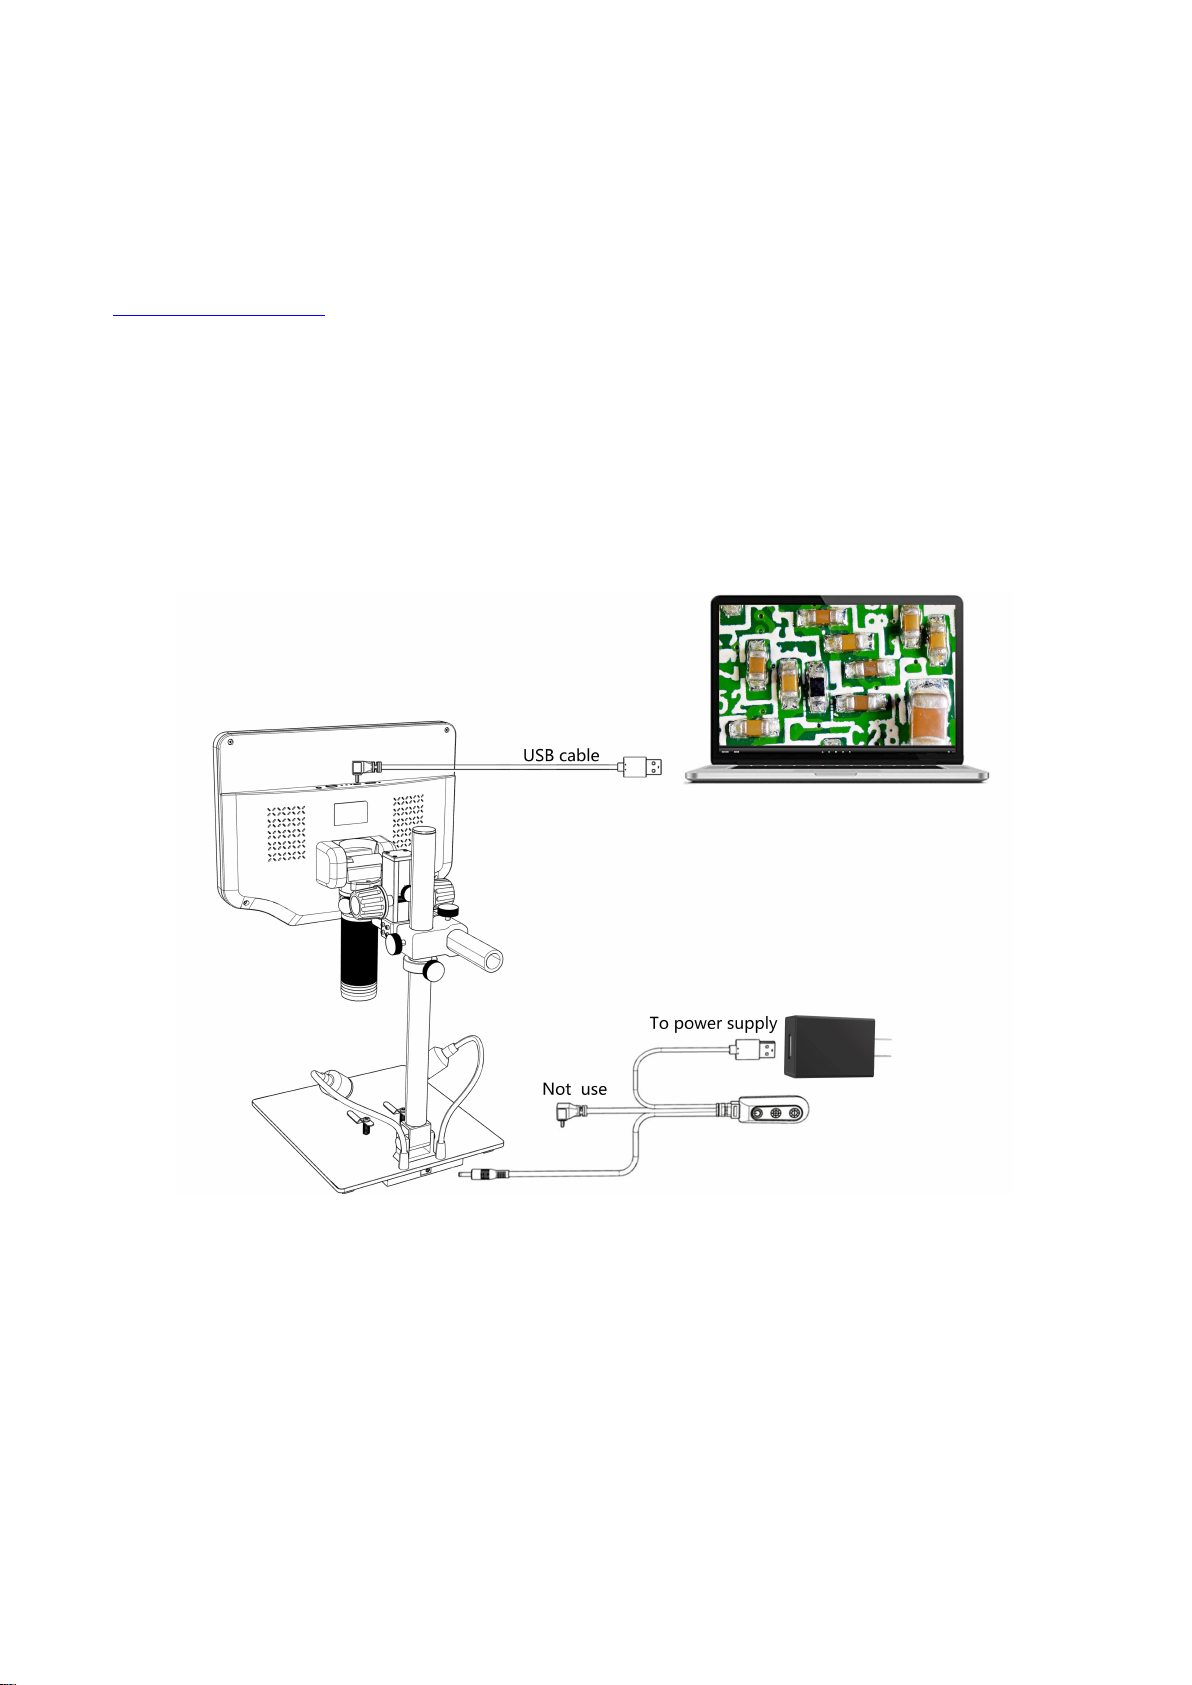
P13: Set the color of line 1 to transparent
(
)
Save Setting
If you need to save the settings, long press the power button to turn off the device after you set everything
right, and then cut off the power. Otherwise, the settings will not be saved.
Three Output Modes
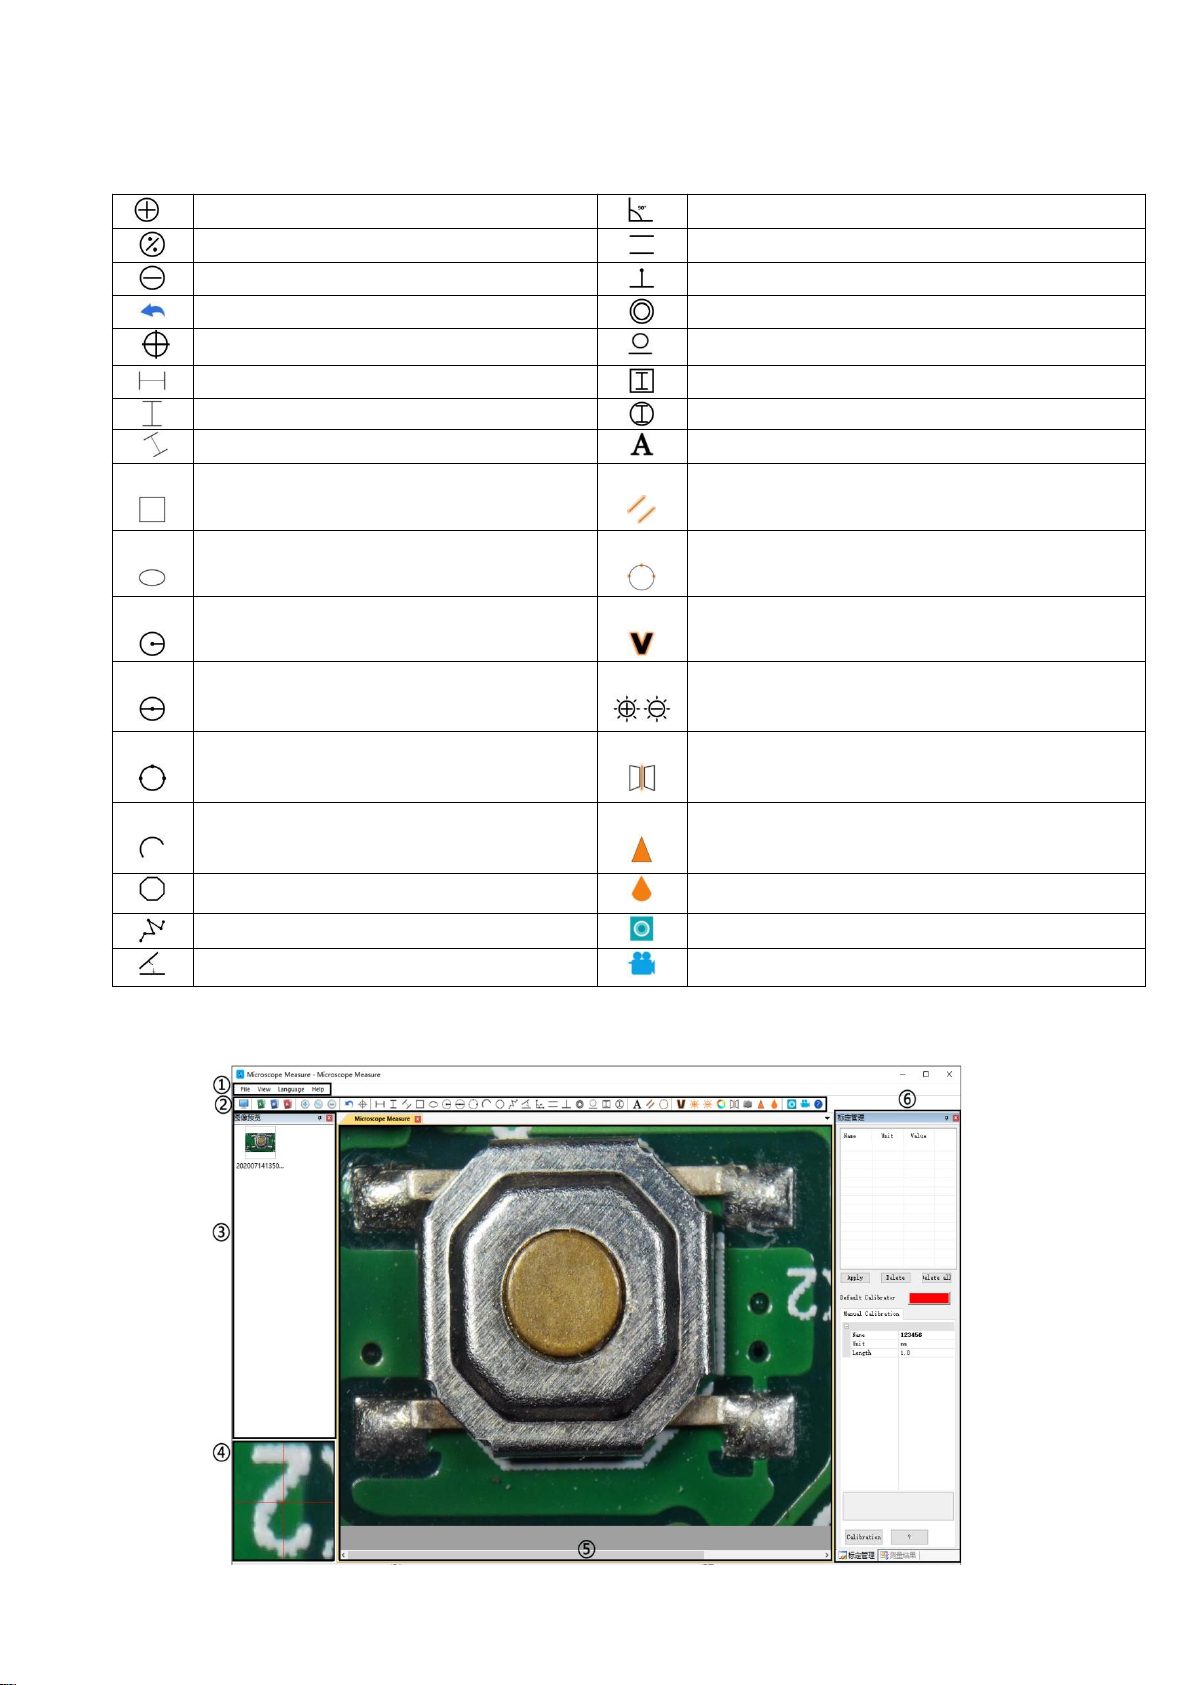
①HDMI Output
P14: HDMI output connection
(
)
Page 12
11
②USB Output
1. Software Installation
Where to download the software (Please type all letters properly capitalized):
https://bit.ly/3xCRDPL
*System support:
Windows XP SP3、Windows 7、Windows8、Windows10
*Runtime:
Microsoft.Net Framework 4.0,Microsoft Visual C++ 2010 Runtime
If either of two runtimes above mentioned is not completely installed, an error will be displayed during
installation.
2. Connect to Computer
(P15: USB output connection)
1) Objects required: PC (Windows system with the“Microscope Measure”software); USB microscope
(device name:“USB Camera”), Ruler.
2) Connect the microscope and computer with the USB cable (As shown in P15).
3) Press the “Down”button on the monitor or remote control to select "PC Camera" from the microscope
interface, and then press “OK”button.
4) Open the software“Microscope Measure”, Click “File”→ “Open”→ “Open Device”→ “USB MODE” → “USB
Camera”.
Page 13
12
3.Icons Definitions
Zoom In
Measure a 3-point angle (degree)
Normal(original scale
)
Distance of parallel lines(length)
Zoom out
Distance of a point and a line (length)
Undoes the last action
Distance of 2 circles(radius, length)
Cross hairs (crosier,4 grid, 8 grid)
Distance of a line and a circle(radius,length)
Distance of 2 horizontal points
Add a square mark
Distance of 2 vertical points
Add a circle mark
Distance of any 2 points
Add text
Measure a rectangular
(width,height, perimeter & area)
Distance of 2 lines(length)
Measure an ellipse (Long-axis radius,
short-axis radius, perimeter & area)
3 points circle(radius, perimeter & area)
Measure a radius circle
(radius, perimeter & area)
Edge detection
Measure a diameter circle
(diameter, perimeter & area)
Increase/decrease brightness
Measure a 3-point circle
(radius, perimeter & area)
Flip horizontal
Measure a 3-point arc
(radius, degree, perimeter & area)
Sharpen
Measure a polygon (perimeter & area)
Smooth
Measure fold-lines (length)
Take a picture
Measure a 4-point angle (degree)
Take a video
4.Software Interface Definitions and Functions
Page 14
13
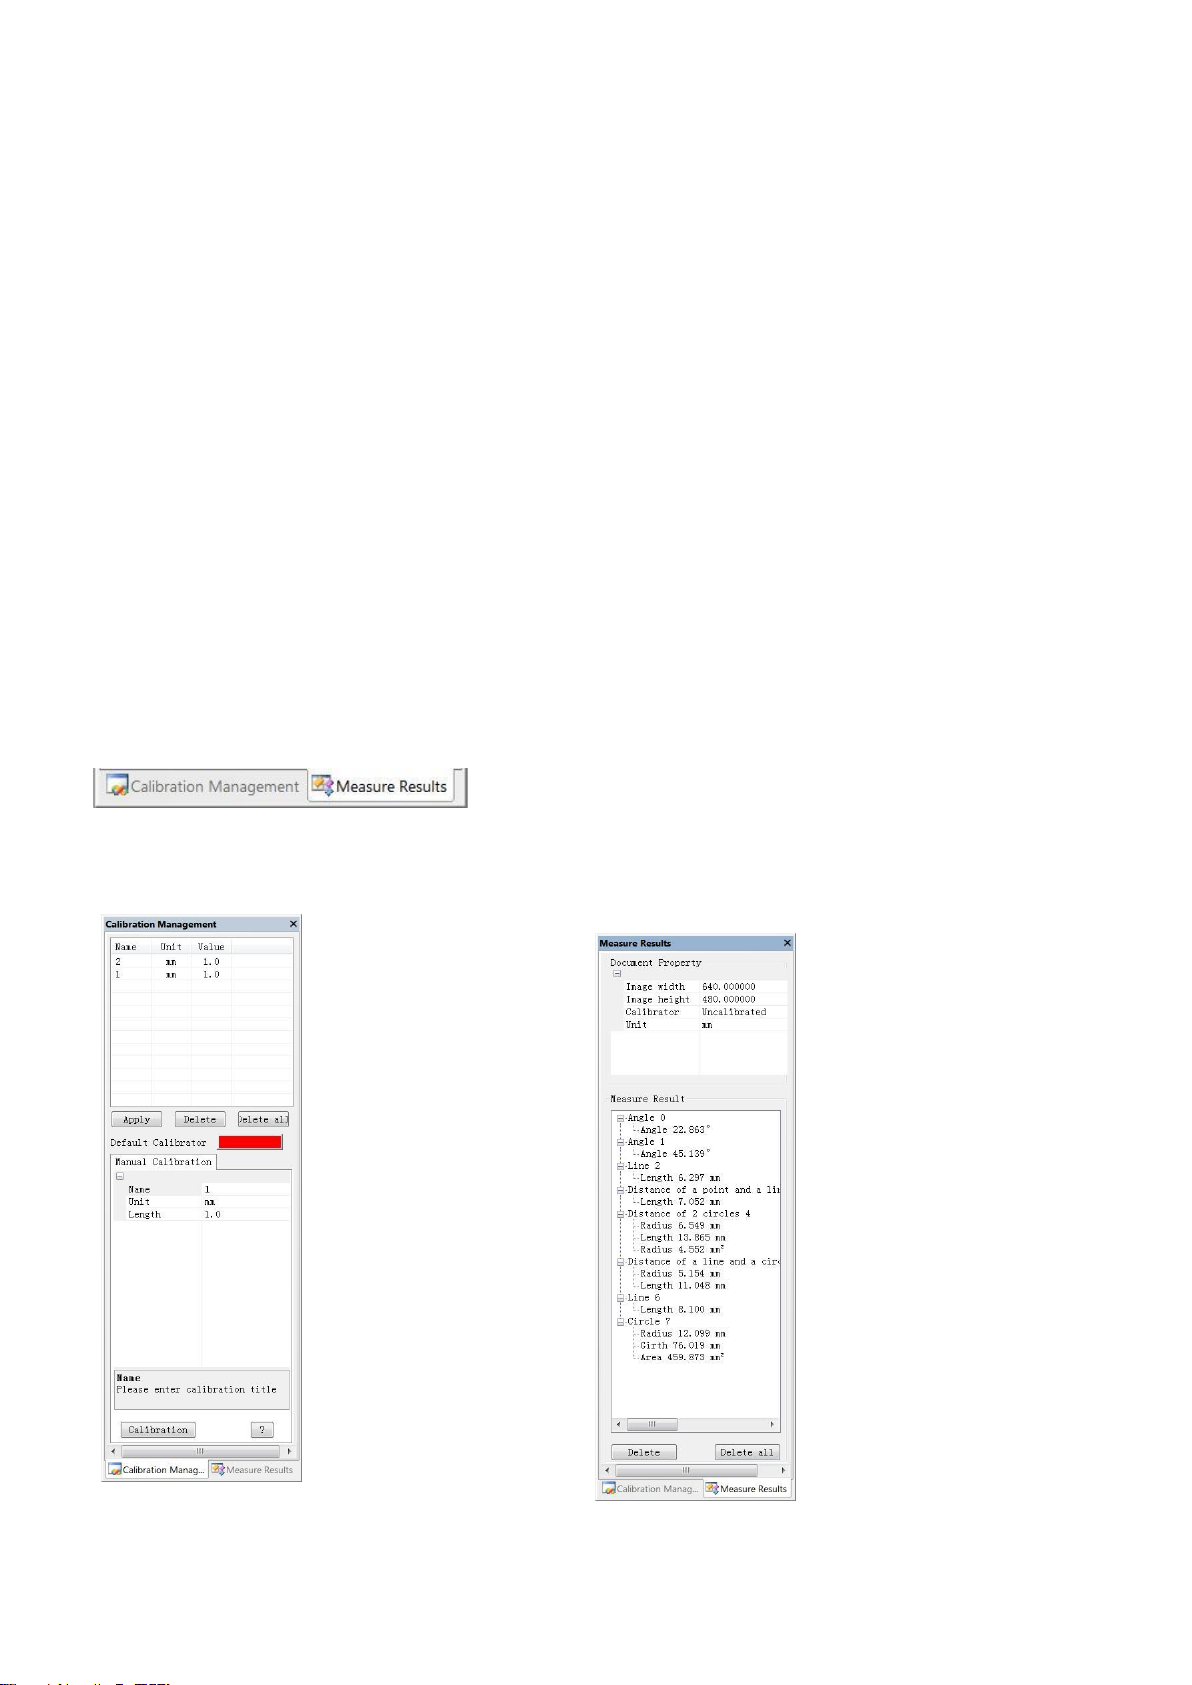
①Main menu:
5. Functions
→ Shows the list of
different Calibrations.
Users can apply or
delete the one they
want.
→ Shows the size of the
whole view. Users Can
change it in “File→
Video setting→Video
capture pin→(S)”.
→Where to set new
Calibrators. (The details
of how to set calibrator
would be given in
another chapter)
→ Shows all results
of measuring.
Here, users can open different devices or lead in pictures to observe or edit, do video setting or save setting,
choose which windows to show or hide etc.
②toolbar:
Here are the tools that would be useful for users to do measuring and image analysis. Definition and function
of different tools would be given in chapter “Icons definitions”. Users can choose to hide or show this toolbar
in “View→Toolbars and Docking Windows→Standard”.
③Pictures browser:
Here is where users can review all pictures they’ve captured. Users can also edit the picture by right clicking
the picture and open it in the main operating window. Choose “View→Toolbars and Docking
Windows→Picture browser” to show or hide this window.
④Secondary operating window:
The image showing in this window always follows your cursor, and with a bigger magnification. With help of
this window, the result of measuring can be much more precisely.
It belongs to window “Pictures browser”.
⑤Main operating window:
This windows shows the full view from the microscope. And it is also the place where users do measuring and
image analysis.
⑥Calibration Management and Measuring Results:
These two windows shows at the same place, users can switch at the bottom of this window.
◆Calibration Management ◆Measure Results
Page 15
14
5. Functions
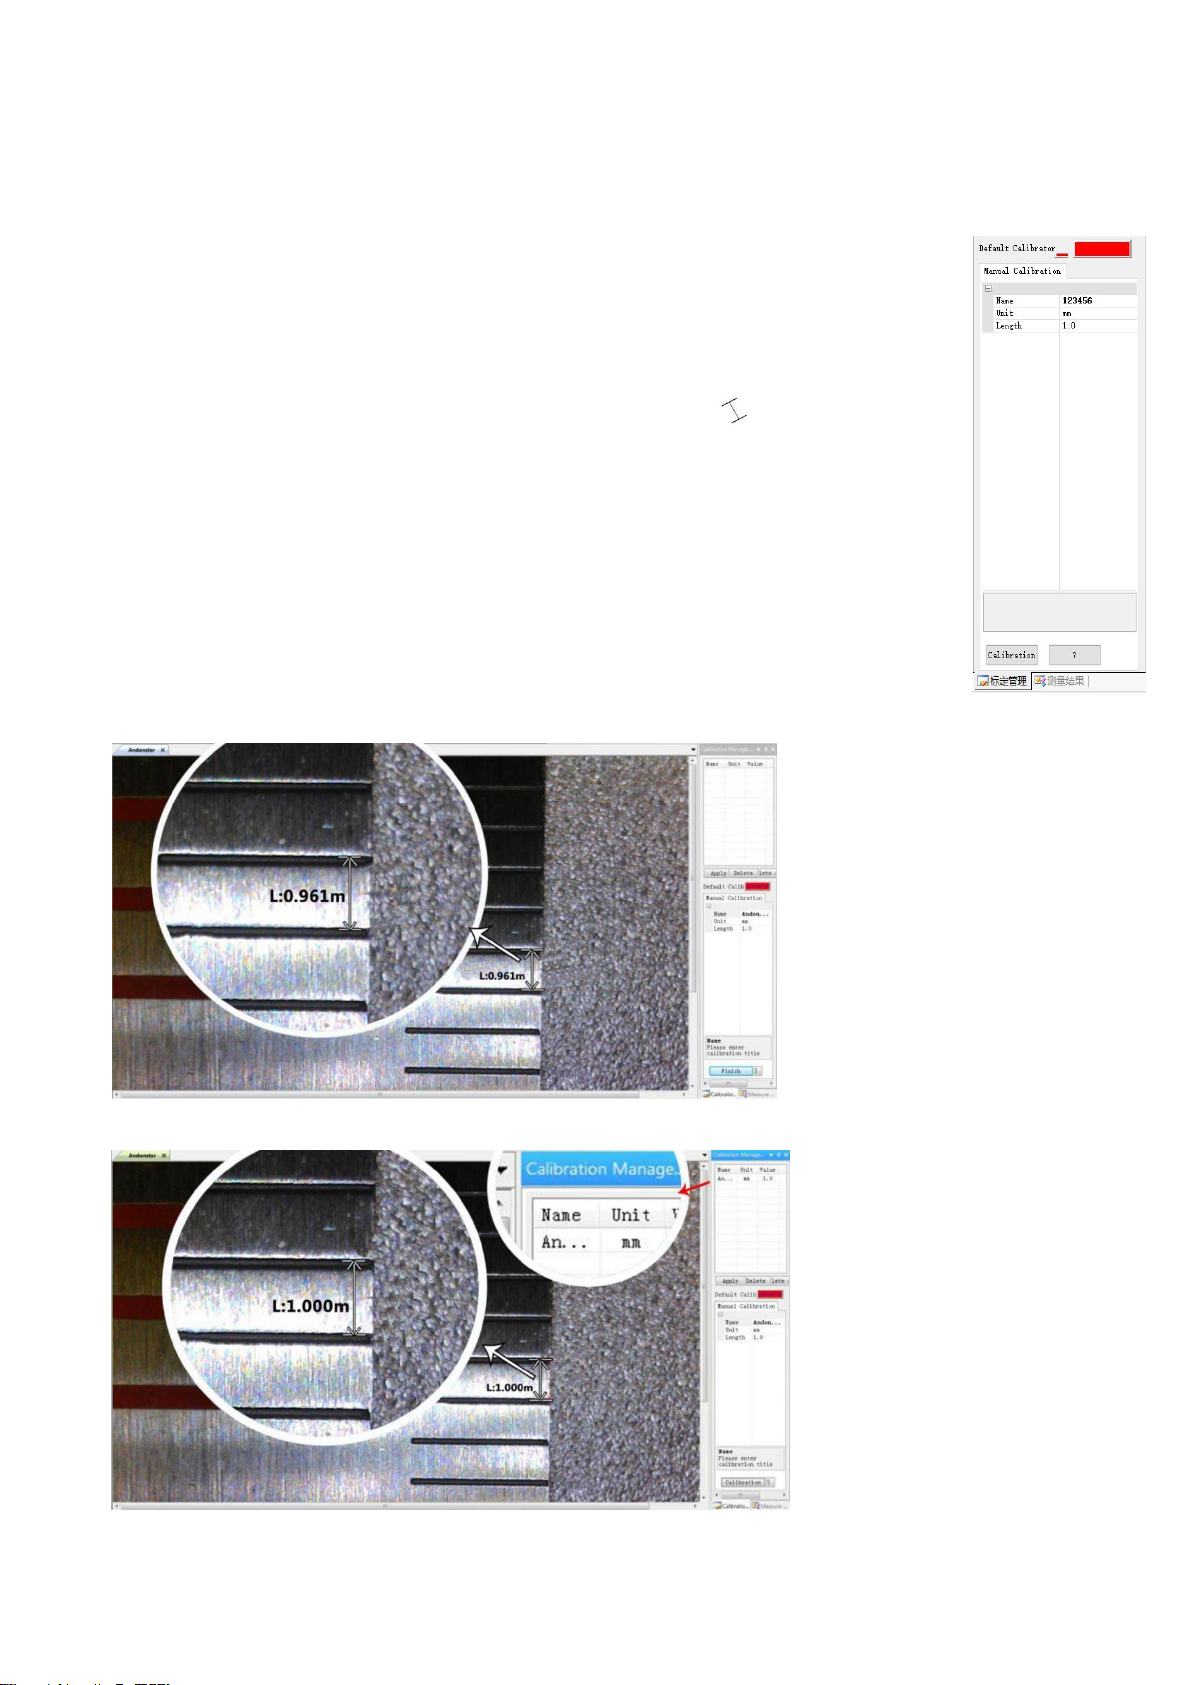
1, Put the ruler under the digital microscope, adjust the focus wheel and the height of the
stand, to get the best clearance. (during the rest of the process, do not change the object
distance any more).
2. In the “Calibration management” set the name and unit length of the new calibration(refer
the picture on the right). Then, click “Calibration”, meanwhile, the “ ” in the toolbar should
have been chosen automatically. If not, please choose it yourselves.
3, Move the cursor to the main operation window, draw a line (the length is the unit length
which has been set in step 2) with help of the ruler. After these, click the “Finish” button in the
bottom of the “Calibration Management” window.
4, Check. The length of the line you draw in step 3 should become as the unit length. The name
of the new calibration should have showed in the list of calibrations.
1)Calibration
3)
4)
Page 16
15
2) Measuring
1, Choose the tool you need to do measuring in the toolbar.
2, Click dots or draw lines that you need to measure in the main operating window.
3, Place the results of measuring in a proper place around the target.
3) Special Effect
·Includes: Edge detection, Inverse color, Flip horizontal, Relief, Sharpen and Smooth.
·Steps:
1, Choose the special effect you need in the toolbar.
2, In the main operating window, long press the Left to draw a rectangle which can covers the whole target
area, loose the Left, get the special effect result.
3, Click Left again, end the special effect.
PS: If you want to use “Flip horizontal”, draw a random rectangle in the view, and the whole view would be
flipped. Click Left again, end the special effect.
4) Capture and Recording
·Capture
1, Click “ ” to capture.
2, The result of capture can be checked and deleted in the “Picture browser” window.
3, Check and change the save path: “File→Save Setting→Path”.
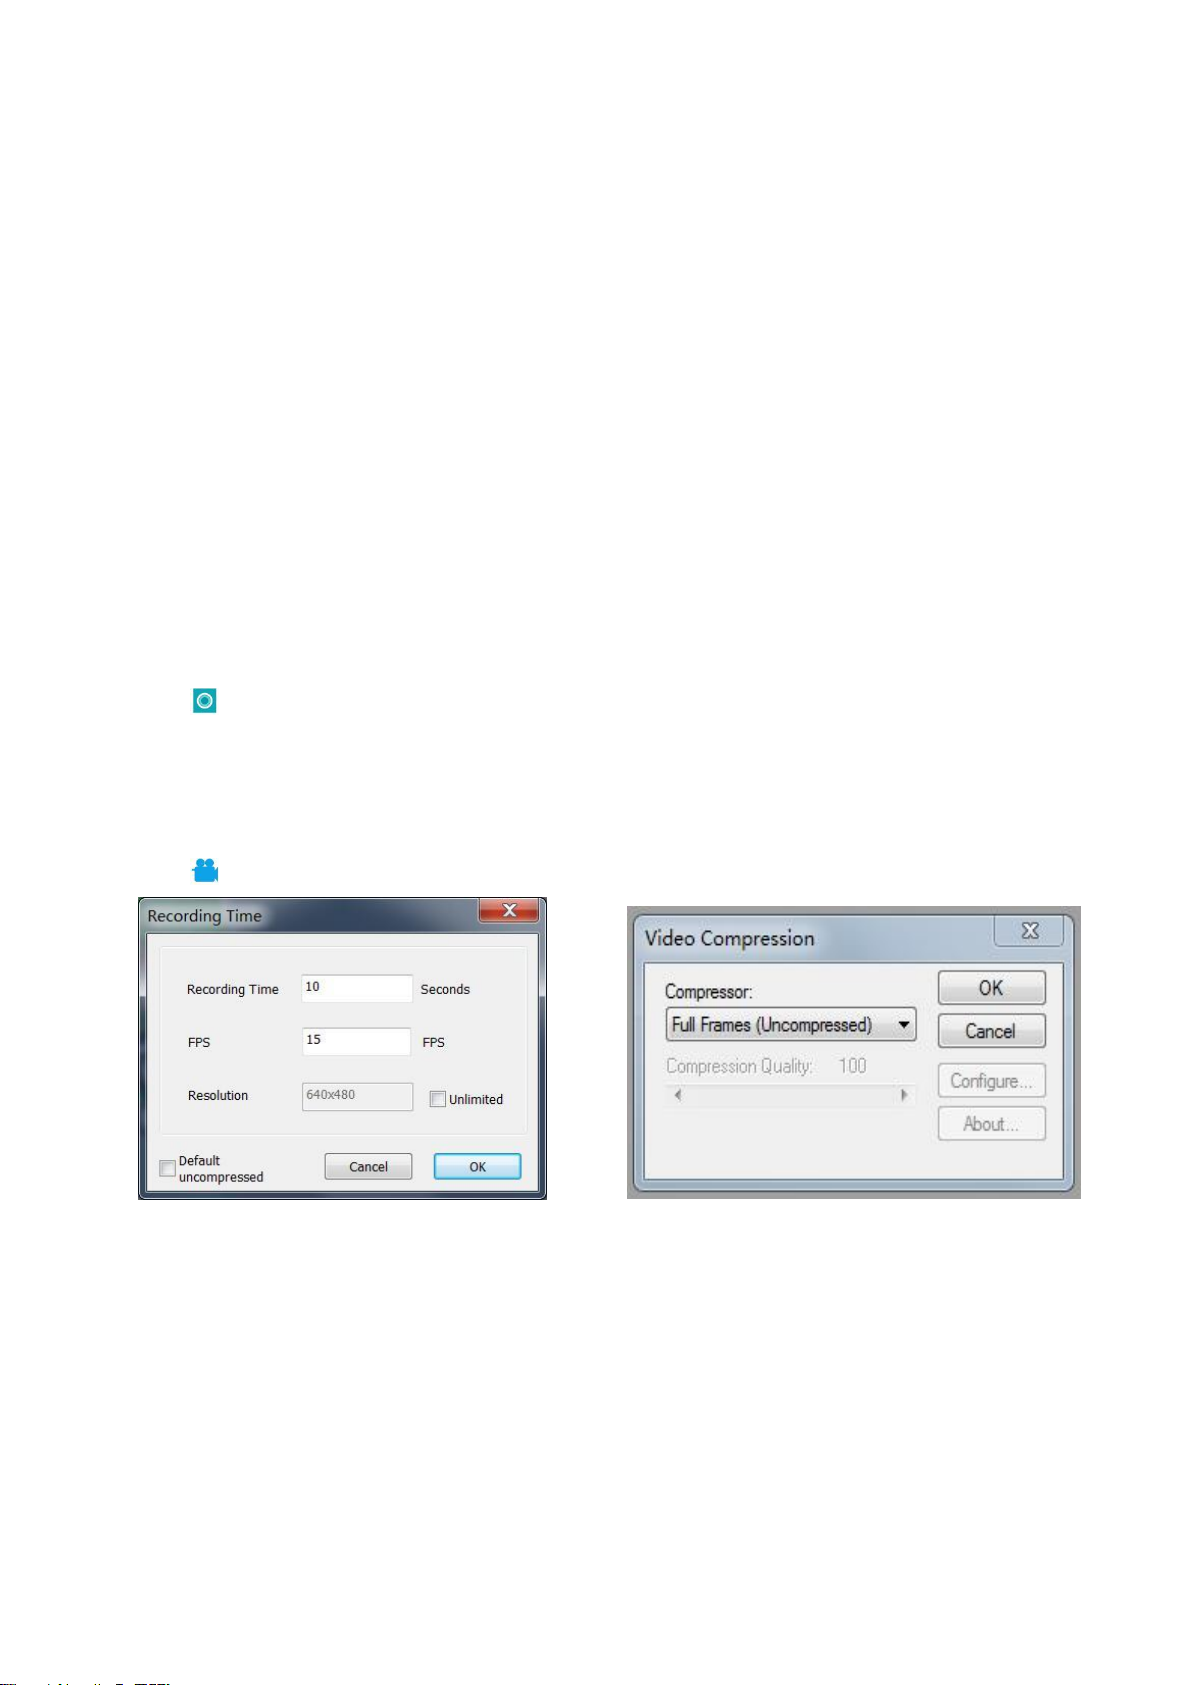
·Recording
1, Choose the size of the view as 640*480 in “File→Video Setting→Video Capture Pin→Output size(S)”
2, Click “ ”, set some other things and start to record.
3, On the top left corner there shows“recording”and a timer. It means it’s recording.
4, Check and change the save path: “File→Save Setting→Path”.
Page 17
16
③WIFI Output (Test function)
*This function is currently a test function, please download and use the following App-Ucam
Dashcam
· Scan the QR code to download the software:
IOS system
· Other ways to install:
*IOS : APP STORE- Search and download ”Ucam Dashcam”
*Android: Google Play STORE- Search and download ”Ucam Dashcam”
Connection steps:
• First, please make sure that there is a memory card inserted in the microscope, otherwise the WIFI
function will not work normally.
• When the device is in standby state, long press the “M” key to enter the video/picture setting menu, then
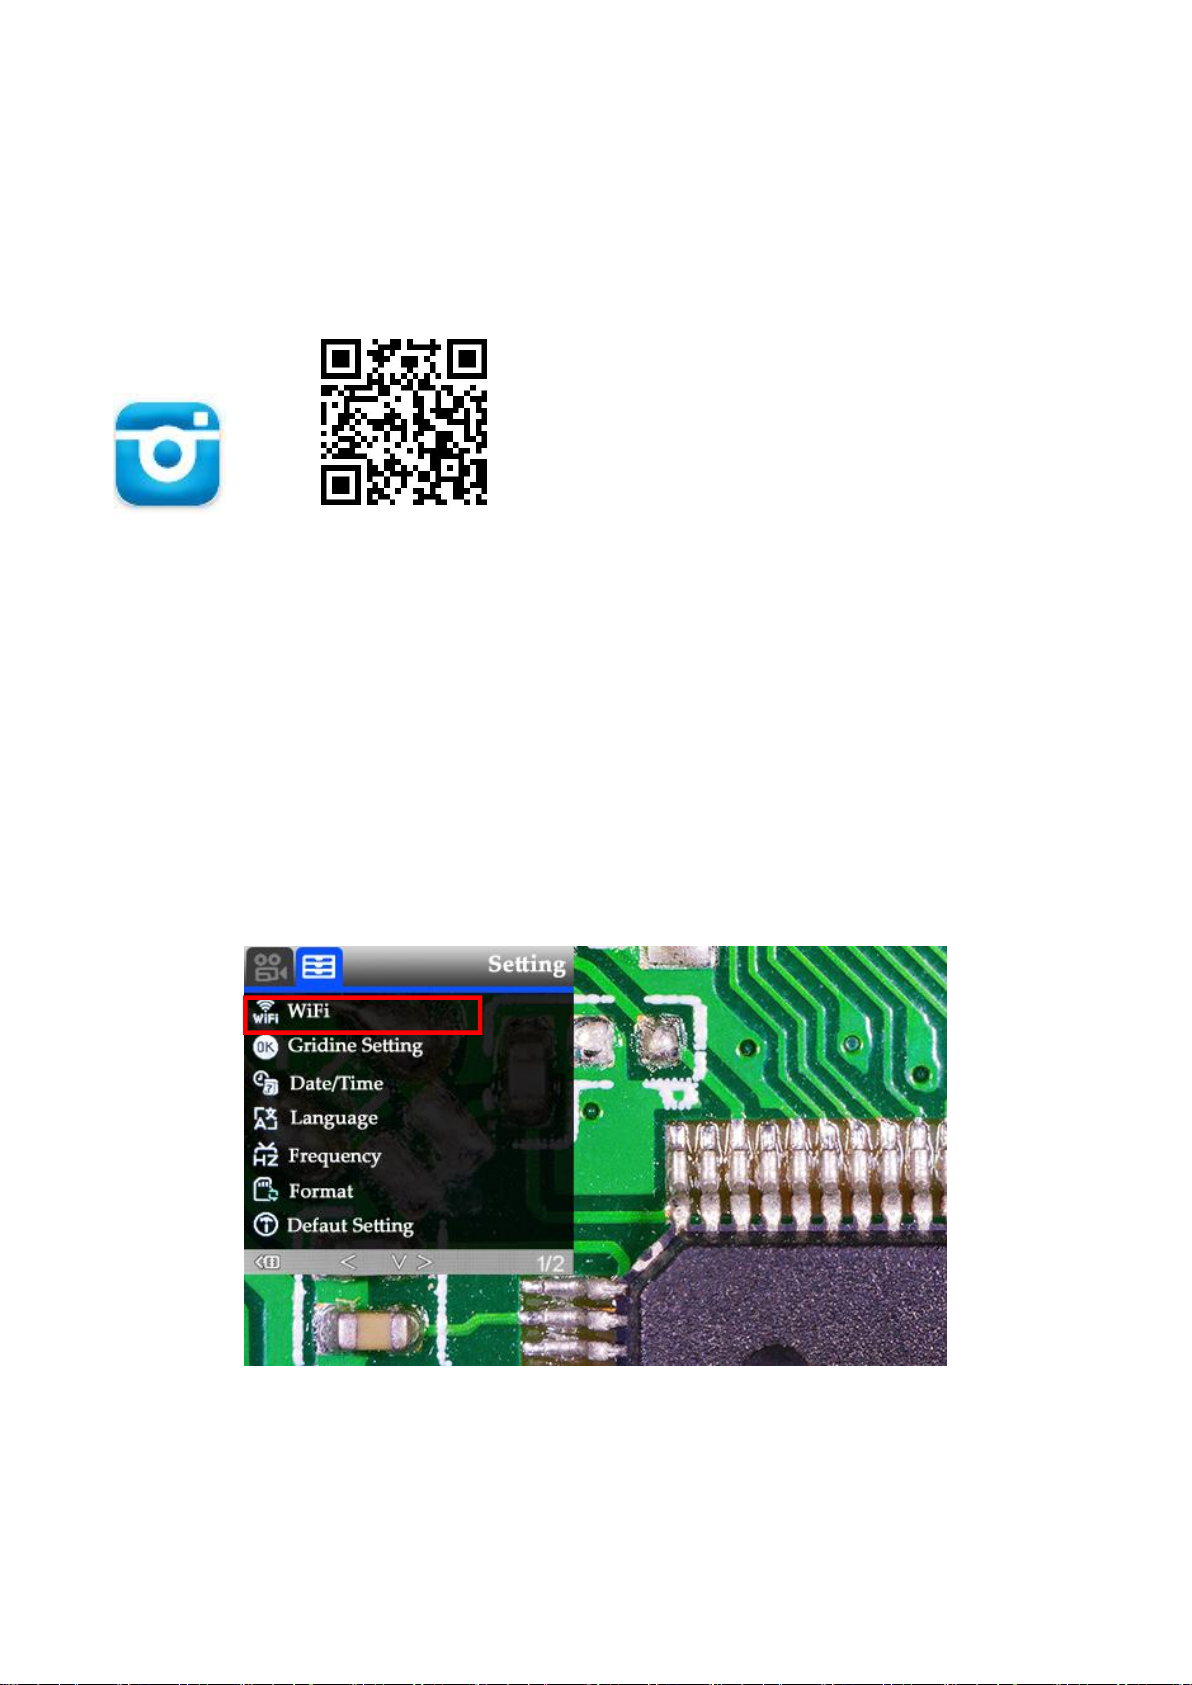
press the “M” key to enter the system settings.
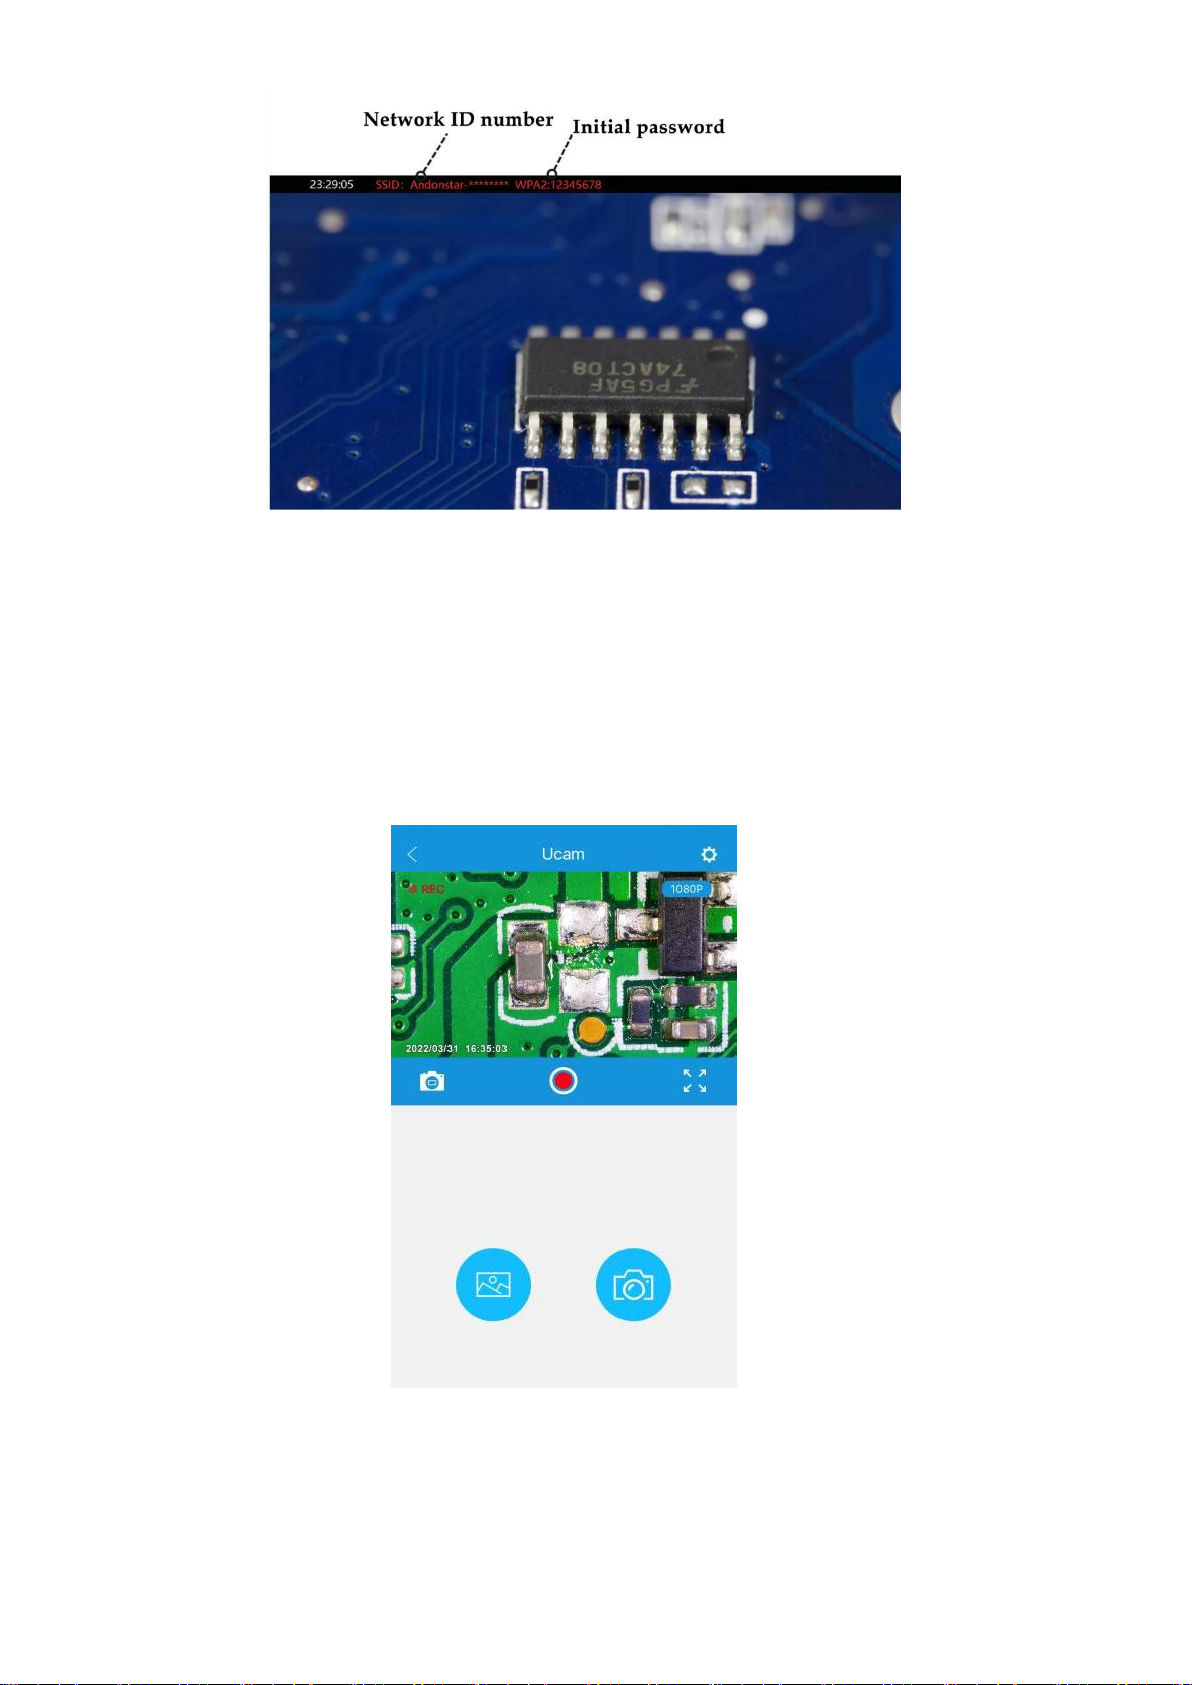
• Select "WIFI" → press the "OK" key → select "On" to turn on WIFI (as shown in P16), after the WIFI is
turned on, the microscope's network identification number and the initial WIFI password: 12345678 will
appear on the top of the display screen. (as shown in P17).
(P16: Turn on WIFI)
Page 18
17
P17:WiFi ID & password
(
)
• Turn on WIFI setting on the cell phone or tablet, connect the corresponding microscope WIFI
Andonstar-********). If connected successfully, the font "Connect" will be displayed in red on the screen.
(
• Open the software Ucam, click "Please connect DVR", and you will see the synchronous display of the
microscope screen (as shown in P18). When it is turned on, the software will automatically start recording.
If you want to take a picture, please click the camera button in the lower right corner. If you want to stop
recording, please click the red recording button to end the recording.
(P18: Ucam images)
* The recorded videos and photos will be saved in the host memory card and will not be automatically saved
in the local album of the phone. If you need to save it locally on your phone, please check the album record click "Edit" in the upper right corner - download.
Page 19

18
Safety and Maintenance
1. Please keep the device in a clean and dry environment, away from oil, water, gas and other materials that
may cause corrosion. The product contains tiny parts and is not edible, please operate under the guidance of
guardians or teachers to avoid accidental ingestion.
2. When the image quality is poor, clean the lens with a dry, soft cloth.
3. Do not press hard or hit the display with sharp objects. To clean dust from the screen surface or case, wipe
with a dry and soft cloth. Never spray water or cleaners directly on the display.
FAQ
1. Why can't turn on the microscope normally?
Please check the circuit and power supply according to the installation instructions.
2. Why can't I get a clear image?
Please adjust the LED light, object distance, and refocus. If you still can’t get a clear image, please wipe the
lens gently with a clean cotton cloth etc.
3. Why can't I save the settings?
After all settings are completed, long press the power button to shut down the device. The settings will not
be saved if the power is turned off by the power cable or if the power is cut off directly.
4. Why is there a message of crash, memory card error or memory card full after inserting the TF
card?
After inserting the TF card, please format it first. It is recommended to use a high-quality TF card with class
10 and above specifications.
5. Why is the missing file prompted during the installation of measurement software or program
startup?
Please make sure that Microsoft.Net Framework 4.0 and Microsoft Visual C++ 2010 runtime have been
completely installed in the system.
6. The program has been installed correctly and can be opened and run normally, but why can't I
measure in the software
Please make sure the hardware is connected correctly, the camera option is shown on the display, and the
“OK” button has been pressed.
If the image still cannot be displayed normally, please enter the device manager of the operating system,
delete the USB video device, unplug and replug the USB cable, and then click refresh to make the system
?
recognize it again. The video device name after successful identification is "USB Camera".
7. Why is the measurement error so large?
If you want to get more accurate results, you need to use a higher precision calibration scale for calibration,
and keep the same focal length and magnification as the calibration as much as possible when measuring.
Errors in the calibration scale, using the wrong calibration value, changing focal length and magnification,
wrong measurement method, and other factors can affect the accuracy of the measurement.
Page 20
19
8. The measurement software does not display the image or display a black screen?
Warranty Card
User’s name
:
Address
:
Phone number:
Post code:
email:
Model name:
Purchase date:
Fault feedback:
Date:
Fault:
Notice:
Our warranty doesn’t cover:
1
If users can not provide the purchase proof or the Warranty.
2
If users use it in an improper environment or conditions, such as incompatible power supply, hot
and humid environment etc.
3
If the fault caused by accident, oversight, misoperation or natural disasters etc.
4
If the fault caused by people who are not belong to authorized organizations of our company during
repacking, repair, dismantle, Or if users repack, repair or dismantle the device not following our
advice.
5
Out of warranty period.
1) Confirm that the microscope is connected to the computer and select “PC Camera”.
2) Use the USB cable instead of the power cable.
3) Check that the computer privacy setting is on.
4) Check if the system is missing Microsoft. Net Framework 4.0 and Microsoft Visual C++ 2010 runtime.
Try downloading multiple C++ runtimes.
5)Change other USB interface or other computer to test it.
9. Why can't the image be displayed after connecting an HDMI monitor?
Please check the microscope and HDMI cable, or try to replace the monitor.
Warranty Card
 Loading...