

Page 1
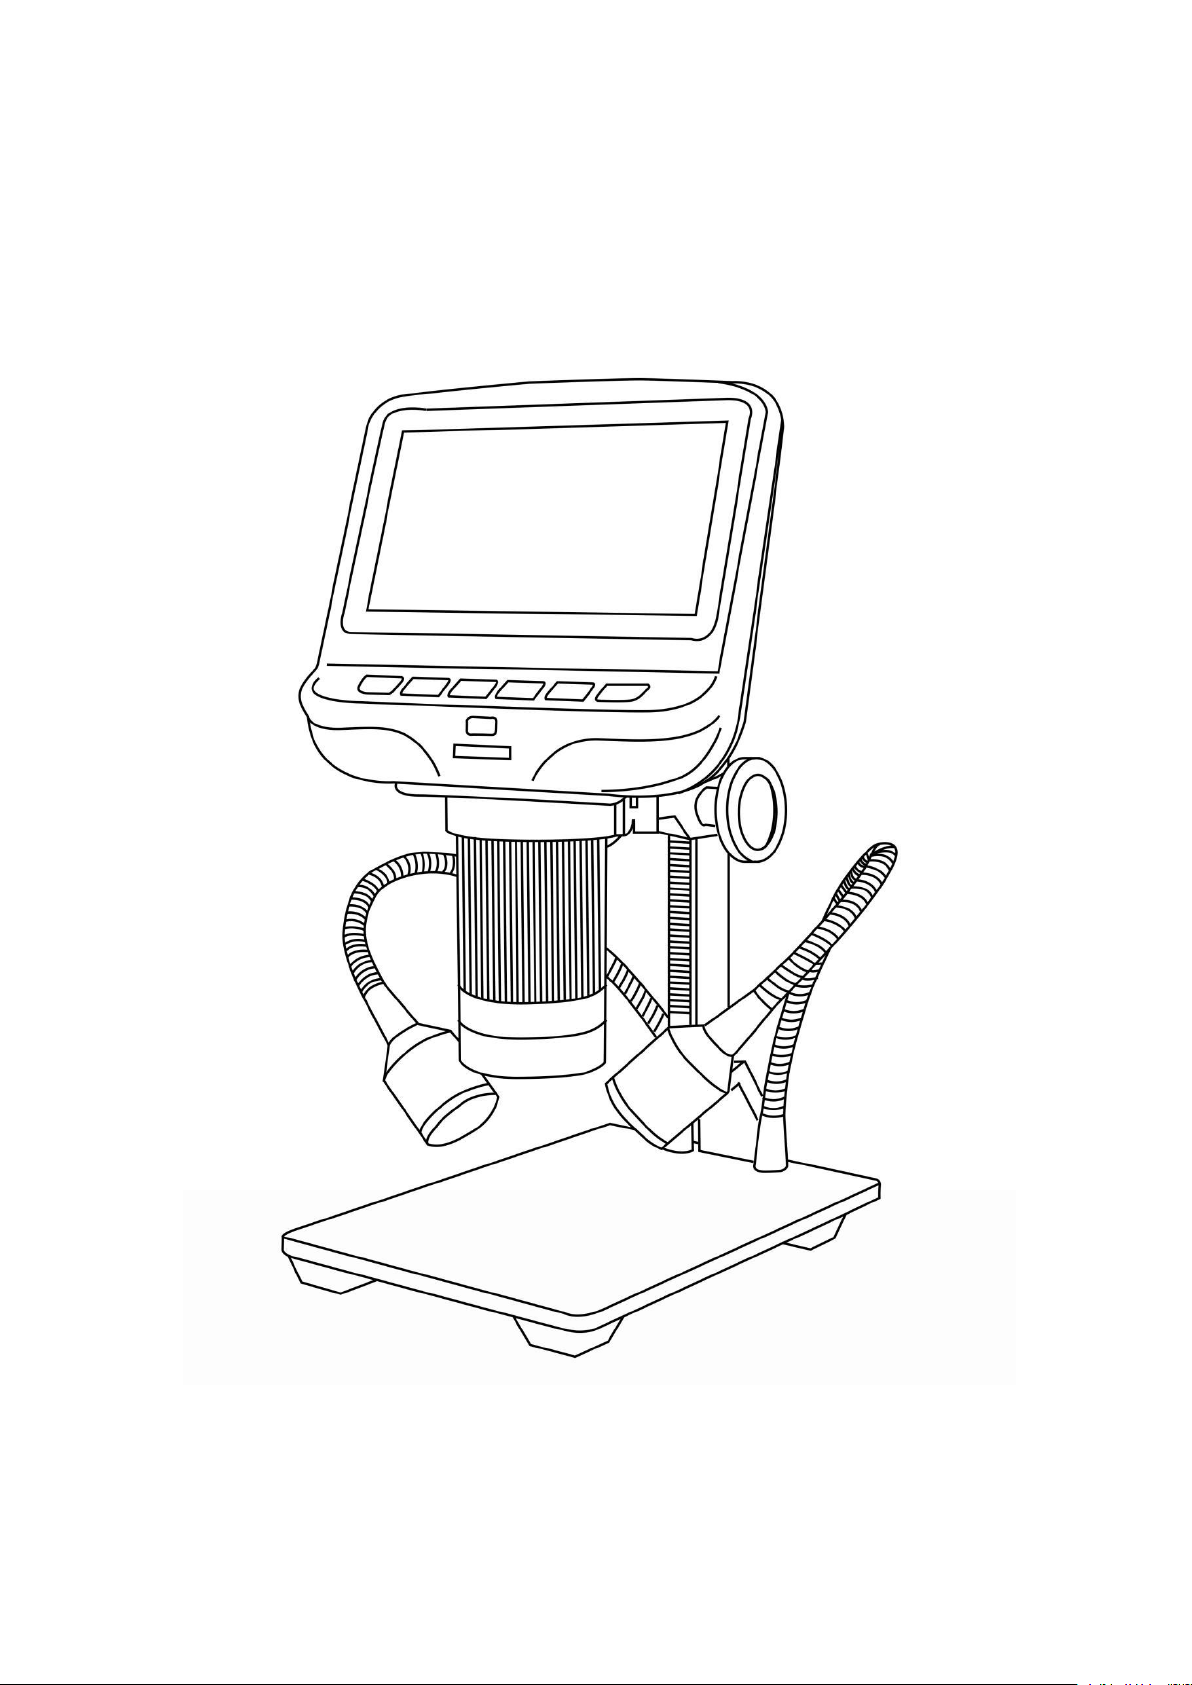
Instructions of Digital Microscope AD106&AD106S
Page 2

Safety and Maintenance
1. This microscope is safe and low-maintenance, as long as common sense is employed.
2. The assembly includes small parts, particularly the thumbscrews used to hold the main device in place. Do
3. The microscope is not intended for field use. It is not waterproof, and should not be exposed to extreme
4. The surface of the lens at the bottom of the main device should be cleaned whenever you start to notice a
5. The rest of the microscope can be cleaned with a damp cloth.
NOT allow unsupervised access by infants or toddlers.
temperatures. Treat as you would any other electronic device, such as laptop or tablet.
degradationin image quality. Use a few drops of lens-cleaning fluid on lens tissues or use a microfiber
cleaning cloth.
List of contents
AD106...................................................................................................................................................................................1
What’s in the box........................................................................................................................................................1
Assembly......................................................................................................................................................................2
Buttons......................................................................................................................................................................... 3
Quick start....................................................................................................................................................................4
AD106S................................................................................................................................................................................6
What’s in the box........................................................................................................................................................6
Assembly......................................................................................................................................................................7
Connect........................................................................................................................................................................8
Buttons......................................................................................................................................................................... 9
Quick start................................................................................................................................................................. 10
Page 3
- 1 -
AD106
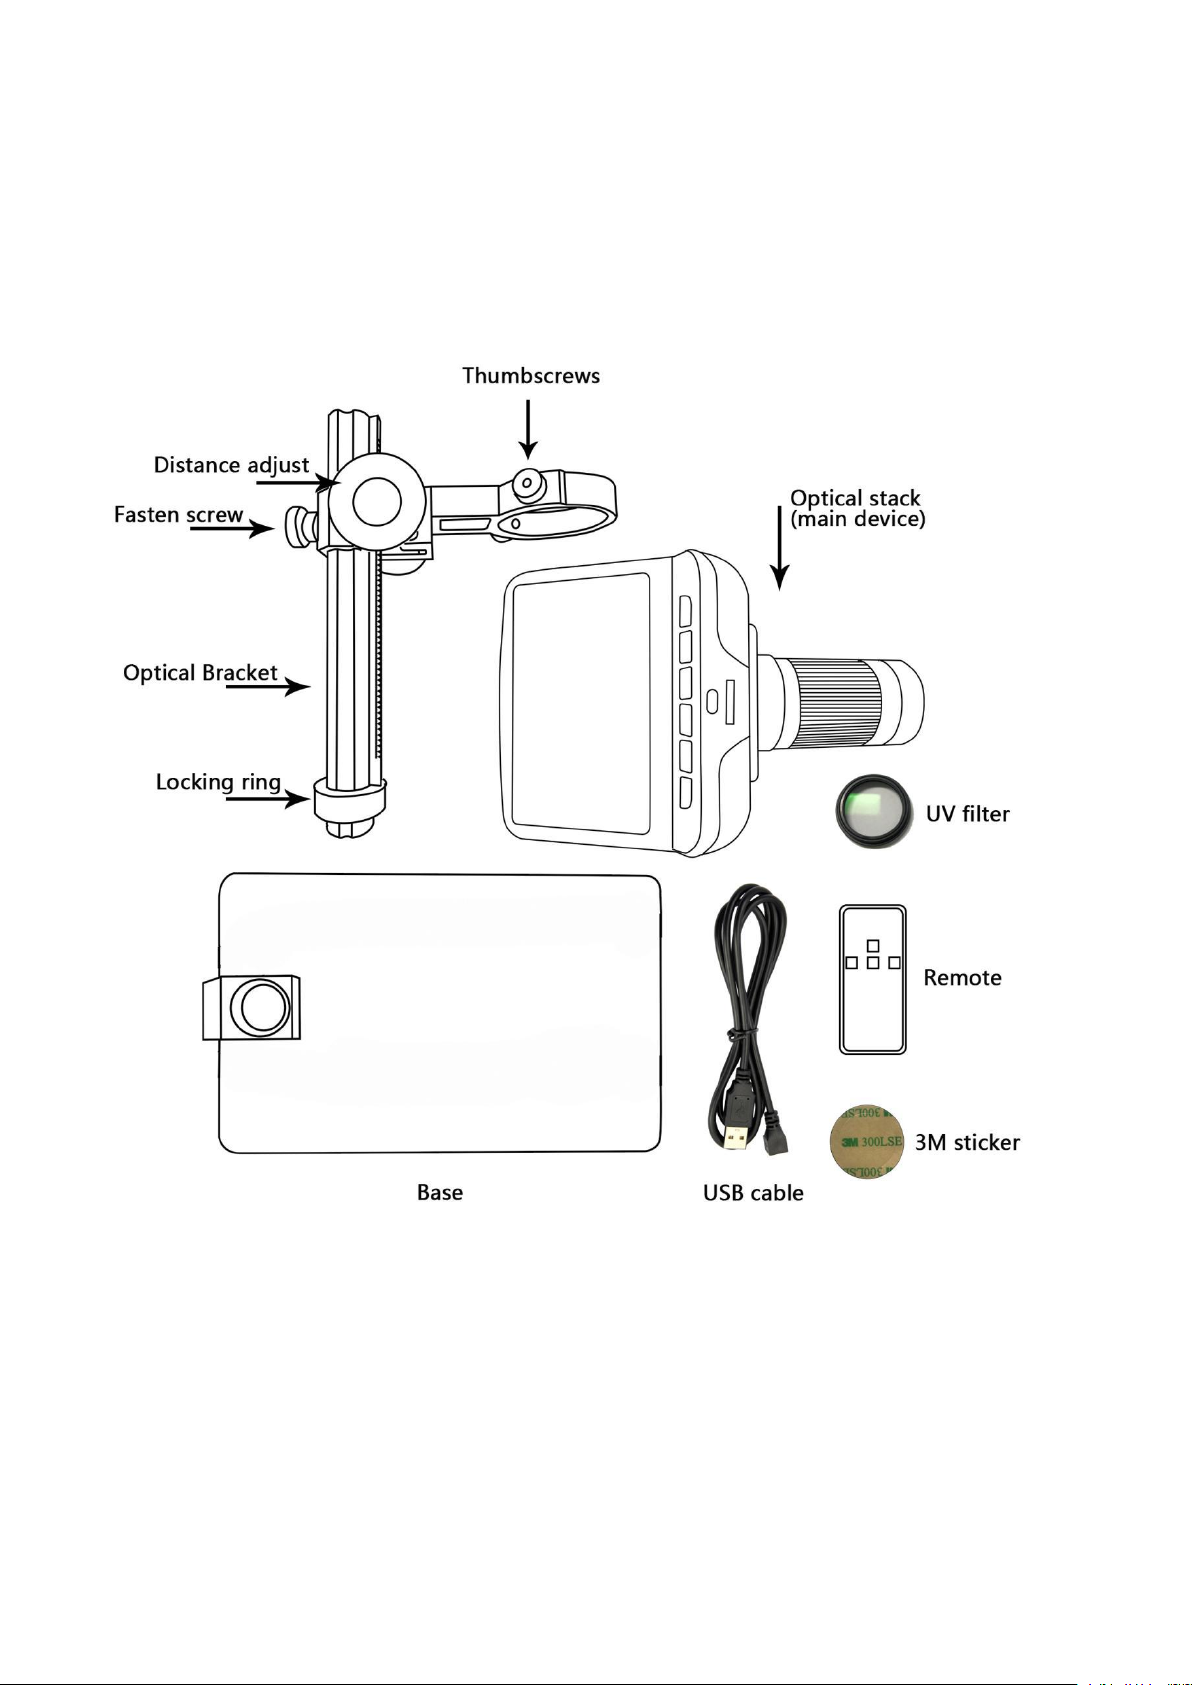
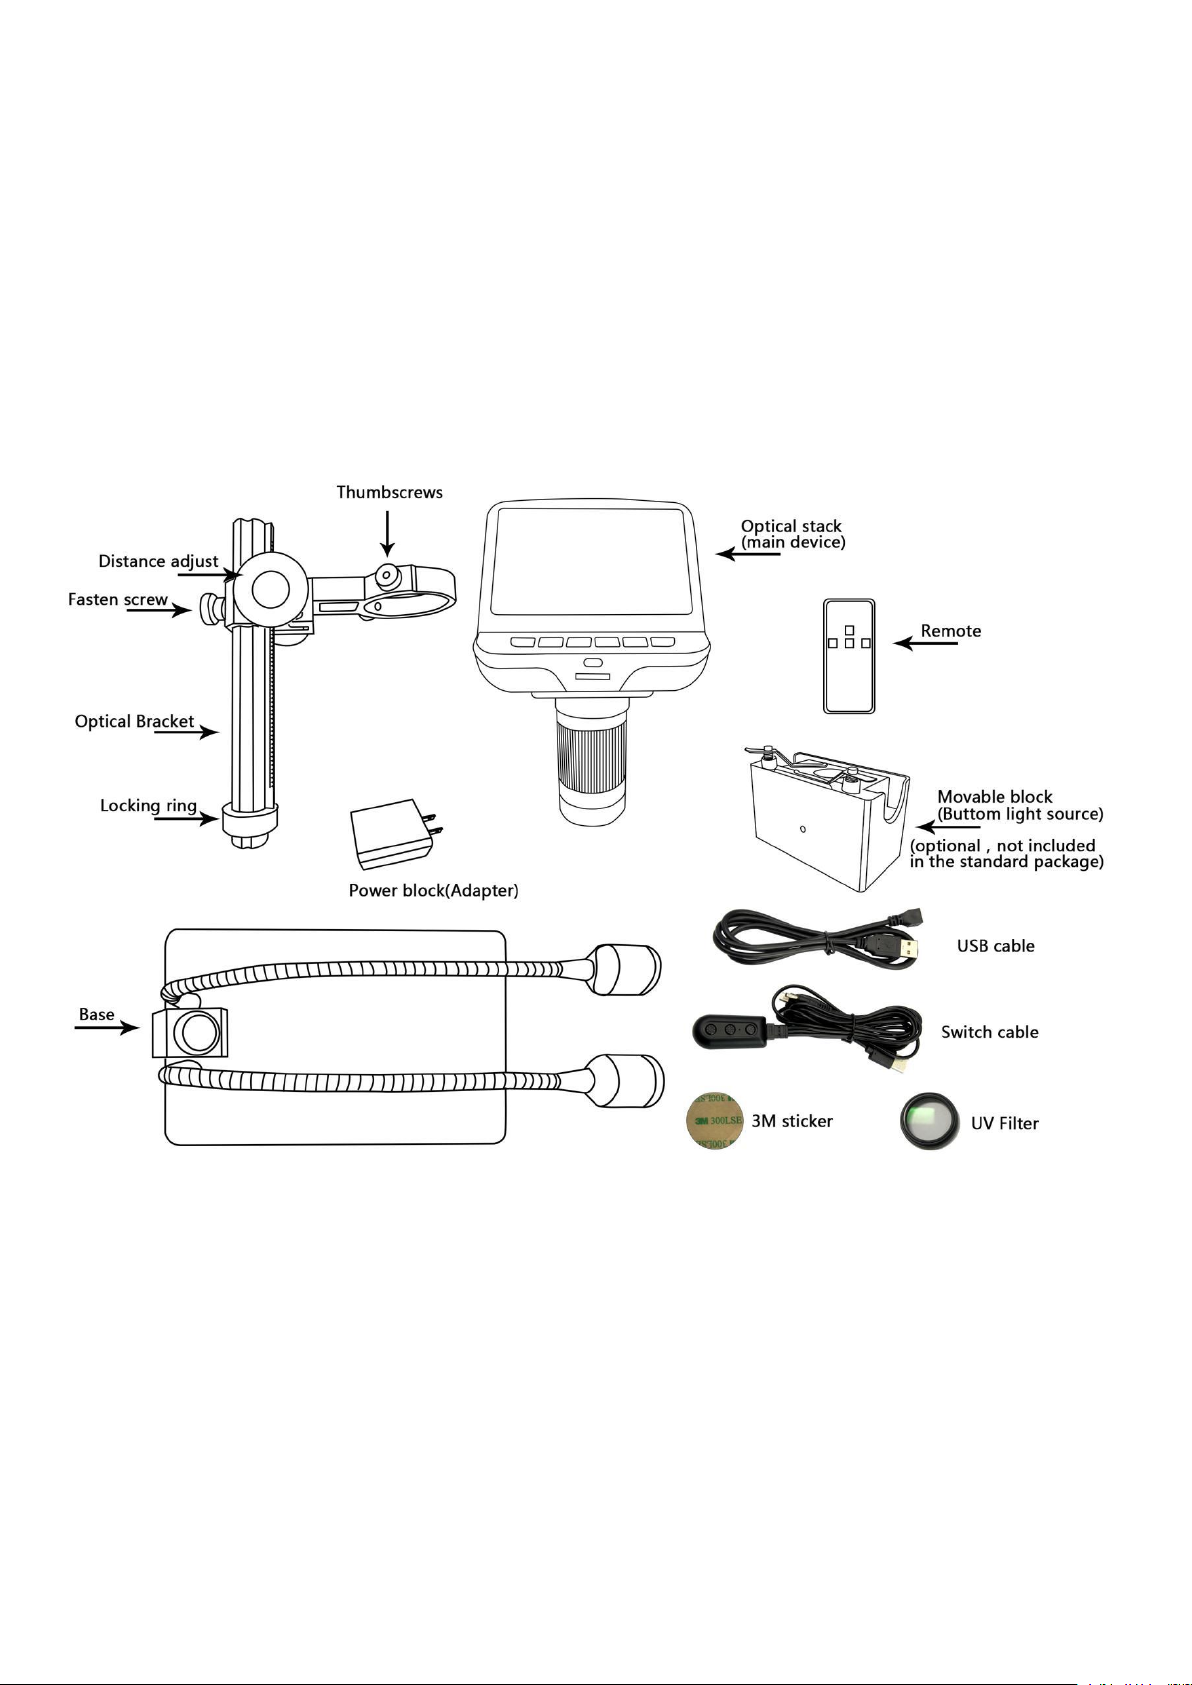
What’s in the box
Page 4
- 2 -
Assembly
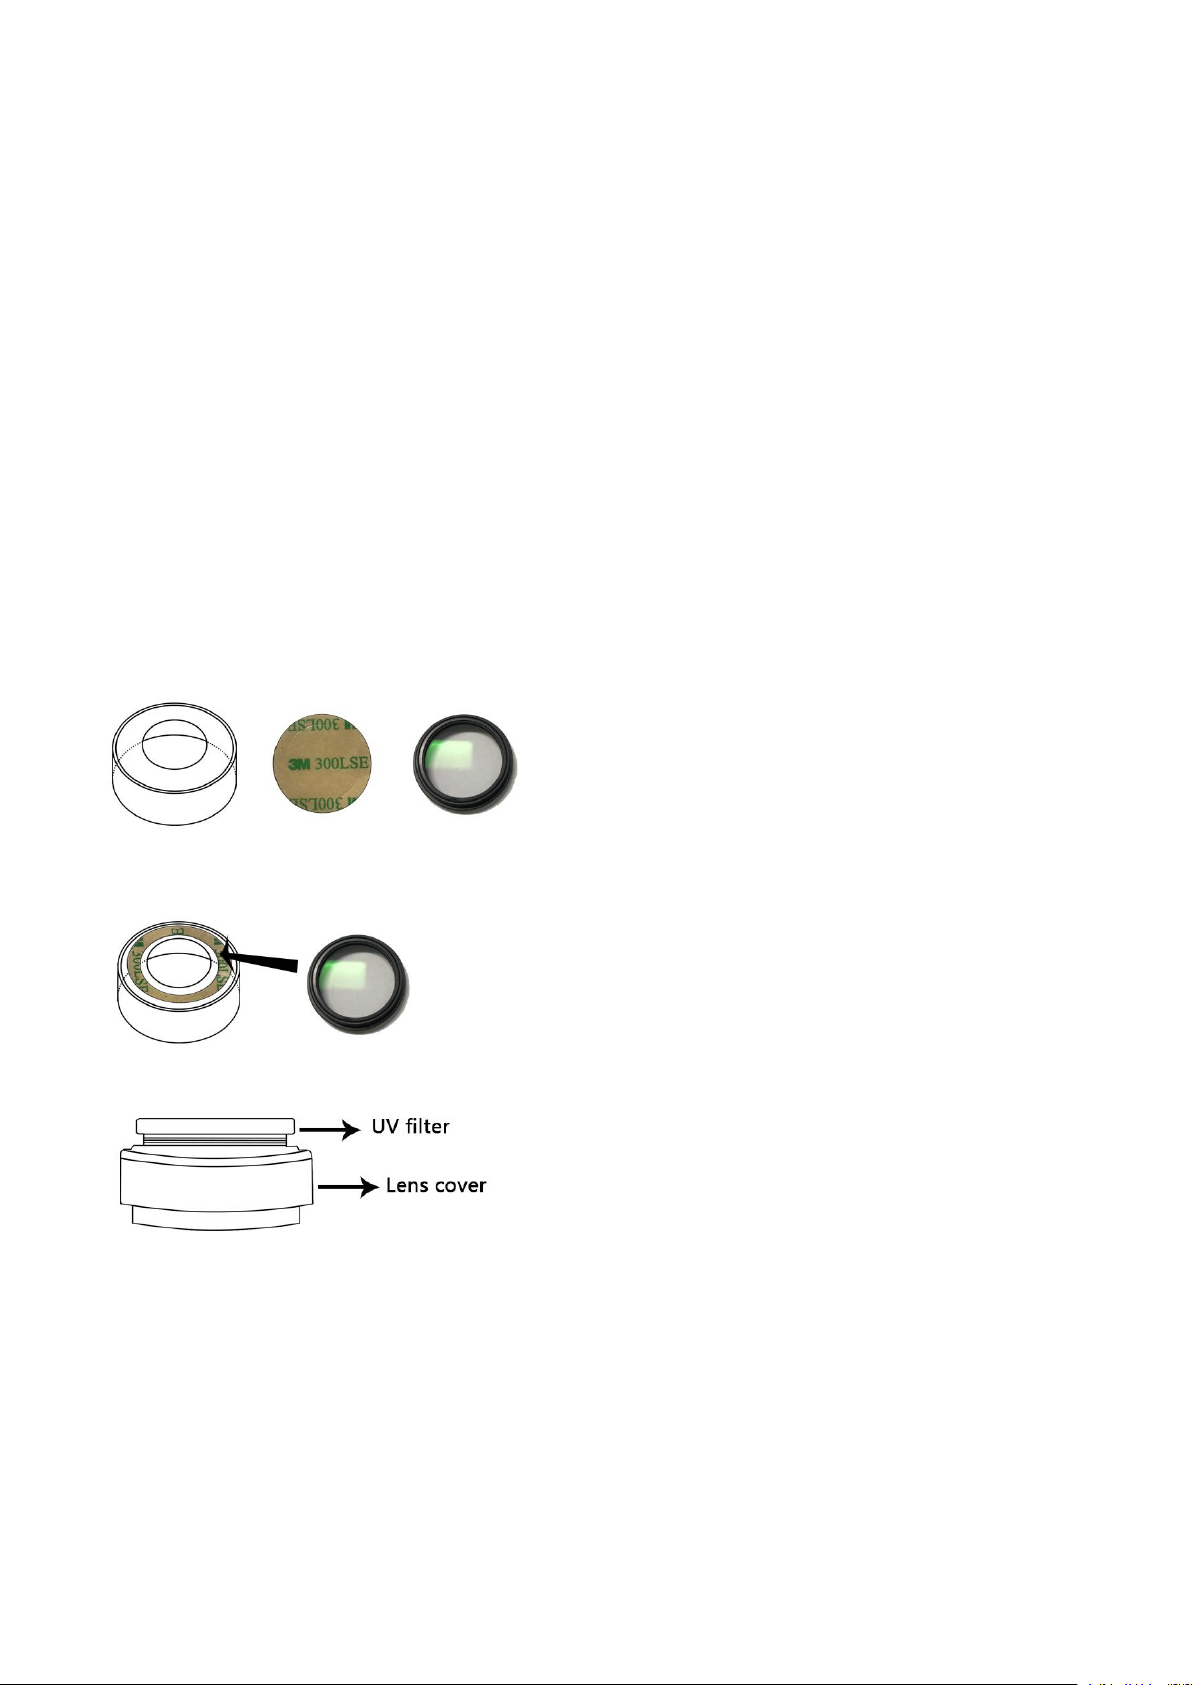
1. Screw the locking ring all the way on to the optical bracket.
2. Screw the optical bracket on to the base. Once you have done so, it is likely
3. Loosen the small thumbscrews on the optical bracket.
4. Slide the optical stack in to the ring of the optical bracket.
5. Tighten the thumbscrews to hold the optical stack
6. Remove the protective film from the display at the top of the optical stack.
the bracket will not be aligned over the base. Unscrew it until it is aligned, and
then turn the locking ring clockwise until it is tight. (After doing so, it will still be possible to hold the base and
turn the bracket if sufficient force is applied, but it will not spin freely.)
in place. If done correctly, you should be able to turn the ridged portion of the optical stack freely while the
rest of it remains in place.
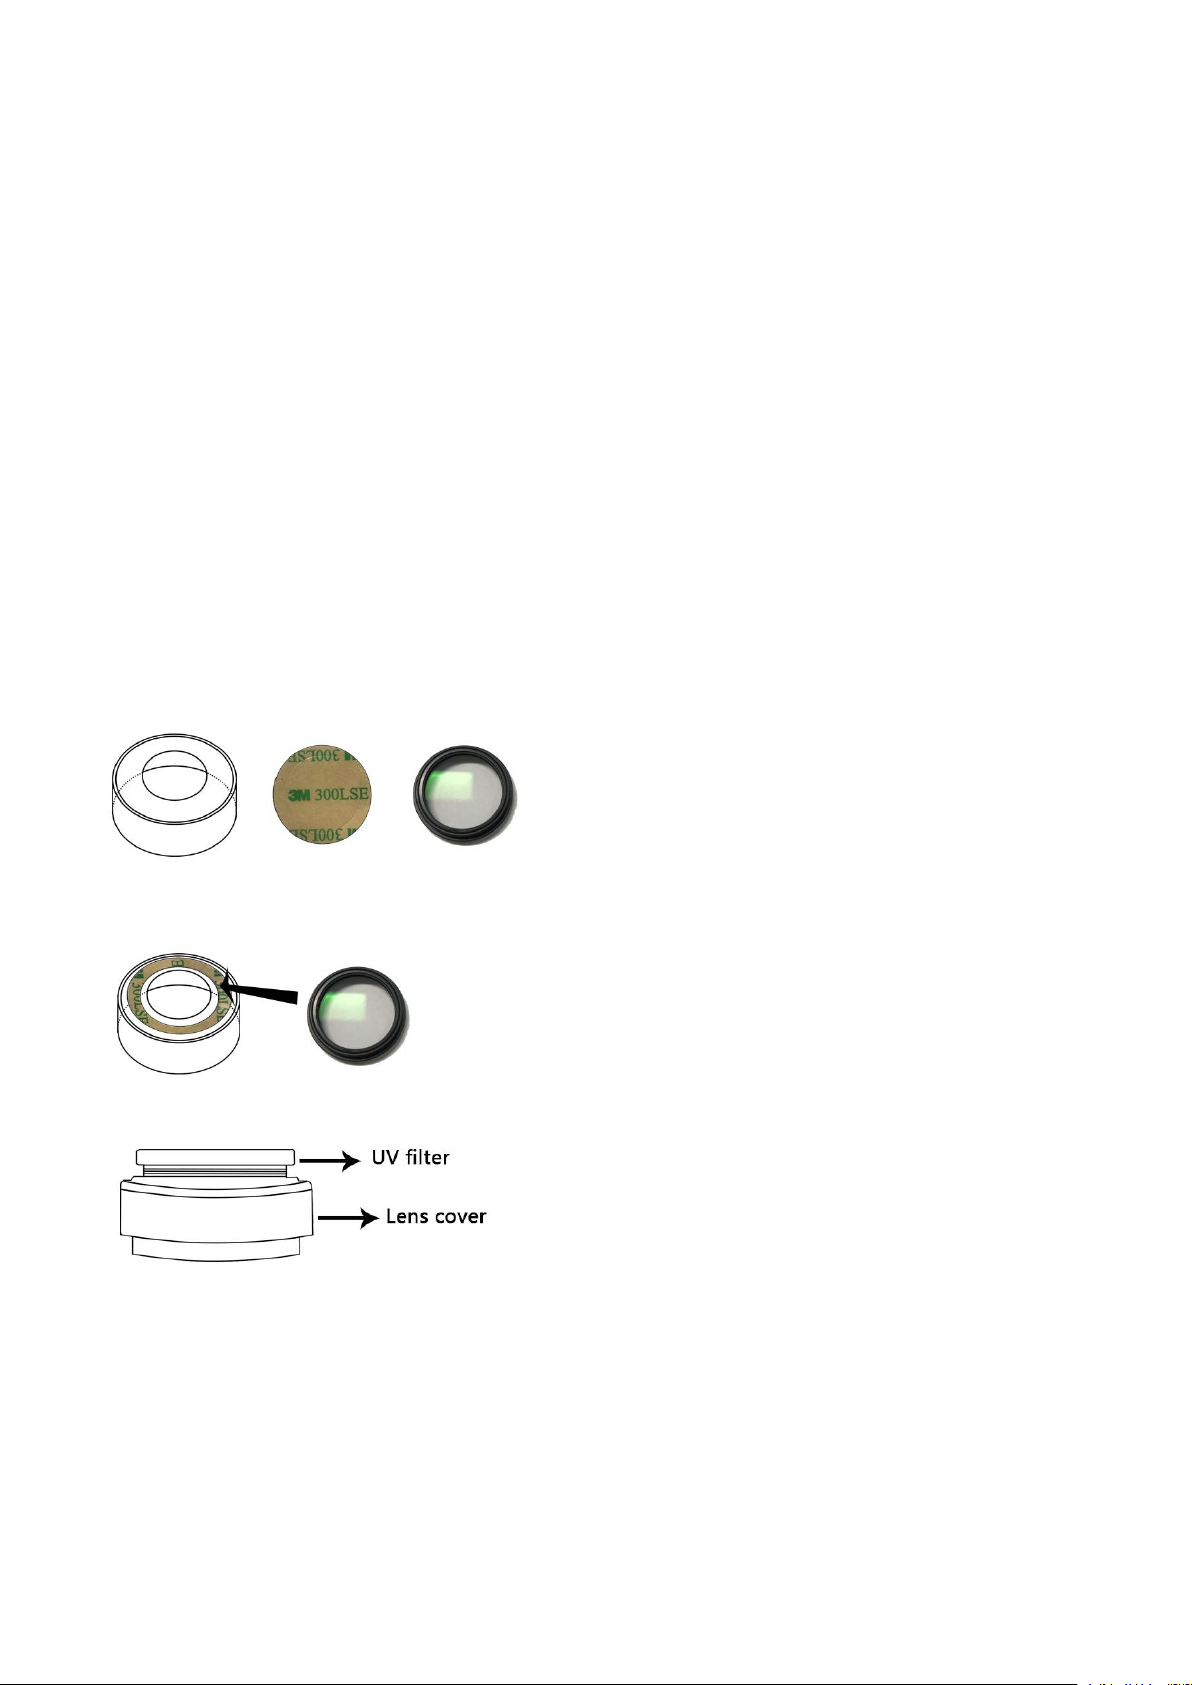
UV filter assembly
Step 1: Materials: Lens cover(half transparent); 3M sticker; UV filter
Step 2: Use 3M sticker to stick the UV filter and the lens cover together. The side which has screw threads on
of the filter should be sticked to the lens cover.
Step 3:
Page 5
- 3 -
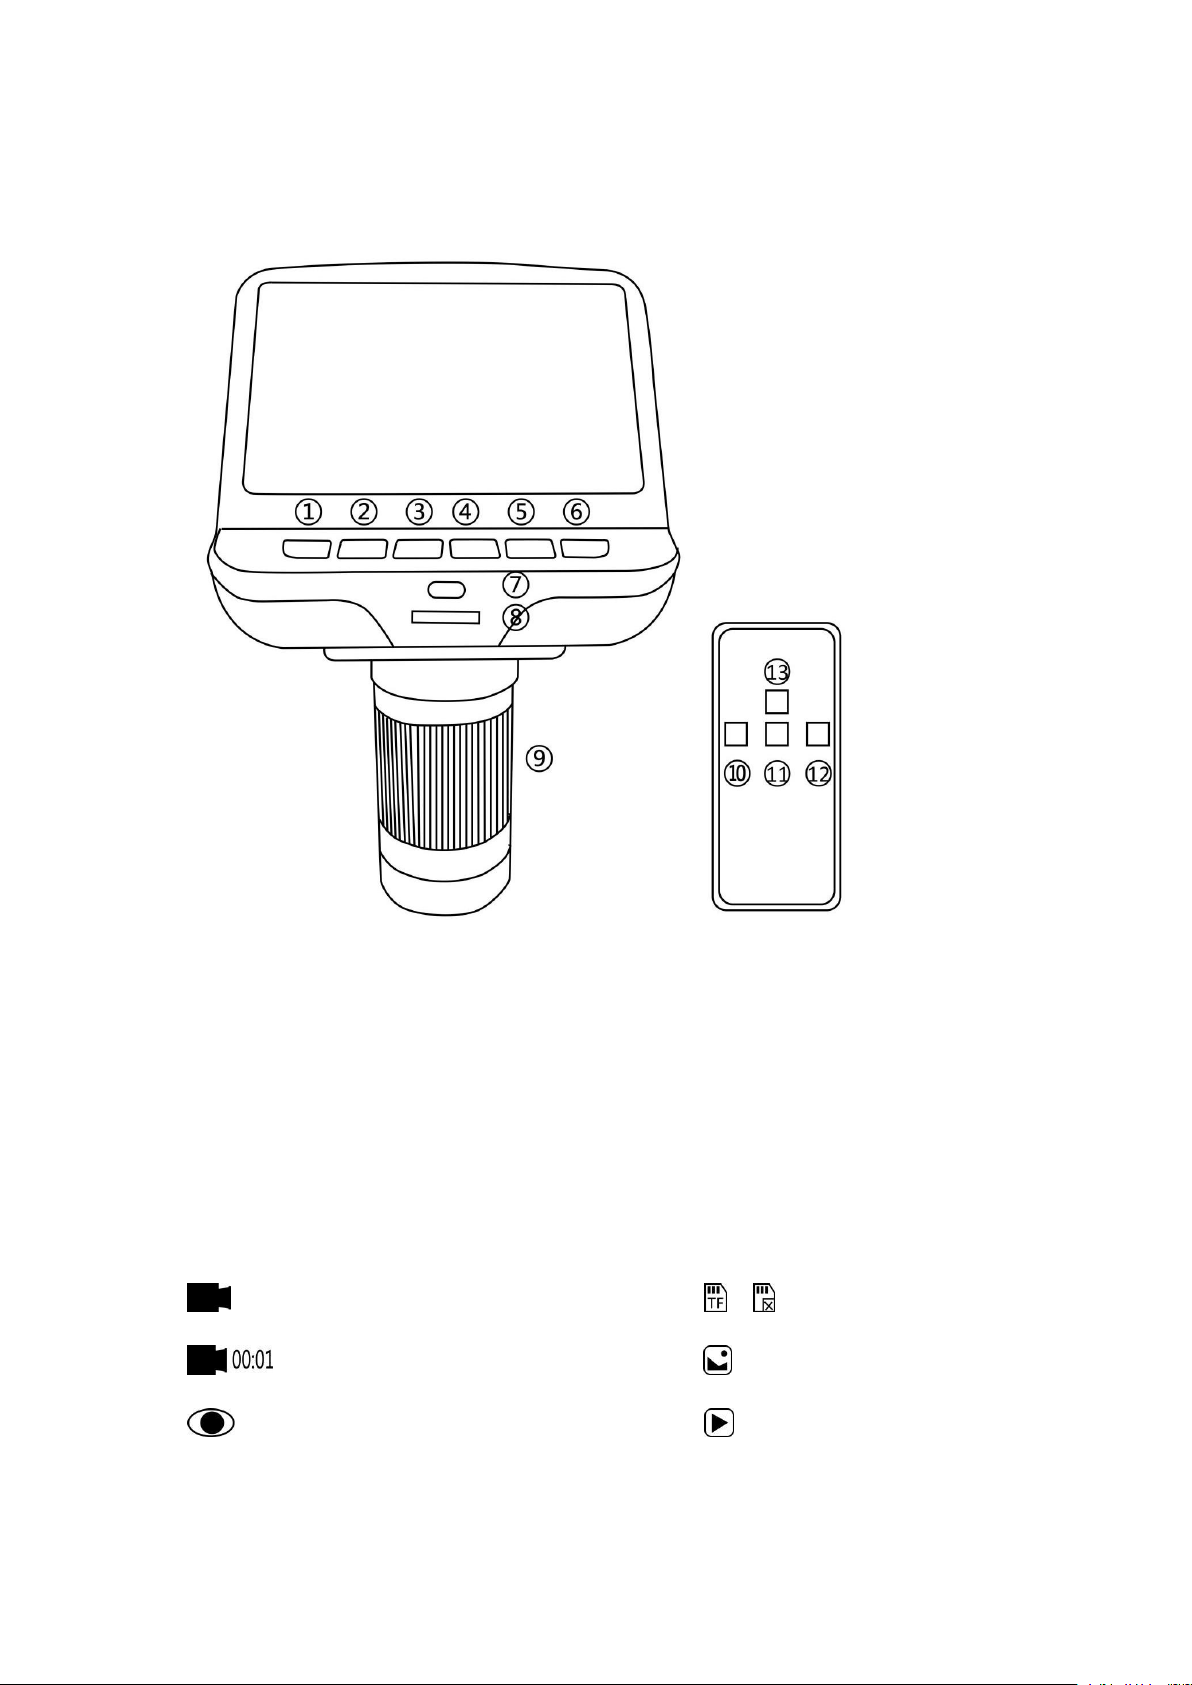
Buttons
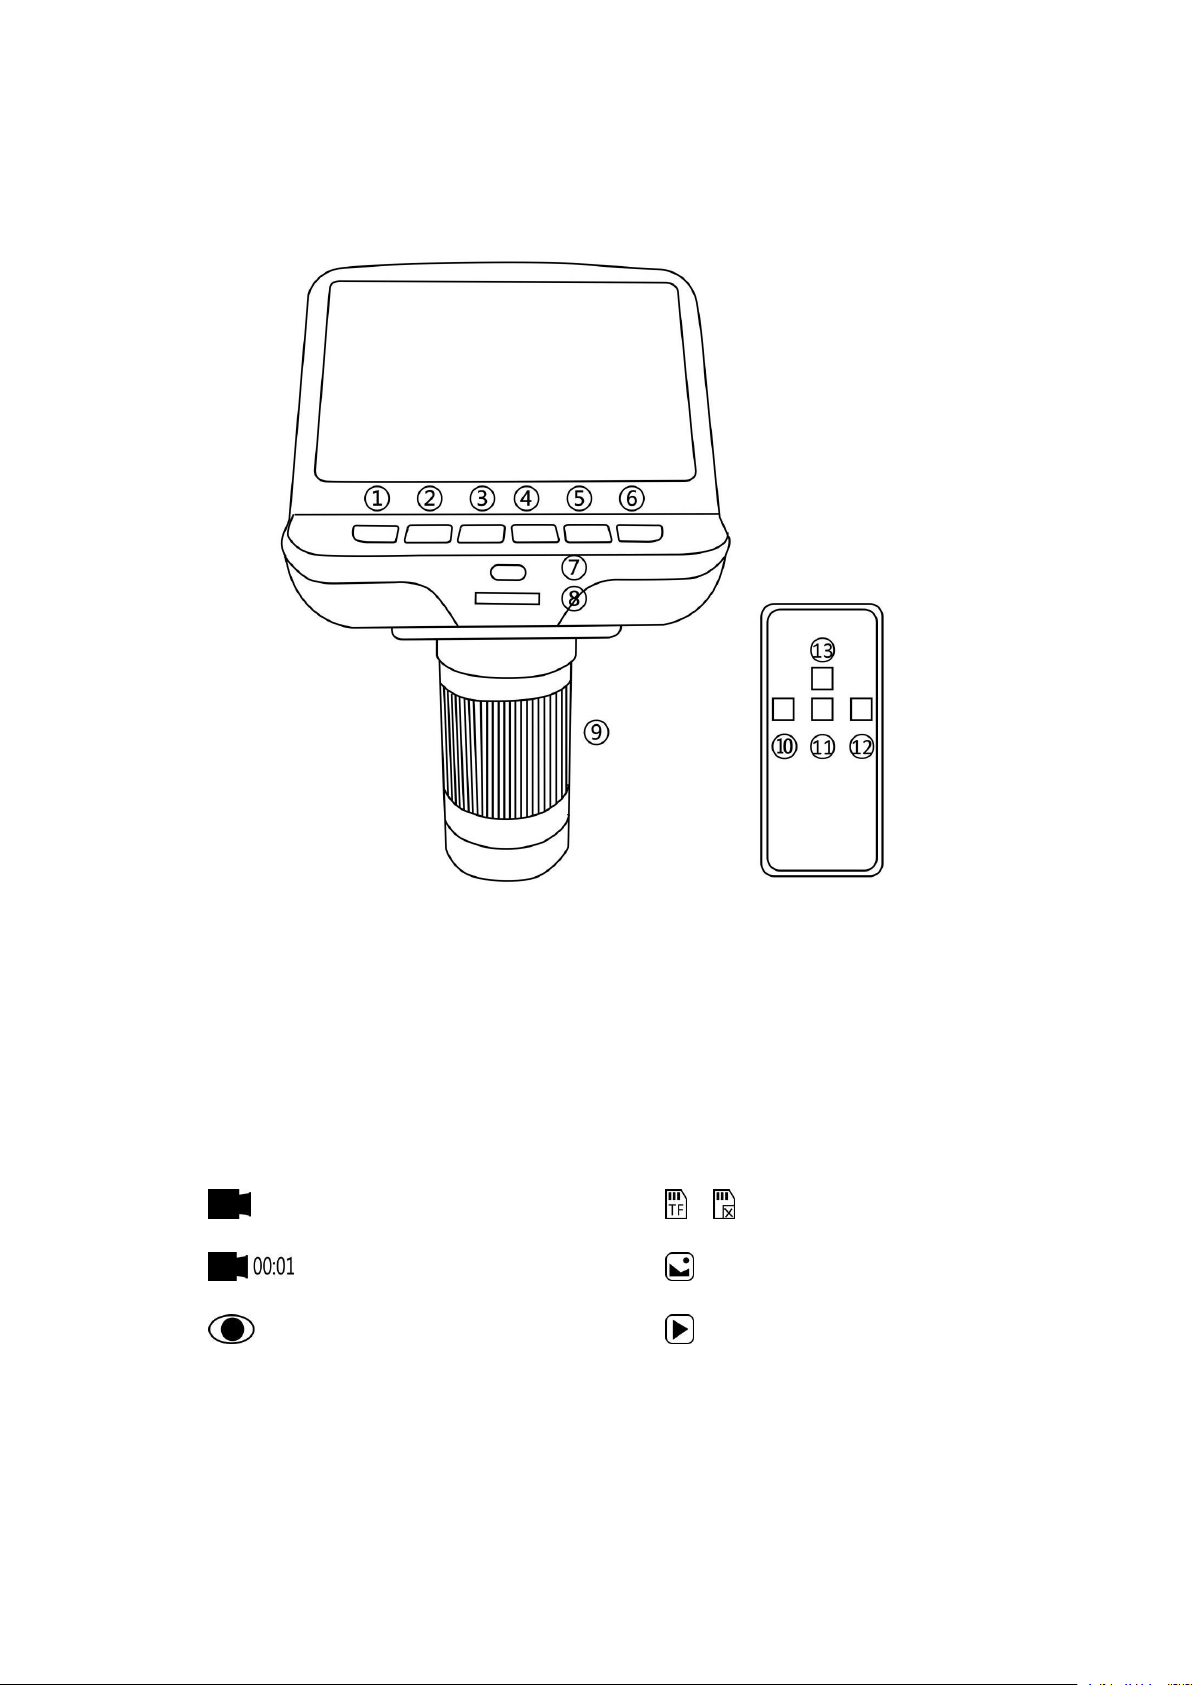
① Power
② Mode
③ Up
④ Down
⑤ OK
⑥Capture (This button
Only can capture pictures
when the microscope is
recording)
⑦ Infrared sensor (when
you are using the remote,
please point the remote to
this so the device would
response)
⑧ LED lights adjustment
⑨ Focus controller
⑩Capture (Only can
capture pictures when the
microscope is recording)
○
11
Down
○
12
OK
○
13
Up
Icons definitions
1. : video mode
2. : The microscope is recording
3. : The microscope is taking a picture
4. / : with/without TF card
5. : Still image mode
6. : review mode
Page 6
- 4 -
Quick start
1. To use the microscope without the need for a computer, then connect the optical stack to the power supply
via the switch cable.
2. Then press and hold the Power button (number ① from the picture “Buttons”) underneath the display until
the display turns on. (It may turn on automatically, and it’s totally fine.)
*Troubleshooting
If the display freezes, locate the “reset ” hole on the back of the monitor. Use a narrow object such as an
unfolded paperclip to depress the button located inside. This resets all settings to their factory values and
restarts the display . It does not erase saved images or video.
Adjusting the Magnification and Focus
Use the large knobs on the optical bracket to raise or lower the optical stack to the desired height. The lower
the height, the greater the magnification, but be careful not to let the bottom of the stack contact the object
being imaged. (Note that you may need to reposition the spotlights as you move the stack up or down.)
Turn the Focus controller(number ⑨ from the picture “Buttons”) to focus the image.
To increase the digital magnification, press and hold the Up button ( number ③/
○
13
from the picture
“Buttons” ) until the desired digital magnification(up to an additional 4x beyond the optical magnification) is
reached. Use the Down (number ④/
○
11
from the picture “Buttons”) button to decrease the digital
magnification.
Displaying on a PC
Before you connect the microscope to a PC, make sure that you have appropriate software on that PC.
To display images on a PC, attach one end of the provided USB cable to the USB port on the top of the
monitor and the other to the PC. Select “PC camera” on the monitor.
Open your webcam software to view and save images.
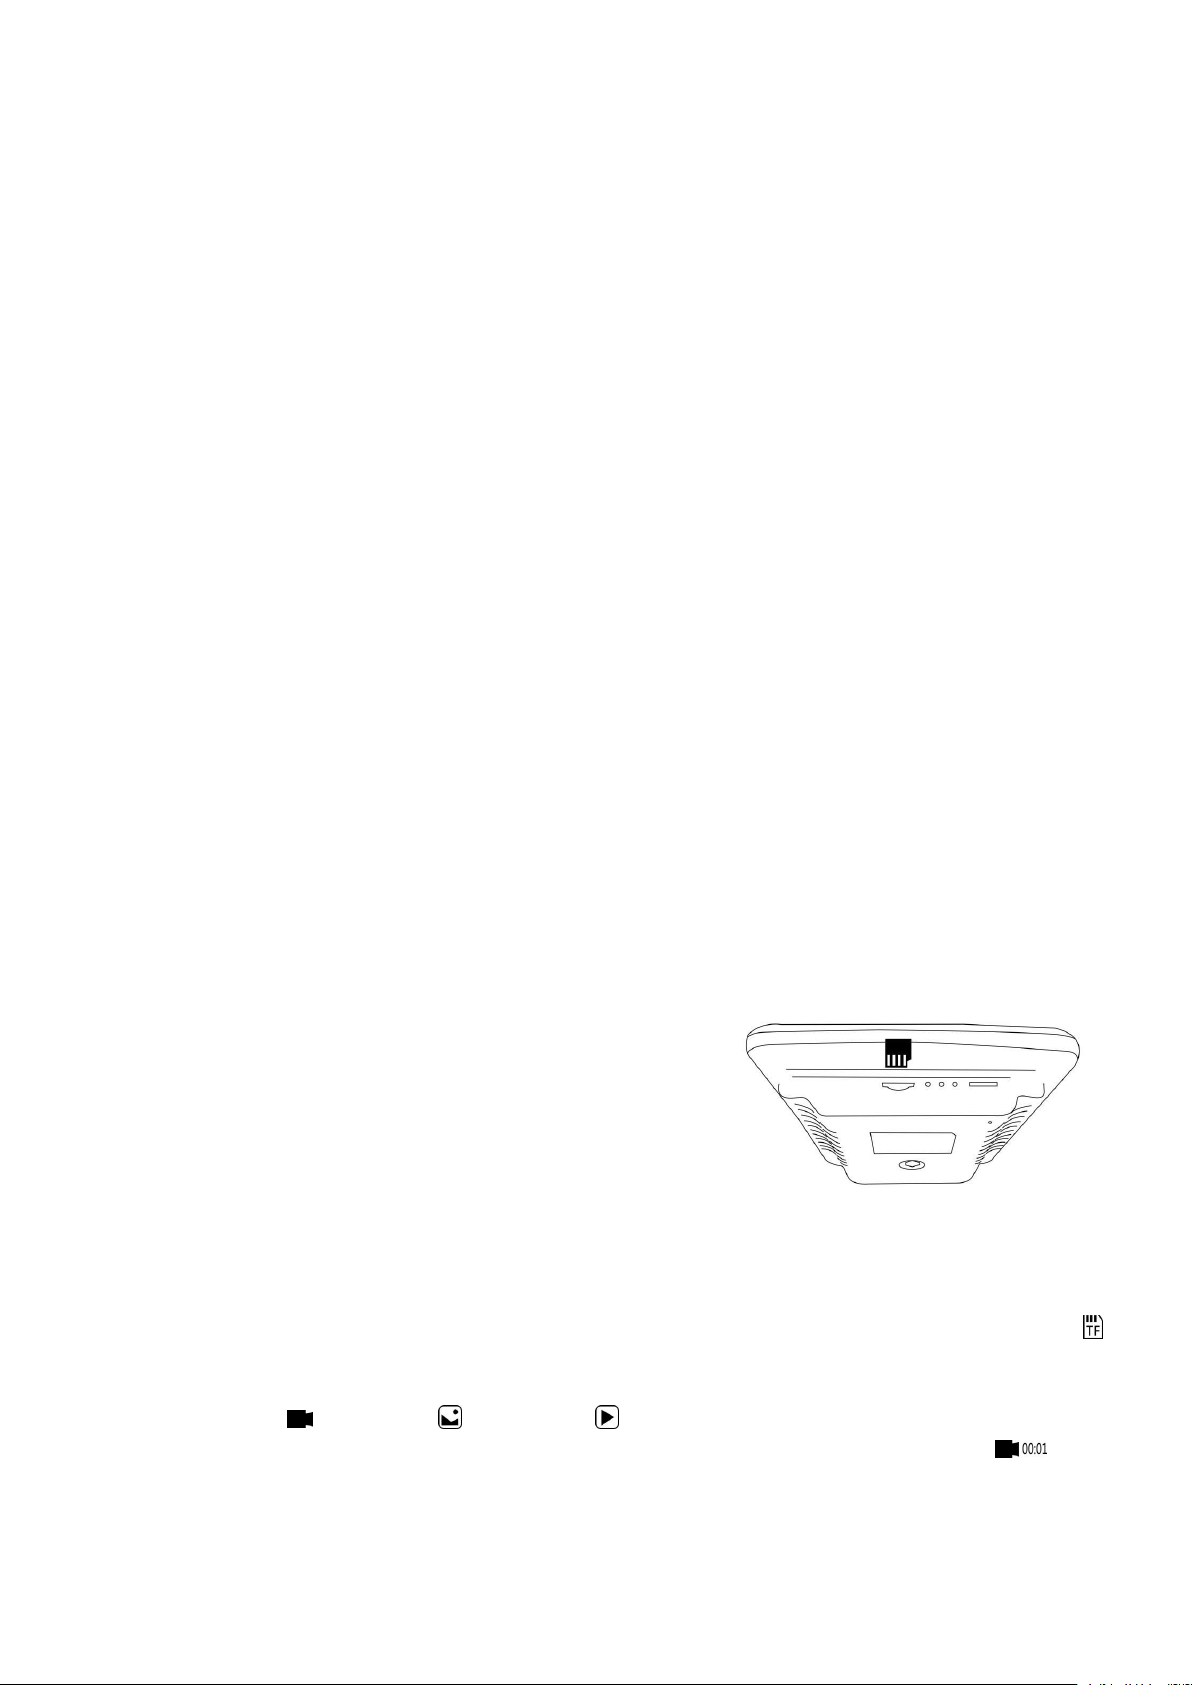
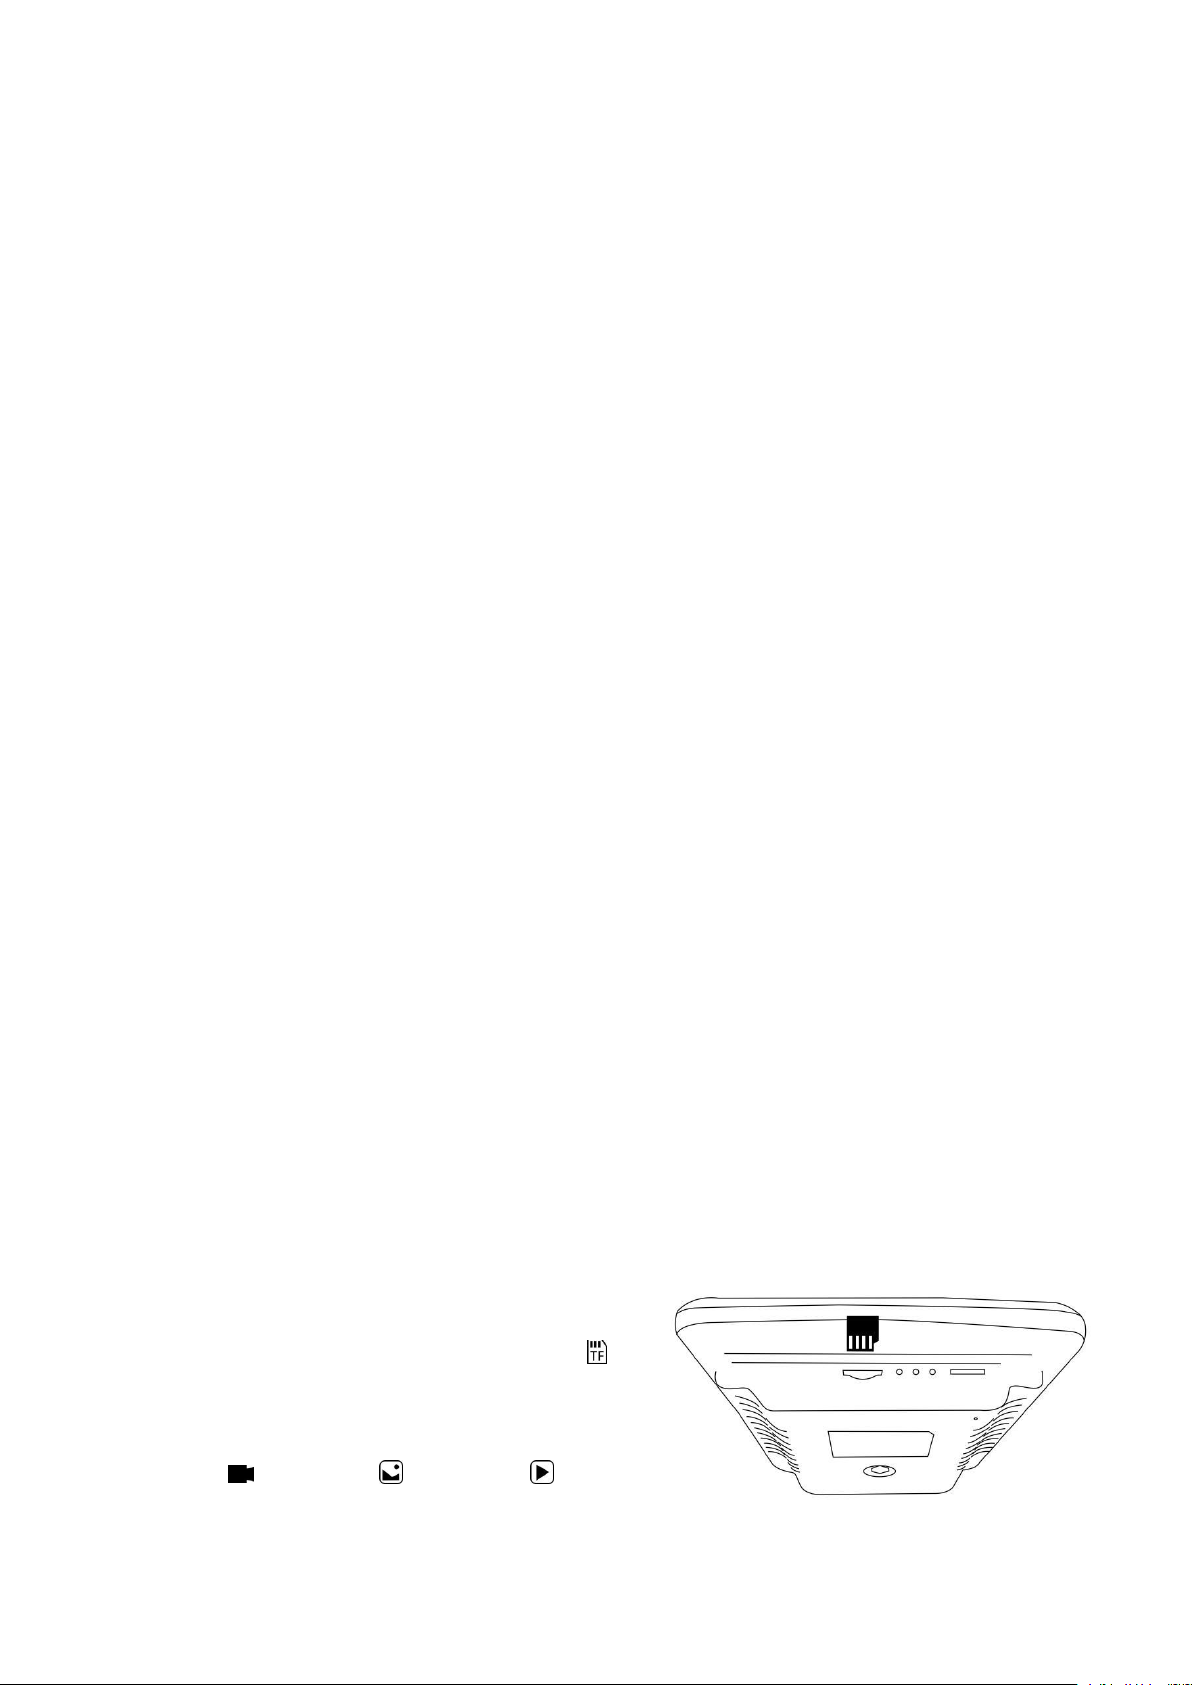
Push it in until you hear a click. (If you don't push it in far enough, it will be ejected.) An icon for the card “ ”
will appear at the top right side of the display.
The Mode button(number ② from the picture “Buttons”, marked with an "M") can be used to cycle between
three modes: video ( ), still image ( ), and review ( ).
In video mode, press the OK button(⑤/
○
12
) briefly to begin recording(the icon becomes to ). The
elapsed time in the recording will appear at the top right. To stop recording, hit the OK button again.
Note: do not hold in the OK button while starting or stopping a recording, just press and release.
Using a MicroSD Card to Save Images
By using a Micro SD card (not provided), you can save images and videos to review later or export to a
computer or other device .
Insert the Micro SD card in to the TF slot on top back of the monitor.
Page 7

- 5 -
In still image mode, press the OK button(⑤/
○
12
) briefly to capture an image. Icon would appear at the
top middle for a second, when an image has been captured.
Press Capture button(number ⑥/⑩) to capture images while the microscope is recording. If you capture the
image in this way, the resolution of the image could be neither 1080P or 720P, depends on which you choose
for the video resolution, FHD or HD.
Reviewing and Managing Images
To review and manage images on the display, use the Mode button to select review
mode. Use the Up and Down buttons to cycle through the pictures and videos.
To play a video, press the OK button. Press the OK button again to pause.
Hit the Mode button again to exit playback.
While reviewing a still image or video, the Menu button can be used to provide additional options. Press the
Menu botton and hold for a while till options show up.
Delete: deleting just the current image/video;
Delete All: deleting all unprotected images and videos;
Lock This: provides protection for the current image/video from deleting accidentally, but not from Format
function;
Unlock This: unlock the current image/video.
Settings
In video mode, press Menu button and hold it for a while until the Menu shows up on the display.
Resolution: There are two options of Resolution: HD(1280*720) or FHD(1920*1080).
Image quality: There are six options: 1M/2M/3M/5M/8M/12M, resolution of them goes from 1280*720P to
4032*3024P.
EV: Exposure compensation, from +2 to -2.
Language setting: English, Chinese, Japanese, Korean, Russian, French, Dutch etc.
Format: When the memory card is full, use this to format the card. Remember to export all files that you need
before formating.
Reset system: Back to the factory values.
Page 8
- 6 -
AD106S
What’s in the box
Page 9
- 7 -
Assembly
1. Bend the spotlights down, so that they are out of the way.
2. Screw the locking ring all the way on to the optical bracket.
3. Screw the optical bracket on to the base. Once you have done so, it is likely
4. Loosen the small thumbscrews on the optical bracket.
5. Slide the optical stack in to the ring of the optical bracket.
6. Tighten the thumbscrews to hold the optical stack
7. Remove the protective film from the display at the top of the optical stack.
the bracket will not be aligned over the base. Unscrew it until it is aligned, and
then turn the locking ring clockwise until it is tight. (After doing so, it will still be possible to hold the base and
turn the bracket if sufficient force is applied, but it will not spin freely.)
in place. If done correctly, you should be able to turn the ridged portion of the optical stack freely while the
rest of it remains in place.
UV filter assembly
Step 1: Materials: Lens cover(half transparent); 3M sticker; UV filter
Step 2: Use 3M sticker to stick the UV filter and the lens cover together. The side which has screw threads on
of the filter should be sticked to the lens cover.
Step 3:
Page 10
- 8 -
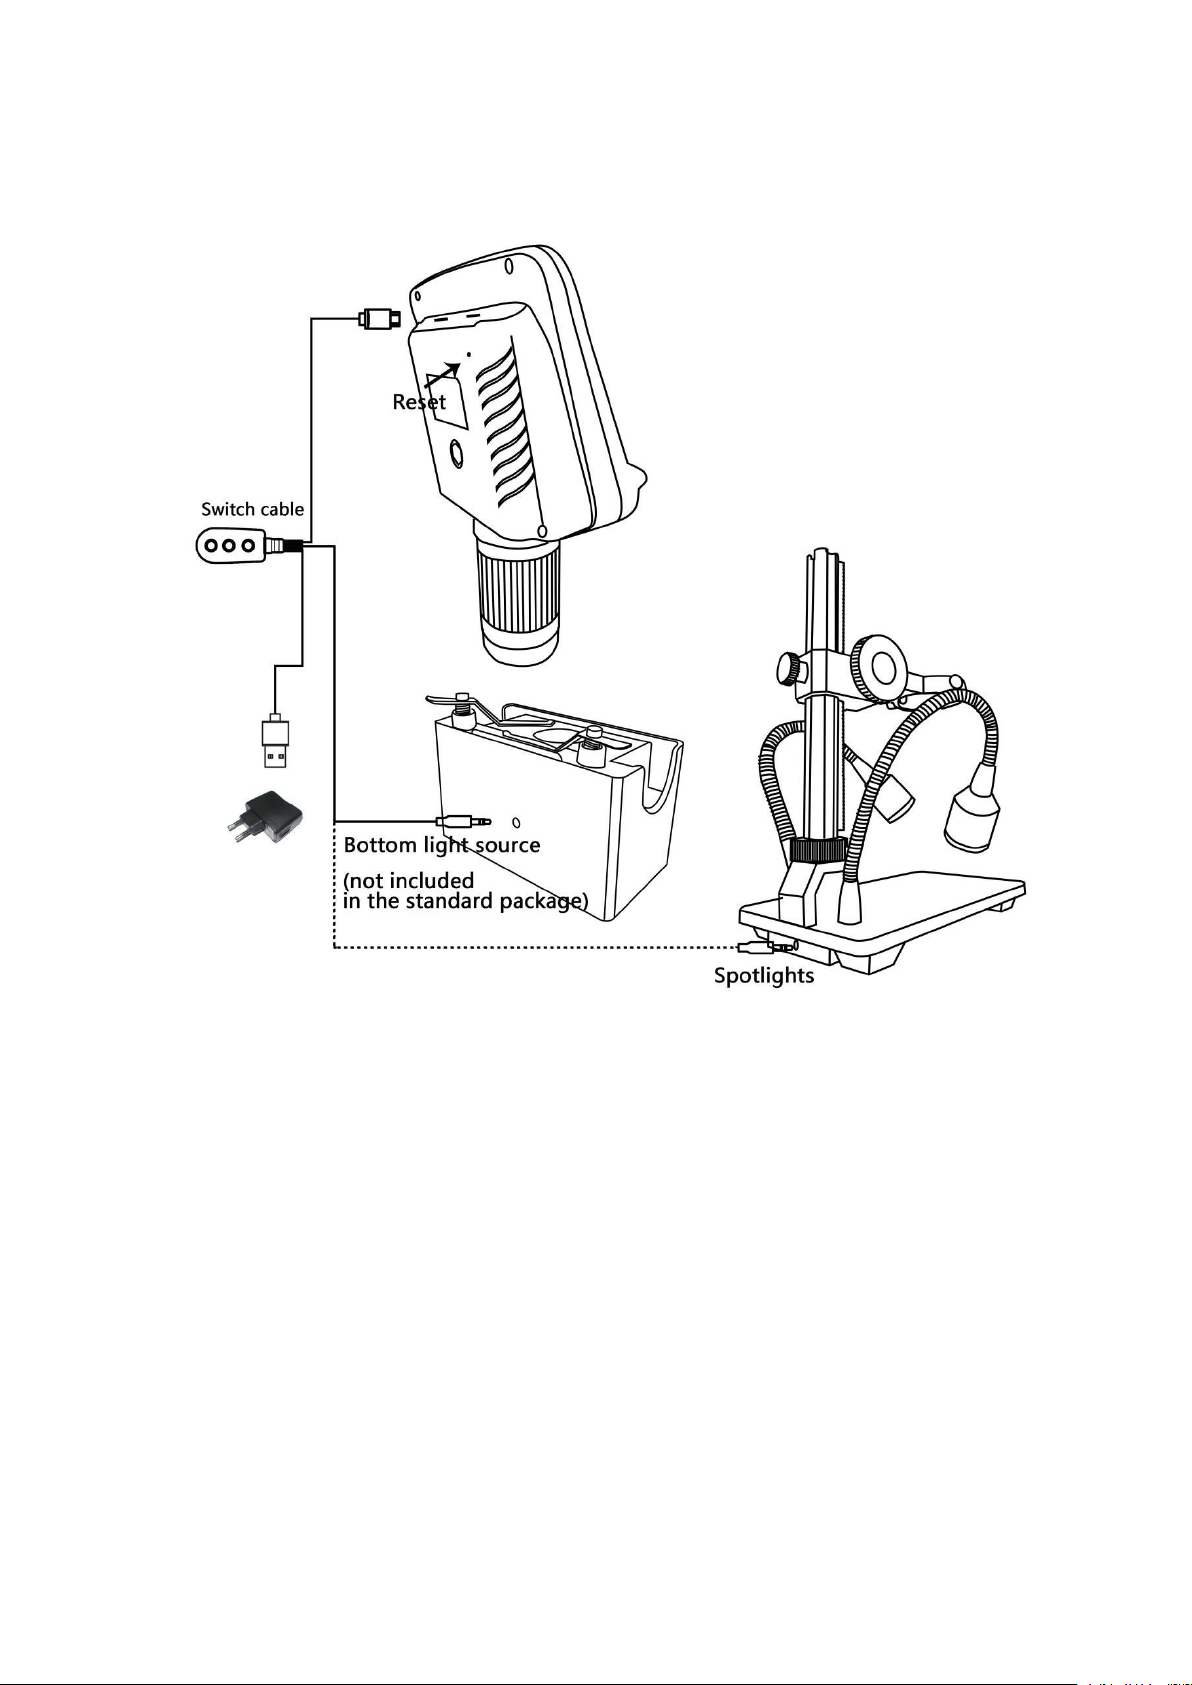
Connect
Page 11
- 9 -
Buttons
① Power
② Mode
③ Up
④ Down
⑤ OK
⑥Capture (This button
Only can capture pictures
when the microscope is
recording)
⑦ Infrared sensor (when
you are using the remote,
please point the remote to
this so the device would
response)
⑧ LED lights adjustment
⑨ Focus controller
⑩Capture (Only can
capture pictures when the
microscope is recording)
○
11
Down
○
12
OK
○
13
Up
7. : video mode
8. : The microscope is recording
9. : The microscope is taking a picture
10. / : with/without TF card
11. : Still image mode
12. : review mode
Icons definitions
Page 12
- 10 -
Quick start
1. To use the microscope without the need for a computer, plug the power block in to an electrical outlet.
Then connect every part via the switch cable (Please see the diagram at part “Connect”).
2. Then press and hold the Power button(number ① from the picture “Buttons”) underneath the display until
the display turns on. (It may turn on automatically, and it’s totally fine.)
*Troubleshooting
If the display freezes, locate the “reset ” hole on the back of the monitor (see part “Connect”). Use a narrow
object such as an unfolded paperclip to depress the button located inside. This resets all settings to their
factory values and restarts the display . It does not erase saved images or video.
Adjusting the Magnification and Focus
Use the large knobs on the optical bracket to raise or lower the optical stack to the desired height. The lower
the height, the greater the magnification, but be careful not to let the bottom of the stack contact the object
being imaged. (Note that you may need to reposition the spotlights as you move the stack up or down.)
Turn the Focus controller(number ⑨ from the picture “Buttons”) to focus the image.
To increase the digital magnification, press and hold the Up button(number ③/
○
13
from the picture “Buttons”)
until the desired digital magnification(up to an additional 4x beyond the optical magnification) is reached. Use
the Down(number ④/
○
11
from the picture “Buttons”) button to decrease the digital magnification.
While ambient light may be adequate for many circumstances, the spotlights or bottom light source can
provide additional illumination. Choose the one you want, and use the buttons on the switch cable to adjust
the brightness.
While using the spotlilghts, to accentuate the surface contours of an object, position the lights at a low angle.
Use a high angle for a flatter, more two - dimensional effect.
Bottom light source(optional) is more useful when the object is transparent or when the object distance is very
short.
Displaying on a PC
Before you connect the microscope to a PC, make sure that you have appropriate software on that PC.
To display images on a PC, attach one end of the provided USB cable to the USB port on the top of the
monitor and the other to the PC. Select “PC camera” on the monitor.
Open your webcam software to view and save images.
Push it in until you hear a click. (If you don't push it in far
enough , it will be ejected.) An icon for the card “ ” will
appear at the top right side of the display.
The Mode button(number ② from the picture “Buttons,
marked with an "M" ) can be used to cycle between three
modes: video( ), still image ( ), and review( ).
In video mode, press the OK button(⑤/
○
12
) briefly to begin
Using a MicroSD Card to Save Images
By using a Micro SD card(not provided), you can save images and videos to review later or export to a
computer or other device .
Insert the Micro SD card in to the TF slot on top back of the monitor.
Page 13

- 11 -
recording (the icon becomes to ). The elapsed time in the recording will appear at the top right. To stop
recording, hit the OK button again.
Note: do not hold in the OK button while starting or stopping a recording, just press and release.
In still image mode, press the OK button(⑤/
○
12
) briefly to capture an image. Icon would appear at the
top middle for a second, when an image has been captured.
Press Capture button (number ⑥/⑩) to capture images while the microscope is recording. If you capture the
image in this way, the resolution of the image could be neither 1080P or 720P, depends on which you choose
for the video resolution, FHD or HD.
Reviewing and Managing Images
To review and manage images on the display, use the Mode button to select review mode. Use the Up and
Down buttons to cycle through the pictures and videos.
To play a video, press the OK button. Press the OK button again to pause.
Hit the Mode button again to exit playback.
While reviewing a still image or video, the Menu button can be used to provide additional options. Press the
Menu botton and hold for a while till options show up.
Delete: deleting just the current image/video;
Delete All: deleting all unprotected images and videos;
Lock This: provides protection for the current image/video from deleting accidentally, but not from Format
function;
Unlock this: unlock the current image/video.
Settings
In video mode, press Menu button and hold it for a while until the Menu shows up on the display.
Resolution: There are two options of Resolution: HD(1280*720) or FHD(1920*1080).
Image quality: There are six options: 1M/2M/3M/5M/8M/12M, resolution of them goes from 1280*720P to
4032*3024P.
EV: Exposure compensation, from +2 to -2.
Language setting: English, Chinese, Japanese, Korean, Russian, French, Dutch etc.
Format: When the memory card is full, use this to format the card. Remember to export all files that you need
before formating.
Reset system: Back to the factory values.
 Loading...