

Page 1
MODEL AG2, AGP
LITERATURE PACKET #04973
Item pictured may differ from actual product
El artículo ilustrado puede diferir del producto real
Il est possible que l’article sur la photo soit différent du produit réel
Use & Care Instructions
Page 2

ENGLISH
Please read the following instructions before using your new Andis
clipper. Give it the care that a fine precision built instrument deserves
and it will give you years of service.
IMPORTANT SAFEGUARDS
When using an electrical appliance, basic precautions should
always be followed, including the following: Read all
instructions before using the Andis clipper.
DANGER:
1. Do not reach for an appliance that has fallen into water.
Unplug immediately.
2. Do not use while bathing or in a shower.
3. Do not place or store appliance where it can fall or be
pulled into a tub or sink. Do not place in or drop into
water or other liquid.
4. Always unplug this appliance from the electrical outlet
immediately after using.
5. Unplug this appliance before cleaning, removing or
assembling parts.
To reduce the risk of electric shock:
WARNING: To reduce the risk of burns, fire
electric shock, or injury to persons:
1. An appliance should never be left unattended when
plugged in.
2. Close supervision is necessary when this appliance is used
by, on or near children or individuals with certain disabilities.
3. Use this appliance only for its intended use as described
in this manual. Do not use attachments not recommended
by Andis.
4. Never operate this appliance if it has a damaged cord or
plug, if it is not working properly, if it has been dropped
or damaged, or dropped into water. Return the appliance
to an Andis Authorized Service Station for examination
and repair.
2 3
5. Keep the cord away from heated surfaces.
6. Never drop or insert any object into any opening.
7. Do not use outdoors or operate where aerosol (spray)
products are being used or where oxygen is being
administered.
8. Do not use this appliance with a damaged or broken
blade or comb, as injury to the skin may occur.
9. To disconnect turn control to OFF then remove plug from
outlet.
10. WARNING: During use, do not place or leave appliance
where it may be (1) damaged by an animal or (2) exposed
to the weather.
SAVE THESE INSTRUCTIONS
THIS PRODUCT INTENDED FOR PROFESSIONAL USE
To reduce the risk of electric shock, this appliance has a polarized plug (one
blade is wider than the other). This plug will fit in a polarized outlet only one
way. If the plug does not fit fully in the outlet, reverse the plug. If it still does
not fit, contact a qualified electrician to install the proper outlet. Do not
change the plug in any way.
OPERATING INSTRUCTIONS
Before starting clipper, remove blade guard (some models may not have a blade
guard). Plug cord into electrical outlet, operate at 120 volt, 60 cycle AC electrical
current or as noted on the unit. To start clipper, move switch button to ON
position. To stop clipper, move switch button back to original position. After
using your clipper, rewrap cord and store in a safe place.
2-SPEED UNIT OPERATION
Your clipper comes with normal and high speed operation. Use the normal
setting (Setting #1) for most cutting needs. Use the high speed setting
(Setting #2) for cutting through heavy coats.
REMOVING BLADE SET
To remove blade set, first make sure your clipper is switched OFF and UNPLUGGED.
Push down on blade, then gently pull the blade forward (Figure A), and slide it
off the blade hinge. If your blade hinge should snap closed and is flush with the
clipper, use a small standard screwdriver to pry the tongue of the hinge out
(Figure B). NOTE: Hair may accumulate in the front cavity of the housing under
Page 3
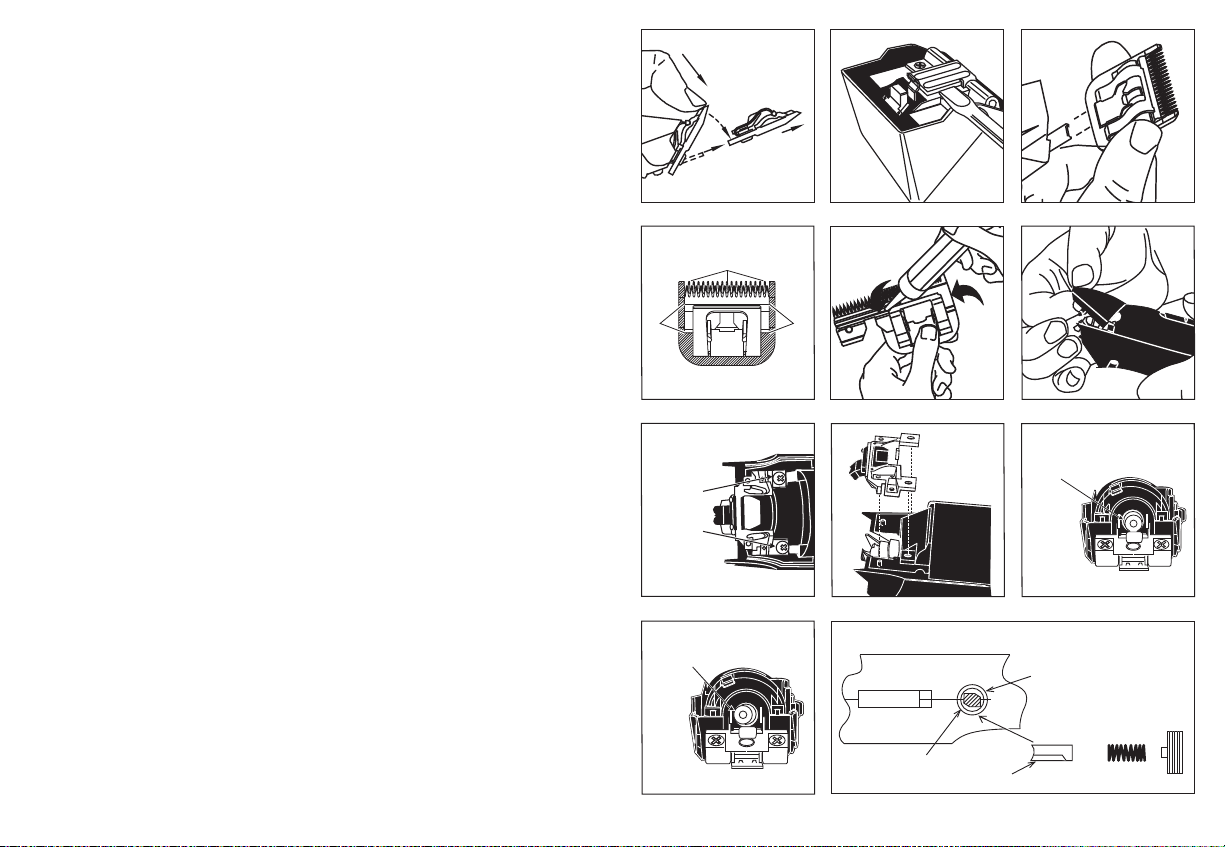
the blade. If this happens, you can clean out the hair by brushing out the cavity
OIL
OIL
OIL
INCORRECT
with a small brush or an old toothbrush while the blade is off the clipper.
REPLACING OR CHANGING BLADE SET
To replace or change your blade set, slide the blade bracket onto the hinge of
the clipper (Figure C) and with the clipper turned ON, push the blade towards
the clipper to lock into position.
USER MAINTENANCE
The internal mechanism of your motor clipper has been permanently lubricated
by the factory. Other than the recommended maintenance described in this
FIGURE A
manual, no other maintenance should be performed, except by Andis Company,
or an Andis Authorized Service Station. To find an Andis Authorized Service
Station near you log on to www.andis.com or contact our customer service
department: 1-800-558-9441 (U.S.) or 1-800-335-4093 (Canada).
BLADE TEMPERATURE
Due to the high speed nature of Andis clippers, please check for blade heat
often, especially on close cutting blades. If blades are too hot, dip the blades
only into Andis Blade Care Plus or apply Andis Cool Care Plus and then Andis
Clipper Oil. If you have a detachable blade unit, you can change your blade in
order to maintain a comfortable temperature; using multiple blades of the same
size is popular among groomers.
CARE AND SERVICING OF YOUR ANDIS CLIPPER BLADES
Blades should be oiled before, during, and after each use. If your clipper blades
leave streaks or slow down, it’s a sure sign blades need oil. Place a few drops of
Andis Clipper Oil on the front and side of the cutter blades (Figure D). Wipe
excess oil off blades with a soft dry cloth. Spray lubricants contain insufficient oil
for good lubrication, but are an excellent clipper blade coolant. Always replace
broken or nicked blades to prevent injury. You can clean the excess hair from
your blades by using a small brush or worn out tooth brush. To clean the blades
we suggest to immerse the blades only into a shallow pan of Andis Clipper Oil,
while the clipper is running. Any excess hair and dirt that has accumulated
between the blades should come out. After cleaning, turn your clipper OFF and
dry blades with a dry cloth and start clipping again.
If upon cleaning your blades you find that the blades will still not cut, there may
be a few fine pieces of hair trapped between the upper and lower blade. If this
happens, you will need to snap the blade off the clipper. Proceed to slide the
upper blade to one side, without loosening the tension spring or moving the
upper blade completely out from under the tension spring (See Figure E for
position of blade). Wipe the surface between the blades clean with a dry cloth,
then place a drop of clipper oil where the upper and lower blades meet and also
4 5
FIGURE D
BLADE
DRIVE
MOUNTING
SCREWS
FIGURE G
POSITION
OF DRIVE
BEARING
FIGURE J FIGURE K
FIGURE B
FIGURE E
TOP OF CLIPPER
INSERT BEVEL SIDE FIRST
CORRECT
POSITION
OF
DRIVE
BEARING
CARBON BRUSH CANAL
CARBON BRUSH
BEVEL
FIGURE C
FIGURE F
FIGURE IFIGURE H
SPRING
CAP
Page 4
in the guide slot of the tension spring (Figure E). Now slide the upper blade to
the opposite side of the lower blade and repeat this process. After completing
this procedure, slide the upper blade, centering it over the lower blade. Handle
or store your Andis Clipper with the blades down so excess oil will not run into
the clipper case.
CHANGING THE BLADE DRIVE ASSEMBLY
If your clipper blades no longer cut properly (be sure to try more than one blade,
since the blade currently being used may be dull), it could be that your blade
drive assembly needs replacement.
To change the blade drive assembly:
1. Remove blade set (Figure A).
2. Remove drive cap (Figure F).
3. Remove blade drive mounting screws (Figure G).
4. NOTE: Before removing blade drive assembly, note the way it is positioned
(this will help you in reassembly). Remove blade drive assembly (Figure H).
5. Drive bearing should be at its lowest position, if not, move it with your finger
to lowest position (Figures I & J).
6. Put on new drive assembly, align screw holes and press down (Figure H).
7. Reassemble blade drive by mounting screws (Figure G).
8. Replace drive cap (Figure F).
9. Replace blade (Figure C).
carbon brush cap with a standard size screwdriver. Turn clockwise only until you
feel the brush cap stop. If the brush cap is tightened too tightly, it will force the
brush spring past the carbon brush and will cause damage to the commutator.
SERVICING OF A DOUBLE-INSULATED CLIPPER
In a double-insulated clipper, two systems of insulation are provided instead of
grounding. No grounding means is provided on a double-insulated clipper, nor
should a means for grounding be added. Servicing a double-insulated clipper
requires extreme care and knowledge of the system, and should be done only by
an Andis Authorized Service Station. Replacement parts must be identical to
those parts being replaced. A double-insulated clipper is marked by the words
“double insulation” or “double insulated”. The symbol
on the appliance.
may also be marked
FACTORY REPAIR SERVICE
When the blades of your Andis clipper become dull after repeated use, it is
advised to purchase a new set of blades available through your Andis supplier or
through an Andis Authorized Service Station. Some blade sets can be
resharpened – contact Andis Company for information on resharpening. To find
an Andis Authorized Service Station near you log on to www.andis.com or
contact our customer service department: 1-800-558-9441 (U.S.) or
1-800-335-4093 (Canada).
REPLACEMENT OF CARBON BRUSHES (MODEL AG2 ONLY)
WARNING: Clipper must be unplugged before removing carbon brush caps or
performing any maintenance, as electrical shock may occur. The carbon brushes
of your clipper should be checked every three to six months. Carbon brush
replacement should be performed when the carbon brushes reach no less than
1/16" in length. To replace the carbon brushes, unscrew brush caps with a
standard screwdriver. Do one side at a time.
Caution: the carbon brushes are spring loaded. Take precaution when
unscrewing the brush caps from the unit. The brush spring should be in plain
view upon removing the cap. Pull out the spring and brush from its canal, then
remove old carbon brush. Tip the clipper to one side so the carbon brush slides
out. Be sure to note the way the brush is inserted so that if it does not need
replacing, it may be re-inserted in exactly the same position. When placing a
new carbon brush into the carbon brush canal, make sure to align the curvature
on the end of the carbon brush with the curve of the commutator seen at the
bottom of the canal (Figure K). When aligned properly, the two beveled edges of
the carbon brush will be located in the upper right and lower left corners. Be
sure to insert the beveled end of the carbon brush into the canal first. Failure to
perform this procedure correctly may cause the carbon brushes to not seat
themselves properly against the commutator. Replace the carbon brush spring
into the brush cavity after the carbon brush has been installed, then replace
6 7
Caution: Never handle your Andis clipper while you are operating a water
faucet, and never hold your clipper under a water faucet or in water. There is
danger of electrical shock and damage to your clipper. Andis Company will
not be responsible in case of injury due to this carelessness.
Page 5

SPANISH
Sírvase leer las instrucciones siguientes antes de usar su nueva
recortadora Andis. Al brindar el cuidado que se merece un instrumento
fino construido con precisión, obtendrá muchos años de servicio.
correctamente o si se ha dejado caer, si se ha dañado o
si se ha caído en el agua. Devuelva el artefacto a un
centro de servicio autorizado de Andis para su revisión y
reparación.
5. Mantenga el cable lejos de superficies calientes.
6. Nunca deje caer el aparato ni inserte ningún objeto en
PRECAUCIONES IMPORTANTES
Al usar un artefacto eléctrico, siempre deben seguirse ciertas
precauciones básicas, que incluyen la siguiente: Lea todas
las instrucciones antes de usar la recortadora de acabado
Andis.
PELIGRO: Para reducir el riesgo de descarga
eléctrica:
1. Si un artefacto se ha caído al agua, no trate de sacarlo.
Desenchúfelo inmediatamente.
2. No lo utilice al bañarse en tina o bajo la regadera.
3. No coloque ni almacene el artefacto donde pueda caerse
en una bañera o un lavabo, o ser halado dentro de éstos.
No la coloque ni la deje caer en agua u otro líquido.
4. Siempre desenchufe este aparato del tomacorriente
eléctrico inmediatamente después de usarlo.
5. Desenchufe este artefacto antes de limpiar, desmontar o
montar las piezas.
ADVERTENCIA: Para reducir el riesgo de
quemaduras, incendio, descarga eléctrica o lesiones a las
personas:
1. Un artefacto nunca debe dejarse desatendido mientras
está enchufado.
2. Es necesaria una supervisión estrecha cuando este
artefacto sea usado por, en o cerca de niños o personas
con ciertas discapacidades.
3. Utilice este artefacto exclusivamente para su uso
propuesto, tal como se describe en este manual. No
utilice accesorios no recomendados por Andis.
4. Nunca opere este artefacto si su cable eléctrico o
enchufe está dañado, si no está funcionando
8 9
ninguna de sus aberturas.
7. No lo utilice al aire libre, ni lo opere donde se estén
usando productos en aerosol (nebulizados) o donde se
esté administrando oxígeno.
8. No utilice este artefacto con una hoja o peine dañado o
roto, ya que se podrían ocasionar lesiones en la piel.
9. Para desconectar, coloque el control en la posición “off”
y luego desconecte el enchufe del tomacorriente.
10. ADVERTENCIA: Durante el uso, no coloque ni deje el
artefacto donde (1) pueda ser dañado por un animal o
(2) pueda quedar expuesto a la intemperie.
GUARDE ESTAS INSTRUCCIONES
ESTE PRODUCTO HA SIDO DISEÑADO PARA USO PROFESIONAL
Para reducir el riesgo de descargas eléctricas, este artefacto tiene un enchufe
polarizado (una patilla es más ancha que la otra). Este enchufe encajará en un
tomacorriente polarizado de una sola manera. Si el enchufe no puede insertarse
completamente en el tomacorriente, invierta el enchufe. Si aún no puede
insertarse, póngase en contacto con un electricista calificado para instalar el
tomacorriente apropiado. No cambie el enchufe de manera alguna.
INSTRUCCIONES DE OPERACIÓN
Antes de arrancar la recortadora, desmonte el protector de la hoja (es posible
que algunos modelos no tengan un protector de la hoja). Enchufe el cable en el
tomacorriente eléctrico, opere a una corriente eléctrica de CA de 120 voltios y
60 ciclos, o según se indique en la unidad. Para arrancar la recortadora, mueva
el botón interruptor a la posición de encendido; para detenerla, vuelva a poner
el botón interruptor en la posición original. Después de usar su recortadora
Andis, vuelva a enrollar el cable y almacénela en un lugar seguro.
OPERACIÓN CON 2 VELOCIDADES
Su recortadora opera a velocidad normal y a alta velocidad. Utilice el ajuste
normal (Ajuste N°1) en la mayoría de los cortes. Utilice el ajuste de alta
velocidad (Ajuste N°2) para cortar a través de mantos pesados.
Page 6

DESMONTAJE DEL JUEGO DE HOJAS
Para desmontar el juego de hojas, asegúrese primero de que la recortadora esté
APAGADA y DESENCHUFADA. Presione la hoja y luego suavemente mueva la
hoja hacia adelante (Figura A), y deslícela para quitarla de la bisagra de la hoja.
Si la bisagra de la hoja se cierra automáticamente para quedar a ras con la
recortadora, use un pequeño destornillador estándar para quitar la lengüeta de
la bisagra (Figura B). NOTA: Es posible que se acumule cabello en la cavidad
frontal de la caja, debajo de la hoja. En caso de ocurrir esto, puede limpiar el
cabello cepillando la cavidad con un cepillo pequeño o un cepillo de dientes
usado mientras la hoja está desmontada de la recortadora.
FIGURA A
FIGURA B
FIGURA C
REEMPLAZO O CAMBIO DEL JUEGO DE HOJAS
Para reemplazar o cambiar el juego de hojas, deslice el soporte de la hoja sobre
la bisagra de la recortadora (Figura C) y con la recortadora en la posición “ON”,
empuje la hoja hacia la recortadora para bloquearla en posición.
MANTENIMIENTO
El mecanismo interno de su recortadora a motor ha sido lubricado de manera
permanente en la fábrica. No debe realizarse ningún tipo de mantenimiento que
no fuera el mantenimiento recomendado en este manual, salvo por Andis
Company o por un centro de servicio autorizado de Andis. Para encontrar un
centro de Servicio Autorizado cercano a su localidad, visite www.andis.com
o póngase en contacto con nuestro departamento de servicio al cliente:
1-800-558-9441 (EE.UU.) o 1-800-335-4093 (Canadá).
TEMPERATURA DE LA HOJA
Debido a la naturaleza de alta velocidad de las recortadoras de Andis, verifique
el calor de la hoja con frecuencia, especialmente para el caso de hojas de corte
al ras. Si las hojas están demasiado calientes, remoje las hojas únicamente en
Andis Blade Care Plus o aplique Andis Cool Care Plus y luego el aceite Andis
para recortadoras. Si tiene una unidad con hoja desmontable, puede cambiar la
hoja para mantener una temperatura confortable; utilizar varias hojas del mismo
tamaño es un método popular entre los profesionales que acicalan.
CUIDADOS Y SERVICIO A LAS HOJAS ANDIS
Debe lubricar las hojas antes, durante y después de cada uso. Si las hojas de su
recortadora dejan líneas o reducen su velocidad, significa que requieren de
lubricación. Al lubricar las hojas, ponga unas cuantas gotas de aceite para
recortadoras marca Andis en la parte de enfrente y lateral de las hojas (Figura D).
Limpie el exceso de aceite en las hojas con una tela seca y suave. Los lubricantes
en aerosol no contienen suficiente aceite para lubricar correctamente, pero son
excelentes para enfriar la recortadora. Siempre reemplace hojas rotas o melladas
para evitar lesiones. Puede limpiar el exceso de pelo en las hojas con un cepillo
10 11
TORNILLOS DE
MONTAJE DEL
ACCIONAMIENTO
DE LAS HOJAS
POSICIÓN INCORRECTA DEL
COJINETE DEL ACCIONAMIENTO
ACEITE
ACEITE
ACEITE
FIGURA D
FIGURA G
FIGURA J FIGURA K
FIGURA E
FIGURA H
PARTE SUPERIOR DE LA RECORTADORA
INSERTE PRIMERO
EL LADO BISELADO
POSICIÓN CORRECTA
DEL COJINETE DEL
ACCIONAMIENTO
CANALETA DEL CEPILLO
DE CARBONO
CEPILLO DE CARBONO
BISEL
FIGURA F
FIGURA I
TAPA
RESORTE
Page 7

pequeño o un cepillo de dientes viejo. Para limpiar las hojas le sugerimos
sumergir sólo las hojas en un poco de aceite para recortadoras marca Andis,
mientras la recortadora esté funcionando. Así debe poder eliminar cualquier
exceso de pelo o de polvo que se haya acumulado entre las hojas. Después de
limpiar las hojas, apague la recortadora y seque las hojas con una tela seca.
Si al limpiar las hojas encuentra que las mismas siguen sin cortar, es posible que
hayan quedado algunos restos finos de cabello atrapados entre la hoja superior
e inferior. Si esto ocurre, necesitará desmontar la hoja de la recortadora. Proceda
a deslizar la hoja superior hacia un lado, sin aflojar el resorte de tensión ni mover
la hoja superior completamente fuera de su posición debajo del resorte de tensión
(consulte el Figura E para conocer la posición de la hoja). Limpie la superficie
entre las hojas con un paño limpio y seco, y luego coloque una gota de aceite
para recortadoras en el punto de encuentro entre las hojas superior e inferior, y
la ranura de guía del resorte de tensión (Figura E). Ahora deslice la hoja superior
al lado opuesto de la hoja inferior y repita este proceso. Después de completar
este procedimiento, deslice la hoja superior, centrándola sobre la hoja inferior.
Cuelgue o almacene la recortadora Andis con las hojas hacia abajo de modo
que el aceite en exceso no entre en contacto con la caja de la recortadora.
CAMBIO DEL CONJUNTO DE ACCIONAMIENTO DE LAS HOJAS
Si las hojas de la recortadora ya no cortan correctamente (asegúrese de probar
más de una hoja, dado que es posible que la hoja que se estuviera usando
actualmente haya perdido el filo), podría ser necesario reemplazar el conjunto de
accionamiento de la hoja.
Para cambiar el conjunto de accionamiento de las hojas:
1. Desmonte el conjunto de hojas (Figura A).
2. Desmonte la tapa del accionamiento (Figura F).
3. Desmonte los tornillos de montaje del accionamiento de las hojas (Figura G).
4. NOTA: Antes de desmontar el conjunto de accionamiento de las hojas,
observe la manera en que esté colocado (esto le ayudará al volver a armarlo).
Desmonte el conjunto de accionamiento de las hojas (Figura H).
5. El cojinete de accionamiento debe encontrarse en su posición más baja; de
no ser así, muévalo con el dedo hasta la posición más baja (Figuras I y J).
6. Coloque el nuevo conjunto de accionamiento, alinee los orificios de los
tornillos y presione hacia abajo (Figura H).
7. Vuelva a armar el accionamiento de las hojas montando los tornillos
correspondientes (Figura G).
8. Reemplace la tapa del accionamiento (Figura F).
9. Reemplace la hoja (Figura C).
REEMPLAZO DE LOS CEPILLOS DE CARBONO
(MODELO AG2 SOLAMENTE)
ADVERTENCIA: Debe desenchufarse la recortadora antes de desmontar las
tapas de los cepillos de carbono o realizar cualquier tipo de mantenimiento, ya
que, de lo contrario, puede producirse una descarga eléctrica. Debe revisar los
cepillos de carbono de su recortadora cada tres a seis meses. Los cepillos de
carbono deben reemplazarse cuando tengan una longitud de 1/16”, no menos.
Para reemplazar los cepillos de carbono, destornille las tapas de los cepillos
usando un destornillador estándar. Trabaje en un lado a la vez.
12 13
Precaución: los cepillos de carbono están cargados a resorte. El resorte del
cepillo debe estar a simple vista al desmontar la tapa. Retire el resorte y el
cepillo de su canaleta, y luego quite el cepillo de carbono desgastado. Incline la
recortadora hacia un lado de modo que el cepillo de carbono pueda deslizarse
hacia afuera. Asegúrese de observar la manera en que está insertado el cepillo,
de modo que si no es necesario reemplazarlo, pueda reinsertarse exactamente
en la misma posición. Al colocar un nuevo cepillo de carbono en la canaleta
correspondiente, asegúrese de alinear la curvatura del extremo del cepillo de
carbono con la curva del conmutador visible en el fondo de la canaleta (Figura K).
Cuando está correctamente alineado, los bordes biselados del cepillo de
carbono quedarán situados en las esquinas superior derecha e inferior izquierda.
Asegúrese de insertar primero el extremo biselado del cepillo de carbono en la
canaleta. Si no realiza este procedimiento correctamente, puede causar que los
cepillos de carbono no se asienten correctamente contra el conmutador.
Reemplace el resorte del cepillo de carbono en la cavidad del cepillo después de
instalar el cepillo de carbono, y luego reemplace la tapa del cepillo de carbono
con un destornillador de tamaño estándar. Gire únicamente hacia la derecha
hasta que sienta el tope de la tapa del cepillo. Si aprieta demasiado la tapa del
cepillo, forzará el resorte del cepillo más allá del cepillo de carbono y causará
daños al conmutador.
SERVICIO TÉCNICO DE UNA RECORTADORA CON
AISLAMIENTO DOBLE
En una recortadora con aislamiento doble, se proporcionan dos sistemas de
aislamiento en lugar de la conexión a tierra. No se proporciona un medio de
conexión a tierra en una recortadora con aislamiento doble ni tampoco deberá
agregarse alguno. El servicio técnico de una recortadora con aislamiento doble
requiere extremo cuidado y conocimientos del sistema, y sólo debe ser efectuado
por una Estación de Servicio Autorizado de Andis. Los repuestos deben ser
idénticos a las piezas que se estén reemplazando. Una recortadora con aislamiento
doble está marcada con las palabras “AISLAMIENTO DOBLE” “DOBLEMENTE
AISLADO”. El símbolo
también puede aparecer en el artefacto.
SERVICIO DE REPARACIÓN EN FÁBRICA
Cuando las hojas de su recortadora Andis pierdan el filo después de un uso
repetido, se aconseja comprar un conjunto nuevo de hojas, disponible por medio
de su proveedor Andis o por medio de un centro de servicio autorizado de
Andis. Algunos juegos de hojas pueden reafilarse - comuníquese con Andis
Company para obtener información sobre el reafilado. Para encontrar un Centro
de Servicio Autorizado cercano a su localidad, visite www.andis.com o póngase
en contacto con nuestro departamento de servicio al cliente: 1-800-558-944 (EE.
UU.) o 1-800-335-4093 (Canadá).
Precaución: Nunca manipule la recortadora Andis mientras esté usando un grifo
de agua corriente, y nunca sujete la recortadora bajo el chorro de un grifo, ni
tampoco la sumerja en agua. Existe el peligro de una descarga eléctrica y de
causar daños a la recortadora. Andis Company no será responsable en el caso
de lesión debido a este descuido.
Page 8

FRENCH
Lire le mode d’emploi en entier avant d’utiliser la tondeuse Andis. Si cet
appareil est traité comme un instrument de précision, il devrait donner des
années de bons services.
ou s’il est tombé dans l’eau. Le retourner à un centre de
réparation agréé par Andis pour examen et réparation.
5. Garder le cordon à l’écart des surfaces chaudes.
6. Ne jamais insérer un objet quelconque dans une ouverture
de l’appareil.
7. Ne pas utiliser l’appareil à l’extérieur, dans un endroit où
MISES EN GARDE IMPORTANTES
Pendant l’utilisation d’un appareil électrique, il faut toujours
suivre certaines règles de sécurité, notamment les suivantes.
Lire toutes les instructions avant d’utiliser cette tondeuse
de finition Andis.
DANGER : Pour réduire le risque d’électrocution :
1. Ne pas tenter de récupérer un appareil électrique qui est
tombé dans l’eau. Le débrancher immédiatement.
2. Ne pas utiliser cet appareil dans le bain ou sous la
des aérosols sont employés ou encore dans un endroit où
l’on administre de l’oxygène.
8. Pour éviter les blessures, ne pas utiliser des lames ou des
guides de coupe cassés ou endommagés; cela pourrait
abîmer la peau.
9. Pour débrancher l’appareil, mettre la commande sur arrêt,
puis retirer la fiche de la prise secteur.
10. AVERTISSEMENT : Pendant l’utilisation, ne pas mettre
l’appareil à un endroit où il risque d’être (1) endommagé
par un animal ou (2) exposé aux intempéries.
douche.
3. Ne pas déposer ni ranger l’appareil à un endroit d’où il
pourrait tomber dans une baignoire ou un lavabo. Ne pas
mettre l’appareil dans l’eau ou dans un autre liquide.
4. Toujours débrancher l’appareil de la prise murale
immédiatement après l’utilisation.
5. Débrancher l’appareil avant de le nettoyer, de le déplacer
ou d’installer une pièce.
CONSERVER CES INSTRUCTIONS
APPAREIL À USAGE PROFESSIONNEL
Afin de réduire les risques d’électrocution, cet appareil est muni d’une fiche
polarisée (une broche est plus large que l’autre). La fiche s’insère dans une prise
polarisée d’une seule façon. Si elle refuse de s’insérer à fond, la tourner et
essayer de nouveau. Si elle refuse toujours de s’insérer à fond, demander à un
électricien agréé d’installer une prise de courant appropriée. Ne pas modifier la
fiche.
AVERTISSEMENT : Pour réduire les risques
de brûlure, d’incendie, d’electrocution et de blessure :
1. Ne jamais laisser un appareil branché sans surveillance.
2. Une supervision étroite est requise lorsque des enfants ou
des personnes avec certaines invalidités utilisent l’appareil
ou se trouvent à proximité.
3. Utiliser cet appareil seulement pour l’usage prévu décrit
dans ce manuel. Utiliser uniquement les accessoires
recommandés par Andis.
4. Ne jamais utiliser l’appareil si son cordon ou sa fiche de
branchement est endommagé, s’il ne fonctionne pas
correctement, s’il est tombé par terre, s’il est endommagé
14 15
MODE D’EMPLOI
Avant de faire fonctionner la tondeuse, enlevez le protège-lame (certains
modèles n’en sont pas dotés). Branchez l’appareil dans une prise de 120 volts,
60 cycles C.A. ou tel qu’il est indiqué sur l’appareil. Pour mettre la tondeuse en
marche, glissez la commande vers la position «ON». Pour l’arrêter, remettez la
commande à sa position initiale. Après avoir utilisé la tondeuse, enroulez le
cordon et rangez l’appareil dans un endroit sécuritaire.
FONCTIONNEMENT À 2 VITESSES
Votre tondeuse offre deux vitesses: normale et élevée. Utilisez la vitesse normale
(Réglage 1) pour la plupart des coupes et la vitesse élevée (Réglage 2), pour les
cheveux épais.
Page 9

RETRAIT DU JEU DE LAMES
Avant d'enlever le jeu de lames, s'assurer que la tondeuse est HORS TENSION et
DÉBRANCHÉE. Appuyer sur la lame, puis glisser doucement la lame vers l’avant
(Figure A) et la dégager de la charnière. Si la charnière est fermée et qu’elle
affleure avec la tondeuse, utiliser un petit tournevis pour dégager la languette
de la charnière (Figure B). REMARQUE: Des poils peuvent s’accumuler dans la
cavité avant de la tondeuse, sous la lame. Dans ce cas, il est possible de
nettoyer la cavité avec une petite brosse ou une brosse à dents usagée alors que
la lame est retirée de la tondeuse.
REMPLACEMENT OU CHANGEMENT DU JEU DE LAMES
Pour remplacer ou changer le jeu de lames, glisser le support de lame sur la
charnière de la tondeuse (Figure C) et, alors que la tondeuse est en marche,
pousser la lame vers la tondeuse pour la bloquer en position.
FIGURE A
D’HUILE
FIGURE B
FIGURE C
ENTRETIEN
Le mécanisme interne de la tondeuse a été lubrifié en permanence à l’usine. Sauf
pour les mesures d’entretien décrites dans ce mode d’emploi, tout entretien doit
D’HUILE
D’HUILE
être confié à Andis ou à un centre de réparation agréé par Andis. Pour le centre
de SAV le plus proche, consulter le site www.andis.com ou contacter notre
service clientèle au : 1-800-558-9441 (É.-U.) ou 1-800-335-4093 (Canada).
FIGURE D
FIGURE E
FIGURE F
TEMPÉRATURE DE LA LAME
Étant donné la grande vitesse des tondeuses Andis, contrôlez souvent la chaleur,
surtout sur les lames qui coupent de près. Si les lames sont trop chaudes,
trempez uniquement les lames dans de l’Andis Blade Care Plus ou appliquez de
l’Andis Cool Care Plus, puis de l’huile pour tondeuse Andis. Si vous avez une
lame détachable, changez de lame pour maintenir une température confortable;
VIS DE FIXATION
DU MÉCANISME
D'ENTRAÎNEMENT
l’utilisation de lames multiples de même taille est populaire auprès des
spécialistes du toilettage.
ENTRETIEN DES LAMES DE LA TONDEUSE ANDIS
Les lames doivent être huilées avant, pendant et après chaque utilisation.
Si les lames de la tondeuse laissent des stries ou ralentissent, cela indique
clairement qu’elles manquent d’huile. Déposer quelques gouttes d’huile pour
tondeuse Andis sur l’avant et le côté des têtes de coupe (Figure D). Essuyer
l’excès d’huile avec un chiffon doux et sec. Les lubrifiants en aérosol ne
FIGURE G
POSITION
INCORRECTE DU
ROULEMENT
FIGURE H
PARTIE SUPÉRIEURE DE LA TONDEUSE
permettent pas d'appliquer suffisamment d'huile pour lubrifier correctement les
lames, mais ce sont d’excellents agents de refroidissement pour tondeuse.
Toujours remplacer les lames brisées ou ébréchées afin de prévenir les blessures.
Enlever les poils qui adhèrent aux lames à l’aide d’une petite brosse ou d’une
vieille brosse à dent. Pour nettoyer les lames, nous suggérons de les immerger
dans un bac peu profond contenant de l’huile pour tondeuse Andis, pendant
que la tondeuse fonctionne. Seules les lames doivent baigner dans l’huile. Cela
16 17
FIGURE J
INSÉREZ D’ABORD
LE BOARD BISEAUTÉ
POSITION
CORRECTE DU
ROULEMENT
BORD BISEAUTÉ
FIGURE K
FIGURE I
CANAL DU VALAI
DE CARBONE
BALAI DE CARBONE
RESSORT
COUVERCLE
Page 10

devrait suffire pour enlever les poils et les saletés logées entre les lames. Après
le nettoyage, arrêter la tondeuse, assécher les lames avec un chiffon sec, puis
reprendre la coupe.
Si, après le nettoyage des lames, il apparaît que celles-ci ne coupent toujours
pas, il est possible que de petits poils soient demeurés logés entre les lames
supérieure et inférieure. Dans ce cas, il faut détacher la lame de la tondeuse.
Glisser la lame supérieure sur un côté, sans desserrer le ressort de tension ni
dégager la lame supérieure complètement de dessous le ressort de tension (voir
la position de la lame dans Figure E). Passer un chiffon sec sur la surface entre
les lames, puis déposer une goutte d’huile lubrifiante au point de contact des
deux lames et également dans la fente-guide du ressort de tension (Figure E).
Glisser ensuite la lame supérieure du côté opposé de la lame inférieure et
reprendre la manoeuvre. Une fois la manoeuvre de nettoyage terminée, centrer
la lame supérieure sur la lame inférieure. Manipuler et ranger la tondeuse Andis
avec les lames vers le bas pour que l’excédent d’huile ne s’infiltre pas dans la
tondeuse.
CHANGEMENT DU MÉCANISME D’ENTRAÎNEMENT
DES LAMES
Si les lames ne coupent plus adéquatement (essayez plus d’une lame: celle en
place est peut-être èmoussée), vous devrez peut-être remplacer le mécanisme
d’entraînement des lames.
Pour remplacer le mécanisme d'entraînement des lames, procéder comme suit :
1. Retirer le jeu de lames (Figure A).
2. Retirer le capuchon d'entraînement (Figure F).
3. Retirer les vis de fixation du mécanisme d'entraînement des lames (Figure G).
4. REMARQUE : Avant de retirer le mécanisme d'entraînement des lames, noter
son positionnement (pour faciliter l'installation du nouveau mécanisme). Retirer
le mécanisme d'entraînement des lames (Figure H).
5. Le roulement du mécanisme d'entraînement doit se trouver à son point le plus
bas; dans le cas contraire, le déplacer avec le doigt à la position la plus basse
(Figures I et J).
6. Installer le nouveau mécanisme d'entraînement, aligner les trous de vis et
appuyer (Figure H).
7. Fixer le mécanisme d'entraînement avec les vis de fixation (Figure G).
8. Remettre le capuchon d'entraînement (Figure F).
9. Remette la lame (Figure C).
leur longueur n’atteigne 1,6 mm. Pour remplacer les brosses en carbone,
dévisser leur capuchon avec un tournevis standard. Procéder une brosse à la fois.
Attention : Les brosses en carbone sont montées sur ressort. Le ressort de la
brosse doit être clairement visible lors du retrait du capuchon. Sortir le ressort et
la brosse de son canal, puis retirer la brosse en carbone usagée. Basculer la
tondeuse vers un côté pour que la brosse en carbone glisse à l’extérieur. Veiller
à noter la manière dont la brosse est insérée de sorte que, si elle n’a pas besoin
d’être remplacée, elle puisse être réinsérée exactement dans la même position.
Lors de l’insertion d’une brosse en carbone neuve dans le canal qui lui est
réservé, veillez à aligner la courbure à l’extrémité de la brosse en carbone sur
celle du commutateur en bas du canal (Figure K). Lorsque l’alignement est
correct, les deux bords biseautés de la brosse en carbone se situent en haut à
droite et en bas à gauche. Veiller à insérer en premier l’extrémité biseautée de la
brosse en carbone dans le canal. Cette procédure doit être correctement
exécutée faute de quoi les brosses en carbone risquent de ne pas être
correctement plaquées contre le commutateur. Remettre le ressort de la brosse
dans le trou de la brosse, une fois celle-ci remise en place, puis remettre le
capuchon et le fixer avec un tournevis standard. Tourner dans le sens horaire
jusqu’à ce que la butée du capuchon soit perceptible. Si le capuchon est trop
serré, il poussera le ressort au-delà de la brosse en carbone et endommagera le
commutateur.
RÉPARATION D’UNE TONDEUSE À DOUBLE ISOLATION
Une tondeuse à double isolation possède deux systèmes d’isolation au lieu
d’une prise de terre. On ne devrait d’ailleurs pas ajouter de prise de terre. Seul
un centre de réparation agréé Andis devrait réparer ce genre de tondeuse qui
nécessite des soins particuliers et une bonne connaissance de l’appareil. Les
pièces de rechange doivent être identiques à celles qu’on remplace. Les mots
«DOUBLE INSULATION» ou «DOUBLE INSULATED», ou encore le symbole
figurent sur une tondeuse à double isolation.
SERVICE DE RÉPARATION EN USINE
Dès que les lames de votre tondeuse s’émoussent suite à une utilisation répétée,
nous vous recommandons d’acheter un nouveau jeu de lames chez un fournisseur
Andis ou dans un centre de SAV agréé par Andis. Certains jeux de lames peuvent
être réaffûtés - contactez Andis Company pour vous renseigner à ce sujet. Pour
le centre de SAV le plus proche, consulter le site www.andis.com ou contacter
notre service clientèle au : 1-800-558-944 (É.-U.) ou 1-800-335-4093 (Canada).
REMPLACEMENT DES BROSSES EN CARBONE
(MODÈLE AG2 SEULEMENT)
AVERTISSEMENT : Débrancher la tondeuse avant de retirer les capuchons de
brosse en carbone ou d’effectuer une maintenance, sous peine d’électrocution.
Les brosses en carbone de votre tondeuse doivent être vérifiées tous les trois à
six mois. Le remplacement des brosses en carbone doit être effectué avant que
18 19
Attention: Ne jamais manipuler la tondeuse Andis tout en réglant le débit d'un
robinet d'eau, la tenir sous un filet d'eau ni la plonger dans l'eau. De telles
manœuvres présentent un risque d'électrocution et d'endommagement de la
tondeuse. Andis Company ne pourra être tenue responsable de blessures
qui font suite à une négligence.
Page 11

This Andis product is warranted against defective material or workmanship for one year from the date of
purchase. All implied warranties arising and by virtue of State law shall also be limited to one year. Any Andis
product determined to be defective in material or workmanship during the warranty period will be repaired
or replaced without cost to the consumer for parts and labor. The defective product must be returned via
parcel post insured or U.P.S., with proof of purchase to any Andis Authorized Service Station or to Andis, 1800
Renaissance Blvd., Sturtevant, WI 53177 USA. In Canada, please call 1-800-335-4093 for repair information.
Attach a letter describing the nature of the problem. Due to foreign matter sometimes found in hair, clipper
blades or resharpening of blades are not subject to this warranty. Andis will not be responsible for cost of
repairs or alterations made by any other person, agency or company, nor for incidental or consequential
damages of any type, or for the use of unauthorized attachments. Some states may not allow exclusion
of limitation of incidental or consequential damages, so the limitation or exclusion may not apply to you.
Date Purchased _________________________ Model ________________________________________________
To find an Andis Authorized Service Station near you log on to www.andis.com or
contact our customer service department: 1-800-558-9441 (U.S.) or 1-800-335-4093 (Canada)
Este producto Andis está garantizado contra material o mano de obra defectuosos durante un año a partir
de la fecha de compra. Todas las garantías implícitas provenientes y en virtud de las leyes estatales también
deberán ser limitadas a un año. Cualquier producto Andis determinado como defectuoso en cuanto a
materiales o mano de obra durante el período de garantía será reemplazado o reparado sin costo para el
consumidor en cuanto a piezas y mano de obra. El producto defectuoso debe ser devuelto junto con el
comprobante de compra a cualquiera de las estaciones de servicio autorizado de Andis o a: Andis, 1800
Renaissance Blvd., Sturtevant, WI 53177 EEUU. En Canadá, llame al 1-800-335-4093 para obtener
información sobre reparaciones. Adjunte también una carta explicando la naturaleza del problema. Debido
al material extraño que a veces se encuentra en el pelo, la garantía no cubre las hojas ni su reafilado. Andis
no será responsable por el costo de ninguna reparación realizada por otra persona, agencia o compañía, ni
por daños incidentales o consecuentes de ningún tipo, ni por el uso de accesorios no autorizados. Algunos
estados prohíben la exclusión de daños consecuentes o incidentales, de forma que dicha limitación o
exclusión podría no aplicarse a su caso.
Fecha de compra ________________________ Modelo_______________________________________________
Para encontrar una de las estaciones de servicio autorizado de Andis cerca de su localidad,
inicie una sesión en www.andis.com o póngase en contacto con nuestro departamento de
Andis garantit cet appareil au premier acquéreur contre tout défaut de fabrication ou de matériau pour une
durée de 12
aussi à une durée de 12 mois. Tout produit Andis dont on détermine qu’il présente un défaut de fabrication
ou de matériau durant la période de garantie sera réparé ou remplacé sans frais de main-d’œuvre et de
pièces pour le client. L’appareil défectueux doit être retourné par colis postal assuré, accompagné de la
preuve d’achat à n’importe quel centre de réparation agréé par Andis ou à Andis, 1800 Renaissance Blvd.,
Sturtevant, WI 53177 USA. Au Canada, veuillez appeler le 1-800-335-4093 en cas de réparation. Joignez
une lettre décrivant la nature du problème. En raison des substances étrangères que peuvent contenir
les cheveux, les lames et leur aiguisage ne sont pas couverts par la garantie. Andis ne pourra être tenu
responsable des coûts des réparations ou des changements effectués par toute autre personne, agence ou
entreprise, ou dommages accidentels ou indirects de tout genre, ou de l’utilisation d’accessoires non inclus
avec l’appareil. Certaines provinces peuvent interdire les exclusions ou limitations à la présente garantie.
Dans ces cas, les exclusions ou limitations ne s’appliquent pas.
Date d’achat __________________________ Modèle ____________________________________________
ou contactez notre service clientèle au : 1-800-558-9441 (É.-U.) ou 1-800-335-4093 (Canada)
MANUFACTURER’S 12 MONTH LIMITED WARRANTY
GARANTÍA LIMITADA DEL FABRICANTE DE 12 MESES
servicio al cliente: 1-800-558-9441 (EE.UU.) o 1-800-335-4093 (Canadá)
GARANTIE LIMITÉE DE 12 MOIS
mois à partir de la date d’achat. Toute autre garantie implicite en vertu d’une loi d’État se limite
Pour le centre de réparation agréé par Andis, consultez le site www.andis.com
ANDIS COMPANY
1800 Renaissance Blvd. Sturtevant, WI 53177
1-800-558-9441 Canada: 1-800-335-4092 info@andisco.com www.andis.com
Form #100823 © 2014 Andis Company, U.S.A. Printed in U.S.A.
 Loading...