

Page 1

W4.5
Getting Started Guide
Analog Devices, Inc.
One Technology Way
Norwood, Mass. 02062-9106
Revision 2.0, April 2006
Part Number
82-000420-01
a
Page 2

Copyright Information
© 2006 Analog Devices, Inc., ALL RIGHTS RESERVED. This document may not be reproduced in any form without prior, express written
consent from Analog Devices, Inc.
Printed in the USA.
Disclaimer
Analog Devices, Inc. reserves the right to change this product without
prior notice. Information furnished by Analog Devices is believed to be
accurate and reliable. However, no responsibility is assumed by Analog
Devices for its use; nor for any infringement of patents or other rights of
third parties which may result from its use. No license is granted by implication or otherwise under the patent rights of Analog Devices, Inc.
Trademark and Service Mark Notice
The Analog Devices logo, the CROSSCORE logo, VisualDSP++,
Blackfin, SHARC, TigerSHARC, and EZ-KIT Lite are registered
trademarks of Analog Devices, Inc.
All other brand and product names are trademarks or service marks of
their respective owners.
Page 3

CONTENTS
PREFACE
Purpose of This Manual ................................................................. vii
Intended Audience ......................................................................... vii
Manual Contents .......................................................................... viii
What’s New in This Manual .......................................................... viii
Technical or Customer Support ....................................................... ix
Supported Processors ....................................................................... ix
Product Information ....................................................................... xi
MyAnalog.com .......................................................................... xi
Processor Product Information ................................................... xi
Related Documents .................................................................. xii
Online Technical Documentation ............................................ xiii
Accessing Documentation From VisualDSP++ ...................... xiv
Accessing Documentation From Windows ............................ xiv
Accessing Documentation From the Web ............................... xv
Printed Manuals ........................................................................ xv
VisualAudio or VisualDSP++ Documentation Set .................. xv
Hardware Tools Manuals ....................................................... xv
Processor Manuals ................................................................. xv
VisualDSP++ 4.5 Getting Started Guide iii
Page 4

CONTENTS
Data Sheets ......................................................................... xvi
Contacting DSP Publications ................................................... xvi
Notation Conventions ................................................................... xvi
FEATURES AND TOOLS
VisualDSP++ Features .................................................................. 1-1
Code Development Tools .............................................................. 1-5
Connecting to a Debug Session ..................................................... 1-6
BASIC TUTORIAL
Overview ...................................................................................... 2-1
Exercise One: Building and Running a C Program ......................... 2-3
Step 1: Start VisualDSP++ and Open a Project ......................... 2-3
Step 2: Build the dotprodc Project ........................................... 2-7
Step 3: Run the Program ....................................................... 2-10
Step 4: Run dotprodc ............................................................ 2-15
Exercise Two: Modifying a C Program to Call an Assembly Routine 2-16
Step 1: Create a New Project ................................................. 2-17
Step 2: Add Source Files to dot_product_asm ........................ 2-24
Step 3: Modify the Project Source Files .................................. 2-25
Step 4: Use the Expert Linker to Modify dot_prod_asm.ldf .... 2-28
Step 5: Rebuild and Run dot_product_asm ............................ 2-31
Exercise Three: Plotting Data ...................................................... 2-33
Step 1: Load the FIR Program ............................................... 2-33
Step 2: Open a Plot Window ................................................. 2-35
iv VisualDSP++ 4.5 Getting Started Guide
Page 5

CONTENTS
Step 3: Run the FIR Program and View the Data ................... 2-38
Exercise Four: Linear Profiling ..................................................... 2-47
Step 1: Load the FIR Program ................................................ 2-47
Step 2: Open the Profiling Window ....................................... 2-48
Step 3: Collect and Examine the Linear Profile Data ............... 2-50
ADVANCED TUTORIAL
Overview ...................................................................................... 3-1
Exercise One: Using Profile-Guided Optimization ......................... 3-2
Step 1: Load the Project ........................................................... 3-4
Step 2: Configure a Data Set .................................................... 3-5
Step 3: Attach an Input Stream .............................................. 3-10
Step 4: Configure Additional Data Sets .................................. 3-15
Step 5: Create PGO Files and Optimize the Program .............. 3-17
Step 6: Compare Execution Times ......................................... 3-18
Exercise Two: Using Background Telemetry Channel ................... 3-22
Adding BTC to Your DSP Application ................................... 3-22
Running the BTC Assembly Demo ........................................ 3-24
Step 1: Load the BTC_AsmDemo Project .......................... 3-25
Step 2: Examine the BTC Commands ................................ 3-26
Step 3: Set Up the BTC Memory Window and View Data . 3-29
Running the BTC FFT Demo ................................................ 3-37
Step 1: Build the FFT Demo ............................................. 3-38
Step 2: Plot BTC Data ...................................................... 3-39
Step 3: Record and Analyze BTC Data ............................... 3-44
VisualDSP++ 4.5 Getting Started Guide v
Page 6

CONTENTS
INDEX
vi VisualDSP++ 4.5 Getting Started Guide
Page 7

PREFACE
Thank you for purchasing Analog Devices, Inc. development software for
signal processing applications.
Purpose of This Manual
The VisualDSP++ 4.5 Getting Started Guide provides basic and advanced
tutorials that highlight many VisualDSP++ features. By completing the
step-by-step procedures, you will become familiar with the VisualDSP++
environment and learn how to use these features in your own digital signal
processing (DSP) development projects.
Intended Audience
This manual is intended for DSP programmers who are familiar with
Analog Devices processors. The manual assumes that the audience has a
working knowledge of Analog Devices processor architecture and instruction set.
DSP programmers who are unfamiliar with Analog Devices processors
should refer to their processor’s Hardware Reference and Instruction Set
Reference, which describe the processor architecture and instruction set.
Note that the ADSP-BF533 Blackfin Processor Hardware Reference includes
information about the ADSP-BF531 and ADSP-BF532 processors.
VisualDSP++ 4.5 Getting Started Guide vii
Page 8

Manual Contents
Manual Contents
This manual consists of:
• Chapter 1, “Features and Tools”
Provides an overview of VisualDSP++ features and code
development tools
• Chapter 2, “Basic Tutorial”
Provides step-by-step instructions for creating sessions, and for
building and debugging projects by using examples of C/C++ and
assembly sources
The tutorial is organized to follow the steps that you take in
developing a typical programming project. Before you begin actual
programming, you should be familiar with the architecture of your
particular processor and the other software development tools.
• Chapter 3, “Advanced Tutorial”
Provides step-by-step instructions for using profile-guided
optimization (PGO) and background telemetry channel (BTC)
What’s New in This Manual
This manual contains updated example screens and procedures for the 4.5
Integrated Development and Debugging Environment (IDDE).
viii VisualDSP++ 4.5 Getting Started Guide
Page 9

Technical or Customer Support
You can reach Analog Devices, Inc. Customer Support in the following
ways:
• Visit the Embedded Processing and DSP products Web site at
http://www.analog.com/processors/technicalSupport
• E-mail tools questions to
processor.tools.support@analog.com
• E-mail processor questions to
embedded.support@analog.com
dsp.support@analog.com
• Phone questions to 1-800-ANALOGD
• Contact your Analog Devices, Inc. local sales office or authorized
distributor
Preface
• Send questions by mail to:
Analog Devices, Inc.
One Technology Way
P.O. Box 9106
Norwood, MA 02062-9106
USA
Supported Processors
The name “Blackfin®” refers to a family of Analog Devices 16-bit,
embedded processors. VisualDSP++ currently supports the following
Blackfin processors:
VisualDSP++ 4.5 Getting Started Guide ix
Page 10

Supported Processors
ADSP-BF531 ADSP-BF532 (formerly ADSP-21532)
ADSP-BF533 ADSP-BF535 (formerly ADSP-21535)
ADSP-BF534 ADSP-BF536
ADSP-BF537 ADSP-BF538
ADSP-BF539 ADSP-BF561
AD6903 AD6531
AD6901 AD6902
The names “SHARC
®
” and “TigerSHARC®” refer to the family of Analog
Devices 32-bit, digital signal processors. VisualDSP++ currently supports
the following SHARC processors.
ADSP-21020 ADSP-21261
ADSP-21060 ADSP-21262
ADSP-21061 ADSP-21266
ADSP-21062 ADSP-21267
ADSP-21065L ADSP-21363
ADSP-21160 ADSP-21364
ADSP-21161 ADSP-21365
VisualDSP++ currently supports the following TigerSHARC processors.
ADSP-TS101 ADSP-TS202
ADSP-TS201 ADSP-TS203
x VisualDSP++ 4.5 Getting Started Guide
Page 11

Preface
Product Information
You can obtain product information from the Analog Devices website,
from the product CD-ROM, or from the printed publications (manuals).
Analog Devices is online at www.analog.com. Our website provides information about a broad range of products—analog integrated circuits,
amplifiers, converters, and digital signal processors.
MyAnalog.com
MyAnalog.com is a free feature of the Analog Devices website that allows
customization of a webpage to display only the latest information on
products you are interested in. You can also choose to receive weekly email
notification containing updates to the webpages that meet your interests.
MyAnalog.com provides access to books, application notes, data sheets,
code examples, and more.
Registration:
Visit www.myanalog.com to sign up. Click Register to use MyAnalog.com.
Registration takes about five minutes and serves as means for you to select
the information you want to receive.
If you are already a registered user, just log on. Your user name is your
email address.
Processor Product Information
For information on embedded processors and DSPs, visit our Web site at
www.analog.com/processors, which provides access to technical publica-
tions, data sheets, application notes, product overviews, and product
announcements.
VisualDSP++ 4.5 Getting Started Guide xi
Page 12

Product Information
You may also obtain additional information about Analog Devices and its
products in any of the following ways.
• E-mail questions or requests for information to
embedded.support@analog.com
dsp.support@analog.com
• Fax questions or requests for information to
1-781-461-3010 (North America)
+49-89-76903-157 (Europe)
• Access the FTP Web site at
ftp ftp.analog.com (or ftp 137.71.25.69)
ftp://ftp.analog.com
Related Documents
For information on product related development software, see these
publications:
• VisualDSP++ 4.5 User’s Guide
• VisualDSP++ 4.5 Assembler and Preprocessor Manual
• VisualDSP++ 4.5 C/C++ Compiler and Library Manual for SHARC
Processors
• VisualDSP++ 4.5 C/C++ Compiler and Library Manual for
TigerSHARC Processors
• VisualDSP++ 4.5 C/C++ Compiler and Library Manual for Blackfin
Processors
• VisualDSP++ 4.5 Linker and Utilities Manual
• VisualDSP++ 4.5 Loader Manual
• VisualDSP++ 4.5 Product Release Bulletin
xii VisualDSP++ 4.5 Getting Started Guide
Page 13

• VisualDSP++ 4.5 Kernel (VDK) User’s Guide
• VisualDSP++ 4.5 Quick Installation Reference Card
For hardware information, refer to your processor’s hardware reference,
programming reference, or data sheet. All documentation is available
online. Most documentation is available in printed form.
Visit the Technical Library Web site to access all processor and tools
manuals and data sheets:
http://www.analog.com/processors/resources/technicalLibrary
Online Technical Documentation
Online documentation comprises VisualDSP++ Help system and tools
manuals, Dinkum Abridged C++ library and FlexLM network license
manager software documentation. You can easily search across the entire
VisualDSP++ documentation set for any topic of interest. For easy printing, supplementary .PDF files for the tools manuals are also provided.
Preface
A description of each documentation file type is as follows.
File Description
.CHM Help system files and VisualDSP++ tools manuals.
.HTML Dinkum Abridged C++ library and FlexLM network license manager software doc-
umentation. Viewing and printing the
net Explorer 5.01 (or higher).
.PDF VisualDSP++ tools manuals in Portable Documentation Format, one .PDF file for
each manual. Viewing and printing the
Adobe Acrobat Reader (4.5 or higher).
.HTML files require a browser, such as Inter-
.PDF files require a PDF reader, such as
VisualDSP++ 4.5 Getting Started Guide xiii
Page 14

Product Information
If documentation is not installed on your system as part of the software
installation, you can add it from the VisualDSP++ CD-ROM at any time
by running the VisualDSP++ installation. Access the online documentation from the VisualDSP++ environment, Windows
®
Explorer, or the
Analog Devices Web site.
Accessing Documentation From VisualDSP++
From the VisualDSP++ environment:
• Access VisualDSP++ online Help from the Help menu’s Contents,
Search, and Index commands.
• Open online Help from context-sensitive user interface items
(toolbar buttons, menu commands, and windows).
Accessing Documentation From Windows
In addition to any shortcuts you may have constructed, there are other
ways to open VisualDSP++ online Help or the supplementary documentation from Windows.
Help system files (.CHM) are located in the Help folder, and .PDF files are
located in the Docs folder of your VisualDSP++ installation CD-ROM.
Using Windows Explorer
• Double-click the vdsp-help.chm file, which is the master Help
system, to access all the other
.CHM files.
• Double-click any file that is part of the VisualDSP++ documentation set.
xiv VisualDSP++ 4.5 Getting Started Guide
Page 15

Preface
Accessing Documentation From the Web
Download manuals at the following Web site:
http://www.analog.com/processors/resources/technicalLibrary/manuals
Select a processor family and book title. Download archive (.ZIP) files, one
for each manual. Use any archive management software, such as WinZip,
to decompress downloaded files.
Printed Manuals
For general questions regarding literature ordering, call the Literature
Center at 1-800-ANALOGD (1-800-262-5643) and follow the prompts.
VisualAudio or VisualDSP++ Documentation Set
To purchase VisualDSP++ manuals, call 1-603-883-2430. The manuals
may be purchased only as a kit.
If you do not have an account with Analog Devices, you are referred to
Analog Devices distributors. For information on our distributors, log onto
http://www.analog.com/salesdir/continent.asp.
Hardware Tools Manuals
®
To purchase EZ-KIT Lite
and In-Circuit Emulator (ICE) manuals, call
1-603-883-2430. The manuals may be ordered by title or by product
number located on the back cover of each manual.
Processor Manuals
Hardware reference and instruction set reference manuals may be ordered
through the Literature Center at 1-800-ANALOGD (1-800-262-5643),
or downloaded from the Analog Devices Web site. Manuals may be
ordered by title or by product number located on the back cover of each
manual.
VisualDSP++ 4.5 Getting Started Guide xv
Page 16

Notation Conventions
Data Sheets
All data sheets (preliminary and production) may be downloaded from the
Analog Devices Web site. Only production (final) data sheets (Rev. 0, A,
B, C, and so on) can be obtained from the Literature Center at
1-800-ANALOGD (1-800-262-5643); they also can be downloaded from
the Web site.
To have a data sheet faxed to you, call the Analog Devices Faxback System
at 1-800-446-6212. Follow the prompts and a list of data sheet code
numbers will be faxed to you. If the data sheet you want is not listed,
check for it on the Web site.
Contacting DSP Publications
Please send your comments and recommendations for improving our
manuals and online Help. You can contact us by sending an email to
dsp.techpubs@analog.com:
Notation Conventions
Text conventions used in this manual are identified and described as
follows.
Example Description
Close command
(File menu)
{this | that} Alternative required items in syntax descriptions appear within curly
[this | that] Optional items in syntax descriptions appear within brackets and
xvi VisualDSP++ 4.5 Getting Started Guide
Titles in reference sections indicate the location of an item within the
VisualAudio environment’s menu system (for example, the Close
command appears on the File menu).
brackets and separated by vertical bars; read the example as
that. One or the other is required.
separated by vertical bars; read the example as an optional this or
.
that
this or
Page 17

Preface
Example Description
[this,…] Optional item lists in syntax descriptions appear within brackets
delimited by commas and terminated with an ellipse; read the example
as an optional comma-separated list of
.SECTION Commands, directives, keywords, and feature names are in text with
letter gothic font.
filename Non-keyword placeholders appear in text with italic style format.
Note: For correct operation, ...
A Note provides supplementary information on a related topic. In the
L
a
[
online version of this book, the word Note appears instead of this
symbol.
Caution: Incorrect device operation may result if ...
Caution: Device damage may result if ...
A Caution identifies conditions or inappropriate usage of the product
that could lead to undesirable results or product damage. In the online
version of this book, the word Caution appears instead of this symbol.
Warn in g: Injury to device users may result if ...
A Warning identifies conditions or inappropriate usage of the product
that could lead to conditions that are potentially hazardous for devices
users. In the online version of this book, the word Wa rnin g appears
instead of this symbol.
this.
L
VisualDSP++ 4.5 Getting Started Guide xvii
Additional conventions, which apply only to specific chapters, may
appear throughout this document.
Page 18

Notation Conventions
xviii VisualDSP++ 4.5 Getting Started Guide
Page 19

1 FEATURES AND TOOLS
This chapter contains the following topics.
• “VisualDSP++ Features” on page 1-1
• “Code Development Tools” on page 1-5
• “Connecting to a Debug Session” on page 1-6
VisualDSP++ Features
VisualDSP++ provides these features:
• Extensive editing capabilities. Create and modify source files by
using multiple language syntax highlighting, drag-and-drop, bookmarks, and other standard editing operations. View files generated
by the code development tools.
• Flexible project management. Specify a project definition that
identifies the files, dependencies, and tools that you use to build
projects. Create this project definition once or modify it to meet
changing development needs.
VisualDSP++ 4.5 Getting Started Guide 1-1
Page 20

VisualDSP++ Features
• Easy access to code development tools. Analog Devices provides
these code development tools: C/C++ compiler, assembler, linker,
splitter, and loader. Specify options for these tools by using dialog
boxes instead of complicated command-line scripts. Options that
control how the tools process inputs and generate outputs have a
one-to-one correspondence to command-line switches. Define
options for a single file or for an entire project. Define these
options once or modify them as necessary.
• Flexible project build options. Control builds at the file or project
level. VisualDSP++ enables you to build files or projects selectively,
update project dependencies, or incrementally build only the files
that have changed since the previous build. View the status of your
project build in progress. If the build reports an error, double-click
on the file name in the error message to open that source file. Then
correct the error, rebuild the file or project, and start a debug
session.
• VisualDSP++ Kernel (VDK) support. Add VDK support to a
project to structure and scale application development. The Kernel
page of the Project window enables you to manipulate events,
event bits, priorities, semaphores, and thread types.
• Flexible workspace management. Create up to ten workspaces and
quickly switch between them. Assigning a different project to each
workspace enables you to build and debug multiple projects in a
single session.
• Easy movement between debug and build activities. Start the
debug session and move freely between editing, build, and debug
activities.
1-2 VisualDSP++ 4.5 Getting Started Guide
Page 21
Features and Tools
Figure 1-1 shows the Integrated Development and Debugging
Environment (IDDE).
Figure 1-1. The VisualDSP++ IDDE
VisualDSP++ 4.5 Getting Started Guide 1-3
Page 22

VisualDSP++ Features
VisualDSP++ reduces debugging time by providing these key features:
• Easy-to-use debugging activities. Debug with one common,
easy-to-use interface for all processor simulators and emulators, or
hardware evaluation and development boards. Switch easily
between these targets.
• Multiple language support. Debug programs written in C, C++, or
assembly, and view your program in machine code. For programs
written in C/C++, you can view the source in C/C++ or mixed
C/C++ and assembly, and display the values of local variables or
evaluate expressions (global and local) based on the current
context.
• Effective debug control. Set breakpoints on symbols and addresses
and then step through the program’s execution to find problems in
coding logic. Set watchpoints (conditional breakpoints) on
registers, stacks, and memory locations to identify when they are
accessed.
• Tools for improving performance. Use the trace, profile, and
linear and statistical profiles to identify bottlenecks in your DSP
application and to identify program optimization needs. Use
plotting to view data arrays graphically. Generate interrupts,
outputs, and inputs to simulate real-world application conditions.
1-4 VisualDSP++ 4.5 Getting Started Guide
Page 23

Code Development Tools
Code development tools include:
• C/C++ compiler
• Run-time library with over 100 math, DSP, and C run-time library
routines
•Assembler
•Linker
• Splitter
•Loader
• Simulator
Features and Tools
• Emulator (must be purchased separately from VisualDSP++)
These tools enable you to develop applications that take full advantage of
your processor’s architecture.
The VisualDSP++ linker supports multiprocessing, shared memory, and
memory overlays.
VisualDSP++ 4.5 Getting Started Guide 1-5
Page 24

Connecting to a Debug Session
The code development tools provide these key features:
• Easy-to-program C, C++, and assembly languages. Program in
C/C++, assembly, or a mix of C/C++ and assembly in one source.
The assembly language is based on an algebraic syntax that is easy
to learn, program, and debug.
• Flexible system definition. Define multiple types of executables for
a single type of processor in one Linker Description File (
Specify input files, including objects, libraries, shared memory
files, overlay files, and executables.
• Support for overlays, multiprocessors, and shared memory
executables. The linker places code and resolves symbols in multiprocessor memory space for use by multiprocessor systems. The
loader enables you to configure multiple processors with less code
and faster boot time. Create host, link port, and PROM boot
images.
.LDF).
Software and hardware tool kits include context-sensitive Help and
manuals in PDF format.
For details about assembly syntax, refer to the VisualDSP++ 4.5 Assembler
and Preprocessor Manual for your target processor.
Connecting to a Debug Session
From the Windows Start menu, navigate to the VisualDSP++ environment via the Programs menu. After a second or two, the main
VisualDSP++ window appears on the screen. When VisualDSP++
launches for the first time, it does not connect to any session (Figure 1-2).
1-6 VisualDSP++ 4.5 Getting Started Guide
Page 25
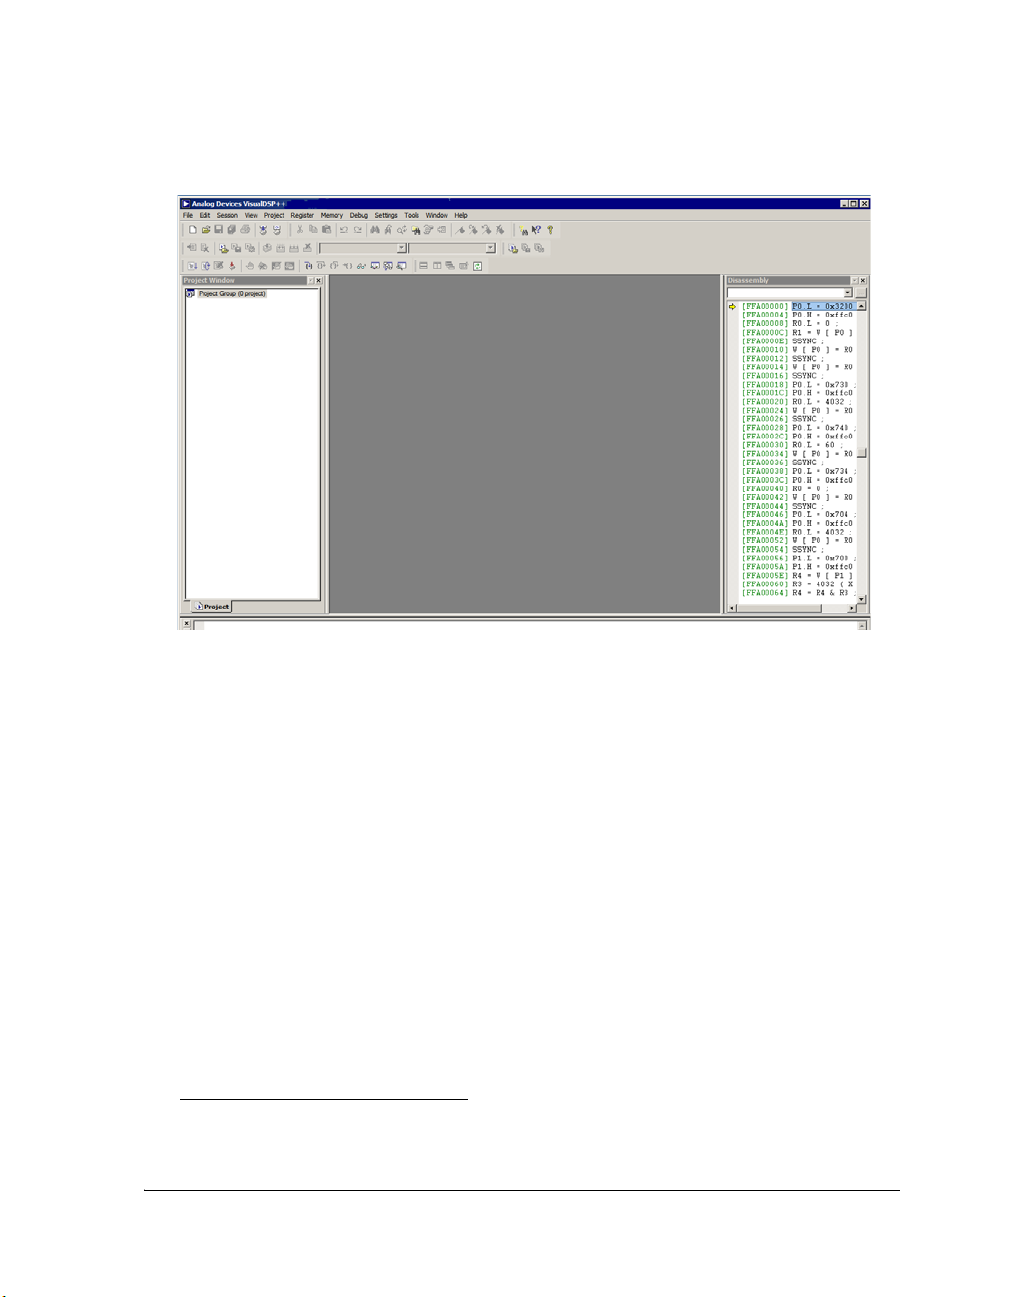
Features and Tools
Figure 1-2. VisualDSP++ Main Window
VisualDSP++ is able to connect to a number of different debug sessions,
where each session has its own application and benefits. The session types
available with VisualDSP++ are
1
:
• EZ-KIT Lite. This is the dedicated USB connection between the
PC and EZ-KIT Lite. An EZ-KIT connection is simple to manage
and is part of the EZ-KIT Lite. However, the connection is available with the kit only. Once your custom hardware board is
available for development, you use an emulator session (described
below) to connect to the custom hardware.
• Simulator. This is a software model of the processor. Simulators
offer unique advantages, the first is that no external hardware is
required, a great benefit when using VisualDSP++ on the road.
1
Third-party software may add additional session types.
VisualDSP++ 4.5 Getting Started Guide 1-7
Page 26

Connecting to a Debug Session
Furthermore, simulators offer a unique insight to the internal
workings of the processor (pipelines, caches, and more), which is
not possible with hardware-based sessions. The downside is that a
simulator is several orders of magnitude slower than actual hardware. The software model simulates only the processor, making it
difficult to accurately simulate a complex system that involves
more than the processor.
VisualDSP++ includes two types of Blackfin simulators:
a cycle-accurate interpreted and a functional compiled one. A
cycle-accurate simulator is a completely accurate model of the
Blackfin processor and allows you to fully visualize the inner-workings of the processor. The compiled simulator sacrifices the
detailed view but allows you to simulate much more quickly, millions of cycles per second, depending on the speed of your PC.
• Emulator. This is a JTAG emulator, the ideal device for connect-
ing to hardware, giving the best performance and maximum
flexibility. A separate module from the PC and EZ-KIT Lite, an
emulator provides a high-bandwidth connection between the PC
and device being debugged. Currently, Analog Devices offers USBand PCI- based emulators. An emulator is required to connect to
any non-EZ-KIT Lite hardware.
• Legacy target. This is a target created in VisualDSP++ 4.0 or a
prior version.
1-8 VisualDSP++ 4.5 Getting Started Guide
Page 27

2 BASIC TUTORIAL
This chapter contains the following topics.
• “Overview” on page 2-1
• “Exercise One: Building and Running a C Program” on page 2-3
• “Exercise Two: Modifying a C Program to Call an Assembly Rou-
tine” on page 2-16
• “Exercise Three: Plotting Data” on page 2-33
• “Exercise Four: Linear Profiling” on page 2-47
Overview
The Basic Tutorial demonstrates key features and capabilities of the
VisualDSP++ Integrated Development and Debugging Environment
(IDDE). The exercises use sample programs written in C and assembly for
Blackfin processors.
You can use different Blackfin processors with only minor changes to the
Linker Description Files (.LDFs) included with each project. VisualDSP++
includes basic Linker Description Files for each processor type in the
folder. For Blackfin processors, the folder’s default installation path is:
Program Files\Analog Devices\VisualDSP 4.5\Blackfin\ldf
The source files for these exercises are installed during the VisualDSP++
software installation.
VisualDSP++ 4.5 Getting Started Guide 2-1
ldf
Page 28
Overview
The tutorial contains four exercises:
•In Exercise One, you start up VisualDSP++, build a project
containing C source code, and profile the performance of a C
function.
•In Exercise Two, you create a new project, create a Linker
Description File to link with the assembly routine, rebuild the
project, and profile the performance of the assembly language
routine.
•In Exercise Three, you plot the various waveforms produced by a
Finite Impulse Response (FIR) algorithm.
•In Exercise Four, you use linear profiling to examine the efficiency
of the FIR algorithm used in Exercise Three. Using the collected
linear profile data, you pinpoint the most time-consuming areas of
the algorithm, which are likely to require hand tuning in the
assembly language.
The ADSP-BF5xx Family Simulator and ADSP-BF533 processor are used
for all exercises.
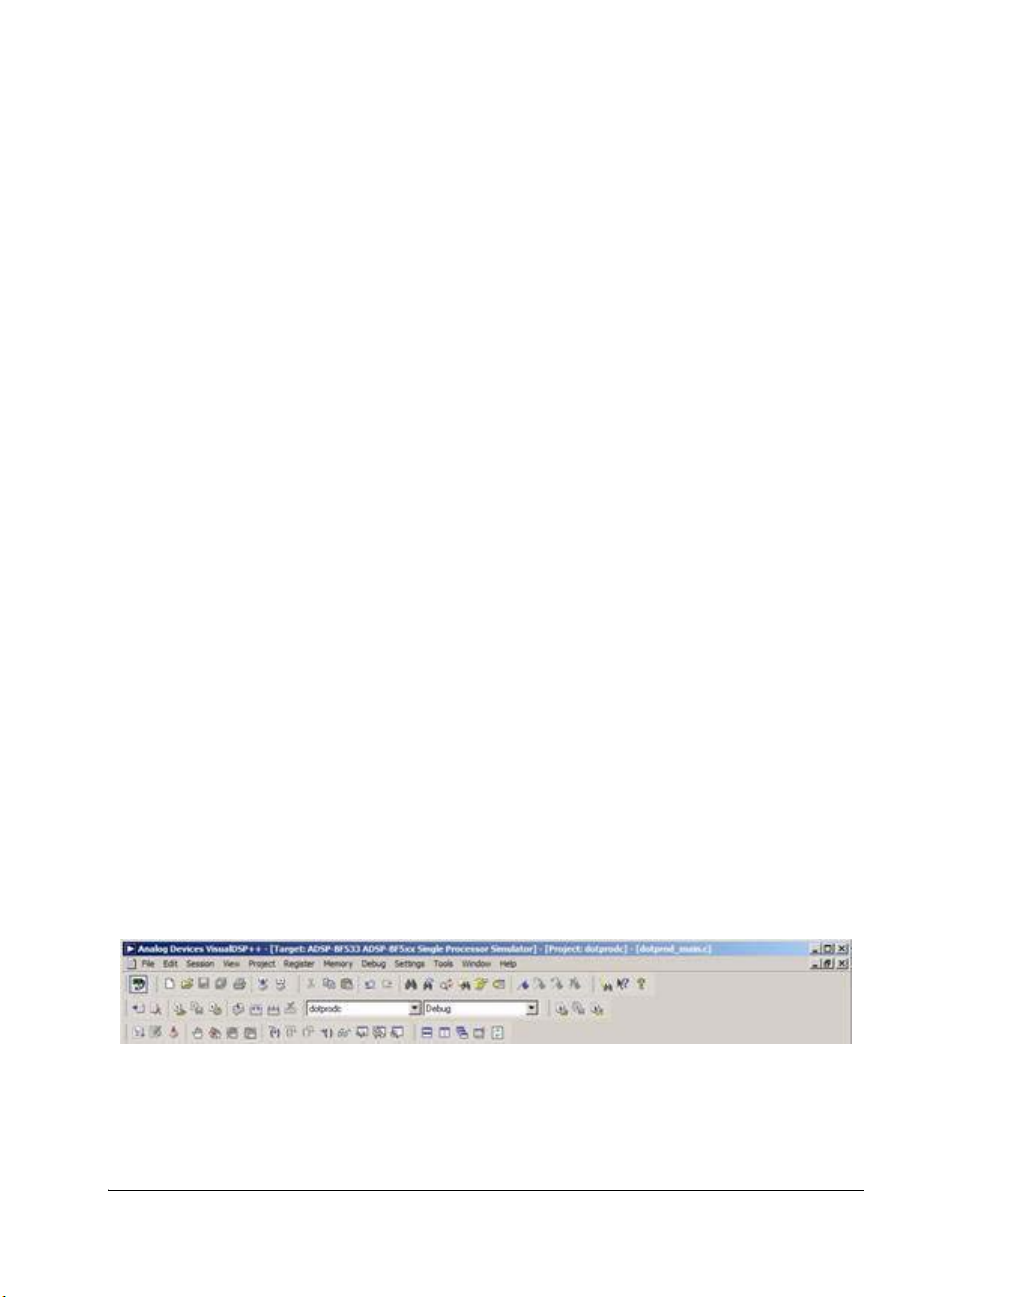
Tip: Become familiar with the VisualDSP++ toolbar buttons, shown in
Figure 2-1. They are shortcuts for menu commands such as Open a file
and Run a program. Toolbar buttons and menu commands that are not
available for tasks are disabled and displayed in gray.
Figure 2-1. VisualDSP++ Toolbar Buttons
2-2 VisualDSP++ 4.5 Getting Started Guide
Page 29

Basic Tutorial
L
VisualDSP++ is a licensed software product. To run the software,
you must have a valid license installed on your system. If you try to
run VisualDSP++ and a license is not installed, a message window
opens to let you add a license. For details about license management, see the VisualDSP++ 4.5 User’s Guide or VisualDSP++
online Help.
Exercise One: Building and Running a C Program
In this exercise, you:
• Start up the VisualDSP++ environment
• Open and build an existing project
• Examine windows and dialog boxes
• Run the program
The sources for this exercise are in the dot_product_c folder. The default
installation path is:
Program Files\Analog Devices\VisualDSP 4.5\Blackfin\Examples\
Tutorial\dot_product_c
Step 1: Start VisualDSP++ and Open a Project
To start VisualDSP++ and open a project:
1. Click the Windows Start button and select Programs, Analog
Devices, VisualDSP++ 4.5, and VisualDSP++ Environment.
If you are running VisualDSP++ for the first time, you will not be
connected to a debug target. In VisualDSP++ 4.5, it is possible to
edit and build your code without being connection to a debug tar-
VisualDSP++ 4.5 Getting Started Guide 2-3
Page 30

Exercise One: Building and Running a C Program
get through a debug session. When you are ready to run and debug
your program, you can quickly connect to a target and disconnect
when you are finished. Doing so eliminates the overhead associated
with the target connection, resulting in a smoother and more
responsive experience.
• When you need to connect to a debug session, click the Connect to
Target toolbar button or choose from the available sessions listed
under Select Session in the Session menu. To create a debug session, select New Session from the Session menu. This will launch
the Session Wizard, which is covered in more detail later. See
Figure 2-7.
If you have already run VisualDSP++ and the Reload last project at
startup option is selected on the Project page under Settings and
Preferences, VisualDSP++ opens the last project that you worked
on. To close this project, choose Close and then Project from the
File menu, and then click No when prompted to save the project.
2. From the File menu, choose Open and then Project.
VisualDSP++ displays the Open Project dialog box.
3. In the Look in box, open the
folder and double-click the following subfolders in succession.
VisualDSP 4.5\Blackfin\Examples\Tutorial\dot_product_c
This path is based on the default installation.
Program Files\Analog Devices
L
2-4 VisualDSP++ 4.5 Getting Started Guide
Page 31

Basic Tutorial
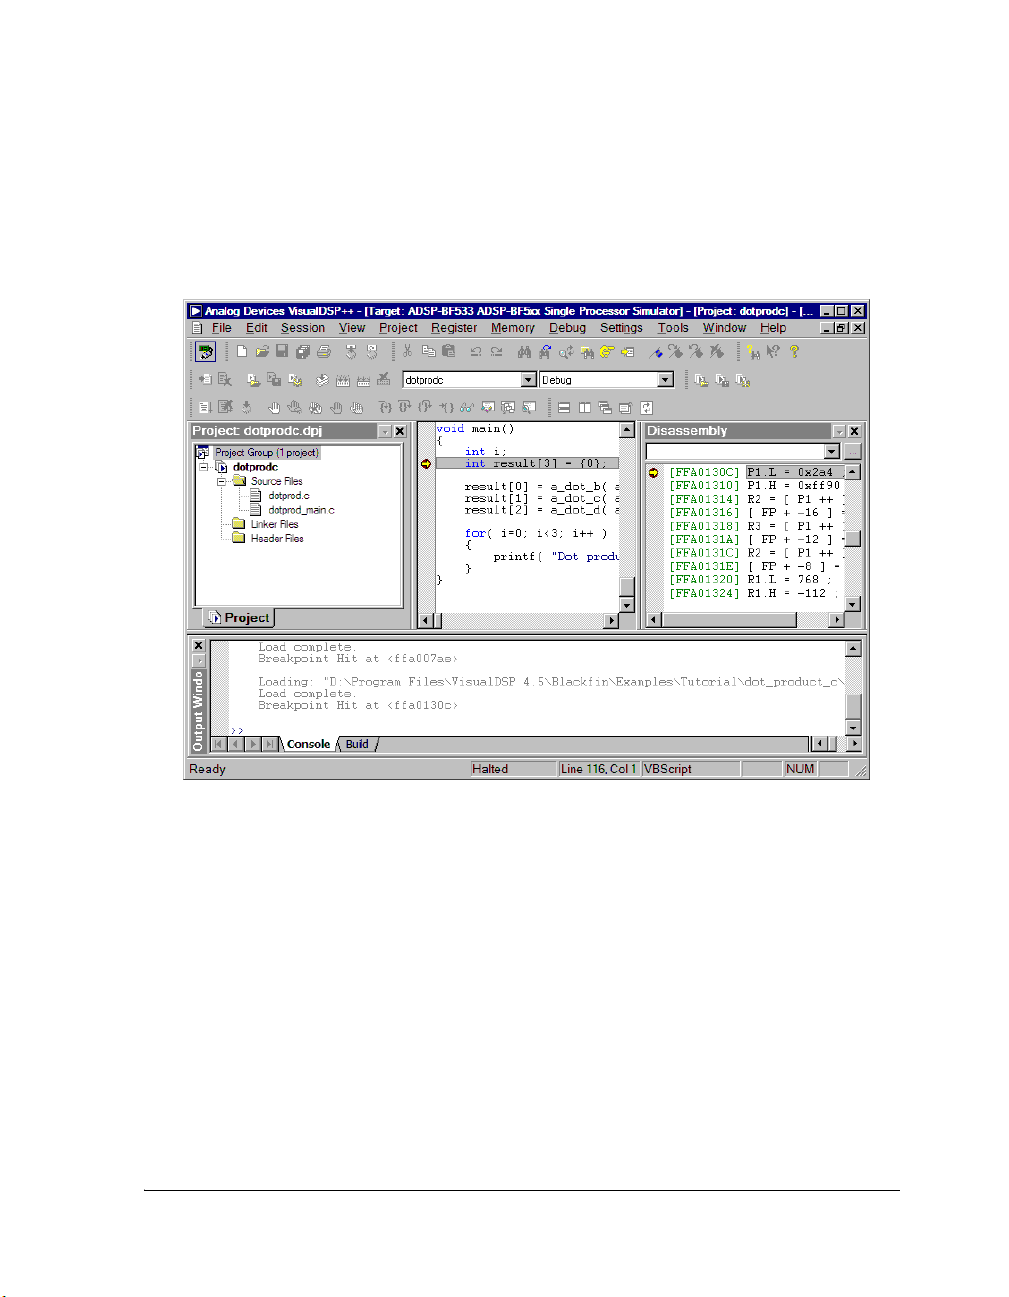
4. Double-click the
dotprodc project (.dpj) file.
VisualDSP++ loads the project in the Project window, as shown in
Figure 2-2. The environment displays messages in the Output
window as it processes the project settings and file dependencies.
Figure 2-2. Project Loaded in the Project Window
The dotprodc project comprises two C language source files,
dotprod.c and dotprod_main.c, which define the arrays and
calculate their dot products.
VisualDSP++ 4.5 Getting Started Guide 2-5
Page 32

Exercise One: Building and Running a C Program
5. From the Settings menu, choose Preferences to open the
Preferences dialog box, shown in Figure 2-3.
Figure 2-3. Preferences Dialog Box
6. On the General page, under General Preferences, ensure that the
following options are selected.
• Run to main after load
• Load executable after build
7. Click OK to close the Preferences dialog box.
The VisualDSP++ main window appears. You are now ready to
build the project.
2-6 VisualDSP++ 4.5 Getting Started Guide
Page 33

Step 2: Build the dotprodc Project
To build the dotprodc project:
1. From the Project menu, choose Build Project.
VisualDSP++ first checks and updates the project dependencies
and then builds the project by using the project source files.
As the build progresses, the Output window displays status
messages (error and informational) from the tools. For example,
when a tool detects invalid syntax or a missing reference, the tool
reports the error in the Output window.
If you double-click the file name in the error message,
VisualDSP++ opens the source file in an editor window. You can
then edit the source to correct the error, rebuild, and launch the
debug session. If the project build is up-to-date (the files,
dependencies, and options have not changed since the last project
build), no build is performed unless you run the Rebuild All
command. Instead, you see the message “Project is up to date.”
If the build has no errors, a message reports “Build completed
successfully.”
Basic Tutorial
VisualDSP++ 4.5 Getting Started Guide 2-7
Page 34

Exercise One: Building and Running a C Program
In this example (Figure 2-4) notice that the compiler detects an
undefined identifier and issues the following error in the Build
view of the Output window.
Figure 2-4. Example of Error Message
2. Double-click the error message text in the Output window.
VisualDSP++ opens the C source file
dotprod_main.c in an editor
window and places the cursor on the line that contains the error
(see Figure 2-5).
The editor window in Figure 2-5 shows that the integer variable
declaration int has been misspelled as itn.
2-8 VisualDSP++ 4.5 Getting Started Guide
Page 35

Basic Tutorial
Figure 2-5. Output Window and Editor Window
3. In the editor window, click on itn and change it to int. Notice
that int is now color coded to signify that it is a valid C keyword.
4. Save the source file by choosing File dotprod_main.c from the
File→Save menu.
5. Build the project again by choosing Build Project from the Project
menu. The project is now built without any errors, as reported in
the Build view of the Output window.
VisualDSP++ 4.5 Getting Started Guide 2-9
Page 36

Exercise One: Building and Running a C Program
Now that you have built your project successfully, you can run the
example program.
Step 3: Run the Program
In this procedure, you:
• Set up the debug session before running the program
• View debugger windows and dialog boxes
Since you enabled Load executable after build on the General page in the
Preferences dialog box, the executable file dotprodc.dxe is automatically
downloaded to the target. If you are not connected to a debug target,
VisualDSP++ will prompt you to connect to one using an existing debug
session, or create a new debug session. Choose the Select a session or cre-
ate a new session option as shown in Figure 2-6.
Figure 2-6. No Session Selected
Click OK to create a new session. This will launch the Session Wizard,
shown in Figure 2-7.
2-10 VisualDSP++ 4.5 Getting Started Guide
Page 37

Basic Tutorial
Figure 2-7. Session Wizard
VisualDSP++ 4.5 Getting Started Guide 2-11
Page 38

Exercise One: Building and Running a C Program
The Session Wizard guides you through the process of specifying your
debug session, including the processor, connection type, and platform. To
set up the debug session:
1. On the Select Processor page, select the ADSP-BF533 processor
from the Blackfin family. Click Next to continue.
2. On the Select Connection Type page, select Simulator, and click
Next to continue.
3. On the Select Platform page, select ADSP-BF5xx Single Processor
Simulator. You can either use the default Session name, or give it a
more meaningful name of your choosing. Click Next to review
your choices, then click Finish
VisualDSP++ closes the Session Wizard dialog box, automatically
loads your project’s executable file (
dotprodc.dxe), and advances to
the main function of your code (see Figure 2-8).
4. Look at the information in the open windows.
The Output window’s Console page contains messages about the
status of the debug session. In this case, VisualDSP++ reports that
the dotprodc.dxe load is complete.
The Disassembly window displays the assembly code for the
executable. Use the scroll bars to move around the Disassembly
window.
Note that a solid red circle and a yellow arrow appear at the start of
the program labeled “
main”. The solid red circle ( ) indicates that
a breakpoint is set on that instruction, and the yellow arrow ( )
indicates that the processor is currently halted at that instruction.
When VisualDSP++ loads your C program, it automatically sets
several breakpoints. Most of the breakpoints set are used as part of
advanced features of VisualDSP++. There are two breakpoints of
2-12 VisualDSP++ 4.5 Getting Started Guide
Page 39

Basic Tutorial
Figure 2-8. Loading dotprodc.dxe
interest for this tutorial, one at the beginning and one at the end of
code execution. Your breakpoint locations may differ slightly from
those shown in the examples in this book.
5. From the Settings menu, choose Breakpoints to view the breakpoints set in your program. VisualDSP++ displays the Breakpoints
dialog box, shown in Figure 2-9.
VisualDSP++ 4.5 Getting Started Guide 2-13
Page 40

Exercise One: Building and Running a C Program
Figure 2-9. Breakpoints Dialog Box
2-14 VisualDSP++ 4.5 Getting Started Guide
Page 41

Basic Tutorial
The two breakpoints of interest are set at these C program
locations:
•
at main + 0x04
• at __lib_prog_term
The active page of the Breakpoints dialog box enables you to view,
add, and delete breakpoints and to browse for symbols. The automatic page allows you to choose which breakpoints to set
automatically each time your program is loaded. In the Disassem-
bly and editor windows, double-clicking on a line of code toggles
(adds or deletes) breakpoints. In the editor window, however, you
must place the mouse pointer in the gutter before double-clicking.
These tool buttons set or clear breakpoints:
Toggles a breakpoint for the current line
Clears all breakpoints
6. Click OK or Cancel to exit the Breakpoints dialog box.
Step 4: Run dotprodc
To run dotprodc, click the Run button or choose Run from the
Debug menu.
VisualDSP++ 4.5 Getting Started Guide 2-15
Page 42

Exercise Two: Modifying a C Program to Call an Assembly Routine
VisualDSP++ computes the dot products and displays the following
results on the Console view (Figure 2-10) of the Output window.
Dot product [0] = 13273595
Dot product [1] = –49956078
Dot product [2] = 35872518
Figure 2-10. Results of the dotprodc Program
You are now ready to begin Exercise Two.
Exercise Two: Modifying a C Program to
Call an Assembly Routine
In Exercise One, you built and ran a C program. In this exercise, you:
• Modify the C program to call an assembly language routine
• Create a Linker Description File to link with the assembly routine
• Rebuild the project
The project files are largely identical to those of Exercise One. Minor
modifications illustrate the changes needed to call an assembly language
routine from C source code.
2-16 VisualDSP++ 4.5 Getting Started Guide
Page 43

Step 1: Create a New Project
To create a new project:
1. From the File menu, choose Close and then Project dotprodc to
close the dotprodc project.
Click Yes when prompted to close all open source windows.
If you have modified your project during this session, you are
prompted to save the project. Click No.
Basic Tutorial
VisualDSP++ 4.5 Getting Started Guide 2-17
Page 44

Exercise Two: Modifying a C Program to Call an Assembly
Routine
2. From the File menu, choose New and then Project to open the
Project Wizard, shown in Figure 2-11.
Figure 2-11. Project Wizard – General Page
3. In the Name field, type
dot_product.asm.
2-18 VisualDSP++ 4.5 Getting Started Guide
Page 45

Basic Tutorial
4. Click the browse button to the right of the Directory field to
open the Browse For Folder dialog box. Locate the
dot_product_asm
tutorial folder and click OK. By default this directory is in the following location.
Program Files\Analog Devices\VisualDSP 4.5\Blackfin\
Examples\Tutorial\dot_product_asm
5. Click Next to bring up the Output Type page.
6. Verify that the Processor type is ADSP-BF533, the Silicon Revi-
sion is Automatic, and the Project output file is Executable file.
Click Next to display the Add Startup Code/LDF page.
7. Read the displayed text, and scroll down to the bottom of the page.
Select the Add an LDF and startup code option. When this project
is created, startup code that initializes and configures the processor
will be added to the project, as will a Linker Description File that
defines the target memory map and the placement of program sections within processor memory. The options available to configure
the startup code and LDF are beyond the scope of this tutorial.
Make sure the Add an LDF and startup code option is selected,
and click Finish. The new project is created and is shown in the
Project window of the IDDE.
VisualDSP++ 4.5 Getting Started Guide 2-19
Page 46

Exercise Two: Modifying a C Program to Call an Assembly
Routine
8. From the Project menu click the Project Options command to
display the Project Options dialog box (Figure 2-12).
Figure 2-12. Project Options Dialog Box – Project Page
This dialog box enables you to specify project build information.
9. Take a moment to view the various pages in the Project Options
dialog box by selecting them from the tree on the left: Project,
General, Compile, Assemble, Link, Load, Pre-Build, and
Post-Build. On each page, you specify the tool options used to
build the project.
2-20 VisualDSP++ 4.5 Getting Started Guide
Page 47

Basic Tutorial
10.On the Project page (Figure 2-12), verify that the values shown in
Table 2-1 are entered here.
Table 2-1. Completing the Project Page
Field Value
Processor ADSP-BF533
Revision Automatic
Type Executable file
Name dot_product_asm
Settings for configuration Debug
These settings specify information for building an executable file
for the ADSP-BF533 processor. The executable contains debug
information, so you can examine program execution.
11.Click the Compile tab to display the General page, shown in
Figure 2-13.
VisualDSP++ 4.5 Getting Started Guide 2-21
Page 48

Exercise Two: Modifying a C Program to Call an Assembly
Routine
Figure 2-13. Project Options Dialog Box – Compile Page
12.Specify these settings in the Code Generation group box:
a. Select the Enable optimization check box to enable
optimization.
b. Select the Generate debug information check box, if it is
not already selected, to enable debug information for the C
source.
2-22 VisualDSP++ 4.5 Getting Started Guide
Page 49

Basic Tutorial
These settings direct the C compiler to optimize code for the
ADSP-BF533 processor. Because the optimization takes advantage
of DSP architecture and assembly language features, some of the C
debug information is not saved. Therefore, debugging is performed
through debug information at the assembly language level.
13. Click OK to apply changes to the project options and to close the
Project Options dialog box.
You are now ready to add the source files to the project.
VisualDSP++ 4.5 Getting Started Guide 2-23
Page 50

Exercise Two: Modifying a C Program to Call an Assembly
Routine
Step 2: Add Source Files to dot_product_asm
To add the source files to the new project:
1. Click the Add File button , or from the Project menu, choose
Add to Project, and then choose File(s).
The Add Files dialog box (Figure 2-14) appears.
Figure 2-14. Add Files Dialog Box – Adding Source Files to the Project
2. In the Look in box, locate the project folder,
dot_product_asm.
3. In the Files of type box, select All Source Files from the
drop-down list.
4. Hold down the Ctrl key and click dotprod.c and dotprod_main.c.
Then click Add.
2-24 VisualDSP++ 4.5 Getting Started Guide
Page 51

Basic Tutorial
To display the files that you added in step 4, open the
Files folder in the Project window.
Source
5. Click the Rebuild All button ( ) to build the project. The C
source file opens in an editor window, and execution halts.
The C version of the project is now complete. You are now ready to modify the sources to call the assembly function.
Step 3: Modify the Project Source Files
In this procedure, you:
•Modify dotprod_main.c to call a_dot_c_asm instead of a_dot_c
• Save the modified file
To modify dotprod_main.c to call the assembly function:
1. Resize or maximize the editor window for better viewing.
2. From the Edit menu, choose Find to open the Find dialog box,
shown in Figure 2-15.
Figure 2-15. Find Dialog Box: Locating Occurrences of /*
VisualDSP++ 4.5 Getting Started Guide 2-25
Page 52

Exercise Two: Modifying a C Program to Call an Assembly
Routine
3. In the Find What box, type
/*, and then click Mark All.
The editor bookmarks all lines containing /* and positions the
cursor at the first instance of /* in the extern int a_dot_c_asm
declaration.
4. Select the comment characters /* and use the Ctrl+X key combination to cut the comment characters from the beginning of the
a_dot_c_asm declaration. Then move the cursor up one line and
use the Ctrl+V key combination to paste the comment characters
at the beginning of the a_dot_c declaration. Because syntax
coloring is turned on, the code changes color as you cut and paste
the comment characters.
Repeat this step for the end-of-comment characters */ at the end of
the a_dot_c_asm declaration. The a_dot_c declaration is now fully
commented out, and the a_dot_c_asm declaration is no longer
commented.
5. Press F2 to move to the next bookmark.
The editor positions the cursor on the /* in the function call to
a_dot_c_asm, which is currently commented out. Note that the
previous line is the function call to the a_dot_c routine.
6. Press Ctrl+X to cut the comment characters from the beginning of
the function call to
a_dot_c_asm. Then move the cursor up one
line and press Ctrl+V to paste the comment characters at the beginning of the call to
a_dot_c.
Repeat this step for the end-of-comment characters */. The main()
function is now calling the a_dot_c_asm routine instead of the
a_dot_c function (previously called in Exercise One).
Figure 2-16 shows the changes made in step 6.
2-26 VisualDSP++ 4.5 Getting Started Guide
Page 53

Basic Tutorial
Figure 2-16. Modifying dotprod_main.c to Call a_dot_c_asm
7. From the File menu, choose Save and then File dotprod_main.c to
save the changes to the file.
8. Place the cursor in the editor window. Then, from the File menu,
choose Close and then File dotprod_main.c to close the
dotprod_main.c file.
You are now ready to modify
dotprodasm.ldf.
VisualDSP++ 4.5 Getting Started Guide 2-27
Page 54

Exercise Two: Modifying a C Program to Call an Assembly
Routine
Step 4: Use the Expert Linker to Modify dot_prod_asm.ldf
In this procedure you:
• View the Expert Linker representation of the
.LDF file that you
created
• Modify the
.LDF file to map in the section for the a_dot_c_asm
assembly routine
To examine and then modify dot_prod_asm.ldf to link with the assembly
function:
1. Click the Add File button .
2. Select dotprod_func.asm and click Add.
3. Build the project by performing one of these actions:
• Click the Build Project button .
• From the Project menu, choose Build Project.
4. Notice the error in the Output window (Figure 2-17).
Figure 2-17. Output Window: Linker Error
2-28 VisualDSP++ 4.5 Getting Started Guide
Page 55

Basic Tutorial
5. In the Project window, double-click in the
dot_prod_asm.ldf file.
The Expert Linker window (Figure 2-18) opens with a graphical
representation of your file.
Resize the window to expand the view and change the view mode.
To display the tree view shown in Figure 2-18, right-click in the
right pane, choose View Mode, and then choose Memory Map
Tree.
The left pane (Input Sections) contains a list of the input sections
that are in your project or are mapped in the .LDF file. A red X is
over the icon in front of the section named “my_asm_section”
because Expert Linker has determined that the section is not
mapped by the .LDF file.
The right pane (Memory Map) contains a representation of the
memory segments that Expert Linker defined when it created the
.LDF file.
Figure 2-18. Expert Linker Window
VisualDSP++ 4.5 Getting Started Guide 2-29
Page 56

Exercise Two: Modifying a C Program to Call an Assembly
Routine
6. Map
my_asm_section into the memory segment named MEM_PROGRAM
as follows.
In the Input Sections pane, open my_asm_section by clicking on
the plus sign in front of it. The input section expands to show that
the linker macros $COMMAND_LINE_OBJECTS and $OBJECTS and the
object file dotprod_func.doj have a section that has not been
mapped. In the Memory Map pane, expand MEM_L1_CODE and drag
the icon in front of $OBJECTS onto the program_ram output section
under MEM_L1_CODE.
As shown in Figure 2-19, the red X should no longer appear
because the section my_asm_section has been mapped.
Figure 2-19. Dragging $OBJECTS onto Program Output Section
2-30 VisualDSP++ 4.5 Getting Started Guide
Page 57

Basic Tutorial
7. From the Tools menu, choose Expert Linker and Save to save the
modified file. Then close the Expert Linker window.
If you forget to save the file and then rebuild the project,
VisualDSP++ will see that you modified the file and will
automatically save it.
You are now ready to rebuild and run the modified project.
Step 5: Rebuild and Run dot_product_asm
To run dot_product:
1. Build the project by performing one of these actions:
• Click the Build Project button .
• From the Project menu, choose Build Project.
At the end of the build, the Output window displays this message
in the Build view:
“Build completed successfully.”
VisualDSP++ loads the program, runs to main, and displays the
Output, Disassembly, and editor windows (shown in Figure 2-20).
VisualDSP++ 4.5 Getting Started Guide 2-31
Page 58

Exercise Two: Modifying a C Program to Call an Assembly
Routine
Figure 2-20. Windows Left Open from the Previous Debugger Session
2. Click the Run button to run
dot_product_asm.
The program calculates the three dot products and displays the
results in the Console view of the Output window. When the
program stops running, the message “Halted” appears in the status
bar at the bottom of the VisualDSP++ main window. The results,
shown below, are identical to the results obtained in Exercise One.
Dot product [0] = 13273595
Dot product [1] = –49956078
Dot product [2] = 35872518
You are now ready to begin Exercise Three.
2-32 VisualDSP++ 4.5 Getting Started Guide
Page 59

Exercise Three: Plotting Data
In this exercise, you:
• Load and debug a prebuilt program that applies a simple Finite
Impulse Response (FIR) filter to a buffer of data
• Use VisualDSP++’s plotting engine to view the different data arrays
graphically, both before and after running the program
Step 1: Load the FIR Program
To load the FIR program:
1. Keep the Disassembly window and Console page (of the Output
window) open, but close all other windows.
2. From the File menu, choose Load Program or click . The
Open a Processor Program dialog box appears.
Basic Tutorial
3. Select the FIR program to load as follows.
a. Open the Analog Devices folder and double-click:
VisualDSP 4.5\Blackfin\Examples\Tutorial\fir
b. Double-click the Debug subfolder.
c. Double-click FIR.DXE to load the program.
If VisualDSP++ does not open an editor window (shown in
Figure 2-21), right-click in the Disassembly window and
select View Source.
VisualDSP++ 4.5 Getting Started Guide 2-33
Page 60

Exercise Three: Plotting Data
Figure 2-21. Loading the FIR Program
4. Look at the source code of the FIR program.
You can see two global data arrays:
•
IN
• OUT
You can also see one function, fir, that operates on these arrays.
2-34 VisualDSP++ 4.5 Getting Started Guide
Page 61

You are now ready to open a plot window.
Step 2: Open a Plot Window
To open a plot window:
1. From the View menu, choose Debug Windows and Plot. Then
choose New to open the Plot Configuration dialog box, shown in
Figure 2-22.
Here you add the data sets that you want to view in a plot window.
Basic Tutorial
Figure 2-22. Plot Configuration Dialog Box
VisualDSP++ 4.5 Getting Started Guide 2-35
Page 62

Exercise Three: Plotting Data
2. In the Plot group box, specify the following values.
•In the Type box, select Line Plot from the drop-down list.
•In the Title box, type
fir.
3. Enter two data sets to plot by using the values in Table 2-2.
Table 2-2. Two Data Sets: Input and Output
Box Input Data
Set
Name Input Output Data set
Memory BLACKFIN
Memory
Address IN OUT The address of this data set is that of the
Count 128 128 The array is 260 elements long, but you are
Stride 1 1 The data is contiguous in memory.
Data short short Input and Output are arrays of int values.
Output Data
Set
BLACKFIN
Memory
Description
Data memory
Input or Output array.
Click Browse to select the value from the list
of loaded symbols.
plotting the first 128 elements.
After entering each data set, click Add to add the data set to the
Data sets list on the left of the dialog box.
The Plot Configuration dialog box should now look like the one in
Figure 2-23.
2-36 VisualDSP++ 4.5 Getting Started Guide
Page 63

Basic Tutorial
Figure 2-23. Plot Configuration Dialog Box with Input/Output Data Sets
4. Click OK to apply the changes and to open a plot window with
these data sets.
The plot window now displays the two arrays. By default, the
simulator initializes memory to zero, so the Output data set
appears as one horizontal line, shown in Figure 2-24.
VisualDSP++ 4.5 Getting Started Guide 2-37
Page 64

Exercise Three: Plotting Data
Figure 2-24. Plot Window: Before Running the FIR Program
Resizing the plot window changes the scale on the x and y axis.
L
5. Right-click in the plot window and choose Modify Settings. On
the General page, in the Options group box, select Legend and
click OK to display the legend box.
Step 3: Run the FIR Program and View the Data
To run the FIR program and view the data:
1. Press F5 or click the Run button to run to the end of the
program.
When the program halts, you see the results of the FIR filter in the
Output array. The two data sets are visible in the plot window, as
shown in Figure 2-25.
2-38 VisualDSP++ 4.5 Getting Started Guide
Page 65

Basic Tutorial
Figure 2-25. Plot Window After Running the FIR Program to Completion
Next you will zoom in on a particular region of interest in the plot
window to focus in on the data.
VisualDSP++ 4.5 Getting Started Guide 2-39
Page 66

Exercise Three: Plotting Data
2. Click the left mouse button inside the plot window and drag the
mouse to create a rectangle around the area of interest. Then
release the mouse button to magnify the selected region.
Figure 2-26 shows the selected region, and Figure 2-27 shows the
magnified result.
Figure 2-26. Plot Window: Selecting a Region to Magnify
2-40 VisualDSP++ 4.5 Getting Started Guide
Page 67

Basic Tutorial
Figure 2-27. Plot Window: Magnified Result
To return to the previous view (before magnification), right-click
in the plot window and choose Reset Zoom from the pop-up
menu. You can view individual data points in the plot window by
enabling the data cursor, as explained in the next step.
3. Right-click inside the plot window and choose Data Cursor from
the pop-up menu. Move to each data point in the current data set
by pressing and holding the Left (←) or Right (→) arrow key on
the keyboard. To switch data sets, press the Up (↑) or Down (↓)
arrow key. The value of the current data point appears in the
lower-left corner of the plot window, as shown in Figure 2-28.
VisualDSP++ 4.5 Getting Started Guide 2-41
Page 68

Exercise Three: Plotting Data
Figure 2-28. Plot Window: Using the Data Cursor Feature
4. Right-click in the plot window and choose Data Cursor from the
pop-up menu.
Next you will look at data sets in the frequency domain.
5. Right-click in the plot window and choose Modify Settings to
open the Plot Settings dialog box.
2-42 VisualDSP++ 4.5 Getting Started Guide
Page 69

6. Complete these steps:
a. Click the Data Processing tab to display the Data Process-
ing page, shown in Figure 2-29.
Basic Tutorial
Figure 2-29. Data Processing Page
b. In the Data Sets box, ensure that Input (the default) is
selected. In the Data Process box, choose FFT Magnitude.
c. In the Sample rate (Hz) box, type 10000.
d. In the Data Sets box, select Output. In the Data Process
box, choose FFT Magnitude
VisualDSP++ 4.5 Getting Started Guide 2-43
Page 70

Exercise Three: Plotting Data
e. Click OK to exit the Plot Settings dialog box.
VisualDSP++ performs a Fast Fourier Transform (FFT) on
the selected data set before it is plotted. The FFT enables
you to view the signal in the frequency domain, as shown in
Figure 2-30.
Figure 2-30. FFT Performed on a Selected Data Set
Now, complete the following steps to look at the FIR filter’s response in
the frequency domain.
1. From the View menu, choose Debug Windows and Plot. Then
choose New to open the Plot Configuration dialog box.
2. Set up the Filter Frequency Response plot by completing the Plot
and Data Setting group boxes as shown in Figure 2-31.
2-44 VisualDSP++ 4.5 Getting Started Guide
Page 71

Basic Tutorial
Figure 2-31. Filter Frequency Response Data Set
3. Click Add to add the data set to the Data sets box.
4. Click OK to apply the changes and to open the plot window with
this data set.
5. Right-click in the plot window and choose Modify Settings to
open the Plot Settings dialog box.
VisualDSP++ 4.5 Getting Started Guide 2-45
Page 72

Exercise Three: Plotting Data
6. Click the Data Processing tab to display the Data Processing page,
shown in Figure 2-29 on page 2-43. Complete this page as follows.
a. In the Data Sets box, select h.
b. In the Data Process box, choose FFT Magnitude.
c. In the Sample rate (Hz) box, type 10000.
d. Click OK to exit the Data Processing page.
VisualDSP++ performs a Fast Fourier Transform (FFT) on the
selected data set, and enables you to view the filter response plot in
the frequency domain, as shown in Figure 2-32.
Figure 2-32. Filter Frequency Response Plot
This plot shows that the low-pass FIR filter cuts off all frequency
components above 4,000 Hz. When you apply a low-pass filter to
the input signal, the resulting signal has no output above 4,000 Hz.
You are now ready to begin Exercise Four.
2-46 VisualDSP++ 4.5 Getting Started Guide
Page 73

Exercise Four: Linear Profiling
In this exercise, you:
• Load and debug the FIR program from the previous exercise
• Use linear profiling to evaluate the program’s efficiency and to
determine where the application is spending the majority of its execution time in the code
VisualDSP++ supports two types of profiling: linear and statistical.
• You use linear profiling with a simulator. The count in the Linear
Profiling Results window is incremented every time an assembly
instruction is executed.
• You use statistical profiling with a JTAG emulator connected to a
processor target. The count in the Statistical Profiling Results
window is based on random sampling of the program counter.
Basic Tutorial
Step 1: Load the FIR Program
To load the FIR program:
1. Close all open windows except the Disassembly window and the
Output window.
2. From the File menu, choose Load Program, or click . The
Open a Processor Program dialog box appears.
VisualDSP++ 4.5 Getting Started Guide 2-47
Page 74

Exercise Four: Linear Profiling
3. Select the program to load as follows.
a. Open the
VisualDSP 4.5\Blackfin\Examples\Tutorial\fir
Analog Devices folder and double-click:
b. Double-click the Debug subfolder.
c. Double-click FIR.DXE to load and run the FIR program.
If VisualDSP++ does not open an editor window (shown in
Figure 2-34), right-click in the Disassembly window and
select View Source.
You are now ready to set up linear profiling.
Step 2: Open the Profiling Window
To open the Linear Profiling Results window:
1. From the Tools menu, choose Linear Profiling and then choose
New Profile.
Figure 2-33. Setting Up Linear Profiling for the FIR Program
The Linear Profiling Results window opens without any data.
2-48 VisualDSP++ 4.5 Getting Started Guide
Page 75

Basic Tutorial
2. Click in the profiling window’s title bar and then drag and drop
the window to the top of the VisualDSP++ main window, as shown
in Figure 2-34. You will have a better view of the profile data.
Figure 2-34. Linear Profiling Results Window (Empty)
The Linear Profiling Results window is initially empty. Linear
profiling is performed when you run the FIR program. After you
run the program and collect data, this window displays the results
of the profiling session.
You are now ready to collect and examine linear profile data.
VisualDSP++ 4.5 Getting Started Guide 2-49
Page 76

Exercise Four: Linear Profiling
Step 3: Collect and Examine the Linear Profile Data
To collect and examine the linear profile data:
1. Press F5 or click to run to the end of the program.
When the program halts, the results of the linear profile appear in
the Linear Profiling Results window.
2. Examine the results of your linear profiling session.
The Linear Profiling Results window is divided into two
three-column panes.
The left pane shows the results of the profile data. You can see the
percentages of total execution time consumed, by function and by
address.
Double-clicking a line with a function enables you to display the
source file that contains that function. For example, double-click
the fir function to display the assembly source file (fir.asm) in
the right pane, as shown in Figure 2-35.
Figure 2-35. Linear Profiling Results, FIR Program Performance Analysis
2-50 VisualDSP++ 4.5 Getting Started Guide
Page 77

Basic Tutorial
The field values in the left pane are defined as follows.
Histogram A graphical representation of the percentage of time
spent in a particular execution unit. This percentage
is based on the total time that the program spent
running, so longer bars denote more time spent in a
particular execution unit. The Linear Profiling
Results window always sorts the data with the most
time-consuming (expensive) execution units at the
top.
% The numerical percent of the same data found in
the Histogram column. You can view this value as
an absolute number of samples by right-clicking in
the Linear Profiling Results window and by select-
ing View Sample Count from the pop-up menu.
Execution Unit The program location to which the samples belong.
If the instructions are inside a C function or a C++
method, the execution unit is the name of the function or method. For instructions that have no
corresponding symbolic names, such as hand-coded
assembly or source files compiled without debugging information, this value is an address in the
form of
PC[xxx], where xxx is the address of the
instruction.
If the instructions are part of an assembly file, the
execution unit is either an assembly function or the
assembly file followed by the line number in
parentheses.
VisualDSP++ 4.5 Getting Started Guide 2-51
Page 78

Exercise Four: Linear Profiling
In Figure 2-35 on page 2-50 the left pane shows that the
fir function
consumes over 93% of the total execution time. The right (source) pane,
shown in Figure 2-36, displays the percentage that each line in the fir
function consumes.
Figure 2-36. Linear Profile Data for fir.asm
You have now completed the Basic Tutorial.
2-52 VisualDSP++ 4.5 Getting Started Guide
Page 79

3 ADVANCED TUTORIAL
This chapter contains the following topics.
• “Overview” on page 3-1
• “Exercise One: Using Profile-Guided Optimization” on page 3-2
• “Exercise Two: Using Background Telemetry Channel” on
page 3-22
Overview
This tutorial demonstrates advanced features and techniques that you can
use in the VisualDSP++ Integrated Development and Debugging Environment (IDDE). The exercises use sample programs written in C and
assembly for Blackfin processors.
•In Exercise One: Using Profile-Guided Optimization, you build a
project with PGO support, create PGO files, compile the project
without using the information in the PGO files, recompile the
project by using the PGO files to optimize the build, check the
PGO results, and compare execution times.
•In Exercise Two: Using Background Telemetry Channel, you add
BTC to your DSP application and then run two demos that
demonstrate BTC functionality.
The ADSP-BF53x Family Simulator and ADSP-BF533 processor are used
in Exercise One. The EZ-KIT Lite USB emulator, HPPCI-ICE, and
ADSP-BF533 processor are used in Exercise Two.
VisualDSP++ 4.5 Getting Started Guide 3-1
Page 80

Exercise One: Using Profile-Guided Optimization
Exercise One: Using Profile-Guided
Optimization
Profile-guided optimization (PGO) is an optimization technique that uses
collected profile information to guide the compiler optimizer’s decisions.
Traditionally, a compiler compiles each function only once and attempts to
produce generated code that will perform well in most cases. The compiler has
to make decisions about the best code to generate. For example, given an
if…then…else construct, the compiler has to decide whether the most com-
mon case is the then or the else. You can offer crude guidelines—compile for
speed or compile for space—but, usually, the compiler has to make a default
decision.
With PGO, the compiler makes these decisions based on data collected during
previous executions of the generated code. This process involves the following
steps.
1. Compiling the application to collect profile information
2. Running the application in a simulator session by using representative
data sets
The simulator accumulates profile data indicating where the application spends most of its time.
3. Recompiling the application by using the collected profile data
The compiler uses the collected information rather than the application’s default behavior to make decisions about the relative importance
of parts of the application.
The profile data collected from a simulator run is stored in a file with a .PGO
suffix. You can process multiple data sets to cover the spectrum of potential
data and create a separate
can accept multiple
3-2 VisualDSP++ 4.5 Getting Started Guide
.PGO file for each data set. The recompilation stage
.PGO files as input.
Page 81

Advanced Tutorial
You must complete these basic steps to use PGO:
1. Build the application with PGO support.
2. Set up one or more streams in the simulator to provide a set of data
inputs that represent what the application would see in a real target
environment.
3. Tell the simulator to produce a
.PGO file with a specified file name.
4. Load and run the application to produce the .PGO file.
5. Rebuild the application and pass all .PGO files to the compiler, which
uses the generated PGO results to optimize the application.
In this exercise, you:
• Load the PGO example project in the VisualDSP++ environment
• Create data sets for profile-guided optimization
• Attach input streams to the data sets
•Create .PGO files by executing the project with the data sets as input
• Recompile the project by using the .PGO files to optimize the build
• Run the optimized version of the project with the same data sets as
input
• Compare the execution times of all three executions
The files used for this exercise are in the
pgo folder. The default installation
path of this folder is:
Program Files\Analog Devices\VisualDSP++ 4.5\Blackfin\Examples\
Tutorial\pgo
VisualDSP++ 4.5 Getting Started Guide 3-3
Page 82

Exercise One: Using Profile-Guided Optimization
Step 1: Load the Project
To open a VisualDSP++ project:
1. Start VisualDSP++ and connect to an ADSP-BF533 simulator session.
For information about connecting to a session, refer to “Step 1: Start
VisualDSP++ and Open a Project” on page 2-3.
2. Open the PgoExample.dpj project. For details about opening projects,
see “Step 1: Start VisualDSP++ and Open a Project” on page 2-3.
This project contains a C file, PgoExample.c. When you run the program, it reads data from an address and counts the number of even and
odd values. This counting is done with an if…then…else statement. If
the majority of values read are odd, the program will spend most of its
time in the then… branch. If the majority of values are even, the program will spend most of its time in the else… branch. Normally, the
compiler has no way of knowing which branch will be taken more
often. By using PGO, the compiler can determine which branch is
used most often and optimize the next build.
L
3-4 VisualDSP++ 4.5 Getting Started Guide
This project also contains a Visual Basic script that demonstrates
how to use the VisualDSP++ Automation API to perform PGO.
The automation functionality is beyond the scope of this tutorial.
Refer to online Help for more information about automation.
Three data files are used as input to the C program. These simple text
files contain lists of values.
Dataset_1.dat has 128 even values (50%) and 128 odd values
•
(50%).
• Dataset_2.dat has 192 even values (75%) and 64 odd values
(25%).
•
Dataset_3.dat has 256 even values (100%) and 0 odd values
(0%).
Page 83

Advanced Tutorial
To view these files, choose the Open command on the File menu in
VisualDSP++. The two possible values in all three files are either
0x01
or 0x02. Each file contains 256 values.
In this exercise, assume that this program will be used in the real
world, and that you can expect a similar distribution of values as input
from the real world.
By looking at the C code and the potential input, you can easily see
that the executed program will spend more time in the else… branch
than in the then… branch. Without using PGO, the compiler cannot
make this same conclusion. By default, it will expect the then… branch
to be executed most frequently and will compile the code without
optimizing execution time.
Since the example program and input are very simple, you could fix
the problem by making a few minor changes to the code. Manually
tweaking a large program to speed up execution time, however,
would take far too long, and you would have to analyze sample
input on your own. PGO provides a quick and easy way to enable
the compiler to make these adjustments for you.
Step 2: Configure a Data Set
The first step in the PGO process is to create a data set—a collection of
sample input for the program being optimized. A data set feeds the input into
the executing program, and this input causes the program to be executed
along certain paths. Some paths will be used more often than others. This
information is recorded by the simulator and stored in a .PGO file for the
compiler to use later for optimization. The most commonly used paths will be
optimized to run quickly, and less common paths will run more slowly.
VisualDSP++ 4.5 Getting Started Guide 3-5
Page 84

Exercise One: Using Profile-Guided Optimization
To create the first of three data sets for this exercise:
1. From the Tools menu, choose PGO and then Manage Data Sets, as
shown in Figure 3-1.
Figure 3-1. Manage Data Sets Menu Option
3-6 VisualDSP++ 4.5 Getting Started Guide
Page 85

Advanced Tutorial
The Manage Data Sets dialog box (Figure 3-2) is displayed.
Figure 3-2. Manage Data Sets Dialog Box
This dialog box is where you manage data sets. Note the Optimiza-
tion level slider bar. This control allows you to customize your
optimization. Moving the slider all the way to the left enables you to
build as small an executable as possible, but may sacrifice execution
speed. Moving the slider all the way to the right enables you to build a
fast executable, with a potential space tradeoff. Placing the slider
between the two extremes provides varying ratios of space versus speed
optimization. For this exercise, move the slider all the way to the right.
VisualDSP++ 4.5 Getting Started Guide 3-7
Page 86

Exercise One: Using Profile-Guided Optimization
2. Click the New button to open the Edit Data Set dialog box, shown in
Figure 3-3.
Figure 3-3. Edit Data Set Dialog Box
3. Replace the default Data set name with a more descriptive name.
Since the first data file contains an equal number of even and odd
values, use a name such as
50% Even – 50% Odd.
3-8 VisualDSP++ 4.5 Getting Started Guide
Page 87

Advanced Tutorial
4. Specify the Output filename (where the optimization information
produced by this data set will be saved). Optimization information is
saved in files with a
.PGO suffix.
Type in a file name such as dataset_1.pgo. The file will be saved in
the project directory. To save the files elsewhere, type in a full path
name. You can use Command line arguments for more advanced
control of the data set, but they are not covered in this tutorial.
For more information about command-line arguments, see the
VisualDSP++ 4.5 C/C++ Compiler and Library Manual for Blackfin
Processors.
Now you have to attach an input stream to this data set.
VisualDSP++ 4.5 Getting Started Guide 3-9
Page 88

Exercise One: Using Profile-Guided Optimization
Step 3: Attach an Input Stream
In this step you attach an input stream to the data set.
1. Click the New button to open the Edit PGO Stream dialog box,
shown in Figure 3-4.
Figure 3-4. Edit PGO Stream Dialog Box
3-10 VisualDSP++ 4.5 Getting Started Guide
Page 89

Advanced Tutorial
An input stream maps a data file to a destination device. In this exercise, the input streams map the three data files to the simulator. The
input stream provides the program with input as needed during
execution.
For more information about streams, see the “Debugging” chapter
in the VisualDSP++ 4.5 User’s Guide.
2. Complete the Input Source File group box as described in Table 3-1.
Table 3-1. Input Source File Group Box Settings
Field/Control Action/Value
Filename Specify a file name by clicking the file browse button and selecting the
input source file dataset_1.dat from the pgo directory.
Format The data in this file is in hexadecimal format, so leave the format set-
ting as is.
Rewind on reset or restart Select this option. When you run a program with an input stream, the
program may or may not work through all of the data in the stream. If
the program encounters a reset or restart event before working through
the entire data stream and this option is enabled, the next execution
starts at the beginning of the input stream. Otherwise, execution
continues where it left off.
Circular Select this option. It allows the program to read through an input
stream many times during a single execution.
3. In the Destination Device group box, specify where the data from the
input stream is sent. Refer to Table 3-2.
VisualDSP++ 4.5 Getting Started Guide 3-11
Page 90

Exercise One: Using Profile-Guided Optimization
Table 3-2. Destination Device Group Box Settings
Field/Control Action/Value
Processor This field lets you specify a peripheral in another processor as the
destination device. For this tutorial, you are connected to a single
processor session, so this field is disabled.
Device This field lets you choose any stream device supported by the simula-
tor target as the destination. Devices can include a memory address or
various peripherals. Available devices depend on the processor you are
using. For more information on devices, see the hardware manual for
your processor. The program reads the input streams from memory, so
leave this field as it is.
Address Specify where in memory the input will be sent. Since the program in
this exercise reads data from address
PgoExample.c), enter this value.
0xFFD00000 (refer to
3-12 VisualDSP++ 4.5 Getting Started Guide
Page 91
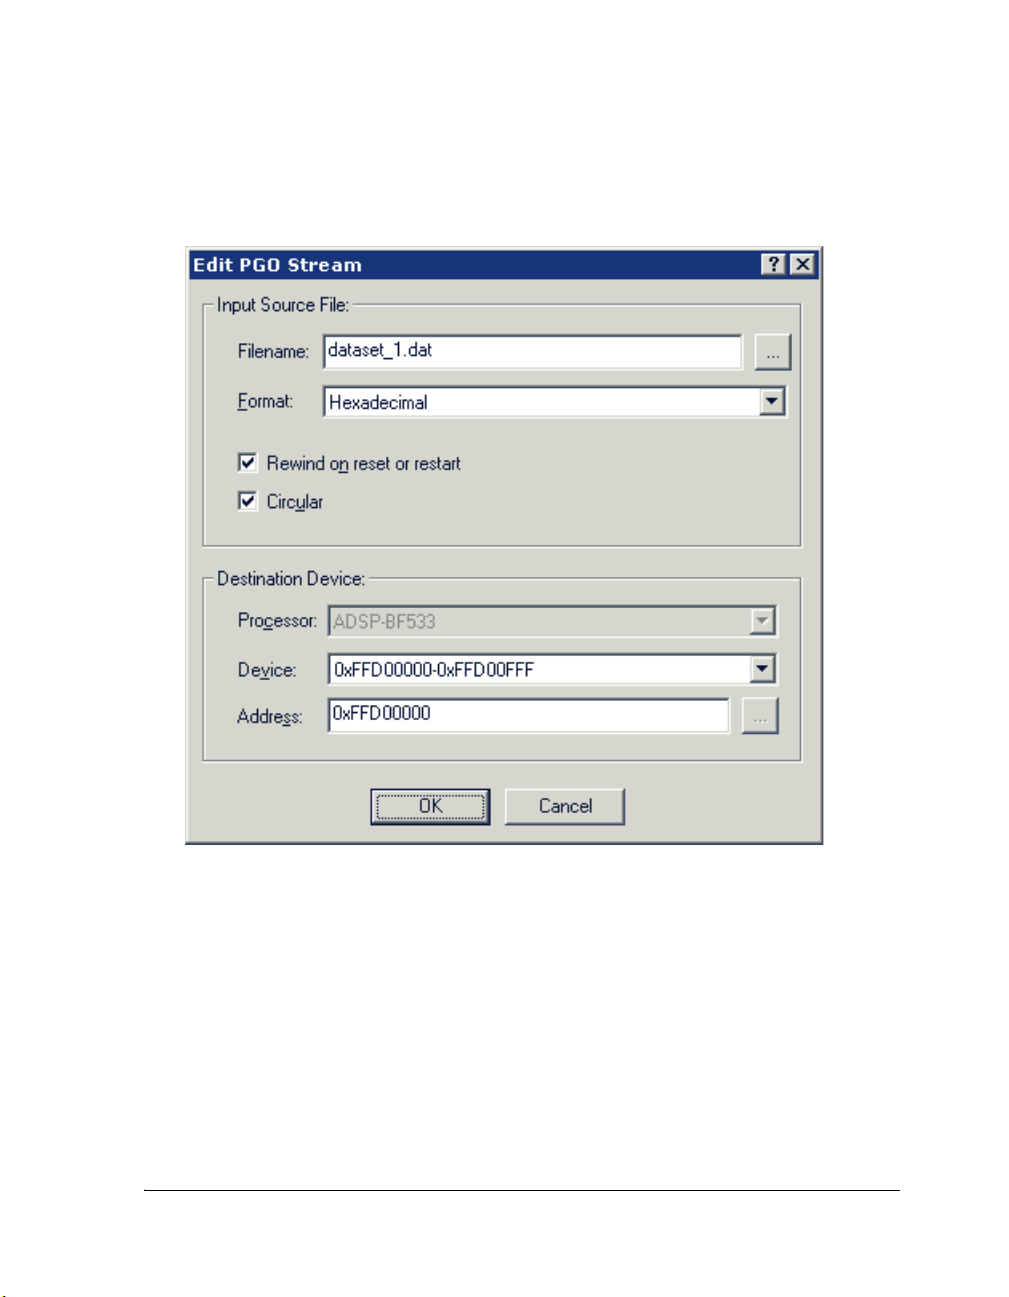
Advanced Tutorial
The completed dialog box should now look like Figure 3-5.
Figure 3-5. A Configured PGO Stream
VisualDSP++ 4.5 Getting Started Guide 3-13
Page 92

Exercise One: Using Profile-Guided Optimization
4. Click OK to return to the Edit Data Set dialog box. The dialog box
with your configured data set should match Figure 3-6.
Figure 3-6. A Configured Data Set
5. Click OK to save the data set and close the dialog box.
You now have to create the remaining two data sets.
3-14 VisualDSP++ 4.5 Getting Started Guide
Page 93

Advanced Tutorial
Step 4: Configure Additional Data Sets
To create the remaining two data sets, you can repeat the steps used to create
the first data set and substitute the appropriate files, or use the Copy button.
The following steps explain how to use the Copy button to create a data set.
1. Highlight the
50% Even – 50% Odd data set, and click the Copy
button.
The Edit Data Set dialog box opens with the information for the
50% Even – 50% Odd data set. Clicking the OK button makes a copy
of the 50% Even – 50% Odd data set. For this exercise, however, you
will edit the data set.
2. In the Data set name field, specify an appropriate name for the new
data set.
The second input source file contains three times as many even values
as odd values, so use a name such as 75% Even – 25% Odd.
3. In the Output filename field, type the name dataset_2.pgo to save
the .PGO file in the project directory.
To save the file elsewhere, click the file browse button ( ) to specify a
full path.
4. In the Input streams box, highlight the dataset_1.dat Input File
and click the Edit button.
5. Click the file browse button ( ) to change the Input Source File
dataset_1.dat to dataset_2.dat.
from
6. Click the OK button to return to the Edit Data Set dialog box.
The second data set is now complete.
VisualDSP++ 4.5 Getting Started Guide 3-15
Page 94

Exercise One: Using Profile-Guided Optimization
7. Click the OK button to return to the Manage Data Sets dialog box.
8. Create the third data set from scratch or modify a copy of one of the
existing data sets.
Make sure that you use the
dataset_3.pgo and dataset_3.dat files.
The third data set contains all even values, so give it a name such as
100% Even – 0% Odd. When you are finished, expand the three data
sets listed in the Manage Data Sets dialog box and compare them
with the data sets in Figure 3-7.
Figure 3-7. Expanded Data Sets
3-16 VisualDSP++ 4.5 Getting Started Guide
Page 95

Advanced Tutorial
If your data sets match those in Figure 3-7, you have the data sets
needed to optimize the program.
9. Click OK to save the data sets and close the dialog box.
You are now ready to create
.PGO files.
Step 5: Create PGO Files and Optimize the Program
Now that you have configured the data sets, you are ready to optimize your
program.
From the Tools menu, choose PGO and then Execute Data Sets, as shown
in Figure 3-8.
Figure 3-8. Execute Data Sets Menu Option
Several things happen during the execute process. First, the project is built
with the
–pguide switch, which enables the collection of the PGO data that is
later fed back into the compiler. The compiler makes default assumptions
about which sections of code will be most commonly executed. Next, the
resulting executable is run once with each data set. While the program is run-
VisualDSP++ 4.5 Getting Started Guide 3-17
Page 96

Exercise One: Using Profile-Guided Optimization
ning, the simulator monitors the paths of execution through the program, and
the number of cycles used in the execution. As stated before, this information
is stored in the
.PGO file that you specified when creating each data set.
Once the program has been run with each data set, the project is recompiled.
This time, however, the compiler uses the information found in the .PGO files
to optimize the resulting executable. This optimized executable is then run
with the input provided by each data set, and again, the simulator monitors
each execution.
You are now ready to examine the results of the optimization.
Step 6: Compare Execution Times
When the execution is completed, an XML report of the PGO optimization
results is generated and displayed in a browser window. This file is in the
pgo\debug folder and is named PgoReport.date and time.xml (for example,
PgoReport.20031027145428.xml).
At the top of the report is a header, shown in Figure 3-9.
Figure 3-9. PGO Results – Report Header
The header provides basic information such as the project name, location,
and when the report was generated. Also listed is the optimization level
(which you specified with the slider bar in the Manage Data Sets dialog
3-18 VisualDSP++ 4.5 Getting Started Guide
Page 97

Advanced Tutorial
box, Figure 3-2 on page 3-7), and an average result. The Average result is
the difference in total cycle counts on all executions from before and after
optimization.
L
The header is followed by information about each data set (see Figure 3-10).
The Average result obtained on your machine may vary slightly
from the result shown in Figure 3-9.
Figure 3-10. PGO Results – Data Sets
The file information, including the Data Set file name, Input stream file
name, and PGO output file name, is listed first. Then the results of optimization are shown. The number of cycles needed to run the original build with
VisualDSP++ 4.5 Getting Started Guide 3-19
Page 98

Exercise One: Using Profile-Guided Optimization
this data set (Before optimization) is followed by the number of cycles
needed to run this data set on the optimized build (After optimization).
Note that the number of cycles may vary on different machines.
Finally, the percent difference between the two builds (Result) is listed. A
positive percentage indicates that the optimized build ran faster than the
original build.
The Execution Output section of the log appears first. Figure 3-11 shows
selections from the execution output.
Figure 3-11. PGO Results – Execution Output Sample
This information is the output that appeared in the Console view of the
Output window while the PGO was running. The output includes the
basic events that occurred during execution.
3-20 VisualDSP++ 4.5 Getting Started Guide
Page 99

Advanced Tutorial
The Build Output section appears next at the bottom of the report. This
section contains build output for each build. Figure 3-12 shows a build
output sample.
Figure 3-12. PGO Results – Build Output Sample
This information is the output that was displayed in the Build view of the
Output window while the PGO was running.
This output information shows how effective PGO can be. As shown in
Figure 3-9 on page 3-18, the optimized executions used approximately 18%
fewer cycles than the original executions. The gain in performance is significant, especially given the ease with which it was accomplished.
You are now ready to begin Exercise Two.
VisualDSP++ 4.5 Getting Started Guide 3-21
Page 100

Exercise Two: Using Background Telemetry Channel
Exercise Two: Using Background
Telemetry Channel
A background telemetry channel (BTC) enables you to exchange data between
a host and target application without halting the processor. This mechanism
provides real-time visibility into a running program. Uses for a BTC include:
• Monitoring program status without halting the processor
• Viewing algorithm output in real time
• Injecting data into a program
• Streaming real-time data to a file (data logging)
• Providing I/O, either standard or user-defined
In this exercise, you:
• Add BTC to your DSP application.
• Run the BTC Assembly demo, designed to demonstrate the basic
functionality of BTC.
• Run the BTC FFT demo, which demonstrates the transfer of data
from the Blackfin EZ-KIT Lite over background telemetry
channels.
Adding BTC to Your DSP Application
To add BTC to your DSP application:
1. Add the
The
programs, including the macros necessary to define a channel.
3-22 VisualDSP++ 4.5 Getting Started Guide
btc.h header file to your source code.
btc.h file contains the macros necessary to use BTC in your
 Loading...