

Evaluation Board User Guide
UG-062
One Technology Way • P. O . Box 9106 • Norwood, MA 02062-9106, U.S.A. • Tel : 781.329.4700 • Fax : 781.461.3113 • www.analog.com
Evaluation Board for AD7843/AD7873 Resistive Touch Screen Controllers
FEATURES
Easy access to the AD7843/AD7873
Connects to any PC USB port
Self-contained evaluation system
Test points for easy access to signals
Touch screen included
PACKAGE CONTENTS
The AD7843/AD7873 evaluation board kit contains the following:
• The AD7843/AD7873 evaluation board
• A USB cable
• A CD with the evaluation software, schematics, and this
user guide
• A 4-wire resistive screen
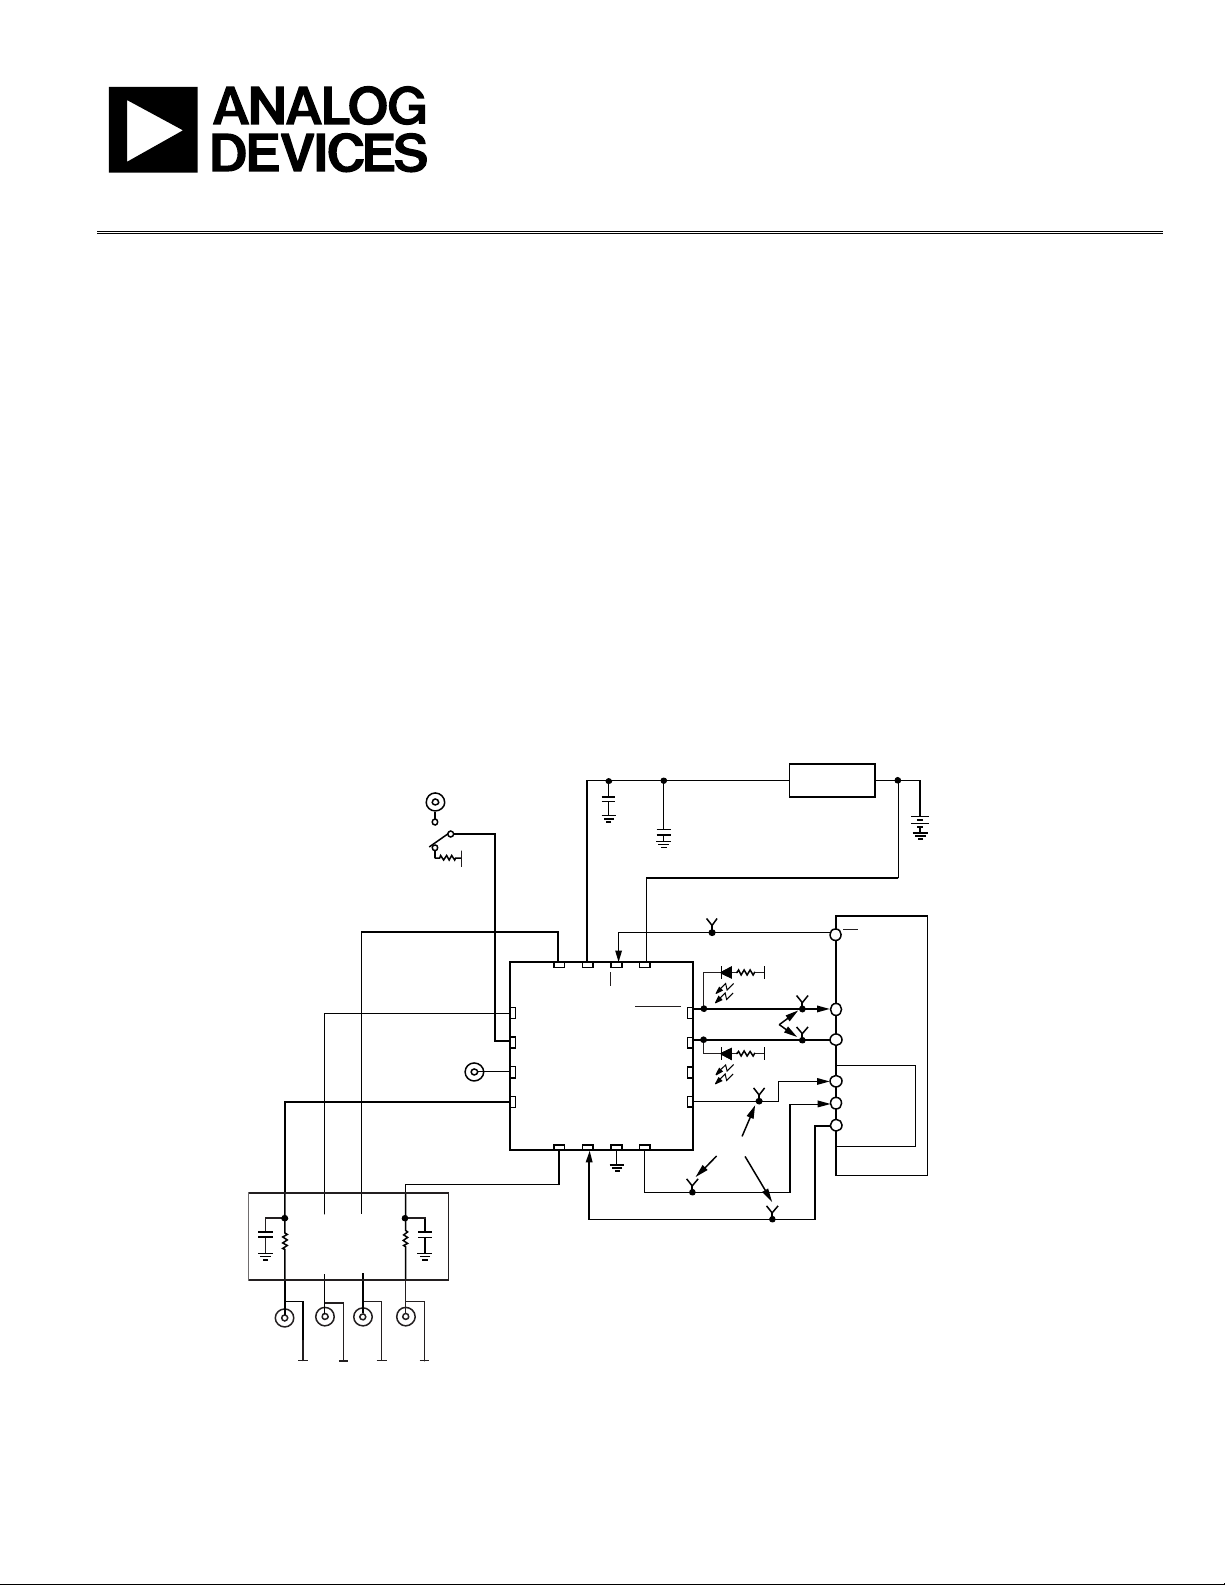
EVALUATION BOARD BLOCK DIAGRAM
J7-2
3.3V
GENERAL DESCRIPTION
The AD7843/AD7873 evaluation board allows the user to
evaluate all features of the AD7843/AD7873. The evaluation
software allows the user to change the settings on the AD7843/
AD7873. The users can connect the touch screen to the J3 connector,
or use the on-board variable resistors, to evaluate the touch screen
function.
VOLTAGE
0.1µF
1.0µF TO 10µF
(OPTIONAL)
REGULATOR
MAIN
BATTERY
TEST POINT
3/
V
IN
CS
PENIRQ
GND
Figure 1.
BAT
BUSY
+V
DOUT
K
DCL
CC
X+
CC
+
Y
V
REF
J2
OPTIONAL
R-C
X+
Y+X–
J1-1
J1-2
J3-1
TOUCH
SCREEN
NOTES
1. THE AUX AND V
See the last page for an important warning and disclaimers. Rev. 0 | Page 1 of 12
Y–
J1-3
J1-4
J3-4
J3-3J3-2
PINS ONLY APPLY TO THE AD7873. THE IN3 AND IN4 PINS O NLY APPLY TO THE AD7843 .
BAT
IN4/AUX
X–
+V
AD7843/
AD7873
Y–
DIN
TEST POINTS
TEST POINTS
3.3V
3.3V
CS
INT1
INT2
MISO
SCLK
MOSI
HOST
INTERFACE
SPI
08633-001

UG-062 Evaluation Board User Guide
TABLE OF CONTENTS
Features .............................................................................................. 1
Package Contents .............................................................................. 1
General Description ......................................................................... 1
Evaluation Board Block Diagram ................................................... 1
Revision History ............................................................................... 2
Evaluation Board .............................................................................. 3
Setting Up the Evaluation Board ................................................ 3
Evaluation Board Description .................................................... 3
Evaluation Board Hardware ............................................................ 4
Connector Function Descriptions ............................................. 4
Link Function Descriptions ........................................................ 4
REVISION HISTORY
12/09—Revision 0: Initial Version
Indicator LED Descriptions .........................................................4
Evaluation Board Software ...............................................................5
Installing the Software ..................................................................5
Running the Software ...................................................................5
Evaluation Demonstration ...............................................................6
Single Conversion Block ...............................................................6
Continuous X-Y Conversion .......................................................7
Touchscreen ...................................................................................8
Schematics ..........................................................................................9
ESD Caution................................................................................ 12
Rev. 0 | Page 2 of 12

Evaluation Board User Guide UG-062
EVALUATION BOARD
SETTING UP THE EVALUATION BOARD
Follow these steps to set up the AD7843/AD7873 evaluation
board:
• Install the evaluation software (CD) before connecting
the board.
• Plug the USB connector from the USB port on your PC
into the mini-USB socket on the evaluation board. The
power indicator LED on the board should turn on.
• Ensure that all switches and links are in their default
positions.
• Start the AD7843/AD7873 evaluation software.
EVALUATION BOARD DESCRIPTION
The AD7843/AD7873 evaluation board allows the user to evaluate
all features of the AD7843 and AD7873. The board is powered via
the USB connection to the host PC. The evaluation software
allows data to be read from and written to the
AD7843/AD7873. Install the evaluation software on the PC before
plugging in the board.
The evaluation board contains the following main components,
which are also shown in the functional block diagram (see
Figure 1):
• AD7843/AD7873 IC
• USB microcontroller IC, CY7C68013-CSP
• LED indicators for power and
• EEPROM for USB initialization information
• Connector for USB interface
• Connector for touch screen
• Screw-top connectors for the following signals: X−, Y+,
X+, Y−, +V
• Test points for the following signals: DOUT, DIN, DCLK,
PENIRQ
CS
,
The printed circuit board (PCB) schematics are shown in Figure 6
and Figure 7.
, V
, and GND
CC
REF
, BUSY, +VCC, and V
PENIRQ
.
BAT
Rev. 0 | Page 3 of 12
UG-062 Evaluation Board User Guide
EVALUATION BOARD HARDWARE
CONNECTOR FUNCTION DESCRIPTIONS
Table 1.
Name Mnemonic Description
J6 USB interface Plug the USB cable directly from the PC into this connector. It is a type USB Mini-B socket.
J13-1 Power
J13-2 AGND An external ground can be connected via the J13-2 connector.
J7-2 EXT_VREF
J2 AUX The J2 connector can be used to apply a signal to the AUX input on the AD7843/AD7873.
J5 EXT_BAT
J3 Touch screen
J1 Touch screen
LINK FUNCTION DESCRIPTIONS
Power can be supplied to the board by either the USB cable or the power connector, J13. If L5 is in Position B,
power is supplied via the USB cable. If L5 is in Position A, power is supplied from the J13-1 connector.
Connector J7-2 can be used to apply a signal to the VREF input on the AD7843/AD7873. L6 must be in
Position A for this connector to be linked to the AD7843/AD7873. If L6 is in Position B, 3.3 V is applied to
the VREF input.
Connector J5 can be used to apply a signal to the VBAT input on the AD7843/AD7873. L7 must be in Position B
for this connector to be linked to the AD7843/AD7873.
The touch screen included with the demonstration kit can be connected directly into the AD7843/AD7873
demonstration board using this connector. Connect as follows: X− to J3-1, Y+ to J3-2, X+ to J3-3, and Y− to J3-4.
This connector can be used to connect a touch screen to the AD7843/AD7873. Connect as follows:
X− to J1-1, Y+ to J1-2, X+ to J1-3, and Y− to J1-4.
Table 2.
Default
Name Mnemonic
L1 X+ A
L2 Y+ A
L3 X− A
L4 Y− A
L5 Input power B
L6 REF input A
L7 BAT input A
Position Description
This jumper selects the X+ input on the AD7843/AD7873. If the jumper is in Position A, the X+ input
comes from the J1-3 or J3-3 touch screen connectors.
This jumper selects the Y+ input on the AD7843/AD7873. If the jumper is in Position A, the Y+ input
comes from the J1-2 or J3-2 touch screen connectors.
This jumper selects the X− input on the AD7843/AD7873. If the jumper is in Position A, the X− input
comes from the J1-1 or J3-1 touch screen connectors.
This jumper selects the Y− input on the AD7843/AD7873. If the jumper is in Position A, the Y− input
comes from the J1-4 or J3-4 touch screen connectors.
This jumper selects the input power for the evaluation board. If the jumper is in Position A, power
for the board must be supplied through the J13-1connector. If the link is in Position B, the USB
connection supplies the power for the board.
This jumper selects the input signal to the reference input on the AD7843/AD7873. If the jumper is
in Position A, REF is connected to Pin 2 of the J7 (J7-2) connector. An input voltage can then be
connected to J7-1. If the link is in Position B, REF is connected to 3.3 V.
This jumper selects the input signal to the VBAT input on the AD7843/AD7873. If the jumper is in
Position B, VBAT is connected to the J5 connector. An input voltage can then be connected to J5. If
the link is in Position A, VBAT is connected to a variable resistor, R9. The user can vary R9 to change
the input voltage on the V
INDICATOR LED DESCRIPTIONS
Table 3.
Name Mnemonic Description
D1
PENIRQ
This LED indicates when lit (green) that the
pin. The maximum resistance of R9 is 10 kΩ.
BAT
PENIRQ
interrupt is active on the AD7843/AD7873.
Rev. 0 | Page 4 of 12

Evaluation Board User Guide UG-062
EVALUATION BOARD SOFTWARE
The AD7843/AD7873 evaluation software configures the part
in master mode; therefore, unless the screen is touched, no
measurements are taken.
The user can change the register settings, plot, and save data from
the AD7843/AD7873 and plot the X and Y positions using the
evaluation software.
INSTALLING THE SOFTWARE
Install the software before the evaluation board is plugged into
the host PC. The evaluation software is installed by running the
AD7843/73EvaluationSoftwareInstall.exe program, found on
the CD within the evaluation board kit. The user must agree to
Analog Devices, Inc., licensing agreement before the software
can be installed. The software installs and saves into the
AD7843/73 Evaluation Software directory.
RUNNING THE SOFTWARE
Before running the software, ensure that the evaluation board is
plugged into the USB port of the host PC. Run the software from
the AD7843/73 Evaluation Software directory. When the software
starts, the AD7873 Communication Demo dialog box appears,
as shown in Figure 2.
If the software downloads properly, a Download Ok message
appears in the lower left corner of the AD7873 Communication
Demo dialog box. If this message does not appear, the software
has not initialized properly. If this happens, exit the software and
restart it. If an error persists, exit the software, disconnect the USB
connector from the board, reconnect the USB connector to the
board, and reinstall the evaluation software.
08633-002
Figure 2. AD7843/AD7873 Evaluation Software Start-Up Dialog Box
Rev. 0 | Page 5 of 12

UG-062 Evaluation Board User Guide
EVALUATION DEMONSTRATION
The evaluation demonstration allows the user to set up the
AD7843/AD7873 control register according to requirements.
The demonstration also displays the X and Y coordinates
SINGLE CONVERSION BLOCK
The Single Conversion Block tab allows user to read and
modify the values of the Control Register bits. By using the
software, the user can program the main features of the
AD7843/ AD7873. When any of the programmable features
change, the control register bit display section is updated
automatically.
Control Register
Users can write to the control register by clicking on the
corresponding bit boxes. The programmable features in the
control register are the following: the power management bits
(PD1, PD0 (LSB)), the single or differential mode (SER/DFR),
the ADC mode (8 bits or 12 bits, Mode), the ADC Channel
Start Address (A2, A1, A0), and the Initiate start (MSB) bit.
The user can read specific conversion results by supplying the
channel address in the control register bits (A2, A1, A0). To
read more than one channel, insert the number of channels you
want read into the Number of Channels box. Click Get Data to
see the results of the ADC conversion on the right side of the
screen.
The user can modify the SPI Clock frequency: setting from
10 kHz to 600 kHz by using the slider shown in Figure 3.
ALLO WS YOU TO MODIFY
THE SPI CLOCK FREQUENCY
Figure 3. Single Conversion Block
Rev. 0 | Page 6 of 12
08633-003

Evaluation Board User Guide UG-062
CONTINUOUS X-Y CONVERSION
When the user clicks the Continuous X-Y Conversion tab, the
screen shown in Figure 4 appears. ADC values measured by the
AD7843/AD7873 can be graphed on this screen. This screen also
allows the user to program PD0 (LSB), PD1, SER/DFR, and the
mode bits contained in the control register (Address 0x90).
The evaluation board offers the following three options to measure
the X and Y coordinates:
• Connect the screen provided in the evaluation kit to
Connector J3.
• Connect any other screen to Connector J1.
• Use the variable resistors, R7 and R6, to simulate the
resistance of the screen.
Connecting a Touch Screen to the Board
Follow these steps to connect the touch screen included in the
evaluation board kit to the board:
• Use Connector J3.
• Ensure that L1, L2, L3, and L4 are in Position A.
• Connect the 4-wire resistive screen with the green side of the
flex tail facing the board. When it is secure in the connector,
flip the tail over so that the board lies flat with the green
side of the flex tail facing upward. The included touch
screen requires a strong activation force. When using the
screen, ensure that you press hard on it.
• Use Connector J1 to connect any other touch screens to
the board.
Using the Variable Resistors
If no touch screens are available, the variable resistors, R7 and
R6, can be used to mimic a touch screen. Ensure that L1, L2, L4,
and L6 are in Position B. The variable resistors can then be adjusted
to mimic a user touching a screen.
X, Y COORDINATES
MEASUREMENTS
Figure 4. Result Plotting Screen
08633-004
Rev. 0 | Page 7 of 12
UG-062 Evaluation Board User Guide
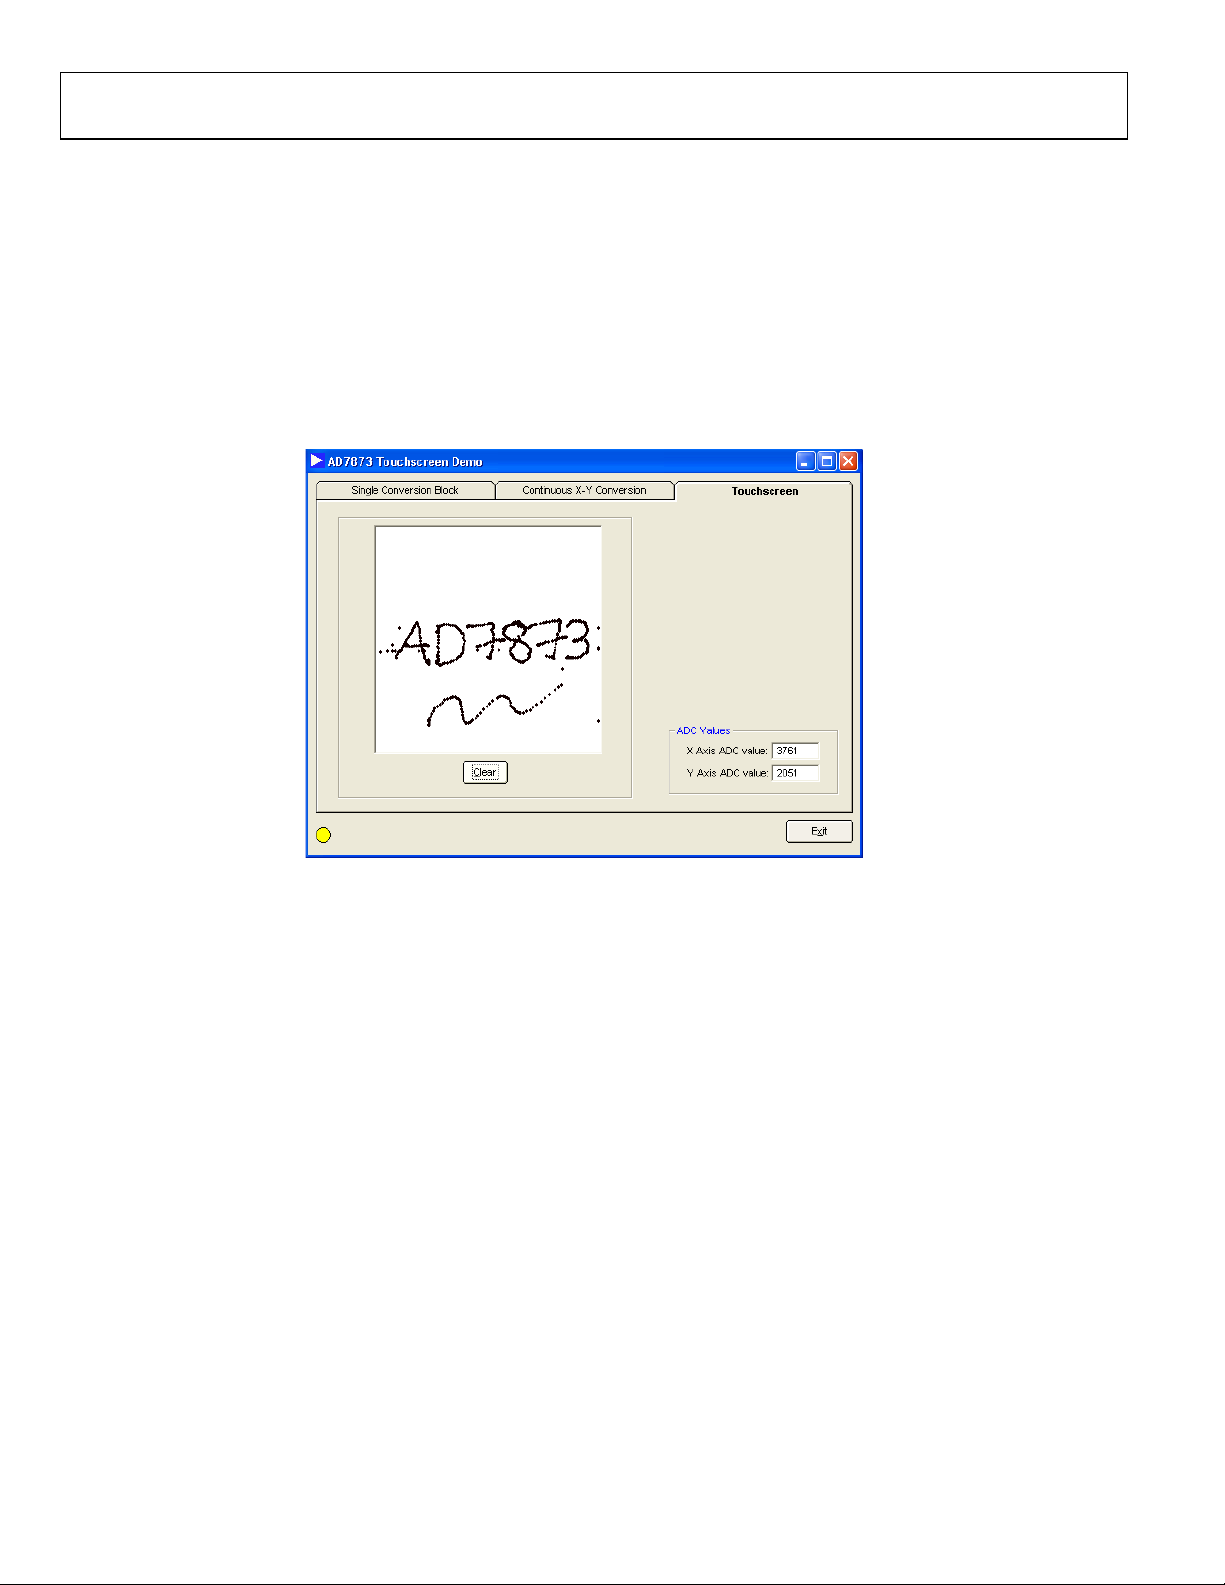
TOUCHSCREEN
Click Continuous X-Y Conversion to display the Tou c h s c r e e n
window, see Figure 5. The X and Y coordinates from the screen
are displayed in Figure 5.
The window approximates a real touch screen application. If a
touch screen is connected to the AD7843/AD7873 evaluation
board, then any touch on the screen is plotted in this window.
The Clear button deletes everything written on the screen.
08633-005
Figure 5. Touchscreen Window
Rev. 0 | Page 8 of 12

Evaluation Board User Guide UG-062
SCHEMATICS
08633-006
Figure 6. Evaluation Board Schematic AD7843/AD7873 Section
Rev. 0 | Page 9 of 12

UG-062 Evaluation Board User Guide
08633-007
Figure 7. AD7843/AD7873 Evaluation Board Schematic USB Section
Rev. 0 | Page 10 of 12

Evaluation Board User Guide UG-062
8633-008
Figure 8. AD7843AD7873 Evaluation Board Component Side
Rev. 0 | Page 11 of 12

UG-062 Evaluation Board User Guide
NOTES
ESD CAUTION
Evaluation boards are only intended for device evaluation and not for production purposes. Evaluation boards are supplied “as is” and without warranties of any kind, express,
implied, or statutory including, but not limited to, any implied warranty of merchantability or fitness for a particular purpose. No license is granted by implication or otherwise under
any patents or other intellectual property by application or use of evaluation boards. Information furnished by Analog Devices is believed to be accurate and reliable. However, no
responsibility is assumed by Analog Devices for its use, nor for any infringements of patents or other rights of third parties that may result from its use. Analog Devices reserves the
right to change devices or specifications at any time without notice. Trademarks and registered trademarks are the property of their respective owners. Evaluation boards are not
authorized to be used in life support devices or systems.
©2009 Analog Devices, Inc. All rights reserved. Trademarks and
registered trademarks are the property of their respective owners.
UG08633-0-12/09(0)
Rev. 0 | Page 12 of 12
 Loading...