

Page 1

Engineer To Engineer Note EE-164
a
Technical Notes on using Analog Devices' DSP components and development tools
Contact our technical support by phone: (800) ANALOG-D or e-mail: dsp.support@analog.com
Or vi sit ou r on-l ine re sourc es ht tp:// www.analog.com/dsp and http://www.analog.com/dsp/EZAnswer
Advanced EPROM Boot and No-boot Scenarios with ADSP-219x DSPs
Contributed by Benno Kusstatscher April 15, 2003
Introduction
EPROM or Flash devices are often used to boot
ADSP-2191/95/96 DSPs, but after booting, the
EPROM/Flash is not used anymore.
The goal of this document is to demonstrate that
EPROM/Flash is of use at run-time as well.
It may store coefficient tables, overlays and, last
but not least, the DSP may execute instructions
directly from it.
If you take advantage of the boot device this
way, you may reduce the SRAM requirements of
your application. Perhaps you can choose a
derivative with less on-chip memory, perhaps
you can save an additional external SRAM
device.
This document discusses various scenarios of
advanced Boot EPROM usage. Besides ADSP2191 specific aspects it will explain how
VisualDSP++
TM
3.01 helps you to manage such
applications.
EPROM Booting Tools Chain
Details of standard EPROM booting are
discussed in application note EE-131 [1]. Just to
complete the picture, this first section provides a
brief overview about the related tool chain.
If you build a VisualDSP++ project during the
development cycle the linker will output a so-
1
Some features discussed require latest patches installed.
Download from: ftp://ftp.analog.com/pub/tools/
Copyright 2003, Analog Devices, Inc. All rights reserved. Analog Devices assumes no responsibility for customer product design or the use or application of
customers’ products or for any infringements of patents or rights of others which may result from Analog Devices assistance. All trademarks and logos are property
of their respective holders. Information furnished by Analog Devices Applications and Development Tools Engineers is believed to be accurate and reliable, however
no responsibility is assumed by Analog Devices regarding technical accuracy and topicality of the content provided in Analog Devices’ Engineer-to-Engineer Notes.
called Executable File (.dxe) that meets the ELF /
DWARF-2
standard. This file is passed to the
debugging tools and contains application data as
well as debugging information.
The DSP itself cannot access such a
(.dxe). It simply expects properly formatted data
Executable File
in the EPROM/Flash. Before you can program
the EPROM/Flash physically you need to
convert the
Executable File (.dxe) into any format
known by the EPROM programming tool.
A common file format for such purposes is the
Enhanced Intel Hex File format. Therefore,
VisualDSP++ provides another utility that post
processes the
boot stream and emits it to a so-called
(.ldr) that meets these Intel Hex conventions. This
post-processor is called
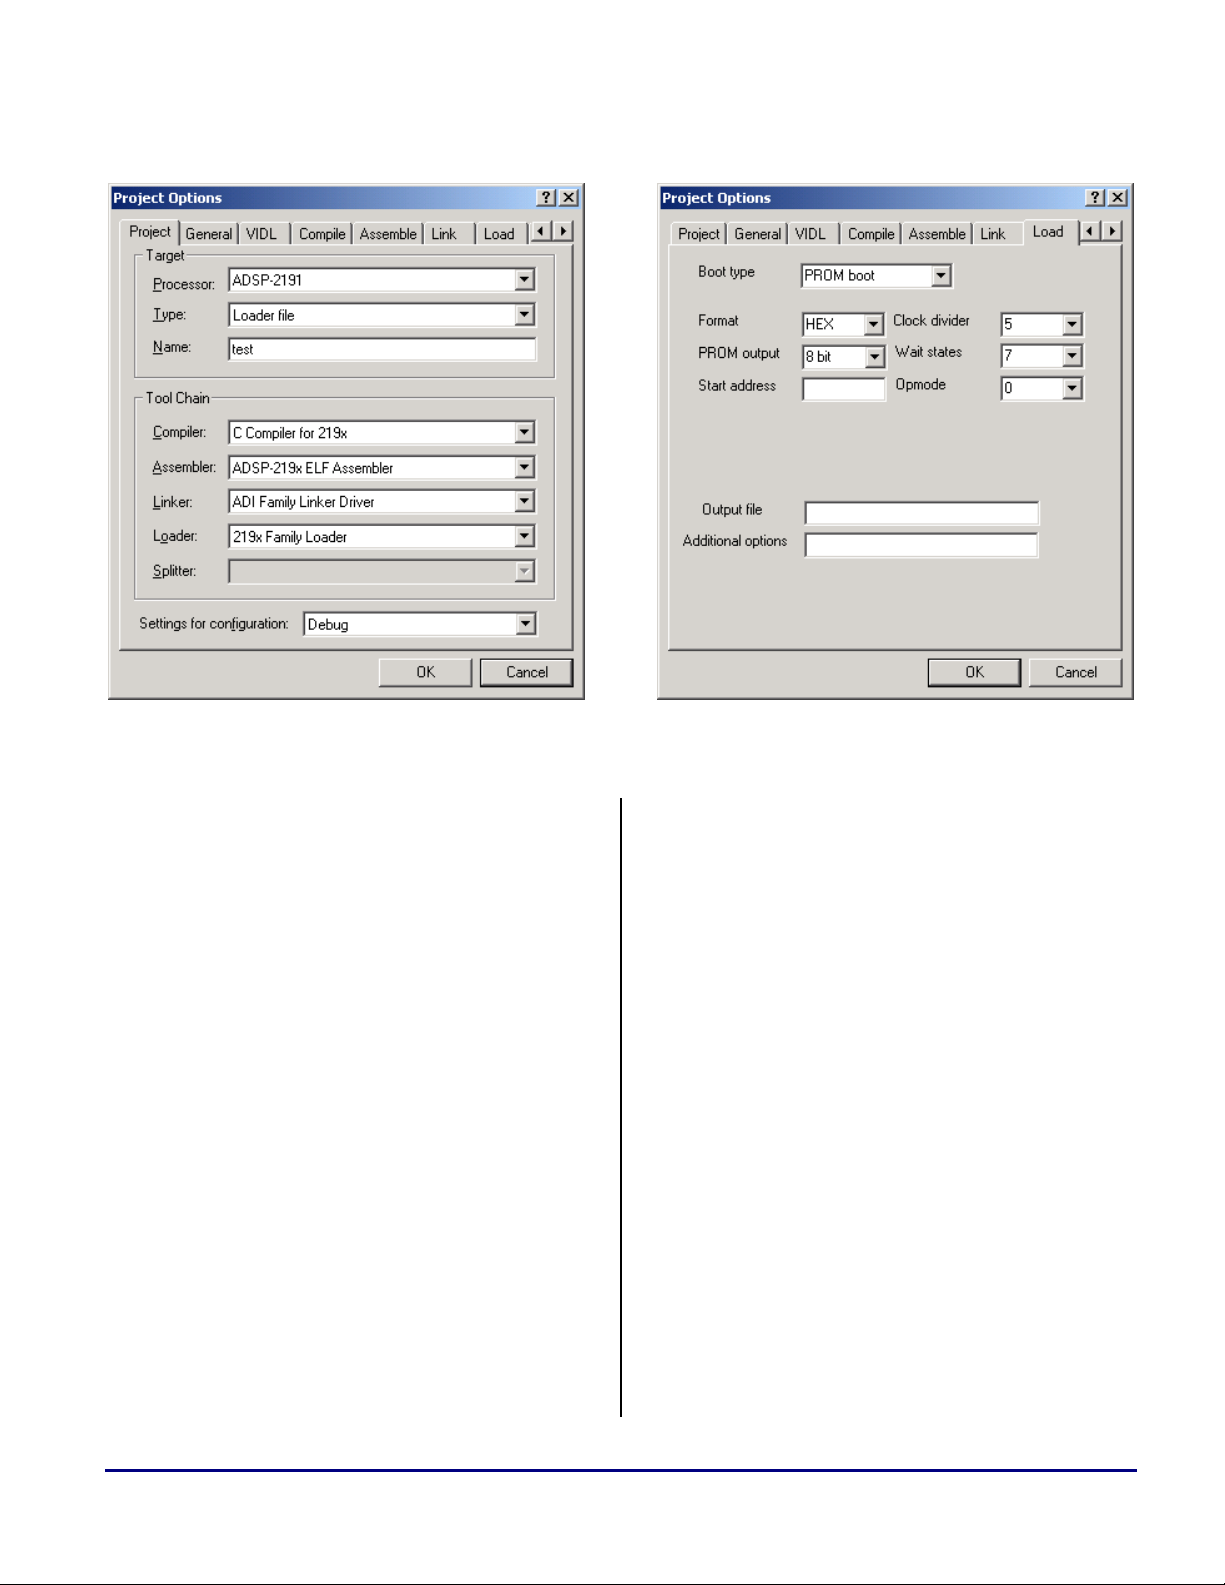
Figure 1 illustrates how to set up the
Options
Loader Utility. If you set the Type field in the Project
Options Dialog to Loader file, VisualDSP++
in order to make VisualDSP++ invoke the
invokes the
to post-process the project’s
Executable File (.dxe). It generates the
Loader File
Loader Utility (elfloader.exe).
Project
Loader Utility during the project build
Executable File (.dxe).
To burn the Loader File (.ldr) into the
EPROM/Flash device externally you may use a
separate programming tool. Flash devices can
also be programmed in circuit, alternatively. Use
the VisualDSP++ plug-in
to download and flash the
ToolsÎFlash Programmer
Loader File (.ldr) through
the JTAG emulator (or even the USB connection
if you are working with the EZ-KIT Lite™).
s
Page 2
a
Figure 1: VisualDSP++ 3.0 Project Options Figure 2: Load Property Page
If the DSP detects EPROM boot configuration
mode after reset, it starts executing the
Kernel
. This is a program residing at the on-chip
Loader
ROM address 0xFF.0000. It is responsible for
the boot process. Initially, the
two control bytes from
/BMS space to determine
Loader Kernel reads
the BMSCTL and EMICTL register settings, such as
Wait states, EMI Clock divider and EMI Bus width (8 or
16 bit).
Once the control registers of the
Interface (EMI) are set up accordingly, the Loader
Kernel
parses the boot stream in the EPROM and
External Memory
completes the boot process without further user
intervention. When the DSP is booted, the
Kernel executes a JUMP instruction to on-chip
Loader
address 0x00.0000 and the user application gets
control over the DSP.
Loader Utility and Loader Kernel hide all the boot
stream details from you. Application note EE131 [1] provides further explainations.
Using the
Load property page shown in Figure 2
you can choose whether the boot device is 8-bit
or 16-bit wide. Also, you have access to the
states
and to the EMI Clock divider used for EPROM
accesses. According to the speed-grade of the
used EPROM/Flash device you may speed up the
boot process by altering the default values.
The
Opmode field specifies the preferred
hardware setting (SPI0 + SPI1 versus SPORT2)
during booting only. The
useful if the DSP has to share the boot EPROM
with other processors or if multiple boot images
need to be stored in a single EPROM.
The settings shown in Figure 2 make the loader
utility generate
Intel Hex Loader File (.ldr) for 8-bit
EPROM booting. They result in the
command line:
elfloader -proc ADSP-2191
-f HEX -b PROM
-width 8 -opmode 0
-clkdivide 5 -waits 7
-o test test.dxe
Wait
Start address box is
Loader Utility
Advanced EPROM Boot and No-boot Scenarios with ADSP-219x DSPs (EE-164) Page 2 of 16
Page 3
a
Alternatively, one may set the Width field to 16 bit
if the DSP is booted from a 16-bit EPROM or to
8+8 bit if the DSP is booted from two 8-bit
EPROMS in 16-bit mode. In the last case, the
Loader Utility will output two Loader Files (.ldu,.ldl).
Before burning/flashing the
Loader File (.ldr) you
may evaluate it in software. The VisualDSP++
3.0 simulator can read the image file from the
tools command menu
EPROM.Rx
(.ldr)
. The simulator interprets the Loader File
in the same way as the Loader Kernel does.
SettingsÎ SimulatorÎ BootÎ
Once a file is loaded, the simulator boots the
memory content every time a reset is issued until
the menu setting
Booting
is checked again.
SettingsÎ SimulatorÎ BootÎ No
ADSP-219x Memory
Booting is nothing else than initializing RAM
after power-up or system reset. In most of cases
only on-chip SRAM of the ADSP-219x DSPs is
initialized by the boot process.
ADSP-2191 ADSP-2195 ADSP-2196
000000
003FFF
004000
007FFF
008000
00BFFF
00C000
00FFFF
16k x 24 bit
16k x 24 bit
16k x 16 bit
16k x 16 bit
16k x 24 bit
16k x 16 bit
8k x 24 bit
8k x 16 bit
In addition the ADSP-219x DSPs may access
additional external SRAM through the EMI port.
This parallel interface supports both, 8-bit and
16-bit data width.
The ADSP-219x DSPs may address 16M words,
organized as 256
Memory Pages of 64k words size.
Page 0 is reserved for on-chip memory. Page 255
holds the on-chip boot ROM. All accesses to any
of the pages 1 to 254 initiate an off-chip bus
transfer.
24 address line are required to access the
complete 16M address space. To avoid the need
of off-chip address decoders, ADSP-219x DSPs
provide four memory strobes
strobe controls one
Memory Bank, 4M words each.
/MS0 to /MS3. Every
Consistently, the EMI features only 22 address
lines.
Every memory bank has its own control register
MSxCTL. Access parameters such as wait-states
can be controlled individually. Although the
MEMPGx registers may redefine the start page of
the individual memory banks, this application
note always assume the default settings.
Bank 0 (/MS0) 0x010000 – 0x3FFFFF
Bank 1 (/MS1) 0x400000 – 0x7FFFFF
Bank 2 (/MS2) 0x800000 – 0xBFFFFF
Bank 3 (/MS3) 0xC00000 – 0xEFFFFF
Note that the address range of Bank 0 is
overlapped by the on-chip memory page.
Similarly, the boot ROM page overlaps Bank 3.
Figure 3: On-chip Memory Map
Figure 3 illustrates the physical layout of the onchip memory. The ADSP-2191 has four
independent memory blocks. Two are 24-bit
wide and can store instructions, but may also
store 16-bit data. The other two blocks can only
store 16-bit data. In total, 32k words of 24-bit
memory and 32k of 16-bit memory are integrated
on-chip. These 64k address locations build the
memory page 0. While accessing on-chip
memory, always set the related page registers
DMPG0, DMPG1 and IJPG to zero.
If a 4MWord device is connected to
/MS0, the
lower 64k addresses cannot be access using this
scheme. Typically, devices are much smaller,
and all locations can be reached by address
aliases. For example, device address 0x000000
can be accessed through alias address 0x200000,
if the connected device features less than 22
address lines.
Beside the
/MSx strobes, the EMI features an
additional Boot Memory Select (/BMS) pin. There are
three bits in the
overwrite the normal
E_STAT register, that may
/MSx functionality, for
instruction fetch, DM bus access or PM access
Advanced EPROM Boot and No-boot Scenarios with ADSP-219x DSPs (EE-164) Page 3 of 16
Page 4
a
operations. If set, the the EMI activates the /BMS
strobe instead of the
/MSx ones whenever the
address range 0x010000 to 0xEFFFFF is
accessed, by one of the three operations.
The
Boot Kernel typically reads the boot stream
from the so-called
/BMS. If it is booting off-chip SRAM, the Boot
Kernel manages the
Boot Memory Space by activating
E_STAT bits properly.
Finally, the ADSP-219x DSPs feature an I/O
memory space. This one is typically not booted
and is not described in this document, therefore.
Logical versus Physical Addresses
There is a need to distinguish between logical and
physical parameters. Logical settings describe
memory from the core’s perspective: logical data
width is either 16 or 24 bit wide; logical
addresses are the ones used by program coding.
Physical addresses and memory width may differ
from the logical parameters, especially when
describing off-chip memories.
The physical width of on-chip memory can be
either 16 bit or 24 bit, according to the individual
memory blocks shown in Figure 3. 16-bit
operations to/from 24-bit on-chip memory access
the upper 16-bits of the addressed memory
locations only. 24-bit writes to on-chip 16-bit
memory ignore the lower 8 bits stored in the
register. 24-bit reads from on-chip memory zero
the
PX register.
The
E_BWS bit in the EMICTL register controls,
whether the interface is 8-bit or 16-bit wide.
Logical width Physical width
16 bit 8 bit 2
24 bit 8 bit 4
16 bit 16 bit 1
24 bit 16 bit 2
Table 1: Physical Address Multiply Factor
Address
Multiply
PX
When physical data width does not match the
logical one, multiple physical address locations
are required to built one logical address location.
Consistently, physical addresses are multiples of
logical addresses. The multiply factor depends
on logical to physical data width relationship
(and EMI settings) as shown in Table 1.
When multiplying logical addresses with the
proper factor, the resulting address may be of
theoretical nature. Often the result exceeds the
address range supported by a given memory
devices.
If, for example, a 64kByte SRAM is connected
to
/MS0, and the program performs a 16-bit
access to address 0x011000, the physical address
is not 0x022000. It is 0x002000.
In the general case, the logical to physical
address calculation performs the multiplication
and masks non-existing address bits out,
afterwards.
Whether off-chip data accesses are trade as 16bit or 24-bit operations is controlled by the
E_DFS bit in the E_STAT register. At run-time this
bit is usually cleared. If set, it helps to load 24-bit
instructions into on-chip memory.
Memory Segment Types
When you are managing EPROM boot scenarios
you need to be familiar with a few basic
commands of the
While processing the
Loader Utility evaluates the individual memory
segments. Memory segments are defined within
the memory layout of the
(.ldf).
Besides the logical address range, every segment
specifies its physical width by the
command. External memory segments set their
physical width according to EMI port settings. It
is possible that the invidual off-chip memory
segments have different width settings. Then,
Linker Description File (.ldf).
Executable File (.dxe) the
Linker Description File
WIDTH()
Advanced EPROM Boot and No-boot Scenarios with ADSP-219x DSPs (EE-164) Page 4 of 16
Page 5

a
l
y
e
t
M
t
software must take care, that the E_BWS bit is
managed propely at run-time.
Also, every memory segment has a type. The
dedicated
TYPE() command accepts four different
options:
TYPE(DM RAM)
TYPE(PM RAM)
TYPE(DM ROM)
TYPE(PM ROM)
The Loader Utility ignores all segments declared by
the
TYPE(ROM) option and reads the TYPE(RAM)
segments only. It generates 16-bit boot streams
for
TYPE(DM RAM) segments and 24-bit boot
streams for
TYPE(PM RAM) segments.
Please note that this naming convention is of
historical nature.
TYPE(PM) segments are 24-bit
wide and may contain data and program code. If
a segment holds 16-bit data only, it can be
defined by the
TYPE(DM) command, regardless
whether the containing data is accessed through
the
DM or the PM bus.
MEMORY {
seg_code {
TYPE(PM RAM) WIDTH(24)
START(0x000000) END(0x007FFF)
}
seg_data1 {
TYPE(DM RAM) WIDTH(16)
START(0x008000) END(0x00BFFF)
}
seg_data2 {
TYPE(DM RAM) WIDTH(16)
START(0x00C000) END(0x00FFFF)
}
}
Listing 1: LDF Memory Layout Example
Listing 1 illustrates a very basic example of an
ADSP-2191 memory layout according to Figure
3. It sets up on-chip memory for booting,
because all segments are of
Note that the
Linker Description File (.ldf) does not
describe the boot memory itself. Use the
TYPE(RAM).
Load
property page in Figure 2 to define whether the
DSP is booted from 8-bit or from 16-bit
EPROM.
Booting Off-chip SRAM
So far we discussed booting to internal memory.
If you have additional SRAM connected to the
system bus you may want to initialize its content
at boot-time, too.
This section discusses an example scenario with
an 8-bit boot EPROM connected to
additional 8-bit SRAM that is connected to the
memory strobe
/MS1.
Although the ADSP-2191 Loader Kerne
L
can boot on-chip and off-chip memor
from 8-bit and from 16-bit EPROMs, th
E_BWS bit in the EMICTL register is se
only once. As a result, external SRA
must use the same bus width as the boo
EPROM, if you want to boot it.
This example can still use the project options
shown in Figure 1 and Figure 2. However the
Linker Description File (.ldf) needs to be enriched by
external memory segments.
MEMORY {
seg_code {
TYPE(PM RAM) WIDTH(24)
START(0x000000) END(0x007FFF)
}
seg_data1 {
TYPE(DM RAM) WIDTH(16)
START(0x008000) END(0x00BFFF)
}
seg_data2 {
TYPE(DM RAM) WIDTH(16)
START(0x00C000) END(0x00FFFF)
}
seg_data_ext {
TYPE(DM RAM) WIDTH(8)
START(0x400000) END(0x40FFFF)
}
seg_code_ext {
TYPE(PM RAM) WIDTH(8)
START(0x408000) END(0x417FFF)
}
}
Listing 2: LDF Memory Layout Example
/BMS and an
Advanced EPROM Boot and No-boot Scenarios with ADSP-219x DSPs (EE-164) Page 5 of 16
Page 6

a
If new segments are introduced in the LDF
memory map, also proper section assignment is
required like shown in Listing 3.
PROCESSOR p0 {
SECTIONS {
...
ext_data_dxe {
INPUT_SECTIONS( $OBJECTS(extdata) )
} > seg_data_ext
ext_code_dxe {
INPUT_SECTIONS( $OBJECTS(extcode) )
} > seg_code_ext
}
}
Listing 3: LDF Section Assignment Example
Listing 2 introduces one 24-bit TYPE(PM RAM)
segment intended to store instructions and one
16-bit
bootable. The
TYPE(DM RAM) segment for data. Both are
WIDTH(8) commands in Listing 2
define the physical width to 8 bit as required.
A little understanding of EMI address translation
is required to determine start and end address of
the external memory segments.
logical address 0x40.FFFF accesses the SRAM
at address 0x01.FFFE and 0x01.FFFF
(0x81FFFE and 0x81FFFF ANDed with
0x03.FFFF).
It is obvious that the code segment
seg_code_ext
should follow contiguously to seg_data_ext
without wasting SRAM locations due to address
gaps. Segment
seg_code_ext reserves space for
65536 instructions and every instruction word
takes four byte locations. Thus,
seg_code_ext
should fit into SRAM addresses 0x02.0000 to
0x05.FFFF.
To achieve this goal, the logical address space of
the code segment spans from 0x40.8000 to
0x41.7FFF. Table 2 summarizes the address
translation of the example used in Listing 2.
logical address
seg_data_ext (16 bit)
40 0000 080 0000 00 0000
40 FFFF 081 FFFE 01 FFFE
theoretical
8-bit address
physical 8-bit
SRAM address
Provided that the
register is cleared, the EMI uses the following
E_DFS bit in the E_STAT
seg_code_ext (24 bit)
40 8000 102 0000 02 0000
packing schemes: if core or DMA engine access
16-bit data in the segment
seg_data_ext, then two
8-bit accesses are required. Logical addresses are
multiplied by two.
However, if the core fetches 24-bit instructions
from segment
seg_code_ext, three 8-bit reads are
required, resulting in an address multiply factor
41 7FFF 105 FFFC 05 FFFC
Table 2: EPROM Boot Example Address Translation
Please note that the Clock divide and Wait States
settings specified in the
not apply to SRAM accesses. The
does not alter the
MSxCTL registers.
Load property page do
Loader Kernel
of four.
Since not just the packing but also the addressing
scheme differs, the memory map of the off-chip
8-bit SRAM needs to be defined carefully:
segment
seg_data_ext starts at logical address
0x40.0000. Therefore it activates the memory
strobe
/MS1. The corresponding byte address
would be 0x80.0000, but the ADSP-2191 DSPs
feature only 22 address lines
A0..A21. Therefore a
data read from logical address 0x40.0000
accesses the byte addresses 0x00.0000 and
0x00.0001 of the SRAM. Similarly, a read from
Advanced EPROM Boot and No-boot Scenarios with ADSP-219x DSPs (EE-164) Page 6 of 16
No-Boot Option
Although rarely used, there may be good reasons
to refuse the booting capabilities of the ADSP2191 family. One example is applications that
use on-chip memory for data storage only. Also,
this mode helps to implement customized boot
loader scenarios.
Being programmable by the hardware pins (strap
pins), the DSP can bypass the
start program execution at address 0x01.0000.
Loader Kernel and
Page 7

a
Two different options support instruction
fetching from 8-bit as well as from 16-bit
memory connected to the strobe
The memory connected to
/MS0.
/MS0 is usually an
EPROM or Flash, but it can also be a volatile
memory controlled by another processor in the
system.
In order to generate a proper EPROM file, the
so-called
Splitter Utility is part of the same elfloader.exe tool
like the
Splitter Utility needs to be invoked. This
Loader Utility mentioned above.
Also the Splitter Utility parses a VisualDSP++
Executable File (.dxe), but this time it ignores all
segments declared by
TYPE(ROM) segments only.
TYPE(RAM) and reads
Listing 4 shows a very basic example of an LDF
memory layout that meets the requirements. The
segment
seg_code contains all programming code
including the interrupt vector table. Section
assignment instructions are not shown explicitly.
MEMORY {
seg_data1 {
TYPE(PM RAM) WIDTH(24)
START(0x000000) END(0x007FFF)
}
seg_data2 {
TYPE(DM RAM) WIDTH(16)
START(0x008000) END(0x00FFFF)
}
seg_code {
TYPE(PM ROM) WIDTH(16)
START(0x010000) END(0x01FFFF)
}
seg_constants {
TYPE(DM ROM) WIDTH(16)
START(0x040000) END(0x05FFFF)
}
}
Listing 4: No-boot LDF File Example
If the boot mode is set up accordingly, after reset
the DSP starts program execution at the reset
vector 0x01.0000. The example assumes a 16-bit
wide EPROM/Flash connected to
/MS0. No
packing and no address multiplication is needed
to access 16-bit words off-chip. Whereas
fetching 24-bit instructions still requires two offchip reads and addresses are multiplied by two.
The first instruction is located at physical
EPROM addresses 0x02.0000 and 0x02.0001.
The segment
seg_code occupies EPROM space up
to address 0x03.FFFF.
EPROM location lower than 0x02.0000 can be
accessed through alias addresses. The example in
Listing 4 uses the these locations to store
constant 16-bit data tables mapped to the data
segment
seg_constants. Nevertheless the explained
procedure can also be used to allocate the same
EPROM space for a second code segment.
Assuming the size of the used EPROM is 256k
by 16 bits, only the address lines
A0..A17 are
connected. EPROM addresses are aliased
periodically in the DSP address space. The reset
vector can be read from address 0x02.0000 but
also from address 0x06.0000 or 0x0A.0000.
Similarly, the EPROM space 0x00.0000 to
0x01.FFFF can be accessed through the physical
address alias 0x04.0000 to 0x05.FFFF. No
address translation is required for 16-bit
accesses. Thus, also the LDF file may use the
address range between 0x04.0000 and
0x05.FFFF to define segment
seg_constants.
Again, Table 3 summarizes the address
translation.
logical address
seg_constants (16 bit)
04 0000 04 0000 00 0000
05 FFFF 05 FFFF 01 FFFF
seg_code (24 bit)
01 0000 02 0000 02 0000
01 FFFF 03 FFFE 03 FFFE
Table 3: No-Boot Example Address Translation
theoretical
16-bit address
physical 16-bit
EPROM address
If the Splitter Utility processes an Executable File
(.dxe) based on the example LDF file, it would
emit EPROM address from 0x02.0000 to
Advanced EPROM Boot and No-boot Scenarios with ADSP-219x DSPs (EE-164) Page 7 of 16
Page 8

a
0x05.FFFF. This is unacceptable because the
256k EPROM used in this example provides
addresses from 0x00.0000 to 0x03.FFFF only.
That is why the
additional
–maskaddr addressbit command line
Splitter Utility features the
switch. This switch enables the masking of the
upper physical address bits.
If, in the example above, all physical address bits
greater or equal A18 are masked out, every
EPROM address is ANDed with 0x03.FFFF
before it is emitted to the
addresses belonging to segment
unchanged, but
seg_constants addresses are
Intel Hex file. All
seg_code remain
mapped into address space 0x00.0000 to
0x01.FFFF as required.
The complete command line may look as
follows:
elfloader -proc ADSP-2191
-romsplitter -maskaddr 18
-f HEX -width 16
-o test test.dxe
Using the integrated environment of
VisualDSP++ the same command line is
generated if the
Load property page is set up as
shown in Figure 4.
Currently, the VisualDSP++ single-
L
stepping and breakpoint features are
supported for off-chip code execution
debug.
When the DSP detects no-boot option after reset,
the interrupt vector table starts from off-chip
address 0x01.0000. If you want to map it to onchip address 0x00.0000 set the
SYSCR register. Make sure, that corresponding
RMODE bit in the
on-chip memory locations have been initialized
accordingly. You may also clear the
RMODE bit
again to map the interrupt vector table back to
0x01.0000.
Combining Boot + No-Boot
Fortunately, the Splitter functionality discussed in
the previous section is not restricted to the noboot options only.
Almost all applications require booting after
reset. Booting is transparent to the user and once
all code and data resides in on-chip memory
program execution can perform at full speed.
In today’s applications DSPs have to perform
several tasks rather than executing a single realtime algorithm repetitively. Memory
requirements increase, perhaps beyond the
SRAM resources available on-chip.
Adding an additional SRAM device could help.
Although this increases systems costs, complex
applications may or may not give you the choice
here.
But, you have another option. There is already
additional memory connected to your system: the
boot EPROM/Flash device.
ADSP-2191 processors have full access to the
boot device at run-time. Not only can flash be
used to store data and boot code, it can also be
used to store program instructions. These
instructions can be directly executed by the DSP
Figure 4: No-boot Property Page
without moving them into internal memory first.
VisualDSP++ provides you all the support you
need.
Advanced EPROM Boot and No-boot Scenarios with ADSP-219x DSPs (EE-164) Page 8 of 16
Page 9

a
The same elfloader.exe tool covers both Loader and
Splitter functionality. It can combine both
techniques easily and emits
data to the same
With the
–readall command line switch or the Load
Intel Hex EPROM image file.
Loader and Splitter
property page settings shown in Figure 5, you
can force the
TYPE(RAM) as well as TYPE(ROM) segments.
elfloader.exe tool to consume
Figure 5: Boot+No-boot Property Page
The command line could look like this:
elfloader -proc ADSP-2196
-b PROM -readall
-width 8 -maskaddr 19
-f HEX –opmode 0
–clkdivide 0 –waits 5
-o test test.dxe
As an example you may balance system costs by
utilizing the on-chip memories for DSP
algorithms and data storage only and executing
slower program parts directly from the EPROM.
Evaluate your application and distinguish
between real-time code and less speed-critical
parts of a program such as initialization and
control code. Typically, DSP algorithms are
speed-sensitive and execute in highly optimized
program loops. It is the setup and control code
that - due to its linear nature - consumes many
memory locations for program storage.
Assign different section names to the individual
code fragments in order you can manage them in
the LDF file properly.
The following example executes the initialization
code directly from EPROM and continues with
on-chip program execution afterward. Also it
accesses some EPROM constants.
.section / data constants;
.var myconst[2] = 0xdead, 0xbeaf;
.section / code IVreset;
_reset:
iopg = External_Memory_Interface_Page;
ar = 0x086D;
io(BMSCTL) = ar;
io(MS0CTL) = ar;
ar = 0x0070;
io(EMICTL) = ar;
iopg = External_Access_Bridge_Page;
ar = 0x0007;
io(E_STAT) = ar;
lcall _initsystem;
jump _algorithm;
.section / code setup_code;
_initsystem:
dmpg1 = 0; dmpg2 = 0;
l0 = 0; l1 = 0; l2 = 0; l3 = 0;
l4 = 0; l5 = 0; l6 = 0; l7 = 0;
...
rts;
.section / code dsp_code;
_algorithm:
dmpg1 = PAGE(myconst);
ax0 = dm(myconst);
ax1 = dm(myconst+1);
do algo until forever;
call _library;
...
algo: ...
.section / code lib_code;
_library:
...
rts;
Listing 5: Code example with off-chip setup routine
The sections Ivreset, lib_code and dsp_code are
booted in the normal way, but section
setup_code
will execute from EPROM. Within the reset
vector routine the EMI port is configured
accordingly before the off-chip function
_initsystem is invoked by a long call instruction.
Advanced EPROM Boot and No-boot Scenarios with ADSP-219x DSPs (EE-164) Page 9 of 16
Page 10

Make sure that you are using long branc
h
e
t
G
e
L
instructions when jumping from on-chip
memory to external instructions or vic
versa. Alternatively you can use indirec
branches by taking advantage of the IJP
register. RTS and RTI instructions restor
the page by themselves.
We need to describe the memory layout within
the LDF file, but first let us discuss how to
manage the EPROM addresses.
The example is based on the ADSP-2196
architecture, with 8k of 24-bit memory and 8k of
16-bit memory available on-chip as shown in
Figure 3. This example assumes that 32k of
EPROM bytes are sufficient to store the
complete boot stream. Note that this assumption
does not cover the worst case (48k + some extra
boot control words)!
Assuming a 4MBit EPROM (512k x 8 bit) the
byte addresses 0x00.8000 to 0x07.FFFF are
available for further usage. Just as an example let
us reserve addresses 0x00.8000 to 0x01.FFFF for
constant data storage and 0x02.0000 to
0x07.FFFF for code execution. Due to the size of
the EPROM the
with the
–maskaddr 19 command. One possible
elfloader tool will be invoked
result of the required address calculation is
shown in Table 4:
logical address
seg_ext_constants (16 bit)
04 4000 08 8000 00 8000
04 FFFF 09 FFFE 01 FFFE
seg_ext_code (24 bit)
02 8000 0A 0000 02 0000
03 FFFF 0F FFFC 07 FFFC
Table 4: Boot+No-boot Example Address Translation
theoretical
8-bit address
physical 8-bit
EPROM address
a
MEMORY {
seg_ivt {
TYPE(PM RAM) WIDTH(24)
START(0x000000) END(0x000241)
}
seg_int_code {
TYPE(PM RAM) WIDTH(24)
START(0x000242) END(0x001FFF)
}
seg_ext_code {
TYPE(PM ROM) WIDTH(8)
START(0x028000) END(0x03FFFF)
}
seg_ext_constants {
TYPE(DM ROM) WIDTH(8)
START(0x044000) END(0x04FFFF)
}
}
Listing 6: Boot + No-boot LDF File Example
Finally, you can manage the individual sections
by editing the LDF
as a cross table.
PROCESSOR p0 {
SECTIONS {
vectors_dxe {
INPUT_SECTIONS( $OBJECTS(IVreset) )
} > seg_ivt
dsp_code_dxe {
INPUT_SECTIONS( $OBJECTS(dsp_code) )
} > seg_int_code
lib_code_dxe {
INPUT_SECTIONS( $OBJECTS(lib_code) )
} > seg_int_code
setup_code_dxe {
INPUT_SECTIONS( $OBJECTS(setup_code) )
} > seg_ext_code
constants_dxe {
INPUT_SECTIONS( $OBJECTS(constants) )
} > seg_ext_constants
}
Listing 7: LDF Section Assignment Example
Keep in mind that the elfloader.exe tool generates a
boot stream for
TYPE(ROM) segments are stored without
formatting.
SECTIONS assignment. Use it
TYPE(RAM) segments only.
Accordingly, the memory layout in the LDF files
is specified as follows:
Advanced EPROM Boot and No-boot Scenarios with ADSP-219x DSPs (EE-164) Page 10 of 16
Page 11

a
Speed Estimation
It is obvious that code that executes from
EPROM is slower than the one executed from
on-chip memory. Without providing a complete
speed analysis, this chapter will just impart a first
idea of how much slower code execution from
EPROM is by discussing one example.
Assuming an ADSP-2191 device running at
160MHz (
device with a read access time of 70ns the
can be clocked with full speed (
but requires five additional wait-states (
CCLK) and 80MHZ (HCLK) and a Flash
EMI
E_CDS = 000b),
E_RWC =
101b). Then, any instruction fetch takes 18
HCLK cycles if the Flash is 16-bit wide and 25
HCLK cycles if the Flash is 8-bit wide.
Depending on the bus width, off-chip program
execution is 36 to 50 times slower than on-chip
execution if a standard 70ns Flash device is used.
EPROM Overlays
Section “Code Example” on page 12 provides a
complete example.
About Memory Strobes
The question is whether all these scenarious
discussed in the previous sections can be
implemented glue-less, or whether additional
logic is required.
At run-time the
the several types of off-chip accesses activate the
/BMS or the /MSx strobes. As long as there is only
the boot EPROM connected to the system, it
should be connected to
the three bits,
one and all off-chip accesses (except IO
transfers) will activate the EPROM.
These control bits belong to all
additional SRAM is connected to the system
things are getting tricky. Nevertheless there are
three possibilities to handle this:
E_STAT register controls whether
/BMS. After booting set
E_PI_BE, E_PD_BE and E_DD_BE to
/MSx strobes. If
We learned that code execution from off-chip
EPROM is very easy to handle, but the execution
speed is not that efficient. One may use an
overlay approach, by loading speed-sensible
algorithms from EPROM into internal memory
on demand during run-time.
ADSP-219x overlays are discussed in application
notes EE-152 [2] and AN-572 [3]. This
document assumes the basic VisualDSP++
overlay principle is already known.
Usually, overlay ‘live’ in off-chip SRAM. With
the restriction that overlay data is read-only
(code overlays, coefficient sets etc.) overlays
may also ‘live’ in any kind of ROM. If this ROM
is the same as the boot EPROM, system
complexity and costs will be reduced drastically,
because no additional SRAM device is required.
In order to implement such an EPROM overlay
scenario properly, all information of EE-152 [2]
is still valid, except that overlays cannot be
written back and ‘live’ segments are changed
from
TYPE(RAM) to TYPE(ROM).
• Combine
/BMS and /MS0 with an AND gate
(logical OR due to negative logic) prior to
connecting them to the chip enable pin of the
EPROM. Connect the SRAM to
/MS1, for
example.
• Alter the
E_STAT register anytime the program
is accessing the SRAM or the EPROM.
• Once booted, use the EPROM for additional
code execution but not for data storage
anymore. Also use the SRAM for data storage
only. Then, you can set
E_PD_BE and E_DD_BE cleared.
E_PI_BE but keep
Please note that we recommend keeping E_PD_BE
equal to
E_DD_BE. In many cases it is just a
question of the optimization level whether a data
access uses the
PM or the DM bus. Note the
difference between the following two
instructions:
ar=ax0+ay0, ay0=dm(i4,m4);
and
ar=ax0+ay0, ax0=dm(i0,m0), ay0=pm(i4,m4);
Advanced EPROM Boot and No-boot Scenarios with ADSP-219x DSPs (EE-164) Page 11 of 16
Page 12

a
Another issue of interest is that a boot EPROM
needs to be connected to
/BMS but if the ADSP-
2191 detects the no-boot option it expects an
EPROM connected to
support both scenarios ANDing
/MS0. If hardware needs to
/BMS and /MS0
sounds like a great idea. The ADSP-2191 EZKIT Lite features such a gate.
At the other hand, if the AND gate is missing and
the EPROM is connected to
/BMS directly, it is
very simple to simulate the no-boot option by
booting a small program into on-chip memory
that just sets up the EMI port properly and jumps
to address 0x01.0000 afterwards.
Generally, when booting from EPROM always
pull the
ACK signal could prevent off-chip accesses from
ACK down by a 10kΩ resistor. A floating
being completed according to the wait-states,
because the
E_WMS field in the BMSCTL register
is set to binary 11 during the boot process.
Code Example
The following code example is written for the
ADSP-2191 EZ-KIT Lite. It assumes an 8-bit
flash device connected to
advantage of the boot device in two ways: the
initialization code executes directly from flash
and also code overlays are loaded from it.
In order to concentrate on the functionality
discussed in this application note, the example
(specially the overlay manager) is kept as simple
as possible.
The example consists of four source files
• main.asm
• ovlman.asm
• overlays.h
• example.ldf
The main assembly file
complete application code, including reset vector
and overlays. The initialization code is not
booted. It executes from EPROM directly. Only
a few instructions are required to setup the
port accordingly before accessing the EPROM.
/BMS. It takes
main.asm contains the
EMI
Please note that this example sets the E_DFS bit
in the
E_STAT register.
Also the overlay code is not loaded at boot-time,
but loaded on demand at run-time. It executes
from on-chip memory (run space).
#include <def2191.h>
/******************************************
* Reset Vector
* this piece of code is booted normally
* to on-chip address 0x0000
*/
.section / code IVreset;
_reset:
/* configure EMI
* use 5 wait states
* ignore ACK
* set EMI clock equal HCLK
*/
iopg = External_Memory_Interface_Page;
ar = 0x086D;
io(BMSCTL) = ar;
io(MS0CTL) = ar;
/* set EMI width to 8-bit and
* use active-low strobes
*/
ar = 0x0070;
io(EMICTL) = ar;
/* active /BMS for all off-chip accesses
* also use 24-bit access scheme, because
* the core-based overlay manager reads
* instructions using 24-bit PM moves.
*/
iopg = External_Access_Bridge_Page;
ar = 0x000F;
io(E_STAT) = ar;
nop; nop; nop; nop;
nop; nop; nop; nop;
/* long call, note that _sys_init
* resided in off-chip memory and the jump
* crosses page boundary
*/
lcall _sys_init;
do _algo until forever;
call _algorithm;
nop;
_algo: nop;
idle;
/******************************************
* Initialition Routine
* this piece of code is not critical in
* terms of speed. Therefore it is not
* booted. It resides in off-chip ROM.
*/
Advanced EPROM Boot and No-boot Scenarios with ADSP-219x DSPs (EE-164) Page 12 of 16
Page 13

.section / code romcode;
_sys_init:
l0 = 0; l1 = 0; l2 = 0; l3 = 0;
l4 = 0; l5 = 0; l6 = 0; l7 = 0;
dmpg1 = 0;
iopg = 0;
rts;
/***************************************
* Data Section
* The example requires some variables
* to store results.
*/
.section / data data1;
.var result_add = 0;
.var result_sub = 0;
.var result_mul = 0;
.var result_div = 0;
/******************************************
* Normal DSP code
* this piece of code is booted normally
* after reset
*/
.section / code program;
_algorithm:
ena mm;
ax0 = 10;
ay1 = 2;
call _func_add;
dm(result_add) = ar;
call _func_sub;
dm(result_sub) = ar;
call _func_mul;
dm(result_mul) = ar;
call _func_div;
dm(result_div) = ar;
rts; // set breakpoint here
/******************************************
* Overlay code
* these functions live in off-chip ROM
* and are loaded on demand into internal
* memory. In this example every overlay
* consists of a single function. Overlay
* entry functions have to be global.
*/
.section / code code_overlay1;
.global _func_add;
_func_add:
ar = ax0 + ay1;
rts;
.section / code code_overlay2;
.global _func_sub;
_func_sub:
a
ar = ax0 - ay1;
rts;
.section / code code_overlay3;
.global _func_mul;
_func_mul:
rts (db);
mr = ax0 * ay1 (ss);
ar = mr0;
.section / code code_overlay4;
.global _func_div;
_func_div:
// divide ax0 by ay1
// integer division requires left shift
sr = lshift ax0 by 1 (lo);
// unsigned division core
// ay0 = af:ay0 / ay1
af = pass 0, ay0 = sr0;
astat = 0;
ar = ay1;
divq ar; divq ar; divq ar; divq ar;
divq ar; divq ar; divq ar; divq ar;
divq ar; divq ar; divq ar; divq ar;
divq ar; divq ar; divq ar;
rts (db);
divq ar;
ar = ay0;
Listing 8: main.asm
The Linker Description File plays an important
role. Note that
overlay run space are all mapped into the general
on-chip code segment. Similar overlay live space
shares its segment with off-chip ROM code.
#include "overlays.h"
ARCHITECTURE(ADSP-2191)
$OBJECTS = $COMMAND_LINE_OBJECTS;
MEMORY {
mem_INT_RSTI {
TYPE(PM RAM) WIDTH(24)
START(0x000000) END(0x00001f)
}
mem_code {
TYPE(PM RAM) WIDTH(24)
START(0x000242) END(0x007fff)
}
mem_data2 {
TYPE(DM RAM) WIDTH(16)
START(0x008000) END(0x00bfff)
}
PLIT code, overlay manager and
Advanced EPROM Boot and No-boot Scenarios with ADSP-219x DSPs (EE-164) Page 13 of 16
Page 14

mem_data1 {
TYPE(DM RAM) WIDTH(16)
START(0x00c000) END(0x00ffff)
}
mem_romcode {
TYPE(PM ROM) WIDTH(8)
START(0x028000) END(0x03ffff)
}
} // end of memory map
PROCESSOR p0 {
LINK_AGAINST( $COMMAND_LINE_LINK_AGAINST )
OUTPUT( $COMMAND_LINE_OUTPUT_FILE )
PLIT {
// assuming ar and ay0 are scratch
// registers
ar = PLIT_SYMBOL_OVERLAYID;
ay0 = PLIT_SYMBOL_ADDRESS;
// assuming plit and run address are
// both located in internal memory no
// ljump intruction is required and a
// simple jump is sufficient
jump _ovl_man;
} // plit
SECTIONS {
IVreset_dxe {
INPUT_SECTIONS( $OBJECTS(IVreset) )
} > mem_INT_RSTI
program_dxe {
INPUT_SECTIONS( $OBJECTS(program) )
} > mem_code
.plit {} > mem_code
// OVL_SECTION() is a PP macro
run_dxe {
OVL_SECTION(1) > mem_romcode
OVL_SECTION(2) > mem_romcode
OVL_SECTION(3) > mem_romcode
OVERLAY_SECTION(4) > mem_romcode
} > mem_code
setup_dxe {
INPUT_SECTIONS( $OBJECTS(romcode) )
} > mem_romcode
data1_dxe {
INPUT_SECTIONS( $OBJECTS(data1) )
} > mem_data1
data2_dxe {
INPUT_SECTIONS( $OBJECTS(data2) )
} > mem_data2
} // SECTIONS
} // PROCESSOR p0
Listing 9: example.ldf
This LDF file uses the preprocessor macro
OVL_SECTION() that has been defined in the file
overlays.h shown in Listing 11.
a
The
PLIT code calls the overlay manager shown
in Listing 10. This is a very basic overlay
manager for demonstration purposes. It uses core
instructions to load overlays into on-chip
memory rather than
[2] for real-world overlay managers.
// import C-style structure
.import "overlays.h";
// include preprocessor macros
#include "overlays.h";
.section / data data1;
.extern OVL_EXTERNALS(1);
.extern OVL_EXTERNALS(2);
.extern OVL_EXTERNALS(3);
.extern OVL_EXTERNALS(4);
.struct ovl_struct _ovl_tab[] = {
OVL_STRUCT_INIT(1),
OVL_STRUCT_INIT(2),
OVL_STRUCT_INIT(3),
OVL_STRUCT_INIT(4)
};
.global _ovl_id;
.var _ovl_id;
.global _ovl_addr;
.var _ovl_addr;
.var _ovl_loaded = -1;
.var _save_dmpg2;
.var _run_addr;
/******************************************
/* this simple example assumes
* dmpg1 = 0, iopg = 0
* l4 = 0, l2 = 0;
* run space is in page 0
* _ovl_tab in page 0
* input parameters
* ar = overlay_id
* ay0 = run address
* also it alters several registers
*/
.section / code program;
.global _ovl_man;
_ovl_man:
// save run address
dm(_run_addr) = ay0;
// is ovl already loaded?
ay0 = dm(_ovl_loaded);
ar - ay0;
if eq rts;
dm(_ovl_loaded) = ar;
// read overlay structure
i4 = _ovl_tab - sizeof(ovl_struct);
ay0 = dmpg2;
dm(_save_dmpg2) = ay0;
dmpg2 = 0;
m4 = sizeof(ovl_struct);
DMA. Please refer to EE-152
Advanced EPROM Boot and No-boot Scenarios with ADSP-219x DSPs (EE-164) Page 14 of 16
Page 15

cntr = ar;
+
t
d
r
do getstructaddr until ce;
getstructaddr: modify(i4+=m4);
ar = dm(i4+offsetof(ovl_struct,run_size));
cntr = ar;
ay0 =
dm(i4+offsetof(ovl_struct,run_addr));
i2 = ay0;
ar =
dm(i4+offsetof(ovl_struct,live_addr));
ay0 =
dm(i4+offsetof(ovl_struct,live_page));
dmpg2 = ay0;
i4 = ar;
m4 = 1;
m2 = 1;
// load overlay
do loadovl until ce;
ar = pm(i4+=m4);
loadovl: pm(i2+=m2)=ar;
// jump to run address
i4 = dm(_run_addr);
flush cache;
jump (i4) (db);
ay0 = dm(_save_dmpg2);
dmpg2 = ay0;
a
_ov_word_size_run_##N \
}
/*** LDF macros ************************/
#define OVL_SECTION(N) \
OVERLAY_INPUT { \
ALGORITHM (ALL_FIT) \
OVERLAY_OUTPUT ( \
$COMMAND_LINE_OUTPUT_DIRECTORY\ovl \
##N##.ovl ) \
INPUT_SECTIONS ( \
$OBJECTS(code_overlay##N)) \
}
/*** C-style structures ***************/
#ifdef _LANGUAGE_C
typedef struct {
int live_page;
int live_addr;
int live_size;
int run_page;
int run_addr;
int run_size;
} ovl_struct;
#endif
#endif
Listing 10: ovlman.asm
The overlay manager takes advantage of C-style
structures, first time supported by the
VisualDSP++ 3.0 assembler. The special overlay
structure
overlay manager uses the .
ovl_struct is defined in Listing 11. The
IMPORT assembly
directive to get access to this structure.
Furthermore
overlays.h defines preprocessor
macros that help you to define and initialize the
ovl_struct structure. In order to group structure
definition and macros in one file, the structure
definition needs to be encapsulated by the
_LANGUAGE_C statement.
#ifndef __overlay_header__
#define __overlay_header__
/*** ASM macros *************************/
#define OVL_EXTERNALS(N) \
_ov_word_size_live_##N,\
_ov_word_size_run_##N,\
_ov_startaddress_##N, \
_ov_runtimestartaddress_##N
#define OVL_STRUCT_INIT(N) \
{ \
PAGE(_ov_startaddress_##N), \
_ov_startaddress_##N, \
_ov_word_size_live_##N, \
PAGE(_ov_runtimestartaddress_##N), \
_ov_runtimestartaddress_##N, \
#ifdef
Listing 11: overlays.h
Finally make sure that the project is built using
the settings shown in Figure 1 and Figure 2.
If you are working with VisualDSP+
L
3.0 you may need some patches to ge
this example to work. Please downloa
the latest assembler / linker / loade
patches from
ftp://ftp.analog.com/pub/tools/patches.
To evaluate this example you may use an ADSP2191 EZ-KIT Lite. Download the
using the VisualDSP++
Flash Programming plug-in.
Loader File (.ldr)
Afterward deactivate the VisualDSP++
debugging session. Make sure the boot mode is
set to EPROM boot, and press the Reset push
button. Then, invoke the debugging session again
and use the
File Î Load Symbols command to
download the debugging information stored in
the project’s
Executable File (.dxe). Without
performing single-steps, set a breakpoint at the
RTS instruction of the _algorithm subfunction.
Press
F5. As soon as the DSP halts due to the
breakpoint you may verify the content of the
result variables starting from address 0x00.C000.
Advanced EPROM Boot and No-boot Scenarios with ADSP-219x DSPs (EE-164) Page 15 of 16
Page 16

a
Conclusion
In the successful story of Analog Devices DSPs,
booting from parallel EPROM or Flash devices
has always played an import role.
Although the soft overlay approach of the ADSP218x DSPs already took advantage of the boot
EPROM during run-time, the ADSP-2191 DSP is
the first processor from ADI that enables
unrestricted access to the boot EPROM during
run-time.
VisualDSP++ 3.0 takes this architecture into
consideration and provides powerful scenarios to
reduce system complexity and costs.
References
[1] Booting the ADSP-2191/95/96 DSPs (EE-131),
April 2003, Analog Devices Inc.
[2] Using Software Overlays with the ADSP-219x and VisualDSP 2.0++ (EE-152),
February 2002, Analog Devices Inc.
[3] Overlay Linking on the ADSP-219x (AN-572),
January 2001, Analog Devices Inc.
Recommended Readings
[4] VisualDSP++ 3.0 Linker and Utilities Manual,
July 2002, Analog Devices Inc.
[5] ADSP-2191 DSP Hardware Reference,
July 2001, Analog Devices Inc.
[6] ADSP-219x DSP Instruction Set Reference,
October 2000, Analog Devices Inc.
[7] ADSP-2191 DSP Data Sheet, Rev. 0,
April 2002, Analog Devices Inc.
[8] ADSP-2106x EPROM Overlays Support with VisualDSP++ 2.0 (EE-166),
June 2002, Analog Devices Inc.
[9] Using Code Overlays from ROM on the ADSP-21161 EZ-Kit Lite (EE-180),
December 2002, Analog Devices Inc.
Document History
Version Description
April 15, 2003 by B.Kusstatscher Initial Release, focusing on ADSP-2191/95/96 DSPs
Advanced EPROM Boot and No-boot Scenarios with ADSP-219x DSPs (EE-164) Page 16 of 16
 Loading...