

Page 1
a
a
aa
Phone: (800) ANALOG-D, FAX: (781) 461-3010, EMAIL: dsp.support@analog.com, FTP: ftp.analog.com, WEB: www.analog.com/dsp
Creating A Master-Slave SPI Interface
Engineer To Engineer Note EE-144
Technical Notes on using Analog Devices’ DSP components and development tools
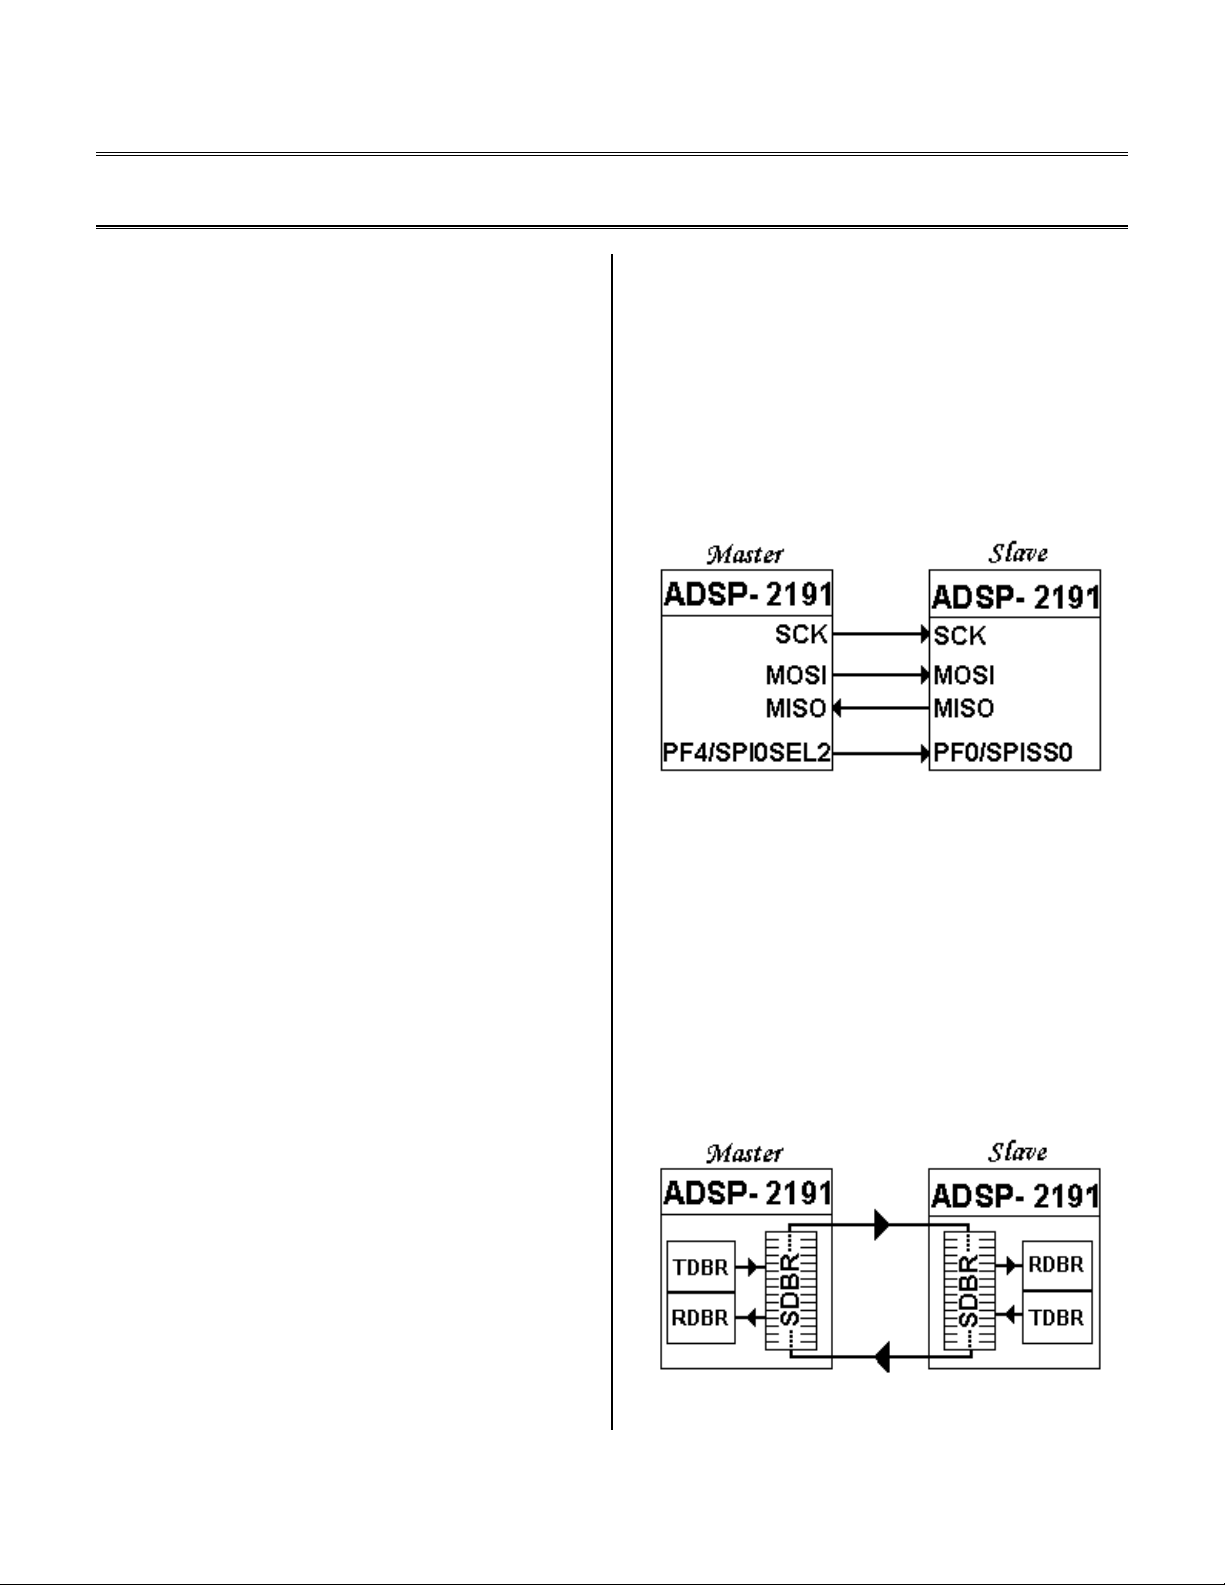
configured as the master-driven output deviceselect signal.
Between Two ADSP-2191 DSPs
Last modified: 6/26/01
Contributed By: JWB.
This Engineer-to-Engineer note will discuss
how to set-up a Serial Peripheral Interface (SPI)
between two ADSP-2191 devices in both the
hardware and the software. The master and
slave code included in the associated archive
can be used as a template for any ADSP-2191
SPI interface.
The hardware for this system was verified using
two ADSP-2191-EZ-KITs, and the software was
built using the VisualDSP++ 2.0 Tools Suite.
On the slave side of the interface, PF0 is the
multiplexed flag pin assigned to be the SPI0
Slave Select (~SPISS0) signal. Figure 2 depicts
the hardware connection for a typical masterslave SPI interface. Remember that we are
utilizing SPI0 in this interface (SPI1 would use
different PFx pins and the SPI1 signals).
1. Hardware Interface
The SPI is a full-duplex, 4-wire, synchronous
interface consisting of two data lines, a clock,
and a device-select signal.
The data is transmitted over the MOSI (Master
Out Slave In) and MISO (Master In Slave Out)
data I/O signals and the clock is the SPI Clock
(SCK) signal. These 3 signals are shared
between the master and slave devices.
The 4th wire in the interface is the device-select
signal. The Programmable Flag pins on the
ADSP-2191 can be configured to function as
SPI device-selects. Please refer to the data sheet
for more information regarding the functional
use of these programmable flag pins. On a
master ADSP-2191 device, up to seven slaveselect signals are available for each SPI port. In
this example, programmable flag pin 4 (PF4) is
Figure 1: SPI Hardware Connection For 2 ADSP-2191s
2. How The ADSP-2191 SPI Works
The ADSP-2191 features two SPI-compatible
ports. An SPI Interface essentially consists of
two shift registers that simultaneously transmit
and receive one bit of data to and from each
other at a fixed bit rate. The following diagram
is a general overview of the SPI data buffers and
how they relate to each other in an SPI system:
Figure 2: SPI Data Exchange (16-Bit Registers)
Copyright 2001, Analog Devices, Inc. All rights reserved. Analog Devices assumes no responsibility for customer product design or the use or application of customers’ products or
for any infringements of patents or rights of others which may result from Analog Devices assistance. All trademarks and logos are property of their respective holders. Information
furnished by Analog Devices Applications and Development Tools Engineers is believed to be accurate and reliable, however no responsibility is as sumed by Analog Devices
regarding the technical accuracy of the content provided in all Analog Devices’ Engineer-to-Engineer Notes.
Page 2

The behavior of the SPI depends on how the SPI
ports are configured. In this example, transfers
are initiated on reads of the receive data buffer
register (RDBRx) and interrupts are generated
when RDBRx is full. Due to this configuration,
the following describes the behavior of the SPI:
Before the SPI transfer takes place, the master
and slave devices each places the data to be
transmitted in its respective transmit data
register (TDBRx).
The master then drives the device-select signal
of the slave and supplies the gated SPI Clock
(SCK). When the master initiates the transfer,
the master’s data moves from its TDBRx
register to its shift data register (SDBR), where
it is shifted out one bit at a time on the MOSI
pin on active SCK edges. The master is also
sampling the MISO pin on inactive SCK edges.
Meanwhile, the slave waits for its device-select
input to go active, meaning that the master is
about to transmit. When that happens, the slave
moves its data from its TDBRx to its SDBR and
starts shifting out on the MISO pin on active
SCK edges and sampling the MOSI pin on
inactive SCK edges.
So, both devices are transmitting and sampling
on each SCK pulse simultaneously. This datashifting scheme continues until one full word
has been transmitted and received (i.e., the two
devices have essentially exchanged SDBR data).
The received data in SDBR then moves to the
respective receive data register (RDBRx), which
is when the interrupt is generated, informing the
DSP that the data can now be read *. When the
RDBRx register is read, it is cleared and
becomes ready to get the next word from the
shift register when it arrives.
*Note: The ADSP-2191 core cannot directly access the
Shift Data Buffer Register (SBDR).
3. Programming The SPI Devices
Once the hardware is properly connected, it is
time to generate the software to control the two
SPI ports so that they will talk to each other.
For this to work, software is required to
initialize both the master and the slave devices.
Please refer to chapter 10 of the “ADSP-
219x/2191 Hardware Reference” for the various
SPI register descriptions and for the “SPI
General Operation” section, which describes
the steps required by both the master and the
slave to get an SPI interface running properly.
The code contained in the ZIP archive
associated with this Engineer-to-Engineer note
will be referenced throughout this section of the
text.
3.1. Master Code
The assembly code for the master has been
broken into two files, the source code
(SPI_Master.asm) and the interrupt handler
(SPI_MISR.asm). The numeric super-scripts
indicate the corresponding source code line
numbers being referenced in the text.
3.1.1. SPI_Master.asm
The very first thing that is always required when
initializing an SPI interface is the setting of the
OPMODE bit (bit 0) in the System
Configuration Register
this bit instructs the DSP to disable SPORT2
and to enable SPI0/1 on those pins. It is also
good practice to set bit 4 while you are
manipulating SYSCR to ensure that the
Interrupt Vector Table (IVT) resides with the
rest of your code. There are 3 possible default
locations for the IVT depending on the boot
mode and whether or not an emulator is present
54-56
(SYSCR). Setting
EE-144 Page 2
Technical Notes on using Analog Devices’ DSP components and development tools
Phone: (800) ANALOG-D, FAX: (781)461-3010, EMAIL: dsp.support@analog.com, FTP: ftp.analog.com, WEB: www.analog.com/dsp
Page 3
in the system. Setting bit 4 will prevent jumps
to incontiguous memory from the IVT when the
SPI interrupt occurs.
The next task is to prioritize the interrupts
65-70
.
This step is optional, but, for the purpose of
demonstrating this new ADSP-2191 feature, the
process will be described here. Because this
system will only service the SPI0 interrupt, the
interrupts will be prioritized so that the SPI0
interrupt has the highest priority after the 4
fixed-priority core interrupts. This is achieved
by setting the appropriate priority values in the
Interrupt Priority Registers (IPR0-3). Figure 3
illustrates the alignment of the IPRx registers.
Each numeric location in this diagram actually
contains a hexadecimal number assigned to be
that particular interrupt’s priority level.
Note: It is best to do this first in order to
guarantee that the slave device is disabled
while the master is being configured. The
slave, if properly configured, will do nothing
until the master enables the slave-select line.
Setting bit 2 (FLS2) of the SPIFLG0 register
enables PF4 as an output. Since the slave’s
select line is active-low, the corresponding
FLG2 value (bit 10) is kept high89 to ensure that
the slave is inactive until the master device is
ready to transmit.
After the flag pins have been configured, the
next step is to set the bit rate at which the SPI
transfer will operate. The bit rate is governed by
the equation:
Figure 3: Interrupt Priority Register Alignment
The SPI0 interrupt resides in the 5th location in
the priority chain, therefore, we want to assign
the highest priority (0x1) to the 5th location,
which is actually the second location in IPR1.
All the other interrupts share the lowest priority
value (0xB). Because of this, the hex value
0xBBBB is written to IPR0, IPR2, and IPR3,
which sets programmable interrupts 0-3 and 815 to the lowest priority. The value written to
IPR1 is 0xBB1B, thus setting the SPI0 interrupt
at location 5 to be the highest priority of the 16
programmable interrupts.
Once the SPI interface has been enabled and the
interrupts are prioritized, the next step is to
configure the hardware to use the PF4 pin as a
slave-select output signal.
In this equation, HCLK is the peripheral clock
rate and SPIBAUD0 is the value that will be
written to the SPI0 Baud Rate Register93
(SPIBAUD0). The SPI bit rate will determine
the frequency of the SPI Clock (SCK).
After the bit rate has been determined, the final
step in preparing the SPI interface is to
configure the SPI port itself, which is
accomplished by writing to the SPI0 Control
Register
114
(SPICTL0), shown in figure 4:
Bit # Name Value Result
Transmit on read of RBDR.
1:0 TIMOD 00
Interrupt when RDBR is full
EE-144 Page 3
Technical Notes on using Analog Devices’ DSP components and development tools
Phone: (800) ANALOG-D, FAX: (781)461-3010, EMAIL: dsp.support@analog.com, FTP: ftp.analog.com, WEB: www.analog.com/dsp
Page 4

Send last word when
2 SZ 0
3 GM 1 Get more data if RDBR full
4 PSSE 0 Disables slave-select input
5 EMISO 0 Disables slave data output
7:6 Reserved 00 RESERVED
8 SIZE 1 16-Bit Word Length
9 LSBF 0 Transmit MSB First
10 CPHA 1
11 CPOL 1 Active-Low SCK
12 MSTR 1 Device Is Master Device
13 WOM 0 Normal Data I/O
14 SPE 1 SPI Module Enabled
15 Reserved 0 RESERVED
Figure 4: SPICTL0 Register Settings For Master
TDBR is empty
SCK Toggles Immediately.
Software Controls Slave
Selects
There are precautions to be considered when
choosing the value that will be written to this
register. The most important thing to consider
here is that certain components of this control
register in both the master and slave devices
need to be configured identically to one another
or the interface will not function properly.
Since this design utilizes identical master and
slave devices, we have identical control registers
and it is very easy to have the two sides agree.
In the even that your interface utilizes a device
other than an ADSP-2191, simply follow these
recommendations and the interface should run
smoothly.
The critical bit-fields in the SPICTL0 register
that must match between master and slave are
SPI clock phase (CPHA) and polarity (CPOL),
data format (LSBF), and word length (SIZE).
These descriptors determine when the data is
moved to and from the shift register, how that
data is coming in and going out, and what size
words are going to be transmitted. If this
information differs from the configuration of the
other SPI devices over the link, there can be data
faults, latch errors, and/or data contention.
Since we have identical devices, it is very easy
to copy these fields to the slave device’s
configuration code.
The bit fields that are based on whether the
device is a master or a slave are the Master
Select (MSTR), the Enable Slave-Select Input
(PSSE), and the Enable MISO For Output
(EMISO) bits. Since this is the master device,
these bits are set accordingly.
The Enable Open-Drain (WOM) bit is needed in
the event that you do not wish to have your datalines connected in a multi-master or multi-slave
environment. Since this is a single-master,
single-slave design, this feature is not enabled.
The rest of the fields in the register can be
configured independently because they deal with
internal interrupt and data handling. The
transfer initiation mode (TIMOD) instructs the
DSP when to have the interrupt occur and when
to begin the SPI transfer. The Send Zeros (SZ)
and Get More (GM) bits control what the SPI
port will do when the Transfer Buffer is empty
at the start of a transmission or the Receive
Buffer is full when more data is coming in.
And, finally, the SPI Module Enable (SPE) bit
must be set in order to turn on the port.
After all the set-up code has run, all that is left is
to actually do the transfer. The next segment of
code sets up the DAG registers for the input and
output buffers with a stride of 1 and linear
addressing
written again
followed by a dummy read of the RDBR0
123-127
. The SPI0 Flag Register is
132
to enable the slave on PF4,
133
to
kick off the transfer. The data is then written to
TDBR0
139
and the loop structure revolves
around the SPI interrupt being generated. After
the entire 16-word buffer has been transmitted
and received, the loop terminates and the
EE-144 Page 4
Technical Notes on using Analog Devices’ DSP components and development tools
Phone: (800) ANALOG-D, FAX: (781)461-3010, EMAIL: dsp.support@analog.com, FTP: ftp.analog.com, WEB: www.analog.com/dsp
Page 5

SPIFLG0 register is written again
145
to disable
the slave on PF4.
3.1.2. SPI_MISR.asm
This module is the Master Interrupt Service
Routine. Because of the way the SPI0 Control
Register is configured in the SPI_Master.asm
module, the SPI0 interrupt will be generated
when RDBR0 is full. The interrupt routine uses
the secondary set of registers in order to avoid
corrupting existing data33, reads the data from
RDBR037, and stores the read data off to
memory in the receive data buffer,
RX_Buf_MASTER38. It then reverts to the
primary set of registers41 and returns to the main
program42.
3.2 . Slave Code
The assembly code for the slave is similar to
that of the master and has been broken into two
files, the source code (SPI_Slave.asm) and the
interrupt handler (SPI_SISR.asm). Again, the
referenced line numbers appear as super-scripts.
3.2.1. SPI_Slave.asm
Just as in the master, the first step is to set the
OPMODE bit in the SYSCR register. Again, bit
4 of the SYSCR is set to remap the IVT
The interrupt priorities are then configured as
they were in the master device
59-64
being used is still SPI0, therefore, the same
procedure applies.
Since this is the slave device, the SPIFLG0 and
SPIBAUD0 registers can be ignored because the
master is going to supply all that stuff for the
slave. Remember, the master supplies the clock,
so the bit rate is only useful in the master
47-50
. The port
.
device. The master also supplies the slaveselect signal, so the slave doesn’t need to
configure any output flags.
The only configuration code left to implement is
writing the SPICTL0 Register98. As was
previously stated in the “Master Code” section
of this application note, this interface will not
work properly unless the critical values in the
slave device match those set in the master
device.
Figure 5 depicts the values of the bit-fields in
the SPICTL0 register and the corresponding
result of choosing those specific values:
Bit # Name Value Result
Transmit on read of RBDR.
1:0 TIMOD 00
2 SZ 0
3 GM 1 Get more data if RDBR full
4 PSSE 1 Enables slave-select input
5 EMISO 1 Enables slave data output
7:6 Reserved 00 RESERVED
8 SIZE 1 16-Bit Word Length
9 LSBF 0 Transmit MSB First
10 CPHA 1
11 CPOL 1 Active-Low SCK
12 MSTR 0 Device Is Slave Device
13 WOM 0 Normal Data I/O
14 SPE 1 SPI Module Enabled
15 Reserved 0 RESERVED
Figure 5: SPICTL0 Register Settings For Slave
Interrupt when RDBR is full
Send last word when
TDBR is empty
SCK Toggles Immediately.
Software Controls Slave
Selects
As can be seen in this table, the only fields that
differ from the configuration of the master
device are the 3 fields that determine whether
the device is a master or a slave (PSSE, EMISO,
and MSTR). Setting PSSE high enables the SPI
Slave-Select signal (~SPISS) as an input from a
EE-144 Page 5
Technical Notes on using Analog Devices’ DSP components and development tools
Phone: (800) ANALOG-D, FAX: (781)461-3010, EMAIL: dsp.support@analog.com, FTP: ftp.analog.com, WEB: www.analog.com/dsp
Page 6

master device. Setting EMISO enables the
MISO data signal as an output. Clearing MSTR
indicates that this is not a master device.
The slave then initializes the buffers
fills TDBR0
122
with the data that will be sent
107-111
and
back to the master once the master starts
transmitting. The loop is set up to receive and
transmit 16 words. The slave device sits in idle
until the master device drives its SPI slaveselect line on PF0. Once that goes low, the
slave starts transmitting on MISO and receiving
on MOSI at the same time.
3.2.2. SPI_SISR.asm
This module is the Slave Interrupt Service
Routine. Because of the way the SPI0 Control
Register is configured in the SPI_Slave.asm
module, the SPI0 interrupt will be generated
when RDBR0 is full. This ISR is identical to
the master’s ISR and was only included because
the master and slave portions of this interface
were developed as two separate projects.
4. Conclusion
While the SPI hardware interface itself is fairly
straightforward, the control code required on
both ends can be confusing. Remember that the
configuration of the SPI Control Register is
what dictates how the ports will behave. For
example, the user could choose to change the
TIMOD to indicate a transfer on write to
TDBRx and interrupt when TDBRx is empty. In
that case, the dummy read in the master example
would be removed but the interrupt routine
would remain the same.
Another alternate scenario could be that the user
wants to have the hardware automatically
control the device selects, which is done by
setting the CPHA bit of the SPICTLx register to
0. In this case, the writes to SPIFLG0 that
control the value of the PF4 pin can be omitted.
Finally, the user may want to use something
other than an ADSP-2191 to be the master or
the slave in an ADSP-2191 SPI system. If that
is the case, then there will not be a one-to-one
mapping of SPI Control Registers. That means
that the user must be careful and know the
behavior of this other SPI device in order to
appropriately program the control register on the
ADSP-2191.
EE-144 Page 6
Technical Notes on using Analog Devices’ DSP components and development tools
Phone: (800) ANALOG-D, FAX: (781)461-3010, EMAIL: dsp.support@analog.com, FTP: ftp.analog.com, WEB: www.analog.com/dsp
 Loading...