

Circuit Note
CN-0224
Dual Port Xpressview 225 MHz HDMI
Receiver
225 MHz, High Performance HDMI
Transmitter with ARC
Rev.0
engineers. Standard engineering practices have been employed in the design and construction of
each circuit, and their function and performance have been tested and verified in a lab environment at
room temperature. However, you are solely responsible for testing the circuit and determining its
suitability and applicability for your use and application. Accordingly, in no event shall Analog Devices
consequential or punitive damages due to any cause
whatsoever connected to the use of any Circuits from the Lab circuits. (Continued on last page)
Fax: 781.461.3113 ©2011 Analog Devices, Inc. All rights reserved.
73
VS/ALSB/FIELD
72
HS
71
69
68
67
DE
P0
P1
P2
42
LLC
3.3V
10kΩ
84
83
SDA
SCL
27
P35
ADV7612"
73
VS/ALSB/FIELD
72
HS
71
69
68
67
DE
P0
P1
P2
42
LLC
84
83
SDA
SCL
27
P35
ADV7612'
47kΩ
3.3V
COMMON VI DEO BUS
SDA
SCL
87
87
CS
0
GND
0
GND
CSCS
HDMI PORT A
HDMI PORT B
HDMI PORT C
HDMI PORT D
RXA_C–/C+
RXA_0–/0+
RXA_1–/1+
RXA_2–/2+
RXA_5V/HPA_A
DDCA_SDA/SC L
RXB_C–/C+
RXB_0–/0+
RXB_1–/1+
RXB_2–/2+
RXB_5V/HPA_B
DDCB_SDA/SC L
RXA_C–/C+
RXA_0–/0+
RXA_1–/1+
RXA_2–/2+
RXA_5V/HPA_A
DDCA_SDA/SC L
RXB_C–/C+
RXB_0–/0+
RXB_1–/1+
RXB_2–/2+
RXB_5V/HPA_B
DDCB_SDA/SC L
47kΩ
10009-001
Circuits from the Lab™ reference circuits are engineered and
tested for quick and easy system integration to help solve today’s
analog, mixed-signal, and RF design challenges. For more
information and/or support, visit www.analog.com/CN0224.
Quad HDMI Input, Fast Switching Multiplexer
Using the ADV7612 Receiver with Extended Temperature Range
EVALUATION AND DESIGN SUPPORT
Design and Integration Files
Schematics, Layout Files, Bill of Materials
Devices Connected/Referenced
ADV7612
ADV7511
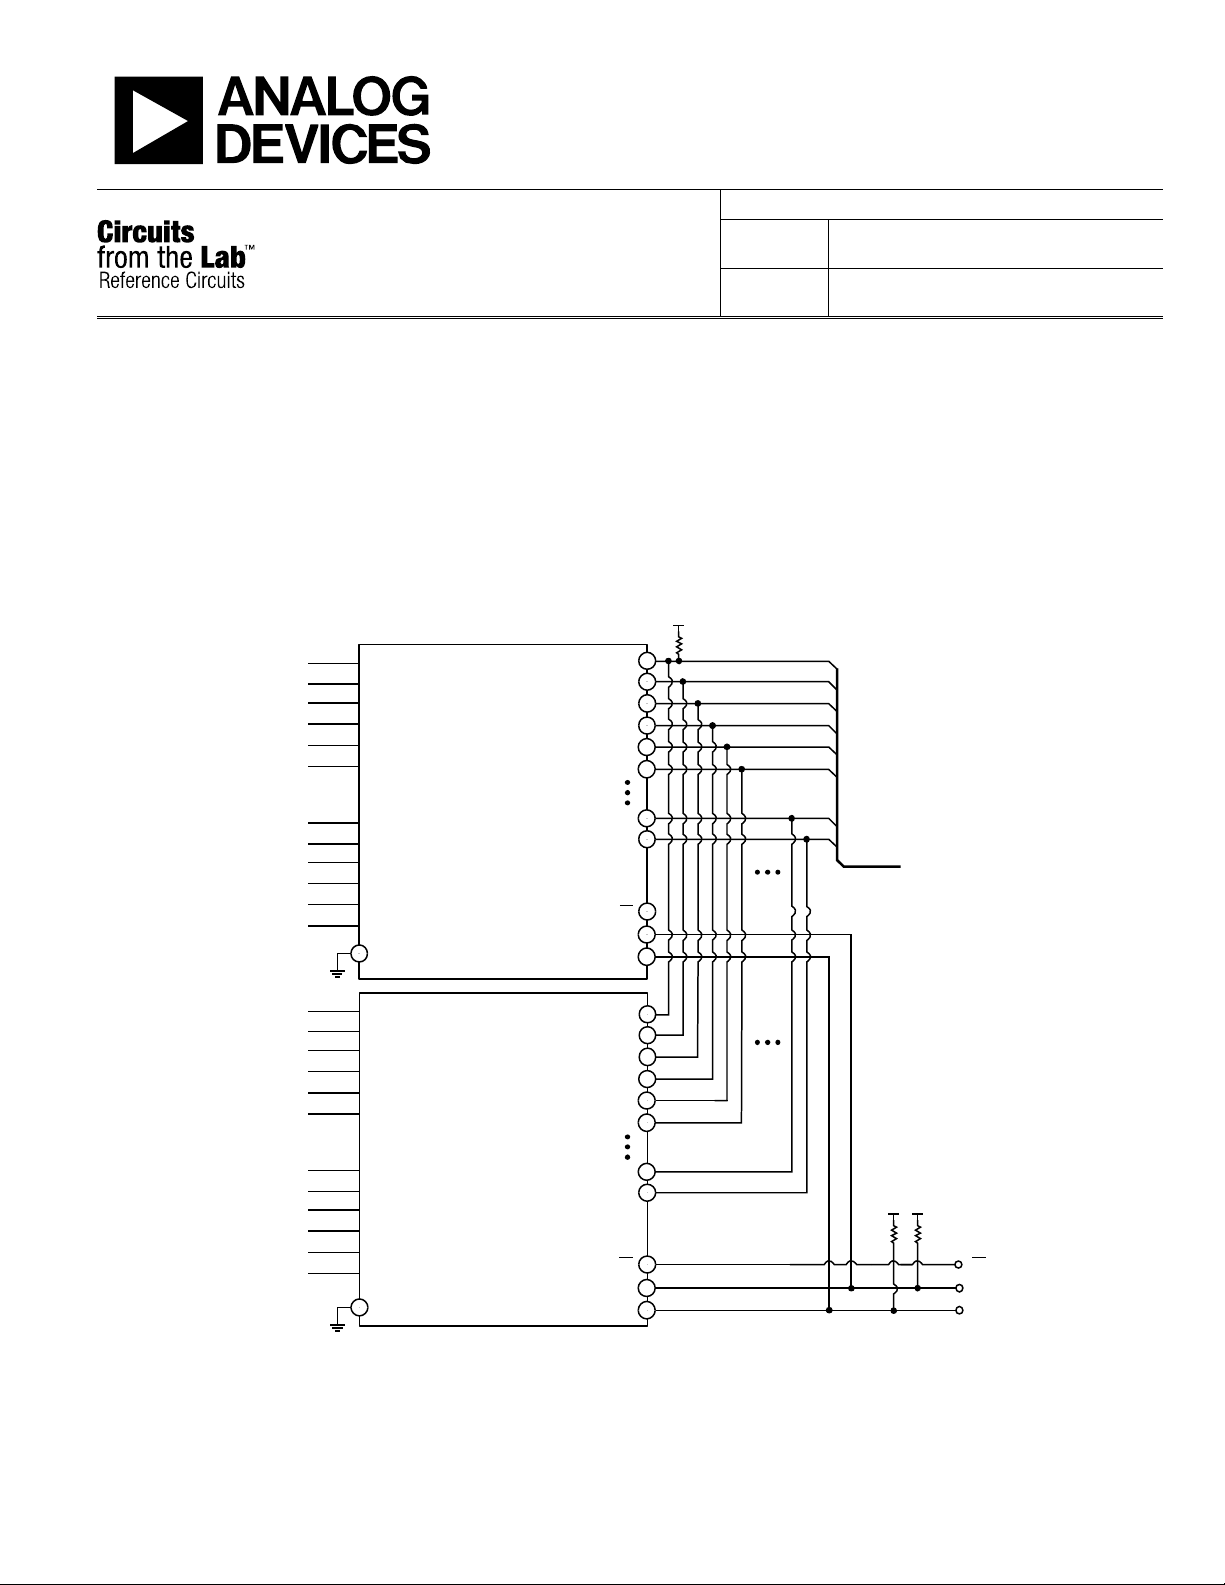
CIRCUIT FUNCTION AND BENEFITS
The ADV7612 is a dual port Xpressview™ 225 MHz HDMI®
receiver that allows fast switching between two inputs. The
circuit shown in Figure 1 shows the use of two ADV7612’s
as a quad-input fast switching HDMI receiver.
Figure 1. Dual ADV7612 Circuit (Simplified Schematic: Decoupling, Terminations, Resets, and All Connections Not Shown)
Circuits from the Lab™ circuits from Analog Devices have been designed and built by Analog Devices
be liable for direct, indirect, special, incidental,
One Technology Way, P.O. Box 9106, Norwood, MA 02062-9106, U.S.A.
Tel: 781.329.4700
www.analog.com
CN-0224 Circuit Note
51Ω 51Ω 51Ω 51Ω
P0 … P35 P0 … P35
LLC
LLC
LLC
ADV7612
ADV7612
ADV7511
150Ω
3.3V
150Ω
10009-002
This circuit shows the expandability of the ADV7612 in
applications requiring four multiplexed HDMI inputs of up to
225 MHz TMDS (1080p60, 12 bits per channel; 148.5 MHz LLC
pixel clock) or UXGA (1600 × 1200, 10 bits per channel;
162 MHz LLC pixel clock). The circuit offers a cost effective
solution to this application and operates over the extended
industrial temperature range of −40°C to +85°C.
CIRCUIT DESCRIPTION
The ADV7612 provides a receving solution for two HDMI
inputs. Figure 1 shows how to connect two ADV7612’s in
parallel on a common shared video and audio bus, thereby
providing multiplexing of four HDMI inputs. How to set up the
2
I
C communications without bus conflicts and how to switch
between the sources will be shown. A software package is
available showing how to handle communication and
authentication in an HDMI repeater application
(see http://ez.analog.com/community/video).
In order for multiple ADV7612 devices to share the same bus,
we need to consider the output state of the devices, capabilities
of tri-stating buses, and the electrical parameters of the load on
the bus. Additionally, the devices must be controlled from an
2
I
C bus in a non-conflicting manner. The board layout of this
circuit is critical and should follow a straight line using
controlled impedances to reduce risk of reflections and crosscoupling. Complete PCB layouts are contained in the design
support package downloadable at www.analog.com/CN0224-
DesignSupport. An ADV7511 HDMI transmitter was used as a
backend device.
Bus Output States
After resetting, the ADV7612 tri-states pins P0-P35, HS,
VS/FIELD/ALSB, DE, LLC, AP0…AP5, SCLK/INT2, and
MCLK/INT2. These pins can be set to the active state using
registers TRI_PIX, TRI_SYNCS, TRI_LLC, TRI_AUDIO as
described in the UG-216 Hardware User Guide, available at
http://ez.analog.com/docs/DOC-1751.
Video and Audio Bus Loading
Only one
second
resistance (P0…P35) of 10 Ω to 20 Ω (highest drive strength)
and a trace characteristic impedance of 75 Ω, a series resistor of
55 Ω to 65 Ω is required to match the characteristic impedance
of the trace. The maximum capacitance of a tri-stated output
bus driver on the ADV7612 is 20 pF (refer to Electrical
Specifications in the ADV7612 data sheet).
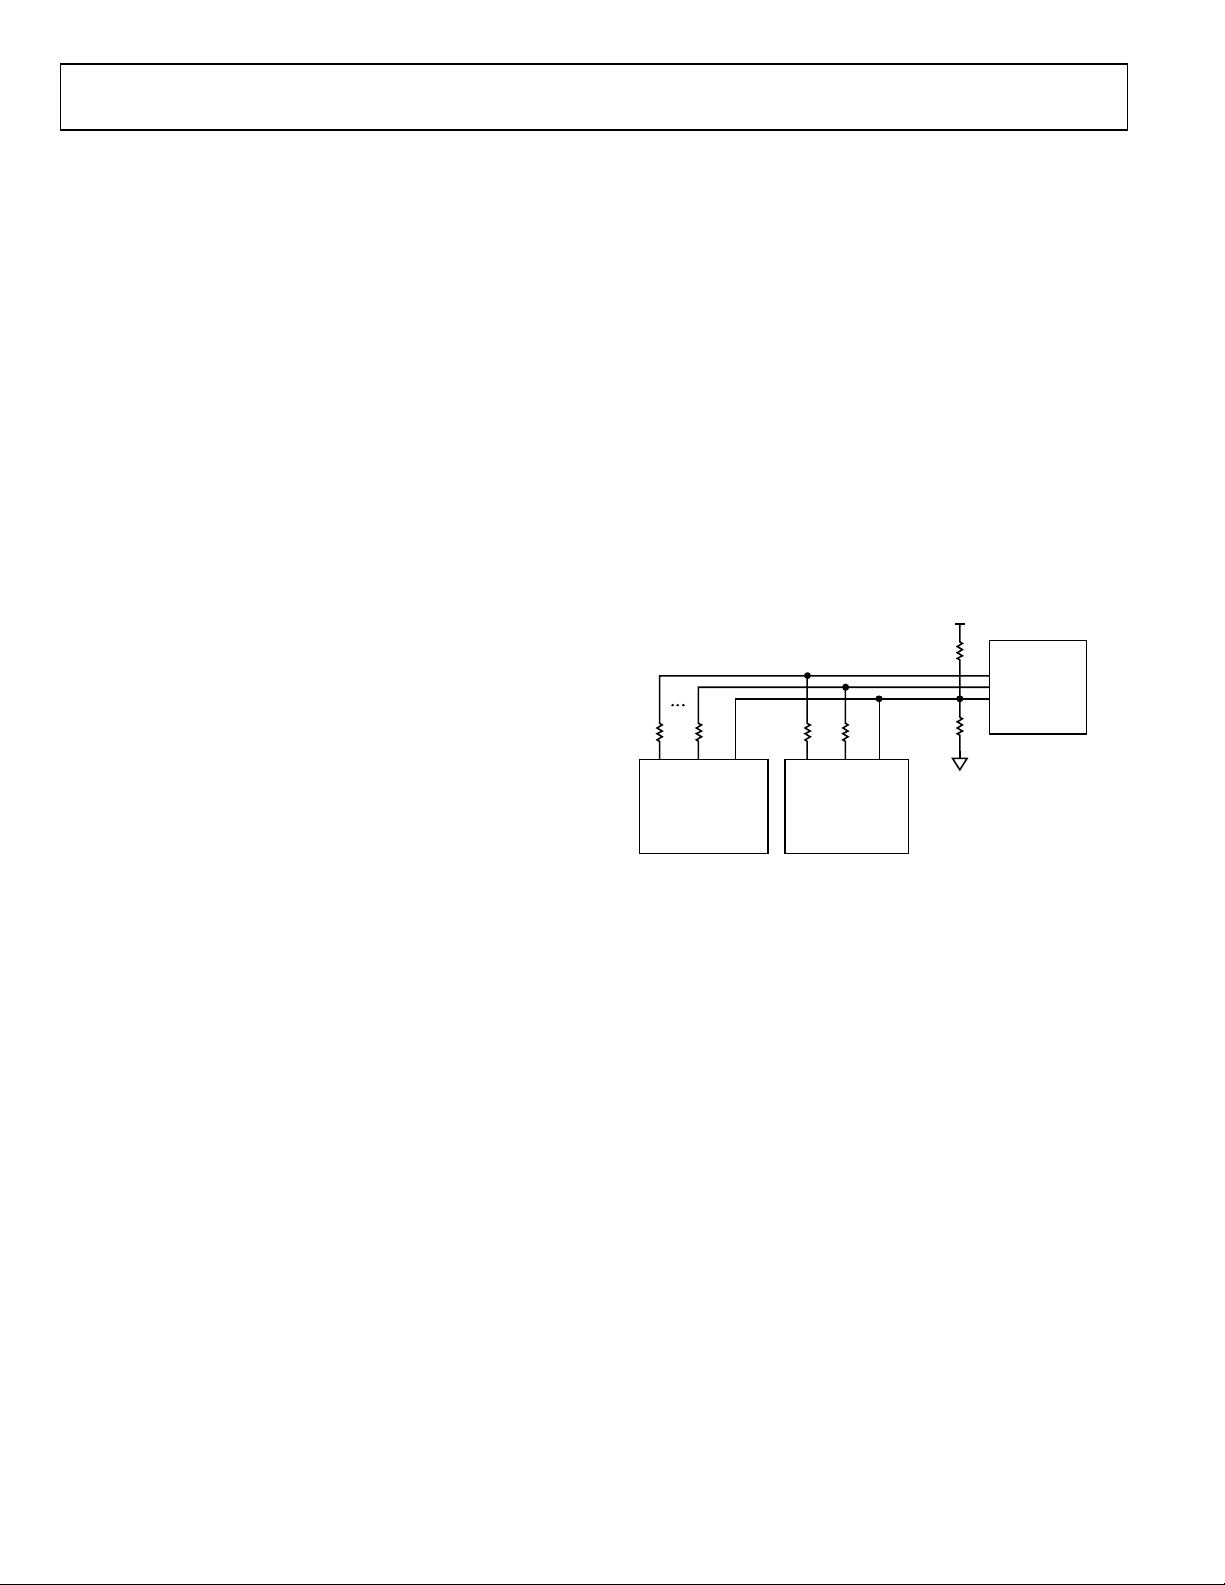
Layout and Termination Considerations
For this design, it is important to make sure the transmission
line is properly terminated and has controlled impedance.
Otherwise, reflections (which may occur on longer lines) can
have a negative impact on transmitted data.
ADV7612 can access the AV bu s es at a time; the
must remain tri-stated. Assumming an output driver
For pixel lines (P0…P35), video synchronization
(VS/FIELD/ALSB, HS, DE), and audio lines (AP0,
AP1/I2S_TDM, AP2...AP5, MCLK/INT2, SCLK/INT2)—other
than LLC—it is suggested to use series termination resistors of
51 Ω at the ADV7612 driver side, and tracks having a
characteristic impedance of 75 Ω.
The line locked clock (LLC) line has the same characteristic
impedance of 75 Ω and should have no series resistor, but
should be terminated at the far end with a symmetrical
termination (150
in Figure 2.
Even though theory suggests a best termination value between
50 Ω and 60 Ω, it was observed during tests that a symmetrical
75 Ω (2 ×150 Ω) termination increases the swing and centers
the signal around mid-supply (1.65 V), which is desireable.The
ADV7511 HDMI transmitter is included on the board and is
used to transmit the multiplexed output of the two ADV7612’s.
Figure 3 to Figure 6 show waveforms for various terminations.
In each case, a symmetrical LLC termination was placed at the
far end (close to the ADV7511), and series termination resistors
as close as possible to the two ADV7612 devices, as shown in
Figure 2.
Measurments were taken on the ADV7511 pins with Tektronix
P6243 FET probes (1 MΩ resistance, 1 GHz bandwidth, less
than 1 pF capacitance) and a Tektronix TDS5104B scope.
From the waveforms we can see that using 2 × 150 Ω
terminations on the LLC line ensures a maximum swing of 3.3 V.
Using 75 Ω on the data lines slows the edges too much. 33 Ω
and 15 Ω on data lines caused undershoots on falling edges
(Figure 5 and Figure 6) and overshoots on rising edges (not
illustrated). Therefore, 2 × 150 Ω was chosen for LLC, and 51 Ω
was used on data lines, which is illustrated in the eye diagrams
shown in Figure 9 and Figure 10.
Rev. 0 | Page 2 of 6
Ω to +3.3 V and to 150 Ω to GND), as shown
Figure 2. Terminations for P0…P35 Data Lines and LLC Traces

Circuit Note CN-0224
10009-003
10009-004
10009-005
10009-006
0
GND
84
83
SDA
SCL
87
CS
CS
CS
0
GND
84
83
SDA
SCL
87
47kΩ
3.3V
SDA
SCL
ADV7612"
ADV7612'
47kΩ
10009-007
Figure 3. Termination: Symmetrical 2 × 150 Ω on LLC line, 75 Ω on Data Lines
(HS). Vertical Scale: 1 V/div, Horizontal Scale: 2 ns/div
Figure 4. Termination: Symmetrical 2 × 100Ω on LLC line, 5 1Ω on Data Lines
(HS). Vertical Scale: 1 V/div, Horizontal Scale: 2 ns/div
Figure 6. Termination: Symmetrical 2 × 33 Ω on LLC, Series 15 Ω Termination
on Data Lines (HS). Note 1 V Undershoot.
Vertical Scale: 1 V/div, Horizontal Scale: 2 ns/div
I2C Access
After power up, both ADV7612 devices will have the same I2C
address on the main map, which may lead to conflicts.
CS
pin is provided on both parts, which allows selecting one
A
CS
of the two devices. When the
line is pulled low, I2C
communication is enabled.
When the
CS
line is pulled high, I2C communication is
disabled.
A simple inverter reduces the resources required on the
microcontroller side, as shown in Figure 7.
Figure 5. Termination: Symmetrical 2 × 68 Ω on LLC, Series 33 Ω Termination
on Data Lines (HS). Note 0.5 V Undershoot.
Vertical Scale: 1 V/div, Horizontal Scale: 2 ns/div
Rev. 0 | Page 3 of 6
2
Figure 7. I
C Access

CN-0224 Circuit Note
ADV7612
ADV7612
ADV7511
10009-008
CEC
CEC implementation is not mandatory on the board, and it is
up to end user to implement it. If CEC is not desired, CEC pins
should be left floating (as described in UG-216, Appedix B:
Recommended Unused Pin Configuration). This user guide is
included at http://ez.analog.com/docs/DOC-1751.
In the other case, separate engines should be used to handle
CEC commands.
XTAL_N, XTAL_P
There are two ways of driving the ADV7612 clock. Both parts
may have separate crystals connected to XTAL_N and XTAL_P
pins, or they can share same signal clock. In the circuit, the 1.8 V
signal clock from the oscillator is provided to pins XTA L_P o f
both parts. In this configuration, XTAL_N must be left floating.
It is critical to ensure proper layout routing and grounding to
eliminate coupling between sensitive lines. The length of each
trace of the bus should be kept equal.
Interrupts
Interrupts from both devices must be considered. The
ADV7612 has two possible interrupts : INT1 (INT1 pin) and
INT2 (available through SCLK/INT2, MCLK/INT2 or
HPA_A/INT2).
It is advised not to use INT2 via pins MCLK/INT2 or
SCLK/INT2, as tri-stating the audio bus with the TRI_AUDIO
register will also tri-state these pins.
Figure 8. Dual ADV7612 Board Solution with ADV7511
Rev. 0 | Page 4 of 6

Circuit Note CN-0224
10009-009
10009-010
QUANTUM DATA
882
DUAL ADV7612 BOARD
PORT A
PORT B
PORT C
PORT D
ADV7612
ADV7612
ADV7511
USB
ASTRO VA-1831
HDMI PROTOCOL
ANALYZER
SCOPE
P35
LLC
PC WITH DVP
EVALUATION
SOFTWARE
QUANTUM DATA
882
10009-011
Figure 9. Screenshot from Scope. Signal Driven from ADV7612-U43. LLC Line
(162 MHz) Measured at ADV7511’s Input and Pixel Line P35. Red Rectangle
Shows Eye Mask for ADV7511. 2 × 150 Ω Symmetrical Termination on LLC
and 51 Ω Series Resistors on Data Lines.
Vertical Scale: 1 V/div, Horizontal Scale: 2 ns/div
Evaluation and Test
The circuit was evaluated using two video generators (Quantum
Data 882) to generate UXGA 1600 × 1200 pixels, 30-bits, and
1080p60, 36 bits (Samsung2 and MoirèX patterns). As an HDMI
sink (output from ADV7511), an A st ro VA -1831 video analyzer
was used. Additionally, video signals from the ADV7612 (LLC
and P35) were observed on the ADV7511 pins with a P6243
(1 pF, 1 MΩ, 1 GHz) probe attached to a Te ktro n ix TDS5104B
oscilloscope. The resulting waveforms are presented as eye
diagrams with ADV7511 eye masks and are shown in Figure 9
and Figure 10 for UXGA (162 MHz, 30 bits) with the Samsung2
pattern. The MoirèX pattern used during tests also showed a
similar safety margin.
Figure 10. Screenshot from Scope. Signal Driven from ADV7612-U1. LLC Line
(162 MHz) Measured at ADV7511’s Input and Pixel Line P35 Red rectangle
Shows Eye Mask for ADV7511. 2 × 150Ω Symmetrical Termination on LLC
and 51Ω Series Resistors on Data Lines.
Vertical Scale: 1V/div, Horizontal Scale: 2ns/div
Layout Considerations
Layout should consist of very short traces. In the ideal case,
traces connecting two pins of the same function between the
two ADV7612’s should be as short as possible and should share
a common series termination resistor placed as close as possible
to both devices and then connected to the bus. In practice, this
is not possible due to layout constraints; therefore, each device
requires its own series termination resistor (see Figure 2). The
video traces should be kept as close to the same length as
possible for delay matching.
Rev. 0 | Page 5 of 6
Figure 11. Test Setup
Video timing measured by the Astro VA-1831 showed no
anomalies. Even and odd vertical lines of MoirèX were analyzed
(1080p60 36-bit and UXGA 30-bit), and it showed that all bits
toggle properly at the same time without any leakage between
lines (MoirèX pattern). The Astro VA-183 also showed stable
HDMI synchronization signals and packets having correct CRC
checksum. This indicates properly received clock and
synchronization information by the backend ADV7511.
Test Steps
1. Prepare test configuration as shown in Figure 11.
2. Power up board and measuring equipment; start DVP
Evaluation Software.
3. In DVP Evaluation Eoftware, load ADV7612 board.
4. Run INIT_PARTS_AND_SET_PORT_A_ver4.py
script in DVP Evaluation Software (refer to design
resources).
5. Press Init button. Once board is initialized, click one
of the buttons: Port A, Port B, Port C, or Port D to
select desired input (see Figure 12).

CN-0224 Circuit Note
10009-012
(Continued from first page) Circuits from the L ab circuits are intended only for use with Analog Devices products and are the intellectual property of Analog Devices or its licensors. While you
reserves the right to change any Circuits fr om the Lab circuits at any time without notice but is under no obligation to d o so.
LEARN MORE
CN-0224 Design Support Package:
www.analog.com/CN0224-DesignSupport
ADV7612 Design Support Files on Engineer Zone:
http://ez.analog.com/docs/DOC-1751
Ardizzoni, John. A Practical Guide to High-Speed Printed-
Circuit-Board Layout, Analog Dialogue 39-09, September
2005.
Figure 12. Software Used for Selecting HDMI Input
MT-031 Tutorial, Grounding Data Converters and Solving the
Mystery of “AGND” and “DGND”, Analog Devices.
MT-101 Tutorial, Decoupling Techniques, Analog Devices.
Howard Johnson, Martin Graham, High-Speed Digital Design,
Prentice Hall, ISBN-10: 0133957241, ISBN-13: 978-
0133957242.
Howard Johnson, Martin Graham, High Speed Signal
Propagation, Prentice Hall, ISBN-10: 013084408X, ISBN-13:
978-0130844088.
Data Sheets and Evaluation Boards
ADV7612 Data Sheet.
ADV7511 Data Sheet.
UG-216, ADV7612 Hardware User Guide:
http://ez.analog.com/docs/DOC-1751
REVISION HISTORY
12/11—Revision 0: Initial Release
may use the Circuits from the Lab circuits in the design of your product, no other license is granted by implication or otherwise under any patents or other intellectual property by
application or use of the Circuits from the Lab circuits. Informa tion furnished by Ana log Devices is believed to be accurate and reliable. However, "Circuits from the Lab" are supplied "as is"
and without warranties of any kind, express, implied, or statutory including, but not limited to, any implied warranty of merchantability, noninfringement or fitness for a particular
purpose and no responsibility is assumed by Analog Devices for their use, nor for any infringements of patents or other rights of third parties that may result from their use. Analog Devices
©2011 Analog Devices, Inc. All rights reserved. Trademarks and
registered trademarks are the property of their respective owners.
CN10009-0-12/11(0
)
Rev. 0 | Page 6 of 6
 Loading...