

Page 1

PowerTel
2880
User Guide
Handleiding
Manual de
instrucciones
Page 2

Page 3

Contents
Getting started. . . . . . . . . . . . . . . . . . . . . . . . . . . . . . . . . . . . . . . . 4
Check box contents . . . . . . . . . . . . . . . . . . . . . . . . . . . . . . . . . . . 4
Set up your phone system . . . . . . . . . . . . . . . . . . . . . . . . . . . . . . 4
Location . . . . . . . . . . . . . . . . . . . . . . . . . . . . . . . . . . . . . . . . . . . . 4
Connect the base unit . . . . . . . . . . . . . . . . . . . . . . . . . . . . . . . . . 5
Connect the cordless handset . . . . . . . . . . . . . . . . . . . . . . . . . . 7
Connect the Charger . . . . . . . . . . . . . . . . . . . . . . . . . . . . . . . . . . 8
Backup battery installation . . . . . . . . . . . . . . . . . . . . . . . . . . . . . 9
Wall mount installation. . . . . . . . . . . . . . . . . . . . . . . . . . . . . . . 10
Controls . . . . . . . . . . . . . . . . . . . . . . . . . . . . . . . . . . . . . . . . . . . . 13
Cordless handset. . . . . . . . . . . . . . . . . . . . . . . . . . . . . . . . . . . . 13
Corded phone . . . . . . . . . . . . . . . . . . . . . . . . . . . . . . . . . . . . . . 16
Display icons . . . . . . . . . . . . . . . . . . . . . . . . . . . . . . . . . . . . . . . . 20
Navigating the menu. . . . . . . . . . . . . . . . . . . . . . . . . . . . . . . . . . 21
Open main menu (cordless handset) . . . . . . . . . . . . . . . . . . . 21
Menu layout (cordless handset). . . . . . . . . . . . . . . . . . . . . . . . 21
Open main menu (corded phone) . . . . . . . . . . . . . . . . . . . . . . 22
Menu layout (corded phone) . . . . . . . . . . . . . . . . . . . . . . . . . . 23
Making and receiving calls . . . . . . . . . . . . . . . . . . . . . . . . . . . . . 24
Making a call, answering a call, ending a call. . . . . . . . . . . . . 24
Handsfree. . . . . . . . . . . . . . . . . . . . . . . . . . . . . . . . . . . . . . . . . . 25
Audio assist . . . . . . . . . . . . . . . . . . . . . . . . . . . . . . . . . . . . . . . . 25
Equaliser . . . . . . . . . . . . . . . . . . . . . . . . . . . . . . . . . . . . . . . . . . 25
Volume control . . . . . . . . . . . . . . . . . . . . . . . . . . . . . . . . . . . . . 25
Mute . . . . . . . . . . . . . . . . . . . . . . . . . . . . . . . . . . . . . . . . . . . . . . 26
Temporary ringer silence . . . . . . . . . . . . . . . . . . . . . . . . . . . . . 26
Redial . . . . . . . . . . . . . . . . . . . . . . . . . . . . . . . . . . . . . . . . . . . . . 26
Caller list . . . . . . . . . . . . . . . . . . . . . . . . . . . . . . . . . . . . . . . . . . 27
Chain dialling. . . . . . . . . . . . . . . . . . . . . . . . . . . . . . . . . . . . . . . 28
Find handset . . . . . . . . . . . . . . . . . . . . . . . . . . . . . . . . . . . . . . . 28
Internal call . . . . . . . . . . . . . . . . . . . . . . . . . . . . . . . . . . . . . . . . 29
Helpline 0844 800 6503 (See page 51 for costs and hours of operation)
1
Page 4

Transfer an external call internally. . . . . . . . . . . . . . . . . . . . . . 29
Conference. . . . . . . . . . . . . . . . . . . . . . . . . . . . . . . . . . . . . . . . . 30
Phone book. . . . . . . . . . . . . . . . . . . . . . . . . . . . . . . . . . . . . . . . . . 31
Create a new entry . . . . . . . . . . . . . . . . . . . . . . . . . . . . . . . . . . 31
Using the phone book. . . . . . . . . . . . . . . . . . . . . . . . . . . . . . . . 31
Photo speed dial . . . . . . . . . . . . . . . . . . . . . . . . . . . . . . . . . . . . . 32
Store a photo speed dial entry. . . . . . . . . . . . . . . . . . . . . . . . . 32
Edit a photo speed dial entry . . . . . . . . . . . . . . . . . . . . . . . . . . 32
Delete a photo speed dial entry . . . . . . . . . . . . . . . . . . . . . . . . 33
Dial a photo speed dial number. . . . . . . . . . . . . . . . . . . . . . . . 33
Reminder . . . . . . . . . . . . . . . . . . . . . . . . . . . . . . . . . . . . . . . . . . . 33
Add a reminder . . . . . . . . . . . . . . . . . . . . . . . . . . . . . . . . . . . . . 34
Review reminders . . . . . . . . . . . . . . . . . . . . . . . . . . . . . . . . . . . 34
Delete reminders. . . . . . . . . . . . . . . . . . . . . . . . . . . . . . . . . . . . 35
Settings. . . . . . . . . . . . . . . . . . . . . . . . . . . . . . . . . . . . . . . . . . . . . 35
Ringtones. . . . . . . . . . . . . . . . . . . . . . . . . . . . . . . . . . . . . . . . . . 35
Key tone on the corded phone. . . . . . . . . . . . . . . . . . . . . . . . . 35
Tones on the cordless handset. . . . . . . . . . . . . . . . . . . . . . . . . 35
Set date and time . . . . . . . . . . . . . . . . . . . . . . . . . . . . . . . . . . . 36
Set the time format . . . . . . . . . . . . . . . . . . . . . . . . . . . . . . . . . . 36
Set the date format . . . . . . . . . . . . . . . . . . . . . . . . . . . . . . . . . . 36
Display language. . . . . . . . . . . . . . . . . . . . . . . . . . . . . . . . . . . . 37
Voice language . . . . . . . . . . . . . . . . . . . . . . . . . . . . . . . . . . . . . 37
Clear voicemail indicator . . . . . . . . . . . . . . . . . . . . . . . . . . . . . 38
Rename corded phone/cordless handset . . . . . . . . . . . . . . . . 38
CID time sync. . . . . . . . . . . . . . . . . . . . . . . . . . . . . . . . . . . . . . . 39
Dial mode. . . . . . . . . . . . . . . . . . . . . . . . . . . . . . . . . . . . . . . . . . 39
Flash time. . . . . . . . . . . . . . . . . . . . . . . . . . . . . . . . . . . . . . . . . . 40
Registering a handset (corded phone) . . . . . . . . . . . . . . . . . . 40
Quiet mode . . . . . . . . . . . . . . . . . . . . . . . . . . . . . . . . . . . . . . . . 41
2
Helpline 0844 800 6503 (See page 51 for costs and hours of operation)
Page 5

Answering machine . . . . . . . . . . . . . . . . . . . . . . . . . . . . . . . . . . . 42
Switching the answering machine on/off . . . . . . . . . . . . . . . . 42
Hear messages . . . . . . . . . . . . . . . . . . . . . . . . . . . . . . . . . . . . . 42
Record personal announcement . . . . . . . . . . . . . . . . . . . . . . . 44
Call screening . . . . . . . . . . . . . . . . . . . . . . . . . . . . . . . . . . . . . . 44
Call intercept . . . . . . . . . . . . . . . . . . . . . . . . . . . . . . . . . . . . . . . 46
Delete messages . . . . . . . . . . . . . . . . . . . . . . . . . . . . . . . . . . . . 46
Record a memo . . . . . . . . . . . . . . . . . . . . . . . . . . . . . . . . . . . . . 46
Number of rings . . . . . . . . . . . . . . . . . . . . . . . . . . . . . . . . . . . . 47
Remote access code . . . . . . . . . . . . . . . . . . . . . . . . . . . . . . . . . 48
Message alert tone . . . . . . . . . . . . . . . . . . . . . . . . . . . . . . . . . . 48
Message recording time. . . . . . . . . . . . . . . . . . . . . . . . . . . . . . 49
Remote access. . . . . . . . . . . . . . . . . . . . . . . . . . . . . . . . . . . . . . 50
Appendix. . . . . . . . . . . . . . . . . . . . . . . . . . . . . . . . . . . . . . . . . . . . 51
Help and support. . . . . . . . . . . . . . . . . . . . . . . . . . . . . . . . . . . . 51
Safety information . . . . . . . . . . . . . . . . . . . . . . . . . . . . . . . . . . 51
Intended use . . . . . . . . . . . . . . . . . . . . . . . . . . . . . . . . . . . . . . . 51
Phone location. . . . . . . . . . . . . . . . . . . . . . . . . . . . . . . . . . . . . . 51
Power supply. . . . . . . . . . . . . . . . . . . . . . . . . . . . . . . . . . . . . . . 52
Energy efficient power adapter . . . . . . . . . . . . . . . . . . . . . . . . 52
Medical equipment . . . . . . . . . . . . . . . . . . . . . . . . . . . . . . . . . . 52
Rechargeable batteries . . . . . . . . . . . . . . . . . . . . . . . . . . . . . . . 53
Hearing aid compatibility . . . . . . . . . . . . . . . . . . . . . . . . . . . . . 53
Disposal . . . . . . . . . . . . . . . . . . . . . . . . . . . . . . . . . . . . . . . . . . . 53
Maintenance . . . . . . . . . . . . . . . . . . . . . . . . . . . . . . . . . . . . . . . 54
Technical details . . . . . . . . . . . . . . . . . . . . . . . . . . . . . . . . . . . . 54
Guarantee . . . . . . . . . . . . . . . . . . . . . . . . . . . . . . . . . . . . . . . . . 55
Declaration of conformity. . . . . . . . . . . . . . . . . . . . . . . . . . . . . 56
Helpline 0844 800 6503 (See page 51 for costs and hours of operation)
3
Page 6

Getting started
Important: Please make sure you’ve read the safety information on page 51 before you set up your phone system.
Check box contents
If you have purchased a PowerTel 2880 pack you should have:
• 1 corded phone (base)
• 1 receiver
• 1 receiver cord
• 1 AC power adaptor for corded phone
• 1 cordless handset
• 3 AAA NiMH rechargeable batteries
• 1 battery compartment cover
• 1 charger
• 1 AC power adaptor for charger
• 1 telephone line cord
Important: Use only the power adaptors, telephone line cord
and batteries supplied with your PowerTel 2880, otherwise
your phone may not work.
Set up your phone system
Location
Place the base unit (corded phone) near a mains socket and a
telephone wall jack to ensure that the connection cables are
long enough. Keep the unit approx. 1 m away from other
electronic devices to prevent interference. The corded phone
uses radio signals to connect with the cordless handset. Signal
4
Helpline 0844 800 6503 (See page 51 for costs and hours of operation)
Page 7

strength depends on the base unit's location. The maximum
range is 300 m based on an unobstructed line of sight; the
range is shorter inside buildings because of walls and other
obstacles.
Connect the base unit
1. Plug the connector on the cable end into the corresponding
jack on the underside of the base and plug the power
adaptor into the wall socket.
2. Plug the small connector on the end of the telephone line
cord into the corresponding jack on the base and plug the
other end into the telephone jack.
3. Connect the receiver with the telephone using the coiled
receiver cord.
Note: Guide the connection cables through the strain-relief tabs
on the base so the unit sits flush with the desk.
For pluggable equipment, the socket-outlet (power adaptor)
shall be installed near the equipment and shall be easily
accessible.
Helpline 0844 800 6503 (See page 51 for costs and hours of operation)
5
Page 8

Telephone
line cord
If you have DSL high-speed
Internet service, a DSL filter
(not included) is required
Telephone base
power adaptor
Mains power
wall socket
Telephone
wall jack
Coiled cord jack
Telephone line jack
Power cord
jack
Important: Use only the power adaptors, telephone line cord
and batteries supplied with your PowerTel 2880, otherwise
your phone may not work.
Do not block access to the wall power supply with furniture
or other items.
6
Helpline 0844 800 6503 (See page 51 for costs and hours of operation)
Page 9

Connect the cordless handset
1. Open the battery compartment and insert the batteries. Pay
attention to the correct polarity.
2. Slide the battery compartment cover towards the centre of
the handset until it clicks into place.
For a full charge, the handset must be left in the charger for at
least 16 hours (check the charger’s power supply!).
Important: Use only the batteries supplied with this product.
If the batteries need to be replaced later on the same battery
type must be used.
Helpline 0844 800 6503 (See page 51 for costs and hours of operation)
7
Page 10

Connect the Charger
1. Plug the connector on the cable end into the jack on the
underside of the charger and plug the power adaptor into
the wall socket.
2. Place the handset in the handset charger to charge.
Note: Guide the power cord through the strain-relief tabs on the
base so the unit sits flush with the desk.
For pluggable equipment, the socket-outlet (power adaptor)
shall be installed near the equipment and shall be easily
accessible.
8
Helpline 0844 800 6503 (See page 51 for costs and hours of operation)
Page 11

Backup battery installation
Install three AAA non-rechargeable batteries (not supplied) so
that your telephone can still operate in the event of a mains
power failure.
WARNING: Disconnect the telephone line cord from the base
when replacing back-up batteries.
1. Press the large tab on the backup battery compartment
cover. Then pull to open.
2. Place three AAA batteries into the compartment, matching
the polarity engravings.
3. Replace the backup battery compartment cover. Push the
large tab until it locks securely.
Note: Under normal usage conditions, the three AAA nonrechargeable batteries should last approximately 6 months.
Battery life depends on the frequency and duration of mains
power failures.
Helpline 0844 800 6503 (See page 51 for costs and hours of operation)
9
Page 12

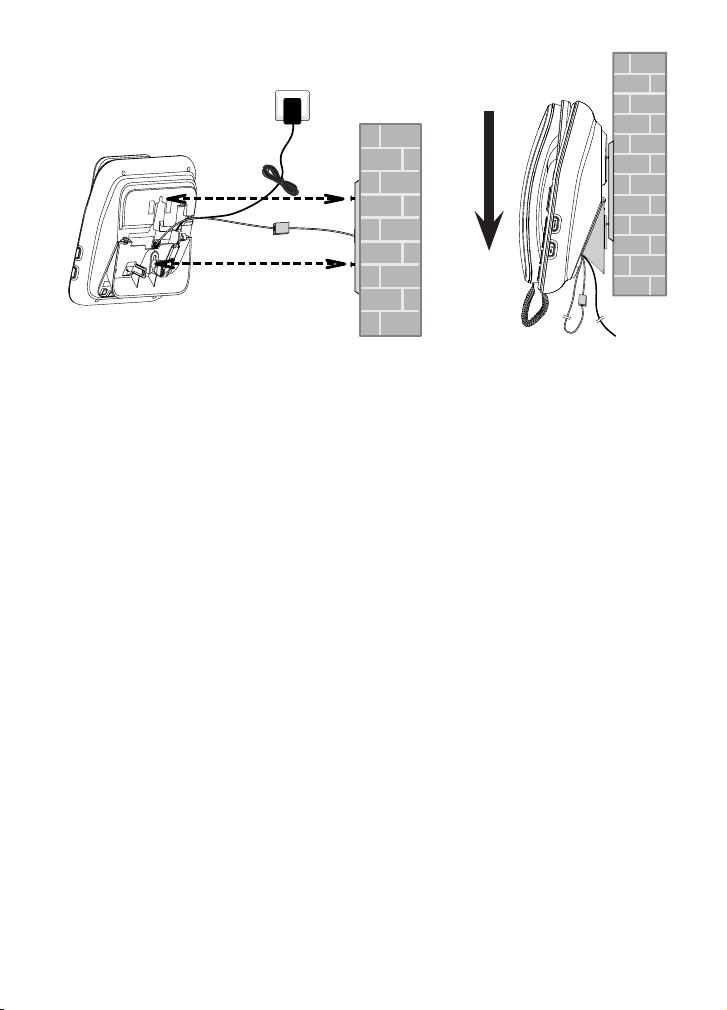
Wall mount installation
To mount the base unit (corded phone) on the wall you need 2
dowels and 2 suitable screws, preferably fillister-head screws,
dia. 4 mm. Fasten the screws 83 mm apart one below the other
in a vertical line so that the screw heads are about 3 mm from
the wall.
CAUTION: Know where your electrical wires and water
pipes are located before drilling!
1. Unplug the power adaptor cord and the telephone line cord
from the base.
2. Remove the retainer from the handset cradle, turn it 180º
and reinsert it in the cradle.
3. Grasp and squeeze the tabs as indicated by the arrows to
open the hinged bracket. Route the telephone line cord and
the power adaptor cord through the hole of the wall mount
bracket. Push the end of the telephone line cord into the
telephone jack and push the connector of the power adaptor
into the power cord jack on the underside of the phone.
10
Helpline 0844 800 6503 (See page 51 for costs and hours of operation)
Page 13

4. Rotate the wall mount bracket and lock it into wall mount
position. Route the telephone line cord and power adaptor
cord through the slot on the bottom of the telephone base.
Bundle the telephone line cord and the power adaptor cord
with twist ties.
5. Plug the power adaptor and the telephone line cord back into
their sockets.
6. Position the telephone over the screw heads and push down
lightly until it is firmly seated.
Helpline 0844 800 6503 (See page 51 for costs and hours of operation)
11
Page 14
7. Place the receiver in the telephone base. Rotate the top of
the display up or down to adjust the screen angle for
maximum visibility.
12
Helpline 0844 800 6503 (See page 51 for costs and hours of operation)
Page 15

Controls
1
2
3
4
5
6
7
8
9
10
11
12
13
Cordless handset
Helpline 0844 800 6503 (See page 51 for costs and hours of operation)
13
Page 16

1 Incoming call light
- Flashes when there is an incoming call/ the base is paging
the handset.
2 Charge light
- On when the handset is charging.
3 Phonebook/Up
- Press to review the phonebook when in idle.
- Press to scroll up while in menus or lists.
- Press to move the cursor to the right while entering names
or numbers.
4 Redial/Pause
- In idle state: press to open redial list. Press repeatedly to
view the last 10 numbers dialed.
- Press and hold to insert a dialing pause while dialing or
entering numbers.
5 Call/Recall
- Press to make or answer a call.
- Press to access network features during a call.
6 Caller list/Down
- Press to review the caller list when in idle.
- Press to scroll down while in menus or lists.
- Press to move the cursor to the left while entering names
or numbers.
7 Speaker
- Press to make or answer a call using the speakerphone.
- Press to switch between the handset speakerphone and the
handset earpiece during a call.
8 Mute/Delete
- Press to mute the microphone during a call.
- Press to silence the handset ringer temporarily while the
phone is ringing (the call can still be accepted if the caller
hasn't hung up).
14
Helpline 0844 800 6503 (See page 51 for costs and hours of operation)
Page 17

- Press to delete an individual entry while reviewing the
redial list/phonebook/ caller list/reminder.
9 Audio-Assist
- Press to enhance the clarity and loudness of the caller’s
voice during a call.
10 Alphanumeric keypad
- Press to enter numbers or characters/*/#.
- Press any key to answer an incoming call.
- Press star key to switch between upper case and lower
case while entering characters.
- Press and hold hash key to set and turn on the quiet mode,
or turn it off.
11 End call/Cancel
- Press to hang up during a call.
- Press to cancel an operation, or back up to the previous
menu while in a menu. Press and hold to return to idle
mode while in a menu.
- Press to silence the handset ringer temporarily while the
phone is ringing (the call can still be accepted if the caller
hasn't hung up).
- Press and hold to erase the missed call indicator when idle.
12 Menu/Select
- Press to show the menu.
- Press to select an item or save an entry/setting while in a
menu.
13 Volume keys
- Press to adjust the handset ringer volume when in idle.
- Press to adjust the listening volume during a call or
message playback.
Helpline 0844 800 6503 (See page 51 for costs and hours of operation)
15
Page 18

Corded phone
12
3
4
5
6
7
8
9
10
11
1 Incoming call light
- Flashes when there is an incoming call.
2 “In use“ light
- On when there is an incoming call or the phone is in use or
the answering system is answering an incoming call.
16
Helpline 0844 800 6503 (See page 51 for costs and hours of operation)
Page 19

- On when a device is being registered.
- Flashes when devices are being deregistered.
- Flashes when another telephone (cordless handset) on the
same line is in use.
3 Display
- Press to move the top of the display forward or backward
to adjust the angle of the screen for maximum visibility.
4 Speed dial keys
- Press to set or dial a speed dial number when in idle.
5 Page
- Press to page all handsets when in idle.
6 Answering machine on/off
- Press to turn the built-in answering machine on/off. Lit
when the answering system is turned on.
7 Volume keys
- Press to adjust the ringer volume when in idle.
- Press to adjust the listening volume during a call or
message playback.
8 Slow
- Press to slow down the answering machine or reminder
message playback.
9 Speaker
- Press to make, answer or end a call.
- Press to switch between the corded handset and the base
speakerphone during a call.
10 Redial/Pause
- In idle state: press to open redial list. Press repeatedly to
view the last 10 numbers dialed.
- Press and hold to insert a dialing pause while dialing or
entering numbers.
11 Microphone
Helpline 0844 800 6503 (See page 51 for costs and hours of operation)
17
Page 20

12 Alphanumeric keypad
14 15 16 17
2122
20
19
18
- Press to enter numbers or characters/*/#.
- Press any key to answer an incoming call.
- Press star key to switch between upper case and lower
case while entering characters.
- Press and hold hash key to set and turn on quiet mode, or
turn it off.
13 Audio-Assist
- Press to enhance the clarity and loudness of the caller’s
voice during a call.
14 Cancel
- Press to cancel an operation, or go back to the previous
menu while in a menu. Press and hold to return to idle
mode while in a menu.
- Press to silence the base ringer temporarily while the
phone is ringing (the call can still be accepted if the caller
hasn't hung up).
- Press and hold to erase the missed call indicator when idle.
18
Helpline 0844 800 6503 (See page 51 for costs and hours of operation)
Page 21

15 Down
- Press to scroll down while in menus or lists.
- Press to move the cursor to the left while entering or
modifying names or numbers.
16 Up
- Press to scroll up while in menus or lists.
- Press to move the cursor to the right while entering or
modifying names/numbers.
17 Menu
- Press to enter the menu.
18 Left softkey/Right softkey
- Press to select a menu item displayed above the key.
19 Delete
- Press to delete the current message/announcement/
reminder.
- Press to delete an individual entry while reviewing the
redial list/phonebook/caller list/reminder.
20 Skip
- Press to skip to the next message during message
playback.
- Press to move the cursor to the right while entering or
modifying names or numbers.
21 Play/Stop
- Press to start or stop message playback.
- Flashes when there are new messages/memos in the
answering machine.
22 Repeat
- Press once to repeat the current message.
- Press twice to play the previous message.
- Press to move the cursor to the left while entering or
modifying names or numbers.
Helpline 0844 800 6503 (See page 51 for costs and hours of operation)
19
Page 22

Display icons
ANS ON
Battery is low; place handset in charger to
recharge.
Full battery power level.
2/3 battery power level.
1/3 battery power level.
The handset speakerphone is in use.
Ringer off (handset/corded phone).
New voicemail from your telephone service
provider (handset/depending on provider).
New voicemail from your telephone service
provider (corded phone/depending on provider).
Microphone is muted.
20
New call list- Missed and new calls.
The answering machine is turned on.
New message on the answering machine.
Helpline 0844 800 6503 (See page 51 for costs and hours of operation)
Page 23

Navigating the menu
This chapter describes how to use the menu to access features
on both telephones.
Open main menu (cordless handset)
1. Press .
2. Use and to select the desired menu item and
press .
3. Press to cancel an operation, back up to the previous
menu, or exit that menu.
4. Press and hold down to return to idle state.
Note: If a key is not pressed within 30 seconds, the telephone
automatically returns to idle mode.
Menu layout (cordless handset)
Play messages
Answering sys Announcement
Delete all old
Record memo
Answer ON/OFF
Ans sys setup
Intercom
Phonebook Review
Add contact
Caller ID log Review
Del all calls
Reminder Review
Set reminder
On/off
Helpline 0844 800 6503 (See page 51 for costs and hours of operation)
21
Page 24

Ringers Ringer volume
Ringer tone
Tones Key tone
Battery low
Out of range
Set date/time
Time format
Date format
Settings LCD language
Voice language
Clr voicemail
Rename handset
CID time sync
Dial mode
Flash time
Reset
Open main menu (corded phone)
1. Press .
2. Use to select the desired menu item and press
SELECT.
3. Press to cancel an operation, back up to the previous
menu, or exit that menu.
4. Press and hold down to return to idle state.
Note: If a key is not pressed within 30 seconds, the telephone
automatically returns to idle mode.
22
Helpline 0844 800 6503 (See page 51 for costs and hours of operation)
Page 25

Menu layout (corded phone)
Answering system Announcement
Delete all old
Record memo
Answer ON/OFF
Ans sys setup
Intercom
Photo speed dial
Phonebook Review
Add contact
Caller ID log Review
Delete all calls
Reminder Review
Set reminder
Reminder on/off
Ringers Ringer volume
Ringer tone
Key tone
Set date/time
Time format
Date format
Settings LCD language
Voice language
Clear voicemail
Rename base
CID time sync
Dial mode
Flash time
Registration
Reset
Helpline 0844 800 6503 (See page 51 for costs and hours of operation)
23
Page 26

Making and receiving calls
Making a call, answering a call, ending a call
To make a call on the corded phone
Enter the telephone number and lift the receiver or press
.
- or -
Lift the receiver or press . When you hear a dial tone,
enter the telephone number.
To answer a call on the corded phone
Lift the receiver, or press or any dialing key.
To end a call on the corded phone
When you are using the receiver, place it on the telephone
base.
When you are using the speakerphone, press .
To make a call on a cordless handset
Enter the telephone number and press or .
- or -
Press or . When you hear a dial tone, enter the
telephone number.
To answer a call on a cordless handset:
Press or or any dialling key.
To end a call on a cordless handset:
Press or place the handset in the charger.
24
Helpline 0844 800 6503 (See page 51 for costs and hours of operation)
Page 27

Handsfree
Whilst in a call press on the corded phone or on
the cordless handset. To deactivate, press the same key
again.
Audio assist
Use this feature to enhance the clarity and loudness of
a caller’s voice on the cordless or corded handset
earpiece when listening to a message or an
announcement. Whilst in a call press on the corded
phone or on the cordless handset. CAUTION: The
volume is very high!
To deactivate, press the same key again.
Equaliser
This feature allows you to change the quality of the audio for
both handset earpiece and speakerphone to best suit your
hearing.
1. Whilst in a call press the menu key or .
2. Press SELECT on the corded phone or press on the
cordless handset to conrm.
3. Select Natural, Treble 1, Treble 2 or Bass and press SAVE on
the corded phone or press on the cordless handset to
save your setting.
Volume control
On the cordless handset
Whilst in a call press the volume buttons on the side.
On the corded phone
Whilst in a call press the volume keys .
Helpline 0844 800 6503 (See page 51 for costs and hours of operation)
25
Page 28

Mute
The mute function allows you to hear the other party but the
other party cannot hear you.
On the cordless handset
Whilst in a call press . Press again to resume the
conversation.
On the corded phone
Whilst in a call press MUTE. Press UNMUTE to resume the
conversation.
Temporary ringer silence
When the telephone is ringing, you can temporarily silence
the ringer on the cordless handset or the corded phone
without disconnecting the call. The next call rings normally
at the preset volume.
On the cordless handset
Press .
On the corded phone
Press SILENCE or .
Redial
The last 10 telephone numbers dialled are stored in the
system memory.
On the cordless handset
1. Press in idle state.
2. Select the desired entry with and or press
repeatedly.
3. Press or to dial the telephone number.
26
Helpline 0844 800 6503 (See page 51 for costs and hours of operation)
Page 29

On the corded phone
1. Press in idle state.
2. Select the desired entry with or press
repeatedly.
3. Lift the receiver or press to dial the telephone
number.
Caller list
Note: This function is only available if your telephone service
provider has activated the CLIP (Calling Line Identification
Presentation) service attribute. Please contact your service
provider for more information.
The phone numbers of incoming calls are stored in a call
log. For new entries you will see a message on the display.
Calling from the caller list (cordless handset)
1. Press in idle state.
2. Select the desired entry with and .
3. Press or to dial the telephone number.
Calling from the caller list (corded phone)
1. Press CALL LOG in idle state.
2. Select the desired entry with .
3. Lift the receiver or press to dial the telephone
number.
Helpline 0844 800 6503 (See page 51 for costs and hours of operation)
27
Page 30

Saving an entry from the caller list to the phone book
1. Open the caller list and select an entry.
2. Press SAVE on the corded phone or press on the
cordless handset
3. Edit the telephone number if necessary and press NEXT on
the corded phone or press on the cordless handset.
4. Enter the name and press SAVE on the corded phone or
press on the cordless handset.
Chain dialling
Use this feature to initiate a dialling sequence from numbers
stored in the phonebook, caller list or redial list whilst you
are on a call.
Selecting an entry from the phone book/caller list
1. Press the menu key whilst in a call or .
2. Select Phonebook or Caller ID log and press SELECT on the
corded phone or press on the cordless handset.
3. Select the desired entry and press CALL on the corded
phone or press on the cordless handset to dial the
telephone number.
Selecting an entry from the redial list
1. Whilst in a call press or .
2. Select an entry using the arrow keys or by repeatedly
pressing or and press CALL on the corded phone or
press on the cordless handset to dial the telephone
number.
Find handset
You can locate a missing handset or alert a handset user that
they are wanted by causing the handset to beep from the
corded phone.
28
Helpline 0844 800 6503 (See page 51 for costs and hours of operation)
Page 31

Start paging
Press the paging button on the right-hand side of the corded
phone to page all registered cordless handsets.
Stop paging
On the corded phone: press STOP or press the paging button
again.
On the cordless handset: press or or any dialling
key, or place the handset in the charger.
Internal call
Use the intercom feature for conversations between two
system devices. These calls are free of charge.
1. Press the menu key or , select Intercom and
press SELECT on the corded phone or press on the
cordless handset.
If only 2 devices are available the second one will ring right
away. If there are several registered cordless handsets,
choose one and press SELECT on the corded phone or press
on the cordless handset.
2. To answer the call on the corded phone, lift the receiver or
press or any dialling key.
- or To answer the call on the cordless handset, press or
or any dialling key.
Transfer an external call internally
While on an external call, you can transfer the call from the
cordless handset to the corded phone or vice-versa.
From the cordless handset to the corded phone
1. Whilst in a call press , select Transfer and press .
If no additional cordless handsets are registered the corded
Helpline 0844 800 6503 (See page 51 for costs and hours of operation)
29
Page 32

phone will ring right away. If there are several registered
cordless handsets, choose one and press .
2. To answer the call on the corded phone, lift the receiver or
press or any dialing key.
- or To answer the call on the cordless handset, press or
or any dialing key.
From the corded phone to the cordless handset
1. Whilst in a call press , select Transfer and press
SELECT.
If there is only one registered cordless handset it will ring
right away. If there are several registered cordless handsets,
choose one and press SELECT.
2. To answer the call on the cordless handset press or
or any dialling key.
Conference
You can set up a three-party conference with the corded
phone, the handset and an external call partner.
1. You are in an external call.
2. Press the menu key or , select Intercom and
press SELECT on the corded phone or press on the
cordless handset.
If only 2 devices are available the second one will ring right
away. If there are several registered cordless handsets,
choose one and press SELECT on the corded phone or press
on the cordless handset.
3. If the internal call has been accepted, press or .
4. Select Share call and press SELECT on the corded phone or
press on the cordless handset.
The conference is set up.
30
Helpline 0844 800 6503 (See page 51 for costs and hours of operation)
Page 33

Phone book
The Phonebook stores up to 100 entries that can be accessed
by all devices. You can nd a Phonebook entry by entering
the rst letter of the stored name using the numeric keys. If
necessary, use the arrow keys to select the desired entry.
Create a new entry
1. In idle state press the menu key or .
2. Select Phonebook and press SELECT on the corded phone or
press on the cordless handset.
3. Select Add contact and press SELECT on the corded phone
or press on the cordless handset.
4. Enter the telephone number
- or add a phone number from the redial list. Press or ,
select the desired entry and press SELECT on the corded
phone or press on the cordless handset.
5. Press NEXT on the corded phone or press on the
cordless handset.
6. Enter the name and press SAVE on the corded phone or
press on the cordless handset.
Using the phone book
Open the phone book (corded phone: PHONEBOOK, cordless
handset: ) and select the desired entry.
Make a call
Corded phone: Lift the receiver or press .
Cordless handset: Press or .
Helpline 0844 800 6503 (See page 51 for costs and hours of operation)
31
Page 34

Edit an entry
Press EDIT on the corded phone or press on the
cordless handset. Edit the entry and press SAVE on the
corded phone or press on the cordless handset.
Delete an entry
Press on the corded phone or press on the
cordless handset. To conrm press YES on the corded phone
or press on the cordless handset.
Photo speed dial
The corded phone has four photo speed dial buttons for
numbers you wish to call with the press of one button.
To open the covers insert a fingernail in the recess at the
bottom and lift up the cover. Photo inserts can be up to 18 x
20 mm in size.
Store a photo speed dial entry
1. In idle state press the menu key .
2. Select Photo speed dial and press SELECT.
3. Select the desired speed dial location and press SELECT.
4. Enter the telephone number and press NEXT.
5. Enter the name and press SAVE.
Edit a photo speed dial entry
1. In idle state press the menu key .
2. Select Photo speed dial and press SELECT.
3. Select the desired speed dial location and press SELECT.
4. Edit the telephone number and press NEXT.
5. Edit the name and press SAVE.
32
Helpline 0844 800 6503 (See page 51 for costs and hours of operation)
Page 35

Delete a photo speed dial entry
1. In idle state press the menu key .
2. Select Photo speed dial and press SELECT.
3. Select the desired speed dial location and press . To
conrm press YES.
Dial a photo speed dial number
When in idle state, press a photo speed dial key to dial the
number stored in the corresponding photo speed dial
location.
Reminder
The Reminder function can be used to remind you of
important events with a voice message recorded on the
answering machine. You can set the reminder to remind you
only once or on a daily, weekly or monthly basis.
You can store up to 9 reminders in total. Each reminder can
be up to four minutes in length. The total storage capacity for
the answering machine and reminders is approximately 30
minutes.
If you record a reminder the corded phone and the cordless
handset will notify you at the specified time with an alert
tone and a message on the display.
Always play the reminder message all the way to the end.
The phone will return to idle mode after the message is
finished.
To hear a reminder on the cordless handset
When the reminder alert tone sounds, press or .
To hear a reminder on the corded base
When the reminder alert tone sounds, lift the receiver or
press .
Helpline 0844 800 6503 (See page 51 for costs and hours of operation)
33
Page 36

Add a reminder
1. In idle state press the menu key or .
2. Select Reminder and press SELECT on the corded phone or
press on the cordless handset.
3. Select Set reminder and press SELECT on the corded phone
or press on the cordless handset.
4. Enter day, month and year for the reminder and press NEXT
on the corded phone or press on the cordless handset.
5. Enter hours and minutes for the reminder and press NEXT
on the corded phone or press on the cordless handset.
6. After the tone speak your reminder message into the
microphone. Press SAVE on the corded phone or key 5 on
the cordless handset when done.
7. Select the frequency you would like to set and press SAVE
on the corded phone or press on the cordless handset.
Review reminders
1. In idle state press the menu key or .
2. Select Reminder and press SELECT on the corded phone or
press on the cordless handset.
3. Select Review reminder and press SELECT on the corded
phone or press on the cordless handset.
4. The reminders will be played back in sequence. Press on
the corded phone or press key 6 on the cordless handset to
skip to the next reminder. Press on the corded phone or
press key 4 on the cordless handset to hear the current
reminder again. Press twice on the corded phone or
press key 4 on the cordless handset to hear the previous
reminder again.
34
Helpline 0844 800 6503 (See page 51 for costs and hours of operation)
Page 37

Delete reminders
1. During playback, press on the corded phone or press
on the cordless handset.
Settings
Ringtones
1. In idle state press the menu key or .
2. Select Ringers and press SELECT on the corded phone or
press on the cordless handset.
3. Select Ringer volume and press SELECT on the corded
phone or press on the cordless handset. Adjust the
volume and press SELECT on the corded phone or press
on the cordless handset.
- or -
Select Ringer tone and press SELECT on the corded phone
or press on the cordless handset. Select a melody and
press SELECT on the corded phone or press on the
cordless handset.
Key tone on the corded phone
1. In idle state press the menu key .
2. Select Key tone and press SELECT.
3. Adjust the volume and press SET.
Tones on the cordless handset
1. In idle state press the menu key .
2. Select Tones and press .
- Key tone: adjust the volume and press .
- Battery low: turn the low battery alert tone on or off and
press .
Helpline 0844 800 6503 (See page 51 for costs and hours of operation)
35
Page 38

- Out of range: turn the out-of-range alert tone on or off and
press .
Set date and time
Entries in the caller list and messages on the answering
machine display the date and time of a call. Setting the
correct date and time is also important for the proper
playback of reminders.
1. In idle state press the menu key or .
2. Select Set date/time and press SELECT on the corded phone
or press on the cordless handset.
3. Enter day, month and year and press NEXT on the corded
phone or press on the cordless handset.
4. Enter hours and minutes and press SAVE on the corded
phone or press on the cordless handset.
Set the time format
1. In idle state press the menu key or .
2. Select Time format and press SELECT on the corded phone
or press on the cordless handset.
3. Select 12-HR or 24-HR and press SAVE on the corded phone
or press on the cordless handset.
Set the date format
1. In idle state press the menu key or .
2. Select Date format and press SELECT on the corded phone
or press on the cordless handset.
3. Select MM/DD/YY or DD/MM/YY and press SAVE on the
corded phone or press on the cordless handset.
36
Helpline 0844 800 6503 (See page 51 for costs and hours of operation)
Page 39

Display language
This setting sets the language for messages shown on the
display (menu).
1. In idle state press the menu key or .
2. Select Settings and press SELECT on the corded phone or
press on the cordless handset.
3. Select LCD language and press SELECT on the corded phone
or press on the cordless handset.
4. Select the desired language and press SELECT on the corded
phone or press on the cordless handset.
5. To conrm press YES on the corded phone or press on
the cordless handset.
Voice language
This setting sets the language for the default
announcements on the answering machine.
1. In idle state press the menu key or .
2. Select Settings and press SELECT on the corded phone or
press on the cordless handset.
3. Select Voice language and press SELECT on the corded
phone or press on the cordless handset.
4. Select the desired language for the default announcements
on the answering machine and press SELECT on the corded
phone or press on the cordless handset.
Helpline 0844 800 6503 (See page 51 for costs and hours of operation)
37
Page 40

Clear voicemail indicator
Use this feature when the telephone indicates that there is a
new voicemail, but there is none. This feature only turns off
the indicators. It does not delete your voicemail messages.
As long as you have new voicemail messages, your
telephone service provider continues to send the signal to
turn on the indicators.
1. In idle state press the menu key or .
2. Select Settings and press SELECT on the corded phone or
press on the cordless handset.
3. Select Clear voicemail and press SELECT on the corded
phone or press on the cordless handset.
4. To conrm press YES on the corded phone or press on
the cordless handset.
Rename corded phone/cordless handset
You can edit the names for the corded phone and the
cordless handset.
1. In idle state press the menu key or .
2. Select Settings and press SELECT on the corded phone or
press on the cordless handset.
3. Select Rename base (corded phone) oder Rename handset
(cordless handset) and press SELECT on the corded phone
or press on the cordless handset.
4. Delete the name with BACKSPACE (corded phone) or
(cordless handset) and enter the new name.
5. Press SAVE on the corded phone or press on the
cordless handset.
38
Helpline 0844 800 6503 (See page 51 for costs and hours of operation)
Page 41

CID time sync
If you subscribe to a Calling Number Display service, the
date and time are set automatically with each incoming call.
Follow the steps below to turn the CID time sync feature on
or off. For more information contact your telephone service
provider.
1. In idle state press the menu key or .
2. Select Settings and press SELECT on the corded phone or
press on the cordless handset.
3. Select CID time sync and press SELECT on the corded phone
or press on the cordless handset.
4. Select On or Off and press SELECT on the corded phone or
press on the cordless handset.
Dial mode
The standard dialling mode for analogue phones is "touch-
tone". On some older phone systems the dialling mode must
be set to "pulse". Please see your phone system's user guide
for more information.
1. In idle state press the menu key or .
2. Select Settings and press SELECT on the corded phone or
press on the cordless handset.
3. Select Dial mode and press SELECT on the corded phone or
press on the cordless handset.
4. Select Touch-tone or Pulse and press SELECT on the corded
phone or press on the cordless handset.
Helpline 0844 800 6503 (See page 51 for costs and hours of operation)
39
Page 42

Flash time
The use of supplementary services requires a flash signal of
a specific length. You can obtain information about available
supplementary services and the required flash time from
your telephone service provider.
1. In idle state press the menu key or .
2. Select Settings and press SELECT on the corded phone or
press on the cordless handset.
3. Select Flash time and press SELECT on the corded phone or
press on the cordless handset.
4. Select Short, Medium or Long and press SELECT on the
corded phone or press on the cordless handset.
Registering a handset (corded phone)
You can connect up to 4 cordless handsets to your corded
phone. New cordless handsets (PowerTel 2701, available as
an accessory) must be registered prior to use.
Registering a brand new PowerTel 2701
1. In idle state press the menu key .
2. Select Settings and press SELECT.
3. Select Registration and press SELECT.
4. Place the handset in the charger. After a short time the handset will be registered.
Reset
1. In idle state press the menu key or .
2. Select Reset and press SELECT on the corded phone or
press on the cordless handset.
3. To conrm press YES on the corded phone or press on
the cordless handset.
40
Helpline 0844 800 6503 (See page 51 for costs and hours of operation)
Page 43

Quiet mode
You can turn on the quiet mode for a period of time (1-12
hours). During this period, all tones (except paging tone) and
call screening are muted.
When you turn on the quiet mode, the answering machine
turns on automatically. When the quiet mode duration expires, the answering machine remains on.
1. Press and hold down the Hash key for approx. 3 se-
conds.
2. Enter the desired duration (1-12), then press .
To turn the quiet mode off, press and hold down the Hash
key for approx. 3 seconds.
Helpline 0844 800 6503 (See page 51 for costs and hours of operation)
41
Page 44

Answering machine
The answering machine can store up to 99 messages.
A message must not be longer than 3 minutes (adjustable,
see below). Total recording time for messages, memos and
reminders is approx. 30 minutes. You should delete the
messages you've heard to make room for new ones. Once
the memory is full the answering machine will not record
any new calls.
The answering machine comes with a default announcement
that can be replaced with your own (see below).
Switching the answering machine on/off
On the corded phone
Press the button on the side.
- or -
1. In idle state press the menu key .
2. Press SELECT to select Answering system.
3. Select Answer ON/OFF and press SELECT.
4. Select On or Off and press SAVE.
On the cordless handset
1. In idle state press the menu key .
2. Select Answering sys and press .
3. Select Answer ON/OFF and press .
4. Select On or Off and press .
Hear messages
On the corded phone
Press .
If there are both old and new messages you can select
whether you want to listen to old or new messages. If there
42
Helpline 0844 800 6503 (See page 51 for costs and hours of operation)
Page 45

are only old or only new messages playback will start right
away.
During playback you can:
- adjust the volume with ,
- skip to the next message with ,
- repeat the current message with . Press twice to
skip back to the previous message.
- delete the current message with .
- stop or resume playback .
- reduce playback speed with .
- press CALL BACK to call back the caller. To conrm press
YES.
On the cordless handset
1. In idle state press the menu key .
2. Press to select Play messages.
If there are both old and new messages you can select
whether you want to listen to old or new messages. If there
are only old or only new messages playback will start right
away.
During playback you can:
- adjust the playback volume with the volume buttons on the
side,
- skip to the next message with key 6 ,
- repeat the current message with key 4. Press key 4 twice to
skip back to the previous message.
- delete the current message with .
- press to switch between speakerphone mode and
handset mode.
Helpline 0844 800 6503 (See page 51 for costs and hours of operation)
43
Page 46

- press to enhance clarity and loudness of message.
- press to call back the caller. To conrm press . If
you don’t want to call back, press .
Record personal announcement
You can record an announcement of up to 90 seconds in
length, but any announcement shorter than two seconds will
not be recorded.
On the corded phone
1. In idle state press the menu key .
2. Press SELECT to select Answering system.
3. Press SELECT to select Announcement.
4. Press SELECT to select Record new annc.
5. Speak your announcement after the tone and press SAVE
when done.
On the cordless handset
1. In idle state press the menu key .
2. Select Answering sys and press .
3. Press to select Announcement.
4. Press to select Record annc.
5. Speak your announcement after the tone and press key 5
when done.
Call screening
Use this feature to choose whether incoming messages can
be heard on the cordless handset or the corded phone while
they are being recorded. The setting applies to both devices.
1. In idle state press the menu key or .
2. Select Answering system and press SELECT on the corded
phone or press on the cordless handset.
44
Helpline 0844 800 6503 (See page 51 for costs and hours of operation)
Page 47

3. Select Ans sys setup and press SELECT on the corded phone
or press on the cordless handset.
4. Select Call screening and press SELECT on the corded phone
or press on the cordless handset.
5. Select On or Off and press SELECT on the corded phone or
press on the cordless handset.
On the corded phone
If the answering machine and call screening are on, the an-
nouncement and the incoming message will be heard on the
corded phone while the call is answered by the answering
machine. During this you can:
- adjust the volume with ,
- press to temporarily turn off the feature.
- press SILENCE to temporarily mute the feature,
- press SCREEN to temporarily turn on the feature if it is set
to off.
On the cordless handset
If the answering machine and call screening are on, press
. The announcement and the incoming message will be
heard on the handset while the call is answered by the
answering machine. During this you can:
- adjust the playback volume with the volume buttons (on
the side of the cordless handset),
- press to temporarily turn off the feature,
- press to temporarily turn on the feature if it is set to
off.
Helpline 0844 800 6503 (See page 51 for costs and hours of operation)
45
Page 48

Call intercept
When a caller is leaving a message on the answering
machine and you hear the message being recorded, you can
intercept the call.
On the corded phone
Lift the receiver or press .
On the cordless handset
Press or .
Delete messages
You can only delete old (reviewed) messages.
1. In idle state press the menu key or .
2. Select Answering system and press SELECT on the corded
phone or press on the cordless handset.
3. Select Delete all old and press SELECT on the corded phone
or press on the cordless handset.
4. To conrm press YES on the corded phone or press on
the cordless handset.
Record a memo
Memos are your own recorded messages used as reminders
for yourself or others using the same answering machine.
Play and delete them in the same way as incoming
messages.
On the corded phone
1. In idle state press the menu key .
2. Press SELECT to select Answering system.
3. Select Record memo and press SELECT.
4. Speak your memo after the tone and press SAVE when done.
46
Helpline 0844 800 6503 (See page 51 for costs and hours of operation)
Page 49

On the cordless handset
1. In idle state press the menu key .
2. Select Answering sys and press .
3. Select Record memo and press .
4. Speak your memo after the tone and press key 5 when done.
Number of rings
You can set the number of rings (2, 4, 6, 8 or 10) before the
answering machine records a call.
1. In idle state press the menu key or .
2. Select Answering system and press SELECT on the corded
phone or press on the cordless handset.
3. Select Ans sys setup and press SELECT on the corded phone
or press on the cordless handset.
4. Select # of rings and press SELECT on the corded phone or
press on the cordless handset.
5. Select an entry from the list and press SELECT on the corded
phone or press on the cordless handset.
Helpline 0844 800 6503 (See page 51 for costs and hours of operation)
47
Page 50

Remote access code
A two-digit security code is required to access the answering
machine remotely from any touch-tone telephone. The preset
code is “00“. You can set the code from “00“ to “99“.
1. In idle state press the menu key or .
2. Select Answering system and press SELECT on the corded
phone or press on the cordless handset.
3. Select Ans sys setup and press SELECT on the corded phone
or press on the cordless handset.
4. Select Remote code and press SELECT on the corded phone
or press on the cordless handset.
5. Enter a two-digit code and press SELECT on the corded
phone or press on the cordless handset.
Message alert tone
When this feature is on, the corded phone beeps every 10
seconds when there are new messages on the answering
machine. The alert tone is only heard on the corded phone.
Press any key (except Paging) to switch the alert off for the
current message only. The alert will sound again for the next
new message.
1. In idle state press the menu key or .
2. Select Answering system and press SELECT on the corded
phone or press on the cordless handset.
3. Select Ans sys setup and press SELECT on the corded phone
or press on the cordless handset.
4. Select Msg alert tone and press SELECT on the corded
phone or press on the cordless handset.
5. Select On or Off and press SELECT on the corded phone or
press on the cordless handset.
48
Helpline 0844 800 6503 (See page 51 for costs and hours of operation)
Page 51

Message recording time
You can set the recording time allowed for incoming
messages (1 minute, 2 minutes or 3 minutes).
1. In idle state press the menu key or .
2. Select Answering system and press SELECT on the corded
phone or press on the cordless handset.
3. Select Ans sys setup and press SELECT on the corded phone
or press on the cordless handset.
4. Select Recording time and press SELECT on the corded
phone or press on the cordless handset.
5. Select an entry from the list and press SELECT on the corded
phone or press on the cordless handset.
Helpline 0844 800 6503 (See page 51 for costs and hours of operation)
49
Page 52

Remote access
To get access to your answering machine remotely from any
touch-tone telephone you have to enter the two-digit remote
access code.
1. Dial your telephone number from any touch-tone telephone.
2. If the answering machine is on, your call will be answered
after the pre-set number of rings.
If the answering machine is off, your call will be answered
after approx. 16 rings.
3. Enter the two-digit remote access code. You will hear a
confirmation tone.
4. Press below keys will have the following options:
- key 2 - play all messages
- key 4 - skip to previous message (during playback)
- key 5 - delete message (during playback)
- key 6 - skip to the next message (during playback)
- key 7 - turm the answering machine on
- key 9 - turn the answering machine off.
50
Helpline 0844 800 6503 (See page 51 for costs and hours of operation)
Page 53

Appendix
Help and support
If you need help and you’re in the UK, please first check and see
if your problem can be solved using the troubleshooting guide
below. If not, please call us on 0844 800 6503 (using a UK landline, at time of going to print: calls cost 6p for connection
charge and then 5p a minute. Mobile costs may vary). Lines are
open Monday to Friday, 9am to 5pm, excluding public holidays.
If you’ve a claim on your 2-year guarantee, please contact your
supplier.
Some issues may be resolved by simply disconnecting the
power to the unit. Switch off the power to the base station
(corded phone) and remove the batteries in the handset for
about 20 minutes. Reconnect everything to determine if the
issue has been resolved.
Safety information
Please read this User Guide carefully.
Intended use
This phone is suitable for use on either a public telephone network or on an approved Private exchange (PABX). Any other
use is considered unintended use. Unauthorised modifications
are prohibited. Do not attempt to carry out repairs yourself.
Phone location
Make sure your phone:
• is on a dry, flat and stable surface
Helpline 0844 800 6503 (See this page for costs and hours of operation)
51
Page 54

• isn’t a trip hazard with its power cable
• is at least one metre from other electrical appliances
• isn’t exposed to smoke, dust, vibration, chemicals, moisture,
heat and direct sunlight.
Please take care that the power supply isn’t obstructed by furniture.
Power supply
Important: Use only the power adaptors supplied with
your PowerTel 2880.
If you have installed backup batteries in your base station
(corded phone) you can continue to use your telephone during
a power outage. The backup batteries should be replaced every
6 months to ensure proper functioning.
Energy efficient power adapter
The included mains adaptor meets the ecodesign requirements
of the European Union (Directive 2005/32/EC). Thus, its power
consumption is considerably lower, both in operating and in
idle mode, compared with the previous design.
Medical equipment
Do not use your phone:
• near emergency or intensive care medical equipment
• during an electrical storm
It is recommended that if you have a pacemaker fitted you
check with a medical expert or your health adviser before using
this product.
52
Helpline 0844 800 6503 (See page 51 for costs and hours of operation)
Page 55

Rechargeable batteries
Do not throw the batteries into a fire or water.
Hearing aid compatibility
You phone works with most popular hearing aids. However,
given the wide range of hearing aids available, we are unable to
guarantee that your phone will function fully with every hearing
aid.
Disposal
In order to dispose of your device, take it to a collection point provided by your local public waste authorities (e.g. recycling centre). According to laws on the
disposal of electronic and electrical devices, owners
are obliged to dispose of old electronic and electrical
devices in a separate waste container. The symbol indicates that the device must not be disposed of in
normal domestic waste!
Batteries represent a hazard to health and the environment!
Never open, damage or swallow batteries or allow
them to pollute the environment. They may contain
toxic, ecologically hazardous heavy metals. You are
legally required to dispose of batteries and rechargeable batteries safely, either at a retailer that sells batteries or at an appropriate collection point that
provides a suitable container. Never put batteries in
the household waste. Disposal is free of charge.
Lithium batteries and battery packs of all kinds
should be fully discharged before you drop them off.
Be sure to take precautions against short-circuits, e.g.
Helpline 0844 800 6503 (See page 51 for costs and hours of operation)
53
Page 56

by covering poles with adhesive tape, to prevent the
risk of a fire.
Packaging materials must be disposed of according
to local regulations.
Maintenance
• Please clean your equipment’s surfaces with a soft, lint-free
cloth.
• Never use cleaning agents or solvents.
Technical details
Standard DECT
Power supply (corded phone) Input: 100-240V 50/60Hz
Output: 6VDC 800mA
Manufacturer and model (UK plug):
Chousen, CS6F060080FBF
Tenpao, S006MB0600080
Power supply (charger base) Input: 100-240V 50/60Hz
Output: 6VDC 450mA
Manufacturer and model (UK plug):
Shenzen Rujing,
RJ-AS060450B001
VTech, VT04EUK06045
Range Outdoors approx. 300m,
Indoors approx. 50m
Standby Up to 100hrs
Maximum Talk Time Up to 10hrs
Maximum earpiece volume +40 dB
54
Helpline 0844 800 6503 (See page 51 for costs and hours of operation)
Page 57

Rechargeable batteries 3 x AAA 1.2V 500mAh NiMH
Manufacturer and model:
GPI , VT50AAAHC
Corun, NI-MHAAAJ500
Dialling mode Tone (DTMF) / Pulse
Recall time (Flash) Short (100 ms), Medium
(250 ms), Long (600 ms)
Optimum ambient temperature 0˚C to 45˚C
Optimum relative humidity 20% to 80%
Use only the provided batteries and the provided power supplies!
Guarantee
AMPLICOMMS equipment is produced and tested according to
the latest production methods. The use of carefully chosen materials and highly developed technologies ensures trouble free
functioning and a long service life. The terms of the warranty do
not apply where the cause of the equipment malfunction is the
fault of the telephone network operator or any interposed private branch extension system. The terms of the warranty do not
apply to the rechargeable batteries or power adaptors used in
the products. The warranty period is 24 months from the date of
purchase.
All deficiencies resulting from material or production faults
which occur during the warranty period will be eliminated free
of charge. Rights to claims under the warranty terms are voided
following intervention by the purchaser or third parties. Damage caused as a result of improper handling or operation, incorrect positioning or storing, improper connection or installation,
Helpline 0844 800 6503 (See page 51 for costs and hours of operation)
55
Page 58

Acts of God or other external influences are not covered by the
warranty.
In the case of complaints, we reserve the right to repair or replace defective parts or provide a replacement device. Replaced
parts or devices become our property.
Rights to compensation in the case of damage are excluded
where there is no evidence of intent or gross negligence by the
manufacturer.
If your equipment shows signs of a defect during the warranty
period, please return it to the sales outlet where you purchased
the AMPLICOMMS equipment together with the purchase receipt. All claims under the warranty terms in accordance with
this agreement must be asserted exclusively with regard to your
sales outlet.
The right to assert a warranty claim expires two years after the
purchase of our products.
Declaration of conformity
This device fulfils the requirements stipulated
in the EU directive: 2014/53/EU.
Conformity with the above mentioned directive is confirmed by
the CE symbol on the device.
To view the complete Declaration of Conformity, please refer to
the free download available on our website
www.amplicomms.com.
56
Helpline 0844 800 6503 (See page 51 for costs and hours of operation)
Page 59

Inhoudsopgave
Inbedrijfstelling . . . . . . . . . . . . . . . . . . . . . . . . . . . . . . . . . . . . . . 60
Inhoud van de verpakking controleren . . . . . . . . . . . . . . . . . . 60
Het telefoonsysteem opstellen. . . . . . . . . . . . . . . . . . . . . . . . . . 60
Installatieplek. . . . . . . . . . . . . . . . . . . . . . . . . . . . . . . . . . . . . . . 60
Tafeltoestel aansluiten . . . . . . . . . . . . . . . . . . . . . . . . . . . . . . . 61
De handset in bedrijf stellen. . . . . . . . . . . . . . . . . . . . . . . . . . . 63
Het laadstation aansluiten . . . . . . . . . . . . . . . . . . . . . . . . . . . . 64
De noodbatterijen plaatsen . . . . . . . . . . . . . . . . . . . . . . . . . . . 65
Het tafeltoestel op een wand monteren . . . . . . . . . . . . . . . . . 66
Bedieningselementen . . . . . . . . . . . . . . . . . . . . . . . . . . . . . . . . . 69
Handset . . . . . . . . . . . . . . . . . . . . . . . . . . . . . . . . . . . . . . . . . . . 69
Tafeltoestel. . . . . . . . . . . . . . . . . . . . . . . . . . . . . . . . . . . . . . . . . 72
Symbolen in de display . . . . . . . . . . . . . . . . . . . . . . . . . . . . . . . . 76
Door het menu navigeren . . . . . . . . . . . . . . . . . . . . . . . . . . . . . . 77
Hoofdmenu openen (handset) . . . . . . . . . . . . . . . . . . . . . . . . . 77
Menuoverzicht (handset) . . . . . . . . . . . . . . . . . . . . . . . . . . . . . 77
Hoofdmenu openen (tafeltoestel) . . . . . . . . . . . . . . . . . . . . . . 78
Menuoverzicht (tafeltoestel) . . . . . . . . . . . . . . . . . . . . . . . . . . . 79
Eerste inbedrijfname . . . . . . . . . . . . . . . . . . . . . . . . . . . . . . . . . . 80
Telefoneren . . . . . . . . . . . . . . . . . . . . . . . . . . . . . . . . . . . . . . . . . . 81
Bellen, gesprek aannemen en gesprek beëindigen . . . . . . . . 81
Handsfree bellen . . . . . . . . . . . . . . . . . . . . . . . . . . . . . . . . . . . . 81
Audio-hulp . . . . . . . . . . . . . . . . . . . . . . . . . . . . . . . . . . . . . . . . . 82
Equalizer. . . . . . . . . . . . . . . . . . . . . . . . . . . . . . . . . . . . . . . . . . . 82
Volume instellen . . . . . . . . . . . . . . . . . . . . . . . . . . . . . . . . . . . . 82
Microfoon uitschakelen. . . . . . . . . . . . . . . . . . . . . . . . . . . . . . . 82
Beltoon uitschakelen. . . . . . . . . . . . . . . . . . . . . . . . . . . . . . . . . 83
Nummerherhaling. . . . . . . . . . . . . . . . . . . . . . . . . . . . . . . . . . . 83
Oproeplijst . . . . . . . . . . . . . . . . . . . . . . . . . . . . . . . . . . . . . . . . . 84
Opeenvolgende nummers kiezen . . . . . . . . . . . . . . . . . . . . . . 84
De handset bellen (oproepsignaal/paging) . . . . . . . . . . . . . . . 85
57
Page 60

Intern gesprek . . . . . . . . . . . . . . . . . . . . . . . . . . . . . . . . . . . . . . 85
Extern gesprek intern doorverbinden . . . . . . . . . . . . . . . . . . . 86
Conferentie . . . . . . . . . . . . . . . . . . . . . . . . . . . . . . . . . . . . . . . . 87
Telefoonboek . . . . . . . . . . . . . . . . . . . . . . . . . . . . . . . . . . . . . . . . 87
Een contact opslagen in het telefoonboek . . . . . . . . . . . . . . . 88
Nummer uit telefoonboek gebruiken . . . . . . . . . . . . . . . . . . . 88
Fotosneltoetsen . . . . . . . . . . . . . . . . . . . . . . . . . . . . . . . . . . . . . . 89
Fotosneltoets opslaan. . . . . . . . . . . . . . . . . . . . . . . . . . . . . . . . 89
Fotosneltoets bewerken . . . . . . . . . . . . . . . . . . . . . . . . . . . . . . 89
Fotosneltoets wissen . . . . . . . . . . . . . . . . . . . . . . . . . . . . . . . . 89
Fotosneltoets selecteren. . . . . . . . . . . . . . . . . . . . . . . . . . . . . . 90
Herinneringsberichten . . . . . . . . . . . . . . . . . . . . . . . . . . . . . . . . . 90
Een herinneringsbericht toevoegen. . . . . . . . . . . . . . . . . . . . . 90
Herinneringsbericht controleren . . . . . . . . . . . . . . . . . . . . . . . 91
Een herinneringsbericht wissen. . . . . . . . . . . . . . . . . . . . . . . . 92
Instellingen. . . . . . . . . . . . . . . . . . . . . . . . . . . . . . . . . . . . . . . . . . 92
Beltonen. . . . . . . . . . . . . . . . . . . . . . . . . . . . . . . . . . . . . . . . . . . 92
De toetstoon op het tafeltoestel. . . . . . . . . . . . . . . . . . . . . . . . 92
Tonen op de handset. . . . . . . . . . . . . . . . . . . . . . . . . . . . . . . . . 92
Datum/tijd instellen. . . . . . . . . . . . . . . . . . . . . . . . . . . . . . . . . . 93
Tijdsformaat instellen . . . . . . . . . . . . . . . . . . . . . . . . . . . . . . . . 93
Datumformaat instellen . . . . . . . . . . . . . . . . . . . . . . . . . . . . . . 93
Displaytaal instellen . . . . . . . . . . . . . . . . . . . . . . . . . . . . . . . . . 94
De taal voor de standaard begroeting instellen . . . . . . . . . . . 94
MWI wissen . . . . . . . . . . . . . . . . . . . . . . . . . . . . . . . . . . . . . . . . 95
De naam van het toestel wijzigen . . . . . . . . . . . . . . . . . . . . . . 95
CID-tijdssynchronisatie. . . . . . . . . . . . . . . . . . . . . . . . . . . . . . . 96
Kiesmethode instellen . . . . . . . . . . . . . . . . . . . . . . . . . . . . . . . 96
Flashtijd instellen . . . . . . . . . . . . . . . . . . . . . . . . . . . . . . . . . . . 96
Extra handsets registreren (tafeltoestel) . . . . . . . . . . . . . . . . . 97
Nachtmodus. . . . . . . . . . . . . . . . . . . . . . . . . . . . . . . . . . . . . . . . 98
58
Page 61

Antwoordapparaat. . . . . . . . . . . . . . . . . . . . . . . . . . . . . . . . . . . . 98
Antwoordapparaat aan-/uitschakelen . . . . . . . . . . . . . . . . . . . 99
Berichten beluisteren . . . . . . . . . . . . . . . . . . . . . . . . . . . . . . . . 99
Eigen begroeting opnemen . . . . . . . . . . . . . . . . . . . . . . . . . . 101
Meeluisteren . . . . . . . . . . . . . . . . . . . . . . . . . . . . . . . . . . . . . . 101
Een oproep overnemen . . . . . . . . . . . . . . . . . . . . . . . . . . . . . 103
Berichten wissen . . . . . . . . . . . . . . . . . . . . . . . . . . . . . . . . . . . 103
Memo opnemen . . . . . . . . . . . . . . . . . . . . . . . . . . . . . . . . . . . 103
Opnamevertraging instellen. . . . . . . . . . . . . . . . . . . . . . . . . . 104
Pincode van antwoordapparaat instellen . . . . . . . . . . . . . . . 104
Akoestisch signaal voor berichten . . . . . . . . . . . . . . . . . . . . . 105
Opnametijd instellen. . . . . . . . . . . . . . . . . . . . . . . . . . . . . . . . 106
Het antwoordapparaat op afstand bedienen . . . . . . . . . . . . 106
Bijlage . . . . . . . . . . . . . . . . . . . . . . . . . . . . . . . . . . . . . . . . . . . . . 108
In geval van een storing . . . . . . . . . . . . . . . . . . . . . . . . . . . . . 108
Veiligheidsinstructies . . . . . . . . . . . . . . . . . . . . . . . . . . . . . . . 108
Rechtmatig gebruik . . . . . . . . . . . . . . . . . . . . . . . . . . . . . . . . . 108
Installatieplek. . . . . . . . . . . . . . . . . . . . . . . . . . . . . . . . . . . . . . 109
Stroomvoorziening . . . . . . . . . . . . . . . . . . . . . . . . . . . . . . . . . 109
Energiezuinige adapter . . . . . . . . . . . . . . . . . . . . . . . . . . . . . . 109
Medische apparaten . . . . . . . . . . . . . . . . . . . . . . . . . . . . . . . . 110
Accu's/batterijen. . . . . . . . . . . . . . . . . . . . . . . . . . . . . . . . . . . . 110
Compatibiliteit met hoorapparaten . . . . . . . . . . . . . . . . . . . . 110
Gescheiden inzameling . . . . . . . . . . . . . . . . . . . . . . . . . . . . . . 110
Technische gegevens . . . . . . . . . . . . . . . . . . . . . . . . . . . . . . . . 111
Onderhoudsinstructies . . . . . . . . . . . . . . . . . . . . . . . . . . . . . . 112
Garantie . . . . . . . . . . . . . . . . . . . . . . . . . . . . . . . . . . . . . . . . . . 112
Conformiteitsverklaring. . . . . . . . . . . . . . . . . . . . . . . . . . . . . . 114
59
Page 62

Inbedrijfstelling
Belangrijk: Lees voordat u de telefoon in werking stelt de
veiligheidsaanwijzingen vanaf blz 108.
Inhoud van de verpakking controleren
In de verpakking van de PowerTel 2880 zit het volgende:
• 1 tafeltoestel (basisstation)
• 1 hoorn
• 1 hoornaansluitsnoer
• 1 adapter voor het tafeltoestel
• 1 draadloze telefoon (mobiele telefoon)
• 3 NiMH-batterijen AAA
• 1 deksel voor batterijvakje
• 1 laadstation
• 1 adapter voor laadstation
• 1 telefoonkabel
Belangrijk: Gebruik alleen de met de PowerTel 2880 meegeleverde adapters, telefoonkabel en batterijen. Zo niet, dan is
een correcte werking van de telefoon niet gegarandeerd.
Het telefoonsysteem opstellen
Installatieplek
Plaats het tafeltoestel in de buurt van een stopcontact en van de
telefooncontactdoos, zodat de lengte van de telefoonkabel voldoende is. Bewaar een afstand van ongeveer 1 meter tot andere
elektronische apparaten, om een wederzijdse interferentie te
voorkomen. De verbinding tussen het tafeltoestel en de handset
60
Page 63

gebeurt via radiosignalen. De signaalsterkte is afhankelijk van
de installatieplek. De maximale reikwijdte bij een ongehinderde
zichtlijn is 300 meter; wanneer muren en andere hindernissen
aanwezig zijn, is de maximale reikwijdte kleiner.
Tafeltoestel aansluiten
1. Steek de kabelstekker in de overeenkomstige ingang op de
onderkant van het tafeltoestel en sluit de adapter aan op het
stopcontact.
2. Steek de kleine stekker van de telefoonkabel in de overeen-
komstige ingang van het tafeltoestel en het andere uiteinde
in de telefooncontactdoos op de wand.
3. Sluit de hoorn met behulp van het gekrulde hoornsnoer aan
op het tafeltoestel.
Opmerking: Steek de telefoonkabel door de kabelklemmen
zodat het tafeltoestel vlak op de ondergrond staat.
Bij apparaten met stekker moet het wandstopcontact (de
adapter) zich in de buurt van het apparaat bevinden en
gemakkelijk toegankelijk zijn.
61
Page 64

Telefoon-
kabel
Bij het aansluiten van de
telefoon op een DSL-leiding
is eventueel een DSL-filter nodig
(niet meegeleverd).
Adapter
tafeltoestel
Wandstopcontact
Telefoon-
Aansluiting
hoornsnoer
Aansluiting
telefoon
Aansluiting
adapter
Belangrijk: Gebruik alleen de met de PowerTel 2880 meegeleverde adapters, telefoonkabel en batterijen. Zo niet, dan is
een correcte werking van de telefoon niet gegarandeerd. De
toegang tot de adapter mag niet worden belemmerd door
meubels of andere voorwerpen.
62
Page 65

De handset in bedrijf stellen
1. Open het batterijvak en leg er de batterijen in.
Let op de polariteit.
2. Schuif het deksel terug op het batterijvak en zorg ervoor dat
het vastklikt.
Om de handset volledig op te laden, moet hij minstens 16 uur in
het laadstation blijven staan (controleer of de spanning naar het
laadstation ingeschakeld is!).
Belangrijk: Gebruik uitsluitend de meegeleverde batterijen.
Ook wanneer u later de batterijen vervangt, mag u alleen dit
type accu gebruiken.
63
Page 66

Het laadstation aansluiten
1. Steek de kabelstekker in de ingang op de onderkant van het
laadstation en sluit de adapter aan op het wandstopcontact.
2. Zet de handset in het laadstation om hem op te laden.
Opmerking:Steek de aansluitkabel door de kabelklemmen zodat
het laadstation vlak op de ondergrond staat.
Bij apparaten met stekker moet het wandstopcontact (de
adapter) zich in de buurt van het apparaat bevinden en
gemakkelijk toegankelijk zijn.
64
Page 67

De noodbatterijen plaatsen
Leg 3 AAA-batterijen (niet meegeleverd) in het tafeltoestel,
zodat u in geval van stroomuitval de telefoon verder kunt blijven gebruiken.
OPGELET: Haal altijd de stekker van het tafeltoestel uit het
wandstopcontact voordat u batterijen plaatst/vervangt!
1. Ontgrendel het deksel van het batterijvak en verwijder het
deksel.
2. Leg 3 AAA-batterijen in het batterijvak (zorg voor een cor-
recte polariteit!).
3. Schuif het deksel terug op het batterijvak en zorg ervoor dat
het deksel vastklikt.
Opmerking: Bij normaal gebruik moet u de batterijen elke 6
maanden vervangen, om een correcte werking te garanderen.
De levensduur van de batterijen wordt beïnvloed door de frequentie en duur van een stroomuitval.
65
Page 68

Het tafeltoestel op een wand monteren
Om het tafeltoestel op een wand te monteren, hebt u 2 pluggen
en 2 gepaste schroeven nodig, bij voorkeur met bolcilinderkop
en met een diameter van 4 mm. Breng de schroeven op een onderlinge afstand van 83 mm loodrecht onder elkaar aan en laat
de kop ongeveer 3 mm uit de wand steken.
OPGELET: Houd bij het boren van de gaten rekening met
stroom- en waterleidingen!
1. Haal de stekkers van de adapter en van de telefoonaansluit-
kabel uit het tafeltoestel.
2. Haal de houder uit het hoornvak en steek de houder er 180°
gedraaid opnieuw in.
3. Druk de lussen samen, zoals de pijlen aangeven, om de
scharnierhaken te openen. Leg de telefoonkabel en de adapterkabel door het gat van de wandhouder. Steek het uiteinde
van de telefoonkabel in de telefooningang en steek de stekker van de adapter in de adapteringang op de onderkant van
de telefoon.
66
Page 69

4. Klap de wandhouder naar onderen en vergrendel hem. Leg
de telefoonkabel en de adapterkabel door de gleuf aan de
onderkant van de telefoon. Bind de telefoonkabel en de adapterkabel indien nodig samen met behulp van een kabelklem.
5. Sluit de adapter en de telefoonkabel opnieuw aan op het
stopcontact en de telefooncontactdoos.
6. Plaats het tafeltoestel op de schroefkoppen en trek voorzich-
tig het tafeltoestel naar onderen tot het vastzit.
67
Page 70

7. Hang de hoorn op de hoornhouder en pas de hoek van de
dispaly aan, zodat hij duidelijk te lezen is.
68
Page 71

Bedieningselementen
1
2
3
4
5
6
7
8
9
10
11
12
13
Handset
69
Page 72

1 Oproep
- Knippert bij binnenkomende oproep of oproep vanuit tafeltoestel.
2 Batterijstand
- Brandt wanneer de handset wordt opgeladen.
3 Telefoonboek/Omhoog
- In ruststand: telefoonboek openen.
- In menu/lijsten: omhoog bladeren.
- Bij invoeren van namen/nummers: cursor naar rechts verschuiven.
4 Nummerherhaling/Pauze
- In ruststand: nummerherhaling openen/door lijst bladeren
door herhaaldelijk te drukken
- Tijdens invoeren van telefoonnummer: ingedrukt houden
voegt kiespauze toe.
5 Bel-toets/R-toets
- Bellen of oproep beantwoorden.
- Tijdens een gesprek: flashfunctie voor gebruik van functies
van telefoonnet.
6 Oproeplijst/Omlaag
- In ruststand: oproeplijst openen.
- In menu/lijsten: omlaag bladeren.
- Bij invoeren van namen/nummers: cursor naar links bewegen.
7 Luidspreker
- Handsfree bellen of oproep beantwoorden.
- Tijdens een gesprek: luidspreker aan/uit-schakelen.
8 Geluidsdemping/Wissen
- Tijdens een gesprek: microfoon uitschakelen
- Bij een oproep: beltoon uitschakelen (u kunt ongewijzigd het
gesprek opnemen, zolang de beller niet heeft opgelegd).
- Individuele gegevens in lijsten wissen (oproeplijst/nummerherhaling/telefoonboek/herinneringen).
70
Page 73

9 Audio-hulp
- Tijdens een gesprek: verbeteren van de klank en verhoging
van volume.
10 Toetsenblok
- Invoeren van cijfers of letters
- Met om het even welke toets een binnenkomende oproep
aannemen.
- Ster-toets bij het invoeren van namen: schakelen tussen
hoofd- en kleine letters.
- Hekjes-toets in ruststand: ingedrukt houden om de nachtmodus in/uit te schakelen.
11 Opleggen/annuleren
- Tijdens een gesprek: opleggen.
- In het menu: selectie annuleren/terug naar vorige menu/ingedrukt houden om terug naar ruststand te gaan.
- Bij een oproep: beltoon uitschakelen (u kunt ongewijzigd
het gesprek opnemen, zolang de beller niet heeft opgelegd).
- In ruststand: ingedrukt houden om gemiste oproepen te
wissen.
12 Menu/selectie
- In ruststand: menu openen.
- In het menu: menupunt selecteren of opslaan.
13 Volumetoetsen
- In ruststand: rinkelvolume instellen.
- Tijdens een gesprek/afspelen van antwoordapparaat: volume instellen.
71
Page 74

Tafeltoestel
12
3
4
5
6
7
8
9
10
11
1 Oproep
- Knippert bij oproep.
2 Weergave "Bezet"
- Brandt bij oproep, gesprek of aannemen van gesprek door
antwoordapparaat.
72
Page 75

- Brandt wanneer een handset aangemeld is.
- Knippert wanneer een handset afgemeld wordt.
- Knippert wanneer de lijn bezet is door een ander toestel
(handset).
3 Display
- De display kan omhoog of omlaag geklapt worden om hem
beter te kunnen lezen.
4 Snelkiestoetsen
- In ruststand: indrukken om een telefoonnummer onder de
toets op te slaan of te bellen.
5 Bel-toets
- In ruststand: indrukken om alle aangemelde handsets te
bellen.
6 Antwoordapparaat aan/uit
- Indrukken om het antwoordapparaat aan/uit te schakelen.
Brandt wanneer het antwoordapparaat ingeschakeld is.
7 Volumetoetsen
- In ruststand: rinkelvolume instellen.
- Tijdens een gesprek/afspelen van antwoordapparaat: volume instellen.
8 Slow-toets
- Vertraagt de weergave bij het beluisteren van het antwoordapparaat of van de herinneringen.
9 Luidspreker-toets
- Handsfree bellen, een oproep aannemen of een gesprek
beëindigen.
- Tijdens een gesprek: luidspreker aan/uit-schakelen.
10 Nummerherhaling/Pauze
- In ruststand: nummerherhaling openen/door lijst bladeren
door herhaaldelijk te drukken
- Tijdens invoeren van telefoonnummer: ingedrukt houden
voegt een kiespauze toe.
73
Page 76

11 Microfoon
14 15 16 17
2122
20
19
18
12 Toetsenblok
- Invoeren van cijfers of letters
- Met om het even welke toets een binnenkomende oproep
aannemen.
- Sterretjes-toets bij het invoeren van namen: schakelen tus-
sen hoofd- en kleine letters.
- Hekjes-toets in ruststand: ingedrukt houden om de nachtmodus in/uit te schakelen.
13 Audio-hulp
- Tijdens een gesprek: verbeteren van de klank en verhoging
van volume.
14 Annuleren
- In het menu: selectie annuleren/terug naar vorige menu/ingedrukt houden om terug naar ruststand te gaan.
- Bij een oproep: beltoon uitschakelen (u kunt ongewijzigd
het gesprek opnemen, zolang de beller niet heeft opgelegd).
74
Page 77

- In ruststand: ingedrukt houden om gemiste oproepen te
wissen.
15 Omlaag
- In menu/lijsten: omlaag bladeren.
- Bij invoeren van namen/nummers: cursor naar links bewegen.
16 Omhoog
- In menu/lijsten: omhoog bladeren.
- Bij invoeren van namen/nummers: cursor naar rechts verschuiven.
17 Menutoets
- In ruststand: menu openen.
18 Linker-schermtoets/rechter-schermtoets
- Selecteren van de opties die boven de knop vermeld zijn.
19 Wissen-toets
- Wissen van het afgespeelde antwoordapparaatbericht, het
welkomstbericht of de herinnering.
- Individuele gegevens in lijsten wissen (oproeplijst/nummerherhaling/telefoonboek/herinneringen).
20 Verder-toets
- Verdergaan naar volgende bericht bij het afspelen van het
antwoordapparaat.
- Bij invoeren van namen/nummers: cursor naar rechts verschuiven.
21 Starten/stoppen-toets
- Het afspelen van het antwoordapparaat starten/stoppen.
- Knippert bij nieuwe berichten/memo's op het antwoordapparaat.
22 Terug-toets
- Momenteel afgespeeld bericht van antwoordapparaat herhalen.
- Tweemaal indrukken om het vorige bericht af te spelen.
- Bij invoeren van namen/nummers: cursor naar links bewegen.
75
Page 78

Symbolen in de display
ANS ON
Batterij bijna leeg: batterij moet worden geladen
(handset).
Batterij vol (handset).
Batterij ongeveer 2/3 vol (handset).
Batterij ongeveer 1/3 vol (handset).
De handsfree-modus is ingeschakeld (handset).
Beltoon uitgeschakeld (handset/tafeltoestel).
Nieuw bericht op antwoordapparaat (handset/
afhankelijk van de telefoonmaatschappij).
Nieuw bericht op antwoordapparaat (tafeltoestel/
afhankelijk van de telefoonmaatschappij).
76
Microfoon uitgeschakeld (handset/tafeltoestel).
Nieuw nummer in oproeplijst (handset/tafeltoes-
tel).
Antwoordapparaat ingeschakeld (handset/tafel-
toestel).
Nieuwe berichten op het antwoordapparaat (hand-
set/tafeltoestel).
Page 79

Door het menu navigeren
In dit hoofdstuk leest u hoe u de functies van de beide telefoons
via het menu kunt inschakelen.
Hoofdmenu openen (handset)
1. Druk op .
2. Selecteer met en het gewenste menupunt en
druk op .
3. Druk op om de actie te annuleren, terug naar het vorige
menupunt te gaan of het menu te verlaten.
4. Houd ingedrukt om terug in de ruststand te schakelen.
Opmerking: Wanneer u 30 seconden lang op geen enkele toets
drukt, schakelt het toestel automatisch terug in ruststand.
Menuoverzicht (handset)
Berchtn afspln
Antwoordapp Boodschap
Alle wissen
Memo opnemen
Antwrd AAN/UIT
Antw app
Intercom
Telefoonboek Controleren
Contact toevgn
Oproeplijst Controleren
Oproepen wissn
Memo Controleren
Memo instellen
Aan/uit
77
Page 80

Beltonen Toonvolume
Beltoon
Toon Toetsgeluid
Batterij leeg
Buiten bereik
Datum/tijd
Tijdsformaat
Datumformaat
Instellingen Displaytaal
Taal v. stem
Voicmail wissn
Handset bewrkn
CID tijdsynchr
Belmodus
Flashtijd
Reset
Hoofdmenu openen (tafeltoestel)
1. Druk op .
2. Selecteer met het gewenste menupunt en druk
op SELECT.
3. Druk op om de actie te annuleren, terug naar het vo-
rige menupunt te gaan of het menu te verlaten.
4. Houd ingedrukt om terug in de ruststand te schake-
len.
Opmerking: Wanneer u 30 seconden lang op geen enkele toets
drukt, schakelt het toestel automatisch terug in ruststand.
78
Page 81

Menuoverzicht (tafeltoestel)
Antwoordapparaat Boodschap
Alle wissen
Memo opnemen
Antwoord AAN/UIT
Antw app instelln
Intercom
Fotosneltoets
Telefoonboek Controleren
Contact toevoegen
Oproeplijst Controleren
Alle oprpn wissen
Memo Memo lezen
Memo instellen
Memo aan/uit
Beltonen Toonvolume
Beltoon
Toetsgeluid
Datum/tijd
Tijdsformaat
Datumformaat
Instellingen Displaytaal
Taal v. stem
Voicemail wissn
Basis bewerken
CID tijdsynchr
Belmodus
Flashtijd
Registratie
Reset
79
Page 82

Eerste inbedrijfname
Fabrieksmatig is de menutaal ingesteld op ENGELS.
1. In de display van het tafeltoestel verschijnt SET DATE/TIME.
2. Voer de datum in (dag/maand/jaar) en druk op NEXT.
3. Voer de tijd in (uren/minuten) en druk op SAVE.
De taal instellen op het tafeltoestel
1. Druk op .
2. Selecteer Settings en druk op SELECT.
3. Druk op SELECT om LCD language te selecteren.
4. Selecteer een taal en druk op SELECT.
5. Druk op YES om uw selectie te bevestigen.
De taal instellen op de handset
1. Druk op .
2. Selecteer Settings en druk op .
3. Druk op om LCD language te selecteren.
4. Selecteer een taal en druk op .
5. Druk op om uw selectie te bevestigen.
80
Page 83

Telefoneren
Bellen, gesprek aannemen en gesprek beëindigen
Via tafeltoestel bellen
Voer het telefoonnummer in en hef de hoorn op, of druk op
.
- ofwel -
Hef de hoorn op of druk op . Wacht op de kiestoon en
voer het telefoonnummer in.
Gesprek aannemen via tafeltoestel
Hef de hoorn op of druk op of druk op om het even
welke cijfertoets.
Gesprek beëindigen via tafeltoestel
Wanneer u via de hoorn hebt getelefoneerd, leg dan de
hoorn op.
Wanneer u via de luidspreker hebt getelefoneerd, druk dan
op .
Bellen via de handset
Voer het telefoonnummer in en druk op of .
- ofwel -
Druk op of . Wacht op de kiestoon en voer het tele-
foonnummer in.
Gesprek aannemen via handset
Druk op of of druk op om het even welke cijferto-
ets.
Gesprek beëindigen via handset
Druk op of zet de handset in het laadstation.
81
Page 84

Handsfree bellen
Druk tijdens een gesprek op de toets op het tafeltoes-
tel of op de handset. Om de handsfree-modus uit te
schakelen, drukt u opnieuw op de toets.
Audio-hulp
Deze functie verbetert de klank en verhoogt het volume
in de hoorn. Druk tijdens een gesprek op het tafeltoestel op de toets of op de handset op .
VOORZICHTIG: het volume is erg hoog!
Om deze functie uit te schakelen, drukt u opnieuw op
de toets.
Equalizer
Met deze functie kunt u de klankkwaliteit van de hoorn en
luidspreker veranderen.
1. Druk tijdens een gesprek op de menutoets of .
2. Druk op het tafeltoestel op SELECT of op de handset
om de opties te zien.
3. Selecteer Natuurlijk, Hoog 1, Hoog 2 of Laag en druk op het
tafeltoestel op OPSLAAN of op de handset op , om te
instelling op te slaan.
Volume instellen
Via de handset
Druk tijdens een gesprek op de volumetoetsen op de zijkant
van het toestel.
Via het tafeltoestel
Druk tijdens een gesprek op de volumetoetsen .
82
Page 85

Microfoon uitschakelen
U kunt tijdens een gesprek de microfoon uitschakelen, zodat
uw gesprekspartner u tijdelijk niet meer kan horen.
Via de handset
Druk tijdens een gesprek op . Om de microfoon opnieuw
in te schakelen, druk u nogmaals op .
Via het tafeltoestel
Druk tijdens een gesprek op GEDEMPT. Om de microfoon
opnieuw in te schakelen, drukt u op VOLUME.
Beltoon uitschakelen
U kunt de beltoon van een binnenkomende oproep uitscha-
kelen, zodat dat de verbinding verbroken wordt. U kunt het
gesprek gewoon aannemen zolang de beller niet heeft opgelegd. Bij de volgende binnenkomende oproep rinkelt de telefoon opnieuw normaal.
Via de handset
Druk op .
Via het tafeltoestel
Druk op STIL of .
Nummerherhaling
Uw telefoon slaat de 10 laatst gekozen telefoonnummers op
in een lijst.
Via de handset
1. Druk in ruststand op .
2. Selecteer met en of door herhaaldelijk te druk-
ken op het gewenste telefoonnummer.
3. Druk op of om het nummer te bellen.
83
Page 86

Via het tafeltoestel
1. Druk in ruststand op .
2. Selecteer met of door herhaaldelijk te drukken
op het gewenste telefoonnummer.
3. Hef de hoorn op of druk op om het nummer te bellen.
Oproeplijst
Opmerking: Deze functie is alleen beschikbaar wanneer uw
telefoonmaatschappij de service CLIP (Calling Line Identification Presentation: belleridentificatie) ingeschakeld heeft.
Raadpleeg voor meer informatie uw telefoonmaatschappij.
De telefoonnummers van binnenkomende oproepen worden
opgeslagen in de oproeplijst. Bij nieuwe oproepen verschijnt
een melding in de display.
Terugbellen vanuit de oproeplijst op de handset
1. Druk in ruststand op .
2. Selecteer met en het gewenste nummer.
3. Druk op of om het nummer te bellen.
Terugbellen vanuit de oproeplijst op het tafeltoestel
1. Druk in ruststand op OPROEPEN.
2. Selecteer met het gewenste nummer.
3. Hef de hoorn op of druk op om het nummer te bellen.
Een telefoonnummer uit de oproeplijst opslaan in het telefoonboek
1. Selecteer de oproeplijst en selecteer een nummer.
2. Druk op het tafeltoestel op OPSLAAN of op de handset op
.
3. Wijzig indien nodig het telefoonnummer en druk op het ta-
feltoestel op VOLGNDE of op de handset op .
4. Voer een naam in en druk op het tafeltoestel op OPSLAAN of
op de handset op .
84
Page 87

Opeenvolgende nummers kiezen
Gebruik deze functie om tijdens een gesprek een nummer uit
het telefoonboek, de nummerherhaling of de oproeplijst te
bellen.
Nummer uit telefoonboek/oproeplijst
1. Druk tijdens een gesprek op de menutoets of .
2. Selecteer Telefoonboek of Oproeplijst en druk op het tafelto-
estel op SELECT of op de handset .
3. Selecteer het gewenste nummer en druk op het tafeltoestel
op BELLEN of op de handset op om het nummer te bellen.
Nummer uit nummerherhaling
1. Druk tijdens een gesprek op of op .
2. Selecteer met de pijltoetsen of door herhaaldelijk te drukken
op of het gewenste nummer en druk op het tafeltoestel op BELLEN of op de handset op om het nummer
te bellen.
De handset bellen (oproepsignaal/paging)
U kunt een verloren handset zoeken of de gebruiker van een
handset melden dat u hem/haar wilt spreken, door via het tafeltoestel een akoestisch signaal te activeren.
Oproepsignaal activeren
Druk op de bel-toets op de rechterkant van het tafeltoestel
om alle aangemelde handsets te bellen.
Oproepsignaal stoppen
Via het tafeltoestel: Druk op STOPPEN of druk opnieuw op
de beltoets.
Via de handset: Druk op of of op om het even
welke cijfertoets, of zet de handset in het laadstation.
85
Page 88

Intern gesprek
U kunt een intern gesprek voeren tussen twee telefoons.
Deze gesprekken zijn gratis.
1. Druk op de menutoets of , selecteer Intercom en
druk op het tafeltoestel op SELECT of op de handset .
Als slechts 2 toestellen beschikbaar zijn, dan rinkelt onmiddellijk het andere toestel. Wanneer meerdere handsets aangemeld zijn, selecteert u de gewenste handset en drukt u op
het tafeltoestel op SELECT of op de handset .
2. Om het gesprek via het tafeltoestel aan te nemen, heft u de
hoorn af of drukt u op of op om het even welke cijfertoets.
- ofwel Om het gesprek via een handset aan te nemen, drukt u op
of of op om het even welke cijfertoets.
Extern gesprek intern doorverbinden
U kunt een extern gesprek vanuit het tafeltoestel naar de
handset of omgekeerd doorverbinden.
Vanuit de handset naar het tafeltoestel
1. Druk tijdens een gesprek op , selecteer Doorverbinden
en druk op .
Als geen handset aangemeld is, dan rinkelt onmiddellijk het
tafeltoestel. Wanneer meerdere handsets aangemeld zijn, selecteert u de gewenste handset en drukt u op .
2. Om het gesprek via het tafeltoestel aan te nemen, heft u de
hoorn af of drukt u op of op om het even welke cijfertoets.
- ofwel -
Om het gesprek via een andere handset aan te nemen, drukt
u op of of op om het even welke cijfertoets.
86
Page 89

Vanuit het tafeltoestel naar de handset
1. Druk tijdens een gesprek op , selecteer Doorverbinden
en druk op SELECT.
Als slechts één handset aangemeld is, begint deze onmiddellijk te rinkelen. Wanneer meerdere handsets aangemeld zijn,
selecteert u de gewenste handset en drukt u op SELECT.
2. Om het gesprek via de handset op te nemen, druk u op
of of op om het even welke cijfertoets.
Conferentie
U kunt een conferentie instellen met het tafeltoestel, de
handset en een externe gesprekspartner.
1. Je voert een extern gesprek.
2. Druk op de menutoets of , selecteer Intercom en
druk op het tafeltoestel op SELECT of op de handset .
Als slechts 2 toestellen beschikbaar zijn, dan rinkelt onmiddellijk het andere toestel. Wanneer meerdere handsets aangemeld zijn, selecteert u de gewenste handset en drukt u op
het tafeltoestel op SELECT of op de handset .
3. Als het interne gesprek is aangenomen, drukt u op of
.
4. Selecteer Gedeeld gesprk en druk op het tafeltoestel op
SELECT of op de handset .
De conferentie is opgezet.
87
Page 90

Telefoonboek
In het telefoonboek kunt u tot 100 telefoonnummers opslaan
die voor alle toestellen beschikbaar zijn. Om het nummer in
het telefoonboek te vinden, voert u de eerste letters van de
opgeslagen naam in met behulp van de cijfertoetsen. Selecteer met de pijltoetsen het gewenste nummer.
Een contact opslagen in het telefoonboek
1. Druk in ruststand op de menutoets of op .
2. Selecteer Telefoonboek en druk op het tafeltoestel op
SELECT of op de handset op .
3. Selecteer Contact toevoegen en druk op het tafeltoestel op
SELECT of op de handset op .
4. Voer het telefoonnummer in
- ofwel Markeer een nummer uit de nummerherhaling. Druk op
of , selecteer het gewenste nummer en druk op het tafeltoestel op SELECT of op de handset op .
5. Druk op het tafeltoestel op VOLGNDE of op de handset op
.
6. Voer een naam in en druk op het tafeltoestel op OPSLAAN of
op de handset op .
Nummer uit telefoonboek gebruiken
Open het telefoonboek (tafeltoestel: TELEFOONB, handset:
) en selecteer het gewenste nummer.
Bellen
Tafeltoestel: Hef de hoorn op of druk op .
Handset: Druk op of .
88
Page 91

Bewerken
Druk op het tafeltoestel op BEWERK of op de handset op
. Bewerk de gegevens en druk op het tafeltoestel op
OPSLAAN of op de handset op .
Wissen
Druk op het tafeltoestel op of op de handset op .
Antwoord bevestigend op de controlevraag
Fotosneltoetsen
Het tafeltoestel beschikt over 4 fotosneltoetsen om nummers
op te slaan die u vervolgens met slechts één druk op de knop
kunt bellen. Op het deksel te openen, grijpt u met uw vingernagel in de gleuf aan de onderkant en klapt u het deksel
open. U kunt er een foto van ongeveer 18 x 20 mm inleggen.
Fotosneltoets opslaan
1. Druk in ruststand op de menutoets .
2. Selecteer Fotosneltoets en druk op SELECT.
3. Selecteer het gewenste toetsnummer en druk op SELECT.
4. Voer het telefoonnummer in en druk op VOLGNDE.
5. Voer de naam in en druk op OPSLAAN.
Fotosneltoets bewerken
1. Druk in ruststand op de menutoets .
2. Selecteer Fotosneltoets en druk op SELECT.
3. Selecteer het gewenste toetsnummer en druk op SELECT.
4. Bewerk het telefoonnummer en druk op VOLGNDE.
5. Bewerk de naam en druk op OPSLAAN.
Fotosneltoets wissen
1. Druk in ruststand op de menutoets .
2. Selecteer Fotosneltoets en druk op SELECT.
89
Page 92

3. Selecteer het gewenste toetsnummer en druk op . Ant-
woord bevestigend op de controlevraag.
Fotosneltoets selecteren
Druk in ruststand op de gewenste fotosneltoets. De luidspre-
ker wordt ingeschakeld en het telefoonnummer wordt onmiddellijk gebeld.
Herinneringsberichten
Met deze functie kunt u op het antwoordapparaat een bericht
inspreken als geheugensteuntje voor belangrijke zaken. Herinneringsberichten kunnen eenmalig zijn, maar ook dagelijks, wekelijks of maandelijk herhaald worden.
U kunt tot 9 herinneringsberichten opslaan. Een herinne-
ringsbericht mag maximaal 4 minuten lang zijn. De totale opnamecapaciteit van het antwoordapparaat voor berichten en
herinneringsberichten bedraagt ongeveer 30 minuten.
Als u een herinneringsbericht ingesproken hebt, attenderen
zowel het tafeltoestel als de handset u op de ingevoerde tijd
op deze herinnering met behulp van een akoestisch signaal
en een melding in de display.
Speel het herinneringsbericht altijd tot het einde af. Daarna
schakelt de telefoon opnieuw in ruststand.
Een herinneringsbericht via de handset afspelen
Wanneer u het akoestische signaal hoort, drukt u op of
.
Een herinneringsbericht via het tafeltoestel afspelen
Wanneer u het akoestische signaal hoort, heft u de hoorn op
of drukt u op .
90
Page 93

Een herinneringsbericht toevoegen
1. Druk in ruststand op de menutoets of op .
2. Selecteer Memo en druk op het tafeltoestel op SELECT of op
de handset op .
3. Selecteer Memo instellen en druk op het tafeltoestel op
SELECT of op de handset op .
4. Voer de dag, de maand en het jaar voor het herinneringsbe-
richt in en druk op het tafeltoestel op VOLGNDE of op de
handset op .
5. Voer de tijd en druk op het tafeltoestel op VOLGNDE of op de
handset op .
6. Spreek na het signaal uw herinneringsbericht via de micro-
foon in. Beëindig de opname via het tafeltoestel met
OPSLAAN of via de handset met toets 5.
7. Selecteer de gewenste frequentie en druk op het tafeltoestel
op OPSLAAN of op de handset op .
Herinneringsbericht controleren
1. Druk in ruststand op de menutoets of op .
2. Selecteer Memo en druk op het tafeltoestel op SELECT of op
de handset op .
3. Selecteer Controleren en druk op het tafeltoestel op
SELECT of op de handset op .
4. De herinneringsberichten worden na elkaar afgespeeld. Met
toets op het tafeltoestel of toets 6 op de handset springt
u naar het volgende herinneringsbericht. Druk op op het
91
Page 94

tafeltoestel of op toets 4 op de handset om het huidige herinneringsbericht opnieuw te horen. Druk tweemaal op
op het tafeltoestel of op toets 4 op de handset om het vorige
herinneringsbericht opnieuw te horen.
Een herinneringsbericht wissen
1. Druk tijdens het afspelen van het herinneringsbericht op het
tafeltoestel op of op de handset op .
Instellingen
Beltonen
1. Druk in ruststand op de menutoets of op .
2. Selecteer Beltonen en druk op het tafeltoestel op SELECT of
op de handset op .
3. Selecteer Toonvolume en druk op het tafeltoestel op SELECT
of op de handset op . Stel het gewenste volume in en
druk op het tafeltoestel op OK of op de handset op .
- ofwel -
Selecteer Beltoon en druk op het tafeltoestel op SELECT of
op de handset op . Selecteer een melodie en druk op
het tafeltoestel op SELECT of op de handset op .
De toetstoon op het tafeltoestel
1. Druk in ruststand op de menutoets .
2. Selecteer Toetsgeluid en druk op SELECT.
3. Stel het gewenste volume in en druk op OK.
92
Page 95

Tonen op de handset
1. Druk in ruststand op de menutoets .
2. Selecteer Toon en druk op .
- Toetsgeluid: Stel het gewenste volume in en druk op .
- Batterij leeg: Schakel het akoestische signaal dat waar-
schuwt voor een bijna lege batterij, aan of uit en druk op
.
- Buiten bereik: Schakel het akoestische signaal dat waarschuwt voor een te grote afstand tot het basisstation, aan
of uit en druk op .
Datum/tijd instellen
Bij de nummers in de oproeplijst en de berichten van het
antwoordapparaat worden de datum en tijd aangegeven.
Ook voor een correcte werking van de herinneringsberichten
is het belangrijk om de datum en tijd correct in te stellen.
1. Druk in ruststand op de menutoets of op .
2. Selecteer Datum/tijd en druk op het tafeltoestel op SELECT
of op de handset op .
3. Voer de dag, de maand en het jaarin en druk op het tafeltoestel op VOLGNDE of op de handset op .
4. Voer het uur en de minuten in en druk op het tafeltoestel op
OPSLAAN of op de handset op .
Tijdsformaat instellen
1. Druk in ruststand op de menutoets of op .
2. Selecteer Tijdformaat en druk op het tafeltoestel op SELECT
of op de handset op .
3. Selecteer 12 U oder 24 U en druk op het tafeltoestel op
OPSLAAN of op de handset op .
93
Page 96

Datumformaat instellen
1. Druk in ruststand op de menutoets of op .
2. Selecteer Datumformaat en druk op het tafeltoestel op
SELECT of op de handset op .
3. Selecteer MM/DD/JJ of DD/MM/JJ en druk op het tafeltoestel op OPSLAAN of op de handset op .
Displaytaal instellen
Met deze instelling legt u vast in welke taal de displaygege-
vens (het menu) moet verschijnen.
1. Druk in ruststand op de menutoets of op .
2. Selecteer Instellingen en druk op het tafeltoestel op
SELECT of op de handset op .
3. Selecteer Displaytaal en druk op het tafeltoestel op
SELECT of op de handset op .
4. Selecteer de gewenste taal en druk op het tafeltoestel op
OPSLAAN of op de handset op .
5. Beantwoord de controlevraag op het tafeltoestel met JA of
op de handset met .
De taal voor de standaard begroeting instellen
Met deze instelling legt u vast in welke taal de standaard be-
groeting van het antwoordapparaat moeten zijn (Duits en
Engels).
1. Druk in ruststand op de menutoets of op .
2. Selecteer Instellingen en druk op het tafeltoestel op
SELECT of op de handset op .
3. Selecteer Taal v. stem en druk op het tafeltoestel op
SELECT of op de handset op .
94
Page 97

4. Selecteer de gewenste taal voor de instructies van het antwoordapparaat en druk op het tafeltoestel op OPSLAAN of
op de handset op .
MWI wissen
MWI staat voor "Message Waiting Indication" en betekent dat
een signaal aangeeft dat er een nieuw bericht aangekomen
is in de voicemail die uw telefoonmaatschappij mogelijk ter
beschikking stelt. Via de hier beschreven procedures kunt u
dit signaal in de display wissen, zonder dat het bericht zelf
gewist wordt. Raadpleeg voor meer informatie uw telefoonmaatschappij.
1. Druk in ruststand op de menutoets of op .
2. Selecteer Instellingen en druk op het tafeltoestel op
SELECT of op de handset op .
3. Selecteer Voicemail wissen en druk op het tafeltoestel op
SELECT of op de handset op .
4. Beantwoord de controlevraag op het tafeltoestel met JA of
op de handset met .
De naam van het toestel wijzigen
U kunt de namen van het tafeltoestel en van de handset
wijzigen.
1. Druk in ruststand op de menutoets of op .
2. Selecteer Instellingen en druk op het tafeltoestel op
SELECT of op de handset op .
3. Selecteer Basis bewerken (tafeltoestel) of Handset bewrkn
(handset) en druk op het tafetoestel op SELECT of op de
handset op .
4. Wis de oude naam met TERUG (tafeltoestel) of (handset) en voer een nieuwe naam in.
95
Page 98

5. Druk op het tafeltoestel op OPSLAAN of op de handset op
.
CID-tijdssynchronisatie
Als u een tijdssynchronisatie van uw telefoonmaatschappij
ontvangt, dan worden bij binnenkomende oproepen de
datum en tijd automatisch ingesteld. U kunt deze tijdssynchronisatie in- of uitschakelen. Raadpleeg voor meer informatie uw telefoonmaatschappij.
1. Druk in ruststand op de menutoets of op .
2. Selecteer Instellingen en druk op het tafeltoestel op
SELECT of op de handset op .
3. Selecteer CID tijdsynchr en druk op het tafeltoestel op
SELECT of op de handset op .
4. Selecteer Aan of Uit en druk op het tafeltoestel op OPSLAAN
of op de handset op .
Kiesmethode instellen
De gebruikelijke kiesmethode op analoge telefooncentrale is
toonkiezen". Bij gebruik van oudere telefooncentrales moet
de kiesmethode "Impulskiezen" worden ingesteld. Raadpleeg
voor meer informatie de gebruikshandleiding van uw telefooncentrale.
1. Druk in ruststand op de menutoets of op .
2. Selecteer Instellingen en druk op het tafeltoestel op
SELECT of op de handset op .
3. Selecteer Belmodus en druk op het tafeltoestel op
SELECT of op de handset op .
4. Selecteer Toon of Puls en druk op het tafeltoestel op
SELECT of op de handset op .
96
Page 99

Flashtijd instellen
Voor het gebruik van bepaalde functies van het telefoonnet
is een zogenaamd flash-signaal met een bepaalde lengte vereist. Raadpleeg uw telefoonmaatschappij voor meer informatie over beschikbare functies van uw telefoonnet en over
de benodigde flashtijd.
1. Druk in ruststand op de menutoets of op .
2. Selecteer Instellingen en druk op het tafeltoestel op
SELECT of op de handset op .
3. Selecteer Flashtijd en druk op het tafeltoestel op
SELECT of op de handset op .
4. Selecteer Kort, Standaard of Lang en druk op het tafeltoestel
op OPSLAAN of op de handset op .
Extra handsets registreren (tafeltoestel)
U kunt tot 4 handsets koppelen aan het tafeltoestel.
Nieuw gekochte handsets (PowerTel 2701, als accessoire be-
schikbaar) moeten op het tafeltoestel worden geregistreerd
voordat ze in gebruik worden genomen.
Een nieuwe PowerTel 2701 registreren:
1. Druk in ruststand op de menutoets .
2. Selecteer Instellingen en druk op SELECT.
3. Selecteer Registratie en druk op SELECT.
4. Zet de nieuwe handset in het laadstation.
97
Page 100

De fabrieksinstellingen opnieuw instellen
1. Druk in ruststand op de menutoets of op .
2. Selecteer Reset en druk op het tafeltoestel op
SELECT of op de handset op .
3. Beantwoord de controlevraag op het tafeltoestel met
SELECT of op de handset met .
Nachtmodus
U kunt de "nachtmodus" instellen voor een bepaalde duur (1-
12 uur). Tijdens deze periode worden alle geluiden (behalve
paging) en het meeluisteren van berichten op het antwoordapparaat, uitgeschakeld.
Wanneer u de nachtmodus inschakelt, wordt automatisch het
antwoordapparaat ingeschakeld. Nadat de ingestelde duur
van de nachtmodus afgelopen is, blijft het antwoordapparaat
ingeschakeld.
1. Druk in ruststand op de hekjes-toets of en houd
deze ongeveer 3 seconden ingedrukt.
2. Voer de gewenste duur in (1 - 12) en druk op het tafeltoestel
op SELECT of op de handset op .
Om de nachtmodus uit te schakelen, drukt u op de hekjes-
toets of en houd u deze ongeveer 3 seconden in-
gedrukt.
98
 Loading...