

Page 1
PowerTel
M7510
mobile phone
Operating
Instructions
Page 2

M7510
Hearing aid compatibility
This telephone is equipped with T Coil coupler making it com-
patible with most popular hearing aids. Due to the wide range
of hearing aids available there is no guarantee that the tele-
phone will function with all hearing aid models. Please check
your hearing aid immunity rating is higher than M2. This rat-
ing can be provided by the manufacturer of your hearing aid.
Instruments with rating lower than M2 may not be compatible
with this telephone. When using this telephone press the ‘T’
button on your hearing aid to switch it to Telecoil mode, this
will link your hearing aid to the phone and will enable clearer
sound without background noises. Please check if your hear-
ing aid is equipped with ‘T’ facility and if it is automatic or
manual. Hearing aids with high immunity rating equipped
with automatic T mode should be able to detect your phone
automatically and switch over to T position. Hearing aids with
Manual T function would need manual activation of this func-
tion on your hearing aids.
Helpline 0844 800 6503
(See page 91 for costs and hours of operation)
Page 3

CONTENTS
Quick Start Guide.............................................................6
Quick Glance ....................................................................................6
What is in the box ..........................................................................8
Installing the SIM card(s), memory card and battery ................8
Charging the battery .....................................................................11
Charging via the mini USB charging socket .............................11
Charging via the desktop charging unit .....................................11
Battery status ................................................................................12
Switching the mobile phone on and off.....................................12
Setting the display language ......................................................13
Setting the time and date ............................................................13
Taking a call ...................................................................................14
Rejecting a call ..............................................................................14
Ending a call ..................................................................................14
Making a call .................................................................................14
Advanced Settings and Functions ..............................................15
The phone in details ......................................................16
Keys and Parts................................................................................16
Special key functions ....................................................................16
Icons in the display .......................................................................20
Helpline 0844 800 6503
(See page 91 for costs and hours of operation)
1
Page 4

CONTENTS
Using the phone.............................................................22
General ...........................................................................................22
Entering text...................................................................................22
External display (sub LCD) ...........................................................25
Switching the mobile phone on and off.....................................25
Using the torch ..............................................................................26
Dialling a phone number / Calling ..............................................27
Dialling with the speed dialling keys ..........................................27
Dialling with the one−touch dialling keys ..................................28
Using redial / using the Calls list.................................................28
Taking a call....................................................................................29
Setting the volume........................................................................29
Hands-free......................................................................................29
Muting the microphone................................................................30
Options whilst in a call .................................................................30
3-party conference.........................................................................31
“Phonebook“ menu .......................................................32
Opening the phonebook...............................................................32
Checking the memory status.......................................................32
Creating a new phonebook entry................................................33
Calling from the phonebook ........................................................34
Editing a phonebook entry...........................................................35
2
Helpline 0844 800 6503
(See page 91 for costs and hours of operation)
Page 5

CONTENTS
Deleting a phonebook entry.........................................................35
Deleting all phonebook entries....................................................35
Copying/moving all phonebook entries .....................................36
Storing a phonebook entry to a speed dialling key..................36
Storing a phonebook entry to an one−touch dialling key........37
“Messages“ menu..........................................................40
Messages menu ............................................................................41
Text message settings...................................................................42
Multimedia message settings......................................................44
Service message settings.............................................................45
Writing and sending a SMS/MMS ..............................................46
Reading/deleting messages and further options ......................47
“Call center“ menu ........................................................50
Reading the calls list .....................................................................50
Deleting the calls list.....................................................................51
“SOS“ menu...................................................................52
Selecting an emergency call destination ...................................52
Entering emergency call numbers..............................................53
Select an outgoing emergency voice message.........................54
Recording a personal emergency voice message ....................54
Emergency call procedure ...........................................................56
Cancel the emergency call function............................................57
Helpline 0844 800 6503
(See page 91 for costs and hours of operation)
3
Page 6

CONTENTS
“Settings“ menu ............................................................58
Tone control ...................................................................................58
Switching Boost on and off..........................................................58
Direct number................................................................................59
Profiles ............................................................................................59
Call settings ....................................................................................62
Dual SIM settings ..........................................................................67
Phone settings ...............................................................................67
Network settings............................................................................70
Security settings ............................................................................72
Bluetooth ........................................................................................73
Restore settings .............................................................................76
“Organizer“ menu ..........................................................77
Calender..........................................................................................77
Calculator........................................................................................77
Tasks................................................................................................78
Alarm...............................................................................................78
Stopwatch.......................................................................................79
“Services“ menu ............................................................81
4
Helpline 0844 800 6503
(See page 91 for costs and hours of operation)
Page 7

CONTENTS
“Multimedia“ menu .......................................................82
Camera/Camcorder .......................................................................82
Gallery.............................................................................................85
Video player ...................................................................................86
Sound recorder..............................................................................87
“File manager“ menu ....................................................89
Appendix.........................................................................90
Technical data.................................................................................90
Service hotline ...............................................................................91
Problems and solutions................................................................91
Tips on the battery ........................................................................94
Intended use .................................................................................95
Areas of use ..................................................................................95
Safety Information ........................................................................96
Power adapter plug.......................................................................98
Disposal ..........................................................................................99
Declaration of Conformity .........................................................100
Maintenance ................................................................................101
Guarantee ....................................................................................101
Index ..............................................................................104
Menu tree ......................................................................108
Helpline 0844 800 6503
(See page 91 for costs and hours of operation)
5
Page 8

QUICK START GUIDE
Quick Start Guide
Important: Before you start, please read the safety
information on page 96.
Quick Glance
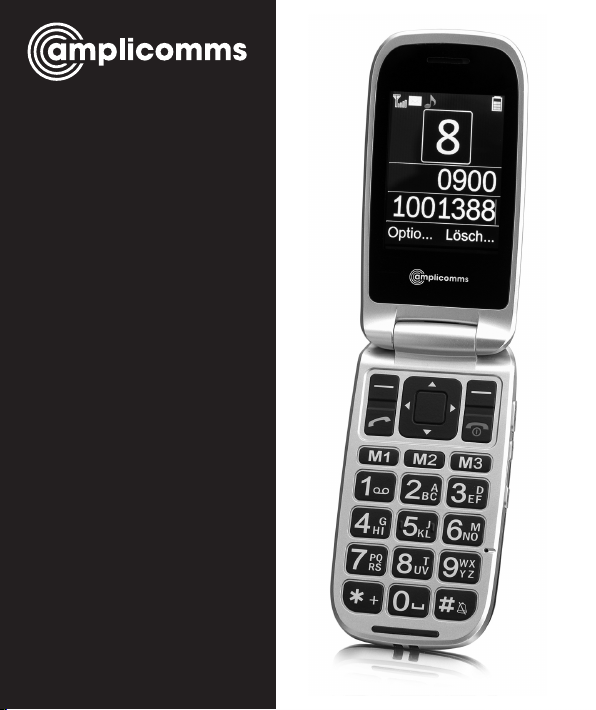
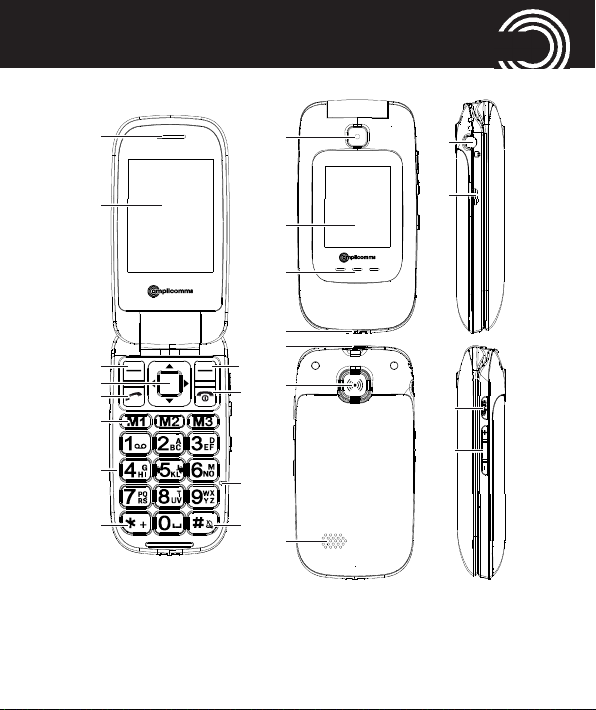
1 Earpiece
2 Display
3 Left softkey
4 Navigation key
5 Call key
6 Direct call keys
M1, M2, M3
7 Keypad
8 Star key
9 Hash key
10 Microphone
11 End call key /
On/Off key
12 Right softkey
13 Camera lense
14 Front display
15 Notification LEDs
16 Charging contacts
17 LED Flashlight
18 Emergency call switch
19 Loudspeaker
20 Headset socket (Headset
not supplied)
21 Mini-USB charging socket
22 Boost key/
Flashlight key
23 Volume control
6
Helpline 0844 800 6503
(See page 91 for costs and hours of operation)
Page 9
QUICK START GUIDE
1
1313
20
21
2
141514
15
21
5
4
3
12
11
18
17
16
18
17
16
7
6
5
10
11
22
23
8 9
19
19
Helpline 0844 800 6503
(See page 91 for costs and hours of operation)
7
Page 10

QUICK START GUIDE
What is in the box
The box contains:
1 mobile phone 1 power adapter plug
1 li−ion battery 1 operating manual
1 desktop charging unit
Installing the SIM card(s), memory card and battery
Risk of swallowing small objects!
The SIM card can be removed.
Small children can swallow them.
Pay attention that the SIM card is not bent or
scratched. Prevent any contact with water, dirt or
electrical charges.
Your telephone number is carried by the SIM card, not
the phone. Therefore if you use a SIM card you had in a
previous phone, you will keep the same phone number.
• Switch the phone off.
•
Remove the battery cover by pressing on it in the area
below the SOS key, slide it down and take it off.
• If there is already a battery inside, remove it.
8
Helpline 0844 800 6503
(See page 91 for costs and hours of operation)
Page 11
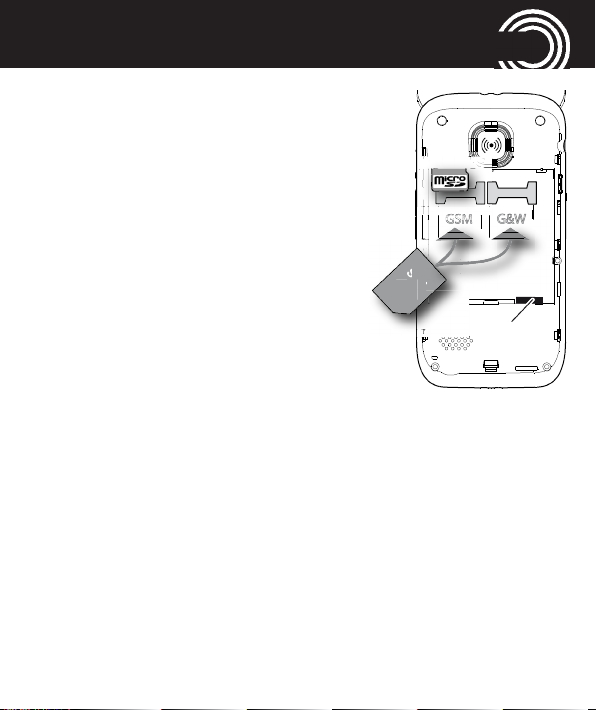
• Your phone supports two SIM
c
ard
SI
I
Battery
I
M
M
Battery
contacts
Battery
contacts
Battery
cards. This enables you to use
cards from two different networks and/or countries. Before
making an outgoing call, sending a text message or using
data services the phone will
prompt you to decide and
chose which SIM Card to use if
you are using two at that time.
Note: The card slot marked with
“G&W“ (on the right hand side in the drawing) sup-
ports UMTS/GSM (3G) and the card slot marked with
“GSM“ (on the left hand side in the drawing)
ted to GSM (2G) only. When using only one SIM
card, in order to use all the phone’s services via 3G
networks you must place the SIM card in card slot
“G&W“.
Helpline 0844 800 6503
(See page 91 for costs and hours of operation)
QUICK START GUIDE
is limi-
9
Page 12

QUICK START GUIDE
Slide the SIM card with the golden contacts facing
down in the moulded SIM card holder. The SIM card
must be located under the metal retaining bar to be in
the correct position.
• To expand the internal storage memory, you can insert
a microSD memory card (max. 32 GB / not included in
the delivery). Insert the memory card into the slot until
it stops as illustrated.
• Insert the battery. The golden contacts on the battery
must face towards the bottom right. Press lightly on
the top end of the battery until it snaps into place.
• Replace the battery cover on the back of the phone and
shift it upwards until it clicks into place.
10
Helpline 0844 800 6503
(See page 91 for costs and hours of operation)
Page 13

QUICK START GUIDE
Charging the battery
• Before starting to charge the battery, check that it has
been installed properly. Do not remove the battery while
it is being charged. This could damage the phone.
• When charging the battery for the first time, it should
be charged for at least 4 hours. Some batteries only
reach their full capacity after several complete
charge/discharge cycles.
Charging via the mini USB charging socket
• Plug the power adapter in the mini USB charging
socket.
• Connect the power adapter plug. For safety reasons,
only use the power adapter plug supplied.
Charging via the desktop charging unit
• Plug the power adapter plug in the mini USB charging
socket on the charging unit. Insert the phone in the
charging unit to charge it.
Helpline 0844 800 6503
(See page 91 for costs and hours of operation)
11
Page 14
QUICK START GUIDE
• It may take a few seconds before the phone indicates
the charging process.
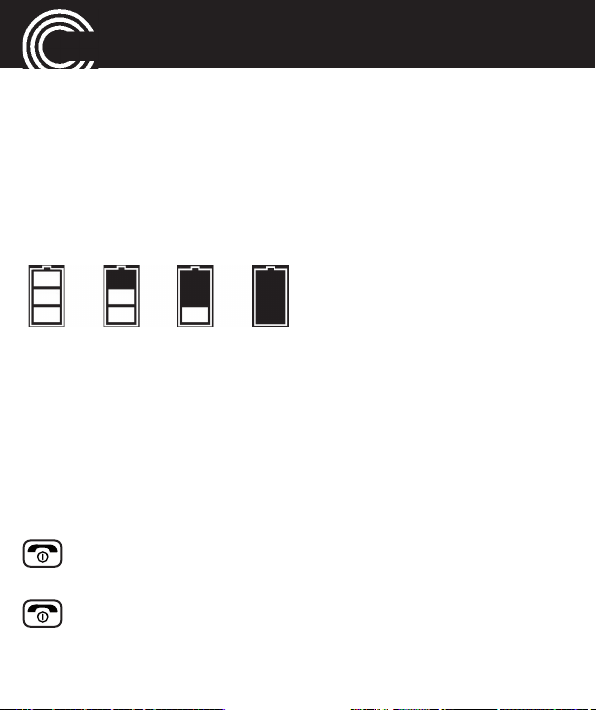
Battery status
The current battery charge status is indicated in the dis-
play as follows:
Full - - > - - > - - > - - > - - Empty
When the battery charge is low, a corresponding warning
message appears in the display. Charge the battery.
When the battery charge drops below the minimum sta-
tus, the phone switches off automatically.
Switching the mobile phone on and off
3 sec. Switch the mobile phone on. To stop the
melody press the End call key.
3 sec. Switch the mobile phone off.
12
Helpline 0844 800 6503
(See page 91 for costs and hours of operation)
Page 15

QUICK START GUIDE
Some SIM cards will require you to enter a PIN code. Fol-
low the prompts on the screen.
The SIM code (PIN of the SIM card) that you received with
your SIM card, protects the SIM card against unauthori-
sed use. The PIN2 code supplied with some SIM cards,
you need to access certain services. If you enter the PIN
or PIN2 code incorrectly three times in a row, you will be
prompted to enter the PUK or PUK2 code. Check with
your provider if you do not know these codes.
Setting the display language
If you want to select a different language please refer
to the Settings menu, starting on page 58.
Setting the time and date
Refer to the Settings menu, starting on page 58.
Helpline 0844 800 6503
(See page 91 for costs and hours of operation)
13
Page 16
QUICK START GUIDE
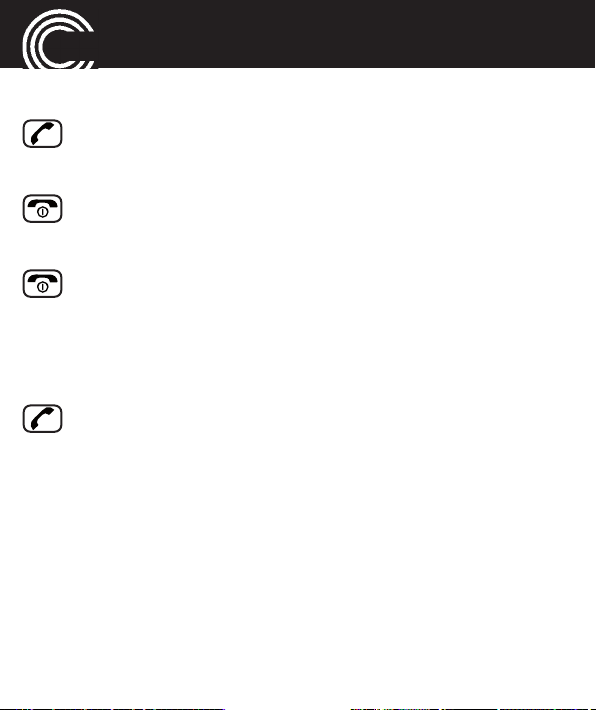
Taking a call
Take the call
Rejecting a call
Reject the call
Ending a call
End the call
Making a call
Enter the phone number
Clear Delete the last digit if incorrect
Dial the phone number
14
Helpline 0844 800 6503
(See page 91 for costs and hours of operation)
Page 17

QUICK START GUIDE
Advanced Settings and Functions
For more details about setting up your Amplicomms
M7510 and other functions follow the descriptions in this
user guide.
Examples:
• Set your one−touch dialling keys -> page 37.
• Store numbers in the phone book -> page 33.
Helpline 0844 800 6503
(See page 91 for costs and hours of operation)
15
Page 18

THE PHONE IN DETAILS
The phone in details
Keys and Parts
for the explanation of keys and parts please refer to page 6.
Special key functions
Left softkey In standby -> open the main menu
In menus the function changes due
to the term in the display above the
softkey (e. g. OK, Select).
Right softkey In standby -> open the phonebook
In menus the function changes due
to the term in the display above the
softkey (e. g. Back).
Direct call keys M1, M2, M3 - pressing one of these
keys dials the assigned phone num-
ber. A phonebook entry can be assig-
ned to each one−touch dialling key
(refer to “Storing a phonebook entry
16
Helpline 0844 800 6503
(See page 91 for costs and hours of operation)
Page 19

THE PHONE IN DETAILS
to a one-touch dialling key“ page 37).
Call key - Take a call or dial a number.
- Open the call list and the redial list
End call key - End or reject a call
- Cancel the current process and
return to standby (in menus)
- Switch the mobile phone on and off
Navigation key Navigate through the menu.
In standby the navigation key offers
a quick access to specific menu
items that you can define yourself
(refer to page 69). The default set-
tings are as follows:
▲ - Quick access to the tone set-
tings: customisation of the
user profile (ringtone etc.).
▼ - Switch on the camera.
◀ - Open SMS/MMS menu
Helpline 0844 800 6503
(See page 91 for costs and hours of operation)
17
Page 20

THE PHONE IN DETAILS
▶ - Calculator
■ - centre of the navigation key
In standby: open the menu
In menus: function “OK“.
Digit key 0 In idle mode, long press (approx 3
s) to toggle the tone control setting
between “Low frequency“, “High fre-
quency“ and “Normal frequency“.
(See page 58 for explanation of
tone control).
Digit key 1 Long press (approx. 3 s) dials the
number to access your voice mail
messages.
Note: If prompted, it may be neces-
sary to enter your network's voice
mail number first. Refer to the
documentation supplied with your
SIM card for this number.
18
Helpline 0844 800 6503
(See page 91 for costs and hours of operation)
Page 21

THE PHONE IN DETAILS
Star key - to enter the international prefix “+“
in pre-dialling (press 2 times) or to
enter P (pause)/ W (wait) (may be
necessary for call-through numbers
or remote accessing an answering
machine).
- when entering text: open the spe-
cial character table.
Hash key - In standby: long press toggles
between selected user profile and
silent mode.
- when entering text: toggles
between case and numbers.
Volume control +/- keys: - In standby: adjusts the
volume level of the ringtone
- Whilst on a call -> adjusts the ear-
piece or Hands-free volume.
Helpline 0844 800 6503
(See page 91 for costs and hours of operation)
19
Page 22

THE PHONE IN DETAILS
Boost/Flashlight key In standby: press and hold for
approx. 2 sec to switch the torch
on/off
- In a call: press to toggle between
boost and normal volume.
SOS key Start the SOS sequence. For details
please refer to the SOS menu, star-
ting on page 52.
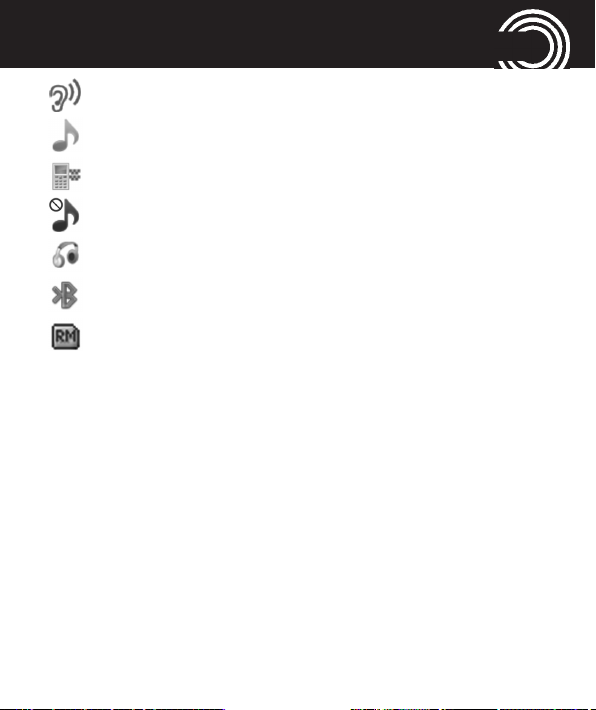
Icons in the display
Signal strength of the phone’s connection
Battery capacity (refer to page 12)
New SMS
New call
Call forwarding active
Alarm is activated
20
Helpline 0844 800 6503
(See page 91 for costs and hours of operation)
Page 23
THE PHONE IN DETAILS
Boost is activated
Profile “Outdoor“ or “General“ is activated
Profile “Meeting“ is activated
Profile “Silent“ is activated
A headset is connected
Bluetooth is activated
The “Roaming” symbol will appear if the phone swit-
ches to an alternate network provider. This may
occur for example when entering another country.
The Roaming facility depends on your network provider. Call your network provider if you have any queries regarding this service.
Helpline 0844 800 6503
(See page 91 for costs and hours of operation)
21
Page 24

USING THE PHONE
Using the phone
General
All the functions can be accessed via the various menus.
• Use the arrow keys ▲ /▼ to scroll though the menus
and the lists (e. g. phonebook).
• Press Back, to return to the last step.
• Press OK, to get to the next step.
Entering text
• When entering text (e. g. phonebook or SMS) use the
#-key to toggle between smart input (
abc), uppercase letters (ABC), lowercase letters (abc),
words beginning in size (Abc) or numbers (123).
- Smart text input is based on a built-in dictionary.
Start writing a word, using the keys 2 to 9. Press
each key only once for one letter. Confirm a word by
Select or by adding a space (press 0). If the word is
not correct, press the volume keys +/- repeatedly,
eeZZi
i
ABC or
eeZZi
i
22
Helpline 0844 800 6503
(See page 91 for costs and hours of operation)
Page 25

USING THE PHONE
and select the word from the list. When you do not
find the correct letters between ◀ and ▶ press Clear
until you find the first letters are OK, then press
Select, then continue by typing the next letter key, if
this is incorrect use the option bar at the bottom of
the screen which should have appeared, showing
individual letters and characters then press choose a
letter and press Select. Repeat this procedure for the
next letter if necessary. If you still cannot get the cor-
rect word, Long press
ly toggle the input method from Smart ABC/abc to
plain ABC/abc.
NOTE: If you wish to include a numeric character you
can do this by pressing and holding the appropriate
numeric key down for 3 seconds.
- In order to enter text in Multitap mode, press the key
labelled with the corresponding letter/character. If the
first character of the group is required, press the key
›
-key and you can temporari-
Helpline 0844 800 6503
(See page 91 for costs and hours of operation)
23
Page 26

USING THE PHONE
once. If the second character is required, press it
twice, and so on. To enter two characters assigned to
the same key, press the key the respective number
of times to enter the first character. Then wait for
approx. 2 sec. and enter the second letter.
Punctuation: Press the numeric key 1 you get
punctuation.
Special character: press
racter table. Select the character using ▲ /▼/◀ /▶ and
confirm with OK.
Move the cursor: use ◀ /▶ to move the cursor.
Switching the input language: press and hold down
the #-key (approx. 3 s) to get the list of the available
languages. Select an entry and press OK.
• Use the arrow keys ▲ /▼/ ◀/▶ to place the cursor and
press Delete for deleting characters.
›
to display the special cha-
24
Helpline 0844 800 6503
(See page 91 for costs and hours of operation)
Page 27

USING THE PHONE
Important Note: If the display light turns off, any keystroke activates only the light again. You must press
the desired button a second time to perform the
function.
External display (sub LCD)
The external display informs you of the incoming calls,
SMS and, for a short time after closing the mobile phone,
it also shows the signal strength, battery capacity and
time. With a short press on one of the outer buttons
(+ / - / boost key or emergency button) you can activate
the display at any time.
Switching the mobile phone on and off
Switch off: Press and hold the red end call key. After a
few seconds the telephone will be switched off.
Switch on: Press and hold the red end call key until the dis-
play light will be switched on. Enter the PIN code for your
SIM card and press OK. Entering the PIN code is not requi-
Helpline 0844 800 6503
(See page 91 for costs and hours of operation)
25
Page 28

USING THE PHONE
red if this feature is switched off for your SIM card (refer to
page 72 “SIM lock“ / not available for every provider).
Using the torch
Activate the display, press and hold the boost/flashlight
key for approx. 2 seconds to switch the torch on and off.
Note:
- The light is generated by a high-power LED. Do not
shine directly into eyes or optical devices.
- Please remember that by the operation of the torch,
the operating time to the next charging of the
phone is shortened.
26
Helpline 0844 800 6503
(See page 91 for costs and hours of operation)
Page 29

USING THE PHONE
Dialling a phone number / Calling
• The phone must be in standby (SIM card inserted and
the phone switched on).
• Enter the telephone number incl. the prefix. For ente-
ring a + in front of the country prefix press
two times.
• Press the green call key to dial the phone number.
• Press the red end call key for ending the call.
Dialling with the speed dialling keys
• Make sure, a phone number is assigned to the
respective key. Press the desired digit key for approx.3
seconds. Each stored number is dialled. To program
the speed dialling keys see "Storing a phonebook
entry to a speed dialling key," page 36.
›
quickly
Helpline 0844 800 6503
(See page 91 for costs and hours of operation)
27
Page 30

USING THE PHONE
Dialling with the one−touch dialling keys
• Make sure, a phone number is assigned to the
respective key. Press the desired one-touch dialling
key. Each stored number is dialled. To program the
one-touch dialling keys see "Storing a phonebook
entry to an one-touch dialling key," page 37.
Using redial / using the Calls list
• In standby press the green call key. A list of the last
calls is shown (Missed calls, dialled calls, received
calls). Select an entry using the arrow keys ▲ /▼.
• Press the green call key to dial the selected phone
number.
28
Helpline 0844 800 6503
(See page 91 for costs and hours of operation)
Page 31

USING THE PHONE
Taking a call
• If your phone is ringing:
• Press the green call key or the left softkey (Options
-> Answer) to take the call.
• Press the red end call key or the right softkey to
reject the call. The caller gets the busy tone (depen-
ding on your provider).
Setting the volume
• During a call you can set the volume using the + / -
keys on the right hand side of the phone. The setting
will be saved.
Hands-free
• During a call press H-Free. You can hear the caller via
the loudspeaker.
• For switching off press H-Held. The loudspeaker will be
switched off.
Helpline 0844 800 6503
(See page 91 for costs and hours of operation)
29
Page 32

USING THE PHONE
Muting the microphone
• During a call press Options, select Mute and press On.
The microphone will be muted.
• To unmute press Options, select Mute and press Off.
Options whilst in a call
You can select the following Options with the left softkey:
- Hold single call -> The call is put on hold. To retrieve
the call press Options/Retrieve single call
- End single call -> End the call (same as end call
key).
- New call
- Phonebook -> Open the phonebook.
- Call center -> Open the call history.
- Messages -> Open the messages menu.
- Sound recorder
- Mute
- DTMF
30
Helpline 0844 800 6503
(See page 91 for costs and hours of operation)
Page 33

USING THE PHONE
3-party conference
“3-party“ is a provider dependant feature. Establishing a
3-party conference lets you talk to two subscribers simul-
taneously.
• Call the first subscriber.
•
Press
Options -> New call
the second subscriber and press the green call key.
or
press Options -> Phonebook or Call history to select
an entry. Press Options and select Call - OK.
• When the second subscriber answers, press Options
and select Conference - OK to establish the 3-party
conference.
Press Options -> Switch to toggle between the two
subscribers.
, enter the phone number for
Helpline 0844 800 6503
(See page 91 for costs and hours of operation)
31
Page 34

“PHONEBOOK“ MENU
“Phonebook“ menu
You can save names and phone numbers in the internal
memory (up to 500 entries) and on the SIM card.
Opening the phonebook
• In standby press Names
or
• During a call press Options, select Phonebook and
press OK.
Checking the memory status
For checking how many names and phone numbers are
stored in the phonebook press Names -> Options -> Pho-
nebook settings -> Memory status -> OK . The status of
the SIM and phone memory is displayed.
32
Helpline 0844 800 6503
(See page 91 for costs and hours of operation)
Page 35

“PHONEBOOK“ MENU
Creating a new phonebook entry
• Press Names, select Add new contact at the very top
-> Options -> Select.
• Select whether the new entry should be stored to the
phone’s memory or to the SIM card and press OK.
Note: If the entry is saved to the SIM card, you can
only enter the name and one phone number.
• Enter the name and press ▼.
• Enter the (first) phone number and press ▼.
• If necessary enter additional phone numbers (Home
number/Office number). After every input press ▼.
• Assign a ring melody to the entry. Use ◀ and ▶ to
select a melody. If Default is selected, the standard
ringtone (as set in the profile) is used. Select New
record to record a personal ring tone or speak any text
to the telephone’s microphone. Your recorded words
will be used as ringtone for this entry. To do this, press
Helpline 0844 800 6503
(See page 91 for costs and hours of operation)
33
Page 36

“PHONEBOOK“ MENU
Options -> New record and say your personal ringtone
into the microphone.
• Via Options - Add detail you can enter further contact
information for this entry.
• When you are finished entering information for the
new entry, press Options -> Save.
Note: Your personal ringtone
You can record e. g. “Peter is calling“ as a ringtone.
Did you associate this ringtone to phonebook entry
“Peter“, your phone will announce calls from Peter
with: “Peter is calling“.
Calling from the phonebook
• Press Names to open the phonebook.
• Select an entry using the arrow keys or enter the first
letter for the entry.
• Press the green call key to dial the phone number.
34
Helpline 0844 800 6503
(See page 91 for costs and hours of operation)
Page 37

“PHONEBOOK“ MENU
Editing a phonebook entry
• Press Names to open the phonebook.
• Select an entry, press Options, select Edit and press
Select.
• Edit the entry.
• Press Options -> Save.
Deleting a phonebook entry
• Press Names to open the phonebook.
• Select an entry, press Options, select Delete and press
Select. Press Yes in the following confirmation query.
Deleting all phonebook entries
• Press Names -> Options -> Phonebook settings ->
Delete all contacts. Select whether the contacts in the
phone or on the SIM card should be deleted, enter the
phone lock code (in delivery state: 0000) and confirm.
Helpline 0844 800 6503
(See page 91 for costs and hours of operation)
35
Page 38

“PHONEBOOK“ MENU
Copying/moving all phonebook entries
• Press Names -> Options -> Phonebook settings ->
Copy/Move contacts. Select whether the contacts in
the phone should be copied/moved to the SIM card or
vice-versa and confirm.
Note: The contacts will be deleted from their original location when moved!
Storing a phonebook entry to a speed dialling key
• Press Names -> Options -> Phonebook settings ->
Speed dial and press OK.
• Make sure that the feature Speed dial is switched on.
Note: When you see “Off“ below status press the left
softkey (OK) and switch on the function.
• Select Set numbers and press OK.
• Select a button from the list (2…9) and press Edit.
36
Helpline 0844 800 6503
(See page 91 for costs and hours of operation)
Page 39

“PHONEBOOK“ MENU
• The phonebook is opened. Select an entry and press
OK.
Storing a phonebook entry to an one−touch dialling key
• Press Menu -> Settings -> Direct Number -> OK
• Select a direct call key (M1, M2, M3), enter a phone
number and press OK.
• Press Yes in the following confirmation query.
Further options
With the phonebook open and an entry selected press
Options and select one of the following options:
• View: The entry is shown
• Send text message: Send a SMS/MMS to the respecti-
ve phone number.
• Call: To make a call to the phone number.
• Edit: You can edit the entry.
• Delete: The entry will be deleted.
Helpline 0844 800 6503
(See page 91 for costs and hours of operation)
37
Page 40

“PHONEBOOK“ MENU
• Copy: You can copy the entry to the telephone or to the
SIM card.
• Move: You can move the entry to the telephone or to
the SIM card. The entry will be deleted at its origin.
• Add to Blocklist: The entry will be added to the block
list.
• Groups: You can define caller groups. In these caller
groups, you can group phone book entries stored in
the phone book of the phone.
• Phonebook settings
• Preferred storage: Select where new entries should
be saved (SIM card, telephone).
• Speed dial: Switch on the speed dial function and
edit the speed dial buttons.
• Memory status: Shows the number of entries on
the SIM card and in the phone.
• Copy contacts: Copy all contacts from the SIM card
to the phone and vice-versa.
38
Helpline 0844 800 6503
(See page 91 for costs and hours of operation)
Page 41

“PHONEBOOK“ MENU
• Move contacts: Move all contacts from the SIM
card to the phone and vice-versa.
• Delete all contacts: Delete all contacts.
Helpline 0844 800 6503
(See page 91 for costs and hours of operation)
39
Page 42

“MESSAGES“ MENU
“Messages“ menu
You can send and receive text messages (SMS / Short
Message Service) and multimedia messages (MMS).
A message will be treated as an SMS until you attach an
image, sound, etc. Then it will automatically be converted
to an MMS. In this case, there are more and other options
available if needed.
Received messages are stored either internally in the
phone or on the SIM card. Unread messages are stored in
the Inbox. When a new SMS/MMS is received, a message
appears on the display.
If the memory is full, you will receive a message. To recei-
ve new messages you will have to delete old messages.
40
Helpline 0844 800 6503
(See page 91 for costs and hours of operation)
Page 43

“MESSAGES“ MENU
Messages menu
Press Menu -> Messages -> OK. You will have the follo-
wing options:
• Write message: To write a new SMS/MMS.
• Inbox: Open the list of received messages.
• Drafts: Open the draft list.
• Outbox: Open the list of messages still to be sent.
• Sent messages: Open the list of already sent mes-
sages.
• Broadcast message: If your provider supports this ser-
vice you can change some parameters in this menu.
Note: These settings should only be changed by advan-
ced users.
• Message settings: You can change some of the SMS
related parameters.
Note: These settings should only be changed by advan-
ced users.
Helpline 0844 800 6503
(See page 91 for costs and hours of operation)
41
Page 44

“MESSAGES“ MENU
Text message settings
Note for the SMS centre number: This particular number
is needed for sending and receiving of SMS. It is stored
on the SIM card correctly. In certain cases it is necessary
to check that number or to change it.
• Press Menu, select Messages -> Message settings ->
Text message and press OK.
• You will have the following options:
- SIM1/SIM2 message settings
- Profile settings (the active profile is marked with a
green tick).
• Select the desired profile, press Options, select
Activate or Edit and press Select.
• Editing options include: change the profile name,
the SMSC address (the phone number for your
provider’s SMS centre), the validity period
(change the setting using ◀ and ▶) and the mes-
sage type (this parameter should remain “Text“
and not be changed.)
42
Helpline 0844 800 6503
(See page 91 for costs and hours of operation)
Page 45

“MESSAGES“ MENU
- Voicemail server: You can change your voicemail
phone number. If you have questions, please con-
tact your network provider.
Exit the menu by pressing Back or Save.
- Common settings: Select whether sent SMS
should be saved.
- Memory status: The status of the SIM and phone
memory is displayed.
- Preferred storage: Select where messages should be
saved (SIM or Phone).
Helpline 0844 800 6503
(See page 91 for costs and hours of operation)
43
Page 46

“MESSAGES“ MENU
Multimedia message settings
Note about MMS: Both you and the recipient must have a
subscription that supports drafting and sending multime-
dia messages. This type of profile or account is often pre-
installed. If not, you can get the information from your
network provider.
• Press Menu, select Messages -> Message settings ->
Multimedia message and press OK.
• You have the following options.
- Data account (SIM1/SIM2): Select Primary or Secon-
dary account and press Edit. Select an entry from
the list and press OK.
- Common settings
- Compose: Settings for composing a MMS as Slide
time, Creation m.., Picture resi..., Auto signa..., Sig-
nature.
44
Helpline 0844 800 6503
(See page 91 for costs and hours of operation)
Page 47

“MESSAGES“ MENU
- Sending: Settings for sending a MMS as Validity
pe..., Delivery re..., Read report, Priority, Delivery
ti.., Send and s...
- Retrieval: Settings for treating a MMS as Home
net..., Roaming, Filters, Read report, Delivery re....
- Preferred storage: Select, where the MMS should
be stored to (Memory card or Phone).
- Memory status: The status of the memory card and
phone memory is displayed.
Service message settings
• Press Menu, select Messages -> Message settings ->
Service message and press OK.
• You have the following options.
- Enable push: Press OK, select from the options and
press OK.
- Service loading: Press OK, select from the options
and press OK.
Helpline 0844 800 6503
(See page 91 for costs and hours of operation)
45
Page 48

“MESSAGES“ MENU
Writing and sending a SMS/MMS
• Press Menu, select Messages -> Write message and
press OK.
• Write your message using the digit keys. For more
information for entering text refer to chapter “Using
the phone / General“, page 22.
• After having entered the text press Options, select
Send to and press Select.
Note: When sending a MMS, press Options to select
images, sounds or other attachments.
• Select Enter recipient, press Select, enter the phone
number including the prefix and press Options ->
Done.
• The entered phone number will be shown.
• Press Options, select Send and press OK.
or
• Select Add from Phonebook and press OK.
• Select an entry and press OK.
46
Helpline 0844 800 6503
(See page 91 for costs and hours of operation)
Page 49

“MESSAGES“ MENU
• The selected entry will be shown.
• Press Options, select Send and press OK.
Reading/deleting messages and further options
• Press Menu, select Messages -> Inbox and press OK.
• Select a message.
• Press Options when viewing the list. You have the fol-
lowing options:
- View: The message is displayed.
- Reply: Reply to the number from which the mes-
sage was sent.
- Call sender: Call the sender on the phone.
- Forward: Forward the message to a different num-
ber.
- Delete: Delete the message.
- Delete all: Delete all messages.
- Save to Phonebook: (only available if there is no
respective entry in the phonebook yet) stores the
sender’s phone number in the phonebook.
Helpline 0844 800 6503
(See page 91 for costs and hours of operation)
47
Page 50

“MESSAGES“ MENU
Press Options when displaying the SMS content to
open the following options:
- Reply: Reply to the number from which the mes-
sage was sent.
- Call sender: Call the sender on the phone.
- Forward: Forward the text to a different number.
- Delete: Delete the message.
- Add to Calendar: You can add a reminder direct-
ly into the calendar. Edit the input options. For
saving the entry move to one of the input fields
for date or time and press OK. Confirm the
prompt to save the entry.
- Advanced with the following options: Use num-
ber / Use URL / Use USSD / Copy to phone/to
SIM / Move to phone/to SIM.
48
Helpline 0844 800 6503
(See page 91 for costs and hours of operation)
Page 51

“MESSAGES“ MENU
- Edit options: You can mark / copy the whole text
or a part the text and paste it into a new mes-
sage (Write message -> Options -> Edit options
-> Paste).
Helpline 0844 800 6503
(See page 91 for costs and hours of operation)
49
Page 52

“CALL CENTER“ MENU
“Call center“ menu
A new call is shown on the display.
• Press Back to delete the message. The icon for a new
call appears in the display. You can see this call “nor-
mally“ in the Missed calls list.
• Press View, to read the caller’s name and number.
• Press Options. For further options please refer to the
following chapter..
Reading the calls list
• Press Menu, select Call center and press OK.
• Select Missed calls, Dialled calls or Received calls and
press OK.
In these lists you will have the following options:
Press Options and select one of the following options:
- View: Read the details.
- Call: Call the telephone number.
- Send message: Send a SMS/MMS to the phone
number.
50
Helpline 0844 800 6503
(See page 91 for costs and hours of operation)
Page 53

“CALL CENTER“ MENU
- Save to Phonebook: (only available if there is no
respective entry in the phonebook yet) save the
entry in the phonebook.
- Add to Blocklist: Add the entry to the block list.
- Edit before call: Edit the phone number before cal-
ling back.
- Delete: Delete the entry.
Deleting the calls list
• Press Menu, select Call center and press OK.
• Select Delete call logs and press OK.
• Select a list to delete Dialled calls, Missed calls, Recei-
ved calls or All calls and press OK. Press Yes in the fol-
lowing confirmation query.
Helpline 0844 800 6503
(See page 91 for costs and hours of operation)
51
Page 54

“SOS“ MENU
“SOS“ menu
This phone is equipped with an emergency call function.
You can register up to 5 personal phone numbers for
automatic periodic dialling or an emergency phone num-
ber for an emergency call centre.
Note: With two SIM cards installed, choose SIM selection
for the SIM card to be used for the emergency call.
Selecting an emergency call destination
• Press Menu, select SOS -> SOS mode setting and
press OK.
• Select Set 5 numbers, if you want to call up to five per-
sonal emergency call numbers (see below) or Set call
center, if you want to call an emergency call centre.
Select Off for deactivating the emergency call function.
52
Helpline 0844 800 6503
(See page 91 for costs and hours of operation)
Page 55

“SOS“ MENU
Entering emergency call numbers
• Press Menu, select SOS and press OK.
• Select Set SOS number -> OK, select one of the 5 pos-
sible entries and press Edit.
• Select Add from phonebook, to select a phone number
from the phonebook or Edit number, to enter the
phone number manually.
or
• Select Call center number -> OK and enter the desired
phone number.
Note: It is forbidden to enter a public emergency
number such as police, fire and rescue control centre. It is a purely "private" emergency call.
Helpline 0844 800 6503
(See page 91 for costs and hours of operation)
53
Page 56

“SOS“ MENU
Select an outgoing emergency voice message
• Press Menu, select SOS -> Set outgoing voice MSG
and press OK.
• Select Default, to select the default outgoing voice
message.
or
• Select Custom, to select a personal outgoing voice
message. To use this setting you will have to record
the personal outgoing message before (see below).
Recording a personal emergency voice message
• Press Menu, select SOS -> Set outgoing voice MSG
and press OK.
• Select Custom and press OK.
• Select Record and press OK.
• Press Options, select New record and press OK.
• Speak your personal outgoing message to the micro-
phone.
54
Helpline 0844 800 6503
(See page 91 for costs and hours of operation)
Page 57

“SOS“ MENU
• Stop recording with Stop.
• Then choose Select and press OK, to activate your per-
sonal emergency contact.
With Play, you can listen to the control notifications.
If you Delete your personal emergency voice message
the default outgoing voice message will be restored
again.
Helpline 0844 800 6503
(See page 91 for costs and hours of operation)
55
Page 58

“SOS“ MENU
Emergency call procedure
Press and hold down the emergency call button on the
rear of the device for approx. 2-3 seconds. When the auto-
matic SOS call starts you will hear a siren tone.
When “Set 5 numbers
• The first phone number will be dialled.
• If the first phone number will not answer the next
phone number will be dialled and so on. All phone
numbers (max. 5) will be called one by one subse-
quently. If you have only set one phone number, the
phone will only call that number cyclically. This proce-
dure will be repeated as long as the phone’s battery is
not empty.
The procedure stops, as soon as the first person ans-
wers. The emergency voice message will be played. If
the called party press key “0“ within 10 seconds after
your recorded voice playing ended, hands free mode
“ is set:
56
Helpline 0844 800 6503
(See page 91 for costs and hours of operation)
Page 59

“SOS“ MENU
will be activated at your side and you can talk to the
called person directly.
• Note: Please mention explicitly in your personal
emergency message, that the called party will have
to press key “0“ to be able to speak with you. If not,
the loop continues. This prevents the emergency loop
from terminating, when, for example, an answering
machine takes your emergency call.
• The emergency loop continues even after an answered emergency call, until you cancel the emergency
(press emergency call button again).
Cancel the emergency call function
Press and hold down the emergency call button again for
approx. 2-3 seconds.
Helpline 0844 800 6503
(See page 91 for costs and hours of operation)
57
Page 60

“SETTINGS“ MENU
“Settings“ menu
Tone control
Set the tone for the earpiece/loudspeaker.
• Press Menu, select Settings -> Tone Control and press
OK.
• Select Normal frequency, Low frequency (increases the
lower frequencies) or High frequency (increases the
higher frequencies) and press OK.
Switching Boost on and off
• Press Menu, select Settings -> Boost setting and press
OK.
• Select On to activate the Boost function permanently
or Off to deactivate it.
If you have turned off the gain here in general, you can
switch it on at any time with the boost button (refer to
page 6) to increase the earpiece volume.
58
Helpline 0844 800 6503
(See page 91 for costs and hours of operation)
Page 61

“SETTINGS“ MENU
Prolonged listening at full speaker volume can cause
hearing damage.
Direct number
You can assign important phone numbers to the
one−touch dialling keys M1, M2 and M3.
• Press Menu, select Settings -> Direct Number and
press OK.
• Select a one–touch dialling key (M1, M2, M3), enter the
phone number manually and press OK.
• Press Yes in the following confirmation query.
Profiles
You can store different profiles (special settings depen-
dent on user and surroundings), which you can switch
quickly.
• Press Menu, select Settings -> Profiles and press OK.
• Select one of the profiles and press Options.
Helpline 0844 800 6503
(See page 91 for costs and hours of operation)
59
Page 62

“SETTINGS“ MENU
• You have the following options:
- Activate: The profile with the respective settings is
activated.
- Customize: Change the settings for the respective
profile (“Silent“ can not be edited).
- Alert type: Select whether an incoming call
should be signalled by Ring only, Vib. only, Vib.
and ring or Vib. then ring (Vib. = vibration).
- Ring type: You can select Ascending, Beep once
or Repeat.
- SIM 1/SIM 2 Ring: Selecting the melody for
incoming calls for each SIM card installed.
- Ring Volume: Select the volume for the ring
tone.
- SIM1/SIM2 SMS- Set the tone for an incoming
message.
- SMS Volume: Select the volume for the inco-
ming message tone.
60
Helpline 0844 800 6503
(See page 91 for costs and hours of operation)
Page 63

“SETTINGS“ MENU
- Keypad - Select whether the confirmation of a
pressed button should be confirmed with a
Click, a Tone, Human voice tone (with a voice
prompt when entering a digit) or Silent.
- Key Volume: Select the volume for the keytone.
- Power on - Set the tone for powering on the
phone.
- Power off - Set the tone for powering off the
phone.
- Cover open - Set the tone for opening the
phone’s cover.
- Cover close - Set the tone for closing the
phone’s cover.
- System alert - Switch the sound on/off for sys-
tem notifications.
The new settings will only take effect if you press
Options again and select Save, once the modificati-
ons are done.
Helpline 0844 800 6503
(See page 91 for costs and hours of operation)
61
Page 64

“SETTINGS“ MENU
Call settings
• After pressing Menu -> Settings -> Call settings -> OK
you have the following options (separately for SIM1 /
SIM2, if two SIM cards are installed):
• Caller ID: Settings for the transmission of your
phone number.
- Set by network: Using the default setting of
your provider.
- Hide ID: No transmission of your phone number.
- Send ID: Transmission of your phone number.
• Call waiting: Settings for an incoming call if you are
already in a conversation.
- Activate: The second call will generate a short
beep in the earpiece.
- Deactivate: The second caller will get the busy
tone.
- Query status: Information on the current setting.
62
Helpline 0844 800 6503
(See page 91 for costs and hours of operation)
Page 65

“SETTINGS“ MENU
• Call divert: Settings for call diversion.
- Divert all voice calls: You can Activate a call
diversion for all voice calls To new number
(enter subsequently a destination) or select To
voicemail, if you want to divert to your voice
mail box. Select Deactivate to deactivate a diver-
sion or Query status to get information on the
current setting.
- Divert if unreachable: Call diversion, if your
phone is not available (switched off or “No net-
work“). For information on settings please refer
to “Divert all voice calls“.
- Divert if no answer: Call diversion, if you do not
accept the call. For information on settings plea-
se refer to “Divert all voice calls“.
- Divert if busy: Call diversion, if your phone is
busy. For information on settings please refer to
“Divert all voice calls“.
Helpline 0844 800 6503
(See page 91 for costs and hours of operation)
63
Page 66

“SETTINGS“ MENU
- Divert all data calls: Diversion for all “No voice“
calls. For information on settings please refer to
“Divert all voice calls“.
- Cancel all diverts: To cancel all call diversions.
• Call barring: Barring of incoming or outgoing calls.
You can request the barring password from your
network provider.
- Outgoing calls: If you select All voice calls, no
more calls can be dialled. If you select Interna-
tional voice calls, no more calls to networks
abroad can be dialled. If you select International
voice calls except to home, only calls to your
home country can be made.
- Incoming calls: If you activate All voice calls no
more calls will be signalled - You are not availa-
ble.
The setting Voice calls when roaming bars all
incoming calls, if you are not in your home land
64
Helpline 0844 800 6503
(See page 91 for costs and hours of operation)
Page 67

“SETTINGS“ MENU
(e. g. abroad on vacation).
- Cancel all: Cancel all barrings.
- Change barring password: Changing the pas-
word for activating/deactivating the call barring.
You can request the barring password from your
network provider.
• Advanced settings:
- Block list: You can enter a list of phone numbers
to be blocked. If you activate this feature calls
from phones with the respective numbers will
not be signalled any more.
- Auto redial: If the function is activated, phone
numbers that were "busy," will be redialled auto-
matically (interval 5 min, max. 5 attempts).
- Call time reminder: You can specify whether you
want to be alerted during a call by a beep in the
earpiece after a certain time of call duration.
For Single you can set a time up to 3000 sec (=
Helpline 0844 800 6503
(See page 91 for costs and hours of operation)
65
Page 68

“SETTINGS“ MENU
50 min), for Periodic you can set up a time bet-
ween 30 and 60 s.
- Reject by SMS: If this feature is activated you
can reject an incoming call by SMS (Incoming
call is signalled: Options -> Reject by SMS ->
select a template).
- Connect notice: When this feature is turned on,
an advisory will be given in the handset when
the connection is established.
- Answer mode: If Cover answer is selected, a call
will be taken by opening the flap. If Any key is
activated, incoming calls can be taken by any
key (except the right softkey and the red end call
key). If Auto answer when headset mode is acti-
vated, an incomung call will be taken automatic-
ally if a headset is connected.
If no option is activated an incoming call can
only be taken with the green call key.
66
Helpline 0844 800 6503
(See page 91 for costs and hours of operation)
Page 69

“SETTINGS“ MENU
Dual SIM settings
• Press Menu -> Settings -> Dual SIM settings -> OK to
select the active SIM card (if two SIM cards are instal-
led). This is, for example, useful if you use a "private"
and "business" SIM card. Dual SIM Enabled means
both SIM cards are activated. Only SIM1 Enabled or
Only SIM2 Enabled activates only the respective SIM
card.
Phone settings
• Press Menu, select Settings -> Phone settings and
press OK.
• You have the following options:
- Time and date: In this menu you can Set home city,
Set time/date and Set format (time 24/12h / date
(DD MM YYYY/ MM DD YYYY / YYYY MM DD) / Date
separator). If you switch on Update with time zone,
the time will be automatically updated when the
time zone changes (see above: Set home city).
Helpline 0844 800 6503
(See page 91 for costs and hours of operation)
67
Page 70

“SETTINGS“ MENU
- Schedule power on/off: You can set up to four auto-
matic switch on/off times for your phone.
• Select Enable or Disable and press OK.
• Select an entry and press OK.
• Under "Status", using the arrow keys ◀/▶ select
"Activate“ to turn the function on.
• Select Power on or Power off using the arrow
keys ◀/▶ .
• Then enter the desired time and press Save.
Note: Please note that depending on the settings
entering the SIM PIN is required when switching
the phone on. See also -> Security settings / SIM
lock, page 72.
- Language: Select a language for the display.
- Display
- Wallpaper: Select a wallpaper for the standby
mode.
- Power on display/Power off display: Select an
68
Helpline 0844 800 6503
(See page 91 for costs and hours of operation)
Page 71

“SETTINGS“ MENU
animation which should be played when powe-
ring the phone on/off.
- Sub LCD Clock type: Select a type for the clock
on the external display.
- Dedicated key: You can assign quick access for
some menus to the navigation key ▲ /▼/◀/▶. Pres-
sing the respective key in standby opens the assig-
ned menu directly.
• Select a key (Up, Down, Left or Right), press
Edit and select a function from the list. Press
OK.
- Night mode: Set the time for the night mode. During
the set “Night mode“-time the indicator LED signal-
ling (see below) is deactivated.
- Signal LED: Select whether the indicator LED for
charging, incoming calls and new messages should
be always active (On), in night mode (see above) or
always deactivated (Off).
Helpline 0844 800 6503
(See page 91 for costs and hours of operation)
69
Page 72

“SETTINGS“ MENU
- LCD backlight: Set the brightness and the duration
for the backlight.
Network settings
• Press Menu, select Settings -> Network settings and
press OK.
• You have the following options (separately for SIM1 /
SIM2, if two SIM cards are installed):
- SIM1/SIM2 network settings
- Network selection: Select whether the network
selection should be automatic or manual
(Selection mode), start a New search or select a
network from the list (Select network). When
Automatic is selected the phone tries to connect
to your SIM card’s provider.
- Service selection: Select GSM (2G), WCDMA
(3G) or Automatic (recommended).
Note: 3G is a third generation mobile communi-
cations standard (UMTS / Universal Mobile Tele-
70
Helpline 0844 800 6503
(See page 91 for costs and hours of operation)
Page 73

“SETTINGS“ MENU
communications System), with which signifi-
cantly higher data transfer rates are possible
than with the second generation (2G) mobile
communications standard, the GSM standard
(Global System for Mobile Communications).
For a mobile telephone conversation, however, it
is irrelevant which standard is available; the
advantages of the higher transfer rates only
apply to data applications, e.g. sending a MMS.
- Network information: Information about the
used network / provider.
- GPRS transfer pref.: Select Data prefer or Call
prefer.
Helpline 0844 800 6503
(See page 91 for costs and hours of operation)
71
Page 74

“SETTINGS“ MENU
Security settings
• Press Menu, select Settings -> Security settings and
press OK.
• You have the following options (separately for SIM1 /
SIM2, if two SIM cards are installed):
- SIM1/SIM2 security:
- PIN lock: You can turn on or off the request for
the SIM PIN when the phone is switched on. This
is not allowed for some SIM cards/providers.
- Change PIN: You can change the PIN für the SIM
card.
- Change PIN2: You can change the PIN2 für the
SIM card.
- Phone security:
- Phone lock: Entering the phone lock code you can
lock the phone (0000 in delivery state).
- Change password: You can change the phone lock
code (0000 in delivery state).
72
Helpline 0844 800 6503
(See page 91 for costs and hours of operation)
Page 75

“SETTINGS“ MENU
Bluetooth
• Press Menu, select Settings -> Bluetooth and press
OK.
• You have the following options:
- Power: Switching the function on or off. You can
change the setting with the left softkey.
- Visibility: Select whether your phone is visible for
other Bluetooth devices when the Bluetooth functi-
on is activated. You can change the setting with the
left softkey.
- My device: For connecting the phone to another
Bluetooth device with audio profile (e. g. headset or
car kit).
Previously the "Search new device" and the "pai-
ring" with the device has to be carried out. After
selecting the device and Options you have the fol-
lowing options:
- Connect (with the paired device)
Helpline 0844 800 6503
(See page 91 for costs and hours of operation)
73
Page 76

“SETTINGS“ MENU
- Service list
- Rename
- Authorize: You can assign an authorisation to a
Bluetooth device. This is practical, e.g. for pre-
venting the constantly repeating query for
hands-free systems in the car. To do this, set the
authorisation to "Always connect".
- Delete
- Delete all
- Search audio device: After pressing OK the phone
searches active bluetooth devices. Having found a
device this must be paired with the phone (left soft-
key: Pair).
- My name: The Bluetooth name. Can be changed.
- Advanced: After pressing OK you have the follo-
wing options:
- Audio path: Determine whether the audio
remains on the phone or is routed to a Blue-
74
Helpline 0844 800 6503
(See page 91 for costs and hours of operation)
Page 77

“SETTINGS“ MENU
tooth headset.
- Storage: Select the preferred storage
(Phone/Memory card/Always ask).
- Sharing permission: Select Full control or Read
only.
- My address: The phone’s Bluetooth address.
Note: If your phone is connected to a Bluetooth handsfree device you must copy your phone book entries
from your SIM card to the phone (see page 36) before
you can use the hands-free device to call those numbers and to enable the hands-free device to display the
caller's name instead of the phone number during a
call.)
Helpline 0844 800 6503
(See page 91 for costs and hours of operation)
75
Page 78

“SETTINGS“ MENU
Restore settings
You can reset the phone to its factory settings.
• Press Menu, select Settings -> Restore factory settings
and press OK.
• Enter the phone phone password (0000 in delivery
state) and press OK.
• Press Yes in the following confirmation query.
76
Helpline 0844 800 6503
(See page 91 for costs and hours of operation)
Page 79

“ORGANIZER“ MENU
“Organizer“ menu
Calender
You can set the calendar from January 1970 to December
2030. With Options the following functions are available:
• View
• View all
• Add event
• Delete event
• Jump to date
• Go to today
• Go to weekly/monthly view
• Start of week
Calculator
The phone can support four continuous mixed arithmetic
operations.
• Enter the first digit(s) for your arithmetic operation.
Helpline 0844 800 6503
(See page 91 for costs and hours of operation)
77
Page 80

“ORGANIZER“ MENU
Enter the “dot“ using the hash key.
• Press the navigation key ▲/▼/◀/▶ to select the operati-
on sign (+ - x ÷).
• Enter the next digit(s).
• Press the button in the centre of the navigation key to
carry out the operation.
Tasks
After pressing Add you can define tasks. There are various
options available.
Alarm
You can set 5 different alarms, which will sound once,
daily or only on certain days.
• Select an entry and press Edit.
• Switch the alarm On or Off using ◀/▶ and press ▼.
• Enter the desired time.
• Select Once, Everyday or Custom (Options - On/Off,
when ready: Options - Done).
78
Helpline 0844 800 6503
(See page 91 for costs and hours of operation)
Page 81

“ORGANIZER“ MENU
• Select with Alert type what kind of alarm should be
given (Ring only / Vib. only / Tone and Vib.).
• Press Done.
Stopwatch
The stopwatch has various features.
• Typical stopwatch
• Split timing: Stopwatch with split timing and total
time. Press Start to start the function, Split to take
the split time (the total time is still displayed),
Pause or the button in the centre of the navigation
key stops the stopwatch with saving ability, and
after pressing Options you can Reset or Continue
the stopwatch.
• Lap timing: Stopwatch with lap timing without total
time. Press Start to start the function, Lap to take
the lap time (each elapsed time since the last round
timing is displayed), Pause or the button in the cen-
Helpline 0844 800 6503
(See page 91 for costs and hours of operation)
79
Page 82

“ORGANIZER“ MENU
tre of the navigation key stops the stopwatch with
saving ability, and after pressing Options you can
Reset or Continue the stopwatch.
• View records: list of the stored records.
• nWay stopwatch
The nWay stopwatch is composed of 4 parallel stop-
watches that you can individually start with the naviga-
tion key ▲ /▼/◀/▶.
The active timer can be started with the button in the
centre of the navigation key or the left soft key (Start),
stopped (Pause) and resumed (Cont.).
Pressing the right softkey Reset resets the respective
timer.
80
Helpline 0844 800 6503
(See page 91 for costs and hours of operation)
Page 83

“SERVICES“ MENU
“Services“ menu
The items in this menu depend on your network operator.
Please check with your provider for details.
Helpline 0844 800 6503
(See page 91 for costs and hours of operation)
81
Page 84

“MULTIMEDIA“ MENU
“Multimedia“ menu
Camera/Camcorder
• Press Menu, select Multimedia -> Camera and press
OK. The installed camera will be switched on in picture
mode. The current image will be shown on the display.
• When in camera mode press the left softkey (wrench
icon) to access the options. Use the arrow keys ◀/▶ to
navigate and ▲/▼ to edit the settings.
Press the left softkey to save the settings and the right
softkey to exit the menu.
- EV: Setting the exposure.
- Switch to photo album/video recorder: Switch to
video recorder mode or photo album.
- Capture mode: Normal, Continuous shot or Add
frame.
- Scene mode: Select Auto or Night.
- Image size: Setting the image size for the photo.
- Self-timer: Setting the trigger time.
82
Helpline 0844 800 6503
(See page 91 for costs and hours of operation)
Page 85

“MULTIMEDIA“ MENU
- White balance: Selecting the settings for white
balancing.
- Effects: Select different (colour) effects.
- Adv. settings
- Storage: Select whether the images should be
saved on the telephone or on the memory card.
- Image quality: Defining the image quality.
- Contrast: Contrast setting.
- Time stamp: When this function is switched on,
the date and time will be superimposed on the
image.
- Shutter sound: Selecting the tone when activa-
ting the trigger.
- Anti-flicker: Anti-flicker setting.
- Restore default: Resetting all options to standard
settings.
• When in video recorder mode press Options to see the
following options:
Helpline 0844 800 6503
(See page 91 for costs and hours of operation)
83
Page 86

“MULTIMEDIA“ MENU
- EV: Setting the exposure.
- Switch to Video player/Camera: Switch to video
player or camera mode.
- Scene mode: Select Auto or Night.
- Record size: Setting the image size for the video.
- White balance: Selecting the settings for white
balancing.
- Effects: Select different (colour) effects.
- Record limit: Set the maximum duration for recor-
dings.
- Adv. settings
- Storage: Select whether the videos should be
saved on the telephone or on the memory card.
- Video quality: Defining the video quality.
- Contrast: Contrast setting.
- Record audio: Record the original sound during
video recordings.
- Anti-flicker: Anti-flicker setting.
84
Helpline 0844 800 6503
(See page 91 for costs and hours of operation)
Page 87

“MULTIMEDIA“ MENU
- Restore default: Resetting all options to standard
settings.
Gallery
• Press Menu, select Multimedia -> Gallery and press
OK. A gallery of the available images will be displayed.
• Press Options. You have the following options:
- View - shows the picture with further options:
Use the keys 1 and 3 to rotate the picture, use 4
and 6 to enlarge/reduce the view. Press the left soft-
key to access the following options:
- Play: Starts a slide show.
- Use as: Use the image as a background image,
Power on/Power off diplay.
- Send: Option for sending the image as an MMS
or via Bluetooth.
- Image information: information about the
image.
- Settings: Set the speed for the slide show.
Helpline 0844 800 6503
(See page 91 for costs and hours of operation)
85
Page 88

“MULTIMEDIA“ MENU
- Image information: information about the image.
- Browse style: Select the style (List style/Matrix
style).
- Send: Option for sending the image as a MMS or
via Bluetooth.
- Use as: Use the image as a background image, etc.
- Rename: Change the name of the image.
- Delete: Delete the image.
- Sort by: Options for sorting the images.
- Storage: Select the storage location for images
(telephone/memory card).
Video player
• Press Menu, select Multimedia -> Video player and
press OK. List of the existing video files.
• Press Options. You have the following options:
- Play: Play the video file with further options (navi-
gation key):
- Start/Pause: press ■.
86
Helpline 0844 800 6503
(See page 91 for costs and hours of operation)
Page 89

“MULTIMEDIA“ MENU
- Stop: press the right softkey.
- Back: press ◀.
- Forward: press ▶.
›
- Enlarge/rotate: press
- Setting the volume with the volume keys + / -.
- Send: Option for sending the video as a MMS or
via Bluetooth.
- Rename: Change the name of the video.
- Delete: Delete the video.
- Sort by: Options for sorting the videos.
- Storage: Select the storage location for videos (tele-
phone/memory card).
Sound recorder
• Press Menu, select Multimedia -> Sound recorder and
press OK.
• Press Options. You have the following options:
- New record: Record an audio file.
key.
Helpline 0844 800 6503
(See page 91 for costs and hours of operation)
87
Page 90

“MULTIMEDIA“ MENU
- List: List of the existing audio files with additional
options:
- Play: Play an audio file.
- Rename: Rename an audio file.
- Delete: Delete an audio file.
- Use as: using the audio file as incoming ringto-
ne.
- Send: Send the audio file as a MMS or via Blue-
tooth.
- Settings: Settings for the recordings such as the
storage medium (telephone/memory card), file for-
mat and audio quality.
88
Helpline 0844 800 6503
(See page 91 for costs and hours of operation)
Page 91

“FILE MANAGER“ MENU
“File manager“ menu
You can edit the storage media (Phone/Memory card) in
this menu. Selecting Open displays the respective directo-
ry structure and additional editing options are available.
Format formats the respective memory - ATTENTION: All
content will be irrevocably deleted!
Helpline 0844 800 6503
(See page 91 for costs and hours of operation)
89
Page 92

APPENDIX
Appendix
Technical data
Quad-band 850 / 900 / 1800 / 1900 MHz
WCDMA dual-band 900 / 2100 MHz
Additional functions Bluetooth, torch,
emergency call function
Battery Li-Ion, 3.7 V, 900 mAh
Earpiece volume Maximal +35 dB
Talk time up to 5 hours
Standby time up to 8 days
Dimensions approx. 102 x 51 x 20 mm (closed)
approx. 190 x 51 x 12 mm (open)
USB connection Micro USB, EU Standard
Headset
(TRRS) phone connector
SAR values GSM 900 Head: 0.507 / Body: 0.260
DCS 1800 Head: 0.229 / Body: 0.077
WCDMA 900 Head: 0.517 / Body: 0.328
WCDMA 2100 Head: 0.431 / Body: 0.270
connection
3.5 mm jack, 4-conductor
90
Helpline 0844 800 6503
(See page 91 for costs and hours of operation)
Page 93

APPENDIX
Service hotline
Should problems arise with the telephone, please refer to
the following information first. In the event of technical
problems, please contact our service hotline under tel.
0844 800 6503 (Using a UK landline, at the time of going
to print: calls cost 6p for connection charge and then 5p a
minute. Mobile costs may vary.) In the case of claims
under the terms of guarantee, contact your sales outlet.
There is a 2 year period of guarantee.
Problems and solutions
Problems
The mobile phone
cannot be switched on.
Remedy
- No battery inserted.
- Battery is not charged.
The phone is requesting
a PUK when I switch on
the phone
Helpline 0844 800 6503
(See on this page for costs and hours of operation)
If you do not have the PUK for
your SIM card then contact your
service provider
91
Page 94

APPENDIX
No signal quality is
displayed.
Keypad does not
function or only
functions very slowly.
A message appears in
the display for some
functions, indicating
execution/use is not
possible.
92
(See page 91 for costs and hours of operation)
No network
connection. The mobile phone is
in a location where there is no
network service. Move to a diffe-
rent location or contact your ser-
vice provider.
The operating speed of the dis-
play is reduced in the case of
low temperatures. This is nor-
mal.
Some functions can only be
used after the respective service
has been applied for.
Contact your service provider.
Helpline 0844 800 6503
Page 95

APPENDIX
Screen frozen or no
response when
pressing keys.
No connection to the
mobile telecommuni -
cation network.
The “Insert SIM“
message appears in
the display.
The battery cannot be
charged or is empty
within a short time.
Helpline 0844 800 6503
(See page 91 for costs and hours of operation)
Remove the battery for 3 minutes
and try again.
Contact your service provider.
Ensure that the SIM card has
been installed correctly. Contact
your service provider, if necessa-
ry.
- Battery is defective.
- Place the phone correctly in the
charging unit or connect the
charging unit properly. Clean
the contact surfaces on the
mobile phone and charging
93
Page 96

APPENDIX
unit with a soft, dry cloth.
- Charge the mobile for 4 hours.
Tips on the battery
• Only use batteries, cables and charging unit approved
by the manufacturer, otherwise the battery could be
damaged.
• Do not short circuit the battery. Always leave the batte-
ry in the phone to avoid accidentally short circuiting
the battery contacts.
• Keep the battery contacts clean and free of dirt.
• The battery can be charged/discharged hundreds of
times but its service life is limited. Replace the battery
when the battery power has decreased noticeably.
94
Helpline 0844 800 6503
(See page 91 for costs and hours of operation)
Page 97

APPENDIX
Intended use
This mobile phone is designed for use when connected to
a mobile phone network. Any other use is considered
unintended use. Unauthorised modification or recon-
struction is not permitted. Under no circumstances open
the device or complete any repair work yourself.
Areas of use
• Do not use the phone in prohibited areas.
• Switch the phone off in the vicinity of medical equip-
ment (e.g. in hospitals).
• Do not use the phone in petrol stations or near fuels
and chemicals.
• Check with the airline whether mobile phones may be
used on board.
Helpline 0844 800 6503
(See page 91 for costs and hours of operation)
95
Page 98

APPENDIX
Safety Information
• Prevent exposure to smoke, dust, vibration, chemicals,
moisture, heat and direct sunlight. The phone is not
waterproof; therefore, keep it dry.
• Only use original accessories and batteries. Never
attempt to connect other products.
• If you want to connect the phone to another device,
read the manual supplied with that device with regard
to any detailed safety information.
• Never attempt to connect incompatible products.
• Repairs to this device may only be completed by quali-
fied service personnel.
• All mobile communication equipment is subject to
interference which may impair its performance.
• Keep the phone and accessories out of the reach of
children.
• The SIM card can be removed. Caution! Small children
can swallow them.
96
Helpline 0844 800 6503
(See page 91 for costs and hours of operation)
Page 99

APPENDIX
• The ringing tone is issued via the loudspeaker. Take an
incoming call first and then hold the phone to your
ear. This prevents any possible hearing damage.
• Only use the phone while driving or riding a transport
vehicle in road traffic when using the approved hands-
free equipment and appropriately positioned holders.
Ensure that no safety−related functions are interfered
with when operating the phone. It is essential to obser-
ve the applicable national laws and regulations.
• Always maintain a distance of at least 15 cm to imp-
lanted heart pacemakers to prevent any possible inter-
ference. If you have had a pacemaker implanted, do
not carry the phone in a breast pocket when switched
on. Always hold the phone to the ear furthest away
from the pacemaker during calls.
Switch the phone off immediately if you notice or
suspect any adverse effects.
Helpline 0844 800 6503
(See page 91 for costs and hours of operation)
97
Page 100

APPENDIX
• This phone is hearing aid compatible. If you wear a
hearing aid, however, please contact your doctor or
the hearing aid manufacturer to inquire about any pos-
sible impairments through mobile communication
equipment.
• Do not rely on the mobile phone as a safeguard for
emergencies. For a variety of technical reasons, it is
not possible to guarantee a reliable connection under
all circumstances.
Power adapter plug
The power adapter plug supplied ful-
fils the ecodesign requirements of the
European Community (Directive
2005/32/EC). This means that the cur-
rent consumption is considerably less, both in operation
as well as in standby, in comparison to older power adap-
ter plug models.
98
Helpline 0844 800 6503
(See page 91 for costs and hours of operation)
 Loading...