

Page 1
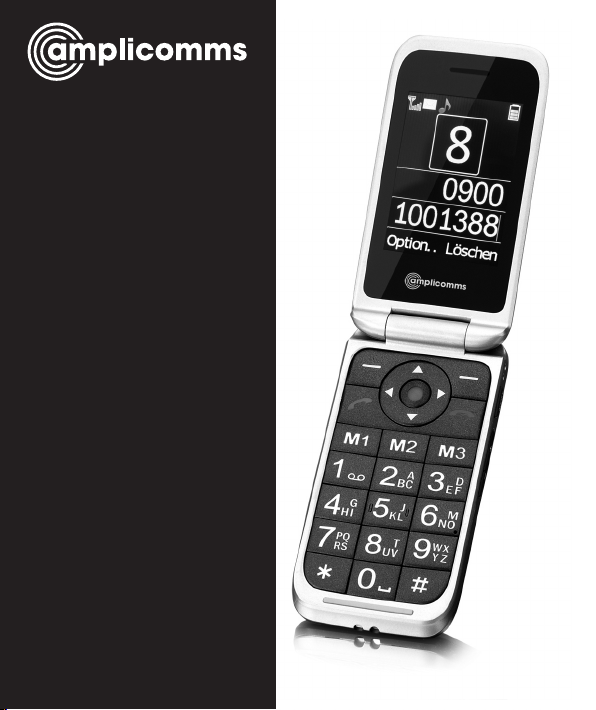
PowerTel
M7000i
mobile phone
Operating
Instructions
Page 2

M7000I
Hearing aid compatibility
This telephone is equipped with T Coil coupler making it com-
patible with most popular hearing aids. Due to the wide range
of hearing aids available there is no guarantee that the tele-
phone will function with all hearing aid models. Please check
your hearing aid immunity rating is higher than M2. This rat-
ing can be provided by the manufacturer of your hearing aid.
Instruments with rating lower than M2 may not be compatible
with this telephone. When using this telephone press the ‘T’
button on your hearing aid to switch it to Telecoil mode, this
will link your hearing aid to the phone and will enable clearer
sound without background noises. Please check if your hear-
ing aid is equipped with ‘T’ facility and if it is automatic or
manual. Hearing aids with high immunity rating equipped
with automatic T mode should be able to detect your phone
automatically and switch over to T position. Hearing aids with
Manual T function would need manual activation of this func-
tion on your hearing aids.
Helpline 0844 800 6503
(See page 73 for costs and hours of operation)
Page 3

CONTENTS
Quick Start Guide .............................................................6
Quick Glance.....................................................................................6
What is in the box ...........................................................................8
Installing the SIM card and battery ..............................................8
Charging the battery ....................................................................10
Charging via the mini USB charging socket .............................10
Charging via the desktop charging unit ....................................10
Battery status ................................................................................11
Switching the mobile phone on and off.....................................11
Setting the display language ......................................................12
Setting the time and date ............................................................12
Taking a call ...................................................................................13
Rejecting a call ..............................................................................13
Ending a call ..................................................................................13
Making a call .................................................................................13
Advanced Settings and Functions ..............................................14
Questions and Answers ...............................................................14
The phone in details ......................................................18
Keys and Parts................................................................................18
Special key functions ....................................................................18
Icons in the display........................................................................22
Helpline 0844 800 6503
(See page 73 for costs and hours of operation)
1
Page 4

CONTENTS
Using the phone .............................................................24
General............................................................................................24
Switching the mobile phone on and off.....................................25
Using the torch...............................................................................26
Dialling a phone number / Calling...............................................27
Dialling with the speed dialling keys ..........................................27
Dialling with the one−touch dialling keys ..................................28
Using redial / using the Calls list.................................................28
Taking a call....................................................................................28
Setting the volume ........................................................................29
Hands-free ......................................................................................29
Options whilst in a call..................................................................30
3-party conference.........................................................................31
“Phonebook“ menu .......................................................32
Opening the phonebook...............................................................32
Checking the memory status .......................................................32
Creating a new phonebook entry................................................32
Calling from the phonebook ........................................................34
Editing a phonebook entry ...........................................................35
Deleting a phonebook entry.........................................................35
Deleting all phonebook entries ....................................................35
Copying/moving all phonebook entries .....................................36
2
Helpline 0844 800 6503
(See page 73 for costs and hours of operation)
Page 5

CONTENTS
Storing a phonebook entry to a speed dialling key..................36
Storing a phonebook entry to an one−touch dialling key........37
“Messages“ menu..........................................................40
Messages menu.............................................................................40
Text message settings...................................................................41
Writing and sending a SMS .........................................................44
Reading/deleting messages and further options ......................45
“Call center“ menu ........................................................47
Reading the calls list......................................................................47
Deleting the calls list .....................................................................48
Further options...............................................................................49
“SOS“ menu ...................................................................51
Selecting an emergency call destination....................................51
Entering emergency call numbers ..............................................51
Select an outgoing emergency voice message.........................52
Recording a personal emergency voice message ....................53
Emergency call procedure............................................................54
Cancel the emergency call function ............................................55
Helpline 0844 800 6503
(See page 73 for costs and hours of operation)
3
Page 6

CONTENTS
“Settings“ menu ............................................................56
Profiles.............................................................................................56
Direct number ................................................................................58
Switching Boost on and off..........................................................59
Tone control....................................................................................59
Phone settings................................................................................60
Network settings............................................................................62
Security settings ............................................................................63
Bluetooth.........................................................................................64
Restore settings .............................................................................66
“Organizer“ menu ..........................................................67
Calender..........................................................................................67
Calculator........................................................................................67
Alarm...............................................................................................68
Tasks ................................................................................................69
Stopwatch.......................................................................................69
“Services“ menu ............................................................71
Appendix .........................................................................72
Technical data.................................................................................72
Service hotline ...............................................................................73
Problems and solutions ................................................................73
4
Helpline 0844 800 6503
(See page 73 for costs and hours of operation)
Page 7

CONTENTS
Tips on the battery.........................................................................76
Intended use ..................................................................................77
Areas of use ...................................................................................77
Safety Information ........................................................................78
Power adapter plug .......................................................................80
Disposal...........................................................................................81
Declaration of Conformity ...........................................................82
Maintenance ..................................................................................83
Guarantee ......................................................................................83
Index ................................................................................86
Menu tree ........................................................................90
Helpline 0844 800 6503
(See page 73 for costs and hours of operation)
5
Page 8

QUICK START GUIDE
Quick Start Guide
Important: Before you start, please read the safety
information on page 78.
Quick Glance
1 Earpiece
2 Display
3 Left softkey
4 Navigation key
5 Call key
6 Direct call keys
M1, M2, M3
7 Keypad
8 Star key
9 Hash key
10 Microphone
11 End call key /
On/Off key
12 Right softkey
13 Boost key
14 Volume control
15 LED Charging/Low battery
16 LED New calls/New SMS
17 LED Flashlight/Incoming
call
18 Emergency call switch
19 Loudspeaker
20 Headset socket (Headset
not supplied)
21 Mini-USB charging socket
6
Helpline 0844 800 6503
(See page 73 for costs and hours of operation)
Page 9
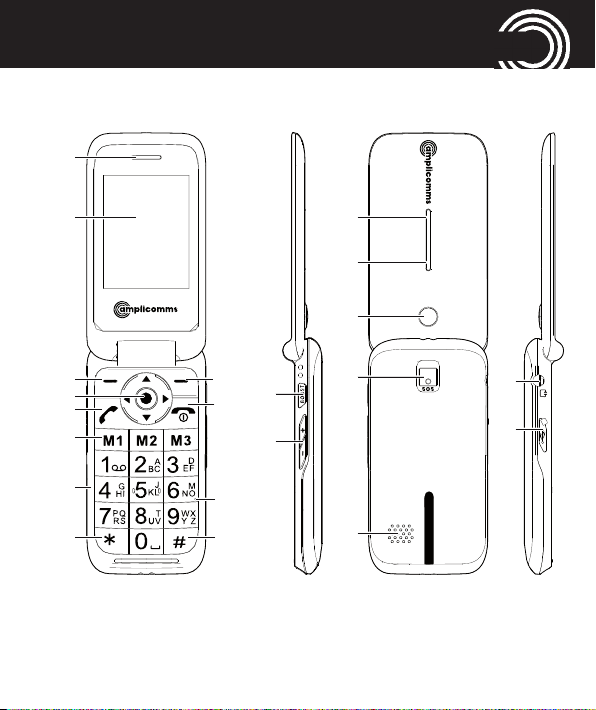
QUICK START GUIDE
1
2
3
4
5
6
7
89
11
10
12
13
18
17
15
16
19
14
20
21
Helpline 0844 800 6503
(See page 73 for costs and hours of operation)
7
Page 10

QUICK START GUIDE
What is in the box
The box contains:
1 mobile phone 1 power adapter plug
1 li−ion battery 1 operating manual
1 desktop charging unit
Installing the SIM card and battery
Risk of swallowing small objects!
The SIM card can be removed.
Small children can swallow them.
Pay attention that the SIM card is not bent or
scratched. Prevent any contact with water, dirt or
electrical charges.
Your telephone number is carried by the SIM card, not
the phone. Therefore if you use a SIM card you had in a
previous phone, you will keep the same phone number.
• Switch the phone off.
• Remove the battery cover by grasping the small recess
in the housing (near the speaker) and lift the rear hou-
sing cover.
8
Helpline 0844 800 6503
(See page 73 for costs and hours of operation)
Page 11
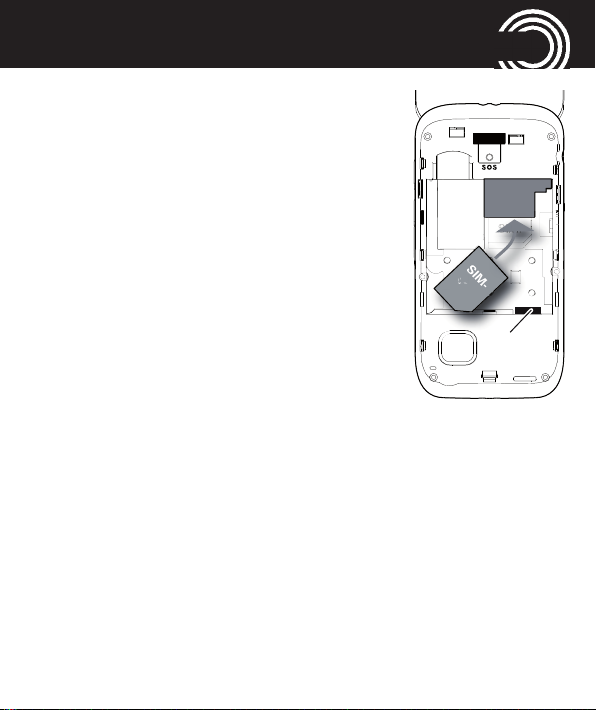
QUICK START GUIDE
c
a
r
d
Battery
contacts
• If there is already a battery inside,
remove it.
• Slide the SIM card with the gol-
den contacts facing down in the
moulded SIM card holder. The
SIM card must be located under
the metal retaining bar to be in
the correct position.
• Insert the battery. The golden con-
tacts on the battery must face
towards the bottom right.
Press lightly on the top end of the battery until it snaps
into place.
• Locate the battery cover on the back of the phone and
secure it by gently pressing around the edges until it
clicks into place.
Helpline 0844 800 6503
(See page 73 for costs and hours of operation)
9
Page 12

QUICK START GUIDE
Charging the battery
• Before starting to charge the battery, check that it has
been installed properly. Do not remove the battery while
it is being charged. This could damage the phone.
• When charging the battery for the first time, it should
be charged for at least 4 hours. Some batteries only
reach their full capacity after several complete
charge/discharge cycles.
Charging via the mini USB charging socket
• Plug the power adapter in the mini USB charging
socket.
• Connect the power adapter plug. For safety reasons,
only use the power adapter plug supplied.
Charging via the desktop charging unit
• Plug the power adapter plug in the mini USB charging
socket on the charging unit. Insert the phone in the
charging unit to charge it.
10
Helpline 0844 800 6503
(See page 73 for costs and hours of operation)
Page 13
QUICK START GUIDE
• It may take a few seconds before the phone indicates
the charging process.
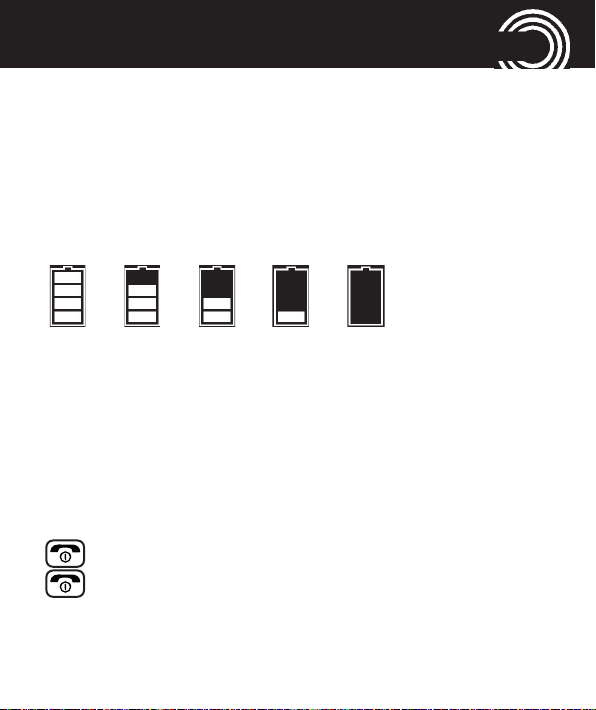
Battery status
The current battery charge status is indicated in the dis-
play as follows:
Full - - > - - > - - > - - > - - > - - > - - Empty
When the battery charge is low, a corresponding warning
message appears in the display. Charge the battery.
When the battery charge drops below the minimum sta-
tus, the phone switches off automatically.
Switching the mobile phone on and off
3 sec. Switch the mobile phone on.
3 sec. Switch the mobile phone off.
Helpline 0844 800 6503
(See page 73 for costs and hours of operation)
11
Page 14

QUICK START GUIDE
Some SIM cards will require you to enter a PIN code. Fol-
low the prompts on the screen.
The SIM code (PIN of the SIM card) that you received with
your SIM card, protects the SIM card against unauthori-
sed use. The PIN2 code supplied with some SIM cards,
you need to access certain services. If you enter the PIN
or PIN2 code incorrectly three times in a row, you will be
prompted to enter the PUK or PUK2 code. Check with
your provider if you do not know these codes.
Setting the display language
If you want to select a different language please refer
to the Settings menu, starting on page 56.
Setting the time and date
Refer to the Settings menu, starting on page 56.
12
Helpline 0844 800 6503
(See page 73 for costs and hours of operation)
Page 15
QUICK START GUIDE
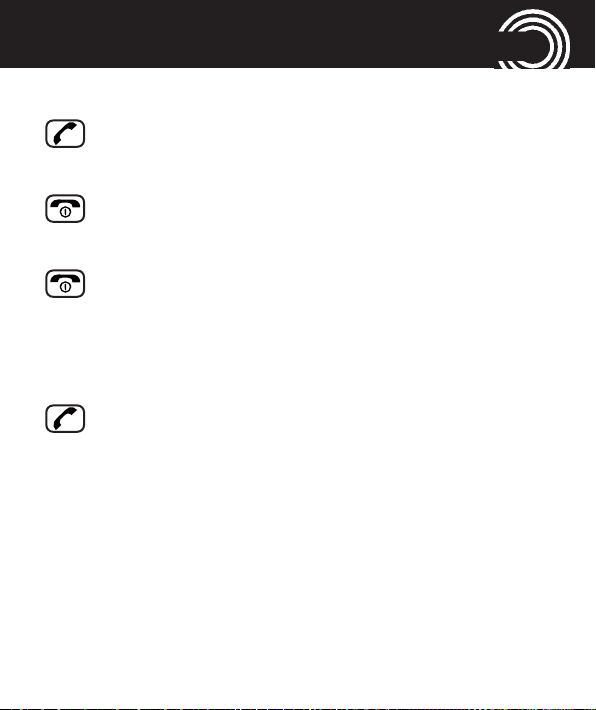
Taking a call
Take the call
Rejecting a call
Reject the call
Ending a call
End the call
Making a call
Enter the phone number
Clear Delete the last digit if incorrect
Dial the phone number
Helpline 0844 800 6503
(See page 73 for costs and hours of operation)
13
Page 16

QUICK START GUIDE
Advanced Settings and Functions
For more details about setting up your Amplicomms
M7000i and other functions follow the descriptions in this
user guide.
Examples:
• Set your one−touch dialling keys -> page 37.
• Store numbers in the phone book -> page 32.
Questions and Answers
In the majority of cases your M7000i phone is supplied
with out a SIM card. You may find the following “Questi-
ons and Answers“ (Q & A) helpful.
Why hasn’t the mobile phone been supplied with a SIM
card?
Many people already have a mobile phone and wish to
transfer their existing SIM card over to the new phone.
This has the advantage of keeping the same telephone
number and if the card is subscribed to a Pay−as−you−go
14
Helpline 0844 800 6503
(See page 73 for costs and hours of operation)
Page 17

QUICK START GUIDE
service then you also benefit from being able to carry
over any credit that has been paid on the card.
Where can I get a SIM card from?
Any high street mobile phone shop will be able to provide
you with a SIM card. Some of the major supermarket
chains also provide mobile phone services and can supply
a SIM card. A useful tip when choosing a SIM card / ser-
vice provider however is to make sure that you have ade-
quate signal coverage at home; this is particularly impor-
tant if you live in a very rural area.
Why doesn’t the mobile phone have a telephone num-
ber?
The telephone number is supplied by the service provider
and will be registered onto the SIM card.
Can I use the SIM card from my old mobile phone?
Yes as long as the SIM card is less than three years old
you can transfer the card over. Some old SIM cards howe-
ver are not compatible with the Amplicomms mobile
Helpline 0844 800 6503
(See page 73 for costs and hours of operation)
15
Page 18

QUICK START GUIDE
phone as they are from an earlier generation of SIM card
design.
Can I use a SIM card from any mobile phone company?
Yes. The Amplicomms mobile phone is what is termed as
an open SIM card phone and so it is not restricted to any
particular service provider or mobile phone company.
How do I pay for my calls?
There are two main types of registration with a service
provider or mobile phone company. One is a contract −
this is where you sign up for an agreed contract over
several months / year and pay an agreed monthly fee.
This is more suited to people who are using their mobile
phone as part of their job for example. The other is
Pay−as−you−go, sometimes abbreviated to PAYG. With
this type of service you add credit to the card and top up
as and when required. Topping up the card is easy, you
can do this over the phone, on−line, at many shops and
even some cash points allow you to do this. PAYG is more
16
Helpline 0844 800 6503
(See page 73 for costs and hours of operation)
Page 19

QUICK START GUIDE
suited to less frequent users.
How do I find out my credit balance?
The service provider of the SIM card should have provi-
ded an information pack with the card. This will give
details of a short number to dial in order to check your
balance. These access codes differ between mobile phone
companies so please check the details specific to your ser-
vice provider. Key in your number, press the talk button
and the credit balance will be announced to you.
Helpline 0844 800 6503
(See page 73 for costs and hours of operation)
17
Page 20

THE PHONE IN DETAILS
The phone in details
Keys and Parts
for the explanation of keys and parts please refer to page 6.
Special key functions
Left softkey In standby -> open the main menu
In menus the function changes due
to the term in the display above the
softkey (e. g. OK, Select).
Right softkey In standby -> open the phonebook
In menus the function changes due
to the term in the display above the
softkey (e. g. Back).
Direct call keys M1, M2, M3 - pressing one of these
keys dials the assigned phone num-
ber. A phonebook entry can be assig-
ned to each one−touch dialling key
(refer to “Storing a phonebook entry
18
Helpline 0844 800 6503
(See page 73 for costs and hours of operation)
Page 21

THE PHONE IN DETAILS
to a one-touch dialling key“ page 37).
Note: Since this operation only requi-
res a short press of a button, it could
lead to unintentional dialling.
Call key - Take a call or dial a number.
- Open the call list and the redial list
End call key - End or reject a call
- Cancel the current process and
return to standby (in menus)
- Switch the mobile phone on and off
Navigation key Navigate through the menu.
In standby the navigation key offers
a quick access to specific menu
items that you can define yourself
(refer to page 61). The default set-
tings are as follows:
▲ - Shortcuts: Quick access to
important settings.
Helpline 0844 800 6503
(See page 73 for costs and hours of operation)
19
Page 22

THE PHONE IN DETAILS
▼ - Alarm: Setting an alarm time.
◀ - User profiles: Activation/Custo-
misation of a user profile.
▶ - Calculator
◉
- Centre of the navigation key
In menus: function “OK“.
In standby: press and hold for
approx. 2 sec to switch the
torch on/off.
Digit key 0 In idle mode, long press (approx 3
s) to toggle the tone control setting
between “Low frequency“, “High
frequency“ and “Normal frequen-
cy“. (See page 59 for explanation of
tone control).
Digit key 1 Long press (approx. 3 s) dials the
number to access your voice mail
messages.
20
Helpline 0844 800 6503
(See page 73 for costs and hours of operation)
Page 23

THE PHONE IN DETAILS
Note: If prompted, it may be neces-
sary to enter your network's voice
mail number first. Refer to the
documentation supplied with your
SIM card for this number.
Star key - to enter the international prefix “+“
in pre-dialling (press 2 times) or to
enter P (pause)/ W (wait) (may be
necessary for call-through numbers
or remote accessing an answering
machine).
- when entering text: open the spe-
cial character table.
Hash key - In standby: long press toggles
between selected user profile and
silent mode.
- when entering text: toggles
between case and numbers.
Helpline 0844 800 6503
(See page 73 for costs and hours of operation)
21
Page 24

THE PHONE IN DETAILS
Volume control +/- keys: - In standby: adjusts the
volume level of the ringtone
- Whilst on a call -> adjusts the ear-
piece or Hands-free volume.
Boost key - In a call: press to toggle between
boost and normal volume.
SOS key Start the SOS sequence. For details
please refer to the SOS menu, star-
ting on page 51.
Icons in the display
Signal strength of the phone’s connection
Battery capacity (refer to page 11)
New SMS
New call
Call forwarding active
22
Helpline 0844 800 6503
(See page 73 for costs and hours of operation)
Page 25
THE PHONE IN DETAILS
Alarm is activated
Boost is activated
Profile “Outdoor“ or “General“ is activated
Profile “Meeting“ is activated
Profile “Silent“ is activated
A headset is connected
Bluetooth is activated
The “Roaming” symbol will appear if the phone swit-
ches to an alternate network provider. This may
occur for example when entering another country.
The Roaming facility depends on your network provider. Call your network provider if you have any queries regarding this service.
Helpline 0844 800 6503
(See page 73 for costs and hours of operation)
23
Page 26

USING THE PHONE
Using the phone
General
All the functions can be accessed via the various menus.
• Use the arrow keys ▲ /▼ to scroll though the menus
and the lists (e. g. phonebook).
• Press Back, to return to the last step.
• Press OK, to get to the next step.
• When entering text (e. g. phonebook or SMS) use the
# key to toggle between uppercase letters (ABC),
lowercase letters (abc), words beginning in size (Abc)
or numbers (Numeric).
- In order to enter text, press the key labelled with the
corresponding letter/character. If the first character of
the group is required, press the key once. If the
second character is required, press it twice, and so
on. To enter two characters assigned to the same key,
press the key the respective number of times to
enter the first character. Then wait for approx. 2 sec.
24
Helpline 0844 800 6503
(See page 73 for costs and hours of operation)
Page 27

USING THE PHONE
and enter the second letter.
• Use the arrow keys ▲ /▼/ ◀/▶ to place the cursor and
press Delete for deleting characters.
Important Note: If the display light turns off, any keystroke activates only the light again. You must press
the desired button a second time to perform the
function.
Switching the mobile phone on and off
Switch off: Press and hold the red end call key. After a
few seconds the telephone will be switched off.
Switch on: Press and hold the red end call key until the dis-
play light will be switched on. Enter the PIN code for your
SIM card and press OK. Entering the PIN code is not requi-
red if this feature is switched off for your SIM card (refer to
page 63 “SIM lock“ / not available for every provider).
Helpline 0844 800 6503
(See page 73 for costs and hours of operation)
25
Page 28

USING THE PHONE
Using the torch
Switch on: Press and hold the red button in the centre of
the navigation key in standby for approx. 2 sec.
Switch off: Press and hold the red button in the centre of
the navigation key in standby for approx. 2 sec.
Note:
- The light is generated by a high-power LED. Do not
shine directly into eyes or optical devices.
- Please remember that by the operation of the torch,
the operating time to the next charging of the
phone is shortened.
26
Helpline 0844 800 6503
(See page 73 for costs and hours of operation)
Page 29

USING THE PHONE
Dialling a phone number / Calling
• The phone must be in standby (SIM card inserted and
the phone switched on).
• Enter the telephone number incl. the prefix. For ente-
ring a + in front of the country prefix press
two times.
• Press the green call key to dial the phone number.
• Press the red end call key for ending the call.
Dialling with the speed dialling keys
• Make sure, a phone number is assigned to the
respective key. Press the desired digit key for approx.3
seconds. Each stored number is dialled. To program
the speed dialling keys see "Storing a phonebook
entry to a speed dialling key," page 36.
›
quickly
Helpline 0844 800 6503
(See page 73 for costs and hours of operation)
27
Page 30

USING THE PHONE
Dialling with the one−touch dialling keys
• Make sure, a phone number is assigned to the
respective key. Press the desired one-touch dialling
key. Each stored number is dialled. To program the
one-touch dialling keys see "Storing a phonebook
entry to an one-touch dialling key," page 37.
Using redial / using the Calls list
• In standby press the green call key. A list of the last
calls is shown (Missed calls, dialled calls, received
calls). Select an entry using the arrow keys ▲ /▼.
• Press the green call key to dial the selected phone
number.
Taking a call
• If your phone is ringing press the green call key.
• Press the red end call key to reject the call. The cal-
ler gets the busy tone (depending on your provi-
der).
28
Helpline 0844 800 6503
(See page 73 for costs and hours of operation)
Page 31

USING THE PHONE
Use the right softkey to switch off the ring tone
(“Silent“). After this you can reject the call by pres-
sing the right softkey (“Reject“).
Pressing the left softkey you take the call with Ans-
wer.
Setting the volume
• During a call you can set the volume using the + / -
keys on the right hand side of the phone. The setting
will be saved.
Hands-free
• During a call press H-Free. You can hear the caller via
the loudspeaker.
• For switching off press H-Held. The loudspeaker will be
switched off.
Helpline 0844 800 6503
(See page 73 for costs and hours of operation)
29
Page 32

USING THE PHONE
Options whilst in a call
You can select the following Options with the left softkey:
- Hold -> The call is put on hold. To retrieve the call
press Options/Retrieve
- End single call -> End the call (same as end call
key).
- Phonebook -> Open the phonebook.
- Call history -> Open the call history.
- Messages -> Open the messages menu.
30
Helpline 0844 800 6503
(See page 73 for costs and hours of operation)
Page 33

USING THE PHONE
3-party conference
“3-party“ is a provider dependant feature. Establishing a
3-party conference lets you talk to two subscribers simul-
taneously.
• Call the first subscriber.
•
Enter the phone number for the second subscriber and
press the green call key.
or
press Options -> Phonebook or Call history to select
an entry. Press Options and select Call - OK.
• When the second subscriber answers, press Options
and select Conference - OK to establish the 3-party
conference. Press Options -> Switch to toggle between
the two subscribers.
Helpline 0844 800 6503
(See page 73 for costs and hours of operation)
31
Page 34

“PHONEBOOK“ MENU
“Phonebook“ menu
You can save names and phone numbers in the internal
memory (up to 300 entries) and on the SIM card.
Opening the phonebook
• In standby press Names
or
• During a call press Options, select Phonebook and
press OK.
Checking the memory status
For checking how many names and phone numbers are
stored in the phonebook press Names -> Options -> Pho-
nebook settings -> Memory status -> OK . The status of
the SIM and phone memory is displayed.
Creating a new phonebook entry
• Press Names, select Add new contact at the very top
-> Options -> Select.
32
Helpline 0844 800 6503
(See page 73 for costs and hours of operation)
Page 35

“PHONEBOOK“ MENU
• Select whether the new entry should be stored to the
phone’s memory or to the SIM card and press OK.
Note: If the entry is saved to the SIM card, you can
only enter the name and one phone number.
• Enter the name and press ▼.
• Enter the (first) phone number and press ▼.
• If necessary enter additional phone numbers (Home
number/Office number). After every input press ▼.
• Assign a ring melody to the entry. Use ◀ and ▶ to
select a melody. If Default is selected, the standard
ringtone (as set in the profile) is used. Select New
record to record a personal ring tone or speak any text
to the telephone’s microphone. Your recorded words
will be used as ringtone for this entry. To do this, press
Options and say your personal ringtone into the
microphone.
Helpline 0844 800 6503
(See page 73 for costs and hours of operation)
33
Page 36

“PHONEBOOK“ MENU
• Via Options - Add detail you can enter further phone
numbers for this entry (office, mobile. . .), an email
address or a company name.
• When you are finished entering information for the
new entry, press Options -> Save.
Note: Your personal ringtone
You can record e. g. “Peter is calling“ as a ringtone.
Did you associate this ringtone to phonebook entry
“Peter“, your phone will announce calls from Peter
with: “Peter is calling“.
Calling from the phonebook
• Press Names to open the phonebook.
• Select an entry using the arrow keys or enter the first
letter for the entry.
• Press the green call key to dial the phone number.
34
Helpline 0844 800 6503
(See page 73 for costs and hours of operation)
Page 37

“PHONEBOOK“ MENU
Editing a phonebook entry
• Press Names to open the phonebook.
• Select an entry, press Options, select Edit and press
OK.
• Edit the entry.
• Press Options -> Save.
Deleting a phonebook entry
• Press Names to open the phonebook.
• Select an entry, press Options, select Delete and press
OK. Press Yes in the following confirmation query.
Deleting all phonebook entries
• Press Names -> Options -> Phonebook settings ->
Delete all contacts. Select whether the contacts in the
phone or on the SIM card should be deleted and con-
firm.
Helpline 0844 800 6503
(See page 73 for costs and hours of operation)
35
Page 38

“PHONEBOOK“ MENU
Copying/moving all phonebook entries
• Press Names -> Options -> Phonebook settings ->
Copy/Move contacts. Select whether the contacts in
the phone should be copied/moved to the SIM card or
vice-versa and confirm.
Note: The contacts will be deleted from their original location when moved!
Storing a phonebook entry to a speed dialling key
• Press Names -> Options -> Phonebook settings ->
Speed dial and press OK.
• Make sure that the feature Speed dial is switched on.
Note: When you see “Off“ below status press the left
softkey (OK) and switch on the function.
• Select Set numbers and press OK.
• Select a button from the list (2…9) and press Edit.
36
Helpline 0844 800 6503
(See page 73 for costs and hours of operation)
Page 39

“PHONEBOOK“ MENU
• The phonebook is opened. Select an entry and press
OK.
Storing a phonebook entry to an one−touch dialling key
• Press Menu -> Settings -> Direct Number -> OK
• Select a direct call key (M1, M2, M3) and press OK.
• Change the name for the key if necessary and press ▼.
• Press Edit -> Add from phonebook -> OK, select an
entry and press OK.
or
Press Edit -> Enter number -> OK, enter a phone num-
ber and press OK.
Note: To edit or delete the entry press Options -> Edit
or Remove.
Helpline 0844 800 6503
(See page 73 for costs and hours of operation)
37
Page 40

“PHONEBOOK“ MENU
Further options
With the phonebook open and an entry selected press
Options and select one of the following options:
• View: The entry is shown
• Send text message: Send a SMS to the respective
phone number.
• Call: To make a call to the phone number.
• Edit: You can edit the entry.
• Delete: The entry will be deleted.
• Copy: You can copy the entry to the telephone or to the
SIM card.
• Add to block list: The entry will be added to the block
list.
• Groups: You can define caller groups. In these caller
groups, you can group phone book entries stored in
the phone book of the phone.
38
Helpline 0844 800 6503
(See page 73 for costs and hours of operation)
Page 41

“PHONEBOOK“ MENU
• Phonebook settings
• Preferred storage: Select where new entries should
be saved (SIM card, telephone).
• Speed dial: Switch on the speed dial function and
edit the speed dial buttons.
• Memory status: Shows the number of entries on
the SIM card and in the phone.
• Copy contacts: Copy all contacts from the SIM card
to the phone and vice-versa.
• Move contacts: Move all contacts from the SIM
card to the phone and vice-versa.
• Delete all contacts: Delete all contacts.
Helpline 0844 800 6503
(See page 73 for costs and hours of operation)
39
Page 42

“MESSAGES“ MENU
“Messages“ menu
You can send and receive text messages (SMS / Short
Message Service). Received messages are stored either
internally in the phone or on the SIM card. Unread mes-
sages are stored in the Inbox. When a new SMS is recei-
ved, a message appears on the display.
If the memory is full, you will receive a message. To recei-
ve new messages you will have to delete old messages.
Messages menu
Press Menu -> Messages -> OK. You will have the follo-
wing options:
• Write message: To write a new SMS.
• Inbox: Open the list of received messages.
• Drafts: Open the draft list.
• Outbox: Open the list of messages still to be sent.
• Sent messages: Open the list of already sent mes-
sages.
40
Helpline 0844 800 6503
(See page 73 for costs and hours of operation)
Page 43

“MESSAGES“ MENU
• Broadcast message: If your provider supports this ser-
vice you can change some parameters in this menu.
Note: These settings should only be changed by advan-
ced users.
• Message settings: You can change some of the SMS
related parameters.
Note: These settings should only be changed by advan-
ced users.
Text message settings
Note for the SMS centre number: This particular number
is needed for sending and receiving of SMS. It is stored
on the SIM card correctly. In certain cases it is necessary
to check that number or to change it.
• Press Menu, select Messages -> Message settings e
and press OK.
• You will have the following options:
- SIM
Helpline 0844 800 6503
(See page 73 for costs and hours of operation)
41
Page 44

“MESSAGES“ MENU
- Profile settings (the active profile is marked with a
green tick).
• Select the desired profile, press Options, select
Activate or Edit and press Select.
• Editing options include: change the Profile name
and the SMSC address (the phone number for
your provider’s SMS centre).
- Validity period (change the setting using ◀ and ▶).
- Message type (this parameter should remain Text
and not be changed.)
- Delivery report (change the setting using ◀ and ▶).
- Reply path (this parameter should remain OFF and
not be changed.)
- Voicemail server: You can change your voicemail
phone number. If you have questions, please con-
tact your network provider.
Exit the menu by pressing Back or Save.
42
Helpline 0844 800 6503
(See page 73 for costs and hours of operation)
Page 45

“MESSAGES“ MENU
- Memory status: the status of the SIM and phone
memory is displayed.
- Text msg. counter: number of sent and received
SMS.
- Save sent messages: Select whether sent SMS
should be saved.
- Preferred storage: Select where messages should be
saved (SIM or Phone).
Helpline 0844 800 6503
(See page 73 for costs and hours of operation)
43
Page 46

“MESSAGES“ MENU
Writing and sending a SMS
• Press Menu, select Messages -> Write message and
press OK.
• Write your message using the digit keys. For more
information for entering text refer to chapter “Using
the phone / General“, page 24.
• After having entered the text press Options, select
Send to and press OK.
• Select Enter number, press OK, enter the phone num-
ber including the prefix and press OK.
• The entered phone number will be shown.
• Press Options, select Send and press OK.
or
• Select Add from Phonebook and press OK.
• Select an entry and press OK.
• The selected entry will be shown.
• Press Options, select Send and press OK.
44
Helpline 0844 800 6503
(See page 73 for costs and hours of operation)
Page 47

“MESSAGES“ MENU
Reading/deleting messages and further options
• Press Menu, select Messages-> Inbox and press OK.
• Select a message.
• Press Options when viewing the list. You have the fol-
lowing options:
- View: The message is displayed.
- Reply by SMS: Reply to the number from which the
message was sent.
- Call sender: Call the sender on the phone.
- Forward: Forward the message to a different num-
ber.
- Delete: Delete the message.
- Delete all: Delete all messages.
- Save to Phonebook: (only available if there is no
respective entry in the phonebook yet) stores the
sender’s phone number in the phonebook.
- Delete several: Marking options for bulk deleting
several messages.
Helpline 0844 800 6503
(See page 73 for costs and hours of operation)
45
Page 48

“MESSAGES“ MENU
Press Options when displaying the SMS content to
open the following options:
- Reply by SMS: Reply to the number from which
the message was sent.
- Call sender: Call the sender on the phone.
- Forward: Forward the text to a different number.
- Delete: Delete the message.
- Advanced with the following options: Use num-
ber / Use URL / Use Email / Use USSD / Copy to
phone/to SIM / Move to phone/to SIM.
46
Helpline 0844 800 6503
(See page 73 for costs and hours of operation)
Page 49

“CALL CENTER“ MENU
“Call center“ menu
A new call is shown on the display.
• Press Back to delete the message. The icon for a new
call appears in the display. You can see this call “nor-
mally“ in the Missed calls list.
• Press View, to read the caller’s name and number.
• Press Options. For further options please refer to the
following chapter..
Reading the calls list
• Press Menu, select Call center -> Call history and press
OK.
• Select Missed calls, Dialled calls or Received calls and
press OK.
In these lists you will have the following options:
Press Options and select one of the following options:
- View: Read the details.
- Call: Call the telephone number.
Helpline 0844 800 6503
(See page 73 for costs and hours of operation)
47
Page 50

“CALL CENTER“ MENU
- Send text message: Send a SMS to the phone num-
ber.
- Save to Phonebook: (only available if there is no
respective entry in the phonebook yet) save the
entry in the phonebook.
- Add to Blacklist: Add the entry to the block list.
- Delete: Delete the entry.
Deleting the calls list
• Press Menu, select Call center -> Call history and press
OK.
• Select Delete call logs and press OK.
• Select a list to delete Dialled calls, Missed calls, Recei-
ved calls or All calls and press OK. Press Yes in the fol-
lowing confirmation query.
48
Helpline 0844 800 6503
(See page 73 for costs and hours of operation)
Page 51

“CALL CENTER“ MENU
Further options
• Press Menu, select Call center and press OK.
• Block list: You can enter a list of phone numbers to
be blocked. If you activate this feature calls from
phones with the respective numbers will not be sig-
nalled any more.
• Auto redial: If the function is activated, phone num-
bers that were "busy," will be redialled automatically
(interval 5 min, max. 5 attempts).
• Call time display: If the function is activated, the
duration of the call is displayed.
• Call time reminder: You can specify whether you
want to be alerted during a call by a beep in the ear-
piece after a certain time of call duration.
For Single you can set a time up to 3000 sec (= 50
min), for Periodic you can set up a time between 30
and 60 s.
Helpline 0844 800 6503
(See page 73 for costs and hours of operation)
49
Page 52

“CALL CENTER“ MENU
• Answer mode: With the setting Flap answer activat-
ed an incoming call will be taken by opening the
cover. If you select Any key incoming calls can be
taken by any key (except the right softkey and the
red end call key).
When the "Auto answer when headset mode" setting
is on and a headset is plugged in, calls will be auto-
matically accepted.
If not a single setting is selected calls can only be
taken with the green call key.
50
Helpline 0844 800 6503
(See page 73 for costs and hours of operation)
Page 53

“SOS“ MENU
“SOS“ menu
This phone is equipped with an emergency call function.
You can register up to 5 personal phone numbers for
automatic periodic dialling or an emergency phone num-
ber for an emergency call centre.
Selecting an emergency call destination
• Press Menu, select SOS -> SOS mode setting and
press OK.
• Select Set 5 numbers, if you want to call up to five per-
sonal emergency call numbers (see below) or Set call
center, if you want to call an emergency call centre.
Select Off for deactivating the emergency call function.
Entering emergency call numbers
• Press Menu, select SOS and press OK.
• Select Set SOS number -> OK, select one of the 5 pos-
sible entries and press Edit.
• Select Add from phonebook, to select a phone number
Helpline 0844 800 6503
(See page 73 for costs and hours of operation)
51
Page 54

“SOS“ MENU
from the phonebook or Enter number, to enter the
phone number manually.
or
• Select Call center number -> OK and enter the desired
phone number.
Note: It is forbidden to enter a public emergency
number such as police, fire and rescue control centre. It is a purely "private" emergency call.
Select an outgoing emergency voice message
• Press Menu, select SOS -> Set outgoing voice MSG
and press OK.
• Select Default, to select the default outgoing voice
message.
or
• Select Custom, to select a personal outgoing voice
message. To use this setting you will have to record
the personal outgoing message before (see below).
52
Helpline 0844 800 6503
(See page 73 for costs and hours of operation)
Page 55

“SOS“ MENU
Recording a personal emergency voice message
• Press Menu, select SOS -> Set outgoing voice MSG
and press OK.
• Select Custom and press OK.
• Select Record and press OK.
• Speak your personal outgoing message to the micro-
phone.
• Stop recording with Stop.
• Then choose Select and press OK, to activate your per-
sonal emergency contact.
With Play, you can listen to the control notifications.
Helpline 0844 800 6503
(See page 73 for costs and hours of operation)
53
Page 56

“SOS“ MENU
Emergency call procedure
Push the SOS switch on the rear side of the phone to the
upper position - SOS is visible. When the automatic SOS
call starts you will hear a siren tone.
When “Set 5 numbers
• The first phone number will be dialled.
• If the first phone number will not answer the next
phone number will be dialled and so on. All phone
numbers (max. 5) will be called one by one subse-
quently. If you have only set one phone number, the
phone will only call that number cyclically. This proce-
dure will be repeated as long as the phone’s battery is
not empty.
The procedure stops, as soon as the first person ans-
wers. The emergency voice message will be played. If
the called party press key “0“ within 10 seconds after
your recorded voice playing ended, hands free mode
“ is set:
54
Helpline 0844 800 6503
(See page 73 for costs and hours of operation)
Page 57

“SOS“ MENU
will be activated at your side and you can talk to the
called person directly.
• Note: Please mention explicitly in your personal
emergency message, that the called party will have
to press key “0“ to be able to speak with you. If not,
the loop continues. This prevents the emergency loop
from terminating, when, for example, an answering
machine takes your emergency call.
• The emergency loop continues even after an answe-
red emergency call, until you cancel the emergency
(push emergency switch down again).
Cancel the emergency call function
Push the SOS switch on the rear side of the phone in the
lower position again.
Helpline 0844 800 6503
(See page 73 for costs and hours of operation)
55
Page 58

“SETTINGS“ MENU
“Settings“ menu
Profiles
You can store different profiles (special settings depen-
dent on user and surroundings), which you can switch
quickly.
• Press Menu, select Settings -> Profiles and press OK.
• Select one of the profiles and press Options.
• You have the following options:
- Activate: The profile with the respective settings is
activated.
- Customize: Change the settings for the respective
profile.
- Alert type: Select whether an incoming call
should be signalled by Ring only, Vib. only, Tone
and Vib. or Vib. then ring (Vib. = vibration).
- Ring type: You can select Beep once or Repeat.
- Ringtone - Set the ring tone for incoming calls
56
Helpline 0844 800 6503
(See page 73 for costs and hours of operation)
Page 59

“SOS“ MENU
- Ringtone volume: Select the volume for the ring
tone.
- Message - Set the tone for an incoming message.
- Message volume: Select the volume for the inco-
ming message tone.
- Keypad - Select whether the confirmation of a
pressed button should be confirmed with a
Click, a Tone, Human voice tone (with a voice
prompt when entering a digit) or Silent.
- Keytone volume: Select the volume for the key-
tone.
- Power on - Set the tone for powering on the
phone.
- Power off - Set the tone for powering off the
phone.
- Flap open - Set the tone for opening the phone’s
cover.
Helpline 0844 800 6503
(See page 73 for costs and hours of operation)
57
Page 60

“SETTINGS“ MENU
- Flap close - Set the tone for closing the phone’s
cover.
- System alert - Switch the sound on/off for sys-
tem notifications.
The new settings will only take effect if you press
Options again and select Save, once the modificati-
ons are done.
Direct number
You can assign important phone numbers to the
one−touch dialling keys M1, M2 and M3.
• Press Menu, select Settings -> Direct Number and
press OK.
• Select a one–touch dialling key and press OK.
• Press Options and change the name if necessary (max.
9 characters) and press Options -> Done.
• Go to the entry field for the number and press Options
-> Add from Phonebook, select a telephone number or
58
Helpline 0844 800 6503
(See page 73 for costs and hours of operation)
Page 61

“SETTINGS“ MENU
select Enter number and enter the phone number
manually.
Switching Boost on and off
• Press Menu, select Settings -> Boost Setting and press
OK.
• Select On to activate the Boost function permanently
or Off to deactivate it.
During a call the volume control can be used to adjust
the volume level in both Boost ON or OFF modes. See
page 22.
Prolonged listening at full speaker volume can cause
hearing damage.
Tone control
Set the tone for the earpiece/loudspeaker.
• Press Menu, select Settings -> Tone control and press
OK.
• Select Normal frequency, Low frequency (increases
Helpline 0844 800 6503
(See page 73 for costs and hours of operation)
59
Page 62

“SETTINGS“ MENU
the lower frequencies) or High frequency (increases
the higher frequencies) and press OK.
Phone settings
• Press Menu, select Settings -> Phone settings and
press OK.
• You have the following options:
- Time and date: In this menu you can Set time/date
and Set format (time 24/12h / date (DD MM YYYY/
MM DD YYYY / YYYY MM DD)).
- Schedule power on/off: You can set up to two auto-
matic switch on/off times for your phone.
• Select Enable or Disable and press OK.
• Select an entry and press OK.
• Under "Status", using the arrow keys ◀/▶ select
"Activate“ to turn the function on.
• Then entery the desired time and press Save.
60
Helpline 0844 800 6503
(See page 73 for costs and hours of operation)
Page 63

“SETTINGS“ MENU
Note: Please note that depending on the settings
entering the SIM PIN is required when switching
the phone on. See also -> Security settings / SIM
lock, page 63.
- Language: Select a language for the display.
- Pref. input method: Select which setting you prefer
for entering text (phonebook entries/SMS).
- Display
- Wallpaper: Select a wallpaper for the standby
mode.
- Power on display/Power off display: Select an
animation which should be played when powe-
ring the phone on/off.
- Dedicated key: You can assign quick access for
some menus to the navigation key ▲ /▼/◀/▶. Pres-
sing the respective key in standby opens the assig-
ned menu directly.
• Select a key (Up, Down, Left or Right), press
Helpline 0844 800 6503
(See page 73 for costs and hours of operation)
61
Page 64

“SETTINGS“ MENU
Edit and select a function from the list. Press
OK.
- Backlight settings
- Main LCD backlight: Set the brightness and the
duration for the backlight.
- Incoming and SMS LED: Select whether the indi-
cator LED for incoming calls and SMS should be
always active (On), between 8 pm and 8 am off
(Night mode) or always deactivated (Off).
- Charge LED: Select whether the indicator LED
for charging should be always active (On), bet-
ween 8 pm and 8 am off (Night mode) or always
deactivated (Off).
Network settings
• Press Menu, select Settings -> Network settings and
press OK.
• You have the following options:
62
Helpline 0844 800 6503
(See page 73 for costs and hours of operation)
Page 65

“SETTINGS“ MENU
- Network selection: Select whether the network
selection should be automatic or manual (Selection
mode), start a New search or select a network from
the list (Select network). When Automatic is
selected the phone tries to connect to your SIM
card’s provider.
Security settings
• Press Menu, select Settings -> Security settings and
press OK.
• You have the following options:
- SIM security:
- PIN lock: You can turn on or off the request for
the SIM PIN when the phone is switched on. This
is not allowed for some SIM cards/providers.
- Change PIN: You can change the PIN für the SIM
card.
Helpline 0844 800 6503
(See page 73 for costs and hours of operation)
63
Page 66

“SETTINGS“ MENU
- Change PIN2: You can change the PIN2 für the
SIM card.
- Phone security:
- Phone lock: Entering the phone lock code you can
lock the phone (0000 in delivery state).
- Change password: You can change the phone lock
code (0000 in delivery state).
Bluetooth
• Press Menu, select Settings -> Bluetooth and press
OK.
• You have the following options:
- Power: Switching the function on or off. You can
change the setting with the left softkey.
- Visibility: Select whether your phone is visible for
other Bluetooth devices when the Bluetooth functi-
on is activated. You can change the setting with the
left softkey.
64
Helpline 0844 800 6503
(See page 73 for costs and hours of operation)
Page 67

“SETTINGS“ MENU
- My device: For connecting the phone to another
Bluetooth device with audio profile (e. g. headset or
car kit).
Previously the "Search new device" and the "pai-
ring" with the device has to be carried out. After
selecting the device and Options you have the fol-
lowing options:
- Connect (with the paired device)
- Service list
- Rename
- Delete
- Delete all
- My name: The Bluetooth name. Can be changed.
- Preferred storage: Select the preferred storage
(M7000i: “Phone“ only).
Helpline 0844 800 6503
(See page 73 for costs and hours of operation)
65
Page 68

“SETTINGS“ MENU
Note: If your phone is connected to a Bluetooth handsfree device you must copy your phone book entries
from your SIM card to the phone (see page 36) before
you can use the hands-free device to call those numbers and to enable the hands-free device to display the
caller's name instead of the phone number during a
call.)
Restore settings
You can reset the phone to its factory settings.
• Press Menu, select Settings -> Restore settings and
press OK.
• Enter the phone phone password (0000 in delivery
state) and press OK.
• Press Yes in the following confirmation query.
66
Helpline 0844 800 6503
(See page 73 for costs and hours of operation)
Page 69

“ORGANIZER“ MENU
“Organizer“ menu
Calender
You can set the calendar from January 1970 to December
2030. With Options the following functions are available:
• View
• View all
• Add event
• Delete event
• Jump to date
• Go to today
• Go to weekly/monthly view
• Start of week
Calculator
The phone can support four continuous mixed arithmetic
operations.
• Enter the first digit(s) for your arithmetic operation.
Enter the “dot“ using the hash key.
Helpline 0844 800 6503
(See page 73 for costs and hours of operation)
67
Page 70

“ORGANIZER“ MENU
• Press the navigation key ▲/▼/◀/▶ to select the operati-
on sign (+ - x ÷).
• Enter the next digit(s).
• Press OK or the red button in the centre of the naviga-
tion key to carry out the operation.
Alarm
You can set 5 different alarms, which will sound once,
daily or only on certain days.
• Select an entry and press Edit.
• Switch the alarm On or Off using ◀/▶ and press ▼.
• Enter the desired time.
• Select Once, Everyday or Custom (Options - On/Off,
when ready: Options - Done).
• Select with Alert type what kind of alarm should be
given (Ring only / Vib. only / Tone and Vib.).
• Press Save.
68
Helpline 0844 800 6503
(See page 73 for costs and hours of operation)
Page 71

“ORGANIZER“ MENU
Tasks
After pressing Add you can define tasks. There are various
options available.
Stopwatch
The stopwatch has various features.
• Typical stopwatch
• Split timing: Stopwatch with split timing and total
time. Press Start to start the function, Split to take
the split time (the total time is still displayed),
Pause or the red button in the centre of the naviga-
tion key stops the stopwatch with saving ability,
and after pressing Options you can Reset or Conti-
nue the stopwatch.
• Lap timing: Stopwatch with lap timing without total
time. Press Start to start the function, Lap to take
the lap time (each elapsed time since the last round
timing is displayed), Pause or the red button in the
Helpline 0844 800 6503
(See page 73 for costs and hours of operation)
69
Page 72

“ORGANIZER“ MENU
centre of the navigation key stops the stopwatch
with saving ability, and after pressing Options you
can Reset or Continue the stopwatch.
• View records: list of the stored records.
• nWay stopwatch
The nWay stopwatch is composed of 4 parallel stop-
watches that you can individually start with the naviga-
tion key ▲ /▼/◀/▶.
The active timer can be started with the red button in
the centre of the navigation key or the left soft key
(Start), stopped (Pause) and resumed (Cont.).
Pressing the right softkey Reset resets the respective
timer.
70
Helpline 0844 800 6503
(See page 73 for costs and hours of operation)
Page 73

“SERVICES“ MENU
“Services“ menu
The items in this menu depend on your network operator.
Please check with your provider for details.
Helpline 0844 800 6503
(See page 73 for costs and hours of operation)
71
Page 74

APPENDIX
Appendix
Technical data
Quad-Band 850/900/1800/1900 MHz
Additional functions Bluetooth, torch,
emergency call function
Battery Li-Ion, 3.7V, 900 mAh
Maximum earpiece
volume +35 dB
Talk time up to 7 hours
Standby time up to 8 days
Dimensions 102 x 51 x 17 mm (closed)
195 x 51 x 11 mm (open)
USB connection Micro USB, EU Standard
Headset connection 3.5 mm jack, 4-conductor
(TRRS) phone connector
SAR values GSM 900 Head : 0.550 W/kg
Body: 0.970 W/kg
DCS 1800 Head: 0.062 W/kg
Body: 0.716 W/kg
72
Helpline 0844 800 6503
(See page 73 for costs and hours of operation)
Page 75

APPENDIX
Service hotline
Should problems arise with the telephone, please refer to
the following information first. In the event of technical
problems, please contact our service hotline under tel.
0844 800 6503 (Using a UK landline, at the time of going
to print: calls cost 6p for connection charge and then 5p a
minute. Mobile costs may vary.) In the case of claims
under the terms of guarantee, contact your sales outlet.
There is a 2 year period of guarantee.
Problems and solutions
Problems
The mobile phone
cannot be switched on.
Remedy
- No battery inserted.
- Battery is not charged.
The phone is requesting
a PUK when I switch on
the phone
Helpline 0844 800 6503
(See on this page for costs and hours of operation)
If you do not have the PUK for
your SIM card then contact your
service provider
73
Page 76

APPENDIX
No signal quality is
displayed.
Keypad does not
function or only
functions very slowly.
A message appears in
the display for some
functions, indicating
execution/use is not
possible.
74
(See page 73 for costs and hours of operation)
No network connection. The
mobile phone is in a location
where there is no network ser-
vice. Move to a different location
or contact your service provider.
The operating speed of the dis-
play is reduced in the case of
low temperatures. This is nor-
mal.
Some functions can only be
used after the respective service
has been applied for.
Contact your service provider.
Helpline 0844 800 6503
Page 77

APPENDIX
Screen frozen or no
response when
pressing keys.
No connection to the
mobile telecommunicati-
on network.
The “Insert SIM“
message appears
in the display.
The battery cannot be
charged or is empty
within a short time.
Helpline 0844 800 6503
(See page 73 for costs and hours of operation)
Remove the battery for 3 minutes
and try again.
Contact your service provider.
Ensure that the SIM card has
been installed correctly. Contact
your service provider, if necessa-
ry.
- Battery is defective.
- Place the phone correctly in the
charging unit or connect the
charging unit properly. Clean
the contact surfaces on the
mobile phone and charging
75
Page 78

APPENDIX
unit with a soft, dry cloth.
− Charge the mobile for 4 hours.
Tips on the battery
• Only use batteries, cables and charging unit approved
by the manufacturer, otherwise the battery could be
damaged.
• Do not short circuit the battery. Always leave the batte-
ry in the phone to avoid accidentally short circuiting
the battery contacts.
• Keep the battery contacts clean and free of dirt.
• The battery can be charged/discharged hundreds of
times but its service life is limited. Replace the battery
when the battery power has decreased noticeably.
76
Helpline 0844 800 6503
(See page 73 for costs and hours of operation)
Page 79

APPENDIX
Intended use
This mobile phone is designed for use when connected to
a mobile phone network. Any other use is considered
unintended use. Unauthorised modification or recon-
struction is not permitted. Under no circumstances open
the device or complete any repair work yourself.
Areas of use
• Do not use the phone in prohibited areas.
• Switch the phone off in the vicinity of medical equip-
ment (e.g. in hospitals).
• Do not use the phone in petrol stations or near fuels
and chemicals.
• Check with the airline whether mobile phones may be
used on board.
Helpline 0844 800 6503
(See page 73 for costs and hours of operation)
77
Page 80

APPENDIX
Safety Information
• Prevent exposure to smoke, dust, vibration, chemicals,
moisture, heat and direct sunlight. The phone is not
waterproof; therefore, keep it dry.
• Only use original accessories and batteries. Never
attempt to connect other products.
• If you want to connect the phone to another device,
read the manual supplied with that device with regard
to any detailed safety information.
• Never attempt to connect incompatible products.
• Repairs to this device may only be completed by quali-
fied service personnel.
• All mobile communication equipment is subject to
interference which may impair its performance.
• Keep the phone and accessories out of the reach of
children.
• The SIM card can be removed. Caution! Small children
can swallow them.
78
Helpline 0844 800 6503
(See page 73 for costs and hours of operation)
Page 81

APPENDIX
• The ringing tone is issued via the loudspeaker. Take an
incoming call first and then hold the phone to your
ear. This prevents any possible hearing damage.
• Only use the phone while driving or riding a transport
vehicle in road traffic when using the approved hands-
free equipment and appropriately positioned holders.
Ensure that no safety−related functions are interfered
with when operating the phone. It is essential to obser-
ve the applicable national laws and regulations.
• Always maintain a distance of at least 15 cm to imp-
lanted heart pacemakers to prevent any possible inter-
ference. If you have had a pacemaker implanted, do
not carry the phone in a breast pocket when switched
on. Always hold the phone to the ear furthest away
from the pacemaker during calls.
Switch the phone off immediately if you notice or
suspect any adverse effects.
Helpline 0844 800 6503
(See page 73 for costs and hours of operation)
79
Page 82

APPENDIX
• This phone is hearing aid compatible. If you wear a
hearing aid, however, please contact your doctor or
the hearing aid manufacturer to inquire about any pos-
sible impairments through mobile communication
equipment.
• Do not rely on the mobile phone as a safeguard for
emergencies. For a variety of technical reasons, it is
not possible to guarantee a reliable connection under
all circumstances.
Power adapter plug
The power adapter plug supplied ful-
fils the ecodesign requirements of the
European Community (Directive
2005/32/EC). This means that the cur-
rent consumption is considerably less, both in operation
as well as in standby, in comparison to older power adap-
ter plug models.
80
Helpline 0844 800 6503
(See page 73 for costs and hours of operation)
Page 83

APPENDIX
Disposal
In order to dispose of your device, take it to a
collection point provided by your local public
waste authorities (e.g. recycling centre). Accor-
ding to laws on the disposal of electronic and
electrical devices, owners are obliged to dispo-
se of old electronic and electrical devices in a
separate waste container. The symbol indicates
that the device must not be disposed of in nor-
mal domestic waste!
Batteries represent a hazard to health and the
environment!
Never open, damage or swallow batteries or
allow them to pollute the environment. They
may contain toxic, ecologically hazardous
heavy metals. You are legally obliged to dispo-
se of power packs and batteries at the point of
sale or in the corresponding containers provi-
Helpline 0844 800 6503
(See page 73 for costs and hours of operation)
81
Page 84

APPENDIX
ded at collection points by local public waste
authorities.
Disposal is free of charge. The symbols indicate
that the batteries must not be disposed of in nor-
mal domestic waste and that they must be
brought to collection points provided by local
public waste authorities.
Packaging materials must be disposed of accor-
ding to local regulations.
Declaration of Conformity
This device fulfils the requirements stipulated in the EU
directive: 1999/5/EU directive on radio equipment and
telecommunications terminal equipment and the mutual
recognition of their conformity.
Conformity with the above mentioned directive is confir-
med by the CE mark on the device. To view the complete
Declaration of Conformity, please refer to the free
82
Helpline 0844 800 6503
(See page 73 for costs and hours of operation)
Page 85

APPENDIX
download available on our web site
www.amplicomms.com
Maintenance
• Clean the housing surfaces with a soft, fluff−free cloth.
Do not use any cleaning agents or solvents.
Guarantee
AMPLICOMMS equipment is produced and tested accor-
ding to the latest production methods. The implementati-
on of carefully chosen materials and highly developed
technologies ensure trouble−free functioning and a long
service life. The terms of guarantee do not apply when a
device malfunction was caused by the mobile telecommu-
nications network operator/provider. The terms of guaran-
tee do not apply to the batteries or power packs used in
the products. The period of guarantee is 24 months from
the date of purchase.
Helpline 0844 800 6503
(See page 73 for costs and hours of operation)
83
Page 86

APPENDIX
All deficiencies related to material or manufacturing
errors within the period of guarantee will be redressed
free of charge. Rights to claims under the terms of gua-
rantee are annulled following tampering by the purchaser
or third parties.
Damage caused as a result of improper handling or ope-
ration, normal wear and tear, incorrect positioning or sto-
rage, improper connection or installation or Acts of Gods
and other external influences are excluded from the terms
of guarantee. In the case of complaints, we reserve the
right to repair defective parts, replace them or replace the
entire device.
Replaced parts or devices become our property. Rights to
compensation in the case of damage are excluded where
there is no evidence of intent or gross negligence by the
manufacturer.
If your device shows signs of defect during the period of
guarantee, please return it to the sales outlet in which you
84
Helpline 0844 800 6503
(See page 73 for costs and hours of operation)
Page 87

APPENDIX
purchased the AMPLICOMMS device together with the
purchase receipt. All claims under the terms of guarantee
in accordance with this agreement can only be asserted at
the sales outlet.
No claims under the terms of guarantee can be asserted
after a period of two years from the date of purchase and
hand−over of the product.
Helpline 0844 800 6503
(See page 73 for costs and hours of operation)
85
Page 88

INDEX
Index
3-party conference. . . . . 31
A
Alarm. . . . . . . . . . . . . . . . 68
Areas of use . . . . . . . . . . 77
Auto redial . . . . . . . . . . . 49
B
Battery. . . . . . . . . . . . . . . . 8
Battery status . . . . . . . . . 11
Block list . . . . . . . . . . . . . 49
Bluetooth . . . . . . . . . . . . 64
Boost . . . . . . . . . . . . . . . . 59
C
Calculator . . . . . . . . . . . . 67
Calender . . . . . . . . . . . . . 67
Call center. . . . . . . . . . . . 47
86
Helpline 0844 800 6503
(See page 73 for costs and hours of operation)
Call time display. . . . . . . 49
Call time reminder . . . . . 49
Calling . . . . . . . . . . . . . . . 27
Calls list. . . . . . . . . . . 28, 47
Cancel the emergency
call function . . . . . . . . . . 55
Charging the battery . . . 10
Charging via the mini
USB charging socket. . . 10
Checking the memory
status. . . . . . . . . . . . . . . . 32
D
Declaration of
Conformity . . . . . . . . . . . 82
Dedicated key. . . . . . . . . 61
Desktop charging unit. . 10
Page 89

INDEX
Dialling a phone
number . . . . . . . . . . . . . . 27
Direct number . . . . . . . . 58
Display . . . . . . . . . . . . . . 61
Disposal . . . . . . . . . . . . . 81
E
Emergency call
destination . . . . . . . . . . . 51
Emergency call
numbers . . . . . . . . . . . . . 51
Emergency call
procedure . . . . . . . . . . . . 54
Emergency voice
message . . . . . . . . . . . . . 52
Ending a call . . . . . . . . . . 13
Entering text . . . . . . . . . . 24
Helpline 0844 800 6503
(See page 73 for costs and hours of operation)
G
Guarantee. . . . . . . . . . . . 83
H
Hands-free . . . . . . . . . . . 29
I
Icons in the display . . . . 22
Intended use. . . . . . . . . . 77
K
Keytone. . . . . . . . . . . . . . 57
L
Language . . . . . . . . . 12, 61
M
Maintenance. . . . . . . . . . 83
Making a call . . . . . . . . . 13
Memory status . . . . . . . . 32
87
Page 90

INDEX
Messages menu. . . . . . . 40
Mini USB charging
socket . . . . . . . . . . . . . . . 10
N
Network settings . . . . . . 62
O
One−touch
dialling . . . . . . . . 28, 37, 58
Options whilst in a call . 30
Organizer . . . . . . . . . . . . 67
P
Personal emergency
voice message . . . . . . . . 53
Phone security . . . . . . . . 64
Phone settings . . . . . . . . 60
Phonebook . . . . . . . . . . . 32
88
Helpline 0844 800 6503
(See page 73 for costs and hours of operation)
Phonebook settings. . . . 39
Problems and solutions 73
Profiles . . . . . . . . . . . . . . 56
Q
Questions and Answers 14
Quick Start Guide. . . . . . . 6
R
Redial. . . . . . . . . . . . . . . . 28
Rejecting a call . . . . . . . . 13
Restore settings . . . . . . . 66
Ring type. . . . . . . . . . . . . 56
Ringtone . . . . . . . . . . . . . 56
Ringtone volume . . . . . . 57
S
Safety Information. . . . . 78
Security settings . . . . . . 63
Page 91

INDEX
Service hotline . . . . . . . . 73
Services. . . . . . . . . . . . . . 71
Set time/date . . . . . . . . . 60
SIM card . . . . . . . . . . . . . . 8
SIM security . . . . . . . . . . 63
SMS center number . . . 41
SOS . . . . . . . . . . . . . . . . . 51
Special key functions . . 18
Speed dialling . . . . . 27, 36
Stopwatch. . . . . . . . . . . . 69
Switching the mobile
phone on and off . . . 11, 25
T
Taking a call . . . . . . . 13, 28
Tasks . . . . . . . . . . . . . . . . 69
Technical data. . . . . . . . . 72
Text message settings. . 41
Helpline 0844 800 6503
(See page 73 for costs and hours of operation)
Time and date. . . . . . . . . 12
Tips on the battery. . . . . 76
Tone control . . . . . . . . . . 59
Torch . . . . . . . . . . . . . 20, 26
V
Voicemail . . . . . . . . . . . . 42
Volume . . . . . . . . . . . . . . 29
Volume control. . . . . . . . 22
W
What is in the box . . . . . . 8
Writing and sending a
SMS. . . . . . . . . . . . . . . . . 44
89
Page 92

MENU TREE
Messages Write message
Inbox
Drafts
Outbox
Sent messages
Broadcast messages
Message settings
SIM
Memory status
Text msg. counter
Save sent messages
Preferred storage
Phonebook (Option) View
Send text message
Call
Edit
Delete
Copy
Add to block list
Groups
Menu tree
90
Helpline 0844 800 6503
(See page 73 for costs and hours of operation)
Page 93

p
Phonebook settings
Preferred storage
Speed dial
Memory status
Copy contacts
Move contacts
Delete all contacts
Call center Call history
Missed calls
Dialled calls
Received calls
Delete call logs
Block list
Auto redial
Call time display
Call time reminder
Answer mode
SOS SOS mode setting
Set SOS numbers
Call center number
Set outgoing voice MSG
MENU TREE
Helpline 0844 800 6503
(See page 73 for costs and hours of operation)
91
Page 94

Settings Profiles
Direct Number
Boost Setting
Tone Control
Phone settings
Time and date
Schedule power on/off
Language
Pref. input methods
Display
Wallpaper
Power on display
Power off display
Dedicated key
Backlight Setting
Main LCD backlight
Incoming And SMS LED
Charge LED
Network settings
Network selection
Security settings
SIM security
PIN lock
Change PIN
Change PIN2
Phone security
Phone lock
Change password
MENU TREE
92
Helpline 0844 800 6503
(See page 73 for costs and hours of operation)
Page 95

Bluetooth
Power
Visibility
My device
My name
Preferred storage
Restore settings
Organizer Calendar
Calculator
Alarm
Tasks
Stopwatch
Services (depending on network provider)
Helpline 0844 800 6503
(See page 73 for costs and hours of operation)
MENU TREE
93
Page 96

Audioline GmbH
4250711993382
D-41460 Neuss
03/2015 – Edition 2.0
 Loading...