

AMPEG SVT-VR Owner's Manual

User’s Guide
for the
SVT-VR
Bass Amplifier
Made in the U.S.A. by
TABLE OF
CONTENTS
Introduction . . . . . . . . . . . . . . . . . . . . . . . . . . . . . . . . . . . . . . . .3
Features . . . . . . . . . . . . . . . . . . . . . . . . . . . . . . . . . . . . . . . . . .3
The Front Panel . . . . . . . . . . . . . . . . . . . . . . . . . . . . . . . . . . . . .4
The Rear Panel . . . . . . . . . . . . . . . . . . . . . . . . . . . . . . . . . . . . .5
Important Information About Tubes and Tube Products
A Brief History of the Tube . . . . . . . . . . . . . . . . . . . . . . . . . .6
Tube Types and Usages . . . . . . . . . . . . . . . . . . . . . . . . . . . .6
The Nature of Tubes: Why (and when) to Replace Them . . .7
The Importance of Proper Biasing . . . . . . . . . . . . . . . . . . . . .7
Survival Tips For Tube Amplifiers . . . . . . . . . . . . . . . . . . . . .8
Changing the Tubes . . . . . . . . . . . . . . . . . . . . . . . . . . . . . . . . . .9
Setting Tube Bias and Balance . . . . . . . . . . . . . . . . . . . . . . . . . .9
Some Suggested Settings . . . . . . . . . . . . . . . . . . . . . . . . . . . .10
Troubleshooting . . . . . . . . . . . . . . . . . . . . . . . . . . . . . . . . . . . .11
System Block Diagram . . . . . . . . . . . . . . . . . . . . . . . . . . . . . . .11
Technical Specifications . . . . . . . . . . . . . . . . . . . . . . . .back cover
SVT-VR Bass Amplifier
IMPORTANT SAFETY INSTRUCTIONS
• READ, FOLLOW, HEED, AND KEEP ALL INSTRUCTIONS AND WARNINGS.
• DO NOT OPERATE NEAR ANY HEAT SOURCE AND DO NOT BLOCK ANY VENTILATION OPENINGS ON THIS APPARATUS. FOR PROPER OPERATION, THIS UNIT REQUIRES 3”
(75CM) OF WELL VENTILATED SPACE AROUND HEATSINKS AND OTHER AIR FLOW PROVISIONS IN THE CABINET.
• DO NOT USE THIS APPARATUS NEAR SPLASHING, FALLING, SPRAYING, OR STANDING LIQUIDS.
• CLEAN ONLY WITH LINT-FREE DAMP CLOTH AND DO NOT USE CLEANING AGENTS.
• ONLY CONNECT POWER CORD TO A POLARIZED, SAFETY GROUNDED OUTLET WIRED TO CURRENT ELECTRICAL CODES AND COMPATIBLE WITH VOLTAGE, POWER, AND
FREQUENCY REQUIREMENTS STATED ON THE REAR PANEL OF THE APPARATUS.
• PROTECT THE POWER CORD FROM DAMAGE DUE TO BEING WALKED ON, PINCHED, OR STRAINED.
• UNPLUG THE APPARATUS DURING LIGHTNING STORMS OR WHEN UNUSED FOR LONG PERIODS OF TIME.
• ONLY USE ATTACHMENTS, ACCESSORIES, STANDS, OR BRACKETS SPECIFIED BY THE MANUFACTURER FOR SAFE OPERATION AND TO AVOID INJURY.
• WARNING: TO REDUCE THE RISK OF ELECTRIC SHOCK OR FIRE, DO NOT EXPOSE THIS UNIT TO RAIN OR MOISTURE.
• SERVICE MUST BE PERFORMED BY QUALIFIED PERSONNEL.
• OUR AMPLIFIERS ARE CAPABLE OF PRODUCING HIGH SOUND PRESSURE LEVELS. CONTINUED EXPOSURE TO HIGH SOUND PRESSURE LEVELS CAN CAUSE PERMA-
NENT HEARING IMPAIRMENT OR LOSS. USER CAUTION IS ADVISED AND EAR PROTECTION IS RECOMMENDED IF UNIT IS OPERATED AT HIGH VOLUME.
• WARNING: THIS UNIT REQUIRES A SAFETY GROUNDED OUTLET WIRED TO CURRENT ELECTRIC CODES HAVING THE LINE SUPPLY VOLTAGE, POWER, AND FREQUENCY
IDENTIFIED ON THE REAR OF THE UNIT. THE OUTLET MUST REMAIN ACCESSIBLE TO DISCONNECT THE UNIT IF A FAULT SHOULD ARISE WHILE IN USE. THIS UNIT SHOULD
BE UNPLUGGED WHEN NOT IN USE.
CAUTION
RISK OF ELECTRIC SHOCK
DO NOT OPEN
WARNING: TO REDUCE THE RISK OF FIRE OR ELECTRIC SHOCK, DO NOT EXPOSE
THIS APPARATUS TO RAIN OR MOISTURE. TO REDUCE THE RISK OF ELECTRIC
SHOCK, DO NOT REMOVE COVER. NO USER-SERVICEABLE PARTS INSIDE. REFER
SERVICING TO QUALIFIED SERVICE PERSONNEL.
PRECAUCION
RIESGO DE CORRIENTAZO
NO ABRA
PRECAUCION: PARA REDUCIR EL RIESGO DE INCENDIOS O DESCARGAS ELECTRICAS, NO PERMITA QUE ESTE APARATO QUEDE EXPUESTO A LA LLUVIA O LA HUMEDAD. PARA DISMINUOIR EL
RIESGO DE CORRIENTAZO. NO ABRA LA CUBIERTA. NO HAY PIEZAS ADENTRO QUE EL USARIO
PUEDO REPARAR DEJE TODO MANTENIMIENTO A LOS TECHNICOS CALIFICADOS.
ATTENTION
RISQUE D'ELECTROCUTION
NE PAS OUVRIR
ATTENTION: PROTÉGEZ CET APPAREIL DE LA PLUIE ET DE L'HUMIDITÉ AFIN D'ÉVITER TOUT
RISQUE D'INCENDIE OU D'ÉLECTROCUTION. POUR REDUIRE D'ELECTROCUTION NE PAS ENLEVER
LE COUVERCLE. AUCUNE PIECE INTERNE N'EST REPRABLE PAR L'UTILISATEUR. POUR TOUTE
REPARATION, S'ADRESSER A UN TECHNICIEN QUALIFIE.
"IT IS NECESSARY FOR THE USER TO REFER TO THE INSTRUCTION MANUAL"
“ES NECESARIO QUE EL USUARIO SE REFIERA AL MANUAL DE INSTRUCCIONES.”
"REFERREZ-VOUS AU MANUAL D'UTILISATION"
EXPLANATION OF GRAPHICAL SYMBOLS:
EXPLICACION DE SIMBOLOS GRAFICOS:
EXPLICATION DES SYMBÔLES GRAPHIQUES:
"DANGEROUS VOLTAGE"
“VOLTAJE PELIGROSO”
"DANGER HAUTE TENSION"
=
=

3
An Introduction to your new Ampeg SVT-VR Bass Amplifier
The harmonically rich sound and legendary performance of the classic AMPEG SVT are reborn in the SVT-VR.
This dynamically powerful bass amp delivers a thunderous 300 watts of unsurpassed quality, reliability, and tonal
flexibility, offering the classic vibrance of tubes as well as contemporary features.
All of the features and controls of your SVT-VR are covered in detail within the pages of this user’s guide. We
recommend that you read this guide and understand them before you use the amplifier.
Features
In the world of high performance bass amps, Ampeg amplifiers stand alone. In true Ampeg tradition, the SVT-VR
offers you more power, performance and flexibility than any other bass amplifier in its class. The outstanding
features of your new amplifier, features which set it apart from the competition, are listed below.
• TWO-CHANNEL OPERATION: Two separate channels with independent tone and volume controls
• BRIGHT AND NORMAL INPUTS: Each channel offers a choice of inputs: normal or high-end
enhanced (bright)
• ULTRA HI, ULTRA LOW, BASS CUT (CH. 1 ONLY) SWITCHES: Allow you to tailor your sound in
many different ways at the touch of a button
• MIDRANGE FREQUENCY SELECT “1•2•3” SWITCH (CH. 1 ONLY): Allows you to select the
operating range for the midrange control for increased tonal flexibility
• BIAS ADJUSTMENT CONTROLS: Allow you to adjust tube bias and balance for optimal operation
• SLAVE OUT: Allows you to send a preamp signal to a secondary power amplifier
• POWER AMP IN/PREAMP OUT: A separate preamp may be connected to the Power Amp In jack,
and the Preamp Out jack may be connected to a slave amp
• TRANSFORMER BALANCED LINE OUT: Independent level control - balanced XLR output jack -
switchable pre or post EQ - ground lift for balanced XLR
• HEAVY-DUTY SPEAKER JACKS: Speakon
®
jacks for more reliable connections at higher output
Speakon®is a registered trademark of Neutrik AG.
SVT-VR Bass Amplifier
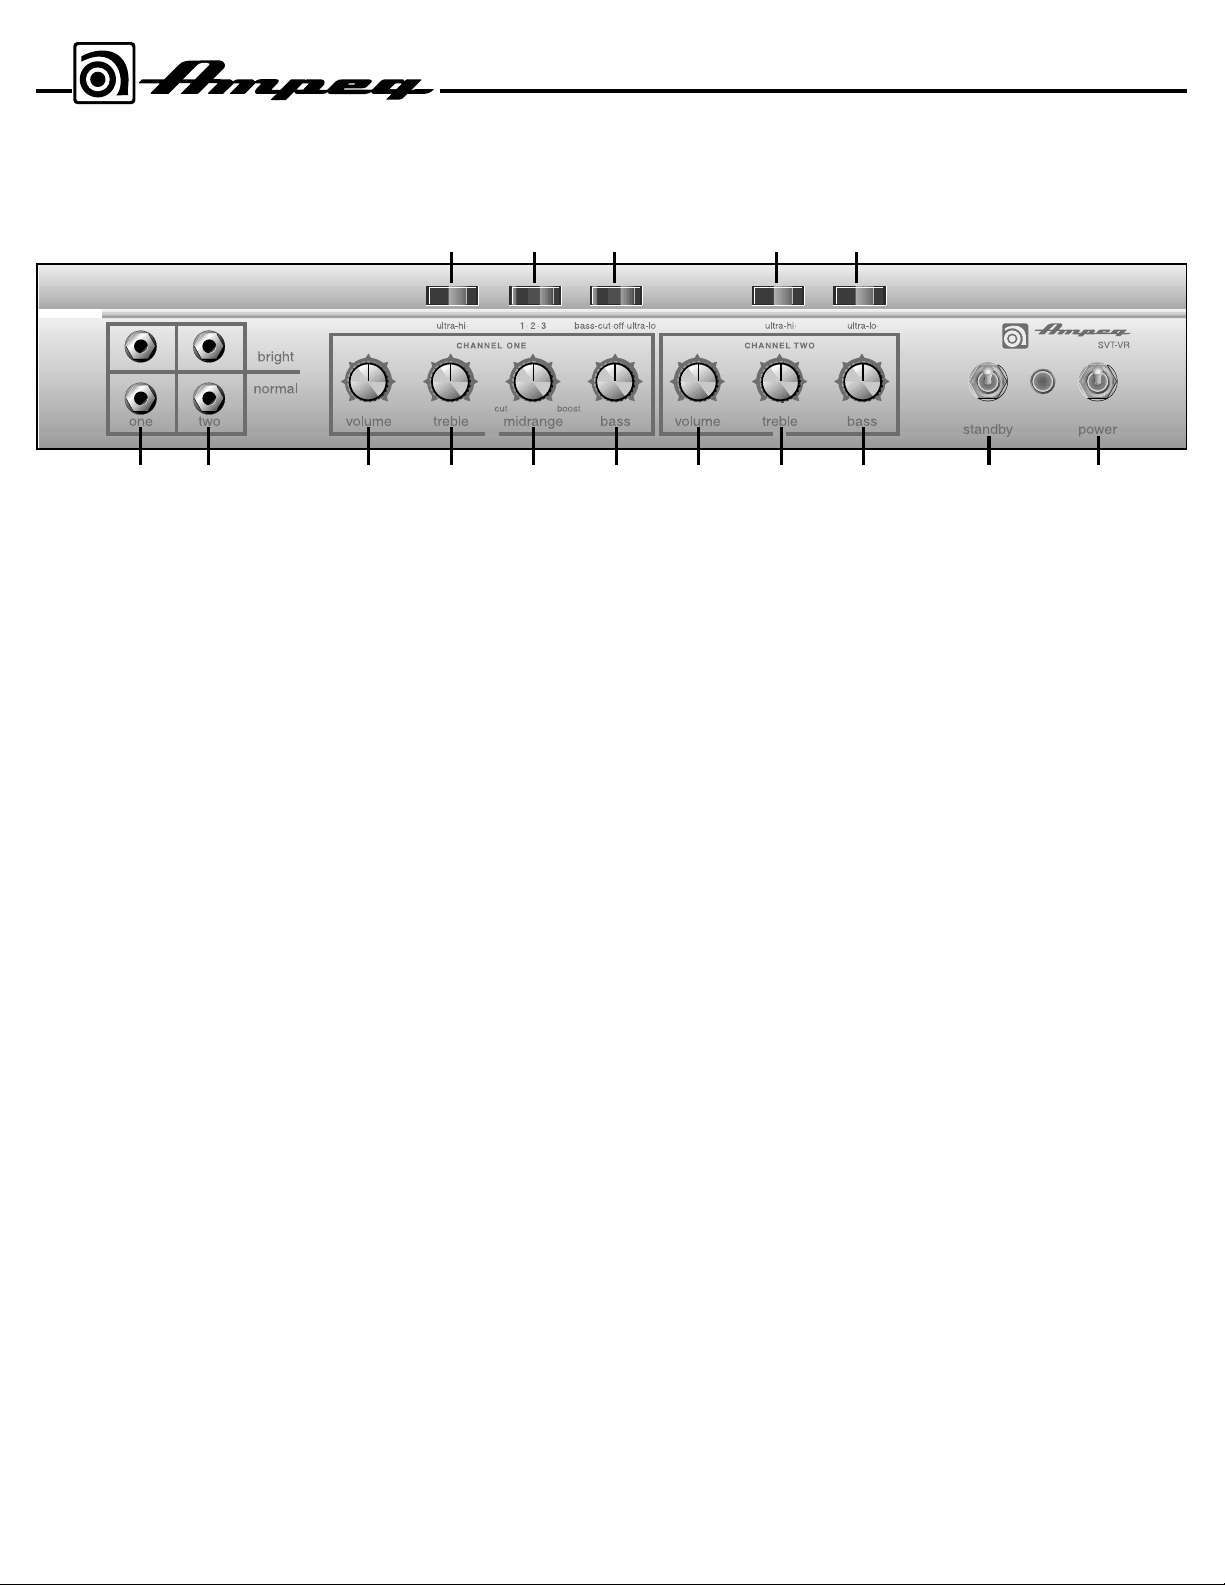
1. ONE: (The Channel One Input jacks) The signal output from an instrument or a line level signal may be connected here by means of a shielded
instrument cable. Either the Bright or Normal jack may be used - the Bright
jack enhances the high frequencies of the input signal. The signal at these
jacks is sent into the Channel One preamp section (tone and volume controls).
2. TWO: (The Channel Two Input jacks) The signal output from an instru-
ment or a line level signal may be connected here by means of a shielded
instrument cable. Either the Bright or Normal jack may be used - the Bright
jack enhances the high frequencies of the input signal. The signal at these
jacks is sent into the Channel Two preamp section (tone and volume controls).
3. VOLUME: Use this control to adjust the output level of Channel One.
4. TREBLE: Use this control to adjust the high frequency level of the sig-
nal of Channel One. This control provides 12dB of cut or boost at 4kHz.
The high frequency output is flat at the center position.
5. MIDRANGE: Use this control to adjust the mid frequency level of the
signal of Channel One. This control provides 20dB of cut or boost at the
frequency selected by the 1•2•3 switch (#8). The midrange frequency output is flat at the center position.
6. BASS: Use this control to adjust the low frequency level of the signal of
Channel One. This control provides 12dB of cut or boost at 40Hz. The low
frequency output is flat at the center position.
7. ULTRA-HI: This switch increases the high frequency output of Channel
One. The Ultra Hi is active when the right side of the switch is depressed.
The amount of boost is dependent on the setting of the Volume control
(#3).
8. 1•2•3: This switch selects the frequency to be affected by the Midrange
control (#5). The available frequencies are 220Hz (left side of the switch
depressed), 800Hz (switch in the center position), or 3kHz (right side of the
switch depressed).
9. BASS-CUT/OFF/ULTRA-LO: Depressing the left side of this switch
decreases the low frequency output of Channel One. Depressing the right
side of this switch enhances the low frequency output of Channel One. The
switch is inactive in the center position.
10. VOLUME: Use this control to adjust the output level of Channel Two.
11. TREBLE: Use this control to adjust the high frequency level of the sig-
nal of Channel Two. This control provides 12dB of cut or boost at 4kHz.
The high frequency output is flat at the center position.
12. BASS: Use this control to adjust the low frequency level of the signal
of Channel Two. This control provides 12dB of cut or boost at 40Hz. The
low frequency output is flat at the center position.
13. ULTRA-HI: This switch increases the high frequency output of
Channel Two. The Ultra Hi is active when the right side of the switch is
depressed. The amount of boost is dependent on the setting of the Volume
control (#10).
14. ULTRA-LO: This switch decreases the low frequency output of
Channel Two. The Ultra Lo is active when the right side of the switch is
depressed.
15. STANDBY: The Standby mode allows the tubes to warm up or remain
warm without high voltage applied to them. This helps extend the life of the
tubes. When the amplifier is first turned on, it is automatically in Standby
mode regardless of the switch position. After approximately 20 seconds,
the amp is in the mode selected by this switch. During short periods of
non-use, the amplifier should be put into Standby mode. The Standby
mode is active when this switch is in the DOWN position. The adjacent
lamp illuminates red when the amplifier is in the Standby mode.
16. POWER: This switch supplies AC power to the amplifier in the UP
position. The adjacent lamp illuminates green when the amplifier is on and
is not in Standby mode.
4
The Front Panel
SVT-VR Bass Amplifier
7 8 9 13 14
1 2 3 4
5 6 10 11 12 15 16
 Loading...