

Page 1

User’s Guide
High Power Touch Screen AC750
Wi-Fi Router
TAP-R2
Page 2

TAP-R2
USER’S GUIDE
1
CONTENTS
INTRODUCTION .................................................. 4
GETTING STARTED .............................................. 5
Package Contents ...................................................................... 5
Product Description ................................................................... 6
BASIC SETUP GUIDE (TOUCH MENU) ................... 7
Setup Preparations .................................................................... 7
Navigating the Touch Screen Menu ........................................ 11
Welcome to the Dashboard .................................................... 12
Internet Connection Setup ...................................................... 13
Wi-Fi Setup .............................................................................. 15
Setup Summary ....................................................................... 16
MORE SETTINGS (TOUCH MENU) ...................... 17
2.4GHz WI-FI SETTINGS (TOUCH MENU) ............ 18
Basic Settings .......................................................................... 18
Guest Network ....................................................................... 19
Wi-Fi Coverage Controls ......................................................... 20
Wi-Fi Protected Setup (WPS) .................................................. 21
Access Schedule ..................................................................... 22
5.0GHz WI-FI SETTINGS (TOUCH MENU) ............ 23
Basic Settings .......................................................................... 23
Wi-Fi Coverage Controls ......................................................... 25
Wi-Fi Protected Setup (WPS) .................................................. 26
Access Schedule ...................................................................... 27
NETWORK SETTINGS (TOUCH MENU) ................ 28
Local Network ......................................................................... 28
Internet Connection ................................................................ 29
SECURITY FEATURES (TOUCH MENU) ................. 31
Block Websites ........................................................................ 31
User Access (Mac) ................................................................... 32
User Access (IP) ....................................................................... 33
Demilitarized Zone (DMZ) ....................................................... 34
Port Forwarding ...................................................................... 35
Port Filtering ........................................................................... 36
MANAGEMENT SETTINGS (TOUCH MENU) ........ 37
Screen Settings........................................................................ 37
Clock / Date ............................................................................. 38
System Status .......................................................................... 39
Connected Users ..................................................................... 40
Statistics .................................................................................. 41
Logs ......................................................................................... 42
Upgrade Firmware .................................................................. 43
Dynamic DNS .......................................................................... 44
Reset Settings ......................................................................... 45
Page 3

TAP-R2
USER’S GUIDE
2
USB STORAGE (TOUCH MENU) .......................... 46
Local Sharing .......................................................................... 46
FTP Server............................................................................... 47
BASIC SETUP GUIDE (WEB MENU) ..................... 48
Setup Preparations .................................................................. 48
Welcome to the Setup Wizard ................................................ 53
Internet Connection Detection ................................................ 54
Personalize your Wi-Fi Settings ............................................... 55
Setup Summary ....................................................................... 57
WEB MENU DASHBOARD Welcome to the Dashboard ......... 58
5GHz WI-FI SETTINGS (WEB MENU) .................. 59
Basic Settings (5.0GHz) ........................................................... 59
Basic Settings: Guest Networks (5.0GHz) ............................... 61
Security Settings (5.0GHz) ...................................................... 62
Advanced Settings (5.0GHz) ................................................... 63
Wi-Fi Protected Setup – WPS (5.0GHz) ................................... 64
Wireless Coverage Controls (5.0GHz) ..................................... 65
Access Schedule (5.0GHz) ....................................................... 65
2.4GHz WI-FI SETTINGS (WEB MENU) ............... 67
Basic Settings (2.4GHz) ........................................................... 67
Basic Settings: Guest Networks (2.4GHz) ............................... 69
Security Settings (2.4GHz) ...................................................... 70
Advanced Settings (2.4GHz) ................................................... 71
Wi-Fi Protected Setup – WPS (2.4GHz) ................................... 72
Wireless Coverage Controls (2.4GHz)...................................... 73
Access Schedule (2.4GHz) ....................................................... 73
NETWORK SETTINGS .......................................... 75
Local Network (LAN) ............................................................... 75
IPv6 Local Network (LAN) ........................................................ 77
Internet Network (WAN) ......................................................... 79
IPv6 Internet Network (WAN) ................................................. 81
Advanced Settings ................................................................... 83
SMART FEATURES .............................................. 85
Block Websites ........................................................................ 86
User Access (MAC Address Filtering)....................................... 87
User Access (IP Address Filtering) ........................................... 88
USB STORAGE .................................................... 89
Local Sharing ........................................................................... 89
FTP Server ............................................................................... 93
FIREWALL SETTINGS .......................................... 94
Port Filtering ........................................................................... 95
Port Forwarding ...................................................................... 96
DMZ (Demilitarized Zone) ....................................................... 97
Virtual LAN .............................................................................. 98
Denial of Service ..................................................................... 99
QUALITY OF SERVICE ....................................... 100
Page 4

TAP-R2
USER’S GUIDE
3
ROUTING SETUP ............................................. 101
MANAGEMENT FEATURES .............................. 102
System Status ....................................................................... 103
Network Statistics ................................................................ 104
Dynamic DNS Settings .......................................................... 105
System Clock ........................................................................ 106
System Logs .......................................................................... 107
Upgrade Firmware ................................................................ 108
Password Settings ................................................................. 111
TECHNICAL SPECIFICATION .............................. 112
DEFAULT SETTINGS .......................................... 113
TROUBLESHOOTING & SUPPORT INFO ............. 114
WARRANTY AND REGULATORY INFO ............... 132
LEGAL NOTICES AND DISCLAIMERS ……………….140
Page 5

TAP-R2
USER’S GUIDE
4
INTRODUCTION
Thank you for purchasing this Amped Wireless product. At Amped Wireless we strive to provide you with the
highest quality products through innovation and advanced technology. We pride ourselves on delivering
products that outperform the competition and go beyond your expectations. If you have any questions please
feel free to contact us. We’d love to hear from you and thank you for your support!
Email: sales@ampedwireless.com
Call: 888-573-8830
Web: www.ampedwireless.com
Page 6

TAP-R2
USER’S GUIDE
5
GETTING STARTED
Package Contents
Check to make sure you have all the contents within your package:
High Power Touch Screen AC750 Wi-Fi Router
Detachable High Gain Antenna
Stylus
RJ-45 Ethernet Cable
Power Adapter
Setup Guide
Product Stand
CD: User’s Guide & Installation Video
Page 7
TAP-R2
USER’S GUIDE
6
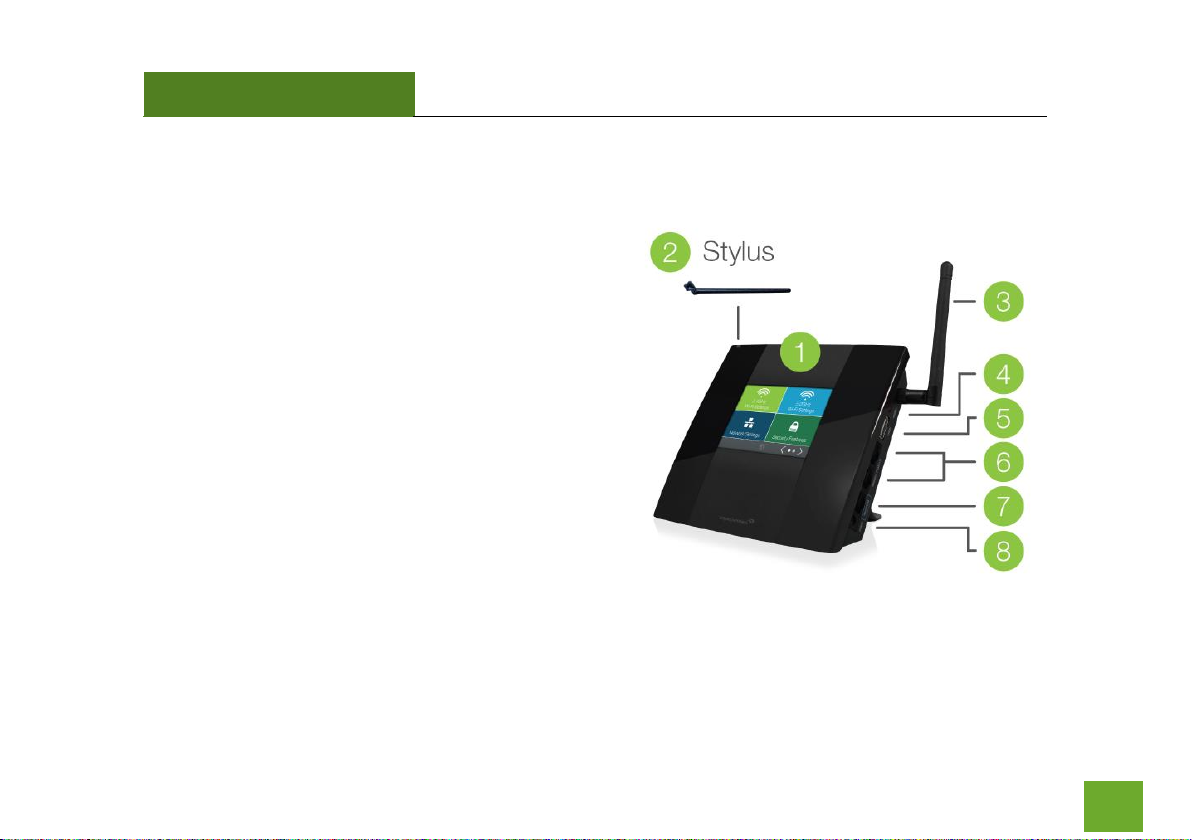
Product Description
1. LCD Screen: 3.5” LCD touch screen. Displays the
user interface for configuring the Router as well as
the status.
2. Stylus: Input tool that assists in navigating the LCD
touch screen Menu.
3. Antenna Connectors (ANT): RJ-SMA antenna
connector. Compatible with all antennas that have
RP-SMA connectors.
4. Reset: Button used to reset device. Push down
once to reboot, hold down for 5-10 seconds to
reset to factory default settings.
5. USB Port: Attach USB storage devices, such as a
USB flash drive or external hard drive, for file
sharing.
6. Wired Ports: RJ-45 ports for connecting wired
computers or network devices.
7. Modem Port: RJ-45 port for connecting to your
Broadband Modem.
8. Power (PWR): Power adapter port. DC 12V 1A.
Page 8
TAP-R2
USER’S GUIDE
7
BASIC SETUP GUIDE (TOUCH)
Setup Preparations
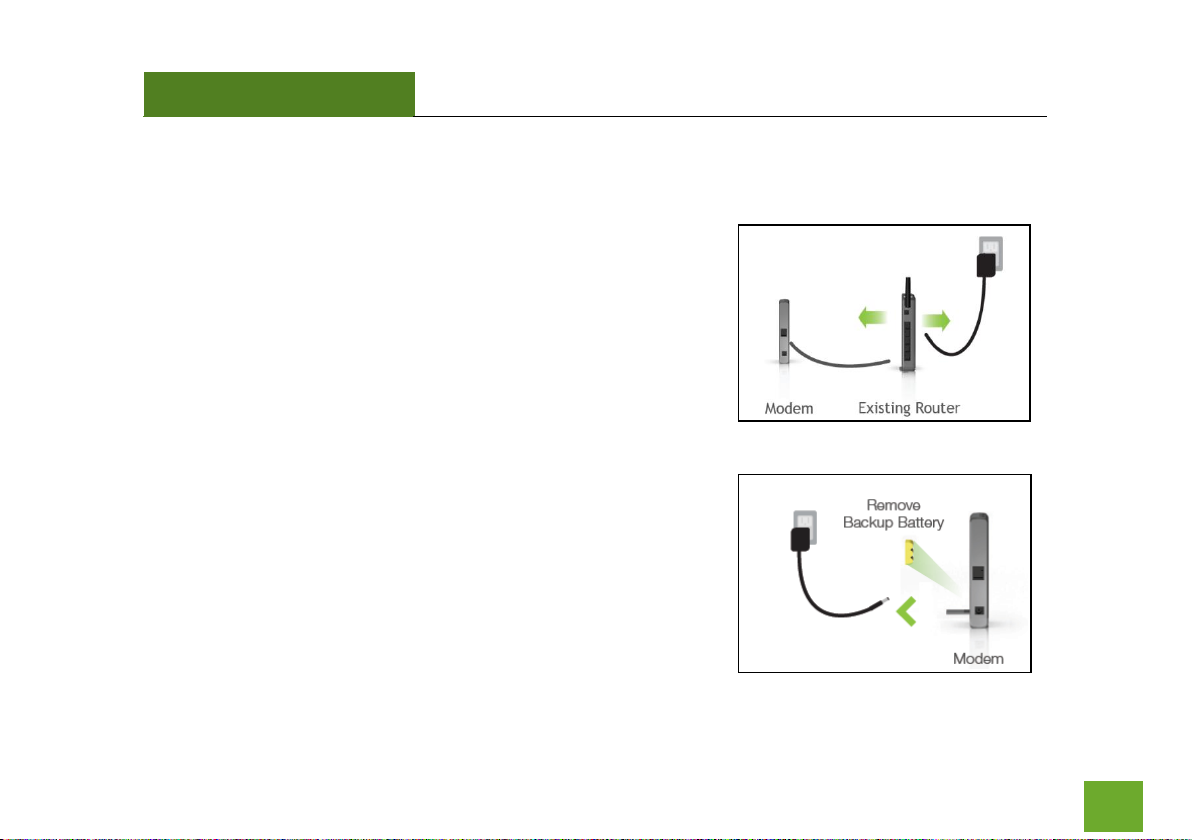
Disconnect and power off your existing router.
Disconnect your existing router from your computer, your broadband
modem and its power outlet. If you do not have an existing router
please continue to the next step.
Power off your Modem
Power off the modem by disconnecting the modem’s power adapter
from the power outlet. If your modem has a backup battery, remove
the backup battery from your modem. Do NOT power on the modem
until prompted at a later step.
Page 9
TAP-R2
USER’S GUIDE
8
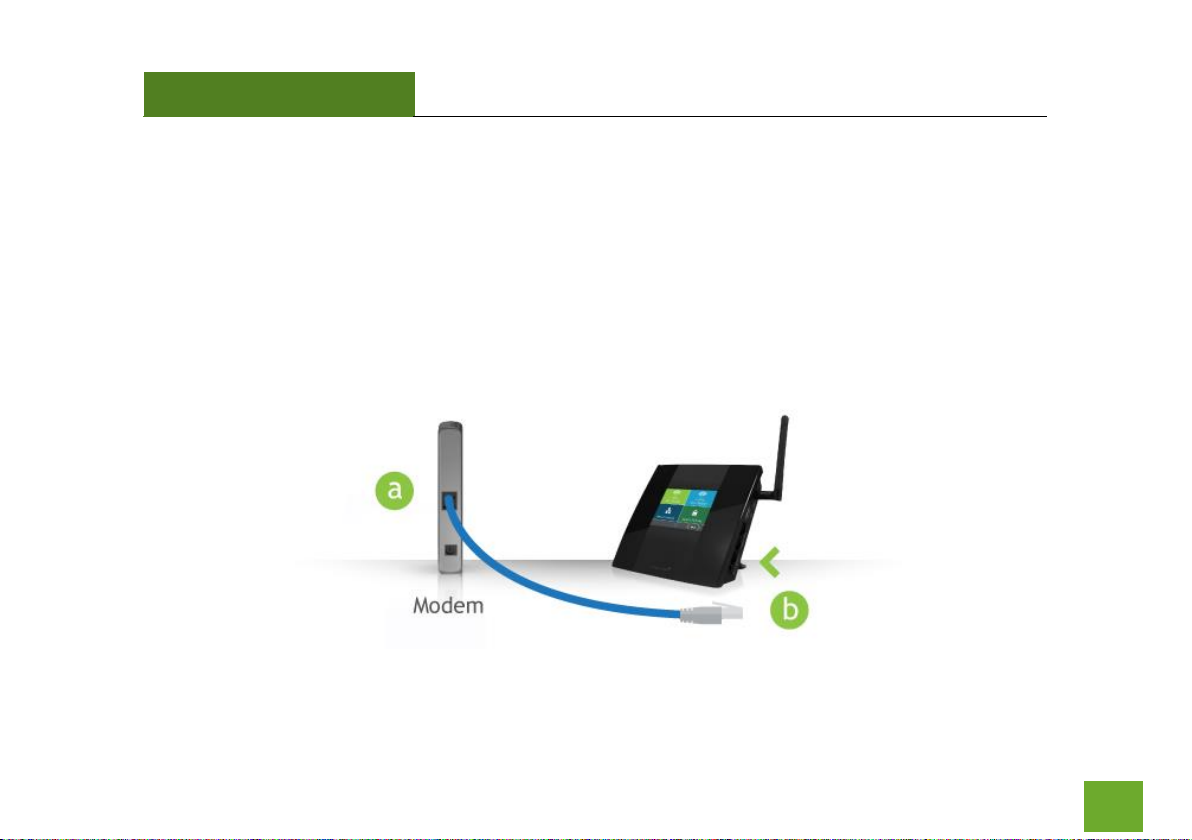
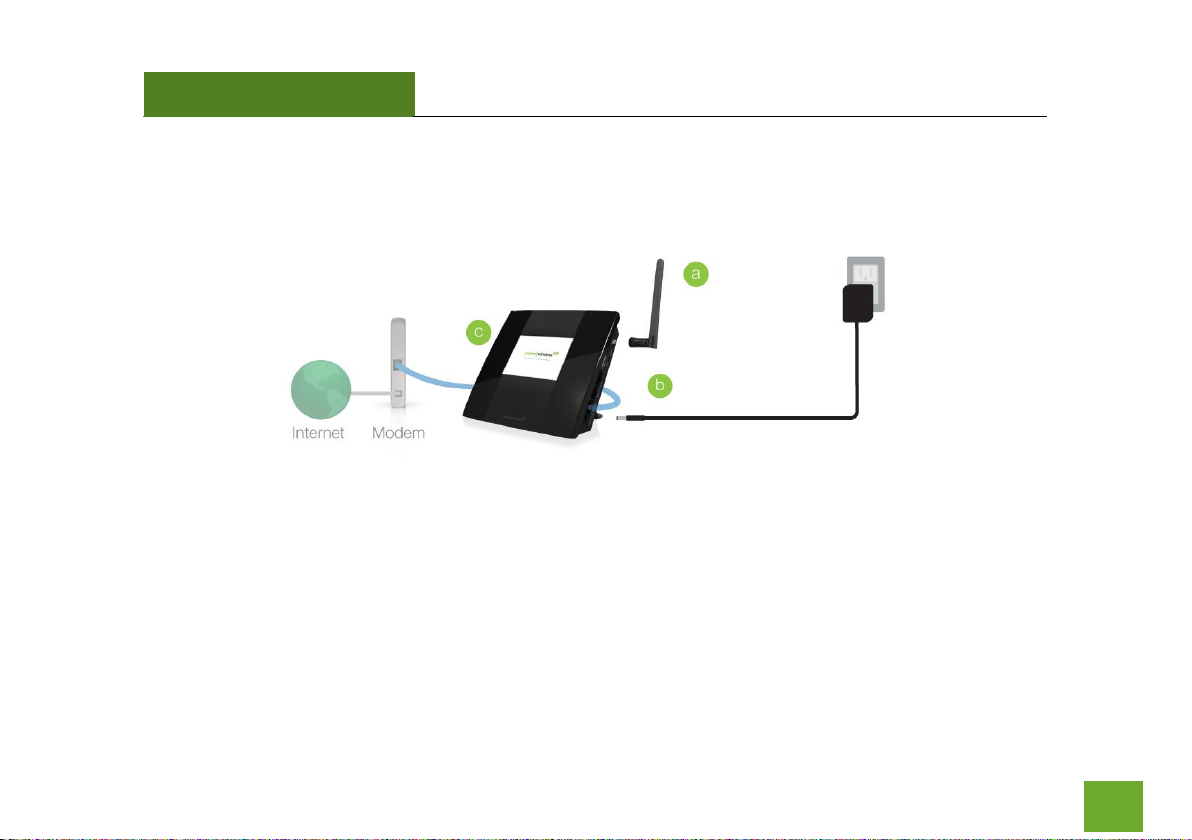
Connect the Router to your Modem
Do NOT connect the power adapter to the Router at this time.
a) Use the included blue Ethernet cable and connect one end of the cable to your modem.
b) Connect the other end of the cable to the blue Modem port on the Router.
Page 10
TAP-R2
USER’S GUIDE
9
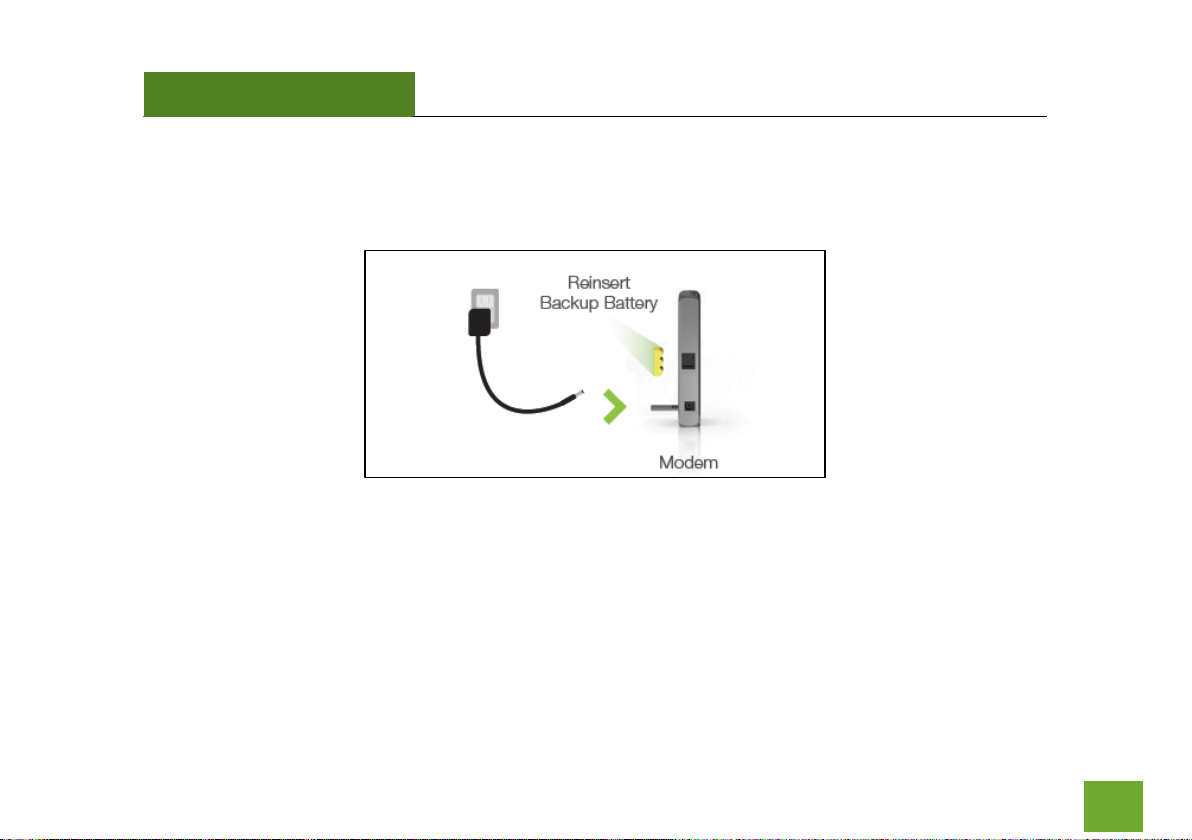
Power on your Modem
Plug in your modem’s power adapter and backup battery (if available):
Page 11
TAP-R2
USER’S GUIDE
10
Power On the Router
a. Attach the included antenna.
b. Attach the Power Adapter to the Router’s PWR Port and plug it into an available power outlet.
c. The Amped Wireless logo will appear as the unit boots up, then the Dashboard screen will appear.
Page 12

TAP-R2
USER’S GUIDE
11
Navigating the Touch Screen Menu
Before we begin, here are a few tips on how to navigate the Touch Screen Menu:
Language Selection: Tap the Globe icon, found on the bottom of the Settings screen, to
change the language of the menu.
Back Arrow: Tap the Left Arrow, found on the upper left corner of many screens, to
navigate back to the previous page.
Home Button: Tap the Home icon, found on the bottom of many screens, to return to the
Dashboard at any time.
Navigation Button: Tap the Left or Right Arrow to navigate between multiple pages for
one screen. The dots in this example indicate there are 3 pages to see.
Keyboards/Keypads: Tap on a Blank Field to access a keyboard or keypad for entering in
information such as your Network ID and Security Key.
Page 13
TAP-R2
USER’S GUIDE
12
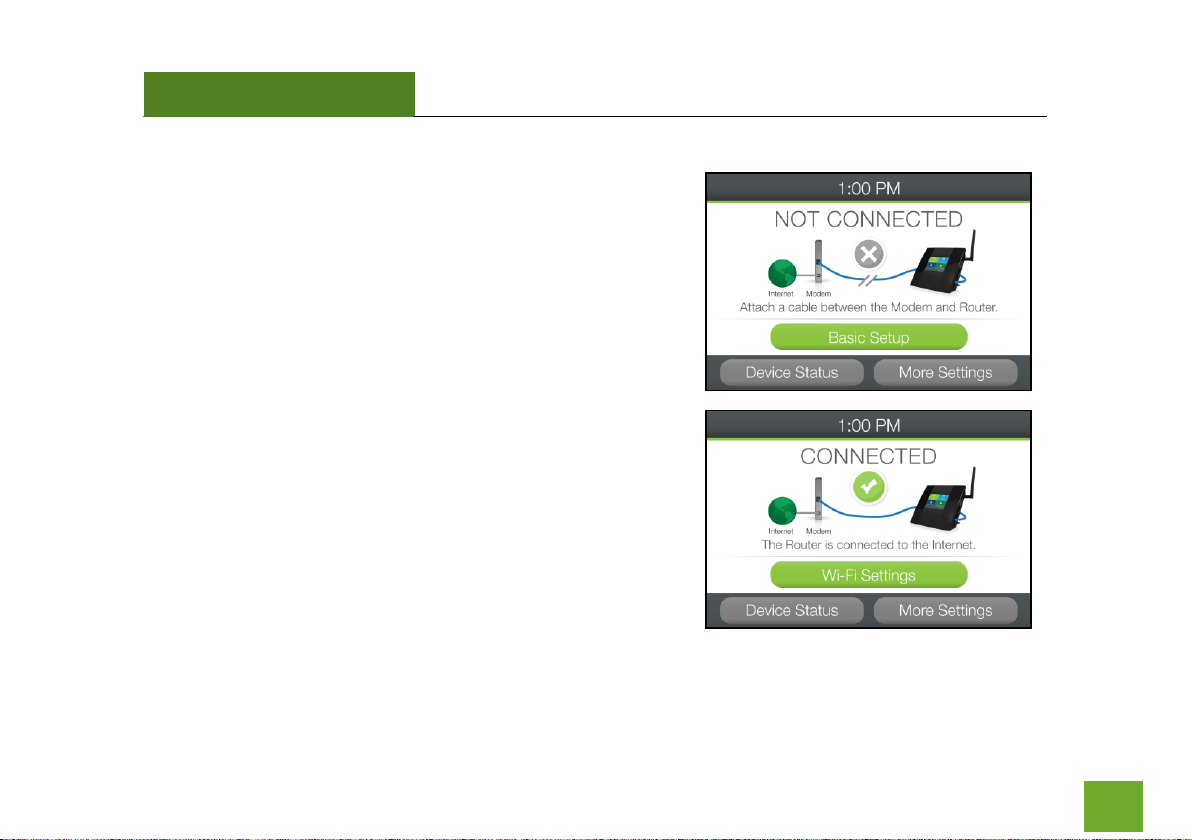
Welcome to the Dashboard
The Dashboard will provide you with the current status of the
Router.
Tap Basic Setup to configure your Internet connection.
If the Dashboard shows that the Router is already connected to
the Internet (Green check mark), please Tap WI-FI Settings to
configure your Wi-Fi network. Please skip ahead to page 14 (Wi-Fi
Setup)
Page 14
TAP-R2
USER’S GUIDE
13
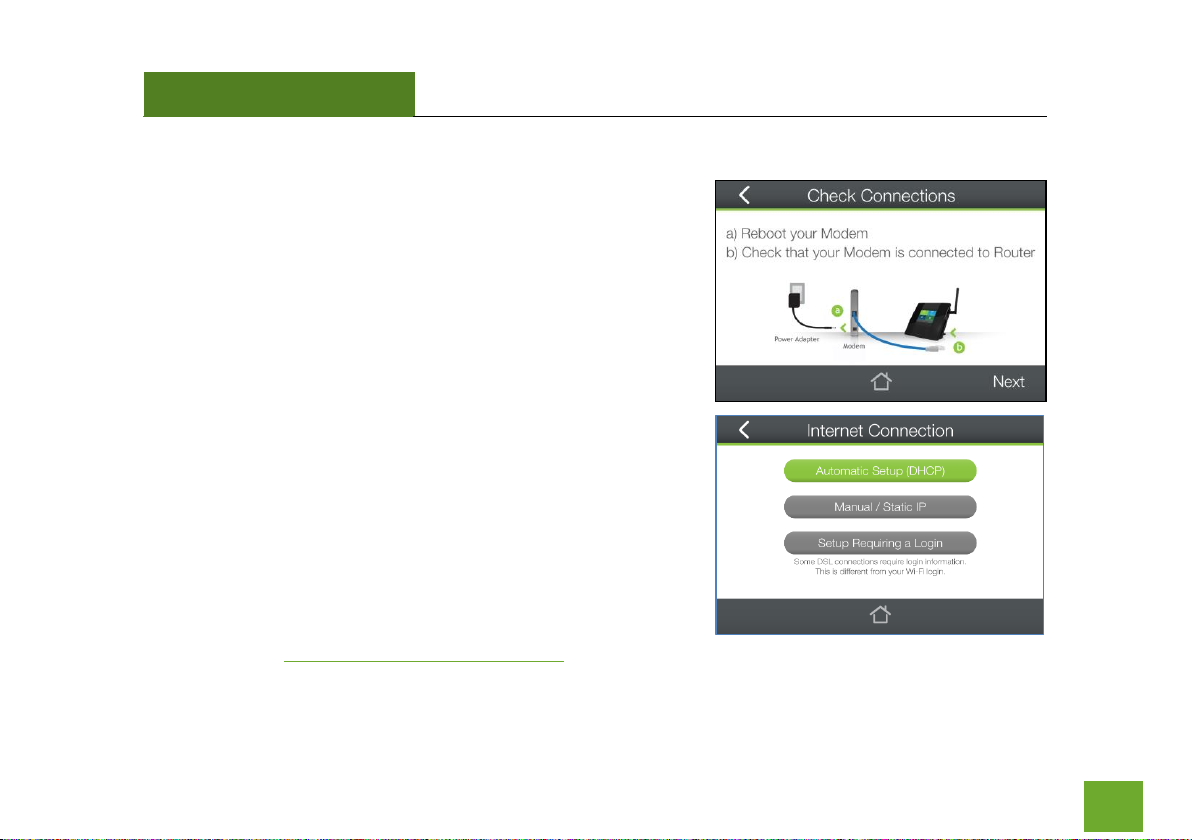
Check Connections
If you have not already done so, please reboot your Modem and
check that your Modem is connected to the Router. Once this is
complete tap Next.
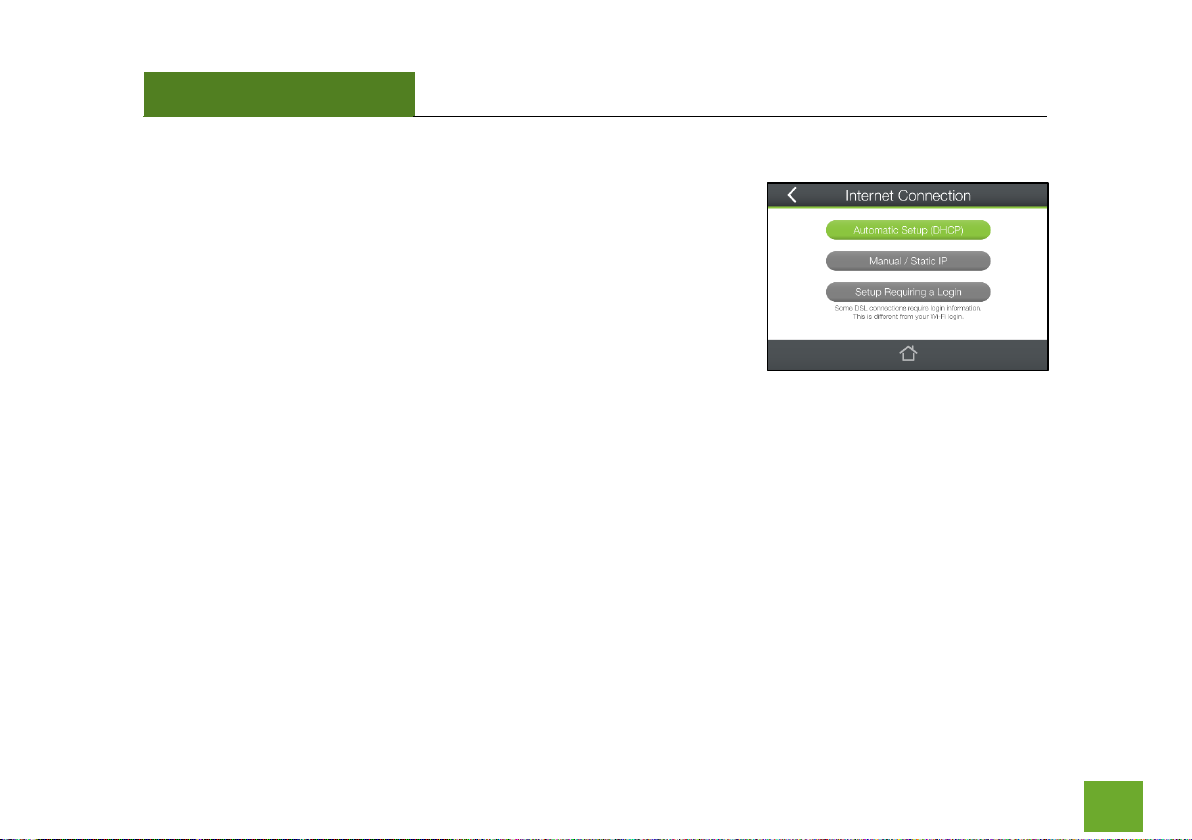
Internet Connection Setup
Select Automatic Setup (DHCP) to have the Wizard automatically
configure your Internet connection.
For more advanced users who wish to manually configure their IP
address settings, please tap Manual/Static IP.
For Internet service providers that require a login and password to
access the Internet, such as some DSL PPPoE, PPTP or L2TP
connections, tap Setup Requiring a Login. This login is not the login
you use to access the Wi-Fi network. If you are not sure what this is
please contact your Internet Service Provider.
If you continue to have issues, please contact Elite Support at
888-573-8820 or techsupport@ampedwireless.com for further assistance.
Page 15
TAP-R2
USER’S GUIDE
14
Internet Connection Setup
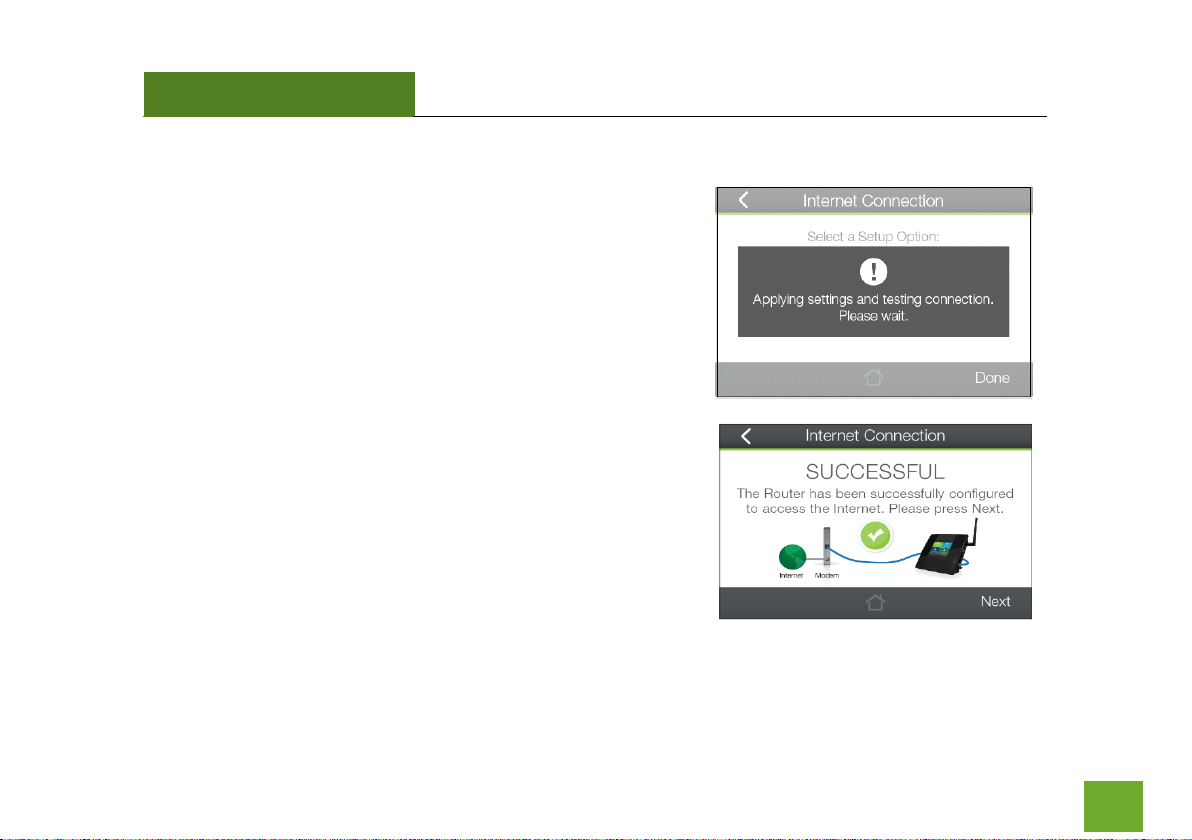
The Wizard will try to detect your Internet settings and configure
the Router. Please be patient.
If there is a problem with the Automatic Configuration, the wizard
will notify you of the issue. If you continue to have problems,
contact our Elite Support department at 888-573-8820.
If the Internet connection detection was successful, you will see a
green check mark.
Tap Next to continue.
Page 16
TAP-R2
USER’S GUIDE
15
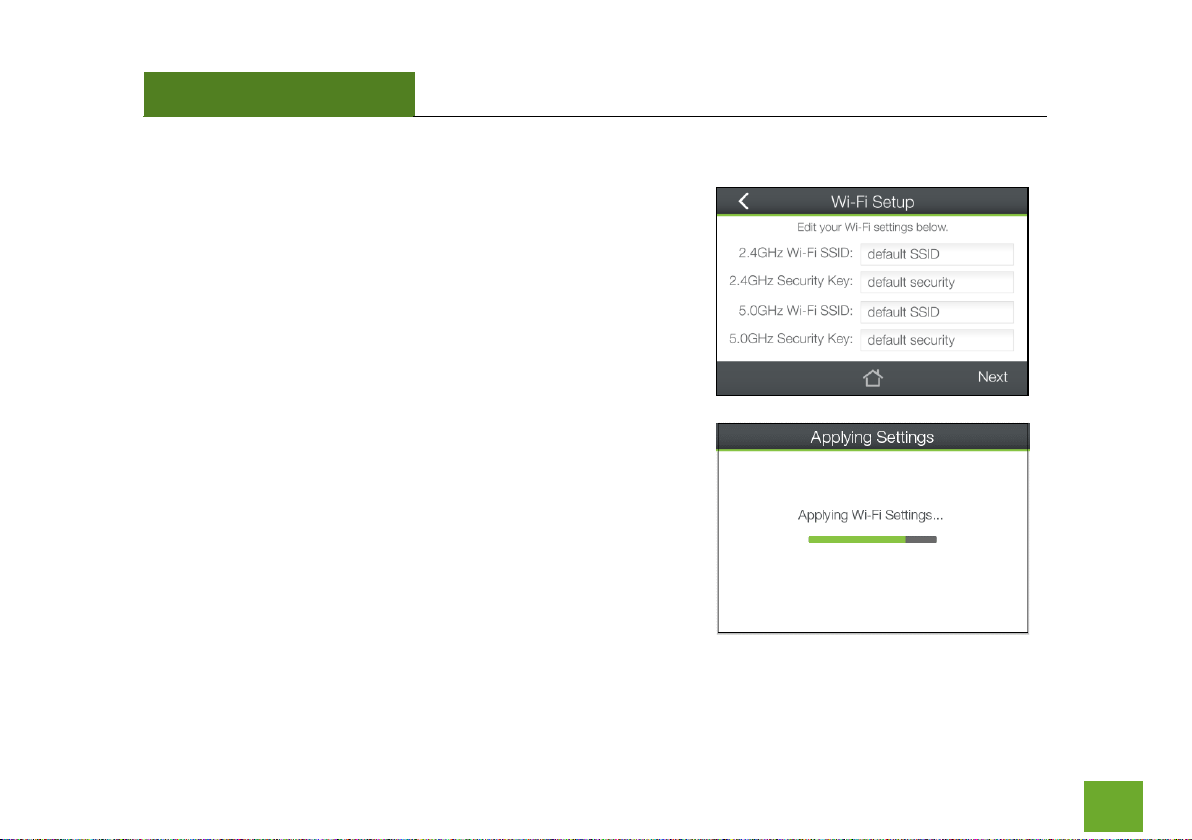
Wi-Fi Setup
The default IDs of your 5GHz Wi-Fi network and 2.4GHz Wi-Fi
network are:
TAP
Amped_TAPR2_5.0
Amped_TAPR2_2.4
To change it, tap the SSID field to configure the name of your Wi-Fi
network. Users connecting wirelessly to the Router will use these
IDs to identify your wireless network.
The default Security Key (WPA/WPA2) of your Wi-Fi networks is:
wireless
To change it, tap the Security Key field and enter a new key for each
Wi-Fi networks. The keys must be at least 8 characters long. For no
security (not recommended) leave the field blank.
Click Next to apply your settings.
Page 17
TAP-R2
USER’S GUIDE
16
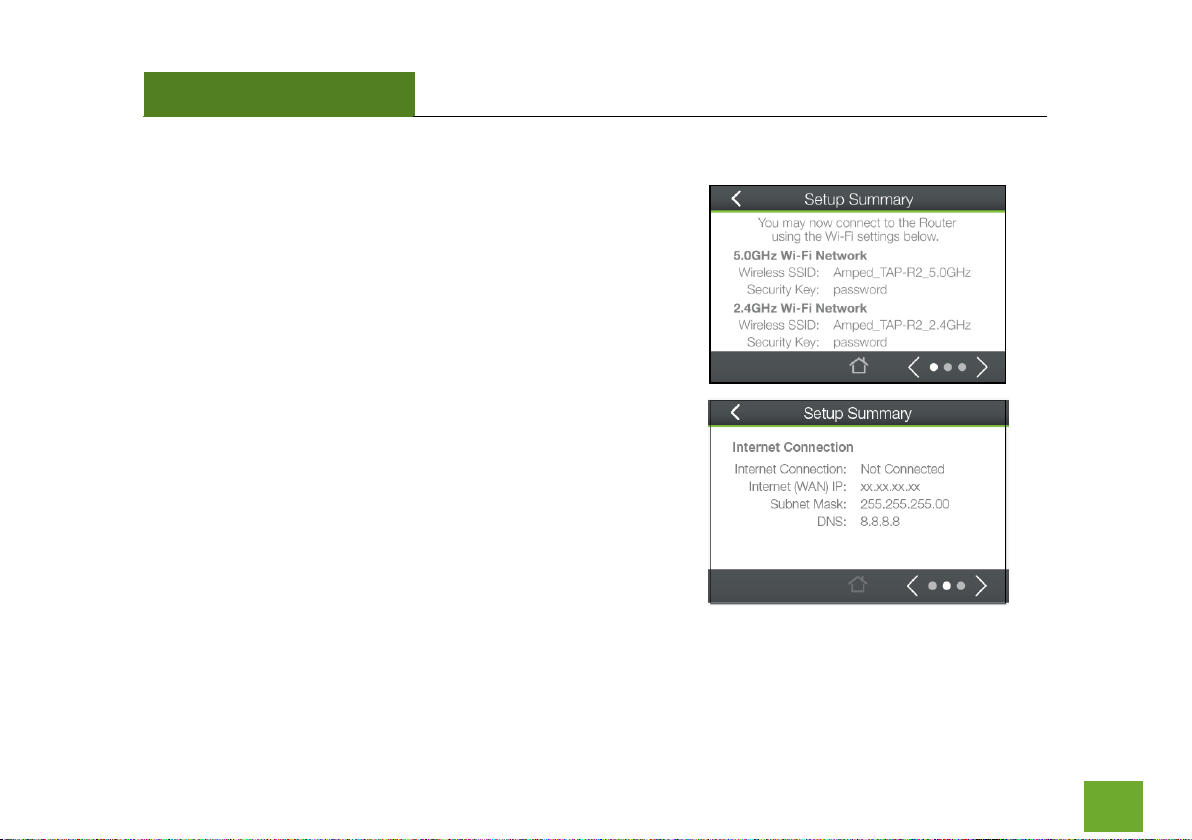
Setup Summary
Congratulations, your Router is now configured. The Setup
Summary provides you with the details of your setup.
At this time, you may connect additional devices to the Router
using a wired or wireless connection.
The details of your Wi-Fi settings, Internet connection and local
network settings can be found on these screens.
Enjoy your new Amped Wireless network!
Page 18
TAP-R2
USER’S GUIDE
17
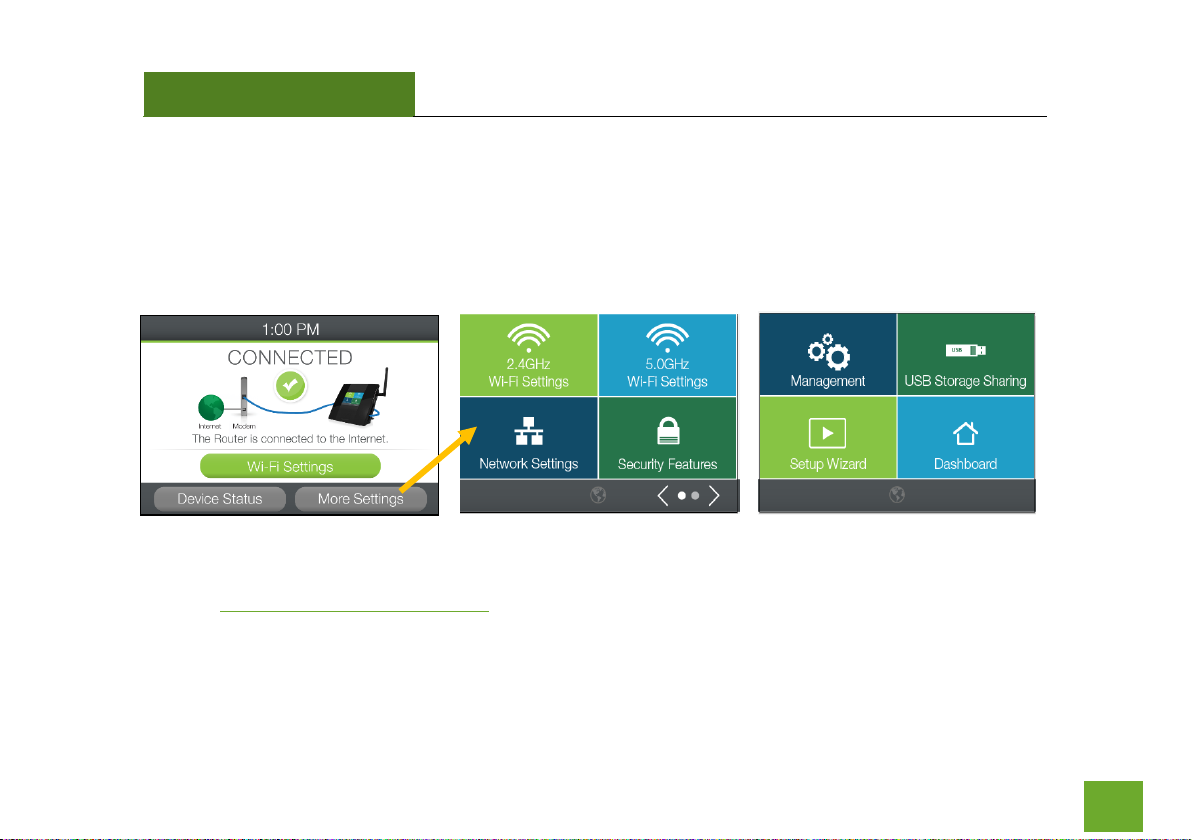
MORE SETTINGS (TOUCH SCREEN)
The Router’s Touch Screen Menu provides a host of features that you can easily configure with the touch of
your finger. To access the main Settings Menu tap More Settings from the Dashboard. From there you can
access additional Wi-Fi Settings, Network Settings, Security Features, USB Storage or Management Settings.
Note: For more advanced features and detailed options please access the web menu through your web
browser, http://setup.ampedwireless.com
Page 19
TAP-R2
USER’S GUIDE
18
2.4GHz WI-FI SETTINGS (TOUCH SCREEN)
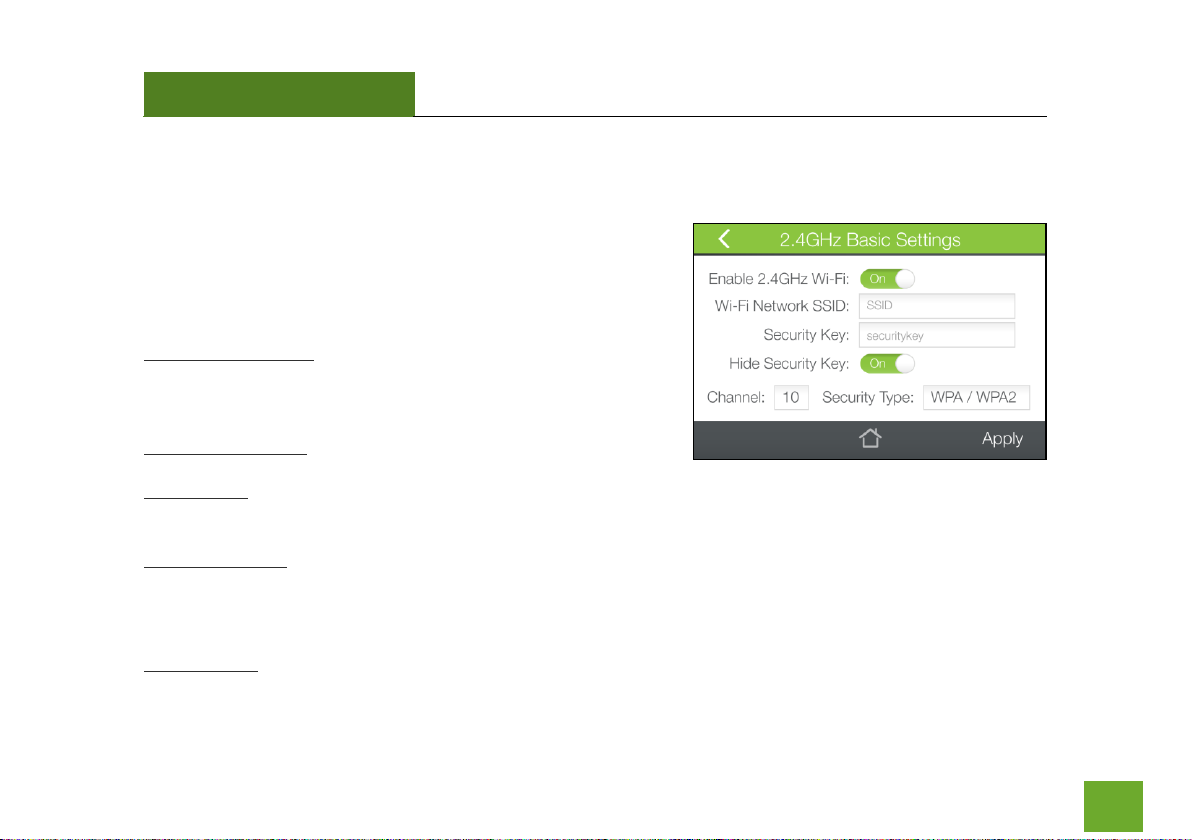
2.4GHz Wi-Fi Settings (Touch): Basic Settings
The Basic Settings page allows you to adjust settings for your
2.4GHz local wireless network.
Enable 2.4GHz Wi-Fi: Disabling will turn off all 2.4GHz Wi-Fi
activity. Users will no longer be able to connect wirelessly to
your 2.4GHz network.
Wi-Fi Network SSID: The name of your 2.4GHz wireless network
Security Key: Enter the security key of the 2.4GHz wireless network. This is the password that your network
devices will use to connect to the 2.4GHz Wi-Fi network.
Channel Number: Wi-Fi networks operate on specific wireless channels. Some network channels may have
more interference than others. If your performance is unstable, try a different channel number. If you are
using a repeater with this network, it is recommended you set a static channel, instead of using "Auto".
Security Type: Select the encryption method used by the 2.4GHz Wi-Fi network.
Page 20
TAP-R2
USER’S GUIDE
19
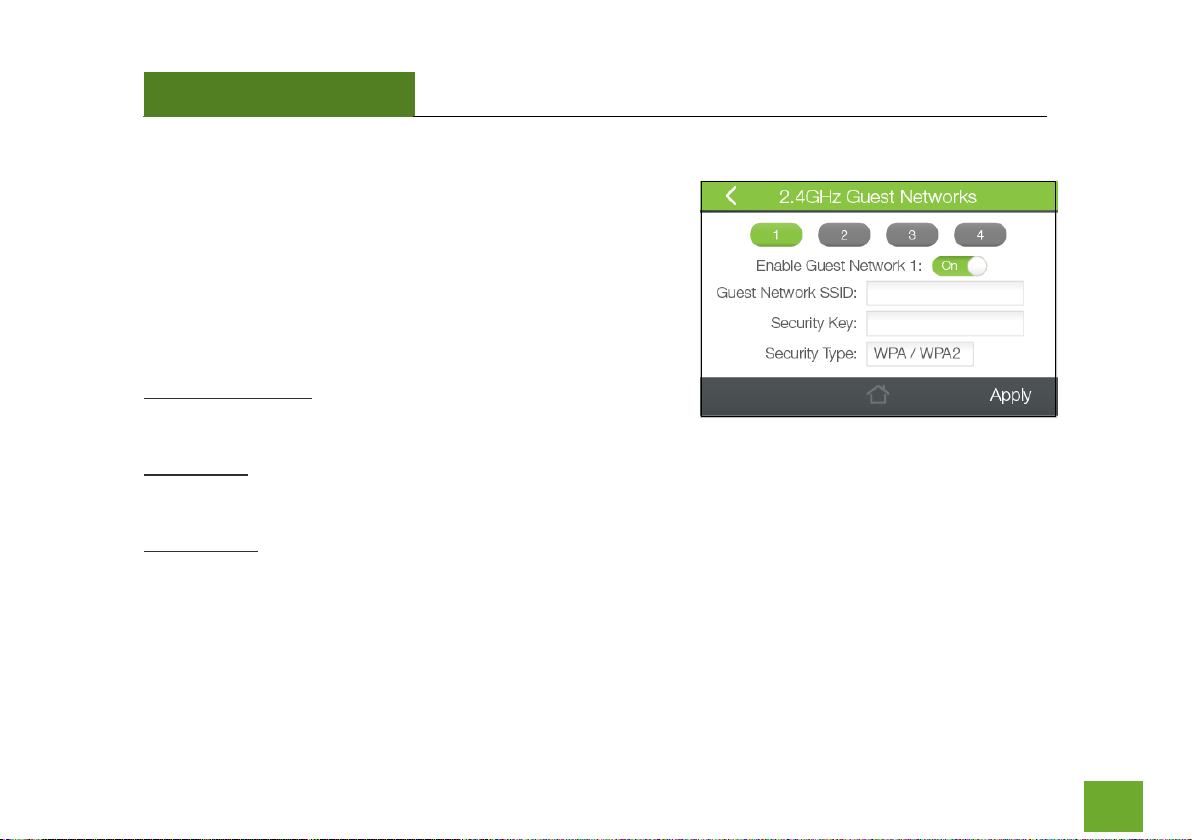
2.4GHz Wi-Fi Settings (Touch): Guest Network
The Router supports 4 additional 2.4GHz Guest Networks. Guest
Networks provide a separate Wi-Fi network with unique names
and security keys.
Select a number 1 through 4 and toggle the Guest Network to On
to activate the Guest Network.
Guest Network SSID: This is the Identification name of your new
Guest Network.
Security Key: Enter the security key of the Guest Network. This is the password that your network devices will
use to connect your new Guest Network.
Security Type: Select the encryption method used by the Guest Network.
Page 21
TAP-R2
USER’S GUIDE
20
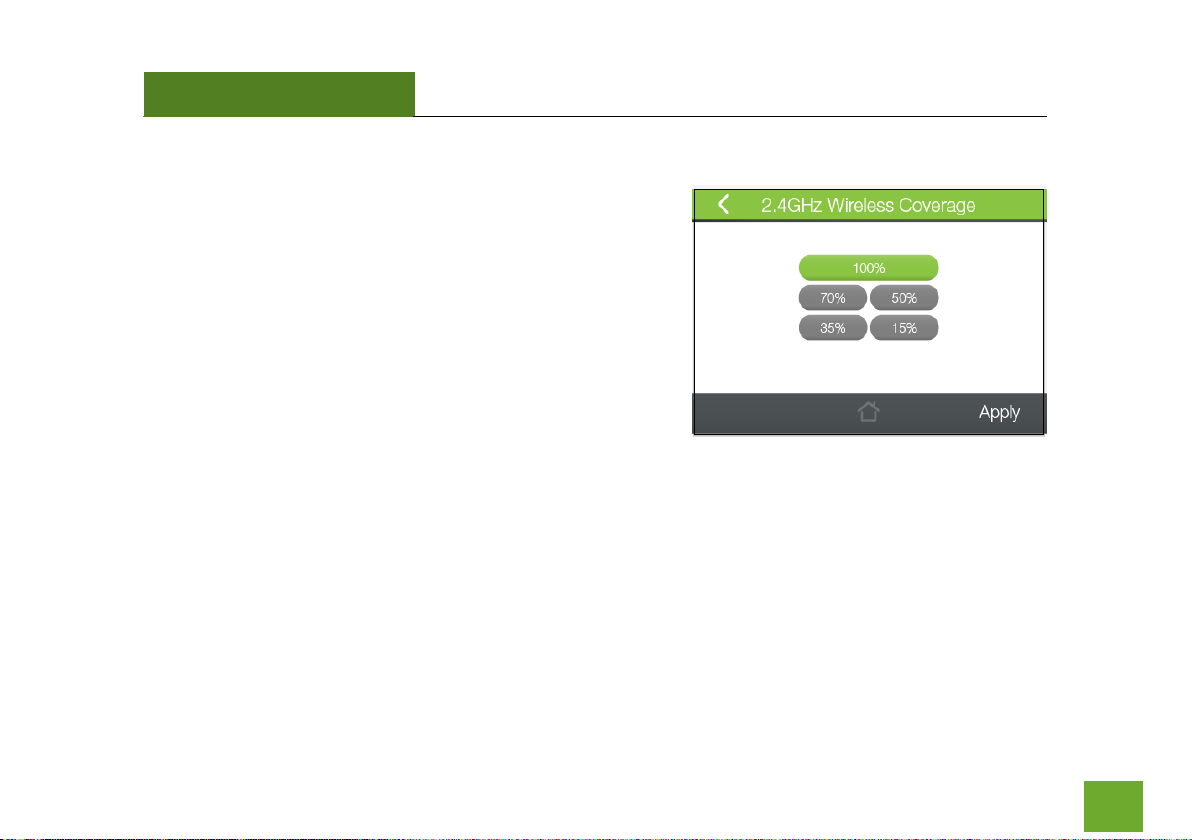
2.4GHz Wi-Fi Settings (Touch): Wi-Fi Coverage Controls
Adjust the output power of the Router to control the coverage
distance of your 2.4GHz Wi-Fi Network. For a smaller coverage
area you can select a lower output power. For the maximum WiFi coverage select the 100% selection.
Page 22
TAP-R2
USER’S GUIDE
21
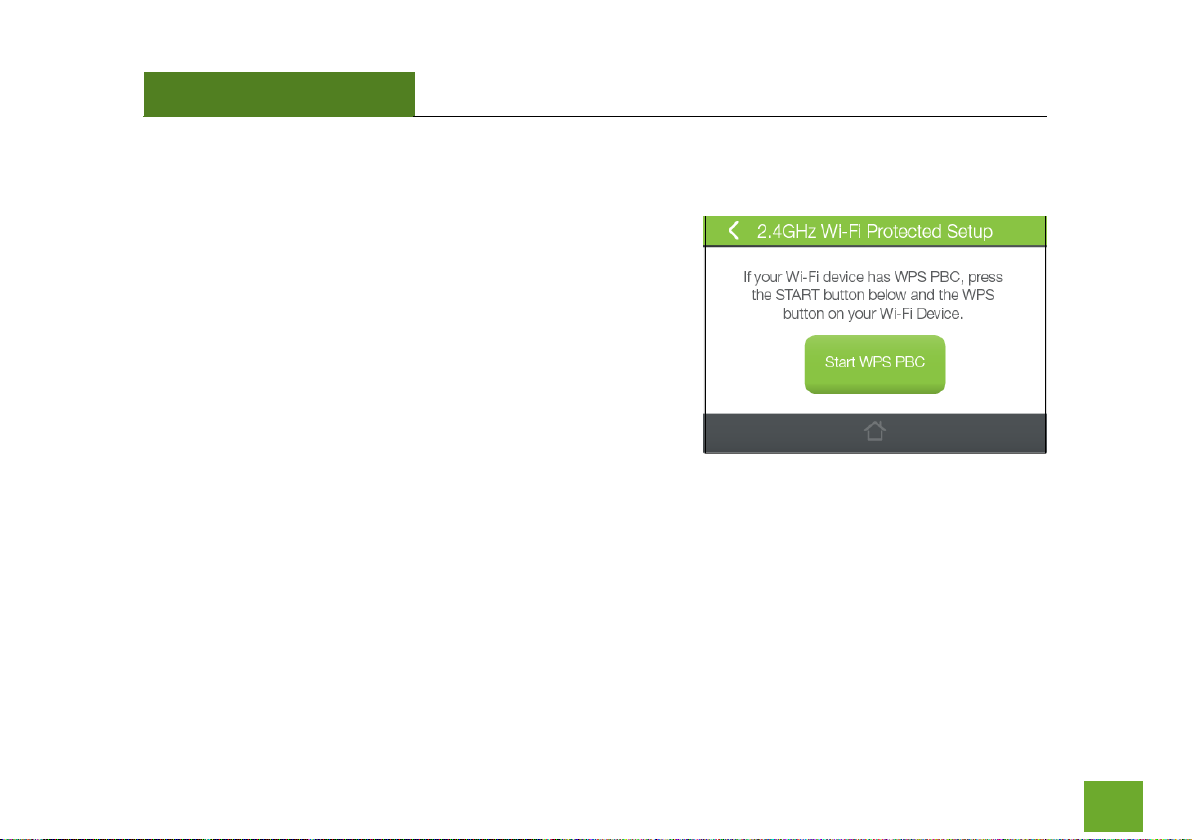
2.4GHz Wi-Fi Settings (Touch): Wi-Fi Protected Setup (WPS)
WPS is a Wi-Fi feature created to make Wi-Fi setup simple and
easy. Some Wi-Fi routers and adapters support this feature with
varying names (i.e. One Touch Setup or WPS).
You may enable WPS setup here by tapping Start WPS PBC.
Follow the steps on the Router to complete WPS setup.
More detailed settings can be found by accessing the web menu,
setup.ampedwireless.com.
Page 23
TAP-R2
USER’S GUIDE
22
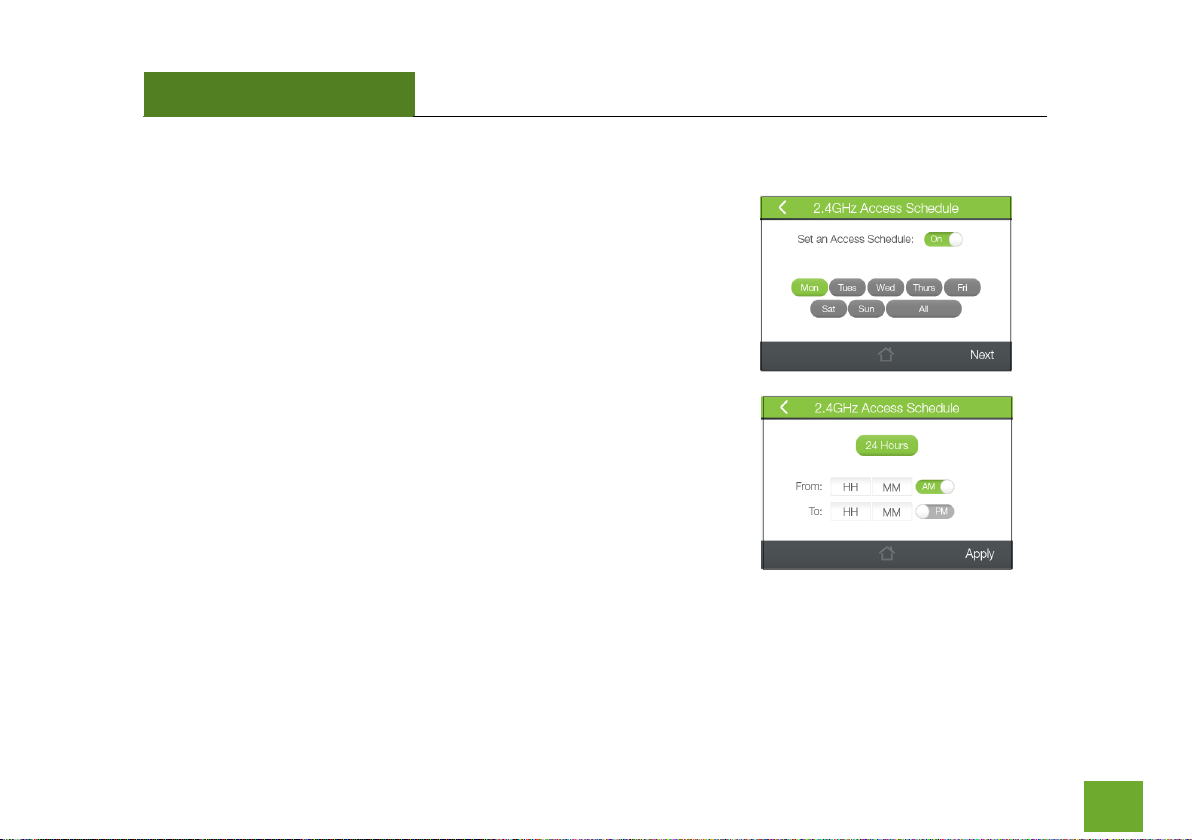
2.4GHz Wi-Fi Settings (Touch): Access Schedule
You can set a schedule for when your Wi-Fi is enabled or disabled
through the Access Schedule menu. To do so:
a. Toggle the Access Schedule to On.
b. Select which days you wish for your Wi-Fi to be available, one
day at a time. Select the first day and tap Next.
c. Then select the time frame during that day that you wish for Wi-
Fi to be available. Tap Apply to save your settings.
d. Tap the next day that you wish to schedule and then repeat
steps a-c.
Your Access Schedule will also control the Internet access for wired
connections. For more detailed settings, access
setup.ampedwireless.com.
Note: Make sure you have already configured your System Clock in order for your schedule to work correctly.
Time Zone Settings can be adjusted from the Settings menu under Management > Clock / Date
Page 24
TAP-R2
USER’S GUIDE
23
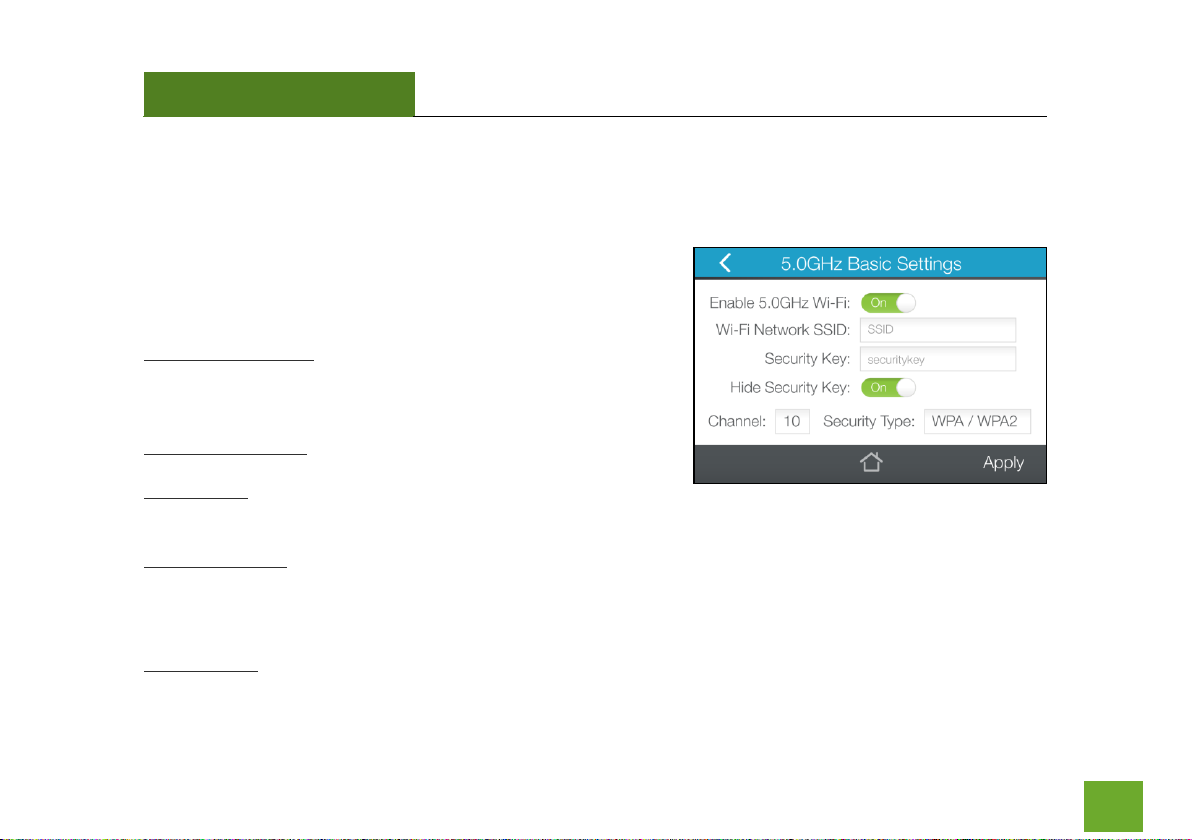
5.0GHz WI-FI SETTINGS (TOUCH SCREEN)
5.0GHz Wi-Fi Settings (Touch): Basic Settings
The Basic Settings page allows you to adjust settings for your
5.0GHz local wireless network.
Enable 5.0GHz Wi-Fi: Disabling will turn off all 2.4GHz Wi-Fi
activity. Users will no longer be able to connect wirelessly to
your 2.4GHz network.
Wi-Fi Network SSID: The name of your 5.0GHz wireless network
Security Key: Enter the security key of the 5.0GHz wireless
network. This is the password that your network devices will use to connect to the 5.0GHz Wi-Fi network.
Channel Number: Wi-Fi networks operate on specific wireless channels. Some network channels may have
more interference than others. If your performance is unstable, try a different channel number. If you are
using a repeater with this network, it is recommended you set a static channel, instead of using "Auto".
Security Type: Select the encryption method used by the 5.0GHz Wi-Fi network.
Page 25
TAP-R2
USER’S GUIDE
24
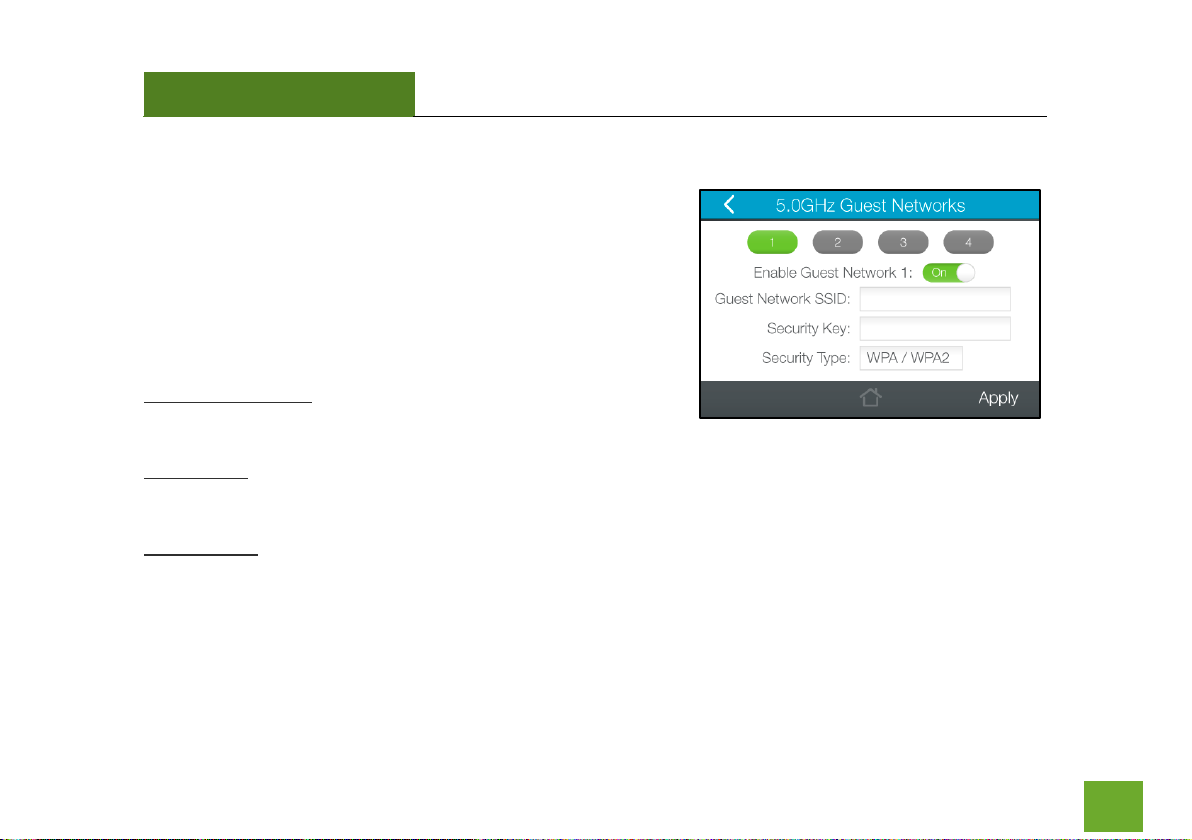
5.0GHz Wi-Fi Settings (Touch): Guest Network
The Router supports 4 additional 5.0GHz Guest Networks. Guest
Networks provide a separate Wi-Fi network with unique names
and security keys.
Select a number 1 through 4 and toggle the Guest Network to On
to activate the Guest Network.
Guest Network SSID: This is the Identification name of your new
Guest Network.
Security Key: Enter the security key of the Guest Network. This is the password that your network devices will
use to connect your new Guest Network.
Security Type: Select the encryption method used by the Guest Network.
Page 26
TAP-R2
USER’S GUIDE
25
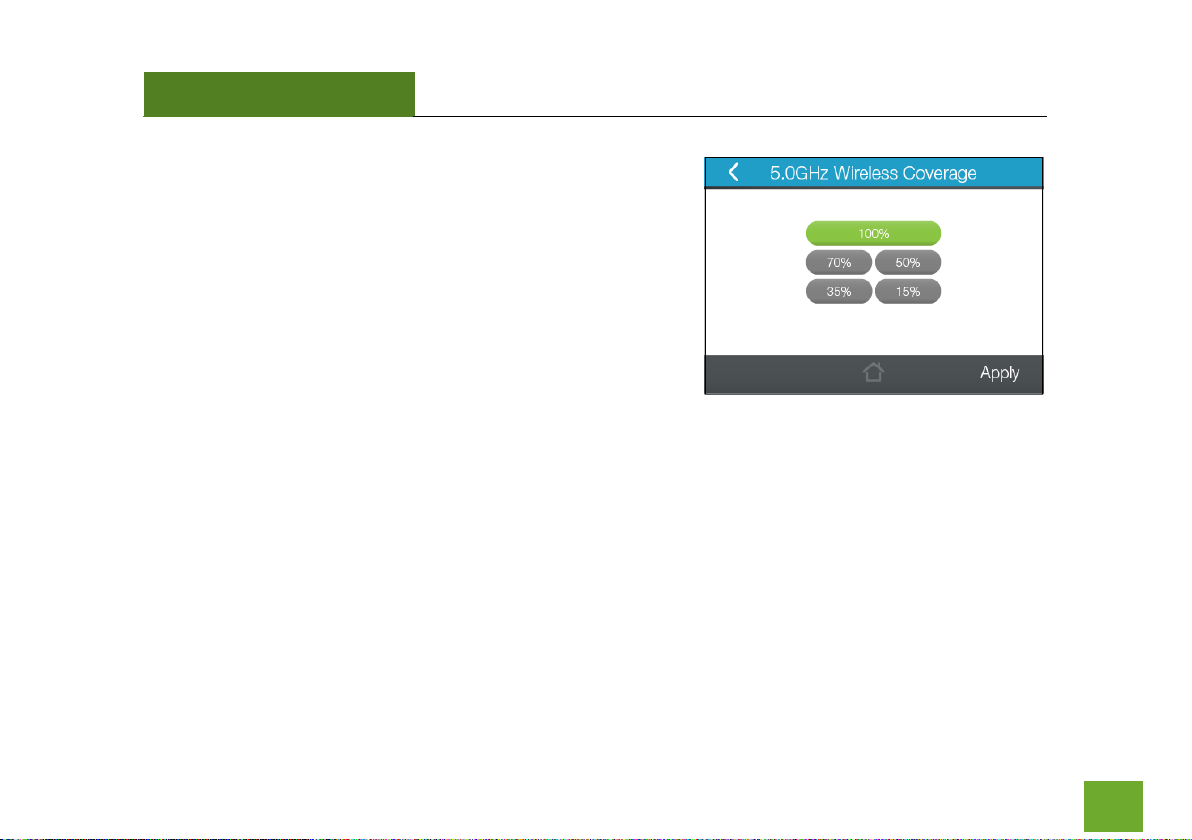
5.0GHz Wi-Fi Settings (Touch): Wi-Fi Coverage Controls
Adjust the output power of the Router to control the coverage
distance of your 5.0GHz Wi-Fi Network. For a smaller coverage
area you can select a lower output power. For the maximum Wi-Fi
coverage select the 100% selection.
Page 27
TAP-R2
USER’S GUIDE
26
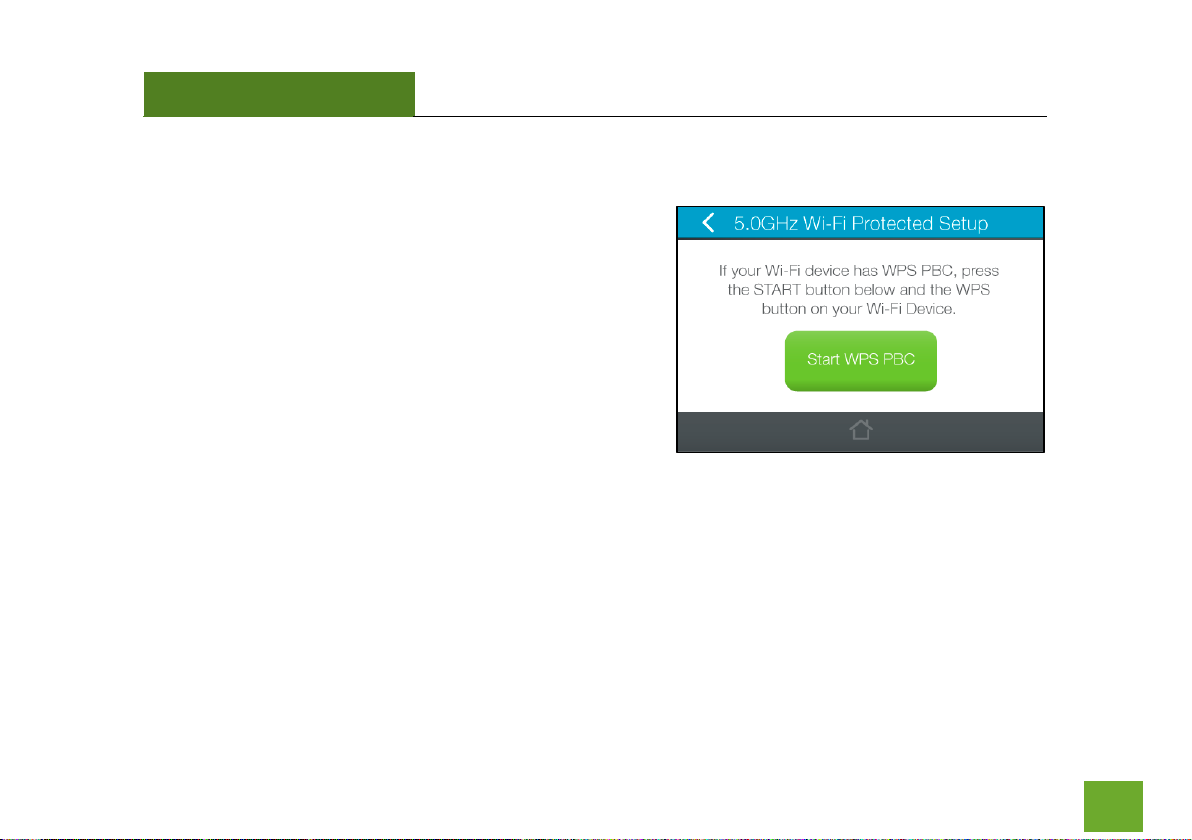
5.0GHz Wi-Fi Settings (Touch): Wi-Fi Protected Setup (WPS)
WPS is a Wi-Fi feature created to make Wi-Fi setup simple and
easy. Some Wi-Fi routers and adapters support this feature
with varying names (i.e. One Touch Setup or WPS).
You may enable WPS setup here by tapping Start WPS PBC.
Follow the steps on the Router to complete WPS setup.
More detailed settings can be found by accessing the web
menu, setup.ampedwireless.com.
Page 28
TAP-R2
USER’S GUIDE
27
5.0GHz Wi-Fi Settings (Touch): Access Schedule
You can set a schedule for when your Wi-Fi is enabled or disabled through
the Access Schedule menu. To do so:
a. Toggle the Access Schedule to On.
b. Select which days you wish for your Wi-Fi to be available, one day
at a time. Select the first day and tap Next.
c. Then select the time frame during that day that you wish for Wi-Fi
to be available. Tap Apply to save your settings.
d. Tap the next day that you wish to schedule and then repeat steps
a-c.
Your Access Schedule will also control the Internet access for wired
connections. For more detailed settings, access setup.ampedwireless.com.
Note: Make sure you have already configured your System Clock in order
for your schedule to work correctly. Time Zone Settings can be adjusted from the Settings menu under
Management > Clock / Date
Page 29
TAP-R2
USER’S GUIDE
28
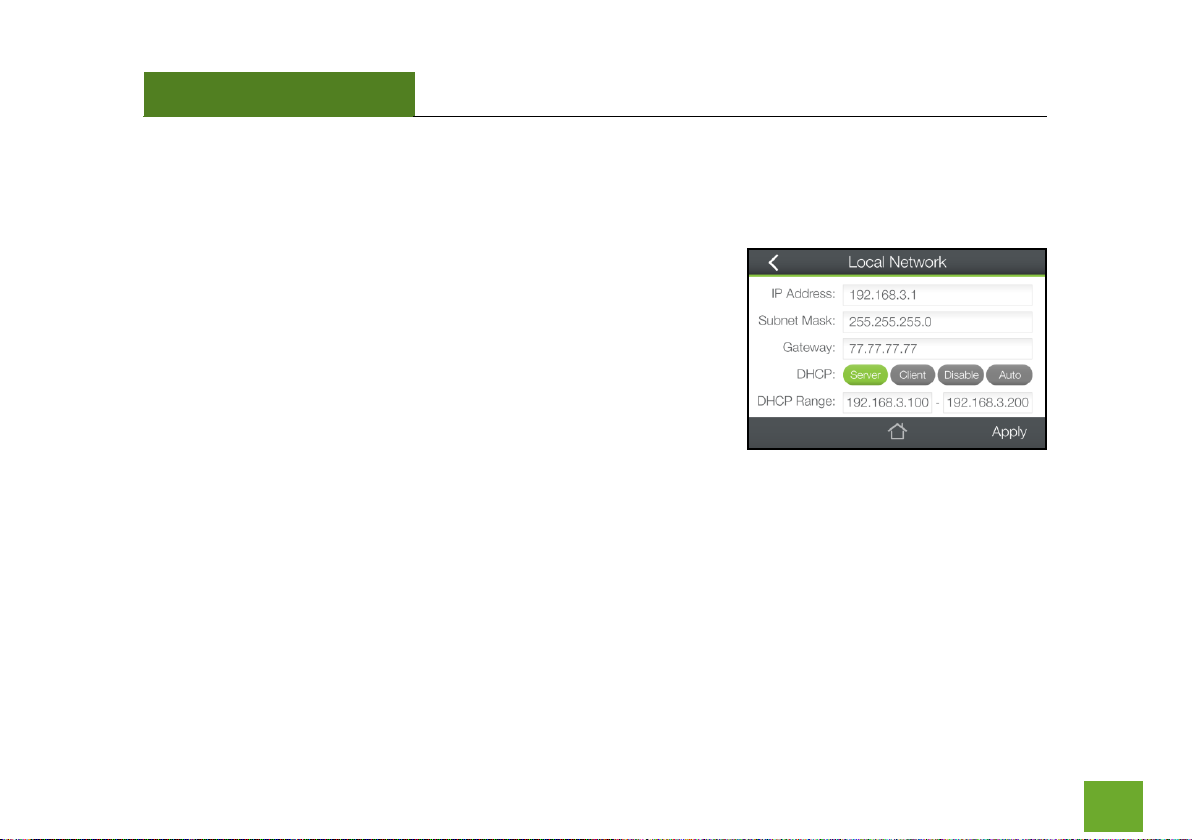
NETWORK SETTINGS (TOUCH)
Network Settings: Local Network
These settings are for your local network only and do not apply to your
Internet / ISP connection.
IP Address: The IP address of the Router.
Subnet Mask: The subnet of the Router.
Default Gateway: The access point to another network.
DHCP: Each network device on your local network will have its own IP
Address. The DHCP server automatically assigns the IP addresses to each device connected to your network.
Disabling DHCP will require that each device on your network be assigned a manual or static IP address.
DHCP Client Range: The range of IP addresses provided by the DHCP server is defined by this field. You can
limit how many IP addresses are used in your network by setting a smaller or larger range.
Page 30
TAP-R2
USER’S GUIDE
29
Network Settings: Internet Connection
The Basic Setup Wizard will assist you in setting up your Internet
connection. However, in the case that you wish to adjust settings
manually, the options on this page provides you with the tools to do this
easily.
Select your Internet Connection type from the drop down menu:
Automatic Setup (DHCP): This is the configuration type most often used by Internet providers. Automatic
configurations are used by both DSL and Cable as well as other providers. Under the Automatic Configuration
method, the Internet provider will assign your router an Internet IP address automatically.
Manual / Static IP: For Internet connections where the Internet provider does not provide you with an IP
address automatically. If you know the IP address and DNS settings that your Internet provider uses, select this
option.
Page 31

TAP-R2
USER’S GUIDE
30
If for some reason you do not get an IP address and you know that your Internet provider uses DHCP, try
resetting your modem. Remove the power adapter from the modem as well as the backup battery (if
available). Wait about 30 seconds and then power the modem back on. You can run through the Basic Setup
Wizard again to see if that fixes your Internet connection issues.
Setups Requiring a Login: If you have an Internet connection that requires you to enter a login to access the
Internet through the modem, select this option. DSL connections sometimes use this method. The different
types of DSL connections are listed below.
PPPoE connections normally requires login information. If you do not know the settings for your PPPoE
connection, please contact your Internet provider.
PPTP and L2TP connections requires login information as well as IP address settings. If you do not know the
settings for your PPTP / L2TP connection, please contact your Internet provider.
Page 32

TAP-R2
USER’S GUIDE
31
SECURITY FEATURES (TOUCH)
Security Features: Block Websites
To block a website, you must first enable website blocking by
toggling the switch to On. After it has been enabled, you can
add websites into the URL field that you wish to block.
Note: If you wish to block www.website.com, simply type in
"website" and the Router will block all websites with the text
"website" in the URL.
Page 33

TAP-R2
USER’S GUIDE
32
Security Features: User Access (Mac)
User Access (Mac) allows you to deny access or allow access to specific
users that are connecting wirelessly to the Router’s network via Mac
Addresses. Each network device has a unique address called a MAC
address (a 12 digit hex number).
By inputting the MAC address into the field, you can define whether that
device is allowed to connect to your network or not allowed.
Tap Select from Connected Devices to conveniently alter the access of
devices that are already connected to the Router’s network.
Page 34

TAP-R2
USER’S GUIDE
33
Security Features: User Access (IP)
User Access (IP) allows you to deny access or allow access to specific
users that are connecting wirelessly to the Router’s network using their
IP address. Toggle the switch to On to enable Users Access (IP).
Input an IP Address into the field and the network device with that
specific IP address will no longer be able to access the Internet or the
Router. You may add multiple IP address that you wish to block access
to.
Tap Select from Connected Devices to conveniently alter the access of
devices that are already connected to the Router’s network.
Page 35

TAP-R2
USER’S GUIDE
34
Security Features: Demilitarized Zone (DMZ)
A DMZ is a network location or IP Address that is not protected by the
firewall. When enabling DMZ, it is important to note that the device on
the IP Address designated as part of the DMZ does not have any
protection from the Router’s firewall. The device’s only security would be
those built into the operating system.
As a general safety rule, devices placed on the DMZ should not have any
other network connections to any other devices.
Enable DMZ: Enables the Demilitarized Zone.
DMZ IP Address: The designated IP Address of the network device to have unrestricted access through the
Router’s Firewall.
Page 36

TAP-R2
USER’S GUIDE
35
Security Features: Port Forwarding
Port Forwarding is a rule that tells the Router that if a specific type
of request comes in on a specific port, then that request should be
forwarded to a specific device on the private network.
Port Forwarding is often used for setting up servers, cameras and
other devices that require remote access.
Enable Port Forwarding: Enables designated ports to begin
forwarding.
IP Address: The IP address of the device behind the Firewall that is being designated for Port Forwarding.
Protocol: Select UDP, TCP or Both for the protocols to be forwarded.
Port Range: Select a range of ports for the designated IP address that you wish to be forwarded.
Page 37

TAP-R2
USER’S GUIDE
36
Security Features: Port Filtering
Port Filtering is a security measure that prevents users from using
specific ports for reasons other than what those ports were
originally intended for. For example, TCP port 21 is traditionally
used for FTP. However, there is nothing stopping a user from
using port 21 for purposes other than FTP access. By enabling
Port Filtering on TCP port 21, only FTP communications would be
allowed. No other types of communication would be allowed on
this port.
Hackers may sometimes scan for all open ports on your network as a method of hacking into your network.
Port Filtering and other firewall features help to prevent this from happening.
To set up Port Filtering, select a range of ports you wish to filter. If you are trying to filter a single port, enter
the port number twice. (For example, Port 21: 21 – 21) Select the Protocol of the port you are filtering. If you
do not know what protocol you wish to filter, select “TCP & UDP.”
Page 38

TAP-R2
USER’S GUIDE
37
MANAGEMENT SETTINGS (TOUCH)
Management (Touch): Screen Settings
Manage the behavior and security of the LCD screen:
Timeout: When the touch screen is inactive past the duration of the
Timeout time (in seconds), it will turn off to conserve power.
Lock Passcode: You can turn on a screen that has turned off simply by
touching the screen. The Lock Passcode is a 4 digit security code used
to secure access to the screen. If the Passcode is incorrect, the Touch
Screen Menu will not appear. (Note: If you forget your passcode,
simply reset the Router back to default settings by holding down the reset button on the right panel of the
Router for 5-10 seconds)
Show Clock After Timeout: The Router can automatically display the time and date after the timeout time has
elapsed instead of turning the screen off.
Page 39

TAP-R2
USER’S GUIDE
38
Management (Touch): Clock / Date
Maintain the internal clock for the Router by syncing with the time
with the Internet.
Your clock and date settings need to be accurate in order for Logs and
Wi-Fi Access Schedules to work correctly.
If you wish for the Clock to show on your screen when the Router is
timed-out, toggle this to On.
Be sure to Apply settings to save them.
Page 40

TAP-R2
USER’S GUIDE
39
Management (Touch): System Status
The System Status provides you with a snapshot of your Router’s current
connections and settings.
The System Information section provides you with the router’s firmware version
and build. This is used to help our support department determine what firmware
version your device is running. The Current Date / Time is the setting for the
system clock. If this time is off, go to the System Clock section and configure your
system time.
The Internet Connection Status displays the information from your Internet
Provider. If for some reason your Internet connection stops working, you may try
running through the Basic Setup Wizard again or contact our support department
at 888-573-8820.
The Wireless Settings shows the details of the 2.4GHz and 5.0GHz wireless
networks.
The Local Area Network settings displays the current configurations for local
network IP address and DHCP server settings.
Page 41

TAP-R2
USER’S GUIDE
40
Management (Touch): Connected Users
Connected Users displays all users currently connected to the Router’s
network. If available, It provides a list of name, IP address and MAC
address of each connected device.
Page 42

TAP-R2
USER’S GUIDE
41
Management (Touch): Statistics
Network statistics shows the data activity for each connection type on
the Router (Internet, Wireless and Wired).
2.4GHz and 5.0GHz Wi-Fi shows the data activity for all devices
connected to the Wi-Fi networks of the Router.
The Wired Connection statistics shows all data activity for all users
physically connected to the wired ports on the Router.
The Internet Connection statistics shows the data activity for all
upload and download data over your Internet connection.
Page 43

TAP-R2
USER’S GUIDE
42
Management (Touch): Logs
The System Log is useful for viewing the activity and history of your
Router. The System Log is also used by Amped Wireless technicians to
help troubleshoot your router when needed. It is recommended that
you enable all logs in the event that troubleshooting is required.
All log entries will be deleted each time the Router reboots or is
powered off.
Page 44

TAP-R2
USER’S GUIDE
43
Management (Touch): Upgrade Firmware
Amped Wireless continuously updates the firmware for all products in
an effort to constantly improve our products and their user
experiences. When connected to an active connection with Internet
access, the Router can automatically check for new firmware updates
that are available by tapping Check for Updates. Follow the prompts
to complete the upgrade process.
Before upgrading the firmware, remember to always save your
current settings first by going to Save/Reload Settings via the web menu. The firmware upgrade process will
reset the settings of the Router to default settings.
More detailed settings can be found by accessing the web menu, setup.ampedwireless.com.
Page 45

TAP-R2
USER’S GUIDE
44
Management (Touch): Dynamic DNS
The Dynamic Domain Name System (DDNS) is a method to keep a web
domain name, or web address, linked to a changing IP address as
most Internet Providers do not provide static IP addresses.
To use DDNS, you must first set up an account with a DDNS provider.
The Router supports two of these providers (TZO and DynDNS). Once
the DDNS service has been set up you will be given a login and
password. Enter it on this page along with your registered DDNS
domain. Once configured, the DDNS service will constantly track the
IP address of your Internet connection. Each time your Internet Provider changes your IP address, the Router
will inform the DDNS service and the DDNS service will update your new IP address. The DDNS web domain
that you have chosen to use will then be updated to redirect to your new Internet IP address. The DDNS
service makes it so you never have to check or remember your Internet IP address. This feature is typically
used for users running servers, network cameras and other devices that require remote access.
Page 46

TAP-R2
USER’S GUIDE
45
Management (Touch): Reset Settings
Reset the Router’s settings to factory settings by pressing Reset. By
resetting the Router you will lose all previous configurations and will
need to run the Basic Setup Wizard again to configure the Router’s
Settings.
Page 47

TAP-R2
USER’S GUIDE
46
USB STORAGE (TOUCH)
USB Storage (Touch): Local Sharing
Share a USB storage device with computers on the Router’s network.
Insert a USB storage device, such as a flash drive or external hard drive, to
the USB port on the side of the Router. The computer must be connected
to the Router’s network in order to access the storage device. You may
also want to Map the Network Drive so it shows up as a standard drive on
your computer for easier access.
More detailed settings can be found by accessing the web menu, setup.ampedwireless.com.
For remote access of the USB Storage device please see the following section: FTP Server
Page 48

TAP-R2
USER’S GUIDE
47
USB Storage (Touch): FTP Server
Share a USB storage device with computers remotely over the Internet.
A FTP server allows you to access files through the use of an FTP client
remotely over the Internet.
Insert a USB storage device, such as a flash drive or external hard drive,
to the USB port on the side of the Router.
a) Enable the FTP Server by toggling the switch to On
b) Choose the network port you wish to use for the FTP server (typically port 21)
c) For an open FTP server that anyone can access to download files without a login, enable Anonymous FTP.
d) For a secure FTP server that requires users to login, turn Anonymous FTP off and tap on Login Accounts to
create user accounts.
e) Open your FTP client software (not provided) and create a new FTP connection.
Enter the Internet Address for the router as the IP address for your FTP connection. This IP can be found at the
top of the screen “FTP Internet IP Address”. When prompted enter your login information to access the USB
Storage device remotely
Page 49

TAP-R2
USER’S GUIDE
48
BASIC SETUP GUIDE (WEB MENU)
Setup Preparations
Disconnect and power off your existing router.
Disconnect your existing router from your computer, your broadband
modem and its power outlet. If you do not have an existing router
please continue to the next step.
Power off your Modem
Power off the modem by disconnecting the modem’s power adapter
from the power outlet. If your modem has a backup battery, remove
the backup battery from your modem. Do NOT power on the modem
until prompted at a later step.
Page 50

TAP-R2
USER’S GUIDE
49
Connect the Router to your Modem
Do NOT connect the power adapter to the Router at this time.
a) Use the included blue Ethernet cable and connect one end of the cable to your modem.
b) Connect the other end of the cable to the blue Modem port on the Router.
Page 51

TAP-R2
USER’S GUIDE
50
Power on your Modem
Plug in your modem’s power adapter and backup battery (if available):
Page 52

TAP-R2
USER’S GUIDE
51
Attach the Antenna, Power On & Connect to your Computer
a) Attach the antenna to the antenna connector on the Router.
b) Connect an Ethernet cable to an available port on your computer or connect to the Router’s Wi-Fi
Network: Amped_TAPR2_2.4 or Amped_TAPR2_5.0. Password: wireless
c) Attach the Power Adapter to the Router’s PWR port and a power outlet.
Page 53

TAP-R2
USER’S GUIDE
52
Open your Web Browser to Access the Setup Wizard
a) Open your web browser.
b) Type http://setup.ampedwireless.com
into the web address bar.
c) If the web menu fails to open, type the following
IP address into your web address bar:
http://192.168.3.1
Page 54

TAP-R2
USER’S GUIDE
53
Welcome to the Setup Wizard
If this is your first time setting up the Router, the Setup
Wizard should automatically load.
If you wish to manually configure your router you can also
choose to skip the Setup Wizard.
Double check that the modem is connected to the Router’s
Modem port.
Check that the antenna is attached firmly to the antenna
connector.
Click Next to continue.
If the Dashboard loads (see right image) instead of the Setup
Wizard, scroll to the bottom and click the Setup Wizard
button to access the Wizard.
Page 55

TAP-R2
USER’S GUIDE
54
Internet Connection Detection
The Wizard will try to detect your Internet settings and
configure the router. Please be patient.
If there is a problem with the Automatic Configuration, the
wizard will notify you of the issue. If you continue to have
problems, contact our Elite Support department at 888573-8820.
If the Internet connection detection was successful, you
will see a green check mark.
Click Next to continue.
Page 56

TAP-R2
USER’S GUIDE
55
Personalize your Wi-Fi Settings
The default ID of your 5GHz Wi-Fi network and
2.4GHz Wi-Fi network is:
Amped_TAPR2_5.0
Amped_TAPR2_2.4
To change it, enter a new name in the SSID field.
Users connecting wirelessly to the Router will
use these IDs to identify your wireless network.
The default Security Key (WPA/WPA2) of your Wi-Fi networks is: wireless
To change them, enter a new key in the Security Key field for both 2.4GHz and 5GHz networks. The keys must
be at least 8 characters long.
Click Next to apply your settings.
Page 57

TAP-R2
USER’S GUIDE
56
Create a Password for your Router
This password is NOT your Wi-Fi network password.
This password is to access the web menu of the
Router to access additional router settings. Leave this
blank if you do not wish to have a password.
Click Apply to save your settings.
The Router will reboot. This process may take up to 1 minute. The page will automatically reload after the
countdown. If it does not, you may need to manually refresh the page or check your connection to the Router.
Page 58

TAP-R2
USER’S GUIDE
57
Setup Summary
Once the Router has rebooted, it will load the Setup
Summary page and provide you with the details of your
setup. It is recommended that you print this page for
your records.
Open a new web browser window and check that you
have access to the Internet.
At this time, you may disconnect from the Router and start a wireless connection.
If you have any wired devices that you would like to attach to the Router you may do so now as well.
Enjoy your new Amped Wireless network!
Page 59

TAP-R2
USER’S GUIDE
58
WEB MENU DASHBOARD
Welcome to the Dashboard
Once you have completed the Router Setup Wizard, going to
http://setup.ampedwireless.com will now bring you to the
Router’s Dashboard.
The Dashboard provides you with information regarding your
internet connection and basic router settings. From here you
can enable or disable guest networks, have a quick glance at
what devices are connected to your Router and enable or
disable website blocking features. For more advanced settings
click on More Settings to navigate through the configuration
menu.
Page 60

TAP-R2
USER’S GUIDE
59
5GHz WI-FI SETTINGS
5GHz Wi-Fi Settings: Basic Settings (5.0GHz)
The Basic Settings page allows you to adjust settings for your
5GHz local wireless network.
Disable 5.0GHz Wireless Connections: Disabling will turn off all
5GHz Wi-Fi activity. Users will no longer be able to connect
wirelessly to your 5GHz network.
Band: Select the compatible Wi-Fi standard and speed for your
wireless network.
Broadcast SSID: Selecting Disable Broadcast SSID will hide the
visibility of the router’s 5GHz network SSID. Users must manually
enter the SSID to connect.
Data Rate: Sets the maximum wireless data rate that your
network will operate on.
Page 61

TAP-R2
USER’S GUIDE
60
Wireless Network ID (SSID): The name of your 5GHz wireless network.
Channel Number: Wi-Fi networks operate on specific wireless channels. Some network channels may have
more interference than others. If your performance is unstable, try a different channel number. If you are
using a repeater with this network, it is recommended you set a static channel, instead of using "Auto".
WMM: Prioritizes multimedia data over the wireless network.
Associated Clients: Shows the active users connected wirelessly to your 5GHz network.
Page 62

TAP-R2
USER’S GUIDE
61
5GHz Wi-Fi Settings: Basic Settings: Guest Networks (5.0GHz)
Guest Networks: You may add additional names (SSID) to your Wireless Network with different characteristics
for each SSID.
Each additional Network or SSID can have its own
security, band and data rate settings. You may
restrict users to specific SSIDs or provide access
only to some users with lower bandwidth by
changing the band (i.e. only allow 802.11b access
to specific users).
Guest Networks may also be set with restrictions
so that guests can only access the Internet and
not the local network.
Associated Clients: View all computers and network devices that are connected to your network wirelessly.
Page 63

TAP-R2
USER’S GUIDE
62
5GHz Wi-Fi Settings: Security Settings (5.0GHz)
The Security page allows you to change the type of wireless
security settings for your 5.0GHz wireless network.
Using the drop down menu, you can select which network you
wish to configure and may adjust the security settings below.
If you are using the Guest Network feature, you will be able to
adjust the security settings for your additional SSIDs as well.
(For 2.4GHz Guest Networks, view the 2.4GHz Wi-Fi Settings menu)
Encryption Types:
WEP is rated as a low level encryption and is compatible with all wireless devices and operating systems.
Using WEP may slow down your wireless performance.
WPA is a medium level encryption and is supported by most wireless devices and operating systems.
WPA2 is a high level encryption and is supported by most wireless devices and operating systems.
WPA Mixed Mode allows the use of both WPA and WPA2 at the same time.
If you are not sure which encryption type to use, we recommend you choose WPA/WPA2 Mixed Mode.
Page 64

TAP-R2
USER’S GUIDE
63
5GHz Wi-Fi Settings: Advanced Settings (5.0GHz)
Advanced Wireless Settings should only be adjusted by
technically advanced users. It is not recommended that
novice users adjust these settings to avoid degrading
wireless performance.
Fragment Threshold: The default and recommended
setting is at 2346, meaning the Router will never
fragment any frames that it sends to wireless users.
RTS Threshold: Adjusts the size of RTS data packets.
Lower values reduce throughput, but allow the system
to recover quicker from interference/collisions. Higher values provide the fastest throughput.
Beacon Interval: Indicates the frequency interval of the beacon. A beacon is a packet broadcast by the router
to synch the wireless network.
Preamble Type: Defines the length of the Cyclic Redundancy Check for communication between the router
and roaming wireless users.
IAPP: Inter-Access Point Protocol.
STBC: Space Time Block Coding improves reception by coding the data stream in blocks.
Page 65

TAP-R2
USER’S GUIDE
64
5GHz Wi-Fi Settings: Wi-Fi Protected Setup – WPS (5.0GHz)
WPS is a Wi-Fi feature created to make Wi-Fi setup
simple and easy. Some wireless routers and adapters
support this feature with varying names (i.e. one
touch setup or WPS).
You may enable WPS setup here by selecting the type
of WPS setup you wish to use. The Router supports
all types of WPS setup:
Option A: Push button: You may push the WPS button on the web menu or use the physical button on the
back of the Router.
Option B: PIN: Some wireless devices use PIN number to access wireless network. If your wireless device
requests for a PIN number, use the PIN code located here.
Option C: Enter PIN: Some wireless devices require that you use a PIN number to add them to the wireless
network. If your wireless device has a PIN number locate the number and enter in the field, then press Start
Pin.
Page 66

TAP-R2
USER’S GUIDE
65
5GHz Wi-Fi Settings: Wireless Coverage Controls (5.0GHz)
Adjust the output power of the Router to control the coverage distance of your 5GHz wireless network. For a
smaller coverage area, you can select a lower output power. For the maximum wireless coverage, select the
100% selection.
Page 67

TAP-R2
USER’S GUIDE
66
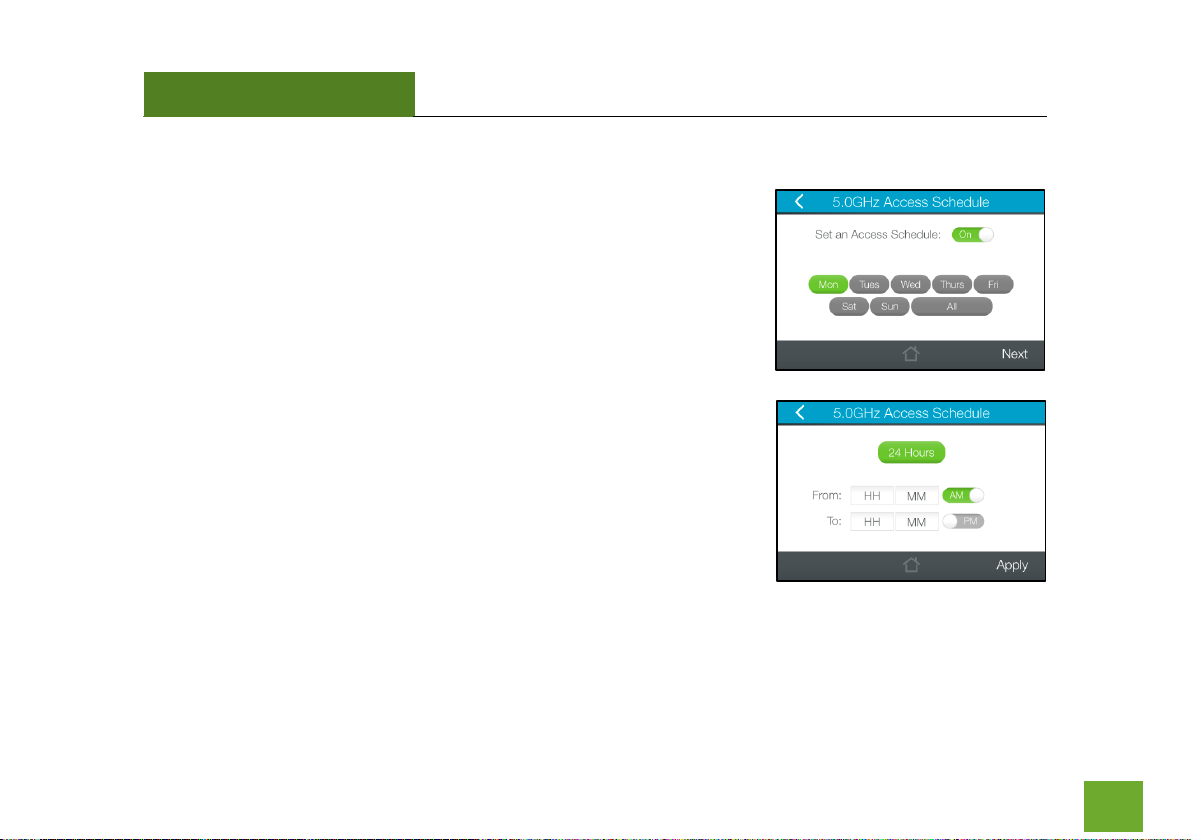
5GHz Wi-Fi Settings: Access Schedule (5.0GHz)
Access Schedules will enable or disable your 5GHz wireless access at a set time based on your predefined
schedule. This feature is often used for restricting access to all users (such as children, employees, guests)
during specific times of the day for parental control or security reasons.
a) Enable Access Schedule
b) Select which days you wish for your 5.0GHz Wi-Fi to be
available
c) Select the time frame during that day that you wish for
your 5.0GHz Wi-Fi to be available
d) Apply Changes
Note: Make sure you have already configured your Time Zone Settings in order for your schedule to work
correctly. Time Zone Settings can be adjusted from the web menu under Management > Time Zone Settings.
Page 68

TAP-R2
USER’S GUIDE
67
2.4GHz WI-FI SETTINGS
2.4GHz Wi-Fi Settings: Basic Settings (2.4GHz)
The Basic Settings page allows you to adjust settings for your
2.4GHz local wireless network.
Disable 2.4GHz Wireless Connections: Disabling will turn off all
2.4GHz Wi-Fi activity. Users will no longer be able to connect
wirelessly to your 2.4GHz network.
Band: Select the compatible Wi-Fi standard and speed for your
wireless network.
Broadcast SSID: Selecting Disable Broadcast SSID will hide the
visibility of the router’s 2.4GHz network SSID. Users must
manually enter the SSID to connect.
Data Rate: Sets the maximum wireless data rate that your network will operate on.
Wireless Network ID (SSID): The name of your 2.4GHz wireless network.
Page 69

TAP-R2
USER’S GUIDE
68
Channel Number: Wi-Fi networks operate on specific wireless channels. Some network channels may have
more interference than others. If your performance is unstable, try a different channel number. If you are
using a repeater with this network, it is recommended you set a static channel, instead of using "Auto."
WMM: Prioritizes multimedia data over the wireless network.
Associated Clients: Shows the active users connected wirelessly to your 2.4GHz network.
Page 70

TAP-R2
USER’S GUIDE
69
2.4GHz Wi-Fi Settings: Basic Settings: Guest Networks (2.4GHz)
Guest Networks: You may add additional names (SSID) to your Wireless Network with different characteristics
for each SSID.
Each additional Network or SSID can have its own
security, band and data rate settings. You may
restrict users to specific SSIDs or provide access
only to some users with lower bandwidth by
changing the band (i.e. only allow 802.11b access
to specific users).
Guest Networks may also be set with restrictions
so that guests can only access the Internet and not the local network.
Associated Clients: View all computers and network devices that are connected to your network wirelessly.
Page 71

TAP-R2
USER’S GUIDE
70
2.4GHz Wi-Fi Settings: Security Settings (2.4GHz)
The Security page allows you to change the type of wireless
security settings for your 2.4GHz wireless network.
Using the drop down menu, you can select which network you
wish to configure and may adjust the security settings below.
If you are using the Guest Network feature, you will be able to
adjust the security settings for your additional 2.4GHz SSIDs as
well.
Encryption Types:
WEP is rated as a low level encryption and is compatible with all wireless devices and operating systems.
Using WEP may slow down your wireless performance.
WPA is a medium level encryption and is supported by most wireless devices and operating systems.
WPA2 is a high level encryption and is supported by most wireless devices and operating systems.
WPA Mixed Mode allows the use of both WPA and WPA2 at the same time.
If you are not sure which encryption type to use, we recommend you choose WPA/WPA2 Mixed Mode.
Page 72

TAP-R2
USER’S GUIDE
71
2.4GHz Wi-Fi Settings: Advanced Settings (2.4GHz)
Advanced Wireless Settings should only be adjusted by
technically advanced users. It is not recommended that
novice users adjust these settings to avoid degrading
wireless performance.
Fragment Threshold: The default and recommended
setting is at 2346, meaning the Router will never
fragment any frames that it sends to wireless users.
RTS Threshold: Adjusts the size of RTS data packets.
Lower values reduce throughput, but allow the system to
recover quicker from interference/collisions. Higher
values provide the fastest throughput.
Beacon Interval: Indicates the frequency interval of the beacon. A beacon is a packet broadcast by the router
to synch the wireless network.
Preamble Type: Defines the length of the Cyclic Redundancy Check for communication between the router
and roaming wireless users.
IAPP: Inter-Access Point Protocol.
STBC: Space Time Block Coding improves reception by coding the data stream in blocks.
Page 73

TAP-R2
USER’S GUIDE
72
2.4GHz Wi-Fi Settings: Wi-Fi Protected Setup – WPS (2.4GHz)
WPS is a Wi-Fi feature created to make Wi-Fi setup
simple and easy. Some wireless routers and adapters
support this feature with varying names (i.e. one
touch setup or WPS).
You may enable WPS setup here by selecting the type
of WPS setup you wish to use. The Router supports
all types of WPS setup:
Option A: Push button: You may push the WPS button on the web menu or use the physical button on the
back of the Router.
Option B: PIN: Some wireless devices use PIN number to access wireless network. If your wireless device
requests for a PIN number, use the PIN code located here.
Option C: Enter PIN: If your wireless device has a PIN number, locate the number and enter it into the field.
Press Start PIN when ready.
Page 74

TAP-R2
USER’S GUIDE
73
2.4GHz Wi-Fi Settings: Wireless Coverage Controls (2.4GHz)
Adjust the output power of the Router to control the coverage distance of your 2.4GHz wireless network. For
a smaller coverage area, you can select a lower output power. For the maximum wireless coverage, select the
100% selection.
Page 75

TAP-R2
USER’S GUIDE
74
2.4GHz Wi-Fi Settings: Access Schedule (2.4GHz)
Access Schedules will enable or disable your 2.4GHz wireless
access at a set time based on your predefined schedule. This
feature is often used for restricting access to all users (such as
children, employees, guests) during specific times of the day for
parental control or security reasons.
a) Enable Access Schedule
b) Select which days you wish for your 2.4GHz Wi-Fi to be
available
c) Select the time frame during that day that you wish for your 2.4GHz Wi-Fi to be available
d) Apply Changes
Note: Make sure you have already configured your Time Zone Settings in order for your schedule to work
correctly. Time Zone Settings can be adjusted from the web menu under Management > Time Zone Settings.
Page 76

TAP-R2
USER’S GUIDE
75
NETWORK SETTINGS
Network Settings: Local Network (LAN)
These settings are for your local network only and do
not apply to your Internet / ISP connection.
IP Address: The IP address of the Router.
Subnet Mask: The subnet of the Router.
Default Gateway: The access point to another network.
DHCP: Each network device on your local network will have its own IP Address. The DHCP server automatically
assigns the IP addresses to each device connected to your network. Disabling DHCP will require that each
device on your network be assigned a manual or static IP address.
DHCP Client Range: The range of IP addresses provided by the DHCP server is defined by this field. You can
limit how many IP addresses are used in your network by setting a smaller or larger range.
DHCP Lease Time: The amount of time each device is given a specific IP is decided by the DHCP lease time.
After the Lease Time expires, the DHCP server will assign another IP address to the device.
Page 77

TAP-R2
USER’S GUIDE
76
Set Static DHCP: This allows specific devices to be given a specific IP address each time the device connects to
the network. The DHCP server will always assign the same IP address to the same device. This feature is often
used for shared devices such as network printers or servers.
802.1d Spanning Type (STP): A network protocol that ensures a loop-free topology for networks that have
Ethernet bridges. The STP prevents bridge loops and allows a network design to include redundant links to
provide automatic backup paths if active links fails.
Clone MAC Address: The Router can use a MAC address that you define as its own. This is often used when an
Internet Provider only authorizes one MAC address to access the Internet. Cloning the MAC address will make
it so that the cloned MAC address is the only MAC address seen by the Internet Provider.
Page 78

TAP-R2
USER’S GUIDE
77
Network Settings: IPv6 Local Network (LAN)
These settings are for your IPv6 local network only and do not
apply to your Internet / ISP connection. The LAN IPv6 LinkLocal Address is the IPv6 Address that you use to access the
web-based management interface. If you change the LAN IPv6
Address here, you may need to adjust your PC’s network
settings to access the network again. DHCP can be used to
acquire an IPv6 prefix for the LAN interface. These settings are
for advanced users with a good understanding of IPv6 addresses,
DHCPv6 servers and DNSv6 servers. If you are not familiar with
these settings, please contact a network administrator for
assistance.
IP Address: The IPv6 IP address of the Router.
Prefix Length: Functions similar to the subnet mask of an IPv4 IP address.
The IPv6 Local IP Address is the IPv6 Address that you use to access the web-based management interface. If you
change the LAN IPv6 Address here, you may need to adjust your PC’s network settings to access the network again.
DHCP can be used to acquire an IPv6 prefix for the LAN interface.
Page 79

TAP-R2
USER’S GUIDE
78
DHCPv6 is a network protocol that is used for configuring IPv6 hosts with IP addresses, IP prefixes and/or other
configurations required to operate on an IPv6 network.
IPv6 hosts can acquire IP addresses by using DHCPv6.
The DHCP Unique Identifier (DUID) is used by a client to get an IP address from a DHCPv6 server. The server
compares the DUID with its database and delivers configuration data (address, lease times, DNS servers, etc.) to the
client.
Page 80

TAP-R2
USER’S GUIDE
79
Network Settings: Internet Network (WAN)
The Basic Setup Wizard will assist you in setting up your
Internet connection. However, in the case that you wish to
adjust settings manually, the options on this page provides you
with the tools to do this easily.
Select your Internet Connection type from the drop down
menu:
Manual IP (Static): For Internet connections where the Internet provider does not provide you with an IP
address automatically. If you know the IP address and DNS settings that your Internet provider uses, select this
option.
Automatic/Dynamic (DHCP): This is the configuration type most often used by Internet providers. Automatic
configurations are used by both DSL and Cable as well as other providers. Under the Automatic Configuration
method, the Internet provider will assign your router an Internet IP address automatically.
Page 81

TAP-R2
USER’S GUIDE
80
If for some reason you do not get an IP address and you know that your Internet provider uses DHCP, try
resetting your modem. Remove the power adapter from the modem as well as the backup battery (if
available). Wait about 30 seconds and then power the modem back on. You can run through the Basic Setup
Wizard again to see if that fixes your Internet connection issues.
PPPoE connections normally requires login information. If you do not know the settings for your PPPoE
connection, please contact your Internet provider.
PPTP and L2TP connections requires login information as well as IP address settings. If you do not know the
settings for your PPTP / L2TP connection, please contact your Internet provider.
Page 82

TAP-R2
USER’S GUIDE
81
Network Settings: IPv6 Internet Network (WAN)
The Basic Setup Wizard will assist you in setting up your
Internet connection. However, in the case that you wish to
adjust settings for IPv6 connections, the options on this page
provides you with the tools to do this easily.
Each selection will have the option to select the WAN Link
Type: IP or PPPoE. If your ISP requires login information, select
PPPoE. If not, select IP.
IPv6 Connection Types
Automatic/Dynamic (DHCPv6): The ISP automatically provides
IPv6 stateful address configurations.
Manual IP (Static): For Internet connections where the Internet
provider does not provide you with an IP address automatically. If you know the IPv6 address and DNS
settings that your Internet provider uses, select this option.
Page 83

TAP-R2
USER’S GUIDE
82
Stateless Address Autoconfiguration (SLAAC): In this mode, configuration of addresses is based on the receipt
of Router Advertisement messages. These messages include stateless address prefixes and require that hosts
not use a stateful address configuration protocol. Stateless autoconfiguration does not require any sort of
central management, and is therefore preferable in networks where no management is readily available, such
as a typical home network.
Tunnel 6to4: Enabling this feature, enables encapsulation of IPv6 packets into IPv4 for transport across an IPv4
network. It allows for automatic IPv6-to-IPv4 address translation, and treats the underlying IPv4 network as
one big non-broadcast multiaccess (NBMA) network, rather than a collection of independent point-to-point
links.
For configuring IPv6 Tunnel 6to4 settings, go to Network Settings > Advanced Settings.
Page 84

TAP-R2
USER’S GUIDE
83
Network Settings: Advanced Settings
These settings apply to the Local Network and your
Internet Connection Network. If you are not familiar
with these settings, please refer to a network
administrator to avoid putting your network at risk.
Enable uPnP: Universal Plug and Play is a network
feature that allows uPnP enabled devices to “just
work” with each other when connected to the same
network. UPnP can work across different network
media, such as an Ethernet connection or wireless connection. With UPnP enabled, network devices may
change security settings within the Router’s firewall to allow access over the Internet. By default, UPnP is
disabled to avoid exposing your network to security issues.
Enable IGMP Proxy: Internet Group Management Protocol is a communication protocol used by hosts and
routers on the network to establish multicast group memberships. IGMP Proxy is typically used to implement
multicast routing and commonly used when advanced protocols such as PIM is not suitable.
Enable Ping Access on WAN: Allows users to ping the WAN interface IP address from the Internet.
Page 85

TAP-R2
USER’S GUIDE
84
Enable Web Server Access on WAN (Remote Management): Allows access to the Web Menu over the Internet.
Enable IPsec pass through on VPN connection: Allows the IP security protocol suite to pass through on a VPN
connection.
Network Settings: IPv6 Advanced Settings:
Enable IPv6 pass through on VPN connection: Allows the IPv6 protocol suite to pass through on a VPN
connection.
Enable Tunnel 6to4: Enabling this feature, enables encapsulation of IPv6 packets into IPv4 for transport across
an IPv4 network. It allows for automatic IPv6-to-IPv4 address translation, and treats the underlying IPv4
network as one big non-broadcast multi-access (NBMA) network, rather than a collection of independent
point-to-point links.
Page 86

TAP-R2
USER’S GUIDE
85
SMART FEATURES
The Router provides your network with Smart Features that helps to provide convenience and protection for
your wired and wireless network.
The Smart Features allows you to control access of your wireless network through: on/off schedules, specific
user authorizations, and wireless coverage control.
These settings apply to your local wireless and wired network.
Page 87

TAP-R2
USER’S GUIDE
86
Smart Features: Block Websites
To block a website, you must first enable URL filtering.
After it has been enabled, you can begin adding as
many websites as you wish into the URL Address field.
Note: If you wish to block www.google.com, simply
type in "google" and the Router will block all websites
with the text "google" in the URL.
Page 88

TAP-R2
USER’S GUIDE
87
Smart Features: User Access (MAC Address Filtering)
User Access allows you to deny access or allow access
to specific users connecting to the network. Each
networking device has a unique address called a MAC
address (a 12 digit hex number).
By inputting the MAC address into the field, you can
define whether that device is allowed into your
network or not allowed.
A MAC Address may sometimes be referred to as a Physical Address. Most networking devices have their MAC
Address located on a label on the actual device.
For Windows computers with internal networking adapters, the MAC Address can be found by viewing the
Network Connection Details of the network adapter. The MAC Address will be listed as the Physical Address.
Be sure to enter the MAC Address without any symbols. For example, a MAC Address of 78-DD-78-AA-78-BB
would be entered as 78DD78AA78BB.
Page 89

TAP-R2
USER’S GUIDE
88
Smart Features: User Access (IP Address Filtering)
User Access (IP Filtering) is similar to User Access (MAC
filtering) except that the Router uses the local IP
address to filter the specific data from the specified
network protocol. For example, if you chose to block
TCP data packets from a specific computer, you would
need to figure out what that device's IP address is and
select TCP from the Protocol drop down menu.
If you are not sure which Protocol to filter, select
"Both" as your Protocol selection.
Page 90

TAP-R2
USER’S GUIDE
89
USB STORAGE
USB Storage: Local Sharing
Share a USB storage device with computers on the local
network of the Router.
Insert a USB storage device, such as a flash drive or
external hard drive, to the USB port on the back of the
Router and follow the directions below for your operating
system. The computer must be connected to the router to
access the storage device. You may also want to Map the
Network Drive so it shows up as a standard drive on your
computer for easier access.
Page 91

TAP-R2
USER’S GUIDE
90
Windows 7 and Vista
To access the drive from your Windows desktop:
Note: If the USB drive does not appear automatically under your Networked devices (Windows 7, Vista or Mac OS X), you will need to Map
the Network Drive.
a) Click the Start button.
b) Click Computer.
c) On the Computer page, the drive should appear on the left hand column under Network as
AMPED_USB.
To Map the Network Drive:
a) Click the Start button.
b) Click Computer.
c) Click Map Network Drive from the top bar.
d) Select a drive letter (any), then enter in the folder field:
\\AMPED_USB\public\ or \\router’s LAN IP address\public\
e) If the drive fails to open, click browse and locate AMPED_USB under Network.
Page 92

TAP-R2
USER’S GUIDE
91
Windows XP
To access the drive from your Windows desktop:
Note: If the USB drive does not appear automatically under your Networked devices (Windows 7, Vista or Mac OS X), you will need to Map
the Network Drive.
a) Click the Start button.
b) Click My Computer.
c) Click on My Network Places and locate the drive named AMPED_USB.
To Map the network drive:
a) Click the Start button.
b) Right Click My Computer and select Map Network Drive.
c) Select a drive letter (any), then enter in the folder field:
\\AMPED_USB\public\ or \\router’s LAN IP address\public\
d) If the drive fails to open, click browse and locate AMPED_USB under Network.
Page 93

TAP-R2
USER’S GUIDE
92
Mac OS X
To access the drive from your Mac desktop:
Note: If the USB drive does not appear automatically under your Networked devices, you will need to Map your Network Drive
(Instructions below).
a) Open Finder.
b) On the left hand menu, under Shared, click AMPED_USB.
To Map the network drive:
a) Open Finder.
b) From the menu on the top of the desktop, select Go.
c) Select Connect To Server from the drop down menu.
d) Enter the address of the network drive: smb://amped_usb/public or smb://router’s LAN ip
address/public
e) Then click Connect.
If the network drive does not appear on your Mac desktop, follow these steps:
a) Open Finder.
b) Select Preferences from the drop down menu.
c) Check show "Connected Servers".
d) The drive should now appear on your desktop.
Page 94

TAP-R2
USER’S GUIDE
93
USB Storage: FTP Server
Share a USB storage device with computers remotely over the
Internet. A FTP server allows you to access files through the use
of an FTP client remotely over the Internet.
Insert a USB storage device, such as a flash drive or external hard
drive, to the USB port on the back of the Router.
c) From the USB Storage/FTP Server page of the web
menu, enter a FTP server name.
d) Select whether you wish to have an open or secured
access to your FTP server.
e) Open your FTP client software (not provided) and
create a new FTP connection.
f) Enter the Internet Address for the router as the IP
address for your FTP connection. When prompted
enter your login information to access the USB
Storage device remotely.
Page 95

TAP-R2
USER’S GUIDE
94
FIREWALL SETTINGS
The Router’s Firewall is designed to prevent unauthorized users from accessing your network. This section will
go over the different features of the Firewall and how to configure them.
Page 96

TAP-R2
USER’S GUIDE
95
Firewall Settings: Port Filtering
Port Filtering is a security measure that prevents users
from using specific ports for reasons other than what
those ports were originally intended for. For example,
TCP port 21 is traditionally used for FTP. However,
there is nothing stopping a user from using port 21 for
purposes other than FTP access. By enabling Port
Filtering on TCP port 21, only FTP communications
would be allowed. No other types of communication
would be allowed on this port.
Hackers may sometimes scan for all open ports on your network as a method of hacking into your network.
Port Filtering and other firewall features help to prevent this from happening.
To set up Port Filtering, select a range of ports you wish to filter. If you are trying to filter a single port, enter
the port number twice. (For example, Port 21: 21 – 21) Select the Protocol of the port you are filtering. If you
do not know what protocol you wish to filter, select “Both.”
Page 97

TAP-R2
USER’S GUIDE
96
Firewall Settings: Port Forwarding
Port Forwarding is a rule that tells the Router that if a
specific type of request comes in on a specific port,
then that request should be forwarded to a specific
device on the private network.
Port Forwarding is often used for setting up servers,
cameras and other devices that require remote access.
Enable Port Forwarding: Enables designated ports to
begin forwarding.
IP Address: The IP address of the device behind the Firewall that is being designated for Port Forwarding.
Protocol: Select UDP, TCP or Both for the protocols to be forwarded.
Port Range: Select a range of ports for the designated IP address that you wish to be forwarded.
Comment: Create a name that you can use to easily identify this Port Forwarding entry.
Page 98

TAP-R2
USER’S GUIDE
97
Firewall Settings: DMZ (Demilitarized Zone)
A DMZ is a network location or IP Address that is not
protected by the firewall. When enabling DMZ, it is
important to note that the device on the IP Address
designated as part of the DMZ does not have any
protection from the Router’s firewall. The device’s
only security would be those built into the operating
system.
As a general safety rule, devices placed on the DMZ should not have any other network connections to any
other devices.
Enable DMZ: Enables the Demilitarized Zone.
DMZ Host IP Address: The designated IP Address of the network device to have unrestricted access through
the Router’s Firewall.
Page 99

TAP-R2
USER’S GUIDE
98
Firewall Settings: Virtual LAN
A VLAN has the same attributes as a physical local area
network (LAN) but it allows for devices to be grouped
together even if they are not located on the same physical
network switch. The benefit of a VLAN is that it allows
network traffic to flow more efficiently for computers or
network devices that are within sections of mutual interest.
In addition, changes to the VLAN can be made virtually via a
user interface rather than manually changing cables and
network switches.
VLAN are often used to segment network devices based on
their department, user types or common applications. Bandwidth can then be more easily managed by
adjusting the bandwidth to specific VLANs based on their priorities.
Page 100

TAP-R2
USER’S GUIDE
99
Firewall Settings: Denial of Service
A Denial of Service attack is an attempt by a user (or users) to
make a server’s or network’s services unavailable. The user
sends a server multiple requests with false return addresses.
The server will attempt to respond by sending a request back to
the user; however, since the address is false, the server will
wait for a response before closing the connection. When
multiple requests like this occur, servers may often get
overloaded with too many requests and stop functioning
altogether. This is a typical DoS attack, although DoS attacks
may not be limited to this type of attack.
The Router can assist in preventing these types of attacks by
scanning the network for patterns of activity that represent DoS
attacks. If a pattern comes in frequently, the Router can
attempt to block messages containing that pattern and thus
protect the server from becoming overloaded and
unresponsive.
 Loading...