

Page 1

User’s Guide
TAP-EX2
TM
HIGHPOWER
AC750 WI-FI® RANGE EXTENDER
TOUCH SCREEN
Page 2

TAP-EX2
USER’S GUIDE
1
CONTENTS
INTRODUCTION ..................................................................... 3
GETTING STARTED ................................................................. 4
Package Contents ...................................................................... 4
Product Description ................................................................... 5
SETUP GUIDE (TOUCH SCREEN) .............................................. 6
Find a Setup Location ................................................................ 6
Navigating the Touch Screen Menu .......................................... 8
Welcome to the Dashboard ...................................................... 9
Select a 2.4GHz Home Network to Extend .............................. 10
Connecting to a Secure Network (2.4GHz) .............................. 11
Select a 5GHz Home Network to Extend ................................ 12
Connecting to a Secure Network (5GHz) ................................. 13
Extended Network Settings ..................................................... 14
Applying Settings ..................................................................... 16
Setup Summary ....................................................................... 17
MORE SETTINGS (TOUCH SCREEN) ....................................... 19
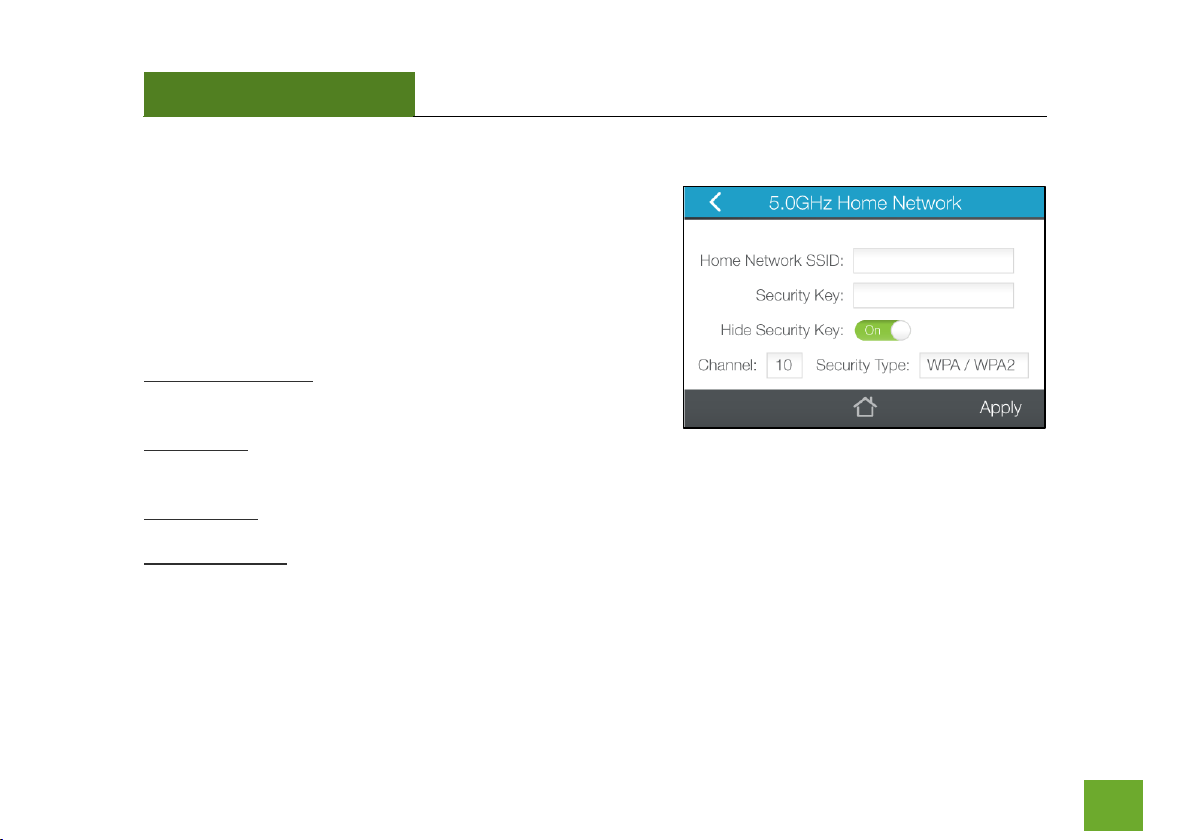
2.4GHz WI-FI SETTINGS (TOUCH SCREEN) ............................. 20
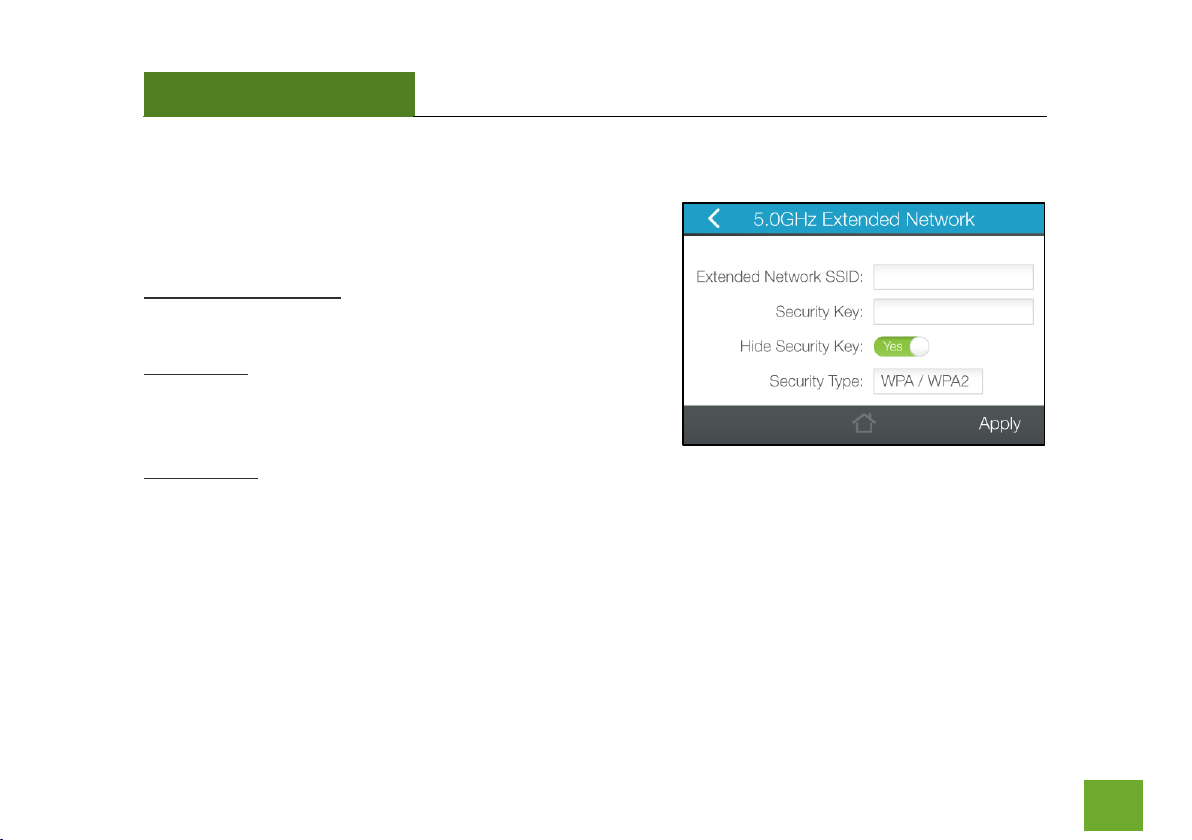
Home Network Settings .......................................................... 20
Extended Network Settings ..................................................... 21
Connected Devices .................................................................. 23
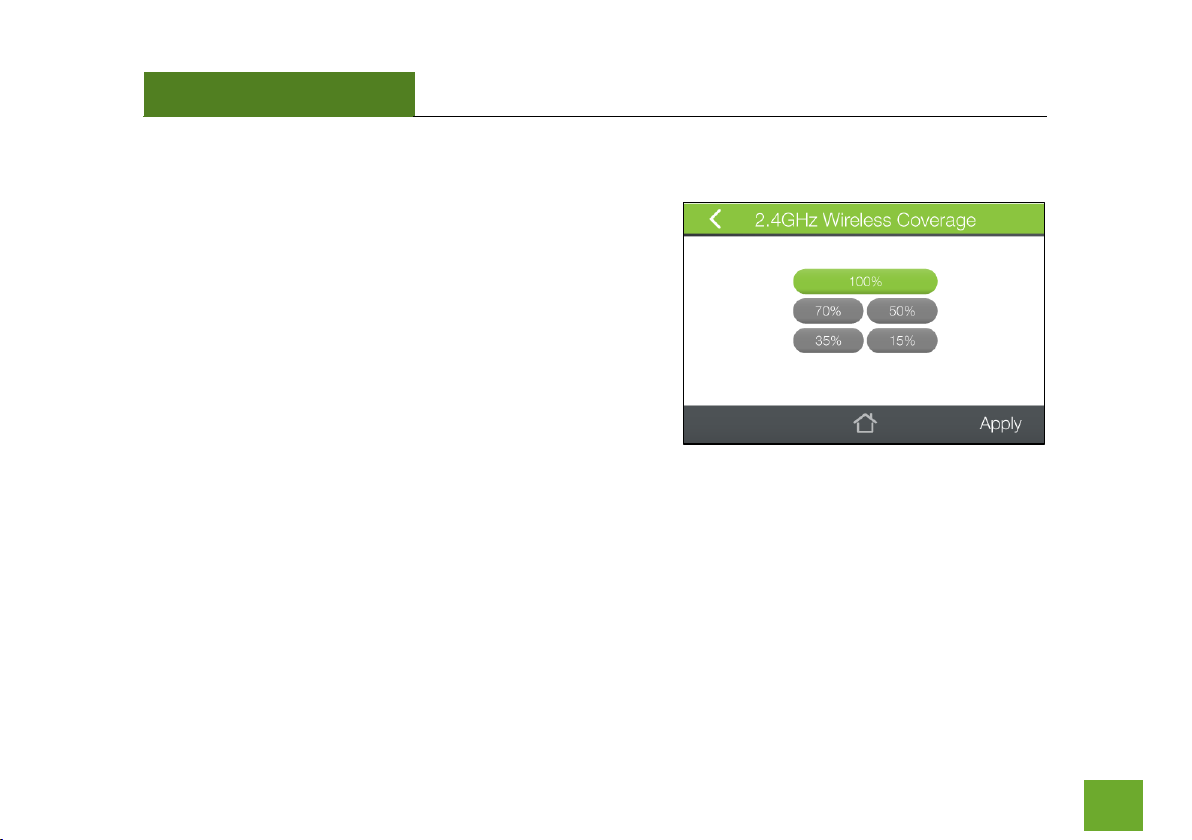
Wi-Fi Coverage Controls .......................................................... 24
Access Schedule ...................................................................... 25
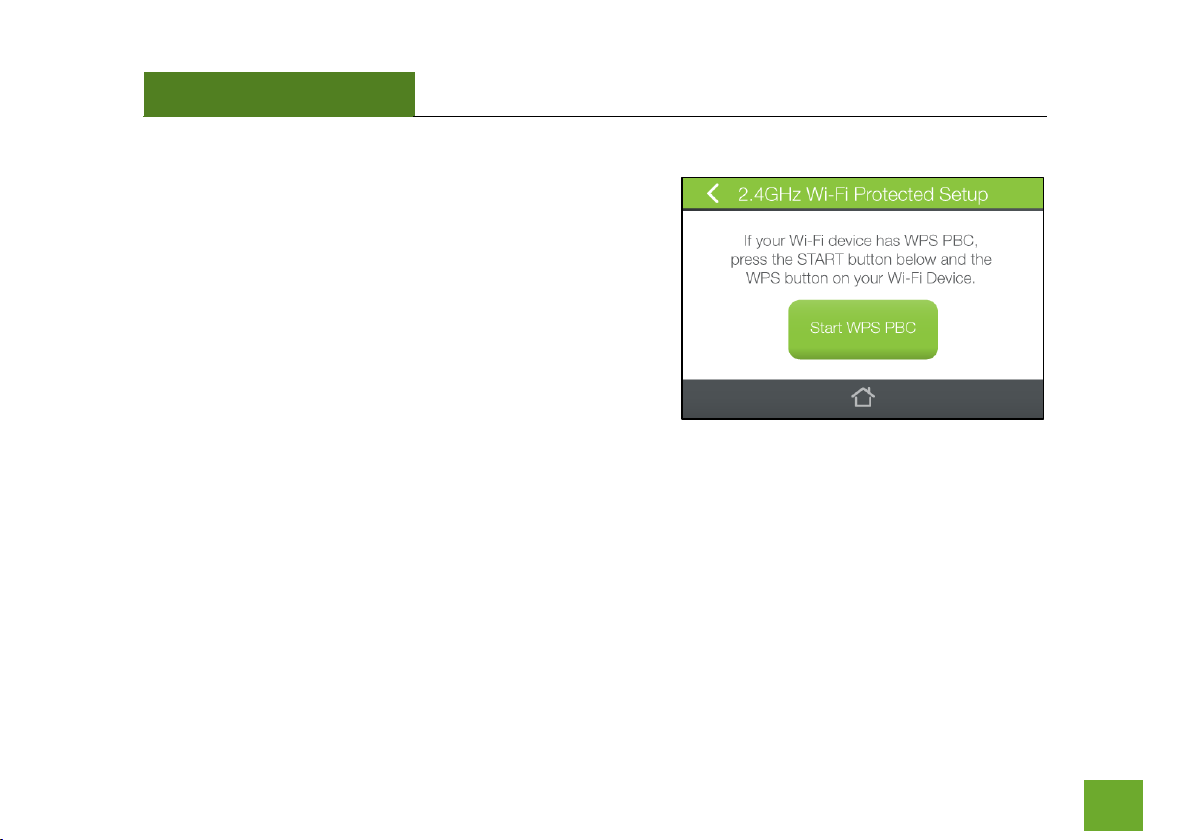
Wi-Fi Protected Setup (WPS) ................................................... 26
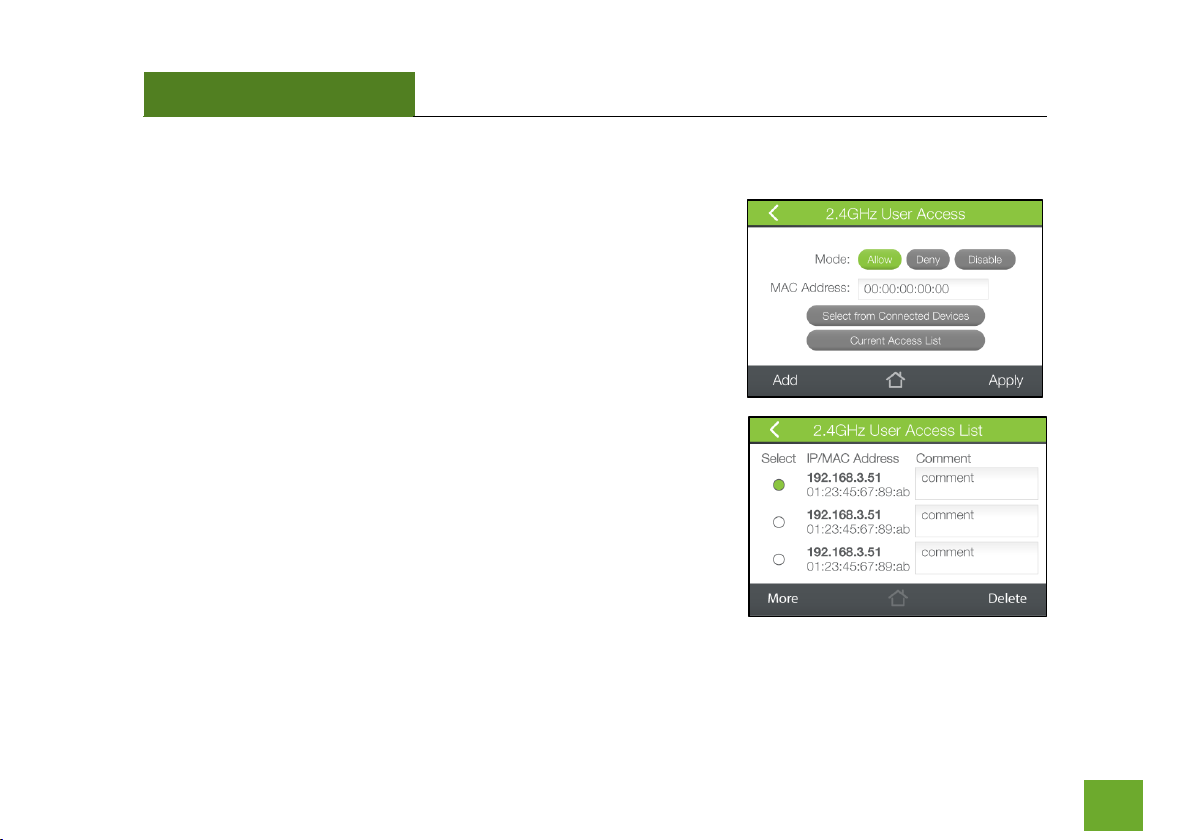
User Access .............................................................................. 27
5GHz WI-FI SETTINGS (TOUCH SCREEN) ................................ 28
Home Network Settings ........................................................... 28
Extended Network Settings ..................................................... 29
Connected Devices................................................................... 31
Wi-Fi Coverage Controls .......................................................... 32
Access Schedule ....................................................................... 33
Wi-Fi Protected Setup (WPS) ................................................... 34
User Access .............................................................................. 35
BOOSTBAND TECHNOLOGY (TOUCH) .................................... 36
NETWORK SETTINGS (TOUCH) .............................................. 37
IP Settings ................................................................................ 37
Wired Port Routing .................................................................. 38
MANAGEMENT SETTINGS (TOUCH) ...................................... 39
Screen Settings ........................................................................ 39
Clock / Date ............................................................................. 40
System Details.......................................................................... 41
Statistics ................................................................................... 43
USB Storage ............................................................................. 44
System Logs ............................................................................. 48
Upgrade Firmware ................................................................... 49
Page 3

TAP-EX2
USER’S GUIDE
2
Reset Settings .......................................................................... 50
ACCESSING THE WEB MENU ................................................ 51
SETUP GUIDE (WEB MENU) .................................................. 52
Find a Setup Location .............................................................. 52
Open your Web Browser to Access the Setup Wizard ............. 54
Welcome to the Dashboard .................................................... 55
Scan for a Home Network to Extend ....................................... 56
Connecting to a Secure Network ............................................. 57
Extended Network Settings (SSID and Security) ...................... 58
Setup Summary ....................................................................... 61
5GHz WI-FI SETTINGS (WEB MENU) ..................................... 64
Home Network Settings ......................................................... 64
Extended Network Settings .................................................... 65
Security ................................................................................... 67
Wi-Fi Protected Setup – WPS ................................................. 68
User Access ............................................................................ 69
Wireless Coverage Controls .................................................... 70
Access Schedule ..................................................................... 71
Advanced Settings .................................................................. 72
2.4GHz WI-FI SETTINGS (WEB MENU) ................................... 74
Home Network Settings ......................................................... 74
Extended Network Settings .................................................... 75
Security ................................................................................... 77
Wi-Fi Protected Setup – WPS ................................................. 78
User Access ............................................................................ 79
Wireless Coverage Controls .................................................... 80
Access Schedule ...................................................................... 80
Advanced Settings ................................................................... 82
BOOSTBAND™ TECHNOLOGY (WEB MENU) .......................... 84
NETWORK SETTINGS (WEB MENU) ....................................... 85
IP Settings ................................................................................ 85
Wired Port Routing .................................................................. 87
MANAGEMENT FEATURES (WEB MENU) .............................. 88
Device Status ........................................................................... 89
Network Statistics .................................................................... 91
System Clock ............................................................................ 92
System Logs ............................................................................. 93
Upgrade Firmware ................................................................... 94
Save/Reload Settings ............................................................... 96
Password Settings .................................................................... 97
TECHNICAL SPECIFICATIONS ................................................. 97
DEFAULT SETTINGS .............................................................. 99
TROUBLESHOOTING & SUPPORT INFORMATION ................ 100
WARRANTY AND REGULATORY INFORMATION .................. 117
LEGAL NOTICES AND DISCLAIMERS ……………………………….… 125
Page 4

TAP-EX2
USER’S GUIDE
3
INTRODUCTION
Thank you for purchasing this Amped Wireless product. At Amped Wireless we strive to provide you with the
highest quality products through innovation and advanced technology. We pride ourselves on delivering
products that outperform the competition and go beyond your expectations. If you have any questions please
feel free to contact us. We’d love to hear from you and thank you for your support!
Email: sales@ampedwireless.com
Call: 888-573-8830
Web: www.ampedwireless.com
Page 5

TAP-EX2
USER’S GUIDE
4
GETTING STARTED
Package Contents
Check to make sure you have all the contents within your package:
High Power Touch Screen AC750 Wi-Fi Range Extender
Stylus
Detachable High Gain Antenna
Power Adapter
Setup Guide
CD: User’s Guide & Installation Video
Product Stand
Page 6
TAP-EX2
USER’S GUIDE
5
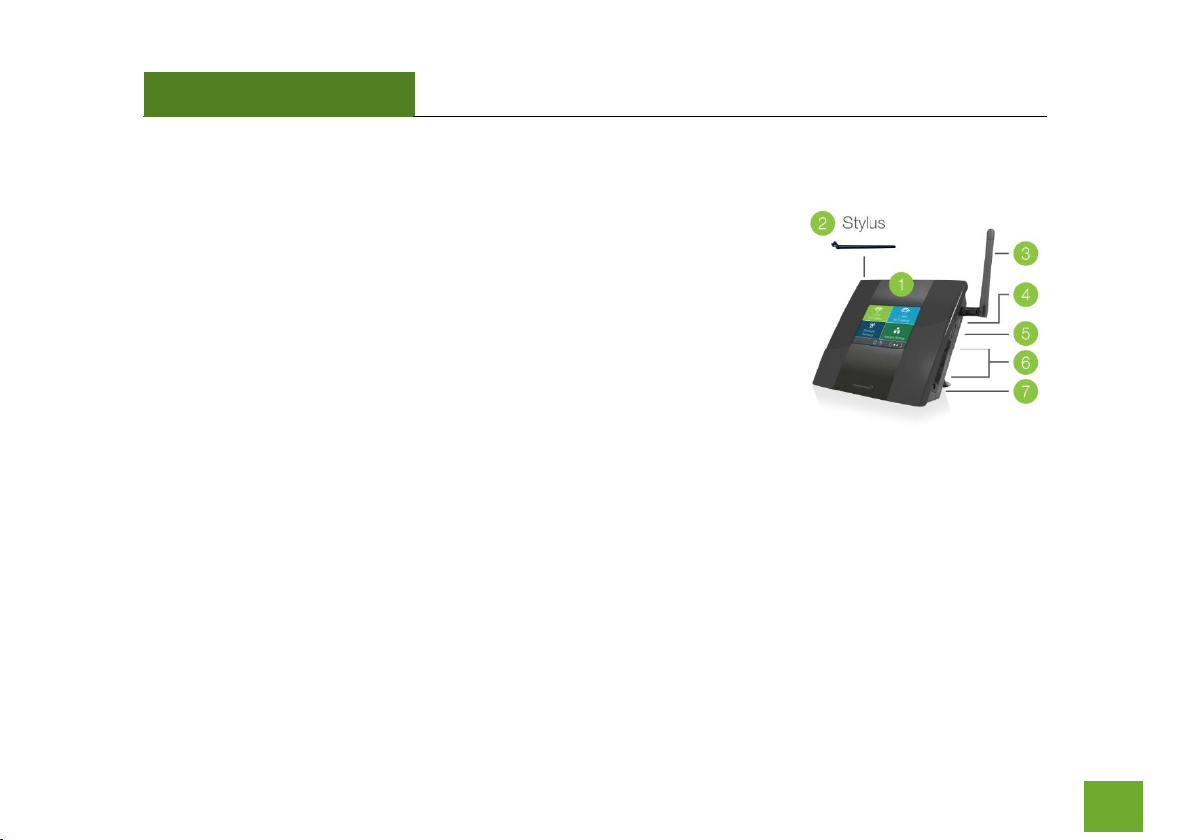
Product Description
1. LCD Screen: 3.5” LCD touch screen. Displays the user interface for
configuring the Range Extender as well as the status.
2. Stylus: Input tool that assists in navigating the LCD touch screen Menu.
3. Antenna Connectors (ANT): RJ-SMA antenna connector. Compatible
with all antennas that have RP-SMA connectors.
4. Reset: Button used to reset device. Push down once to reboot, hold
down for 5-10 seconds to reset to factory default settings.
5. USB Port: USB 2.0 Port used to attach USB storage devices, such as a
USB flash drive or external hard drive, for file sharing.
6. Wired Ports: RJ-45 ports for connecting wired computers or network
devices.
7. Power (PWR): Power adapter port. DC 12V 1A.
Page 7

TAP-EX2
USER’S GUIDE
6
6
SETUP GUIDE (TOUCH SCREEN)
Find a Setup Location
The location of where you install the Range Extender is important to how it will function. The optimal setup
location should be somewhere no more than halfway between your Wi-Fi router and your Wi-Fi dead zone.
Page 8
TAP-EX2
USER’S GUIDE
7
7
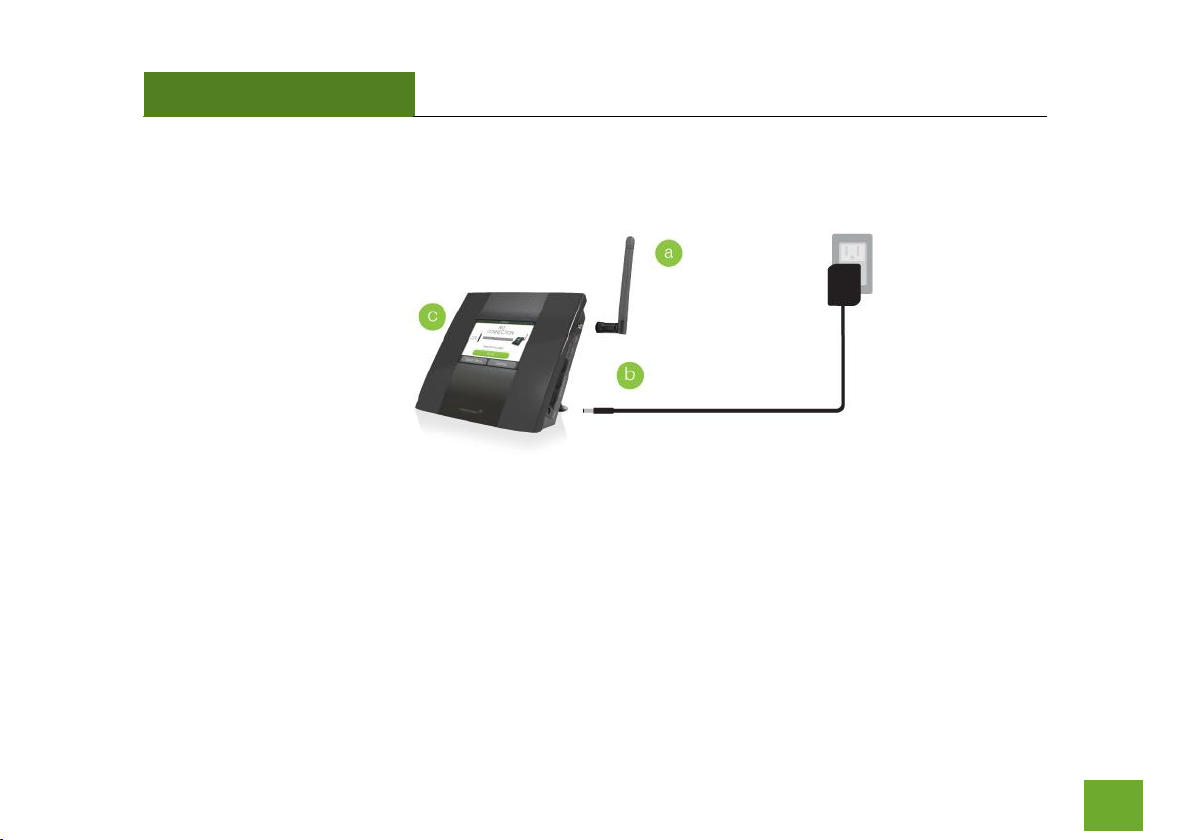
Power On the Range Extender
a. Attach the included antenna.
b. Attach the Power Adapter to the Range Extender’s PWR Port and plug it into an available power outlet.
c. The Amped Wireless logo will appear as the unit boots up, then the Dashboard screen will appear.
Page 9

TAP-EX2
USER’S GUIDE
8
8
Navigating the Touch Screen Menu
Before we begin, here are a few tips on how to navigate the Touch Screen Menu:
Language Selection: Tap the Globe icon, found on the bottom of the Settings screen, to
change the language of the menu.
Back Arrow: Tap the Left Arrow, found on the upper left corner of many screens, to
navigate back to the previous page.
Home Button: Tap the Home icon, found on the bottom of many screens, to return to the
Dashboard at any time.
Navigation Button: Tap the Left or Right Arrow to navigate between multiple pages for
one screen. The dots in this example indicate there are 3 pages to see.
Keyboards/Keypads: Tap on a Blank Field to access a keyboard or keypad for entering in
information such as your Network ID and Security Key.
Page 10
TAP-EX2
USER’S GUIDE
9
9
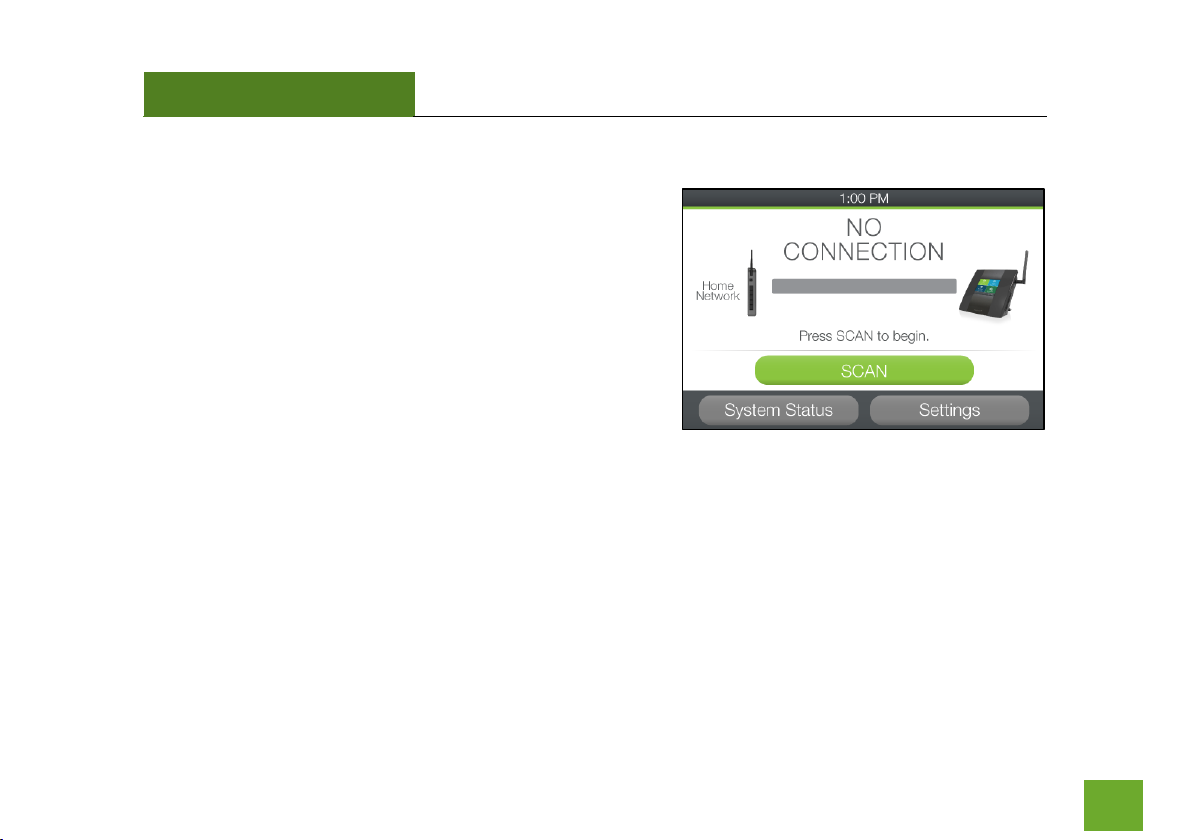
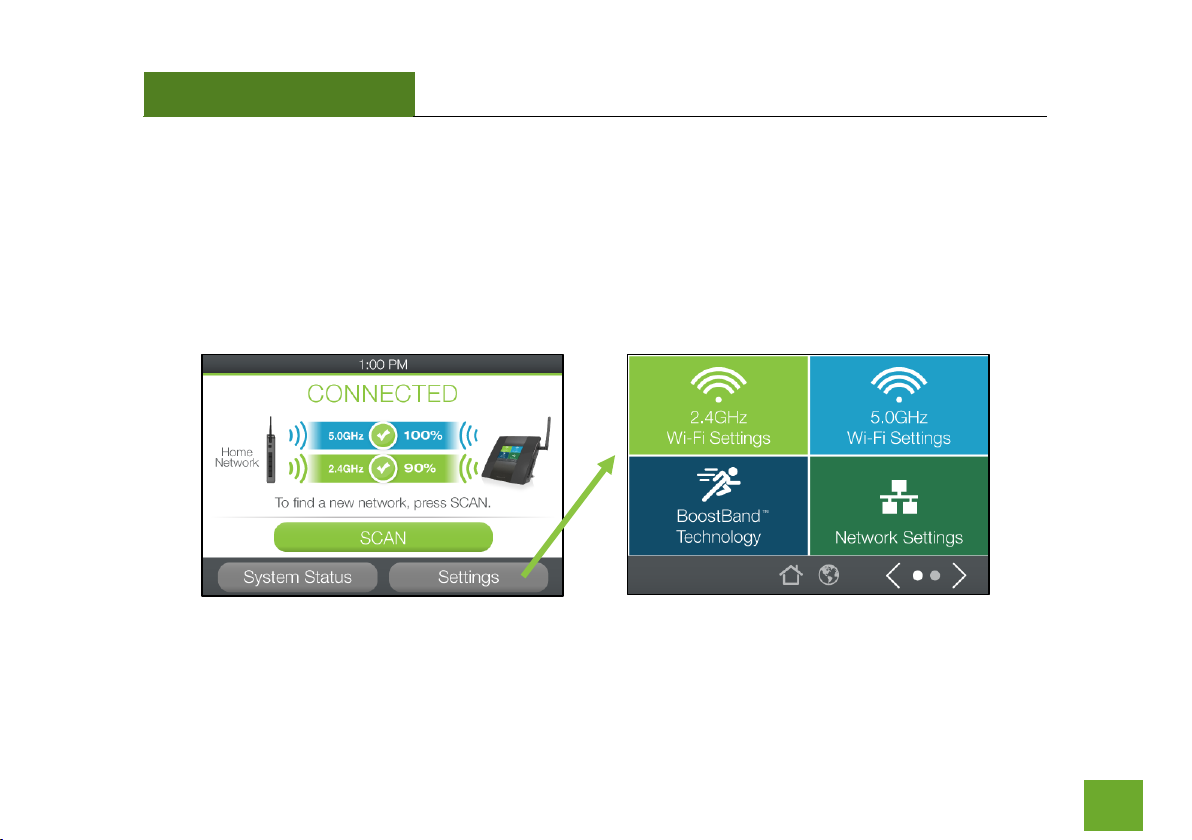
Welcome to the Dashboard
The Dashboard will provide you with the current status of the
Range Extender.
Tap SCAN to find an available network to extend.
During the setup process, the wizard will refer to the Home
Network and the Extended Network:
The Home Network is the network you are trying to extend.
The Extended Network is the network that is rebroadcasted and extended by the Range Extender.
Page 11

TAP-EX2
USER’S GUIDE
10
10
Select a 2.4GHz Home Network to Extend
The Range Extender can extend a single 2.4GHz network, a
single 5GHz network or both (2.4GHz and 5GHz)
simultaneously. The wizard will walk you through the setup of
the 2.4GHz network first, and then the 5GHz network.
Select the Wi-Fi network that you wish to extend. Check that
your Wi-Fi Network has a signal strength of 70% or greater.
If you wish to only extend a 5GHz network and not a 2.4GHz
network, tap Skip to move on to the 5GHz network selection.
Otherwise, tap Next to continue.
If you fail to find any Wi-Fi networks, or your signal strength is below 70%, the Range Extender may be placed
too far from the Wi-Fi network that you are trying to extend. Move your Range Extender closer to the Wi-Fi
network that you are trying to extend and tap Rescan to scan again.
The Scan results page will display information regarding the name of the network (SSID), the channel which the
Wi-Fi network is operating on and the security type of the network. The results page will also display what the
signal strength is of every network detected.
Page 12
TAP-EX2
USER’S GUIDE
11
11
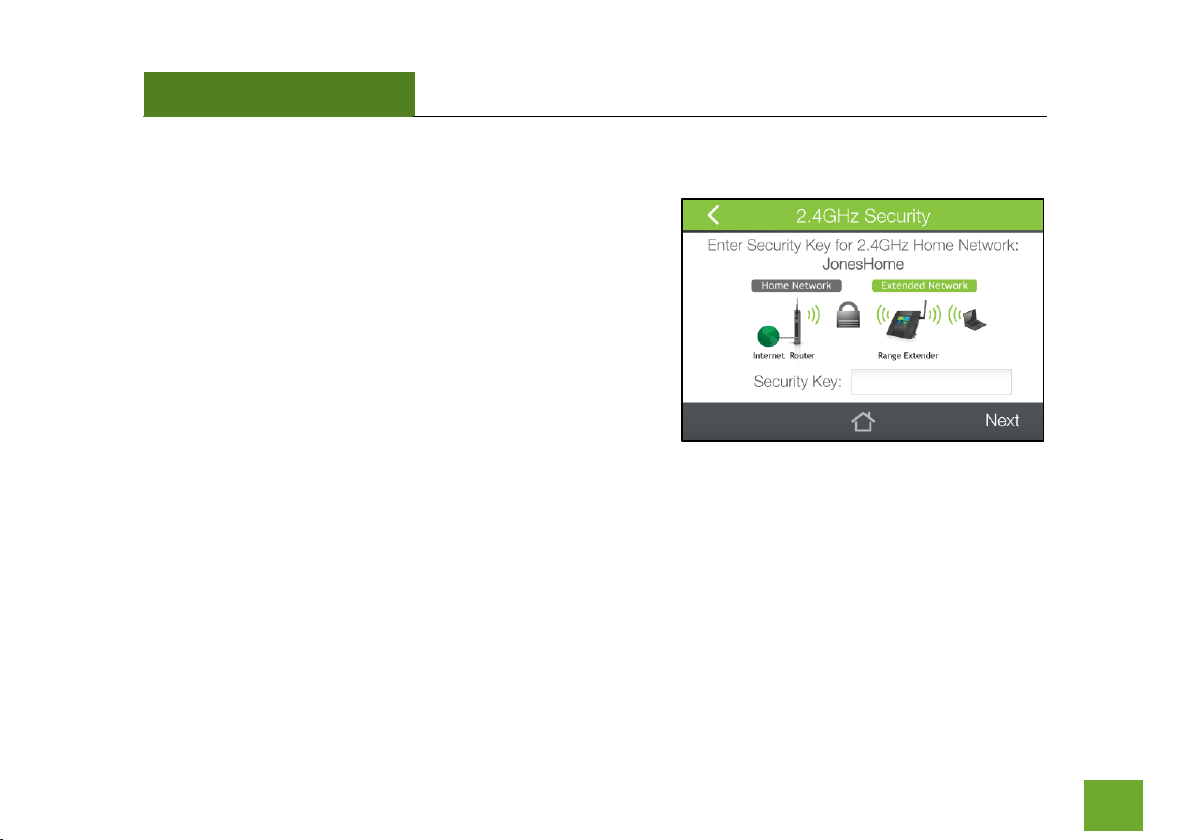
Connecting to a Secure Network (2.4GHz)
If the 2.4GHz Wi-Fi network you are trying to extend has Wi-Fi
security enabled, you will be prompted to enter a Security Key.
If you did not select a secure network, you will not see this
page.
Enter the security key in the space provided. You do not need
to select what type of security it is, just simply type in the key
and tap Next.
The Wizard will automatically detect your home network’s security settings. If you do not know the key to the
network you are trying to extend, then tap the Back arrow to select another network.
Page 13
TAP-EX2
USER’S GUIDE
12
12
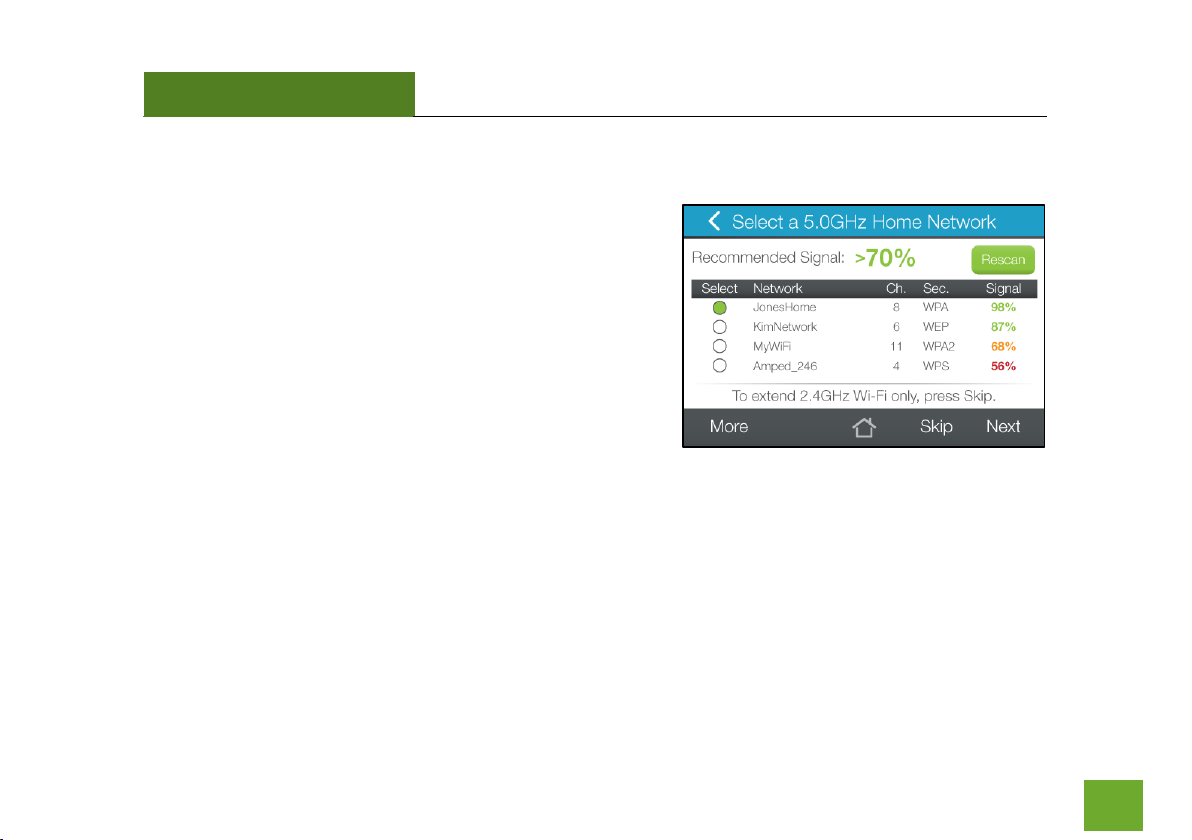
Select a 5GHz Home Network to Extend (5GHz)
Select the 5GHz Wi-Fi network that you wish to extend. Check
that your Wi-Fi Network has a signal strength of 70% or
greater.
If you have already selected a 2.4GHz network and do not wish
to select a 5GHz network, tap Skip to continue. Otherwise, tap
Next to continue.
If you fail to find any Wi-Fi networks, or your signal strength is
below 70%, the Range Extender may be placed too far from the Wi-Fi network that you are trying to extend.
Move your Range Extender closer to the Wi-Fi network that you are trying to extend and tap Rescan to scan
again.
The Scan results page will display information regarding the name of the network (SSID), the channel which the
Wi-Fi network is operating on and the security type of the network. The results page will also display what the
signal strength is of every network detected.
Page 14

TAP-EX2
USER’S GUIDE
13
13
Connecting to a Secure Network (5GHz)
If the 5GHz Wi-Fi network you are trying to extend has Wi-Fi
security enabled, you will be prompted to enter a Security Key.
If you did not select a secure network, you will not see this
page.
Enter the security key in the space provided. You do not need
to select what type of security it is, just simply type in the key
and tap Next.
The Wizard will automatically detect your home network’s security settings. If you do not know the key to the
network you are trying to extend, then tap the Back arrow to select another network.
Page 15

TAP-EX2
USER’S GUIDE
14
14
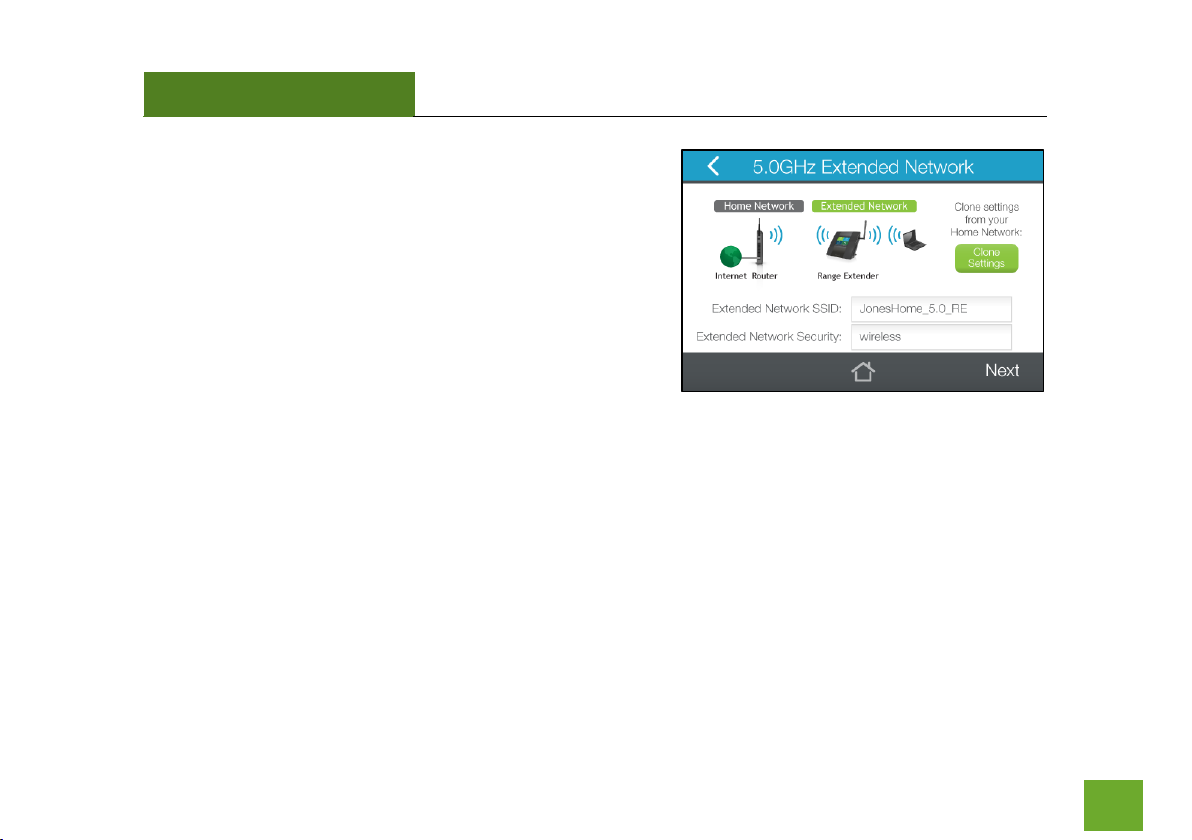
Extended Network Settings
The Range Extender features both a 2.4GHz and 5GHz Extended
Network. The wizard will walk you through the setup of your
2.4GHz extended network first, and then the 5GHz extended
network.
The default SSID of the Range Extender’s Extended Network is
“Amped TAPEX_2.4”.
If you choose to Clone the settings from your Home
Network, the wizard will copy the SSID and Security Key of your Home Network.
The SSID of the Extended Network will have a "_RE" at the end of its name. For example: Home_Network_RE.
You can also manually enter a new network ID and security key. The new security key must be at least 8
characters long.
Tap Next to apply the settings and repeat these steps for your 5GHz extended network.
Page 16
TAP-EX2
USER’S GUIDE
15
15
The default SSID of the Range Extender’s Extended Network is
“Amped_TAPEX2_5.0”.
If you choose to Clone the settings from your Home Network,
the wizard will copy the SSID and Security Key of your Home
Network.
The SSID of the Extended Network will have a "_RE" at the end
of its name. For example: Home_Network_RE.
You can also manually enter a new network ID and security key. The new security key must be at least 8
characters long.
Tap Next to apply the settings.
Page 17
TAP-EX2
USER’S GUIDE
16
16
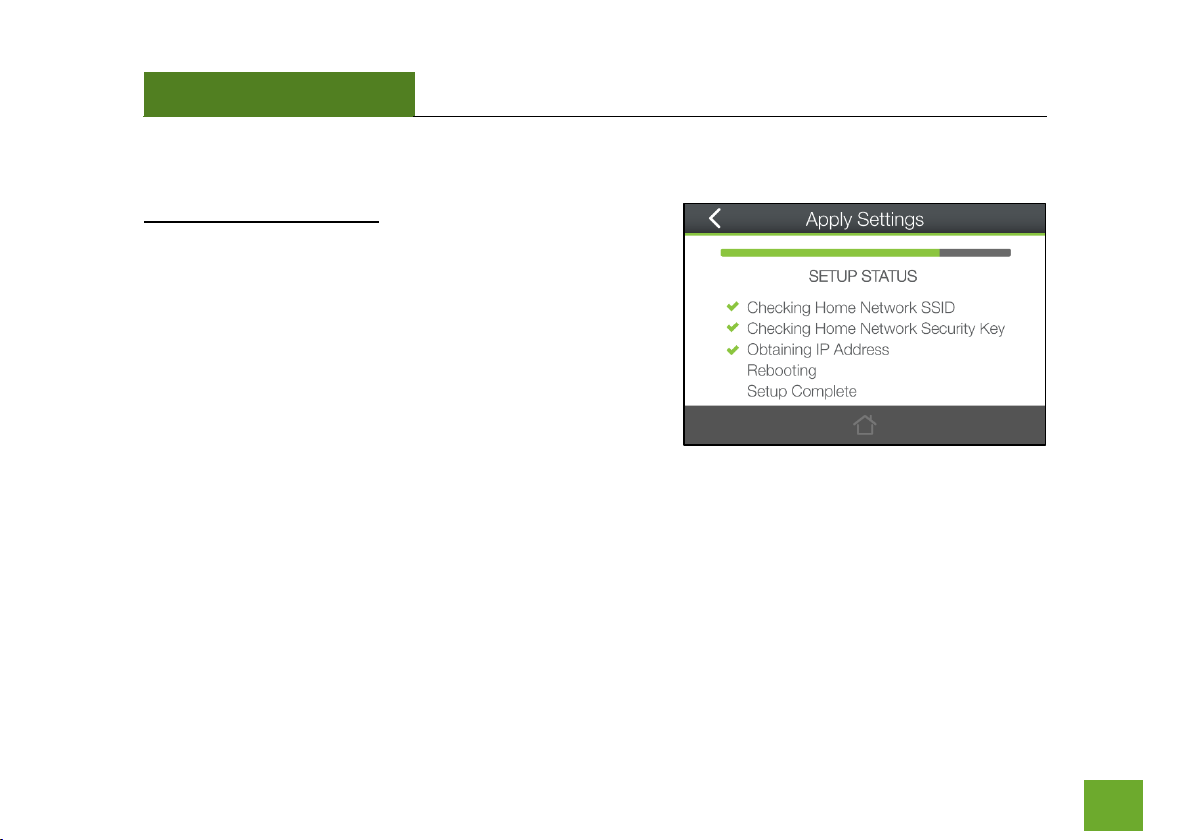
Applying Settings
DO NOT LEAVE THIS SCREEN.
Allow the progress bar to complete and the Wizard will
automatically redirect you to the next step.
Page 18
TAP-EX2
USER’S GUIDE
17
17
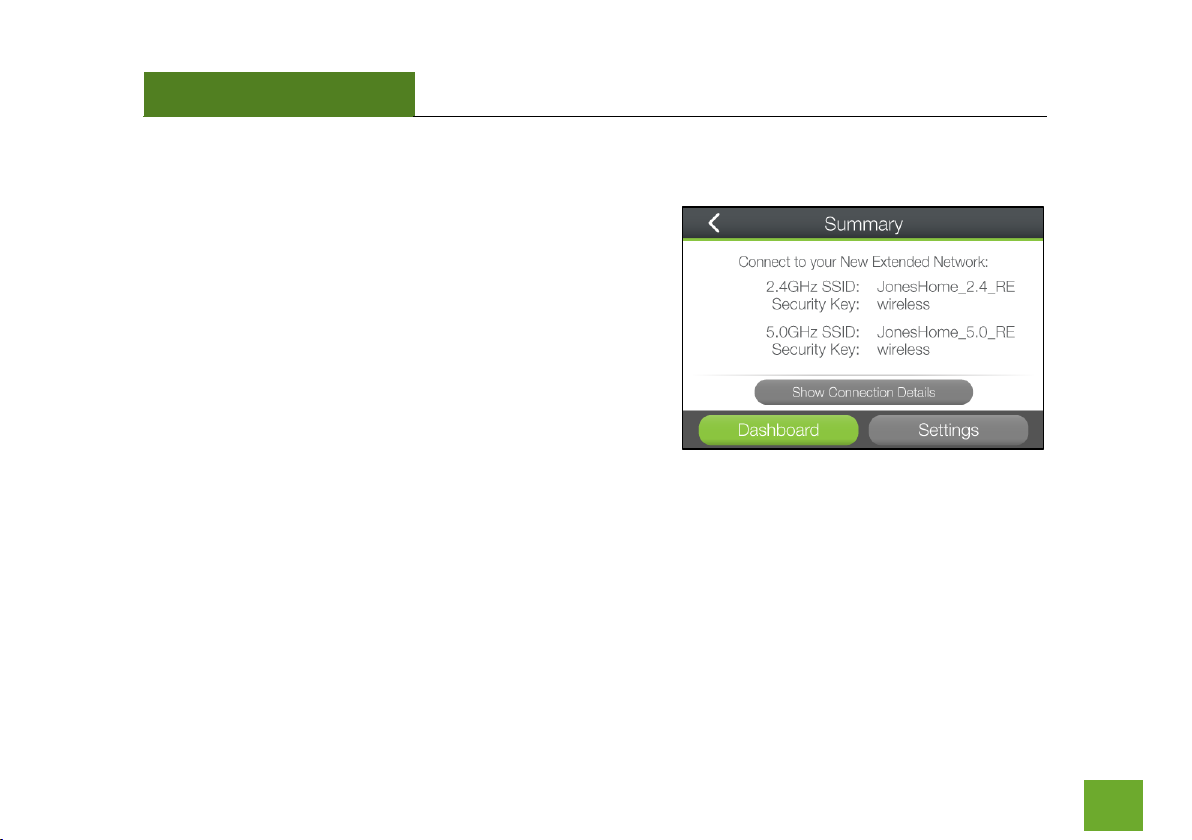
Setup Summary
Congratulations, the Range Extender is now successfully
configured! Your settings are now saved.
At this point you can connect your Wi-Fi devices to you
Extended Network using the Wi-Fi network name and
password on the screen.
If you haven’t already positioned your Range Extender in an
optimal location, you may do so now. All Range Extender
settings are saved and the unit can be safely powered off for relocation.
You may also attach any wired network devices to the wired ports on the side of the Range Extender at this
time.
If you experience any problems during this process, please contact our Amped Wireless Elite Support at
888-573-8820 or 909-217-3168.
Page 19

TAP-EX2
USER’S GUIDE
18
18
If the Extended Network connection fails try the following…
The failed connection page will provide you with information on why the connection failed. Read the
instructions carefully and retry your connection. The tips below will help to solve common issues:
a. Check to make sure your Home Network security settings are correct.
b. On the SCAN page, check that your Home Network is showing a signal of 70% or greater. If not, move
the Range Extender closer to your Home Network router and try again. If you are connecting to a dual
band router, ensure that both the 2.4GHz and 5GHz networks show a signal strength of 70% or
greater.
c. Check that your Home Network router’s DHCP server is enabled.
d. Try changing the channel of the Home Network router to a higher channel number and run the Setup
Wizard again.
e. Check the internet connection on your Home Network wireless router. Connect directly to your router
and attempt to access the web. If this fails, the problem is with your internet connection. Contact
your broadband provider to fix this issue first before configuring the Range Extender.
f. Try to reboot (unplug the power from the Range Extender and plug it back in) the Range Extender and
check to see if the connection is established (some networks may be very slow and take longer than
the allotted time for the Range Extender to successfully connect).
Page 20
TAP-EX2
USER’S GUIDE
19
19
MORE SETTINGS (TOUCH SCREEN)
The Range Extender’s Touch Screen Menu provides a host of features that you can easily configure
with the touch of your finger. To access the main Settings Menu tap Settings from the Dashboard.
From there you can access additional Wi-Fi Settings or Management Settings.
Note: For more advanced features and detailed options, please access the web menu
through web browser: http://setup.ampedwireless.com
Page 21
TAP-EX2
USER’S GUIDE
20
20
2.4GHz WI-FI SETTINGS (TOUCH SCREEN)
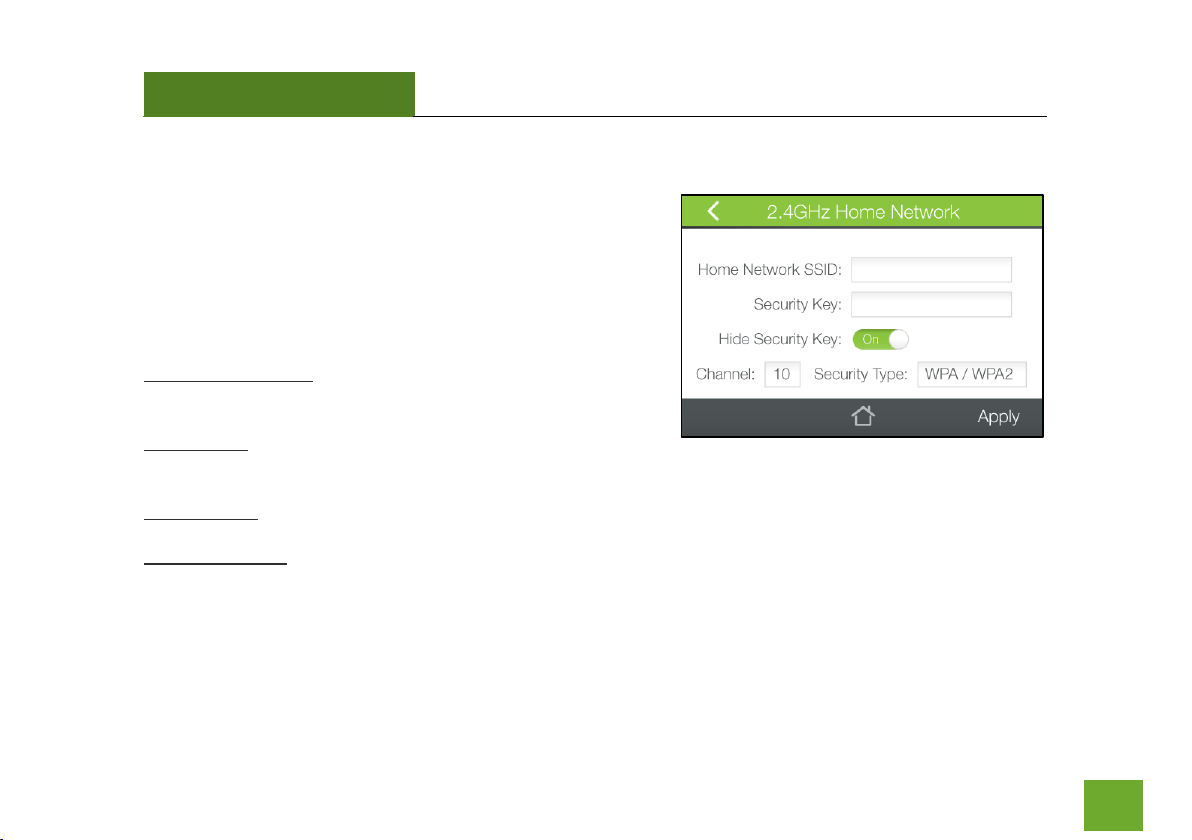
2.4GHz Wi-Fi Settings (Touch): Home Network Settings
Home Network Settings allow you to adjust settings for your
Range Extender’s connection with your Home Network router.
Should you choose to skip the Setup Wizard and manually
configure your Range Extender, this is the menu you use to do
so.
Home Network SSID: Manually enter the Identification name of
the Home Network you wish to connect to.
Security Key: Enter the Security Key of the Home Network. This
is the password that you normally use when connecting directly to your home Wi-Fi connection.
Security Type: Select the encryption method used by your Home Network.
Channel Number: Enter the Channel number of the Home Network.
If the Settings entered here do not match the Settings of your home router, a connection between the router
and the Range Extender will not be established.
More detailed settings can be found by accessing the web menu, http://setup.ampedwireless.com.
Page 22

TAP-EX2
USER’S GUIDE
21
21
2.4GHz Wi-Fi Settings (Touch): Extended Network Settings
The Extended Network Settings page allows you to adjust
settings for your Extended Network.
Extended Network SSID: This is the Identification name of the
repeated/extended network.
Security Key: Enter the security key of the Extended Network.
This is the password that your network devices will use to
connect to the Extended Network.
Security Type: Select the encryption method used by the Home
Network. This setting must match the Security Type setting of your Home Network router.
More detailed settings can be found by accessing the web menu, http://setup.ampedwireless.com.
Page 23
TAP-EX2
USER’S GUIDE
22
22
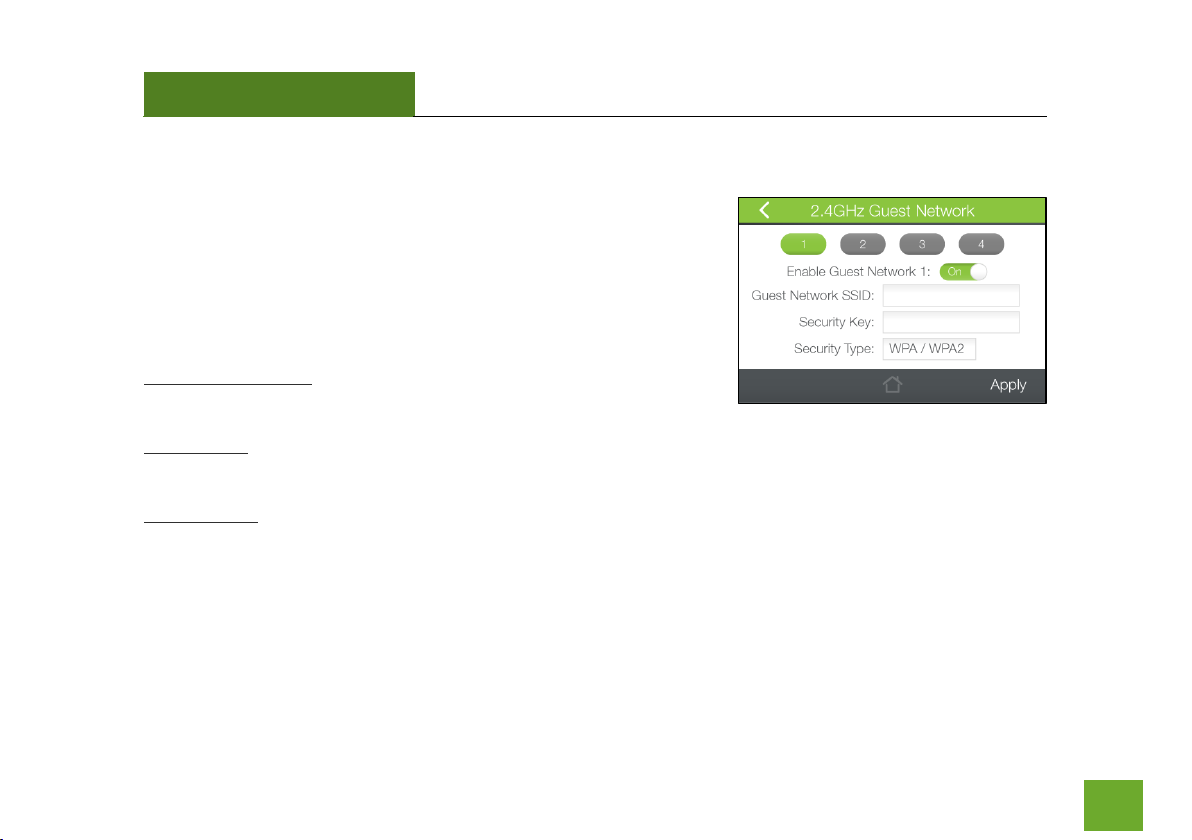
2.4GHz Wi-Fi Settings (Touch): Guest Network
Guest Networks provide a separate Wi-Fi network, with unique
settings for users to connect to. Select one of the four available Guest
Networks.
Toggle the selected Guest Network to On to enable the Guest
Network.
Guest Network SSID: This is the Identification name of your new Guest
Network.
Security Key: Enter the security key of the Guest Network. This is the password that your network devices will
use to connect your new Guest Network.
Security Type: Select the encryption method used by the Home Network. This setting must match the Security
Type setting of your Home Network router.
More detailed settings can be found by accessing the web menu, http://setup.ampedwireless.com.
Page 24
TAP-EX2
USER’S GUIDE
23
23
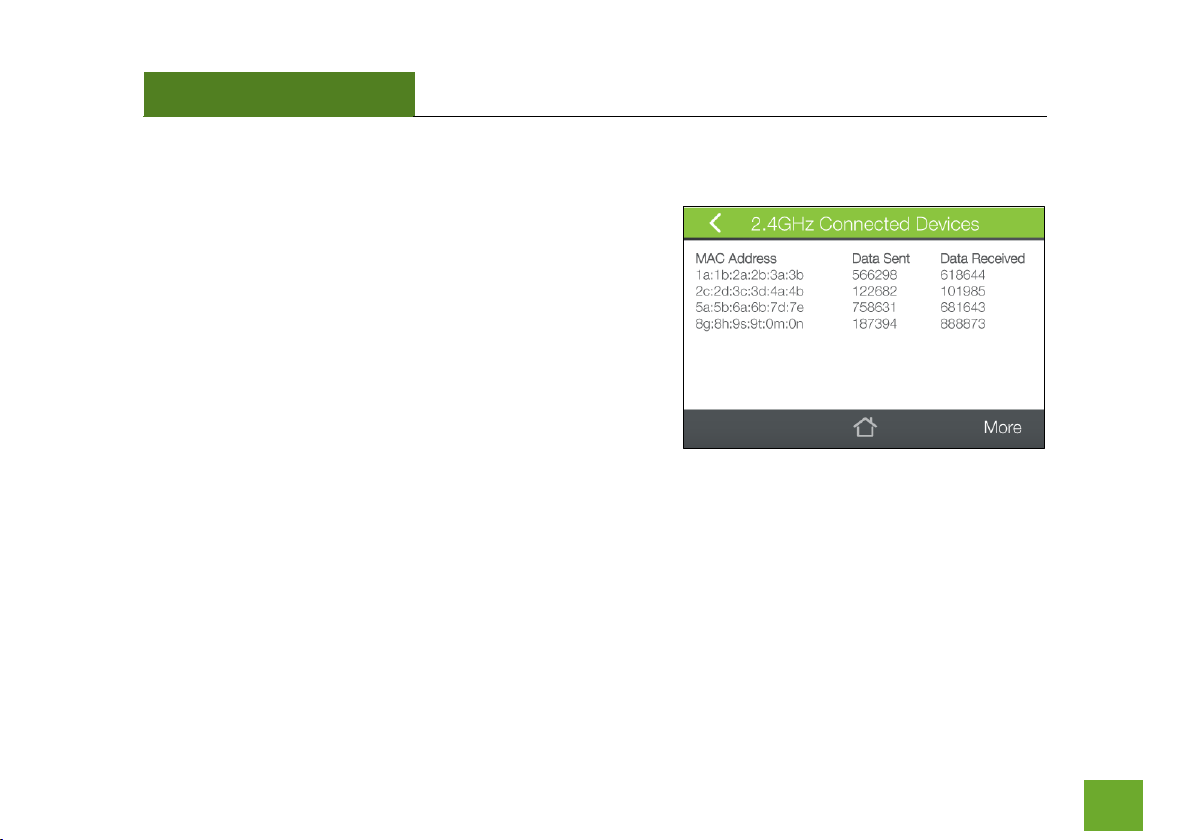
2.4GHz Wi-Fi Settings (Touch): Connected Devices
Connected Devices displays all users currently connected to the
Range Extender’s Extended Network. It provides a list of MAC
Addresses for each connected device and the sent and received
data for each.
Page 25
TAP-EX2
USER’S GUIDE
24
24
2.4GHz Wi-Fi Settings (Touch): Wi-Fi Coverage Controls
Adjust the output power of the Range Extender to control the
coverage distance of your Extended Wi-Fi Network. For a
smaller coverage area you can select a lower output power. For
the maximum Wi-Fi coverage select the 100% selection. Note
that if you select a lower output power, your connection to
your Home Network will also decrease in range. So be careful
and test your signal strength after each adjustment.
Page 26

TAP-EX2
USER’S GUIDE
25
25
2.4GHz Wi-Fi Settings (Touch): Access Schedule
You can set a schedule for when your Wi-Fi is enabled or disabled
(both Home Network and the Extended Network) through the Access
Schedule menu. To do so:
a. Toggle the Access Schedule to On.
b. Select which days you wish for your Wi-Fi to be available, one
day at a time. Select the first day and tap Next.
c. Then select the time frame during that day that you wish for
Wi-Fi to be available. Tap Apply to save your settings.
d. Tap the next day that you wish to schedule and then repeat
steps a-c.
Your Access Schedule will also control the Internet access for wired
connections. For more detailed settings, access
http://setup.ampedwireless.com.
Note: Make sure you have already configured your System Clock in order for your schedule to work correctly.
Time Zone Settings can be adjusted from the Settings menu under Management > Clock / Date.
Page 27
TAP-EX2
USER’S GUIDE
26
26
2.4GHz Wi-Fi Settings (Touch): Wi-Fi Protected Setup (WPS)
WPS is a Wi-Fi feature created to make Wi-Fi setup simple and
easy. Some Wi-Fi routers and adapters support this feature
with varying names (i.e. One Touch Setup or WPS).
You may enable WPS setup here by tapping Start WPS PBC.
Follow the steps on the Range Extender to complete WPS
setup.
More detailed settings can be found by accessing the web
menu, http://setup.ampedwireless.com.
Page 28
TAP-EX2
USER’S GUIDE
27
27
2.4GHz Wi-Fi Settings (Touch): User Access
User Access allows you to deny access or allow access to specific users
that are connecting wirelessly to the Extended Network. Each Wi-Fi
device has a unique address called a MAC address (a 12 digit hex
number).
By inputting the MAC address into the field, you can define whether
that device is allowed to connect to your network or not allowed.
Tap Select from Connected Devices to conveniently alter the access of
devices that are already connected to the Extended Network.
Page 29
TAP-EX2
USER’S GUIDE
28
28
5GHz WI-FI SETTINGS (TOUCH SCREEN)
5GHz Wi-Fi Settings (Touch): Home Network Settings
Home Network Settings allow you to adjust settings for your
Range Extender’s connection with your Home Network router.
Should you choose to skip the Setup Wizard and manually
configure your Range Extender, this is the menu you use to do
so.
Home Network SSID: Manually enter the Identification name of
the Home Network you wish to connect to.
Security Key: Enter the Security Key of the Home Network. This
is the password that you normally use when connecting directly to your home Wi-Fi connection.
Security Type: Select the encryption method used by your Home Network.
Channel Number: Enter the Channel number of the Home Network.
If the Settings entered here do not match the Settings of your home router, a connection between the router
and the Range Extender will not be established.
More detailed settings can be found by accessing the web menu, http://setup.ampedwireless.com.
Page 30
TAP-EX2
USER’S GUIDE
29
29
5GHz Wi-Fi Settings (Touch): Extended Network Settings
The Extended Network Settings page allows you to adjust
settings for your Extended Network.
Extended Network SSID: This is the Identification name of the
repeated/extended network.
Security Key: Enter the security key of the Extended Network.
This is the password that your network devices will use to
connect to the Extended Network.
Security Type: Select the encryption method used by the Home Network. This setting must match the Security
Type setting of your Home Network router.
More detailed settings can be found by accessing the web menu, http://setup.ampedwireless.com.
Page 31

TAP-EX2
USER’S GUIDE
30
30
5GHz Wi-Fi Settings (Touch): Guest Network
Guest Networks provide a separate Wi-Fi network, with unique
settings for users to connect to. Select one of the four available
Guest Networks.
Toggle the selected Guest Network to On to enable the Guest
Network.
Guest Network SSID: This is the Identification name of your
new Guest Network.
Security Key: Enter the security key of the Guest Network. This is the password that your network devices will
use to connect your new Guest Network.
Security Type: Select the encryption method used by the Home Network. This setting must match the Security
Type setting of your Home Network router.
More detailed settings can be found by accessing the web menu, http://setup.ampedwireless.com.
Page 32

TAP-EX2
USER’S GUIDE
31
31
5GHz Wi-Fi Settings (Touch): Connected Devices
Connected Devices displays all users currently connected to the
Range Extender’s Extended Network. It provides a list of MAC
Addresses for each connected device and the sent and received
data for each.
Page 33

TAP-EX2
USER’S GUIDE
32
32
5GHz Wi-Fi Settings (Touch): Wi-Fi Coverage Controls
Adjust the output power of the Range Extender to control the
coverage distance of your Extended Wi-Fi Network. For a
smaller coverage area you can select a lower output power. For
the maximum Wi-Fi coverage select the 100% selection. Note
that if you select a lower output power, your connection to
your Home Network will also decrease in range. So be careful
and test your signal strength after each adjustment.
Page 34

TAP-EX2
USER’S GUIDE
33
33
5GHz Wi-Fi Settings (Touch): Access Schedule
You can set a schedule for when your Wi-Fi is enabled or disabled
(both Home Network and the Extended Network) through the Access
Schedule menu. To do so:
a. Toggle the Access Schedule to On.
b. Select which days you wish for your Wi-Fi to be available, one
day at a time. Select the first day and tap Next.
c. Then select the time frame during that day that you wish for
Wi-Fi to be available. Tap Apply to save your settings.
d. Tap the next day that you wish to schedule and then repeat
steps a-c.
Your Access Schedule will also control the Internet access for wired
connections. For more detailed settings, access
http://setup.ampedwireless.com.
Note: Make sure you have already configured your System Clock in order for your schedule to work correctly.
Time Zone Settings can be adjusted from the Settings menu under Management > Clock / Date.
Page 35

TAP-EX2
USER’S GUIDE
34
34
5GHz Wi-Fi Settings (Touch): Wi-Fi Protected Setup (WPS)
WPS is a Wi-Fi feature created to make Wi-Fi setup simple and
easy. Some Wi-Fi routers and adapters support this feature
with varying names (i.e. One Touch Setup or WPS).
You may enable WPS setup here by tapping Start WPS PBC.
Follow the steps on the Range Extender to complete WPS
setup.
More detailed settings can be found by accessing the web menu, http://setup.ampedwireless.com.
Page 36

TAP-EX2
USER’S GUIDE
35
35
5GHz Wi-Fi Settings (Touch): User Access
User Access allows you to deny access or allow access to specific users
that are connecting wirelessly to the Extended Network. Each Wi-Fi
device has a unique address called a MAC address (a 12 digit hex
number).
By inputting the MAC address into the field, you can define whether
that device is allowed to connect to your network or not allowed.
Tap Select from Connected Devices to conveniently alter the access of
devices that are already connected to the Extended Network.
Page 37

TAP-EX2
USER’S GUIDE
36
36
BOOSTBAND TECHNOLOGY (TOUCH)
BoostBand Technology (Touch): Screen Settings
BoostBand Technology is a feature that increases the overall
speed and performance of the Range Extender by streamlining
dual band network traffic through a single Wi-Fi frequency
band between the Router and Range Extender. Doing so
optimizes network traffic through the fastest available
frequency band.
BoostBand Technology can only be enabled when the Range
Extender is connected to a dual band connection. By default
BoostBand Technology will use the faster, 5GHz band. If the 5GHz band is not available or becomes too weak,
BoostBand Technology will automatically switch over to the 2.4GHz band.
While BoostBand Technology is enabled, Wi-Fi devices will still be able to connect to the Range Extender using
2.4GHz and 5GHz connections.
Page 38

TAP-EX2
USER’S GUIDE
37
37
NETWORK SETTINGS (TOUCH)
Network Settings (Touch): IP Settings
IP Address: The IP address of the Range Extender.
Subnet Mask: The subnet of the Range Extender.
Default Gateway: The access point to another network,
normally the Range Extender or your router.
DHCP: The Range Extender includes a feature to help manage
the IP addresses within your Extended Network and with your Home Network automatically. When connected
to a Home Network, the Range Extender will obtain an IP address from your Home Network’s router and act as
a DHCP Client. However, when there is no connection available, the Range Extender will act as a DHCP Server.
You may also manually control the IP settings of the Range Extender by choosing Client, Server or Disabled
from the DHCP drop down menu. This is only for advanced users.
DHCP Client Range: The range of IP addresses the Range Extender’s DHCP server will assign to users and
devices connecting to the Range Extender.
Page 39

TAP-EX2
USER’S GUIDE
38
38
Network Settings (Touch): Wired Port Routing
If the Range Extender is connected to a dual band router, the Range Extender will automatically route the
traffic from the device connected to the Range Extender’s wired port through the 5GHz Home Network to
access the web with the fastest speeds. If you choose, you may adjust this setting so that all wired traffic is
routed through the 2.4GHz Home Network connection instead.
If the Range Extender is only connected to a single Home Network, it will automatically route all wired traffic
through the Home Network connection that is active.
Page 40

TAP-EX2
USER’S GUIDE
39
39
MANAGEMENT SETTINGS (TOUCH)
Management (Touch): Screen Settings
Manage the behavior and security of the LCD screen:
Timeout: When the touch screen is inactive past the duration
of the Timeout time (in seconds), it will turn off to conserve
power.
Lock Passcode: You can turn on a screen that has turned off
simply by touching the screen. The Lock Passcode is a 4 digit
security code used to secure access to the screen. If the
Passcode is incorrect, the Touch Screen Menu will not appear.
(Note: If you forget your passcode, simply reset the Range
Extender back to default settings by holding down the reset
button on the right panel of the Range Extender for 5-10 seconds)
Show Clock After Timeout: The Range Extender can automatically display the time and date after the timeout
time has elapsed instead of turning the screen off.
Page 41

TAP-EX2
USER’S GUIDE
40
40
Management (Touch): Clock / Date
Maintain the internal clock for the Range Extender by syncing
with the Internet.
Your clock and date settings need to be accurate in order for
Logs and Wi-Fi Access Schedules to work correctly.
If you wish for the Clock to show on your screen when the
Range Extender is timed-out, toggle this to On.
Be sure to Apply settings to save them.
Page 42

TAP-EX2
USER’S GUIDE
41
41
Management (Touch): System Details
The Device Status provides you with a snapshot of your Range Extender’s current connections and settings.
Home Wi-Fi Network Settings: This section displays the current status of
the connection between the Range Extender and your 2.4GHz or 5GHz
Home Network. When viewing this section, it is important to check that
your Home Network SSID is correct and the channel number matches
your Home Network's channel number settings.
Connection Status: The Connection State will say "Connected" when
there are no problems with the connection to your Home Network.
Extended Wi-Fi Network Settings: This shows the current settings for
your 2.4GHz or 5GHz Extended Wi-Fi Network. The IP settings for your
Range Extender will change as you connect and disconnect from your
Home Network. When connected to your Home Network, the network
IP settings will be assigned by your Home Network. When not
connected, the Range Extender will use its own default network IP
settings.
Page 43

TAP-EX2
USER’S GUIDE
42
42
Device Details: This section provides you with information on
the version and build time of your firmware. This is used to help
our support department determine what firmware version your
device is running.
The Current Date / Time is the setting for the System Clock. If
this time is off, go to the System Clock section and configure
your system time.
Page 44

TAP-EX2
USER’S GUIDE
43
43
Management (Touch): Statistics
These statistics show the data activity for your 2.4GHz or 5GHz connections.
Home Network: These statistics show the data activity for all
upload and download data between the Home Network and
the Range Extender.
Extended Wi-Fi Network: These statistics show all data activity
for all users connected wirelessly to the Range Extender.
Wired Network: The Wired Connection statistics show all data
activity for all users physically connected to the wired ports on
the Range Extender.
Page 45

TAP-EX2
USER’S GUIDE
44
44
Management (Touch): USB Storage
Share a USB storage device with computers on both the Home
Network and the Extended Network of the Range Extender.
Insert a USB storage device, such as a flash drive or external
hard drive, to the USB port on the side of the Range Extender
and follow the directions below for your operating system. The
computer must be connected to your Home Network or
Extended Network in order to access the storage device. You
may also want to Map the Network Drive so it shows up as a
standard drive on your computer for easier access.
More detailed settings can be found by accessing the web menu, http://setup.ampedwireless.com.
Page 46

TAP-EX2
USER’S GUIDE
45
45
Windows 7 & Vista
To access the drive from your Windows desktop:
Note: If the USB drive does not appear automatically under your Networked devices (Windows 7, Vista or Mac OS X), you will need to Map
the Network Drive.
a. Click the Start button
b. Click Computer
c. On the Computer page, the drive should appear on the left hand column under Network as
AMPED_RE_USB
To Map the Network Drive:
a. Click the Start button
b. Click Computer
c. Click Map Network Drive from the top bar
d. Select a drive letter (any), then enter in the folder field:
\\AMPED_RE_USB\public\ or \\Range Extender’s LAN IP address\public\
e. If the drive fails to open, click browse and locate AMPED_RE_USB under Network
Page 47

TAP-EX2
USER’S GUIDE
46
46
Windows XP
To access the drive from your Windows desktop:
Note: If the USB drive does not appear automatically under your Networked devices (Windows 7, Vista or Mac OS X), you will need to Map
the Network Drive.
a. Click the Start button
b. Click My Computer
c. Click on My Network Places and locate the drive named AMPED_RE_USB
To Map the network drive:
a. Click the Start button
b. Right Click My Computer and select Map Network Drive
c. Select a drive letter (any), then enter in the folder field:
\\AMPED_RE_USB\public\ or \\Range Extender’s LAN IP address\public\
d. If the drive fails to open, click browse and locate AMPED_RE_USB under Network
Page 48

TAP-EX2
USER’S GUIDE
47
47
Mac OS X
To access the drive from your Mac desktop:
Note: If the USB drive does not appear automatically under your Networked devices, you will need to Map your Network Drive
(Instructions below).
a. Open Finder
b. On the left hand menu, under Shared, click AMPED_RE_USB
To Map the network drive:
a. Open Finder
b. From the menu on the top of the desktop, select Go
c. Select Connect To Server from the drop down menu
d. Enter the address of the network drive:
smb://AMPED_RE_USB/public or smb://Range Extender’s LAN ip address/public
e. Then click Connect
If the network drive does not appear on your Mac desktop, follow these steps:
a. Open Finder
b. Select Preferences from the drop down menu
c. Check show Connected Servers
d. The drive should now appear on your desktop
Page 49

TAP-EX2
USER’S GUIDE
48
48
Management (Touch): System Logs
System Logs are useful for viewing the activity and history of the Range Extender. The System Logs are also
used by Amped Wireless techs to help troubleshoot your Range Extender when needed.
It is recommended that you enable all logs in the event that troubleshooting is required. All log entries are
deleted each time the Range Extender reboots or is powered off.
More detailed log information can be found by accessing the web menu, http;//setup.ampedwireless.com.
Page 50

TAP-EX2
USER’S GUIDE
49
49
Management (Touch): Upgrade Firmware
Amped Wireless continuously updates the firmware for all
products in an effort to constantly improve our products and
their user experiences. When connected to an active
connection with Internet access, the Range Extender can
automatically check for new firmware updates that are
available by tapping Check for Updates. Follow the prompts to
complete the upgrade process.
Before upgrading the firmware, remember to always save your
current settings first by going to Save/Reload Settings via the
web menu. The firmware upgrade process will reset the settings of the Range Extender to default settings.
More detailed settings can be found by accessing the web menu, http://setup.ampedwireless.com.
Page 51

TAP-EX2
USER’S GUIDE
50
50
Management (Touch): Reset Settings
Reset the Range Extender’s settings to factory settings by
pressing Reset. By resetting the Range Extender will lose all
previous configurations and will need to run the Setup Wizard
again to configure the Range Extender’s Settings.
Page 52

TAP-EX2
USER’S GUIDE
51
51
ACCESSING THE WEB MENU
The Range Extender can be configured via the simple to use Touch Screen Menu or via a web browser with the
Web Menu. The Web Menu features a more advanced, more detailed interface with additional configuration
options that may not be found on the Touch Screen Menu. To access the Web Menu, simply connect your
computer, tablet, or smartphone to the Wi-Fi network or the wired network port of the Range Extender.
a. Open your web browser
b. Type http://setup.ampedwireless.com into the web
address bar
c. If the web menu fails to open, type in the following
IP address into your web address bar:
http://192.168.1.240
a. Disconnect your PC from all Wi-Fi networks
b. Attach an Ethernet cable between the PC and the Range Extender
c. Open your web browser and go to http://setup.ampedwireless.com again
Page 53

TAP-EX2
USER’S GUIDE
52
52
SETUP GUIDE (WEB MENU)
Find a Setup Location
The location of where you install
the Range Extender is very
important to how it will function.
The optimal setup location should
be somewhere no more than
halfway between your Wi-Fi router
and your Wi-Fi dead zone.
Page 54

TAP-EX2
USER’S GUIDE
53
53
Connect your PC, Tablet, or Smartphone to the Range Extender
a. Attach the included antenna.
b. Attach the Power Adapter to the Range
Extender’s PWR Port and an available
power outlet.
c. The Range Extender should boot up
with the Amped Wireless logo and then
the Dashboard screen should appear.
d. Connect your PC, Tablet, or Smartphone
to the Range Extender’s Wi-Fi network:
Amped_TAPEX2_2.4 or Amped_TAPEX2_5.0.
Page 55

TAP-EX2
USER’S GUIDE
54
54
Open your Web Browser to Access the Setup Wizard
a. Open your web browser
b. Type http://setup.ampedwireless.com into
the web address bar
c. If the web menu fails to open, type in the
following IP address into your web address
bar: http://192.168.1.240
a. Disconnect your PC from all Wi-Fi networks
b. Attach an Ethernet cable between the PC and the Range Extender
c. Open your web browser and go to http://setup.ampedwireless.com again
Page 56

TAP-EX2
USER’S GUIDE
55
55
Welcome to the Dashboard
The Dashboard will provide you with the current status of the Range
Extender.
Click SCAN to find an available network to extend.
The diagram on this page displays the terms used to describe:
1) The network you are trying to extend (Home Network).
2) The network that is rebroadcasted and extended (Extended
Network).
Study this diagram carefully as the terms used in the following
instructions will refer to these names.
Page 57

TAP-EX2
USER’S GUIDE
56
56
Scan for a Home Network to Extend
The Scan result will list all available 2.4GHz and 5GHz wireless networks
detected by the Range Extender – including each network name (SSID),
the operating channel, the type of security and the signal strength.
If you are extending a dual band router, you will need to select the SSID
of your 2.4GHz network and the SSID of your 5GHz network.
The signal strength indicates the wireless connection between that
network and the Range Extender. It is important to choose networks
that are greater than 70%. A wireless network with a signal strength of
less than 70% may create a poor connection which results in slower
throughput and frequent dropped connections. If you fail to find any wireless networks, or your signal strength
is below 70%, try moving the Range Extender closer to the wireless network that you are trying to repeat and
click SCAN again.
Once you have selected your wireless network(s), click Next to continue. If you are only connecting to one
network, simply select that 2.4 or 5GHz network and click Next to continue.
Page 58

TAP-EX2
USER’S GUIDE
57
57
Connecting to a Secure Network
If the wireless network(s) you are trying to repeat has wireless security
enabled, you will be prompted to enter a security key. If you are
repeating a dual band router, you will need to enter the security key for
both the 2.4GHz and 5GHz network. If either network does not have
security, leave the field blank.
After you have entered the security key(s), click Next to continue.
If you do not know the key to the network you are trying to repeat, then
click Back and select another network.
Page 59

TAP-EX2
USER’S GUIDE
58
58
Extended Network Settings (SSID and Security)
The default SSID of the Range Extender is “Amped_TAPEX2_2.4” and
“Amped_TAPEX2_5.0”.
If you choose to "Clone" the settings from your Home
Network, the wizard will copy the SSID and security key of your Home
Network.
The SSID of the Extended Network will have a "_RE" at the end of its
name. For example: Home_Network_RE.
You can also manually enter a new network ID and security key. The new
security key must be at least 8 characters long.
Click Next to apply the settings.
Page 60

TAP-EX2
USER’S GUIDE
59
59
Connection Check
DO NOT LEAVE OR REFRESH THIS PAGE.
Allow the countdown to complete and the Wizard will automatically
redirect you to the next step.
Page 61

TAP-EX2
USER’S GUIDE
60
60
Connect to the new Extended Network
During the countdown process, the Range Extender will reboot and
disconnect the Wi-Fi connection. At this point, you will need to
reconnect your PC or tablet to the new Extended Network. Follow the
instructions on the screen to connect to the Extended Network.
Once you have connected, click the check box to confirm. The Next
button will appear allowing you to complete the setup process.
If there are problems with your configuration, the Wizard will inform
you to rescan for a network to extend.
If there are no problems, you will see the Setup
Summary on the following page.
Page 62

TAP-EX2
USER’S GUIDE
61
61
Setup Summary
Congratulations, the Range Extender is now successfully configured.
Your settings are now saved.
Print the Setup Summary details and save it for future reference.
If you haven’t already positioned your Range Extender in an optimal
location, you may do so. All Range Extender settings are saved and can
be safely powered off for relocation.
You may also attach any wired network devices to the wired ports on
the side of the Range Extender.
If you experience any problems during this process please contact
Amped Wireless Elite Support at 888-573-8820.
Page 63

TAP-EX2
USER’S GUIDE
62
62
Wired Port Routing
The Setup Wizard automatically selects the Home Network (2.4GHz or
5GHz) your wired devices will be routed through to connect to the
Internet. If you wish to change this setting you may do so from the web
menu by accessing Network Settings > Wired Port Routing.
Page 64

TAP-EX2
USER’S GUIDE
63
63
If the Home/Office Network connection fails try the following…
The failed connection page will provide you with information on why the connection failed. Read the
instructions carefully and retry your connection. The tips below will help to solve common issues:
a. Check to make sure your Home Network security settings are correct.
b. On the SCAN page, check that your Home Network is showing a signal of 70% or greater. If not, move
the Range Extender closer to your Home Network router and try again. If you are connecting to a dual
band router, ensure that both the 2.4GHz and 5GHz networks show a signal strength of 70% or
greater.
c. Check that your Home Network router’s DHCP server is enabled.
d. Try changing the channel of the Home Network router to a higher channel number and run the Setup
Wizard again.
e. Check the internet connection on your Home Network wireless router. Connect directly to your router
and attempt to access the web. If this fails, the problem is with your internet connection. Contact
your broadband provider to fix this issue first before configuring the Range Extender.
f. Try to reboot (unplug the power from the Range Extender and plug it back in) the Range Extender and
check to see if the connection is established (some networks may be very slow and take longer than
the allotted time for the Range Extender to successfully connect).
Page 65

TAP-EX2
USER’S GUIDE
64
64
5GHz WI-FI SETTINGS
5GHz Wi-Fi Settings: Home Network Settings (5GHz)
The Home Network Settings (5GHz) page allows you to adjust settings
for your 5GHz Home Network connection. These settings are for
adjusting the Range Extender’s Home Network connection after you
have already gone through the Setup Wizard and wish to adjust your
current configurations.
Home Network SSID (5GHz): Manually enter the Identification name of
the existing 5GHz Home Network you wish to connect to.
Channel Number: Enter the channel number of the Home Network. If
the channel number does not match, a connection will not be
established.
Channel Width: Wi-Fi operates in two separate channel widths, 20Hz and 40Hz. 40Hz allows for faster speeds.
Each Channel Width will have a different selection of wireless channels to choose from. Select the channel
width you wish to use for your network. This setting must match that of your Home Network for a successful
connection.
Page 66

TAP-EX2
USER’S GUIDE
65
65
5GHz Wi-Fi Settings: Extended Network Settings (5GHz)
The Extended Network Settings page allows you to adjust
settings for your Extended Network.
SSID of Extended Network: The name used to identify your
Extended Network. This is the name that appears when a user
scans for available Wi-Fi networks.
Band: Allows you to setup access under a specific combination of Wi-Fi speed standards.
Broadcast SSID: Selecting Disable Broadcast SSID will hide the visibility of the Range Extender’s SSID. Users
must manually enter the SSID to connect.
Page 67

TAP-EX2
USER’S GUIDE
66
66
Guest Networks (5GHz)
Click “Enable” to create a Guest Network. Guest Networks
provide a separate wireless network, with unique settings for
users to connect to.
Band: Restrict the Wi-Fi protocol and speed used for the
specific Guest Network.
SSID: This is the name of your Guest Network.
Data Rate: Restrict access to the Guest Network by setting a lower bandwidth by changing the data rate.
Broadcast SSID: Disable to hide your SSID from public view. Users will need to manually enter the SSID into
their wireless software interface to connect.
Associated Clients: View all computers and network devices that are connected to your Guest Network
wirelessly.
To set security settings for the Guest Network go to: 5GHz Wi-Fi Settings > Security.
Page 68

TAP-EX2
USER’S GUIDE
67
67
5GHz Wi-Fi Settings: Security
Wireless security allows you to change the type of wireless security settings for your 5GHz Extended Network,
Home Network or Guest Networks.
Note: If you adjust the security of your Home Network and it is incorrect, the Range Extender will no longer
have a successful connection to your Home Network.
Using the drop down menu, you can select which network you
wish to configure and may adjust the security settings below.
If you are using the Guest Network feature, you will be able to
adjust the security settings for those additional network SSIDs
here as well.
For more information on the differences between the types of
Wi-Fi security available, please visit the Learning Center on the Amped Wireless website:
www.ampedwireless.com
Page 69

TAP-EX2
USER’S GUIDE
68
68
5GHz Wi-Fi Settings: Wi-Fi Protected Setup – WPS
WPS is a Wi-Fi feature created to make Wi-Fi setup simple and
easy. Some wireless routers and adapters support this feature
with varying names (i.e. one touch setup or WPS).
You may enable WPS setup here by selecting the type of WPS
setup you wish to use. The Range Extender supports all types of
WPS setup:
Option A: Push button: You may push the WPS button on the web menu or use the physical button on the
back of the Range Extender.
Option B: PIN: Some wireless devices use a PIN number to access wireless network. If your wireless device
requests for a PIN number, then use the PIN code located here.
Option C: Enter PIN: Some wireless devices require that you use a PIN number to add them to the wireless
network. If your wireless device has a PIN number, then locate the number and enter in the field,
then press Start Pin.
Page 70

TAP-EX2
USER’S GUIDE
69
69
5GHz Wi-Fi Settings: User Access
User Access allows you to deny access or allow access to
specific users connecting to the network. Each networking
device has a unique address called a MAC address (a 12 digit
hex number).
By inputting the MAC address into the field, you can define
whether that device is allowed into your network or not
allowed.
A MAC Address may sometimes be referred to as a Physical Address. Most networking devices have their MAC
Address located on a label on the actual device.
For Windows computers with internal networking adapters, the MAC Address can be found by viewing the
Network Connection Details of the network adapter. The MAC Address will be listed as the Physical Address.
Be sure to enter the MAC Address without any symbols. For example, a MAC Address of 78-DD-78-AA-78-BB
would be entered as 78DD78AA78BB.
Page 71

TAP-EX2
USER’S GUIDE
70
70
5GHz Wi-Fi Settings: Wireless Coverage Controls
Adjust the output power of the Range Extender to control the coverage distance of your 5GHz Extended
Wireless Network. For a smaller coverage area you can select a lower output power. For the maximum
wireless coverage select the 100% selection. Note that if you select a lower output power, your connection to
your 5GHz Home Network will also decrease in range. It is recommended that you test your signal strength
after each adjustment.
Page 72

TAP-EX2
USER’S GUIDE
71
71
5GHz Wi-Fi Settings: Access Schedule
Access Schedules will enable or disable your 5GHz wireless
access at a set time based on your predefined schedule. This
feature is often used for restricting access to all users (such as
children, employees, guests) during specific times of the day for
parental control or security reasons.
a. Enable Access Schedule.
b. Select which days you wish for your Wi-Fi to be
available.
c. Select the time frame during that day that you wish for Wi-Fi to be available.
d. Apply Changes.
Enabling Access Schedule will also disable internet access for wired connections on specified days.
Note: Make sure you have already configured your System Clock in order for your schedule to work correctly.
Time Zone Settings can be adjusted from the web menu under Management > Time Zone Settings.
Page 73

TAP-EX2
USER’S GUIDE
72
72
5GHz Wi-Fi Settings: Advanced Settings
Advanced Wireless Settings should only be adjusted by
technically advanced users. It is not recommended that novice
users adjust these settings to avoid degrading wireless
performance.Here are a few definitions on some settings.
Fragment Threshold: The Default and Recommended setting is
at 2346, meaning the High Power Range Extender will never
fragment any frames that it sends to wireless users.
RTS Threshold: Adjusts the size of RTS data packets. Lower
values reduce throughput, but allow the system to recover
quicker from interference/collisions. Higher values provide the fastest throughput.
Beacon Interval: Indicates the frequency interval of the beacon. A beacon is a packet broadcast by the Range
Extender to sync the wireless network.
Preamble Type: Defines the length of the Cyclic Redundancy Check for communication between the Range
Extender and roaming wireless users.
Page 74

TAP-EX2
USER’S GUIDE
73
73
IAPP: Inter-Access Point Protocol
STBC: Space Time Block Coding improves reception by coding the data stream in blocks.
Page 75

TAP-EX2
USER’S GUIDE
74
74
2.4GHz WI-FI SETTINGS
2.4GHz Wi-Fi Settings: Home Network Settings
The Home Network Settings (2.4GHz) page allows you to adjust settings
for your 2.4GHz Home Network connection. These settings are for
adjusting the Range Extender’s Home Network connection after you
have already gone through the Setup Wizard and wish to adjust your
current configurations.
Home Network SSID (2.4GHz): Manually enter the Identification name of
the existing 2.4GHz Home Network you wish to connect to.
Channel Number: Enter the channel number of the Home Network. If the channel number does not match, a
connection will not be established.
Channel Width: Wi-Fi operates in two separate channel widths, 20Hz and 40Hz. 20Hz allows operation on
channels 1-11, while 40Hz is 5-11. 40Hz allows for faster speeds. Select the channel width you wish to use for
your network. This setting must match that of your Home Network for a successful connection.
Page 76

TAP-EX2
USER’S GUIDE
75
75
2.4GHz Wi-Fi Settings: Extended Network Settings
The Extended Network Settings page allows you to adjust settings for your Extended Network.
SSID of Extended Network: The name used to identify your
Extended Network. This is the name that appears when a user
scans for available Wi-Fi networks.
Band: Allows you to setup access under a specific combination
of Wi-Fi speed standards.
Broadcast SSID: Selecting Disable Broadcast SSID will hide the visibility of the Range Extender’s SSID. Users
must manually enter the SSID to connect.
Page 77

TAP-EX2
USER’S GUIDE
76
76
2.4GHz Wi-Fi Settings: Guest Networks
Click “Enable” to create a Guest Network. Guest Networks
provide a separate wireless network, with unique settings for
users to connect to.
Band: Restrict the Wi-Fi protocol and speed used for the
specific Guest Network.
SSID: This is the name of your Guest Network.
Data Rate: Restrict access to the Guest Network by setting a lower bandwidth by changing the data rate.
Broadcast SSID: Disable to hide your SSID from public view. Users will need to manually enter the SSID into
their wireless software interface to connect.
Associated Clients: View all computers and network devices that are connected to your Guest Network
wirelessly.
To set security settings for the Guest Network go to: 2.4GHz Wi-Fi Settings > Security.
Page 78

TAP-EX2
USER’S GUIDE
77
77
2.4GHz Wi-Fi Settings: Security
Wireless security allows you to change the type of wireless security settings for your 2.4GHz Extended
Network, Home Network or Guest Networks.
Note: If you adjust the security of your Home Network and it is incorrect, the Range Extender will no longer
have a successful connection to your Home Network.
Using the drop down menu, you can select which network you
wish to configure and may adjust the security settings below.
If you are using the Guest Network feature, you will be able to
adjust the security settings for those additional network SSIDs
here as well.
For more information on the differences between the types of
Wi-Fi security available, please visit the Learning Center on the Amped Wireless website:
www.ampedwireless.com
Page 79

TAP-EX2
USER’S GUIDE
78
78
2.4GHz Wi-Fi Settings: Wi-Fi Protected Setup – WPS
WPS is a Wi-Fi feature created to make Wi-Fi setup simple and
easy. Some wireless routers and adapters support this feature
with varying names (i.e. one touch setup or WPS).
You may enable WPS setup here by selecting the type of WPS
setup you wish to use. The Range Extender supports all types of
WPS setup:
Option A: Push button: You may push the WPS button on the web menu or use the physical button on the
back of the Range Extender.
Option B: PIN: Some wireless devices use a PIN number to access wireless network. If your wireless device
requests for a PIN number, then use the PIN code located here.
Option C: Enter PIN: Some wireless devices require that you use a PIN number to add them to the wireless
network. If your wireless device has a PIN number, then locate the number and enter in the field,
then press Start Pin.
Page 80

TAP-EX2
USER’S GUIDE
79
79
2.4GHz Wi-Fi Settings: User Access
User Access allows you to deny access or allow access to
specific users connecting to the network. Each networking
device has a unique address called a MAC address (a 12 digit
hex number).
By inputting the MAC address into the field, you can define
whether that device is allowed into your network or not
allowed.
A MAC Address may sometimes be referred to as a Physical Address. Most networking devices have their MAC
Address located on a label on the actual device.
For Windows computers with internal networking adapters, the MAC Address can be found by viewing the
Network Connection Details of the network adapter. The MAC Address will be listed as the Physical Address.
Be sure to enter the MAC Address without any symbols. For example, a MAC Address of 78-DD-78-AA-78-BB
would be entered as 78DD78AA78BB.
Page 81

TAP-EX2
USER’S GUIDE
80
80
2.4GHz Wi-Fi Settings: Wireless Coverage Controls
Adjust the output power of the Range Extender to control the coverage distance of your 2.4GHz Extended
Wireless Network. For a smaller coverage area you can select a lower output power. For the maximum
wireless coverage select the 100% selection. Note that if you select a lower output power, your connection to
your 2.4GHz Home Network will also decrease in range. It is recommended that you test your signal strength
after each adjustment.
Page 82

TAP-EX2
USER’S GUIDE
81
81
2.4GHz Wi-Fi Settings: Access Schedule
Access Schedules will enable or disable your 2.4GHz wireless
access at a set time based on your predefined schedule. This
feature is often used for restricting access to all users (such as
children, employees, guests) during specific times of the day for
parental control or security reasons.
a. Enable Access Schedule.
b. Select which days you wish for your Wi-Fi to be
available.
c. Select the time frame during that day that you wish for Wi-Fi to be available.
d. Apply Changes.
Enabling Access Schedule will also disable internet access for wired connections on specified days.
Note: Make sure you have already configured your System Clock in order for your schedule to work correctly.
Time Zone Settings can be adjusted from the web menu under Management > Time Zone Settings.
Page 83

TAP-EX2
USER’S GUIDE
82
82
2.4GHz Wi-Fi Settings: Advanced Settings
Advanced Wireless Settings should only be adjusted by
technically advanced users. It is not recommended that novice
users adjust these settings to avoid degrading wireless
performance.Here are a few definitions on some settings.
Fragment Threshold: The Default and Recommended setting is
at 2346, meaning the High Power Range Extender will never
fragment any frames that it sends to wireless users.
RTS Threshold: Adjusts the size of RTS data packets. Lower
values reduce throughput, but allow the system to recover
quicker from interference/collisions. Higher values provide the fastest throughput.
Beacon Interval: Indicates the frequency interval of the beacon. A beacon is a packet broadcast by the Range
Extender to sync the wireless network.
Preamble Type: Defines the length of the Cyclic Redundancy Check for communication between the Range
Extender and roaming wireless users.
Page 84

TAP-EX2
USER’S GUIDE
83
83
IAPP: Inter-Access Point Protocol
STBC: Space Time Block Coding improves reception by coding the data stream in blocks.
Page 85

TAP-EX2
USER’S GUIDE
84
84
BOOSTBAND™ TECHNOLOGY
BoostBand Technology is a feature that increases the overall
speed and performance of the Range Extender by streamlining
dual band network traffic through a single Wi-Fi frequency
band between the Router and Range Extender. Doing so
optimizes network traffic through the fastest available
frequency band.
BoostBand Technology can only be enabled when the Range
Extender is connected to a dual band connection. By default
BoostBand Technology will use the faster, 5GHz band. If the
5GHz band is not available or becomes too weak, BoostBand Technology will automatically switch over to the
2.4GHz band.
While BoostBand Technology is enabled, Wi-Fi devices will still be able to connect to the Range Extender using
2.4GHz and 5GHz connections.
Page 86

TAP-EX2
USER’S GUIDE
85
85
NETWORK SETTINGS
Network Settings: IP Settings
IP Address: The IP address of the Range Extender.
Subnet Mask: The subnet of the Range Extender.
Default Gateway: The access point to another network,
normally the Range Extender or your router.
DHCP: The Range Extender includes a feature to help manage
the IP addresses within your Extended Network and with your
Home Network automatically. When connected to a Home
Network, the Range Extender will obtain an IP address from
your Home Network’s router and act as a DHCP Client.
However, when there is no connection available, the Range Extender will act as a DHCP Server. You may also
manually control the IP settings of the Range Extender by choosing Client, Server or Disabled from the DHCP
drop down menu. This is only for advanced users.
Page 87

TAP-EX2
USER’S GUIDE
86
86
DHCP Client Range: The range of IP addresses the Range Extender’s DHCP server will assign to users and
devices connecting to the Range Extender.
Static DHCP: You may set a static IP address within your DHCP network. The Range Extender will track the
device via its MAC address and assign it a pre-defined IP address each time the device logs into the network.
Obtain IP settings from the Home router or manually enter your IP settings.
Auto-Load Menu (Auto-DNS): When the Range Extender loses connection to your Home Network it will
automatically redirect your web browser to the web menu. To turn this feature off, you can disable Auto-DNS.
Note: Disabling Auto-DNS will require that you access the web menu using the IP address of this device. It is
recommended that you note your IP address before changing this mode. If you are no longer able to access
the web menu, you will need to perform a hardware reset.
Domain Name: The Domain Name allows you to change the URL which is used to access the Setup Menu for
the Range Extender. For example, entering http://setup.ampedwireless.com into your web browser while
connected to the Range Extender, will guide you to the Web menu for the Range Extender. By changing the
Domain Name, you will change the URL entered to access the Web menu. If you forget the Domain Name you
entered and can no longer access the Web menu, then you will need to reset your Range Extender to default
settings by holding down the reset button on the back panel for 5-10 seconds.
Page 88

TAP-EX2
USER’S GUIDE
87
87
Network Settings: Wired Port Routing
If the Range Extender is connected to a dual band router, the Range
Extender will automatically route the traffic from the device connected
to the Range Extender’s wired port through the 5GHz Home Network to
access the web with the fastest speeds. If you choose, you may adjust
this setting so that all wired traffic is routed through the 2.4GHz Home
Network connection instead.
If the Range Extender is only connected to a single Home Network, it
will automatically route all wired traffic through the Home Network
connection that is active.
Page 89

TAP-EX2
USER’S GUIDE
88
88
MANAGEMENT FEATURES
The Management features on the Range Extender allow you to view the status of your Range Extender and
adjust other settings such as your System Clock, Passwords, and Firmware Upgrades among other
administrative functions.
Page 90

TAP-EX2
USER’S GUIDE
89
89
Management: Device Status
The System Status provides you with a snapshot of your Range
Extender’s current connections and settings.
System Information: This section provides you with information on the
version and build time of your firmware. This is used to help our support
department determine what firmware version your device is running.
The Current Date / Time will display the current clock settings of the
Range Extender. If this time is off, go to the System Clock section and
configure your system time.
The Wired Ports Routing shows the active Home Network used for
transferring data to and from the wired ports.
Home Wireless Network Settings: This section displays the current
status of the connection between the High Power Range Extender and
your Home Network (2.4GHz or 5GHz). When viewing this section it is
important to check that your Home Network SSID is correct, that the
channel number matches your Home Network's channel number
settings.
Page 91

TAP-EX2
USER’S GUIDE
90
90
Connection State: The Connection State will say "Connected" when there are no problems with the connection
to your Home Network.
If the Connection State shows "Waiting for Keys" then the WPA/WPA2 security key you entered is incorrect.
If the Connection State shows "Scanning" the Range Extender may be too far away from your home/office
router.
The Signal Strength display can be updated by refreshing the page and is a good tool to use for finding the
optimal installation location. A signal strength of 70% or greater is recommended for stable operation of the
High Power Range Extender.
Extended Wireless Network Settings: Shows the current settings for your Extended Wireless Network (2.4GHz
or 5GHz).
IP Settings: The network IP settings for your Range Extender will change as you connect and disconnect from
your 2.4 or 5GHz Home Network. When connected to your Home Network, the network IP settings will be
assigned by your Home Network. When not connected, the High Power Range Extender will use its own
default network IP settings. These IPs are assigned to the 2.4 and 5GHz networks individually.
Page 92

TAP-EX2
USER’S GUIDE
91
91
Management: Network Statistics
These statistics show the data activity for each network connection.
Connection to Home Network: This statistics shows the data activity for
all upload and download data between the Home Network and the
Range Extender.
Extended Wireless Network: These statistics shows all data activity for
all users connected wirelessly to the Range Extender.
Extended Wired Network: The Wired Connection statistics shows all
data activity for all users physically connected to the wired ports on the
Range Extender.
Page 93

TAP-EX2
USER’S GUIDE
92
92
Management: System Clock
Maintain the internal clock for the Range Extender by syncing with your computer’s time. Your system clock
settings need to be accurate in order for logs and wireless access schedules to work correctly.
Page 94

TAP-EX2
USER’S GUIDE
93
93
Management: System Logs
System Logs are useful for viewing the activity and history of the Range Extender. The System Logs are also
used by Amped Wireless Elite Support Concierges to help troubleshoot your Range Extender when needed.
It is recommended that you enable all logs in the event that troubleshooting is required. All log entries are
deleted each time the Range Extender reboots or is powered off.
Page 95

TAP-EX2
USER’S GUIDE
94
94
Management: Upgrade Firmware
Amped Wireless continuously updates the firmware for all products in
an effort to constantly improve our products and their user experiences.
When connected to an active connection with Internet access, the
Range Extender can automatically check for new firmware updates that
are available by pressing Check Now. Follow the prompts to complete
the upgrade process.
Before upgrading the firmware, remember to always save your current
settings first by going to the Save/Reload Settings page. The firmware
upgrade process will reset the settings of the Range Extender to default
settings.
Manual Firmware Upgrade: In the case that the Range Extender does not have access to the Internet, you can
manually upgrade the firmware by downloading the firmware file from the Amped Wireless Elite Support
website. The firmware update is downloaded as a zip file and you will need to have an unzipping program to
open the file. Inside the file will be a text document with details on the current firmware release and
instructions on how to upgrade the firmware.
To manually upgrade your firmware:
Page 96

TAP-EX2
USER’S GUIDE
95
95
a. Download the file from www.ampedwireless.com/support and remember the location where you
saved it. Firmware files may also be provided by Amped Wireless Elite Support Concierges.
b. Click Choose File and locate the file.
c. Click Upload to begin upgrading.
Note: Firmware files normally have a .bin file extension.
Page 97

TAP-EX2
USER’S GUIDE
96
96
Management: Save/Reload Settings
Saving your current settings allows you to back-up your current
settings which may be reloaded at a later time. This feature
may be useful for testing new features and settings without
having to worry about returning to a stable platform.
To save current settings:
a. Click Save
b. Select a file name and location
You may also reset the Range Extender’s settings to factory settings by pressing Reset. By resetting the Range
Extender you will lose all previous configurations and will need to run the Setup Wizard again to reconnect to a
Home Network.
To load previously saved settings:
a. Click Browse
b. Locate the previously saved settings file
c. Click Upload to restore the settings to the
saved file
Page 98

TAP-EX2
USER’S GUIDE
97
97
Management: Password Settings
By default, the Range Extender does not require a password to log on to the web menu. If you wish to enable a
password to protect unauthorized access to the web menu and Setup Wizard, you may enter one here.
Page 99

TAP-EX2
USER’S GUIDE
98
98
TECHNICAL SPECIFICATIONS
Wireless Standard: 802.11a/b/g/n/ac
Frequency Band: 2.4GHz & 5GHz
Wireless Speed: 2.4GHz: 300Mbps (Tx/Rx)
5GHz: 433Mbps (Tx/Rx)
Amplifier: 2 x 2.4GHz Amplifiers
1 x 5GHz Amplifier
3 x Low Noise Amplifiers
Wireless Security:
WEP, WPA, WPA2, WPA Mixed, WPS
User Access Control:
MAC address filtering
Wireless Access Scheduling:
Specific day and time
(2.4GHz or 5GHz Separately)
Wireless Coverage Control:
15% - 100% Output Power
(2.4GHz or 5GHz Separately)
Antennas:
1 x Detachable High Gain Antenna
1 x Internal High Gain Antenna
Ports:
3 x RJ-45 10/100M LAN Ports
1 x USB 2.0 Port
Mounting:
Wall or Desktop Stand
Operating Temperature
0° - 40° C, 32° - 140° F
Warranty: 1 Year
Setup Requirements:
Wireless 802.11a/b/g/n or ac 2.4GHz or
5GHz Network
Page 100

TAP-EX2
USER’S GUIDE
99
99
DEFAULT SETTINGS
The default settings for your Range Extender are listed here. If for some reason you need to return your Range
Extender back to default settings, hold down the Reset button on the back panel for 10 seconds. The Range
Extender will reset back to factory settings as listed below:
IP Address: 192.168.1.240
Web Menu Access: http://setup.ampedwireless.com
2.4GHz Extended Network SSID: Amped_TAPEX2_2.4
5GHz Extended Network SSID: Amped_TAPEX2_5.0
 Loading...