

Page 1

M470039-01
Rev A
Contact Information
Telephone: 800 733 5427 (toll free in North Americ a )
858 450 0085 (direct)
Fax: 858 458 0267
Email:
Domestic Sales: domorders.sd@ametek.com
International Sales: intlorders.sd@ametek.com
Customer Service: service.ppd@ametek.com
Web:
www.programmablepower.com
OPERATION MANUAL
This manual covers:
PLA Series Programmable Air-cooled Electronic Loads
PLW Series Programmable Water-cooled Electronic Loads
Page 2

_______________________________________________
12
Page 3

WARRANTY IN FORMATION
CERTIFICATION
AMETEK Programmable Power, Inc. (“AMETEK”), certifies that this product met its published specifications at
time of shipment from the factory.
Contact Information
Telephone: 800 733 5427 (toll free in North Americ a )
858 450 0085 (direct)
Fax: 858 458 0267
Email:
Domestic Sales: domorders.sd@ametek.com
International Sales: intlorders.sd@ametek.com
Customer Service: service.ppd@ametek.com
Web:
www.programmablepower.com
Warranty Period:
AMREL DC Loads: One Year
WARRANTY TERMS
AMETEK Programmable Power, Inc. (“AMETEK”), provides this written warranty covering the
Product stated above, and if the Buyer discovers and notifies AMETEK in writing of any defect in
material or workmanship with in the applicable warranty period stat e d ab ove, then AMETEK may,
at its option: repair or replace the Product; or issue a credit note for the defective Product; or
provide the Buyer with replacement parts for the Product.
The Buyer will, at its expense, return the defective Product or parts thereof to AMETEK in
accordance with the return procedure specified below. AMETEK will, at its expense, deliver the
repaired or replaced Product or parts to the Buyer. Any warranty of A METEK will not apply if the
Buyer is in default under the Purchase Order Agreement or where the Product or any part
thereof:
• is damaged by misuse, accident, negligenc e or f ailure to maintain the same as
specified or required by AMETEK;
• is damaged by modifications, alterations or attac hments thereto which are not
authorized by AMETEK;
• is installed or operated contrary to the instructions of AMETEK;
• is opened, modified or disassembled in any way without AMETEK’s consent; or
• is used in combination with items, articles or materials not authorized by AMETEK.
The Buyer may not assert any claim that the Products are not in conformity with any warranty
until the Buyer has made all payments to AMETEK provided for in the Purchase Order Agreement.
PRODUCT RETURN PROCEDURE
1. Request a Return Material Authorization (RMA) number from the repair facility (must be
done in the count ry in which it wa s p urchased):
• In the USA, contact the AMETEK Repair Department prior to the return of the
product to AMETEK for repair:
Telephone: 800-733-5427 (toll free North America)
858-450-0085 (direct)
• Outside the United States, contact the nearest Authorized Service Center
(ASC). A full listing can be found either through your local distributor or our
website, www.programmablepower.com, by clicking Support and going to the
Service Centers tab.
2. When requesting an RMA, have the following information ready:
• Model number
• Serial number
• Description of the problem
NOTE: Unauthorized returns will not be accepted and will be returned at the shipper’s expense.
NOTE: A returned product found upon inspection by AMETEK, to be in specification is subject to
an evaluation fee and applicable freight charges.
Page 4

About AMETEK
AMETEK Programmable Power, Inc., a Division of AMETEK, Inc., i s a global l eader in the design and
manufacture of precision, programmable power supplies for R&D, test and measurement, process
control, power bus simulation and power conditioning applications across diverse industri al segments.
From bench top supplies to rack-mounted industrial power subsystems, AM E TEK Programmable Power
is the proud manufacturer of AMREL brand power suppli es.
AMETEK, Inc. is a leadi ng global m anufacturer of electronic instr uments and electromec hanic al dev ices
with a nnualized sales of $2. 5 billion. The Company has over 11,000 c olleagues working at more than 80
manufacturing facilities and more than 80 sales and service centers in the United St ates and around the
world.
Trademarks
AMETEK is a registered trademark of AMETEK, Inc. AMREL is a trademar k owned by AMETEK, Inc. Other
trademarks, registered trademarks, and product names are the property of their respective owners and
are used herein for identification purposes only.
Notice of Copyright
Manual © 2003-2011 AMETEK Programmable Power, Inc. All rights reserved.
Exclusion for Documentation
UNLESS SPECIFICALLY AGREED TO IN WRITING, AMETEK PROGRAMMABLE POWER, INC.
(“AMETEK”):
(a) MAKES NO WARRANTY AS TO THE ACCURACY, SUFFICIENCY OR SUITABILITY OF ANY TECHNICAL
OR OTHER INFORMATION PROVIDED IN ITS MANUALS OR OTHER DOCUMENTATION.
(b) ASSUMES NO RESPONSIBILITY OR LIABILITY FOR LOSSES, DAMAGES, COSTS OR EXPENSES,
WHETHER SPECIA L, DIRECT, INDIREC T, CONSEQUENTIAL OR INCIDENTAL, WHICH MIGHT ARISE O UT
OF THE USE OF SUCH INFORM ATION. THE USE OF AN Y SUCH INFORMATION W ILL BE ENTIRELY AT
THE USER’S RISK, AND
(c) REMINDS YOU THAT IF THIS MANUAL IS IN ANY LANGUAGE OTHER THAN ENGLISH, ALTHOUGH
STEPS HAVE BEEN TAKEN TO MAINTAIN THE ACCURACY OF THE TRANSLATION, THE AC CURACY
CANNOT BE GUARANTEED. APPRO VED AMETEK CONT ENT IS CO NTAI NED WITH TH E ENGLISH
LANGUAGE VERSION, WHICH IS POSTED AT WWW.PROGRAMM ABLEP OWER.COM.
Contact Information
Telephone: 800 733 5427 (toll free in North America) 858 450 0085 (direc t)
Fax: 858 458 0267
Email:
Domestic Sales :
International Sales :
Customer Service :
Web: www.programmablepower.com
domorders.sd@ametek.com
intlorders.sd@ametek.com
service.ppd@ametek.com
Page 5

_________________________________________________________________________________________
SAFETY SUMMARY
NOTE: The following general safety precautions must be observed during all phases of operation of this instrument.
Failure to comply with these precautions or with specific warnings elsewhere in this manual violates safety standards of
design, manufacture, and intended use of the instrument. AMETEK Programmable Power, Inc. assumes no liability for the customer’s
failure to comply with these requireme
WARNING
Servicing instructions are for use by service-trained personnel. To avoid dangerous electrical shock, do not perform any
servicing unless you are qualified to do so. Some procedures described in this manual are performed with power supplied
to the instrument while its protective covers are removed. If contacted, the energy available at many points may result in
personal injury.
ENVIRONMENTAL CONDITIONS
This instrument is intended for indoor use in an installation category II, pollution degree 2 environment. It is designed to
operate at maximum relative humility of 95% and at altitudes of up to 2000 meters. Refer to the specifications for the ac
mains voltage requirements and ambient operating temperature range.
BEFORE APPLYING POWER
y that the product is set to the appropriate line voltage, the correct line fuse is installed, and all safety precautions are
Verif
taken.
GROUND THE INSTRUMENT
Before switching on the instrument, the protective earth terminal of the instrument must be connected to the protective
conductor of the main power cord. The mains plug shall be inserted only in an outlet socket that is provided with a
protective earth contact. This protective action must not be negated by the use of an extension cord that does not have a
protective conductor. Any interruption of the protective grounding or disconnection of the protective earth terminal will
cause a potential shock hazard that could result in personal injury.
nts.
FUSES
Only fuses with the required rated current, voltage, and specified type should be used. Do not use repaired fuses or shortcircuited fuse holder. To do so could cause a shock or fire hazard.
AVOID ACCESS TO LIVE CIRCUITS
Operating personnel must not remove the instrument cover. Component replacement and internal adjustments must be
made by qualified service personnel. Do not replace components with the power cable connected. Under certain
conditions, dangerous voltage may exits even with the power cable removed, to avoid injuries, always disconnect power,
discharge circuits and remove external voltage sources before touching components.
AVOID TROUBLESHOOTING ALONE
Do not attempt internal service or adjustment unless another person, capable of rendering first aid and resuscitation, is
present. Any adjustment, maintenance, and repair of this instrument while it is opened and under voltage should be
avoided as much as possible. If this is unavoidable, adjustment, maintenance, and repair should be carried out by only
qualified personnel who are aware of the hazard involved.
DO NOT SUBSTITUTE PARTS OR MODIFY INSTRUMENT
Because of the danger of introducing additional hazards, do not install substitute parts or perform an unauthorized
modification to the instrument. Return the instrument to an American Reliance Service Department for service and repair
to ensure that safety features are maintained.
iii
Page 6

SAFETY SYMBOLS
WARNING The WARNING symbol denotes a hazard. It calls attention to a procedure, practice, or the like, which,
if not correctly performed or adhered to, could result in personal injury. Do not proceed beyond a WARNING symbol
until the indicated conditions are fully understood and met.
CAUTION The CAUTION symbol denotes a hazard. It calls attention to an operating procedure, or the like,
which, if not correctly performed or adhered to, could result in damage to or destruction of parts or all of the products.
Do not proceed beyond a CAUTION symbol until the indicated conditions are fully understood and met.
SAFETY SYMBOL DEFINITIONS
Symbol Description
------------------------------------------------------------------------------------------------------------
Direct current.
Alternating current.
Both direct and alternating current.
Earth (ground) terminal.
Protective earth (ground) terminal.
Terminal for Neutral conductor on permanently installed equipment.
Terminal for Line conductor on permanently installed equipment.
Standby (supply)
Units with this symbol are not completely disconnect the unit from AC
mains, either disconnect the power cord or have a qualified electrician
install an external switch.
Warning, risk of electric shock.
Caution (refer to accompanying documents).
iv
Page 7

TABLE OF CONTENTS
ONE: FEATURES AND OPERATION OVERVIEW 1-1
INTRODUCTION 1-1
PLW MODEL NUMBER DESCRIPTION 1-1
PLA MODEL NUMBER DESCRIPTION 1-2
FEATURES AND OPTIONS 1-2
GENERAL INFORMATION AND OPERATING NOTES 1-3
OPERATING MODES 1-3
PROGRAMMING MODE PARAMETERS 1-4
INPUT CONTROL 1-5
TRANSIENT OPERATION 1-5
TRIGGER OPERATION 1-6
PROTECTION FEATURES 1-6
FRONT PANEL OPERATION QUICK GUIDE 1-10
LCD STATUS ENUCIATOR 1-10
LCD DESCRIPTION 1-10
FRONT PANEL KEYPAD DESCRIPTION 1-11
HOT KEY DESCRIPTION 1-11
ENCODER OPERATION 1-12
MODE AND MENU NAVIGATION 1-13
FRONT PANEL MENU TREE 1-14
EXTERNAL PROGRAMMING PORT 1-18
REMOTE INHIBIT (RI) & DRY CONTACTS ALARM PIN DEFINITION 1-19
INPUT VOLTAGE LIMIT 1-20
INPUT CURRENT LIMIT 1-20
INPUT POWER LIMIT 1-20
DIMENSIONAL DRAWING & DESCRIPTIONS 1-22
PLW 2U MODEL 1-22
PLA 2U MODEL 1-24
PLA 3U MODEL 1-26
PLW 4U & HIGHER MODEL 1-27
PLA 4U AND HIGHER MODEL 1-28
TWO: INSTALLATION 2-1
INTRODUCTION 2-1
BASIC SET UP PROCEDURE 2-1
INSPECTION, CLEANNING, AND PACKAGING 2-1
RETURNING ELECTRONIC LOAD TO THE MANUFACTURER 2-2
PACKAGING FOR SHIPPING OR STORAGE 2-3
LOCATION, MOUNTING, AND VENTILATION 2-3
FUSE REPLACEMENT 2-4
AC INPUT POWER CONNECTION 2-4
AC INPUT CONNECTOR AND VOLTAGE SELECTION 2-5
AC INPUT CORD 2-5
LOAD WIRING 2-5
REAR PANEL INLET & OUTLET PIPE INSTALLATION (PLW ONLY) 2-6
COOLANT WITH ANTI-FREEZE (GLYCOL) PRECAUTIONS 2-7
PREVENTION OF WATER FREEZING, AND OXIDIZATION CONDITIONS 2-8
LOAD WIRING LENGTH FOR OPERATION WITH SENSE LINES 2-9
NOISE AND IMPEDANCE EFFECTS 2-9
LOAD CONNECTIONS 2-9
INPUT TERMINAL 2-9
INPUT TERMINAL CONNECTOR 2-10
LOCAL SENSE CONFIGURATION 2-10
REMOTE SENSE CONFIGURATION 2-11
PARALLEL CONNECTION 2-11
v
Page 8

TRIGGER OPERATION 2-12
ZERO-VOLT LOADING CONNECTION 2-13
THREE: LOCAL OPERATION 3-1
INTRODUCTION 3-1
VOLTAGE AND CURRENT METERING INFORMATION 3-1
OPERATING STATUS INFORMATION 3-1
LOCAL AND GPIB OPERATION INFORMATION 3-2
MODE MENU OPERATION AND RANGE SETTING 3-2
MAIN LEVEL LOCAL OPERATION 3-3
ENCODER OPERATION 3-4
MENU FUNCTION 3-5
LOAD CONTROL MENU 3-5
STEP PARAMETERS 3-7
MEASURE SENSE 3-7
PORT 0 3-7
EXTERNAL CONTROL 3-7
SHORT CONTROL 3-8
CROSS MODE 3-8
CROSS RANGE 3-8
RSF DETECT 3-8
TRIGGER SOURCE 3-8
PROTECTION 3-9
V-ON PROTECTION (UVL) 3-9
MAX/MIN SETTING FUNCTION 3-9
CALIBRATION PARAMETERS 3-10
OSCILLATE 3-10
OSC DETECTION DISABLE AND DELAY FEATURES 3-10
BOOT INPUT 3-10
LOAD PROFILE MENU 3-10
DISPLAY MENU 3-10
C OPERAND FOR BATTERY TESTING 3-10
STABLE READ BACK – MEAS. BUFFER 3-10
SYSTEM FUNCTIONS MENU 3-11
GPIB FUNCTION 3-11
RS-232 FUNCTION 3-11
SYNTAX MODE 3-11
EOS CODE 3-11
BUZZER 3-11
PANEL LOCK 3-11
ETHERNET FUNCTION 3-12
USB FUNCTION 3-13
AUTHENTICATE MENU 3-24
SERIAL NUMBER 3-24
INTERFACE 3-24
CODE 3-24
TRANSIENT OPERATION 3-24
ENTERING TRANSIENT MODE VALUES 3-25
TRANSIENT FREQUENCY, SLEW RATE AND DUTY CYCLE PROGRAMMING 3-25
LOCAL TRANSIENT OPERATION 3-26
CONTINUOUS MODE 3-26
TOGGLE MODE 3-27
PULSE MODE 3-28
TRIGGER MODE 3-29
STEP MODE 3-30
STEP OPERATION SET-UP 3-30
STEP FUNCTION 3-31
STEP COUNT 3-31
STEP MODE 3-31
vi
Page 9

ENTERING STEPPING MODE VALUE 3-31
FOUR: REMOTE OPERATION 4-1
INTRODUCTION 4-1
INTRODUCTION TO GPIB & RS-232 (SCPI) COMMANDS 4-1
OVER VIEW SCPI LANGUAGE 4-1
LANGUAGE DICTIONARY 4-2
COMMANDS STRUCTURE 4-2
SCPI (GPIB & RS-232) PROGRAMMING COMMANDS SET 4-3
COMMON COMMANDS 4-12
COMMAND LIST 4-13
FIVE: CALIBRATION 5-1
INTRODUCTION 5-1
CALIBRATION SERVICE ENVIRONMENT AND PRECAUTIONS 5-1
CALIBRATION REQUIRED EQUIPMENT 5-1
CONFIGURATION 5-2
CALIBRATION PARAMETERS 5-2
LOCAL CALIBRATION PROCEDURES 5-3
RE-INSTALLING CALIBRATION DATA 5-8
APPENDIX A: PEL & PLA/PLW COMMAND COMPATIBILITY TABLE A-1
APPENDIX B: HEAT-SINK TEMPERATURE VS. GPM CURVES B-1
APPENDIX C: NEW ELOAD FEATURES C-1
APPENDIX D: SPECIFICATION & POWER CURVE (see attached)
vii
Page 10

Page 11
ONE: FEATURES AND OPERATION OVERVIEW
INTRODUCTION
The PLA and PLW Series Programmable DC Electronic Load from AMETEK Programmable Power, Inc offers a compl ete solution to
the electronic load system requirements. This instrument was designed to assist in the development and testing of new
products, as well as is being a standard instrument for automatic test systems and evaluation of dc power supplies,
batteries, and power components. Other applications include use as a power circuit breaker or crowbar, high current
function or pulse generator, fuel-cell and photovoltaic cell test, and de-energizing super conducting magnets. This
instrument uses advanced power MOSFETs to dissipate the input power. The electronic load consumes minimum power
to control maximum input power handling capability. Complex circuits are used to control the power balance and
dissipation of the MOSFET. This control circuit also supports the Constant Voltage (CV), Constant Current (CC),
Constant Resistance (CR), and Constant Power (CP) modes of operation. It comes with Standard Commands for
Programmable Instrument (SCPI) commands, remote monitoring of input voltage and currents is a standard features. The
electronic load can be used either on your bench or in a standard 19 in. (483 mm) rack: occupies 3.5” ~ 8.75” (2U ~ 5 U)
of vertical rack space. Designed for continuous use in standalone or systems applications, this electronic load is typically
used to evaluate DC equipment, control circuits, or burn-in power applications.
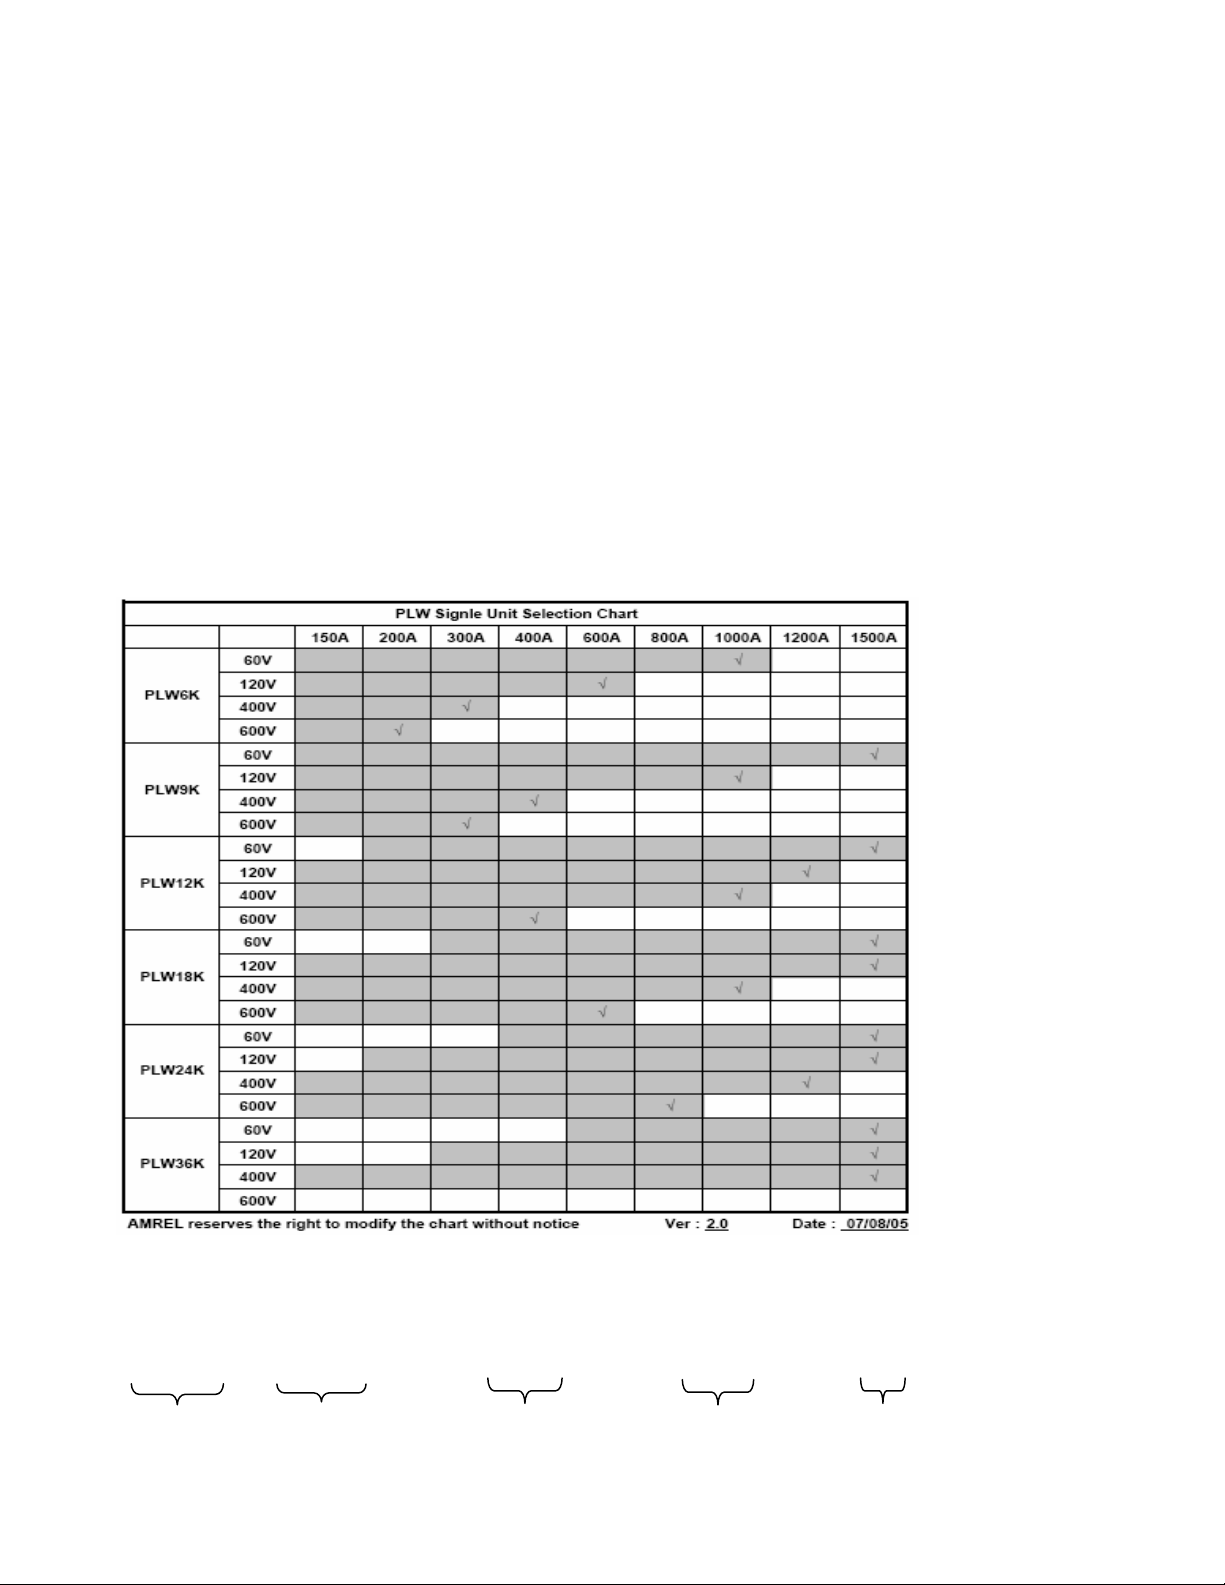
TABLE 1.1a – PLW GENERAL VOLTAGE AND CURRENT RANGES
Note: ¥ - Max Voltage & Current Rated Model; Gray Highlight – Available Model Combinations
PLW MODEL NUMBER DESCRIPTION
PLW 36K – 400 – 300 E
Model Type Power Rating Voltage Rating Current Rating E-Package Suffix
1-1
Page 12
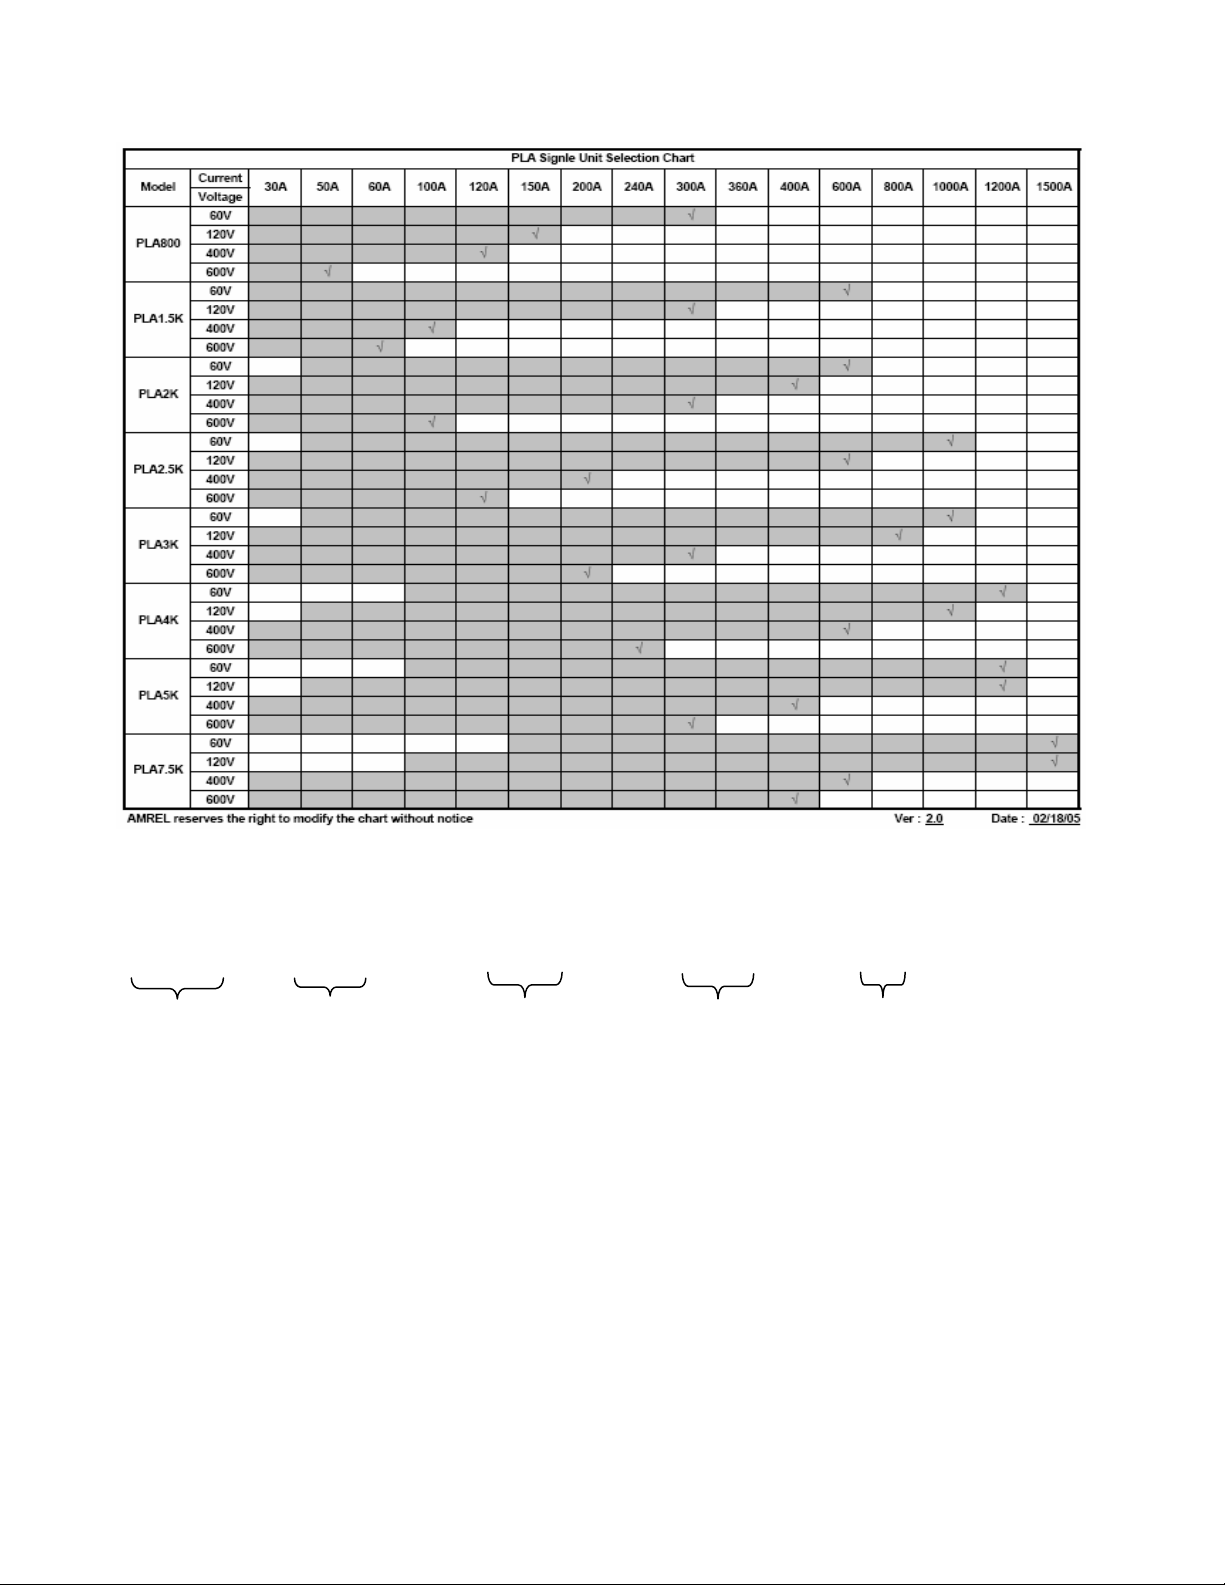
TABLE 1.1b – PLA GENERAL VOLTAGE AND CURRENT RANGES
Note: ¥ - Max Voltage & Current Rated Model; Gray Highlight – Available Model Combinations
PLA MODEL NUMBER DESCRIPTION
PLA 5K – 400 – 300 E
Model Type Power Rating Voltage Rating Current Rating E-Package Suffix
FEATURES AND OPTIONS
x Four constant operating modes: Constant current (CC), constant voltage (CV), constant resistance (CR), and
constant current (CP) mode operation.
x Local control and remote programming for pulse amplitude, pulse width, and pulse cycle.
x Trig-In/Trig-Out and measurement functions.
x GPIB, RS-232, Ethernet, and USB interface programming with SCPI command language.
(Ethernet and USB are available as part of the E-Package).
x Front panel control with keypad and rotary encoder (Tune Mode) for accurate setting.
x Built in pulse generator for continuous, pulsed, and toggled transient operation.
x Seven programmable protection modes: Over Voltage Protection (OVP), Under Voltage Protection (UVP),
Over Current Protection (OCP), Under Current Protection (UCP), Over Power Protection (OPP), and Under
Power Protection (UPP).
x Fan speed control for reduced acoustic noise under light load conditions.
-10Vdc analog programmable.
x 0
x Simple closed-case calibration.
x Highest power density: up to 18KW in 2U height
1-2
Page 13

x Fan speed control for reduced acoustic noise under light load conditions (PLA Only)
x 0-10Vdc analog programmable
x Simple closed-case calibration
x Highest power density: up to 18KW in 2U height (PLW Only)
x Field-upgradeable capability for GPIB, RS232, USB and Ethernet
x Three ranges for each operating mode; Auto or Manual
x External analog programming control for each mode and range
x Panel lock capability
x Program the Slew rise time and Slew fall time independently
x 50us transient time at CC mode; 500us transient time at CV mode
x Anti-Oscillation controls: System bandwidth controls
x Oscillation detection and protection
x Anti-Saturation controls: Under Voltage Lockout
x 16 bits programming and read back capability
x Cross mode and Cross range capability; default off
x Remote Inhibit and Dry contact Fault output
x Pulse power capability with Over Power Protection
x Field-upgradeable firmware
x Self-diagnostic capability
x Redundant Over Temperature Protection
x Four Step profiles; 32 step points for each profile
x Soft-Start Functionality
x Convenient and efficient Hot Keys for mode and Transient Mode Selection, Input and Transient On/Off
Control, Slew Rate Settings, Front panel trigger, and Short.
x Independent Large Numerical Voltage and Current LED display
x Power Interruption (Current Interruption) for Impedance Measurement of Fuel Cells and Batteries
GENERAL INFORMATION AND OPERATING NOTES
Operating Modes:
The four modes of operation are:
Constant Current (CC):
The eLOAD will sink a current in accordance with the programmed value regardless of the input voltage.
Note 1: Never use CC mode for testing a constant current source. The regulation of the two units will fight for control of
the current and an unstable oscillation will result.
Note 2: During CC mode, the eLOAD can operate under the fastest transient time.
Constant Voltage (CV):
The eLOAD will attempt to sink enough current to control the source voltage to the programmed value. It acts
as a shunt voltage regulator when operating in the CV mode.
Note 1: Never use CV mode for testing a constant voltage source. The regulators of the two devices will buck each other
trying to gain control of the voltage which will lead to an unstable condition.
Note 2: In CV mode, the transient time will be adjusted to a slower setting to ensure stable operation.
Constant Resistance (CR):
The eLOAD will sink a current linearly proportional to the input voltage according to the programmed value.
1-3
Page 14

Constant Power (CP):
The eLOAD will dissipate the power in accordance with the programmed value. It will automatically adjust the
current level inversely in response to a change in voltage.
Note: If the source voltage decays to zero volts the load will attempt to draw max rated current. If the OCP limit of the
eLOAD is greater than the current limit of the voltage source, the voltage source will be latched to the CC state. Otherwise
the OCP will trip to shutdown the load.
Programming Mode Parameters:
When programmed to a mode, the eLOAD remains in that mode until the mode is changed or until a fault
condition, such as an over power or over temperature occurrence. The current, voltage, resistance and power
mode parameters can be programmed without mode limitations. When a mode is selected via the front panel
or the digital interfaces, the associated parameters will then take effect at the instance of turning the input on.
Cross Mode:
According to the AMREL eLOAD design, the eLOAD has four operating modes: CC, CV, CR, and CP. As part
of our factory default settings, when switching from one mode to another mode in manual range (i.e. CV Low
to CC High), the final switched state will have the input turned off. If an application requires the input to stay
on when switching modes, the option “cross mode” must be changed from “input off” to “input remain.” By
changing the option, the load will switch between modes while keeping the input on, to accommodate for the
different applications of the DUT.
Note: Cross mode operation will work under both “manual” and “auto” range control mode.
Ranges:
Parameters may be programmed in any of the three overlapping ranges. The low range provides better
resolution at low settings. The range can be set using the front panel or via SCPI command. For auto-range
control: when you program a value, the eLOAD automatically selects the range that corresponds to the value
you program. If the value falls in a region where ranges overlap, the eLOAD selects one with the highest
resolution. In manual-range control: the programmed values will be limited by the current range setting, an
OUT OF RANGE message will appear on the front panel display when an invalid value is entered. When a
range is selected, the associated parameters (preset value or value from memory) will take into effect.
Cross Range Operation:
According to AMREL eLOAD design specification, the eLOAD has three overlapping operating ranges in each
mode. As part of our factory default settings, when switching from one range to another range in manual
mode (i.e. CV Low to CV High), the final switched state will have the input turned off. If an application requires
the input to stay on when switching ranges, the option “cross range” must be changed from “input off” to “input
remain.” By changing the option, the load will switch ranges while keeping the input on, to accommodate for
the different applications of the DUT. The cross range feature allows the user to effectively switch between
ranges based on the application needed by the DUT.
Note: Cross range operation will work under both “manual” and “auto” range control mode.
Immediate (Main) Level:
The immediate level can be set at front panel or via the digital interfaces. If the selected mode is active (Input
on), the new setting immediately changes the input at a rate determined by the soft-start turn-on sequence of
the unit. If the eLOAD is not in the selected mode, the new setting is saved until that mode is activated.
Transient Level:
The transient level can be set at front panel or via digital interfaces. The eLOAD input will switch between the
main level and the transient level when transient operation is turned on. During transient operation, the load
will switch from the immediate level to the transient level determined by the programmed slew time.
1-4
Page 15

Triggered Level:
The level can be preset (stored in the eLOAD) allowing the input to be updated when a trigger is received.
The trigger level can only be changed via digital interfaces, and can be programmed to any value within the
mode’s range settings.
Slew Rate:
The slew rate determines the rate at which the input to the eLOAD changes to a new programmed value,
usually defined as Adc/μs. Slew time (positive and negative) is the amount of time it takes for the eLOAD to
change from the immediate (main) level to the triggered/transient level. To better accommodate user
applications, the positive and negative edge of the slew time can be set independently via the front panel or
through digital remote programming.
Input Control:
Short On/Off:
The eLOAD can simulate a short circuit at its input by activating the load with full-scale current. The short
circuit can be toggled on/off at the front panel or via the digital interfaces while Short On/Off is enabled. The
short on/off switch-over uses the slew rate setting of the active mode and range. The actual value of the
electronic short is dependent on the active mode and range when the short is activated. In CV mode it is
equivalent to setting zero volts. In CC mode it is equivalent to setting full-scale current for the present current
range. In CR mode it is equivalent to programming the minimum resistance for the present resistance range.
Important Notes:
1) Activating the short operation in CV mode may cause the load to draw excessive current that will trigger the
software current limit, which will turn the input off (Protection Mode).
2) It is dangerous to activate short operation when testing batteries or other DUT without current limit. The eLOAD
will act as a near-short current sink, and drain Maximum Current. Severe damages can occur to both the DUT
and eLOAD.
Turning the short circuit on does not affect the programmed settings, and the load input will return to the
previously programmed values when the short is turned off.
Input On/Off:
The eLOAD’s input can be toggled on/off at the front panel, or via the digital interfaces. Turning the input off
(zero current) does not affect the programmed settings. The input will return to the previously programmed
settings when the input is activated again.
Transient Operation:
Utilizing an internal transient generator, the eLOAD provides a robust set of transient operation modes to
periodically switch the eLOAD between two load levels. Transient operation can be activated using the front
panel or via the digital interfaces. Before you turn on the transient operation, you want to set the desired mode
of operation as well as all of the parameters associated with transient operation under varying combinations of
load levels, frequency, duty cycle, and slew rate. Transient operation may be used in CC, CR, CV or CP
modes and can be continuous, pulsed, triggered, stepped or toggled. During transient operation, the eLOAD
will switch from the immediate level to the transient level determined by the programmed slew time.
Continuous Transient Operation
The built-in transient generator produces a pulse train to control the eLOAD in dynamic (transient) operations.
Adjustable parameters include, rise/fall time, frequency and duty cycle. In CONTINUOUS transient operation,
the eLOAD switches between the immediate (main) level and transient level according to parameter settings.
Pulsed Transient Operation
Generate a load change that returns to its original state after a time period SINGLE key or SCPI commands.
1-5
Page 16

Toggled Transient Operation
Toggled transient mode allows the eLOAD input to alternate between two pre-defined load levels as in
Continuous Mode except that the transient points can be triggered instead of an internal transient generator.
STEP Operation:
Step mode lets you generate complex sequences of input changes with rapid, precise timing, which may be
synchronized with internal or external signals. You can program up to 32 settings (or steps) in the profile, the
time interval (dwell) that each setting is maintained, the number of times that the list will be executed, and the
setting’s change in response to the triggers. The step data can be stored in Profile 0, 1, 2 or 3 via either the
front panel or the digital interfaces. Use RCL command to recall the saved state.
Trigger Operation:
The eLOAD has various triggering modes to allow synchronization with other test equipment or events.
Triggering a preset level
Transfers all pending preset levels to the actual level. For the presently active mode, the new level appears at
the input. For the modes which are not presently active, the present levels will not take effect at the input until
the applicable mode becomes active. However you must first initiate the trigger function by executing the
TRIG:IMMED command.
Triggering a transient pulse
A trigger signal will generate a transient pulse of programmable width when pulsed transient operation is in
effect. Triggers can be sent from the front panel by pressing the TRIGGER key or via Remote Interface.
Triggering to a toggle level
A trigger signal will change the input between the main level and the transient level when TOGGLE mode is in
effect. Triggers can be sent from the front panel using the TRIGGER key or via Remote Interface.
Protection Features:
The eLOAD includes the following protection features:
Over Voltage (OV):
The eLOAD has an Over Voltage Protection (OV) set at 105% of the full voltage rating. If the input voltage
exceeds 105% of the over voltage threshold, the input will shut off and an alarm message “OV” will display.
Over Current (OC):
The eLOAD has an Over Current Protection (OC) set at 110% of the full current rating. If the input current
exceeds 110% of the over current threshold, the input will shut off and an alarm message “OC” will display.
Over Power (OP):
The eLOAD has an Over Power Protection function set at 105% (PLW Models) and 110% (PLA Models) of full
Power Rating. If the accumulated energy based on operating voltage and current exceeds the over power
threshold, the input will shut down and display the alarm message “OP”.
Over Temperature (OTP):
The eLOAD utilizes a redundant over-temperature protection structure, which comprises of a temperature
sensor and a thermal switch. Both are designed to force off the eLOAD input during abnormal operating
temperatures. The OTP control algorithm will maintain the eLOAD in its normal temperature range, and in the
case of an OTP condition, the input will be forced off.
1-6
Page 17

Reverse Voltage (RCP):
The eLOAD has the internal parallel diodes to short the input in the presence of a reversed DC voltage input.
The front panel display with the alarm message “RCP” will indicate this condition has been detected.
Remote Sense Fault (RSF):
If the connection to the sense leads is not proper when operating under remote sense mode, the input will be
forced off with the alarm message “RSF”; Remote Sense Fault. Two common errors that can result in “RSF”
failure are while the “Measure Sense” is set to remote, the sense leads are not connected or if the leads are
connected and the connection is lost. The latter can become a serious problem in CP mode. In Constant
Power mode, the eLOAD will maintain the set wattage by balancing the voltage and current. If the remote
sense leads are disconnected, the V
of the load will sense zero voltage and sink the amount of current
MON
needed to keep the same power level until OC or other protection are triggered. The “RSF” protection will
trigger if the voltage deviation between the actual measured voltage and remote sense voltage exceeds a set
limit, forcing the input off until the conditions is cleared. Please refer to page 2-8 for voltage deviation limits.
The “RSF” detection can be disabled via Menu Æ Local ControlÆ RSF Detection Æ OFF.
Note: “RSF” error signal has precedence over OC with remote sense enabled, and will trigger if connection is lost.
Unregulated state (UNR):
The “UNR” message cautions that the power stage of the eLOAD is operating at its minimum resistance or
equivalent to it being shorted (marginal region for the load). Another indication is that the load is being
operated improperly, i.e. not enough supply current/voltage or incorrect calibration data.
Supply Current and Voltage Below Main Level
A common cause for the eLOAD entering into the unregulated state is when the eLOAD is supplied with
insufficient voltage and current, not allowing it to reach the programmed current, voltage, power or resistance
level. For example, if the input is off in CV mode and the main level of the load is set at 3 volts and the power
supply is programmed for 2 volts. An “UNR” alarm message will appear when turning the input on. The
message is caused by the lack of voltage needed to bring the main to 3 volts, and the voltage and current
readings will be unstable during this state. The same condition will occur for CC mode, if the needed current is
lower than the supplied current. To fix the problem, increase the voltage or current above the needed main
value. The “UNR” threshold is set as 1% deviation from the maximum value in that mode and/or range.
CR and CP Mode
In CR and CP mode, if the voltage or current is below the needed value to reach a certain resistance or
wattage, an “UNR” alarm message will appear. For example, in order to obtain 300 watts the input current
value multiplied by the input voltage value will need to equal 300 watts, otherwise an error will occur. For CR
mode, the input voltage value divided by the input current value will need to equal the resistance value
entered. To fix the problem, increase the voltage or current above the needed power or resistance. The
“UNR” threshold for constant power mode is set as 0.3% deviation from the maximum value in that mode
and/or range. The constant resistance mode has a higher fluctuation in its value, so it will have a higher
“UNR” deviation range.
Note: When testing power supplies, a sudden current sink by the eLOAD in CP mode may cause the power supply to
latch in CC mode. At that time, the eLOAD will sink no current and display “UNR”. Simply power cycle the power supply
and repeat the application with a higher voltage setting to prevent the power supply from entering an uncontrollable state.
Insufficient Voltage for Normal eLOAD Regulation
The eLOAD requires a minimum voltage (compliance voltage) in order for proper regulation in any operating
mode and the eLOAD will become unregulated in the case of insufficient supplied voltage. Important factors
such as large line voltage drop, and “dc + ac” input voltages will contribute to drive the eLOAD into an UNR
state. Please take precautions to ensure proper operating voltage is supplied.
Re-Calibration
Verify that the supply current and voltage is sufficient for the operating condition. If the “UNR” message still
occurs, check the current or voltage read back and compare it with the main value setting (CC mode: current;
CV mode: voltage) to make sure the difference is below 1%. If the difference is above 1% for CC/CV mode,
1-7
Page 18

30% for CR mode or 0.3% for CP mode, that particular mode will need to be recalibrated. As a factory default,
all loads are calibrated to its optimal condition. Please verify the calibration inaccuracy carefully or contact
$0(7(.33'Technical Support before re-calibrating the unit.
Precautions for Testing Batteries
As a precaution, when testing batteries prevent from operating in CV mode and make sure that the load does
not enter the unregulated state. If a battery is connected to a short circuited load (UNR state), the load will
draw max current and may cause permanent damage to the load, battery under test and possibly start a fire.
Under Voltage Lockout Protection (UVL):
The programmable under voltage lockout feature allows the user to set a trip point between zero and full-scale
voltage (V-On Voltage Threshold). The input will remain off until the input voltage is greater than the preprogrammed value or the V-On Voltage threshold. For the V-On (UVL) feature, there are two modes that can
be set. In “continuous” mode, the UVL detection will remain active, and each time the voltage drops below the
set threshold voltage, the UVL protection will shut off the input. Under “input on” mode, the UVL detection will
only trigger once to shut down the input and will reset each time the input is cycled. The only way to clear a
UVL protection message is to increase the input voltage beyond the V-On threshold. As a recommended
setting, the V-On threshold should be set equivalent to at least the unit’s min. operating/compliance voltage.
Oscillation Protection (OSC):
The eLOAD offers oscillation protection to prevent the system or DUT from being damaged during unstable
operating conditions. If the oscillation exceeds the frequency threshold for longer than the programmed
oscillation delay, the input will shutdown and an alarm message “OSC” will display. For applications that are
oscillatory in nature, the OSC protection can be disabled. Please refer to the menu tree for further disabling
procedures.
Anti-Oscillation (system bandwidth control):
In addition to the “OSC” protection, the eLOAD has four selectable bandwidth controls: Default, OSC1, OSC2
and OSC3 (DISABLE to disable OSC protection), that will adjust the system speed to resolve potential
oscillation problems. The slew time ranges will vary according to the range selected. At Default state, it has the
widest bandwidth and fast transient time. At OSC1 state, it has the normal bandwidth and transient time. At
OSC2 and OSC3 state, they have the slower transient time in order to have the better stability. The selection
of different bandwidth ranges allows for higher speed or slower stable applications.
Self-Test Failure:
The self-test assures early detection of hardware problems and forces the input off when a failure does occur.
The appropriate bit(s) in the status registers are set when any of the above protection features are active. The
front panel display will indicate which condition(s) have been detected.
Resetting Latched Protection
All of the protection features remain latched (set) when they are tripped. The latched protection features can
be reset via the front panel PROT (CLEAR) key or the digital interfaces. The condition that caused the
protection feature to trip must be removed or it will trip again as soon as it is reset.
Bias Voltage Protection (VPP & VNP)
For the eLOAD to operate properly it requires an internal +12 V
and -12VDC voltage to bias different parts of
DC
the system. In the case that the +12V bias voltage malfunctions, a “VPP” error message will appear indicating
a voltage positive power error. If the -12V bias voltage malfunctions, a “VNP” error will appear indicating a
voltage negative power error. For either of these error messages, please contact AMREL Technical Support.
The eLOAD most likely had a serious internal malfunction that caused the system to shutdown.
Note: For VPP and VNP failures, please refrain from repairing the unit, for it may inflict further damage.
1-8
Page 19

In Fault Protection (INF)
If the eLOAD is forced to sustain too much power, current or voltage in a short amount of time, the internal
power stage may have been damaged. If the damage is serious enough, the system hardware will shutdown
and the display will show an “In_Fault” error message. When this message occurs, please contact $0(7(.33'
customer service. The eLOAD most likely has a power stage malfunction and will no longer operate normally.
Note: For INF failure, please refrain from repairing the unit, for it may inflict further damage.
User-Defined Over Current, Voltage, and Power Protection:
Over Voltage (OVP):
OVP is a programmable voltage trip point. Limits can be programmed to “shut down” the eLOAD input if the
voltage exceeds pre-programmed value (default to off). The default programmable over voltage (OVP) trip
point is 105% of full voltage rating
Over Current (OCP):
Over Current Protection (OCP) is a programmable current trip point. Limits can be programmed to “shut down”
the eLOAD input if the current exceeds pre-programmed value for longer than the pre-set time interval (default
to off). The default programmable over current (OCP) trip point is 105% of full current rating.
Over Power (OPP):
The over power protection (OPP) is a programmable power trip point. If the input power exceeds the OPP limit,
the eLOAD input will shutdown and display an OPP alarm message. The default programmable over power
trip point is 110% of full power rating for PLW Models and 105% of full power rating for PLA Models.
User-Defined Under Current, Voltage, and Power Protection
For flexible customer application, AMREL’s eLOAD provides a user-defined under current (UCP), under
voltage (UVP) and under power protection (UPP). For applications that require a minimum voltage, current or
power level for normal operation, the input will shut off when the level drops below the set value.
Custom Max/Min Value Setting
The maximum and minimum value for each mode and range is programmable. To prevent accidental
erroneous settings, the Max/Min will limit the programmable values.
Note: The max and min value settings must be within the limits of each individual range and mode
Low Voltage (LV) Protection
When the input voltage drops below 1% of the maximum voltage, a “LV” message will appear to indicate the
eLOAD is operating under a low voltage condition. During “LV” mode, the load will automatically switch to a
slower slew time to soften high in-rush currents by limiting the speed of the current rise. The “LV” message
notifies the user of a change in the slew time, so they can modify their settings to ensure proper test operation.
Self-Diagnostic Capability
Based on the system error message displayed on the front panel, certain troubleshooting analysis can be
concluded and may be fixed accordingly. The error messages or alarms displayed due to “over limit” faults or
erroneous operation will trigger an internal relay that shuts off the system input. For more serious failures,
such as “VPP”, “VNP” or “INF,” the system has permanently shutdown and will need to be shipped back to $0(7(.33'
for repair. There are other fault prote
depth analysis of the system errors, please refer to the
error bit for the different types of error. Utilizing any of the interfaces, the fault condition can be diagnosed
based on the returned error bit.
ctions that could occur under different applications, for an in-
protection features section. The eLOAD also provides
1-9
Page 20
FRONT PANEL OPERATION QUICK GUIDE
LCD Status Enunciator
LIQUID CRYSTAL DISPLAY:
1
2
3
CC 40.000A LOCAL
FIGURE 1.1 LIQUID CRYSTAL DISPLAYS
Important Notes:
1) The LCD displays real time input Voltage/Current & mode status. These messages are viewed in either local or
2) The Front Panel and Remote read back provide 4 digits of display after the decimal point. Any numbers
AUTO LOW 600A
4
remote mode.
th
exceeding the 4
digit will be rounded to the next significant digit and displayed as the read back value.
5
LCD DESCRIPTION
Mode Indicator: Constant Voltage (CV), Constant Current (CC), Constant Resistor (CR), and Constant Power (CP).
1)
2) Main Setting Indicator: Main Voltage, Current, Resistance and Power Setting.
3) Local Mode/Remote Mode Indicator: Local, INSC, GPIB, RS232, ETHER, and USB.
4) Operating Range Indicator: Auto, Manual Low, Manual Middle, and Manual High.
5) Max Range Setting Indicator: Displays maximum value for the specified range.
1-10
Page 21

Front Panel Keypad Description
x
R
R
MENU
7 8 9 LOCAL
4 5 6 RANGE
1 2 3 STEP
0
FIGURE 1.2 FRONT PANEL KEYPAD
Key “0” Numeric entry key for number 0.
Key “.” Numeric entry key for decimal dot.
Key “1” Numeric entry key for number 1.
Key “2” Numeric entry key for number 2.
Key “3” Numeric entry key for number 3.
Key “4” Numeric entry key for number 4.
Key “5” Numeric entry key for number 5.
Key “6” Numeric entry key for number 6.
Key “7” Numeric entry key for number 7.
Key “8” Numeric entry key for number 8.
Key “9” Numeric entry key for number 9.
CLEA
Key “CLEAR” Clears partially set commands and
return the unit to the metering mode. By
pressing the "Clear" with no entry will
display "AMREL Model number and
software version.
Note: If the model name exceeds 16 digits, the displayed
model name will truncate. Please refer to the model name
label or use *IDN? Command to query back model name
Key “RANGE” Selects between auto, manual low,
Key “LOCAL” Returns from remote PC control to local
Key “STEP” Allows programming of time duration
Key “ENTER” Enters the values in the set mode and
ENTE
manual middle and manual high range.
operation and status indicator will
change from RMT to LCL. The Local
key also accesses all eLOAD menu
options and parameters for configuring
desired settings.
and value settings for step operation
returns the unit to the metering mode.
Hot Key Description
HOT KEYS OFF SOLID ON FLASHING ON
INPUT
SHORT
STEP
PULSE
CC
CR
CP
19CV
CONT
TOGGLE
SINGLE
TRIGGER
PEAK
FREQ
DUTY
SLEW
INPUT OFF INPUT ON Press to Short
SHORT OFF SHORT ON Press to Short
STEP OFF STEP ON Press Input to Start Step
PULSE OFF PULSE ON Press Input to Start Pulse
CC Mode Disabled CC Mode Enabled N/A
CR Mode Disabled CR Mode Enabled N/A
CP Mode Disabled CP Mode Enabled N/A
CV Mode Disabled CV Mode Enabled N/A
Continuous Disabled Continuous Enabled N/A
Toggle Disabled Toggle Enabled N/A
Single Disabled Single Enabled N/A
N/A N/A Trigger Transient Operation
Setting not Enabled Adjust Trans. Value N/A
Setting not Enabled Adjust Trans. Freq. N/A
Setting not Enabled Adjust Trans. Duty N/A
Setting not Enabled Adjust +/- Slew Rate N/A
TABLE 1.2 – HOT KEY DESCRIPTION
1-11
Page 22

Encoder Operation
BUTTON or
SETTING
Main Level Setting
Screen in Main Value
Edit Mode
Main Level Setting
Screen With Input On
PEAK Hot Key Pressed
DUTY Hot Key Pressed
SLEW Hot Key Pressed
MENU Button Pressed
RANGE Button
Pressed
STEP Button Pressed
ENCODER
ACTION FUNCTION
Press & Hold Change Input Value
Tap Change Decimal Position
Rotate Left Decrement Value
Rotate Right Increment Value
Press & Hold Modify/Enter Value
Tap Modify/Enter Value
Rotate Left Decrement Value (real-time)
Rotate Right Increment Value (real-time)
Press & Hold Change Input Value
Tap Change Decimal Position
Rotate Left Decrement Value
Rotate Right Increment Value
Press & Hold Modify/Enter Value
Tap Change Decimal Position
Rotate Left Decrement Value
Rotate Right Increment Value
Press & Hold Make Selection/Modify/Enter Value
Tap Change Decimal Position
Rotate Left
Rotate Right
Press & Hold Select Menu Option
Tap Exit to Previous Menu
Rotate Left Scroll Through Selection
Rotate Right Scroll Through Selection
Press & Hold Select Mode & Range Type
Tap Select Mode & Range Type
Rotate Left Scroll Through Selection
Rotate Right Scroll Through Selection
Press & Hold Make Selection/Modify/Enter Value
Tap Change Decimal Position
Rotate Left
Rotate Right
TABLE 1.3 – ENCODER OPERATION
Scroll Through Selection/Increment
Value
Scroll Through Selection/Decrement
Value
Scroll Through Selection/Increment
Value
Scroll Through Selection/Decrement
Value
Note: Press “Clear” to exit from any menu or edit mode
1-12
Page 23

Mode and Menu Navigation
Mode and Menu Navigation
1) In meter mode, press CV, CC, CR, or CP Hot Keys to make a mode selection.
2) In meter mode, press RANGE from the Front Key Pad to enter into range selection mode.
3) Press RANGE again to make a range selection from Low, Middle, High or Auto.
4) The first row displays the currently selected mode and main value
5) The second row displays the currently selected range.
6) Press “ENTER” key to confirm range, and go back to meter mode.
7) Press “CLEAR” key to go back to meter mode.
8) Press encoder, same as CLEAR key.
9) Press and hold encoder, similar to ENTER key.
Function selection mode
1) In meter mode, press FREQ, DUTY, or SLEW Hot Keys to enter into an edit mode.
2) Press SLEW to make a selection between rise time and the fall time.
3) Press DUTY to configure the duty cycle.
4) Press FREQ to configure the frequency.
5) Rotate 43 the encoder to edit value by each decimal place.
6) Press “CLEAR” key to go back to meter mode.
7) Press encoder, same as CLEAR key.
8) Press and hold encoder to enter and accept a value.
Menu mode
1) Press LOCAL/MENU key, or press and hold encoder to enter into menu mode.
2) Rotate 43 the encoder to select menu item.
3) Press “ENTER” or press and hold the encoder to accept the setting.
4) Press “CLEAR”, or press encoder to go back to meter mode.
Note: Please refer to the front panel menu tree section for detailed menu selections.
Panel Lock
1) When LCD is in “Menu Mode”, select “PANEL LOCK” can set PANEL ENABLE, and PANEL PASSSWORD.
2) When “PANEL ENABLE” is set to OFF, power off the PD unit and power on again, the local panel is disabled.
All other keys are locked except “LOCAL” key. When these keys are pressed, LCD displays “LOCAL
LOCKED”.
3) Press “LOCAL” key, users must enter PASSWORD. If the PASSWORD is correct, the LCD goes back to
normal state. Press “ENTER” key and “LOCAL” key in the same time locks all the keys again.
4) If users forget the password, they can use “555555” as default password.
List step edit mode
1) When LCD display is in meter mode, press STEP key from Front Key Pad to enter into step edit mode.
2) Press STEP key to make a selection between Time edit or Value edit of a step.
3) Press and hold the encoder to enter and accept the setting of a step.
4) Rotate 43 the encoder to select step point one by one.
5) Press “VALUE (9)” key to edit step value.
6) Press “CLEAR” key to go back to meter mode.
1-13
Page 24

Front Panel Menu Tree
MENU
All Words in Bold are Factory Default Settings
LOAD CONTROL STEP PARAM. Æ MODE Æ STEP
Æ STEP AUTO
Æ STEP ONCE
Æ COUNT Æ 1 ~ INFINITY
MEASURE SENSE Æ LOCAL
Æ REMOTE
PORT0 Æ OFF
Æ ON
EXT. CONTROL Æ OFF
Æ ON
SHORT CONTROL Æ OFF
Æ ON
CROSS MODE Æ INPUT OFF
Æ INPUT REMAIN
CROSS RANGE Æ INPU
T OFF
Æ INPUT REMAIN
RSF DETECT Æ ON
Æ OFF
TRIGGER Æ SOURCE Æ HOLD
Æ BUS
Æ EXTERNAL
Æ ETHERNET
Æ DELAY Æ 00000mS
PROTECTION Æ OV-PROTECTION Æ OV STATE Æ OFF
Æ ON
Æ OV LIMIT Æ 1.05*V
MAX
Æ OV DELAY Æ 01000mS
Æ UV-PROTECTION Æ UV STATE Æ OFF
Æ ON
Æ UV LIMIT Æ 000.000V
Æ UV DELAY Æ 01000mS
Æ OC-PROTECTION Æ OC STATE Æ OFF
Æ ON
Æ OC LIMIT Æ1.05* I
MAX
Æ OC DELAY Æ 01000mS
Æ UC-PROTECTION Æ UC STATE Æ OFF
Æ ON
Æ UC LIMIT 000.000A
Æ UC DELAY 01000mS
Æ OP-PROTECTION Æ OP STATE Æ OFF
1-14
Page 25

Æ ON
Æ
Æ OP LIMIT Æ1.05*P
MAX
Æ OP DELAY Æ 01000ms
Æ UP-PROTECTION Æ UP STATE Æ OFF
Æ ON
Æ UP LIMIT Æ 000.000W
Æ UP DELAY Æ 01000ms
Æ V-ON CONTROL Æ V-ON STATE Æ INPUT ON
Æ CONTINUE
Æ V-ON THRESHOLD
Æ 01.000V
MAX/MIN LIMIT Æ MAX VOLTAGE Æ V
MAX
Æ MIN VOLTAGE Æ 000.000V
Æ MAX CURRENT Æ I
MAX
Æ MIN CURRENT Æ 000.000A
Æ MAX RESIST. Æ R
Æ MIN RESIST. Æ R
Æ MAX POWER Æ P
MAX
MIN
MAX
Æ MIN POWER Æ 000.000W
CAL. PARAM. Æ MEASURE LOW Æ 06400 COUNT
Æ MEASURE HIGH Æ 32000 COUNT
Æ TRAN. OFFSET Æ 06400 COUNT
OSCILLATE Æ OSC. CONTROL Æ DEFAULT
Æ OSC1
Æ OSC2
Æ OSC3
Disable
Æ OSC. DELAY Æ 0000ms
BOOT INPUT Æ OFF
Æ ON
INPUT CONTACTOR Æ CONTROL Æ DISABLE
Æ PORT0 + @ ON
Æ PORT0 - @ ON
ÆDELAY Æ 50ms ~ 500ms
PROFILE RECALL Æ 0 Æ - DONE -
Æ 1 Æ - DONE Æ 2 Æ - DONE Æ 3 Æ - DONE SAVE Æ
0 Æ - DONE Æ 1 Æ - DONE Æ 2 Æ - DONE Æ 3 Æ - DONE RESET Æ ENTER TO RESET Æ - DONE -
DISPLAY METER MODE Æ V+I
Æ V+P
Æ
Æ V+R
Æ I+P
V+C
1-15
Page 26

Æ I+C
Æ
Æ I+R
Æ R+P
Æ R+C
Æ P+C
Æ V+T
Æ I+T
Æ R+T
Æ P+T
Æ C+T
‘C’ VALUE Æ 001.000A
MEAS. BUFFER Æ 8
Æ 16
Æ 32
Æ 64
Æ 128
Æ 256
SYSTEM GPIB ADDRESS Æ 12
RS-232 SPEED Æ 2400
Æ 4800
Æ 9600
Æ 19200
Æ 38400
Æ 57600
Æ 115200
SYNTAX
EOS CODE Æ CR+LF
Æ NULL
Æ CR
BUZZER Æ ON
Æ OFF
PANEL LOCK Æ PANEL ENABLE Æ ON
Æ OFF
Æ PANEL PASSWD Default: 555555
ETHERNET Æ ADDRESS 0.0.0.0
Æ NETMASK 0.0.0.0
Æ GATEWAY 0.0.0.0
AUTHENTICATE SERIAL NO. Æ 000B87XXXXXX
INTERFACE Æ GPIB ETHER USB
CODE Æ _______
MODE
PLA/PLW
Æ PEL
Æ LF
1-16
Page 27

HOT KEYS
ON/OFF
“FLASHING”
ON
“FLASHING”
ON
“FLASHING”
ON
ON
Note: “Flashing” stands for a blinking light displayed on the key being pressed
RANGE
STEP
ÆINPUT OFF
ÆSHORT OFF
ÆSTEP OFF
ÆPULSE OFF
“FLASHING”
ÆAUTO
ÆMANU LOW
ÆMANU MID
ÆMANU HI
ÆSTEP ÆTIME Æ 00000 ms
ÆVALUE Æ 000.000V/A/ȍ/W
(PRESS ENCODER TO ENTER.)
ÆENCODER RIGHT Æ +1 for Point of step (increment step# by 1)
ÆENCODER LEFT Æ -1 for point of step (decrement step# by 1)
MODE/MAIN
ÆON
Æ CC ÆOFF
ÆCR ÆOFF
ÆON
ÆCP ÆOFF
ÆON
ÆCV ÆOFF
ÆON
By default the range is set to AUTO RANGE and mode is set to CCL
PULSE
ÆFALL Æ5ms
ÆCONT ÆON
ÆOFF
ÆTOGGLE ÆON
ÆOFF
ÆSINGLE ÆON
ÆOFF
ÆTRIGGER ÆBLINK
ÆOFF
ÆPEAK Æ001.000A
ÆFREQ Æ20Hz
ÆDUTY Æ50%
ÆSLEW ÆRISE Æ5ms
1-17
Page 28

EXTERNAL PROGRAMMING PORT
The external programming port provides remote sense inputs, input voltage monitoring, input current monitoring, external
trigger input, external trigger output, and analog programming signal.
External Program Port
Terminal Block
10
11
12
9
9
10
11
12
5
6
7
8
5
6
7
8
1
2
3
4
4
3
2
1
DGND
TRIGOU T
TRI GI N
IMON
NC
PORT
VMON
FAULT
+S
-S
External Prog
AGND
1 + S Positive remote sense.
2 -S Negative remote sense.
3 EXT_GND Analog Ground. Provides common (reference) connection for EXT_PRG
(PIN 4), VMON (PIN 5), and IMON (PIN 6). When an external
programming function is not used, connect this point to Analog pin 4 to
prevent EMI Noise.
4 EXT_PRG External analog programming input signal. The electronic load can be
programmed externally by 0-10Volts DC or DC + AC voltage (AC voltage
must be biased to above 0V). When external analog programming function
is not used, connect this point to AGND pin 3 to prevent EMI Noise.
5 VMON Input voltage monitoring signal. Generates a 0-10Volt output signal that is
linearly proportional to the electronic load’s 0 to full-scale voltage.
6 IMON Input current monitoring signal. Generates a 0-10Volt output signal that is
linearly proportional to the electronic load’s 0 to full-scale current.
7 NC No Connection
8 FAULT Fault signal output. A TTL compatible signal that becomes active (high)
when any of the protections are triggered.
9 PORT Digital port output. Port can be activated via front panel operation or by
SCPI command PORT 0|1 |off|on. PORT becomes active (high) when the
PORT is on.
10 TRIG_IN Negative Edge Triggered External trigger signal input. A TTL compatible
signal is used to activate the electronic load. TRIG_IN is used to change to
a preset mode or switch between settings in transient mode, such as trigger
the step mode, trigger mode, continuous mode, toggle mode, step auto
mode, step once mode, or pulse mode.
NOTE: IN ORDER TO ENABLE THE TRIG_IN PORT FOR USE, THE
TRIGGER SOURCE MUST BE SET TO EXTERNAL.
11 TRIG_OUT External trigger signal output. A TTL compatible signal that is activated
via the Trig-in or GPIB command *TRG. This output follows the state of
the TRIG_IN input. External trigger output is used for triggering
oscilloscopes, power supplies, or other electronic loads that have external
trigger input.
12 EGND Earth Ground. Provides the common (reference) connection for TRIG_IN
(PIN 10), TRIG_OUT (PIN 11), Fault (PIN 8), and PORT (PIN 9).
1-18
Page 29
REMOTE INHIBIT (RI) & DRY CONTACTS ALARM PIN DEFINITION
In the case of fault conditions, the eLOAD provides an externally short-activated emergency shut-off port
(Remote Inhibit) that will disengage the eLOAD operation. For added protection, normal and deviant
conditions can be identified by the Dry Contacts Alarm, which utilizes Normal Open (RY_NO) and
Normal Close (RY_NC) relays as alarm indicators for customization of external protection systems. In the
case of a protection or AC power loss, the RY_NO will short (closed) and RY_NC will be opened to
indicate a fault/deviant condition, either contact can be used to trigger an external alarm.
1
3
4
5
2
Pin Number Pin Definition
1 – RI+ Remote Inhibited (RI) is used as an emergency switch to disable
the system. RI can be connecting to a switch or an open collector
device that shorts the RI pin to common (EGND) whenever it is
necessary to disable input of the unit. Once RI is activated, it
will turn off the dc output. In order to re-activate the unit, the
connection between common and RI pin needs to be open again,
and it will have 3 seconds delay.
2 – RI- The EGND return path for RI+ pin. Shorting RI+ and RI- (Pin 1
& Pin 2) will trigger RI protection.
3 – RY_NC Dry Contacts alarm: a fault alarm is declared if there is a loss of
AC power or protections are triggered. The fault alarm outputs
provide a normally closed relay configuration that provides
user’s flexibility and isolation required to an external controller
or an external alarm panel. The delay is 3 second
4 – RY_CO Relay Common. Provides the common (reference) connection
only for RY_NC or RY_NO
5 – RY_NO Dry Contacts alarm: a fault alarm is declared if there is a loss of
AC power or protections are triggered. The fault alarm outputs
provide a normally open relay configuration that provides user’s
flexibility and isolation required to an external controller or an
external alarm panel. The delay is 3 second.
1-19
Page 30

INPUT VOLTAGE LIMIT
The programmable electronic load can handle voltages within nominal values and surge voltages less than 5% above
nominal value. The Over-voltage protection will be tripped when the input voltage exceeds 5% of nominal value. For
CV mode application, the input power source should have current limit capability to prevent exceeding the electronic
load’s input current range.
Two over voltage protection features have been provided. 1) Over voltage protection to limit maximum current to 5%
above nominal value. 2) Software selectable, the user can set and read back the input protection voltage level.
WARNING
High voltage and high current operation may result in a fault condition, shutting down the Load input. Ensure that the
maximum voltage and current applied to the electronic load does not exceed the power rating.
INPUT CURRENT LIMIT
The nominal current values are indicated in the specification datasheet. During Load bank operation in CV (Constant
Voltage) mode, limiting the input current at high voltages become a critical factor. The internal structure of the Load
Bank and the Over-Current protection will limit the maximum current to less than 5% above nominal rated current.
However, the combined input current and voltage can easily exceed the maximum rated power. If the power overload
condition persists over a time period, the accumulated over-power energy will trigger the hardware OP protection, and
control the input current to not exceed 120% of max rated power. For CC mode operation, the input power source should
be a CV source or operate in CV mode, to avoid potential unstable conditions caused by two Constant Current Control
loops. As for over power conditions in CC mode, please limit the input voltage to pre
down the Load input.
vent the OP fault condition shutting
Two over current protection features have been provided. 1) Over current protection to limit maximum current to 5%
above nominal value. 2) Software selectable, the user can set and read back the input protection current level.
WARNING
High voltage and high current operation may result in a fault condition, shutting down the Load input. Ensure that the
maximum voltage and current applied to the electronic load does not exceed the power rating.
INPUT POWER LIMIT
The programmable electronic load is designed to handle power up to 110% of Max Power Rating, with input voltage and
current below the max rated specifications. As a recommendation, the input power source should not exceed the max
rated power, to avoid fault conditions shutting the Load input off. As indicated in the specification sheet, Constant Power
mode requires a current limit for each range (CPL, CPM, and CPH), which cannot exceed the corresponding current range
max value (CCL, CCM, and CCH).
WARNING
Anticipate the Maximum output of the power source carefully and consider the worst-case scenario. The maximum
power range of the load should be higher than the output power of the source. High voltage and high current operation
may result in a fault condition, shutting down the Load input.
For CP mode application, the programmable electronic load can be set to maximum power dissipation with the following
limitations. Input must be within maximum voltage and current ratings. For example, PLA1.2K-120-200, the max rated
values are 120V/200A/1200W. Therefore, the maximum power will be limited to a combination of “voltage x current
values” equating to 1,200W. Thus, CP mode is limited by the hardware's maximum current, voltage and power ratings.
1-20
Page 31

Maximum Current – Max A
V
in
MaxV Maximum Voltage – Max V
Maximum Power – Max KW
LowV
Low-Mid Max A I
in
The theory of the CP operation comes from the divider circuit built in the load. Because of the nonlinear characteristic of
the divider, the input voltage, input current, and power setting will limit the CP mode of operation. The CP mode will not
allow the load to operate beyond the full range of the Constant Power setting.
1-21
Page 32

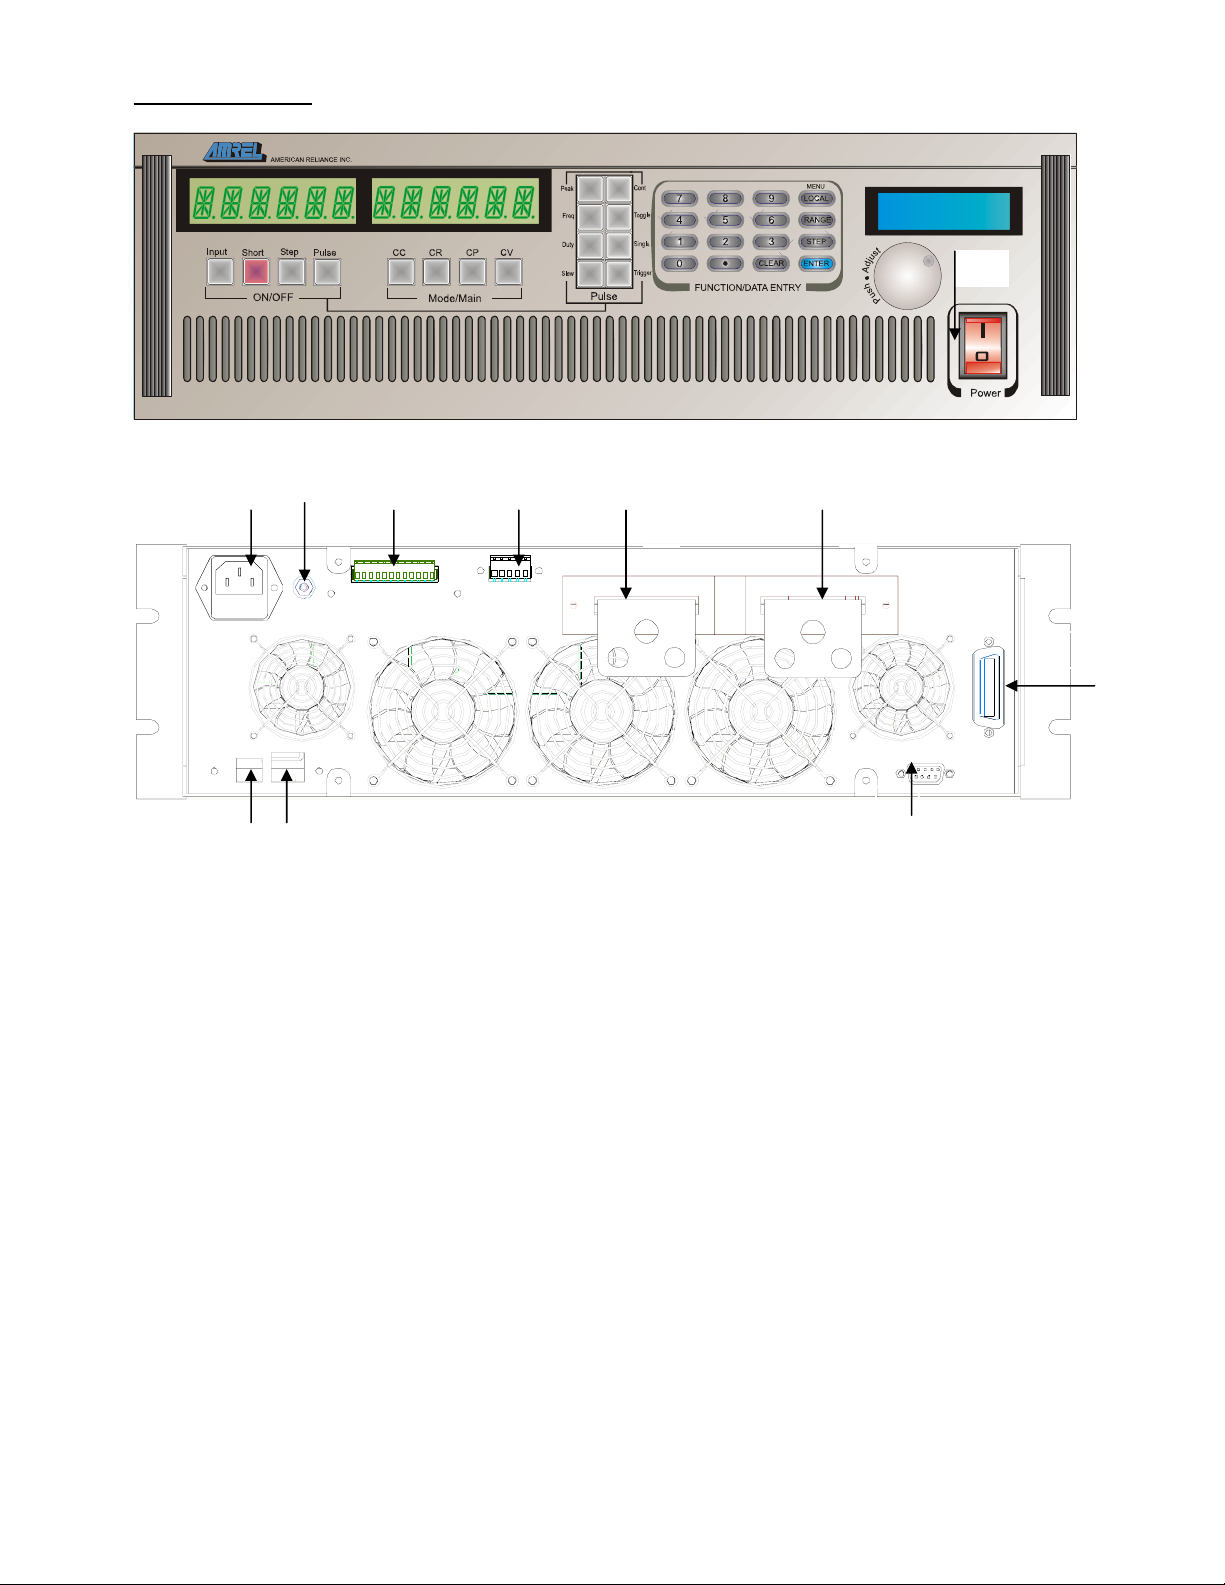
DIMENSIONAL DRAWINGS & DESCRIPTIONS
PLW 2U MODEL
Note: Please refer to the Specifications for detailed unit dimensions
Front Panel
1
22
2 3
21
20
5 6 798
19 18
16
17
12
1110
13
14
15
1.Input ON/OFF Button
2.Short ON/OFF Button
3.Step ON/OFF Button
4.Pulse (Transient) ON/OFF Button
5.Constant Current Mode Selection
6.Constant Resistance Mode Selection
7.Constant Power Mode Selection
8.Constant Voltage Mode Selection
9.Slew Rate Duty Cycle Setting
10. Slew Rate Rising/Falling Time Setting
11. Manual Trigger Button
12. Single
13. Front Panel Keypad
14. Encoder
15. Power ON/OFF Button
16. LCD Display
17. Toggle Transient Operation Selection
18. Continuous Transient Operation
Selection
19. Transient Level Setting
20. Transient Frequency Setting
21. Current & Warning Signal LED Display
22. Voltage LED Display
1-22
Page 33

32
26
25
2324
27
34
33
35 36
31
PLW 2U REAR PANEL
Rear Panel
23. ( – ) Negative input terminal.
24. ( + ) Positive input terminal.
25. Relay connector.
26. External programming port.
27. Standard GPIB interface connector.
28. Standard RS-232 interface connector.
29. Standard RJ45 for Ethernet (LAN).
30. Standard USB interface connector.
29 30
28
31. Chassis / Line ground lug screw.
32. AC power inlet with external fuse holder.
33. Water inlet
34. Water outlet
35. Water valve power connector
36. Auxiliary master/slave connector
(future option).
1-23
Page 34

PLA 2U MODEL
22 21
19 18
16
20
12
1110
1
2 3 4
9
5 6 7 8
Note: Please refer to the Specifications for detailed unit dimensions
17
13
14
15
Front Panel Descriptions
1. Input ON/OFF Button
2. Short ON/OFF Button
3. Step ON/OFF Button
4. Pulse (Transient) ON/OFF Button
5. Constant Current Mode Selection
6. Constant Resistance Mode Selection
7. Constant Power Mode Selection
8. Constant Voltage Mode Selection
9. Slew Rate Duty Cycle Setting
10. Slew Rate Rising/Falling Time Setting
11. Manual Trigger Button
12. Single
13. Front Panel Keypad
14. Encoder
15. Power ON/OFF Button
16. LCD Display
17. Toggle Transient Operation Selection
18. Continuous Transient Operation Selection
19. Transient Level Setting
20. Transient Frequency Setting
21. Current & Warning Signal LED Display
22. Voltage LED Display
1-24
Page 35

25
26
23
24
32
31
PLA 2U REAR PANEL
Rear Panel Descriptions
23. ( + ) Positive input terminal.
24. ( – ) Negative input terminal.
25. Relay connector.
26. External programming port.
27. Standard GPIB interface connector.
28
2729
30
28. Standard RS-232 interface connector.
29. Standard RJ45 for Ethernet (LAN).
30. Standard USB interface connector.
31. Chassis / Line ground lug screw.
32. AC power inlet with external fuse holder.
1-25
Page 36
PLA 3U MODEL
PLA 3U FRONT PANEL
NOTE: All front panel descriptions are the same for 2U, 3U, 4U, and 6U.
14
10
7
9
8
4
PLA3U REAR PANEL
1. ( – ) Negative input terminal.
2. ( + ) Positive input terminal.
3. Relay connector.
4. External programming port.
5. Standard GPIB interface connector.
3
12
5
6
6. Standard RS-232 interface connector.
7. Standard RJ45 for Ethernet (LAN).
8. Standard USB interface connector.
9. Chassis / Line ground lug screw.
10. AC power inlet with external fuse holder.
1-26
Page 37

PLW 4U & HIGHER MODELS
Note: Please refer to the Specifications for detailed unit dimensions
PLW 4U & HIGHER FRONT PANEL
NOTE: All front panel descriptions are the same for 2U and higher models.
10
69
5
4
3
12
GPIB
VALVE
VALVE
13 14
115/230V 50/60Hz
AC
FLUID
INLET
11
RS-232
PLW 4U & HIGHER REAR PANEL
Note: Please refer to the Specifications for detailed unit dimensions
1. ( – ) Negative input terminal.
2. ( + ) Positive input terminal.
3. Relay connector.
4. External programming port.
5. Standard GPIB interface connector.
6. Standard RS-232 interface connector.
7. Standard RJ45 for Ethernet (LAN).
9. Chassis / Line ground lug screw.
10. AC power inlet with external fuse holder.
11. Water inlet
12. Water outlet
13. Water valve power connector
14. Auxiliary master/slave connector
(future option).
8. Standard USB interface connector.
EXTERNAL PROGRAMMING
DC INPUT
AUX1
AUX2
AUX3
PORT
FLUID
OUTLET
(-)
(+)
NO
NC
CO
RY RI
ETHE RNET
12
USB
8
7
6
1-27
Page 38

PLA 4U AND HIGHER MODELS
PLA 4U & HIGHER FRONT PANEL
NOTE: All front panel descriptions are the same for 2U and higher models.
9
10
4
2
1
3
5 6
7 8
PLA 4U & HIGHER REAR PANEL
Note: Please refer to the Specifications for detailed unit dimensions
1. ( – ) Negative input terminal.
2. ( + ) Positive input terminal.
3. Relay connector.
4. External programming port.
5. Standard GPIB interface connector.
6. Standard RS-232 interface connector.
7. Standard RJ45 for Ethernet (LAN).
8. Standard USB interface connector.
9. AC power inlet with external fuse holder.
10. Interconnect AC power
11. Auxiliary master/slave connector
(future option).
11
1-28
Page 39

9
10
4
8
2
1
5
6
3
7
ALTERNATE PLA 4U & HIGHER REAR PANEL
1. ( – ) Negative input terminal.
2. ( + ) Positive input terminal.
3. Standard RJ45 for Ethernet (LAN).
4. External programming port.
5. Standard GPIB interface connector.
6. Standard RS-232 interface connector.
11
7. Standard USB interface connector.
8. Relay connector.
9. AC power inlet with external fuse holder.
10. Interconnect AC power
11. Auxiliary master/slave connector
(future option).
1-29
Page 40

12
Page 41

TWO: INSTALLATION
INTRODUCTION
This section provides recommendations and procedures for inspecting, installing, and testing the electronic load.
BASIC SETUP PROCEDURE
Use Table 2.1 to summarize the basic setup procedure and an overall view of the subsections. Use the procedure as a
quick reference if you are familiar with the installation requirements for the programming electronic load. If you want
more information, each step in the procedure refers to subsequent sections, which contain more details. Execute each step
in the sequence provided.
TABLE 2.1 BASIC SETUP PROCEDUE
-------------------------------------------------------------------------------------------------------------------------------------Step# Description Action Reference
------------------------------------------------------------------------------------------------------------------------------------- 1 Inspection Perform an initial physical Inspection, cleaning,
inspection of the load. and packaging.
------------------------------------------------------------------------------------------------------------------------------------- 2 Installation Install the instrument on Location, mounting,
bench or rack mount, and ventilation.
ensuring adequate ventilation.
------------------------------------------------------------------------------------------------------------------------------------- 3 Input power Connect AC input power AC input power
connection.
------------------------------------------------------------------------------------------------------------------------------------- 4 Test Perform functional tests for Functional test.
CV mode, CC mode, and
front panel controls.
------------------------------------------------------------------------------------------------------------------------------------- 5 Source Connect the source. Source connection.
------------------------------------------------------------------------------------------------------------------------------------- 6 Sense Connect sensing lines. Local and Remote sense.
--------------------------------------------------------------------------------------------------------------------------------------
INSPECTION, CLEANING, AND PACKAGING
x INITIAL INSPECTION: When you first receive your unit, perform a quick physical check.
1. Inspect the instrument for cracks, scratches, broken switches, connectors, and display.
2. Make sure there is not damage on the AC power cord; the AC input cover is installed properly and with the
strain relief.
3. Make sure there is no loose component in the unit that may cause by the long distance shipping.
If the unit is damaged, save all the packing materials and notify the carrier immediately.
x MAINTENANCE: No routine servicing of the electronic load is required except for periodic cleaning.
Whenever the instrument is removed from operation, first use a low pressure air to blow dust from in and around
components on the printed circuit board, clean the front panel with dry cloths or with a weak solution of soap
and water, clea
the low-pressure air to blow it again.
n the metal surfaces with naphtha or an equivalent solvent when used in high humility. Then use
2-1
Page 42

RETURNING ELECTRONIC LOAD TO THE MANUFACTURER
Return Material Authorization Policy for warranty and non-warranty service:
Before returning a product directly to AMETEK Programmable Power, Inc. you must obtain a Return Materia
number and the correct manufactory Ship To: address. Products must also be shipped prepaid. Product shipments will be
refused and returned at sender expense if they are unauthorized shipped without RMA # clearly marked on the outside of
the shipping box, shipped “COD”, or if they are shipped to the wrong location.
Please have the following information when contacting American Reliance for RMA #:
1- The model number of your product.
2- The serial number of your product.
3- Information about the failure and/or reason for the return.
4- A copy of your dated proof of purchase.
5- Firmware Version (Press “Clear” on the front panel)
When returning the product to $0(7(.3URJUDPPDEOH3RZHU,QF.:
Package the unit safely, preferably using the original box and packing materials. Please ensure that your product
1-
is shipped fully insured in the original packaging or equivalent. THIS WARRANTY WILL NOT APPLY
WHERE THE PRODUCT IS DAMAGED DUE TO IMPROPER PACKAGING.
2- Include the following information:
o The RMA# supplied by $0(7(.3URJUDPPDEOH3RZHU,QF. clarlymarked on the outside of the box.
o A return address where the unit can be shipped. Post office boxes are not acceptable.
o A contact person, telephone, email where sender can be reached during work hours.
o A brief description of the problem.
l Authorization (RMA)
Ship the unit prepaid to the address provided by $0(7(.33'
If you are returning a product from outside of the United States:
In addition to the above, you must include return freight funds if you instrument is out of warranty and are fully
responsible for all documents, duties, tariff, and deposits.
customer servce representativH.
2-2
Page 43

PACKAGING FOR SHIPPING OR STORAGE
Instructions to prepare the instrument for shipping or storage.
1- When returning the unit or sending it to the service center, attach a tag to the unit stating its model number
(available at the front panel label) and its serial number (available at the rear panel label). Give the date of
purchase and an invoice number, if you have it, as well as a brief description of the problem.
2- For storage or shipping, repack the electronic load in its original box. If the original box is not available, seal the
instrument in a plastic bag and pack it in a 200 lb. (90Kg) test corrugated cardboard carton large enough allow 3
inches (76.2mm) of cushioning material to surround the unit or use a material such as foam slabs or chips or an
appropriate w
and handling.
3- Label the package as shown in Figure 2.1.
4- Mark the address of the service center and your return address carton.
5- For storing, no more than two cartons high. The storage temperature should be between -40qC to 70qC.
ooden crate used. Please consult with $0(7(.33' shipping department for proper packing material
PROGRAMMABLE DC ELECTRONIC LOAD
Model #: _______________________
Serial #: _______________________
FRAGILE – ELECTRONIC EQUIPMENT
(PLEASE HANDLE WITH CARE)
FIGURE 2.1 SHIPPING OR STORAGE PACKAGE LABEL
LOCATION, MOUNTING, AND VENTILATION
Electronic load is designed for rack-mounted or bench top applications.
RACK MOUNTING INTALLATION
1- Use the integral rack-mount ears at both sides of the front panel to install the electronic load in a rack mount
application.
2- Provide adequate support for the rear of the instrument without obstructing the ventilation inlets on the sides and
rear of the unit. Use a support bar at the bottom or rear of the unit. Follow the rack-mount manufacturer’s
instructions to install the support bar.
VENTILATION
Whether you place the electronic load in a rack or on a bench, allow cooling air to reach the ventilation inlets on the sides
of the instrument and allow 4 in. (101.6mm) of unrestricted air space at the rear of the unit for the fan exhaust. Any
ventilation space at the top and bottom of the supply will further lower internal operating temperatures.
2-3
Page 44

FUSE REPLACEMENT
If the fuse is suspected to be defective, it should be inspected and, if necessary, replaced. To inspect or replace the fuse,
please contact to American Reliance service department before perform the following steps
(1) Disconnect the AC line cord from the unit to reduce electrical shock hazard.
(2) Remove the fuse by sliding out the fuse holder. The fuse holder is beneath the AC receptacle. Test the fuse for
electrical continuity with an ohmmeter. Other fuse holder located at the printed circuit board.
(3) If the fuse is found to be defective, replace it with a replacement fuse as specified in the following table:
Model Type Fuse Rating Specification Location
PLW6K
PLW9K
PLW12K
PLW18K
PLW24K
PLW36K
PLW48K - Slave
PLW48K - Master
PLW60K - Slave
PLW60K - Master
PLA-2U
PLA-3U
PLA-4U
PLA-6U
PLA-8U-Master
PLA-8U-Slave
2.5A/250V Slow Blow External Fuse (Beneath the AC receptacle)
4A/250V Slow Blow External Fuse (Beneath the AC receptacle)
4A/250V Slow Blow External Fuse (Beneath the AC receptacle)
4A/250V Slow Blow External Fuse (Beneath the AC receptacle)
6.3A/250V Slow Blow External Fuse (Beneath the AC receptacle)
6.3A/250V Slow Blow External Fuse (Beneath the AC receptacle)
10A/250V Slow Blow External Fuse (Beneath the AC receptacle)
6.3A/250V Slow Blow External Fuse (Beneath the AC receptacle)
10A/250V Slow Blow External Fuse (Beneath the AC receptacle)
6.3A/250V Slow Blow External Fuse (Beneath the AC receptacle)
2.5A/250V Slow Blow External Fuse (Beneath the AC receptacle)
4A/250V Slow Blow External Fuse (Beneath the AC receptacle)
6.3A/250V Slow Blow External Fuse (Beneath the AC receptacle)
8A/250V Slow Blow External Fuse (Beneath the AC receptacle)
10A/250V Slow Blow External Fuse (Beneath the AC receptacle)
6.3A/250V Slow Blow External Fuse (Beneath the AC receptacle)
:
Table 2.2 – Fuse Replacement Specifications
(4) Replace the fuse in the fuse holder and re-install.
(5) Re-install the cover and connect the AC power cord.
CAUTION
USE OF ANY FUSE OTHER THAN THE ONE SPECIFIED MAY CAUSE DAMAGE TO THE UNIT, POSE A
SEVERE FIRE HAZARD, AND WILL VOID THE WARRANTY.
AC INPUT POWER CONNECTION
WARNING
JJJJJJ
Disconnect AC power from the instrument before removing the cover. Even with the front panel power switch in the
OFF position, live line voltages are exposed when the cover is removed and the AC cord is attached. Repairs must be
made by experienced service technicians only.
NOTE: REMOVING THE TOP COVER OR DISASSEMBLING THE UNIT WILL VOID THE WARRANTY.
WARNING
JJJJJJ
There is a potential shock hazard if the electronic load chassis and cover are not connected to an electrical ground via the
safety ground in the AC input connector. Ensure that the electronic load is connected to a grounded AC outlet with the
recommended AC input connector configured for the available line voltage.
2-4
Page 45

AC INPUT CONNECTOR AND VOLTAGE SELECTION
CAUTION
To prevent damage to the electronic load, turn off AC power to the unit before changing from one AC input voltage range
to another. Example 115Vac to 230Vac.
eLOAD series has an auto range selection function. This function allows you to connect to either low or high AC input
voltage without making any adjustment to the unit.
AC INPUT CORD
WARNING
JJJJJJ
The AC input cord is the disconnect device for the electronic load. The plug must be readily identifiable to the operator.
The input cord must be no longer than 3 m (9.84 feet).
The AC input cord we recommend is specified in Table 2.3, “AC Cord Specification”.
If you require a special cord, call our sales representative.
TABLE 2.3 AC CORD SPECIFICATION
WIRE SIZE TYPE OF CONDUCTOR RATINGS LENGTH (feet)
DIMENSIONS AWG
16/3 SJT 105qC 6
18/3 SJT 105qC 6
LOAD WIRING
To select wiring for connecting the load to the electronic load, consider the following factors:
x Insulation rating of the wire
x Current carrying capacity of the wire
x Maximum load wiring length for operation with sense lines
x Noise and impedance effects of the load lines
CURRENT CARRYING CAPACITY: As a minimum, load wiring must have a current capacity greater than the output
current rating of the power supply. This ensures that the wiring will not be damaged even if the load is shorted. Table 2.4
shows the maximum current rating, based on 450 A/cm², for various gauges of wire rate for 105qC operations. Operate at
the maximum current rating results in an approximately 30qC temperature rise for a wire operating in free air. Where
iring must operate in areas with elevated ambient tem
load w
wiring rated for higher temperature.
TABLE 2.4 CURRENT CARRYING CAPACITY FOR LOAD WIRING
WIRE SIZE (AWG) MAXIMUM CURRENT (A)
2/0 303
1/0 247
1 192
2 155
4 97
6 61
8 36
10 21
12 16
14 10
peratures or bundled with other wiring, use larger gauges or
2-5
Page 46

REAR PANEL INLET AND OUTPUT PIPE INSTALLATION (PLW ONLY)
Refer to attached drawing of Rear Panel diagram for the position of the cooling water inlet and outlet pipe
as well as the drain faucet and pressure release faucet. Before filling the Load Bank with water, carefully
read the following paragraphs for correct flow rate, water flow direction, and water pressure.
WARNING
JJJJJJ
Ensure the correct water flow direction and flow rate is set. Improper settings will extensively affect the
power module heat dissipation capability. At all time, do not exceed the inlet water flow pressure limits and
water pipe pressure specifications in order to prevent leakage or water pipe rupture.
Refer to the specification for proper water flow rate and pressure limit for inlet
water.
INLET WATER
Refer to attached drawing of Rear Panel diagram for the position of the inlet water pipe (3/4" NPT) located
in the bottom left center of the cabinet. Properly tighten the pipe with the correct wrench and do not over
tighten the pipe causing damage to the threads.
Note: 150 micron filtration is recommended.
OUTLET WATER
Refer to attached drawing of Rear Panel diagram for the position of the outlet water pipe (3/4" NPT)
located in the upper right corner of the cabinet. Properly tighten the pipe with the correct wrench and do not
over tighten the pipe causing damage to the threads.
WATER PRESSURE
Before applying water to the Load Bank, separately turn-off the drain faucet (clockwise direction) and
pressure relief faucet (clockwise direction). Gradually let the water flow and check for any leaks in the
pipe and lines. If any leaks are found, relieve the pressure and tighten the pipe connector immediately with
the proper tool.
Note: The load must have water flow in order to work properly and the water pressure must be less than
80 PSI.
PLW SERIES RECOMMENDED WATER PIPING INSTALLATION
–
INLET
WATER
PLW Series
OUTLET
WATER
–
FIGURE 2.2 PIPING AND COOLANT INSTALLATION
2-6
Page 47

Important Precautions:
1.
Models Pipe Size
Models 18K Watts ½” NPT
24K to 36K Watts ¾” NPT
2. It is recommended that the system be check for water leaks before operation.
a. Check for water leaks by closing Water Switch – B.
b. Then opening Water Switch – A.
c. Turn the Load’s power ON and check for leaks (the power of the PLW
must be ON in order for water flow into the load).
3. Flow Meter’s inlet and outlet must be at least ¾”.
4. Install a 150-micron filter at the water inlet. (Recommend)
5. Water pressure must be less than 80 PSI in order for the valve to work
properly.
6. Never allow to flow from outlet to inlet.
7. Water temperature should be between 5
ºC and 30ºC.
8. Use only non-corrosive type of liquid for cooling with a neutral pH level of 7.
(We suggest using distilled or de-ionized water)
9. Water viscosity must be greater than 50 CST.
Important Note: Please refer to Appendix B for Heat Sink Temperature VS. GPM Curve to help
determine the GPM level for your system
COOLANT WITH ANTI-FREEZE (GLYCOL) PRECAUTIONS
Cooling liquids containing Anti-Freeze (Glycol) will decrease the thermal efficiency of the PLW
cooling system by reducing the cooling efficiency and increasing the viscosity of the coolant. To
counteract the lowered heat dissipation, the GPM must be increased to maintain proper cooling of
the system. Please refer to table 2.5 for a detailed chart explaining the relationship between
GPM, Glycol level and Power De-rating. Increased glycol levels will affect the power handling
capability of the unit, please consult the chart carefully.
Power Derated
0% 10% 20% 30% 40% 50%
1.5 GPM
2 GPM 1.5 GPM
2.5 GPM 2 GPM 1.5 GPM
3 GPM 2.5 GPM 2 GPM 1.5 GPM
3 GPM 2.5 GPM 2 GPM 1.5 GPM
3 GPM 2.5 GPM 2 GPM 1.5 GPM
Glycol Level
0%
10%
20%
30%
40%
50%
GPM Level Based on PLW 6KW Model @ 15°C Cooling Liquid
2-7
Page 48

CAUTION
PREVENTION OF WATER FREEZING, AND OXIDATION CONDITIONS
1) When the Water-cooled eLOAD is not operating under loaded conditions, please
drain the water from the system to prevent from thermal expansion of water for
temperatures 4°C to below freezing.
2) Still water will corrode and oxidize internal piping over long periods of time.
After use, it is recommended to remove water from the system to prevent
corrosion and oxidation of the internal copper pipes.
Water Drain Method:
a) Upon completion of testing application, adjust power loading on the eLOAD to
30% of Pmax in Constant Current Mode
b) Stop the fluid flow to the eLOAD while unit is still loaded
c) Use front panel temperature reading (UTILITYÎDISPLAYÎMETER
MODEÎP+T) and wait until the temperature reading is 40 degrees C.
d) Disable and Power off dc input source to the eLOAD
e) With eLOAD input still on, wait 5 seconds and Remove eLOAD from source by
disconnecting leads (this will discharge residual voltage on the eLOAD)
f) Remove inlet and outlet piping into the eLOAD
g) Drain the water inside the eLOAD’s water distribution system by tilting the
eLOAD at a 30 ~ 45 degree angle into a bucket or water sink
h) For best results, use a compressed air gun inserted at the outlet and force air flow
through the system with air exiting at the inlet while the eLOAD is tilted. Make
sure the Water Valve is still conducting (the orange light on the water valve
should illuminate).
i) Now disable the eLOAD input and power off the eLOAD. Disconnect the ac cord
and the eLOAD is ready for relocation, storage or non-usage.
2-8
Page 49

LOAD WIRING LENGTH FOR OPERATION WITH SENSE LINES
For applications that use remote sensing, you must limit the voltage drop across each source line. The eLOAD must be
supplied with the minimum operating voltage or compliance voltage for normal regulation and the voltage drop across the
cables should be accounted for. We recommend that you use the larger load wiring or ensure a smaller voltage drop (1V
typical max.) along the wire, although the remote sensing will accommodate voltage drops up to 1% of V
Please see the following table:
Max Rated Voltage Max Voltage Drop Compensation
100 V 1 V
200 V 2 V
300 V 3 V
400 V 4 V
500 V 5 V
600 V 6 V
700 V 7 V
800 V 8 V
in each line.
MAX
TABLE 2.6 VOLTAGE DROP COMPENSATION
NOISE AND IMPEDANCE EFFECTS
To minimize noise pickup or radiation, use shielded pair wiring or shortest possible length for source wires. Connect the
shield to the chassis via a rear panel mounting screw. Where shielding is impossible or impractical, simply twisting the
wires together will offer some noise immunity. When using local sense connections, the user must use the largest
practical wire size to minimize the effects of load line impedance on the regulation of the load.
LOAD CONNECTIONS
The eLOAD is designed with an air-cooling/water-cooling system that provides airflow/water flow through the heat sink
to remove the heat generated by the Power MOSFETs. To obtain efficient heat exchange rate between heat sink and
power MOSFETs, the user needs to follow the instruction outlined below to ensure the heat is removed from heat sink
properly to prevent excess heat from accumulating in the power module. Under high power handling applications or
increased temperature operation, heat dissipation becomes a key factor in determining the reliability of the overall unit.
INPUT TERMINAL
CAUTION
For the safety of personnel and to prevent electrical shock due to high voltage, do not come in contact or obstruct the
input terminals. Refer to the next page diagram, for the location of the input terminals.
Observe the maximum current handling capability of the power cables from DUT to the Load Bank. Please refer to Table
2.4 for higher current rating cables. Observe the maximum input current and voltage of the terminals. Do not underrate
the cable, excessive current will cause the temperature to increase and cause melting of the insulation rubber of the
terminal and cable insulation sleeves resulting in input cable shorts.
For the high current applications, large diameter power cables are necessary to prevent load oscillation. The power cables
should be as short as possible to reduce inductance from the power cable and cause oscillation between power sources and
the load unit.
2-9
Page 50

INPUT TERMINAL CONNECTOR
Æ
Æ
WARNING
JJJJJJ
There is a shock hazard at the load when using an electronic load with a rated output greater than 40V. To protect
personnel against contact with hazardous voltages, ensure that the load, including connections, has no live parts, which
are accessible. Also ensure that the insulation rating of the source wiring and circuitry is greater than or equal to the
maximum output voltage of the electronic load.
CAUTION
When making connections to the bus bars. Ensure that each terminal’s mounting hardware and wiring assembly are
placed to avoid touching the other terminal and shorting the electronic load input. Heavy connecting cables must have
some form of strain relief to avoid loosening the connections or bending the bus bars.
LOCAL SENSE CONFIGURATION
When the Electronic Load is strapped for local sensing, an unavoidable voltage drop is incurred in the load leads and this
adds to the load regulation. Hence, local sensing is usually used in applications where the lead lengths are relatively short
or load regulation is not critical. Local or remote sense can be set by accessing: MENU
CONTROL
To meet safety requirement, load wire size should be large enough to carry electric current of the source to the Electronic
Load without overheating. Stranded, copper wires are recommended. The wires should be large enough to limit the
voltage drop to less than 1V per lead. Refer to Table 2.4 for proper wire size selection. Input wire connections are made
to the "+" and "-" terminals on the rear panel of the Load.
REMOTE SENSE Æ LOCAL and pressing enter button to confirm.
LOAD
USE THE LARGEST GAUGE,
LOWEST INDUCTANCE AND
SHORTEST LENGTH POSSIBLE
PROGRAMMING
DC Power Supply
_
(-)
ELECTRONIC
LOAD
–
+
(+)
+
WARNING
JJJJJJ
To protect personnel against accidental contact with hazardous voltages, ensure that the load, including connections, have
no live parts, which are accessible. Also ensure that the insulation rating of the load wiring and circuitry is greater than or
equal to the maximum input voltage of the electronic load.
WARNING
Never touch the input terminal when your hands are wet. Dry your hands first before operate the instrument.
2-10
Page 51

REMOTE SENSE CONFIGURATION
CAUTION
Turn off the electronic load before making any connections on the rear panel terminal block.
In remote sense operation, the electronic load senses the input at output terminals of the source. As shown in figure
the remote sense terminals of the Load are connected to the output of the source. Remote sensing compensates for the
voltage drop in applications that require long leads. It is useful in any operating mode requiring accurate voltage read
back. Load leads should be bundled or tied together to minimize inductance.
Note: Use the largest gauge size, lowest inductance and shortest possible length for the sources line.
PROGRAMMING
DC Power Supply
ELECTRONIC LOAD
_
–
(-) Sense Pin – 2 at External Programming Port
+
+
(+) Sense Pin – 1 at External Programming Port
REMOTE SENSE CONFIGURATIONS
PARALLEL CONNECTIONS
The electronic loads can be connected in parallel to increase power dissipation and allow current sharing. Numerous
Electronic Loads can be directly paralleled in CC or CRM or CP mode, with the proper setup and configuration. Parallel
operation in all operating modes is recommended when using the external control port to send in an in-sync external
control signal. By utilizing an external control signal and ensuring all eLOAD are identical in model, operating range and
mode; synchronized parallel eLOAD operation can be achieved, providing optimized performance and results. As a rule
of thumb, parallel Load Bank operation is for current sharing amongst a number of loads, to ease the over power
restrictions of a single load. In short, parallel operation increases the power handling capability for high current and
voltage applications. Each Electronic Load will dissipate the power it has been programmed for. If two Electronic Loads
are connected in parallel, with Load 1 programmed for 10 A and Load 2 programmed for 15 A, the total current drawn
from the source is 25 A. In another scenario, if Load 1 is programmed for 0.5 ohm and Load 2 is programmed for 0.5
ohm, the total equiv
SXpportto obtain a copy of the “Parallel Load Operation Guide,” for step-by-step procedures and important details.
alent resistance of the two paralleled Loads is 0.25 ohm. Please contact $0(7(.33' Technical
high
2-11
Page 52

DC Power Supply
+
PROGRAMMING
ELECTRONIC
LOAD
–
+
(+)
PROGRAMMING
ELECTRONIC
LOAD
_
(-)
–
+
PARALLEL CONFIGURATION
TRIGGER OPERATION
Figure depicts the method of triggering the Eectronic Loads. The TRIGOUT signal of the Electronic Load is
connected to the Trigger input of the DMM. Additional instruments can be daisy chained to a DMM in the same manner.
Once the preset settings of the instruments have been programmed, one trigger signal can simultaneously set all
instruments to their transient settings.
Note: Trigger Operation is Negative-Edge Triggered
OSCILLOSCOPE
Programming Electronic Load
(Trig-in) Pin – 10 at External Programming Port
(Trig-out) Pin – 11 at External Programming Port
XT in XT out
XT out XT in
DMM
TRIGGER CONFIGURATION
– Input +
(+)(-)
– +
DEVICE UNDER TEST
2-12
Page 53

ZERO-VOLT LOADING CONNECTION
The Electronic Load can be connected in series with voltage sources that can accommodate the minimum operating
voltage and line voltage drop so the Electronic Load can test the devices at its full current capacity down to a zero-volt
level.
Important Notes:
1. The boost power supply used for Zero-Volt Load Operation must handle up to the maximum operating current of
the application.
2. The power rating of the Load Bank will decrease based on the amount of power dissipated at the boost power
supply.
3. A protective diode rated for the maximum operating current of the application will need to be placed across the
power terminals of the DUT.
4. A boost power supply with minimal noise specification is recommended for zero-volt load operation.
ZERO-VOLTS LOADING
2-13
Page 54

Page 55

THREE: LOCAL OPERATION
INTRODUCTION
The programmable electronic load provides powerful control capabilities, which consist of four operating modes
CV/CC/CR/CP. To complement and enhance these features, an internal transient generator is provided to simulate
dynamic operations. The Transient operation provides three programmable features, Transient frequency, Transient duty
cycle, and Transient slew rate. These features provide the user with precise and efficient control of the powerful eLOAD
to handle the most diverse array of testing applications.
The programmable electronic load provides additional functions and capabilities, such as 32 point step programmable in
four user defined profiles, Cross Mode and Cross Range Operation and Short Operation. For battery testing, we provide
the “C” operand to help user in testing battery parameters without troublesome calculations.
The wide range of operating m
increased flexibility to work with different types of DUT and power source. Protection features such as Programmable
OVP, OCP, OPP, redundant OTP and hardware OP Protection are provided to protect the electronic load under different
load conditions. Please refer to the specifications to check the maximum input current, voltage, and power range in order
to safely test and obtain the best results.
Note: Protection Mode will shut off the Load Bank input, please take the necessary precaution.
odes, accurate specifications, and advanced features provide the electronic load with
VOLTAGE AND CURRENT METERING INFORMATION
The programmable electronic load uses a DAC with a guaranteed 14-bit resolution in the metering system and is active
once the unit is turn on. With sophisticated control circuits, the load can measure full-scale input voltages and currents
with Auto-Scaling capability. For example, when low voltages levels are applied, the display's decimal point will move
to accurately display the lower value. The same is true for the larger input values, the decimal will move to accurately
display the hi
gher value. Refer to the Specifications for more programming and read back information.
OPERATING STATUS INFORMATION
All operating status information will be displayed when they become active. For example, when the Over-
voltage is tripped, the LCD module will display OVP.
SYMBOL TYPE DESCRIPTIONS
----------------------------------------------------UNR WARNING unregulated
OVP ALARM over voltage protection
UVP ALARM under voltage protection
OCP ALARM over current protection
UCP ALARM under current protection
OPP ALARM over power protection
UPP ALARM under power protection
OTP ALARM over temperature protection
OSC ALARM oscillation
LV WARNING low voltage
OV ALARM over voltage
OC ALARM over current
OP ALARM over power
RCP ALARM reverse current protection
RSF ALARM remote sense fault
UVL WARNING under voltage lockout
3-1
Page 56

WARNING
Do not deliberately try to trip the OVP circuit on when performing battery-testing applications. When an Over-voltage
condition occurs, the electronic load will try to sink more current in order to drop the input voltage source. In other
words, the input source is supplying more power than the electronic load is capable of handling. By trying to trip the
Over-voltage circuit, you may severely damage both the input source and the load.
LOCAL AND GPIB OPERATION INFORMATION
When the programmable electronic load is first turned on, the LCD will display LCL for local communication (via
keypad). When the electronic load is communicating via GPIB, USB, Ethernet or RS-232 remote control operation, the
LCD module will display GPIB/ETHER/RS-232/USB to inform the user that the keypad is disabled and the load is being
controlled remotely. Pressing the LOCAL key will change status from remote access to local operation.
MODE MENU OPERATION AND RANGE SETTING
The eLOAD provides a wide range of input operating modes CV/CC/CR/CP and range operation (Manual Low/Manual
Middle/Manual High/Automatic). The user is capable of activating any mode during the operation of the unit; however,
careful attention needs to be adhered to prior to entering the programming values for each operating mode and correct
range.
WARNING
The Mode HOT Keys play an important role in switching operating mode (CV, CC, CR, and CP) and the “Range”
selection key allows easy range switching from manual (all ranges) to auto. By switching to other modes/range, the input
will shut off. A cross mode and cross range feature is offered on the eLOAD that will keep the input on when switching
between different modes and ranges. An important precaution is to make sure the proper settings are utilized for the
designated range. For example, if a PLA800-120-150 eLOAD is operating in CCH mode at 100A, and the mode is
crossed over to CPL, the input will shut off and display “OC”. The reason for the protection shutdown is due to the
maximum current in CPL is 15A, and 100A in that range is too high. To prevent from protection shutdown of the
eLOAD, ensure proper voltage and current settings before using the cross mode and cross range feature.
TO SELECT THE MANUAL MODE AND RANGE, SIMPLY FOLLOW THE PROCEDURE:
1. Press the Range key, and use the encoder to select between manual low, manual middle, manual high or
automatic. Select manual
2. S
elect the desired mode by pressing the corresponding hot key. Press the CC hot key.
3. Now the operating range is CC mode in low range.
TO SELECT THE AUTOMATIC MODE AND RANGE, SIMPLY FOLLOW THE PROCEDURE:
Example: If 300A is maximum current = high range, then 30A = low range.
1. Press the Range key, and use the encoder to select between manual low, manual middle, manual high or
automatic. Select automatic and press enter.
2. Select the desired mode by pressing the corresponding hot key. Press the CC hot key.
3. Now the operating range is CC mode in automatic range.
low and
press enter.
3-2
Page 57

MAIN LEVEL LOCAL OPERATION
There are three levels of operations: MAIN level, TRANSIENT level and TRIGGERED level. The MAIN level operation
and its associated set of values are for static operation. TRANSIENT and TRIGGERED operations are for various types
of dynamic applications.
The main level programming values for the four different operating modes are entered in the same manner; the difference
is the unit of measurement for each operating mode. For example CV mode is in V (Voltage) unit, CC mode is in A
(Amps) unit, CR mode is in : (Ohm) unit and CP mode is in W (Watts) unit.
The CV, CC, CP and CR modes have more than one operating range. The low ranges provide better resolution for low
settings. Each mode’s range is selected by pressing the “RANGE” key. See examp
Example 1.
1. Press the “CC” Hot Key. Select the programming range by pressing “Range,” and turn the encoder to the desired
range (set to low range). Let’s assume main level programming value indicates 10 amps, in the low range. Try to set
the programming value to 15.0 Amps.
2. Press and hold the encoder and wait for a numerical key entry for a new value. On the second line of the LCD module
the following format will be displayed: CURR = 1
3. Enter the following numerical key sequence “1”, “5”, “.” and “0” or another current value below the max rated current.
4. If the number that was entered is not correct, then press the “CLEAR” key to erase the wrong entry and repeat step 3.
0.000A
le below.
5. Press the “ENTER” key to complete the entry operation.
6. If the entered value is over the maximum rating of the current range, then the eLOAD LCD will display “Overflow”,
and allow the user to enter another value. Either change the entered value to a number that is within the current range
or select the correct range by pressing the RANGE key as indicated in step 1.
Example 2.
1. Assume that the eLOAD is in the CP mode and main level programming value indicates 40 Watts. Try to set the
programming value up to 50.0 Watts.
2. Press the “CP” Hot Key. Select the programming range by pressing “Range,” and turn the encoder to the desired
range (set to low range). Press and hold the encoder and wait for a numerical key entry for a new value. On the
second line of the LCD module the following format will be displayed: POWER = 4
3. Enter the following numerical key sequence “5”, “0”, “.” and “0”.
4. If the number that was entered is not correct, then press the “CLEAR” key to erase the wrong entry and repeat step 3.
5. Press the “ENTER” key to complete the entry operation.
6. If the entered value is over the maximum rating of the power range, then the eLOAD LCD will display “Overflow”,
and allow the user to enter another value. Either change the entered value to a number that is within the current range
or select the correct range by pressing the RANGE key as indicated in step 1.
After the entry steps have been completed, the new main level programming values will immediately be in effect and the
eLOAD will return to the me
tering mode.
0 W
3-3
Page 58

ENCODER OPERATION
BUTTON or
SETTING
Main Level Setting
Screen in Main Value
Edit Mode
Main Level Setting
Screen With Input On
PEAK Hot Key Pressed
DUTY Hot Key Pressed
SLEW Hot Key Pressed
MENU Button Pressed
RANGE Button
Pressed
STEP Button Pressed
ENCODER
ACTION FUNCTION
Press & Hold Change Input Value
Tap Change Decimal Position
Rotate Left Decrement Value
Rotate Right Increment Value
Press & Hold Modify/Enter Value
Tap Modify/Enter Value
Rotate Left Decrement Value (real-time)
Rotate Right Increment Value (real-time)
Press & Hold Change Input Value
Tap Change Decimal Position
Rotate Left Decrement Value
Rotate Right Increment Value
Press & Hold Modify/Enter Value
Tap Change Decimal Position
Rotate Left Decrement Value
Rotate Right Increment Value
Press & Hold Make Selection/Modify/Enter Value
Tap Change Decimal Position
Scroll Through Selection/Increment
Rotate Left
Rotate Right
Press & Hold Select Menu Option
Tap Exit to Previous Menu
Rotate Left Scroll Through Selection
Rotate Right Scroll Through Selection
Press & Hold Select Mode & Range Type
Tap Select Mode & Range Type
Rotate Left Scroll Through Selection
Rotate Right Scroll Through Selection
Press & Hold Make Selection/Modify/Enter Value
Tap Change Decimal Position
Rotate Left
Rotate Right
Value
Scroll Through Selection/Decrement
Value
Scroll Through Selection/Increment
Value
Scroll Through Selection/Decrement
Value
3-4
Page 59

MENU FUNCTION
43
43
The MENU function allows the user to set the different system configurations such as GPIB, Stepping, Max/Min setting,
Protection, and Calibration. The vast array of features and configurations allow the eLOAD to accommodate different
situations or testing configurations. The Local/Menu function is the start of the tree structure, which enables the user to
branch.
Press MENU key:
* (Use 43 to select the next menu setting then press ENTER key to enter the selected menu).
* (Use CLEAR key to back space or to correct the wrong value).
(A: LOAD CONTROL 43 B: PROFILE 43 C: DISPLAY 43 D: SYSTEM
E: AUTHENTICATE)
A: Load Control Menu - press ENTER key:
*Turn the encoder
* (Use CLEAR key to back space or to correct the wrong value).
1: STEP PARAM. 432: MEASURE SENSE 43 3: PORT 0 434: EXT. CO
CONTROL 43 6: CROSS MODE 43 7: CROSS RANGE 43 8: TRIGGER 439: PROTECTION 43
10: MAX/MIN LIMIT 4311: CAL PARAM. 43 12: OSCILLATE 43 13: BOOT INPUT
1. STEP PARAM.------- press ENTER key, use 43 to select number of Step COUNT then press ENTER. (0 Î
infinite)
2. MEASURE SENSE--press ENTER key, use 43 to select LOCAL / REMOTE sense then press ENTER.
3. PORT0 ----------------press ENTER key, use 43 to enables or disables digit port the press ENTER.
4. EXT. CONTROL-----press ENTER key, use 43 to select ON / OFF then press ENTER.
5. SHORT CONTROL--press ENTER key, use 43 to select ON / OFF then press ENTER.
CROSS MODE-------press ENTER key, use 43 to select INPUT OFF / INPUT REMAIN then press ENTER.
6.
7. CROSS RANGE----- press ENTER key, use 43 to select INPUT OFF / INPUT REMAIN then press ENTER.
8. TRIGGER-------------press ENTER key, use 43 to select Source (Held, BUS, EXTERNAL, ETHERNET) /
DELAY (in milli-second), then press ENTER.
9. PROTECTION--------press ENTER key,
to select the next menu setting then press ENTER key to enter the selected menu.
NTROL 43 5: SHORT
1: OV PROTECTION 432: UV PROTECTION 43 3: OC PROTECTION 43 4: UC PROTECTION
43 5: OP PROTECTION 436: UP PROTECTION 43 7: V-ON CONTROL
1. OV PROTECTION--------------press ENTER key, input the STATE/LIMIT/DELAY then press ENTER.
2. UV PROTECTION--------------press ENTER key, input the STATE/LIMIT/DELAY then press ENTER.
3. OC PROTECTIO
4. UC PROTECTION--------------press ENTER key, input the STATE/LIMIT/DELAY then press ENTER.
5. OP PROTECTION--------------press ENTER key, input the STATE/LIMIT/DELAY then press ENTER.
6. UP PROTECTION--------------press ENTER key, input the STATE/LIMIT/DELAY then press ENTER.
7. V-ON CONTROL--------------press ENTER key, input the STATE/V-ON THRESHOLD then press ENTER.
10. MAX/MIN LIMIT---press ENTER key,
1: MAX VOLTAGE 432: MIN VOLTAGE 43 3: MAX CURRENT 43 4: MIN CURRENT 43 5:
MAX RESISTOR 436: MIN RESISTOR 43 7: MAX POWER 43 8: MIN POWER
1. MAX VOLTAGE--------press ENTER key, input the maximum voltage then press ENTER
N--------------press ENTER key, input the STATE/LIMIT/DELAY then press ENTER.
3-5
Page 60

2. MIN VOLTAGE ---------press ENTER key, input the minimum voltage then press ENTER.
43
43
43
3. MAX CURRENT--------press ENTER key, input the maximum current then press ENTER.
4. MIN CURREN-----------press ENTER key, input the minimum current then press ENTER.
5. MAX RESISTANCE----press ENTER key, input the maximum resistance then press ENTER
6. MIN RESISTANCE-----press ENTER key, input the minimum resistance then press ENTER
7. MAX POWER----------- press ENTER key, input the maximum power then press ENTER
8. MIN POWER------------ press ENTER key, input the minimum power then press ENTER
11. CAL. PARAM.-----press ENTER key, input the MEASURE LOW/ MEASURE HIGH / TRA
press ENTER.
1: LOW MEAS POINT 432: HIGH MEAS POINT 433: TRANS OFFSET
1: LOW MEASURE POINT--press ENTER key, set the low measure count value then press ENTER.
2: HIGH MEASURE POINT-press ENTER key, set the high measure count value then press ENTER.
3: TRANSIENT OFFSET---- press ENTER key, set the transient offset count then press ENTER.
12. OSCILLATE-------press ENTER key, select the OSC. CONTROL/ OSC. DELAY, then press ENTER.
13. BOOT INPUT--------press ENTER key, use 43 to select ON / OFF then press ENTER.
N. OFFSET, then
B: Profile Menu - press ENTER key:
*Use
* (Use CLEAR key to back space or to correct the wrong value).
1: RECALL 432: SAVE 43 3: RESET
to select the next menu setting then press ENTER key to enter the selected menu.
1. RECALL----------press ENTER key, use 43 to select the profile 0/1/2/3 then press ENTER to recall.
2. SAVE----------press ENTER key, use 43 to select the profile 0/1/2/3 then press ENTER to save.
3. RESET---------press ENTER key, then press ENTER to reset.
C: Display Menu - press ENTER key:
*Use
* (Use CLEAR key to back space or to correct the wrong value).
1: Meter Mode 432: ‘C’ Value
1. METER MODE---press ENTER key, use 43 to select display mode (V+I, V+P, V+C, V+R, I+P, I+C, I+R,
2. ‘C’ Value------press ENTER key, then input the C value in Ampere.
to select the next menu setting then press ENTER key to enter the selected menu.
R+P, R+C, P+C, V+T, I+T, R+T, P+T, C+T) then press ENTER.
D: System Menu - press ENTER key:
*Use
* (Use CLEAR key to back space or to correct the wrong value).
1: GPIB ADDRESS 432: RS-232 SPEED 43 3: SYNTAX MODE 434: EOS CODE 43 5: BUZZER
43 6: PANEL LOCK 437: ETHERNET
1. GPIB ADDRESS--press ENTER key, use 43 to set the GPIB address ( 0 – 31 ) then press ENTER.
2. RS-232 SPEED----press ENTER key, use 43 to set the BAUD RATE ( 2400 – 115200 ) then press ENTER.
3. SYNTAX MODE--press ENTER key, use 43select the syntax mode (PEL or PLW/PLA) then press ENTER
4. EOS CODE----------press ENTER key, use 43 to set end of interface code then press ENTER.
5. BUZZER-----------press ENTER key, use 43 to select ON / OFF then press ENTER.
to select the next menu setting then press ENTER key to enter the selected menu.
3-6
Page 61

6. PANEL LOCK
43
7. ETHERNET-------press ENTER key, use 43 to select ADRESS/NETMASK/GATEWAY; press ENTER.
E: Authenticate Menu - press ENTER key:
*Use
* (Use CLEAR key to back space or to correct the wrong value).
1: SERIAL NO. 432: INTERFACE 43 3: CODE
to select the next menu setting then press ENTER key to enter the selected menu.
1. SERIAL NO.----------press ENTER key. Serial NO. should start with 000B87xxxxxx.
2. INTERFACE------press ENTER key. GPIB/ETHER/USB should be display according to customer’s order.
3. CODE--------------press ENTER key, Input the code from AMREL, then press ENTER.
LOAD CONTROL MENU
STEP PARAMETERS
Selects the number of Step Count (0 ~ 65535 & infinity) and different Step Modes (STEP, STEP AUTO, and STEP ONCE)
MEASURE SENSE
This feature allows selection of local sense or remote sense of voltage. Remote sense measures voltage at a different
sense point than the bus bars to prevent large voltage drops over lengthy wires. If the voltage reading between the remote
sense and bus bar differ by greater than a set threshold, Remote Sense Fault (RSF) will trigger and shutdown the input.
Note: The eLOAD’s voltage measuring points (positive and negative) can be configured to two locations. One is from the
power input terminals called Local; the other is from the remote sense terminal block in the rear panel called Remote
(Remote option i
measurement when longer cables are used (large voltage drop caused by long cables).
s only available in certain models)
. The purpose of the
Remote sense is for more accurate voltage
PORT 0
A general purpose output port that generates a TTL compatible signal; active high (5V) when port is on and inactive low
(0V) when port is turned off. The PORT 0 feature can be used to control external devices such as a DC Contactor or a
relay. To enable PORT 0, simply follow LOAD CONTROL Æ PORT 0 Æ ON.
EXTERNAL CONTROL
The external control function allows the eLOAD’s maximum range (L/M/H) voltage, current, power and resistance to be
scaled from 0 to 10 Volts. The external voltage signal will control the eLOAD to operate at the corresponding
current/voltage/resistance/power. Please see the table below for further details.
Note: AMREL eLOAD’s external analog programming accepts bipolar Vac < 10Vpp.
EXT_CTRL Voltage Current Range Range Current Rating Main Curent Value
0 V L 6 A 0 A
5 V L 6 A 3 A
10 V L 6 A 6 A
0 V M 30 A 0 A
5 V M 30 A 15 A
10 V M 30 A 30 A
0 V H 60 A 0 A
5 V H 60 A 30 A
10 V H 60 A 60 A
3-7
Page 62

Setup Diagram
t
DUT
Current
Shun
+ INPUT
+S
-S
-INPUT
10V AC Signal -1V
EXT PRG
EXT GND
eLOAD
DMM
DMM
Function
Generator
AC + DC
EXTERNAL PROGRAMMING SETUP
SHORT CONTROL
Enables/Disables Short Control.
CROSS MODE
Toggles between Input Off/Input Remain. Input remain will allow input to remain on when switching modes.
CROSS RANGE
Toggles between Input Off/Input Remain. Input remain will allow input to remain on when switching ranges.
RSF DETECT
Enable/Disable Remote Sense Fault Protection.
TRIGGER SOURCE
Trigger source and the triggering method Selection – Refer to table below.
TRIGGER
SOURCE
EXTERNAL
BUS
ETHERNET
HOLD
EXT_TRG_IN *TRG
O X X O O
X O X O O
X X O X X
X X X O O
TRIGGER INPUT
Command
Ethernet TRIG:IMM
Command
Front
Panel
TABLE 3.1 TRIGGER INPUT SOURCE
Important Notes:
1. X = Non-functional & O = Functional
2. EXT_TRG_IN & ETHERNET triggers input through the respective interface connections
3. *TRG and TRIG:IMM are SCPI commands
3-8
Page 63

PROTECTION
OV PROTECTION UC PROTECTION
OV DELAY UC DELAY
UV PROTECTION OP PROTECTION
UV DELAY OP DELAY
OC PROTECTION UP PROTECTION
OC DELAY UP DELAY
AMREL eLOAD provides programmable OVP/OCP/OPP and UVP/UCP/UPP over-limit and under-limit protection
capabilities. The user can program all of the protection values and delay times. Protection will be activated once the
protection mode has been tripped and then shut down the eLOAD input. The protection delay setting provides a
programmed delay time to accommodate short duration surges without inadvertently shutting the input off.
Protection Sub-Menu Navigation: Press the "Menu/Local" key then turn the 43 encoder to select the PROTECTION
function then the "ENTER" key. Turn the 43 encode
the "ENTER key to display the current value. Press the "ENTER" key to edit or enter the new value then press the
“ENTER” key to confirm entry. Press the “CLEAR” key to exit from the PROTECTION MODE sub-menu.
V-ON (Under Voltage Lockout): To prevent the eLOAD from operating under unstable conditions such as voltages
below the minimum operating voltage, the V-On Protection feature can be utilized. The V-On protection will force the
input to remain off until the V-On voltage threshold is exceeded, the purpose is to ensure sufficient voltage is delivered to
the eLOAD for normal operation. When operating under strict turn-on sequences, such as sending power via a power
supply into an eLOAD with the input already turned on, current overshoot, bounce or ringing may occur. As a
recom
mendation for improved performance without changing the turn-on sequence, the V-On threshold can be increased
to a voltage closer to the application’s operating voltage and the V-On detection mode changed to “Continuous”. By
making the necessary adjustments, both the DUT and eLOAD can operate under stable conditions to avoid irregular
results. To achieve best results, the V-On Voltage should be set to a level higher than the stabilizing voltage of the power
supply or DUT, and higher than the eLOAD’s minimum operating voltage. Please refer to “Protection Feature” in section
one for a detailed explanation of the different V-On modes.
r to select the appropriate protection or delay function by pressing
Fault Signal: Each time a protection fault triggers, the Fault pin becomes active TTL high. When this occurs, the
appropriate bits in the status register are set and the fault signal is latched. The status bits will remain set until the
electronic load is reset via the GPIB or RS232 (*RST command) or at the front panel (CLEAR key). The condition that
caused the protection feature to trip must be corrected or the load will turn off again.
Note: Because the protection is done through software, the response time for the delay trip time must be set to at least
50ms for each protection feature. Otherwise the load may not reset correctly if the trip delay time is too short.
MAX/MIN SETTING FUNCTION
To change the values, press the "Menu/Local" key press Enter, then use the 43 keys to select the Max/Min Limit
function then the "ENTER" key. Use 43 keys to select the appropriate Min/Max setting by pressing the "ENTER key.
The LCD will display the current value, press the "ENTER" key to enter a new value and press the “ENTER” key to
confirm entry. Press “CLEAR” key to escape the Max/Min Setting MODE.
The following are special eLOAD MAX/MIN settings that can be programmed to prevent erroneous value entry for
specific applications or special power sources that are sensitive to inappropriate operating values.
MAX VOLTAGE - Max V
MIN VOLTAGE - 0.000V
MAX CURRENT - Max A
MIN CURRENT - 0.0000 A
MAX RESISTANCE - Max OHM
MIN RESISTANCE - 0.00 OHM
MAX POWER - Max W
MIN POWER - 0.00 W
3-9
Page 64

CALIBRATION PARAMETERS
Please refer to “SECTION 5. CALIBRATION”.
OSCILLATE
This function selects between DISABLE/OSC3/OSC2/OSC1/Default System Bandwidth Settings. OSC3 & OSC2 have a
slower transient time range and slower bandwidth and OSC1 & Default have a faster transient time range and wider
bandwidth.
OSC DETECTION DISABLE AND DELAY FEATURES
For applications that utilize non-pure DC output power to the eLOAD input, the OSC detection can be disabled by
selecting the “DISABLE” menu choice. The OSC Protection Delay can be increased to 10 seconds for applications that
require a buffer to avoid false protection trigger. Please refer to the menu tree for detailed selection procedures
BOOT INPUT
Boot Input allows the input to be automatically turned on once the unit is powered on. By default, Boot Input is
deactivated.
LOAD PROFILE MENU
The profile menu allows 4 different profiles (0~3) to save all current load configurations. As a factory default, profile 0
& 3 are our factory default profile and profile 1 is our syntax profile.
DISPLAY MENU
Display Mode: V + I (Voltage + Current) V + C (Voltage + “C” operand)
V + P (Voltage + Power) V + R (Voltage + Resistance)
I + C (Current + “C” operand) I + P (Current + Power)
P + C (Power +“C” operand) I + R (Current + Resistance)
R + P (Resistance + Power) R + C (Resistance + “C” operand)
V + T (Voltage + Temperature) I + T (Current + Temperature)
R + T (Resistance + Temperature) P + T (Power + Temperature)
C + T (“C” operand + Temperature)
The LCD display module of the eLOAD can be configured to the different measuring combinations.
Press the "Menu/Local" key. Turn the encoder 43 to select the Display, and then press the "ENTER" key and turn the
encoder 43 to select the desired function. Press the “ENTER” key to confirm the selection. Press “CLEAR” key to
escape the Display Mode.
C OPERAND FOR BATTERY TESTING
“C” Value: 1.0000A
The eLOAD provides the “C” operand. This is especially useful for battery testing applications that use “C” as the battery
capacity unit. The user can avoid troublesome calculations by monitoring and testing the battery directly. After the user
changes the display combination to V + C, all current values entered and/or measured will be in “C” automatically. The
Current value will be scaled according to its value in C units, for example if a “C” value of 10 A is entered, a main value
setting of 20 A will be represented as 2 C.
Press the "Menu/Local" key, select display mode and press ENTER. Turn the encoder 43 to select the "C" value. Press
the "ENTER" key, input the
desired value,
and press "ENTER". Then Press “CLEAR” to exit the “C” operand mode.
STABLE READ BACK – MEAS. BUFFER
For AC coupled DC input signals, the read back meter may display an unstable reading. Do not be alarmed, the read back
reading update rate can be slowed down for a more stable reading. Only 8 or 16 meas. buffer setting should be selected,
to ensure the correct measurements are updated properly.
3-10
Page 65

SYSTEM FUNCTIONS MENU
To enter a value for a particular function, please follow the correct key sequence indicated under the System Menu above.
Press the "Menu/Local" to enter the main menu tree then turn the encoder 43 keys to select the System Menu. Then
press the “ENTER” and turn the encoder 43 to further select the next level of commands. Press the Enter key to
confirm the selection.
You can press the "Clear” key repeatedly or the “Local” key at any time to exit the function or mode level.
GPIB FUNCTION
The eLOAD provides the GPIB/SCPI interface control capability. The following are user configurable GPIB options:
PRIMARY ADDR: 0 o 31
Primary address for GPIB interface has a range from 0 to 31.
Press the "Menu/Local" key then turn the encoder 43 to select the System function, and select GPIB Address then press
the "ENTER" key. Turn the encoder 43 to select the PRIMARY ADDR function by pressing enter, turn the encoder
43 to increase or decrease the GPIB address, then press the “ENTER” key to confirm the value. The number displayed
with the "
ADDR mode. eLOAD needs to be restart in order to synchronize the change.
RS-232 FUNCTION
The eLOAD provides an RS-232 interface for remote control and utilizes a 1-to-1 (direct connect) RS-232 cable. To save
setup time, the eLOAD has preconfigured default RS-232 settings for parity check bit, data length, and stop bit.
Default settings:
Ż" annunciated behind it is the currently selected GPIB address. Press the “CLEAR” to escape the Primary
Data Length: 8 bits Parity Check bit: No Parity Stop Bit: 1 bit
Handshake: Xon/Xoff BAUD RATE: 2400/4800//9600/19200/38400/57600/115200
The eLOAD only provide seven-baud rate settings for RS-232 communication. Press the "Menu/Local" key and use the
encoder 43 to select the System function (press enter), then use the encoder 43 to select the RS-232 function then
press the "ENTER" key twice to select BAUD RATE function. Use the encoder 43 to select between 2400 and 115200
then press the "ENTER key to confirm selection. Press “CLEAR” key to escape the BAUD RATE MODE.
SYNTAX MODE
The Syntax Mode function allows a selection between PEL and PLA/PLW command sets. Please refer to “PEL &
PLW/PLA COMMAND COMPATIBILITY APPENDIX” for further information.
EOS CODE
EOS CODE: NULL only
CR only
LF only
CR + LF
During remote operation, the users can define the different End of String (EOS) for the usage of different protocols.
When using AMREL Application Programs/Drivers, the EOS setting should be configured as shown below:
For non-query commands: OK + LF + CR;
For queries: OK + LF + CR + returned value + LF + CR + OK + LF + CR.
Press the "Menu/Local" key then use the encoder 43 to select the System function then the "ENTER" key. Turn the
encoder 43 to select the EOS function then use the encoder 43 to scroll and select the desired EOS code method. Press
the “ENTER” key to confirm the selection. Press “CLEAR” key to exit the EOS CODE menu option.
BUZZER
Toggles the system sounds on and off.
PANEL LOCK
This function allows the user to lock the front panel with a 6 digit numerical password. The factory default password is:
555555.
3-11
Page 66

ETHERNET FUNCTION
The eLOAD provides an Ethernet programming interface. All SCPI commands are also available through Ethernet
interface. Obtaining Network Information to connect the eLOAD to the network, you only need a network cable with RJ45 connector. No transceiver is necessary. However, you need to obtain the following information from the eLOAD and
your network administrator:
1. eLOAD Ethernet MAC Address:
It’s a twelve digits string that unequally identifies the eLOAD unit. It can be obtained from the control board.
2. Network information:
1) DHCP server enabled? Yes or no.
2) eLOAD IP address: ___ . ___ . ___ . ___
3) Gateway IP address: ___ . ___ . ___ . ___
4) Subnet mask: ___ . ___ . ___ . ___
Setting the eLOAD Ethernet Parameters
You need to set the eLOAD Ethernet IP address first. The eLOAD IP address uniquely identifies the load to other
devices on the network, and is required for the eLOAD to communicate over the network.
1. Ethernet Network settings: DHCP supported. The purpose of a DHCP (Dynamic Host Configuration Protocol)
server is to issue an IP address to a network device that requests an address.
2. The IP address enables the device to communicate with the network. This is similar to personal computer Plug &
Play concept.
The following procedure presumes that your eLOAD has the Ethernet option and you have connected the eLOAD to
your network.
If your network supports DHCP server, do the following:
1) Power on the eLOAD
2) Press the LOCAL key on the front panel, and rotate the encoder 43 to scroll to the “SYSTEM” menu option.
3) Press ENTER to select.
4) Choose “ETHERNET” and Press ENTER to select option.
5) Select “ADDRESS” and press E
6) Enter the IP address as “0.0.0.0” if it is not and press ENTER.
7) Choose “NETMASK” by rotating the encoder 43 to scroll and press ENTER to select option.
8) Enter the value as “0.0.0.0” if it is not and press ENTER to set value.
9) Choose “GATEWAY” by rotating the encoder 43 to scroll and press ENTER to select.
NTER
ect option.
to sel
10) Enter the default gateway IP address as “0.0.0.0” if it is not and press ENTER to set desired address.
To Exit, press LOCAL to go back to the start-up screen
3-12
Page 67

Note: Because the DHCP server assigns a dynamic IP address, the value of the eLOAD IP address maybe different
each time you power on the eLOAD. However, if you intend to remotely control the eLOAD, a static IP address is
more convenient, as the eLOAD IP address does not change, making it easier for remote devices to access the
eLOAD
If your network does not support DHCP server, you must enter the Ethernet settings manually which you obtained
from your network administrator.
Note: The following procedure presumes that your eLOAD has the Ethernet option and you have connected the
eLOAD to your network.
If your network does not support DHCP server, do the following:
1) Power on the eLOAD
2) Press the LOCAL key on the front panel, and rotate the encoder 43 to scroll to the “SYSTEM” menu option.
3) Press ENTER to select.
4) Choose “ETHERNET” and Press ENTER to select option.
5) Select “ADDRESS” and press ENTER to select option.
6) Enter the IP address obtained from your network administrator and press ENTER.
7) Choose “NETMASK” by rotating the encoder 43 to scroll and press ENTER to select option.
8) Enter the value obtained from your network administrator and press ENTER.
9) Choose “GATEWAY” by rotating the encoder 43 to scroll and press ENTER to select.
10) Enter the default gateway IP address obtained from your network administrator and press ENTER
To Exit, press LOCAL to go back to the start-up screen
USB FUNCTION
The eLOAD also provides a USB remote interface to connect to your computer. You need to install USB driver
included in a CD-ROM shipped with your eLOAD .
After your USB driver is installed, the USB port is converted to a virtual COM port. Refer to the “Verify Installed
USB Driver using Hyper Terminal (Windows XP/2000/98)” section for detailed procedures on how to verify the
USB driver.
Windows XP USB Driver Installation Procedures
Note: You must have administrative privileges to install the USB driver
1) Connect eLOAD Unit using USB cable
2) Click on found new hardware bubble (bottom right hand corner of screen)
3-13
Page 68

3) Found New Hardware Wizard installation window will pop up
4) Select the “install from a list or specific location [Advanced]” radio button and click next to continue
5) Select the “Search for the best driver in these locations.” Radio (default) and check only the “search
removable media [floppy, CD-ROM…]” checkbox.
3-14
Page 69

6) Click next
7) The Wizard will search for the needed drivers
8) After the driver has been found, the wizard will display the “completing the Found New Hardware
Wizard” screen
3-15
Page 70

9) Click finish to complete USB driver installation
10) A pop-up balloon will notify you that the USB Serial Device is ready for use
Windows 2000 USB Driver Installation Procedures
1) Connect eLOAD using USB cable
2) A new hardware will be detected
3-16
Page 71

3) The “Found New Hardware Wizard” screen will appear
4) Click Next to continue
5) Select the “Search for suitable driver for my device (recommended)” to search for the appropriate driver
6) Click Next to continue
3-17
Page 72

7) The driver files are located in the pre-packaged CD
8) Check the “Specify a location” check box and click Next to continue
9) Select the drive corresponding to your CD-ROM, and locate the folder name “FT245VCP driver 2104
XP certified”
10) Click OK to continue
3-18
Page 73

11) The correct driver has been located, click Next to continue installation
12) Windows will check for the validity of the device driver, click Yes to continue installation
3-19
Page 74

13) Windows will copy the needed drivers to the PC
14) The above screen will appear to notify the end of the installation process and the USB Serial Port will
now function properly.
15) Click Finish to complete setup
Windows 98 USB Driver Installation Procedures
1) Connect eLOAD Unit using USB cable
2)
A new hardware will be detected
3-20
Page 75

2) The “Add New Hardware Wizard” window will appear
3) Click next to continue
4) Select the “Search for the best driver for your device.” radio button, and click Next to continue
3-21
Page 76

5) Check the “Specify a location” check box and browse to select the file “FT245 VCP driver 2104 XP
certified” from your CD-ROM drive
6) Click Next to continue
7) Now the location of the driver has been set, and click next to install the driver
3-22
Page 77

8) Click Cancel and the wizard will automatically locate the needed driver
9) The drivers have been installed successfully, and now the High Speed Serial Converter will work
properly
10) Click Finish to complete the installation process
Verify Installed USB Driver using Hyper Terminal (Windows XP/2000/98)
1) Enter into Device Manager window
2) Locate and record the “USB Serial Port” COM Port number (under ports)
3) Enter into hyper terminal [Start Æ Accessories Æ Communications Æ Hyper Terminal]
4) Enter connection name, i.e. AMREL
5) Choose the corresponding “USB Serial Port” COM Port [To check, right click on My Computer Æ
Properties Æ Hardware Æ Device Manager Æ Ports (note the COM port the High Speed Serial Port is
connected to)]
6) Choose BPS according to the Baud Rate set on the eLOAD unit (the two baud rates have to be the
same)
7) Click Okay to connect
8) Test any SCPI command as desired (i.e. *idn?, addr?...)
3-23
Page 78

AUTHENTICATION MENU
SERIAL NUMBER
Displays the serial number/MAC Address of the eLOAD unit
INTERFACE
Displays the interfaces activated for the load unit
CODE
Field Upgradeable E-Package code activation
TRANSIENT OPERATION
Amrel’s Programmable Electronic Load can facilitate testing sources and load simulation through the use of its internal
transient generator. This transient capability allows the user to determine operating specifications for instruments such as
a power supply. This capability also allows for pulse-charging a battery and for simulating battery drain or simulating an
electronic switch.
Operating in the Transient mode, the eLOAD offers 7 operating types: continuous, toggle, pulse, step, step auto, step once
and trigger. Each transient mode has a corresponding hot key, with the exception of the different STEP modes which
instead is selected from the local menu, and TRIGGER, which is remotely operated. The selected TRANSIENT
operation is initiated using the PULSE hot key. After the input is turned on, and the pulse activated, the transient
operation will begin upon receiving a trigger signal or continuous mode w
on. If any of the STEP modes is activated via the STEP hot key, then the selected STEP mode will begin once input is
on.
ill activate as soon as transient (pulse) is turned
All Transient Modes can be selected or activated by using their designated Hot Keys. The Step function has a separate
menu for setting the step value, time, and mode selection. The front panel “TRIGGER” hot key will trigger certain
transient modes when appropriate.
For Continuous mode, once the transient operation is activated the eLOAD will switch between main level and transient
level based on the duty cycle, frequency and slew time.
For Pulse mo
comes from GPIB or external TTL trigger.
For Trigger mode operation, the eLOAD will switch to the set triggered level once a trigger signal is received (trigger
signal via GPIB, Ethernet, External port, or Bus). The triggered level can be changed to a value greater or smaller than
the main value setting.
For Toggle mode operation, the eLOAD will toggle once between main level and transient level whenever it receives a
trigger signal from GPIB or external TTL trigger.
For Step/Step Auto/Step Once operation, the eLOAD will switch to the new value setting based on th
of the programmed step.
Trigger Out signal can be cascaded via the trigger out port to multiple loads or instrument application where the user
requires synchronized triggered events, such as activating different transient values for a group of eLOAD. The trigger
out signal is a hardwired trigger signal with minimal delay.
de operation when amplitude and duration is programmed via GPIB or RS-232 bus. The trigger source
e length and value
3-24
Page 79

ENTERING TRANSIENT MODE VALUES
Example:
The test application requires the main operation to be at 25 A in CC mode and a Transient test current of 50.0 A,
Frequency of 500Hz, Slew rate of 5 ms, and a 50% Duty cycle.
1. Set the Transient operation mode to Continuous by pressing the CONT Hot Key.
2. Set CC mode – press the CC hot key.
3. Set main voltage level – press and hold the encoder, the voltage value on the LCD will flash and enter 25.0 A. After
you have entered the new current value (25.0) press ENTER to confirm.
4. Set Transient voltage value - press the PEAK hot key to enter transient voltage edit mode and view stored current
value. Press and hold the encoder and the transient current value will flash on the LC
have entered the new current value (50.0) press ENTER to confirm.
5. Set transient Frequency - press the FREQUENCY hot key, tap the encoder to edit or change stored value to 500 Hz
then press ENTER to confirm.
6. Set transient Slew rate - press the SLEW hot key and use the encoder "43" to scroll to Rise time and tap the encoder
to edit or change stored value to 5 ms then press ENTER to confirm.
7. Repeat for Slew Fall Time
8. Set transient Duty Cycle - press the DUTY hot key and tap the encoder to change the duty cycle to 50%, then press
ENTER to confirm.
D, and enter 50.0 A. After you
9. Press the CONT hot key to select the Continuous Transient Operation mode.
10. Activate the Continous Transient operation
The Transient condition will cycle continuously based on the rise and fall slew time until the CONT transient operation is
turned off. By changing the frequency, the transient cycle will increase or decrease in repetition based on the set value.
by pressing the PULSE hot key and the INPUT hot key.
TRANSIENT FREQUENCY, SLEW RATE AND DUTY CYCLE PROGRAMMING
The transient frequency, slew rate and duty cycle can be programmed directly using the Hot Keys.
1. Press the “FREQ”, “SLEW” or “DUTY” hot key to access the transient frequency, slew rate and duty cycle editing
mode and LCD module will display the most current setting once the designated hot key is pressed.
2. To change existing values to the appropriate parameter, tap the encoder to activate the edit entry mode.
3. For Frequency editing, the LCD module will display the following:
FREQ = 1
4. Enter the following numerical keys “2”, “0”, “0”, “.” and “0” keys in sequence in order to change the Frequency to
200Hz.
5. Make sure that the entered number is correct and press “ENTER” key to complete the entry operation.
6. Press “CLEAR” key to return to the metering mode. By pressing the "Clear" with no entry will display AMREL Model
number and software version.
000 Hz
3-25
Page 80

LOCAL TRANSIENT OPERATION
t
LCL Operation:
STEP Selection
MENU/LOCAL o LOAD CONTROL o STEP PARAM. oSTEP
oSTEP AUTO
oSTEP ONCE
OTHER TRANSIENT OPERATION SELECTIONS
Remote Only – Trigger Operation
CONT Hot Key – Continuous Operation
TOGGLE Hot Key – Toggle Operation
SINGLE Hot Key – Pulse Operation
STEP Hot Key – Step Operation
TRIGGER Hot Key – Front Panel Trigger
CONTINUOUS MODE
In continuous mode, the eLOAD input switches between 2 user defined levels; main and transient. The duty cycle and
frequency is user defined.
i
Transient
Level
Main
Level
Typical application:
Testing the Load Regulation (Effect) of a power Supply, defined as the voltage change in dc output
due to a change in load current from minimal resistance (closed circuit) to maximum resistance (open circuit). The PLW
can be programmed to switch between any two current levels.
LCL Operation:
1. Using the mode hot keys, select operating mode (CC, CV, CR, CP)
2. Set the MAIN level by holding down the encoder and rotate to change the value or enter numerically.
3. Set the Transient level by pressing the “PEAK” hot key and edit the value using the encoder or enter manually.
4. Select Continuous transient operation by pressing the “CONT” hot key.
5. Set the duty cycle and frequency by pressing the “DUTY” and “FREQ” hot keys and tapping the encoder to edit
each. The duty cycle can be set from 2% to 98% and the frequency from 0.1Hz to 10 KHz. Rotate the encoder
clockwise or counterclockwise to change values or enter manually.
6. Set the Rising and Falling Slew Time by
pressing “SLEW,” rotate the encoder to select option, tap the encoder
to edit slew time value and press “ENTER” to confirm value entry.
7. To begin the continuous transient operation, press the “PULSE” hot key (pulse hot key will blink) and then press
the “INPUT” hot key to activate the Continuous transient operation.
3-26
Page 81

TOGGLE MODE:
In toggle mode, the eLOAD input alternates between two user-defined input levels. Unlike transient-continuous mode,
the input only changes from one level to another, one transition at a time.
Transient
Level
Main
Level
Typical Application
: Testing the transient recovery time for a CV power supply. The recovery time for a power supply is
Toggle
t
defined as the time required for the supply to settle to a predefined settling band following a change in load current caused
by an induced transient (pulse).
LCL Operation:
1. Using the mode hot keys, select operating mode (CC, CV, CR, CP)
2. Set the MAIN level by holding down the encoder and rotate to change the value or enter numerically.
3. Set the Transient level by pressing the “PEAK” hot key and edit the value using the encoder or enter manually.
4. Select TOGGLE transient operation by pressing the “TOGGLE” hot key.
5. Set the Rising and Falling Slew Time by pressing “SLEW,” rotate the encoder to select option, tap the encoder to
edit slew time value and press “ENTER” to confirm value entry.
6. To begin the TOGGLE transient operation, press the “PULSE” hot key (pulse hot key will blink) and then press
the “INPUT” hot key. To activate the TOGGLE, press the “TRIGGER” hot key.
3-27
Page 82

PULSE MODE:
In pulse mode, the eLOAD generates a pulse with a user-defined amplitude and width. The pulse width can be set from
0.05ms to 10seconds.
i
Transient
Level
Main
Pulse Width
t
Typical Application
: Testing the transient recovery time for a CV power supply. The recovery time for a power supply is
defined as the time required for the supply to settle to a predefined settling band following a change in load current caused
by an induced transient (pulse).
LCL Operation:
1. Using the mode hot keys, select operating mode (CC, CV, CR, CP)
2. Set the MAIN level by holding down the encoder and rotate to change the value or enter numerically.
3. Set the Transient level by pressing the “PEAK” hot key and edit the value using the encoder or enter manually.
4. Select PULSE transient operation by pressing the “SINGLE” hot key.
5. Set the Pulse width by tapping the encoder to edit.
6. set the Rising and Falling Slew Time by pressing “SLEW,” rotate the encoder to select option, tap the encoder to
edit slew time value and press “ENTER” to confirm value entry.
7. To begin the Pulse Transient Operation press the “PULSE” hot key (pulse hot key will blink) and then press the
“INPUT” hot key. To activate the Pulse, press the “TRIGGER” hot key.
3-28
Page 83

TRIGGER MODE
In trigger mode, the eLOAD waits for a trigger signal from the selected trigger source (HOLD (local), BUS, EXTERNAL
and ETHERNET)
the main value. After each trigger level is reached, another trigger level can be set and re-triggered to the new trigger
level. The trigger operation mode is only available via remote operation. The trigger signal can be sent from any of the
trigger sources or via the front panel TRIGGER hot key.
Note: All the operating modes can be programmed via the front panel or using GPIB/RS232/ETHERNET/USB Interfaces
with the exception of TRIGGER operation, which is remotely controlled. In addition, each transient mode besides
CONTINUOUS can be triggered through a negative edge triggered external TTL compatible signal. CONTINUOUS
Transient Operation will start as soon as PULSE is activated, and can not be activated using a trigger signal.
to switch to the user configured trigger level. The trigger level can be set to a value greater or less than
Transient
Level
Main
Level
Trigger 1
Trigger 2
Transient off
t
Setting the Triggered Level:
1. Connect the eLOAD to a PC via any of the interfaces (GPIB/USB/Ethernet/RS-232)
2. Communicate with the instrument using e-Tool 1, and confirm connection by sending the command *IDN?
3. The returned parameter should indicate the eLOAD’s firmware revision number
4. Select the Transient Mode via “TR:MOD 0” command, which will set the eLOAD for Trigger operation
5. Select the Trigger Source via TRIG:SOUR and followed by one of the following selections EXT (external
trigger), BUS (Bus Trigger), ETH (Ethernet Trigger), and HOLD (Local Trigger). Please refer to the table 3.1
for further trigger source details.
6. Set the Trigger Delay to the desired amount of time via TRIG:DEL and time entry in ms.
7. Set the Triggered Level via CURR:TRIG (current), VOLT:TRIG (voltage), RES
:TRIG (resistance) and
POW:TRIG (power) command, followed by the desired numerical value, such as 1 or 15.
8. Set the Main Level via CURR, VOLT, RES AND POW command, followed by the desired numerical value.
9. Turn the input on via the INP 1 command.
10. Trigger the eLOAD via Trig or *TRG.
Note: The “TRIG” command will trigger under all trigger sources with the exception of Ethernet (Ethernet Trigger
is reserved for the MCU-1 Controller), and the *TRG command will only work when the trigger source is selected to
“BUS.” Please refer to table 3.1 for the appropriate trigger commands for the various trigger sources.
3-29
Page 84

STEP MODE
In step mode, the eLOAD generates customized sequence of different input levels up to a maximum of 32 steps (points)
for each mode, with dwell times from 1ms to 65535ms and rise/fall times of 1ms. The step sequence can be cycled for
one up to 65535 count(s) or infinity for unlimited repeat. At the end of the step cycle count, turn transient level off and
then on to restart the step cycle and count.
i
T
t0 t1 t2 t3 T4 t5 t6 t7 t8
STEP: The Step mode will repeat the step cycle until the end of the dwell time without the need for a trigger
signal. Once transient level is activated, the STEP mode will start as well.
STEP AUTO: The Step Auto mode will traverse through the user-defined step cycle until the end of the dwell
time upon the receiving a trigger signal.
n+1
Note: When triggering the STEP AUTO function via the front panel, when the step is activated (it will show “AUTO”),
the step cycle will repeat itself until the end of the Step Parameter setting. If the STEP AUTO function is triggered via
PC, the step has to be triggered using a *TRG or TRIG command after the transient level is turned on.
STEP ONCE: The STEP ONCE function will only activate the first step in the step cycle until the next
trigger signal is received.
Note: For front panel operation, the STEP ONCE function will only activate the first step in the step cycle. For PC
operation, by sending a *TRG or TRIG command with transient on, the next step in the step cycle can be activated.
Typical Application
example, has complex battery discharge characteristics due to its different operating modes. A load profile can be created
using the eLOAD load to simulate those characteristics.
: Simulating battery drain for testing portable, battery powered products. A cellular phone, for
STEP OPERATION SET-UP
WARNING
Every time the Stepping mode is enabled, it is critical that you re-enter or check for the correct number of steps in the
STEP NUMBER function under Menu/Load Control/Step Param., in order to avoid initiating an erroneous step. If the
value is set higher than expected the system may perform previous steps that may exceed the power rating for the
application and may damage the eLOAD or power source.
Important Notes:
1) All steps must be in the same constant mode (CV, CC, CR, and CP). Stepping error will occur if different modes
are programmed.
2) All programmed steps must be saved before power cycling the eLOAD, otherwise the data will be lost.
3-30
Page 85

STEP FUNCTION
The eLOAD provides 32 points for self-programming capability for which parameters can be programmed in the Menu
function. This feature allows the users to create a mini program and automate the control of the eLOAD without the need
of computer, GPIB, USB, ETHERNET or RS-232 communication interface. The user is able to set Programming Points,
Loop Number, Step Mode and Time Duration (dwell time).
At the Meter Mode, press the STEP key. This will lead eLOAD to its step entry menu. Press the STEP menu button to
select between time duration (dwell time) and step value for each step number. To change value and time duration for
each step press and hold the encoder to select and clear to exit. Turn the encoder to increment/decrement the step
number.
After configuring each step, the step sequence will need to be defined. Two parameters will determine the behavior of the
overall step cycle. Under MENU Æ LOAD CONTROL Æ STEP PARAM. , there are two pa
and (STEP) MODE.
STEP COUNT
COUNT is the number of loops the step program will be repeated. The stepping function provides loop control with
COUNT, which instructs the eLOAD to repeat the stepping function, based on the COUNT. For instance, if the COUNT
is set to 10 and the eLOAD will cycle the desired steps 10 times. If the COUNT is infinity, then eLOAD will cycle the
stepping infinitely.
To configure the Step Count parameter, Press the "Menu/Local" key press ENTER, then use the encoder 43 to select the
STEP PARAM. function then the "ENTER" key. Turn the encoder 43 to select the Step COUNT then press the
"ENTER” key twice to enter the value or use the encoder 43 to increment or decrement the value. Press the “ENTER”
key to confirm the selection. Press “CLEAR” key to exit from the STEP C
onfiguration Menu.
rameters, (STEP) COUNT
STEP MODE
MODE provides selection to the different types of step operation: STEP, STEP AUTO, and STEP ONCE.
1. Step will initiate step operation without a trigger signal and repeat until end of the loop number.
2. Step Auto will wait for a *TRG command or TRIG (via PC SCPI command) or front panel trigger to initiate the
step operation and will end at the end of the loop number.
3. Step Once will activate one step for every trigger signal received.
To configure the Step MODE parameter, Press the "Menu/Local" key press ENTER, then use the encoder 43 to select
the STEP PARAM. function then the "ENTER" key. Turn the encoder 43 to select the Step MODE then press the
"ENTER” key. Different step MODE selections will
press “ENTER”” to confirm the selection. Press the “ENTER” key to confirm the selection. Press “CLEAR” key to exit
from the STEP Configuration Menu.
appear, select the appropriate choice using the encoder 43 and
ENTERING STEP MODE VALUES
Example:
The test application requires (3) steps to be performed in the Step Mode with the following criteria. Step (1) in the CC
mode with 5 amps for 800 ms, step (2) in the CC mode with 10 amps for 400 ms, and step (3) in the CC mode with 50
amps for 200 ms.
Note: CC Mode has 3 ranges. Therefore, if stepping values are in the manual high range, main level value must be set to
high range or switch to auto range to cover all current step entries.
1. Choose the STEP transient mode by toggling the Step Parameters selection to Step via the Menu Æ Load Control ->
Step Parameters. Press enter to choose the menu selection and turn the encoder 43 to select the STEP transient
mode and press ENTER key to confirm.
2. Set the STEP Count – Scroll using the encoder 43 for the total number of times the steps will be processed via the
Menu Æ Load Control Æ Step Param. Æ Count
3-31
Page 86

3. Set first step value - Press the CC hot key, press the STEP key to enter step edit mode, scroll 43 to select step 1.
Press the STEP key to switch between step value and time settings. Select step value and tap the encoder or press
enter. The step current value on the bottom right hand corner of the LCD screen will flash, now enter the new amps
value (5.0), and press enter to confirm. Press the STEP key again to scroll to the time edit selection and press enter
or tap the encoder to confirm. The step time value on the bottom left hand corner of the LCD screen will flash, now
enter the new time value (800), and press enter to confirm.
4. Set second step value - Press the CC hot key, press the STEP key to enter step edit mode, scroll 43 to s
Press the STEP key to switch between step value and time settings. Select step value and tap the encoder or press
enter. The step current value on the bottom right hand corner of the LCD screen will flash, now enter the new amps
value (10.0), and press enter to confirm. Press the STEP key again to scroll to the time edit selection and press enter
or tap the encoder to confirm. The step time value on the bottom left hand corner of the LCD screen will flash, now
enter the new time value (400), and press enter to confirm.
5. Set third step value - Press the CC hot key, press the STEP key to enter step edit mode, scroll 43 to select step 3.
Press the STEP key to switch between step value and time settings. Select step value and tap the encode
enter. The step current value on the bottom right hand corner of the LCD screen will flash, now enter the new amps
value (50.0), and press enter to confirm. Press the STEP key again to scroll to the time edit selection and press enter
or tap the encoder to confirm. The step time value on the bottom left hand corner of the LCD screen will flash, now
enter the new time value (200), and press enter to confirm.
6. To start the selected STEP mode, press the STEP hot key to initiate the step mode.
7. To enable the STEP mode, press the INPUT hot key.
8. The INPUT will be turned off automatically when the program completes the number of step and loops.
NOTE: To edit any entry press the STEP menu key and turn the encoder to increment to the desired step. Use the STEP
to scroll to select the step value or time
numerical keys to change to the desired setting. To program other steps, turn the encoder to increment to the desired
step. Press the STEP hot key and turn input on to reactivate STEP mode.
setting, and press enter or tap the encoder to select. Use the encoder or
elect step 2.
r or press
3-32
Page 87

FOUR: REMOTE PROGRAMMING
INTRODUCTION
The Programming Electronic Load is provided with GPIB and RS-232 Standard Commands for Programmable
Instruments (SCPI) interface for automated testing applications. The purpose of this section is to introduce the user to
SCPI commands used to control the eLOAD via remote communication.
NOTE: For a more comprehensive set of SCPI COMMANDS, please refer to the Programming Manual.
INTRODUCTION TO GPIB & RS-232 (SCPI) COMMANDS
The General Purpose Interface bus is synonymous with HP-IB standard bus used for controlling electronic instruments
with a computer. Also called IEEE 488 bus because ANSI/IEEE Standards 488-1978 defines it, 488.1-1987, and 488.2-
1987.
Standard Commands for Programmable Instruments (SCPI) is a programming language developed to remotely control
different test and measurement instruments over GPIB (IEEE 488) bus. SCPI functions with GPIB hardware conform to
the IEEE 488.2 Standard Digital Interface for Programmable Instrumentation. It is a device independent command set
and is layered on top of the hardware portion of IEEE 488.2. SCPI simplifies the programming task by defining a single
comprehensive command set of programmable instrumentation, regardless of type or manufacturer. The same SCPI
command can be applied to different classes of instruments. SCPI systems are much easier to program and maintain. In
many cases, you can interchange or upgrade instruments without having to change the test program. SCPI also applies to
RS-232 p
rogramming.
The electronic load's GPIB address cannot be set via GPIB bus communication or program. The address needs to be set
from the front panel keypad in the MENU function.
OVER VIEW SCPI LANGUAGE
The SCPI language uses a hierarchical structure in its programming syntax similar to an inverted tree. The command is
organized with root level commands positioned at the top, with multiple sub commands below each root-level command.
For example, VOLTage, which is a branch of SOURce, is a command mnemonic and it forms a subtree of its own.
VOLTage has three sub-level commands: LEVel, SLEW, TLEVel. At the end of a sub-level command, you can attach a
parameter, a question mark (for query), a colon (command mnemonics separator), a semicolon (for multiple commands in
a message) or an end of line terminator. To execute a sub-level command, you must specify the complete path from rootlevel. Each command statement is simply I/O ASCII data st
(GW-BASIC, HP BASIC, Quick Basic, Pascal, etc.).
Command Mnemonics Data
Query Indicator
VOLT:LEV 10;TLEV 15;:RES:TLEV? <NL>
Root Specifier
Command Statement
Command Statement Separator
rings incorporated within high-level programming language
Message Terminator
Command Message
4-1
Page 88

SYNTAX OVERVIEW
Use of the Colon (:)
A colon is used to separate command mnemonics. It indicates a move down in branch level of the command tree.
The command follows a colon is a sub command of the command immediate before the colon. When colon
precedes the first command mnemonic of a message unit, it becomes root specifier. Its action places the parser
(decoder) at the root of the command tree. Parser can only travel downward the command tree. If another
command at different branch needs to be executed, a root specifier (colon) is required to place parser at origin and
a complete path from root level should also be defined.
Use of the Semicolon (;)
A semicolon is used to separate two command statements with the same command message string. The semicolon
does not change location of the parser in the command tree. Only command statements that are in the current path
of the first command statement can be combined to form a command message.
Use of the Space ( )
A white space is used to separate a parameter (data) from a command mnemonic. When a command statement
includes parameter, data always follows the last keyword of a comm
Use of the Comma (,)
A comma is used to separate adjacent parameters if a command requires more than one parameter.
Use of the Query (?)
A query command is used to instruct the instrument to send a response message. Queries return either measured
values or internal instrument setting. When a keyword is followed by a question mark, it becomes a query. The ?
follows the last keyword of a command statement. You should read back the result of first query before you send
out another query or command. Otherwise, returned data will be lost.
and.
Common Commands:
Commands starting with a * and three-letter mnemonic are called common commands. They are generally not
related to specific device operation but to perform the identical function for all instruments that are compliant with
the IEEE-488.2 interface standard. Common commands can be mixed in with regular Electronic Load commands.
The common command will be executed without affecting the position of the parser.
Root-Level Commands:
The rootmixed with common commands.
level commands are those commands specific to the Electronic Load. They are device specific and can be
LANGUAGE DICTIONARY
The syntax and parameters for the IEEE 488.2 common commands and SCPI commands used by the Electronic Load is
presented in this section. The section starts with description for common commands and then follows by SCPI commands
specific to the electronic load.
COMMANDS STRUCTURE
The electronic load has two command types for GPIB and RS-232 interface.
Programming commands
Query commands
System commands
4-2
Page 89

Programming commands send programming instructions or values to the electronic load to control the CV/CC/CR/CP
functions. There are two types of commands, the SCPI command and instruction commands that co-exist in the program.
SCPI commands should adhere to their syntax and format structure (command line) in order to be properly process by the
electronic load.
Query commands request measured values, status, or programmed settings from the electronic load.
System commands belong to the GPIB bus system commands list to controls GPIB bus condition and electronic load
interface system. Some commands are not compatible with RS-232 interface.
SCPI (GPIB & RS-232) COMMAND SET
The following describes the GPIB (IEEE488.2) command set for the Programmable Electronic Load Series. All the
electronic load commands follow SCPI format and are RS232 compliant. The commands in brackets are implicit and
don’t have to be written out. The letters in bold is the short form syntax of the command mnemonic. For example, the
command CURRent[:LEVel][:IMMediate] has the following equivalent forms:
CURRent:LEVel:IMMediate 5
CURRent:IMMediate 5
CURR:IMM 5
CURR 5
All of the above commands will set the Current value to 5Amps.
*NOTE: The parameters MIN and MAX designate minimum and maximum programmable value of the range.
Queries for each of the following commands can be obtained by placing a question mark after the command syntax.
Example: CURR?
CURRent
This subsystem programs the constant current mode functions of the Electronic Load. The IEEE 488.1 command, “ISET”
and “SET” (if current active mode is CC mode), can also be used.
CURR
This command sets the input current level that is to be applied immediately in the constant current mode. If the
Electronic Load is not in the CC mode when the command is sent, the programmed level is saved and is applied when the
Load changes to CC mode. The rate of input change is in accord with the slew rate in effect.
Parameter: 0 to maximum value; MIN; MAX Units: Amp.
Example: “CURR 50” – sets current input level to 50Amps
CURR:PROT:OVER
This command sets a protection limit to the input current that the Electronic Load will sink. When the input current
reaches the programmed current limit for the programmed delay period, the Electronic Load input is off and draws no
current.
Parameter: 0 to maximum value; MIN; MAX Units: Amp.
Exam
CURR:PROT:OVER:DEL
This command sets the delay time in millisecond for current protection. When the input current reaches the programmed
current limit for the programmed delay period, the Electronic Load input is off and draws no current.
Parameter: 0 to maximum value; Units: ms.
Example: “CURR:PROT:OVER:DEL 200”- sets the over-current protection delay time to 200 ms.
Current Programming Functions
ple: “CURR:PROT:OVER 12”- sets the over-current protection to 12 Amps.
CURR:PROT:UND
This command sets an undercurrent protection limit to the input current that the Electronic Load will sink. When the
input currents falls below the undercurrent protection limit for the programmed delay period, the load input is off and
draws no current.
4-3
Page 90

Parameter: 0 to maximum value; MIN; MAX Units: Amp.
Example: “CURR:PROT:UND 1.5”- sets the undercurrent protection to 1.5 Amps.
CURR:PROT:UND:DEL
This command sets the delay time for under-current protection. When the input currents falls below the undercurrent
protection limit for the programmed delay period, the load input is off and draws no current.
Parameter: 0 to maximum value Units: ms
Example: “CURR:PROT:UND:DEL 500”- sets the undercurrent protection delay to 500 ms.
CURR:TRIG
This command sets the input current level that is to be applied on occurrence of a trigger in the constant current mode. If
the Electronic Load is not in the CC mode when the command is sent, the programmed TRIG level becomes a stored level
that takes effect when the Load changes to CC mode. The rate of input change is in accord with the slew rate in effect.
Parameter: 0 to maximum value; MIN; MAX Units: Amp.
Example: “CURR:TRIG 10” – sets the current trigger level to 10Am
CURR:TLEV
This command sets the transient current level in CC mode. When the transient subsystem is on, the Electronic Load will
switch between the main level and transient level at a rate determined by the slew rate in effect. If the programmed
transient current level is below the main current level, the switching will not occur until the main level is below the value
of CURR:TLEV. The IEEE 488.1 command, “ITR” can also be used.
Parameter: Low Range: 0 to maximum value; MIN; MAX Units: Amp.
High Range: 0 to maximum value; MIN; MA
Example: “CURR:TLEV 30”- sets the current transient level to 30A.
CURR:DUTY
This command sets pulse duty cycle, as a percentage of the total cycle, of continuous transient mode in CC mode. If the
Electronic Load is operating in another mode, the duty cycle is stored until the Load changes to continuous mode.
Parameter: 2 to 98; MIN; MAX Unit: %
Example: “CURR:DUTY 50” – sets a 50% duty cycle for transient current mode.
X
ps.
CURR:FREQ
This command sets pulse frequency of continuous transient mode in Hz. If the Electronic Load is operating in another
mode, the pulse frequency is stored until the Load changes to continuous mode.
Parameter: 0.25 to 20000; MIN; MAX Unit: Hz
Example: “CURR:FREQ 1000” – sets a 1000Hz frequency for transient current mode.
CURR:SLEW
This command sets the current slew rate for both ranges in CC mode. The programmed slew rate is in effect for all
current changes except INP:ON or OFF. The hardware im
CURR:SLEW value. To determine the actual value, use the query CURR:SLEW?.
Parameter: Low Range: minimum to maximum value; MIN; MAX Units: Amp/Ps.
High Range: minimum to maximum value; MIN; MAX
Example: “CURR:SLEW 0.1” - sets the current slew rate to 0.1A/Ps.
CURR:LIM:MAX
This command sets and queries the maximum input current level that is to be applied immediately in the constant current
mode.
Parameter: 0 to maximum value; MIN; MAX Units: Amp.
Example: “CURR:LIM:MAX 50” – sets maximum current input level to 50Amps
CURR
:LIM:MIN
This command sets and queries the minimum input current level that is to be applied immediately in the constant current
mode.
Parameter: 0 to maximum value; MIN; MAX Units: Amp.
Example: “CURR:LIM:MIN 50” – sets minimum current input level to 50Amps
plementation selects a slew rate that is closet to the
4-4
Page 91

RESistance
This subsystem programs the constant resistance mode functions of the Electronic Load. The IEEE488.1 command,
“RSET” and “SET” (if current active mode is CR mode), can also be used.
RES
This command sets the input resistance level that is to be applied immediately in the constant resistance mode. If the
Electronic Load is not in the CR mode when the command is sent, the programmed level is saved and is applied when the
Load changes to CR mode. The rate of input change is in accord with the slew rate in effect.
Parameter: Low Range: minimum to maximum value ; MIN; MAX Units: :
Middle Range: minimum to maximum value; MIN: MAX
High Range: minimum to maximum value; MIN; MAX
Example: “RES 5” – sets the resistance level to 5ohms.
RES:TRIG
This command sets the input resistance level that is to be applied on
mode. If the Electronic Load is not in the CR mode when the command is sent, the programmed TRIG level becomes a
stored IMM level that takes effect when the Load changes to CR mode. The rate of input change is in accord with the
slew rate in effect.
Parameter: minimum to maximum value; MIN; MAX Units: :
RES:TLEV
This command sets the transient resistance level in the CR mode. When the transient subsystem is on, the Electronic
Load will switch between the main level and transient level at a rate determined by the slew rate in effect. The IEEE
488.1 command, “RTR” can also be used. The input resistance transient switching will occur only when RES:TLEV is
programmed as following:
Low Range
Middle and high range TLEV<LEV
Parameter: minimum to maximum value; MIN; MAX Units: :
Example: “RES:TLEV 15” – sets the resistance transient level to 15ohms.
Resistance Programming Functions
TLEV>LEV
occurrence of a trigger in the constant resistance
RES:DUTY
This command sets pulse duty cycle, as a percentage of the total cycle, of continuous transient mode in CR mode. If the
Electronic Load is operating in another mode, the duty cycle is stored until the Load changes to continuous mode.
Parameter: 2 to 98; MIN; MAX Unit: %
Example: “
RES:FREQ
This command sets pulse frequency of continuous transient mode in Hz. If the Electronic Load is operating in another
mode, the pulse frequency is stored until the Load changes to continuous mode.
Parameter: 0.25 to 20000; MIN; MAX Unit: Hz
Example: “RES:FREQ 1000” – sets a 1000Hz frequency for transient current mode.
RES:SLEW
This command sets the current slew rate for both ranges in CR mode. The programmed slew rate is in effect for all
current changes except INP:ON or OFF. The hardware implementation selects a slew rate that is closest to the
RES:SLEW value. To determine the actual value, use the query RES:SLEW?.
Parameter: Low Range: minimum to maximum value; MIN; MAX Units: Ohm/Ps.
Example: “RES:SLEW 0.1” - sets the resistance slew rate to 0.1A/Ps.
RES:LIM:MAX
This command sets and queries the maximum input resistance level that is to be applied immediately in the CR mode.
Parameter: 0 to maximum value; MIN; MAX Units: Ohm.
Example: “RES:LIM:MAX 50” – sets maximum resistance input level to 50 Ohms.
High Range: minimum to maximum value; MIN; MAX
RES:DUTY 50” – sets a 50% duty cycle for transient current mode.
RES:LIM:MIN
This command sets and queries the minimum input resistance level that is to be applied immediately in the CR mode.
4-5
Page 92

Parameter: 0 to maximum value; MIN; MAX Units: Ohm.
Example: “RES:LIM:MIN 50” – sets minimum resistance input level to 50 Ohms.
VOLTage
This subsystem programs the constant voltage mode functions of the Electronic Load. The IEEE488.1 command,
“VSET” and “SET” (if current active mode is CV mode), can also be used.
VOLT
This command sets the input voltage level that is to be applied immediately in the constant voltage mode. If the
Electronic Load is not in the CV mode when the command is sent, the programmed level is saved to be applied when the
Load changes to CV mode. The rate of input change is in accord with the slew rate in effect.
Parameter: 0 to maximum value; MIN; MAX Unit: Volt
Example: “VOLT 120” – sets the voltage level to 120V.
VOLT:PROT:OVER
This command sets a protection limit to the input voltage that the Electronic Load will shunt. When the input current
reaches t
voltage.
Parameter: 0 to maximum value; MIN; MAX Units: Volt.
Example: “VOLT:PROT:OVER 12”- sets the over voltage protection to 12 Volts.
VOLT:PROT:OVER:DEL
This command sets the delay times in millisecond for over-voltage protection. When the input voltage reaches the
programmed voltage limit for the programmed delay period, the Electronic Load input is off and shunts no voltage.
Parameter: 0 to maximum value; MIN; MAX Units: ms
Example: “VOLT:PROT:OVER:DEL 1000”- sets the over voltage protection delay to 1000 ms.
VOLT:P
This command sets an under voltage protection limit to the input voltage that the Electronic Load will shunt. When the
input voltage falls below the under voltage protection limit for the programmed delay period, the load input is off and
shunts no voltage.
he programmed voltage limit for the programmed delay period, the Electronic Load input is off and shunts no
ROT:UND
Parameter: 0 to maximum value; MIN; MAX Units: Volt.
Example: “VOLT:PROT:UND 1.5”- sets the under voltage protection to 1.5Volts.
Voltage Programming Functions
VOLT:PROT:UNDER:DEL
This command sets the delay times in millisecond for under-voltage protection. When the input voltage falls below the
programmed the under voltage protection lim
shunts no voltage.
Parameter: 0 to maximum value; Units: ms
Example: “VOLT:PROT:UNDER:DEL 1000”- sets the under voltage protection delay to 1000 ms.
VOLT:TRIG
This command sets the input voltage level that is to be applied on occurrence of a trigger in the constant voltage mode. If
the Electronic Load is not in the CV mode when the command is sent, the programmed TRIG level becomes a stored
IMM level that takes effect when the Load changes to CV mode. The rate of input change is in accord with the slew rate
in effect.
Parameter: 0 to maximum value; MIN; MAX Unit: Volt
Example: “VOLT:TRIG 100” – sets the voltage trigger value to 100V.
VOLT:TLEV
This command sets the tr
switch between the main level and transient level at a rate determined by the slew rate in effect. If the programmed
transient voltage level is below the main voltage level, the switching will not occur until the main level is below the value
of VOLT:TLEV. The IEEE488.1 command, “VTR” can also be used.
Parameter: 0 to maximum value; MIN; MAX Unit: Vol
Example: “VOLT: TLEV 50” – sets the voltage trigger level to 50V
ansient voltage level in CV mode. When the transient subsystem is on, the Electronic Load will
it for the programmed delay period, the Electronic Load input is off and
t
4-6
Page 93

VOLT:SLEW
This command sets the voltage slew rate in CV mode. The programmed slew rate is in effect for all voltage changes
except INP:ON or OFF. The hardware implementation selects a slew rate that is closet to the VOLT:SLEW value. To
determine the actual value, use the query VOLT:SLEW?.
Parameter: 0 to maximum value; MIN; MAX Unit: V/Ps
Example: “VOLT:SLEW 6”- sets the voltage slew rate to 6V/Ps
VOLT:DUTY
This command sets pulse duty cycle, as a percentage of the total cycle, of continuous transient mode in CV mode. If the
Electronic Load is
Parameter: 2 to 98; MIN; MAX Unit: %
Example: “VOLT:DUTY 50” – sets a 50% duty cycle for transient voltage mode.
VOLT:FREQ
This command sets pulse frequency of continuous transient mode in Hz. If the Electronic Load is operating in another
mode, the pulse frequency is stored until the Load changes to continuous mode.
Parameter: 0.25 to 20000; MIN; MAX Unit: Hz
Example: “VOLT:FREQ 1000” – sets a 1000Hz frequency for transient voltage mode.
VOLT:LIM:MAX
This command sets and queries the maximum input voltage level that is to be applied immediately in the constant voltage
mode.
Parameter: 0 to maximum value; MIN; MAX Units: Volt.
Example: “VOLT:LIM:MAX 50” – sets maximum voltage input level to 50 Vol
operating i
n another mode, the duty cycle is stored until the Load changes to continuous mode.
ts
VOLT:LIM:MIN
This command sets and queries the minimum input voltage level that is to be applied immediately in the constant voltage
mode.
Parameter: 0 to maximum value; MIN; MAX Units: Volt.
Example: “VOLT:LIM:MIN 50” – sets minimum voltage input level to 50 Volts.
POWer
This subsystem programs the constant power mode functions of the Electronic Load. The IEEE 488.1 command, “PSET”
and “SET” (if current active mode is CP mode), can also be used.
POW
This command sets the input power level that is to be applied immediately in the constant power mode. If the Electronic
Load is not in the CP mode when the command is sent, the programmed level is saved and is applied when the Load
changes to CP mode. The rate of input change is in accord with the slew rate in effect.
Parameter: 0 to maximum value; MIN; MAX Units: Watt.
Example: “POW 50” – sets current input level to 50Watts.
POW:PROT:OVER
This command sets a protection limit to the input power that the Electronic Load will accept. When the input power
reaches the programmed power limit for th
Parameter: 0 to maximum value; MIN; MAX Units: Watt.
Example: “POW:PROT:OVER 12”- sets the overpower protection to 120 Watts.
POW:PROT:OVER:DEL
This command sets the delay time for over-power protection. When the input power reaches the programmed power limit
for the programmed delay period, the Electronic Load input is off.
Parameter: 0 to maximum value Units: ms.
Example: “POW:PROT:OVER:DEL 1200”- sets the overpower protection delay time to 1200 ms.
Power Programming Functions
e programmed delay period, the Electronic Load input is off.
POW:PROT:UND
This command sets an under power protection limit to the input power that the Electronic Load accepts. When the input
power falls below the under power protection limit for the programmed delay period, the load input is
off.
4-7
Page 94

Parameter: 0 to maximum value; MIN; MAX Units: Watt.
Example: “POW:PROT:UND 1.5”- sets the under power protection to 1.5 Watts.
POW:PROT:UNDER:DEL
This command sets the delay time for under-power protection. When the input power falls below the programmed power
limit for the programmed delay period, the Electronic Load input is off.
Parameter: 0 to maximum value Units: ms.
Example: “POW:PROT:UNDER:DEL 1200”- sets the under-power protection delay time to 1200 ms.
POW:TRIG
This command sets the input voltage level that is to be applied on occurrence of a trigger in the constant power mode. If
the Electronic Load is not in the CP mode when the command is sent, the programmed TRIG level becomes a stored
IMM level that takes effect when the Lo
in effect.
Parameter: 0 to maximum value; MIN; MAX Unit: Watt.
Example: “POW:TRIG 100” – sets the power trigger value to 100 W.
POW:TLEV
This command sets the transient voltage level in CP mode. When the transient subsystem is on, the Electronic Load will
switch between the main level and transient level at a rate determined by the slew rate in effect. If the programmed
transient power level is below the main voltage level, the switching will not occur unti
of POW:TLEV. The IEEE488.1 command, “PTR” can also be used.
Parameter: 0 to maximum value; MIN; MAX Unit: Watt
Example: “POW: TLEV 50” – sets the power trigger level to 50 W
POW:SLEW
This command sets the power slew rate in CP mode. The programmed slew rate is in effect for all voltage changes except
INP:ON or OFF. The hardware implementation selects a slew rate that is closest to the POW:SLEW value. To determine
the actual value, use the query POW:SLE
Parameter: 0 to maximum value; MIN; MAX Unit: Watt/Ps
Example: “POW:SLEW 6”- sets the power slew rate to 6W/Ps
ad changes to CP mode. The rate of input change is in accord with the slew rate
l the main level is below the value
W?.
POW:DUTY
This command sets pulse duty cycle, as a percentage of the total cycle, of continuous transient mode in CP mode. If the
Electronic Load is operating in another mode, the duty cycle is stored until the Load changes to continuous mode.
Parameter: 2 to 98; MIN; MAX Unit: %
Example: “POW:DUTY 50” – sets a 50% duty cycle for transient power mode.
POW:FREQ
This command sets pulse frequency of continuous transient mode in Hz. If the Electronic Load is operating in another
mode, the pulse frequency is stored until th
Parameter: 0.25 to 20000; MIN; MAX Unit: Hz
Example: “POW:FREQ 1000” – sets a 1000Hz frequency for transient power mode.
POW:LIM:MAX
This command sets and queries the maximum input power level that is to be applied immediately in the constant power
mode.
Parameter: 0 to maximum value; MIN; MAX Units: Watt.
Example: “POW:LIM:MAX 50” – sets maximum power input level to 50 Watts.
POW:LIM:MIN
This command sets and queries the minimum input power level that is to be applied immediately in the constant power
mode.
Parameter: 0 to maximum value; MIN; MAX Units: Watt.
Example: “POW:LIM:MIN 50” – sets minimum power input level to
e Load changes to continuous mode.
50 Watts.
4-8
Page 95

INPut/OUTPutInput Programming Functions
This subsystem controls the Electronic Load input.
INP[:STATe]
This command turns the Electronic Load input ON and OFF. When the input is off, the Electronic Load draws minimal
current at its input. The input turns on or off at the maximum rate, not in accord with the presently programmed slew
rate.
Parameter: OFF or 0; ON or 1
Example: “INP 1”- enables the input to the load.
INP:SHOR[:STATe] or SHOR
This command enables/disables electronic short across the Electronic Load input. The actual short condition depends on
the active mode and its active operating range. If a mode or range is changed, the short will be reapplied to the new mode
or range.
Parameter: OFF or 0; ON or 1
Example: “INP:SHOR 0” – disables the short across the input.
INP:REL
Programming OFF closes the relay contacts; programming ON opens them.
Syntax INPut:RELay [STATe]
Param
eters 0 | 1; CLOSE | OPEN; OFF | ON
MEASure
This subsystem queries and returns the current, voltage, and power at the input of the Electronic Load.
MEAS:CURR[:DC]?
Returns the Electronic Load input current value to the buffer.
MEAS:VOLT[:DC]?
Returns the Electronic Load input voltage value to the buffer.
MEAS:DEL
This command is to sets or queries the delay time to obtain read back value for “MEAS:VOLT?” and “MEAS:CURR?” queries.
Parameter: 0 to 100,000 Units: ms.
Example: “MEAS:DEL 600” – sets the delay time to 600 ms.
MODE / MODE?
This subsystem selects and queries the operating mode of the Electronic Load
MODE CC or
This command sets Electronic Load to constant current mode.
MODE CR or
This command sets Electronic Load to constant resistance mode.
MODE CV or
This command sets Electronic Load to constant voltage mode.
MODE:CURR
MODE:RES
MODE:VOLT
Measurement Query
Mode Selection Command/Query
MODE CP or
This command sets Electronic Load to constant power mode.
MODe:RANGe
This command sets the range after the mode is set.
Parameters: 0 – 3
MODE:POW
i. low range
ii. middle range
iii. high range
iv.ultra range
4-9
Page 96

Example: “MODE:RES” – sets the Electronic Load in CR mode;
“MODE:RANG 2” – sets the Electronic Load in high range;
“MODE:RANG? CR” – queries the range for CR mode.
TRANsient Transient Programming Function
This subsystem programs the transient functions of three transient modes: CONTinous, PULSe, TOGGle. The input
levels (TLEVel) and slew rate (SLEW) are programmed from the current, resistance, power and voltage subsystems.
TRAN[:STATe]
This command enables or disables the transient or
| 0 disables it.
Parameter: ON | 1, OFF | 0
Example: “TRAN ON” – enables the transient function
DUTY
This command sets pulse duty cycle, as a percentage of the total cycle, of continuous transient mode. If the Electronic
Load is operating in another mode, the duty cycle is stored until the Load changes to continuous mode.
Parameter: 2 to 98; MIN; MAX Unit: %
Example: “CURR:DUTY 50” – sets a 50% duty cycle for transient current mode.
FREQ
This command sets pulse frequency of continuous transient mode in Hz. If the Electronic Load is operating in another
mode, the pulse frequency is stored until the Load changes to continuous mode.
Parameter: 0.25 to 20000; MIN; MAX Unit: Hz
Example: “CURR:FREQ 1000” – sets a 1000Hz frequency for transient current mode.
stepping function. The parameter ON | 1 enables the function and OFF
SLEW
This command sets the power slew rate for the active mode. The programmed slew
INP:ON or OFF. The hardware implementation selects a slew rate that is closest to the SLEW value. To determine the
actual value, use the query SLEW?.
Parameter: 0 to maximum value; MIN; MAX Unit: Depending on mode
Example: “SLEW 6”- sets the slew rate to 6.
rate is in effect for all changes exce
pt
4-10
Page 97

TRAN:TWID
This command sets pulse width of pulse transient mode in millisecond. If the Electronic Load is operating in another
mode, the pulse width is stored until the Load is powered cycle.
Parameter: 0.05 to 10000 Unit: ms
Example: “TRAN:TWID 800” – sets the pulse width to 800 ms.
Query syntax: “TRAN:TWID?”
Returned parameter: Pulse width value in second.
STEP
This subsystem programs the stepping functions for stepping mode. The number of loops, step values, and dwell times
are programmed for a specified operating mode.
UTIL:STEP:LOOP
This command sets the number of loops the stepping operation will repeat.
Parameter: 0 to 99
Example: “UTIL:STEP:LOOP 10” - sets the number of loops to 10.
If Parameter is set to 0, the loops will repeat indefinitely.
UTIL:STEP:COUNT
This command sets the number of steps activated
Parameter: 1 to 99
Example: UTIL:STEP:COUNT 5” – sets the number of steps to 5.
STEP:MODE <STEP COUNT> <MODE>
This command sets the step number for a specified operating mode.
Parameter for Step count: 0 to 99
Parameter for Mode: 0 (CV); 1 (CC); 2 (CR); 3 (CP)
Example: “STEP:MODE 0 1” – sets to step 0 (first step) in the Constant Current (CC) mode
Note: All steps must be set to same mode and same range.
STEP:VALue <STEP COUNT> <VALUE>
This command sets the step value for a specified step.
Parameter for Step count: 0 to 99
Parameter for Value: 0 to maximum value of operating mode range
Example: “STEP:VAL 0 5” – sets step 0 to 5Amps(CC Mode)
Step Programming Functions
STEP:TIME <STEP COUNT> <TIME>
This command sets the step (dwell) time for a specified step.
Parameter for Step count: 0 to 99
Parameter for Time: 10ms to 600,000ms(10min)
Example: “
UTILITY
This subsystem sets or queries Menu configurations.
UTIL:MEAS:SENSE
This command sets or queries the measurement sense (Local / Remote ).
Parameter: 0 | 1 (0 – Local; 1 – Remote)
Example: UTIL:MEAS:SENS 1 – sets measurement sense to remote sense
Utility Functions
STEP:TIME
0 1000” –
sets time to 1000ms for step 0 (first step)
4-11
Page 98

UTIL:EOI
This command sets or queries the end of string (EOS) mode for read back.
Parameter: 0 … 1 (0 – NONE; 1 – CR)
Example: UTIL:EOI 1 – sets the EOS mode to CR
UTIL:TR:MODE
This command sets or queries the transient mode.
Parameter: 0 … 3 (0 – CONTINUOUS; 1 – STEPPING; 2 – PULSE; 3 – TOGGLE)
Example: UTIL:TR:MODE 0 – sets the transient mode to continuous.
UTIL:CURR <VAL>
This command sets or queries the Electronic Load C value setting.
Example: UTIL:CURR 10.0 – sets C value to 10.0.
UTIL:RANG <VAL>
This command sets or queries the range mode.
Parameters: 0 – Manual range
1 – Auto range
Example: UTIL:RANG 0 – Sets the electronic load to manual range.
SYST:RANG?
This command returns the number of ranges for each mode in a “CV/CC/CR/CP” sequence.
Example: SYST:RANG? – returns “1/2/3/2” means 1 range for CV mode, 2 ranges for CC mode, 3
ranges for CR mode and 2 ranges for CP mode.
COMMON COMMANDS
A common command begins with an * and consists of three letters. It is followed by a “?” if it is a query. They are
generally not related to specific device operation but to perform the identical function for all instruments that are
compliant with the IEEE488.2 standard. Common commands can be mixed in with regular Electronic Load commands.
The eLOAD responds to 8 common commands that control internal operation, status and event registers, and system data.
*CLS Clear Status Command
This command clears the Status Byte summary register and all event register.
*ESR? Event Status Register Query
This command queries the Standard Event Status register. Reading it clears it.
*IDN? Identification Query
This query requests the Electronic Load to identify itself.
*STB? Status Byte Query
This query reads the Status Byte Register. Reading the register does not clear it.
*TRG Trigger Command
This command generates a trigger to the Electronic Load.
*TST? Test Query
This query causes the Electronic Load to go through a self-test.
*SAV Save Command
This command stores the present state and calibration data to internal back-up flash memory.
It returns the model num
ber of the unit.
4-12
Page 99

COMMAND LIST
COMMAND FORMAT ACTION
INPUT enable INP[?] 0/1/OFF/ON
INP[:STAT][?] 0/1/OFF/ON
SHORT enable SHOR 0/1/OFF/ON
INP:SHOR[:STAT][?] 0/1/OFF/ON
SET commands
SET value SET[?] MAX/MIN
SET Voltage VSET[?] MAX/MIN
VOLT[:LEV][:IMM][?] MAX/MIN
VOLT[:LEV]:TRIG[?] MAX/MIN
SET Current ISET[?] MAX/MIN
CURR[:LEV][:IMM][?] MAX/MIN
CURR[:LEV]:TRIG[?] MAX/MIN
SET Resistance RSET[?] MAX/MIN
RES[:LEV][:IMM][?] MAX/MIN
RES[:LEV]:TRIG[?] MAX/MIN
SET Power PSET[?] MAX/MIN
POW[:LEV][:IMM][?] MAX/MIN
POW[:LEV]:TRIG[?] MAX/MIN
TRANSIENT commands
TRANsient enable TR[?] 0/1/OFF/ON
TLEV transient level TLEV[?] MAX/MIN
TRansient Volatge VTR[?] MAX/MIN
VOLT:TLEV[?] MAX/MIN
TRansient Current ITR[?] MAX/MIN
CURR:TLEV[?] MAX/MIN
TRansient Resistance RTR[?] MAX/MIN
RES:TLEV[?] MAX/MIN
TRansient Power PTR[?] MAX/MIN
POW:TLEV[?] MAX/MIN
SLEW rate value SLEW[?] MAX/MIN
SLEW rate Voltage VOLT:SLEW[?] MAX/MIN
SLEW rate Current CURR:SLEW[?] MAX/MIN
S
LEW rate Resistance RES:SLEW[?] MAX/MIN
SLEW rate Power POW:SLEW[?] MAX/MIN
DUTY cycle DUTY[?] MAX/MIN
DUTY Voltage VOLT:DUTY[?] MAX/MIN
DUTY Current CURR:DUTY[?] MAX/MIN
DUTY Resistance RES:DUTY[?] MAX/MIN
DUTY Power POW:DUTY[?] MAX/MIN
FREQuency FREQ[?] MAX/MIN
FREQuency voltage VOL
FREQuency current CURR:FREQ[?] MAX/MIN
FREQuency resistance RES:FREQ[?] MAX/MIN
FREQuency power POW:FREQ[?] MAX/MIN
T:FREQ[?] MAX/MIN
QUERY commands
MEASure Voltage MEAS:VOLT[:DC][?]
MEASure Current MEAS:CURR[:DC][?]
MEASure DELay MEAS:DEL[?]
4-13
Page 100

PROTECTION commands
OVER Voltage value VOLT:PROT:OVER[?]
OVER Current value CURR:PROT:OVER:[?]
OVER Power value POW:PROT:OVER:[?]
UNDER Voltage value VOLT:PROT:UND[?]
UNDER Current value CURR:PROT:UND[?]
UNDER Power value POW:PROT:UND[?]
OVER-V Time Delay VOLT:PROT:OVER:DEL[?
OVER-C Time delay CURR:PROT:OVER:DEL[?]
OVER-P Time delay POW:PROT:OVER:DEL[?]
UNDER-V Time Delay VOLT:PROT:UND:DEL[?]
UNDER-C Time delay CURR:PROT:UND:DEL[?]
UNDER-P Time delay POW:PROT:UND:DEL[?]
LIMIT commands
LIMIT Voltage MAX VOLT:LIM:MAX[?]
LIMIT Current MAX CURR:LIM:MAX[?]
LIMIT Resistance MAX RES:LIM:MAX[?]
LIMIT Power MAX POW:LIM:MAX[?]
LIMIT Voltage MIN VOLT:LIM:MIN[?]
LIMIT Current MIN CURR:LIM:MIN[?]
LIMIT Resistance MIN RES:LIM:MIN[?]
LIMIT Power MIN POW:LIM:MIN[?]
MODE and RANGE commands
MODE Query MODe?
CURR MODE MODe CC
MODe:CURR
VOLT MODE MODe CV
MODe:VOLT
RES MODE MODe CR
MODe:RES
POW MODE MODe CP
MODe:POW
MODE RANGE MODe:RANGe <n> 0…3
MODe:RANGe? <MODE>
SYSTEM RANGE SYST:RANGe[?]
STEP commands
Utility STEP LOOP UTIL:STEP:LOOP[?] <VAL>
Utility STEP COUNT UTIL:STEP:COUNT[?] <VAL>
STEP MODE STEP:MODE[?] <STEP COUNT> <MODE> (Must be in same mode and range)
STEP VAL STEP:VAL[?] <STEP COUNT> <VAL>
STEP TIME STEP:TIME[?] <STEP COUNT> <VAL>
UTILITY commands
Utility MEASure SENSE UTIL:MEAS:SENSE
Utility End Of Identifier UTIL:EOI
Utility TRansient Mode UTIL:TR:MODE
Utility Current value UTIL:CURR[?] <VAL> C value
Utility Range Operation UTIL:RANG[?] <VAL>
4-14
 Loading...