

Page 1

©AMERIPHONE products are manufactured by Walker, A Division of Plantronics, Inc.
12082 Western Avenue, Garden Grove, CA 92841
(800) 874-3005 VOICE • (800) 772-2889 TTY/TDD • (714) 897-4703 FAX
email: ameriphonecs@plantronics.com website: www.ameriphone.com
®
Page 2
Users’ Guide
© AMERIPHONE®XL-50 5270-2911 A 4/03
∆
M46902 XL-50
XL
XL-50 AMPLIFIED TELEPHONE
The Extra Powerful
with lighted keypad!
E
N
G
L
I
S
H
F
R
A
N
Ç
A
I
S
®
Page 3

IMPORTANT INSTRUCTIONS
Important Safety
Instructions
When using your telephone
equipment, basic safety precautions
should always be followed to
reduce the risk of fire, electric
shock and persons including the
following:
1.Read and understand all
instructions.
2.Follow all warnings and
instructions marked on the
telephone.
3.Do not use this telephone
near a bathtub, wash basin,
kitchen sink or laundry tub, in
a wet basement, near a
swimming pool or anywhere
else there is water.
4.Avoid using a telephone
(other than a cordless type)
during a storm. There may be
a remote risk of electrical
shock from lightning.
5.Do not use the telephone to
report a gas leak in the
vicinity of the leak.
6.Unplug this telephone from
the wall outlets before
cleaning. Do not use liquid
cleaners or aerosol cleaners
on the telephone. Use a damp
cloth for cleaning.
7.Place this telephone on a
stable surface. Serious damage
and/or injury may result if the
telephone falls.
8.Do not cover the slots and
openings on this telephone.
This telephone should never
be placed near or over a
radiator or heat register. This
telephone should not be
placed in a built-in installation
unless proper ventilation is
provided.
9.Operate this telephone using
the electrical voltage as
stated on the base unit or the
owner’s manual. If you are
not sure of the voltage in your
home, consult your dealer or
local power company.
10. Do not place anything on
the power cord. Install the
telephone where no one will
step or trip on the cord.
11. Do not overload wall outlets
or extension cords as this
can increase the risk of fire or
electrical shock.
12. Never push any objects
through the slots in the
telephone. They can touch
dangerous voltage points or
short out parts that could
result in a risk of fire or
electrical shock. Never spill
liquid of any kind on the
telephone.
13. To reduce the risk of electrical
shock, do not take this phone
Page 4

E
N
G
L
I
S
H
Important Safety
Instructions
apart. Opening or removing
covers may expose you to
dangerous voltages or other
risks. Incorrect reassembly
can cause electric shock when
the appliance is subsequently
used.
14. Unplug this product from the
wall outlets and refer
servicing to the manufacturer
under the following conditions:
A. When the power supply
cord or plug is frayed or
damaged.
B. If liquid has been spilled
into the product.
C. If the telephone has been
exposed to rain or water.
D. If the telephone does not
operate normally by
following the operating
instructions. Adjust only
those controls that are
covered by the operating
instructions. Improper
adjustment may require
extensive work by a
qualified technician to
restore the telephone to
normal operation.
E. If the telephone has been
dropped or the case has
been damaged.
F. If the telephone exhibits a
distinct change in performance.
15. Never install telephone
wiring during a lightning
storm.
16. Never install telephone
jacks in wet locations
unless the jack is specifically
designed for wet locations.
17. Never touch uninsulated
telephone wires or terminals
unless the telephone line
has been disconnected at
the network interface.
18. Use caution when installing
or modifying telephone lines.
19. Use only the power cord
and batteries indicated in
this manual. Do not dispose
of batteries in a fire. They
may explode. Check with
local codes for possible
special disposal instructions.
ADDITIONAL SAFETY NOTES
FOR CANADIAN USERS
The following items are included
as part of the CS-03 Requirements.
The standard connecting
arrangement for the equipment is
CA11A. This product meets the
applicable Industry Canada
technical specifications.
NOTICE: The Canadian
Department of Communications
Page 5

Important Safety
Instructions
label identifies certified equipment.
This certification means that the
equipment meets certain
telecommunications network
protective operational and safety
requirements. The Department
does not guarantee that the
equipment will operate to the
user’s satisfaction. Before installing
this equipment, users should
ensure that it is permissible to be
connected to the facilities of the
local telecommunications company.
The equipment must also be
installed using an acceptable
method of connection. In some
cases, the company’s inside
wiring associated with a single
line individual service may be
extended by means of a certified
connector assembly (telephone
extension cord). The customer
should be aware that compliance
with the above conditions may not
prevent degradation of service in
some situations. Repairs to certified
equipment should be made by an
authorized Canadian maintenance
facility designated by the supplier.
Any repairs or alterations made
by the user to this equipment, or
equipment malfunctions, may give
the telecommunications company
cause to request the user disconnect
the equipment.
Users should ensure for their own
protection that the electrical
ground connections of the power
utility, telephone lines and inter nal
metallic water pipe system, if
present, are connected together.
This precaution may be particularly
important in rural areas.
CAUTION: Users should not
attempt to make such connections
themselves, but should contact the
appropriate electric inspection
authority, or electrician, as
appropriate. The Ringer Equivalent
Number is an indication of the
maximum number of terminals
allowed to be connected to a
telephone interface. The
termination on an interface may
consist of any combination of
devices subject only to the
requirement that the sum of the
Ringer Equivalent Number of all
the devices not exceed five.
SAVE THESE INSTRUCTIONS
Page 6

E
N
G
L
I
S
H
Contents
Introducing the XL-50
Warranty Service..............................................................................1
Sales Receipt....................................................................................1
Help from Ameriphone ......................................................................1
Package Checklist..............................................................................2
Features ..........................................................................................3
Setting up Your XL-50
Installing the Backup Batteries ............................................................4
Setting the Dial Mode ........................................................................5
Connecting for Desk or Wall Mount ..................................................5
Desktop Use ..............................................................................5
For Wall Mounting......................................................................6
Using Your XL-50
Incoming Voice Volume ......................................................................7
Incoming Voice Tone..........................................................................8
Ringer Volume and Tone ....................................................................8
Hold................................................................................................8
Last Number Redial ..........................................................................9
Flash................................................................................................9
Special Features
Unanswered Call/Voice Mail Message Light ......................................10
Programming the Memory Buttons......................................................10
Direct Audio Output ........................................................................11
Cochlear Implant Adapter Cord ........................................................12
Connecting to Speech Processor........................................................12
Regulator y Compliance ....................................................................13
Warranty ........................................................................................19
Troubleshooting Chart ......................................................................21
Specifications ..................................................................................21
Index..............................................................................................22
Page 7

Help from Ameriphone
For help with using your XL-50, call
our Customer Relations department
at 800-874-3005.
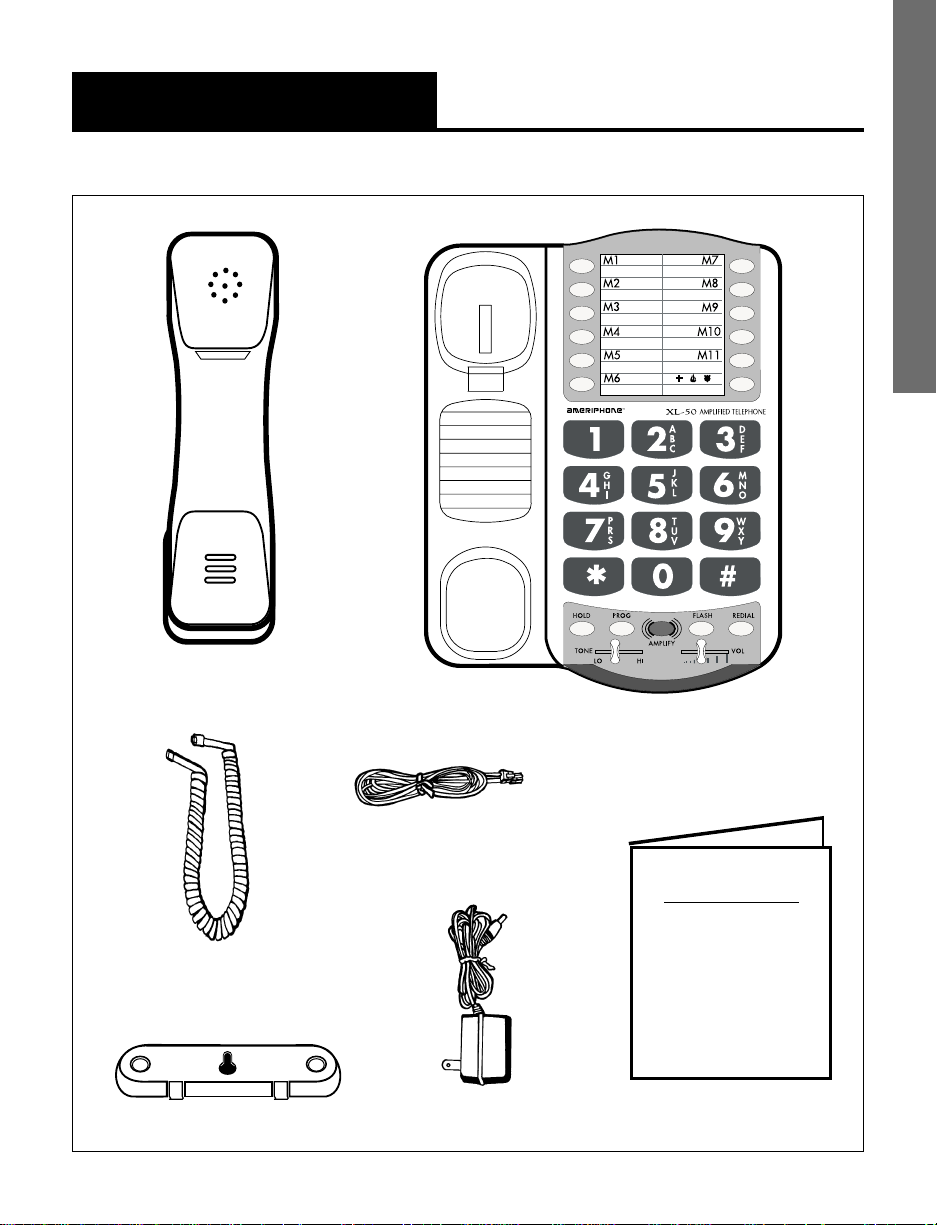
Please make sure your XL-50
package includes the items shown
in Figure 1.
1
Introducing the XL-50
Thank you for selecting the XL-50
Amplified Telephone from
Ameriphone. These Operating
Instructions and the associated
Quick Operating Guide provide
you with the information you
need to use your XL-50 effectively,
easily and safely. Read this
manual thoroughly before using
your telephone. Keep the manual
near the telephone for easy
reference.
Warranty Ser vice
Your telephone is designed to
provide years of quality service.
But, should the phone malfunction
and the Trouble-shooting Chart
on page 21 not resolve the
problem, follow the Warranty
procedure on page 19.
Sales Receipt
Be sure to save your sales receipt
as proof of purchase date should
you need warranty service.
Page 8
E
N
G
L
I
S
H
2
Package Checklist
OPERATING
INSTRUCTIONS
AND
QUICK GUIDE
XL-50
Handset
Base Unit
Telephone Line Cords
Handset
Coil Cord
Operating Guides
Figure 1 - Package Components
Mounting Bracket
AC Adapter
Page 9
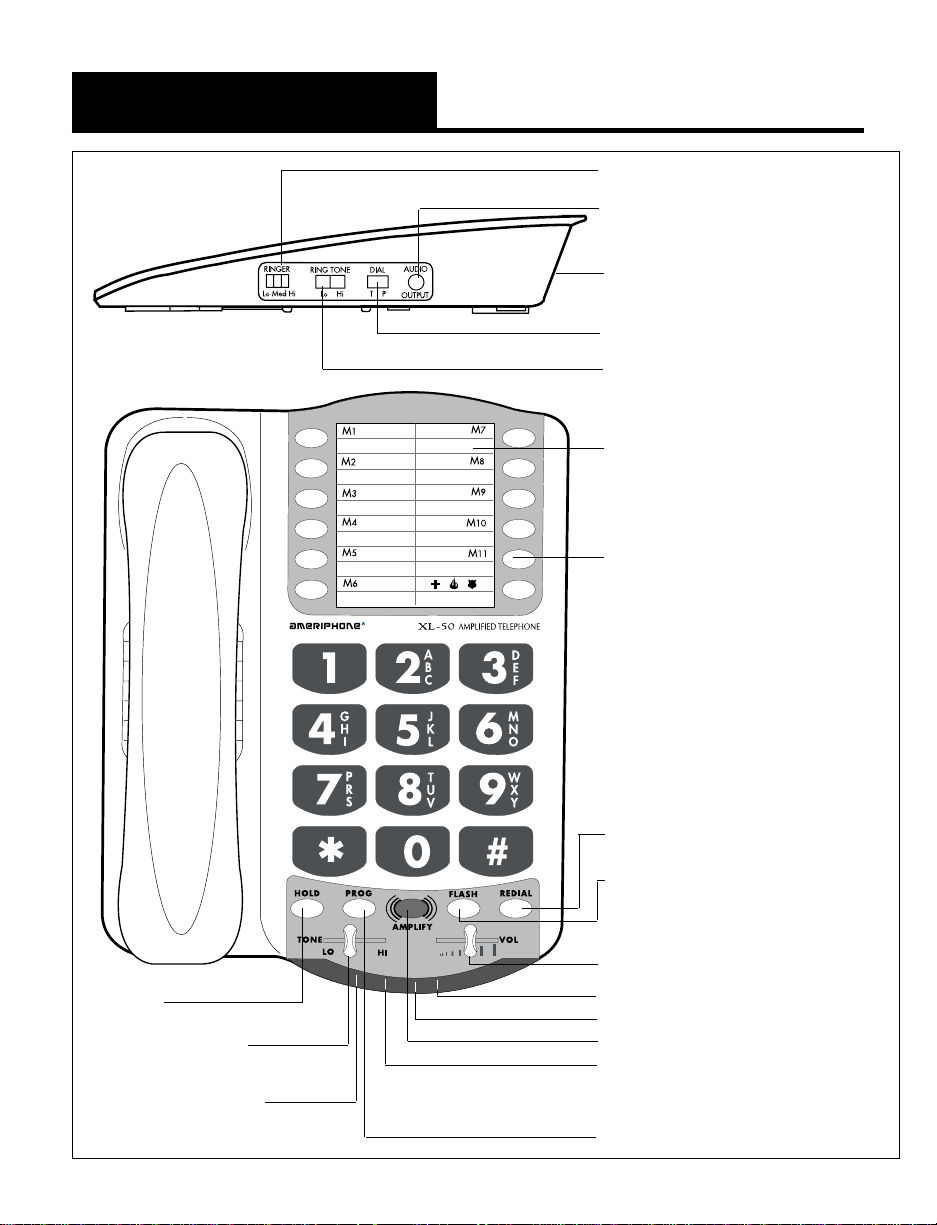
3
Features on the XL-50
RINGER volume switch
AUDIO OUTPUT jack
AC adapter and phone
line connection
TONE/PULSE switch
RING TONE switch
Phone number
directory
MEMORY button
REDIAL button
FLASH button
VOL volume slider
LOW BATTERY indicator
RING flasher
AMPLIFY button
AMPLIFY/MISSED CALLS/
VOICE MAIL/EXTENSION
IN USE indicator
PROG program button
TONE
slider
HOLD
button
Figure 2 - Base Unit Controls
HOLD
indicator
Page 10
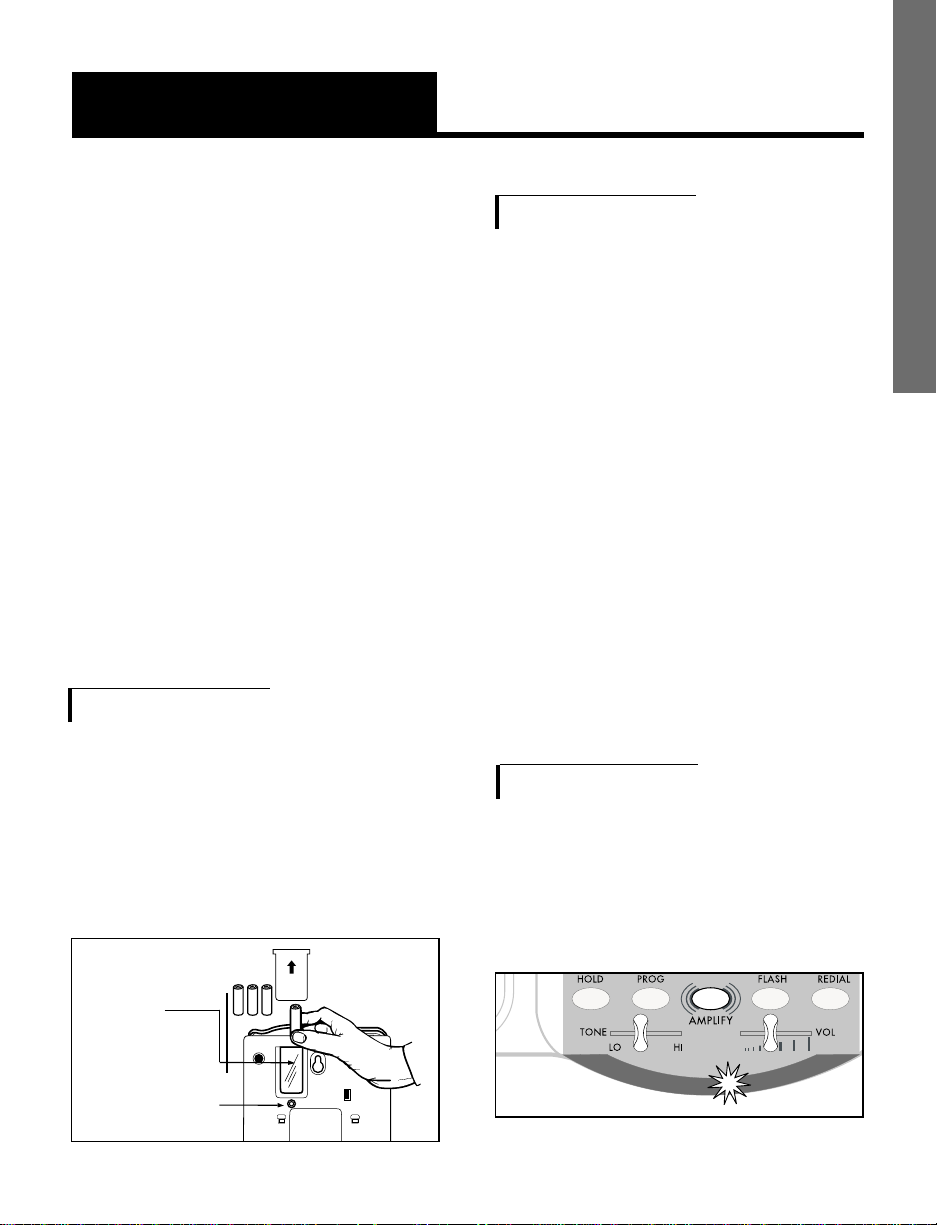
Insert 4 AA
batteries
here
Press in
here with a
tip of a pen
to open
4
Setting up Your XL-50
There are five initial steps involved
in setting up your XL-50.
1. Insert four AA alkaline batteries
for back-up in case of AC
power outage.
2.Decide if you want the
phone to sit on a desk or
hang on the wall.
3. Connect the telephone
components.
4.Program up to 12 telephone
numbers to call with the
press of a memory button.
5.Set up special features
Installing the Backup Batteries
If there is a power outage, the
XL-50 will operate for up to 48
hours with four AA alkaline
backup batteries (not included). If
the phone is not in use, the batteries
will stay charge for several months.
To install new batteries:
1.Slide open the batter y
compartment cover on the
bottom of the telephone
(Figure 3).
2.Install four fresh batteries. Be
sure to observe batter y polarity
as imprinted on the base of
the
compartment. The batter y
indicator
on the top panel will
light up if the batteries are
running low.
The phone operates as a regular
phone if there is no power or battery
.
XL-50 Low Batter y Indicator
If the batteries are weak or not
installed, the Low Battery indicator
will light up. Install fresh batteries
according to the directions above.
E
N
G
L
I
S
H
Figure 3 - Accessing the Batteries
Figure 4 - Low Battery Indicator Light
Page 11

Setting the Dialing Mode
Set the dial mode switch to T
(tone) if you have touch tone
service. Set the switch to P (pulse)
if you have rotary dialing.
Connecting for Desk or Wall Mount
For Desktop Use
1.Connect one end of the
telephone line cord to the
“Line” jack on the back of
the XL-50 and the other end
to the phone outlet on your
wall. Connect the handset
cord to the telephone as
shown in Figure 5.
2.Plug the AC adapter into an
electric outlet and into the
AC jack on the telephone as
shown in Figure 5.
5
Setting up Your XL-50
(continued)
3.Lift the handset and listen for
a dial tone.
The phone is ready to use.
For W
all Mounting
1.Pull the handset hook out of
the base as shown in Figure
6 and reverse its position so
that the hook points up and
will hold the handset when
you hang up.
2.Insert the tabs of the phone
base into the slots in the
lower position of the base as
shown in Figure 7. Push the
mounting bracket in and
down firmly until it snaps into
place.
M
1
M
2
M
5
M
6
M
7
M
8
M
9
M
1
0
M
1
1
M
3
M
4
Figure 5 - Connecting the Components
Line Cord
AC Adapter
Handset
(Curly)
Cord
Figure 6 - Reversing the Hook
Page 12

E
N
G
L
I
S
H
6
Setting up Your XL-50
(continued)
3.Locate a desired wall phone
jack near an AC outlet and
hold phone upright.
4.Plug the short phone line
cord into the wall outlet as
shown in Figure 8.
5. Angle the phone downward
to feel for the LOWER
protruding nail head. Insert
the WALL JACK'S nail head
into the LOWER part of the
M
ANUAL
AU
TO
Figure 7 - Mounting Bracket
for Wall Mounting
phone's mounting bracket.
6. Once the lower nail head
has been inserted, insert the
UPPER nail head into the
phone's bracket and slide
the phone down until it is
firmly in place on the wall.
7. Once firmly in place, attach
the short line cord to the
phone, the AC adapter to
the phone and attach the
phone's handset.
8. Plug the AC adapter into the
AC wall outlet. Lift the
handset and listen for a dial
tone. The phone is now
ready to use.
Figure 8 - Wall mounting installation
M
A
N
U
A
L
A
U
T
O
- Short phone
line cord
Page 13
7
Using Your XL-50
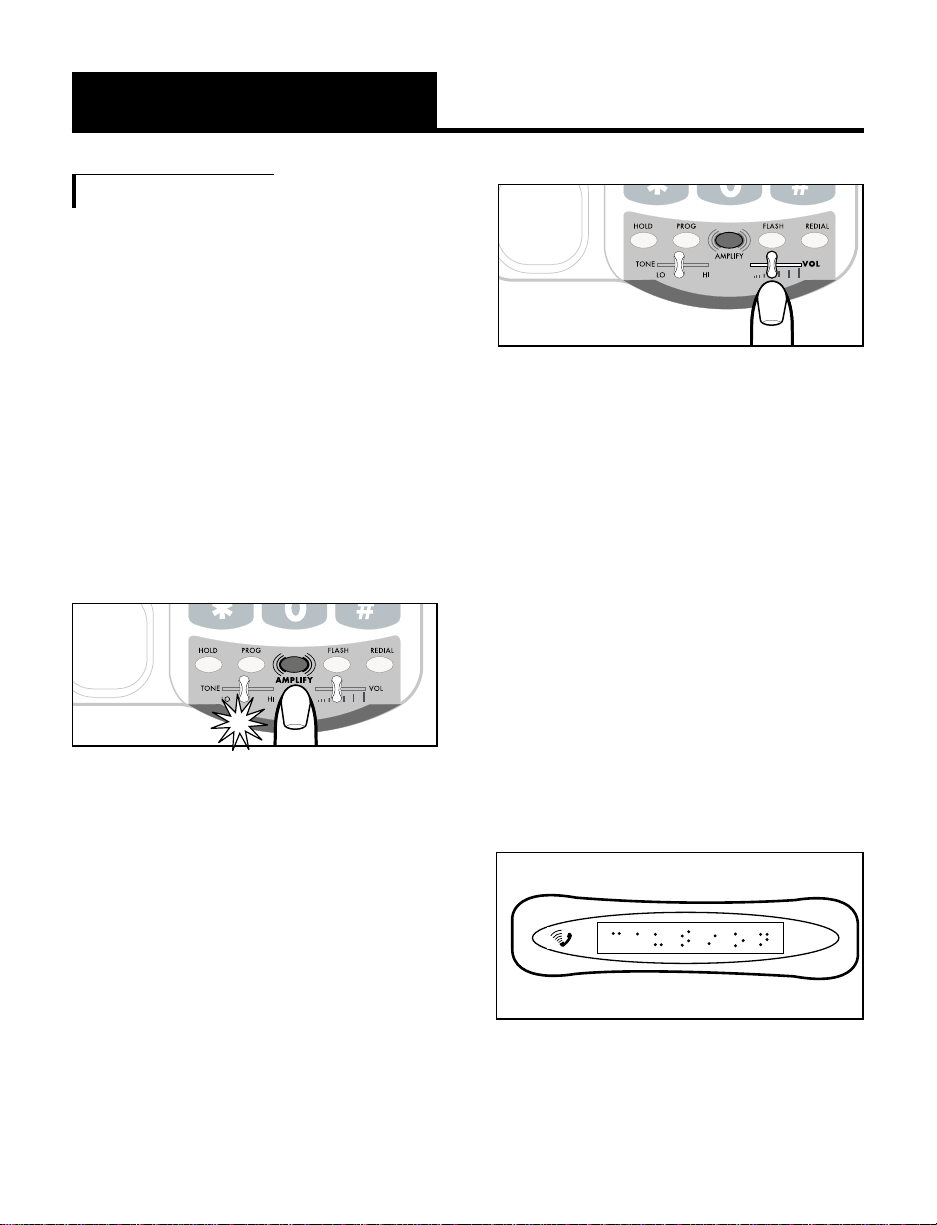
Caution: Repeated incremental
exposure to amplification levels
greater than 18 dB may be
harmful
to individuals without
hearing disabilities
. Therefore, do
not remove the warning label
attached to the back of the
handset. If it is likely that a
visually impaired person will use
the
telephone, securely attach the
provided
warning printed in
Braille to the back of the handset
(See Diagram A).
Diagram A
Incoming Voice Volume
You can adjust the volume of
incoming
calls by simply sliding
the VOL control. This gives you up
to 18 dB more volume. If you
want more amplification, follow
the directions below.
1. Press the AMPLIFY button as
shown in Figure 9 to turn the
incoming voice amplifier on or
off. When AMPLIFY is on, the
AMPLIFY indicator comes on.
2.Adjust the ear piece volume
while on a call by moving the
VOL slide control in Figure 10.
With AMPLIFY on, incoming
volume will be up to 48dB
louder .
Figure 9 - AMPLIFY Button
and Indicator
Figure 10 - Volume Slide Control
OLUME
CAUTION
USE WITH
LOUD
Page 14
E
N
G
L
I
S
H
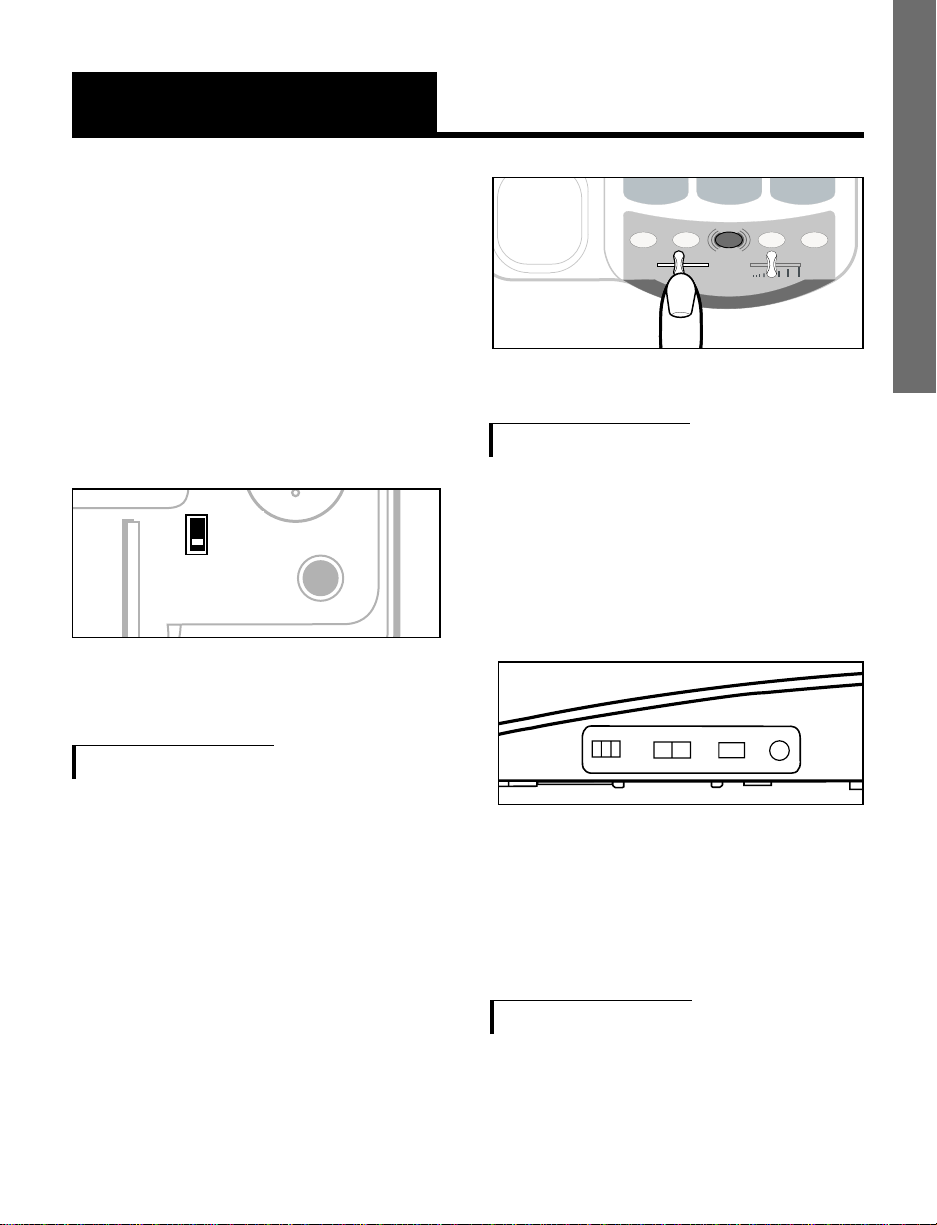
Note: In standard use, the
amplifier turns off when you hang
up the telephone. This is a useful
feature if many people use the
phone. If you want the amplifier to
always remain on, slide the
Volume Reset Override switch on
the bottom of the phone to ON, as
shown in Figure 11.
Incoming Voice Tone
The XL-50 provides extra
amplification in the sound frequency
range you need to boost. To
identify the range that best suits
your needs, follow these steps:
1.When you hear a voice on the
line, press the AMPLIFY button
shown in Figure 9.
2.Adjust the TONE slide control in
Figure 12 to suit your hearing.
8
Using Your XL-50
(Continued)
Ringer Volume and Tone
1.You can adjust the RINGER
VOLUME as high as 95+
decibels. The settings available
are LO, MED and HI as shown
in Figure 13.
2.The RING TONE has two pitch
settings: LO and HI.
Hold
To put the line on hold, press the
HOLD button and return the handset
to its cradle. You will notice the
HOLD indicator light comes on.
0
#
HOLD PROG
TONE
LO HI
FLASH REDIAL
VOL
AMPLIFY
*
Figure 12 - Tone Slide Control
RINGER
RING TONE DIAL
AUDIO
OUTPUT
Lo Med Hi
T P
Lo Hi
Figure 13 - Ringer Volume & Pitch
MANUAL
AUTO
Figure 11 - Volume Reset Override
On/Off
- OFF
- ON
Volume
Reset
Override
Page 15

9
Using Your XL-50
(Continued)
Flash
Press the FLASH button shown in
Figure 16 to access special
services available from your local
phone company such as Call
Waiting and 3-Way Calling.
Figure 16 - Flash Button
Figure 15 - Redial Button
Note: If you pick up an extension
phone on the same line when the
XL-50 is on HOLD, the XL-50 will
release the HOLD, and you can
continue your conversation on the
extension phone.
Last Number Redial
To redial the last number called,
lift the handset and press REDIAL.
The phone will redial up to 31
digits.
Figure 14 - Hold Button and
Indicator
Page 16

E
N
G
L
I
S
H
10
or an answering machine after 1
ring, provided that you set the
switch underneath the phone to
Missed Calls. The light will
continue to flash until the handset
is lifted or AC power is disconnected.
Note: this feature does not require
any optional telephone company
services.
It is useful when you are away for
a short time while expecting a
call. If you don’t want any
notification, set the switch on OFF.
Programming the Memor y Buttons
You can automatically dial twelve
programmed telephone numbers
using the memory buttons shown
in Figure 19. Each button can be
programmed (or reprogrammed
using the same procedure) for a
phone number up to 15 digits
long.
Unanswered Call/Voice Mail
Message Light
If you subscribe to voice mail
messaging with your telephone
company, this light flashes if you
have a message waiting.
Note: To turn the Voice Mail
feature on or off, adjust the switch
underneath the phone.
If you do not have voice mail
service, the same indicator
functions as a missed call
indicator. It flashes if an incoming
call is not answered by a person
Special Features
Figure 17 - Voice Mail Indicator
VMAIL
MISSED CALL
OFF
Figure 18 - Voice Mail Switch
Figure 19 - Memory Buttons
Page 17

11
Special Features
(continued)
4.Press a memor y button (Figure
19) to store this number on that
button.
5.Immediately hang up the
handset.
Note: Any number previously
stored at that memory button
will be overwritten.
6.To change a stored number,
repeat the programming
process starting with step 1.
Note: Please do not program 911
in any memory button.
Direct Audio Output
The AUDIO OUTPUT socket allows
you to connect the XL-50 to a
hearing aid, neck loop, cochlear
implant or other assistive listening
devices.
Figure 22 - Audio Output
Socket
To program a button, follow these
steps:
1. Lift the handset and press
PROG as shown in Figure 20.
2.Enter the phone number on the
keypad (Figure 21) just as you
would dial it normally.
Note: Press REDIAL if you want
to insert a brief pause between
two numbers.
3.Press PROG (Figure 20) once
again.
Figure 20 - PROG Button
Figure 21 - Telephone Keypad
Page 18

E
N
G
L
I
S
H
12
To use this port, plug in a
compatible cable and connect it to
your assistive listening device.
Speak into the handset when you
use the Audio Output connection.
Cochlear Implant Adapter Cor
d
A cochlear adapter cord is
available from Ameriphone that
can be used to directly connect the
XL-50 to a speech processor.
Connecting the
Speech Processor:
Caution: Before plugging any cord
into your speech processor, you
must consult your implant
manufacturer.
•Plug the mono end of the plug
into the speech processor.
•Plug the stereo end of the plug
into the Audio Output socket on
the phone.
•Speak into the handset when
using the Cochlear Implant
Adapter Cord.
Figure 23 - Connection of
Speech Processor
Special Features
(continued)
WARNING! During thunderstorms,
avoid using telephones other than
cordless models. Electric shock
from lightning can occur.
Page 19

13
Regulator y Compliance
Part 68 of FCC Rules
Information
This equipment complies with Part
68 of the FCC rules and the
requirements adopted by the
ACTA. On the bottom of this
equipment is a label that contains,
among other information, a
product identifier in the format
US:AAAEQ##TXXXX. If requested,
this
number must be provided to the
telephone company.
A plug and jack used to connect
this equipment
to the premises
wiring and telephone network
must comply with the applicable
FCC Part 68 rules and requirements
adopted by the ACTA. A compliant
telephone cord and modular plug
,
RJ11 USOC, is provided with this
product. It is designed to be
connected to a compatible modular
jack that is also compliant. See
installation instructions for details.
The REN is used to determine the
number of devices that may be
connected to a telephone line.
Excessive RENs on a telephone
line may result in the devices not
ringing in response to an incoming
call. In most but not all areas, the
sum of RENs should not exceed
five (5.0). To be certain of the
number of devices that may be
connected to a line, as determined
by the total RENs, contact the
local telephone company. For
products approved after July 23,
2001, the REN for this product is
part of the product identifier that
has the format US:AAAEQ##TXXXX.
The digits represented by ## are
the REN without a decimal point
(e.g., 03 is a REN of 0.3). For
earlier products,
the REN is
separately shown on the label.
If this telephone equipment, the
XL-50 telephone causes harm to
the telephone network, the
telephone company will notify you
in advance that temporary
discontinuance of service may be
required. But if advance notice
isn’t practical, the telephone
company will notify the customer
as soon as possible. Also, you will
be advised of your right to file a
complaint with the FCC if you
Page 20

E
N
G
L
I
S
H
14
believe it is necessary.
The telephone company may
make changes in its facilities,
equipment, operations or procedures
that could affect the operation of
the equipment. If this happens the
telephone company will provide
advance notice in order for you to
make necessary modifications to
maintain uninterrupted service.
If trouble is experienced with this
telephone equipment, for repair or
warranty information, please contact
Walker / Ameriphone, 1-800874-3005. If the equipment is
causing harm to the telephone
network, the telephone company
may request that you disconnect
the equipment until the problem is
resolved.
DO NOT DISASSEMBLE THIS
EQUIPMENT.
This telephone equipment is not
intended to be repaired and it
contains no repairable parts.
Opening the equipment or any
attempt to perform repairs will
void the warranty. For service or
repairs, call 1-800-874-3005.
Connection to party line ser vice is
subject to state tariffs. Contact the
state public utility commission,
public service commission or
corporation commission for
information.
If your home has specially wired
alarm equipment connected to the
telephone line, ensure the
installation of this telephone
equipment does not disable your
alarm equipment. If you have
questions about what will disable
alarm equipment, consult your
telephone company or a qualified
installer.
This telephone equipment is
hearing aid compatible.
We recommend the installation of
an AC surge arrester in the AC
outlet to which this equipment is
connected. The telephone
companies report that electrical
surges, typically lighting transients,
are very destructive to customer
terminal equipment connected to
AC power sources.
Regulator y Compliance
(continued)
Page 21

15
Customer-Owned Coin/Credit
Card Phones:
To comply with state tariffs, the
telephone company must be given
notification prior to connection. In
some states, the state public utility
commission, public service
commission or corporation
commission must give prior
approval of connection.
Part 15 of FCC Rules
Information
This device complies with part 15
of the FCC Rules. Operation is
subject to the following two
conditions: (1) This device may
not cause harmful interference,
and (2) this device must accept
any interference received,
including interference that may
cause undesired operation.
Your XL-50 Telephone has been
tested and found to comply with
the limits of a Class B digital
device, pursuant to Part 15 of
FCC rules. These limits are
designed to provide reasonable
protection against harmful
interference in residential
installation.
This equipment generates, uses,
and can radiate radio frequency
energy and, if not installed and
used in accordance with the
instructions, may cause harmful
interference to radio communications.
However, there is no guarantee
that interference will not occur in
a particular installation; if this
equipment does cause harmful
interference to radio or television
reception, which can be determined
by turning the equipment off and
on, you are encouraged to try to
correct the interference by one of
the following measures:
1.Where it can be done safely,
reorient the receiving
television or radio antenna.
2.To the extent possible,
relocate the television, radio
or other receiver with respect
to the telephone equipment.
Regulator y Compliance
(continued)
Page 22

E
N
G
L
I
S
H
16
Regulator y Compliance
(continued)
(This increases the separation
between the telephone
equipment and the receiver.)
3.Connect the telephone
equipment into an outlet on a
circuit difference from that
to which the television, radio,
or other receiver is connected.
4.Consult the dealer or an
experienced radio/TV
technician for help.
CAUTION: Changes or
modifications not expressly
approved by the manufacturer
responsible for compliance could
void the user’s authority to operate
the equipment.
THE PARTY RESPONSIBLE
FOR PRODUCT COMPLIANCE
Ameriphone Products by Walker,
A Division of Plantronics, Inc.
12082 Western Avenue
Garden Grove, CA 92841
Telephone: 800-874-3005
Industr y Canada Technical
Specifications
This product meets the applicable
Industr y Canada technical
specifications.
Before installing this equipment,
users should ensure that it is
permissible to be connected
to the
facilities of the local
telecommunications company. The
equipment must also be installed
using an acceptable method of
connection. In some cases, the
company’s inside wiring
associated with a single line
individual service may be
extended by means of a certified
connector assembly (telephone
extension cord). The customer
should be aware that compliance
with the above conditions may not
prevent degradation of service in
some situations.
Repairs to certified equipment
should be made
by an authorized
Canadian maintenance
facility
designated by the supplier. Any
repairs
or alterations made by the
Page 23

17
Regulator y Compliance
(continued)
user to this equipment, or
equipment malfunctions, may give
the telecommunications company
cause
to request the user to
disconnect the equipment.
Users should ensure for their own
protection that the electrical
ground connections of the power
utility, telephone lines and inter nal
metallic water pipe system, if
present, are connected together.
This precaution may be particularly
important in rural areas.
Caution: Users should not attempt
to make such connections
themselves, but should contact the
appropriate electric inspection
authority, or electrician, as
appropriate.
The Ringer Equivalence Number is
an indication of the maximum
number of terminals allowed to be
connected to a telephone interface.
The termination on an interface
may consist of any combination of
devices subject only to the
requirement that the sum of the
Ringer Equivalence Numbers of all
the devices does not exceed five.
[The term “IC:” before the
certification/registration number
only signifies that the Industry
Canada technical specifications
were met.]
Page 24

E
N
G
L
I
S
H
18
Page 25

19
Warranty
This warranty applies only to
Ameriphone products that are
purchased and used in the United
States or Canada.
Ameriphone warrants the XL-50
telephone against any defect in
materials or workmanship for the
period of one year from the date
of purchase.
If your Ameriphone product is
defective and returned within 30
days of the date of pur-chase, your
Ameriphone dealer will replace it
at no charge.
If returned after 30 days but within
one year from the date of
purchase, we will repair or replace
it at no charge. In the repair of
your XL-50, we may use new or
reconditioned replacement parts.
If we elect to replace your XL-50,
we may replace it with a new or
reconditioned product of the same
or similar design. Repair or
replacement will be warranted for
either 90 days or the remaining
time on the original warranty
period, whichever is longer.
Implied warranties, including
those of fitness for a particular
purpose and merchantability (an
unwritten warranty that the
product is fit for ordinary use), are
limited to one year from date of
purchase. We will not pay for loss
of time, inconvenience, loss of use
of your XL-50 phone, or property
damage caused by your XL-50
phone or its failure to work, or
any other incidental or consequential
damages. Some states do not
allow limitations on how long an
implied warranty lasts or the
exclusion of incidental or
consequential damages, so the
above exclusions or limitations
may not apply to you.
To get warranty ser vice for your
XL-50 phone, you must provide
proof of the purchase date. Within
30 days of the date of purchase,
return your XL-50 to the place
where you purchased it for
immediate replacement. After 30
days, call Ameriphone at (800)
874-3005 voice or 800-7722889 TTY for the authorized
service center nearest you. You
Page 26

20
Warranty
must prepay all shipping costs.
We suggest you save the original
package materials in the event
you need to ship the XL-50. When
shipping for warranty repair,
include your name, address,
phone number, proof of date of
purchase, and a description of the
problem. After repairing the
product, we, (or the service
center) will ship it back to you at
no cost within the United States
and Canada. CANADIAN
RESIDENTS: call Ameriphone at
800-874-3005, 800-772-2889
TTY for instructions.
This warranty does not cover
defects resulting from accidents,
damage while in transit to our
service location, alterations,
unauthorized repair, failure to
follow instructions, misuse, use
outside the United States or
Canada, fire, flood, and acts of
God. Nor do we warrant the
product to be compatible with any
particular telephone equipment,
party line, key telephone systems
or more sophisticated switching
systems.
If your XL-50 is not
covered by this warranty, call us
at (800) 874-3005 voice or
800-772-2889 TTY for advice as
to whether we will repair your
XL-50 and other repair
information. The repair shall be
warranted for 90 days.
E
N
G
L
I
S
H
Page 27

21
Specifications
Maximum gain
High frequency (3kHz): 48dB
Wide band (300 to 3000Hz):
36dB
Tone control range
Full range: 300 to 3000Hz using
one slide control.
Dimensions
Size: 9
1
/2
" x 7" x 3
1
/4
"
Weight: 2.52 lbs.
Power Requirements
AC Adapter: 9VDC, 300 mA
Batteries: 4 AA alkaline batteries
(not included)
Troubleshooting Chart
The chart below will help you
solve most problems that may
arise during operation of your
telephone. Should the difficulty
continue, contact Ameriphone or
your authorized dealer for
assistance.
CAUSE AND
CORRECTIVE
ACTION
Check all phone
cord connections.
No number stored in
that memory
button. See:
“Programming the
Memory buttons”, P. 10.
See “Setting Up
Your Phone” to reset
the dial mode
switch, P. 4, 5.
1. Check that line
cord is not loose.
2.Check that AC
adapter is
plugged in.
1.Unplug the
AC adapter.
2.Remove backup
batteries.
3.Then, plug in the
AC adapter
and reinstall
batteries.
SYMPTOM
No dial tone
No number
dialed when
memory
button pressed
Call cannot
be dialed,
or dials
very slowly
Call comes in
but phone
does not ring.
Phone locks up.
No functions
operate
Page 28

E
N
G
L
I
S
H
22
Index
Cochlear Implant
Adapter Cord ..................12
Connecting for Desk or Wall Mount
Desktop Use ......................5
Wall Mount ......................5
Connecting the Speech
Processor ........................12
Direct Audio Output ..............11
Features ................................3
Flash......................................9
Help from Ameriphone ............1
Hold ......................................8
Incoming Voice Tone ................8
Incoming Voice Volume............7
Installing the Backup Batteries ..4
Last Number Redial ................9
Package Checklist ..................2
Programming the
Memory Buttons ..............10
Ringer Volume and Tone ..........8
Sales Receipt ........................1
Setting the Dialing Mode..........5
Troubleshooting ....................21
Unanswered Call/voice mail
Message Light..................10
Warranty Service ....................1
Ameriphone products are
manufactured by Walker,
A Division of Plantronics, Inc.
© 2002 Plantronics, Inc. All rights
reserved. Ameriphone, Amplifying
Your Life, and Walker are
trademarks or registered
trademarks of Plantronics, Inc.
Page 29

M03699 XL-50
XL
XL-50 AMPLIFIED TELEPHONE
Manuel d'utilisation
Le téléphone à Amplification très
forte et très claireavec clavier eclaire!
F
R
A
N
Ç
A
I
S
©AMERIPHONE® XL-50french 5270-2911 A 4/03
∆
®
Page 30

RENSEIGNEMENTS IMPORTANTS
SUR LA SÉCURITÉ
E. Si l’appareil à été échappé ou s’il semble
être endommagé.
F. Si le rendement de l’appareil est nettement
réduit.
RENSEIGNEMENTS SUPPLÉMENT AIRES À
L’INTENTION DES UTILISATEURS CANADIENS
AVIS: L’étiquette du ministère des Communications
du Canada identifie le matériel homologué. Cette
étiquette certifie que le matériel est conforme à
certaines normes de protection, d’exploitation et de
sécurité des réseaux de télécommunications. Le
ministère ne garantit pas toutefois que le matériel
fonctionnera à la satisfaction de l’utilisateur.
Avant d’installer le présent matériel, l’utilisateur doit
s’assurer qu’il est permis de le raccorder aux
installations de l’entreprise locale de télécommunications.
Le matériel doit également être installé selon une
méthode de raccordement approuvée. L’abonné ne
doit pas oublier que malgré le respect des conditions
énoncées ci-dessus, il se peut qu’il y ait dégradation
du service dans certaines situations. Le matériel
homologué doit être réparé par un centre d’entretien
canadien autorisé désigné par le fournisseur. La
compagnie de télécommunications se réserve le
droit de demander à un utilisateur de débrancher un
appareil s’il a effectué des réparations ou des
modifications ou si l’appareil fonctionne mal.
Pour sa propre protection, l’utilisateur doit s’assurer
que tous les fils de mise à la terre de la source
d’énergie électrique, des lignes téléphoniques et des
canalisations d’eau métalliques, s’il y en a, sont
raccordés ensemble. Cette précaution est
particulièrement importante dans les régions rurales.
MISE EN GARDE: L’utilisateur ne doit pas tenter de
faire les raccordements de mise à la terre lui-même;
il doit avoir recours à un service d’inspection
des installations électriques ou à un électricien, le
plus tôt possible.
AVIS: Le facteur de charge attribué à chaque
appareil permet de déterminer le nombre total de
téléphones pouvant être raccordés à une même
ligne. Pour éviter les surcharges, la somme des
facteurs de charge des appareils raccordés à la
ligne ne doit pas dépasser 100, quel que soit le
modèle utilisé.
CONSERVEZ CES INSTRUCTIONS
Lorsque vous utiliserez votre téléphone, suivez
toujours les mesures de sécurité de base suivantes
afin de réduire les risques d’incendie, de choc
électrique et de blessures.
1.Lire et bien comprendre toutes les instructions.
Se conformer à tous les avertissements et à
toutes les instructions marqués sur l’appareil.
2.Pendant un orage électrique, ne pas utiliser de
téléphone autre qu’un téléphone sans cordon. Il
pourrait y avoir un léger risque de choc électrique.
3.Ne pas utiliser le téléphone près d’une fuite de
gaz. Si vous croyez qu’il y a une fuite de gaz,
signalez celle-ci immédiatement en utilisant un
téléphone qui ne se trouve pas à proximité de la
fuite de gaz.
4.Ne pas utiliser le téléphone dans un endroit
humide ou lorsque vous êtes mouillé. Par exemple,
ne pas l’utiliser sous la douche, près d’une piscine,
d’une baignoire, d’un lavabo de cuisine ou de
salle de lavage, ni dans un sous-sol humide. Ne
pas utiliser de nettoyeurs liquides ou en aérosol.
Si un liquide quelconque est renversé sur l’appareil,
débranchez la prise téléphonique et le cordon
d’alimentation immédiatement. Ne pas le brancher
de nouveau avant qu’il soit complètement sec.
5.Ne pas placer cet appareil dans un endroit où
les cordons risquent d’être piétinés. Protéger les
cordons de tout dommage ou frottement.
6.Si l’appareil ne fonctionne pas normalement, lire
la section "En cas de difficultés". Si vous ne trouvez
pas la solution à votre problème ou si l’appareil
est endommagé, reportez-vous à la garantie
d’Ameriphone. Ne pas ouvrir l’appareil sauf pour
suivre les instructions contenues dans ce manuel.
L’ouverture et l’assemblage de l’appareil peuvent
exposer l’utilisateur à des tensions dangereuses
ou à d’autres risques. L’ouverture de l’appareil
entraîne automatiquement l’annulation de la
garantie.
7.Débrancher l’appareil de la prise murale et confier
toute réparation à un technicien qualifié dans
les conditions suivantes:
A.Si le cordon est endommagé.
B. Si un liquide a été renversé sur l’appareil.
C.Si l’appareil a été exposé à la pluie ou à
l’humidité.
D.Si l’appareil ne fonctionne pas normalement
quand les instructions d’utilisation sont
respectées, ne faites que les rajustements
qui sont expliqués dans ce manuel d’utilisation
car vous pourriez l’endommager davantage.
Page 31

F
R
A
N
Ç
A
I
S
TABLE DES MATIÈRES
CHAPITRE 1: INTRODUCTION ..............................................................................2
CHAPITRE 2: LISTE DES PIÈCES ..............................................................................2
CHAPITRE 3: COMMANDES ET CARACTÉRISTIQUES ................................................3
CHAPITRE 4: INSTALLATION
A. Installation sur bureau........................................................................4
B. Installation au mur ............................................................................4
C. Pile .................................................................................................5
CHAPITRE 5: UTILISATION DE XL-50
A. Amplificateur....................................................................................6
B. Bouton d’amplification ......................................................................6
C. Sélecteur de tonalité ........................................................................7
D. Volume et tonalité de la sonnerie........................................................7
E. Indicateur visuel de la sonnerie ..........................................................8
F. Appel en garde................................................................................8
G. Recomposition du dernier numéro ......................................................8
H. Programmation des numéros fréquemment composés ............................8
I. Composition des numéros mémorisés ..................................................9
J. Prise audio directe ............................................................................9
K. Commutateur..................................................................................10
L. Boîte Vocale/Appels Manqués ........................................................10
M. Cordon pour implant cochléair ........................................................11
CHAPITRE 6: EN CAS DE DIFFICULTÉS ..........................................................12
CHAPITRE 7: GARANTIE ............................................................................13
CHAPITRE 8: DESCRIPTION DE L’APPAREIL ......................................................14
INDEX ..................................................................................................... 14
Page 32

CHAPITRE 1
INTRODUCTION
Veuillez vous assurer que toutes les
pièces suivantes se trouvent bien dans
la boîte:
Base du socle
Fig. 1- Liste des pièces
Cordon spiralé Manuel d’utilisation
du combiné
Cordons modulaires
XL-50
MANUEL
d'utilisation
et fiche
d'utilisation rapide
CHAPITRE 2
LISTE DES PIÈCES
Merci d’avoir choisi le nouveau
téléphone XL-50 d’AMERIPHONE,
Inc. Ce téléphone a été conçu pour
répondre aux normes de qualité les
plus élevées afin que vous puissiez
l’utiliser sans problème pendant des
années.
Warranty Service
Lisez attentivement les instructions
sui-vantes avant d’utiliser votre
téléphone. Conservez ce manuel
pour référence ultérieure.
Sales Receipt
Conservez votre reçu de caisse
comme preuve d’achat pour tout
service couvert par la garantie.
Help from Ameriphone
Si vous avez des questions au sujet
de votre téléphone XL-50,
téléphonez à notre Ser vice à la
au (714) 897-0808.
Combiné
AC Adapter
1
Page 33

F
R
A
N
Ç
A
I
S
Fig. 2- Commandes et caractéristiques de XL-50
Volume de la sonnerie
Prise audio directe
Adapteur et prise
téléphonique
Composition par
Tonalité/Impulsions
Tonalité de la sonnerie
Répertoire téléphonique
Touches mémoire
Touche de Recomposition
Commutateur FLASH
Contrôle du Volume
Indicateur de pile usée
Voyant de la sonnerie
Touche d’Amplification
V oyant d’Amplification/Boîte
vocale/Appels manqués/
Autre poste en ligne
Touche de programmation
Réglage de
la tonalité
Bouton de
mise en
attente
Indicateur de
mise en attente
CHAPITRE 3
COMMANDES ET CARACTÉRISTIQUES
2
Page 34

CHAPITRE 4
INSTALLATION
Pour installer et brancher votre
téléphone XL-50 sur un bureau ou au
mur, suivez les étapes ci-dessous:
A. Installation sur bureau
1.Réglez le sélecteur de mode
de composition à T si vous
avez le service par tonalité.
Réglez le sélecteur sur P pour
le mode de composition à
impulsions (cadran rotatif).
2.Branchez le cordon de
raccordement dans la prise du
socle. (Voir fig. 3)
3.Branchez le cordon du combiné
dans l’appareil. (Voir fig. 3)
4.Décrochez et vérifiez si vous
avez la tonalité.
5.Vous êtes maintenant prêt à
utiliser votre téléphone
XL-50.
B. Installation au mur
1. Glissez le crochet du combiné
vers le haut et l’enlevez.
Tournezle d’un demi-tour et
remettez-le en place afin qu’il
supporte bien le combiné. (Voir
fig. 4)
2. Insérez les languettes de la base
du socle dans les ouvertures à
cette fin. Poussez-les fermement
vers le bas jusqu’à ce qu’elles
s’enclenchent. (Voir fig. 5)
3. Utilisez le cordon modulaire
court et installez le téléphone au
mur comme l’indique la figure 6.
4. Voir la section “Installation sur
bureau” et reprendre les étapes
de 1 à 5.
Fig.3- Raccordement et installation
Fig. 4- Inversement du Crochet
M
1
M
2
M
5
M
6
M
7
M
8
M
9
M
1
0
M
1
1
M
3
M
4
3
Page 35

F
R
A
N
Ç
A
I
S
CHAPITRE 4
(SUITE)
C. Pile
Utilisez 4 piles Alkalines AA non
rechargeable de (non incuse) pour
augmenter la luminosité de la lampe de
la sonnerie. Pour installer la pile et afin
d’éviter tout choc électrique,
débranchez le cordon téléphonique
avant d’installer la pile, puis connectez
la pile (Fig. 7). Enfin, reconnectez le
cordon téléphonique. Répétez ces
étapes à chaque fois que vous
remplacez une pile usagée.
Fig. 5 - Installation de la base du
socle
Fig. 6 - Installation au mur
Fig. 7 - Installation de la pile
M
A
N
U
A
L
A
U
T
O
M
A
N
U
A
L
A
U
T
O
Insert
batteries
here
Press in
here
to open
battery
compartment
4
Page 36

CHAPITRE 5
UTILISATION DE
XL-50
ramène au réglage précédent de
l’amplificateur, et un voyant rouge
s’allume. Lorsque vous raccrochez, la
désactivation se fait automatiquement.
Attention:
Une exposition répétée et
de plus en plus intense à des
degrés d'amplification supérieurs à
18 dB peut être dangereuse pour
les personnes ne souffrant pas de
troubles auditifs. Il est donc
vivement recommandé de
ne pas retirer l'étiquette de mise
en garde appliquée à l'arrière du
combiné. Si une personne
malvoyante est susceptible
d'utiliser le téléphone, fixez de
manière sûre l'avertissement
imprimé en Braille à l'arrière du
combiné (schéma A).
Le téléphone XL-50 a été conçu pour
vous faciliter les communications. Il
comprend de nombreuses
caractéristiques pratiques et faciles à
utiliser.
A. Amplificateur
L’amplificateur augmente le volume
de la voix de votre interlocuteur de 0
à plus de 47 décibels. L’échelle
graduée indique la force du volume.
Choisissez le volume désiré en glissant
le bouton de réglage. Activez ou
désactivez l’amplificateur en appuyant
sur la touche AMPLIFY comme
l’indique la section suivante. Pour que
l’amplificateur soit allumé en permanence, voir le pararaphe suivant et la
Fig. 10.
B. Bouton d’amplification
Appuyez sur AMPLIFY pour activer ou
désactiver l’amplificateur. Lorsque la
touche AMPLIFY est activée, cela vous
Fig. 8
P
E
0
#
HOLD PROG
TONE
LO HI
FLASH REDIAL
VOL
AMPLIFY
*
Fig. 9
O
P
E
0
#
HOLD PROG
TONE
LO HI
FLASH REDIAL
VOL
AMPLIFY
*
Schéma A
5
CAUTION
USE WITH
LOUD
VOLUME
Page 37

F
R
A
N
Ç
A
I
S
C. Sélecteur de tonalité
Avec le sélecteur de tonalité, vous
entendez des sons forts, clairs et
faciles à comprendre. Cela vous
permet d’accentuer les fréquences des
sons que vous entendez le mieux.
1. Lorsque vous avez une personne en
ligne, appuyez sur AMPLIFY
2. Ajustez le sélecteur de tonalité
(TONE) jusqu’à ce que vous
entendiez bien.
D. Volume et tonalité de
la sonnerie
Vous pouvez régler le volume de la
sonnerie de votre téléphone XL-50 afin
de l’adapter à votre niveau. Lorsque
placé sur HI (élevé), le volume de la
sonnerie atteint 95+ décibels.
Vous pouvez régler la tonalité de la
sonnerie en ajustant les fréquences à
votre niveau.
CHAPITRE 5
(SUITE)
P
E
0
#
HOLD PROG
TONE
LO HI
FLASH REDIAL
VOL
AMPLIFY
*
Fig. 11
Remarque: En mode d'utilisation
normale, l'amplificateur s'éteint dès
que vous raccrochez. Ceci est très
pratique lorsque plusieurs personnes
utilisent le même combiné. Si vous
désirez que l'amplificateur reste
toujours allumé, placez sur ON le
bouton de neutralisation
d'amplification (Volume Reset
Override) situé en dessous de
l'appareil (Fig. 10).
Fig. 10
MANUAL
AUTO
OFF
ON
VOLUME
RESET
OVERRIDE
6
Page 38

CHAPITRE 5
(SUITE)
G. Recomposition du dernier
numéro
Le téléphone XL-50 enregistre le
dernier numéro composé (jusqu’à 31
chiffres). Décrochez et appuyez
simplement sur
REDIAL
pour
recomposer le dernier numéro.
H. Programmation des numéros
fréquemment composés
Pour vous permettre de composer un
numéro plus rapidement, votre
appareil est muni de douze touches
de mémorisation. Vous pouvez
programmer un numéro dans chaque
O
P
E
0
#
HOLD PROG
TONE
LO HI
FLASH REDIAL
VOL
AMPLIFY
*
P
E
0
#
HOLD PROG
TONE
LO HI
FLASH REDIAL
VOL
AMPLIFY
*
Fig. 14
Fig. 15
E. Indicateur Visuel de la sonnerie
La lampe de la sonnerie est d’une
luminosité normale. Si vous voulez
augmenter la luminosité de la lampe
losque le téléphone sonne, installez
une pile non rechargeable de 9 Volts
au dos au téléphone (Chap. 4 sec. C).
F. Appel en garde
Pour mettre un appel en garde,
appuyez simplement sur
HOLD
et
raccrochez. Le voyant rouge
s’allumera. Si vous reprenez la
conversation à un autre poste sur la
même ligne, le XL-50 raccrochera de
lui-même.
RINGER
RINGER PITCH
AUDIO
OUTPUT
Lo Med Hi
T P
Lo Hi
Fig. 12
P
E
0
#
HOLD PROG
TONE
LO HI
FLASH REDIAL
VOL
AMPLIFY
*
Fig. 13
7
Page 39

F
R
A
N
Ç
A
I
S
3. Appuyez sur la touche PROG
une autre fois (Fig. 17).
4. Appuyez sur une des touches de
mémorisation (Fig. 16) lorsque
vous êtes prêt à enregistrer le
numéro désiré et raccrochez
immédiatement.
5. Le numéro est maintenant
enregistré dans la touche de
mémorisation choisie.
6. Pour changer un numéro déjà en
mémoire, reprendre à l’étape 1.
NB: Nous vous recommandons de ne
pas programmer 911 dans les
touches mémoires.
I. Composition des numéros
mémorisés
Décrochez le combiné et appuyez
simplement sur la touche de
mémorisation choisie pour composer
le numéro qui y est enregistré.
J. Prise audio directe
La prise audio directe vous permet de
vous brancher directement à cet
appareil lorsque vous portez une aide
auditive. Pour vous connecter,
branchez à la prise audio un cable
CHAPITRE 5
(SUITE)
touche (un maximum de 15 chiffres
par numéro) en suivant les étapes
ci-dessous:
1. Décrochez et appuyez sur la
touche PROG.
2. Entrez le numéro de téléphone
comme si vous le composiez.
O
P
E
0
#
HOLD PROG
TONE
LO HI
FLASH REDIAL
VOL
AMPLIFY
*
Fig. 16
TM
DIALOGUE
XL-40
A
B
D
E
M1
M2
M3
M4
M5
M6
M7
M8
M9
M11
M10
Fig. 17
1
A
D
23
Fig. 18
8
B
C
G
H
4
I
789
*
J
K
L
5
P
T
R
U
S
V
O
P
6
E
F
M
N
O
W
X
Y
Page 40

CHAPITRE 5
(SUITE)
L. Boîte vocale/Appels Manqués
Si vous souscrivez à un service de
boîte vocale offert par votre
compa-gnie de téléphone, l’indicateur
(Fig. 21) clignotera lorsqu’un message
a été enregistré. Pour que le voyant
s’allume lorsque vous avez un
message sur votre boîte vocale, réglez
le bouton au dos du téléphone suu la
position Voice Mail.
Si vous n’avez pas de boîte vocale et
que vous souhaitez savoir si vous avez
manqué un appel, réglez le bouton au
dos du téléphone sur Missed Calls. Le
voyant clignotera si le téléphone sonne
une fois au moins et que la personne
raccroche, ou si vous manquez un
appel.
Si vous ne souhaitez pas être notifié
des appels manqués ou des messages
qui attendent sur votre boîte vocale,
réglez le bouton au dos du téléphone
sur Off.
P
E
0
#
HOLD PROG
TONE
LO HI
FLASH REDIAL
VOL
AMPLIFY
*
Figure 21
auxiliaire compatible, puis branchez
l’autre bout à votre aide auditive.
NB: Parlez dans le combiné du
téléphone lorsque vous utilisez la
prise audio directe.
K. Commutateur
La touche commutateur (FLASH) est
utilisée pour avoir accès à certains
services ou fonctions offerts par votre
compagnie de téléphone locale, par
exemple, la mise en attente des
appels, la conférence à trois, etc.
Appuyez sur
FLASH pour activer cette
fonction.
Fig. 19
AUDIO
OUTPUT
T P
O
P
E
0
#
HOLD PROG
TONE
LO HI
FLASH REDIAL
VOL
AMPLIFY
*
Fig. 20
9
Page 41

F
R
A
N
Ç
A
I
S
M. Cordon pour implant
cochléaire
Ameriphone peut fournir un cordon
servant à brancher directement le
XL-50 sur un processeur de parole.
DANGER! Pendant un orage, évitez
d'utiliser le téléphone; la foudre peut
causer une décharge électrique.
Avant de brancher un cordon dans le
processeur de parole, consultez le
fabricant de l'implant.
Branchement du processeur de
parole
• Reliez l'extrémité mono de la fiche
dans le processeur de parole.
• Reliez l'extrémité stéréo de la fiche
dans la douille de sortie audio du
téléphone.
• Si vous utilisez le cordon pour
implant cochléaire, parlez dans le
combiné.
Compatible with ... = Compatible
avec appareils XL-30, XL-40, XL-50,
VCO, JV-35 et CL-40 Ameriphone.
Speech Processor = Processeur de
parole
CHAPITRE 5
(SUITE)
10
Page 42

TEXT
Si votre téléphone XL-50 venait à mal
fonctionner, consulter le guide de
dépannage suivant. Au cas où le
problème persisterait, communiquez
avec Ameriphone ou votre détaillant
autorisé pour obtenir de l’aide.
PROBLÈMES
Pas de tonalité.
Vous appuyez sur
une touche de
mémorisation, mais
rien ne se passe.
Impossibilité de
composer le numéro
ou difficulté à le
composer.
Pas de sonnerie.
Le téléphone «se
bloque» aucune
fonction ne fonctionne.
CAUSES ET
SOLUTIONS
Vérifiez tous les
cordons de
raccordement.
Aucun numéro n’a
été programmé
dans cette touche
de mémorisation.
Voir la section
“Enregistrement des
numéros composés
fréquemment”.
Voir la section
“Installation” pour
régler le mode de
composition.
Vérifiez si le bouton
de la sonnerie n’est
pas positionné sur
“Lo”.
Vérifiez toutes les
connections.
Assurez-vous que
tous les cordons
sont bien raccordés
et branchés.
CHAPITRE 6
EN CAS DE DIFFICULTÉS
11
Page 43

F
R
A
N
Ç
A
I
S
TEXT
TEXT
CHAPITRE 7
GARANTIE
Cette garantie s’applique seulement aux
appareils Ameriphone achetés et utilisés
aux États-Unis et au Canada.
Ameriphone garantit ce téléphone XL-50
contre tous défauts dans les matières
premières et la fabrication pendant l’année
suivant la date d’achat.
Si votre appareil Ameriphone est
défectueux et que vous le retournez dans
les 30 jours suivant la date d’achat, votre
détaillant le remplacera sans frais.
Si vous le retournez après 30 jours mais au
cours de l’année suivant la date d’achat, il
sera réparé ou remplacé sans frais. Des
pièces neuves ou des pièces remises à neuf
peuvent être utilisées pour la réparation. Si
nous choisissons de remplacer votre
téléphone XL-50, il se peut que ce soit par
un téléphone neuf ou remis à neuf du
même modèle ou d’un modèle semblable.
La réparation ou le remplacement sera
garanti pour une période de 90 jours ou
pour la période non écoulée de la garantie
originale, si celle-ci dépasse 90 jours.
Les garanties implicites, y compris celles
touchant des appareils conçus pour un
usage particulier et la valeur marchande
(une garantie non écrite selon laquelle
l’appareil convient à un usage normal), se
limitent à une période d’un an suivant la
date d’achat. Nous ne débourserons aucun
frais entraîné par les pertes de temps, les
inconvénients, l’impossibilité d’utiliser votre
téléphone XL-50, ni pour les dommages
causés à la propriété par votre téléphone
XL-50 ou par son mauvais fonctionnement
ou pour tous autres dommages-intérêts
indirects.
Étant donné que dans certains États, il n’y
a pas de restriction sur la période couverte
par la garantie implicite ni d’exclusion
concernant les dommages-intérêts indirects
par conséquent, ces restrictions ou
exclusions peuvent ne pas s’appliquer.
Pour toutes réparations ou service couverts
par la garantie, joindre une preuve de la
date d’achat. Dans les 30 premiers jours
suivant la date d’achat, retournez votre
téléphone XL-50 au détaillant auprès de qui
vous l’avez acheté, qui vous le remplacera
immédiatement. Après 30 jours, téléphonez
à Ameriphone au numéro suivant: 800874-3005 voix/800-772-2889 TTY/TDD
pour connaître l’adresse du centre de
service le plus près de chez vous. Vous
devez payer à l’avance les frais de
transport. Nous vous suggérons de
conserver l’emballage original au cas où
vous auriez à le retourner. Si vous
retournez votre appareil sous garantie,
veuillez indiquer vos nom, adresse et
numéro de téléphone, et joindre une preuve
de la date d'achat ainsi que la description
du problème. Une fois l'appareil réparé,
nous (ou le centre de réparations) vous le
renverrons gratuitement aux États-Unis ou
au Canada. PERSONNES RÉSIDANT AU
CANADA : Veuillez appeler Ameriphone
au 800-874-3005 ou au 800-772-2889
(TTY) pour connaître la marche à suivre.
Cette garantie ne couvre pas les
dommages attribuables aux accidents, les
dommages causés en transit, ceux
provenant de modifications ou d’une
réparation par un détaillant non autorisé,
d’un défaut de suivre les instructions, d’un
usage impropre, d’un usage hors des
États-Unis ou du Canada, d’un incendie,
d’une inondation ou d’une catastrophe
quelconque. Nous ne garantissons pas que
ce produit est compatible avec toute pièce
de téléphone, avec des lignes communes,
avec n’importe quel téléphone à touches ou
avec des systèmes téléphoniques plus
perfectionnés. Si votre téléphone XL-50
n’est pas couvert par cette garantie,
téléphonez-nous au numéro suivant 800874-3005 voix/800-772-2889 TTY/TDD
pour obtenir des conseils concernant la
réparation de votre appareil. Toute
réparation sera couverte par une garantie
de 90 jours.
12
Page 44

CHAPITRE 8
DESCRIPTION DE L'APPAREIL
DIMENSIONS
Taille: 9
1
/2" x 7 x 3 1/4"
(24.1 x 17.7 x 8.2 cm)
Poids: 2.52 lb. (1 Kg)
PILE
4 Piles Alkalines de type AA
(non incluse)
Adapteur 9V, 300 mA
Amplification
Réglage du volume ..................6
Appel en garde ............................8
Base du socle........................2, 4, 5
Boîte vocale ................................10
Commandes et caractéristiques........3
Commutateur ..............................10
Composition des numéros
mémorisés................................9
Cordons modulaires ......................2
En cas de difficultés......................12
Garantie ....................................13
Installation au mur..........................4
Installation ....................................4
Installation sur bureau ....................4
Lampe de la sonnerie ....................8
Liste des pièces..............................2
Mémorisation ............................... 9
Modes de composition
Impulsions................................4
Tonalité....................................4
Pile ..............................................5
Prise audio directe ........................9
Recomposition ..............................8
Tonalité de la sonnerie....................7
Volume de la sonnerie................3, 7
Voyant lumineux ............................3
Fabriqué aux É.-U.
INDEX
13
 Loading...