

Page 1

©AMERIPHONE products are manufactured by Walker, a Division of Plantronics, Inc.
12082 Western Avenue, Garden Grove, CA 92841
(800) 874-3005 VOICE • (800) 772-2889 TTY/TDD • (714) 897-4703 FAX
email: ameriphonecs@plantronics.com website: www.ameriphone.com
®
Page 2

Operating Instructions
©AMERIPHONE® VCO 5280-2861 A 6/03
∆
M06597
VCO
VCO
The “Read and Talk” Telephone
ENGLISH
FRANÇAIS
ESPAÑOL
®
Page 3

Contents
Important Safety Instructions...............................................................................................................1
Introducing the VCO .........................................................................................................................4
Warranty Service..............................................................................................................................4
Sales Receipt ....................................................................................................................................4
Help from Ameriphone.......................................................................................................................4
Package Checklist .............................................................................................................................5
Features ..........................................................................................................................................6
Setting up Your VCO..........................................................................................................................7
Installing the Backup Batteries.............................................................................................................7
Connecting for Desk or Wall Mount ...................................................................................................7
Desktop Use ..................................................................................................................................7
Wall Mount...................................................................................................................................8
Using Your VCO .............................................................................................................................10
Incoming Voice Volume ...................................................................................................................10
Incoming Voice Tone .......................................................................................................................10
Ringer Volume ................................................................................................................................11
Hold ..............................................................................................................................................11
Last Number Redial .........................................................................................................................11
Flash..............................................................................................................................................12
Special Features ............................................................................................................................13
Unanswered Call Indicator .............................................................................................................13
Programming the Relay Service Number ............................................................................................13
Programming Emergency Calling Message.........................................................................................14
Making Emergency Calls and Sending Emergency Message................................................................15
Programming the Memory Buttons.....................................................................................................16
Making and Answering VCO Calls ...................................................................................................17
Communicating in Text Telephone (TTY/TDD) Mode.............................................................................22
Using Auto Answering Machine........................................................................................................23
Using an External Voice Answering Machine......................................................................................25
Direct Audio Output.........................................................................................................................26
Connecting to the LVD......................................................................................................................27
Connecting to the Q-90 Printer .........................................................................................................27
Connecting to the LVD and the Q-90 Printer.......................................................................................28
Troubleshooting Chart .....................................................................................................................29
FCC Statement ................................................................................................................................29
Warranty........................................................................................................................................34
Specifications..................................................................................................................................36
Page 4

1
Important Safety
Instructions
When using your telephone
equipment, basic safety precautions
should always be followed to
reduce the risk of fire, electric
shock and persons including the
following:
1.Read and understand all
instructions.
2.Follow all warnings and
instructions marked on the
telephone.
3.Do not use this telephone
near a bathtub, wash basin,
kitchen sink or laundry tub, in
a wet basement, near a
swimming pool or anywhere
else there is water.
4.Avoid using a telephone
(other than a cordless type)
during a storm. There may be
a remote risk of electrical
shock from lightning.
5.Do not use the telephone to
report a gas leak in the
vicinity of the leak.
6.Unplug this telephone from
the wall outlets before
cleaning. Do not use liquid
cleaners or aerosol cleaners
on the telephone. Use a damp
cloth for cleaning.
7.Place this telephone on a
stable surface. Serious damage
and/or injury may result if the
telephone falls.
8.Do not cover the slots and
openings on this telephone.
This telephone should never
be placed near or over a
radiator or heat register. This
telephone should not be
placed in a built-in installation
unless proper ventilation is
provided.
9.Operate this telephone using
the electrical voltage as
stated on the base unit or the
owner’s manual. If you are
not sure of the voltage in your
home, consult your dealer or
local power company.
10. Do not place anything on
the power cord. Install the
telephone where no one will
step or trip on the cord.
11. Do not overload wall outlets
or extension cords as this
can increase the risk of fire or
electrical shock.
12. Never push any objects
through the slots in the
telephone. They can touch
dangerous voltage points or
short out parts that could
result in a risk of fire or
electrical shock. Never spill
liquid of any kind on the
telephone.
13. To reduce the risk of electrical
shock, do not take this phone
Page 5

2
Important Safety
Instructions
apart. Opening or removing
covers may expose you to
dangerous voltages or other
risks. Incorrect reassembly
can cause electric shock when
the appliance is subsequently
used.
14. Unplug this product from the
wall outlets and refer
servicing to the manufacturer
under the following conditions:
A. When the power supply
cord or plug is frayed or
damaged.
B. If liquid has been spilled
into the product.
C. If the telephone has been
exposed to rain or water.
D. If the telephone does not
operate normally by
following the operating
instructions. Adjust only
those controls that are
covered by the operating
instructions. Improper
adjustment may require
extensive work by a
qualified technician to
restore the telephone to
normal operation.
E. If the telephone has been
dropped or the case has
been damaged.
F. If the telephone exhibits a
distinct change in performance.
15. Never install telephone
wiring during a lightning
storm.
16. Never install telephone
jacks in wet locations
unless the jack is specifically
designed for wet locations.
17. Never touch uninsulated
telephone wires or terminals
unless the telephone line
has been disconnected at
the network interface.
18. Use caution when installing
or modifying telephone lines.
19. Use only the power cord
and batteries indicated in
this manual. Do not dispose
of batteries in a fire. They
may explode. Check with
local codes for possible
special disposal instructions.
ADDITIONAL SAFETY NOTES
FOR CANADIAN USERS
The following items are included
as part of the CS-03 Requirements.
The standard connecting
arrangement for the equipment is
CA11A. This product meets the
applicable Industry Canada
technical specifications.
NOTICE: The Canadian
Department of Communications
Page 6

3
Important Safety
Instructions
label identifies certified equipment.
This certification means that the
equipment meets certain
telecommunications network
protective operational and safety
requirements. The Department
does not guarantee that the
equipment will operate to the
user’s satisfaction. Before installing
this equipment, users should
ensure that it is permissible to be
connected to the facilities of the
local telecommunications company.
The equipment must also be
installed using an acceptable
method of connection. In some
cases, the company’s inside
wiring associated with a single
line individual service may be
extended by means of a certified
connector assembly (telephone
extension cord). The customer
should be aware that compliance
with the above conditions may not
prevent degradation of service in
some situations. Repairs to certified
equipment should be made by an
authorized Canadian maintenance
facility designated by the supplier.
Any repairs or alterations made
by the user to this equipment, or
equipment malfunctions, may give
the telecommunications company
cause to request the user disconnect
the equipment.
Users should ensure for their own
protection that the electrical
ground connections of the power
utility, telephone lines and inter nal
metallic water pipe system, if
present, are connected together.
This precaution may be particularly
important in rural areas.
CAUTION: Users should not
attempt to make such connections
themselves, but should contact the
appropriate electric inspection
authority, or electrician, as
appropriate. The Ringer Equivalent
Number is an indication of the
maximum number of terminals
allowed to be connected to a
telephone interface. The
termination on an interface may
consist of any combination of
devices subject only to the
requirement that the sum of the
Ringer Equivalent Number of all
the devices not exceed five.
SAVE THESE INSTRUCTIONS
Page 7

Help from Ameriphone
For help with using your VCO, call
our Customer Service Depar tment
at 800-874-3005
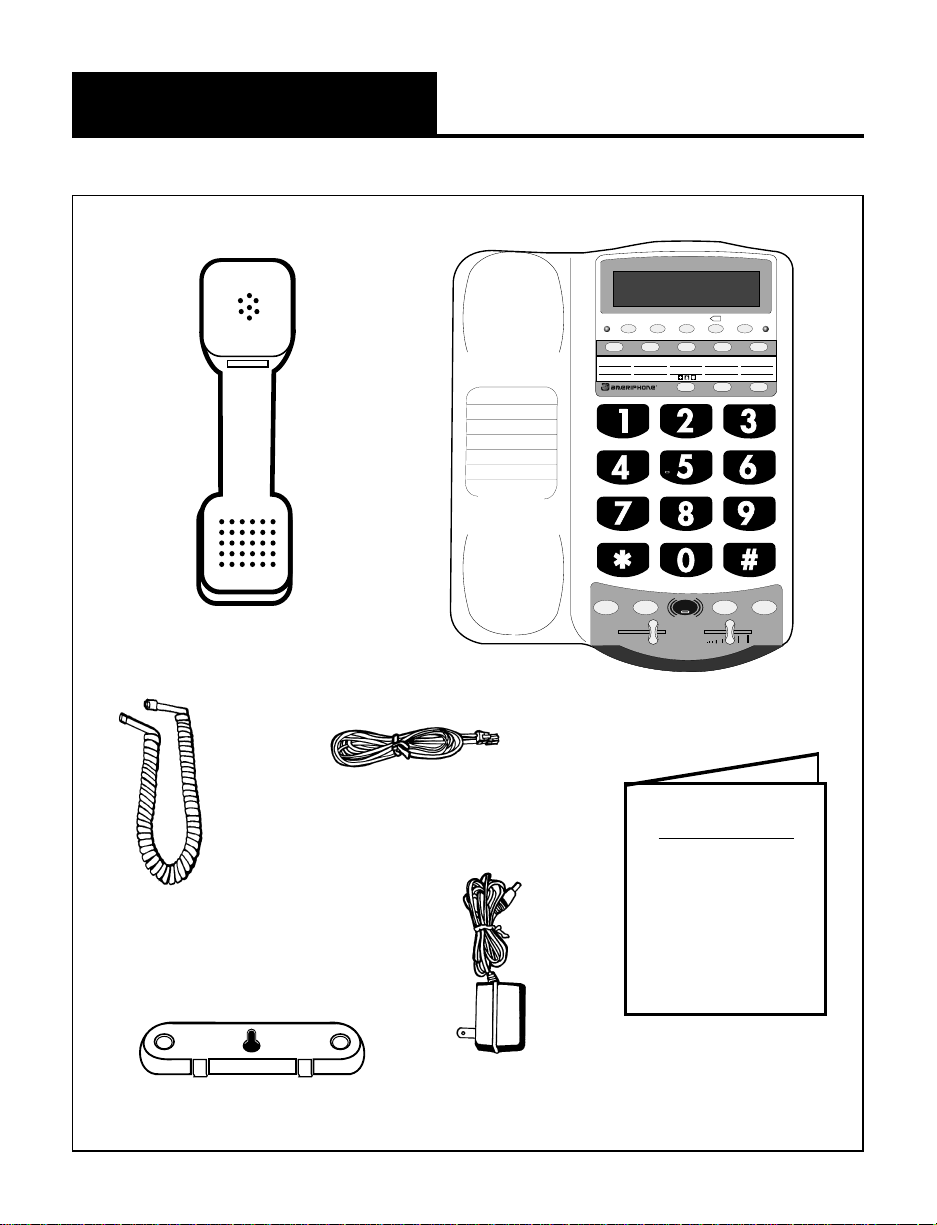
Please make sure your VCO
package includes the items
shown in Figure 1.
4
Introducing the VCO
Thank you for selecting the
VCO Voice Carry Over
amplified telephone from
Ameriphone. These Operating
Instructions and the associated
Quick Operating Guide provide
you with the information you
need to use your VCO effectively
and safely. Read this manual
thoroughly before using your
telephone. Keep the manual near
the telephone for easy reference.
Warranty Ser vice
Your telephone is designed to
provide years of quality service.
But, should the phone malfunction
and the Trouble-shooting Chart
on page 20 not resolve the
problem, follow the Warranty
procedure on page 22.
Sales Receipt
Be sure to save your sales receipt
as proof of purchase date should
you need warranty service.
Page 8
5
Package Checklist
DIALOGUE
VCO
M1
a. a. a. a. a.
POWER
RELAY REL MGS SPACEAUTO ANS
SIGNAL
M2 M3 M4 M5
SELECT MEMORY b
X
HOLD PROG
LO
HI
FLASH REDIAL
TONE
VOL
AMPLIFY
A
B
C
G
H
I
T
U
V
W
X
Y
P
R
S
J
K
L
M
N
O
D
E
F
Q Z
! $ () =
"
/ ' + -
, .
?
: ;
b. b. b. b. b.
OPERATING
INSTRUCTIONS
AND
QUICK GUIDE
VCO
Handset
Base Unit
Telephone Line Cords
Handset
Coil Cord
Operating Guides
Figure 1 - Package Checklist
Mounting Bracket
AC Adapter
Page 9

6
Features on the VCO
RINGER volume switch
AUDIO OUTPUT jack
A/C adapter and phone
line connection
TONE/PULSE switch
RELAY button
RELAY MESSAGE button
AUTO ANSWER button
LCD display screen
Signal indicator light
MEMORY button
MEMORY B button
SELECT button
EMERGENCY button
REDIAL button
FLASH button
VOL volume slider
RING flasher
AMPLIFY button
AMPLIFY indicator
PROG program button
AUDIO
OUTPUT
RINGER
Off Lo Hi
DIAL
T P
DIALOGUE
VCO
M1
a. a. a. a. a.
POWER
RELAY REL MGS SPACEAUTO ANS
SIGNAL
M2 M3 M4 M5
SELECT MEMORY b
X
HOLD PROG
LO
HI
FLASH REDIAL
TONE
VOL
AMPLIFY
A
B
C
G
H
I
T
U
V
W
X
Y
P
R
S
J
K
L
M
N
O
D
E
F
Q Z
! $ () =
"
/ ' + -
, .
?
: ;
b. b. b. b. b.
TONE
slider
HOLD
button
Figure 2 - Base Unit Controls
AC Power indicator
Page 10
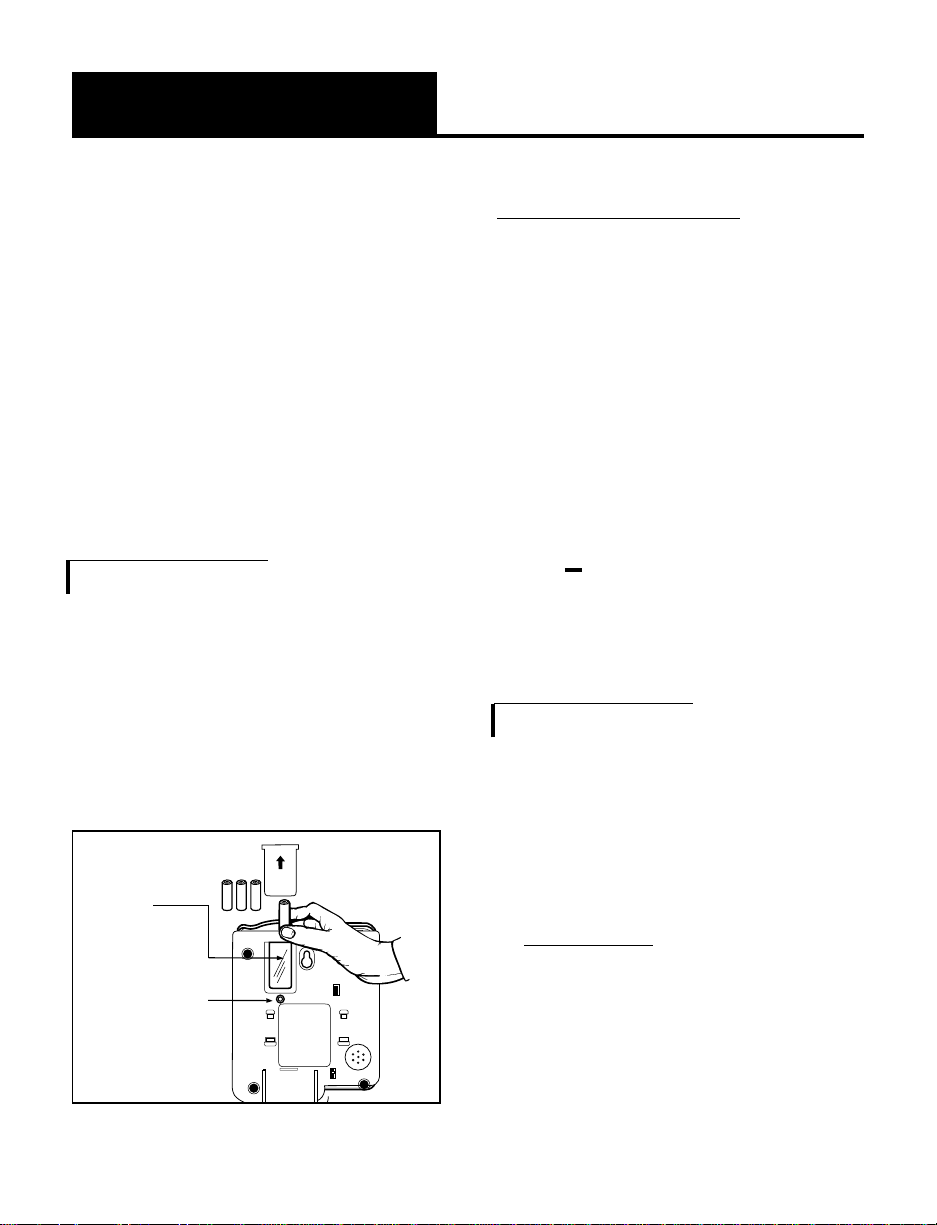
MANUAL
AUTO
Insert 4 AA
batteries
here
Press in
here with a
tip of a pen
to open
battery
compartment
7
Setting up Your VCO
There are three steps involved in
setting up your VCO.
• Insert four AA rechargeable
NiCad batteries for back-up in
case of AC power outage.
• Decide if you want the phone
to sit on a desk or hang on the
wall.
• Connect the telephone
components.
Installing the Backup Batteries
If there is a power outage, the
VCO will operate for 4 - 8 hours
with four AA rechargeable NiCad
batteries (not included). If the
phone is not in use, the batteries
will stay charged for several months.
To Install New Batteries:
1.Slide open the batter y
compartment cover on the
bottom of the telephone
(Figure 3). You may need to
press the tip of a pen into the
opening under the battery
door or with the tip of a pen.
2.Install four fresh AA
rechargeable NiCad
batteries. Be sure to match
the battery polarity as
imprinted on the base of the
compartment. (The “+” and
“ ” symbols).
Connecting for Desk or Wall Mount
Set the dial mode switch to T
(tone) if you have touch tone
service. Set the switch to
P (pulse)
if you have rotary dialing.
Desktop Use:
1.Connect the telephone line
cord and the handset cord to
the telephone as shown in
Figure 4.
2.Plug the AC adapter into an
electric outlet and into the
telephone as shown in Figure 4.
Figure 3 - Accessing the Batteries
Page 11

3.Lift the handset and listen for a
dial tone.
The phone is ready to use.
For Wall Mounting
1.Slide the handset hook out of
the base as shown in Figure
6 and reverse its position so
that the hook points up and
will hold the handset when
you hang up.
8
Setting up Your VCO
2.Inser t the tabs of the phone
base into the slots in the
lower position of the base as
shown in Figure 7. Push the
mounting bracket in and
down firmly until it snaps into
place.
3. Locate a desired wall phone
jack near an AC outlet and
hold phone upright.
4.Plug the shor t phone line
cord into the wall outlet as
shown in Figure 8.
M
1
M
2
M
5
M
6
M
7
M
8
M
9
M
1
0
M
1
1
M
3
M
4
Line Cord
AC Adapter
Handset
(Curly)
Cord
Figure 5 - Reversing the Hook
M
AN
UAL
AUTO
Figure 6 - Mounting Bracket
for Wall Mounting
Figure 8 - Wall mounting installation
M
A
N
U
A
L
A
U
T
O
Figure 4 - Connecting the Components
Page 12

9
Setting up Your VCO
5. Angle the phone downward
to feel for the LOWER
protruding nail head. Insert
the WALL JACK'S nail head
into the LOWER part of the
phone's mounting bracket.
6. Once the lower nail head
has been inserted, insert the
UPPER nail head into the
phone's bracket and slide
the phone down until it is
firmly in place on the wall.
7. Once firmly in place, attach
the short line cord to the
phone, the AC adapter to
the phone and attach the
phone's handset.
8. Plug the AC adapter into the
AC wall outlet. Lift the
handset and listen for a dial
tone. The phone is now
ready to use.
F
R
A
N
Ç
A
I
S
Page 13
10
IMPORTANT INSTRUCTIONS
Using Your VCO
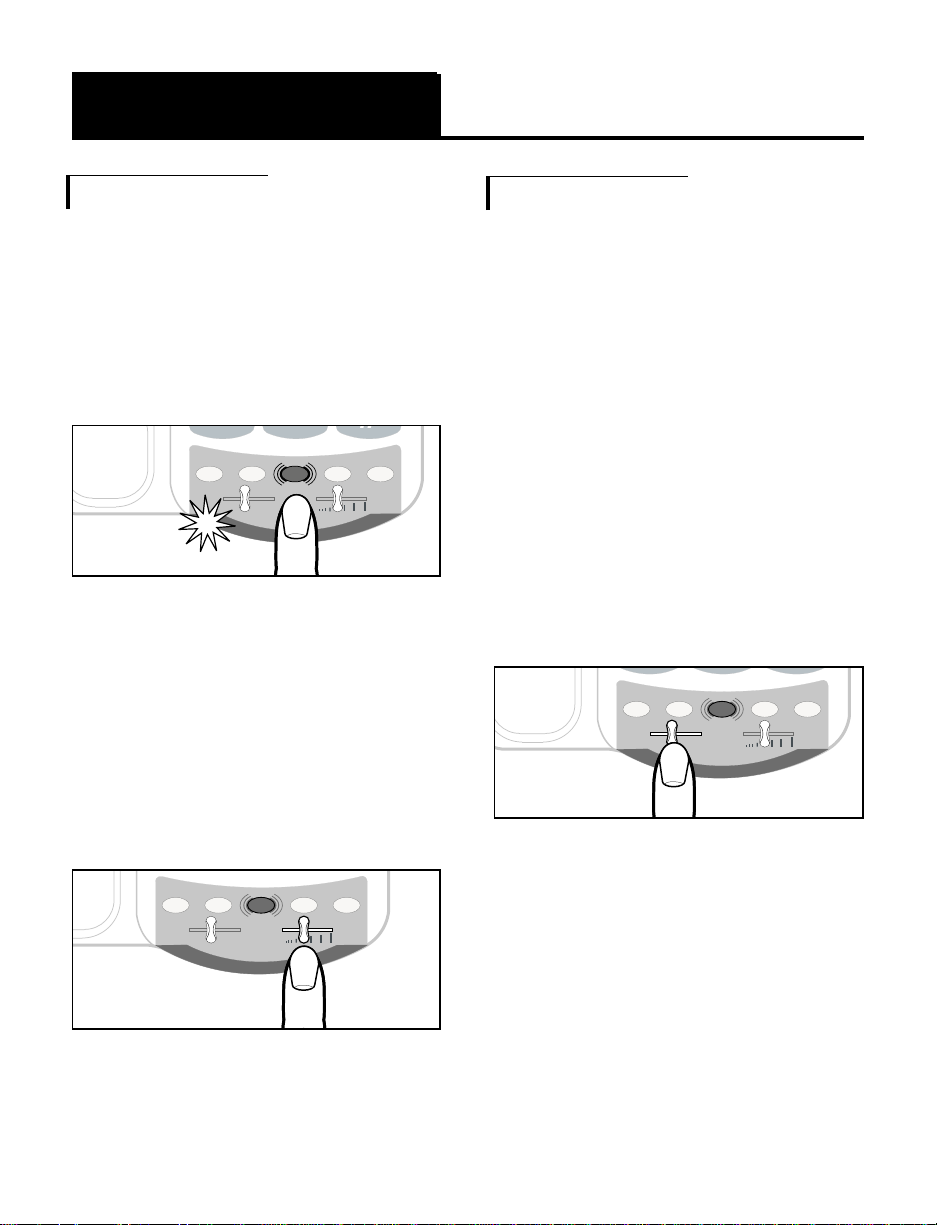
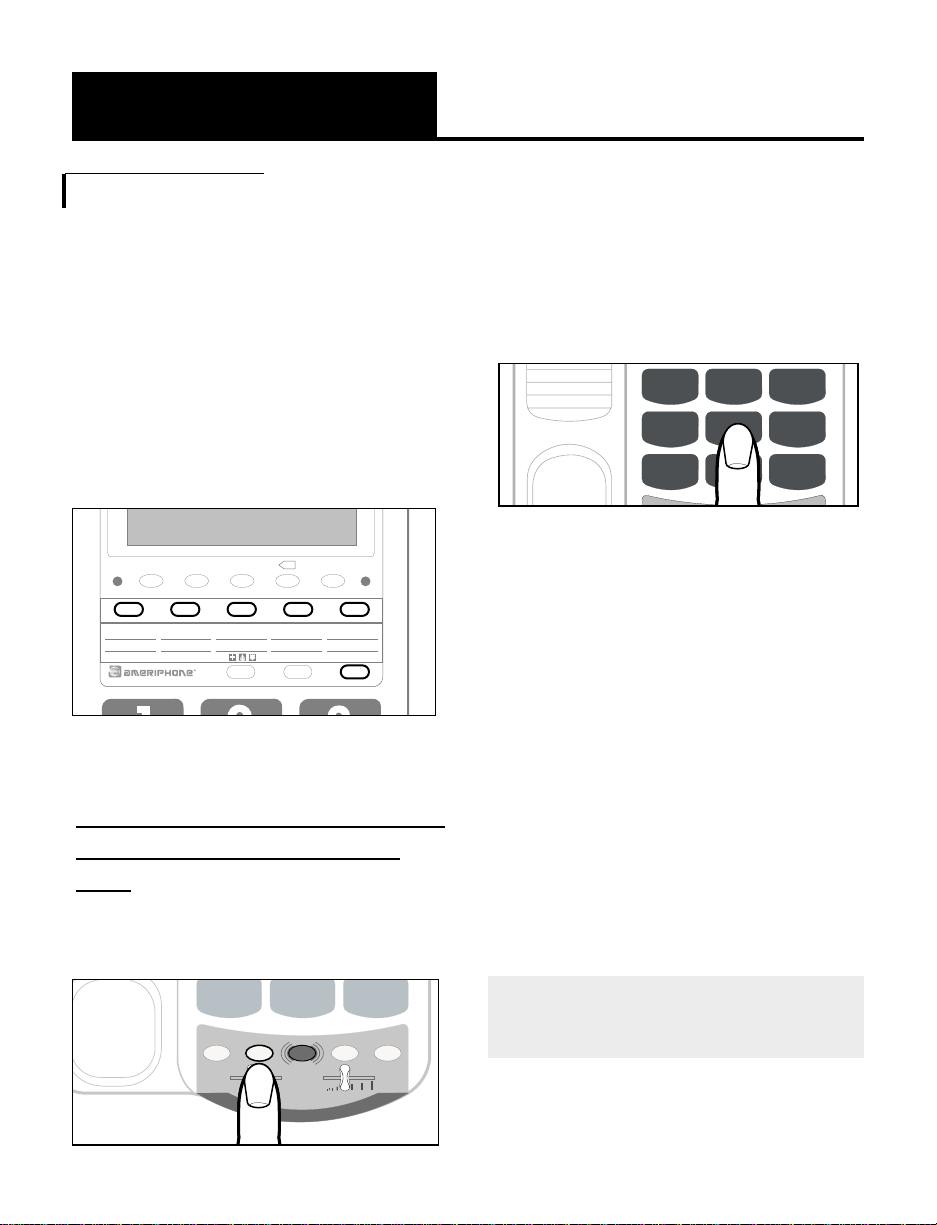
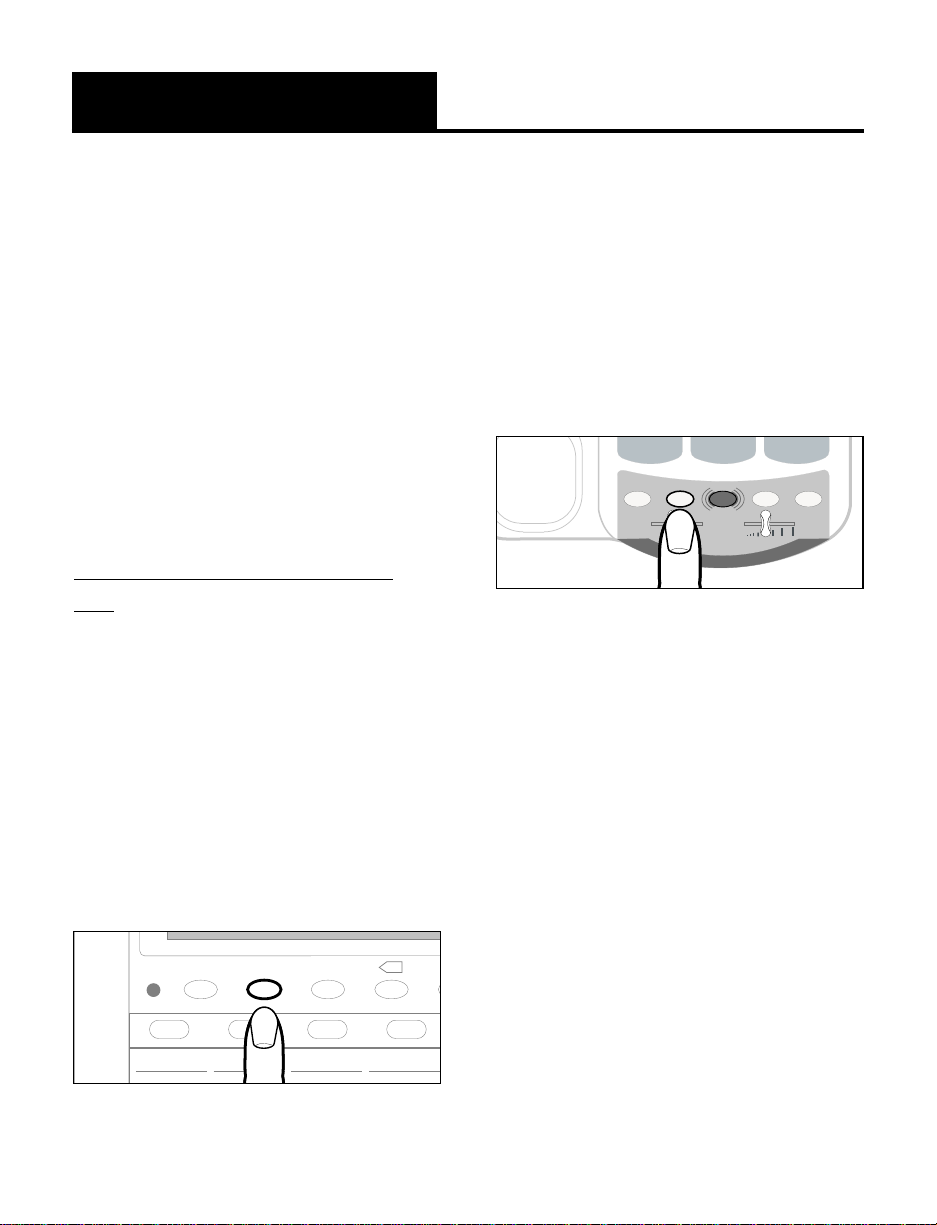
Incoming Voice Volume
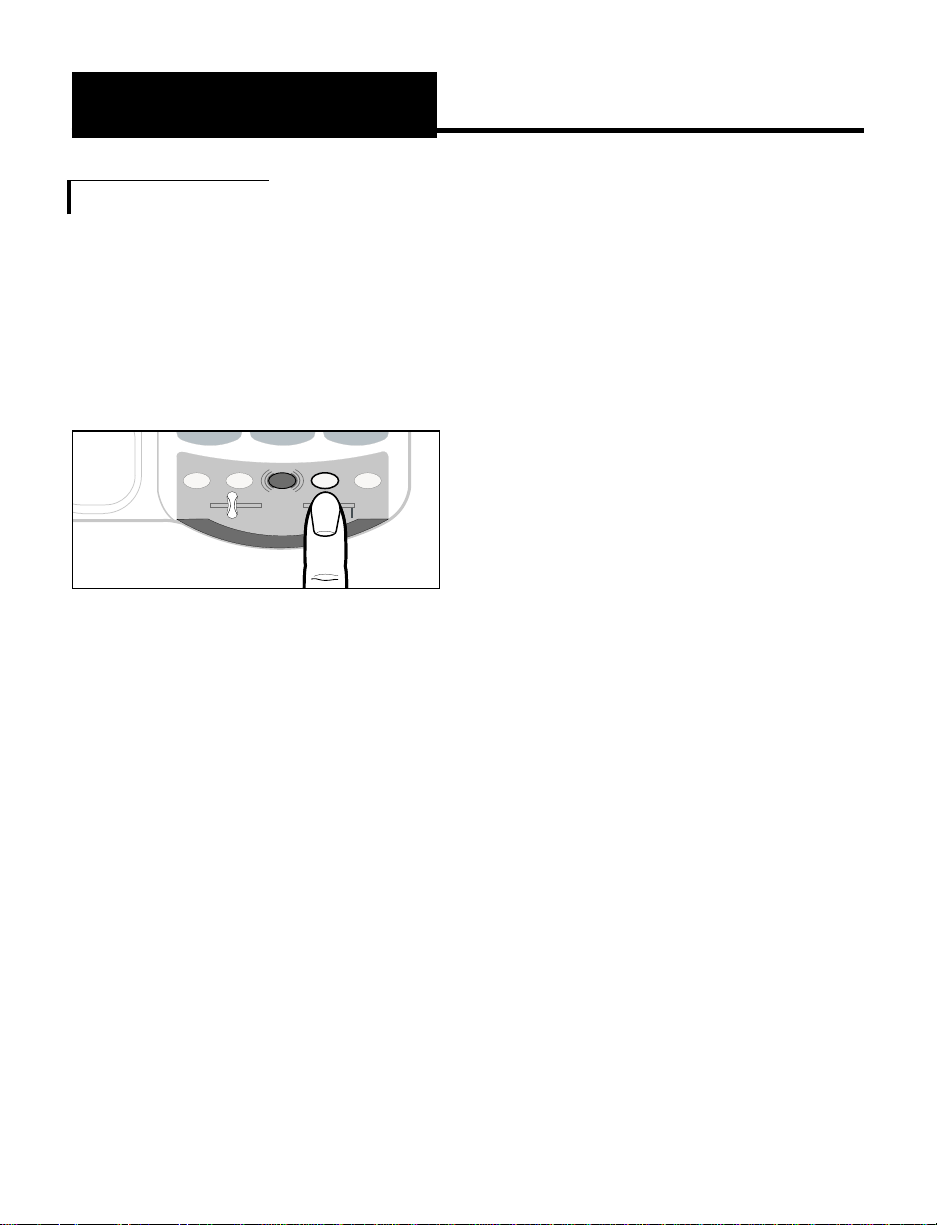
1. Press the AMPLIFY button as
shown in Figure 8 to turn the
incoming voice amplifier on or
off. When
AMPLIFY is on, the
AMPLIFY indicator comes on.
2.Adjust the volume in the
handset by moving the
VOL
slide control in Figure 9. With
AMPLIFY on, incoming volume
will be up to 26 dB louder.
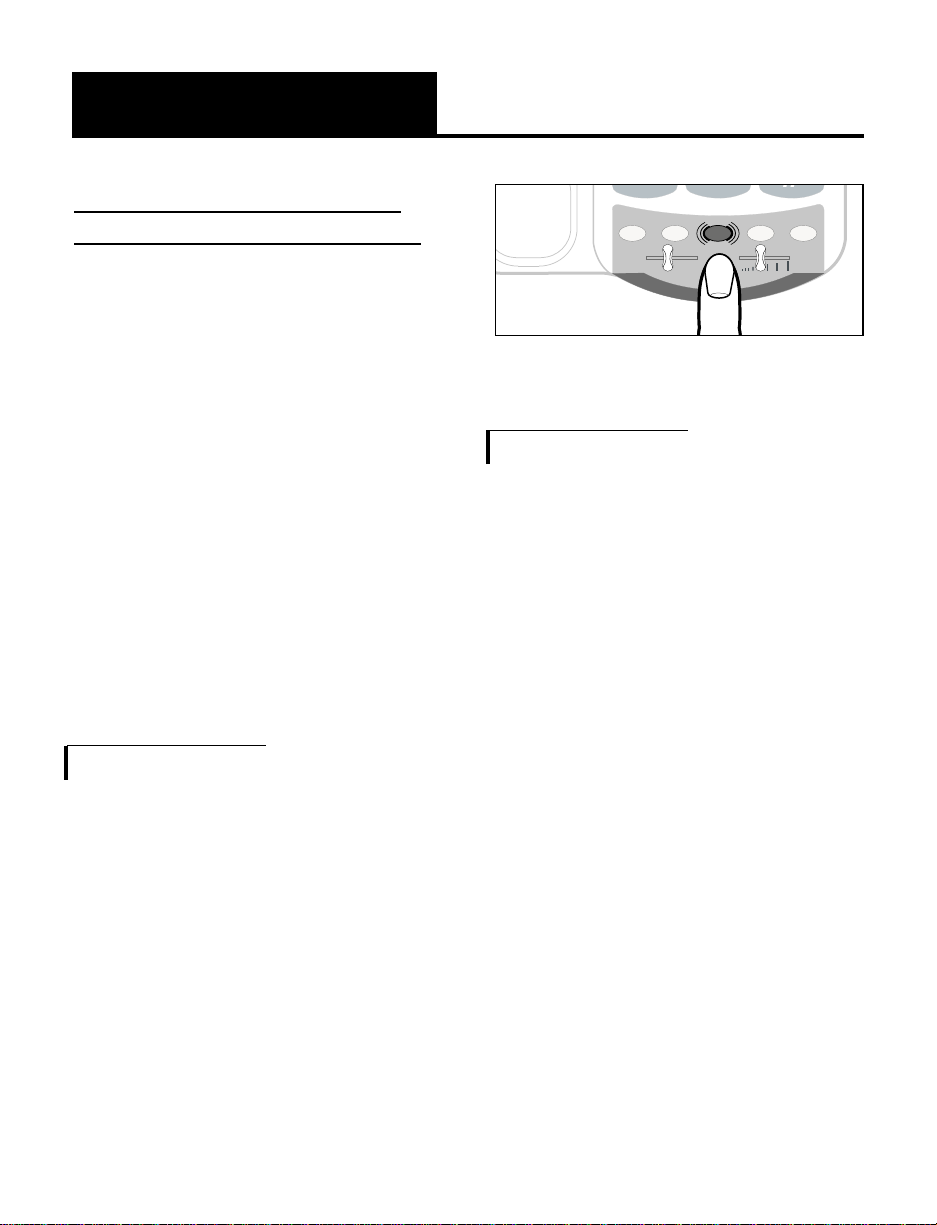
Incoming Voice Tone
The VCO also has a tone control ,
so you can adjust of the sound
frequency level to best suit your
hearing. To identify the sound
frequency range that best suits
your needs, follow these steps:
1.When you hear a voice on the
line, press the
AMPLIFY button
as shown in Figure 8.
2.Adjust the
TONE slide control as
in Figure 10 to suit your hearing.
E
0
#
HOLD PROG
TONE
LO HI
FLASH REDIAL
VOL
AMPLIFY
*
HOLD PROG
TONE
LO HI
FLASH REDIAL
VOL
AMPLIFY
Figure 9 - Volume Slide Control
HOLD PROG
TONE
LO HI
FLASH REDIAL
VOL
AMPLIFY
Figure 10 - Tone Slide Control
Figure 8 - AMPLIFY Button and
Indicator
Page 14
11
Using Your VCO
phone. If you do not pick up the
phone at another extension in 3
minutes, the phone will
disconnect.
Last Number Redial
To redial the last number dialed,
lift the handset and press
REDIAL.
The phone will redial up to 31
digits.
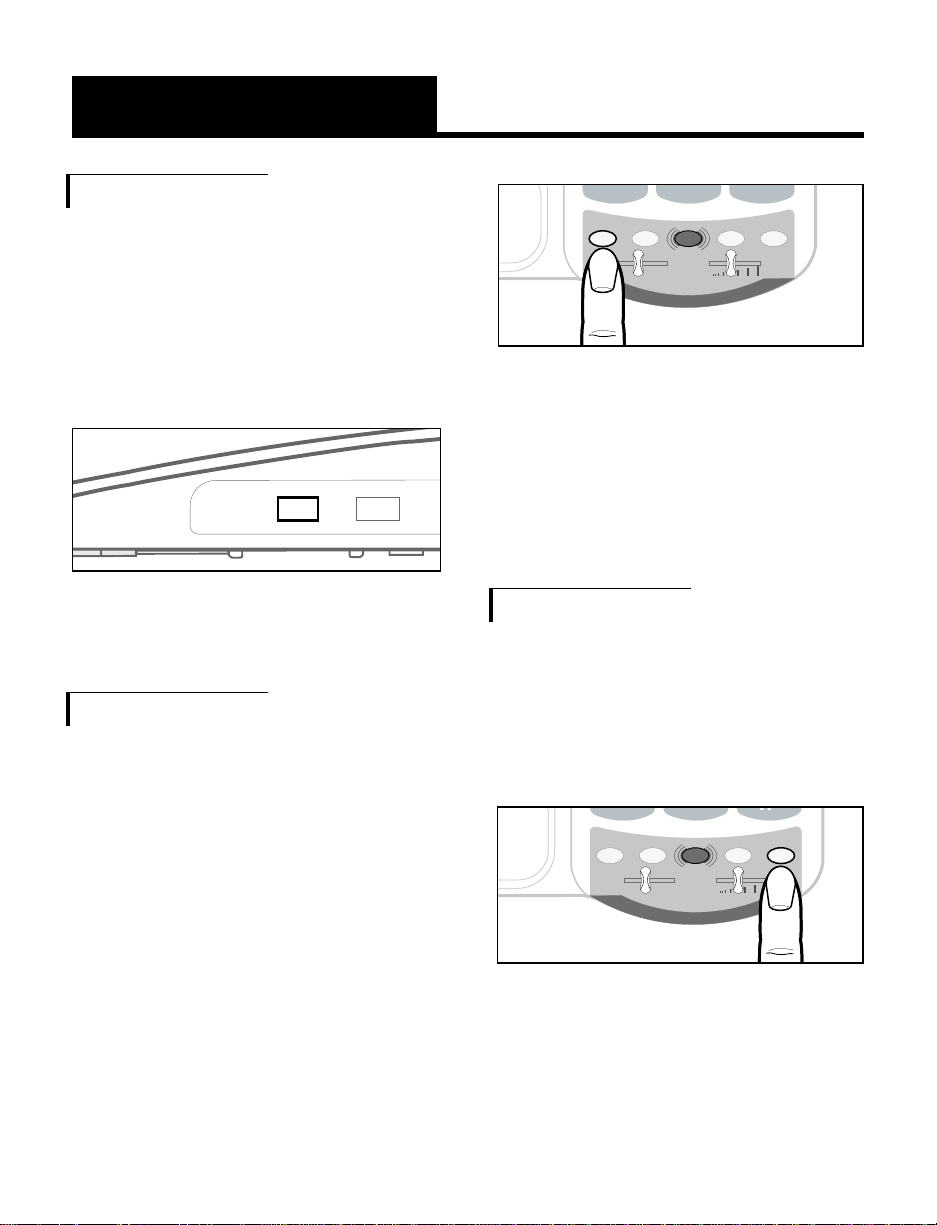
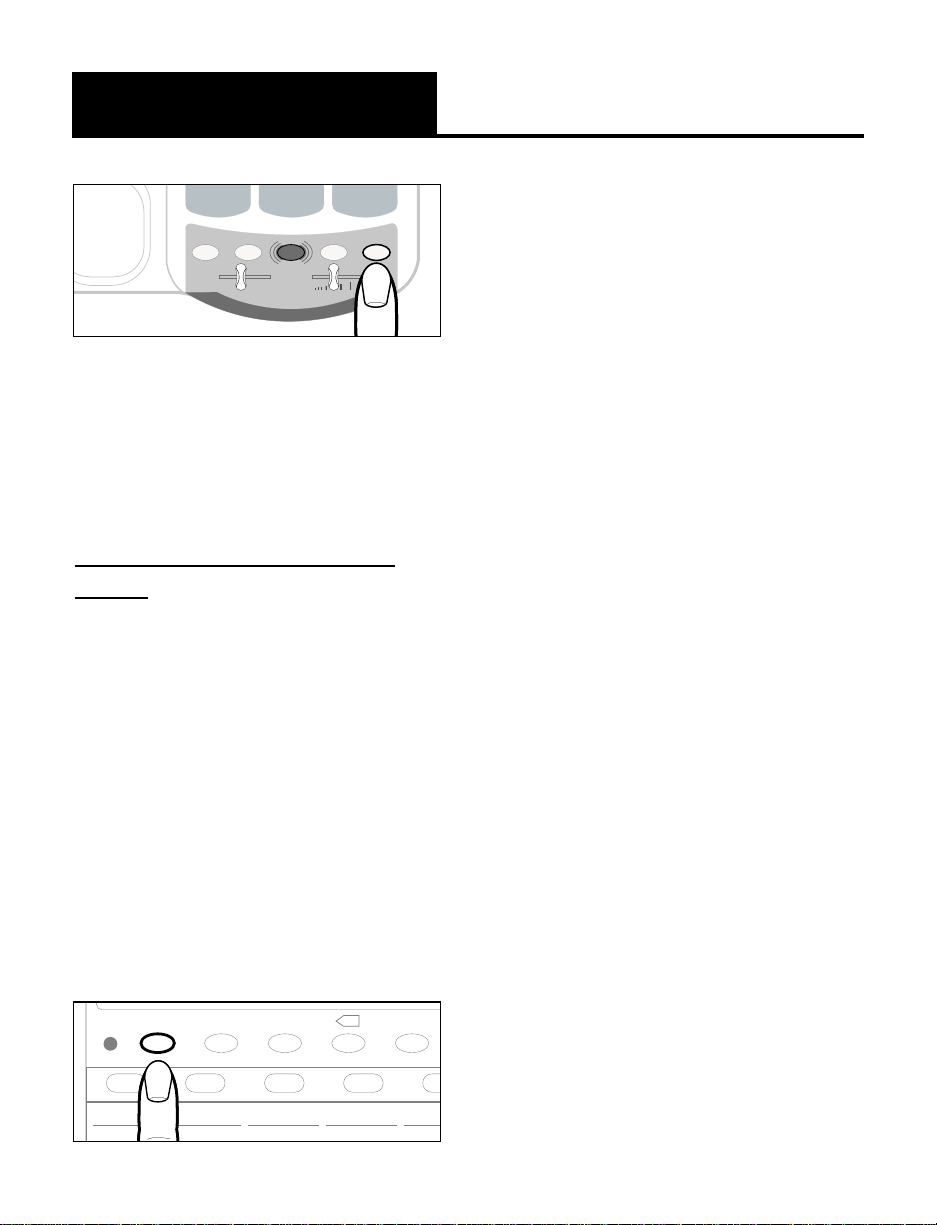
Ringer Volume
1.You can adjust the RINGER
VOLUME
as high as 95 dB.
The settings available are
OFF,
LO and HI as shown in
Figure 11.
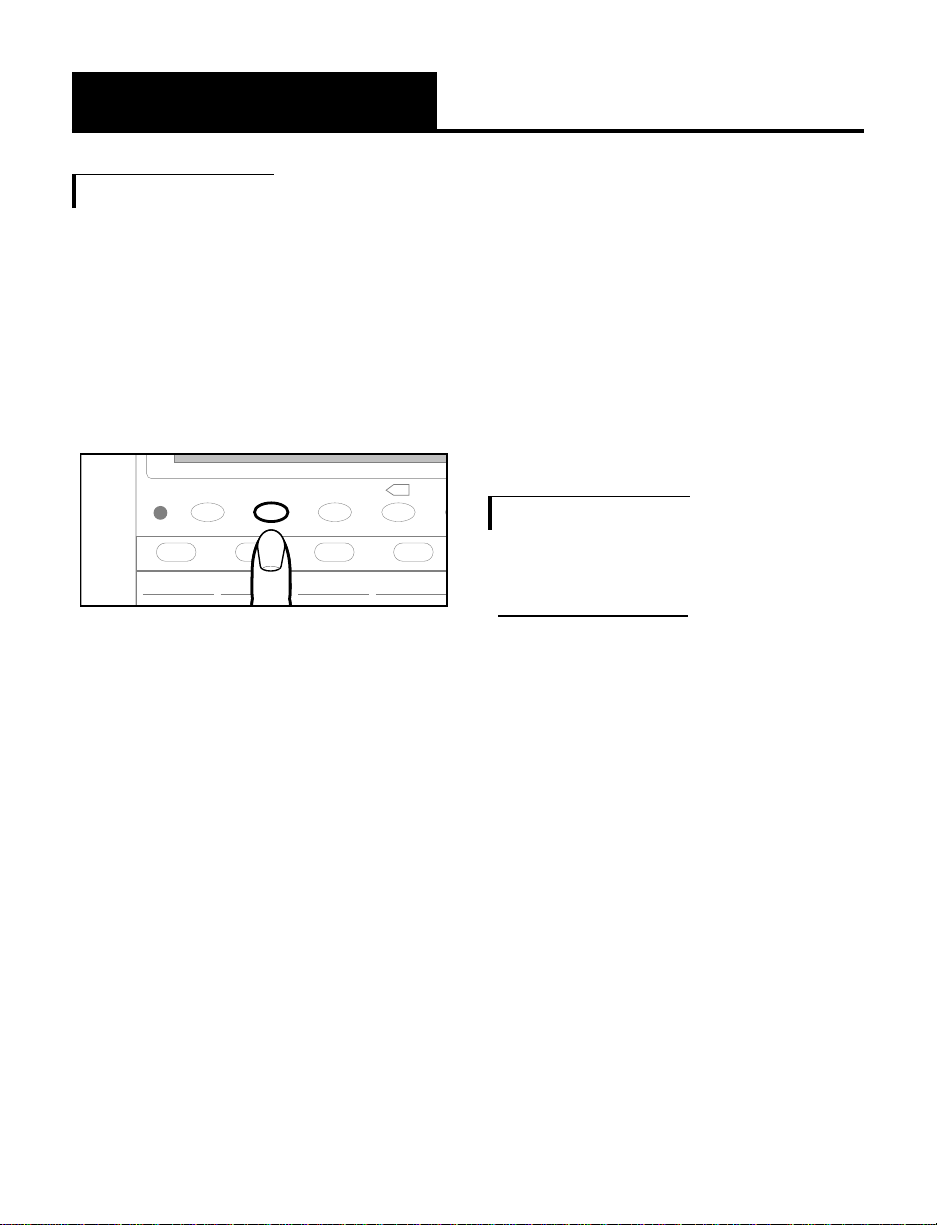
Hold
To put the line on hold, press the
HOLD button and return the
handset to its cradle. In telephone
mode, the screen shows
“CALL-ON HOLD & MUTE”. In text
mode, it shows and transmits the
message “PLS HOLD…”.
Note: If you pick up an extension
phone on the same line when the
VCO is on
HOLD, the VCO will
disconnect and you can continue
your conversation on the extension
E
0
#
HOLD PROG
TONE
LO HI
FLASH REDIAL
VOL
AMPLIFY
*
Figure 13 - Redial Button
P
E
0
#
HOLD PROG
TONE
LO HI
FLASH REDIAL
VOL
AMPLIFY
*
Figure 12 - Hold Button
RINGER
Off Lo Hi T P
DIAL
Figure 11 - Ringer Volume
Page 15
12
IMPORTANT INSTRUCTIONS
Using Your VCO
Flash
Press the FLASH button as shown
in Figure 14 to access the special
services available from your local
phone company such as Call
Waiting and 3-Way Calling.
Figure 14 - Flash Button
E
0
#
HOLD PROG
TONE
LO HI
FLASH REDIAL
VOL
AMPLIFY
*
Page 16
13
IMPORTANT SAFETY
INSTRUCTIONS
Special Features
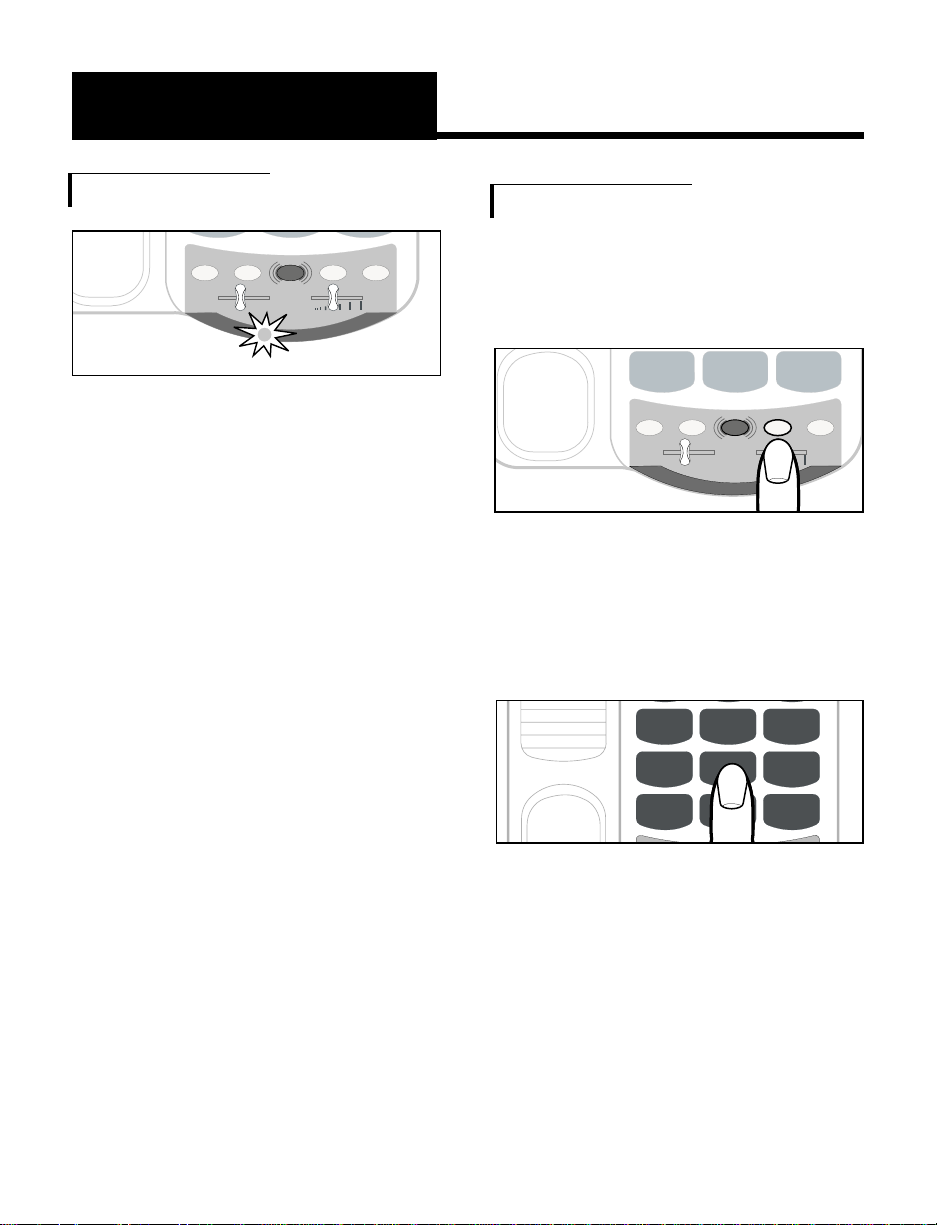
Unanswered Call Indicator
If an incoming call is not
answered by a person after 4
rings, the unanswered call
indicator will flash. The light will
continue to flash until the handset
is lifted or AC power is
disconnected. This feature
does not require any optional
telephone company services.
It is useful if you were away
for a short time while expecting
a call. To cancel this feature,
unplug the AC adapter and
remove all batteries. Press the
HOLD button while reconnecting
the AC adapter, and then
re-install batteries. Repeat this
procedure to enable this
feature again.
0
#
HOLD PROG
TONE
LO HI
FLASH REDIAL
VOL
AMPLIFY
*
Figure 16 - Flash Button
HOLD PROG
TONE
LO HI
FLASH REDIAL
VOL
AMPLIFY
Figure 15 - Unanswered Call
Indicator
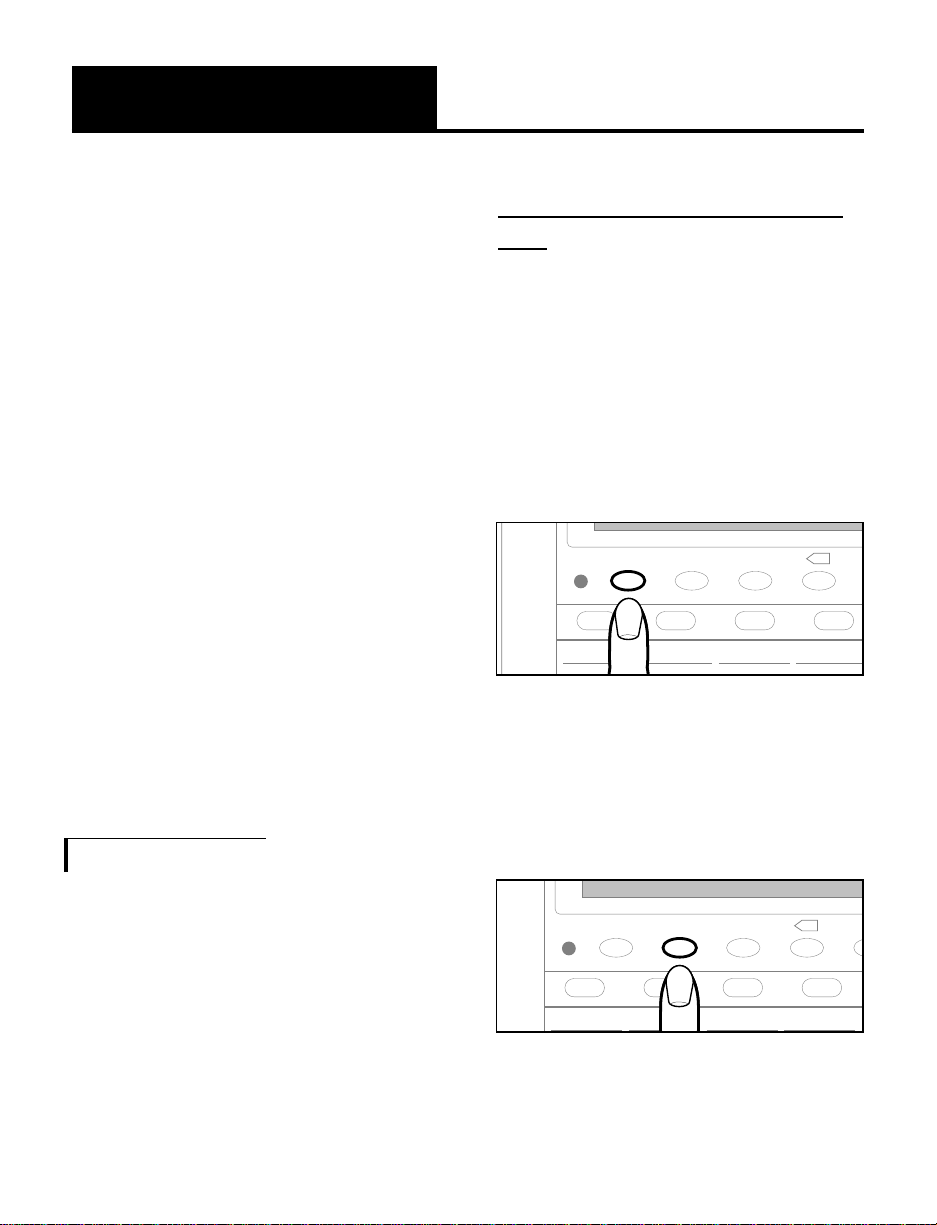
Programming the Relay Ser vice
Number
1. Lift handset and press PROG
button.
2. Enter the
RELAY phone number
using the keypad.
3. Press
RELAY button to store the
number. Hang up immediately.
G
H
I
P
R
S
T
U
V
O
P
E
W
X
Y
J
K
L
M
N
O
4
5
6
789
0
#
*
Figure 17 - Telephone Keypad
Page 17
14
IMPORTANT INSTRUCTIONS
Special Features
3. Type your name (up to 30
letters) and press to save.
(For
number/letter, press key
repeatedly
until the desired
number/letter
appears on
screen. Wait one second
for
cursor to advance to the next
space. See section on
“communicating in text
telephone (TTY/TDP) mode”
making a TTY call.)
4. Type your address (up to 45
letters) and press to save.
5.
Enter your home phone number
(up
to 14 digits) and press
to save.
If your relay requires you to
provide the name of your long
distance carrier continue with
step 6, otherwise skip to step 7
6. Type your long distance
carrier (up to 14 letters), and
press to save.
7. Hang up.
8. To change any information,
repeat from step 1.
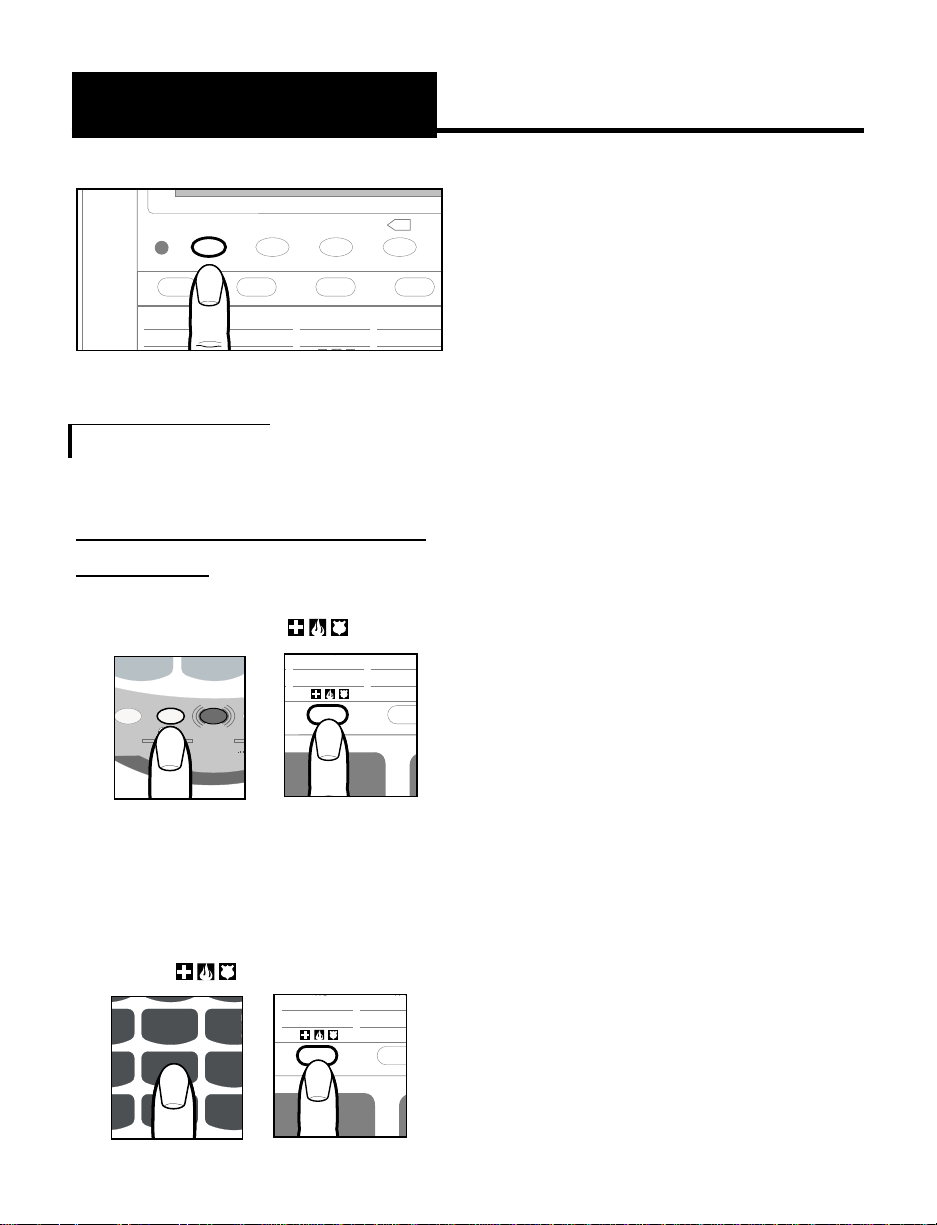
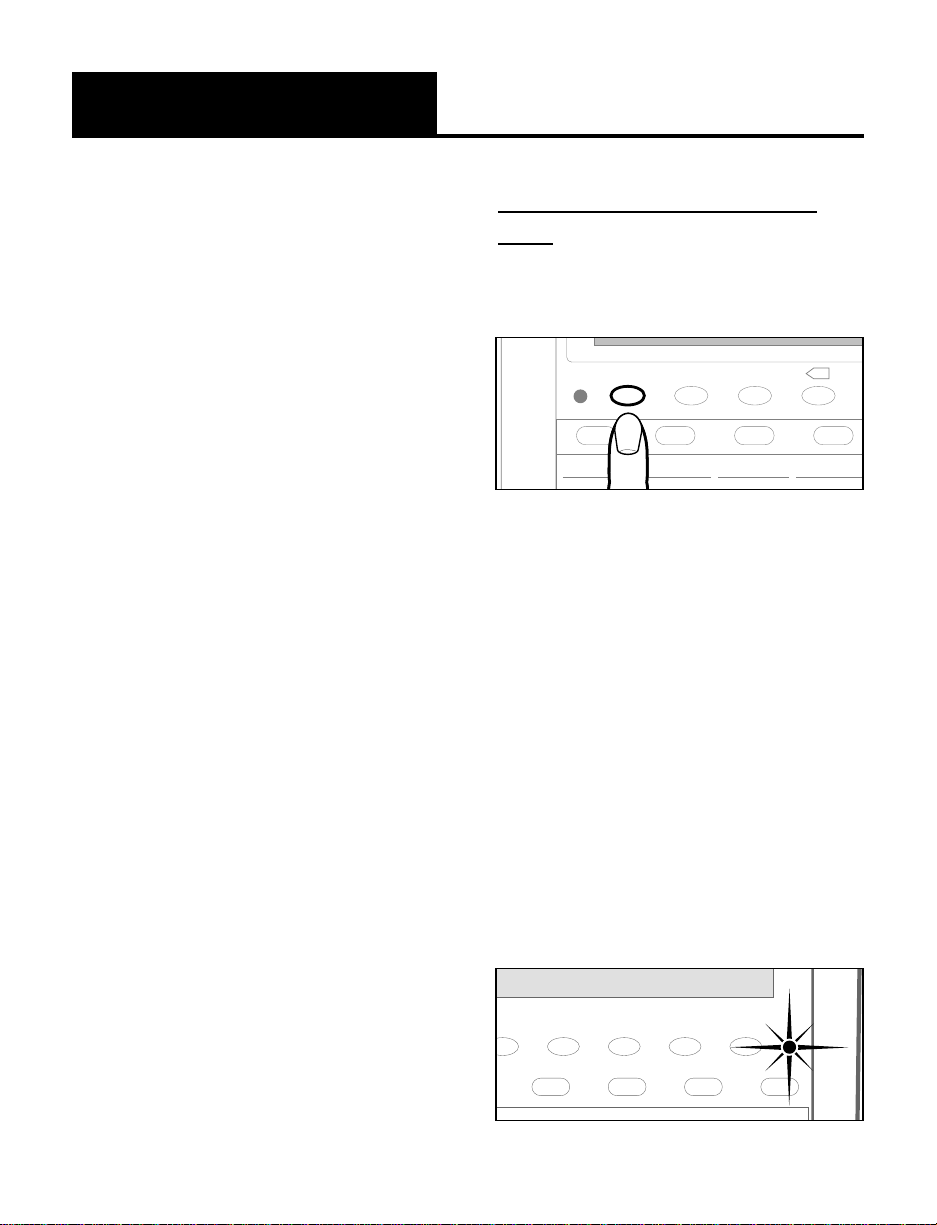
Programming Emergency Calling
Message/Your Home Phone
Number and Long Distance Car
rier
To Program:
1. Lift handset and press PROG
button and then button.
2. Enter 911 if available, or your
local emergency service
number, up to 14 digits.
Press to save.
M1
a. a. a. a.
POWER
RELAY REL MGS AUTO ANS
M2 M3 M4
X
b. b. b. b.
Figure 18 - RELAY Button
P
E
0
HOLD PROG
TONE
LO HI
AMPLIFY
*
Figure 19 - PROG
Button
a. a.
M3 M4
SELEC
A
B
b. b.
G
H
I
P
R
S
T
U
V
O
P
E
W
X
Y
J
K
L
M
N
O
5
6
0
#
Figure 21 - Telephone
Keypad
a. a.
M3 M4
SELEC
A
B
b. b.
Figure 20EMERGENCY Button
Figure 22 EMERGENCY Button
Page 18
15
IMPORTANT SAFETY
INSTRUCTIONS
Special Features
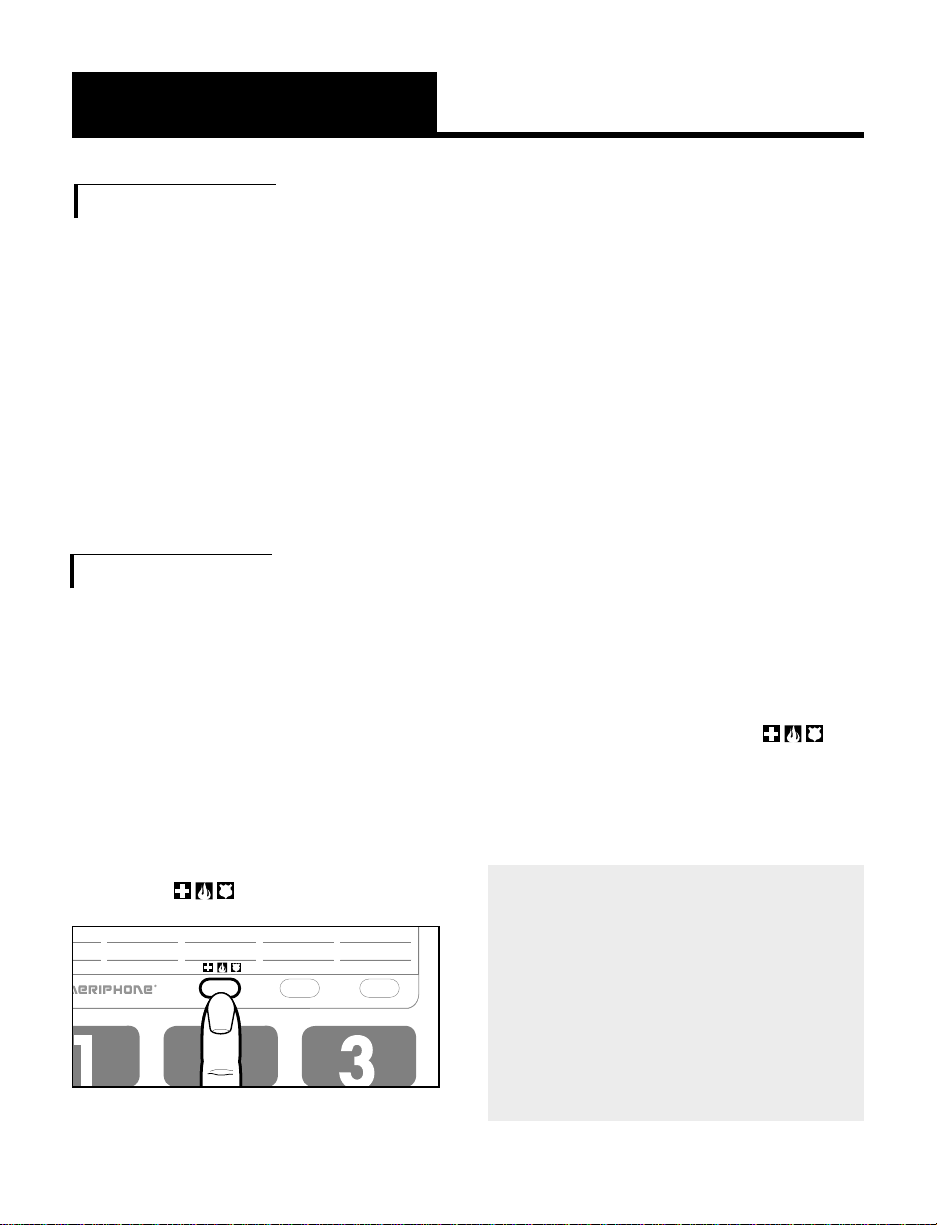
4.
The VCO phone dials the
emergency
number (if
programmed) and
transmits
this present message: "HELP! I
AM
A VCO USER, PLS
RESPOND BY
TYPING ON A
TTY, AND LISTEN TO
ME ON
UR PHONE, (your name),
(your address), (your number)
GA".
5. This message will re-transmit
every few seconds.
6.
The message will stop when it
starts
receiving the typed
message from the dispatcher.
Or, you can stop and start the
message by pressing .
7. Continue conversation by
reading and talking.
Memor y dialing the emergency
ser vice and the emergency
message feature are provided
only as a convenience.
Ameriphone assumes no
responsibility for customer reliance
upon these features
.
a. a. a. a.
M2 M3 M4 M5
SELECT MEMORY b
A
B
D
E
b. b. b. b.
Figure 23 - EMERGENCY Button
Making Emergency VCO Calls
with text and Sending Emergency
Message
1. Lift handset.
2. Dial the emergency number if it
has not been programmed into
(see previous section).
3. Press .
Making Emergency VCO Calls
with voice
1. Dial emergency number 911.
2. When number answers,
signal light flashes.
3. Say your name, address and
the help needed.
Page 19
16
IMPORTANT INSTRUCTIONS
Programming the Memor y Buttons
You can automatically dial ten (10)
programmed telephone numbers
using the memory buttons shown in
Figure 24. Each button can be
programmed (or reprogrammed
using the same procedure) for a
phone number up to 15 digits
long.
To Program the first 5 numbers into
a memor y Button, Follow these
Steps:
1. Lift the handset and press PROG
as shown in Figure 25.
2.Enter the phone number on the
keypad (Figure 26) just as you
would dial it normally. If you
need to dial a “1” and/or the
area code, be sure to include it.
3.Select and press a memor y
(M1-M5) button (Figure 24) to
store this number on that button.
4.Immediately hang up the
handset.
Note: Any number previously
stored at that button number will
be overwritten.
5.To change a stored number,
repeat the programming
process starting with step 1.
Note: Please do not program 911
into any memor y button
M1
a. a. a. a. a.
POWER
RELAY REL MGS SPACEAUTO ANS
SIGNAL
M2 M3 M4 M5
SELECT MEMORY b
X
A
D
b. b. b. b. b.
Figure 24 - Memory Buttons
Special Features
O
P
E
0
#
HOLD PROG
TONE
LO HI
FLASH REDIAL
VOL
AMPLIFY
*
Figure 25 - PROG Button
G
H
I
P
R
S
T
U
V
O
P
E
W
X
Y
J
K
L
M
N
O
4
5
6
789
0
#
*
Figure 26 - Telephone Keypad
Page 20
17
IMPORTANT SAFETY
INSTRUCTIONS
Special Features
T
o Store the Second 5 Numbers
Into the Same Memor y Locations:
1. Lift the handset and press
PROG as shown in Figure 25.
2. Enter the phone number on the
keypad just as you would dial it
normally, as shown in Figure 26.
3.Press the MEMORY b button
and then the desired MEMORY
(M1-M5) button (Figure 24) to
store this number as the
second phone number in the
same memory location.
Making Standard Phone Calls
1. Make or answer voice
calls as usual.
2. Press the AMPLIFY button to
turn amplifier ON/OFF.
3. Adjust VOLUME and TONE
slide controls to suit your hearing
4. Hang up to reset.
Using Relay with VCO
A person with hearing loss who
uses their voice can use voice
carry over (VCO) through the
toll-free local relay service to
communicate with a hearing
person.
In a VCO (voice carry over) call,
the hard of hearing person speaks
directly to the other party. The
Communications Assistant (CA)
relays the response from the other
person, which shows up as text on
your VCO phone screen. You just
read and talk.
It is not possible to speak to the
other person or to the CA while
the VCO is receiving text
E
0
#
HOLD PROG
TONE
LO HI
FLASH REDIAL
VOL
AMPLIFY
*
AMPLIFY Button
Page 21
18
IMPORTANT INSTRUCTIONS
Special Features
Follow These Steps to Make VCO
Calls:
1. To make an outgoing VCO
call, lift the handset and push
the “
RELAY” button or direct
dial 7-1-1, using your keypad.
The Communications
Assistant (CA) anounces in Text
mode, “ Hi, VCO call, PLS
GA”.
2. Press
REL MSG button to
request a VCO call.
messages. You must wait for the
completed message as
indicated by the word
"GA" on
the screen from the CA. It is
important to let the other party
know it is their turn to speak by
saying
"GA" or "GO AHEAD."
Some relay services offer to relay
calls from one VCO user to
another VCO user, called Voice-ToVoice Relay or VTV. Contact your
local relay service for more
information. The relay services
vary from state to state, and the
procedures using the VCO phone
may vary slightly. Follow the
steps below to determine which
procedure you should use for your
local relay service.
Making VCO Calls
If your relay service has a
dedicated
phone number for
TTY/TDD calls listed
on the
directory, use that number
for making outgoing VCO calls.
(The voice num
ber is for
people to call you through the
relay service).
M1
a. a. a. a.
POWER
RELAY REL MGS AUTO ANS
M2 M3 M4
X
Figure 27 - RELAY button
M1
a. a. a. a. a
POWER
RELAY REL MGS SPAUTO ANS
M2 M3 M4
X
Figure 28 - REL MSG button
Page 22
19
IMPORTANT SAFETY
INSTRUCTIONS
Special Features
Pr
ovide Calling Information by
Voice:
1.Dial from keypad or from
RELAY memory.
2.The CA answers in voice
(you can tell from the
flickering of the signal
indicator). Speak into the
handset and tell the CA that
you are a VCO user and
give the CA all the calling
instructions. Repeat the
information
one more time to
ensure the CA received all
of the instructions.
M1
a. a. a. a.
POWER
RELAY REL MGS AUTO ANS
M2 M3 M4
X
Figure 29 - RELAY button
SIGNAL
LED
M2 M3 M4 M5
Figure 30 - Signal Indicator
3. When prompted with "GA" on
the display, voice the number
you're calling. (In some areas,
you may only provide calling
information by text.)
4.
When the call is connected, read
incoming mes
sages on display
screen and start speaking
when
you see "GA". Voice your
conversation through the handset
and be sure to say "go ahead"
when you're finished speaking
and it's the other person's turn
to talk.
5.
Continue your conversation by
reading
and talking.
6. Hang up the handset when you
are finished.
If your relay service has a
common phone number for both
voice and TTY/TDD calls, you can
provide calling information by
either voice or text:
Page 23
20
IMPORTANT INSTRUCTIONS
Special Features
2.Dial the number you're calling
on the keypad (if you make a
mistake, press
PROG to go
back one space to erase the
incorrect number), followed by
pressing the
* and # keys
(this will type
"GA".)
3. When connected, proceed
with your call by reading
and talking.
In areas where the CA needs to
know your long distance carrier
and /or your home phone
number, you must complete the
steps in the "Programming Your
Emergency Calling Message"
section.
1. When requested by the
CA, press
REDIAL.
3.When connected, read
incoming messages on
display and start speaking
when
"GA" appears.
Say "go ahead" when
you're done and it's the
other person's turn to talk.
4. Continue your conversation
by reading and talking.
Provide Calling Information by
Text:
1. After the CA answers the
call first in voice, wait
quietly for one or two
seconds, the CA will then
answer in text. When you
see "GA", press
SELECT then
REL MSG buttons. You'll see
"VCO CALL PLS GA" on
your display.
M1
a. a. a. a.
POWER
RELAY REL MGS SAUTO ANS
M2 M3 M4
X
Figure 31 - REL MSG button
P
E
0
#
HOLD PROG
TONE
LO HI
FLASH REDIAL
VOL
AMPLIFY
*
Figure 32 - PROG button
Page 24
21
IMPORTANT SAFETY
INSTRUCTIONS
Special Features
3. When the CA answers in
text mode, press the desired
memory button. If the
number is stored as the
second number in the
memory, press
MEMORY b
first
and then the memory
button.
4. The phone sends and dis
plays this message on the
screen; “I AM A VCO USER,
PLS CALL (number stored in
memory button selected),
GA”. You don’t need to
voice the phone number. If
necessary, press the same
memory button to repeat
the message.
5.When connected, proceed
with t he call as in normal
VCO communications.
The above procedure works only
when the telephone is in text
mode. When operating in the
telephone mode, pressing any
memory button dials the phone
number stored in that memory.
(See "Memory Dialing" section)
2. Your VCO phone will transmit:
"My number is...., My Long
Distance Carrier is....GA".
Making VCO Calls by Memor y
Dialing:
After you press RELAY and
reach a CA, pressing any
memory button will inform the
CA that you want to make a
VCO call and
give them the
phone number stored in the
memory button, all at the same
time. There is no need to voice
the phone number.
1. Lift handset.
2. Press
RELAY.
O
P
E
0
#
HOLD PROG
TONE
LO HI
FLASH REDIAL
VOL
AMPLIFY
*
Figure 33 - REDIAL button
M1
a. a. a. a. a.
POWER
RELAY REL MGS SPACEAUTO ANS
M2 M3 M4
X
b. b. b. b. b.
Figure 34 - RELAY button
Page 25
22
IMPORTANT INSTRUCTIONS
Special Features
4. Continue your conversation
by reading and talking.
We strongly advise you to tell
your friends
and associates to call
you through the relay service using
the voice relay number for their
state.
Communicating in Text Telephone
(TTY/TDD) Mode
Making a TTY Call:
You may use the VCO to
communicate
with a text telephone
(TTY/TDD). The party you called
will begin using their TTY and
send you a greeting message.
When the VCO receives text
messages, it automatically
switches from regular telephone
mode to text mode. The screen
will display
“BAUDOT MODE,”
and then the text received. After
“GA” appears, you can then
respond by using the keypad
of
the VCO to type your messages.
Answering VCO Calls
1.
Lift the handset when the
phone rings.
2. Press REL MSG. Read the
incoming message on the
display.
3.When you see
"GA" on the
screen, speak to the calling
party. If nothing
appears on
screen, it is not a VCO
call, it is a voice
call. Say
into the phone, “I am a
VCO user. Please call me
through your state relay
operator”. Provide the relay
service voice line number.
M1
a. a. a. a.
POWER
RELAY REL MGS SAUTO ANS
M2 M3 M4
X
Figure 35 - REL MSG button
Page 26

23
Special Features
To type a TTY message, use the
keys of the keypad and their
corresponding letters (i.e. number
2 is also for letters A, B, and C).
On the screen, watch the character
above the cursor change as you
repeatedly press the same key.
When the desired letter is shown,
wait one second for the cursor to
advance to the next space. Then
enter the next character.
SPACE is
used as the space bar, and
BACKSPACE is used for backspace
and correction. The letters “Q”
and “Z” are located in key
number
1, other characters of
punctuation are created with the
*, 0, and # keys.
Text Transmission Speed Selection:
The VCO defaults to the U.S baud
rate of 45.5 when using text
communications. To
change to
International baud rate, just pres
s
SELECT
then
AUTO ANS. The
screen will read
"INT SPEED
SELECTED." You can switch back
to U.S. speed in the same manner
or by hanging up.
Acoustic Coupling of a TTY to the
VCO:
1. Pick up the handset and
place it into TTY acoustic
cups.
2. Dial number from the
VCO keypad.
3. Press
SELECT to go to
Baudot mode.
4. Press
1 key four times until
"&" appears on the screen.
5. Continue conversation
using the TTY.
6. When finished, hang up
the handset.
Using Text Auto Answering
Machine
The VCO’s automatic answering
machine can record 1728 total
characters in text messages. The
answering machine sends out the
factory preset outgoing message
that reads
"THX U FOR CLG, PLS
Page 27

24
IMPORTANT INSTRUCTIONS
Special Features
LV A MSG GA" to greet each
caller.
To Turn on the Answering Machine:
1. Pick up the handset.
2. Press the
AUTO ANS
button. The screen reads:
“AUTO ANS ON 00 MSG
1=READ 2=ERASE 3=OFF”.
The number of old
messages previously
received will be displayed
until you erase them. Erase
old messages when not
needed to ensure enough
memory for new messages.
3. Hang up the handset. The
answering machine is now
ready to take messages.
To Play back Recorded Messages:
1. The screen will indicate the
number of messages you
have received.
2. Press
1 to read your
messages. Or press
1 again
to fast forward to the next
message. When finished,
press
2 to erase messages.
3. Press
3 to tur n off the
answering machine.
Programming your Password (for
remote message retrieval only):
For security, you can set up a
personalized pa s sw or d to pr otect
the privacy of the messages left on
your VCO answering machine.
1. Lift handset and press
AUTO ANS.
2. Press
4.
3. Type your password after
the
" / " by following the
typing procedures.
4. When complete, press
SELECT to return to auto
answering mode.
5.
When you retrieve your
messages remotely, you must
enter your password exactly.
See section below.
Page 28

25
IMPORTANT SAFETY
INSTRUCTIONS
Special Features
Retrieving Messages Remotely:
1. Call your VCO from a
text telephone, another VCO,
or a TTY/ TDD pay phone.
2.
When your VCO answers,
you
will see the greeting message.
3. Type a backslash “ / ”, and
your password if you've set
one up. Then press the space
bar or return key.
4.
Your messages will scroll on the
TTY
screen.
5. At the end of the messages,
“ERASE MSG? Y/N” appears,
followed by “REPEAT MSGS?
Y/N”
. Type “Y” for yes and
“N” for no.
Using an External Voice
Answering Machine
Because the VCO can be used as a
standard amplified telephone by the
whole family, you may wish to
connect an external voice answering
machine to your VCO. However, the
VCO has an Auto Answer
function which is turned ON by
pressing the AUTO ANS button on
the VCO. If a voice answering
machine is connected to the VCO
and is ON when the VCO’s Auto
Answer is ON, when the VCO
answers the call, it will shut off the
voice answering machine and
nothing will be recorded. Also, if
the VCO is receiving text at the
same time you are playing back
voice messages, the voice message
playback will interfere with the
reception of the text messages.
If you wish to use a voice answering
machine with your VCO, you may.
But, you must make certain that the
Auto Answering function is OFF.
Page 29

26
IMPORTANT INSTRUCTIONS
Special Features
To use this port, plug in a
compatible auxiliary cable and
connect it to your assistive
listening device. Speak into the
handset when you use the Audio
Output connection.
Cochlear Implant Adapter Cord:
A cochlear adapter cord is
available from Ameriphone that
can be used to plug the VCO
directly into a speech processor.
Direct Audio Output
The AUDIO OUTPUT socket allows
you to connect the VCO to a
hearing aid, neck loop, cochlear
implant or other assistive listening
devices.
AUDIO
OUTPUT
AL
P
Figure 36 - Audio Output Socket
DIALOGUE
VCO
M1
a. a. a. a. a.
POWER
RELAY REL MGS SPACEAUTO ANS
SIGNAL
M2 M3 M4 M5
SELECT MEMORY b
X
HOLD PROG
LO
HI
FLASH REDIAL
TONE
VOL
AMPLIFY
A
B
C
G
H
I
T
U
V
W
X
Y
P
R
S
J
K
L
M
N
O
D
E
F
Q Z
! $ () =
"
/ ' + -
, .
?
: ;
b. b. b. b. b.
Figure 37 - Connecting the Speech
Processor
WARNING! During thunderstorms,
avoid using telephones, electric
shock from lightning can occur.
Before plugging any cord into your
speech processor, you must consult
your implant manufacturer.
Connecting the Speech Processor:
Plug the mono end of the plug
into the speech processor.
Plug the stereo end of the plug
into the Audio Output socket on
the phone.
Speak into the handset when
using the Cochlear Implant
Adapter Cord.
Page 30

27
IMPORTANT SAFETY
INSTRUCTIONS
Special Features
Connecting to the Q-90 Printer
The VCO can be used with the
Q-90 Printer from Ameriphone.
Attach the Q-90 Printer cable to
the connector on the back of the
VCO.
Connecting to the LVD and the
Q-90 Printer
The VCO can be connected to
both the LVD and the Q-90 Printer
through the use of an optional
cable. The cable is available from
Ameriphone and can connect the
LVD to the Q-90 Printer. The
Ameriphone item number for the
cable is #79028.
MANUAL
AUTO
P
A
P
E
R
F
E
E
D
P
R
I
N
T
S
IZ
E
O
N
/
O
F
F
L
I
N
E
Figure 39 - Connecting the Q-90
Printer
P
RIN
TER
T
T
Y
/
T
D
D
1
2
V
D
C
5
0
0
m
A
MANUAL
AUTO
P
A
P
E
R
F
E
E
D
P
R
I
N
T
S
I
Z
E
O
N
/
O
F
F
L
I
N
E
Figure 40 - Connecting the VCO to
the LVD and the Q-90 Printer
Connecting to the LVD
The VCO can be used with the
LVD from Ameriphone, the large
visual display for the Q-90 TTY.
Attach the LVD cable to the
connector on the back of the
VCO. Be careful not to bend any
pins.
PRINTER
T
T
Y
/
T
D
D
1
2
V
D
C
500
m
A
MANUAL
AUTO
Figure 38 - Connecting the LVD
Page 31

28
IMPORTANT INSTRUCTIONS
Troubleshooting Chart
SYMPTOM
Screen remains blank
No dial tone
Letters do not appear when pressing
keypad
No number dialed when memory
button pressed
Nothing happens when
RELAY
is pressed
Garbled message on screen
Call cannot be dialed, or is
dialed slowly
VCO does not have an audible
ring
CAUSE AND CORRECTIVE ACTION
No power. The screen runs on AC power,
check that the AC adapter is plugged into
the wall, and the receptacle is plugged
into the VCO.
1. Check all phone cord connections.
2. Remove back-up battery if installed.
Plug in AC adapter first then re-install
battery.
Still in telephone mode. Press
SELECT to
enter text mode.
No number stored in that memory button.
See “Programming Frequently Dialed
Numbers.”
No number stored in the RELAY button.
See
“Programming the Relay Service Number.”
Press
SELECT once to correct the inco
ing message.
See "Installation" section to reset the
dialing mode switch.
Make sure the ringer is not set to "Off"
position.
The chart below will help you solve most problems that may arise during
operation of your telephone. Should the difficulty continue, contact
Ameriphone or your authorized dealer for assistance.
Page 32

29
IMPORTANT SAFETY
INSTRUCTIONS
Regulator y Compliance
Part 68 of FCC Rules
Information
This equipment complies with Part
68 of the FCC rules and the
requirements adopted by the
ACTA. On the bottom of this
equipment is a label that contains,
among other information, a
product identifier in the format
US:AAAEQ##TXXXX. If requested,
this
number must be provided to the
telephone company.
A plug and jack used to connect
this equipment
to the premises
wiring and telephone network
must comply with the applicable
FCC Part 68 rules and requirements
adopted by the ACTA. A compliant
telephone cord and modular plug
,
RJ11 USOC, is provided with this
product. It is designed to be
connected to a compatible modular
jack that is also compliant. See
installation instructions for details.
The REN is used to determine the
number of devices that may be
connected to a telephone line.
Excessive RENs on a telephone
line may result in the devices not
ringing in response to an incoming
call. In most but not all areas, the
sum of RENs should not exceed
five (5.0). To be certain of the
number of devices that may be
connected to a line, as determined
by the total RENs, contact the
local telephone company. For
products approved after July 23,
2001, the REN for this product is
part of the product identifier that
has the format US:AAAEQ##TXXXX.
The digits represented by ## are
the REN without a decimal point
(e.g., 03 is a REN of 0.3). For
earlier products,
the REN is
separately shown on the label.
If this telephone equipment, the
VCO telephone, causes harm to
the telephone network, the
telephone company will notify you
in advance that temporary
discontinuance of service may be
required. But if advance notice
isn’t practical, the telephone
company will notify the customer
as soon as possible. Also, you will
be advised of your right to file a
complaint with the FCC if you
Page 33

30
IMPORTANT INSTRUCTIONS
believe it is necessary.
The telephone company may
make changes in its facilities,
equipment, operations or procedures
that could affect the operation of
the equipment. If this happens the
telephone company will provide
advance notice in order for you to
make necessary modifications to
maintain uninterrupted service.
If trouble is experienced with this
telephone equipment, for repair or
warranty information, please contact
Walker / Ameriphone, 1-800874-3005. If the equipment is
causing harm to the telephone
network, the telephone company
may request that you disconnect
the equipment until the problem is
resolved.
DO NOT DISASSEMBLE THIS
EQUIPMENT.
This telephone equipment is not
intended to be repaired and it
contains no repairable parts.
Opening the equipment or any
attempt to perform repairs will
void the warranty. For service or
repairs, call 1-800-874-3005.
Connection to party line ser vice is
subject to state tariffs. Contact the
state public utility commission,
public service commission or
corporation commission for
information.
If your home has specially wired
alarm equipment connected to the
telephone line, ensure the
installation of this telephone
equipment does not disable
your alarm equipment. If you
have questions about what will
disable alarm equipment, consult
your telephone company or a
qualified installer.
This telephone equipment is
hearing aid compatible.
We recommend the installation of
an AC surge arrester in the AC
outlet to which this equipment is
connected. The telephone
companies report that electrical
surges, typically lighting transients,
are very destructive to customer
terminal equipment connected to
AC power sources.
Regulator y Compliance
(continued)
Page 34

31
Customer-Owned Coin/Credit
Card Phones:
To comply with state tariffs, the
telephone company must be given
notification prior to connection. In
some states, the state public utility
commission, public service
commission or corporation
commission must give prior
approval of connection.
Part 15 of FCC Rules
Information
This device complies with part 15
of the FCC Rules. Operation is
subject to the following two
conditions: (1) This device may
not cause harmful interference,
and (2) this device must accept
any interference received,
including interference that may
cause undesired operation.
Your XL-40 Telephone has been
tested and found to comply with
the limits of a Class B digital
device, pursuant to Part 15 of
FCC rules. These limits are
designed to provide reasonable
protection against harmful
interference in residential
installation.
This equipment generates, uses,
and can radiate radio frequency
energy and, if not installed and
used in accordance with the
instructions, may cause harmful
interference to radio communications.
However, there is no guarantee
that interference will not occur in
a particular installation; if this
equipment does cause harmful
interference to radio or television
reception, which can be determined
by turning the equipment off and
on, you are encouraged to try to
correct the interference by one of
the following measures:
1.Where it can be done safely,
reorient the receiving
television or radio antenna.
2.To the extent possible,
relocate the television, radio
or other receiver with respect
to the telephone equipment.
Regulator y Compliance
(continued)
Page 35

32
IMPORTANT INSTRUCTIONS
Regulator y Compliance
(continued)
(This increases the separation
between the telephone
equipment and the receiver.)
3.Connect the telephone
equipment into an outlet on a
circuit difference from that
to which the television, radio,
or other receiver is connected.
4.Consult the dealer or an
experienced radio/TV
technician for help.
CAUTION: Changes or
modifications not expressly
approved by the manufacturer
responsible for compliance could
void the user’s authority to operate
the equipment.
THE PARTY RESPONSIBLE
FOR PRODUCT COMPLIANCE
Ameriphone Products by Walker,
A Division of Plantronics, Inc.
12082 Western Avenue
Garden Grove, CA 92841
Telephone: 800-874-3005
Industr y Canada Technical
Specifications
This product meets the applicable
Industr y Canada technical
specifications.
Before installing this equipment,
users should ensure that it is
permissible to be connected
to the
facilities of the local
telecommunications company. The
equipment must also be installed
using an acceptable method of
connection. In some cases, the
company’s inside wiring
associated with a single line
individual service may be
extended by means of a certified
connector assembly (telephone
extension cord). The customer
should be aware that compliance
with the above conditions may not
prevent degradation of service in
some situations.
Repairs to certified equipment
should be made
by an authorized
Canadian maintenance
facility
designated by the supplier. Any
repairs
or alterations made by the
Page 36

33
IMPORTANT SAFETY
INSTRUCTIONS
Regulator y Compliance
(continued)
user to this equipment, or
equipment malfunctions, may give
the telecommunications company
cause
to request the user to
disconnect the equipment.
Users should ensure for their own
protection that the electrical
ground connections of the power
utility, telephone lines and inter nal
metallic water pipe system, if
present, are connected together.
This precaution may be particularly
important in rural areas.
Caution: Users should not attempt
to make such connections
themselves, but should contact the
appropriate electric inspection
authority, or electrician, as
appropriate.
The Ringer Equivalence Number is
an indication of the maximum
number of terminals allowed to be
connected to a telephone interface.
The termination on an interface
may consist of any combination of
devices subject only to the
requirement that the sum of the
Ringer Equivalence Numbers of all
the devices does not exceed five.
[The term “IC:” before the
certification/registration number
only signifies that the Industry
Canada technical specifications
were met.]
Page 37

34
IMPORTANT INSTRUCTIONS
Warranty
This warranty applies only to
Ameriphone products that are
purchased and used in the United
States or Canada.
Ameriphone warrants the VCO
telephone against any defect in
materials or workmanship for the
period of one year from the date
of purchase.
If your Ameriphone product is
defective and returned within 30
days of the date of purchase, your
VCO dealer will replace it at no
charge.
If returned after 30 days, but
within one year from the date of
purchase, we will repair or
replace it at no charge. In the
repair of your VCO, we may use
new or reconditioned replacement
parts. If we elect to replace your
VCO, we may replace it with a
new or reconditioned product of
the same or similar design. Repair
or replacement will be warranted
for either 90 days or the
remaining time on the original
warranty period, whichever is
longer.
Implied warranties, including
those of fitness for a particular
purpose and merchantability (an
unwritten warranty that the
product is fit for ordinary use), are
limited to one year from date of
purchase. We will not pay for
loss of time, inconvenience, loss of
use of your VCO, or property
damage caused by your VCO or
its failure to work, or any other
incidental or consequential
damages. Some states do not
allow limitations on how long an
implied warranty lasts or the
exclusion of incidental or
consequential damages, so the
above exclusions or limitations
may not apply to you.
To get warranty ser vice for your
VCO, you must provide proof of
the purchase date. Within 30
days of the date of purchase,
return your VCO to the place
where you purchased it for
immediate replacement. After 30
days, call Ameriphone at 800874-3005 VOICE or 800-7722889 TTY for the authorized
service center near you. You must
Page 38

35
IMPORTANT SAFETY
INSTRUCTIONS
Warranty
prepay all shipping costs. We
suggest you save the original
package materials in the event
you need to ship the VCO. When
shipping for warranty repair,
include your name, address,
phone number, proof of date of
purchase, and a description of
the problem. After repairing the
product, we, (or the service
center) will ship it back to you at
no cost within the United States
and Canada. CANADIAN
RESIDENTS: call Ameriphone at
800-874-3005, 800-772-2889
TTY for instructions.
This warranty does not cover
defects resulting from accidents,
damage while in transit to our
service location, alterations,
unauthorized repair, failure to
follow instructions, misuse, use
outside the United States or
Canada, fire, flood, and acts of
God. Nor do we warrant the
product to be compatible with any
particular telephone equipment,
party line, key telephone systems,
or more sophisticated switching
systems. If your VCO is not
covered by this warranty, call us
at 800-874-3005 or 800-7722889 TTY for advice as to
whether we will repair your
VCO and other repair
information. The repair shall be
warranted for 90 days.
Page 39

36
IMPORTANT INSTRUCTIONS
Specifications
Maximum gain
High frequency (3 kHz): 30 dB
Wide band (300 to 3000 Hz): 20 dB
Tone control range
Full range: 300 to 3000Hz
using one slide control.
Dimensions
Size: 9
1
/2
" x 7" x 3
1
/4
"
Weight: 2.52 lbs.
Power Requirements
AC adapter: 9V, 300 mA
4 AA rechargeable batteries
(optional)
VCO and AMERIPHONE and Walker
are registered trademarks of Plantronics, Inc.
Precision engineered in the U.S.A.
Page 40

37
Page 41

38
Page 42

39
Instrucciones de Operación
VCO
VCO
El teléfono leída y de la charla
ESPAÑOL
®
Page 43

Contenido
Instrucciones Importantes de Seguridad .............................................................................................41
Presentando el VCO
Servicio de Garantía .......................................................................................................................45
Recibo de Compra ..........................................................................................................................45
Ayuda de Ameriphone ....................................................................................................................45
Control del Contenido ......................................................................................................................46
Funciones ......................................................................................................................................47
Configurando su VCO
Instalación de la Batería de Respaldo ................................................................................................48
El conectar paara el montaje del escritorio o de la pared ...................................................................49
Uso De escritorio ........................................................................................................................49
Montaje De la Pared ...................................................................................................................49
Usando su VCO
Volumen Entrante De la Voz..............................................................................................................51
Tono Entrante De la Voz ..................................................................................................................51
Timbre ..........................................................................................................................................51
En espera ......................................................................................................................................52
Remarcación del último número .......................................................................................................52
Flash..............................................................................................................................................52
Funciones
Indicador de lamada no respondida .................................................................................................53
Programación del número del servicio del retransmisión .....................................................................53
Programación de Mensaje de llamada de emergencia........................................................................54
Hacer llamadas de emergencia VCO con voice ................................................................................55
Programación de los botones de la memoria .....................................................................................56
Uso del servicio de retransmisión con VCO .......................................................................................57
Contestar llamadas VCO ................................................................................................................62
Comunicación en modo de teléfono de texto (TTY/TDD) ....................................................................62
Uso de la contestadora automática de texto .....................................................................................63
Uso de una contestadora externa ..................................................................................................65
Salida Audio Directa .....................................................................................................................66
El conectar con el LVD ...................................................................................................................67
El conectar con la impresora Q-90 ..................................................................................................67
Cuadro de localización de averías ....................................................................................................68
Cumplimiento con la Normas ...........................................................................................................69
Garantía .......................................................................................................................................74
Caractéristiques ..............................................................................................................................76
Page 44

41
IMPORTANT SAFETY
INSTRUCTIONS
Instrucciones Impor tantes
de Seguridad
Al usar su equipo telefónico, siga
cuidadosamente las instrucciones
básicas de seguridad que se
enumeran a continuación a fin de
evitar peligro de incendio, de
descargas eléctricas o de daños a las
personas:
1. Asegúrese de leer y comprender
todas las instrucciones.
2. Preste atención a las
advertencias e instrucciones que
figuran en el teléfono.
3. No use el teléfono cerca de la
bañera, el lavamanos, el
lavaplatos, el lavadero, un
sótano húmedo, cerca de la
piscina, ni en ningún lugar
donde haya agua.
4. Evite usar el teléfono (con
excepción de los de tipo
inalámbrico) durante una
tormenta. Existe la remota
posibilidad de recibir una
descarga eléctrica a causa de
un rayo.
5. No use el teléfono para
informar de un escape de gas
en un lugar próximo al escape.
6. Desconecte su teléfono antes de
limpiarlo. No utilice limpiadores
líquidos o en aerosol. Limpie el
aparato con un paño húmedo.
7. Ubique el teléfono en una
superficie estable. Las caídas
pueden causar serios daños al
aparato.
8. No debe cubrir las ranuras de
ventilación ni orificios de su
teléfono. Nunca coloque el
teléfono cerca de un radiador o
salida de calefacción. Si ubica
el aparato en una instalación
empotrada, asegúrese de que
cuente con la debida
ventilación.
9. Este teléfono debe funcionar
utilizando el voltaje especificado
en la base del aparato o en el
manual del usuario. Si no está
seguro del voltaje con que
cuenta la red eléctrica en su
casa, consulte con el vendedor
o con la empresa de servicios
eléctricos.
10. No coloque ningún objeto
sobre el cable de alimentación.
Al instalar el teléfono asegúrese
de que nadie pisará el cable o
tropezará con él.
11. No sobrecargue los
Page 45

42
IMPORTANT INSTRUCTIONS
Instrucciones Impor tantes
de Seguridad
tomacorrientes o las conexiones
de los prolongadores para
evitar riesgos de incendio o de
descarga eléctrica.
12. No introduzca objetos a través
de las ranuras del aparato. Ya
que podrían tocar puntos de
alta tensión o provocar un
cortocircuito con riesgo de
incendio o de descarga
eléctrica. No derrame líquidos
de ninguna clase sobre el
teléfono.
13. Para evitar el riesgo de una
descarga eléctrica, no intente
desarmar el aparato. Si abre o
quita las tapas puede exponerse
a una descarga de tensión
peligrosa, o a otro tipo de
riesgos. Si se cometen errores al
rearmar el aparato, el usuario
puede recibir una descarga
eléctrica al volver a usar el
teléfono.
14. Desconecte el teléfono y solicite
servicio técnico si se presenta
alguno de los siguientes
problemas:
A. El cable de alimentación o
el enchufe está quemado o
dañado.
B. Se ha derramado algún
líquido sobre el aparato.
C. El teléfono ha quedado
expuesto a la lluvia o se
mojó por alguna otra
causa.
D. El teléfono no funciona
normalmente al seguir las
instrucciones de uso. En tal
caso, ajuste únicamente los
controles que se incluyen en
las instrucciones de uso. Si
se realizan ajustes
indebidos, el técnico
especializado necesitará
más tiempo para lograr que
el teléfono vuelva a operar
normalmente.
E. El teléfono se ha caído o ha
sido dañado por fuera.
F. El teléfono presenta grandes
cambios en su rendimiento.
15. Nunca instale cableado
telefónico durante una tormen
ta eléctrica.
16. Nunca instale fichas de
conexión en un lugar húmedo
a menos que la ficha esté
específicamente diseñada
Page 46

43
Instrucciones Impor tantes
de Seguridad
para lugares húmedos.
17. No toque cables de teléfono o
terminales que no estén
aislados sin antes desconectar
la línea telefónica de la inter
faz de red.
18. Debe ser muy cuidadoso
cuando instale o modifique
líneas telefónicas.
19. Use únicamente los cables de
alimentación y las baterías
recomendadas en éste manual.
No arroje las baterías al fuego
porque pueden explotar.
Averigüe en su zona cuáles son
las normas vigentes para
desechar este tipo de producto.
RECOMENDACIONES DE
SEGURIDAD ADICIONALES
PARA USUARIOS DE CANADÁ
Se han incluido los siguientes puntos
como parte de los Requerimientos
CS-03.
La conexión estándar para el equipo
es CA11A. Este producto cumple con
las especificaciones técnicas de
aplicación de Industria Canadá.
NOTA: La etiqueta del Depar tamento
de Comunicaciones de Canadá
permite reconocer que se trata de un
equipo certificado.
Esta certificación asegura que el
equipo cumple con ciertos requisitos
de protección operativa y de
seguridad de la red de
telecomunicaciones. El Departamento
no garantiza que el equipo
funcionará a entera satisfacción del
usuario. Antes de instalar este equipo
el usuario debe asegurarse de que
esté autorizado a conectarse a la red
de la compañía de
telecomunicaciones de su zona.
Asimismo, se debe instalar el equipo
usando un método de conexión
aceptado. En algunos casos, la
instalación interna que hace la
compañía en el caso de un servicio
individual de línea única se puede
extender mediante la instalación de
un conector certificado (una extensión
del cable telefónico). El cliente debe
saber que el cumplimiento de los
requisitos arriba mencionados no
impide el deterioro del servicio en
ciertas circunstancias. Para reparar un
Page 47

44
IMPORTANT INSTRUCTIONS
Instrucciones Impor tantes
de Seguridad
equipo certificado se debe recurrir a
un servicio técnico autorizado y
recomendado en Canadá por el
proveedor.
Cualquier reparación o modificación
del equipo por parte del usuario
puede dar lugar a que la compañía
de telecomunicaciones solicite al
usuario que desconecte el equipo.
Por su propia protección, los usuarios
deben asegurarse de que las
conexiones terrestres del servicio de
electricidad, las líneas telefónicas y la
cañería de metal de la red sanitaria
interna, si la hubiere, estén todas
conectadas. Esta precaución es
particularmente importante en zonas
rurales.
PRECAUCIÓN: Los usuarios no deben
intentar realizar estas
conexiones por sí mismos. Deben
consultar a las autoridades
encargadas de inspeccionar la
instalación eléctrica o a un
electricista, según corresponda. El
Número de Equivalencia de
Dispositivo de Llamadas (Ringer
Equivalent Number) indica el número
máximo de terminales que está
permitido conectar a una interfaz de
teléfono. La terminación en una
interfaz puede consistir en cualquier
combinación de dispositivos sujeta al
requisito de que el Número de
Equivalencia de Dispositivo de
Llamadas de todos los dispositivos no
sea mayor que cinco.
CONSERVE ESTAS INSTRUCCIONES
Page 48

45
Presentando el VCO
Gracias por seleccionar el
teléfono amplificado VCO “Voice
Carry Over” de Ameriphone.
Este Manual de instrucciones y la
Guía rápida de funcionamiento
asociada le ofrecen la información
que usted necesita para utilizar su
VCO de una manera efectiva y
segura. Lea detenidamente
este manual antes de usar el
teléfono. Mantenga el manual
cercadel teléfono para su fácil
consulta.
Ser vicio de Garantía
El teléfono está diseñado para
proporcionarle años de excelente
servicio. Pero, si el teléfono
funciona mal y el Cuadro de
localización de averías de la
página 20 no resuelve el
problema, siga el procedimiento
de la garantíaque se encuentra en
la página 22.
Recibo de Compra
Asegúrese de guardar el recibo
de compra como prueba de la
fecha en que lo compró, en el
caso de que necesite servicio
técnico cubierto por la garantía.
Ayuda de Ameriphone
Para solicitar ayuda sobre el uso
de su VCO, llame a nuestro
Departamento de Ser vicio
al Cliente al número 800-874-
3005. Sírvase verificar que el
paquete de su VCO incluya los
artículos mostrados en la
figura 1.
Page 49

46
Control del Contenido
DIALOGUE
VCO
M1
a. a. a. a. a.
POWER
RELAY REL MGS SPACEAUTO ANS
SIGNAL
M2 M3 M4 M5
SELECT MEMORY b
X
HOLD PROG
LO
HI
FLASH REDIAL
TONE
VOL
AMPLIFY
A
B
C
G
H
I
T
U
V
W
X
Y
P
R
S
J
K
L
M
N
O
D
E
F
Q Z
! $ () =
"
/ ' + -
, .
?
: ;
b. b. b. b. b.
INSTRUCCIONES
DE MANEJO Y
GUÍA RÁPIDA
VCO
Auricular
Unidad Base
Cables Telefónicos
Cable Enrollado
del Auricular
Instrucciones
Figura 1 - Contenido del paquete
Soporte de Montaje
Fuente de Alimentación
Page 50

47
Funciones del VCO
Figura 2 - Controles de la unidad base
Conmutador de volumen del
TIMBRE
Conector de SALIDA DE
AUDIO
Adaptador CA y conexión
de línea telefónica
Conmutador de TONO/PULSO
Botón de RETRANSMISIÓN
Botón de MENSAJE DE
RETRANSMISIÓN
Botón de CONTESTADORA
AUTOMÁTICA
Pantalla LCD de visualización
Indicador luminoso de señal
Botón de MEMORIA
Botón de MEMORIA B
Botón SELECCIONAR
Botón de EMERGENCIA
Botón de REMARCACIÓN
Botón de FLASH
Control deslizante del
VOLUMEN
Luz intermitente del TIMBRE
Botón del AMPLIFICADOR
Indicador del AMPLIFICADOR
Botón del PROGRAMA
AUDIO
OUTPUT
RINGER
Off Lo Hi
DIAL
T P
DIALOGUE
VCO
M1
a. a. a. a. a.
POWER
RELAY REL MGS SPACEAUTO ANS
SIGNAL
M2 M3 M4 M5
SELECT MEMORY b
X
HOLD PROG
LO
HI
FLASH REDIAL
TONE
VOL
AMPLIFY
A
B
C
G
H
I
T
U
V
W
X
Y
P
R
S
J
K
L
M
N
O
D
E
F
Q Z
! $ () =
"
/ ' + -
, .
?
: ;
b. b. b. b. b.
Control deslizante
del TONO
Botón
HOLD
Indicador de
alimentación CA
Page 51

48
MANUAL
AUTO
Insert 4 AA
batteries
here
Press in
here with a
tip of a pen
to open
battery
compartment
Instalación del VCO
Se necesitan tres pasos para
la instalación del VCO.
• Inserte cuatro pilas de NiCad
recargables tipo AA para
respaldo en el caso de una
interrupción del suministro
eléctrico.
• Decida si desea que el
teléfono se coloque en una
mesa o cuelgue de la pared.
• Conecte los componentes
del teléfono.
Instalación de las pilas de respaldo
Si ocurre una interrupción del
suministro eléctrico, el VCO
funcionará durante 4 a 8 horas con
cuatro pilas de NiCad recargables
tipo AA (no incluidas). Si el teléfono
no se está usando, las pilas se
mantendrán cargadas por varias
semanas.
Para instalar pilas nuevas:
1. Deslice para abrir la tapa
del compartimiento de las
pilas en la parte de atrás del
teléfono (figura 3). Puede que
tenga que forzar con la punta
de un bolígrafo la abertura
que se localiza debajo de la
tapa del compartimiento.
2. Instale cuatro pilas de NiCad
recargables tipo AA.
Asegúrese de hacer coincidir
la polaridad de las pilas tal
como se muestra en la base
del compartimiento. (Los
signos “+” y “-”).
Conexión para utilizar en
una mesa o montar en la pared
Fije el conmutador de modos de
marcación en
T (tono) si dispone del
servicio de marcación por tonos. Fije
el conmutador en
P (pulso) si tiene el
sistema de marcación por disco.
Utilización en una mesa:
1. Conecte el cable de la línea
telefónica y el cable del
auricular al teléfono como se
muestra en la figura 4.
2. Enchufe el adaptador CA en un
tomacorriente y en el teléfono
como se muestra en la figura 4.
Figura 3 - Acceso de las pilas
Inserte 4
baterías del AA
Clave aquí con
una extremidad
de una pluma
para abrir el
compartimiento
de batería
Page 52

2.
Inserte las pestañas de la base
del teléfono en las pestañas de
la posición inferior de la base,
como se muestra en la figura 7.
Empuje con firmeza el soporte
de montaje hacia dentro y hacia
abajo hasta que calce en su lugar.
3. Localice un enchufe de teléfono
en la pared que esté cerca de
un tomacorriente CA y
sostenga el teléfono en forma
vertical.
4. Enchufe el cable de línea
telefónica corto en la toma
telefónica, como se muestra en
la figura 8.
3. Levante el auricular y
espere hasta oír el tono de
marcación.
El teléfono está listo para
ser usado.
Montaje De la Pared
1.
Deslice el gancho conmutador
del auricular hacia fuera de la
base como se muestra en la
figura 6 e invierta su posición
de manera que el gancho
conmutador apunte hacia arriba
y pueda sostener el auricular
cuando cuelgue el teléfono.
49
M
1
M
2
M
5
M
6
M
7
M
8
M
9
M
1
0
M
1
1
M
3
M
4
Cuerda De Línea
Adaptador de la CA
Microtelé
fono
Cuerda
(Rizada)
Figura 5 - Inversión del gancho
conmutador
M
AN
UAL
AUTO
Figura 6 - Soporte de montaje en
la pared
Figura 4 - Conexión de los componentes
Instalación del VCO
Page 53

50
Instalación del VCO
5. Incline el teléfono hacia abajo
para localizar la cabeza del
clavo que sobresale en la parte
INFERIOR. Inserte la cabeza
del clavo del RECEPTOR DE LA
PARED en la par te INFERIOR
del soporte de montaje del
teléfono.
6. Una vez que se ha insertado la
cabeza inferior del clavo,
inserte la cabeza SUPERIOR del
clavo en el soporte del teléfono
y deslice el teléfono hacia
abajo hasta que quede
firmemente colocado en la
pared.
Figure 8 -
Instalación de montaje en
la pared
M
A
N
U
A
L
A
U
T
O
7. Una vez que esté firmemente
colocado, conecte el cable de
línea corto al teléfono, el
adaptador CA al teléfono y
conecte el auricular del
teléfono.
8. Enchufe el adaptador CA en el
tomacorriente CA. Levante el
auricular y espere hasta oír el
tono de marcación. El teléfono
está ahora listo para ser usado.
Page 54

51
IMPORTANT INSTRUCTIONS
Utilización del VCO
Volumen de voz entrante
1. Presione el botón AMPLIFY
como se muestra en la figura 8
para encender o apagar el
amplificador de voz entrante.
Cuando el
AMPLIFICADOR está
encendido, el indicador
AMPLIFY se ilumina.
2.Ajuste el volumen en el
auricular moviendo el control
deslizante VOL como se
muestra en la figura 9. Cuando
el AMPLIFICADOR está encendido
,
el volumen de entra da será de
hasta 26 dB más alto.
Tono de voz entrante
El VCO tiene también un control
de tono para que usted pueda
ajustar el nivel de la frecuencia de
sonido que mejor se adapte a su
oído. Para identificar la banda de
frecuencias de sonido que mejor
se adapte a sus necesidades, siga
estos pasos:
1. Cuando oiga una voz en la
línea, presione el botón
AMPLIFY como se muestra en
la figura 8.
2. Ajuste el control deslizante
TONE como se muestra en la
figura 10 para adaptarlo a
su oído.
Volumen del timbre
1. Usted puede ajustar el volumen
del
TIMBRE hasta 95 dB. Los
ajustes disponibles son
OFF
E
0
#
HOLD PROG
TONE
LO HI
FLASH REDIAL
VOL
AMPLIFY
*
HOLD PROG
TONE
LO HI
FLASH REDIAL
VOL
AMPLIFY
Figura 9 - Control De la Diapositiva
Del Volumen
HOLD PROG
TONE
LO HI
FLASH REDIAL
VOL
AMPLIFY
Figure 10 -Control De la Diapositiva
Del Tono
Figura 8 - Instalación de montaje
en la pared
Page 55

52
IMPORTANT INSTRUCTIONS
Utilización del VCO
teléfono volverá a marcar hasta
31 dígitos.
(apagado), LO (bajo) y HI (alto)
como se muestra en la figura 11.
En espera
Para poner la línea en espera,
presione el botón
HOLD y vuelva a poner el auricular en su base. En el modo telé-
fono, la pantalla mostrará
“LLAMADA EN ESPERA Y SILENCIADA”. En el modo texto,
mostrará y transmitirá el mensaje
“ESPERE…”.
Nota: Si usted levanta un teléfono
de extensión en la misma línea
cuando el VCO está EN ESPERA,
el VCO se desconectará y usted
podrá continuar su conversación
en el otro extensión.
Remarcación del último número
Para volver a marcar el último
número marcado, levante el
auricular y presione REDIAL. El
E
0
#
HOLD PROG
TONE
LO HI
FLASH REDIAL
VOL
AMPLIFY
*
Figura 13 - Botón de remarcación
P
E
0
#
HOLD PROG
TONE
LO HI
FLASH REDIAL
VOL
AMPLIFY
*
Figura 12 - Botón Hold
RINGER
Off Lo Hi T P
DIAL
Figura 11 - Volumen del timbre
Flash
Presione el botón FLASH como se
muestra en la figura 14 para
acceder a los servicios especiales
disponibles de su compañía de
teléfonos local tales como
Llamada en espera y Llamada en
conferencia.
Figura 14 - Botón Flash
E
0
#
HOLD PROG
TONE
LO HI
FLASH REDIAL
VOL
AMPLIFY
*
Page 56

Programación del número del
ser vicio de retransmisión
1. Levante el auricular y presione
el botón
PROG.
2. Introduzca el número de telé
fono para la
RETRANSMISIÓN
mediante el uso del teclado.
3. Presione el botón RELAY para
almacenar el número. Cuelgue
inmediatamente.
53
IMPORTANT SAFETY
INSTRUCTIONS
Funciones Especiales
0
#
HOLD PROG
TONE
LO HI
FLASH REDIAL
VOL
AMPLIFY
*
Figura 16 - Botón Flash
HOLD PROG
TONE
LO HI
FLASH REDIAL
VOL
AMPLIFY
Figura 15 - Indicador de llamada
no contestada
G
H
I
P
R
S
T
U
V
O
P
E
W
X
Y
J
K
L
M
N
O
4
5
6
789
0
#
*
Figura 17 - Teclado del teléfono
Indicador de llamada no respondida
Si se recibe una llamada y ésta
no es respondida después de 4
timbres, el indicador de llamada
no respondida destellará. La luz
continuará a destellar hasta que
se levante el auricular o hasta que
se desconecte el luministro de
CA. Esta función no requiere
ningún servicio opcional de la
compañía de teléfonos. Es útil en
el caso de que usted se tenga que
ausentar por poco tiempo y está
esperando una llamada. Para cancelar esta función, desenchufe el
adaptador CA y saque todas las
pilas. Presione el botón
HOLD
mientras vuelve a conectar el
adaptador CA, y luego reinstale
las pilas. Repita este
procedimiento para volver a
habilitar esta función.
Page 57

54
IMPORTANT INSTRUCTIONS
Funciones Especiales
3. Escriba su nombre (máximo de 30
letras) y presione para guardarlo.
(Para número/letra, presione la
tecla varias veces hasta que el
número o la letra deseada
aparezca en la pantalla. Espere
un segundo para que el cursor
avance al siguiente espacio. Vea,
en el capítulo “Comunicación en
modo de teléfono de texto
(TTY/TDP)”, la sección Hacer una
llamada TTY.
4. Escriba su dirección (máximo de
45 letras) y presione para guardarla.
5. Introduzca el número de teléfono
de su domicilio (hasta 14 dígitos)
y presione para guardarlo. Si su
sistema de retransmisión necesita
que usted le suministre el nombre
de su empresa de telefonía de
larga distancia, continúe con el
paso 6, de lo contrario, siga al
paso 7.
6. Escriba el nombre de su empresa
de telefonía de larga distancia
(hasta 14 letras) y presione para
guardarlo.
7. Cuelgue.
8. Para cambiar alguna información,
repita desde el paso 1.
Programación de mensaje de llamada
de emergencia/ teléfono de su domicilio
Número y empresa de telefonía
de
larga distancia Para programar:
1. Levante el auricular, presione
el botón PROG y luego el
botón.
2. Introduzca el número 911 si
dispone de este servicio, o el
número del servicio local de
emergencia, hasta 14 dígitos.
Presione para guardarlo.
M1
a. a. a. a.
POWER
RELAY REL MGS AUTO ANS
M2 M3 M4
X
b. b. b. b.
Figure 18 - Bot
ón RELAY
P
E
0
HOLD PROG
TONE
LO HI
AMPLIFY
*
Figura 19 – Botón
PROG
a. a.
M3 M4
SELEC
A
B
b. b.
H
I
P
R
S
T
U
V
O
P
E
W
X
Y
K
L
N
O
5
6
0
#
Figure 21 - Teclado
del teléfono
a. a.
SELEC
A
b. b.
Figura 20 - Botón de
EMERGENCIA
Figure 22 - Botón de
EMERGENCIA
Page 58

55
IMPORTANT SAFETY
INSTRUCTIONS
Funciones Especiales
4. El teléfono VCO marca el número
de emergencia (si está
programado) y transmite
el mensaje: "AUXILIO, SOY UN
USUARIO DE VCO,RESPONDA
ESCRIBIENDOEN UN TTY, Y
ESCUCHE MI VOZ EN SU
TELÉFONO, (su nombre), (su
dirección), (su número) ADELANTE".
5. Este mensaje se retransmitirá
cada tantos segundos.
6. El mensaje dejará de aparecer
cuando comience a recibir el
mensaje que el operador escribió.
O bien, usted puede parar y
reiniciar el mensaje al presionar.
7. Continúe la conversación leyendo
y hablando.
La marcación por memoria del ser vicio
de emergencia y el mensaje de
emergencia se ofrecen sólo como
funciones de utilidad.
Ameriphone no asume ninguna
responsabilidad por la confianza del
cliente en estas funciones.
a. a. a. a.
M2 M3 M4 M5
SELECT MEMORY b
A
B
D
E
b. b. b. b.
Figura 23 - Botón de
EMERGENCIA
Hacer llamadas de emergencia
VCO con texto y envío de mensajes
de emergencia Mensaje
1. Levante el auricular.
2. Marque el número de emergencia
si no se ha programado en la
memoria (véase el capítulo anterior).
3. Presione .
Hacer llamadas de emergencia
VCO con voz
1. Marque el número de emergencia
911.
2. Cuando el número responda,
la luz de la señal centellea.
3. Diga su nombre, su dirección y
la ayuda que necesita.
Page 59

56
IMPORTANT INSTRUCTIONS
Programación de los botones de la
memoria
Usted puede marcar automáticamente
diez (10) números de teléfono
programado mediante el uso de
los botones de memoria que se
muestran en la figura 24. Cada
botón se puede programar (o
reprogramar usando el mismo
procedimiento) con un número de
teléfono de hasta 15 dígitos de
extensión.
Para programar los 5 primeros
números enun botón de memoria,
siga estos pasos:
1. Levante el auricular y presione PROG como
se muestra en la figura 25.
2. Introduzca el número de
teléfono en el teclado (figura
26) tal como usted lo marcaría
normalmente. Si usted tiene que
marcar un “1” y/o el código de
área, asegúrese de incluirlo.
3.Seleccione y presione uno de
los botones de la memoria
(M1-M5) (figura 24) para
almacenar este número en ese
botón.
4.Inmediatamente, cuelgue el
auricular.
Nota: Cualquier número que se
haya almacenado previamente en
ese número de botón se borrará y
se sustituirá por el nuevo.
5. Para cambiar un número
almacenado, repita el proceso
de programación comenzando
por el paso 1.
Note: Please do not program 911
into any memor y button
M1
a. a. a. a. a.
POWER
RELAY REL MGS SPACEAUTO ANS
SIGNAL
M2 M3 M4 M5
SELECT MEMORY b
X
b. b. b. b. b.
Figura 24 - Botones de la memoria
Funciones Especiales
O
P
E
0
#
HOLD PROG
TONE
LO HI
FLASH REDIAL
VOL
AMPLIFY
*
Figure 25 - Botón de PROG
G
H
I
P
R
S
T
U
V
O
P
E
W
X
Y
J
K
L
M
N
O
4
5
6
789
0
#
*
Figura 26 - Teclado del teléfono
Page 60

57
IMPORTANT SAFETY
INSTRUCTIONS
Funciones Especiales
Para almacenar los 5 segundos
números en las mismas localidades
de
la memoria:
1. Levante el auricular y presione
PROG como se muestra en la
figura 25.
2. Introduzca el número de teléfono
en el teclado tal como usted lo
marcaría normalmente, como se
muestra en la figura 26.
3. Presione el botón
MEMORY B y
luego el botón de
MEMORIA
(M1-M5)
deseado (Figura 24)
para almacenar este número
como el segundo número de
teléfono en la misma localidad de
memoria.
Hacer llamadas telefónicas estándar
1. Haga o conteste llamadas de
voz como siempre.
2. Presione el botón
AMPLIFY
para encender o apagar el
amplificador.
3. Ajuste los controles deslizantes
VOLUME y TONE para ajustar
el volumen y el tono a su oído.
4. Cuelgue el teléfono para
restablecer.
Uso del ser vicio de retransmisión
con VCO
Una persona con deficiencia
auditiva que use su voz puede
usar el sistema "voice carry over"
(VCO) mediante el servicio de
retransmisión local gratuito para
comunicarse con una persona de
audición normal. En una llamada
VCO (voice carry over),
las personas con deficiencia
auditiva le hablan directamente a
la otra persona. La Asistente de
Comunicaciones (CA, por sus
siglas en inglés) retransmite la
respuesta de la otra persona, lo
cual aparece como texto en la
pantalla de su teléfono VCO.
Basta con que usted lea y hable.
No se le puede hablar a la otra
persona o a la CA mientras el
teléfono VCO está recibiendo
texto mensajes de texto.
E
0
#
HOLD PROG
TONE
LO HI
FLASH REDIAL
VOL
AMPLIFY
*
Botón AMPLIFICAR
Page 61

58
IMPORTANT INSTRUCTIONS
Funciones Especiales
Siga estos pasos para hacer
llamadas VCO:
1. Para hacer una llamada VCO,
levante el auricular y presione
el botón “RELAY” o marque
directamente el 7-1-1, usando
su teclado. La Asistente de
Comunicaciones (CA) anuncia
en modo texto: “ Hola,
llamada VCO, ADELANTE".
2. Presione el botón REL MSG
para pedir una llamada VCO.
Debe esperar que se complete el
mensaje, lo cual se indica mediante la
palabra "ADELANTE" en la pantalla
cuyo texto proviene de la CA. Es
importante que la otra persona sepa
que es su turno para hablar, lo cual se
indica mediante la palabra “ADELANTE
"
Algunos servicios de retransmisión
ofrecen retransmitir las llamadas de un
usuario VCO a otro usuario VCO, lo
cual se llama Retransmisión Voz a Voz o
VTV, por sus siglas en inglés.
Comuníquese con su servicio local de
retransmisiones para pedir más
información. Los servicios de
retransmisión varían de estado a estado,
y los procedimientos que usan el
teléfono VCO pueden variar un poco.
Siga los pasos siguientes para determinar
el procedimiento que debe usar para su
servicio local de retransmisión.
Hacer llamadas VCO
Si su servicio de retransmisión tiene
un número de teléfono dedicado para
las llamadas TTY/TDD incluido en la
guía telefónica, use ese número para
hacer llamadas VCO. (El número de
voz es para que las personas le llamen a
través del servicio de retransmisión).
M1
a. a. a. a.
POWER
RELAY REL MGS AUTO ANS
M2 M3 M4
X
Figura 27 - Botón RELAY
M1
a. a. a. a. a
POWER
RELAY REL MGS SPAUTO ANS
M2 M3 M4
X
Figura 28 - Botón REL MSG
Page 62

59
IMPORTANT SAFETY
INSTRUCTIONS
Funciones Especiales
Suministrar verbalmente la
información de la llamada:
1. Marque con el teclado o
con la memoria
RELAY.
2. La CA contesta con su voz
(usted puede saber por el
parpadeo del indicador de
la señal). Hable a través del
auricular y dígale a la CA
que usted es un usuario
VCO y déle a la CA todas
las
instrucciones de la
llamada.
Repita la
información una vez más
para asegurar que la CA
reciba todas las instrucciones.
M1
a. a. a. a.
POWER
RELAY REL MGS AUTO ANS
M2 M3 M4
X
Figura 29 - Botón RELAY
SIGNAL
LED
M2 M3 M4 M5
Figura 30 - Indicador luminoso
de señal
3.
Cuando se le avise "GA
(ADELANTE)"
en la pantalla,
pronuncie el número que usted
desea llamar. (En algunas
regiones, usted sólo puede dar
la información por escrito.)
4. Cuando se conecta la llamada,
lea los mensajes recibidos en
la pantalla y comience a
hablar al ver el mensaje
"ADELANTE". Hable
a través del auricular y no
olvide decir “adelante" cuando
haya terminado de hablar
y sea el turno de la otra
persona para hablar.
5. Continúe su conversación
leyendo y hablando.
6. Cuelgue el auricular cuando
haya terminado.
Si su servicio de retransmisión
tiene un número de teléfono
común para voz y para
llamadas TTY/TDD, usted
puede suministrar la
información de la llamada por
voz o por escrito.
Page 63

60
IMPORTANT INSTRUCTIONS
Funciones Especiales
2. Marque el número que
desea llamar con el teclado
(si comete un error, presione
PROG para devolverse un
espacio y borrar el número
incorrecto), y enseguida
presione las teclas * y #
(esto escribirá "ADELANTE".)
3. Cuando se conecte,
proceda con la llamada
leyendo y hablando.
En las áreas en donde la CA
necesita saber su empresa de
telefonía de larga distancia y/o
su número de domicilio,
usted debe completar los pasos
que se indican en el capítulo
"Programación de su mensaje de
llamada de emergencia".
1. Cuando la CA le solicite la
información, presione REDIAL.
3.Cuando se conecte, lea los
mensajes recibidos en la
pantalla y comience a
hablar cuando aparezca
"ADELANTE" . Diga
adelante" cuando haya
terminado y sea el turno de
la otra persona para hablar.
4. Continúe su conversación
leyendo y hablando.
Suministrar por escrito la
información de la llamada:
1. Después de que la CA
conteste la llamada primero
de manera verbal, espere
tranquilamente durante uno
o dos segundos; la CA
contestará entonces por
escrito. Cuando usted vea
"ADELANTE", presione
SELECT y luego presione los
botones REL MSG.
Aparecerá el mensaje
"LLAMADA VCO, ADELANTE"
en su pantalla.
M1
POWER
RELAY REL MGS SPAUTO ANS
M2 M3 M4
X
Figura 31 - Botón REL MSG
P
E
0
#
HOLD PROG
TONE
LO HI
FLASH REDIAL
VOL
AMPLIFY
*
Figura 32 - Botón PROG
Page 64

61
IMPORTANT SAFETY
INSTRUCTIONS
Funciones Especiales
3. Cuando la CA contesta en
modo texto, presione el botón
de memoria deseado. Si el
número está almacenado como
el segundo número en la
memoria, presione MEMORY B
primero y luego el botón de
memoria.
4. El teléfono envía y presenta
este mensaje en la pantalla
“SOY UN USUARIO VCO,
LLAME AL (número almacenado
en el botón de memoria
seleccionado), ADELANTE”. No
tiene que pronunciar el número
de teléfono. Si es necesario,
presione el mismo botón de
memoria para repetir el mensaje.
5. Cuando se conecte, proceda
con la llamada como lo hace
normalmente con las
comunicaciones VCO.
El procedimiento anterior funciona
solamente cuando el teléfono está en
modo texto. Cuando esté usándolo en
modo teléfono, al presionar cualquier
botón de memoria se marca el
número de teléfono almacenado en
esa memoria. (Véase el capítulo
"Marcación por memoria")
2. Su teléfono VCO transmitirá:
"Mi número es...., Mi empresa
de larga distancia es....ADELANTE".
Hacer llamadas VCO por
marcación de memoria:
Después de que usted presione
RELAY y le atienda una CA, al
presionar cualquier botón de
memoria se le informará a la
CA que usted desea hacer una
llamada VCO y le dará el
número de teléfono almacena
do en el botón de memoria;
todo esto de forma simultánea.
No es necesario que pronun
cie el número de teléfono.
1. Levante el auricular.
2. Presione
RELAY.
HOLD PROG
TONE
LO HI
FLASH REDIAL
VOL
AMPLIFY
Figura 33 - Botón REDIAL
M1
a. a. a. a. a.
POWER
RELAY REL MGS SPACEAUTO ANS
M2 M3 M4
X
b. b. b. b. b.
Figura 34 - Botón RELAY
Page 65

62
IMPORTANT INSTRUCTIONS
Funciones Especiales
4. Continúe su conversación
leyendo y hablando.
Le recomendamos encarecidamente que le diga a sus amigos y
asociados que le llamen a través
del servicio de retransmisión
usando el número de retransmisión por voz correspondiente a
sus estados.
Comunicación en modo de
teléfono de texto (TTY/TDD)
Hacer una llamada TTY
:
Puede usar el teléfono VCO para
comunicarse con un teléfono de
texto (TTY/TDD) La persona que
usted llamó comenzará a usar su
TTY y le enviará un mensaje de
saludo. Cuando el teléfono VCO
recibe mensajes de texto,
automáticamente cambia del
modo de teléfono regular al modo
texto. Aparecerá en la pantalla
“MODO BAUDOT,” y luego
aparecerá el texto recibido.
Después de que aparezca
“ADE-
LANTE”, usted puede contestar
usando el teclado del teléfono
VCO para escribir sus mensajes.
Contestar llamadas VCO
1. Levante el auricular cuando
suene el teléfono.
2. Presione
REL MSG. Lea el
mensaje recibido en la
pantalla.
3. Cuando vea
“ADELANTE” en
la pantalla, hable con la
persona que llamó. Si no
aparece nada en la pantalla,
no es una llamada VCO, es
una llamada de voz. Hable
por el teléfono y diga “Soy un
usuario VCO. Llámeme
a través de su operadora de
retransmisión local”. Suministre
el número de la línea de voz
del servicio de retransmisión.
M1
a. a. a. a.
POWER
RELAY REL MGS SAUTO ANS
M2 M3 M4
X
Figure 35 - REL MSG button
Page 66

63
Funciones Especiales
Para escribir un mensaje, use las
teclas del teclado y sus correspondientes letras (por ejemplo, el
número
2 sir ve también para las
letras A, B, y C). En la pantalla,
observe que el carácter que
aparece encima del cursor cada
vez que usted presiona la misma
tecla. Cuando aparece la letra
deseada, espere un segundo para
que el cursor avance al siguiente
espacio. Entonces, introduzca el
siguiente carácter. La tecla
SPACE
sirve como barra de espaciamiento, y la tecla BACKSPACE sirve
como tecla de retroceso y corrección. Las letras “Q” y “Z” se
encuentran en la tecla del número
1. Los otros signos de puntuación
se crean con las teclas
*, 0,
y #.
Selección de la velocidad de
transmisión del texto:
El teléfono VCO toma como valor
predeterminado la velocidad de
transmisión estadounidense de
45,5 cuando usa las comunicaciones de texto. Para cambiar a
la velocidad de transmisión internacional, basta con presionar
SELECT y, luego AUTO ANS. La
pantalla presentará el mensaje
“VELOCIDAD INT SELECCIONADA.” Usted puede volver a cam-
biar a la velocidad estadounidense de la misma manera
o colgando el teléfono.
Acoplamiento acústico de un
TTY al teléfono VCO:
1. Levante el auricular y póngalo
dentro del dispositivo de
acoplamiento acústico para
TTY.
2. Marque el número con el
teclado del teléfono VCO.
3. Presione
SELECT para ir al
modo Baudot
4. Presione cuatro veces la tecla
1
hasta que aparezca “&” en la
pantalla.
5. Continúe la conversación
mediante el uso del TTY.
6. Cuando termine, cuelgue
el auricular.
Uso de la contestadora
automática de texto
La contestadora automática del
teléfono VCO puede grabar un
Page 67

64
IMPORTANT INSTRUCTIONS
Funciones Especiales
total de 1.728 caracteres en mensajes de texto. La contestadora
envía el mensaje predeterminado
de fábrica siguiente:
“GRACIAS
POR LLAMAR, TDEJE UN MENSAJE
ADELANTE”
para saludar a la per-
sona que llama.
Para prender la
contestadora automática:
1. Levante el auricular.
2. Presione el botón
AUTO ANS.
Aparecerá en la pantalla:
“CONTESTAUTO PRENDIDA 00
MENS1=LEER 2=BORRAR
3=AP AGAR”. El número de los
mensajes recibidos anteriormente
aparecerán en pantalla hasta que
usted los borre. Borre los mensajes
viejos cuando no los necesite para
que esté seguro de que hay
suficiente memoria para los
mensajes nuevos.
3. Levante el auricular . La
contestadora automática está
entonces lista para tomar los
mensajes.
Para reproducir los
mensajes grabados:
1. La pantalla indicará el
número de mensajes que
usted ha recibido.
2. Presione
1 para leer sus
mensajes. O bien, vuelva a
presionar 1 para avanzar
rápidamente al siguiente
mensaje. Cuando haya
terminado, presione
2 para
borrar los mensajes.
3. Presione
3 para apagar la
contestadora.
Programación de su
contraseña (sólo para la
recuperación de mensajes desde
otra localidad): Por razones de
seguridad, usted puede establecer una
contraseña personal para proteger la
privacidad de los mensajes dejados en
su contestadora automática VCO.
1. Levante el auricular y
presione
AUTO ANS.
2. Presione
4.
3. Escriba su contraseña
después del
“ / “ siguiendo
los procedimientos
correspondientes.
4. Cuando haya terminado,
presione
SELECT para volver
al modo de la contestadora.
5. Cuando usted recupera sus
mensajes desde otra
localidad, debe introducir su
contraseña con exactitud.
Véase el capítulo siguiente.
Page 68

65
IMPORTANT SAFETY
INSTRUCTIONS
Funciones Especiales
Recuperación de mensajes
desde otra localidad:
1. Llame a su teléfono VCO
desde un teléfono de texto,
desde otro teléfono VCO, o
desde un teléfono público
tipo TTY/ TDD.
2. Cuando conteste su VCO,
usted verá el mensaje de
saludo.
3. Introduzca el signo de la
barra diagonal “ / ”, y su
contraseña personal si usted
ha establecido una. Luego,
presione la barra de espaci
amiento o la tecla de
retorno.
4. Sus mensajes aparecerán en
la pantalla TTY.
5. Al final de los mensajes,
aparece
“BORRAR MENS?
S/N”
, seguido por “REPETIR
MENS? S/N” . Escriba “S”
en caso afirmativo y “N”, en
caso contrario.
Uso de una contestadora
externa de voz
Ya que el VCO puede ser usado
por toda la familia como teléfono
amplificado estándar, usted puede
desear conectarlo a una contestadora externa de voz . Sin embargo, el teléfono VCO tiene una función de contestadora automática
la cual se puede activar al presionar el botón AUTO ANS en
el VCO. Si una contestadora de
voz se conecta al VCO y está activada al igual que la función de la
contestadora automática del
VCO, cuando el teléfono VCO
contesta la llamada, se apagará
la contestadora de voz y no se
grabará nada. Así mismo, si el
teléfono VCO está recibiendo un
texto al mismo tiempo que usted
está reproduciendo los mensajes
de voz, la reproducción de mensajes de voz interferirá con la
recepción de los mensajes de
texto.
Si usted desea usar una contestadora de voz con su teléfono VCO,
usted puede hacerlo. Pero, debe
asegurarse de que la función de
la contestadora automática del
teléfono esté desactivada.
Page 69

66
IMPORTANT INSTRUCTIONS
Funciones Especiales
Para usar este puerto, enchufe un
cable auxiliar compatible y
conéctelo a su dispositivo de
ayuda auditiva. Hable a través
del auricular cuando use la
conexión de salida de audio.
Cable de adaptador
para implante coclear:
Hay un cable de adaptador
coclear disponible en Ameriphone
que se puede emplear para enchufar el teléfono VCO directamente
en un procesador de lenguaje.
Salida directa de audio
El conector AUDIO OUTPUT
permite conectar el teléfono VCO
a un dispositivo de ayuda auditiva, un lazo alrededor del cuello,
un implante coclear u otro dispositivo de ayuda auditiva.
AUDIO
OUTPUT
AL
P
Figura 36 - Conector de salida de audio
DIALOGUE
VCO
M1
a. a. a. a. a.
POWER
RELAY REL MGS SPACEAUTO ANS
SIGNAL
M2 M3 M4 M5
SELECT MEMORY b
X
HOLD PROG
LO
HI
FLASH REDIAL
TONE
VOL
AMPLIFY
A
B
C
G
H
I
T
U
V
W
X
Y
P
R
S
J
K
L
M
N
O
D
E
F
Q Z
! $ () =
"
/ ' + -
, .
?
: ;
b. b. b. b. b.
Figura 37 - Conexión del procesador
de lenguaje
¡ADVERTENCIA! Durante una
tempestad, evite el uso de telé-
fonos ya que puede sufrir una
sacudida eléctrica por la ocurrencia de relámpagos. Antes de enchufar cualquier cable en su procesador de lenguaje, debe consultar
con el fabricante de su implante.
Conexión del procesador de
lenguaje:
Enchufe el terminal monofónico
del enchufe en el procesador de
lenguaje.
Enchufe el terminal estéreo del
enchufe en el conector de salida
de audio del teléfono.
Hable a través del auricular cuando use el cable adaptador para el
implante coclear.
Page 70

67
IMPORTANT SAFETY
INSTRUCTIONS
Funciones Especiales
Conexión a la
impresora Q-90
El teléfono VCO puede usarse con
la impresora Q-90 de
Ameriphone. Conecte el cable de
la impresora Q-90 al conector de
la parte trasera del teléfono VCO.
Conexión a la pantalla
LVD y la impresora Q-90
El teléfono VCO se puede conectar tanto a la pantalla LVD como a
la impresora Q-90 mediante el
uso de un cable opcional. El
cable está disponible en
Ameriphone y puede conectar la
pantalla LVD a la impresora Q-90.
El número del modelo del cable
en Ameriphone es #79028.
MANUAL
AUTO
P
A
P
E
R
F
E
E
D
P
R
I
N
T
S
IZ
E
O
N
/
O
F
F
L
I
N
E
Figura 39 - Conexión de la impresora
P
RIN
TER
T
T
Y
/
T
D
D
1
2
V
D
C
5
0
0
m
A
MANUAL
AUTO
P
A
P
E
R
F
E
E
D
P
R
I
N
T
S
I
Z
E
O
N
/
O
F
F
L
I
N
E
Figura 40 - Conexión del teléfono VCO a
la pantalla L VD y a la impresora Q-90
impresora.
Conexión al LVD
El teléfono VCO puede usarse
con la pantalla LVD de
Ameriphone, la pantalla de visualización grande para el teletipo Q90 TTY. Conecte el cable LVD
cable al conector de la parte
trasera del teléfono VCO Tenga
cuidado de no doblar ninguna
clavija.
PRINTER
T
T
Y
/
T
D
D
1
2
V
D
C
5
0
0
m
A
MANUAL
AUTO
Figura 38 - Conexión de la pantalla L VD
Page 71

68
IMPORTANT INSTRUCTIONS
Cuadro de localización de averías
SÍNTOMA
La pantalla se pone en blanco.
No hay tono de marcación.
No aparecen las letras cuando se
presiona el teclado
No se marca el número cuando se
presiona el botón de memoria
No sucede nada cuando se presiona
el botón
RELAY
Mensaje indescifrable en la pantalla
La llamada no se puede marcar, o se
marca lentamente
El teléfono VCO no tiene un timbre
audible
CAUSA Y ACCIÓN CORRECTIVA
No hay suministro de energía. La pantalla funciona
con electricidad de CA, compruebe que el adaptador CA esté enchufado en la pared, y que el
conector esté enchufado en el teléfono VCO.
1. Compruebe todas las conexiones del cable
telefónico.
2. Extraiga las pilas auxiliares, si éstas están
instaladas. Enchufe el adaptador CA primero y
luego, reinstale las pilas.
Se encuentra todavía en modo teléfono. Presione
SELECT para entrar en el modo texto.
No hay ningún número almacenado en ese botón
de memoria. Véase “Programación de números de
marcación frecuente.”
No hay ningún número almacenado en el botón
RELA Y. Véase “Programación del número de
servicio de transmisión.”
Presione SELECT una vez para corregir el mensaje
recibido.
Véase el capítulo “Instalación del VCO” para
restablecer el conmutador de modos de marcación.
Asegúrese de que el timbre no esté establecido en
la posición “Off”.
El cuadro siguiente le ayudará a resolver la mayoría de los problemas que
pueden surgir durante el uso de su teléfono. Si la dificultad continúa,
comuníquese con Ameriphone o con su distribuidor autorizado para pedir
ayuda.
Page 72

69
IMPORTANT SAFETY
INSTRUCTIONS
Cumplimiento
con las Normas
Información correspondiente a la
sección 68 de las Normas de la
FCC
Este Sistema cumple con lo
establecido en la sección 68 de
las Normas de la FCC y los
requisitos establecidos por el
ACTA. En la par te inferior de este
equipo se encuentra una etiqueta
que entre otras informaciones
contiene un identificador de
producto en el formato
US:AAAEQ##TXXXX. Deberá
proporcionar este número a su
compañía de teléfonos si le es
requerido.
El tomacorriente y la ficha de
conexión usados para conectar
este equipo a la instalación
eléctrica del establecimiento y a
la red telefónica deberán cumplir
con las normas de aplicación de
la FCC sección 68 y con los
requisitos establecidos por el
ACTA. Se provee con este
producto un cable de teléfono y
enchufe modular RJ11 USOC que
cumple con las normas vigentes.
Está diseñado para ser conectado
a un tomacorriente modular que
también cumple con las normas
vigentes. Vea las instrucciones de
instalación para mayores detalles.
El REN (Número de Equivalencia
de Dispositivo de Llamadas) se
utiliza para determinar el número
de artefactos que se pueden
conectar a una línea de teléfono.
Es posible que los teléfonos no
suenen en respuesta a una
llamada entrante cuando el REN
es excesivo. En la mayoría de las
áreas -aunque no en todas- la
suma de los REN no debe ser
mayor que cinco (5.0). Contacte a
su compañía telefónica local para
confirmar el número de artefactos
que pueden conectarse a una
línea, según lo determinado por el
REN total. En el caso de
productos aprobados con
posterioridad al 23 de Julio de
2001, el REN del producto es
parte del identificador de
producto con formato
US:AAAEQ##TXXXX.
Los dígitos representados por ##
son el REN sin el punto decimal
(por ejemplo, 03 es un REN de
Page 73

70
IMPORTANT INSTRUCTIONS
0.3). En el caso de productos
anteriores, el REN aparece en la
etiqueta por separado.
Si este equipo de teléfono, el
teléfono VCO, daña la red
telefónica, la compañía de
teléfonos le informará por
anticipado que podría ser
necesario discontinuar
temporalmente su servicio. Pero si
no resultara posible informarle por
anticipado, la compañía de
teléfonos se comunicará con el
cliente tan pronto como sea
posible. Además, se le informará
sobre su derecho a presentar una
queja en la FCC si lo considera
necesario. La compañía de
teléfonos podrá hacer cambios en
sus instalaciones, equipos,
operaciones o procedimientos que
podrían afectar la operación de
los equipos. Si esto ocurriera, la
compañía de teléfonos se lo
informará por anticipado de
modo que usted pueda hacer las
modificaciones que resulten
necesarias para mantener su
servicio libre de interrupciones.
Si este equipo telefónico presenta
problemas, o para obtener
información sobre reparaciones o
garantías, contacte a Walker /
Ameriphone al 1-800-874-3005.
Si el equipo está causando daños
a la red telefónica, la compañía
de teléfonos podría solicitarle
desconectar el equipo hasta que
se resuelva el problema.
NO DESARME ESTE EQUIPO.
Este equipo telefónico no está
concebido para ser reparado, y
no contiene partes reparables. La
apertura del equipo o cualquier
intento de repararlo anulará la
garantía. Llame al 1-800-8743005 para información sobre
servicio técnico o reparaciones.
La conexión a un servicio de línea
compartida se encuentra sujeta a
las tarifas del estado. Contacte a
la comisión de empresas de
servicios públicos del estado, a la
comisión de servicios públicos o a
la comisión de corporaciones
para obtener información.
Si su casa posee un sistema de
alarma conectado a la línea
telefónica, asegúrese de que la
instalación de este equipo
telefónico no desactive su sistema
Cumplimiento
con las Normas
Page 74

71
de alarma. Si tiene dudas sobre
lo que puede llegar a desactivar
a su sistema de alarma, consulte
con su compañía de teléfonos o
con un técnico calificado.
Este equipo telefónico es
compatible con audífonos.
Le recomendamos la instalación
de un supresor de sobrecargas de
línea en el tomacorriente en el
cual se conecta este equipo. Las
compañías telefónicas informan
que sobrecargas eléctricas,
típicamente descargas de rayos,
son muy destructivas para equipos
de clientes conectados a la red de
CA.
Teléfonos en que las llamadas se
pagan con monedas o tarjetas de
crédito:
La compañía de teléfonos debe
ser notificada antes de la
conexión para que se respeten las
tarifas del estado. En algunos
estados la comisión de empresas
de servicios públicos del estado,
la comisión de servicios públicos
o la comisión de corporaciones
deben aprobar la conexión por
anticipado.
Información correspondiente
a la sección15 de las Normas
de la FCC
Este artefacto cumple con lo
establecido en la sección 15 de
las Normas de la FCC. Su
operación se encuentra sujeta a
las siguientes dos condiciones: (1)
Este artefacto no debe causar
interferencias dañinas, y (2) este
artefacto debe aceptar cualquier
interferencia que reciba,
incluyendo aquellas interferencias
que pueden causar fallas en su
operación.
Su Teléfono VCO ha sido
sometido a pruebas, y a través
de ellas se ha demostrado que
cumple con los límites de un
artefacto digital de Clase B, según
lo establecido en la sección 15 de
las Normas de la FCC. Estos
límites están diseñados para
proveer una razonable protección
contra las interferencias dañinas
en las instalaciones domiciliarias.
Cumplimiento
con las Normas
Page 75

72
IMPORTANT INSTRUCTIONS
Cumplimiento
con las Normas
Este equipo genera, usa y puede
irradiar energía de radiofrecuencia, y si no es in stalado y usado
según las instrucciones, puede
causar interferencias dañinas a
las comunicaciones por radio.
Por otro lado, no se puede
garantizar que la generación de
interferencias pueda evitarse en
todas las instalaciones. Por lo
tanto, si este equipo causa
interferencias dañinas a la
recepción de radio o televisión
–algo que se puede determinar
encendiendo y apagando el
equipo- se le recomienda tratar de
corregir la interferencia mediante
una de las siguientes medidas:
1. En lugares donde pueda
ser hecho con seguridad,
reorientar la antena receptora de radio o televisión.
2. Cambiar la ubicación de
la televisión, radio u otro
equipo receptor respecto
del equipo telefónico tanto
como sea posible. (Así se
aumenta la separación
entre el equipo telefónico y
el receptor).
3. Conectar el equipo telefónico a un tomacorriente
que pertenezca a un
circuito diferente de aquel
en que estén conectados la
televisión, la radio u otro
equipo receptor.
4.
Consultar a su representante
o a un técnico experimentado
de radio y televisión para
obtener ayuda.
PRECAUCIÓN: Los cambios o
modificaciones que no hayan sido
expresamente aprobados por el
fabricante responsable de la
conformidad con las normas
vigentes pueden anular la
autoridad del usuario para operar
el equipo.
RESPONSABLE POR EL CUMPLIMIENTO DE LAS NORMAS
Ameriphone Products by Walker,
una División de Plantronics, Inc.
12082 Western Avenue, Garden
Grove, CA 92841
Teléfono: 800-874-3005
Especificaciones Técnicas de la
Industria de Canadá
Este producto cumple con las
especificaciones técnicas de
aplicación de Industria Canadá.
Page 76

73
IMPORTANT SAFETY
INSTRUCTIONS
Cumplimiento
con las Normas
Antes de instalar este equipo el
usuario debe asegurarse de que
esté autorizado a conectarse a la
red de la compañía de
telecomunicaciones de su zona.
Asimismo, se debe instalar el
equipo usando un método de
conexión aceptado. En algunos
casos, la instalación interna que
hace la compañía en el caso de
un servicio individual de línea
única se puede extender mediante
la instalación de un conector
certificado (una extensión del
cable telefónico). El cliente debe
saber que el cumplimiento de los
requisitos arriba mencionados no
impide el deterioro del servicio en
ciertas circunstancias.
Para reparar un equipo
certificado se debe recurrir a un
servicio técnico autorizado y
recomendado en Canadá por el
proveedor. Cualquier reparación
o modificación del equipo por
parte del usuario puede dar lugar
a que la compañía de
telecomunicaciones solicite al
usuario que desconecte el equipo.
Por su propia protección, los
usuarios deben asegurarse de que
las conexiones terrestres del
servicio de electricidad, las líneas
telefónicas y la cañería de metal
de la red sanitaria interna, si la
hubiere, estén todas conectadas.
Esta precaución es
particularmente importante en
zonas rurales.
Precaución: Los usuarios no deben
intentar realizar estas conexiones
por sí mismos. Deben consultar a
las autoridades encargadas de
inspeccionar la instalación
eléctrica o a un electricista, según
corresponda.
El Número de Equivalencia de
Dispositivo de Llamadas (Ringer
Equivalent Number) indica el
número máximo de terminales
que está permitido conectar a una
interfaz de teléfono.
La terminación en una interfaz
puede consistir en cualquier
combinación de dispositivos sujeta
al requisito de que el Número de
Equivalencia de Dispositivo de
Llamadas de todos los dispositivos
no sea mayor que cinco.
[El término “IC:”antes del número
de certificación / registro sólo
significa que cumple con las
especificaciones técnicas de
Industria Canadá]
Page 77

74
IMPORTANT INSTRUCTIONS
Garantía
Esta garantía sólo cubre los
productos Ameriphone que hayan
sido comprados y usados en los
Estados Unidos o Canadá.
Ameriphone garantiza el teléfono
VCO contra cualquier defecto de
materiales o construcción por el
término de un año a partir de la
fecha de compra.
Si su producto Ameriphone es
defectuoso y retornado dentro de
los 30 días de la fecha de
compra, el representante de
Ameriphone lo reemplazará sin
costo alguno.
Si es retornado después de los 30
días pero antes de un año de la
fecha de compra, lo repararemos
sin cargo alguno. Podremos usar
partes nuevas o reacondicionadas
para la reparación de su VCO. Si
decidimos reemplazar su
VCO, lo podremos reemplazar
por un producto nuevo o
reacondicionado igual o similar.
La reparación o reemplazo tendrá
una garantía de 90 días o del
tiempo restante de su garantía
original, el que sea mas largo de
los dos.
Garantías implícitas, incluyendo
aquellas por aptitud para un
propósito particular y comercial
(una garantía no escrita de que el
producto es apropiado para uso
común), están limitadas a un año
a partir de la fecha de compra.
No compensaremos por pérdida
de tiempo, inconvenientes,
imposibilidad de uso de su
teléfono VCO o su falla, o
cualquier otro daño eventual o
resultante. Algunos estados no
permiten la limitación con
respecto a cuanto tiempo dura
una garantía implícita o la
exclusión de daños eventuales o
resultantes, por lo tanto las
limitaciones y exclusiones
anteriores pueden no
corresponderle a usted.
Para obtener servicio de garantía
por su VCO, debe presentar prueba de la fecha de compra. Dentro
de los 30 días de la fecha de
Page 78

75
IMPORTANT SAFETY
INSTRUCTIONS
Garantía
compra, retorne su VCO al lugar
donde lo compró para un reemplazo inmediato. Luego de los 30
días, llame a Ameriphone al 800874-3005 (voz) o 800-772-2889
(TTY) para averiguar el centro
autorizado más cercano a su
domicilio. Usted debe pagar
todos los gastos de envío por
adelantado.
Le sugerimos que guarde la caja
original por si necesita enviarnos
el VCO. Cuando lo envíe para ser
reparado bajo garantía, incluya
su nombre, dirección, número de
teléfono, comprobante de compra
y la descripción del problema.
Luego de reparar el producto,
nosotros (o el centro de
reparación autorizado) se lo
enviaremos de regreso sin costo
dentro de los Estados Unidos y
Canadá. RESIDENTES CANADIENSES: llamar a Ameriphone al
800-874-3005 (voz) o 800-7722889 (TTY) por instrucciones.
Esta garantía no cubre defectos
resultantes por accidentes, daños
de envío a nuestro centro de
reparación, alteraciones,
reparaciones no autorizadas, falla
en seguir las instrucciones, uso
indebido, uso fuera de los Estados
Unidos o Canadá, incendio,
inundaciones o catástrofes.
Tampoco garantizamos que el
producto será compatible con
algún equipo telefónico en
particular, línea compartida,
centrales telefónicas o sistemas
telefónicos más complejos. Si su
VCO no está cubierto por esta
garantía, llámenos al 800-8743005 (voz) o 800-772-2889 (TTY)
para averiguar si podemos
reparar su VCO así como
también por cualquier otra
información acerca de
reparaciones. Las reparaciones
tendrán una garantía de 90 días.
Page 79

76
IMPORTANT INSTRUCTIONS
Caractéristiques
VCO and AMERIPHONE and Walker
are registered trademarks of Plantronics, Inc.
Precision engineered in the U.S.A.
Amplificación máxima
Alta frecuencia (3KHz): 40dB
Banda ancha (300 a 3000Hz):
30dB
Rango de control de tono
Rango completo: 300 a 3000Hz
usando un control deslizante.
Dimensiones
Tamaño: 91/2” x 7” x 31/4”
Peso: 2.52 lbs.
Alimentación
Fuente de Alimentación 9 VCC,
300 MA
Pilas: 4 pilas alcalinas AA (no
incluidas)
Page 80

77
Cable adaptador para
implante coclear . . . . . . . . . .66
Conexión para instalación de
mesa o de pared
Instalación de mesa . . . . . . . .49
Instalación de pared . . . . . . . .49
Conexión de salida de audio . . .66
Conexión para
procesador de voz . . . . . . . . .65
FCC . . . . . . . . . . . . . . . . . . . .69
Funciones . . . . . . . . . . . . . . . . .47
Flash . . . . . . . . . . . . . . . . . . . .52
Ayuda de Ameriphone . . . . . . . .45
Llamada en espera . . . . . . . . . .52
Tono de voz de recepción . . . . .51
Volumen de voz de recepción . . .51
Instalación de la batería
de respaldo . . . . . . . . . . . . .48
Remarcación del último número . .52
Control del contenido . . . . . . . . .46
Programación de los botones
de la memoria . . . . . . . . . . . .41
Volumen y Tono de la voz . . . . . .51
Recibo de Compra . . . . . . . . . .30
Cuadro de localización
de averías . . . . . . . . . . . . . .53
Garantía . . . . . . . . . . . . . . . . .74
Índice
Page 81

Manuel d’utilisation
©AMERIPHONE® VCO 5280-2861 A 6/03
∆
M06597
VCO
VCO
FRANÇAIS
®
Page 82

Table des matières
Important ! Prière de lire ce qui suit.
...................................................................
82
Présentation du VCO .....................................................................................................83
Contenu de la boîte ........................................................................................................84
Description du VCO ........................................................................................................85
Installation du VCO ........................................................................................................86
Installation des piles de réserve........................................................................................86
Installation sur table ou sur mur........................................................................................86
Sur table...................................................................................................................86
Sur mur.....................................................................................................................87
Réglage de votre VCO ....................................................................................................89
Volume de la voix du correspondent .................................................................................89
Timbre de la voix du correspondent..................................................................................89
Volume de Sonnerie........................................................................................................90
Mise en attente.. ............................................................................................................90
Recomposition du dernier numéro ....................................................................................90
Flash (témoin clignotant) .................................................................................................91
Fonctions Spéciales.........................................................................................................92
Indicateur d’appel n’ayant pas reçu de résponse...............................................................92
Appel d'un numéro d'urgence .........................................................................................92
Programmation du numéro de service de relais .................................................................92
Programmation du numéro d’urgence...............................................................................93
Pour effectuer des appels d’urgence vocaux avec le VCO...................................................94
Pour effectuer des appels d’urgence VCO en mode texte ....................................................94
Programmation des touches de mémoire...........................................................................95
Programmation des 5 premiers numéros dans une touche de mémoire .................................96
Appels normaux .............................................................................................................97
Utilisation du relais avec VCO.........................................................................................97
Response aux appels VCO ............................................................................................102
Communications en mode téléscripteur (ATS / TTY)..........................................................103
Utilisation d’un répondeur vocal externe.............. ...........................................................106
Sortie audio directe......................................................................................................106
Cable adaptateur pour implant cochléaire............................................................. .........106
Connexion d’un appareil d’assistance auditive ...............................................................107
Connexion à l’écran LVD...............................................................................................107
Connexion à l’imprimante Q-90.....................................................................................107
Table de Diagnostic.......................................................................................................109
Garantie......................................................................................................................115
Caractéristiques............................................................................................................117
Index..........................................................................................................................118
Page 83

82
Important! Prière de
lire ce qui suit.
E. Si l’appareil à été échappé ou s’il semble
être endommagé.
F. Si le rendement de l’appareil est nettement
réduit.
RENSEIGNEMENTS SUPPLÉMENT AIRES À
L’INTENTION DES UTILISATEURS CANADIENS
AVIS: L’étiquette du ministère des Communications
du Canada identifie le matériel homologué. Cette
étiquette certifie que le matériel est conforme à
certaines normes de protection, d’exploitation et de
sécurité des réseaux de télécommunications. Le
ministère ne garantit pas toutefois que le matériel
fonctionnera à la satisfaction de l’utilisateur.
Avant d’installer le présent matériel, l’utilisateur doit
s’assurer qu’il est permis de le raccorder aux
installations de l’entreprise locale de télécommunications.
Le matériel doit également être installé selon une
méthode de raccordement approuvée. L’abonné ne
doit pas oublier que malgré le respect des conditions
énoncées ci-dessus, il se peut qu’il y ait dégradation
du service dans certaines situations. Le matériel
homologué doit être réparé par un centre d’entretien
canadien autorisé désigné par le fournisseur. La
compagnie de télécommunications se réserve le
droit de demander à un utilisateur de débrancher un
appareil s’il a effectué des réparations ou des
modifications ou si l’appareil fonctionne mal.
Pour sa propre protection, l’utilisateur doit s’assurer
que tous les fils de mise à la terre de la source
d’énergie électrique, des lignes téléphoniques et des
canalisations d’eau métalliques, s’il y en a, sont
raccordés ensemble. Cette précaution est
particulièrement importante dans les régions rurales.
MISE EN GARDE: L’utilisateur ne doit pas tenter de
faire les raccordements de mise à la terre lui-même;
il doit avoir recours à un service d’inspection
des installations électriques ou à un électricien, le
plus tôt possible.
AVIS: Le facteur de charge attribué à chaque
appareil permet de déterminer le nombre total de
téléphones pouvant être raccordés à une même
ligne. Pour éviter les surcharges, la somme des
facteurs de charge des appareils raccordés à la
ligne ne doit pas dépasser 100, quel que soit le
modèle utilisé.
CONSERVEZ CES INSTRUCTIONS
Lorsque vous utiliserez votre téléphone, suivez
toujours les mesures de sécurité de base suivantes
afin de réduire les risques d’incendie, de choc
électrique et de blessures.
1.Lire et bien comprendre toutes les instructions.
Se conformer à tous les avertissements et à
toutes les instructions marqués sur l’appareil.
2.Pendant un orage électrique, ne pas utiliser de
téléphone autre qu’un téléphone sans cordon. Il
pourrait y avoir un léger risque de choc électrique.
3.Ne pas utiliser le téléphone près d’une fuite de
gaz. Si vous croyez qu’il y a une fuite de gaz,
signalez celle-ci immédiatement en utilisant un
téléphone qui ne se trouve pas à proximité de la
fuite de gaz.
4.Ne pas utiliser le téléphone dans un endroit
humide ou lorsque vous êtes mouillé. Par exemple,
ne pas l’utiliser sous la douche, près d’une piscine,
d’une baignoire, d’un lavabo de cuisine ou de
salle de lavage, ni dans un sous-sol humide. Ne
pas utiliser de nettoyeurs liquides ou en aérosol.
Si un liquide quelconque est renversé sur l’appareil,
débranchez la prise téléphonique et le cordon
d’alimentation immédiatement. Ne pas le brancher
de nouveau avant qu’il soit complètement sec.
5.Ne pas placer cet appareil dans un endroit où
les cordons risquent d’être piétinés. Protéger les
cordons de tout dommage ou frottement.
6.Si l’appareil ne fonctionne pas nor malement, lire
la section "En cas de difficultés". Si vous ne trouvez
pas la solution à votre problème ou si l’appareil
est endommagé, reportez-vous à la garantie
d’Ameriphone. Ne pas ouvrir l’appareil sauf pour
suivre les instructions contenues dans ce manuel.
L’ouverture et l’assemblage de l’appareil peuvent
exposer l’utilisateur à des tensions dangereuses
ou à d’autres risques. L’ouverture de l’appareil
entraîne automatiquement l’annulation de la
garantie.
7.Débrancher l’appareil de la prise murale et confier
toute réparation à un technicien qualifié dans
les conditions suivantes:
A.Si le cordon est endommagé.
B. Si un liquide a été renversé sur l’appareil.
C.Si l’appareil a été exposé à la pluie ou à
l’humidité.
D.Si l’appareil ne fonctionne pas normalement
quand les instructions d’utilisation sont
respectées, ne faites que les rajustements
qui sont expliqués dans ce manuel d’utilisation
car vous pourriez l’endommager davantage.
Page 84

d’achat au cas où vous auriez
besoin de recourir au service de
garantie.
Service à la clientèle
Si vous avez des questions au sujet
de votre VCO, téléphonez à notre
Service à la clientèle au (714) 8970808 (VOIX) ou au (714) 8971111 (TTY).
83
Présentation du VCO
Merci d’avoir choisi le téléphone
amplifié VCO (Voice Carry
Over
: transmission phonique
vocale) d’Ameriphone. Ce mode
d’emploi et le Guide rapide qui
l’accompagne vous donnent les
informations nécessaires pour
utiliser votre VCO efficacement et
sans risques. Lisez entièrement ce
manuel avant d’utiliser votre télé-
phone. Conservez le manuel près
du téléphone pour pouvoir le consulter facilement.
Ser vice de garantie
Vo tre téléphone est conçu pour
offrir plusieurs années de bon
fonctionnement. En cas de problèmes de fonctionnement non
résolus après la consultation de
la table de la page 20, suivez la
procédure de garantie indiquée à
la page 22.
Reçu
Assurez-vous de conserver votre
reçu comme preuve de la date
Page 85

84
Contenu de la boîte
DIALOGUE
VCO
M1
a. a. a. a. a.
POWER
RELAY REL MGS SPACEAUTO ANS
SIGNAL
M2 M3 M4 M5
SELECT MEMORY b
X
HOLD PROG
LO
HI
FLASH REDIAL
TONE
VOL
AMPLIFY
A
B
C
G
H
I
T
U
V
W
X
Y
P
R
S
J
K
L
M
N
O
D
E
F
Q Z
! $ () =
"
/ ' + -
, .
?
: ;
b. b. b. b. b.
OPERATING
INSTRUCTIONS
AND
QUICK GUIDE
VCO
Combiné
Base
Câbles téléphoniques
Câble torsadé du
combiné
Guides d’utilisation
Figure 1 – Contenu de la boîte
Support d’installation
Adaptateur
électrique
Page 86

85
Description du VCO
Bouton de VOLUME DE SONNERIE
Connecteur de SORTIE AUDIO
Connexion à L’ADAPTATEUR
ÉLECTRIQUE
et à la ligne
téléphonique
Bouton TONE / PULSE
(fréquences vocales/impulsions)
Touche RELAY (relais)
Touche RELAY MESSAGE
(relais du message)
Touche AUTO ANSWER
(réponse automatique)
Écran à cristaux liquides (LCD)
Témoin de signal
Touche MEMORY (mémoire)
Touche MEMORY B (mémoire B)
Touche SELECT (sélection)
Touche EMERGENCY
(numéros d’urgence)
Touche REDIAL (renumérotation)
Touche FLASH (témoin clignotant)
Curseur VOL (volume)
Témoin RING (signal lumineux d’appel)
Touche AMPLIFY
Témoin AMPLIFY
Touche PROG (programmation)
AUDIO
OUTPUT
RINGER
Off Lo Hi
DIAL
T P
DIALOGUE
VCO
M1
a. a. a. a. a.
POWER
RELAY REL MGS SPACEAUTO ANS
SIGNAL
M2 M3 M4 M5
SELECT MEMORY b
X
HOLD PROG
LO
HI
FLASH REDIAL
TONE
VOL
AMPLIFY
A
B
C
G
H
I
T
U
V
W
X
Y
P
R
S
J
K
L
M
N
O
D
E
F
Q Z
! $ () =
"
/ ' + -
, .
?
: ;
b. b. b. b. b.
Curseur
TONE
(volume de
la tonalité)
Touche HOLD
(mise en attente)
Figure 2 — Contrôles de la base
AC Power indicator
Page 87

86
Installation
Le réglage de votre VCO se fait
en trois étapes.
• Insérez quatre piles AA
rechargeables NiCd pour
pouvoir sauvegarder les
données en cas de panne de
secteur.
• Décidez si vous voulez placer
le téléphone sur une table ou
accroché au mur.
• Connectez les éléments du
téléphone.
Installation des piles de
sauvegarde
En cas de panne de secteur, le
VCO fonctionnera 4 à 8 heures
avec quatre piles AA rechargeables NiCd (non fournies). Si le
téléphone n’est pas utilisé, les
piles resteront chargées plusieurs
mois.
Installation de nouvelles piles :
1. Faites glisser le couvercle du
compartiment situé sous le
téléphone (Figure 3). Il se
peut que vous deviez
enfoncer la pointe d’un stylo
dans l’ouverture du couvercle.
2. Installez quatre piles AA
rechargeables NiCd neuves.
Assurez-vous de respecter la
polarité indiquée sur la base
du compartiment. (symboles
« + » et « - » ).
Connexion pour l’installation sur une
table ou sur un mur
Mettez le bouton de mode de
numérotation en position T (tone :
fréquences vocales) si vous disposez d’un service à fréquences
vocales. Mettez-le en position P
(pulse : impulsions) si vous avez
un téléphone à cadran rotatif.
Utilisation sur une table :
1. Connectez le câble de ligne
téléphonique et le câble du
combiné à la base, comme
indiqué sur la Figure 4.
2. Raccordez l’adaptateur
électrique à une prise et à la
base, comme indiqué sur la
Figure 4.
Figure 3 – Accès aux piles
Insérez ici
4 piles AA.
Appuyez ici
avec la pointe
d’un stylo pour
ouvrir le
compartiment
des piles.
MANUAL
AUTO
Page 88

3. Décrochez le combiné et
atten dez la tonalité.
Le téléphone est prêt à l’emploi.
Installation sur un mur
1. Dégagez de la base le
crochet du combiné, comme
indiqué sur la Figure 6, et
mettez-le à l’envers, de façon
que le crochet soit orienté
vers le dessus pour maintenir
le combiné quand vous rac
crochez.
87
Installation
2. Insérez les languettes de la
base dans les fentes de la
partie inférieure de la base
comme indiqué sur la Figure
7. Insérez le support et
enfoncez-le fermement vers le
bas jusqu’à ce qu’il se mette
en place avec un léger bruit.
3. Cherchez un connecteur
téléphonique sur un mur,
près d’une prise de courant,
et maintenez le téléphone en
position verticale.
4. Raccordez le câble (court)
de ligne téléphonique au
connecteur mural comme
indiqué sur la Figure 7.
M
1
M
2
M
5
M
6
M
7
M
8
M
9
M
1
0
M
1
1
M
3
M
4
Câble de ligne
Adaptateur électrique
Câble du
combiné
(torsadé)
Figure 5 — Comment inverser la
position du crochet
M
AN
UAL
AUTO
Figure 6 — Support pour
installation sur un mur
Figure 4 : Comment raccorder les
différents éléments
Page 89

88
Installation
5. Inclinez le téléphone vers le
bas de façon à toucher LA
PLUS BASSE des deux
pointes. Insérez LA POINTE
QUI EST DU CÔTÉ DU MUR
dans la partie INFÉRIEURE
du support du téléphone.
6. Une fois que vous avez
inséré la pointe inférieure,
insérez la pointe
SUPÉRIEURE dans le support
et faites glisser le téléphone
vers le bas jusqu’à ce qu’il
tienne bien sur le mur.
7. Branchez le câble de ligne
(court) au téléphone,
raccordez l’adaptateur
Figure 7 — Installation sur un mur
M
A
N
U
A
L
A
U
T
O
électrique au téléphone et
raccordez le combiné.
8. Branchez le câble (court) de
l'adaptateur électrique dans
la prise électrique murale.
Décrochez le combiné et
attendez la tonalité. Le télé
phone est maintenant prêt à
l’emploi.
Page 90

89
IMPORTANT INSTRUCTIONS
Réglage de votre VCO
Volume de la voix du
correspondant
1. Pressez la touche AMPLIFY
comme indiqué sur la Figure
8, pour activer ou désactiver
la fonction d’amplification de
la voix du correspondant.
Quand AMPLIFY est activé,
l’indicateur AMPLIFY est
allumé.
2. Réglez le volume du com
biné en déplaçant le curseur
VOL (Figure 9). Si la fonction
AMPLIFY est activée, le
volume de la voix de votre
correspondant sera plus fort
de 26 dB.
Timbre de la voix du
correspondant
Le VCO possède un réglage du
timbre acoustique pour vous permettre de régler les fréquences et
mieux entendre votre correspondant. Pour trouver le filtrage de
fréquences qui vous convient le
mieux, suivez ces étapes :
1. Quand vous entendez une
voix sur la ligne, pressez la
touche AMPLIFY comme
indiqué sur la Figure 8.
2. Réglez le curseur TONE
selon votre audition, comme
indiqué sur la Figure 10.
E
0
#
HOLD PROG
TONE
LO HI
FLASH REDIAL
VOL
AMPLIFY
*
HOLD PROG
TONE
LO HI
FLASH REDIAL
VOL
AMPLIFY
Figure 9 — Curseur de réglage du volume
HOLD PROG
TONE
LO HI
FLASH REDIAL
VOL
AMPLIFY
Figure 10 — Curseur de réglage du timbre
Figure 8 — T ouche et témoin AMPLIFY
Page 91

90
Réglage de votre VCO
VCO lorsque celui-ci est en
attente, le VCO se déconnecte et
vous pouvez continuer votre conversation sur cet autre poste. Si
vous ne décrochez pas un autre
poste pendant 3 minutes, le télé-
phone se déconnecte.
Recomposition du dernier numéro
Pour recomposer le dernier
numéro composé, décrochez le
combiné et pressez REDIAL. Le
téléphone recomposera jusqu’à
31 chiffres.
Volume de sonnerie
1. Vous pouvez régler le
volume de sonnerie (RINGER
VOLUME) jusqu’à 95 dB. Les
valeurs disponibles sont OFF,
LO et HI (désactivé, faible,
fort) comme indiqué sur la
Figure 11.
Mise en attente
Pour mettre la ligne en attente,
pressez la touche HOLD et remettez le combiné dans la base. En
mode voix, l’écran affiche « CALLON HOLD & MUTE » (appel en
attente, mode silencieux). En
mode texte, il affiche et transmet
le message « PLS HOLD… » («
Veuillez garder la ligne »).
Nota : Si vous décrochez poste
raccordé à la même ligne que le
E
0
#
HOLD PROG
TONE
LO HI
FLASH REDIAL
VOL
AMPLIFY
*
Figure 13 — T ouche de renumérotation
P
E
0
#
HOLD PROG
TONE
LO HI
FLASH REDIAL
VOL
AMPLIFY
*
Figure 12 — T ouche de mise en attente
RINGER
Off Lo Hi T P
DIAL
Figure 11 — Volume de sonnerie
Page 92

91
IMPORTANT INSTRUCTIONS
Réglage de votre VCO
Flash (témoin clignotant)
Pressez la touche FLASH comme
indiqué sur la Figure 14 pour
accéder aux services spéciaux
fournis par votre compagnie de
téléphone locale, comme Appel
en attente et Téléconférence.
Figure 14 — Touche Flash
E
0
#
HOLD PROG
TONE
LO HI
FLASH REDIAL
VOL
AMPLIFY
*
Page 93

92
IMPORTANT SAFETY
INSTRUCTIONS
Fonctions spéciales
Indicateur d’appel n’ayant pas
reçu de réponse
Si personne ne répond à un appel
après 4 sonneries, cet indicateur
clignote jusqu’à ce que le combiné soit décroché ou que l’alimentation soit interrompue. Cette
fonction n’exige aucun service
optionnel de votre compagnie de
téléphone. Il est utile si vous vous
éloignez un instant lorsque vous
attendez un appel. Pour désactiver cette fonction, débranchez
l’adaptateur électrique et enlevez
toutes les piles. Appuyez la touche
HOLD pendant que vous reconnectez l’adaptateur électrique,
puis réinstallez les piles.
Appliquez la même procédure
pour réactiver cette fonction.
0
#
HOLD PROG
TONE
LO HI
FLASH REDIAL
VOL
AMPLIFY
*
Figure 16 — Touche Flash
HOLD PROG
TONE
LO HI
FLASH REDIAL
VOL
AMPLIFY
Figure 15 — Indicateur d’appels
n’ayant pas reçu de réponse
Programmation du numéro de
ser vice de relais
1. Décrochez le combiné et
pressez la touche PROG.
2. Tapez sur le clavier le
numéro du service.
3. Pressez la touche RELAY
pour mettre le numéro en
mémoire. Raccrochez
immédiatement.
G
H
I
P
R
S
T
U
V
O
P
E
W
X
Y
J
K
L
M
N
O
4
5
6
789
0
#
*
Figure 17 – Clavier du téléphone
Page 94

93
IMPORTANT INSTRUCTIONS
Fonctions spéciales
3. Inscrivez votre nom
(jusqu’à 30 caractères) et
pressez pour
sauvegarder. (Pour taper
des chiffres ou des lettres,
pressez plusieurs fois la
touche jusqu’à ce que le
chiffre ou la lettre s’
affiche. Appuyez une
seconde pour que le
curseur passe à l’espace
suivant. Reportez-vous à la
section « Communication
en mode texte (ATS/TTY) »
pour effectuer un appel
AT S .)
4. Tapez votre adresse
(jusqu’à 45 caractères) et
pressez pour
sauvegarder.
Programmation du numéro
d’urgence, de votre propre
numéro et du numéro de votre
communicateur interurbain
Programmation :
1. Décrochez le combiné et
pressez la touche PROG,
puis la touche
2. Tapez 911 si ce ser vice est
disponible, ou votre
numéro local d’appels
d’urgences, jusqu’à 14
chiffres. Pressez
pour sauvegarder le
réglage.
M1
a. a. a. a.
POWER
RELAY REL MGS AUTO ANS
M2 M3 M4
X
b. b. b. b.
Figure 18 – Touche RELAY
P
E
0
HOLD PROG
TONE
LO HI
AMPLIFY
*
Figure 19 — Touche
PROG
a. a.
M3 M4
SELEC
A
B
b. b.
Figure 20 — Touche
URGENCE
G
H
I
P
R
S
T
U
V
O
P
E
W
X
Y
J
K
L
M
N
O
5
6
0
#
Figure 21 — Clavier
du téléphone
a. a.
M3 M4
SELEC
A
B
b. b.
Figure 20 — Touche
URGENCE
Page 95

94
IMPORTANT SAFETY
INSTRUCTIONS
Fonctions spéciales
a. a. a. a.
M2 M3 M4 M5
SELECT MEMORY b
A
B
D
E
b. b. b. b.
Figure 23 — Touche d’appel d’URGENCE
2. Quand le numéro répond,
le témoin de signal clig
note.
3. Indiquez votre nom, votre
adresse et le genre d’aide
dont vous avez besoin.
Pour effectuer des appels d’urgence VCO en mode texte avec
envoi d’un message d’urgence
1. Décrochez le combiné.
2. Composez le numéro
d’urgence s’il n’a pas été
programmé (voir section
précédente).
3. Pressez .
5. Tapez votre numéro de
téléphone à domicile
(jusqu’à 14 chiffres) et
pressez pour sauvegarder.
Si votre relais exige que
vous indiquiez le nom de
votre communicateur
interurbain, passez à l’é
tape 6, sinon allez
directement à l’étape 7.
6. Tapez le nom de votre
communicateur interurbain
(jusqu’à 14 lettres), et
pressez pour sauvegarder.
7. Raccrochez.
8. Pour changer toute
information, répétez la
procédure à partir de
l’étape 1.
Pour effectuer des appels
d’urgence vocaux avec le VCO
1. Composez le numéro
d’urgence (911).
Page 96

95
IMPORTANT INSTRUCTIONS
7. Continuez la conversation
en lisant et en parlant.
La composition à partir de la
mémoire du numéro du ser vice
d’urgence et la fonction d’envoi de
message d’urgence ne sont fournis
que par commodité. Ameriphone
n’assume aucune responsabilité
quant à une dépendance du client
envers ces fonctions.
Programmation des touches de
mémoire
Vous pouvez composer automatiquement dix (10) numéros programmés en utilisant les touches de
mémoire indiquées sur la Figure
24. Vous pouvez programmer (ou
reprogrammer en utilisant la même
procédure) pour chaque touche un
numéro de téléphone comportant
jusqu’à 15 chiffres.
M1
a. a. a. a. a.
M2 M3 M4 M5
SELECT MEMORY b
A
B
C
D
E
F
b. b. b. b. b.
Figure 24 – Les touches de mémoire
Fonctions spéciales
4. Le téléphone VCO
compose le numéro
d’urgence (si ce numéro a
été programmé) et transmet
ce message : « HELP! I AM
A VCO USER, PLS
RESPOND BY TYPING ON
A TTY, AND LISTEN TO
ME ON UR PHONE, votre
nom), (votre adresse),
(votre numéro) GA ». (« À
L‘AIDE I JE SUIS UN
UTILISATEUR DE
TÉLÉPHONE VCO,
RÉPONDEZ PAR ÉCRIT
SUR UN ATS/TTY ET
ÉCOUTEZ-MOI SUR
VOTRE TÉLÉPHONE, (votre
nom), (votre adresse),
(votre numéro) GA »).
5. Ce message sera retrans
mis avec des intervalles de
quelques secondes.
6. Le message s’arrêtera
quand le VCO recevra un
message ATS. Vous pouvez
aussi interrompre et
reprendre la transmission
du message en pressant
Page 97

96
IMPORTANT SAFETY
INSTRUCTIONS
Pr
ogrammation des 5 premiers
numéros dans une touche de
mémoire :
1. Décrochez le combiné et
pressez PROG comme
indiqué sur la Figure 25.
2. Tapez le numéro de
téléphone sur le clavier
(Figure 26) comme si vous le
composiez pour un appel.
N’oubliez pas de taper «1»
et/ou l’indicatif régional si
nécessaire.
3. Choisissez une touche de
mémoire (M1-M5; voir
O
P
E
0
#
HOLD PROG
TONE
LO HI
FLASH REDIAL
VOL
AMPLIFY
*
Figure 25 — Touche PROG
G
H
I
P
R
S
T
U
V
O
P
E
W
X
Y
J
K
L
M
N
O
4
5
6
789
0
#
*
Figure 26 — Clavier du téléphone
Fonctions spéciales
Figure 24) et pressez-le pour
y sauvegarder ce numéro.
4. Raccrochez immédiatement
le combiné.
NB : Tout numéro déjà programmé
sur cette touche sera effacé.
5. Pour modifier un numéro
programmé, répétez
l’opération à partir de
l’étape 1.
NB : Évitez de programmer le 911
dans une touche de mémoire.
Enr
egistrement des 5 numéros
suivants sur les mêmes touches de
mémoire :
1. Décrochez le combiné et
pressez PROG comme
indiqué sur la Figure 25.
2. Tapez le numéro de
téléphone sur le clavier
comme si vous le composiez
pour un appel (Figure 26).
Page 98

97
IMPORTANT INSTRUCTIONS
Fonctions spéciales
4. Raccrochez pour remettre les
réglages à leur valeur
initiale.
Utilisation du relais avec VCO
(transmission phonique vocale)
Les personnes à l’audition déficiente et parlant dans une communication peuvent communiquer
avec des personnes ayant une
bonne audition à l’aide de la
fonction de transmission phonique
vocale (voice carry over) de leur
service de relais téléphonique gratuit.
Dans un appel en VCO, la personne malentendante parle
directement à son interlocuteur.
L’Assistant de communication (AC)
relaie la réponse de l’interlocuteur
sous forme de texte sur l’écran du
téléphone VCO de la première
personne. Vous n’avez qu’à lire et
à parler.
Quand l’appareil VCO reçoit du
texte, il n’est pas possible de par-
3. Pressez la touche MEMORY
B, puis la touche de
mémoire (M1-M5) souhaitée
(Figure 24) pour
sauvegarder ce numéro
comme second numéro de
téléphone sur cette touche de
mémoire.
Appels normaux
1. Effectuez des appels ou
recevez-en comme pour les
conversations habituelles.
2. Pressez la touche AMPLIFY
pour activer ou désactiver
l’amplificateur.
3. Réglez les curseurs VOLUME
et TONE (timbre) suivant
votre audition
E
0
#
HOLD PROG
TONE
LO HI
FLASH REDIAL
VOL
AMPLIFY
*
Figure 27 — Touche AMPLIFY
Page 99

98
IMPORTANT SAFETY
INSTRUCTIONS
ler à l’autre personne ni à l’AC.
Vous devez attendre la fin du message de l’AC, indiquée par la
mention « GA ». Il est important
de signaler à votre interlocuteur
que c’est à son tour de parler, en
disant « À vous » ou « Go ahead
».
Certains ser vices de relais permettent de relayer les appels d’un utilisateur VCO à un autre utilisateur
VCO (relais voix-voi; VTV -- Voiceto-Voice Relay;).
Pour effectuer des appels VCO:
Si votre service de relais a un
numéro spécial de téléphone pour
les appels ATS/TTY (indiqué sur
l’annuaire), utilisez ce numéro pour
vos appels VCO. (Le numéro de
communication vocale permet aux
gens de vous appeler au moyen du
service de relais).
Procédure pour effectuer des
appels VCO
1. Pour effectuer un appel
VCO, décrochez le combiné
et appuyez la touche «
RELAY » ou composez le
711 sur le clavier.
L’Assistant de
communication (AC)
annonce en mode texte : «
Hi, VCO call, PLS GA »
(Bonjour. Ceci est un appel
VCO. À vous. »).
2. Pressez la touche REL MSG
pour solliciter un appel
VCO.
M1
a. a. a. a.
POWER
RELAY REL MGS AUTO ANS
M2 M3 M4
X
Figure 28 – Touche RELAY
M1
a. a. a. a. a
POWER
RELAY REL MGS SPAUTO ANS
M2 M3 M4
X
Figure 28 - REL MSG button
Fonctions spéciales
Page 100

99
IMPORTANT INSTRUCTIONS
Fonctions spéciales
Pour indiquer oralement des
informations r
elatives à l’appel :
1. Composez le numéro au
clavier ou à l’aide de la
mémoire RELAY.
2. L’AC vous répond oralement
(ce qui est indiqué par le
scintillement de l’indicateur
de signal). Parlez dans le
combiné, dites à l’AC que
vous êtes un utilisateur VCO
et donnez-lui les
informations pour l’appel.
Répétez ces informations
pour vous assurer que l’AC
a tout compris.
M1
a. a. a. a.
POWER
RELAY REL MGS AUTO ANS
M2 M3 M4
X
Figure 30 — Touche RELAY
SIGNAL
LED
M2 M3 M4 M5
Figure 31 — Témoin de signal
3. Quand la mention « GA »
s’affiche, prononcez le
numéro que vous voulez
appeler. (Dans certains
endroits, vous pouvez aussi
simplement l’envoyer sous
forme de texte.)
4. Quand vous êtes en ligne,
lisez les messages qui s’
affichent sur l’écran et
parlez quand vous voyez
s’afficher « GA ». Parlez
dans le combiné, en disant
« à vous » ou « go ahead »
quand vous avez fini votre
intervention.
5. Continue votre conversation en
lisant et en parlant.
6. Raccrochez le combiné
quand vous avez terminé.
Si votre service de relais utilise le
même numéro pour les appels
vocaux et ATS/TTY, vous pouvez
indiquer les informations d’appel
soit oralement, soit par écrit.
 Loading...