

Page 1

©AMERIPHONE products are manufactured by Walker, A Division of Plantronics, Inc.
12082 Western Avenue, Garden Grove, CA 92841
(800) 874-3005 VOICE • (800) 772-2889 TTY/TDD • (714) 897-4703 FAX
email: ameriphonecs@plantronics.com website: www.ameriphone.com
®
Page 2

E
N
G
L
I
S
H
F
R
A
N
Ç
A
I
S
Users’ Guide
ER 5270-4051 A 4/03
∆
M03600 ER
ER
ER Emergency
Response Telephone
®
Page 3

3
IMPORTANT INSTRUCTIONS
Contents
Important Safety Instruction....................................................................................................................1
Introducing the ER
Warranty Service..................................................................................................................................4
Sales Receipt........................................................................................................................................4
Help from Ameriphone ..........................................................................................................................4
Package Checklists ................................................................................................................................5
Features ..............................................................................................................................................6
Setting Up Your ER
Installing the Backup Batteries ................................................................................................................7
Setting the Dial Mode............................................................................................................................7
Connecting for Desk or Wall Mount ......................................................................................................8
Desktop Use ................................................................................................................................8
Wall Mounts................................................................................................................................8
Basic Operations
To Adjust Volume and Tone Clarity ........................................................................................................10
To Use the Hold Button..........................................................................................................................11
To Use the Prog/Flash Button ................................................................................................................11
To Use the Redial/Pause Button..............................................................................................................12
To Use the Speakerphone......................................................................................................................12
To Record Your Name, Address/Emergency Message ............................................................................12
To Check/Play Your Recording ..............................................................................................................13
To Program Your Emergency Contact Phone Numbers ..............................................................................14
To Program a Pager as an Emergency Contact........................................................................................14
To Make an Emergency Call Using the Phone..........................................................................................15
To Make an Emergency Call Using the Remote Pendant............................................................................15
To Handle an Emergency Call ..............................................................................................................16
To Cancel Emergency Calling [In case of a false alarm or mistaken activation] ..........................................17
To Program Frequently Dialed Numbers for Memory Dialing ....................................................................17
To Dial from Memory............................................................................................................................18
Advanced Operations
Test the Remote Help Pendant’s Setting ..................................................................................................19
To Re-program the Remote Pendant ........................................................................................................19
To Set the Inactivity Timer......................................................................................................................20
To Listen In Using Remote Audio Monitoring............................................................................................21
If Not Connected to an Answering Machine ..................................................................................22
If Connected to an Answering Machine ........................................................................................22
With Voice Mail Service ..............................................................................................................23
To Change Your “Remote Audio Monitoring Access Code” ......................................................................23
To Check Your ER Settings Status ............................................................................................................24
Troubleshooting Chart ..........................................................................................................................25
Regulatory Compliance .........................................................................................................................26
Warranty ............................................................................................................................................32
Specifications ......................................................................................................................................34
Index ................................................................................................................................................35
Page 4

1
E
N
G
L
I
S
H
Important Safety
Instructions
Thank you for purchasing the ER from
Ameriphone. Ameriphone has made
every effort to make the ER the finest
Personal Emergency Response System
on the market today. However, for your
safety, please take the following
precautions when using the ER.
• The ER should be tested regularly to
ensure proper delivery of your
pre-recorded emergency message
when activated by the Emergency
Button or the Remote Help Pendant.
This is your responsibility as the user
of the product.
• Certain structures within a household
may block the transmitter signal. It is
up to the user to test the transmitter
within the area of use to determine if
dead areas exist, and where they are
located.
• Do not place the ER on any metal
surface. It could reduce reception
range.
• Using the ER does not guarantee that
you will make contact or receive
help. The ER is only an aid to assist
you in calling for help.
• The transmitter should be tested
frequently to protect against
undetected interference or fault.
• The unit will function as a normal
telephone if there is no power
supplied either by batteries or the
AC/DC adapter.
• When the batteries are low, the
low battery light will be on. If this
happens, make sure the AC/DC
adapter is plugged in.
• For U.S. installation only: the ER
is required to comply with Part 15
of the FCC Rules and Regulations.
As such, it has limited transmitter
power and therefore limited range.
• Changes or modifications to the
device may void FCC compliance.
FEDERAL COMMUNICATIONS
COMMISSION RADIO AND
TELEVISION INTERFERENCE
STATEMENT FOR A CLASS ‘B’ DEVICE
This equipment generates and uses radio
frequency energy and, if not installed and
used properly, in strict accordance with
the manufacturer’s instructions, may cause
interference to radio and television
reception. It has been type tested and
found to comply with the limits for a Class
B computing device in accordance with
the specifications in Subpart B of FCC
Rules and Regulations (as outlined in the
Code of Federal Regulation, Title 47),
which are designed to provide
reasonable
protection against such
interference in a residential installation.
User Instructions:
If this equipment does cause interference
to radio or television reception, which
can be determined by turning the
equipment off then on, the user is encouraged
to try to correct the interference by one or
more of the following measures:
Page 5

2
IMPORTANT INSTRUCTIONS
Important Safety
Instructions
• Reorient or relocate the receiving
antenna.
• Increase the separation between
the equipment and receiver.
• Connect the equipment into a
different outlet so that the equipment
and receiver are on different branch
circuits.
• Consult the dealer or an experienced
radio/ TV technician for help
Changes or modifications not expressly
approved by AMERIPHONE could void
the user’s authority to operate the equipment.
When using your telephone equipment,
always follow basic safety precautions to
reduce the risk of fire, electric shock, and
injury to persons, including the following:
1. Read and understand all
instructions. Observe all warnings
and other markings on the product.
2. During thunderstorms, avoid using
telephones. There may be a slight
chance of electric shock from
lightning.
3. Do not use a telephone near a gas
leak. If you suspect a gas leak, report
it immediately, but use a telephone
away from the area where gas is leaking.
4. Do not use this product near water, or
when you are wet. For example, do
not use it in a wet basement or shower
,
or next to a swimming pool, bathtub,
kitchen sink or laundry tub. Do not use
liquids or aerosol sprays for cleaning.
If the product comes in contact with
any liquids, unplug any phone line or
power cord immediately.
5. Install this product in a protected
location where no one can trip
over any phone line or power
cord. Protect cords from damage
or abrasion.
6. If this product does not operate
normally, review the “Troubleshooting”
section. If you cannot resolve the
problem, or if the product is damaged,
refer to the Ameriphone Warranty.
Opening this product or reassembling
it incorrectly may expose you to
hazardous voltages or other risks.
Opening this product automatically
voids the warranty.
7. If this product uses batteries as power
back-up during power outage, replace
batteries only as described in this
owner’s manual. Do not burn or
puncture used batteries — they contain
caustic chemicals.
8. Unplug this product from the wall
outlet and refer servicing to qualified
service personnel under the following
conditions:
A.When the power supply cord or
plug is damaged or frayed.
B. If liquid has been spilled on the
product.
C.If the product has been
exposed to rain or water.
D.If the product does not operate
normally by following the operating
instructions. Adjust only those
controls that are covered by the
Page 6

3
IMPORTANT SAFETY
INSTRUCTIONS
E
N
G
L
I
S
H
Important Safety
Instructions
operating instructions because
improper adjustment of other
controls may result in further damage.
E. If the product has been dropped or
appears damaged.
F. If the product exhibits a distinct
change in performance.
9. If this product has a polarized plug
with one wide prong, it may not fit in
non-polarized outlets. Do not defeat
the purpose of these plugs. If they do
not fit in our outlet, the outlet should be
replaced by an electrician.
ADDITIONAL SAFETY NOTES FOR
CANADIAN USERS
NOTICE:
The Canadian Department of
Communications label identifies certified
equipment. This certification means that
the equipment meets certain telecommunications
network protective, operational and safety
requirements. The Department does not
guarantee the equipment will operate to
the user's satisfaction.
Before installing the equipment, users
should ensure that it is permissible to be
connected to the facilities of the local
telecommunications company. The
equipment must also be installed using an
acceptable method of connection. The
customer should be aware that compliance
with the above conditions may not
prevent degradation of service in some
situations. Repairs to certified equipment
should be made by an authorized
Canadian maintenance facility designated
by the supplier. Any repairs or alteration
made by the user to this equipment, or
equipment malfunctions, may give the
telecommunications company cause to
request the user to disconnect the
equipment.Users should ensure for their
own protection that the electrical ground
connections of the power utility, telephone
lines and internal metallic water pipe
system, if present, are connected together.
This precaution may be particularly
important in rural areas.
CAUTION: Users should not attempt to
make such connections themselves, but
should contact the appropriate electric
inspection authority, or electrician, as
soon as possible.
NOTICE: The LOAD NUMBER (LN)
assigned to each terminal device denotes
the percentage of the total load to be
connected to a telephone loop which is
used by the device, to prevent
overloading. The termination on a loop
may consist of any combination of
devices subject only to the requirement
that the sum of the load numbers of all
devices does not exceed 100.
SAVE THESE INSTRUCTIONS
Page 7

Help from Ameriphone
For help with using your ER, call
our Customer Relations department
at 800-874-3005.
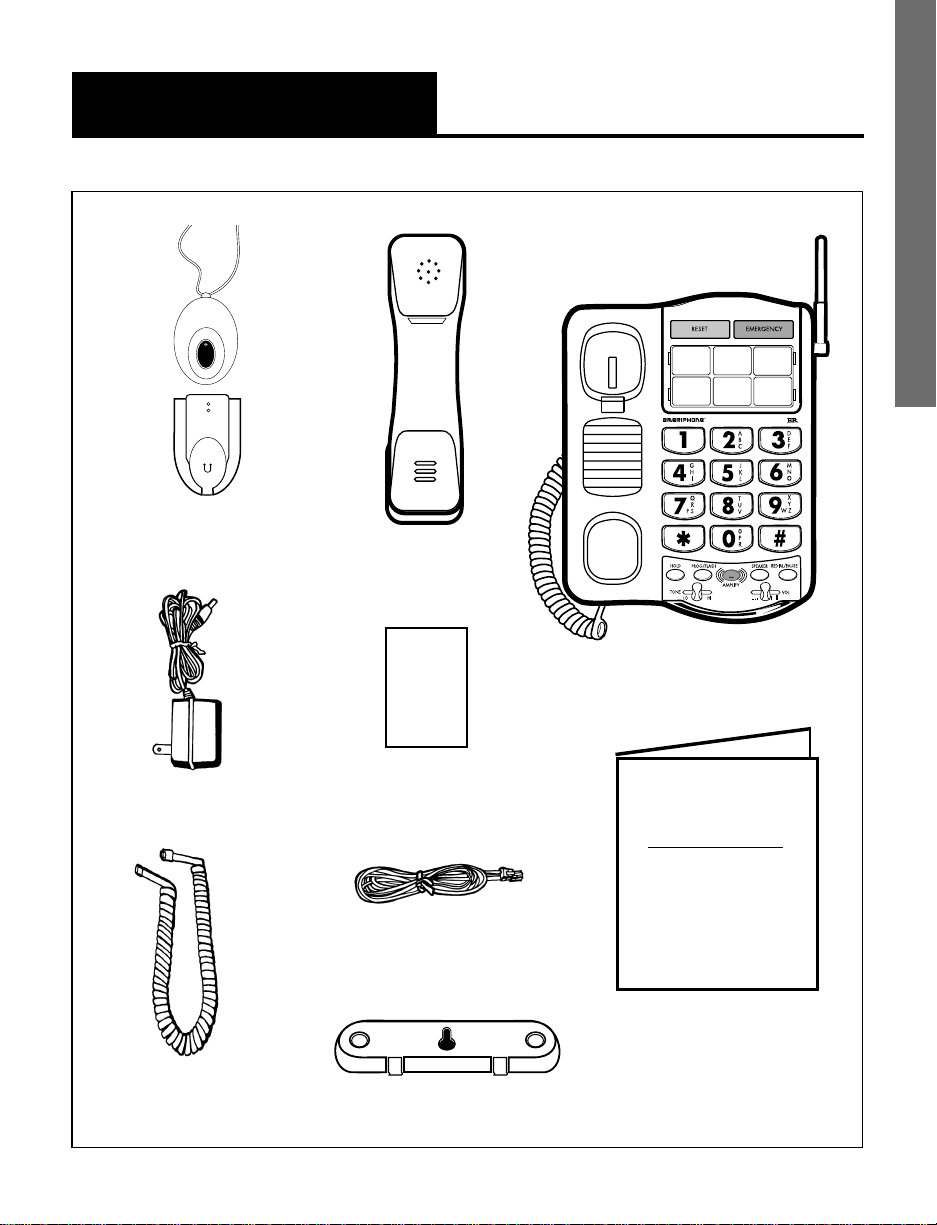
Please make sure your ER package
includes the items shown in Figure 1.
4
Introducing the ER
Thank you for selecting the ER
personal emergency response
telephone from Ameriphone.
These Operating Instructions and
the associated Quick Operating
Guide provide you with the
information you need to use your
ER effectively and safely. Read
this manual thoroughly before
using your telephone. Keep the
manual
near the telephone for
easy reference.
Warranty Ser vice
Your telephone is designed to
provide years of quality service.
But, should the phone malfunction
and the Trouble-shooting Chart
on page 20 not resolve the
problem, follow the Warranty
procedure on page 21.
Sales Receipt
Be sure to save your sales receipt
as proof of purchase date should
you need warranty service.
Page 8
E
N
G
L
I
S
H
Handset
5
Package Checklist
Users’ Guide
ER
Base Unit
Telephone Line Cords
Handset
Coil Cord
Operating Guides
Figure 1 - Package Components
Mounting Bracket
A/C Adapter
Remote Pendant
with Holder
Instruction Card
for Callers
ER
INSTRUCTIONS
FOR CALLERS
Page 9

6
Features on the ER
Figure 2 - Base Unit Controls
RINGER volume switch
A/C adapter and phone
line connection
TONE/PULSE switch
REMOTE HELP PENDANT
with holder
MEMORY buttons
REDIAL / PAUSE button
VOL volume slider
SPEAKER button
LOW BATTERY indicator
AMPLIFY button
AMPLIFY indicator
HOLD indicator
TONE
slider
HOLD
button
FLASH button/
PROG [program] button
Page 10
7
Setting up Your ER
There are five steps involved in
setting up your ER.
• Insert four AA NICAD batteries
for back-up in case of AC
power outage.
• Decide if you want the phone
to sit on a desk or hang on the
wall.
• Connect the telephone
components.
• Program up to 12 telephone
numbers into the memory
buttons.
• Setup special features
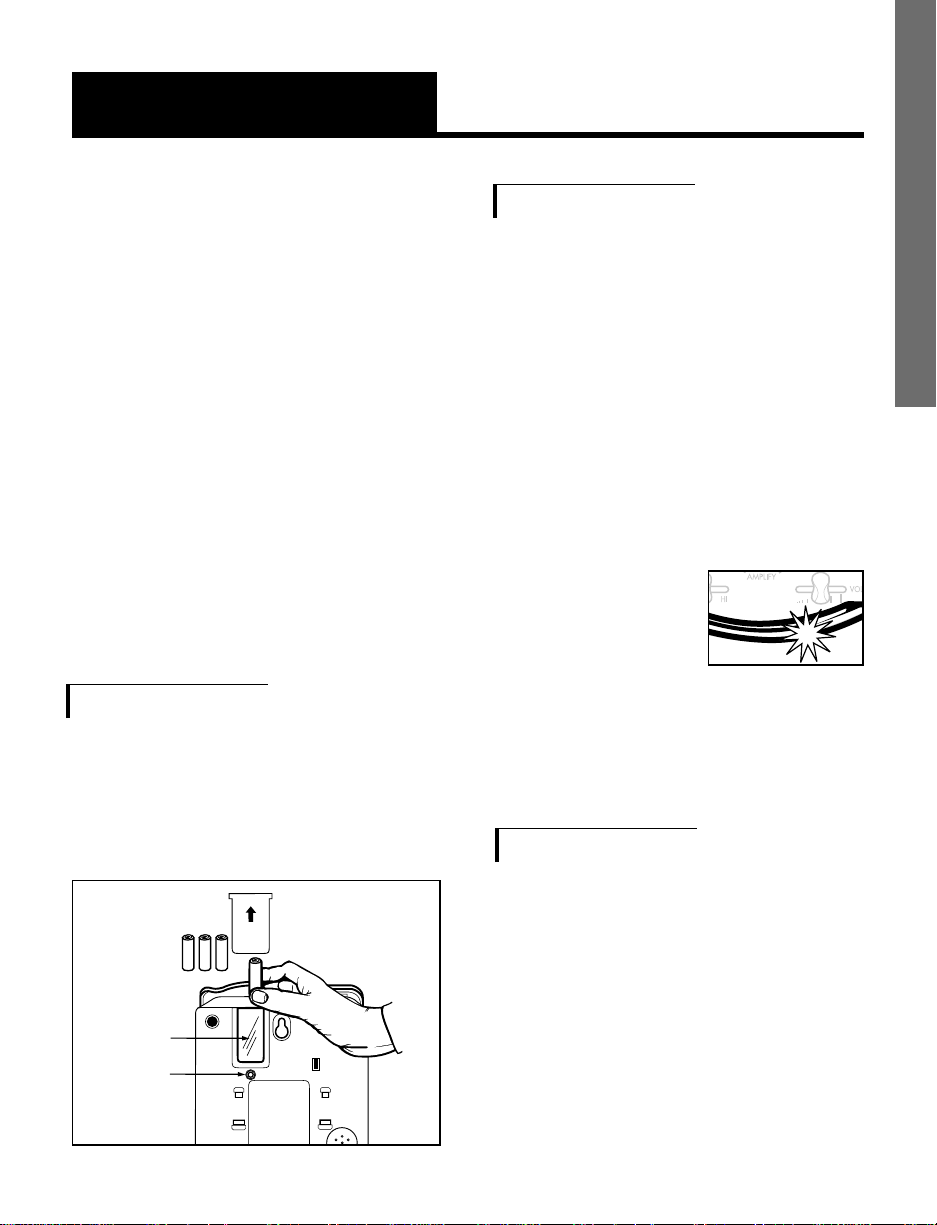
Installing the Backup Batteries
If there is a power outage, the ER
will operate for 4-8 hours with
four AA NiCad back-up batteries
(not included).
To install new battery:
1.Slide open the battery
compartment cover on the
bottom of the telephone
(Figure 3).
2.Install four fresh batteries. Be
sure to observe batter y
polarity as imprinted on the
base of the compartment.
The low battery
indicator will
light up if
the
batteries are
running low.
The phone operates as a regular
phone if there is no power
or battery.
Setting the Dialing Mode
Set the dial mode switch to T (tone) if
you have touch tone service. Set the
switch to
P (pulse) if you have rotar y
dialing.
E
N
G
L
I
S
H
Insert
batteries
here
Press in
here
to open
battery
compartment
Figure 3 - Accessing the Battery
Page 11
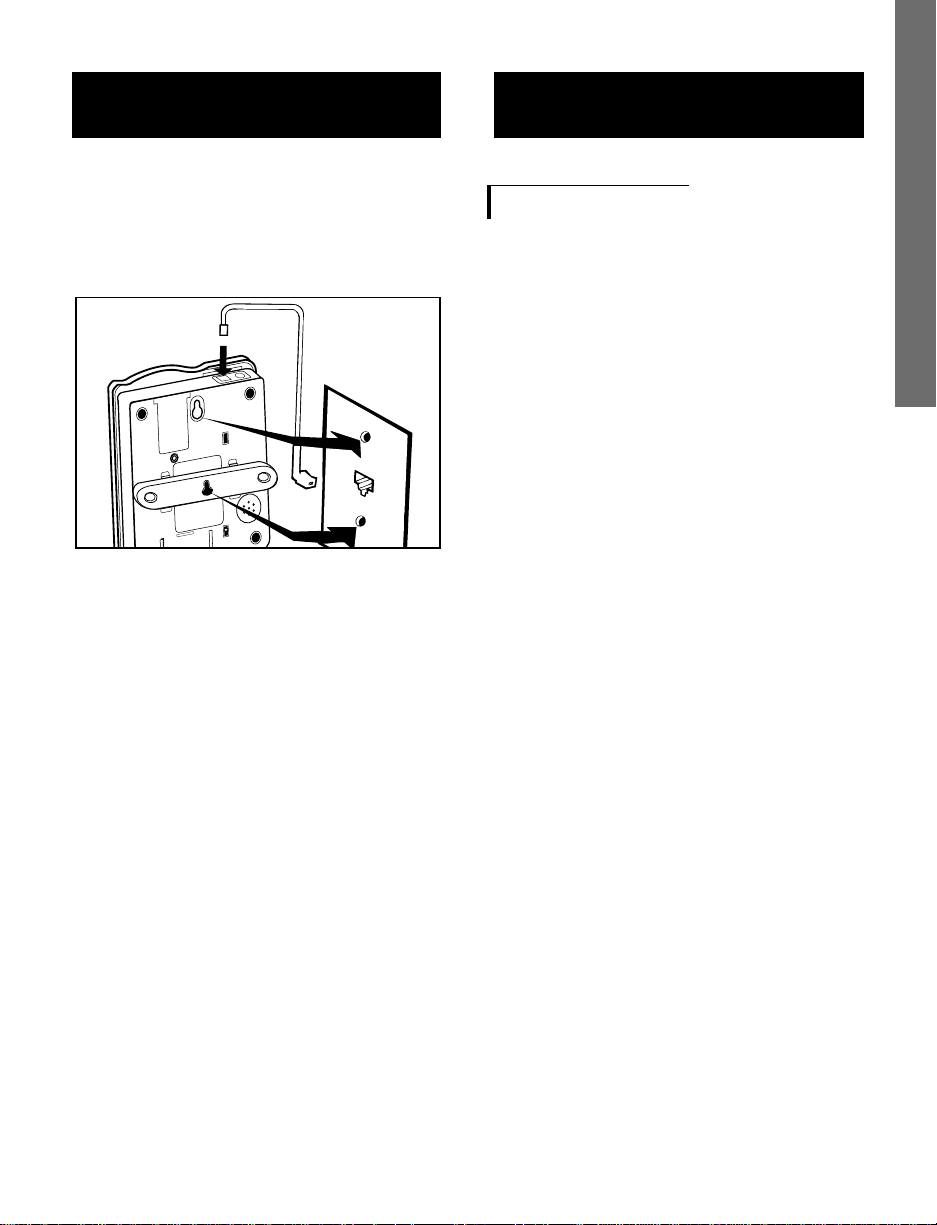
the handset when you hang up.
2.Insert the tabs of the phone
base into the slots in the
lower position of the base as
shown in Figure 6. Push the
phone base in and down
firmly until it snaps into
place.
8
Setting up Your ER
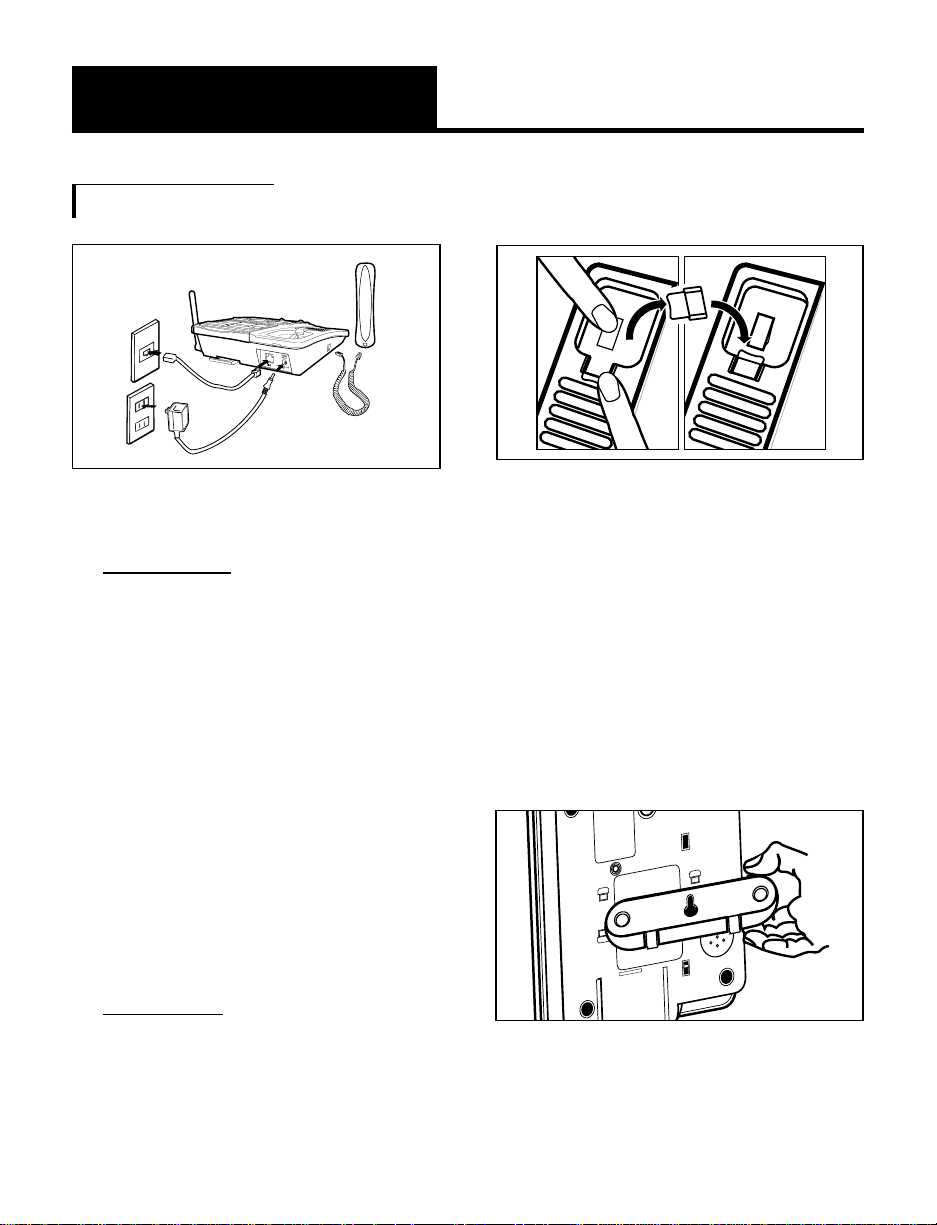
Connecting for Desk or Wall Mount
Desktop Use
1.Connect the telephone line
cord and the handset cord
to the telephone as shown in
Figure 4.
2.Plug the AC adapter into an
electric outlet and into the
telephone as shown in
Figure 4.
3.Lift the handset and listen for
a dial tone.
The phone is ready to use.
Wall Mount
1.Pull the handset hook out as
shown in Figure 5 and
reverse its position so that the
hook points up and will hold
Figure 4 - Connecting the Components
Figure 5 - Reversing the Hook
M
A
N
U
A
L
A
U
T
O
Figure 6 - Phone Base for Wall
Mounting
Page 12
E
N
G
L
I
S
H
9
Setting up Your ER
The ER Is Ready to
Use Right Out of the Box
Your Emergency Response
Telephone comes ready to use
right out of the box. All you have
to do is plug the phone in,
program your emergency contact
phone numbers (up to six contacts,
but at least one is needed). It has
already been pre-programmed at
the factory with the features listed
below.
1. Upon plug-in, the unit will say -
“The unit is ready.”
2. A pre-recorded emergency
voice message saying -
“Emergency, Emergency. This
person is having a serious
emergency at home. Please
contact them at once.
Press a key to acknowledge.”
3.The Remote Audio Monitoring
Access Code is 1,2,3.
4. The Inactivity Timer is set to
OFF.
3. Plug in the short phone line
cord and mount the phone
as shown in Figure 7.
4. See Desktop Use section and
follow steps 1 through 3.
Basic Operations
M
A
N
U
A
L
A
U
T
O
Figure 7 - Wall Mounting Installation
Page 13
10
Basic Operations
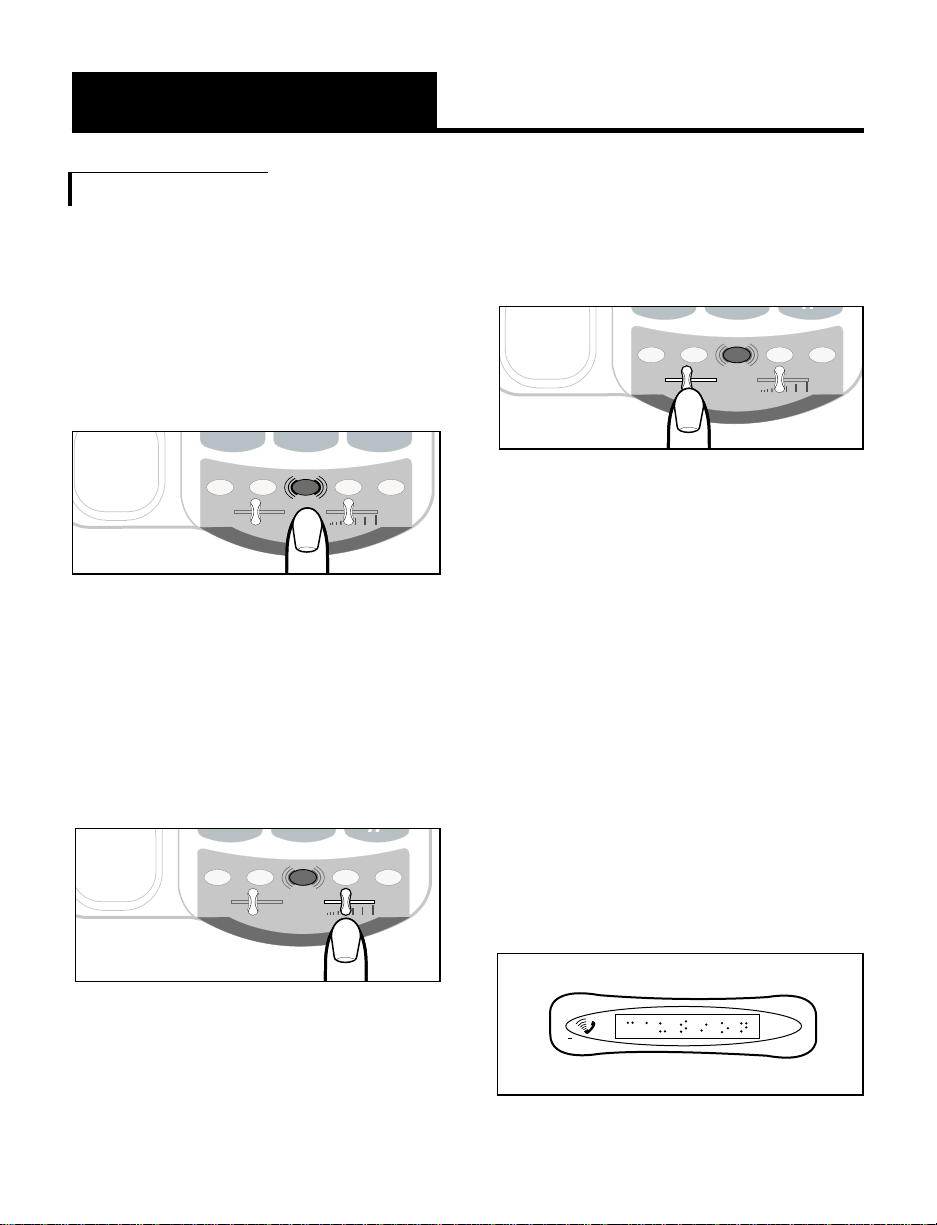
3. Slide the TONE control left or
right to achieve the word clarity
that’s best for you.
Caution: Repeated incremental
exposure to amplification levels
greater than 18 dB may be
harmful to individuals without
hearing disabilities. Therefore, do
not remove the warning label
attached to the back of the
handset. If it is likely that a
visually impaired person will use
the telephone, securely attach the
provided warning printed in
Braille to the back of the handset
(See, Diagram A).
To Adjust Volume and Tone Clarity
1. Press the AMPLIFY button as
shown in Figure 8 to turn the
incoming voice amplifier on or
off. When
AMPLIFY is on, the
AMPLIFY indicator comes on.
2.Adjust the volume in the
handset by moving the
VOL
slide control in Figure 9. With
AMPLIFY on, incoming volume
will be up to 30 dB louder.
P
E
0
#
HOLD PROG/FLASH
TONE
LO HI
SPEAKER
REDIAL/PAUSE
VOL
AMPLIFY
Figure 8 - AMPLIFY Button and Indicator
E
0
#
TONE
LO HI
VOL
AMPLIFY
*
HOLD PROG/FLASH SPEAKER
REDIAL/PAUSE
Figure 9 - Volume Slide Control
E
0
#
TONE
LO HI
VOL
AMPLIFY
*
HOLD PROG/FLASH SPEAKER
REDIAL/PAUSE
Figure 10 - Tone Slide Control
Diagram A.
LOUD
VOLUME
USE WITH
CAUTION
Page 14
E
N
G
L
I
S
H
11
Using Your XL-30
(Continued)
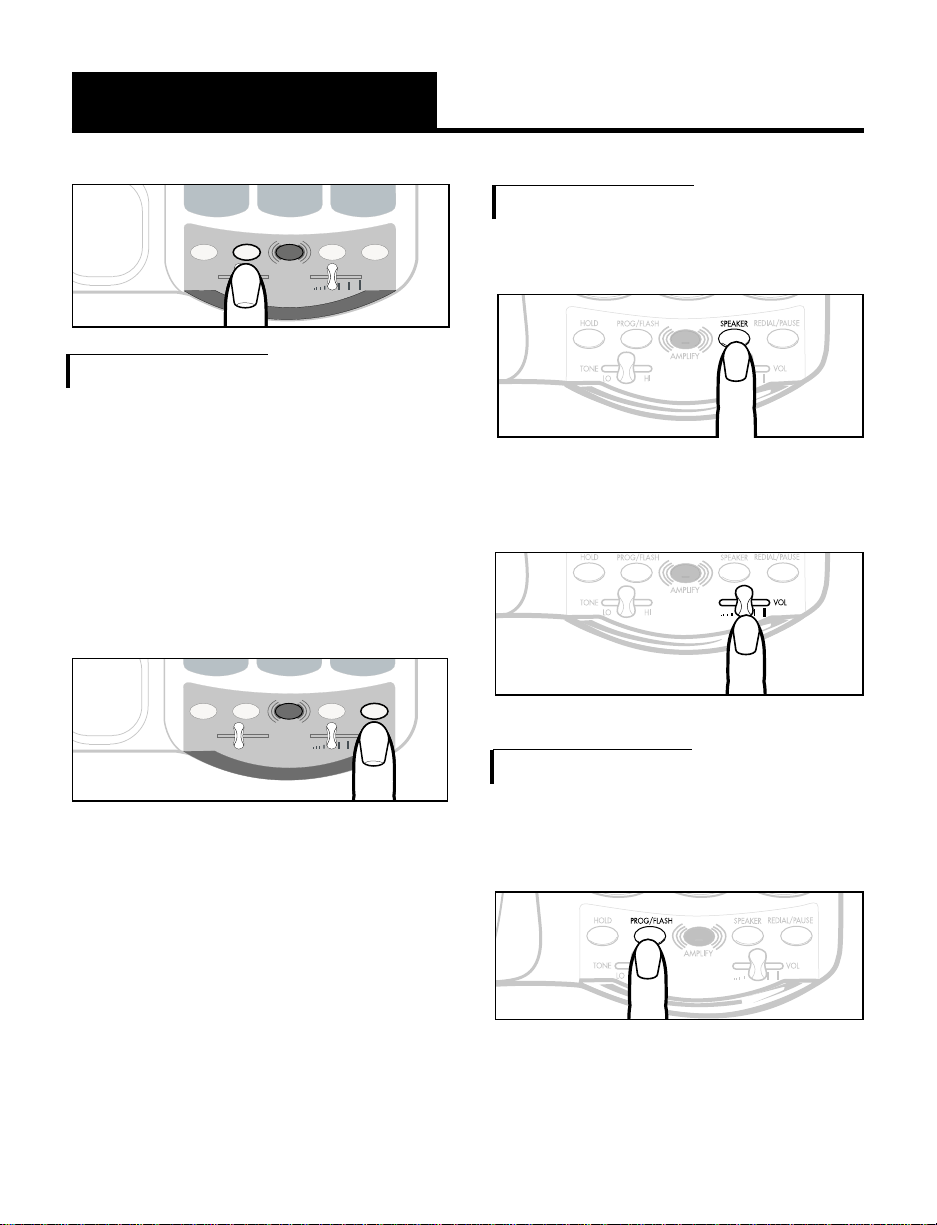
To Use the PROG/FLASH Button
1. When the handset is in the
cradle, the
PROG function
activates. The
PROG button can
be used to record your name,
address/emergency message
and to program your
emergency contacts. For
directions, turn to these sections
in the manual. When the
PROG
button is pressed, voiced
prompts will take you through
programming of the telephone.
2. When the handset is picked up
and the
PROG/FLASH button
is pressed, the
FLASH function
activates. The
FLASH button is
used to access services from
your local phone company,
such as call waiting and 3-way
calling.
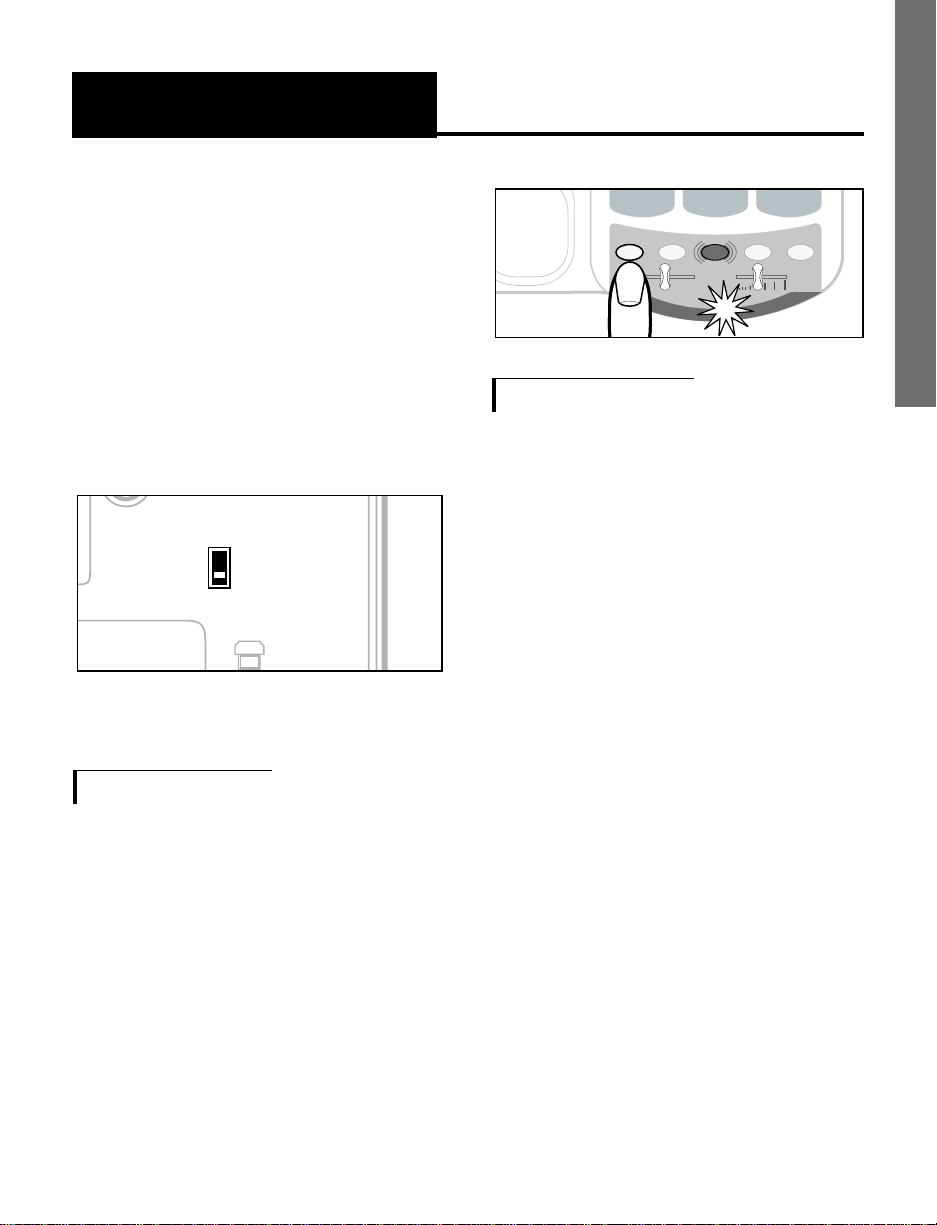
Note: In standard use, the
amplifier turns off whenever you
hang up the telephone. This is a
useful feature if many people use
the phone. If you want the
amplifier to always remain on,
slide the Volume Reset Override
switch on the back of the phone to
ON, as shown in Figure 11.
To Use the HOLD Button
To put a call on hold, press the HOLD
button and return the handset to its
cradle. You will notice the
HOLD
indicator light comes on.
Note: If you pick up an extension
phone on the same line when the ER
is on hold, the ER will disconnect and
you can continue your conversation
on the extension phone.
Figure 11 - Volume Reset Override On/Off
MANUAL
AUTO
OFF
ON
Volume
Reset
Override
O
P
E
0
#
TONE
LO HI
VOL
AMPLIFY
*
HOLD PROG/FLASH SPEAKER
REDIAL/PAUSE
Page 15
12
Basic Operations
To Use the REDIAL/PAUSE Button
1. When the handset is picked up,
if you press the
REDIAL/PAUSE
button once, the REDIAL function
activates. To redial the last
number called, pick up the handset
and press the
REDIAL button.
The phone will redial up to 31
digits.
2. If you press the REDIAL/PAUSE
button after any other NUMBER
KEY
button, the PAUSE function
activates. Press
PAUSE to insert a
2 second pause when dialing
out-going phone numbers.
To Use the Speakerphone
1.Press the SPEAKER button.
2. Slide the VOL control to adjust
the volume.
To Record Your Name,
Address/ Emergency Message
1. Press the PROG/FLASH button.
2. Press
2 and wait for the beep.
O
P
E
0
#
TONE
LO HI
VOL
AMPLIFY
*
HOLD PROG/FLASH SPEAKER
REDIAL/PAUSE
E
0
#
TONE
LO HI
VOL
AMPLIFY
*
HOLD PROG/FLASH SPEAKER
REDIAL/PAUSE
Page 16

13
Basic Operations
3. Then state (within 10 inches of
the phone) your name, address,
phone number and any other
additional personal information.
For example, your message
could be as follows:
“Hi, this is Art Jones at 123
Main St. My phone number is
714-555-1212.”
4. Press # to end recording.
5. Your information will be played
in front of the pre-recorded
emergency voice message.
To Check/Play Your Recording
1. Press the PROG button.
2.Press
5.
E
N
G
L
I
S
H
Page 17

14
Basic Operations
To Program Your Emergency
Contact Phone Numbers
1. Press the PROG button.
2. Press
1.
3. Press the first memory key M1. The phone will announce
the number stored at this
location, or tell you if it is
empty.
M1
M2
M3
M4
M5
M6
4. Enter the telephone number.
5. Press the
PROG button.
6. Repeat the above steps for
each emergency contact from
M2 through M6.
7. Press the PROG button again
to exit.
How to Program a Pager
as an Emergency Contact
You can program a pager number
as one or more of your
emergency contact numbers.
When the emergency button with
the pager number is pushed, the
phone will dial the pager number.
When the pager answers, the
phone will send the home number
(or any series of numbers that you
would like to use as a code) as a
Page 18
E
N
G
L
I
S
H
15
Basic Operations
message. Pager number and
message number can be up to 31
digits long, including the # keys.
The pager numbers can be
programmed by following the
procedures below.
1. Press the PROG button.
2 Press the 1 key.
3. Press the desired memory
button.
4. Press the # key, followed by the
contact pager number and the
# key again, followed by your
home number and the # key
again.
5. For toll-free pager numbers that
use a pin number, follow this
procedure: Press the # key,
followed by the toll-free pager
number and the # key again,
followed by the pin number
and the # key again,
followed by your home phone
number and the # key again.
Here’s an example:
#18007598355#4541
#7148970808#
6. Press the PROG button to store
the number
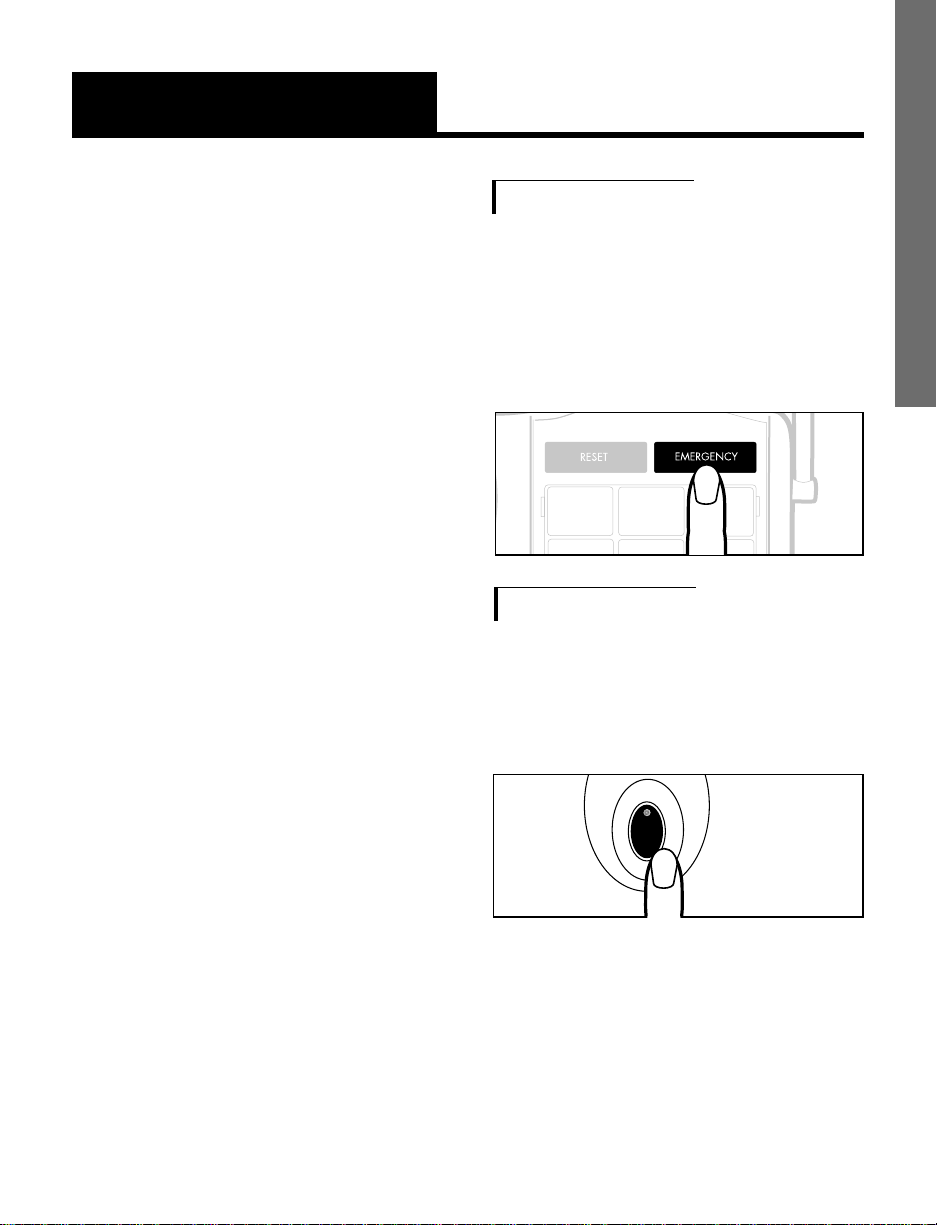
To Make an Emergency Call
Using the Phone
1. Press the red EMERGENCY
button. Your ER phone will
automatically dial your
emergency contact numbers.
To Make an Emergency Call
Using the Remote Help
Pendant
1. Press the button on the remote
pendant.
2. Your phone will begin automatically
dialing your emergency contacts.
NOTE: Please make sure you have
tested your Remote Help Pendant.
See
ADVANCED OPERATIONS.
Page 19

16
Basic Operations
“HOW TO HANDLE AN
EMERGENCY CALL”
You can make copies of this section
and give them to your emergency
contacts. There is a space on the
bottom of the page for you to write the
access code number for quick reference.
* Once an emergency call is dialed,
either from the phone or the remote
pendant, the ER immediately begins
dialing your pre-programmed
emergency contact numbers.
* When a person answers the phone,
they will hear the emergency voice
recording. For example,
“Hi, this is Art
Jones at 123 Main Street, my phone
number is 555-1212”
, followed by the
factory pre-recorded voice
announcement—”Emergency,
Emergency. This person is having a
serious emergency at home. Please
contact them at once. Press a key to
acknowledge”
.
At this time, the emergency contact
can press any key to continue. Once a
key is entered, the two-way
speakerphone communication is
established and the contact can speak
to the ER user. The message will repeat
three times. If no key is entered, then
the phone will hang up and continue to
dial the next emergency number. If a
key is entered, the contact and the ER
user can speak for 60 seconds. After
60 seconds, the phone will prompt the
contact for the access code. If the
contact hangs up before entering the
access code (factory default code is set
as 123), the ER will continue to dial the
next emergency contact number.
* The ER will ask for the access code
twice. If no key is entered, the ER will
hang up and dial the next emergency
contact number. Once the access code
is entered, a recorded message will tell
the contact
“code acknowledged” and
allow conversation for another 60
seconds. Every 60 seconds, the ER will
prompt the contact to enter a key to
continue. When you are finished with
your conversation, hang up the phone.
* The phone will dial all the
pre-programmed emergency numbers a
maximum of 250 times or until a
person is reached who responds by
entering the access code.
* Access Code ______ ______ ______
Page 20
17
Basic Operations
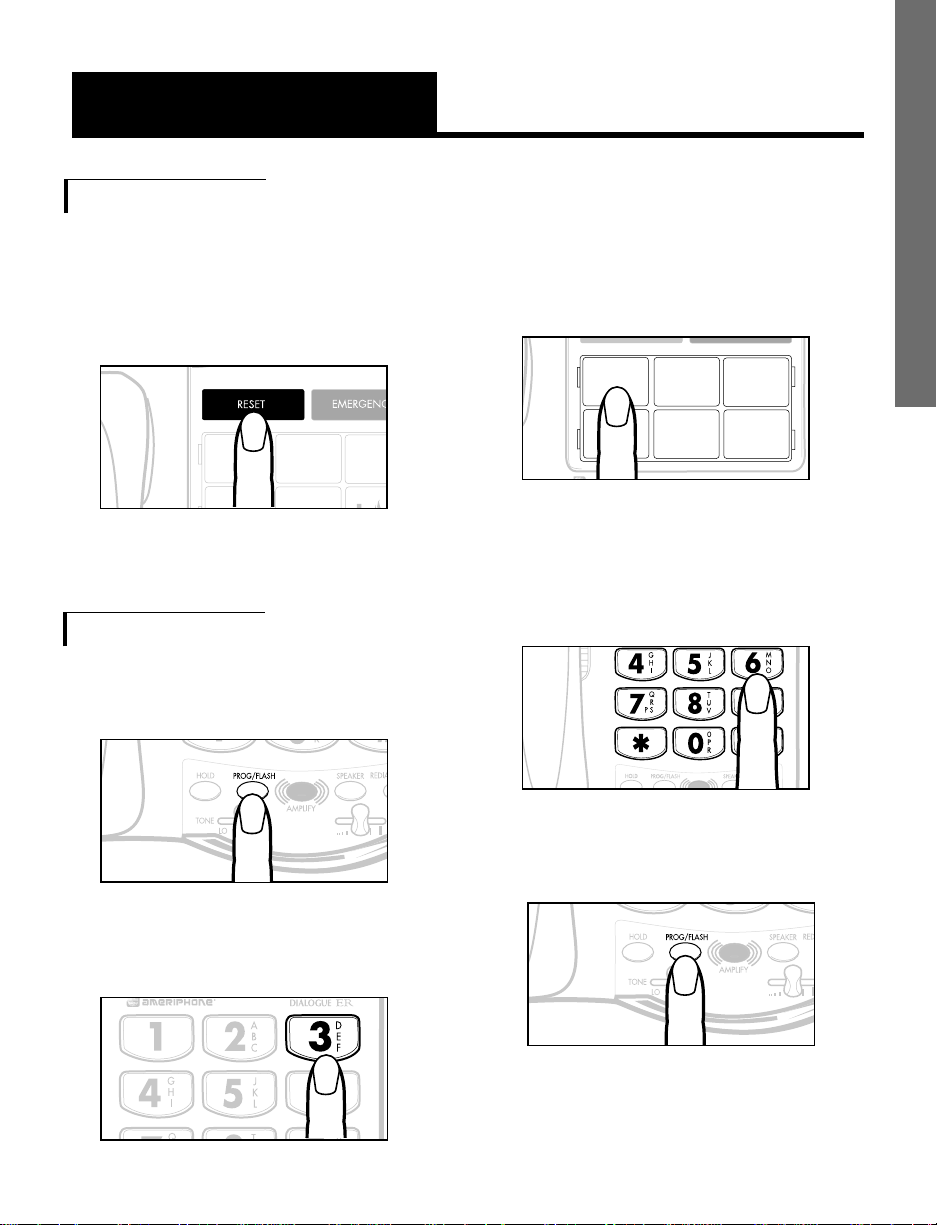
To Cancel Emergency Calling [In
Case of a False Alarm or
Mistaken Activation]
1. Press the RESET button. The ER
will hang up.
To Program Frequently Dialed
Numbers for Memor y Dialing
1. Press the PROG button.
2. Press
3.
3. Press a memory button.The
phone will announce the
stored number, if any, at this
location.
4. Enter the telephone number.
There
can be up to 31 digits in
the number.
5. Press the PROG button.
E
N
G
L
I
S
H
Page 21
18
Basic Operations
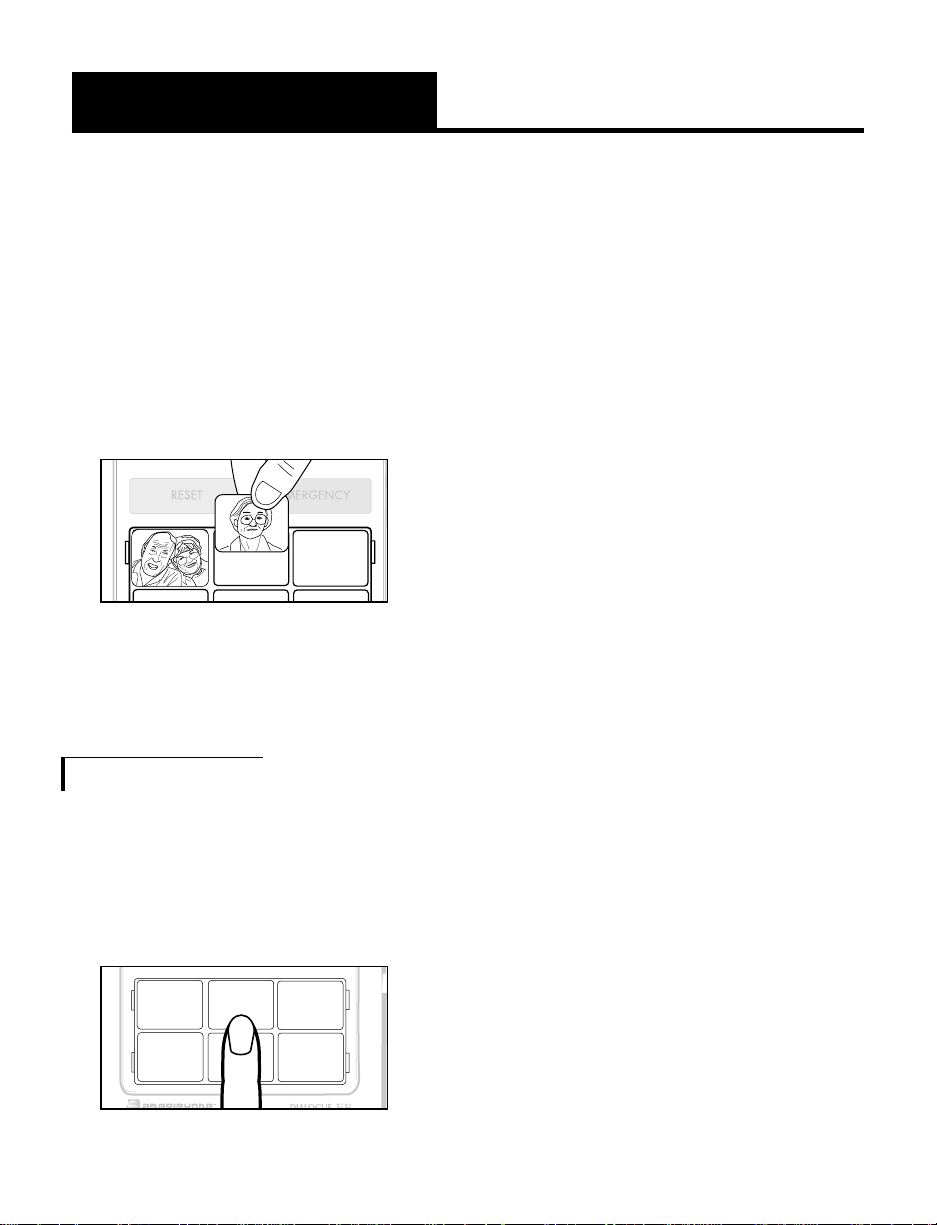
6.Repeat the above steps to
program the other memory
buttons.
7. You can insert pictures or icons
in each memory keypad to
remind you whose number has
been programmed into it.
8.Press the
PROG button again to
exit.
To Dial from Memory
1. Lift handset.
2. Press the desired
Memory
button.
M1
M2
M3
M4
M5
M6
Page 22
E
N
G
L
I
S
H
19
Advanced Operations
4.Press any key on the phone to
exit TEST mode.
5.If the ER doesn’t beep in Step
3, follow the directions in the
next section to re-program the
remote transmitter.
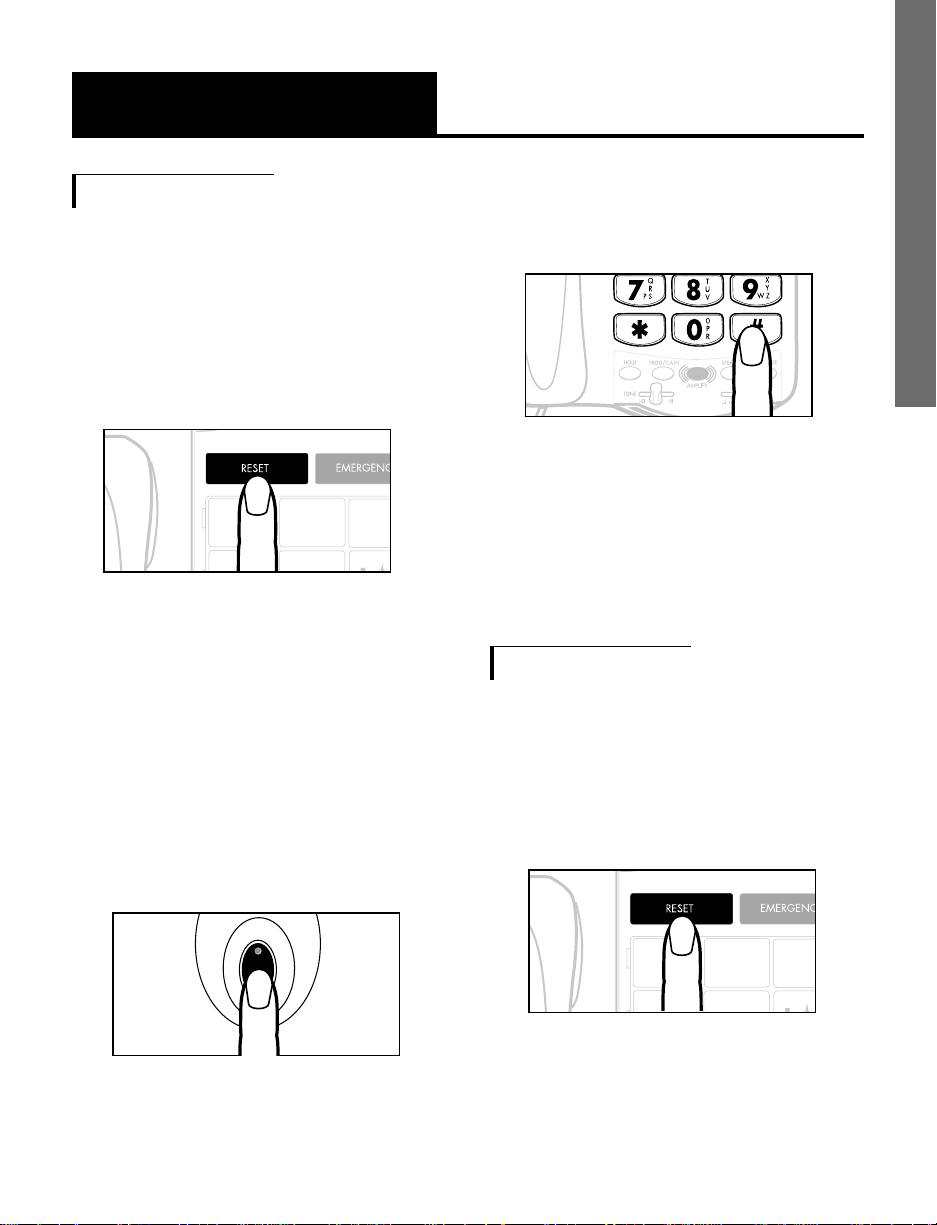
To Re-program the Remote
Help Pendant
1.With the handset in the cradle,
press the
RESET button on the
ER unit and hold the button until
you hear the word “LEARN.”
Test the Remote Help
Pendant’s Setting
1.Make sure the handset is in the
cradle
2.Press
RESET and hold until
you hear the word “TEST”.
3.Press the remote pendant
button. The ER unit will then
beep, letting you know that the
remote pendant has been
programmed correctly.
If you don’t press the button,
TEST mode will be terminated
after 2 minutes.
Page 23
20
Advanced Operations
2. Follow the voice prompt and
press the remote pendant’s
button once.
3.Wait for the 2nd voice prompt
to say,
“Press and hold the
button until the phone beeps.”
When you hear this, press and
hold the remote pendant’s
button for about 4 seconds.
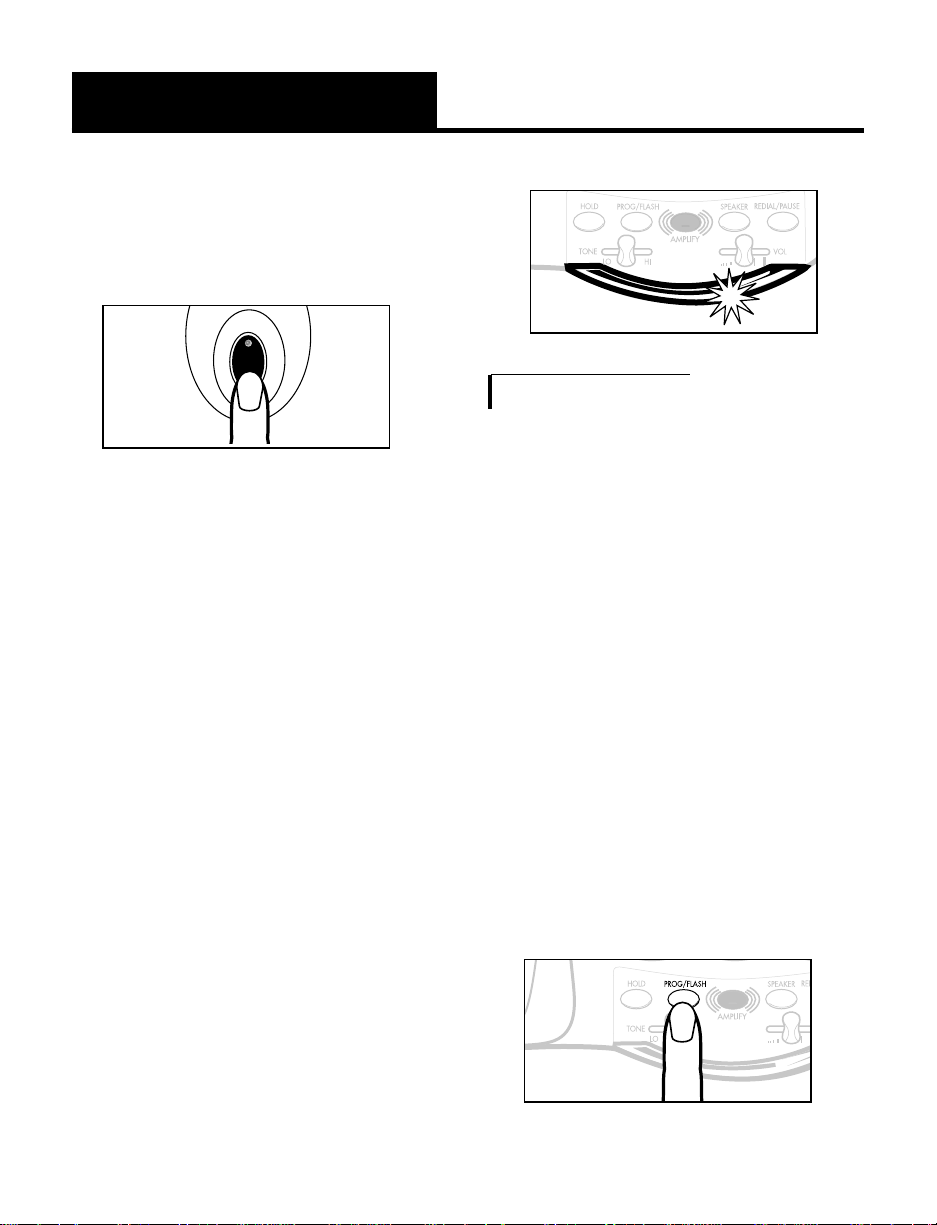
4.The low battery indicator will
blink rapidly and the phone will
beep at the end, indicating that
the remote pendant has been
programmed correctly. After the
phone beeps, the pendant
should be successfully
re-programmed. The ER unit will
then start the
TEST mode. Go to
the previous section to test the
re-programmed pendant.
To Set the Inactivity Timer
• The Inactivity Timer activates the
Emergency Calling feature of the
ER. If, after either 24 or 48
hours, there hasn’t been any
telephone activity on the ER, it
automatically begins dialing your
pre-programmed emergency
contacts.
• Your ER comes from the factory
with the Inactivity Timer set to
OFF. To turn it on and set it,
follow these steps:
1.With the handset in the cradle,
press the
PROG button.
Page 24
21
Advanced Operations
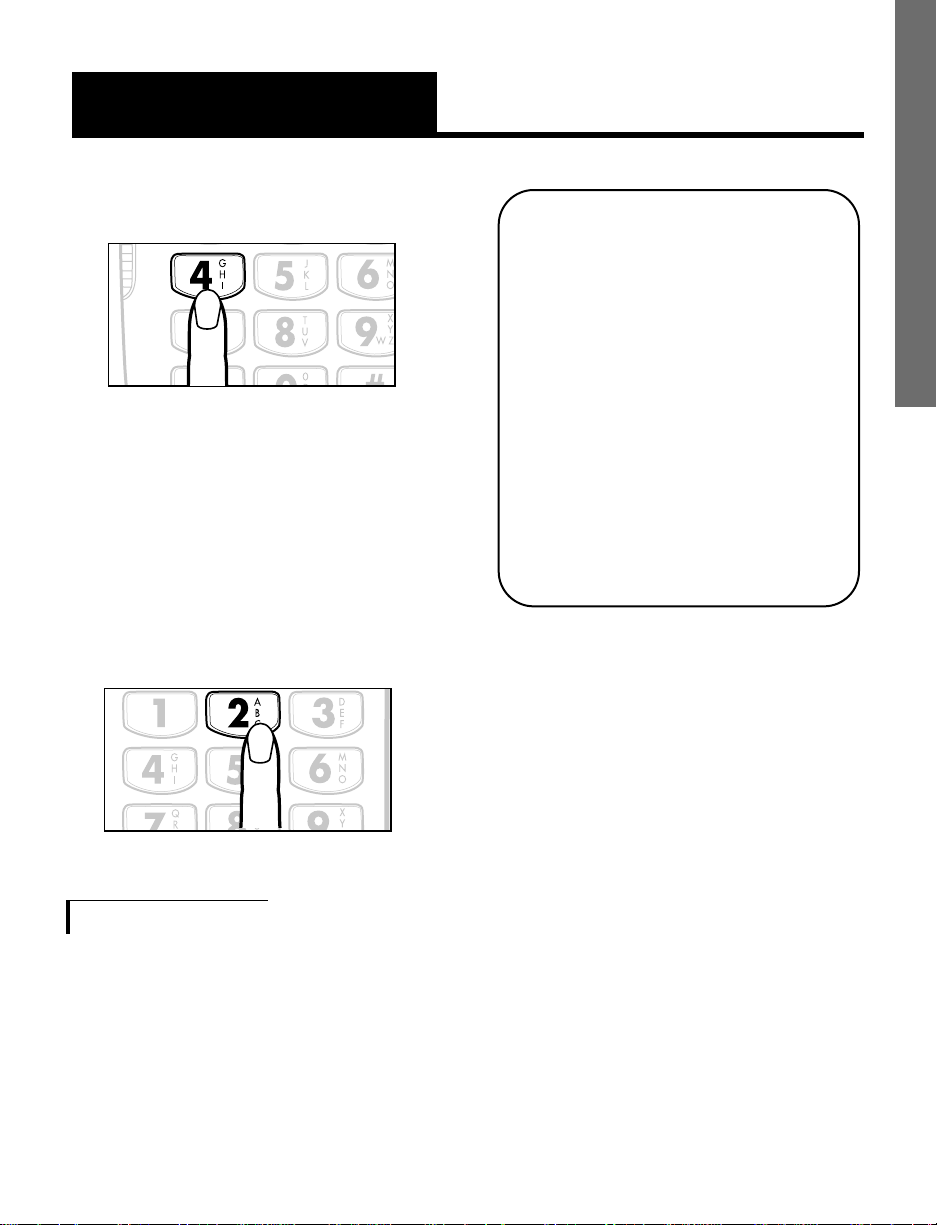
2. Press 4.
3.Choose one of the following:
• Press 2 to set Inactivity Timer to
24 hours
• Press 3 to set Inactivity Timer to
48 hours, or
• Press 1 to set Inactivity Timer to
OFF mode.
For Someone to Call You and Listen In
Using Remote Audio Monitoring
REMOTE AUDIO MONITORING
The following instructions are for
someone to call you, the ER user, in
case they did not hear from you
as expected. Please give a copy of
these important instructions to the
appropriate persons for quick reference.
INSTRUCTIONS FOR CALLERS:
Please make sure you know if the
ER user is using an answering machine
or if he/she subscribes to voice mail
service.
E
N
G
L
I
S
H
WHAT IS REMOTE AUDIO
MONITORING?
If a loved one, to whom you’ve
given your Monitor Access
Code, becomes worried about
you, this feature allows him or
her to call you, turn on the
speakerphone of your ER
remotely and listen in or talk to
you. If everything is all right, you
just answer the phone in a
normal manner.
Page 25

22
Advanced Operations
A. If the ER Is Not Connected to
an Answering Machine
or Voice Mail Service
1. Dial as you would a regular
phone call. The ER will answer
after
10 rings.
2. You will hear a voice message
saying, “Please enter your
Monitor Access Code”.
3. Enter the Monitor Access Code
on your keypad (The access
code is 123 unless it has been
changed). This turns on the
speakerphone of the
ER and allows you to listen in
and have a two -way
conversation.
4. Every 60 seconds, you will be
asked to press any key on the
keypad to continue; otherwise
the ER will hang up.
B. If the ER Is Connected to an
Answering Machine
1. Dial as in a regular phone
call. As the answering machine
starts playing its outgoing
message, listen for the ERto
beep
.
2. When the ER beeps, press any
key on your keypad and hold
it down for at least
3 seconds.
(If you don’t hold the key down
long enough, the answering
machine will continue its
regular recording procedures
and the ER
will not be
activated.)
3. You will hear a voice message
saying, ”Please enter your
Monitor Code”.
4. Enter the Monitor Access Code
on your keypad (the access
code is 123 unless it has been
changed). This turns on the
speakerphone of the ER and
allows you to listen in and
have a two-way conversation.
Page 26

23
Advanced Operations
5. Every 60 seconds, you will be
asked to press any key on the
keypad to continue, otherwise
the ER will hang up.
C. If the ER User Subscribes to
Voice Mail Service
1. After the call is answered by
the Voice Mail Service, hang
up and call back immediately
(within 20 seconds).
2. Repeat calling 2 or 3 times
until you hear a voice
message from the ER saying,
“Please enter your Monitor
Access Code”.
3. Enter the Monitor Access Code
on your keypad (the access
code is 123 unless it has been
changed). This turns on the
speakerphone of the
ER and allows you to listen in
and have a two-way
conversation.
4. Every 60 seconds, you will be
asked to press any key on the
keypad to continue; otherwise
the ER will hang up.
To Change Your Remote Audio
Monitoring Access Code
1. Press the PROG key.
2. Press
6. The ER will announce the
current monitor access code.
3. Enter a new, 3-digit access code
(Don’t use the (*) or (#) keys)
E
N
G
L
I
S
H
Page 27

24
Advanced Operations
4. The ER will repeat the NEW
access code numbers.
5. If correct, press
1 to save. If
not, repeat the above steps.
To Check Your ER Settings Status
1. Leave the handset in the cradle
2. Press
RESET.
3. The phone will announce:
• If your Remote Help Pendant’s
battery is low.
• If any emergency numbers have
been programmed.
• If an emergency message has
been recorded.
• The current Inactivity Timer
Status.
• The current Remote Audio
Monitoring Access Code.
Page 28

25
Troubleshooting Chart
The chart below will help you solve
most problems that may arise during
operation of your telephone.
Should the difficulty continue,
contact Ameriphone or your
authorized dealer for assistance.
E
N
G
L
I
S
H
CAUSE AND
CORRECTIVE ACTION
Check all phone
cord connections.
No number stored
in that memory
button. See:
“Programming the
Memory buttons”,
P. 13
See “Setting Up
Your Phone” to
reset the dial
mode switch,
P. 4
Check all phone
cord connections.
1.Unplug the
AC adapter.
2.Remove backup
batteries.
3.Then, plug in the
AC adapter
and reinstall
batteries.
SYMPTOM
No dial tone
No number
dialed when
memory
button pressed
Call cannot
be dialed,
or dials
very slowly
An incoming
call does not
produce an
audible ring
Phone locks
up.
No functions
operate
Page 29

26
Regulator y Compliance
Part 68 of FCC Rules
Information
This ER Amplified telephone
complies with Part 68 of the FCC
rules and the requirements
adopted by the ACTA. On the
bottom of this equipment is a label
that contains, among other
information, a product identifier in
the format US:AAAEQ##TXXXX. If
requested, this number must be
provided to the telephone company.
A plug and jack used to connect
this equipment to the premises
wiring and telephone network
must comply with the applicable
FCC Part 68 rules and requirements
adopted by the ACTA. A
compliant telephone cord and
modular plug, RJ11 USOC, is
provided with this product. It is
designed to be connected to a
compatible modular jack that is
also compliant. See installation
instructions for details.
The REN is used to determine the
number of devices that may be
connected to a telephone line.
Excessive RENs on a telephone
line may result in the devices not
ringing in response to an
incoming call. In most but not all
areas, the sum of RENs should not
exceed five (5.0). To be certain of
the number of devices that may be
connected to a line, as determined
by the total RENs, contact the
local telephone company. For
products approved after July 23,
2001, the REN for this product is
part of the product identifier that
has the format
US:AAAEQ##TXXXX. The digits
represented by ## are the REN
without a decimal point (e.g., 03
is a REN of 0.3). For earlier
products, the REN is separately
shown on the label.
If this telephone equipment causes
harm to the telephone network,
the telephone company will notify
you in advance that temporary
discontinuance of service may be
required. But if advance notice
isn’t practical, the telephone
company will notify the customer
as soon as possible. Also, you will
Page 30

E
N
G
L
I
S
H
27
be advised of your right to file a
complaint with the FCC if you
believe it is necessary.
The telephone company may
make changes in its facilities,
equipment, operations or
procedures that could affect the
operation of the equipment. If this
happens the telephone company
will provide advance notice in
order for you to make necessary
modifications to maintain
uninterrupted service.
If trouble is experienced with this
telephone equipment, for repair or
warranty information, please
contact Walker / Ameriphone,
1-800-874-3005. If the equipment
is causing harm to the telephone
network, the telephone company
may request that you disconnect
the equipment until the problem is
resolved.
This telephone equipment is not
intended to be repaired and it
contains no repairable parts.
Opening the equipment or any
attempt to perform repairs will
void the warranty. For service or
repairs, call 1-800-874-3005.
Connection to party line ser vice is
subject to state tariffs. Contact the
state public utility commission,
public service commission or
corporation commission for
information.
If your home has specially wired
alarm equipment connected to the
telephone line, ensure the
installation of this telephone
equipment does not disable your
alarm equipment. If you have
questions about what will disable
alarm equipment, consult your
telephone company or a qualified
installer.
This telephone equipment is
hearing aid compatible.
Customer-Owned Coin/Credit
Card Phones:
To comply with state tariffs, the
telephone company must be given
notification prior to connection. In
some states, the state public utility
Regulator y Compliance
(continued)
Page 31

28
commission, public service
commission or corporation
commission must give prior
approval of connection.
Part 15 of FCC Rules
Information
This device complies with part 15
of the FCC Rules. Operation is
subject to the following two
conditions: (1) This device may
not cause harmful interference,
and (2) this device must accept
any interference received,
including interference that may
cause undesired operation.
Your
ER Amplified Telephone has
been tested and found to comply
with the limits of a Class B digital
device, pursuant to Part 15 of
FCC rules. These limits are
designed to provide reasonable
protection against harmful
interference in residential
installation.
This equipment generates, uses,
and can radiate radio frequency
energy and, if not installed and
used in accordance with the
instructions, may cause
harmful interference to radio
communications. However, there is
no guarantee that interference will
not occur in a particular
installation; if this equipment does
cause harmful interference to
radio or television reception,
which can be determined by
turning the equipment off and on,
you are encouraged to try to
correct the interference by one of
the following measures:
1. Where it can be done safely,
reorient the receiving television
or radio antenna.
2. To the extent possible, relocate
the television, radio or other
receiver with respect to the
telephone equipment. (This
increases the separation
between the telephone
equipment and the receiver.)
3. Connect the telephone
equipment into an outlet on a
circuit difference from that to
Regulator y Compliance
(continued)
Page 32

E
N
G
L
I
S
H
29
Regulator y Compliance
(continued)
which the television, radio, or
other receiver is connected.
4. Consult the dealer or an
experienced radio/TV
technician for help.
CAUTION: Changes or
modifications not expressly
approved by the manufacturer
responsible for compliance could
void the user’s authority to operate
the equipment.
Industry Canada Technical
Specifications
This product meets the applicable
Industr y Canada technical
specifications.
Before installing this equipment,
users should ensure that it is
permissible to be connected to the
facilities of the local
telecommunications company. The
equipment must also be installed
using an acceptable method of
connection. In some cases, the
company’s inside wiring
associated with a single line
individual service may be
extended by means of a certified
connector assembly (telephone
extension cord). The customer
should be aware that compliance
with the above conditions may not
prevent degradation of service in
some situations.
Repairs to certified equipment
should be made by an authorized
Canadian maintenance facility
designated by the supplier. Any
repairs or alterations made by the
user to this equipment, or
equipment malfunctions, may give
the telecommunications company
cause to request the user to
disconnect the equipment.
Users should ensure for their own
protection that the electrical
ground connections of the power
utility, telephone lines and inter nal
metallic water pipe system, if
present, are connected together.
This precaution may be
particularly important in rural
areas.
Page 33

30
Regulator y Compliance
(continued)
CAUTION: Users should not
attempt to make such connections
themselves, but should contact the
appropriate electric inspection
authority, or electrician, as
appropriate.
The Ringer Equivalence Number is
an indication of the maximum
number of terminals allowed to be
connected to a telephone
interface. The termination on an
interface may consist of any
combination of devices subject
only to the requirement that the
sum of the Ringer Equivalence
Numbers of all the devices does
not exceed five.
[The term “IC:” before the
certification/registration number
only signifies that the Industry
Canada technical specifications
were met.]
Page 34

E
N
G
L
I
S
H
31
Page 35

32
IMPORTANT INSTRUCTIONS
Warranty
This warranty applies only to
Ameriphone products that are
purchased and used in the United
States or Canada.
Ameriphone warrants the ER
telephone against any defect in
materials or workmanship for the
period of one year from
the date of
purchase.
If your Ameriphone product is
defective and returned within 30
days of the date of purchase, your
Ameriphone dealer will replace it
at no charge.
If returned after 30 days but within
one year from the date of purchase,
we will repair or replace it at no
charge. In the repair of your
ER,
we may use new or reconditioned
replacement parts. If we elect to
replace your ER, we may replace it
with a new
or reconditioned
product of the same or similar
design.
Repair or replacement will be
warranted
for either 90 days or the
remaining time on the original
warranty period, whichever is
longer.
Implied warranties, including
those of fitness for a particular
purpose and merchantability (an
unwritten warranty that the
product is fit for ordinary use), are
limited to one year from date of
purchase. We will not pay for loss
of time, inconvenience, loss of use
of your ER phone, or property
damage caused by your ER phone
or its failure to work, or any other
incidental or consequential
damages. Some states do not
allow limitations on how long an
implied warranty lasts or the
exclusion of incidental or
consequential damages, so the
above exclusions
or limitations may
not apply to you.
To get warranty ser vice for your
ER phone, you must provide proof
of the purchase date. Within 30
days of the date of purchase,
return your ER to the place where
you purchased it for immediate
replacement. After 30 days, call
Ameriphone at (714) 897-0808
or (800) 874-3005 voice for the
authorized service center nearest
you. You must prepay all shipping
Page 36

33
IMPORTANT SAFETY
INSTRUCTIONS
E
N
G
L
I
S
H
Warranty
costs. We suggest you save the
original package materials in the
event you need to ship the ER.
When in need of warranty repair,
please call our customer service
department at the above
mentioned numbers.
They will help
you process your return shipment.
This warranty does not cover
defects resulting from accidents,
damage while in transit to our
service location, alterations,
unauthorized repair, failure to
follow instructions, misuse, use
outside the United States or
Canada, fire, flood, and acts of
God. Nor do we warrant
the
product to be compatible with any
particular telephone equipment,
party line, key telephone systems or
more sophisticated switching
systems.
If your ER is not covered
by this warranty, call us at (714)
897-0808 or (800) 874-3005
voice for advice as to whether we
will repair your ER and other
repair information. The repair
shall be warranted for 90 days.
Page 37

34
Specifications
Maximum gain
High frequency (3kHz): 26dB
Wide band (300 to 3000Hz):
20dB
Tone control range
Full range: 300 to 3000Hz
using one slide control.
Dimensions
Size: 9
1
/2
" x 7" x 3
1
/4
"
Weight: 2.52 lbs.
Power Requirements
AC adapter: 9V, 650mA
4 AA NICAD batteries (optional)
Page 38

35
E
N
G
L
I
S
H
Index
Adjusting Handset Volume and
Tone for Clarity............................10
Canceling an Emergency Call ............17
Checking Your ER’s
Settings Status ............................24
Connecting for Desk or Wall Mounting
Desktop Use..................................8
Wall Mounting ..............................8
Features..............................................6
Help from Ameriphone ........................4
HOLD button ....................................11
How to Handle an Emergency Call......16
Inactivity Timer Setting........................20
Installing the Backup Batteries ..............7
Making an Emergency Call Using
the Phone ..................................15
Making an Emergency Call Using
the Remote Help Pendant ..............15
Programming Emergency Contact
Phone Numbers ................................14
PROG/FLASH button..........................11
Programming a Pager as an
Emergency Contact ..........................14
Programming Frequently Dialed
Phone Numbers ..........................17
Recording Your Name/Address/
Emergency Message....................12
REDIAL/PAUSE button ........................12
Remote Audio Monitoring ..................21
Remote Audio Monitoring Access
Code..........................................23
Remote Help Pendant Re-programming
......19
Sales Receipt ......................................4
Specifications....................................34
Testing the Remote Help Pendant ........19
Troubleshooting Chart ........................25
Using the Speakerphone ....................12
Warranty Service ................................4
Warranty ..........................................32
Ameriphone products are
manufactured by Walker,
A Division of Plantronics, Inc.
© 2003 Plantronics, Inc. All rights
reserved. Ameriphone, Amplifying
Your Life, and Walker are
trademarks or registered
trademarks of Plantronics, Inc.
Page 39

Page 40

F
R
A
N
Ç
A
I
S
Mode d'emploi
ER
Téléphone d'urgence
®
Page 41

IMPORTANT INSTRUCTIONS
Table des matières
Important ! Prière de lire ce qui suit.
...................................................................
39
Présentation du ER .........................................................................................................44
Service de garantie ........................................................................................................44
Reçu de caisse...............................................................................................................44
Aide d'Ameriphone........................................................................................................44
Particularités..................................................................................................................45
Installation du ER............................................................................................................47
Installation des piles de réserve........................................................................................47
Mode de composition.....................................................................................................47
Installation sur bureau ou sur mur .....................................................................................48
Sur bureau................................................................................................................48
Sur mur.....................................................................................................................48
Fonctions principales.......................................................................................................50
Réglage du volume sonore et de la clarté de timbre...........................................................50
Utilisation de la touche de garde. ....................................................................................51
Utilisation de la touche Prog/Flash...................................................................................52
Utilisation de la touche Recomposition/Pause....................................................................52
Utilisation du téléphone à haut-parleur..............................................................................53
Enregistrement de vos nom et adresse/d'un message d'urgence .........................................53
Programmation des numéros d'urgence.............................................................................54
Appel d'un numéro d'urgence .........................................................................................54
Appel d'un numéro d'urgence à partir du pendentif de téléalarme.......................................55
Annulation d'un appel d'urgence.....................................................................................57
Programmation des numéros fréquemment utilisés ..............................................................57
Appel d'un numéro en mémoire.......................................................................................58
Fonctions supérieures......................................................................................................59
Vérification du réglage du pendentif de téléalarme............................................................59
Reprogrammation du pendentif de téléalarme....................................................................59
Réglage de la minuterie d'inactivité..................................................................................60
Écoute à l’aide de la télésurveillance auditive....................................................................61
Appareil non relié à un répondeur..............................................................................62
Appareil relié à un répondeur....................................................................................62
Avec service de boîte vocale......................................................................................63
Changement du code d'accès de la télésurveillance auditive.... ..........................................63
Vérification des réglages du ER........................................................................................64
Guide de dépannage......................................................................................................65
Conformité De normalisation ..........................................................................................66
Garantie........................................................................................................................72
Caractéristiques..............................................................................................................74
Page 42

39
IMPORTANT SAFETY
INSTRUCTIONS
F
R
A
N
Ç
A
I
S
Important ! Prière de
lire ce qui suit.
Merci d'avoir acheté le
ER
d'Ameriphone, Inc. Ameriphone s'est
efforcé de faire du le meilleur
téléphone d'urgence. Cependant,
pour votre sécurité, nous vous prions
de prendre les précautions suivantes
lors de son utilisation.
• Le
ER
doit être régulièrement
vérifié pour assurer le bon débit
de votre message d'urgence
préenregistré aussitôt qu'activé par
le bouton d'urgence ou le
pendentif de téléalarme. En tant
qu'utilisateur, vous êtes
responsable de la vérification.
• Il est possible que le signal de
l'émetteur soit bloqué par des
composantes structurales de
votre maison. L'utilisateur doit
alors vérifier l'efficacité du
transmetteur dans la zone
d'utilisation afin de localiser les
obstacles, s'ils existent.
• Ne placez pas le
ER
sur une sur
face métallique qui peut réduire la
portée de l'appareil.
• L'utilisation du
ER
ne garan
tit pas
l'accès aux secours.
LeERn'est
qu'un moyen pour vous aider à
appeler des secours.
• Le transmetteur doit être vérifé
fréquemment pour éviter les
parasites ou les pannes non
décelées.
• L'appareil fonctionne comme un
téléphone normal en cas de panne
de courant ou de défaillance des
piles.
• Lorsque les piles sont usées, le
voyant de piles déchargées
s'allume. Dans ce cas, vérifiez que
l'adaptateur CA/CC est branché.
• Pour les installations aux É.-U.
seulement : le
ER
doit être
conforme à la section 15 des
règlements et normes de la FCC.
Dans ce cas, la puissance
émettrice et donc la portée
sont réduites.
• Les modifications apportées à
l'appareil peu vent annuler
l'homologation de la FCC.
AVIS SUR LES PARASITES RADIO ET
TÉLÉVISION S'APPLIQUANT À UN
APPAREIL DE CLASSE B
L'appareil produit et utilise de
l'énergie de fréquence radio et s'il
n'est pas bien installé et utilisé, c.-à-d.
Page 43

40
IMPORTANT INSTRUCTIONS
Important ! Prière de
lire ce qui suit.
en suivant strictement les instructions
du fabricant, il peut nuire à la
réception des postes de radio ou de
télévision. L'appareil a été soumis à
des tests afin d'assurer sa conformité
aux limites données à un appareil
informatique de classe B selon les
spécifications de la sous-section B des
règlements et normes de la FCC
(Code of Federal Regulations, Titre
47), conçues dans le but de prévoir
une protection adéquate contre ces
parasites dans les installations
résidentielles.
INSTRUCTIONS À L'UTILISATEUR
Au cas où il existe des parasites aux
postes de radio ou de télévision, le
fait étant prouvé en allumant et en
éteignant l'appareil, l'utilisateur est
prié de corriger la situation en
prenant la ou les mesures
appropriées sui-vantes :
• Réorientez ou déplacez l'antenne
réceptrice.
• Augmentez la distance entre le
récepteur et le téléphone.
• Branchez le téléphone dans une
prise de courant séparée.
• Consultez le détaillant ou
technicien radio-télévision agréé.
Les modifications ou changements
non expressément approuvés par
AMERIPHONE, Inc. peuvent annuler
l'autorisation d'utiliser l'appareil.
Page 44

41
IMPORTANT SAFETY
INSTRUCTIONS
F
R
A
N
Ç
A
I
S
Importantes consignes
de sécurité
Lors de l’utilisation de l’équipement
téléphonique, les mesures de sécurité
de base doivent être toujours suivies
afin de réduire les risques d’incendie,
de choc électrique. Les utilisateurs
doivent prendre en considération les
points suivants :
1. Lire et comprendre toutes les
consignes.
2. Respecter tous les avertissements
et suivre les directives inscrites
sur le produit.
3. Ne jamais utiliser ce produit à
proximité d’une baignoire, d’un
bassin, d’un évier, d’une cuve de
buanderie, dans un sous-sol
humide, autour d’une piscine ou
dans tout autre endroit où il y
a de l’eau.
4. Éviter d’utiliser le produit (autre
qu’un type sans fil) là où il y a
présence de risques
d’électrocution par la foudre.
5. Ne pas utiliser le téléphone pour
rapporter une fuite de gaz en se
tenant près de la fuite.
6. Débrancher ce produit avant de
le nettoyer. Ne pas utiliser de
nettoyant liquide ou en aérosol.
Utiliser un linge humide pour le
nettoyage.
7. Placer ce produit sur une surface
stable. La chute de l’appareil
pourrait causer des dommages et
des blessures.
8. Ne pas couvrir les fentes et
ouvertures sur ce AM100. Ne
jamais placer ce produit près ou
sur un radiateur, ou d’un élément
chauffant. Ce téléphone ne doit
pas être encastré à moins qu’un
système de ventilation efficace ne
soit installé.
9. Utiliser l’appareil en respectant le
voltage indiqué dans le manuel
de l’utilisateur. Si l’utilisateur n’est
pas certain du voltage à son
domicile, il doit consulter sa
compagnie d’électricité pour s’en
informer.
10. Ne rien déposer sur le cordon
d’alimentation. Installer le produit
là où personne ne pourra
marcher ou trébucher sur le
cordon.
11.Ne pas surcharger les prises ou
les barres d’alimentation, car une
surcharge augmente le risque
d’incendie et de choc électrique.
12.Ne jamais insérer d’objet dans
les ouvertures du produit. En
insérant un objet dans une
ouverture, on risque de toucher
des points dangereux de voltage
ou de causer un court-circuit
pouvant résulter en un incendie
ou un choc électrique. Ne jamais
répandre de liquide sur le pro
duit.
Page 45

42
Importantes consignes
de sécurité
13. Afin de réduire les risques de
choc électrique, il faut éviter
de démonter l’appareil. Ouvrir
l’appareil expose l’utilisateur à
de dangereux voltages et à
d’autres risques. Si l’appareil est
ouvert et mal refermé par la
suite, des chocs électriques
peuvent en résulter lors de la
prochaine utilisation.
14. Débrancher le produit et se
référer au fabriquant dans les
situations suivantes :
A. Lorsque le cordon
d’alimentation est
effiloché ou endommagé.
B. Lorsque du liquide a été
répandu sur le produit.
C. Lorsque le produit a été
exposé à la pluie
D. Lorsque le produit ne
fonctionne pas même si
l’utilisateur suit parfaitement
les directives du manuel.
N’ajuster que les réglages
expliqués dans les
directives. Un mauvais
ajustement peut nécessiter
l’assistance d’un technicien
afin de remettre l’appareil en
fonction et régler tous les
détails.
E. Lorsque le produit est tombé
ou si le combiné et la base
sont endommagés.
F. Lorsque le produit montre
une baisse considérable de
fonctionnement.
15. Ne jamais procéder au filage du
produit pendant un orage
électrique.
16. Ne jamais installer de prises de
produit dans un endroit humide à
moins que les prises ne soient
conçues à cet effet.
17. Ne jamais toucher de fils ou de
terminaux téléphoniques non
isolés à moins que la ligne n’ait
été déconnectée du réseau.
18. Faire preuve de prudence lors de
l’installation ou la modification
des lignes téléphoniques.
19. N’utiliser que le cordon et les
piles indiqués dans le manuel.
Ne pas jeter les piles dans le
feu, elles peuvent exploser.
S’informer des directives locales
pour les jeter. ou à l’eau.
Page 46

43
IMPORTANT SAFETY
INSTRUCTIONS
F
R
A
N
Ç
A
I
S
Importantes consignes
de sécurité
DIRECTIVES DE SÉCURITÉ
SUPPLÉMENTAIRES POUR LES
UTILISATEURS CANADIENS
Les articles suivants font partie des
exigences relatives à la déclaration de
conformité SC-03. L’équipement de
connexion standard est CA11A. Ce
produit est conforme aux spécifications
techniques d’Industrie Canada.
AVIS : L’étiquette du ministère
des
Communications du Canada authentifie
l’équipement accrédité. Cette
accréditation implique que l’équipement
est conforme aux normes d’exploitation et
de sécurité pour les réseaux de
communications. Le ministère ne garantie
pas que l’équipement fonctionnera selon
les attentes de l’utilisateur. Avant
d’installer l’équipement, l’utilisateur doit
s’assurer qu’il est possible de se
connecter aux installations de la
compagnie de communications locale.
L’équipement doit également être installé
selon une méthode de connexion
acceptable. Dans certains cas, le filage
interne de la compagnie jumelé à une
ligne simple peut être rallongé à l’aide
d’un assemblage de connexion accrédité
(cordon d’extension téléphonique).
Le client doit être au courant que le fait
de suivre les directives ci-dessus ne
prévient pas nécessairement la
dégradation du service ou de l’appareil
dans certaines situations. Les réparations
nécessaires à l’équipement accrédité
doivent être effectuées par un ser vice de
réparation et d’entretien du Canada
désigné par le fournisseur. Toute
réparation ou altération effectuée sur
l’appareil par l’utilisateur, ou toute
défectuosité de l’appareil peuvent inciter
la compagnie de télécommunications à
demander le débranchement immédiat de
l’appareil. L’utilisateur doit s’assurer, pour
sa propre protection, que les prises
électriques de sol du service public
d’électricité, les lignes téléphoniques et le
système interne de conduite d’eau, si
présent, sont interconnectés. Cette
précaution est nécessaire surtout en milieu
rural.
MISE EN GARDE : L’utilisateur ne doit
pas tenter de procéder à de telles
connexions par lui-même, il doit faire
appel à un inspecteur en électricité ou un
électricien. Le nombre équivalent de
sonneries est un indice du nombre
maximum de terminaux pouvant être
connectés au réseau téléphonique. La
charge sur l’interface du réseau peut être
de n’importe quelle combinaison
d’appareils en respectant un maximum de
cinq (5) comme nombre équivalent de
sonneries.
CONSERVER CES DIRECTIVES
Page 47

44
Présentation du ER
Merci d’avoir choisi le nouveau
téléphone ER d’AMERIPHONE,
Inc. Ce téléphone a été conçu
pour répondre aux normes de
qualité les plus élevées afin que
vous puissiez l’utiliser sans
problème pendant des années.
Ser vice de Grantie
Lisez attentivement les instructions
sui-vantes avant d’utiliser votre
téléphone. Conservez ce manuel
pour référence ultérieure.
Reçu de Caisse
Conservez votre reçu de caisse
comme preuve d’achat pour tout
service couver t par la garantie.
Aide d’Ameriphone
Si vous avez des questions au
sujet de votre téléphone ER,
téléphonez à notre Ser vice à la
clientèle au (714) 897-0808.
Veuillez vous assurer que toutes
les pièces suivantes se trouvent
bien dans la boîte:
Page 48

45
IMPORTANT SAFETY
INSTRUCTIONS
F
R
A
N
Ç
A
I
S
Combiné
Particularités du ER
Users’ Guide
ER
Poste
Cordons téléphoniques
Cordon du
combiné
Mode d'emploi
Figure 1 - Liste des pièces
Socle de l'appareil
Adaptateur CA
Pendentif de téléalarme
avec support
Mode d'emploi à
l'usage des personnes
qui appellent support
ER
INSTRUCTIONS
FOR CALLERS
Page 49

46
IMPORTANT INSTRUCTIONS
Particularités du ER
Commande de volume de
SONNERIE
Prises de l'adaptateur CA et
du cordon téléphonique
Commutateur
TONALITÉ/
IMPULSIONS
BOUTON-PENDENTIF
de
téléalarme avec support
Touche de MISE EN MÉMOIRE
Touche de RECOMPOSITION/ PAUSE
Commande du VOLUME
Touche du HAUT-PARLEUR
Voyant de PILE DÉCHARGÉE
Commande de l'
AMPLIFICATEUR
Touche de
l'AMPLIFICATEUR
Voyant de GARDE
Commande de la TONALITÉ
Touche de GARDE
Figure 2 - Commandes de l'appareil
Touche de
PROGRAMMATION
et FLASH
Page 50

47
IMPORTANT SAFETY
INSTRUCTIONS
F
R
A
N
Ç
A
I
S
Installation du ER
L'installation du ER comprend cinq
étapes:
• Installez 4 piles NICAD AA de
secours en cas de panne du
réseau.
• Choisissez l'installation murale
ou sur bureau.
• Raccordez toutes les pièces du
téléphone.
• Programmez jusqu’à 12
numéros de téléphone avec les
touches de mémoire.
• Réglez les fonctions spéciales.
Installation des piles de réserve
En cas de panne de courant, le ER
peut fonctionner jusqu'à 4-8
heures sur les 4 piles NICAD AA
de réserve (non comprises).
Remplacement des piles
1.Ouvrez le boîtier des piles
situé sous le téléphone
(fig. 3).
2.Posez quatre piles neuves.
Respectez les polarités des
piles tel qu'indiqué sous le
boîtier. Le voyant s'allume si
les piles sont déchargées.
Sans électricité ni piles, le
téléphone
fonctionne
comme un
téléphone
normal.
Mode de composition
Choisissez la composition par
tona-lités
T ou impulsions P,
selon le cas.Les cadrans rotatifs
exigent la position
P.
Insert
batteries
here
Press in
here
to open
battery
compartment
Figure 3 - Accès aux piles.
Page 51

dans la position verticale.
2.Placez les pattes du socle
dans les fentes, en position
basse (fig.6) et enfoncez
jusqu'à enclenchement.
48
Installation du ER
Installation sur un bureau ou sur un mur
Installation sur bureau
1.Branchez les fils du
téléphone et du combiné tel
qu'indiqué sur la fig. 4.
2.Branchez l'adaptateur CA à
une prise de courant et au
téléphone (fig. 4).
3.Soulevez le combiné et
vérifiez la présence de la
tonalité de la ligne.
Le téléphone est prêt à
l'utilisation.
Installation murale
1.Retirez le crochet et
retournez-le pour qu'il
soutienne le combiné
Figure 4 - Raccordement des pièces
Figure 5 - Inversion du crochet
M
A
N
U
A
L
A
U
T
O
Figure 6 - Socle pour montage mural
Page 52

49
IMPORTANT SAFETY
INSTRUCTIONS
F
R
A
N
Ç
A
I
S
Installation du ER
3. Branchez le cordon de
téléphone court et installez
le téléphone tel qu'indiqué
sur la fig. 7.
4. Revenez à la rubrique
d'installation sur bureau et
suivez les 3 étapes
indiquées.
M
A
N
U
A
L
A
U
T
O
Figure 7 - Installation murale
Page 53

50
Fonctions principales
Réglage du volume et de la
tonalité (timbre)
1. Appuyez sur la touche AMPLIFY
(fig. 8) pour mettre en circuit ou
éteindre l’amplificateur de la
voix de l’interlocuteur. Lorsqu’il
est en circuit, le voyant
AMPLIFY est alllumé.
2.Réglez le volume du combiné
en faisant coulisser le bouton
VOL (fig. 9). Lorsque
l’amplificateur est en circuit, le
volume de l’interlocuteur peut
atteindre 30 dB de plus.
Le ER est prêt à fonctionner
une fois déballé.
Le téléphone d'urgence est prêt à
fonctionner une fois déballé. Il ne
reste qu'à le brancher et à
programmer les numéros de
téléphone d'urgence (au maximum
six numéros, dont un est
nécessaire). L'appareil a été
préprogrammé en usine comme
suit. Il est cependant conseillé
d'utiliser toutes les fonctions du ER
pour un maximum de sécurité et
de commodité.
1. Après branchement, l’appareil
indique «
The unit is ready.»
(Appareil prêt).
2. Message vocal d'urgence
préen-registré:
«Urgence,
Urgence. Cette personne est
en danger chez elle. Prière
d'appuyer sur une touche
pour accuser réception.»
3.Le code d'accès de
télésurveillance auditive est 1 2 3 .
4.
La minuterie de l'inactivité est
arrêtée.
P
E
0
#
HOLD PROG/FLASH
TONE
LO HI
SPEAKER
REDIAL/PAUSE
VOL
AMPLIFY
Figure 8 - Touche et voyant Amplificateur
E
0
#
TONE
LO HI
VOL
AMPLIFY
*
HOLD PROG/FLASH SPEAKER
REDIAL/PAUSE
Figure 9 - Commande du volume
Page 54

51
IMPORTANT SAFETY
INSTRUCTIONS
F
R
A
N
Ç
A
I
S
Fonctions principales
Remarque:
En mode d'utilisation
normale, l'amplificateur s'éteint
dès que vous raccrochez. Ceci est
très pratique lorsque plusieurs
personnes utilisent le même
combiné. Si vous désirez que
l'amplificateur reste toujours
allumé, placez sur ON le bouton
de neutralisation d'amplification
(Volume Reset Override) situé en
dessous de l'appareil (Fig. 11).
Utilisation de la touche de garde
Pour placer un interlocuteur en
attente, appuyez sur la touche
HOLD (Garde) et reposez le
combiné sur son socle. Le voyant
HOLD s’allume. Remarque: Si
vous relevez le combiné d’un
autre poste sur la même ligne
lorsque le ER est en garde, l’ER se
débranche et la conversation peut
se poursuivre avec l’autre poste.
3.Coulissez le bouton
TONE
(Tonalité) à gauche ou à droite
pour obtenir le timbre de voix
désiré.
Attention : Une exposition répétée
et de plus en plus intense à des
degrés d’amplification supérieurs
à 18 dB peut être dangereuse
pour les personnes ne souffrant
pas de troubles auditifs. Il est
donc vivement recommandé de
ne pas retirer l’étiquette de mise
en garde appliquée à l’arrière du
combiné. Si une personne
malvoyante est susceptible
d’utiliser le téléphone, fixez de
manière sûre l’avertissement
imprimé en Braille à l’arrière du
combiné (schéma A).
TONE
LO HI
VOL
AMPLIFY
HOLD PROG/FLASH SPEAKER
REDIAL/PAUSE
Figure 10 - Commande de la tonalité
Diagram A.
LOUD
VOLUME
USE WITH
CAUTION
Figure 11 - Volume Reset Override On/Off
MANUAL
AUTO
OFF
ON
Volume
Reset
Override
Page 55

52
Fonctions principales
O
P
E
0
#
TONE
LO HI
VOL
AMPLIFY
*
HOLD PROG/FLASH SPEAKER
REDIAL/PAUSE
E
0
#
TONE
LO HI
VOL
AMPLIFY
*
HOLD PROG/FLASH SPEAKER
REDIAL/PAUSE
P
E
0
#
TONE
LO HI
VOL
AMPLIFY
*
HOLD PROG/FLASH SPEAKER
REDIAL/PAUSE
Utilisation de la touche PROG/FLASH
1. Lorsque le combiné est sur son socle,
la fonction
PROG (Programmation)
est activée. La touche
PROG peut
être utilisée pour enregistrer vos nom
et adresse ou un message d’urgence
et programmer les personnes à contacter en cas d’urgence. Le réglage
et l’emploi de cette fonction sont
indiqués dans les sections
correspondantes de ce mode
d’emploi. Lorsque la touche
PROG
est appuyée, des messages-guides
sonores aident à programmer
l’appareil.
2. Lorsque le combiné est soulevé, et
que la touche
PROG/FLASH est
appuyée, la fonction
FLASH
(Service rapide) est activée. Elle
permet d’accéder à des ser vices
proposés par la compagnie de
téléphone locale, tels que l’appel en
attente et la téléconférence.
Utilisation de la touche
Recomposition/Pause
1. Le combiné étant soulevé de son
socle, si vous appuyez sur la touche
REDIAL/PAUSE,
la fonction
REDIAL
(Recomposition) est activée.
Pour recomposer le dernier numéro
appelé, soulevez le combiné et
appuyez sur la touche
REDIAL/PAUSE. L’appareil
peut recomposer un numéro
possédant jusqu’à 31 chiffres.
2. Si vous appuyez sur la touche
REDIAL/PAUSE après avoir
appuyé sur une autre touche de
numéro, la fonction
PAUSE est
activée. Appuyez sur cette touche
pour insérer une pause de 2
secondes lors de la composition
d’un numéro appelé.
Page 56

53
IMPORTANT SAFETY
INSTRUCTIONS
F
R
A
N
Ç
A
I
S
Fonctions principales
Utilisation du téléphone à hautparleur
1 Appuyez sur la touche SPEAKER.
2.Faites coulisser le bouton VOL.
pour régler le volume.
Enregistrement de vos nom et
adresse/d'un message d'urgence
1. Appuyez sur la touche
PROG/FLASH.
2.
Appuyez sur 2 et attendez le signal
sonore
3.Dites (à environ 25 cm ou 10
po du téléphone) vos nom,
adresse,
numéro
de téléphone
et tout autre renseignement
personnel. Voici un exemple
de message :
«Bonjour,
c'est Jean Fortin au 123, r ue
de la Gare. Mon numéro de
téléphone est le 714-555-
1212.»
4. Appuyez sur la touche # pour
terminer l'enregistrement.
Page 57

54
Fonctions principales
Programmation des numéros
d'urgence
1. Appuyez sur la touche PROG.
2. Appuyez sur
1.
3. Appuyez sur la première
touche de mémoire
M1. Le
téléphone vous indique s'il y a
un numéro déjà programmé.
M1
M2
M3
M4
M5
M6
4. Entrez le numéro de téléphone.
5. Appuyez sur la touche
PROG.
6. Répétez l'opération pour entrer
un deuxième numéro d'urgence
M2 et ainsi de suite jusqu'à
M6.
7. Appuyez sur la touche
PROG
pour finir.
Programmation d’un
téléavertisseur en numéro à
contacter d’urgence
Vous pouvez programmer un
téléavertisseur en tant que numéro
à contacter d’urgence. Lorsque la
touche du numéro du
téléavertisseur est appuyée,
l’appareil compose le numéro du
téléavertisseur. Lorsque ce
dernier répond, l’appareil envoie
le numéro du poste d’origine (ou
Page 58

55
IMPORTANT SAFETY
INSTRUCTIONS
F
R
A
N
Ç
A
I
S
Fonctions principales
tout autre code spécial de
plusieurs chiffres) en tant que
message. Les numéros du
téléavertisseur et du message
peuvent comporter jusqu’à
31 chiffres, y compris les touch es
#. Le numéro du téléavertisseur
peut être programmé de la façon
suivante:
1. Appuyez sur la touche PROG.
2. Appuyez sur la touche 1.
3. Appuyez sur la touche de
mémoire désirée.
4. Appuyez sur la touche #, puis sur
les chiffres formant le numéro du
téléavertisseur, puis à nouveau
sur la touche #, puis sur les
chiffres formant le numéro du
poste d’origine, puis à nouveau
sur la touche #.
5. Si le téléavertisseur est un
numéro gratuit utilisant un
numéro de code d’identité (NIP),
procédez ainsi: Appuyez sur la
touche #, puis sur les chiffres
formant le numéro gratuit du
téléavertisseur, puis à nouveau
sur la touche #, puis sur les
chiffres du NIP, puis à nouveau
sur la touche #, puis sur les
chiffres formant le numéro du
poste d’origine, puis à nouveau
sur la touche #. Voici un exemple
de numéro: #18007598355#
4541#7148970808#
6.Appuyez sur la touche PROG pour
mémoriser le numéro.
Appel d'un numéro d'urgence à
partir du téléphone
1. Appuyez sur le bouton
d'urgence rouge
EMERGENCY
.
Votre téléphone compose
automatiquement tous les
numéros d'urgence programmés.
Appel d'un numéro d'urgence à
l'aide du pendentif de téléphone.
1. Appuyez sur le bouton du
pendentif.
Page 59

56
Fonctions principales
“EN CAS DE NÉCESSITÉ D’APPEL
D’URGENCE”
Vous pouvez photocopier cette section
et la donner aux personnes que vous
désirez contacter en cas d’urgence.
L’espace au bas de la page permet de
noter le numéro de code d’accès,
pour vous y référer rapidement.
* Dès qu’un numéro d’urgence est
composé, à partir du téléphone ou
du pendentif de téléalarme,
l’appareil ER commence
immédiatement à composer les
numéros d’urgence programmés.
* Lorsqu’une personne répond, elle
entend le message vocal d’urgence
qui peut être par exemple: «Bonjour,
c’est Jean Fortin au 123, rue de la
Gare. Mon numéro de téléphone
est le 555_1212», suivi du message
vocal préenregistré en usine:
«Urgence, urgence. Cette personne
est en danger chez elle. Prière de
la contacter immédiatement.
Appuyez sur une touche pour
accuser réception.»
À ce moment-là, la personne
contactée appuie sur n’importe
quelle touche, ce qui établit la
communication; vous pouvez alors
lui parler à l’aide du téléphone à
haut-parleur ER. Le message
est répété trois fois. Si aucune
touche n’est appuyée, le téléphone
raccroche et compose le prochain
numéro d’urgence. Si une touche
est appuyée, la personne contactée
et l’utilisateur du téléphone ER
peuvent parler pendant 60
secondes. Ensuite, l’appareil
demande à la personne contactée
de composer le numéro de code
d’accès. Si la personne raccroche
avant d’entrer le code d’accès (le
code par défaut réglé en usine est
123), l’appareil ER compose le
prochain numéro d’urgence.
* L’appareil demande par deux fois le
code d’accès. Si aucune touche
n’est appuyée, le téléphone
raccroche et compose le prochain
numéro d’urgence. Lorsque le code
d’accès est entré, un message
préenregistré indique à la personne
contactée que le code est accepté et
Page 60

Annulation d'un appel d'urgence
(fausse alerte ou erreur)
1. Appuyez sur la touche RESET.
L'ER coupe la communication.
Programmation des numéros
fréquemment utilisés
1. Appuyez sur la touche PROG.
2. Appuyez sur 3.
57
IMPORTANT SAFETY
INSTRUCTIONS
F
R
A
N
Ç
A
I
S
Fonctions principales
qu’elle peut parler pendant 60
secondes. Toutes les 60 secondes,
l’appareil demande d’appuyer sur
une touche pour continuer. En fin
de conversation, raccrochez.
* L’appareil compose tous les numéros
d’urgence programmés, les uns
après les autres, 250 fois au
maximum, ou jusqu’à ce que
quelqu’un réponde en entrant le
code d’accès.
* Code d’accès : _______ _______
______
Page 61

3. Appuyez sur une touche de
mémoire. Le téléphone vous
indique s'il y a un numéro déjà
programmé.
4. Entrez le numéro de téléphone.
5. Appuyez sur la touche
PROG.
6.Répétez l'opération pour les
autres touches de mémoire.
58
Fonctions principales
7. Vous pouvez placer des photos
ou des icônes dans chaque
touche de mémoire, si vous le
désirez, pour faciliter
l'identification des numéros.
8.Pour finir, appuyez sur la
touche
PROG.
Appel d'un numéro en mémoire
1. Soulevez le combiné.
2.Appuyez sur la touche de
Mémoire désirée.
M1
M2
M3
M4
M5
M6
M1
M2
M3
M4
M5
M6
Page 62

59
IMPORTANT SAFETY
INSTRUCTIONS
F
R
A
N
Ç
A
I
S
Fonctions supérieures
4.
Appuyez sur n'importe quelle
touche pour compléter la
vérification.
5.Si l’appareil ER n’émet aucun
bip sonore à l’étape 3,
procédez de la façon indiquée
dans la section suiv ante pour
reprogrammer le transmetteur à
distance.
Reprogrammation du
pendentif de téléalarme
1.Raccrochez le combiné et
appuyez sur la touche
RESET,
en la maintenant, jusqu'à que
vous entendiez le mot "LEARN".
Vérification du réglage du
pendentif de téléalarme
1.Raccrochez le combiné.
2.Appuyez sur la touche
RESET,
en la maintenant, jusqu'à ce
que vous entendiez le mot
TEST.
3. Appuyez sur le boutonpendentif de téléalarme.
L’appareil ER émet alors un bip
sonore assurant ainsi d’une
bonne programmation. Si
vous n’appuyez pas sur le
bouton, le mode
TEST
(vérification) se ter mine après
2 minutes.
Page 63

2. Au message vocal, appuyez
une fois sur le bouton du
PENDENTIF.
3. Attendez que le deuxième
message vocal indique
«Press
and hold the button until the
phone beeps»
(Appuyez et
maintenez le bouton jusqu’à ce
que l’appareil émette un
bip sonore). Après ce
message, maintenez le bouton
appuyé pendant environ 4
secondes.
4. Le voyant de décharge des
piles clignote rapidement et
l’appareil émet un bip sonore
qui confirme que le pendentif a
été bien programmé. L’appareil
ER commence alors le mode
TEST. Consultez la section
précédente pour vérifier la
nouvelle programmation du
pendentif.
60
Fonctions supérieures
Réglage de la minuterie d'inactivité
•
La minuterie d'inactivité enclenche
le système d'appel des numéros
d'urgence du ER. Après une
période d'inactivité téléphonique
de 24 ou 48 heures, l'ER
commence automatiquement à
appeler les numéros d'urgence
programmés.
• La minuterie d'inactivité du
ER est livrée non réglée. Pour la
régler, suivez les instructions
ci-dessous :
1.Raccrochez le combiné et
appuyez sur la touche
PROG.
Page 64

61
IMPORTANT SAFETY
INSTRUCTIONS
F
R
A
N
Ç
A
I
S
Fonctions supérieures
2. Appuyez sur 4.
3.Appuyez sur
2 pour régler la
minuterie d'inactivité à 24
heures ou sur
3 pour la régler à
48 heures. Appuyez sur
1 pour
arrêter la minuterie.
À l'attention de l'usager qui vous
appelle et reste à l'écoute à l'aide
du dispositif de télésurveillance
auditive
TÉLÉSURVEILLANCE AUDITIVE
Le mode d'emploi qui suit s'adresse
aux personnes qui vous appellent, au
cas où elles n'auraient pas reçu de
vos nouvelles comme prévu. Veuillez
donner un exemplaire de ces i
mportantes directives, imprimées sur
une carte séparée, aux personnes
concernées pour référence rapide.
DIRECTIVES D'APPEL
Veuillez vous assurer de savoir si
l'usager du ER utilise un
répondeur ou s'il est abonné à un
service de messagerie vocale.
QU'EST-CE QUE LA
TÉLÉSURVEILLANCE
AUDITIVE?
Si un être cher, à qui vous avez
donné le code d'accès de
télésurveillance, s'inquiète de
votre sort, cet équipement lui
permet de vous appeler,
d'allumer à distance le
téléphone à haut-parleur de
votre ER et d'écouter ou de
parler avec vous. Si tout va
bien, vous répondez à son
appel de façon normale.
Page 65

62
Fonctions supérieures
A. LORSQUE LE DIALOGUE ER
N'EST PAS RELIÉ À UN
RÉPONDEUR NI À UN
SERVICE DE MESSAGERIE
VOCALE
1.Composez le numéro comme
pour un appel ordinaire. L'ER
répond au bout de 10 sonneries.
2.Vous entendez ensuite un
message vocal qui vous
demande d'entrer votre code
d'accès.
3.Entrez votre code d'accès à
l'aide des touches (le code
d'accès est 123, sauf s'il a été
modifié). Ceci met en marche
le haut-parleur du ER et vous
permet d'écouter et d'avoir une
conversation duplex.
4.Toutes les 60 secondes, on vous
demande d'appuyer sur une
touche de votre clavier afin de
continuer, sinon l'ER coupe la
communication.
B. LORSQUE LE ER EST RELIÉ
À UN RÉPONDEUR
1. Composez le numéro comme
pour un appel ordinaire.
Attendez le bip sonore du ER.
2. Lorsque le ER a émis un
bip sonore, touche du clavier
en la maintenant pendant au
moins
3 secondes. (Si vous ne
la maintenez pas assez
longtemps, le répondeur
poursuit son processus
habituel de prise de message
et le ER
n'est pas mis en
marche.)
3. Vous entendez ensuite un
message vocal qui vous
demande d'entrer votre code
d'accès.
4. Entrez votre code d'accès à
l'aide des touches (le code
d'accès est 123, sauf s'il a été
modifié). Ceci met en marche
le haut-parleur du ER et vous
permet d'écouter et d'avoir une
conversation duplex.
Page 66

63
IMPORTANT SAFETY
INSTRUCTIONS
F
R
A
N
Ç
A
I
S
Fonctions supérieures
5. Toutes les 60 secondes, on
vous demande d'appuyer sur
une touche du clavier afin de
continuer, sinon l'ER coupe la
communication.
C. LORSQUE L'USAGER DU
DIA LOGUE ER EST ABONNÉ À
UN SERVICE DE MESSAGERIE
VOCALE
1. Aussitôt que le ser vice de mes
sagerie répond à votre appel,
raccrochez et rappelez
immédiate
ment (dans les 20
secondes).
2. Répétez l’appel 2 ou 3 fois
jusqu’à ce que vous entendiez
le message vocal qui vous
demande d’entrer votre code
d’accès.
3. Entrez votre code d'accès à
l'aide des touches (le code
d'accès est 123, sauf s'il a été
modifié). Ceci met en marche
le hautparleur du ER, qui
vous permet d'écouter et
d'avoir une conversation
duplex.
4. Toutes les 60 secondes, on vous
demande d'appuyer sur une
touche du clavier afin de
continuer, sinon l'ER coupe la
communication.
Modification de votre code d'accès
1. Appuyez sur la touche PROG.
2.Appuyez sur 6. L'ER indique le
code d'accès en service.
3.Entrez le nouveau code d'accès
en 3 chiffres. (Ne pas utiliser
les touches * et #.)
Page 67

64
Fonctions supérieures
4. Un message vocal de l'ER
confirme le choix des chiffres.
5. S'ils sont corrects, appuyer sur
1 pour les sauvegarder. Sinon,
répétez le processus.
Vérification des réglages du ER
1.Laissez le combiné sur son
support.
2.Appuyez sur
RESET.
3.Un message vocal vérifiera :
•si la pile du pendentif de
téléalarme est déchargée,
•si des numéros d'urgence ont
été programmés,
•si un message d'urgence a été
enregistré,
•le réglage de la minuterie
d'inactivité,
•le code d'accès de télé
surveillance en vigueur.
Page 68

65
IMPORTANT SAFETY
INSTRUCTIONS
F
R
A
N
Ç
A
I
S
Guide de dépannage
Le tableau ci-dessous vous aidera
à résoudre les problèmes
d'utilisation du téléphone. Si le
problème persiste, appelez
Ameriphone ou le détaillant
autorisé.
CAUSE POSSIBLE ET SOLUTION
Vérifiez toutes les connexions.
Pas de numéro programmé.
Reportez-vous à la programmation
des touches de mémoire (page 9).
Reportez-vous au mode de
composition (pages 4 et 5).
Vérifiez toutes les connexions.
1. Débranchez l'adaptateur CA.
2. Enlevez les piles de réserve.
3. Rebranchez l'adaptateur CA et
réinstallez les piles.
PROBLÈME
Pas de tonalité de ligne.
Aucun numéro n'est
composé lorsqu'on
appuie sur une touche
de mémoire
Les numéros se composent lentement ou pas
du tout.
La sonnerie ne
marche pas.
Le téléphone est
inutilisable. Rien ne
fonctionne.
Page 69

66
Conformité De normalisation
La partie 68 de FCC règne
l'information
Ceci HEU téléphone amplifié est
conforme à la par tie 68 des
règles de FCC et des conditions
adoptées par l'ACTA. Sur le fond
de cet équipement est une
étiquette qui contient, entre l'autre
information, une marque de
produit dans le format
US:AAAEQ##TXXXX. Si
demandé, ce nombre doit être
fourni à la compagnie de
téléphone.
Une prise et un cric employé pour
relier cet équipement aux lieux
câblant et réseau téléphonique
doivent être conformes aux règles
et aux conditions applicables de
la partie 68 de FCC adoptées par
l'ACTA. Une corde confor me de
téléphone et une prise modulaire,
RJ11 USOC, est équipée de ce
produit. Il est conçu pour être relié
à un cric modulaire compatible
qui est également conforme. Voir
les instructions d'installation pour
des détails.
Le REN est employé pour
déterminer le nombre de
dispositifs qui peuvent être reliés à
une ligne téléphonique. RENs
excessif sur une ligne téléphonique
peut avoir comme conséquence
les dispositifs ne sonnant pas en
réponse à un appel d'arrivée.
Dans les la plupart mais non tous
les secteurs, la somme de RENs ne
devrait pas excéder cinq (5,0).
Pour être un certain nombre de
nombre de dispositifs qui peuvent
être reliés à une ligne, comme
déterminé par le total RENs,
contactez la compagnie locale de
téléphone. Pour des produits
approuvés après juillet 23, 2001,
le REN pour ce produit fait partie
de la marque de produit qui a le
format US:AAAEQ##TXXXX. Les
chiffres représentés par le ## sont
les REN sans virgule décimale
(par exemple, 03 est des REN de
0,3). Pour des produits plus tôt, le
REN est séparément montré sur
l'étiquette reliée à un cric
modulaire compatible qui est
également conforme. Voir les
instructions d'installation pour des
détails.
Page 70

67
IMPORTANT SAFETY
INSTRUCTIONS
svp le marcheur/Ameriphone,
1-800-874-3005. Si l'équipement
cause le mal au réseau
téléphonique, la compagnie de
téléphone peut demander que
vous débranchez l'équipement
jusqu'à ce que le problème soit
résolu.
Cet équipement de téléphone n'est
pas prévu pour être réparé et il ne
contient aucune pièce réparable.
L'ouverture de l'équipement ou de
n'importe quelle tentative
d'exécuter des réparations videra
la garantie. Pour le service ou les
réparations, appel 1-800-874-
3005.
Le raccordement au service de
ligne de partie est sujet à des
tarifs d'état. Contactez la
commission de équipement
collectif public d'état, la
commission de service public ou
la commission de société pour
information.
Si votre maison a particulièrement
câblé l'équipement d'alarme relié
à la ligne téléphonique, assurez
F
R
A
N
Ç
A
I
S
Si cet équipement de téléphone
cause le mal au réseau
téléphonique, la compagnie de
téléphone vous informera à
l'avance que la cessation provisoire
du service peut être exigée. Mais
si l'isn?t de communication
préalable pratique, la compagnie
de téléphone informera le client
aussitôt que possible. En outre,
vous serez conseillés de votre
droite de classer une plainte avec
la FCC si vous la croyez est
nécessaire.
La compagnie de téléphone peut
faire des changements de ses
équipements, équipement,
opérations ou procédures qui
pourraient affecter l'opération de
l'équipement. Si ceci se produit la
compagnie de téléphone fournira
la communication préalable afin
que vous puissiez pour faire des
modifications nécessaires pour
maintenir non interrompu service.
Pour si l'ennui est éprouvé avec
cet équipement de téléphone, la
réparation ou l'information de
garantie, entrez en contact avec
Conformité De normalisation
Page 71

68
l'installation de cet équipement de
téléphone ne neutralise pas votre
équipement d'alarme. Si vous
avez des questions au sujet de ce
qui neutralisera l'équipement
d'alarme, consultez votre
compagnie de téléphone ou un
installateur qualifié.
Cet équipement de téléphone est
prothèse auditive compatible.
Téléphones Client-Possédés
De Carte De Coin/Credit:
Pour se conformer aux tarifs
d'état, la compagnie de téléphone
doit être donnée l'avis avant le
raccordement. Dans quelques
états, la commission de
équipement collectif public d'état,
la commission de service public
ou la commission de société
doivent donnent l'approbation
préalable du raccordement.
La partie 15 de FCC règne
l'information
Ce dispositif est conforme à la
partie 15 des règles de FCC.
L'opération est sujette aux deux
conditions suivantes: (1) ce
dispositif peut ne pas causer
l'interférence nocive, et (2) ce
dispositif doit accepter n'importe
quelle interférence reçue, y
compris l'interférence qui peut
causer l'opération peu désirée.
Votre HEU téléphone amplifié a
été examiné et avéré pour être
conforme aux limites d'un
dispositif numérique de la classe
B, conformément à la par tie 15
de règles de FCC. Ces limites sont
conçues pour assurer la protection
raisonnable contre l'interférence
nocive dans l'installation
résidentielle.
Cet équipement se produit, des
utilisations, et peut rayonner
l'énergie de fréquence par radio
et, si non installé et utilisé selon
Conformité De normalisation
Page 72

69
IMPORTANT SAFETY
INSTRUCTIONS
F
R
A
N
Ç
A
I
S
Conformité De normalisation
les instructions, peut causer
l'interférence nocive aux
communications par radio.
Cependant, il n'y a aucune
garantie que l'interférence ne se
produira pas dans une installation
particulière; si cet équipement
cause l'interférence nocive à la
radio ou la réception des
émissions télévisées, qui peut être
déterminée en allumant
l'équipement au loin et, vous êtes
encouragés à essayer de corriger
l'interférence par un des mesures
suivantes:
1. Là où il peut être fait sans
risque, réorientez la télévision
ou l'antenne de réception de
radio.
2. Jusqu'au degré possible,
replacez la télévision, la radio
ou tout autre récepteur en ce
qui concerne l'équipement de
téléphone. (ceci augmente la
séparation entre l'équipement
de téléphone et le récepteur.)
3. Reliez l'équipement de
téléphone dans une sortie sur
une différence de circuit de
cela auquel la télévision, la
radio, ou tout autre récepteur
est reliée.
4. Consultez le revendeur ou un
technicien expérimenté de
radio/TV pour l'aide.
ATTENTION: Les changements ou
les modifications pas expressément
approuvées par le fabricant
responsable de la conformité ont
pu vider l'autorité d'user?s pour
actionner l'équipement.
Caractéristiques Techniques
Du Canada D'Industrie
Ce produit répond aux
caractéristiques techniques du
Canada d'industrie applicable.
Avant d'installer cet équipement,
les utilisateurs devraient s'assurer
qu'il est permis d'être relié aux
équipements de la compagnie
locale de télécommunications.
L'équipement doit également être
installé en utilisant une méthode
acceptable de raccordement.
Dans certains cas, les company’s
Page 73

70
Conformité De normalisation
à l'intérieur du câblage lié à un
service individuel de ligne simple
peuvent être prolongés à l'aide
d'un connecteur certifié (corde de
prolongation de téléphone). Le
client devrait se rendre compte
que la conformité dans les
conditions ci-dessus puisse ne pas
empêcher la dégradation du
service dans quelques situations.
À l'équipement certifié devraient
être dépannés par un service
canadien autorisé d'entretien
indiqué par le fournisseur. Tous les
réparations ou changements faits
par l'utilisateur à cet équipement,
ou l'équipement fonctionne mal,
peuvent donner à la compagnie
de télécommunications la cause
pour inviter l'utilisateur à
débrancher l'équipement.
Les utilisateurs devraient s'assurer
pour leur propre protection que
les prises de terre au sol
électriques de l'entreprise
d'électricité, des lignes
téléphoniques et du système
métallique interne de conduite
d'eau, si présent, sont reliées
ensemble. Cette précaution peut
être particulièrement importante
dans des secteurs ruraux.
ATTENTION: Les utilisateurs ne
devraient pas essayer d'établir de
tels rapports eux-mêmes, mais
devraient contacter l'autorité
électrique appropriée
d'inspection, ou l'électricien,
comme approprié.
Le nombre d'équivalence de
sonnerie est une indication du
nombre maximum des bornes
permises d'être relié à une
interface de téléphone. L'arrêt sur
une interface peut se composer de
n'importe quelle combinaison de
sujet de dispositifs seulement à la
condition que la somme des
nombres d'équivalence de
sonnerie de tous les dispositifs
n'excède pas cinq.
[ la limite “IC:” avant que le
nombre de certification/
registration signifie seulement que
les caractéristiques techniques du
Canada d'industrie ont été
rencontrées. ]
Page 74

71
F
R
A
N
Ç
A
I
S
Page 75

72
IMPORTANT INSTRUCTIONS
Garantie
Cette garantie s’applique
seulement aux appareils
Ameriphone achetés et utilisés aux
États-Unis et au Canada.
Ameriphone garantit ce téléphone
ER contre tous défauts dans les
matières premières et la fabrication
pendant l’année suivant la date
d’achat. Si vous achetez une
garantie prolongée, la même
garantie s’applique pour toute la
période visée par la garantie
prolongée.
Si votre appareil Ameriphone est
défectueux et que vous le retournez
dans les 30 jours suivant la date
d’achat, votre détaillant le
remplacera sans frais.
Si vous le retournez après 30 jours
mais au cours de l’année suivant
la date d’achat, il sera réparé ou
remplacé sans frais. Des pièces
neuves ou des pièces remises à
neuf peuvent être utilisées pour la
réparation. Si nous choisissons de
remplacer votre téléphone ER, il se
peut que ce soit par un téléphone
neuf ou remis à neuf du même
modèle ou d’un modèle
semblable. La réparation ou le
remplacement sera garanti pour
une période de 90 jours ou pour
la période non écoulée de la
garantie originale, si celle-ci
dépasse 90 jours.
Les garanties implicites, y compris
celles touchant des appareils
conçus pour un usage particulier
et la valeur marchande (une
garantie non écrite selon laquelle
l’appareil convient à un usage
normal), se limitent à une période
d’un an suivant la date d’achat.
Nous ne débourserons aucun frais
entraîné par les pertes de temps,
les inconvénients, l’impossibilité
d’utiliser votre téléphone ER, ni
pour les dommages causés à la
propriété par votre téléphone ER
ou par son mauvais
fonctionnement ou pour tous
autres dommages-intérêts indirects.
Étant donné que dans certains
États, il n’y a pas de restriction sur
la période couverte par la
garantie implicite ni d’exclusion
concernant les dommages-intérêts
Page 76

73
IMPORTANT SAFETY
INSTRUCTIONS
F
R
A
N
Ç
A
I
S
Garantie
indirects par conséquent, ces
restrictions ou exclusions peuvent
ne pas s’appliquer.
Pour toutes réparations ou service
couverts par la garantie, joindre
une preuve de la date d’achat.
Dans les 30 premiers jours suivant
la date d’achat, retournez votre
téléphone ER au détaillant auprès
de qui vous l’avez acheté, qui
vous le remplacera immédiatement.
Après 30 jours, téléphonez à
Ameriphone au numéro sui-vant:
1-714-897-0808 voix/1-714-8971111 TTY/TDD pour connaître
l’adresse du centre de service le
plus près de chez vous. Vous
devez payer à l’avance les frais
de transport. Nous vous
suggérons de conser- ver
l’emballage original au cas où
vous auriez à le retourner. Si votre
appareil est toujours garanti et a
besoin d’être réparé, merci
d’appeler notre service à la
clientèle au 800-874-3005 (Voix)
ou 800-772-2889 (TTY) AVANT
de nous retourner votre appareil.
Une conseillère vous précisera la
procédure à suivre pour retourner
votre téléphone.
Cette garantie ne couvre pas les
dommages attribuables aux
accidents, les dommages causés
en transit, ceux provenant de
modifications ou d’une réparation
par un détaillant non autorisé,
d’un défaut de suivre les
instructions, d’un usage impropre,
d’un usage hors des États-Unis ou
du Canada, d’un incendie, d’une
inondation ou d’une catastrophe
quelconque. Nous ne garantissons
pas que ce produit est compatible
avec toute pièce de téléphone,
avec des lignes communes, avec
n’importe quel téléphone à
touches ou avec des systèmes
téléphoniques plus perfectionnés.
Si votre téléphone ER n’est pas
couvert par cette garantie,
téléphonez-nous au numéro
suivant 1-714-897-0808 voix
1-714-897-1111 TTY/TDD pour
obtenir des conseils concernant la
réparation de votre appareil.
Toute réparation sera couverte par
une garantie de 90 jours.
Page 77

74
IMPORTANT INSTRUCTIONS
Caractéristiques
Amplification maximale
Haute fréquence (3 kHz) : 26 dB
Bande large (300 à 3 000 Hz) :
20 dB
Tonalité de timbre
Portée : de 300 à 3 000 Hz avec
la commande coulissante.
Dimensions
Encombrement : 17,8 x 24,1 x 8,25
cm
(9,5 x 7 x 3,25 po)
Poids : 1,15 kg (2,52 lb)
Puissance requise
Adaptateur CA : 12 volts,
500 mA
4 piles NICAD AA (non fournies)
 Loading...