

Page 1
∆
TTY
DIALOGUE III / III–P TTY
Text Telephone
12082 Western Avenue
Garden Grove, CA 92841
TTY/TDD: (800) 772-2889
VOICE: (800) 874-3005
Fax: (714) 897-4703
email: ameriphonecs@plantronics.com
web: www.ameriphone.com
©2003 Plantronics, Inc. All rights reserved. Ameriphone, Walker and Plantronics are
trademarks or registered trademarks of Plantronics, Inc.
M082503 DIII Rev A
Operating Instructions
Page 2

When using your telephone equipment, always follow basic safety precautions to reduce the risk of
fire, electric shock, and injury to persons, including
the following:
1. Read and understand all Instructions.
Observe all warnings and other markings on
the product.
2. During thunderstorms, avoid using telephones except cordless models. There may
be a slight chance of electric shock from
lightning.
3. Do not use a telephone near a gas leak. If
you suspect a gas leak, report it immediately, but use a telephone away from the area
where gas is leaking.
4. Do not use this product near water, or when
you are wet. For example, do not use it in a
wet basement or shower, or next to a swimming pool, bathtub, kitchen sink or laundry tub.
Do not use liquids or aerosol sprays for cleaning. If the product comes in contact with any
liquids, unplug any line or power cord immediately. Do not plug the product back in until it
has dried thoroughly.
5. Install this product in a protected location
where no one can trip over any line or
power cord. Protect cords from damage or
abrasion.
6. If this product does not operate normally,
read “troubleshooting” section. If you cannot
resolve the problem, or if the product is damaged, refer to the Ameriphone Warranty. Do
not open this product except as may be
directed in this owner’s manual. Opening this
product or reassembling it incorrectly may
expose you to hazardous voltages or other
risks. Opening this product automatically
voids the warranty.
7. If this product uses batteries as power back-up
during power outages, replace batteries only
as described in this owner’s manual. Do not
burn or puncture used batteries — they contain caustic chemicals.
8. Unplug this product from the wall outlet and
refer servicing to qualified service personnel
under the following conditions:
A. When the power supply cord or plug is
damaged or frayed.
B. If liquid has been spilled on the product.
C. If the product has been exposed to rain or
water.
D. If the product does not operate normally by
following the operating instructions. Adjust
only those controls that are covered by the
operating instructions because improper
adjustment of other controls may result in
further damage.
E. If the product has been dropped or
appears damaged.
ADDITIONAL SAFETY NOTES FOR CANADIAN USERS
NOTICE: The Canadian Department of
Communications label identifies certified equipment. This certification means that the equipment
meets certain telecommunications network protective, operational and safety requirements. The
department does not guarantee the equipment will
operate to the user's satisfaction.
Before installing the equipment, users should
ensure that it is permissible to be connected to the
facilities of the local telecommunications company.
The equipment must also be installed using an
acceptable method of connection. The customer
should be aware that compliance with the above
conditions may not prevent degradation of service
in some situations. Repairs to certified equipment
should be made by an authorized Canadian maintenance facility designated by the supplier. Any
repairs or alteration made by the user to this equipment, or equipment malfunctions, may give the
telecommunications company cause to request the
user to disconnect the equipment.
Users should ensure for their own protection that
the electrical ground connections of the power utility, telephone lines and internal metallic water pipe
system, if present, are connected together. This
precaution may be particularly important in rural
areas.
CAUTION: Users should not attempt to make
such connections themselves, but should contact
the appropriate electric inspection authority, or
electrician, as soon as possible.
NOTICE: The LOAD NUMBER (LN) assigned to
each terminal device denotes the percentage of the
total load to be connected to a telephone loop
which is used by the device, to prevent overloading.
The termination on a loop may consist of any combination of devices subject only to the requirement
that the sum of the load numbers of all devices does
not exceed 100.
SAVE THESE INSTRUCTIONS
IMPORTANT SAFETY INSTRUCTIONS
F. If the product exhibits a distinct change in
performance.
9. If this product has a polarized plug with one
wide prong, it may not fit in non-polarized out
lets. Do not defeat the purpose of these
plugs. If they do not fit in your outlet, the outlet
should be replaced by an electrician.
Page 3

TABLE OF CONTENTS
CHAPTER 1: INTRODUCTION
........................................................................................................3
CHAPTER 2: COMPONENT CHECKLIST ......................................................................................3
CHAPTER 3: IDENTIFYING THE FEATURES ................................................................................4
CHAPTER 4: INSTALLATION ..........................................................................................................6
A. Power and Phone Line Connection ..........................................................................6
B. Loading Paper Into Printer ........................................................................................6
CHAPTER 5: SETTING UP YOUR TTY ............................................................................................7
A. Relay Number Voice Announcer ..............................................................................7
B. Phone Directory for Memory Dialing ........................................................................7
C. Factory Preset Modes of Operation ........................................................................7
D. Personalized Greeting Message (optional) ..............................................................8
E. Personalized Outgoing Message for Auto Answer (optional)....................................8
F. Other Operation Options (optional) ..........................................................................8
F.1 Printer Letter Sizes..................................................................................8
F.2 Screen Display Direction ........................................................................8
F.3 Tone/pulse Dialing ..................................................................................8
F.4 Changing Password for Remote Message Retrieval ..............................9
F.5 Turning Off Toll Saver and Selecting
Number of Rings for Auto Answer ........................................................9
F.6 Transmission Speeds..............................................................................9
F.7 Call Interrupt ..........................................................................................9
F.8 Relay Voice Announcer ........................................................................10
F.9 Printing Auto-Answer Message ............................................................10
CHAPTER 6: OPERATING YOUR TTY ............................................................................................10
A. Making a Phone Call (Direct Connect) ..................................................................10
A.1 Turning Off Audible Identification Tone (optional) ................................10
A.2 Manual Dialing from Keyboard..............................................................10
A.3 Memory Dialing ....................................................................................11
A.4 Calling 911 Emergency Number ..........................................................11
A.5 Last Number Redial ..............................................................................11
A.6 Auto Busy Redial ..................................................................................11
B. Answering a Phone Call..........................................................................................11
C. Call-On-Hold ..........................................................................................................12
D. Using Auto Answer ................................................................................................12
E. Playing Back/ Clearing Recorded Messages ........................................................12
F. Retrieving Messages Remotely ..............................................................................12
G. Preparing a Memo ..................................................................................................13
H. Sending a Prepared Memo ....................................................................................13
I. Recording a Conversation Into Memory ................................................................13
J. Reviewing and Editing a Memo ..............................................................................14
K. Printing a Memo or Conversation Stored in Memory .............................................14
Page 4

TABLE OF CONTENTS
CHAPTER 7: ADDITIONAL FEATURES
......................................................................................14
A. Wait For Response ..............................................................................................14
B. Call Transfer ..........................................................................................................14
C. 3-Way Calling ........................................................................................................15
D. Telebanking and Credit Card Calling ......................................................................15
E. Checking Available Memory....................................................................................15
F. Clearing The Entire Memory ..................................................................................16
G. Using an External Printer ........................................................................................16
H. Voice Carry Over Calls (VCO)......................................................................... ......16
I. Using Acoustic Cups ..............................................................................................17
J. Using Help Menu ....................................................................................................17
K. Date and Time Stamping ........................................................................................17
L. ASCII Code ............................................................................................................18
CHAPTER 8: AVAILABLE OPTIONAL ACCESSORIES ..............................................................19
A. Installing or Replacing Batteries ............................................................................19
B. Heavy Duty Batteries ..............................................................................................19
C. Built–In Printer ........................................................................................................19
D. Training Videos ......................................................................................................19
CHAPTER 9: TROUBLE SHOOTING ............................................................................................20
CHAPTER 10: MAINTENANCE INFORMATION ............................................................................21
A. Caring for Your TTY ..............................................................................................21
B. Recharging Batteries ..............................................................................................21
CHAPTER 11: TTY USER'S ETIQUETTE ........................................................................................21
CHAPTER 12: WARRANTY INFORMATION ................................................................................22
CHAPTER 13: REPAIR INFORMATION ..........................................................................................23
CHAPTER 14: FCC REGISTRATION ..............................................................................................24
CHAPTER 15: SPECIFICATIONS ....................................................................................................24
CHAPTER 16: PROTECTION PLUS EXTENDED WARRANTY PROGRAM ..............................25
OWNER REGISTRATION CARD ..............................................................................27
INDEX ........................................................................................................................................29
Page 5
Thank you for selecting your new DIALOGUE Text
Telephone (TTY) from AMERIPHONE Inc. It has
been designed to meet the highest quality standards in order to provide you with years of convenience and trouble free service.
Please read these operation instructions thoroughly
before using your TTY. Keep this manual for future
reference.
You must save your sales receipt as proof of purchase in the event that you need warranty service.
Mail in your Product Registration Card within ten
days. Although registration is not required for warranty service, the information you provide will allow
us to contact you with any new developments
about your TTY’s operation. Your TTY comes with
a one year warranty. To ensure years of trouble
free service, we also offer our exclusive PROTECTION PLUS EXTENDED WARRANTY PROGRAM
at a very minimal cost.
PROTECTION PLUS offers savings on TTY
accessories and much more. Please see Chapter
12 and 17 for warranty details. Please retain all
original packing material for shipping your TTY to a
service location safely if and when it needs servicing.
Throughout this manual, is used to denote a
key on the keyboard. For example, represents the return key. tells you
what is being displayed on the TTY screen. For
example,
means the word DIALING is displayed.
DIALOGUE Keyboard: The following special
function keys are not presently functional in
Baudot mode of transmission: @, %, ^, &, *, _, <
and >. Thus, you don't need to be concerned with
them, there is nothing wrong with the keyboard.
They are only functional in the ASCII mode.
If you have any questions about your DIALOGUE
TTY, please call our Customer Relations Department at (714) 897-1111 (TTY) or (714) 897-0808
(Voice).
CHAPTER 1
INTRODUCTION
CHAPTER 2
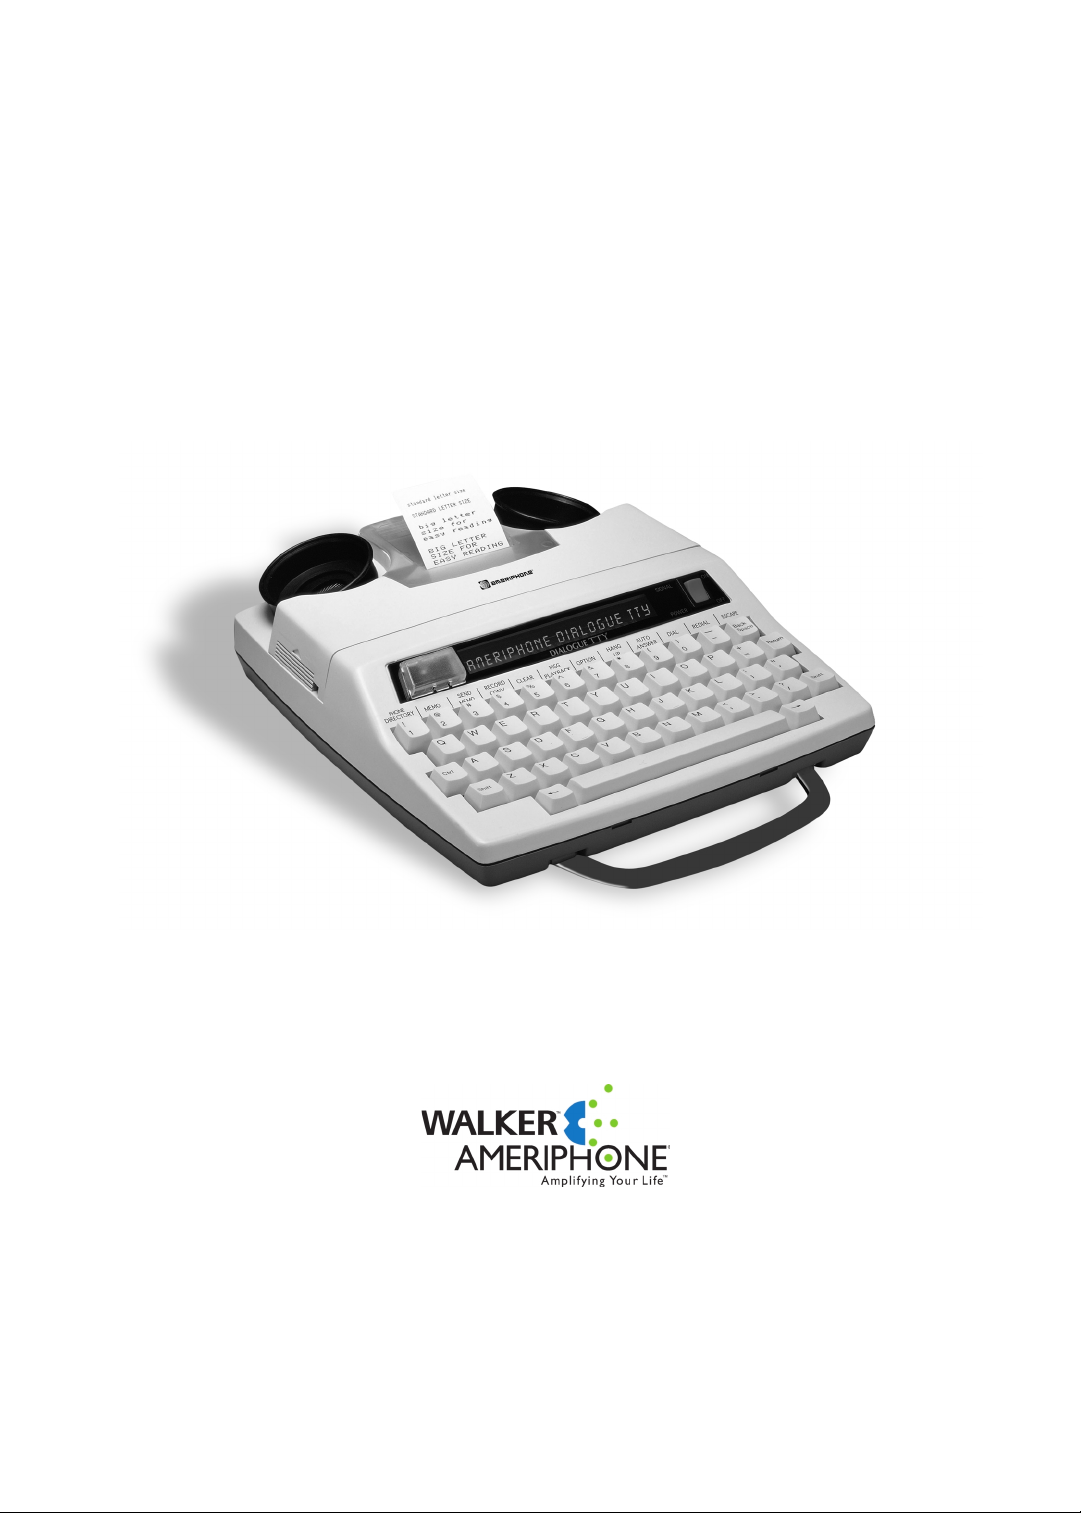
COMPONENT CHECKLIST
Your DIALOGUE TTY package
should contain the following items
Telephone Cord
DIALOGUE
OPERATING
INSTRUCTIONS
AND
QUICK GUIDE
Figure 1 - Package Components
Six NiCad
Rechargeable Batteries
(Installed)
Operating Instructions
DIALOGUE TTY
Printer Paper
(DIALOGUE III–P)
AC Adapter/Charger
DIALING
3
Page 6

DIALOGUE III / III–P TTY
Features on DIALOGUE III / III–P
CHAPTER 3
IDENTIFYING THE FEATURES
Printer compartment
Acoustic cups
AC adapter/charger jack
Handset orientation reference
diagram
Printer paper cover
Jack for telephone
Telephone line jack
Telephone ring signaler
ON/OFF switch (optional)
Optional heavy duty battery
compartment
Battery compartment (underneath)
Display screen
Call signal status indicator light
Power ON/OFF switch
Power indicator
key advances printer
paper by one line
Scroll key scrolls messages
forward on the screen
Spacebar
Built–in handle (underneath)
Scroll key scrolls messages
backward on the screen
key, press other keys while
holding this key down to activate
special TTY functions.
Special functions, see page 5
Telephone ring signaler
Printer ON/OFF switch
(DIALOGUE III–P only)
4
Page 7
Memo – Hold down and press
2 to create or edit memos.
(Pages 8, 13)
Escape – Hold down and press
to exit from special function
modes and go back to normal TTY operation. (Page 7)
Redial – Hold down and press
to redial the last dialed number. (Page 11)
Dial – Hold down and press 0
to dial a phone number from the keyboard or Phone Directory. (Page 10, 11)
Phone Directory – Hold down
and press
1 to create or change a
phone number in memory directory.
(Page 7)
Special Function Keys on DIALOGUE III / III–P
Message Playback – Hold down
and press 6 to playback recorded messages. (Page 12)
Record Conversation – Hold down
and press 4 to record a conversa-
tion and put it into memory. (Page 13)
Send Memo – Hold down and
press 3 to send memo from memory.
(Page 13)
Auto Answer – Hold down and
press 9 to turn on your automatic answering system. (Page 12)
Option – Hold down and press
7 to review or change the operation
settings of your TTY. (Pages 7, 8, 9, 10)
Hang Up – Hold down and press
8 to hang up on your telephone con-
nection without turning your TTY off.
(Page 10)
Clear – Hold down and press
5 to clear all memos, conversations
or recorded messages in memory.
(Page 16)
CHAPTER 3
(CONTINUED)
5
Page 8
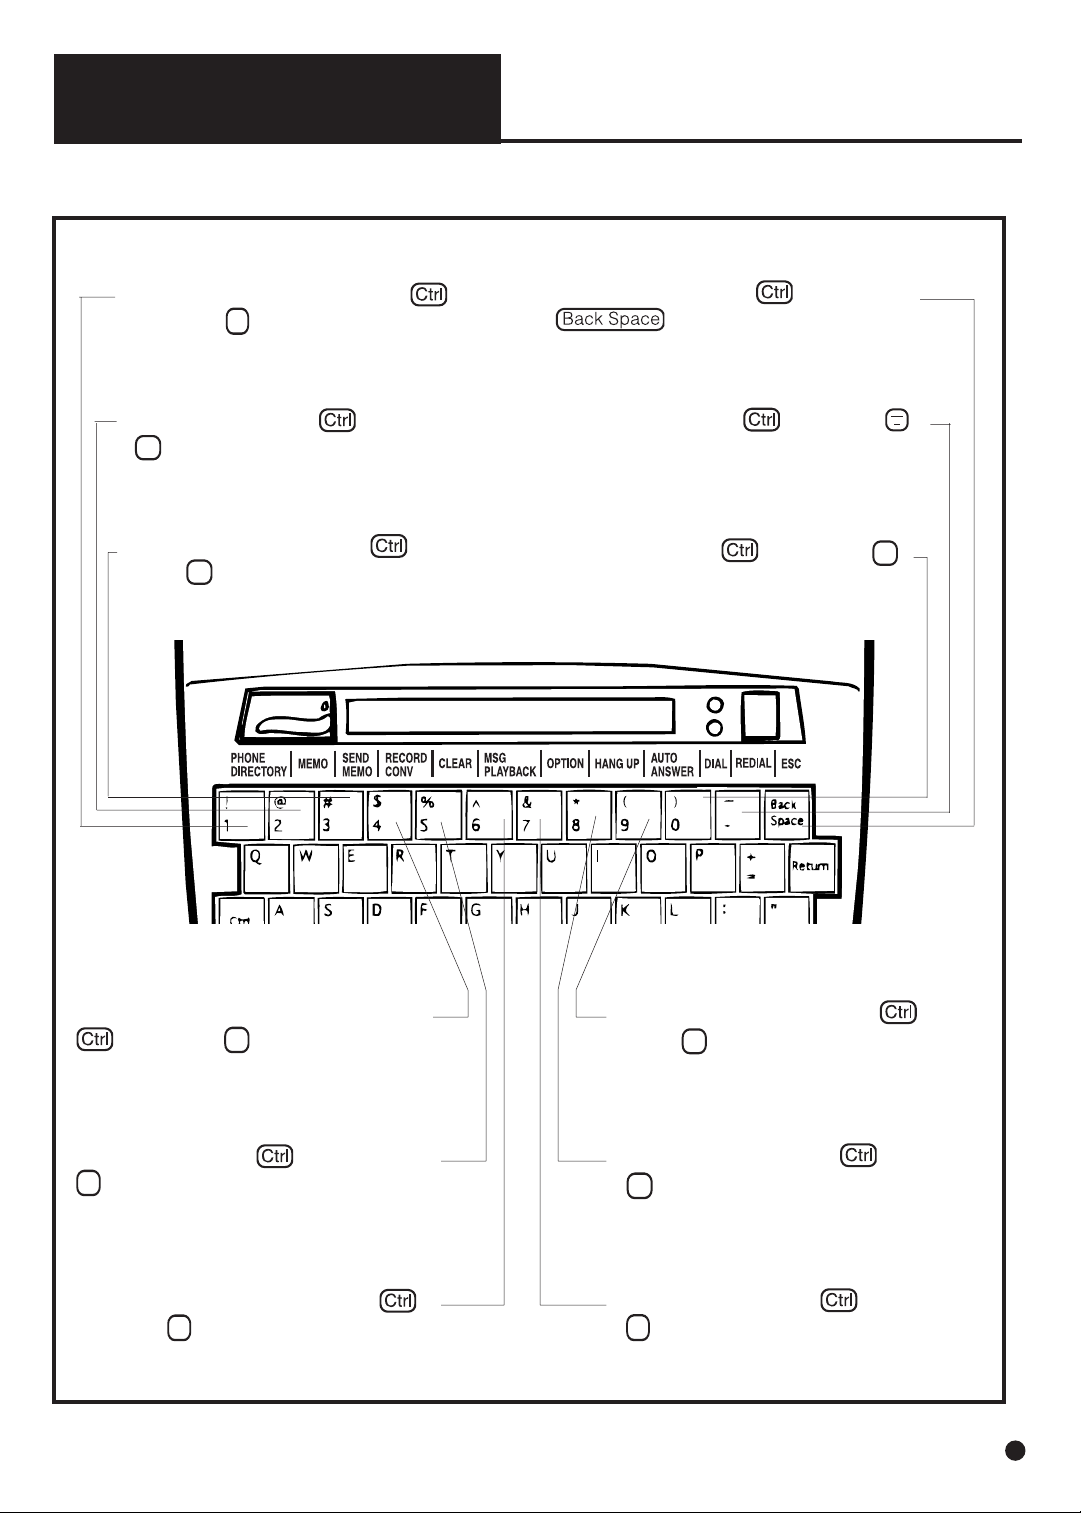
A. Power and Phone Line Connection
Connect the phone cord and the AC
adapter/charger to the DIALOGUE TTY as
shown below. The AC adapter/charger provides power to operate DIALOGUE TTY while
automatically charging the rechargeable battery in the battery compartment.
You should only use the AC adapter/charger
supplied with your TTY. When the TTY is not in
use, turn the power off but keep the charger
plugged in.
B. Loading Paper Into Printer
Figure 4 - Pulling printer paper through
its cover
Figure 3 - Installing printer paper
Figure 2 - Removing paper tray cover
AC Outlet
AC Adapter
CHAPTER 4
INSTALLATION
If your TTY is equipped with a built–in printer,
follow these steps for loading printer paper.
Use 2 1/4" wide thermal paper only. Printer
paper can be ordered from Ameriphone or any
office products supplier.
1. Turn your TTY on.
2. Turn the printer switch on.
3. Remove the paper cover by pressing
down with both thumbs and sliding it
towards the back (see Figure 2).
4. Cut the paper to form a wedge as a lead.
Push the end of the paper as far as possible into the slot at back of the printer
(see Figure 3).
5. Pull the paper once it comes out of the top
or press the key several times to
advance the paper.
6. Feed the paper through the tear off slot in
the paper cover (see Figure 4). Deposit
the paper into the paper compartment
and adjust the roll to eliminate any excessive slack. Slide the paper cover into position. Your printer is now ready to print
your conversations.
Phone Wall
Outlet
Telephone or Signaling
Devices (Optional)
Phone Cord
6
Page 9
1. Programming Phone Directory
1. Turn on the TTY.
2. Hold down and press 1 to select
directory.
3. Type in name (up to 9 characters) and press .
4. Type in the phone number (up to 18 digits). Press to go on to the next
directory entry.
5. When finished, hold down and
press to return to normal
TTY operation.
NOTE: A comma (,) may be entered anywhere in the digit string as a 2-second pause
during dialing. See Page 18 to store an ASCII
phone number
2. Editing Phone Directory
1. With the TTY on, hold down and
press 1 .
2. Press to scroll names in the
directory. Press to select
name and number.
3. If you want to change the number of
the person, press key to
move the blinking cursor to the right
of the digit you want to change,
press to erase the digit
Your TTY comes preset with the following
modes of operation:
1. "Hello, GA" greeting to greet callers when
you press and G simultaneously.
2. "Thank you for calling, please leave a
message, GA" for auto answer outgoing
message.
3. The printer prints incoming messages in
upper case and outgoing messages in
lower case.
4. Characters are scrolled from right to left
on display screen.
5. Tone dialing, the most common
telephone mode of operation.
6. Slash (/) punctuation key as password for
remote message retrieval.
7. Toll Saver automatically answers first call
after five rings and subsequent calls within two rings.
8. Interrupt feature and automatic identification tone are enabled.
NOTE: If you want to change any of the factory preset modes of operation, please follow
the steps on pages 8-10 for each function.
Later on, if you want to reset your TTY to all
the factory preset modes of operation, see
Chapter 7 Section F.
1. Turn on the TTY.
2. Hold down and press 7 to select
option.
3. The screen displays .
4. Type in
Y for yes and enter your local
relay service number.
Press to save.
5. Hold down and press
to return to normal TTY operation.
CHAPTER 5
SETTING UP YOUR TTY
EDIT RELAY NBR? Y/N
A. Relay Number Voice Announcer
Your TTY comes ready to use. However, for your
convenience, we suggest you set up two basic features: The Relay Number Voice Announcer to
inform the hearing caller to call Relay Service, and
Phone Directory for memory dialing.
B. Phone Directory for Memory Dialing
C. Factory Preset Modes of Operation
(to the left of cursor) and type in the
correct digit. Press to save the
revised number and return to normal
operations.
4. If you want to erase the name and the
phone number, press key
repeatedly and until it goes beyond
the last digit of the number and
CLEAR ENTRY? Y/N appears on the
screen. Type Y for yes to erase.
ENTRY CLEARED flashes on screen
and returns the TTY to normal
operation.
3. Printing the Phone Directory
1. Turn the Printer on .
2. Hold down and press 1 .
3. Hold down , press P .
7
Page 10
1. Turn on the TTY.
2. Hold down and press
2 to select
the memo function.
3. Type in the name of your greeting message; , for example. Press
to save memo name.
4. Type in your message. For example,
.
5. Hold down and press
to save.
6. Hold down and press
7 to select
setup option.
7. Press two times until
appears on your
screen. Type in the name of your new
greeting. For example, .
The screen now reads .
Press to save.
8. Hold down and press
to return to normal TTY operation.
CHAPTER 5
(CONTINUED)
D. Personalized Greeting Message (optional)
F. Setting Up Other Operating Options
(optional)
DIALOGUE III/III-P can print conversations in
three letter sizes; standard, medium, and big. It
is preset to print in standard letter size. However, once it is changed it will remember and maintain the size selection.
1. To change to big size, hold down
and press
B .
2. To change to medium, hold down
and press M .
3. To change back to normal, press the
same keys.
You can verify your selection by checking the
print on the paper tape.
1. Printer Letter Sizes
GREETING
GREET MEM> HELLO
GREETING
HI, THIS IS JOHN, GA.
GREET MEM> GREETING
ANSWER
E. Personalized Outgoing Message
for Auto Answer (optional)
WE ARE NOT AVAILABLE, PLS LEAVE A MSG. GA .
2. Screen Display Direction
3. Tone/Pulse Dialing
Your TTY is preset to tone dialing. If tone dialing
is not available from your telephone company,
you can change it to pulse dialing. If changed,
the mode of dialing is set unless you change it
again.
1. Hold down and press 7 .
EDIT RELAY NBR? Y/N appears on the
screen.
2. Press repeatedly until
USING TONE DIAL? Y/N appears on the
screen.
3. Press
N to change to pulse.
4. Hold down and press
to return to normal TTY operation.
To change the mode of display from right-toleft to left-to-right:
1. Hold down and press 7 .
EDIT RELAY NBR? Y/N appears on the
screen.
2. Press repeatedly until
DISPL RT TO LFT? Y/N appears on the
screen.
3. Press
N to change. Once changed, the
TTY will continue to display in this mode
until it is changed again.
4. Hold down and press
to return to normal TTY operation.
1. Turn on the TTY.
2. Hold down and press
2 to select
the memo function.
3. Type in the name of your outgoing message; , for example.
Press to save the memo name .
4. Type in your message. For example,
5. Hold down and press
6. Hold down and press
7 to select
the setup option.
7. Press three times until
appears on
your screen.
8. Type in the name of your new outgoing
message; for example:
The screen now reads
(or the name you
have typed). Press to save.
9. Hold down and press
to return to normal TTY operation.
ANSWER
OUTMSG MEM>AUTO ANS
OUTMSG MEM>ANSWR
8
Page 11

CHAPTER 5
(CONTINUED)
4. Changing Password for Remote Message
Retrieval
5. Turning Off Toll Saver and Selecting the
Number of Rings for Auto Answer
DIALOGUE III and III-P are the world's first
TTY's equipped with the exclusive
TOLL-SAV-
ER. This feature allows you to remotely check
your answering system and not incur any toll
charges if there are no messages. With
TOLL-
SAVER activated, your TTY automatically
answers the first call after five rings and every
subsequent call in two rings. Any old messages
remaining in memory will also be counted. It is
recommended you clear all messages as soon
as possible.
6. Transmission Speeds
7. Call Interrupt
In order to prevent any unauthorized access to
your recorded messages, set up an Auto Answer access password. Once created, it is set
until you change it. If you forget your password,
you can simply create a new one.
1. Hold down and press 7 .
2. Press repeatedly until screen
CHANGE PASSWORD? Y/N appears.
3. Press Y to change the screen to
PASSWORD:/ .
4. Type a password (up to 9 characters
long) PASSWORD:/MYPASS , for example.
Press to save your selection.
5. Hold down and press .
to go back to normal TTY operation.
1. To turn the TOLL-SAVER feature off, hold
down and press 7 .
2. Press five times until
TOLL-SAVER ON Y/N appears on the screen.
Type N for No to turn this TOLL-SAVER
feature off.
3.
AUTO ANSWER RING (2) appears on the
screen.
4. Press to change the number
of rings directly. Press to save.
5. Hold down and press
to return to normal TTY operation.
DIALOGUE III/III-P allows the other TTY to interrupt your typing and ask for attention. When
this happens, "
INTERRUPT " flashes on your
screen and the lamp flasher also blinks. You
may continue to type or you can stop and wait
for a response. If both parties are using DIA-
LOGUE III/III-P
, you may interrupt each other
by holding down and pressing
I .
If you're using a TTY other than
DIALOGUE
III/III-P, to interrupt the DIALOGUE III/III-P
user you must hit the five to ten
times until you get an acknowledgment. If you
want to turn off the Interrupt feature, follow these
steps:
1. Hold down and press 7 .
2. Press once and the screen
reads INTERRUPT ON? Y/N .
3. Press N to turn off Interrupt feature.
4. Hold down and press
to return to normal TTY operation.
There are two accepted standard TTY message
transmission speeds: U.S. Standard (45.5
Baud) and International Standard (50 Baud). In
order for one TTY to talk to another, they both
must be set at the same standard (speed). Your
DIALOGUE TTY is preset to the U.S. Standard.
To make or receive a TTY call outside of U.S.,
U.K., or Canada, you may have to change to
the International Standard. Once changed, it will
remain at that speed until changed again.
1. Hold down and press 7 .
2. Press repeatedly until the
speed is displayed: (U.S. 45) SPEED
3. If you need to set it to international
speed, press the space bar. The screen
will show (INTL. 50) SPEED
4. Everytime you press the the
transmission speed changes.
Press to select the speed
shown on the screen.
5. Hold down and press
to return to normal TTY operation.
9
Page 12

1. Turn on TTY.
2. Hold down , press 0 and
will be displayed on the
screen.
3. Type in the phone number.
4. If you make a mistake in typing, press
to delete one space at a
time until the mistake is deleted.
5. After all numbers are entered, press
to start the dialing sequence.
If a dial tone is not detected,
will appear on the
screen (in some countries where the dial
tone may be different than the U.S., you
can override the waiting sequence by
pressing again).
6. If the line is busy, will be displayed and the SIGNAL indicator blinks
quickly. Hold down and press to
hang up.
7. If the other party answers by TTY, you'll
see a greeting message on the screen.
Proceed with your conversation.
8. If the party answers by voice, the SIGNAL indicator light will flicker. Turn the
TTY voice announcer on by holding down
and pressing the .
9. Printing Auto Answer Messages
CHAPTER 5
(CONTINUED)
CHAPTER 6
OPERATING YOUR TTY
A. Making a Phone Call (Direct Connect)
1. Hold down press 7 .
2. Press repeatedly until
appears.
3. Press N (for No) to turn off this feature.
4. Hold down and to
return to normal TTY operation.
AUTO I.D. ON? Y/N
2. Manual Dialing from Keyboard:
ENTER PHONE NO
8
DIALOGUE III-P TTY is set up to print and
record all incoming call messages. However,
you may turn off print function to save paper.
1. Hold down and press 7 .
2. Press seven times until
PRINT MESSAGES? Y/N appears.
3. Press
N to turn off printing.
4. Hold down and press
to return to normal TTY operation.
8. Relay Voice Announcer for Auto Answer
You can add the Relay Number Voice Announcer
to your outgoing message. When your TTY answers an incoming call, it will activate the Relay
Number Voice Announcer first and then follow
with the Auto Answer Message.
1. To turn on this feature, hold down and
press 7 .
2. Press four times until
VOICE ANSWER ON? Y/N appears.
3. Press Y to select the feature.
4. Hold down and press to
return to normal TTY operation.
All DIALOGUE TTYs are equipped with an Automat-
ic TTY Call Identifier feature which automatically
sends out an audible identification tone every six
seconds when your call is answered by a voice. It
notifies a hearing person that this is a TTY call, and
it triggers automatic TTY detection equipment used
in public dispatching facilities. The signal indicator
blinks when the audible tone comes on and the tone
automatically stops when either party starts to type.
1. Turning Off Audible Identification Tone:
(Optional)
WAIT FOR DIAL TONE
BUSY
10
Page 13

5. Last Number Redial
1. With TTY turned on, hold down
and press – to redial the last number
dialed . The number will be displayed on
the screen.
2. After the conversation is over, turn off the
TTY.
6. Auto Busy Redial
This feature makes dialing a busy number
easy. It puts your call through automatically
as soon as the line is free. The built-in
signaler flashes to alert you when your call is
being connected.
1. Hold down
Shift and press - .
2. The screen shows the number of dialing
attempts and the number of seconds
before it redials. 1ST REDIAL TRY 60
3. To stop redialing, press any key or turn
TTY OFF.
4. If it still cannot get through after 30 trials,
it will hang-up automatically.
3. Memory Dialing:
CHAPTER 6
(CONTINUED)
ENTER PHONE NO.
B. Answering A Phone Call
Before you can dial from memory, you must
have the names and phone numbers stored in
the directory. See Chapter 5 on how to create a
phone directory.
1. Turn on TTY.
2. Hold and press 0 to start the dialing sequence. is displayed on your screen.
3. Type in the name of the person you are
calling then press to enter your
selection.
4. Or: Press the to scan the
telephone directory. To scroll backward,
press . When the desired name appears, press
to enter the selection.
5. Your TTY then starts the dialing sequence
as in manual dialing from Keyboard.
4. Calling 911 Emergency Number:
(911 Emergency Number may not be
available in some areas)
1. To make a 911 emergency call, hold down
and press
0 to start the dialing se-
quence.
2. Type in 911 and press (If you
make a mistake in typing 911, press
to delete the mistake and
retype).
This automatically turns on AMERIPHONE’S
exclusive Emergency Call Announcer (ECA)
and sends out a message for help. You will
see a series of
HELP! HELP! GA go across your
screen at about three second intervals. This
makes it easier for emergency dispatchers to
recognize your call as a TTY emergency call
and greatly improves the response time for
help. The message continues automatically
thus allowing you to leave your TTY to attend
to other matters. It stops as soon as the dispatcher begins to type. To discontinue this
emergency message at any time, press
.
3. You may also manually activate the ECA
anytime by holding down Shift and
typing 911.
1. When there is an incoming call, the built-in
signaler will flash to let you know that your
telephone is ringing. Please note that the
AC adapter/charger must be plugged into
an electrical outlet and the optional signaler ON/OFF switch located on the rear of
the TTY must be ON in order for the signaler to function.
2. Turn on the TTY.
3. Hold down and press
G to answer
with the preset greeting message
(
HELLO, GA ) or type a greeting message.
When you see an incoming message, go
ahead with your conversation.
4. If there is no incoming message displayed
and the SIGNAL indicator light flickers, it
may be a voice call. Hold down and
press
V to turn on the relay voice
announcer. The electronic voice will
repeat and be displayed on the screen
until the caller switches to a TTY or when
you start typing.
11
Page 14

The screen shows you how many mesages you
have. To play back recorded messages you
must first exit auto answer by pressing
while holding down key.
After reading your messages, it is recommended
that you clear them to make room for recording
future messages. The message memory capacity is approximately 17,000 characters (equivalent to 7.5 pages of single line text). However, if
you save too many messages, all the available
memory space may get filled and any new
incoming messages will not be recorded. If you
want to stop reviewing messages to answer a
call, hold down and
press to exit from playback and you
can start your conversation.
1. Hold down and press 6 to see
how many messages are recorded.
2. You can scroll the messages forward or
backward by pressing or
(right and left arrow keys). You may go
fast forward by holding down and
pressing . To stop message scrolling, press the same scrolling key again.
3. When you have finished,
CLEAR MESSAGES Y/N appears. Press Y
(for yes) to clear messages and N (for
no) to save them.
4. Hold down and press
to return to normal TTY operation.
Before using Auto Answer, make sure the TTY is
properly connected to the telephone line.
1. Turn on the TTY. Hold down and
press 9 to turn on Auto Answer.
Leave the TTY on.
2. The screen will indicate that Auto Answer
is on and display the number of messages previously recorded in the memory.
For example:
3. All new messages will be saved in memory
together with the old messages.
4.
If you want your TTY to print incoming
messages as well, make sure the printer is
on and that it has enough paper.
Call-On-Hold allows a call to be placed on HOLD
and the conversation resumed from an extension
TTY. It is only operable when both TTYs are in
direct telephone line connection mode.
1. Tell the other party you are going to use
an extension and press
and H simultaneously.
is displayed on screen.
2. Turn on the extension TTY.
3. Type three periods (...) and the first TTY
will automatically disconnect from the
phone line. Proceed with your conversation.
4. When finished, turn off both TTYs. If you
forgot to turn off the first TTY, you will still
receive calls. However, you must turn the
first TTY OFF and then ON again before
you can type from it.
C. Call-On-Hold
D. Using Auto Answer
CHAPTER 6
(CONTINUED)
E. Playing Back/Clearing Recorded Messages
F. Retrieving Messages Remotely
DIALOGUE III/III-P are the world's first TTYs
equipped with the exclusive TOLL-SAVER. This
feature allows you to remotely check your
answering system and not incur any toll charges
if there are no messages. To take advantage of
this feature, you must have the TOLL-SAVER
option selected in your TTY.
When you remotely call your answering system,
if your DIALOGUE III/ III-P does not answer
within two rings, that means there are no messages. You should hang up immediately to
avoid incurring any call toll charges.
CALL ON HOLD
AUTO ANSWR ON 3 MSG
12
Page 15

If you want to record a conversation for future
review, you can save it as a memo. You can
record it during a call or after you hang up, provided you have not turned your TTY off. No matter when you start to record, the memo always
starts from the beginning of the conversation
(when you turned on your TTY) and ends with the
last typed text.
1. Before you start recording, inform the
other party to hold.
2. Hold down and press 4 .
REC TO MEMO> appears on your screen.
3. Type the name for the memo (up to 9
characters).
4. Press and your TTY starts to
record.
RECORDING TO MEMO flashes on
your screen.
5. Continue with your conversation.
6.
To stop recording, Hold down and
press or turn your TTY OFF.
NOTE: You must visually monitor the number of
rings by watching your TTY SIGNAL indicator.
If your
DIALOGUE III/III-P answers within two
rings, there are new messages and you can
retrieve them by typing in your password and then
press . Your password must start with
a "/" (back slash) in order to be valid. For example,
/MY PASS is a valid password.
1. Call your TTY with another TTY. When it
answers, you will see your outgoing message.
2. Type in your password. You have three tries
to enter the correct password .
3. If you do not have a password set up, just
type in
/ (back slash key).
4. Press to see the total number of
messages you have (old and new). The
messages will scroll across the screen starting from message number one.
5. At the end of the messages type Y to clear
the messages or N to save them for playback later.
6.
If you selected N to save them, the TTY will
then ask you if you want to replay
the messages. Type in Y (to replay) or N (not to
replay).
7. It then asks you if you want to change your
password.
8. To remotely change your password, type in Y
(for Yes) or N (for No) and then enter your
new password. Press to save.
9. Hang up when finished and the TTY will automatically reset itself to Auto Answer.
CHAPTER 6
(CONTINUED)
I. Recording a Conversation Into Memory
H. Sending a Prepared Memo
G. Preparing a Memo
1. After the other party’s TTY answers your
call, hold down and press 3 . The
screen asks you to enter the name of the
memo to be sent. SEND MEMO>
2. Type the name of the memo until the
desired name appears. Or press the
to scan the list of memos in
memory. Press to scroll
back, if necessary, until the desired name
appears.
3. Press to select the memo.
4. The contents of the memo will be displayed on the screen as it is being sent.
5. If you want to stop the transmission, hold
down and press . If you
want to send the memo again, repeat
steps 1-3. The memo remains in memory
until you clear it.
6. When finished, the TTY returns back to
the normal operating mode.
You can create a memo in memory and then
send it during a call.
1. Turn on your TTY. Hold down and
press 2 to go to the memo screen
MEMO NAME> .
2. Type a memo name using up to nine
characters. For example,
MEMO NAME>REQUEST
3. Press and the screen will prompt
you to type in the memo contents.
4. When finished, hold down and
press to save the memo
and return to the screen prior to this function. (Note: You can save a maximum of
20 memos or 8,000 characters).
13
Page 16

This feature notifies the user who was placed on
"HOLD" that the other party has resumed typing.
Press and
W simultaneously to acti-
vate this feature. The built-in signaler flashes
when an incoming signal is being detected from
the other party. Any keyboard activity cancels
Wait-For-Response feature or stops the flashing.
CHAPTER 6
(CONTINUED)
J. Reviewing and Editing a Memo
ENTER PHONE NO.
A. Wait-For-Response
B. Call Transfer
CHAPTER 7
ADDITIONAL FEATURES
1. Turn on the TTY. Hold down and
press 2 to select memo function.
MEMO NAME> appears on the screen.
2. Type in the name of the memo.
3. Or press to scan the list of
memos in memory. Press
to scroll back, if necessary, until the desired memo appears. Press to
select the memo.
4. If you only want to clear the memo, just
hold down and press
5 . Press Y
when
CLEAR MEMO Y?N appears on the
screen. Otherwise use and
to scroll and review the memo.
5.
If you want to modify the memo, use the
and to move the blinking cursor to the location you want to edit. To
insert characters, just begin typing. If you
want to delete characters, press
6. If you continue scrolling through the memo
until it reaches the end,
END OF MEMO will be displayed. The next
screen asks whether or not to clear the
memo. Press Y to clear or N to save.
7. When finished, hold down and press
to return to the screen prior
to this function.
K. Printing a Memo or Conversation
Stored in Memory
1. With the TTY on, hold down and
Press 2 .
2. Type in the name or press to
scroll to the desired memo.
3. Press to select the memo.
4. Hold down and press P .
When directly connected to the phone line, you
can transfer a TTY call from one extension to
another. This feature is especially suited for
businesses with CENTREX telephone service
where each person has a single line telephone
with an extension number. Please note that the
actual transferring process is provided by the
telephone system.
1. Answer an incoming TTY call as you normally would.
2. Tell the incoming party to hold and that
you are going to transfer the call to
another extension.
3. Press and
F simultaneously.
This will activate the call transfer feature
of the phone system.
4.
DIALOGUE TTY displays
Dial the desired extension number on the
keyboard and press .
5. When the transfer call is answered, to
bring the first party on the line, press
and
F simultaneously.
HOOK SWITCH FLASH is displayed on the
screen.
6.
You may stay on the line at this point for a
3-way conference call or you may hang up.
7. If you receive no answer or busy signal
from the second party, press
and F simultaneously twice in succession to return to the first party.
14
Page 17

CHAPTER 7
(CONTINUED)
A new automated tele-access menu system is
available in some areas. This system allows TTY
users to access information such as airline
schedules, bank accounts, and government
office services through an option menu transmitted in Baudot. Users enter their choice of
options by pressing the number keys of a tone
dialing phone or TTY.
2. When connected, press and F
simultaneously. This puts the first party on
hold. then appears on
the screen. Enter the phone number of the
second party and press .
3. When the call is answered, to bring the
first party back, press and
F
simultaneously again. The screen flashes
momentarily. You
can now communicate with both parties
at the same time.
4. If you receive no answer or a busy signal
with your second party, press
and
F simultaneously to generate the
signal. Wait one
second and then press these keys again
to generate a second
signal. This returns you to the first party.
5. When the conversation is over, turn off
the TTY.
3-way calling feature is an optional service offered by your local phone company. It allows you
to hold a three way conversation with friends, relatives, or business associates. You must subscribe to this service and it is operable only when
you're in direct telephone connection mode.
1. Call the first party as you normally would.
C. 3-Way Calling
D. Telebanking, Credit Card Calling, and
Using DTMF Tone Signaling
E. Checking Available Memory
Your DIALOGUE III/III-P TTY has a total memory capacity of 32K, which is approximately
32,000 characters (i.e. equivalent to about 13
letter size typed pages). About 500 characters
are used for programming the internal control instructions of the TTY. Of the remaining memory,
8,000 characters (equivalent to 3-1/2 pages) are
used for memo storage: 1500 characters (approximately 50 names and phone numbers) for
the phone directory, 17,000 characters (about 7
pages) for recording messages, and the remaining 5,000 characters (about 2 pages) for recording conversations.
CHECKING MEMO MEMORY:
1. To check the memory available, Hold
down and press
2 to go to the
memo screen.
2. Hold down and press L to list the
number of free characters available for
storing new memos.
3. Press while holding down
to return to normal TTY operation.
HOOK SWITCH FLASH
ENTER PHONE NO=
HOOK SWITCH FLASH
1. Make the TTY call as usual. If the auto
mated system is operating correctly, there
should be an announcement telling you
what to do.
2. When the system prompts you to press a
number on your phone, hold down
and
D . TONE SIGNAL MODE:
will appear on the screen.
3. Press the numbers you want to send to
the keyboard. The pound sign (#) or
asterisk (*) can be generated by simultaneously pressing and
3 , or
and 8 , respectively.
4. This mode is cancelled automatically
when you press any TTY key except (#),
or (*), or the number keys.
HOOK SWITCH FLASH
15
Page 18

CHAPTER 7
(CONTINUED)
F. Clearing the Entire Memory
CHECKING DIRECTORY MEMORY
1. Hold down and press
1 to go to
the phone directory screen.
2. Hold down and press L to list
the number of free memory “spaces”
available for storing new names and
phone numbers.
3. Press while holding
down to return to normal TTY
operation.
1. Remove the paper tray cover and the printer compartment cover. See Figure 2 on
page 6.
2. Plug one end of the printer cable into the
PRINTER socket. See Figure 5.
3. Replace the printer compartment cover and
then the paper compartment cover so the
cable fits through the slots at the base of
the paper cover.
4. Plug the other end of the cable into your
printer.
5. Turn the printer on and make sure it's online.
H. VCO ( Voice Carry Over) Calls
1. Connect the telephone to the TTY as
shown on page 6.
2. Make the call in the normal manner from
your TTY.
3. After the call is connected, lift the handset
and start talking when it is your turn. (After
seeing GA on the screen).
All DIALOGUE TTYs work with external printers
that support a standard parallel interface.
RS232 serial printers aren't compatible with
AMERIPHONE TTYs. If your DIALOGUE TTY is
not equipped with a built-in printer, follow these
instructions to attach and use an external printer. External printer input impedance must be
greater than 10K OHM.
G. Using an External Printer
Figure 5 - External Printer
It is recommended that when you no longer have
any need to keep previous messages, memos,
and phone conversations, you clear them from
memory.
1. Hold down and press 5 to go to the
clear menu.
2. The first screen will read
CLEAR CONVERSATION Y/N . Press Y to
clear or N or to retain and
move to the next screen. You will see the
following screens displayed in succession:
CLEAR MESSAGES Y/N
CLEAR MEMOS Y/N
CLEAR DIRECTORY Y/N
CLEAR ALL MEMORY Y/N
Press Y to clear or N or to
retain the contents in memory. If you do
not want to clear anything, just hold down
and press
to return to normal TTY operation.
Pressing Y after
CLEAR ALL MEMORY Y/N
also resets the TTY to the factory preset
modes of operation
( see Page 7).
16
Page 19

4. Continue your conversation by reading the
screen and talking into the handset.
5. Hang up both the TTY and telephone
when finished.
The DIALOGUE III TTY comes equipped with
help menus to assist you in using the various
features. These menus are especially helpful
when using the TTY when the users guide is unavailable or when only a quick reference is needed. To activate the help menu:
1. Hold down and press ? .
The primary help menu will scroll across
the screen and will be printed if the printer
is turned on. This menu lists the various
features and shows which keys are used
to access them.
2. Hold down and press any of the top
row function keys to view the help message for that particular function. For
instance, holding down
and pressing
1 would display and print the instructions
for using the Phone Directory.
3. To exit from the help menu, hold down
and press or just
resume typing.
I. Using Acoustic Cups
For the acoustic cups to be operational, the
telephone line must NOT be plugged in. The
call signaler is not operational when the telephone line is not plugged in.
1. Turn the TTY on.
2. Place the telephone handset into the
cups with the cord on the left.
3. Turn on your printer if you want to print
your conversation.
4. Dial the phone number using the telephone.
5. When the party answers, begin your conversation in the usual way.
6. When the conversation is over, turn the
TTY off. Return the handset back to the
phone cradle.
J. Using Help Menu
CHAPTER 7
(CONTINUED)
K. Date and Time Stamping
Everytime you print or record a
conversation/message, it automatically records
the date and time at the beginning of your call,
presuming that the clock is set prior to this.
Follow these steps for setting the clock, and
remember that
NO RETURN KEY PRESS IS
NECESSARY IN THIS OPERATION. The
machine will jump automatically from step to
step, if the step was completed correctly.
1. Hold down and press T to set
the built-in timer. It shows the current
timer settings, then it prompts you to
enter the current time
ENTER HOUR=MINUTE= .
(If you do not want to change, just hold
down and press twice
to return to normal TTY operation). Type
in hour, minutes-2 digits for each entry,
with no space or separation key in
between. For example, for 1:36 you would
enter 0136. Note: It will not accept a
time setting like 23:05, you have to
enter 11:05 PM
. After entering a group of
4 valid digits, it will prompt you for choosing AM or PM:
ENTER AM/PM=. You have to
type A or P for your choice.
2. The clock screen prompts you now for
today’s date ENTER MONTH=DATE=YEAR= .
Again, the correct input is two digits for
each- month, day, year- without any separation character or space. For Example,
for July 8, 2000 you would enter 070800.
3. Once the last digit of the year setting
typed, the machine returns to the operation previous to the clock setting procedure. To check the time, hold down
and press
T again, and the current set-
ting will appear on the screen. If you want
to change anything, hit ENTER until you
get to the screen you need, and follow
one of the steps above. If you want to go
back to your operation, hold down
and hit twice. (pressing
once will take you back to step 1)
4. The date and time clock will continue to
run whether or not the AC adapter/charger is plugged in or not, presuming that the
battery pack is charged. To check the current date and time hold down and
press T .
17
Page 20

1. Hold down and press 1 .
2. DIR NAME: appears on screen.
3. Type in a name (9 letters max) and then
press .
4. Enter the complete phone number and
then press .
5.
ASCII NUMBER? Y/N appears on screen.
6. Press Y (for Yes) for ASCII number.
7. Use and keys to
change / save the next four ASCII
parameters (Duplex, speed, parity,
carriage return & line feed).
8. When finished, hold down and
press to return to normal
TTY operation.
CHAPTER 7
(CONTINUED)
CHANGE MODES? Y/N
300. HALF. ORIG. 8NI
To make a call in ASCII code to a data base or
someone’s personal computer, follow these
steps:
1. Turn on your TTY
2. While holding down and left
press A to go to the ASCII menu.
“ASCII CODE (ON) ” is displayed.
3. Press to select ASCII (or
to not select).
4. Next, the screen summarizes the ASCII
mode settings and then asks if you want to
change modes .
5. Type Y to change. Press or
to answer the rest of the prompts
related to ASCII data format.
6. When finished, the screen shows the setting you selected: ,
for example.
7. Dial the telephone number as you usually
would.
8. Conduct your conversation in the normal
fashion. After the conversation is over,
hang up and turn off your TTY. It will automatically return to the regular Baudot
mode of communication for regular TTY
operation.
You can also receive ASCII calls. DIALOGUE
III/III-P TTY s equipped with ASCII code auto-
matically switch to ASCII mode of communication when there is an ASCII incoming call. Answer
the call and carry on in the normal fashion. If you
do not use the ASCII feature, we recommend you
5. Hold down and press
to return to the screen prior to this function.
L. ASCII Code
ASCII code allows you to communicate with
someone who uses a computer as their communication device and to access computer data
bases such as COMPUSERVE, ABLEDATA or
DEAF NET. Your TTY is already equipped with
ASCII code, it is preset to communicate in the
following mode settings:
• 300 Baud rate of transmission
• Half Duplex
• Answer
• Displays left to right for easier reading
disable the automatic ASCII detection by setting
the ASCII Tone to 0 (zero) seconds in Step 5, as
follows:
1. Turn on your TTY
2. While holding down and left press
A to go to ASCII menu. is
displayed.
3. Press to select ASCII.
4. Next, the screen summarizes the ASCII
mode settings and then asks if you want to
change modes
5. Type Y to change. Press several
times until you get to the screen that
dis plays At this point,
hit twice until the setting
changes to 0 (zero) seconds.
6. Press until you get back to the nor
mal way of operation. You have successful
ly changed the Auto-detection feature to OFF.
Figure 6 - Battery compartment
Save ASCII Phone Number
You can save the phone number as an ASCII
phone number. When you auto dial the ASCII
phone number, your
DIALOGUE TTY will
automatically set up the call without going
through the manual ASCII set up procedures.
CHANGE MODES? Y/N
ASCII CODE (ON)
ASCII TONE: (3) SEC.”
18
Page 21

Figure 7 - Heavy Duty
Batteries
B. Heavy Duty Batteries
When fully charged, the batteries that come with
your
DIALOGUE TTY offer approximately one
hour of operation. For longer operation, select
the Heavy Duty Batteries (requires 48 hours
charging time). They will provide approximately
two hours of operation.
Open the battery door as shown in Figure 6
and remove the old batteries. Install the new
batteries according to the battery orientation
marked in the compartment. (Six "AA" size
NICAD batteries are required).
The batteries must be charged before your TTY
can be used. Leave the AC adapter/charger
plugged in for a minimum of 14 hours for a full
charge. During this time, the power should
remain off. It will take longer to fully charge the
batteries if the TTY is used during charging.
When fully charged, the batteries will supply
power for approximately one hour of TTY con-
versation. For longer operation, order heavy
duty (2 hour) batteries from AMERIPHONE.
When the batteries are running low, the Power
Indicator will blink when the TTY is turned on.
Replace or recharge the batteries immediately.
Your TTY will be inoperable in just a few minutes
if the battery power runs out.
A. Installing or Replacing Batteries
19
CHAPTER 8
AVAILABLE OPTIONAL ACCESSORIES
To maximize performance and take full advantage of
the design of your DIALOGUE TTY, the following
optional accessories are available. Please call:
(800) 874-3005 or (714) 897-0808 - Voice,
or: (800) 772-2889 or (714) 897-1111 - TTY
to order.
Figure 9 - Printer Installation
Figure 8 - Three Letter Size Printer
Videos on how to conduct telephone conversation using
DIALOGUE TTYs are available.
Learning how to use TTYs has never been easier and so much fun.
D. Training Videos
Figure 10 - Training Videos
C. Built-in Printer
You can convert your display DIALOGUE TTY
into a printer TTY simply by plugging a DIALOGUE printer into the printer compartment.
No wiring or assembly is necessary to obtain
your high speed printer (with a selection of letter
sizes). Contact your
DIALOGUE TTY dealer or
AMERIPHONE.
Page 22

SYMPTOM
Nothing happens when DIALOGUE TTY is turned
on
Batteries run down too soon after charging
No dial tone for keyboard dialing
Nothing happens after you dial from keyboard
NO NUMBER TO DIAL shows up on the screen
when you try to redial a phone number
NO DIRECT CONNECT shows up on the screen
when you turn on Auto Answer
No transmission through the acoustic cups
Garbled message displayed on screen when
using acoustic cups
Handset will not stay in cups
Printer does not print
The last line of a conversation is not printed
Incorrect print size.
CHAPTER 9
TROUBLE SHOOTING
If any problem should arise during operation of your TTY, go through the suggestions listed below. Should the
difficulty persist, contact AMERIPHONE or your authorized dealer for assistance.
CAUSE AND CORRECTIVE ACTIONS
No power. Check to make sure that both ends of
the AC adapter/charger are firmly plugged in. If
you are using batteries, make sure that each battery is properly installed and that they are properly
charged.
Batteries are not charged properly. Completely
drain the batteries by turning on the TTY and leaving it on until the power goes off. Recharge it for
14 hours. If this does not work, your batteries may
be too old and need to be replaced.
Check to make sure both ends of the telephone
cord are firmly plugged in.
Make sure you press after dialing the
number. Pressing completes the dialing
sequence.
The
DIALOGUE III/III-P only remembers the last
phone number dialed from the keyboard.
Check to make sure that both ends of the phone
cord are firmly plugged in.
Check the setting of the telephone line connection.
There must be no telephone line plugged in.
Check to make sure that the handset is firmly coupled to the acoustic cups.
Check to make sure the is no grease or oil on the
inside surface of the cups or the handset. Clean
those areas periodically with mild soap and a damp
cloth.
Check to make sure the printer is turned on.
Hold down and press
P to toggle the
printer ON/ OFF.
Pressing the key will cause the printer to
print out any uncompleted lines of conversation.
Select big size print and then medium size print or
vice versa.
20
Page 23

21
CHAPTER 10
MAINTENANCE INFORMATION
A. Caring For Your TTY
Rechargeable batteries usually last longer
when they are used and recharged regularly.
For best results, they should be completely
drained and then recharged every six months
or so. To drain the batteries, unplug the AC
adapter/charger and leave your TTY on until
the product name is no longer displayed. Then
turn your TTY OFF and plug the AC
adapter/charger into an electrical outlet. It
takes approximately 14 hours to fully recharge
the batteries. You can use your TTY during
charging. However, it will take longer to
recharge the batteries.
The batteries should last several years. If they
run down quickly soon after charging, they
may need to be replaced.
Even though your
DIALOGUE TTY is built to
last and is designed to be maintenance free, it
contains sensitive and delicate electronic
parts. To protect your investment and ensure
the best performance, treat it with care.
• Avoid dropping your TTY or subjecting it
to any impact. Use the carrying case
when traveling.
• Clean your TTY plastic case regularly
and use only a slightly damp, soft cloth.
To remove stains, use mild soap. Never
use detergents, excessive water or harsh
cleaning agents.
• Do not allow dust to build up in the gaps
around the keys. Vacuum the keyboard
regularly. For best protection, keep the
dust cover on when your TTY is not in
use.
CHAPTER 11
TTY USER'S ETIQUETTE
B. Recharging Batteries
W A R N I N G ...
DO NOT leave batteries drained of power for
more than 1-1/2 hours. Doing so can cause information that is stored in the TTY's memory to be
lost.
To conduct a TTY conversation, you need a TTY at
each end of the telephone line, just as you need a
telephone at each end to conduct a telephone conversation.
Here are some commonly accepted abbreviations
that eliminate the need to type long phrases.
GA means "Go Ahead". When you finish typing
your sentence or message, type GA to show it's
the other party's turn to respond. For example,
HI, THIS IS JANE, HOW CAN I HELP YOU? GA When
you see GA at the end of an incoming sentence or
message, it is your turn to respond.
Q is often used instead of a question mark. For
example, HOW ARE YOU. Q
SK means "Stop Keying". Type SK when you
are ready to end the conversation. Typing GA followed by SK is a polite way to say good-bye and
to give the other party a last chance to respond
before hanging up. For example,
NICE TALKING WITH YOU. GA SK.
Type SKSK to show that you’re hanging up. For
example,
BYE NOW.SKSK.
Page 24

CHAPTER 11
(CONTINUED)
CHAPTER 12
WARRANTY INFORMATION
AMERIPHONE warrants our TTY against defects
in materials or workmanship for the period of one
year from the date of purchase. If our extended
warranty is purchased, this same warranty also
applies to the period covered by the extended warranty. For information on our extended warranty
program and how to sign up for it, please see
Chapter 17.
If your AMERIPHONE product is defective and returned within 30 days of the date of purchase, your
DIALOGUE dealer will replace it at no charge.
If returned after 30 days but within one year from
the date of purchase, we will repair or replace it at
no charge. In the repair of your AMERIPHONE
product, we may use new or reconditioned replacement parts. If we elect to replace your AMERIPHONE product, we may replace it with a new or
reconditioned product of the same or similar
design. Repair or replacement will be warranted
for either (a) 90 days or (b) the remaining time on
the warranty period, whichever is longer. AMERIPHONE is not responsible for and will not pay for
loss of time or inconvenience, loss of use of your
AMERIPHONE product, or any property damage
caused by your AMERIPHONE product or its failure to work, or any other incidental or consequential damages.
To get warranty service for your DIALOGUE III/III-P
,
you must provide proof of the purchase date.
Within 30 days of the date of purchase, return your
DIALOGUE III/III-P
to the place where you purchased it for immediate replacement. After 30
days, call Ameriphone at 800-874-3005 VOICE or
800-772-2889 TTY for the authorized service center near you. You must prepay all shipping costs.
We suggest you save the original package materials in the event you need to ship the
DIALOGUE
III/III-P
. When shipping for warranty repair, include
your name, address, phone number, proof of date
of purchase, and a description of the problem.
After repairing the product, we, (or the service center) will ship it back to you at no cost within the
United States and Canada. CANADIAN RESIDENTS: call Ameriphone at 800-874-3005, 800772-2889 TTY for instructions.
Here are more abbreviations which are commonly
used by TTY users.
ASAP As soon as possible
ASST Assistant
BIZ Business
BYE Good-bye
CA Communication assistant
CD or CLD Could
CUL See you later
CUZ Because
DR or DOC Doctor
EDUC Education
FIGS Figures
HD or HLD Hold
ILY I love you
IMPT Important
LTRS Letters
MSG or MSGE Message
MISC Miscellaneous
MTG Meeting
NBR or NU Numbers
OFC Office
OIC Oh I see
OPR Operator
PPL People
PLS Please
PRO Professional
R Are
SERV or SVC Service
SD or SHD Should
THKS Thanks
THRU Through
TMR Tomorrow
UYou
UR Your
URS Yours
XXXX Erases an error
22
Page 25

23
This warranty does not cover defects resulting
from accidents, damage while in transit to our service location, alterations, unauthorized repair, failure to follow instructions, misuse, use outside the
United States or Canada, fire, flood, and acts of
God. Nor do we warrant the product to be compatible with any particular telephone equipment, party
line, key telephone systems, or more sophisticated
switching systems. If your
DIALOGUE III/III-P
is not
covered by this warranty, call us at 800-874-3005 or
800-772-2889 TTY for advice as to whether we will
repair your
DIALOGUE III/III-P
and other repair
information. The repair shall be warranted for 90
days.
CHAPTER 12
(CONTINUED)
If your
DIALOGUE III/III-P
is still in warranty, follow
the directions in Chapter 12 for repair service.
If your AMERIPHONE product is not covered by
our warranty, call us at (714) 897-1111 (TTY/TDD)
or (714) 897-0808 (Voice) for advice and other
repair information, including charges. At our
option, we may replace rather than repair your
AMERIPHONE product with a new or reconditioned one of the same or similar design.
Repair or replacement will be warranted for 90 days
or remainder of warranty, whichever is longer.
CHAPTER 13
REPAIR INFORMATION
Page 26

PHYSICAL DIMENSIONS
Size: 10–1/4" x 12" x 3"
Weight: 3 lbs.; 4.25 lbs. (with printer)
POWER
AC adapter: 9VDC, 650 ma (min), UL/CSA
listed Rechargeable batteries: Six NiCad size
AA Powers unit for approximately 1 hour
KEYBOARD
4 row keyboard
51 ergonometric keys
DISPLAY
Blue/Green vacuum fluorescent
20 characters; 0.25" (6mm) character height
ACOUSTIC COUPLERS
Accepts both circular and square telephone
handsets
COMMUNICATION CODES
Baudot Code: 45.5 or 50 Baud
Sensitivity=67 dBSPL (min)
PRINTER (DIALOGUE III–P)
24–character thermal printer
Uses 2–1/4" (58mm) thermal paper
CSA/NRTL LISTED
FCC AND DOC APPROVED
CHAPTER 15
SPECIFICATIONS
CHAPTER 14
FCC REGISTRATION
This TTY complies with the standards in part 68
of the Federal Communications Commission
(FCC) rules and has been approved by the FCC
for direct connection to telephone lines. The
Registration Number and Ringer Equivalence
Number (REN) are noted on the label at the bottom of the unit.
Before connecting the unit to your phone line,
notify your local telephone company of the
Federal Communications Commission (FCC)
Registration Number and the Ringer Equivalence
Number (REN) of your TTY.
Your local telephone company is required by the
FCC to allow you to connect FCC registered telephone equipment to their telephone lines. Your
notification helps your local telephone company to
continue to provide the best possible service.
Your AMERIPHONE product has also been tested
and found to meet the standards for a Class B
digital device, as specified in Part 15 of the FCC
Rules. These specifications are designed to provide against interference to radio and television
reception in a residential installation. However,
there is no guarantee that interference will not
occur in a particular installation. If your AMERIPHONE product causes interference to radio or
television reception when in use, you might correct that interference with any one or all of these
measures:
1. Where it can be done safely, reorient the
receiving television or radio antenna.
2. To the extent possible, relocate the television, radio or other receiver with respect
to the telephone equipment.
3. If your telephone product runs on AC
power, plug it into an AC outlet that’s not
on the same circuit as the one used by
your radio or television.
24
Page 27

25
CHAPTER 16
PROTECTION PLUS EXTENDED
WARRANTY PROGRAM
The latest in text telephone technology deserves a
protection plan that ensures its continued enjoyment. And that’s why we’ve custom designed our
Protection Plus Program as carefully as we’ve designed your new TTY.
I. Protection Plus Program
This protection plan covers your TTY for a full 2
years after the original one year warranty expires
(for a total of 3 years). There is absolutely no
additional cost to you for repairs during this period. AMERIPHONE pays 100% of all parts and
labor. (One year Protection Program is also
available). If service should be required, just
deliver your TTY to any one of our independent
authorized service centers or AMERIPHONE.
Your official Extended Warranty Certificate from
AMERIPHONE will identify you as a member of
our Protection Plus Program. You’ll be covered
in full for whatever repairs are necessary. And
this is only the beginning of the special benefits.
II. Save on Accessories to Expand Your World
of TTYCommunication
With our exclusive accessories hotline, you’ll be
able to purchase the latest accessories for your
new TTY or other AMERIPHONE products–all at
low, member–only prices. From printer paper
and batteries to the ALERTMASTER notification
Name ______________________________________
Address ____________________________________
City ________________________________________
State __________________ Zip ________________
Home Phone: ________________________________
Check One:
Cut along dotted line and send to: AMERIPHONE, Inc., 12082 Western Ave., Garden Grove, CA 92841
system and all assistive devices to make your life
easier. Just call:
(800) 874-3005 or (714) 897-0808 - Voice,
or: (800) 772-2889 or (714) 897-1111 - TTY.
Our customer service department will answer any
questions you may have and help you place your
order.
III. How to Purchase Extended Warranty
Fill out and return the attached application within
90 days from the date you purchased your TTY. A
copy of your sales receipt must be attached.
Include your check, money order, VISA or
MasterCard number for the appropriate amount
depending upon which program you choose.
IV. We’re as Close as a Call Aw ay.
That’s right. If you need to know anything about
AMERIPHONE’S Protection Plus Program, call:
(800) 874-3005 or (714) 897-0808 - Voice,
or: (800) 772-2889 or (714) 897-1111 - TTY. We’ll
tell you the name of the nearest independent
authorized service center. And we’ll answer any
other questions you might have about the benefits
of our Protection Plus Program.
Display TTY
(DIALOGUE III)
___2 Year Protection Plan $ 99.00
___1 Year Protection Plan $ 50.00
Printer TTY
(DIALOGUE III-P)
___2 Year Protection Plan $ 110.00
___1 Year Protection Plan $ 60.00
Applicable Sales Tax (California only) __________
Total Amount Enclosed: __________
Model # ______________Serial No. ______________
Date Purchased ________________________________
(Attached Copy of Sales Receipt)
Business Phone: ______________________________
__Yes, enroll me. Enclosed is my check or money
order made payable to AMERIPHONE.
__Charge instead to: VISA MasterCard
Account No: ______________________________
Expiration Date: ____________________________
______________________________ ____________
Signature Date
✄
Page 28

26
Page 29

27
Thank you for purchasing your AMERIPHONE
DIALOGUE TTY. Please fill out and mail this card
Within The Next 10 Days to register your purchase.
Proper registration will enable us to send you periodic mailings about new products and other important
announcements, and also allow us to contact you in
the unlikely event that your product needs adjustment
or modification.
THANK YOU!
1. __Mr. __Mrs. __Ms. __Miss
First Name Initial Last Name
Street Apt.No.
City State Zip Code
2. Date of Purchase:
Month Day Year
3. Model & Serial Number:
4. Home Telephone No.: ( ) -
5. Where did you purchase this product?
1. Received as a gift
2. Assistive Device specialty store
3. Department store
4. TV/appliance store
5. Catalog showroom
6. General Merchandise store
(Sears,Penneys,Wards,Etc)
7. Discount store (K–mart,Target,etc)
8. Mail order
9. Other
6. How did you first become aware of this
product?
(Please check only one.)
1. Magazine advertisement
2. Newspaper advertisement
3. TV advertisement
4. Information received through the mail
5. In–store display
6. Friend’s/Relative’s recommendation
7. Salesperson’s recommendation
8. Product brochure
7. Excluding sales tax, how much did you
pay for this TTY?
1. Less than $200
2. $200–$249
3. $250–$299
4. $300–$349
5. $350–$399
6. $400–$449
7. $450–$500
8. Is this TTY
1. Your first TTY
2. A replacement for any other TTY
3. An additional TTY
9. Which brands did you most seriously
consider before buying your Ameriphone
TTY?
(Check all that apply.)
1. Ultratec
2. Krown
3. AT&T
4. Other
10. What were the most important factors
influencing your decision to purchase this
TTY? (Please check a maximum of two.)
1. Emergency Call Announcer (ECA)
2. Ease of converting from display to
printer TTY
3. Built–in printer
4. Printer letter sizes
5. Electronic Voice Announcer
6. Compact size
7. Light weight
8. Ease of use
9. Other
11. Did you purchase a factory extended
warranty on your
DIALOGUE TTY?
1. Yes
2. No
12. Where did you purchase the extended
warranty?
1. AMERIPHONE
2. Dealer:
Name
Address
City State
Zip Code
13. How long of an extended warranty?
1. 2 years
2. 1 year
14. How much did you pay for the extended
warranty?
$___________.
OWNER REGISTRATION CARD
Cut along dotted line and send to: AMERIPHONE, Inc., 12082 Western Ave., Garden Grove, CA 92641
(area code)
Page 30

28
Page 31

INDEX
DIALOGUE and AMERIPHONE
are registered trade marks of
American Phone Products Inc.
Editing and Reviewing ....................................14
List ..................................................................15
Memory ..........................................................15
Preparing ........................................................13
Printing.............................................................14
Sending ..........................................................13
Messages ..............................................................12
Clearing ..........................................................12
Playing Back....................................................12
Printing ......................................................10, 14
Remote Retrieval ......................................12, 13
Retrieval Password ........................................13
On Hold Alert ........................................................14
Operations Options..............................................8, 9
Packing Checklist ....................................................3
Password for Message Retrieval ..........................13
Power Supply ........................................................19
Power Indicator......................................................19
Printer ..................................................................19
Built In ............................................................19
Converting Display TTY ..................................19
ON/OFF ............................................................4
Paper Loading ..................................................6
Print Sizes/Case................................................8
Printer Cable ........................................................16
Printer Paper Loading ............................................6
Product Registration Card .....................................27
Proof of Purchase ................................................25
Pulse/Tone Dialing ..................................................8
Recording a Conversation ....................................13
Relay Service ..........................................................7
Repair Information ................................................23
Ring Selection..........................................................9
Setting Up Your TTY................................................7
Specifications ........................................................24
Signal Light ..............................................................4
Telebanking............................................................15
Telephone Directory ................................................7
Clearing ............................................................7
Editing and Printing...........................................7
3-Way Calling ........................................................15
Toll Saver ................................................................9
Tone/Pulse Dialing ..................................................8
Transferring a Call ................................................14
Transmission Speeds...............................................9
Trouble Shooting....................................................20
TTY Etiquette ........................................................21
Videos, Training ....................................................19
Voice Announcer................................................7, 10
Relay Service Number ......................................7
Voice Carry Over Calls (VCO)..........................16,17
Wait for Response..................................................14
Warranty ................................................................22
Abbreviations, TTY ..........................................21, 22
AC Adapter/Charger ............................................3, 6
Acoustic Cups, using ............................................17
Answering a Call ....................................................11
ASCII Code Option ................................................18
Audible TTY Call Identifier ....................................10
Automatic Answering System ................................12
Memory Available............................................15
Password ..........................................................9
Setting Up........................................................12
Auto Answer Greeting..............................................8
Batteries ....................................................19, 20, 21
Charging/Checking..........................................21
Heavy Duty Option ..........................................19
Installation ................................................19, 20
Replacement ............................................19, 20
Baud Rate ( see transmission speeds) ..................9
Busy Number redial ..............................................11
Call Interrupt ............................................................9
Call on Hold ..........................................................12
Call Status Indicator ................................................4
Clearing Memos/Memory ......................................16
Clock......................................................................17
Computer, Communicating With......................18, 19
Computer Data Base Accessing......................18, 19
Conversations..................................................13, 15
Abbreviations..............................................21,22
Clearing ..........................................................16
Recording ........................................................13
Saving ............................................................13
Credit Card Calling ................................................15
Date and Time Stamping ......................................17
Display Direction......................................................8
Emergency 911 Calls ............................................11
Escape ....................................................................5
Extended Warranty Program
.................................27
Factory Preset Operating Modes- Reset ................7
FCC Registration ..................................................24
Features ..............................................................4, 5
Greeting message ..................................................8
Hanging Up With TTY On........................................5
Help Menu ............................................................17
Installation ..............................................................6
International TTY calls ..........................................9
Keyboard Dialing ..................................................10
Keys, Special Function ........................................3, 5
Last Number Redial ..............................................11
Maintenance ..........................................................21
Making a Call ........................................................10
Memory available ................................................15
Memory dialing ....................................................11
Memos ..................................................................13
Clearing ..........................................................16
29
Page 32

©AMERIPHONE, Inc., 12082 Western Avenue, Garden Grove, California 92841 (714) 897-1111 or (800) 772-2889 TTY/TDD
(714) 897-0808 or (800) 874-3005 VOICE (714) 897-4703 Fax email: ameriphone@ameriphone.com web: www.ameriphone.com
M03298•d5 © AMERIPHONE, Inc. D-III 520001 5 10/20/00
Page 33

 Loading...