

Page 1

©AMERIPHONE products are manufactured by Walker, A Division of Plantronics, Inc.
12082 Western Avenue, Garden Grove, CA 92841
(800) 874-3005 VOICE • (800) 772-2889 TTY/TDD • (714) 897-4703 FAX
email: ameriphonecs@plantronics.com website: www.ameriphone.com
®
Page 2

E
N
G
L
I
S
H
E
S
P
A
Ñ
O
L
F
R
A
N
Ç
A
I
S
AM
The All-In-One Wireless Notification System
ALERTMASTER™AM-6000
Users’ Guide
AM6000 5220-0761 A 4/03
∆
M06299
®
Page 3

Instrucciones de seguridad
importantespara el usuario
Contents
IMPORTANT SAFETY INSTRUCTIONS
......................................................1
INTRODUCTION . . . . . . . . . . . . . . . . . . . . . . . . . . . . . . . . . . . . . . . . . . . 4
PACKAGE CHECKLIST . . . . . . . . . . . . . . . . . . . . . . . . . . . . . . . . . . . . . . . .5
FEATURES IDENTIFICATION . . . . . . . . . . . . . . . . . . . . . . . . . . . . . . . . . . . .6
INSTALLATION AND SET UP . . . . . . . . . . . . . . . . . . . . . . . . . . . . . . . . . . . .7
A.Base unit . . . . . . . . . . . . . . . . . . . . . . . . . . . . . . . . . . . . . . . . .7
B.Doorbell . . . . . . . . . . . . . . . . . . . . . . . . . . . . . . . . . . . . . . . . . .8
C.Clock . . . . . . . . . . . . . . . . . . . . . . . . . . . . . . . . . . . . . . . . . . . .8
OPERATIONS . . . . . . . . . . . . . . . . . . . . . . . . . . . . . . . . . . . . . . . . . . . . .8
A.Monitoring functions . . . . . . . . . . . . . . . . . . . . . . . . . . . . . . . . . .8
B.Master Reset . . . . . . . . . . . . . . . . . . . . . . . . . . . . . . . . . . . . . .11
C.Notification Priority . . . . . . . . . . . . . . . . . . . . . . . . . . . . . . . . .11
D.Security Timer . . . . . . . . . . . . . . . . . . . . . . . . . . . . . . . . . . . . .11
E.Battery . . . . . . . . . . . . . . . . . . . . . . . . . . . . . . . . . . . . . . . . . .12
OPTIONAL ACCESSORIES . . . . . . . . . . . . . . . . . . . . . . . . . . . . . . . . . . . .14
A.Remote Receiver . . . . . . . . . . . . . . . . . . . . . . . . . . . . . . . . . . .14
B.Personal Signaler . . . . . . . . . . . . . . . . . . . . . . . . . . . . . . . . . . .14
C.Personal Tactile Signaler . . . . . . . . . . . . . . . . . . . . . . . . . . . . . .14
D.Audio Alarm Transmitter . . . . . . . . . . . . . . . . . . . . . . . . . . . . . .14
E. Baby Sound Monitor . . . . . . . . . . . . . . . . . . . . . . . . . . . . . . . .14
F. Door Announcer . . . . . . . . . . . . . . . . . . . . . . . . . . . . . . . . . . .15
IN CASE OF DIFFICULTY . . . . . . . . . . . . . . . . . . . . . . . . . . . . . . . . . . . . .16
A.Channel Setting . . . . . . . . . . . . . . . . . . . . . . . . . . . . . . . . . . . .17
REGULATORY COMPLIANCE . . . . . . . . . . . . . . . . . . . . . . . . . . . . . . . . . . .18
UK STATUTORY INFORMATION . . . . . . . . . . . . . . . . . . . . . . . . . . . . . . . . .24
WARRANTY . . . . . . . . . . . . . . . . . . . . . . . . . . . . . . . . . . . . . . . . . . . . .27
INDEX . . . . . . . . . . . . . . . . . . . . . . . . . . . . . . . . . . . . . . . . . . . . . . . .28
Page 4

E
N
G
L
I
S
H
1
When using your telephone
equipment, basic safety precautions
should always be followed to
reduce the risk of fire, electric
shock and persons including the
following:
1.Read and understand all
instructions.
2.Follow all warnings and
instructions marked on the
AM6000.
3.Do not use this product
near a bathtub, wash basin,
kitchen sink or laundry tub, in
a wet basement, near a
swimming pool or anywhere
else there is water.
4.Avoid using a telephone
(other than a cordless type)
during a storm. There may be
a remote risk of electrical
shock from lightning.
5.Do not use a telephone to
report a gas leak in the
vicinity of the leak.
6.Unplug this product from
the wall outlets before
cleaning. Do not use liquid
cleaners or aerosol cleaners
on the AM6000. Use a damp
cloth for cleaning.
7.Place this product on a
stable surface. Serious damage
and/or injury may result if the
AM6000 falls.
8.Do not cover the slots and
openings on this product.
This telephone should never
be placed near or over a
radiator or heat register. This
product should not be
placed in a built-in installation
unless proper ventilation is
provided.
9.Operate this product using
the electrical voltage as
stated on the base unit or the
owner’s manual. If you are
not sure of the voltage in your
home, consult your dealer or
local power company.
10. Do not place anything on
the power cord. Install the
telephone where no one will
step or trip on the cord.
11. Do not overload wall outlets
or extension cords as this
can increase the risk of fire or
electrical shock.
12. Never push any objects
through the slots in the
AM6000. They can touch
dangerous voltage points or
short out parts that could
result in a risk of fire or
electrical shock. Never spill
liquid of any kind on the
product.
13. To reduce the risk of electrical
shock, do not take this phone
Important Safety
Instructions
Page 5

2
Instrucciones de seguridad
importantespara el usuario
Important Safety
Instructions
apart. Opening or removing
covers may expose you to
dangerous voltages or other
risks. Incorrect reassembly
can cause electric shock when
the appliance is subsequently
used.
14. Unplug this product from the
wall outlets and refer
servicing to the manufacturer
under the following conditions:
A. When the power supply
cord or plug is frayed or
damaged.
B. If liquid has been spilled
into the product.
C. If the product has been
exposed to rain or water.
D. If the product does not
operate normally by
following the operating
instructions. Adjust only
those controls that are
covered by the operating
instructions. Improper
adjustment may require
extensive work by a
qualified technician to
restore the product to
normal operation.
E. If the product has been
dropped or the case has
been damaged.
F. If the product exhibits a
distinct change in performance.
15. Never install product
wiring during a lightning
storm.
16. Never install telephone
jacks in wet locations
unless the jack is specifically
designed for wet locations.
17. Never touch uninsulated
telephone wires or terminals
unless the telephone line
has been disconnected at
the network interface.
18. Use caution when installing
or modifying telephone lines.
19. Use only the power cord
and batteries indicated in
this manual. Do not dispose
of batteries in a fire. They
may explode. Check with
local codes for possible
special disposal instructions.
ADDITIONAL SAFETY NOTES
FOR CANADIAN USERS
The following items are included
as part of the CS-03 Requirements.
The standard connecting
arrangement for the equipment is
CA11A. This product meets the
applicable Industry Canada
technical specifications.
NOTICE: The Canadian
Department of Communications
Page 6

Instrucciones de seguridad
importantespara el usuario
E
N
G
L
I
S
H
3
Important Safety
Instructions
Users should ensure for their own
protection that the electrical
ground connections of the power
utility, telephone lines and inter nal
metallic water pipe system, if
present, are connected together.
This precaution may be particularly
important in rural areas.
CAUTION: Users should not
attempt to make such connections
themselves, but should contact the
appropriate electric inspection
authority, or electrician, as
appropriate. The Ringer Equivalent
Number is an indication of the
maximum number of terminals
allowed to be connected to a
telephone interface. The
termination on an interface may
consist of any combination of
devices subject only to the
requirement that the sum of the
Ringer Equivalent Number of all
the devices not exceed five.
SAVE THESE INSTRUCTIONS
label identifies certified equipment.
This certification means that the
equipment meets certain
telecommunications network
protective operational and safety
requirements. The Department
does not guarantee that the
equipment will operate to the
user’s satisfaction. Before installing
this equipment, users should
ensure that it is permissible to be
connected to the facilities of the
local telecommunications company.
The equipment must also be
installed using an acceptable
method of connection. In some
cases, the company’s inside
wiring associated with a single
line individual service may be
extended by means of a certified
connector assembly (telephone
extension cord). The customer
should be aware that compliance
with the above conditions may not
prevent degradation of service in
some situations. Repairs to certified
equipment should be made by an
authorized Canadian maintenance
facility designated by the supplier.
Any repairs or alterations made
by the user to this equipment, or
equipment malfunctions, may give
the telecommunications company
cause to request the user disconnect
the equipment.
Page 7

4
Instrucciones de seguridad
importantespara el usuario
INTRODUCTION
Thank you for selecting the
exciting new ALERTMASTER
AM-6000 from AMERIPHONE.
It has been designed to meet the
highest quality standards to
provide you with years of
convenient and trouble-free
service.
Please read these operating
instructions thoroughly before using
your notification system. Keep this
manual for future
reference.
You must save your sales receipt as
proof of purchase in the event that
you need warranty service.
If you have any questions about
your Alertmaster AM-6000, please
call your authorized dealer or our
Customer Service Depar tment at:
800-874-3005
E-mail:
ameriphonecs@plantronics.com
Website: www.ameriphone.com
Page 8
Instrucciones de seguridad
importantespara el usuario
5
E
N
G
L
I
S
H
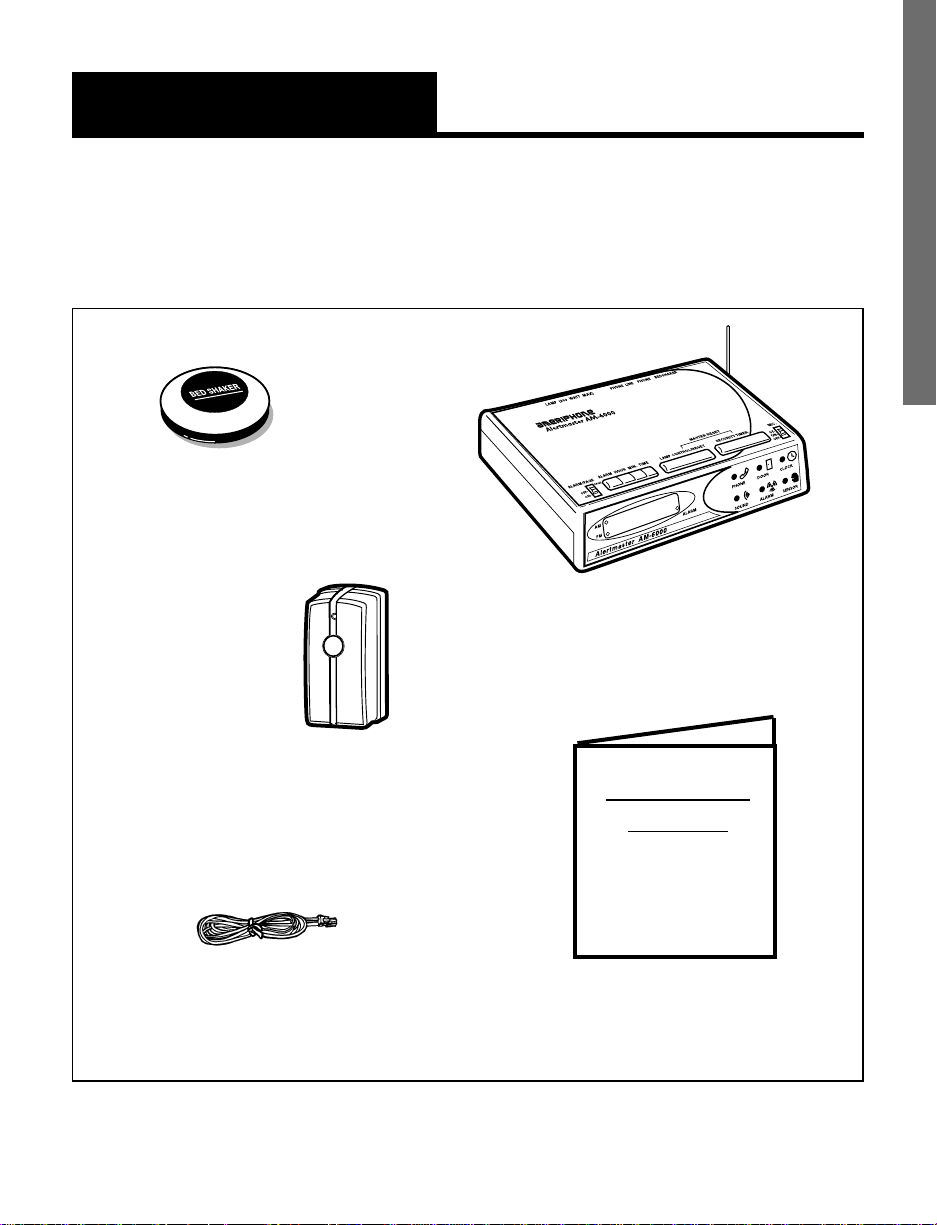
PACKAGE CHECKLIST
Please make sure your Alertmaster AM-6000 package
includes the items as shown below:
Fig. 1- ALERTMASTER AM-6000
base unit, bed shaker, modular phone cord, doorbell, operating instructions.
Modular Phone Cord
ALERTMASTER
AM-6000
OPERATING
INSTRUCTIONS
Doorbell
Bed Shaker
Operating Instructions
Alertmaster AM-6000
Base Unit
Page 9

6
Instrucciones de seguridad
importantespara el usuario
FEATURES IDENTIFICATION
Fig. 2- Features identification for the ALERTMASTER AM-6000
Digital alarm clock
Alarm/Page Selector
Clock Control
Bed shaker jack
Two phone jacks
for easy connection
Lamp Control/Reset
Battery back-up
ensures operation
during power
outage (batteries
not included)
Bed shaker
awakens you with
powerful shaking
motion
Jack/Outlet for
connecting a lamp
as visual signaler.
Distinct flashing
pattern for each
action
Security Timer
Antenna
Mic switch
Monitoring functions:
(accessory may be
required)
• Telephone ringing
• Doorbell sounding
• Alarm clock/timer
• Activation of other
in-home audio
alarm devices
• Sound monitoring
such as baby
crying
Microphone
Wireless doorbell
transmitter. One
touch activates the
Alertmaster up to
80 feet away
Page 10
Instrucciones de seguridad
importantespara el usuario
7
E
N
G
L
I
S
H
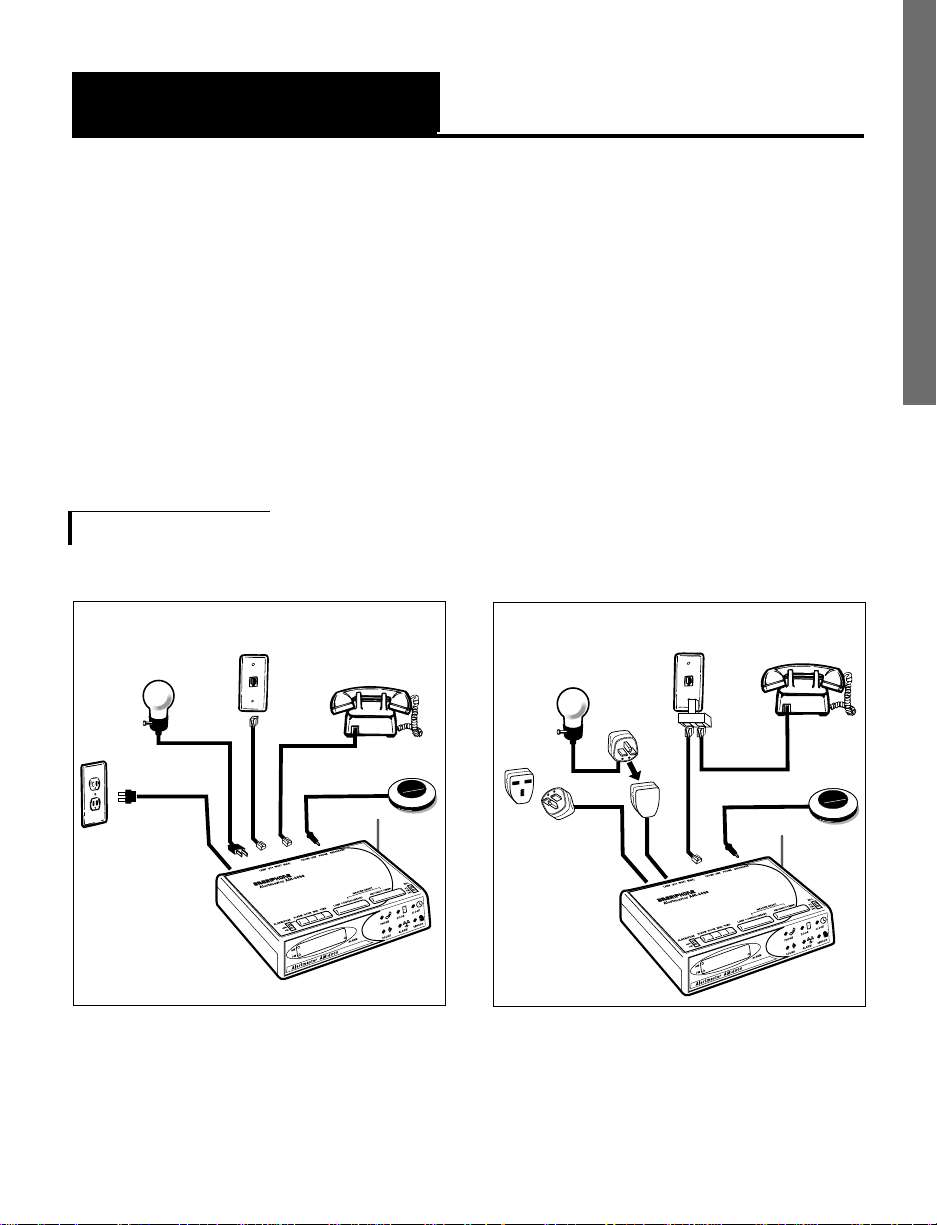
An ideal location for setting up the
base unit is in the bedroom. Do
not put any of the Alertmaster
components on or next to metal
surfaces, computers, television,
microwaves, or other areas with
electronic equipment that can
cause interference to the wireless
system.
A. Base Unit
U.S. and Canada models
INSTALLATION AND SET-UP
U.K. model
BED SHAKER
Phone
outlet
Phone
or TTY
Turn lamp on
before plugging
into the unit
Turn lamp on
before plugging
into the unit
BED SHAKER
Phone
outlet
Put Bedshaker
under pillow
Put Bedshaker
under pillow
T-adapter
(not included)
Wall outlet
Base Unit
Wall outlet
Page 11
8
B. Doorbell
C. Clock
1.Press the Time and the Hour (or
Minute) buttons simultaneously
to change time setting.
2.Press the
Alarm button to check
the alarm setting.
3.Press
Alarm and Hour (or
Minute) buttons to change
alarm clock setting.
4.Use
Alarm/Page selector
switch to turn alarm on or off.
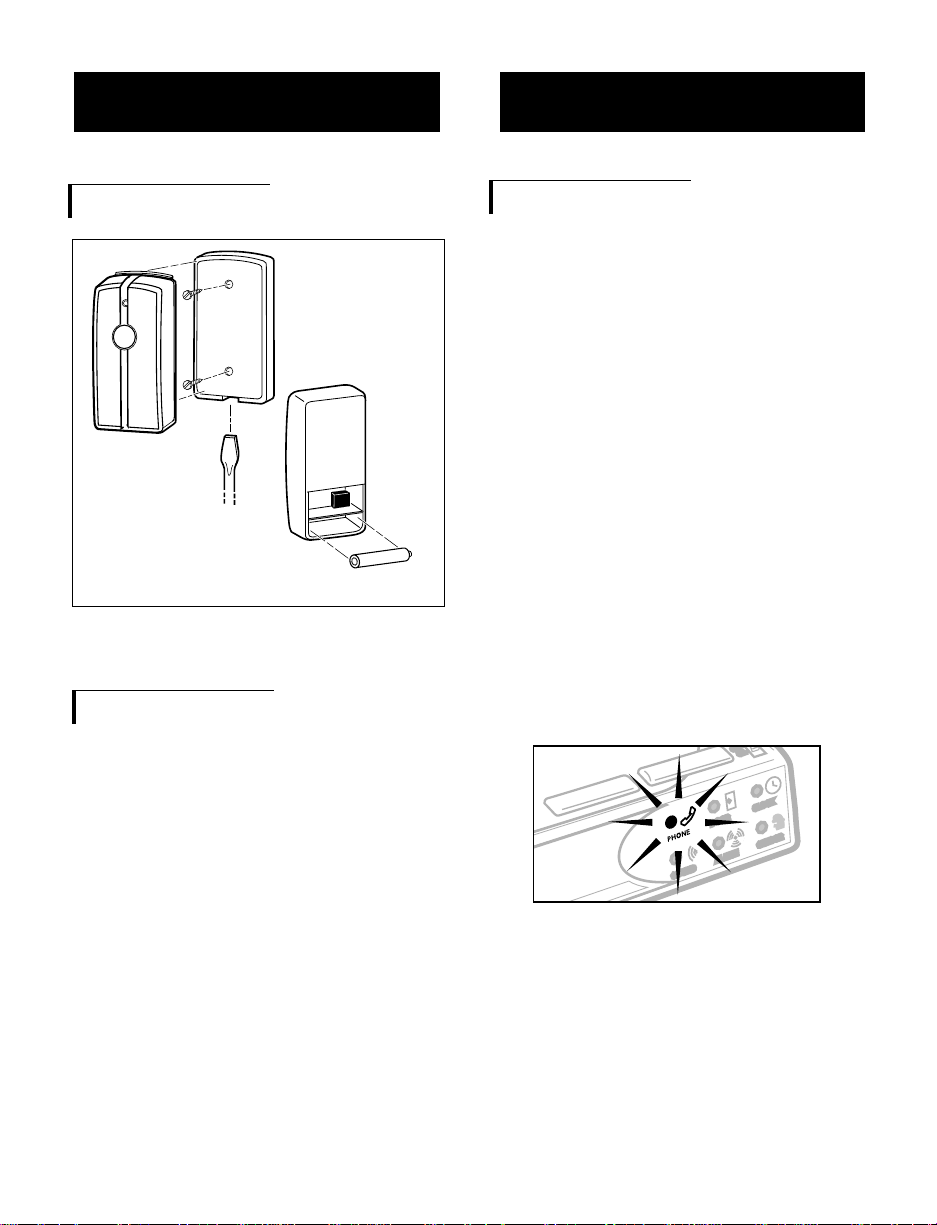
INSTALLATION AND SET-UP
Fig. 4 - Doorbell and battery
installation
–
+
Push latch
inward with
a small
screwdriver
to release
Door Bell
Mounting
back plate
12V alkaline battery
OPERATIONS
A. Monitoring Functions
The console has six indicator lights
for each of the alerting functions of
the Alertmaster AM-6000. Some
functions require an optional
accessory to be purchased.
Anytime the Alertmaster
Notification System is activated by
any function(s) the lamp and bed
shaker will activate, then stop and
reset after 24 seconds, or use the
reset button on the console to stop
and reset it. The lamp flashes in
different patterns for each function.
1. Phone
The phone indicator light illuminates
when the phone is ringing. The
lamp will turn on for two seconds,
off for four seconds, and repeat.
Answering the phone resets the
Phone indicator and any other
Alertmaster systems in your home.
Page 12
Instrucciones de seguridad
importantespara el usuario
9
E
N
G
L
I
S
H
2. Door
The door indicator light illuminates
when the doorbell button is
pressed. The lamp will turn on for
two seconds, off for two seconds,
and repeat. This function is also
activated when a signal is
received from the optional Door
Announcer (Model AM-DX).
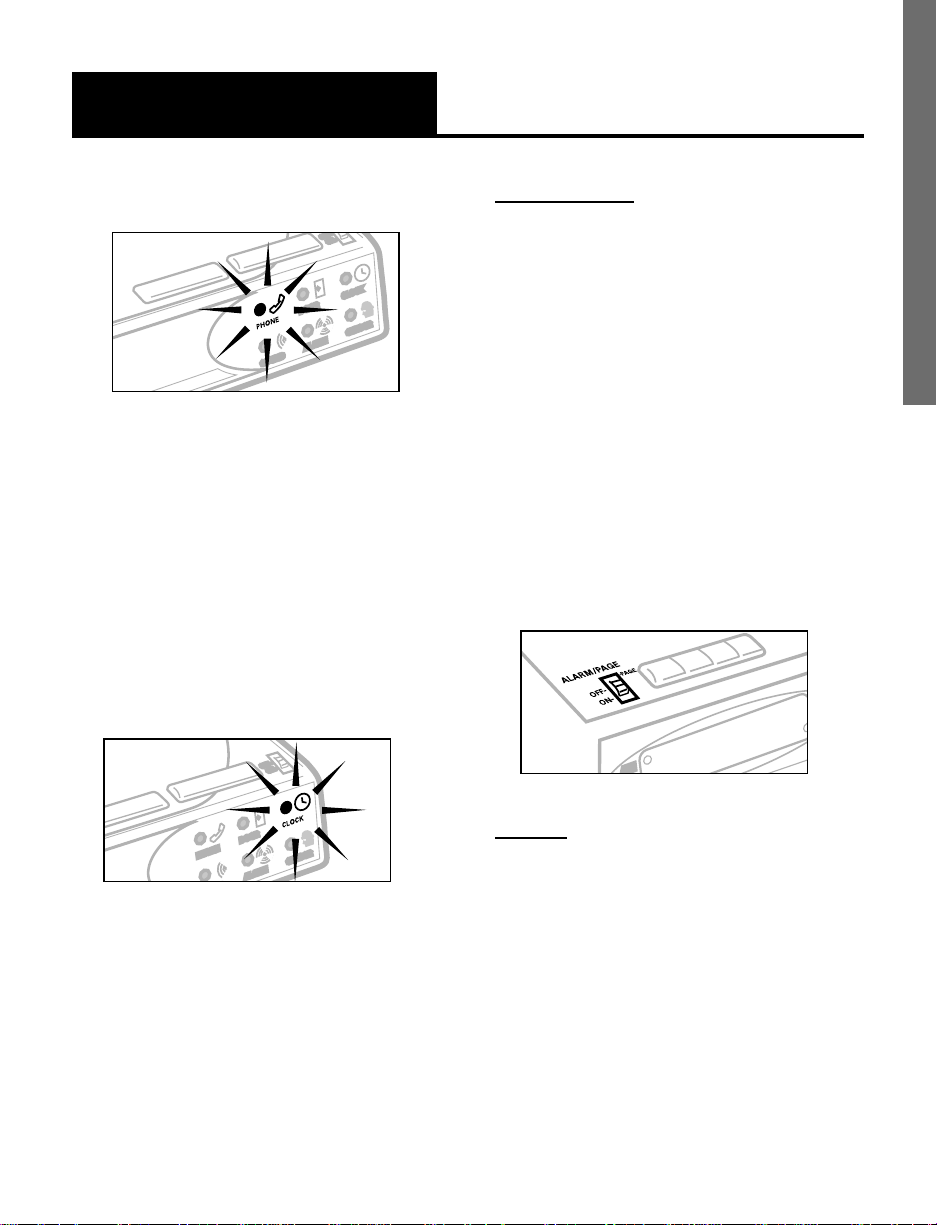
3. Clock/Paging
The clock indicator light illuminates
when the alarm clock is activated.
The bed shaker will vibrate and
the lamp will turn on for one
second, off for two seconds, and
repeat.
Alarm/Snooze
When the alarm clock activates,
the bedshaker will vibrate and the
lamp will flash for 24 seconds, or
until the
LAMP CONTROL / RESET
button is pushed. When the LAMP
CONTROL / RESET
button is
pushed, the bedshaker and lamp
will immediately turn off, and then
reactivate approximately 5 minutes
later, repeating the on/off pattern
16 times, or until the
ALARM/
PAGE
selector is moved to the OFF
position.
Paging
When the ALARM / PAGE switch is
momentarily moved to the
PAGE
position, it activates the base unit
and any remote receivers or
personal signalers that are within
an 80-foot range. They activate for
one 24-second cycle. To repeat the
page, move the
ALARM / PAGE
switch to PAGE again momentarily.
OPERATIONS
Page 13
10
Instrucciones de seguridad
importantespara el usuario
OPERATIONS
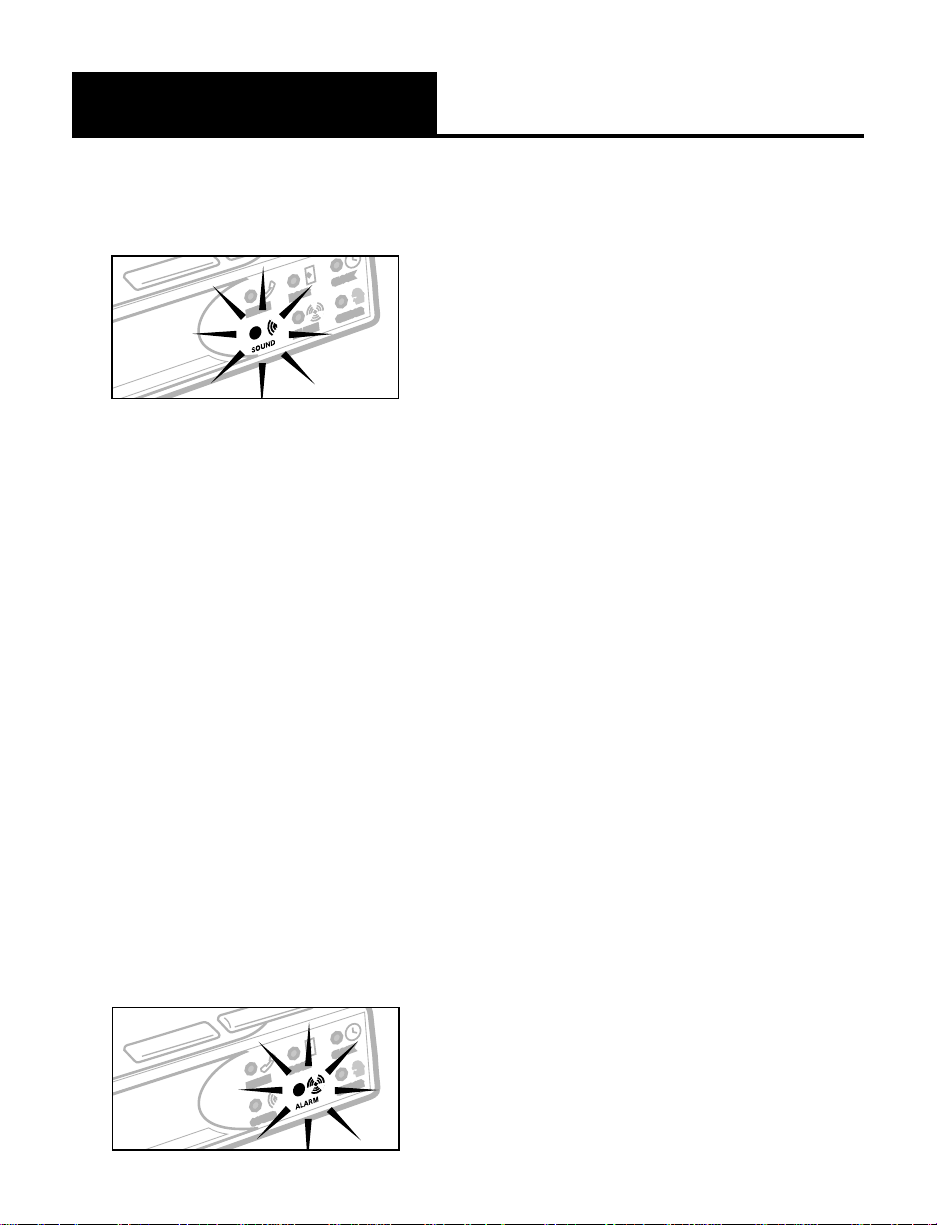
4. Sound
Slide the MIC switch to the ON
position. The sound indicator light
illuminates when continuous sound
is detected for 12 seconds or
longer in the room by the built-in
microphone. After another 10
second delay, the lamp will flash
on for one second, off for one
second, and repeat. This function is
also activated when a signal is
received from the optional Baby
Sound Monitor (AM-BX).
Note: The built-in microphone
remains
ON when the MIC switch
is moved to the
ST (Security Timer)
position. See page 7 for details.
5. Alarm
You must purchase the optional
Audio Alarm Transmitter (Model
AM-AX) from Ameriphone to use
this function. When a signal is
received from the Audio Alarm
Transmitter, the indicator light
illuminates, and the lamp will
turn on for one second, off for one
second, and repeat.
Page 14

11
E
N
G
L
I
S
H
OPERATIONS
B. Master Reset
If you have several Alertmaster
system components (such as the
AM-6000, the AM-100, the
AM-RX2 and accessories), you can
save time by using the AM-6000
to reset all of them at once. To do
this, press the
LAMP CONTROL /
RESET
button and the SECURITY
TIMER
button at the same time.
C. Notification Priority
If the Alertmaster system receives
two notification signals at the same
time, it will display the highest
priority signal. For example, if it
receives a Motion Sensor signal
right after it receives a Phone
signal, the indicator will change
from PHONE to SENSOR. The
priority for each notification signal
is shown as follows:
1. Master Reset
2. Audio Alarm
3. Baby Sound
4. Room Sound
5. Phone
6. Door
7. Paging
8. Alarm Clock
9. Random (Security) Timer
D. Security Timer
With this feature, the lamp
connected to your Alertmaster
system will go on automatically
every evening and turn off later in
the evening. You can use this to
make it look like someone is home.
The light will turn on and off at
slightly different times each
evening so it is not so obvious that
a timer is being used.
To activate this feature:
1.Set the MIC switch to ST. The
lamp will automatically go on
every evening at about 5 PM
and turn off at about 11 PM. To
confirm this setting, the clock
will blink twice every 5 seconds.
a.If you want the light to turn
on at about 6 PM, press
SECURITY TIMER once for 2
seconds or more. To confirm
this setting, the clock will blink
3 times every 5 seconds.
Page 15

12
Instrucciones de seguridad
importantespara el usuario
OPERATIONS
b.If you want the light to turn
on at about 7 PM, press
SECURITY TIMER twice for 2
seconds or more. To confirm
this setting, the clock will
blink 4 times every 5 seconds.
c.To return to 5 PM activation,
press the
SECURITY TIMER
button once for 2 seconds or
more. To confirm this setting,
the clock will blink once
every 5 seconds.
d.If you are home and want to
turn off the
SECURITY TIMER
for the evening, press LAMP
CONTROL / RESET
for more
than 2 seconds. The timer
will resume normal
operation the next evening.
Note: The microphone remains ON
when the MIC switch is in the ST
position.
2. To turn off the
SECURITY
TIMER
, set the MIC switch to
ON or OFF
E. Battery
The Alertmaster AM-6000
operates on ten “AA” size
rechargeable nickel cadmium
batteries (not included) during a
power outage.
DO NOT USE
REGULAR BATTERIES!
Power is
provided for the console and the
pillow shaker, but not for the
connected lamp. The clock
display is blank when operating
on back-up batteries, but
correct time will be
maintained.
Do not burn or puncture the
batteries. Like other batteries of
this type, if they are burned or
punctured, they could release toxic
material which could cause injury.
Do not dispose of batteries in
household garbage. For
information about recycling or
proper disposal, consult your local
solid waste (garbage) collection or
disposal organization.
The doorbell transmitter operates
on one “23A” size cigarette lighter
Ni-Cd
Page 16

13
E
N
G
L
I
S
H
battery (included). It normally lasts
6-12 months and can be tested by
watching the red power indicator
illuminate when the doorbell button
is pressed. If the power indicator is
faint or off, replace the battery.
OPERATIONS
Page 17
14
Instrucciones de seguridad
importantespara el usuario
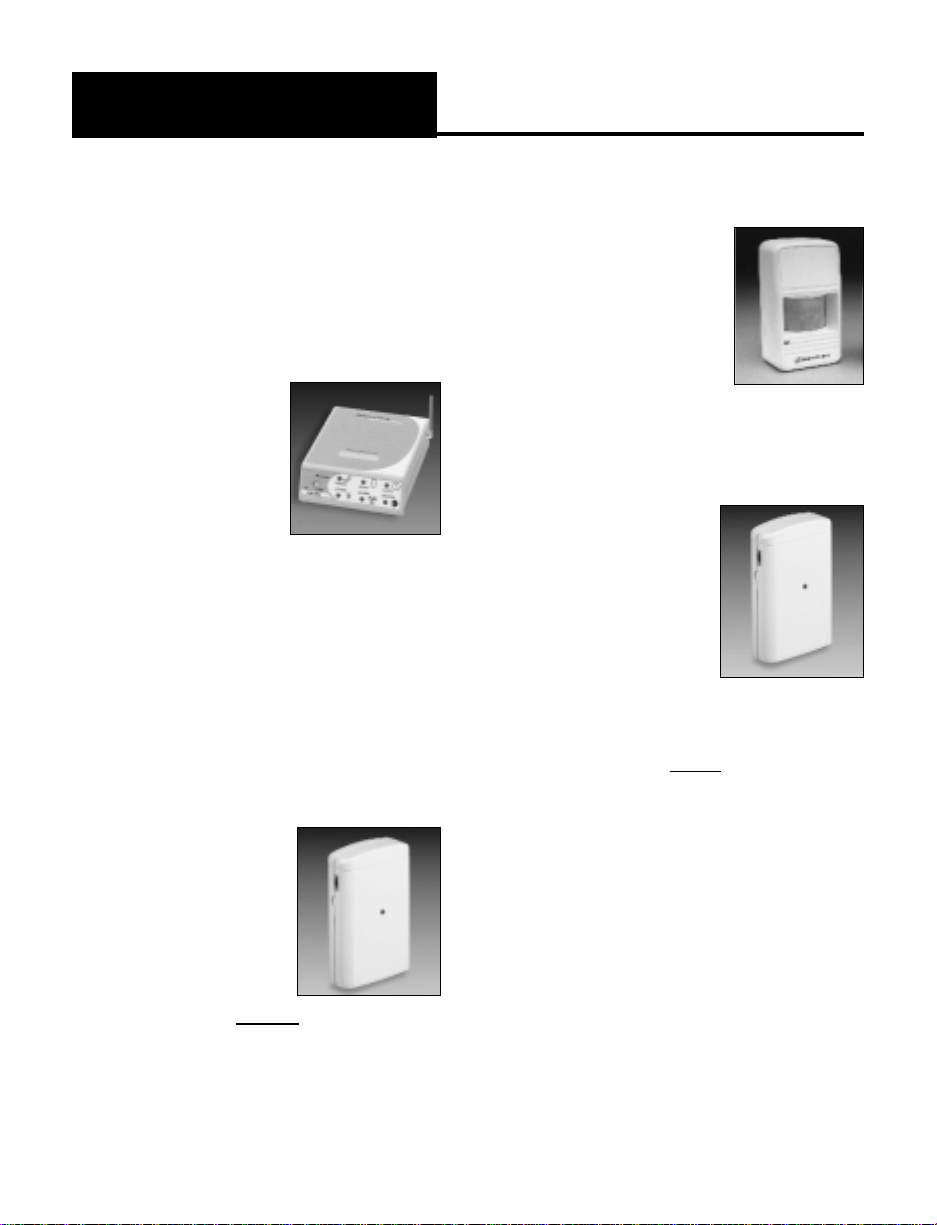
OPTIONAL ACCESSORIES
The Alertmaster AM-6000 is
designed to work with optional
wireless remote receivers and
transmitters, each sold separately.
A.Remote Receiver (AM-RX2)
Plug the receiver
into an AC outlet,
and plug in a
lamp and you’ll
be notified
wherever the
receiver is placed - kitchen,
living room, garage,bathroom,
etc. It operates up to 80 feet
from the Alertmaster AM-6000
base console.
D. Audio Alarm Transmitter
(AM-AX)
Place this next to
any audio alarm
for notification
when the alarm is
activated. It
activates the Alar
m
function of the Alertmaster
system and has a range of
up to 80 feet.
E. Baby Sound Monitor (AM-BX)
Place this monitor
near your infant,
and it will
transmit a signal
to the Alertmaster
system when your
baby cries.
F. Door Announcer (AM-DX)
Place the Door
Announcer next
to your existing
door-bell,
doorchime,
or intercom
announcer.
It will transmit a signal
activating the Door
function of
the Alertmaster system from up
to 80 feet away. Ideal for
apartments, condos or suites
with a common security door or
gate.
Page 18
Instrucciones de seguridad
importantespara el usuario
15
E
N
G
L
I
S
H
OPTIONAL ACCESSORIES
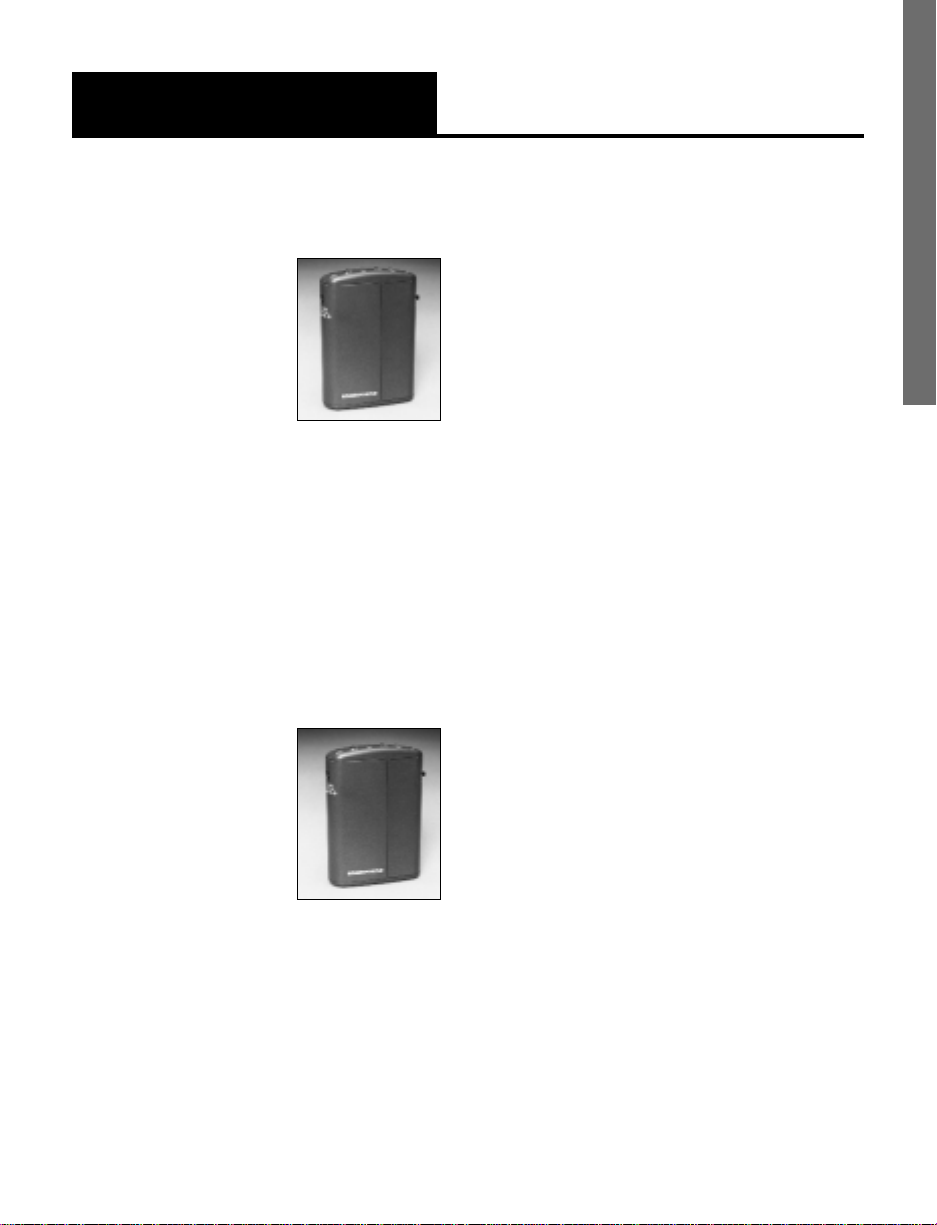
B. Personal Signaler (AM-PX)
Wear this light
weight receiver
on your belt
anywhere
around your
house and
you’ll be alerted
to any activity in your home. It
has an 80-foot range and a
miniature console of indicator
lights, and also alerts with different vibrating motions for each
function.
C. Personal Tactile Signaler
(AM-PXB)
Similar to AM-PX
plus a touch
switch for people
who are deaf
and blind.
Page 19

16
Instrucciones de seguridad
importantespara el usuario
IN CASE OF DIFFICULTY
CAUSE AND REMEDY
Lamp is not turned on prior to plugging it
into Alertmaster. Turn the lamp’s switch on.
Replace bulb if necessary.
Check all phone line connections. Make
sure you can turn the lamp on or off with
the lamp control button.
Alarm clock is not turned on. Slide the
switch to the
ON position.
Bed shaker is unplugged. Plug it in. Coil
the wire once around the plastic loop to
prevent accidental unplugging.
Switch is
OFF. Slide it to the ON position.
Sound must be continuous for twelve seconds for room noise to activate.
There is constant noise in the room, and
the sound function is on. Slide the switch to
OFF.
Dead battery. Depress doorbell button,
red light on housing should light up. If not,
battery needs to be replaced. If the battery
is fully charged, the dipswitches may be
incorrectly set. See section on
Channel
Setting
on page 13.
SYMPTOM
Lamp control button doesn't work
Phone rings, lamp doesn't flash
Alarm clock doesn't work
Bed shaker doesn't vibrate
Room noise doesn't activate
Lamp flashes constantly
Doorbell doesn't work
If any problem should occur during operation of your Alertmaster Notification
System, review the "Symptom and Remedy" list below. Make sure no part of the
Alertmaster system is on or near metal surfaces or electronic equipment. Should the
difficulty persist, contact AMERIPHONE or your authorized dealer for assistance.
Page 20
Instrucciones de seguridad
importantespara el usuario
17
E
N
G
L
I
S
H
IN CASE OF DIFFICULTY
of the doorbell.
3. Change the switch position of
each switch on both units using
a ball point pen. All settings
need to be identical for the
system to work. See Figure 5.
4. Change the switch settings on
each of your other accessories
(Remote Receiver, Audio Alarm
Transmitter, Baby Sound
Monitor, etc.) to match the new
channel setting.
5.
Replace all covers and return
accessories to their proper
places.
Press LAMP CONTROL /
RESET button once to reset the unit.
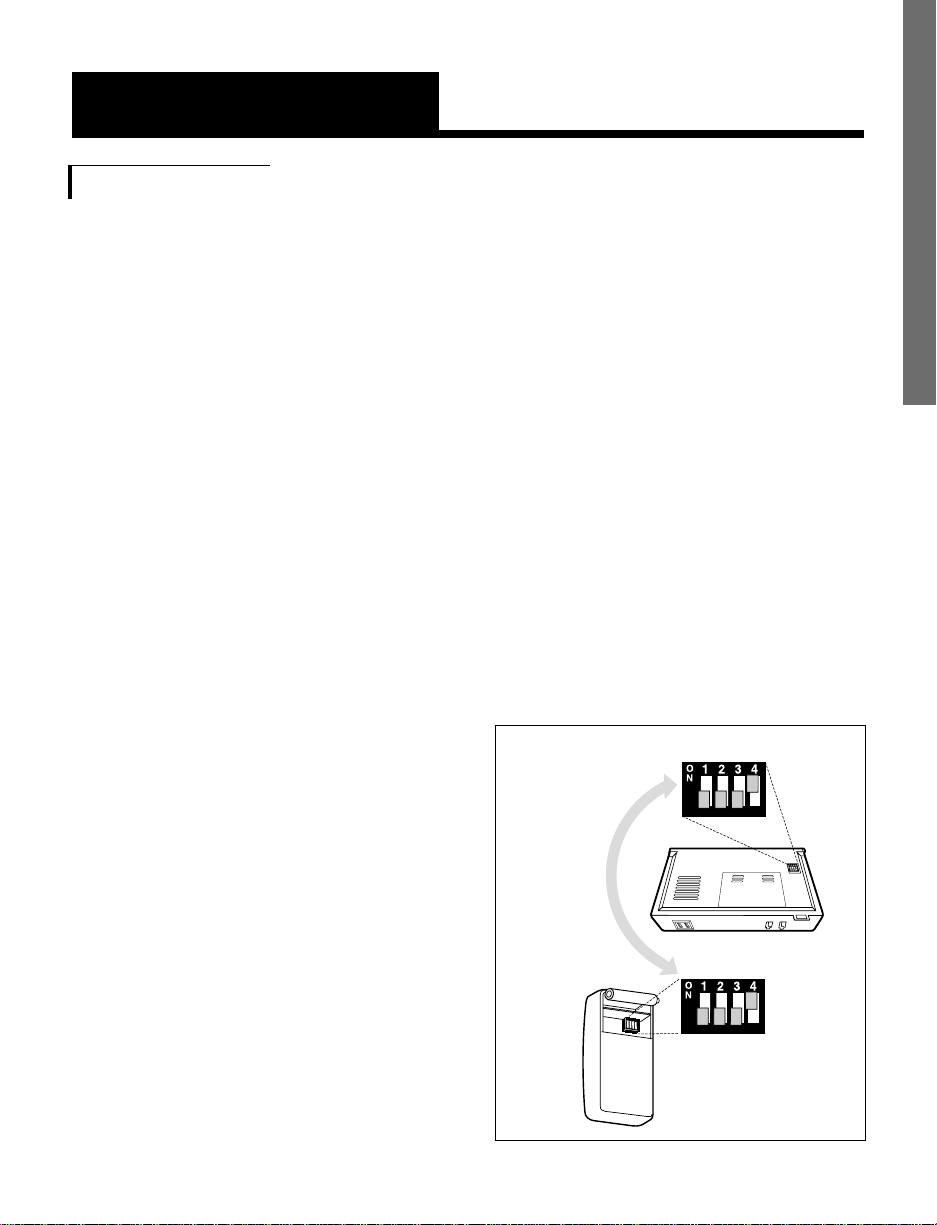
Channel Setting
The Alertmaster System uses special
radio signals to communicate between
the console unit and all its accessories.
For the accessories (Door Announcer,
Baby Sound Monitor, Audio Alarm
Transmitter and Motion Sensor) to
activate the base unit, they all have to
be on the same "channel." A "DIP
Switch" is used for channel selection.
Your system and all the accessories
have been preset in the factory to a
standard channel setting. Under
normal operating conditions, there is
no adjustment necessary.
If your system encounters interference
and repeatedly activates itself for no
obvious reason, it may be
triggered by a system nearby in your
neighborhood.
If the interference from another
Alertmaster Notification System or
other wireless source is present,
change channel switch settings on all
components.
1. Unplug AC power and locate
DIP Switch (a 4-position switch)
on the underside of the Alertmaster
AM-6000.
2. Open the battery compartment
Figure 5 - Channel setting
Use a pen or
pencil to set
DIP Switches
to match
exactly
Alertmaster base unit
Doorbell Transmitter
Page 21

18
Instrucciones de seguridad
importantespara el usuario
Regulator y Compliance
Part 68 of FCC Rules
Information
This AM-6000 Notification System
complies with Part 68 of the FCC
rules and the requirements
adopted by the ACTA. On the
bottom of this equipment is a label
that contains, among other
information, a product identifier in
the format US:AAAEQ##TXXXX. If
requested, this number must be
provided to the telephone
company.
A plug and jack used to connect
this equipment to the premises
wiring and telephone network
must comply with the applicable
FCC Part 68 rules and
requirements adopted by the
ACTA. A compliant telephone
cord and modular plug, RJ11
USOC, is provided with this
product. It is designed to be
connected to a compatible modular
jack that is also compliant. See
installation instructions for details.
The REN is used to determine the
number of devices that may be
connected to a telephone line.
Excessive RENs on a telephone
line may result in the devices not
ringing in response to an
incoming call. In most but not all
areas, the sum of RENs should not
exceed five (5.0). To be certain of
the number of devices that may be
connected to a line, as determined
by the total RENs, contact the
local telephone company. For
products approved after July 23,
2001, the REN for this product is
part of the product identifier that
has the format
US:AAAEQ##TXXXX. The digits
represented by ## are the REN
without a decimal point (e.g., 03
is a REN of 0.3). For earlier
products, the REN is separately
shown on the label.
If this telephone equipment causes
harm to the telephone network,
the telephone company will notify
you in advance that temporary
discontinuance of service may be
required. But if advance notice
isn’t practical, the telephone
company will notify the customer
as soon as possible. Also, you will
Page 22

Instrucciones de seguridad
importantespara el usuario
19
E
N
G
L
I
S
H
be advised of your right to file a
complaint with the FCC if you
believe it is necessary.
The telephone company may
make changes in its facilities,
equipment, operations or
procedures that could affect the
operation of the equipment. If this
happens the telephone company
will provide advance notice in
order for you to make necessary
modifications to maintain
uninterrupted service.
If trouble is experienced with this
telephone equipment, for repair or
warranty information, please
contact Walker / Ameriphone,
1-800-874-3005. If the equipment
is causing harm to the telephone
network, the telephone company
may request that you disconnect
the equipment until the problem is
resolved.
This telephone equipment is not
intended to be repaired and it
contains no repairable parts.
Opening the equipment or any
attempt to perform repairs will
void the warranty. For service or
repairs, call 1-800-874-3005.
Connection to party line ser vice is
subject to state tariffs. Contact the
state public utility commission,
public service commission or
corporation commission for
information.
If your home has specially wired
alarm equipment connected to the
telephone line, ensure the
installation of this telephone
equipment does not disable your
alarm equipment. If you have
questions about what will disable
alarm equipment, consult your
telephone company or a qualified
installer.
This telephone equipment is
hearing aid compatible.
Regulator y Compliance
Page 23

20
Instrucciones de seguridad
importantespara el usuario
Regulator y Compliance
Customer-Owned Coin/Credit
Card Phones:
To comply with state tariffs, the
telephone company must be given
notification prior to connection. In
some states, the state public utility
commission, public service
commission or corporation
commission must give prior
approval of connection.
Part 15 of FCC Rules
Information
This device complies with part 15
of the FCC Rules. Operation is
subject to the following two
conditions: (1) This device may
not cause harmful interference,
and (2) this device must accept
any interference received,
including interference that may
cause undesired operation.
Your
AM-6000 Notification System
has been tested and found to
comply with the limits of a Class B
digital device, pursuant to Part 15
of FCC rules. These limits are
designed to provide reasonable
protection against harmful
interference in residential
installation.
This equipment generates, uses,
and can radiate radio frequency
energy and, if not installed and
used in accordance with the
instructions, may cause harmful
interference to radio
communications. However, there is
no guarantee that interference will
not occur in a particular
installation; if this equipment does
cause harmful interference to
radio or television reception,
which can be determined by
turning the equipment off and on,
you are encouraged to try to
correct the interference by one of
the following measures:
1. Where it can be done safely,
reorient the receiving television
or radio antenna.
2. To the extent possible, relocate
the television, radio or other
receiver with respect to the
telephone equipment. (This
increases the separation
Page 24

Instrucciones de seguridad
importantespara el usuario
21
E
N
G
L
I
S
H
Regulator y Compliance
between the telephone
equipment and the receiver.)
3. Connect the telephone
equipment into an outlet on a
circuit difference from that to
which the television, radio, or
other receiver is connected.
4. Consult the dealer or an
experienced radio/TV
technician for help.
CAUTION: Changes or
modifications not expressly
approved by the manufacturer
responsible for compliance could
void the user’s authority to operate
the equipment.
Industry Canada Technical
Specifications
This product meets the applicable
Industr y Canada technical
specifications.
Before installing this equipment,
users should ensure that it is
permissible to be connected to the
facilities of the local
telecommunications company. The
equipment must also be installed
using an acceptable method of
connection. In some cases, the
company’s inside wiring
associated with a single line
individual service may be
extended by means of a certified
connector assembly (telephone
extension cord). The customer
should be aware that compliance
with the above conditions may not
prevent degradation of service in
some situations.
Repairs to certified equipment
should be made by an authorized
Canadian maintenance facility
designated by the supplier. Any
Page 25

22
Instrucciones de seguridad
importantespara el usuario
Regulator y Compliance
repairs or alterations made by the
user to this equipment, or
equipment malfunctions, may give
the telecommunications company
cause to request the user to
disconnect the equipment.
Users should ensure for their own
protection that the electrical
ground connections of the power
utility, telephone lines and inter nal
metallic water pipe system, if
present, are connected together.
This precaution may be
particularly important in rural
areas.
CAUTION: Users should not
attempt to make such connections
themselves, but should contact the
appropriate electric inspection
authority, or electrician, as
appropriate.
The Ringer Equivalence Number is
an indication of the maximum
number of terminals allowed to be
connected to a telephone
interface. The termination on an
interface may consist of any
combination of devices subject
only to the requirement that the
sum of the Ringer Equivalence
Numbers of all the devices does
not exceed five.
[The term “IC:” before the
certification/registration number
only signifies that the Industry
Canada technical specifications
were met.]
Page 26
23
E
N
G
L
I
S
H
Page 27

24
Instrucciones de seguridad
importantespara el usuario
UK STATUTORY INFORMATION
The modem that forms the subject of
this guide is approved for use with
telecommunications systems run by
British Telecommunications, Mercur y
or Kingston Communications in
accordance with the conditions in the
instruction for use. The following
section provides the statutory
information that relates to this
approval.
Model No.: The unit referred to in this
guide as the apparatus is the
Ameriphone Alertmaster 2000 /
6000.
Type of circuits: The apparatus is
approved for connection to
telecommunications systems specified
in the instructions for use subject to
the conditions set out in them. It is not
approved for use on a shared
service, 1+1 carrier system, or as an
extension to a pay telephone.
Mark of origin: The apparatus is
manufactured in China by
Ameriphone. Functions: Call Indicator
for the Deaf.
REN: The apparatus has a REN of 1.
Explanation of REN: Equipment for
attachment to the Public Telephone
To determine the maximum number of
items of apparatus that should be connected simultaneously to an
exclusive line, the total REN obtained
by summing the REN values of each
of the items of apparatus connected
to the exclusive line should not
exceed the maximum REN value of 4.
This value includes any BT
provided instrument each of which is
assumed to have a REN value of 1.0
unless otherwise marked.
The apparatus has a REN of 1 and
care must be taken not to use it with
other telephone equipment that would
result in a maximum figure of 4 REN
being exceeded.
Because of the wide spread of
ringing detector characteristics, a
guarantee of successful operation in
an installation of mixed types of
network is assessed to determine its
“ringer equivalence” number (REN).
The REN relates to the performance of
the apparatus when used in
combination with other items of
apparatus. The REN is a customer
guide indicating approximately the
maximum number of items of
apparatus that should be connected
simultaneously to the line.
Page 28

25
E
N
G
L
I
S
H
with or connected to:
1.Internal software that has not been
formally accepted by BABT.
2.External control software or
external control apparatus which
causes the operation of the
apparatus or associated call set-up
equipment to contravene the
requirements of the standard set
out in BS6305.
All apparatus connected to this
apparatus and thereby connected
directly or indirectly to the British
Telecom public switched telephone
network must be approved apparatus
as defined in section 22 of the British
Telecommunications Act 1984.
Mains Lamp Connector
The 3-pin 240 Vac connector socket
is for connection to a domestic
240Vac mains lamp only. It may not
be used for any other purpose. The
maximum rating for this is 300W.
Definition of an RBS
An RBS, Relevant Branch exchange is
defined in BS6789:6.1 1986, section
2.4. There is also a proposed British
standard guide for an RBS for PSTN
lines.
ringing detectors may not be given
by the supplier. This apparatus has
been approved for use with the
following facilities:
*Ring Indication - ‘Bed-shaker and
lamp’ Any other usage will invalidate
the approval of the apparatus if as a
result it then ceases to conform to the
standard against which the approval
was granted.
The connection of the apparatus to
an exchange line or PBX extension is
via a BT modular socket. If this is not
already available please use the form
at the end of this chapter to request
one from British Telecom If your PBX
was not installed by British Telecom
then contact your authorized
maintainer.
Approval number:
NS/3979/3/R/604668
This approval applies to the
Ameriphone Alertmaster
2000/6000.
CAUTION:
The approval of this apparatus for
connection to the British Telecom
public switchboard telephone
network is INVALIDATED if the
apparatus is subject to any
modification in any material way not
authorized by BABT or if it is used
UK STATUTORY INFORMATION
Page 29

26
Instrucciones de seguridad
importantespara el usuario
TEXT
ORDER FORM
FOR U.K. RESIDENTS
If you do not have the correct telephone socket fitted for connection of
your Ameriphone Alertmaster 2000/6000, please use the form below and
send it to your local area telephone sales office. The address for this office
can be found in your local area telephone directory.
To: BRITISH TELECOM PLC
Please supply and fit a new style telephone socket suitable for an
Ameriphone Alertmaster 2000/6000 apparatus, approval number:
NS/3979/3/R/604668
The apparatus is fitted with a lead terminated with a 431A type miniature
modular telephone plug.
Name: ______________________________________________________________________
Address: ____________________________________________________________________
City:_________________________________________________________________________
Country:____________________________________Post Code: _____________________
Telephone:( )________________________ FAX: _______________________________
Signed:______________________________
Date: _______________________________
Page 30

Instrucciones de seguridad
importantespara el usuario
27
E
N
G
L
I
S
H
WARRANTY
This warranty applies only to AMERIPHONE
products that are purchased and used in the
United States, Canada, or United Kingdom.
AMERIPHONE warrants the ALERTMASTER
AM-6000 against any defect in materials or
workmanship for the period of one year from
the date of purchase.
If your AMERIPHONE product is defective
and returned within 30 days of the date of
purchase, your authorized Ameriphone dealer
will replace it at no charge.
If returned after 30 days but within one year
from the date of purchase, we will repair or
replace it at no charge. In the repair of your
Alertmaster AM-6000, we may use new or
reconditioned replacement parts. If we elect
to replace your AM-6000, we may replace it
with a new or reconditioned product of the
same or similar design. Repair or replacement
will be warranted for either 90 days or the
remaining time on the original warranty
period, whichever is longer.
Implied warranties, including those of fitness
for a particular purpose and merchantability
(an unwritten warranty that the product is fit
for ordinary use), are limited to one year from
date of purchase. We will not pay for loss of
time, inconvenience, loss of use of your
Alertmaster AM-6000 Notification System, or
property damage caused by your Alertmaster
AM-6000 Notification System or its failure to
work, or any other incidental or consequential
damages. Some states do not allow
limitations on how long an implied warranty
lasts or the exclusion of incidental or
consequential damages, so the above
exclusions or limitations may not apply to
you.
To get warranty ser vice for your Aler tmaster
AM-6000 Notification System, you must
provide proof of the purchase date. Within
30 days of the date of purchase, return your
Alertmaster AM-6000 to the place where you
purchased it for immediate replacement.
After 30 days, call AMERIPHONE at 1-800874-3005 Voice or 1-800-772-2887
TTY/TDD for the authorized service center
nearest you. You must prepay all shipping
costs. We suggest you save the original
packaging materials in the event you need to
ship the Alertmaster AM-6000. When
shipping for warranty repair, include your
name, address, phone number, proof of date
of purchase, and a description of the
problem. After repairing the product, we will
ship it back to you at no cost within the
United States.
This warranty does not cover defects resulting
from accidents, damage while in transit to our
service location, alterations, unauthorized
repair, failure to follow instructions, misuse,
use outside the United States, Canada, or
United Kingdom, fire, flood, and acts of God.
Nor do we warrant the product to be compatible with any particular telephone equipment,
party line, key telephone systems or more
sophisticated switching systems. If your
Alertmaster AM-6000 is not covered by this
warranty, call us at 800-874-3005 Voice,
800-772-2889 TTY/ TDD for advice as to
whether we will repair your Alertmaster
AM-6000 and other repair information. The
repaired parts shall be warranted for 90
days.
Page 31

28
Instrucciones de seguridad
importantespara el usuario
TEXT
INDEX
Alarm ......................................... 9, 10
Base unit ..........................................7
Battery Back-up .................................12
Clock ...........................................8, 9
Doorbell .......................................... 8
Channel setting .............................. 17
UK Statutory Information ...................24
Installation and set up ........................7
Monitoring functions ..........................8
Operations........................................8
Optional accessories ........................14
Audio Alarm Transmitter..................14
Baby Sound Monitor ......................14
Door Announcer.............................15
Personal Signaler...........................14
Personal Tactile Signaler .................14
Remote Receiver.............................14
Regulatory Compliance.....................18
Package checklist...............................5
Paging..............................................9
Problems - In case of difficulty............16
Reset...............................................10
Warranty.........................................27
Page 32

Page 33

Page 34

E
S
P
A
Ñ
O
L
AM
Todo-En-Uno Sistema Sin hilos De la Notificación
ALERTMASTER™AM-6000
GUÍA DE LOS USUARIOS
®
Page 35

32
Instrucciones de seguridad
importantespara el usuario
Contenido
INSTRUCCIONES DE SEGURIDAD IMPORTANTESPARA EL USUARIO................................33
INTRODUCCIÓN . . . . . . . . . . . . . . . . . . . . . . . . . . . . . . . . . . . . . . . . . . . . . . . 36
LISTA DE COMPROBACIÓN DEL PAQUETE . . . . . . . . . . . . . . . . . . . . . . . . . . . . . . .37
LIDENTIFICACIÓN DE LAS CARACTERÍSTICAS . . . . . . . . . . . . . . . . . . . . . . . . . . . . .38
INSTALACIÓN E INSTALADO . . . . . . . . . . . . . . . . . . . . . . . . . . . . . . . . . . . . . . . .39
A.Unidad baja . . . . . . . . . . . . . . . . . . . . . . . . . . . . . . . . . . . . . . . . . . . .39
B.Timbre . . . . . . . . . . . . . . . . . . . . . . . . . . . . . . . . . . . . . . . . . . . . . . .40
C.Reloj . . . . . . . . . . . . . . . . . . . . . . . . . . . . . . . . . . . . . . . . . . . . . . . .40
OPERACIONES . . . . . . . . . . . . . . . . . . . . . . . . . . . . . . . . . . . . . . . . . . . . . . . . .41
A.Funciones de supervisión . . . . . . . . . . . . . . . . . . . . . . . . . . . . . . . . . . .41
B.Reajuste Principal . . . . . . . . . . . . . . . . . . . . . . . . . . . . . . . . . . . . . . . .44
C.Prioridad De la Notificación . . . . . . . . . . . . . . . . . . . . . . . . . . . . . . . . .44
D.Contador de tiempo De la Seguridad . . . . . . . . . . . . . . . . . . . . . . . . . . .45
E.Batería . . . . . . . . . . . . . . . . . . . . . . . . . . . . . . . . . . . . . . . . . . . . . . .45
ACCESORIOS OPCIONALES . . . . . . . . . . . . . . . . . . . . . . . . . . . . . . . . . . . . . . . . .47
A.Receptor Alejado . . . . . . . . . . . . . . . . . . . . . . . . . . . . . . . . . . . . . . . . .47
B.Signaler Personal . . . . . . . . . . . . . . . . . . . . . . . . . . . . . . . . . . . . . . . .47
C.Signaler Táctil Personal . . . . . . . . . . . . . . . . . . . . . . . . . . . . . . . . . . . . .47
D.Transmisor Audio Del Alarmar . . . . . . . . . . . . . . . . . . . . . . . . . . . . . . . .47
E. Monitor Sano Del Bebé . . . . . . . . . . . . . . . . . . . . . . . . . . . . . . . . . . . .47
F. Anunciador De la Puerta . . . . . . . . . . . . . . . . . . . . . . . . . . . . . . . . . . . .48
EN CASO DE QUE DE LA DIFICULTAD . . . . . . . . . . . . . . . . . . . . . . . . . . . . . . . . . . .49
A.Ajuste Del Canal . . . . . . . . . . . . . . . . . . . . . . . . . . . . . . . . . . . . . . . . .50
CONFORMIDAD REGULADORA . . . . . . . . . . . . . . . . . . . . . . . . . . . . . . . . . . . . . . .51
INFORMACIÓN ESTATUTARIA BRITÁNICA . . . . . . . . . . . . . . . . . . . . . . . . . . . . . . . .57
GARANTÍA . . . . . . . . . . . . . . . . . . . . . . . . . . . . . . . . . . . . . . . . . . . . . . . . . . . .61
ÍNDICE . . . . . . . . . . . . . . . . . . . . . . . . . . . . . . . . . . . . . . . . . . . . . . . . . . . . . .62
Page 36

Instrucciones de seguridad
importantespara el usuario
Al usar su equipo telefónico, siga
cuidadosamente las instrucciones básicas
de seguridad que se enumeran a
continuación a fin de evitar el peligro de
incendio, de descargas eléctricas, o de
daños a las personas:
1. Asegúrese de leer y comprender
todas las instrucciones.
2. Preste atención a las advertencias e
instrucciones que figuran en el
AM6000.
3. No use el producto cerca de la
bañera, el lavamanos, la pileta de la
cocina o del lavadero, en un sótano
húmedo, cerca de la piscina, ni en
ningún lugar donde haya agua.
4. Evite usar el teléfono (con excepción
de los de tipo inalámbrico) durante
una tormenta. Existe la remota
posibilidad de recibir una descarga
eléctrica a causa de un rayo.
5. No use un teléfono para informar de
una pérdida de gas en un lugar
próximo a la pérdida.
6. Desconecte su producto antes de
limpiarlo. No utilice limpiadores
líquidos o en aerosol; limpie el
aparato con un paño húmedo.
7. Ubique el producto en una superficie
estable. Las caídas pueden causar
serios daños al aparato.
8. No debe cubrir las ranuras de
ventilación y orificios de su producto.
Nunca coloque el teléfono cerca de
un radiador o boca de calefacción.
Si ubica el aparato en una
instalación empotrada, asegúrese de
que cuenta con la debida ventilación.
9. Este producto debe funcionar
utilizando el voltaje especificado en
la base del aparato o en el manual
del usuario. Si no está seguro del
voltaje con que cuen ta la red
eléctrica en su casa, consulte
con el vendedor o con la empresa de
servicios eléctricos.
10. No coloque ningún objeto sobre el
cable de alimentación. Al instalar el
teléfono asegúrese de que nadie
pisará el cable o tropezará con él.
11. No sobrecargue los tomacorrientes o
las conexiones de los prolongadores
para evitar riesgos de incendio o de
descarga eléctrica.
12. No introduzca objetos a través de las
ranuras del aparato. Ya que podrían
tocar puntos de alta tensión o
provocar un cortocircuito con riesgo
de incendio o de descarga eléctrica.
No derrame líquidos de ninguna
clase sobre el AM6000.
13. Para evitar el riesgo de una
descarga eléctrica, no intente
desarmar el aparato. Si abre o quita
las tapas puede exponerse a una
descarga de tensión peligrosa, o a
otro tipo de riesgos. Si se cometen
errores al rearmar el aparato,
E
S
P
A
Ñ
O
L
33
Instrucciones de seguridad
importantespara el usuario
Page 37

34
Instrucciones de seguridad
importantespara el usuario
el usuario puede recibir una
descarga eléctrica al volver a usar el
teléfono.
14. Desconecte el producto y solicite
servicio técnico si se presenta alguno
de los siguientes problemas:
A. El cable de alimentación o el
enchufe está quemado o dañado.
B. Se ha derramado algún líquido
sobre el aparato.
C. El producto quedó expuesto a la
lluvia o se mojó por alguna otra
causa.
D. El producto no funciona
normalmente al seguir las
instrucciones de uso. En tal caso,
ajuste únicamente los controles
que se incluyen en las
instrucciones de uso. Si se
realizan ajustes indebidos, el
técnico espe cializado necesitará
más tiempo para lograr que el
producto vuelva a operar
normalmente.
E. El producto se ha caído o el
gabinete ha sido dañado.
F. El producto presenta grandes
cambios en su rendimiento.
15. Nunca instale cableado telefónico
durante una tormenta eléctrica.
16. Nunca instale fichas de conexión en
un lugar húmedo a menos que la
ficha esté específicamente diseñada
para lugares húmedos.
17. No toque cables de producto o
terminales que no estén aislados sin
antes desconectar la línea telefónica
de la interfaz de red.
18. Debe ser muy cuidadoso cuando
instale o modifique líneas telefónicas.
19. Use únicamente los cables de
alimentación y las baterías
recomendadas en este manual. No
arroje las baterías al fuego porque
pueden explotar. Averigüe en su
zona cuáles son las normas vigentes
para desechar este tipo de producto.
RECOMENDACIONES DE SEGURIDAD
ADICIONALES PARA USUARIOS DE
CANADÁ
Se han incluido los siguientes puntos
como parte de los Requerimientos CS-03.
La conexión estándar para el equipo es
CA11A. Este producto cumple con las
especificaciones técnicas de aplicación
de Industria Canadá.
NOTA: La etiqueta del Depar tamento de
Comunicaciones de Canadá permite
reconocer que se trata de un equipo
certificado. Esta certificación asegura que
el equipo cumple con ciertos requisitos
de protección operativa y de seguridad
de la red de telecomunicaciones. El
Departamento no garantiza que el
equipo funcionará a entera satisfacción
Page 38

E
S
P
A
Ñ
O
L
35
Instrucciones de seguridad
importantespara el usuario
del usuario. Antes de instalar este equipo
el usuario debe asegurarse de que está
autorizado a conectarse a la red de la
compañía de telecomunicaciones de su
zona. Asimismo, se debe instalar el
equipo usando un método de conexión
aceptado. En algunos casos, la
instalación interna que hace la compañía
en el caso de un servicio individual de
línea única se puede extender mediante
la instalación de un conector certificado
(una extensión del cable telefónico).
El cliente debe saber que el cumplimiento
de los requisitos arriba mencionados no
impide el deterioro del servicio en ciertas
circunstancias.
Para reparar un equipo certificado se
debe recurrir a un servicio técnico
autorizado y recomendado en Canadá
por el proveedor.
Cualquier reparación o modificación del
equipo por parte del usuario puede dar
lugar a que la compañía de
telecomunicaciones solicite al usuario que
desconecte el equipo. Por su propia
protección, los usuarios deben
asegurarse de que las conexiones a
tierra del servicio de electricidad, las
líneas telefónicas y la cañería de metal
de la red sanitaria interna, si la hubiere,
estén todas conectadas. Esta
precaución es particularmente importante
en zonas rurales.
PRECAUCIÓN: Los usuarios no deben
intentar realizar estas conexiones por sí
mismos. Deben consultar a las
autoridades encargadas de inspeccionar
la instalación eléctrica o a un
electricista, según corresponda. El
Número de Equivalencia de Dispositivo
de Llamadas (Ringer Equivalent Number)
indica el número máximo de terminales
que está permitido conectar a una
interfaz de teléfono. La terminación en
una interfaz puede consistir en cualquier
combinación de dispositivos sujeta al
requisito de que el Número de
Equivalencia de Dispositivo de Llamadas
de todos los dispositivos no sea mayor
que cinco.
CONSERVE ESTAS INSTRUCCIONES
Page 39

36
INTRODUCCIÓN
Gracias por seleccionar el
ALERTMASTER nuevo emocionante
Am-6000 de AMERIPHONE. Se ha
diseñado para resolver los estándares
de la calidad más alta para proveer
de usted años del servicio
conveniente y sin problemas.
Lea por favor estas instrucciones de
funcionamiento a fondo antes de usar
su sistema de la notificación. Guarde
este manual para la referencia futura.
Usted debe ahorrar sus ventas pone
el recibo como prueba de la compra
en caso que usted necesite servicio de
la garantía.
Si usted tiene cualesquiera preguntas
sobre su Alertmaster Am-6000, llame
por favor su distribuidor autorizado o
nuestro departamento de ser vicio de
cliente en: 800-874-3005
E-mail:ameriphonecs@plantronics.com
Website: www.ameriphone.com
Page 40

E
S
P
A
Ñ
O
L
37
LISTA DE COMPROBACIÓN
DEL PAQUETE
Se cerciora de por favor su paquete de Alertmaster Am-6000
incluye los artículos según lo demostrado abajo:
Fig. 1- ALERTMASTER AM-6000
unidad baja, coctelera de la cama, cuerda modular del teléfono, timbre,
instrucciones de funcionamiento.
Cuerda Modular Del Teléfono
ALERTMASTER
AM-6000
OPERATING
INSTRUCTIONS
Timbre
Coctelera De la Cama
Instrucciones De
Funcionamiento
Alertmaster AM-6000
Unidad Baja
Page 41

38
IDENTIFICACIÓN DE LAS
CARACTERÍSTICAS
Fig. 2- Ofrece la identificación para el ALERTMASTER AM-6000
Digital alarm clock
Selector De Alarm/Page
Control Del Reloj
Gato de la
coctelera de la cama
Dos gatos del
teléfono para la
conexión fácil
Lámpara Control/Reset
El respaldo de la
batería asegura la
operación durante
la interrupción de
la energía (las
baterías no
incluidas)
La coctelera de la
cama le despierta
con el movimiento
que sacudare de
gran alcance
Jack/Outlet para
conectar una lám-
para como patrón
que destella visual
de signaler.Distinct
para cada acción
Security Timer
Antena
Interruptor Mic
Funciones de supervisión:
(el accesorio puede ser
requerido)
•
Sonido del teléfono
• El sonar del timbre
• Alarmar clock/timer
• Activación de otra
dispositivos audio
del alarmar del
en-hogar
• Supervisión sana tal
como griterío del
bebé
Micrófono
Transmisor sin hilos del
timbre. Onetouch
activa el Alertmaster
hasta 80 pies lejos
Page 42

E
S
P
A
Ñ
O
L
39
INSTALACIÓN E INSTALADO
Una localización ideal para
setting-up la unidad baja está en
el dormitorio. No ponga
cualesquiera de los componentes
de Alertmaster en o al lado de
superficies del metal, de las
computadoras, de la televisión, de
microondas, o de otras áreas con
el equipo electrónico que puede
causar interferencia al sistema sin
hilos.
A. Unidad Baja
Modelos de ESTADOS UNIDOS y de
Canadá
Modelo BRITÁNICO
BED SHAKER
Enchufe del
teléfono
Teléfono o
equipo
teleescritor
Dé vuelta a la
lámpara encendido
antes de tapar en la
unidad
Dé vuelta a la
lámpara encendido
antes de tapar en la
unidad
BED SHAKER
Enchufe del
teléfono
Ponga Bedshaker debajo
de la almohadilla
Ponga Bedshaker
debajo de la
almohadilla
Enchufe
de pared
Unidad Baja
Enchufe de
pared
Page 43

40
INSTALACIÓN E INSTALADO
B. Timbre
C. Reloj
1.Presione la época y los botones
de la hora (o minuto)
simultáneamente de cambiar el
ajuste del tiempo.
2.Presione el botón del alarmar
para comprobar el ajuste del
alarmar.
3.Presione los botones del
alarmar y de la hora (o minuto)
para cambiar el ajuste del
despertador.
Fig. 4 - Instalación del timbre y de
la batería
–
+
Empuje el interior
del cierre con un
destornillador
pequeño al
lanzamiento
Timbre
Montar
detrás la
placa
acumulador alcalino 12V
4.Utilice el interruptor del selector
de Alarm/Page para dar vuelta
al alarmar encendido o
apagado.
Page 44

E
S
P
A
Ñ
O
L
41
OPERACIONES
A. Funciones De Super visión
La consola tiene seis luces de
indicador para cada uno de las
funciones que alertan del
Alertmaster Am-6000. Algunas
funciones requieren un accesorio
opcional ser compradas.
Siempre el sistema de la
notificación de Alertmaster es
activado por cualquier function(s)
la lámpara y coctelera de la
cama activará, entonces pare y
reajuste después de 24 segundos,
o utilice el botón del reajuste en
la consola para pararla y para
reajustar. La lámpara destella en
diversos patrones para cada
función.
1. Teléfono
La luz de indicador del teléfono
ilumina cuando el teléfono está
sonando. La lámpara se girará
para dos segundos, apagado por
cuatro segundos, y la repetición.
Contestar al teléfono reajusta el
indicador del teléfono y cualquier
otro sistema de Alertmaster en su
hogar.
2. Puerta
La luz de indicador de la puerta
ilumina cuando se presiona el
botón del timbre. La lámpara se
girará para dos segundos,
apagado por dos segundos, y
repetición. Esta función también
se activa cuando una señal se
recibe del anunciador opcional de
la puerta (el modelo Es -dx).
3. Clock/Paging
La luz de indicador del reloj
ilumina cuando se activa el
Page 45

42
OPERACIONES
despertador. La coctelera de la
cama vibrará para y la lámpara
se girará un segundo, apagado
por dos segundos, y repetición.
Alar
m/Snooze
Cuando el despertador activa, el
bedshaker vibrará y la lámpara
destellará por 24 segundos, o
hasta que se empuja el
CONTROL
de la LÁMPARA/el botón
REAJUSTADO. Cuando se empuja
el
CONTROL de la LÁMPARA/el
botón
REAJUSTADO, el bedshaker
y la lámpara darán vuelta
inmediatamente apagado, y
después reactivaron
aproximadamente 5 minutos a
más adelante, repitiendo el patrón
con./desc. 16 veces, o hasta que
el selector del
ALARMAR/de la
PÁGINA se mueve a la
POSICIÓN DE REPOSO.
Paginación
Cuando el interruptor del
ALARMAR/de la PÁGINA se
mueve momentáneamente a la
posición de la
PÁGINA, activa la
unidad baja y cualquier signalers
alejado del receptor o personal
que estén dentro de una gama
80-foot. Activan para un
24-segundo ciclo. Para repetir la
página, mueva el interruptor del
ALARMAR/de la PÁGINA a la
PÁGINA otra vez
momentáneamente.
4. Sonido
Resbale el interruptor MIC hacia la
POSICIÓN DE TRABAJO. La luz de
indicador de los sonidos
ilumina cuando el sonido continuo
es detectado por 12 segundos o
más largo en el cuarto por el
micrófono incorporado. Para
después de que otro 10 segundos
retrasen, la lámpara destellará
Page 46

E
N
G
L
I
S
H
E
S
P
A
Ñ
O
L
43
OPERACIONES
encendido un segundo, apagado
para un segundo, y repetición.
Esta función también se activa
cuando una señal se recibe del
monitor opcional del sonido del
bebé (Son -bx). Nota: El micrófono
incorporado sigue siendo
ENCENDIDO cuando el interruptor
MIC se mueve a la posición del ST
(contador de tiempo de la
seguridad). Vea la página 7 para
los detalles.
5. Alarm
Usted debe comprar el transmisor
audio opcional del alarmar
(Ser-hacha modelo) de
Ameriphone para utilizar esta
función. Cuando una señal se
recibe del transmisor audio del
alarmar, la luz de indicador
ilumina, y la lámpara se girará
para un segundo, apagado para
un segundo, y la repetición.
B. Reajuste Principal
Si usted tiene varios componentes
del sistema de Alertmaster (tales
como el AM-6000, el AM-100, el
AM-RX2 y accesorios), usted
puede ahorrar tiempo usando el
Am-6000 para reajustar todos
inmediatamente. Para hacer esto,
presione el
CONTROL de la
LÁMPARA/el botón REAJUSTADO
y el botón del CONTADOR DE
TIEMPO
de la SEGURIDAD en el
mismo tiempo.
Page 47

44
OPERACIONES
C. Prioridad De la Notificación
Si el sistema de Alertmaster recibe
dos señales de la notificación en
el mismo tiempo, exhibirá la señal
de la prioridad más alta. Por
ejemplo, si recibe una derecha de
la señal del sensor de movimiento
después de que reciba una señal
del teléfono, el indicador
cambiará del
TELÉFONO al
SENSOR. La prioridad para cada
señal de la notificación se
demuestra como sigue:
1. Reajuste Principal
2. Alarmar Audio
3. Sonido Del Bebé
4. Sonido Del Sitio
5. Teléfono
6. Puerta
7. Paginación
8. Despertador
9. Contador de tiempo Al
azar (De la Seguridad)
D. Contador de tiempo De la
Seguridad
Con esta característica, la
lámpara conectada con su sistema
de Alertmaster irá en
automáticamente cada tarde y
dará vuelta apagado más
adelante por la tarde. Usted
puede utilizar esto para hacerle
mirada como alguien es casero.
La luz dará vuelta por intervalos
en horas levemente diversas cada
tarde así que no es tan obvio que
se está utilizando un contador de
tiempo.
Para activar esta característica:
1.Set el interruptor MIC al ST. la
lámpara irá automáticamente
en cada tarde en cerca de 5
P.M. y dará vuelta apagado en
cerca de 11 P.M.. Para
confirmar este ajuste, el reloj
centelleo dos veces cada 5
segundos.
a.Si usted quisiera que la luz
se girara en cerca de 6 de
la tarde, presione el
CONTADOR DE TIEMPO de
la SEGURIDAD una vez
para 2 segundos o más.
Para confirmar este ajuste, el
reloj centelleo 3 veces cada
5 segundos.
Page 48

45
OPERACIONES
b. Para si usted quisiera que
la luz se girara en cerca de
7 P.M., presione el
CONTADOR DE TIEMPO de
la
SEGURIDAD dos veces 2
segundos o más. Para
confirmar este ajuste, el
reloj centelleo 4 veces cada
5 segundos.
c.Para volver a la activación
de 5 P.M. para, presione el
botón del
CONTADOR DE
TIEMPO
de la SEGURIDAD
una vez 2 segundos o más.
Para confirmar este ajuste, el
reloj centelleo una vez cada
5 segundos.
d.If you are home and want to
turn off the
SECURITY TIMER
for the evening, press LAMP
CONTROL / RESET
for more
than 2 seconds. The timer
will resume normal operation
the next evening.
Nota: El micrófono sigue siendo
ENCENDIDO cuando el interruptor
MIC está en la posición del ST.
2. Para dar vuelta apagado al
CONTADOR DE TIEMPO de
la
SEGURIDAD, fije el
interruptor
MIC a
ENCENDIDO o APAGADO
E. Batería
El Alertmaster Am-6000 funciona
encendido diez “AA” clasifique
las baterías recargables del
cadmio del níquel (no incluidas)
durante una interrupción de la
energía. No
UTILICE LAS BATERÍAS
REGULARES
! La energía se
proporciona para la consola y la
coctelera de la almohadilla, pero
no para la lámpara conectada. La
exhibición del reloj está
en blanco en cuando funciona las baterías de
reserva, pero tiempo correcto será
mantenido.
No se queme ni pinche las
baterías. Como otras baterías de
este tipo, si se queman o se
pinchan, podrían lanzar el
Ni-Cd
E
S
P
A
Ñ
O
L
Page 49

46
OPERACIONES
material tóxico que podría causar
lesión. No disponga de las
baterías en basura de la casa.
Para la información sobre de la
disposición del reciclaje o
disposición apropiada, consulte
su organización local de la
colección de la basura sólida
(basura) o. ( El transmisor del
timbre funciona encendido un
“2Á” batería del alumbrador del
cigarrillo del tamaño (incluida).
Dura 6-12 meses y puede
normalmente ser probada
mirando el indicador de energía
rojo ilumina cuando se presiona
el botón del timbre. Si el
indicador de energía es débil o
apagado, substituya la batería.
Page 50

E
S
P
A
Ñ
O
L
47
ACCESORIOS OPCIONALES
El Alertmaster AM-6000 se diseña
para trabajar con los receptores y
los transmisores alejados sin hilos
opcionales, cada uno vendido por
separado.
A.Receptor Alejado (AM-RX2)
Tape el receptor en un
enchufe de la CA, y enchufe
una lámpara y
se notifique el
you? ll
dondequiera
que se coloque
el receptor cocina, sitio vivo, garage,
cuarto de baño, etc. Funciona
hasta 80 pies desde la consola
baja de Alertmaster AM-6000.
B. Signaler Personal (AM-PX)
Use este receptor ligero en su
correa
dondequiera
alrededor de su
casa y el you? ll
se alerte a
cualquier
actividad en su hogar. Tiene
una gama 80-foot y una
consola miniatura de las luces
de indicador, y también las
alarmas con diverso vibrar
indican para cada función.
C. Signaler Táctil Personal
(AM-PXB)
Similar a Son px más un
interruptor del
tacto para la
gente que está
sorda y oculta.
D. Transmisor Audio Del Alar mar
(AM-AX)
Place this next to
any audio alarm
for notification
when the alarm
is activated.
It activates the
Alarm function of the
Alertmaster system and has a
range of up to 80 feet.
E. Monitor Sano Del Bebé (AM-BX)
Coloque este
monitor cerca de
su infante, y
transmitirá una
señal al sistema
de Alertmaster
cuando grita su bebé.
Page 51

48
ACCESORIOS OPCIONALES
F. Anunciador De la Puerta
(AM-DX)
Coloque a
anunciador de la
puerta al lado de
su timbre,
doorchime, o
anunciador existente del
intercomunicador. Transmitirá
una señal que activa la función
de la puerta del sistema de
Alertmaster de hasta 80 pies
lejos. Ideal para los
apartamentos, los condos o las
habitaciones con una puerta o
una puerta común de la
seguridad.
Page 52

E
S
P
A
Ñ
O
L
49
EN CASO DE QUE DE LA DIFICULTAD
CAUSA Y REMEDIO
La lámpara no se enciende antes de taparlo en
Alertmaster. Dé vuelta a los lamp?s encienden
(con.). Substituya el bulbo en caso de necesidad.
Compruebe todas las conexiones de la línea
telefónica. Se cerciora de usted puede dar vuelta a
la lámpara encendido o apagado con el botón del
control de la lámpara.
El despertador no se gira. Resbale el interruptor
hacia la POSICIÓN DE TRABAJO.
Se desenchufa la coctelera de la cama. Enchúfela.
Arrolle el alambre una vez alrededor del lazo
plástico para prevenir desenchufar accidental.
Cambie está apagado. Resbálelo hacia la
POSICIÓN DE TRABAJO. El sonido debe ser
continuo por doce segundos para que el ruido
del sitio active.
Hay ruido constante en el cuarto, y la
función sana está encendido. Resbale el
interruptor hacia APAGADO.
B
atería muerta. Presione el botón del timbre, luz
roja en la cubierta debe encenderse para arriba.
Si no, la batería necesita ser substituida. Si la
batería se carga completamente, los dipswitches
pueden ser fijados incorrectamente. Vea la
sección en el canal que fija en la página 13.
SÍNTOMA
El botón del control de la
lámpara no funciona
Los anillos del teléfono,
lámpara no destellan
El despertador no funciona
La coctelera de la cama no vibra
El ruido del sitio no activa
La lámpara destella
constantemente
El timbre no funciona
Si cualquier problema ocurre durante la operación de su sistema de la notificación de Alertmaster,
repase la lista del "síntoma y del remedio" abajo. Se cerciora de ninguna parte del sistema de
Alertmaster está encendido o las superficies cercanas del metal o equipo electrónico. Si la dificultad
persistieron, entraron en contacto con a Ameriphone o a su distribuidor autorizado para la ayuda.
Page 53

50
EN CASO DE QUE DE LA DIFICULTAD
Ajuste Del Canal
El sistema de Alertmaster utiliza
señales de radio especiales de
comunicarse entre la unidad de la
consola y todos sus accesorios. Para
los accesorios (anunciador de la
puerta, monitor sano del bebé,
transmisor audio del alarmar y sensor
de movimiento) para activar la unidad
baja, todos tienen que estar en el
mismo "canal." Un "interruptor DIP"
se utiliza para la selección de canal.
Su sistema y todos los accesorios se
han preestablecido en la fábrica a un
ajuste estándar del canal. Bajo
condiciones de funcionamiento
normales, no hay ajuste necesario.
Si su sistema encuentra interferencia y
se activa en varias ocasiones por
ninguna razón obvia, puede ser
accionado por un sistema cerca en su
vecindad.
Del si la interferencia otro de la
notificación de Alertmaster sistema o
la otra fuente sin hilos está presente,
cambie los ajustes de interruptor de
canal en todos los componentes.
1. Desenchufe la corriente ALTERNA y
localice el interruptor DIP (un
interruptor 4-position) en el
superficie inferior del Alertmaster
AM-6000.
2. Abra el compartimiento de batería
del timbre.
3. Cambie la posición de interruptor
de cada interruptor respecto a
ambas unidades usando un
bolígrafo. Todos los ajustes
necesitan ser idénticos para el
sistema al trabajo. Véase El
Cuadro 5.
4. Cambie los ajustes de interruptor
en cada uno de sus otros
accesorios (receptor alejado,
transmisor audio del alarmar,
monitor sano del bebé, los etc.)
para emparejar el nuevo ajuste
del canal.
5.
Substituya todas las cubiertas y
vuelva los accesorios a sus
lugares apropiados. Presione el
CONTROL de la LÁMPARA/
botón REAJUSTADO una vez
para reajustar la unidad.
Page 54

E
S
P
A
Ñ
O
L
51
CONFORMIDAD REGULADORA
La parte 68 de FCC gobier na
la información
Este sistema de la notificación
AM-6000 se conforma con la
parte 68 de adoptados las reglas
de la FCC y los requisitos por el
ACTA. En el fondo de este equipo
está una etiqueta que contiene,
entre la otra información, un
identificador del producto en el
formato US:AAAEQ##TXXXX. Si
está solicitado, este número se
debe proporcionar a la compañía
del teléfono .
Un enchufe y un gato conectaban
este equipo con las premisas que
ataban con alambre y la red de
teléfono debe conformarse con las
reglas y los requisitos aplicables
de la parte 68 de la FCC
adoptados por el ACTA. Una
cuerda obediente del teléfono y
un enchufe modular, RJ11 USOC,
se proporciona este producto. Se
diseña para ser conectado con un
gato modular compatible que sea
también obediente. Vea las
instrucciones de instalación para
los detalles.
El REN se utiliza para determinar
el número de los dispositivos que
se pueden conectar con una línea
telefónica. RENs excesivo en una
línea telefónica puede dar lugar a
los dispositivos que no suenan en
respuesta a una llamada entrante.
En la mayoría sino no todas las
áreas, la suma de RENs no debe
exceder de cinco (5,0). Para estar
seguro del número de los
dispositivos que se pueden
conectar con una línea, según lo
determinado por el total RENs,
entre en contacto con la
compañía local del teléfono. Para
los productos aprobados después
de julio del 23 de 2001, el REN
para este producto es parte del
identificador del producto que
tiene el formato
US:AAAEQ##TXXXX. Los dígitos
representados por el ## son los
REN sin una coma (e.g., 03 es
REN de 0,3). Para productos
anteriores, el REN se demuestra
por separado en la etiqueta.
Si este equipo del teléfono causa
daño a la red de teléfono, la
compañía del teléfono le
notificará por adelantado que la
Page 55

52
CONFORMIDAD REGULADORA
discontinuación temporal del
servicio puede ser requerida. Pero
si el isn?t de la comunicación
previa práctico, la compañía del
teléfono notifica a cliente cuanto
antes. También, le aconsejarán de
la su derecha de archivar una
queja con la FCC si usted la
cree es necesario.
La compañía del teléfono puede
realizar cambios en sus
instalaciones, equipo,
operaciones o procedimientos que
podrían afectar la operación del
equipo. Si sucede esto la
compañía del teléfono
proporcionará la comunicación
previa en la orden para usted de
hacer modificaciones necesarias
para mantener ininterrumpido
mantiene.
Si el apuro se experimenta con
este equipo del teléfono, para la
reparación o la información de la
garantía, entre en contacto con
por favor el walker/Ameriphone,
1-800-874-3005. Si el equipo
está causando daño a la red de
teléfono, la compañía del teléfono
puede solicitar que usted
desconecte el equipo hasta que se
resuelve el problema.
Este equipo del teléfono no se
piensa para ser reparado y no
contiene ninguna pieza
reparable. Abrir el equipo o
cualquier tentativa de realizar
reparaciones anulará la garantía.
Para el servicio o reparaciones,
llamada 1-800-874-3005.
La conexión al servicio de la línea
de partido está conforme a tarifas
del estado. Entre en contacto con
a la comisión de la utilidad
pública del estado, a la comisión
del servicio público o a comisión
de la corporación para la
información.
Si su hogar ha atado con alambre
especialmente el equipo del
alarmar conectado con la línea
telefónica, asegure la instalación
de este equipo del teléfono no
inhabilita su equipo del alarmar.
Si usted tiene preguntas sobre qué
inhabilitará el equipo del alarmar,
consulte a su compañía del
teléfono o a instalador
cualificado.
Page 56

E
S
P
A
Ñ
O
L
53
CONFORMIDAD REGULADORA
Este equipo del teléfono es
prótesis de oído compatible.
Teléfonos Cliente-Posei'dos
De la Tarjeta De Coin/Credit:
Para conformarse con tarifas del
estado, la compañía del teléfono
debe ser dada la notificación
antes de la conexión. En algunos
estados, la comisión de la utilidad
pública del estado, la comisión
del servicio público o la comisión
de la corporación deben dan la
aprobación anterior de la
conexión.
La parte 15 de FCC gobier na
la información
Este dispositivo se conforma con
la parte 15 de las reglas de la
FCC. La operación está conforme
a las dos condiciones siguientes:
(1) este dispositivo puede no
causar interferencia dañosa, y (2)
este dispositivo debe aceptar
cualquier interferencia recibida,
incluyendo interferencia que
pueda causar la operación
indeseada.
Su sistema de la notificación
AM-6000 se ha probado y se ha
encontrado para conformarse con
los límites de un dispositivo digital
de la clase B, conforme a la parte
15 de reglas de la FCC. Estos
límites se diseñan para
proporcionar la protección
razonable contra interferencia
dañosa en la instalación residencial.
Este equipo genera, las
aplicaciones, y puede irradiar
energía de la radiofrecuencia y, si
no instalado y utilizado de
acuerdo con las instrucciones,
puede causar interferencia
dañosa a las comuncaciones por
radio. Sin embargo, no hay
garantía que interferencia no
ocurrirá en una instalación
particular; si este equipo causa
interferencia dañosa a la radio o
la recepción de televisión, que
puede ser determinada girando el
equipo apagado y, a le animan
que intente corregir la
interferencia por una de las
medidas siguientes:
Page 57

54
CONFORMIDAD REGULADORA
1. Donde puede ser hecho con
seguridad, reoriente la
televisión o la antena de
recepción de la radio.
2. Al grado posible, vuelva a
poner la televisión, la radio o
el otro receptor con respecto
al equipo del teléfono. (esto
aumenta la separación entre el
equipo del teléfono y el
receptor.)
3. Conecte el equipo del teléfono
en un enchufe en una
diferencia del circuito de el
con las cuales la televisión, la
radio, o el otro receptor esté
conectada.
4. Consulte al distribuidor o a
técnico experimentado de
radio/TV para la ayuda.
PRECAUCIÓN: Los cambios o las
modificaciones no no expreso
aprobadas por el fabricante
responsable de conformidad
podían anular la autoridad de los
user?s para funcionar el equipo.
Especificaciones Técnicas De
Canadá De la Industria
Este producto resuelve las
especificaciones técnicas de
Canadá de la industria aplicable.
Antes de instalar este equipo, los
usuarios deben asegurarse de
que es permitido ser conectado
con las instalaciones de la
compañía local de las
telecomunicaciones. El equipo se
debe también instalar usando un
método aceptable de conexión.
En algunos casos, los company’s
dentro del cableado asociado a
un servicio individual de la sola
línea pueden ser extendidos por
medio de un montaje certificado
del conectador (cuerda de la
extensión del teléfono). El cliente
debe estar enterado que la
conformidad con las condiciones
antedichas puede no prevenir la
degradación del servicio en
algunas situaciones que el s
ervicio individual puede ser
extendido por medio de un
montaje certificado del
Page 58

E
S
P
A
Ñ
O
L
55
CONFORMIDAD REGULADORA
conectador (cuerda de la
extensión del teléfono). El cliente
debe estar enterado que la
conformidad con las condiciones
antedichas puede no prevenir la
degradación del servicio en
algunas situaciones.
Al equipo certificado se deben
reparar por una facilidad
canadiense autorizada del
mantenimiento señalada por el
surtidor. Cualesquiera
reparaciones o alteración hecha
por el usuario a este equipo, o el
equipo funciona incorrectamente,
pueden dar a la compañía de las
telecomunicaciones causa para
solicitar al usuario desconectar el
equipo.
Los usuarios deben asegurarse
para su propia protección de que
las conexiones de tierra eléctricas
de la utilidad de energía, de las
líneas telefónicas y del sistema
metálico interno de la pipa de
agua, si presente, estén
conectadas juntas. Esta
precaución puede ser
particularmente importante en
áreas rurales.
PRECAUCIÓN: Los usuarios no
deben procurar hacer tales
conexiones ellos mismos, sino
deben entrar en contacto con la
autoridad eléctrica apropiada de
la inspección, o a electricista,
como apropiado.
El número de equivalencia del
campanero es una indicación del
número máximo de los terminales
permitidos ser conectado con un
interfaz del teléfono. La
terminación en un interfaz puede
consistir en cualquier combinación
del tema de los dispositivos
solamente al requisito que la
suma de los números de
equivalencia del campanero de
todos los dispositivos no excede
de cinco.
El “IC” del término: antes de que
el número de certification/
registration signifique solamente
que las especificaciones técnicas
de Canadá de la industria fueron
resueltas.
Page 59

56
Page 60

E
S
P
A
Ñ
O
L
57
El módem que forma el tema de esta
guía es aprobado para el uso con
los sistemas de las telecomunicaciones
funcionados por British
Telecommunications, mercurio o
comunicaciones de Kingston de
acuerdo con las condiciones en la
instrucción para el uso. La sección
siguiente proporciona la información
estatutaria que se relaciona con esta
aprobación.
Modelo No.: La unidad mencionada
en esta guía como el aparato es el
Ameriphone Alertmaster
2000/6000.
Tipo de circuitos: El aparato es
aprobado para la conexión a los
sistemas de las telecomunicaciones
especificados en las instrucciones
para el uso conforme a las
condiciones precisadas en ellas. No
es aprobado para el uso en un
servicio compartido, sistema de
portador 1+1, o pues una extensión
a un teléfono de la paga.
Marca del origen: El aparato es
fabricado en China por Ameriphone.
Funciones: Indicador de la llamada
para el sordo.
REN: El aparato tiene un REN de 1.
Explicación de REN: El equipo para
el accesorio a la red de teléfono
público se determina para determinar
su “equivalencia del ringer” número
(REN). El REN se relaciona con el
funcionamiento del aparato cuando
está utilizado conjuntamente con
otros artículos de aparatos. El REN
es una guía del cliente que indica
aproximadamente el número máximo
de artículos de los aparatos que se
deben conectar simultáneamente con
la línea.
Para determinar el número máximo
de artículos de los aparatos que se
deben conectar simultáneamente con
una línea exclusiva, el REN total
obtuvo sumando los valores de REN
de cada uno de los artículos de los
aparatos conectados con la línea
exclusiva no debe exceder el valor
del máximo REN de 4. Este valor
incluye cualquier instrumento
proporcionado BT cada uno de el
cual se asuma para tener un valor de
REN de 1,0 a menos que esté
marcada de otra manera.
El aparato tiene un REN de 1 y el
cuidado se debe tomar para no
utilizarlo con el otro equipo del
teléfono que daría lugar a una cifra
más alta de 4 REN que son excedidos.
INFORMACIÓN ESTATUTARIA
BRITÁNICA
Page 61

58
INFORMACIÓN ESTATUTARIA
BRITÁNICA
Debido a la extensión amplia de las
características de sonido del detector,
una garantía de la operación
acertada en una instalación de los
tipos mezclados de detectores de
sonido no se puede dar por el
surtidor. ¿Este aparato se ha
aprobado para el uso con la
indicación siguiente de facilities:
*Ring -?Bed-coctelera y lámpara?
Cualquier otro uso invalidará la
aprobación del aparato si
consecuentemente entonces deja
de
conformarse con el estándar contra el
cual la aprobación fue concedida.
La conexión del aparato a una línea
del intercambio o a la extensión del
PBX está vía un zócalo modular de
BT. Si esto no está ya disponible por
favor utilice la forma en el final de
este capítulo para solicitar uno de
British Telecom si su PBX no fue
instalado por British Telecom después
entra en contacto con a su sostén
autorizado.
Número de aprobación:
Esta aprobación
NS/3979/3/R/604668 se aplica al
Ameriphone Alertmaster
2000/6000.
PRECAUCIÓN:
La aprobación de este aparato para
la conexión a la red de teléfono
pública de la centralita telefónica de
British Telecom SE INVALIDA si el
aparato conforme a ninguna
modificación de ninguna manera
material no es autorizado por BABT
o si se utiliza con o está conectado
con:
1.Software interno que no ha sido
aceptado formalmente por BABT.
2.El software de control externo o el
aparato externo del control que
hace la operación del aparato o
del equipo asociado de la
disposición de llamada contravenir
los requisitos del estándar precisó
en BS6305.
Todo el aparato conectó con este
aparato y de tal modo conectó
directamente o indirectamente a
British Telecom la red de teléfono
cambiada pública debe ser aparato
aprobado según lo definido en la
sección 22 del acto de
telecomunicaciones británico 1984.
Page 62

E
S
P
A
Ñ
O
L
59
INFORMACIÓN ESTATUTARIA
BRITÁNICA
Conectador De la Lámpara De las
Cañerías
Los 3-pernos zócalo del conectador
de 240 VAC están para la conexión
a una lámpara doméstica de las
cañerías 240Vac solamente. No
puede ser utilizado para cualquier
otro propósito. El grado máximo
para esto es 300W.
Definición de un RBS
Un RBS, intercambio de rama
relevante se define en BS6789:6.1
1986, sección 2,4. Hay también una
guía estándar británica propuesta
para un RBS para las líneas del
PSTN.
Page 63

60
Esta garantía se aplica solamente a los
productos de Ameriphone que se compran y
se utilizan en los Estados Unidos, el Canadá,
o el reino unido.
AMERIPHONE autoriza el ALERTMASTER
AM-6000 contra cualquier defecto en
materiales o la ejecución para el período de
un año a partir de la fecha de la compra.
Si su producto de Ameriphone es defectuoso
y vuelto en el plazo de 30 días de la fecha
de la compra, su distribuidor autorizado de
Ameriphone lo substituirá en ninguna carga.
Si están vueltos después de 30 días pero en
el plazo de un año a partir de la fecha de la
compra, lo repararemos o substituiremos en
ninguna carga. En la reparación de su
Alertmaster AM-6000, podemos utilizar
nuevas o reacondicionadas piezas de
recambio. Si elegimos para substituir su
AM-6000, podemos substituirlo por un
producto nuevo o reacondicionado igual o
del diseño similar. La reparación o el
reemplazo será autorizada por 90 días o el
tiempo restante en el período original de la
garantía, cualquiera es más largo.
Las garantías implicadas, incluyendo las de
la aptitud para un propósito y un
merchantability particulares (una garantía no
escrita que el producto está cabido para el
uso ordinario), se limitan a un año a partir de
la fecha de la compra. No pagaremos la
pérdida de época, de inconveniencia, de
pérdida de uso de su sistema de la
notificación de Alertmaster AM-6000, o de
daños materiales causados por su sistema de
la notificación de Alertmaster AM-6000 o su
falta de trabajar, o ninguna otra daños
fortuita o consecuente. Algunos estados no
permiten limitaciones encendido cuánto
tiempo una garantía implicada dura o la
exclusión de daños fortuitos o consecuentes,
así que las exclusiones o las limitaciones
antedichas pueden no aplicarse a usted.
Para conseguir el servicio de la garantía
para su sistema de la notificación de
Alertmaster AM-6000, usted debe
proporcionar la prueba de la fecha de la
compra. En el plazo de 30 días de la fecha
de la compra, vuelva su Alertmaster
AM-6000 al lugar en donde usted lo compró
para el reemplazo inmediato. Después de 30
días, llame Ameriphone en la voz 1-800-8743005 o 1-800-772-2887 TTY/TDD para el
centro de servicio autorizado más cercano
usted. Usted debe pagar por adelantado
todos los costes del envío. Le sugerimos
excepto los materiales de empaquetado
originales en el acontecimiento que usted
necesita enviar el Alertmaster AM-6000. Al
enviar para la reparación de la garantía,
incluya su nombre, la dirección, el número de
teléfono, la prueba de la fecha de la compra,
y una descripción del problema. Después de
reparar el producto, lo enviaremos de nuevo
a usted en ningún coste dentro de los Estados
Unidos.
Esta garantía no cubre defectos resultando de
accidentes, de daño mientras que en tránsito
a nuestra localización del servicio, de
alteraciones, de la reparación desautorizada,
GARANTÍA
Page 64

E
S
P
A
Ñ
O
L
61
GARANTÍA
de la falta de seguir instrucciones, del uso
erróneo, del uso fuera de los Estados Unidos,
de Canadá, o del reino, del fuego, de la
inundación, y de actos del dios unidos ni no
nosotros autoriza el producto
para ser compatible con ningún equipo
particular del teléfono, línea de partido,
sistemas de teléfono dominante o sistemas
más sofisticada de la conmutación. Si su
Alertmaster AM-6000 no es cubierto por esta
garantía, llámenos en la voz 800-874-3005,
equipo teleescritor 800-772-2889/TDD para
el consejo si repararemos su Alertmaster el
AM-6000 y la otra información de la
reparación. Las piezas reparadas serán
autorizadas por 90 días.
Page 65

62
Instrucciones de seguridad
importantespara el usuario
Alarmar...........................................42
Unidad baja ...................................39
Respaldo De la Batería .....................45
Reloj...............................................40
Timbre.............................................40
Ajuste del canal .............................. 50
Información Estatutaria BRITÁNICA ...57
Instalación e instalado ......................39
Funciones de supervisión...................41
Operaciones....................................41
Accesorios opcionales .....................47
Transmisor Audio Del Alarmar ........47
Monitor Sano Del Bebé .................47
Anunciador De la Puerta.................48
Signaler Personal ..........................47
Signaler Táctil Personal ..................47
Receptor Alejado ...........................47
Conformidad Reguladora .................51
Lista de comprobación del paquete ...37
Paginación .....................................42
Problemas - en caso de
que de la dificultad .......................49
Reajuste .........................................44
Garantía ........................................60
ÍNDICE
Page 66

Page 67

Page 68

F
R
A
N
Ç
A
I
S
Manuel d'utilisation
AM
Système d'avertissement sans fils
ALERTMASTER™AM-6000
®
Page 69

64
TABLE DES MATIÈRES
RENSEIGNEMENTS IMPORTANTS SUR LA SÉCURITÉ.....................................................65
INTRODUCTION......................................................................................................67
LISTE DES PIÈCES ....................................................................................................68
CARACTÉRISTIQUES ................................................................................................69
INSTALLATION ET MISE EN MARCHE
A. Appareil.........................................................................................................70
B. Sonnette .........................................................................................................70
C. Régler l'heure .................................................................................................70
FONCTIONNEMENT
A. Fonctions de surveillance .................................................................................71
B. Remise à zéro.................................................................................................74
C. Priorité de Notification .....................................................................................74
D. Horloge de Sécurité.........................................................................................74
E. Piles...............................................................................................................76
ACCESSOIRES OPTIONNELS
A. Récepteur à distance .......................................................................................77
B. Avertisseur personnel .......................................................................................77
C. Avertisseur tactile personnel..............................................................................77
D. Émetteur Alarme audio.....................................................................................78
E. Moniteur sons de bébés ...................................................................................78
F. Avertisseur de porte..........................................................................................78
EN CAS DE DIFFICULTÉS ..........................................................................................79
INFORMATION SUR LA FCC .....................................................................................81
GARANTIE .............................................................................................................82
INDEX...................................................................................................................84
Page 70

F
R
A
N
Ç
A
I
S
65
Instrucciones de seguridad
importantespara el usuario
RENSEIGNEMENTS IMPORTANTS
SUR LA SÉCURITÉ
Lorsque vous utiliserez votre téléphone,
suivez toujours les mesures de sécurité de
base suivantes afin de réduire les risques
d’incendie, de choc électrique et de blessures.
1.Lire et bien comprendre toutes les
instructions. Se conformer à tous les
avertissements et à toutes les instructions
marqués sur l’appareil.
2.Pendant un orage électrique, ne pas utiliser
de téléphone autre qu’un téléphone sans
cordon. Il pourrait y avoir un léger risque
de choc électrique.
3.Ne pas utiliser le téléphone près d’une fuite
de gaz. Si vous croyez qu’il y a une fuite
de gaz, signalez celle-ci immédiatement en
utilisant un téléphone qui ne se trouve pas
à proximité de la fuite de gaz.
4. Ne pas utiliser le produit dans un endroit
humide ou lorsque vous êtes mouillé. Par
exemple, ne pas l’utiliser sous la douche,
près d’une piscine, d’une baignoire, d’un
lavabo de cuisine ou de salle de lavage, ni
dans un sous-sol humide. Ne pas utiliser
de nettoyeurs liquides ou en aérosol. Si un
liquide quelconque est renversé sur
l’appareil, débranchez la prise télephonique
et le cordon d’alimentation immédiatement.
Ne pas le brancher de nouveau avant
qu’il soit complètement sec.
5.Ne pas placer cet appareil dans un endroit
où les cordons risquent d’être piétinés.
Protéger les cordons de tout dommage ou
frottement.
6.Si l’appareil ne fonctionne pas
normalement, lire la section "En cas de
difficultés". Si vous ne trouvez pas la
solution à votre problème ou si l’appareil
est endommagé, reportez-vous à la
garantie d’Ameriphone. Ne pas ouvrir
l’appareil sauf pour suivre les instructions
contenues dans ce manuel. L’ouverture et
l’assemblage de l’appareil peuvent
exposer l’utilisateur à des tensions dan
gereuses ou à d’autres risques. L’ouverture
de l’appareil entraîne automatiquement
l’annulation de la garantie.
7.Débrancher l’appareil de la prise murale
et confi er toute réparation à un
technicien qualifié dans les conditions
suivantes:
A. Si un liquide a été renversé sur
l’appareil.
B. Si l’appareil a été exposé à la pluie
ou à l’humidité.
C. Si l’appareil ne fonctionne pas
normalement quand les instructions
d’utilisation sont respectées, ne faites
que les rajustements qui sont
expliqués dans ce manuel d’utilisation
car vous pourriez l’endom mager
davantage.
D. Si l’appareil à été échappé ou s’il
semble être endommagé.
E. Si le rendement de l’appareil est
nettement réduit.
RENSEIGNEMENTS SUPPLÉMENTAIRES À
L’INTENTION DES UTILISATEURS CANADIENS
Page 71

66
Instrucciones de seguridad
importantespara el usuario
RENSEIGNEMENTS IMPORTANTS
SUR LA SÉCURITÉ
AVIS: L’étiquette du ministère des
Communications du Canada identifie le
matériel homologué. Cette étiquette certifie
que le matériel est conforme à certaines
normes de protection, d’exploitation et de
sécurité des réseaux de télécommunications.
Le ministère ne garantit pas toutefois que le
matériel fonctionnera à la satisfaction de
l’utilisateur.
Avant d’installer le présent matériel,
l’utilisateur doit s’assurer qu’il est permis de
le raccorder aux installations de l’entreprise
locale de télécommunications. Le matériel
doit également être installé selon une
méthode de raccordement approuvée.
L’abonné ne doit pas oublier que malgré le
respect des conditions énoncées cidessus, il
se peut qu’il y ait dégradation du service
dans certaines situations. Le matériel
homologué doit être réparé par un centre
d’entretien canadien autorisé désigné par le
fournisseur. La compagnie de
télécommunications se réserve le droit de
demander à un utilisateur de débrancher un
appareil s’il a effectué des réparations ou
des modifications ou si l’appareil
fonctionne mal.
Pour sa propre protection, l’utilisateur doit
s’assurer que tous les fils de mise à la terre
de la source d’énergie électrique, des lignes
téléphoniques et des canalisations d’eau
métalliques, s’il y en a, sont raccordés
ensemble. Cette précaution est
particulièrement importante dans les régions
rurales.
MISE EN GARDE: L’utilisateur ne doit pas
tenter de faire les raccordements de mise à la
terre lui-même; il doit avoir recours à un
service d’inspection des installations
électriques ou à un électricien, le plus tôt
possible.
AVIS: Le facteur de charge attribué à chaque
appareil permet de déterminer le nombre total
de téléphones pouvant être raccordés à une
même ligne. Pour éviter les surcharges, la
somme des facteurs de charge des appareils
raccordés à la ligne ne doit pas dépasser
100, quel que soit le modèle utilisé.
CONSERVEZ CES INSTRUCTIONS
Page 72

67
Instrucciones de seguridad
importantespara el usuario
F
R
A
N
Ç
A
I
S
INTRODUCTION
Merci d’avoir choisi le nouveau
ALERTMASTER AM-6000
d’AMERIPHONE Cet appareil a
été conçu pour répondre aux
normes de qualité les plus élevées
afin que vous puissiez l’utiliser
sans problème pendant des
années.
Veuillez lire attentivement les
instructions suivantes avant
d’utiliser votre système
d’avertissement. Conser vez ce
manuel pour référence ultérieure.
Veuillez conserver votre reçu de
caisse comme preuve d’achat
pour tout service couver t par la
garantie.
Si vous avez des questions au
sujet de votre Alertmaster
AM-6000, téléphonez à notre
Service à la clientèle au (714)
897-1111 (TTY) ou au
(714) 897-0808 (VOIX).
Page 73

68
LISTE DES PIÈCES
Assurez-vous que toutes les pièces suivantes se trouvent bien dans la
boîte de votre ALERTMASTER AM-6000:
Fig.1-
Appareil ALERTMASTER AM-6000,
appareil de secousses, cordons modulaires,
sonnette, manuel d’utilisation.
Appareil Alertmaster AM-6000
(boîtier et console)
Appareil de secousses
Sonnette
Cordons modulaires
Page 74

F
R
A
N
Ç
A
I
S
69
CARACTÉRISTIQUES
Fig. 2 - Caractéristiques d'ALERTMASTER AM-6000
Deux prises téléphoniques pour
un raccordement facile.
Prise pour l'appareil de
secousses.
Bouton de contrôle de la
lampe ON/OFF.
Bouton de remise à zéro après
avoir activé l'appareil.
Bruits dans la pièce.
Fonctions de surveillance:
(certains accessories peuvent
être nécessaires)
.
• Sonnerie du téléphone.
• Sonnette de la porte.
• Réveil-matin.
• Activation d'autres appareils
alarme audio dans la maison.
• Surveillance des buits
comme les pleurs de bébé.
Microphone.
Émetteur de sonnette de porte
sans fils qui s'installe à la porte.
Vous pouvez activer l'Alertmaster
avec une simple touche jusqu'à
80 pieds de distance.
Réveil-matin numérique.
Bouton de contrôle de
l'horloge
Réglage du réveil-matin
Prise pour brancher une
lampe en tant
qu'indicteur
visuel.
Clignote différemment
selon chaque fonction.
Piles de rechange qui
assurent le
fonctionnement de
l'appareil en cas de
panne d'électricité
(piles non comprises).
Appareil de secousses qui
vous réveille grâce à de
puissantes vibrations.
Page 75

70
INSTALLATION
L’endroit idéal pour installer votre
appareil
est votre chambre à
coucher. Ne pas placer
l’Alertmaster ou toute pièce se
rapportant à votre appareil sur
une surface en métal, un
ordinateur, une
télévision, un four à
micro-ondes ou près
de ces
appareils ou dans tout autre
endroit où se trouve un appareil
électronique qui pourrait causer
des parasites dans la réception de
votre système sans fils.
A. Appareil
Téléphone ou TTY
Mettez
l'appareil de
secousses
sous votre
oreiller
Prise électrique
murale
Allumez la lampe
avant de la
brancher
dans
l'appareil
Prise
téléphonique
murale
Fig. 3 - Installation de l'appareil de secousses,
du téléphone, de la lampe et du boÎtier.
B. Sonnette
C. Régler l'heure
1. Appuyez en même temps sur
les boutons Time et Hour (ou
Minute) pour changer le
réglage de l’heure.
2. Appuyez sur le bouton Alarm
pour vérifier le réglage du
réveilmatin.
3. Appuyez sur les boutons
Alarm et Hour (ou Minute)
pour changer
le réglage de
l’heure du réveilmatin.
4. Utilisez le sélecteur du
réveilmatin pour mettre
l’appareil à ON ou à OFF
.
Fig. 4 - Installation de la sonnette
sur le coté extérieur de la porte.
BED SHAKER
+
–
Page 76

F
R
A
N
Ç
A
I
S
71
FONCTIONNEMENT
A. Fonctions de surveillance
La console de votre appareil
comporte six voyants, un pour
chaque fonction d’avertissement
d’Alertmaster AM-6000. Pour
utiliser certaines de ces fonctions,
il vous faudra acheter un
accessoire optionnel.
Chaque fois que votre système
d’avertissement sera activé par
une de ces fonctions, (sauf le
réveil-matin), la lampe et
l’appareil de secousses seront
également activés. Ils s’arrêteront
et se remettront à zéro après 24
secondes ou si vous utilisez la
commande de remise à zéro
(RESET) sur la console pour
l’arrêter et le remettre a zéro. La
lampe clignote de façon différente
selon la fonction.
1. Téléphone
Le voyant du téléphone s’allume
lorsque le téléphone sonne. La
lampe sera allumée pendant deux
secondes et éteinte pendant
quatre secondes, de façon
répétitive.
Lorsque vous répondez au
téléphone, vous remettez
automatiquement à zéro le voyant
du téléphone et tous les systèmes
Alertmaster que vous avez
dans votre maison.
2. Porte
Le voyant de la sonnette de la porte
s’allume lorsque quelqu’un sonne à
Page 77

72
FONCTIONNEMENT
la porte. La lampe
sera allumée
pendant deux secondes et éteinte
pendant deux secondes, de façon
répétitive. Cette fonction peut
aussi être activée par le signal
qu’envoie l’avertisseur de porte,
modèle AM-DX (optionnel).
3. Horloge
Le voyant de l’horloge s’allume
lorsque le réveil-matin est activé.
L’appareil de secousses vibrera et
la lampe s’allumera pendant une
seconde et s’éteindra pendant
deux secondes, de façon
répétitive
jusqu’à ce qu’il soit remis à zéro
.
Bouton Alarm/Snooze
Lorsque le réveil se déclenche,
l'apareil de secousses se met à
vibrer et la lampe se met à
clignoter pendant 24 secondes,
ou jusqu'à ce que vous appuyez
sur le bouton
LAMP CONTROL/
RESET
. Lorsque vous appyuez
sur ce bouton, l'appareil de
secousses et la lampe s'éteignent
immédiatement, puis se mettront à
nouveau en marche environ 5
minutes plus tard. Ce scenario
sera répété 16 fois, ou jusqu'à ce
que le bouton
ALARM/ PAGE soit
ajusté sur la position
OFF.
Avertisseur (Pager)
Lorsque que le bouton ALARM/
PAGE
est réglé sur PAGE, cela
active l'unité de base ainsi que
tous les recepteurs ou
signalisateurs personnels situés à
80 pieds. Pour répéter le page,
réglez le bouton
ALARM/ PAGE
sur PAGE à nouveau, momentanément.
4. Sons
Page 78

F
R
A
N
Ç
A
I
S
73
FONCTIONNEMENT
Faites glisser le sélecteur du
Microphone (
MIC) ON. Le voyant
des sons s’allume lorsque le
microphone intégré
dans votre
appareil détecte dans la pièce des
sons continus pendant douze
secondes
ou plus. La lampe
s’allume pendant une
seconde et
s’éteint pen dant une seconde, de
façon répétitive. Cette fonction est
aussi activée par un signal
provenant du Moniteur sons de
bébés (modèle AM-BX).
Note: Le microphone intégré reste
allumÈ lorsque le bouton
MIC est
réglésur la position ST (Security
Timer = Horloge de sécurité).
Voir page 7 pour plus de détails.
5. Alarme
Vous devez acheter l’émetteur
Alarme
audio (modèle AM-AX)
d’Ameriphone pour utiliser cette
fonction. Lorsqu’un signal est reçu
par l’émetteur Alarme audio, le
voyant s’allume et la lampe
s’allume pendant une seconde et
s’éteint pendant une seconde,
de
façon répétitive.
Page 79

74
FONCTIONNEMENT
B. Remise à zéro
Si vous avez plusieurs composants
du systéme Alertmaster (tels que le
AM-6000, AM-100, AM-RX2 et
les accessoires), vous ouvez
économiser du temps en remettant
à zéro toutes les unités depuis le
AM-60000. Pour cela, appuyez
simultanément sur les boutons
LAMP CONTROL/RESET et
SECURITY TIMER.
C. Priorité de Notification
Si le systéme Alertmaster reçoit
deux signaux de notification en
mÍme temps, votre Alertmaster
vous notifiera des signaux par
ordre de priorité. Par exemple, si
le systéme reçoit un signal du
détecteur de mouvementsjuste
après que le téléphone sonne,
l'indicateur changera du voyant
PHONE au voyant SENSOR. La
priorité de chaque notification a
été établie comme tel:
1. Remise à zéro de toutes les unités
2. Alarme
3. Détecteur de bébé
4. Bruit
5. Téléphone
6. Porte (sonnette)
7. Avertisseur
8. Réveil matin
9. Horloge de sécurité
D. Horloge de Sécurité
Cette fonction permet qu'une
lampe connectée à votre
Alertmaster, de s'allumer et de
s'éteindre d'elle-mÍme tous les soirs
à des heures pré-programmées.
Ainsi, la lumière s'allume et
s'éteint automatiquement comme si
vous étiez à la maison. La lampe
s'allumera et s'éteindra tous les
soirs à des heures légèrement
différentes, pour que ce ne soit
pas évident que c'est une horloge
et non pas vous qui allumez cette
lampe.
Page 80

F
R
A
N
Ç
A
I
S
75
FONCTIONNEMENT
Pour activer cette fonction:
1.Régler le bouton
MIC sur ST.
La lampe s'ellumera
automatiquement tous les soirs
vers 5:00 PM et s'étein-dra
vers 11:00 PM. Pour confirmer
cette programmation, l'horloge
clig - note une fois toutes les 5
secondes
a: Si vous voulez que
la lampe s'allume à 6:00PM,
appuyez sur
SECURITY TIMER
deux fois pendant 2 secondes
minimum. Pour confirmer cette
programmation, l'horloge
clignotera deux fois toutes les 5
secondes
b: Si vous voulez que la lampe
s'allume à 7:00PM, appuyez
sur
SECURITY TIMER trois fois
pendant 2 secondes
minimum. Pour confirmer
cette programmation,
l'horloge clignotera 3 fois
toutes les 5 secondes.
c: Pour retourner à la
programmation à 5:00 PM,
appuyez sur
SECURITY TIMER
une fois pendant 2 secondes
minimum. Pour confirmer
cette programmation, l'horloge
clignoteraune fois toutes les 5
secondes
d: Si vous Ítes à la maison et que
vous voulez Èteindre l'horloge
de sécurité pour la soirée,
appuyez sur
LAMP CONTROL/
RESET
pendant plus de 2 secon
des. L'horloge reprendra son
activité normale le soir suivant.
Note: Le microphone reste allume
lorsque le bouton MIC est réglé
sur
ST.
2. Pour Èteindre l'horloge de
sécurité, réglez le bouton
MIC
sur ON ou OFF.
Page 81

76
FONCTIONNEMENT
E. Piles
En cas de panne d’électricité, le
Alertmaster AM-6000 fonctionne à
l’aide
de dix piles «AA»
rechargeables au nickel
cadmium
(non comprises).
NE PAS
UTILISER
DES PILES ORDINAIRES.
Les piles
permettront de faire fonctionner la
console et l’appareil de secousses
mais non la lampe qui y est
branchée. L’horloge n’affichera pas
l’heure lorsque votre appareil
fonctionne à l’aide des piles mais
elle la conservera.
Ne brûlez pas et ne percezpas les
piles. Comme toutes les piles de ce
type, si vous les brûlez ou percez,
elle peuvent couler une substance
toxique qui cause de sÈrieux
problèmes de santé. Ne les jetez
pas dans une poubelle de la
maison. Si vous souhaitez des
informations sur le recyclage des
piles ou cmment les jeter, consultez
l'organisme local qui s'occupe de
collecter les détritus.
L’émetteur de la sonnette fonctionne
à l’aide d’une pile «AA» ordinaire
(comprise). Elle dure environ de 6 à
12 mois et peut être testée en
vérifiant si le voyant d’
alimentation
rouge s’allume lorsqu’on appuie
sur
la sonnette. Si le voyant
d’alimentation est faible ou éteint,
remplacez la pile
.
Page 82

F
R
A
N
Ç
A
I
S
77
ACCESSOIRES OPTIONNELS
L’ALERTMASTER AM-6000 est
conçu pour fonctionner avec des
émetteurs et des récepteurs sans
fils et à distance optionnels et
vendus séparément.
A. Récepteur à distance (AM-RX2)
Branchez le
récepteur dans une
prise pour
adaptateur secteur
et branchez une
lampe dans ce récepteur. Vous
recevrez un avertissement peu
importe où est placé le
récepteur - dans la cuisine, le
salon, le garage, la salle de bain,
etc. Il fonctionne jusqu à 80 pieds
(environ 25 mètres) de la console
de votre ALERTMASRTER AM-6000
B. Avertisseur personnel (AM-PX)
Portez ce léger
récepteur à votre
ceinture n’importe
où dans la
maisonet vous
serez averti de
toute activité dans la maison. Il a
une portée de 80 pieds (environ
25 mètres) et une con sole
miniature avec voyants. Il vous
avertit également à l’aide d’une
vibration
différente pour chacune
des fonctions.
C. Aver tisseur tactile personnel
(AM-PXB)
Semblable au
modèle AM-PX
avec en plus un
bouton pour les
gens qui sont à la
fois malentendants
et aveugles.
Page 83

78
ACCESSOIRES OPTIONNELS
D. Émetteur Alarme audio (AM-AX)
Placez cet
émetteur près de
n’im porte quelle
alarme audio
pour être averti
lorsque l’alarme
est activée. Il active la fonction
Alar
m du système Alertmaster et
possède une portée jusqu’à 80
pieds (environ 25 mètres).
E. Moniteur sons de bébés (AM-BX)
Placez ce
moniteur près de
votre enfant et il
émettra un signal
au système
Alertmaster
lorsque votre
bébé pleure.
F. Avertisseur de por te (AM-DX)
Placez l’avertisseur
de porte près de
votre
sonnette ou
de votre interphone.
Il émettra un
signal qui activera
la fonction Door
du système
Alertmaster jusqu’à une distance
de 80 pieds (environ 25 mètres).
Idéal pour appartements ou
condominiums possédant une
porte ou une entrée commune
sécuritaire.
Page 84

E
N
G
L
I
S
H
F
R
A
N
Ç
A
I
S
79
EN CAS DE DIFFICULTÉS
Si votre système d’avertissement Alertmaster venait à mal fonctionner,
consulter le guide de dépannage suivant. Assurez-vous qu’aucune
composante de votre Alertmaster n’est placée sur une surface de métal ou
un appareil électronique ni près de ceux-ci. Au cas où le problème
persisterait, communiquez avec Ameriphone ou avec votre détaillant
autorisé pour obtenir de l’aide.
CAUSES ET SOLUTIONS
Vous n’avez pas allumé la lampe avant de la
brancher dans votre appareil. Assurez-vous
de
bien allumer la lampe. Remplacez
l’ampoule si nécessaire.
Vérifiez tous les raccordements téléphoniques.
Assurez-vous que vous pouvez allumer ou
éteindre la lampe à l’aide du bouton de
contrôle de la lampe.
Vous n’avez pas mis en marche le
réveil-matin. Positionnez le bouton à
ON.
L’appareil de secousses n’est pas branché.
Branchez-le. Enroulez le fil une fois autour
de la boucle de plastique pour éviter qu’il ne
soit débranché par accident.
Le bouton est positionné à
OFF
. Placez-le
à la
position
ON. Les sons doivent être continus
pendant 12 secondes afin que l’avertisseur
de bruits soit activé.
Il y a un bruit constant dans la pièce, et la
fonction «Sound» est à
ON. Positionnez le
bouton à
OFF.
Les piles ne fonctionnent plus. Appuyez sur
le
bouton de la sonnette, le voyant rouge du
couvercle devrait s’allumer. S’il ne s’allume
pas, les piles doivent être remplacées. Si les
piles sont pleinement chargées, les boutons
à
bascule sont peut-être mal réglés. Voir la
section “Réglage de la fréquence” à la page 13.
PROBLÈMES
Le bouton de contrôle de la lampe
ne fonctionne pas.
Le téléphone sonne mais la lampe
ne clignote pas.
Le réveil-matin ne fonctionne pas.
L’appareil de secousses ne vibre
pas.
Votre système n’est pas activé par
les bruits dans la pièce.
La lampe clignote constamment,
même après avoir appuyé sur le
bouton de remise à zéro.
La sonnette ne fonctionne pas.
Page 85

80
EN CAS DE DIFFICULTÉS
Réglage de la fréquence
Le système Alertmaster utilise certains
signaux radio spéciaux pour la
communication entre la console et les
accessoires. Pour que les accessoires
(Annonceur de porte, Moniteur sons
de bébé, Émetteur
Alarme audio,
Détecteur de mouvements)
puissent
activer l'appareil, ils doivent tous être
réglés sur la même fréquence. Un
«bouton à bascule» est utilisé pour
choisir
la fréquence.
Votre système et tous ses accessoires
ont déjà été réglés à l'usine selon
une fréquence standard. Dans des
conditions normales d'utilisation, il
n'est pas nécessaire de procéder à
des rajustements.
Si des parasites se produisent dans la
réception de votre appareil et que
celui-ci
s'active de lui-même et sans
raison évidente, il se pourrait qu'il
soit activé par un système dans votre
voisinage.
S'il se produit des parasites en raison
d'un autre Système d'avertissement
Alertmaster ou d'un autre appareil
sans fils, changez la fréquence de
toutes les composantes.
1.
Localisez le bouton à bascule
sous la
console de votre
AM-6000 (il s'agit d'un bouton à
quatre positions).
2.
Ouvrez le compartiment pour
piles de
la sonnette (il s'agit d'un
bouton à quatre positions).
3. Changez la position de chacun
des
boutons sur les deux appareils
à l'aide
d'un stylo à bille. Pour
que votre système fonctionne
correctement, il faut que les
composantes soient réglées sur
la même fréquence. Voir fig. 5.
4. Changez la fréquence de
chacun de vos accessoires
(Récepteur à distance, Émetteur
Alarme audio, Moniteur sons de
bébé, etc.) pour qu'elle
corresponde à la nouvelle
fréquence.
5. Replacez tous les couvercles des
compartiments pour piles et
remettre les accessoires à leur
place.
Fig. 5 - Réglage de la fréquence
Page 86

F
R
A
N
Ç
A
I
S
81
INFORMATION SUR LA FCC
Le ALERTMASTER AM-6000 est
conforme aux normes du
paragraphe 68 des règlements de
la Federal Communi-cations
Commission (FCC) et a
obtenu
l’approbation de cette commission
pour être branché directement aux
lignes
téléphoniques. Le numéro
d’enregistre-ment ainsi que le
«Ringer Equivalence Number» de
votre appareil sont indiqués au
bas du socle de votre appareil.
Numéro d’enregistrement à la
FCC:
DWVUSA-73204-RG-N
Ringer Equivalence Number
0.3A, 0.8B
En vertu des règlements de la
FCC, votre
compagnie de
téléphone locale est tenue
de vous
permettre de brancher dans ses
prises de téléphone vos appareils
téléphoniques enregistrés auprès
de la
FCC. Avant de brancher votre
Alertmaster AM-6000 dans la prise
téléphonique, vous
devez fournir à
votre compagnie de téléphone les
renseignements ci-dessus. Ces
renseignements lui permettront de
continuer à assurer les meilleures
services
possibles.
Alertmaster AM-6000 utilise un
émetteur et un récepteur approuvé
en vertu de l’article 15 de la
FCC. Son utilisation est sujette aux
deux conditions suivantes :
1.cet appareil ne doit pas
causer de parasites
dangereux;
2.cet appareil doit pouvoir
accepter tous parasites, y
compris les parasites qui
peuvent causer un problème
de fonctionnement.
Page 87

82
GARANTIE
Cette garantie s’applique seulement
aux appareils Ameriphone achetés et
utilisés aux États-Unis et au Canada.
Ameriphone garantit le ALERTMASTER
AM-6000 contre tous défauts dans
les
matières premières et la fabrication
pendant
l’année suivant la date
d’achat. Si vous achetez notre
garantie prolongée, la même
garantie s’applique pour toute la
période visée par la garantie
prolongée.
Si votre appareil Ameriphone est
défectueux
et que vous le retournez
dans les 30 jours suivant la date
d’achat, votre détaillant Ameriphone
autorisé le remplacera sans frais.
Si vous le retournez après 30 jours
mais au cours de l’année suivant la
date d’achat, il sera réparé ou
remplacé sans frais. Des
pièces
neuves ou des pièces remises à neuf
peuvent être utilisées pour la
réparation.
Si nous choisissons de
remplacer votre appareil AM-6000, il
se peut que ce soit par un appareil
neuf ou remis à neuf du même
modèle ou d’un modèle semblable.
La
réparation ou le remplacement sera
garanti
pour une période de 90 jours
ou pour la
période non écoulée de la
garantie originale,
si celle-ci dépasse
90 jours.
Les garanties implicites qui
s’appliquent, y compris celles
touchant des appareils
conçus pour
un usage particulier et la valeur
marchande (une garantie non écrite
selon laquelle le produit est fabriqué
pour un usage ordinaire) se limitent à
une période d’un an suivant la date
d’achat. Nous ne débourserons
aucun frais entraîné par les pertes de
temps, les inconvénients, l’impossibilité
d’utiliser votre Alertmaster AM-6000
ni pour les dommages causés à la
propriété par votre Alertmaster
AM-6000
au par son mauvais
fonctionnement ou pour
tous autres
dommages accessoires ou indirects.
La limitation de la durée de la
garantie implicite ou l’exclusion des
dommages accessoires ou indirects
ne s’appliquent pas à certains États;
par
conséquent, cette limitation ou
cette exclusion peut ne pas s’appliquer
dan votre cas.
Pour toutes réparations ou service
couverts
par la garantie, joindre une
preuve de la date
d’achat. Dans les
30 premiers jours suivant la date
d’achat, retournez votre Alertmaster
Page 88

F
R
A
N
Ç
A
I
S
83
GARANTIE
AM-6000 au détaillant auprès de qui
vous l’avez acheté, qui vous le
remplacera
immédiatement. Après 30
jours, téléphonez
à Ameriphone au
numéro suivant: 1-714-897-1111
voix/ 1-714-897-0808 TTY/TDD
pour connaître l’adresse du centre de
service le plus près de chez vous. Vous
devez payer
à l’avance les frais de
transport. Nous vous
suggérons de
conserver l’emballage original
au cas
où vous auriez à le retourner. Lorsque
vous retournez un appareil, inscrivez
votre nom, votre adresse et votre
numéro de téléphone. Ajoutez la
preuve de la date d’achat et une
description détaillée de la
défectuosité. Nous vous retournerons
l’appareil réparé sans frais aux
États-Unis et au Canada.
Cette garantie ne couvre pas les
dommages attribuables aux accidents,
les dommages
causés en transit, ceux
provenant de modifications ou d’une
réparation par un
détaillant non
autorisé, d’un défaut de suivre
les
instructions, d’un usage impropre,
d’un usage hors des États-Unis ou du
Canada, d’un incendie, d’une
inondation ou d’une catastrophe
quelconque. Nous ne garantissons
pas que ce produit est
compatible
avec tout système téléphonique
particulier ou plus perfectionné. Si
votre appareil AMERIPHONE n’est pas
couvert par
cette garantie,
téléphonez-nous au numéro suivant
1-714-897-1111 (TTY) ou au 1-714897-0808 (voix) pour obtenir des
conseils concernant la réparation de
votre appareil.
Les pièces réparées
sont couvertes par une
garantie de 90
jours.
Page 89

84
INDEX
Alarme............................................73
Unité centrale...................................69
Piles................................................76
Horloge...........................................72
Sonnette..........................................70
Réglage de la fréquence...................80
Information Sur LA FCC.....................81
Installation.......................................70
Fonctions de surveillance .................71
Fonctionnement
................................71
Accessoires optionnels
.......................78
Émetteur Alarme audio
...................78
Moniteur Sain De Bébé ..................78
Avertisseur de porte
.......................78
Avertisseur personnel
......................77
Avertisseur tactile personnel
.............77
Récepteur à distance
.......................77
Renseignements importants
sur LA Sécurité...............................65
Liste des pieces................................67
Régler l'heure...................................70
En cas de difficultés
..........................79
Remise à zéro..................................74
Garantie
..........................................82
 Loading...