

American Metal Ware PB-8103E, PB-8303E Installation Manual
Grindmaster®Barista Series Urns
Operation and Instruction Manual
for
Barista Series Urns
Models PB-8113, PB-8103E, PB-8303E
Description........................................... 3
Installation............................................ 4
How to Brew in
an Automatic Urn ................................ 6
Urn Adjustments ................................. 6
Care & Cleaning .................................. 11
Service ................................................. 12
Troubleshooting Guide ...................... 14
Wiring Diagrams ................................. 16
Table of Contents
Prior authorization must be obtained from
Grindmaster-Cecilware™ for all warranty claims.
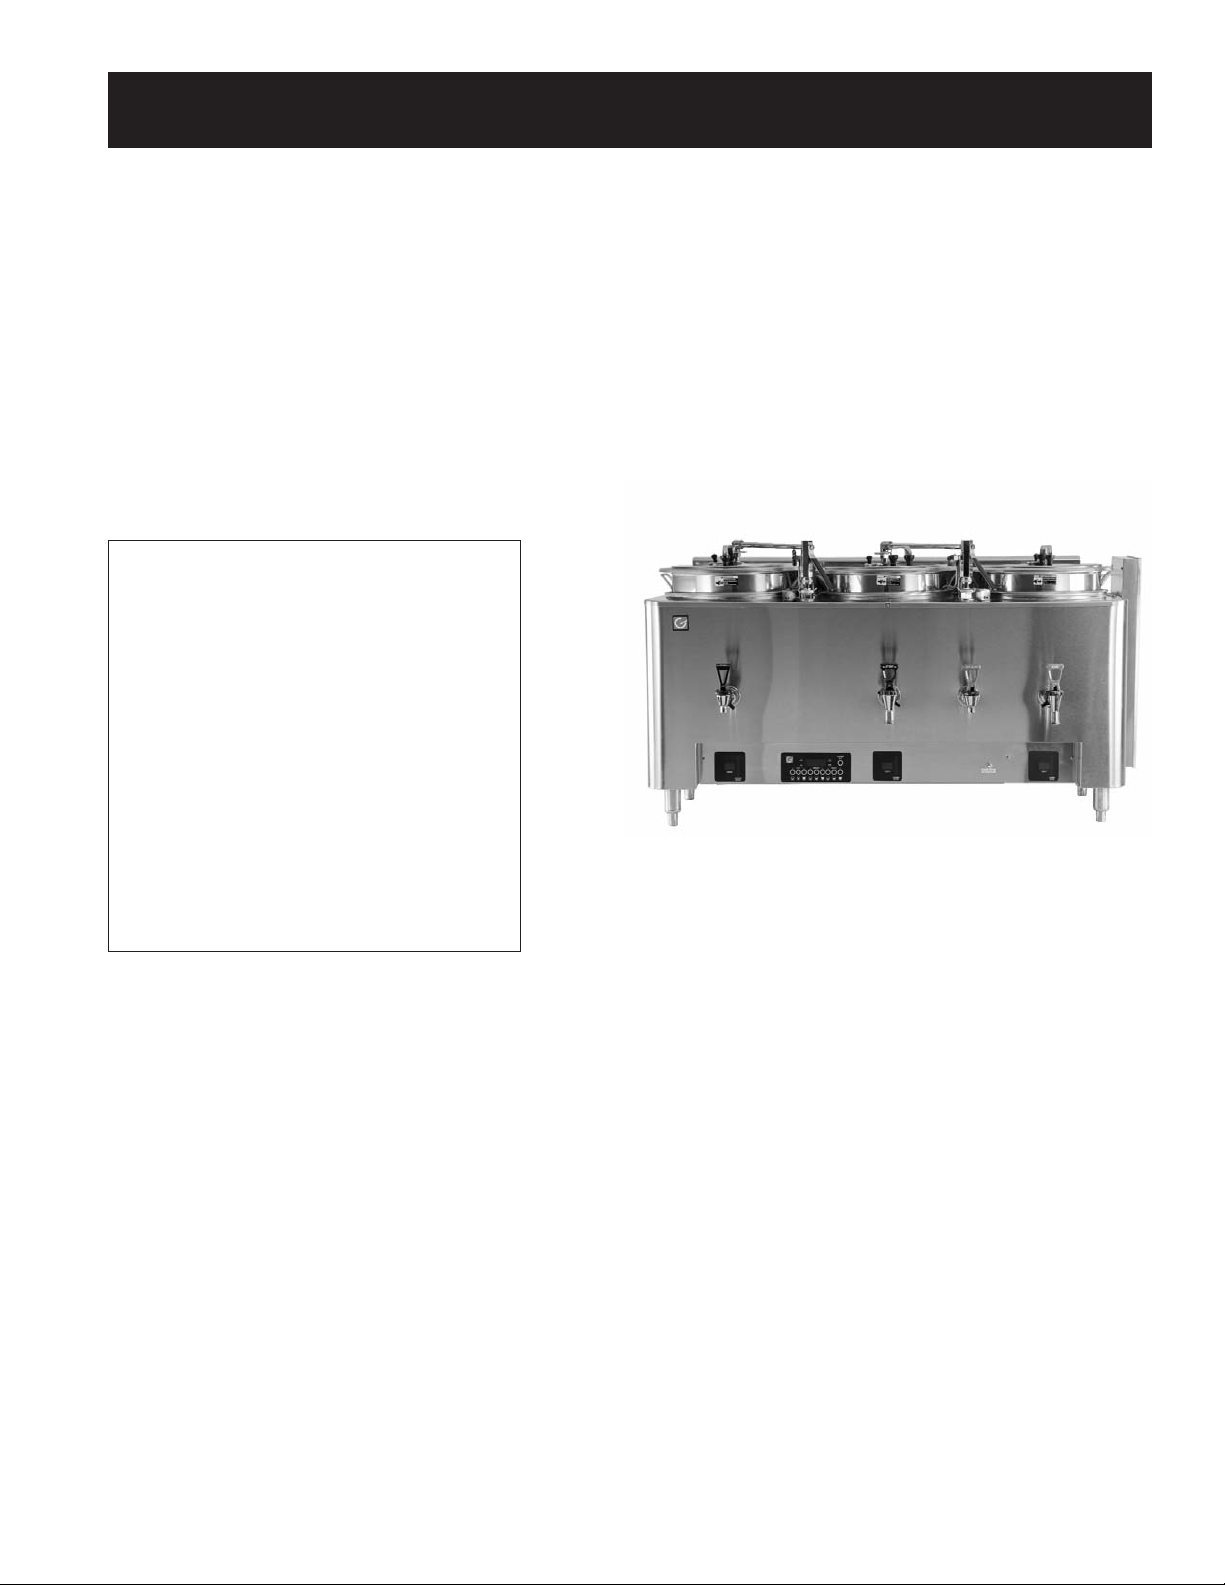
Model PB-8303E
Grindmaster Barista Series Urns
Models PB-8113E, PB-8103E, PB-8303
• All models are electrical heat only
• Single and twin are heat exchange units unless
with suffix (P) which means it comes equipped with
a pump
• Triples are pump style only.
Your model number is found on the nameplate under
the controls.
© Grindmaster-Cecilware Corporation, 2010
PRINTED IN USA
Form # AM-345-01
Part # A090-841
Grindmaster-Cecilware Corporation
4003 Collins Lane • Louisville, KY 40245 USA
Ph: 800.695.4500 or +1.502.425.4776
Fax: +1.502.425.4664
www.grindmaster.com • info@grindmaster.com
For the latest updates to our
manuals please visit our website:
www.grindmaster.com

Page 2 Grindmaster® Barista Series Urns Manual

Grindmaster® Barista Series Urns Manual Page 3
Description
The Barista Series Urn is digitally controlled brewing system. This list of features will help you understand the controls available to
you in your brewing process.
1. Each liner has three independent batch volumes.
• Each batch volume is independent
• Each batch can be programmed with pulse brewing feature
2. This urn displays coffee level inside each liner on the vertical LED graph located on the control panel under each liner. The LED
graph reports the coffee level in 1/8th of total brewed volume.
3. Each liner has coffee-hold, countdown timer.
4. Spray arms are fitted with a sensor that allows the control to know the spray arm position.
5. The main display shows the time of day and if the UP arrow is pressed once, it displays the jacket temperature for 5 seconds
and then reverts back to time of day.
6. The control system has an energy saving features that allow the urn to turn off the heat function during long periods of
non-usage. Each week day can be individually programmed to have an ON time and an OFF time. i.e., if the coffee shop opens
for business at 6 am, the urn can be programmed to heat up at 5 am so that it’s ready to brew by 5:30 am. If the coffee shop
closes at 7 pm the urn can be programmed to turn off the heat at 7 pm.
7. The urn has an automatic air agitation feature. Air agitation is used to keep the un-dissolved solids in the coffee in suspension.
The operator can program the on and off time intervals.
8. The urn is equipped with an audio alarm. It will sound 2 beeps; 2 seconds on 2 seconds off, at the end of the brew cycle –
notifying user that brewed coffee is ready to be served. And it will sound continuously for 5 minutes at the end of the coffee hold
time. The main control is equipped with an ALARM OFF button.
9. The urn has Low Temp No Brew function. If enabled, the urn will not brew unless the water temperature is within 5ºF of set point.
If enabled and one tries to start a brew before reaching the minimum brew temperature the display will flash “COLD” for
3 seconds and the alarm will sound 3 beeps; 1 second on, 1 second off.
10. Program mode is password protected. The default password is: “1208”

Page 4 Grindmaster® Barista Series Urns Manual
Installation
WARNING! ELECTRIC SHOCK HAZARD
INSTALLATION OF THIS URN SHOULD BE PERFORMED BY QUALIFIED SERVICE PERSONNEL ONLY.
IMPROPER INSTALLATION COULD CAUSE ELECTRIC SHOCK.
See rough in drawing for this model for dimensions and location of electrical and water input.
Positioning
1. Position urn so that the faucets drip into a drip trough or drain receptacle of some type.
2. Level urn both front to back and left to right. The feet are adjustable for this purpose.
IMPORTANT:
THE PERSON INSTALLING THIS COFFEE URN IS RESPONSIBLE FOR ENSURING THAT THE
ELECTRIC AND WATER CONNECTIONS MEET THE REQUIREMENTS OF THE NATIONAL ELECTRIC
CODE, THE NATIONAL PLUMBING CODE, AND ANY LOCAL ORDINANCES.
DO NOT RUN TUBING, PIPES, CONDUIT OR CABLE UNDER CENTER PORTION OF BARISTA SERIES
URNS. THIS AREA MUST BE KEPT CLEAR FOR SERVICING URN CONTROLS.
Water
1. Cold or hot water (160 degrees F. maximum) may be used. Heat input capacity is ample for the coldest water, and
cold water should be used for best brewing results.
2. Provide shut-off valve and union in supply line near urn.
3. Minimum operating pressure at urn should be 30 PSI.
4. Maximum pressure recommended at urn is 70 PSI.
5. Copper tubing should be used for flexibility.
6. To insure pressure at the urn of at least 30 PSI, use 3/8" OD tubing for short runs, 1/2" OD tubing for longer runs,
and larger size tubing for unusually long runs. Be sure other appliances will not reduce water pressure excessively.
7. Turn on the water supply line and check for leaks.
NOTE: For the best tasting coffee, add a filtering system to the water supply line to eliminate any taste and/or odor from the water.

Grindmaster® Barista Series Urns Manual Page 5
Heat Input
Electric Heated Urns, Models with suffix (E):
1. Check rating marking on urn nameplate to be sure electric lines match voltage, phase, and amperage requirements of urn.
Select the proper cord and cord grip for electrical rating of the urn. The cord must be an oil resistant type such as SO, SOO,
STO, STOO, SEO, SJO, SJOO, SJTO, SJTOO, SJEO, HSO, HSOO, HSJO, or HSJOO. Alternatively, flexible metal conduit and
type THHN wires may be used.
2. The terminal block and ground screw are located behind a cover plate on the front.
3. A neutral wire is normally required on all single phase and on 208 Volt, 3 phase power supplies to operate 120 VAC control
circuit. In the case of single phase, 2 wire service (no neutral), or 3 phase 3 wire service (no neutral), a separate 120 VAC cord
and plug (NEMA 5-15P) supplies 120 VAC power to the control circuit (or for use of transformer on heat exchange urns). This
cord must be ordered separately.
Installation (cont.)
WARNING! ELECTRIC SHOCK HAZARD
NEVER USE THE GROUND CONDUCTOR AS A NEUTRAL. THIS COULD CAUSE ELECTROCUTION.
4. A fused disconnect switch should be installed near urn.
5. Urn body MUST be grounded. A grounding terminal is provided for this purpose.
6. Use only copper wire to connect this urn.
Operation and Start-Up
1. Open water supply line valve to urn.
2. Turn on or plug in the power supply to the urn. Water compartment will begin to fill automatically. Do not power up the urn when
the water line is off.
3. Pump urns have a fast fill feature. This applies to Triple urns and models with a suffix (P) To fill the urn in only ten minutes on
these models:
The fast fill valve is located on the underneath, rear of the urn. There knurled knob that sticks out past the control drawer.
Turn valve to the right to close. Turn valve to the left to open. During initial fill the valve should be open. Close valve after
initial fill so that the valve will be closed during normal urn operation.
4. For heat exchange urns, just turn on the water. The urn will begin to fill and then heat. It will take approximately 45 minutes to
heat water, depending on inlet water temperature, and urn heater wattage.
5. Brew and discard at least one batch of water into each liner. Check that the level is correct. See the adjustments section if
changes are needed.

Page 6 Grindmaster® Barista Series Urns Manual
How to Brew in an Automatic Urn
1. Place filter paper in brew basket with designated amount of coffee grounds. Coffee experts
recommend from 6 to 10 ounces of coffee per gallon of water. Make certain you have a level
bed of coffee.
Consult your coffee supplier for exact brewing specifications. Filter paper sizes are:
Liner size
Filter size Grindmaster Part #
1.5 gallon 14 x 6 BB2.0WP
3 gallon 18 x 6 BB3WP
2. Replace cover. Lift and rotate the spray arm to position the nozzle in the hole on the basket cover.
3. Press the batch size desired on the liner that the spray arm is set to brew in.
• The timer display for the batch will flash “S” or “M” or “L”; depending on which batch size button was pressed.
• To stop the brew at any time, press any of the three batch buttons for that liner.
• If the spray arm is not pointed to the same liner in which the batch button is pressed, the display will show “ARM”.
You will need to move the spray arm to the correct position, or press the batch size on the liner that the spray arm is
set to brew in.
• If after pressing a batch size, the display momentarily shows “COLD”, it means the water is not hot enough to brew. Wait
for a few minutes and try again. To check the water tank temperature press the UP arrow button once and the tank
temperature will display for 5 seconds.
4. The brew cycle takes from 1 to 6 minutes depending on the batch size. When the brew is finished, allow one to four minutes for
the coffee to drip from the basket. Drip time is dependent on the amount of coffee grounds used.
5. When the drip period is complete, center the spray arm and remove the basket to throw away the grounds. Replace the liner
cover to keep the coffee hot.
6. Coffee is ready to serve.
Urn Adjustments
The URN CONTROL has several factory-set options that can be modified by the operator. These are divided into two categories:
Universal Settings and Brew Settings. Universal Settings pertain to the whole unit, and Brew Settings pertain to brew cycles for
each individual liner.
Brew Settings:
Left Liner (for each batch size: Small, Medium, Large)
Brew time
Number of pulses (0 to 6)
Pulse Brew ON time
Pulse Brew OFF time
Middle Liner (On Triple urns only) (For each batch size: Small, Medium, Large)
Brew time
Number of pulses (0 to 6)
Pulse Brew ON time
Pulse Brew OFF time
Right Liner (On twins and Triple urns only) (For each batch size: Small, Medium, Large)
Brew time
Number of pulses (0 to 6)
Pulse Brew ON time
Pulse Brew OFF time
The urn control has a battery back-up thus all settings are retained during a power loss. The original factory settings can be re
stored by using the System Restore Function.
Grindmaster® Barista Series Urns Manual Page 7
Urn Adjustments (cont.)
Universal Settings:
Temperature Scale: ºF or ºC
Water Temperature: Set water jacket temperature, 205 ºF maximum.
Clock Settings: Set for 12 hours clock (AM and PM) or 24 hour clock
Energy Savings Settings: Set ON and OFF time for each week day
Air agitation setting: Set for automatic or manual air agitation
Low Temp no Brew: Enable or disable low temp no brew function
Coffee hold time setting: Enable or disable hold time and set hold time
Display brightness: Set display brightness level
Audio loudness: Set volume for audio alarm.
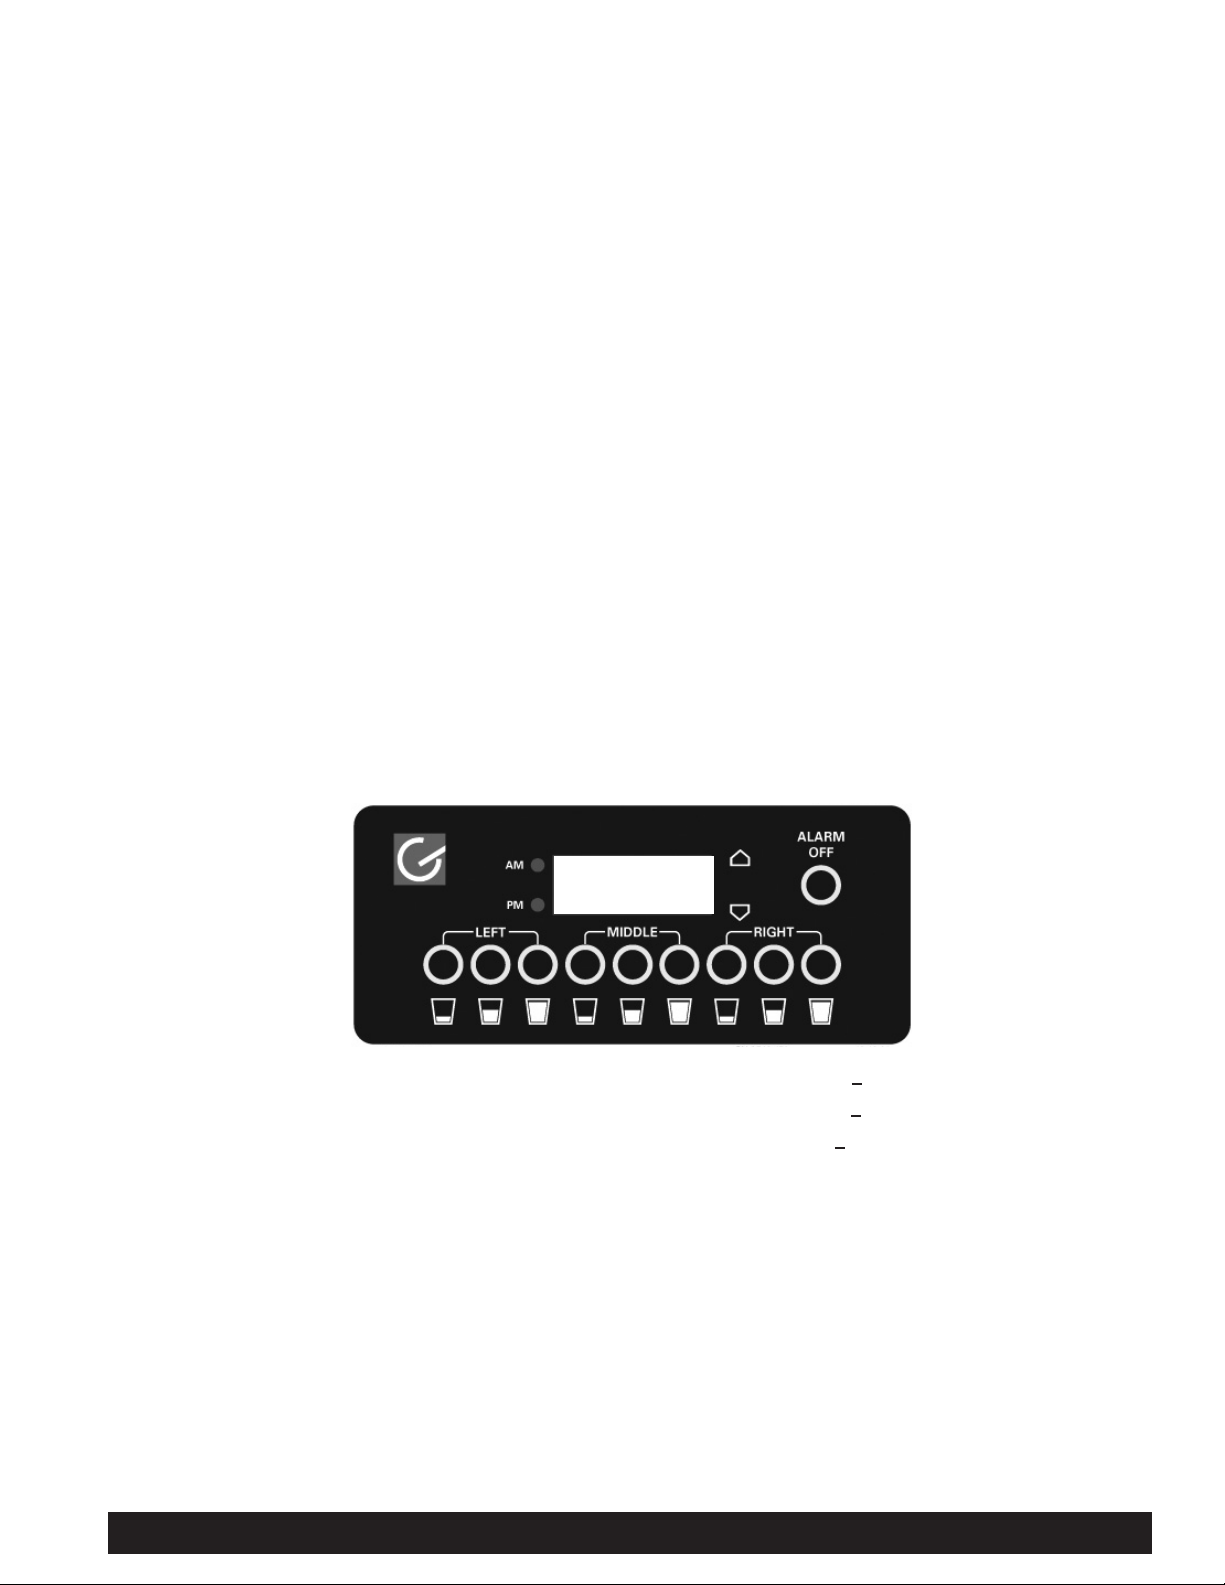
Entering Program Mode:
To enter program mode press and hold the UP and DOWN button simultaneously for 15 seconds until the words “PASS” is shown
on the display.
Now the password “1208” must be entered.
12:08
Press the Middle, Large portion button 8 times to display the 8 of 1208.
Press the Middle, Small portion button 2 times to display the 2
of 1208.
Press the Left, Large portion button 1 time to display the 1
of 1208.
No need to press anything for the 0 in 1208, since 0 is the default number.
Once “1208” appears on the display, press the alarm button once: The display will change to “PRO”.
If you need to enter the UNIVERSAL SETTING program Mode, press the ALARM OFF once more. The display will change to: “ºF”
If you need to change a BREW SETTING program mode, press the portion button of the particular liner you want to change. The
display will change to: “br-t”
NOTE: The triple urn display decal is shown above. On twin urns, the MIDDLE artwork is deleted from the decal but the buttons are
still functional. On single urns, the LEFT and RIGHT artwork is deleted from the decal but the buttons are still functional for entering
the password.

Page 8 Grindmaster® Barista Series Urns Manual
UNIVERSAL PROGRAM MODE
Universal Settings Menu Navigation: Advancing through the menu is done by pressing the ALARM OFF button. Each parameter is
adjusted by pressing the UP or DOWN button. The table below shows how it steps through the menu.
Urn Adjustments (cont.)
Step Setting Display Adjustments
1
Temperature Scale between °F or °C Displays the current selection. Factory default
is “° F”
“° F” or “° C”
2
Water Temperature
set point in °F or °C
Displays the current selection. Factory default
is “195” in °F or “91” in °C
“170” to “205” °F
“77” to “96” °C
3
Clock Format: 12/24 HR Displays the current selection. Factory default
is “12H”
“12H” or “24H”
4
Set Time Displays the current selection. XX:XX
5
Set Day of Week Displays the current selection. “1” to “7”
6
Show Display Mode “diSP” None
7
Set Display Mode Displays the current selection. “d CL” or “d tP”
8
Set Energy Saving Enable/Disable Displays the current selection.
Factory default is “ESdS” Disabled
“ESEn” or “ESdS”
9
Show Energy Saving Temperature
If Energy Saving Enabled
“EStP”
Factory default is 70°F or 21°C
None
10
Set Energy Saving Temperature
If Energy Saving Enabled
Displays the current selection. Factory default
is “70” in °F or “21” in °C.
“70” to “205” °F
“77” to “21” °C
11
Show Day ON
If Energy Savings Enabled
X “on” : This defines day of the week, gener-
ally day 1 is Monday, Day 2 Tuesday, etc.
X = “1” to “7”
12
Set On Time
If Energy Savings Enabled
Displays the current selection.
(The time the urn starts to heat)
XX:XX
13
Show Day OFF
If Energy Savings Enabled
X “oFF”
(The time the urn will stop heating)
X = “1” to “7”
14
Set OFF Time
If Energy Savings Enabled
Displays the current selection. XX:XX
15
Set Air Stir Enable/Disable Displays the current selection.
Factory default is “A-En” Enabled
“A-En” or “A-dS”
16
If Air Stir Enabled
Show Air Stir On Time
“A on” : How long air agitation should be on
should be a proximately 20 – 30 sec.
None
17
Set Air Stir On Time
Total amount of on time for the Air Stirrer.
Displays the current selection
Factory default is 30
“1” to “255” in seconds
18
If Air Stir Enabled
Show Air Stir Off Time
“Aoff” None
19
Set Air Stir Off Time
Total amount of off time for the Air Stirrer.
Displays the current selection
Factory default is 180
“1” to “255” in seconds
21
Show Low Temp No Brew “Ltn” None
22
Set Low Temp No Brew
enable or disable
Displays the current selection. Factory default
is “OFF”
“OFF” or “On”
23
Show Coffee Hold time Enable/Disable Displays the current selection.
Factory default is “CHtE”
“CHtE” or “CHtd”
24
Show Hold Time
If enabled total amount of time for holding the
coffee brewed before Alarm
“Hd-t” None
25
Set Hold Time
If enabled total amount of time in minutes for
holding the coffee brewed before Alarm
Displays the current selection
Factory default is 35
“1” to “99” in minutes.
26
Show Display Brightness “DiSP”
27
Set Display Brightness Displays the current selection. Factory default
is “25”
“100” , “75”, “50” or “25”
26
Show Audio Loudness “Au L”
27
Set Audio Loudness Displays the current selection. Factory default
is “100”
“100” , “75”, “50” or “25”
28
DONE “donE” press a Brew Key to program
or the ALARM Key to exit
programming mode
 Loading...