

American Metal Ware FDD2500 Installation Manual
Model FDD2500
Operator Manual
Daily Cleaning
1.
CAUTION: When cleaning the unit, do not use cleansers, liquid bleach, powders or any other substance that contains
chlorine. These products promote corrosion of stainless steel and plastic parts. Use of these products will void the warranty.
Empty drip pan as needed and wash daily in a dish detergent.
Wipe down all surfaces of the dispense spouts, product storage cabinet, splash panel and drip tray areas with a clean
soft cloth using a mixture of one ounce Ivory liquid detergent (or equivalent) to one gallon of fresh water. Follow by
wiping down all surfaces of the dispense spouts, product storage cabinet, splash panel and drip tray areas with a clean
soft cloth moistened with fresh water and allow to air dry.
2.
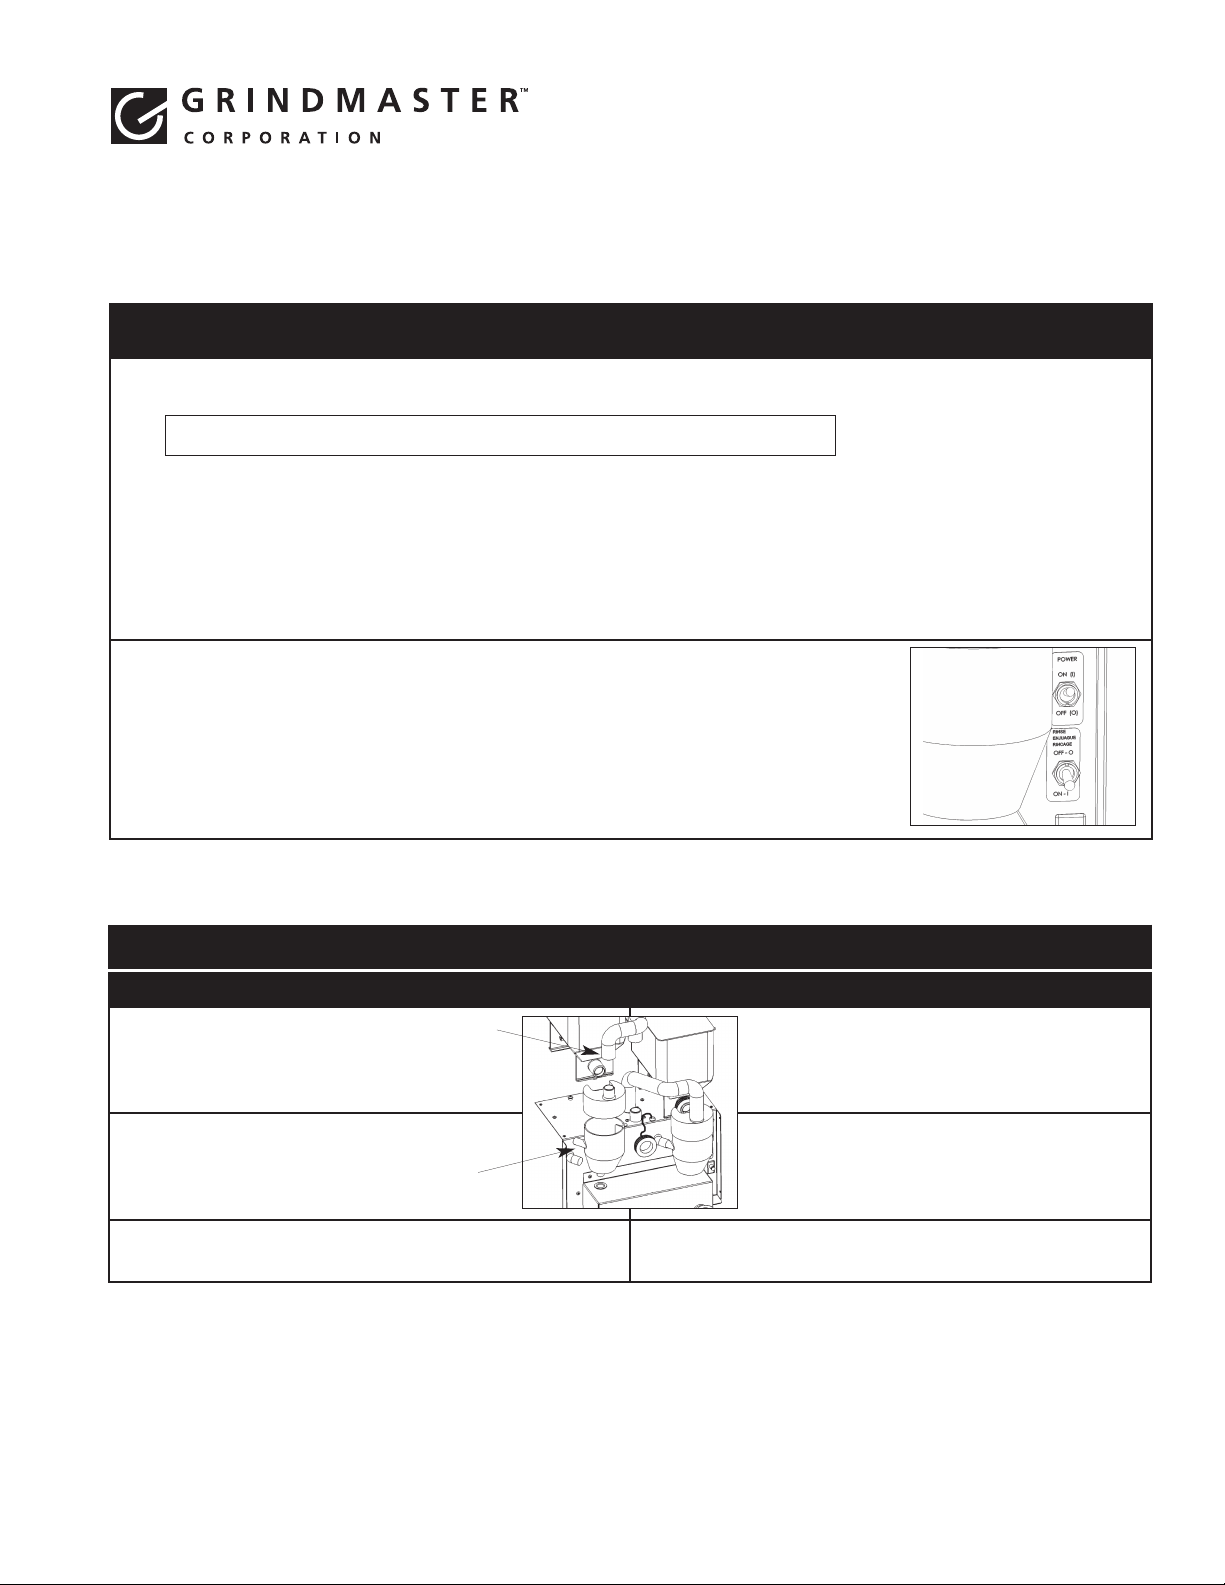
Rinse out the funnel by placing the rinse switch (located to the right of the dispensing valves
when the door is open) in the ON position. Dispense one to two cupfuls until the water is
clear. Short bursts of dispensing may also help clean the chambers. When
complete, return the rinse switch to the OFF position.
WARNING: Do not use a water jet to clean machine. Risk of electric shock.
Cleaning
Weekly Cleaning
Cleaning the Funnel – Disassembly Cleaning the Funnel – Reassembly
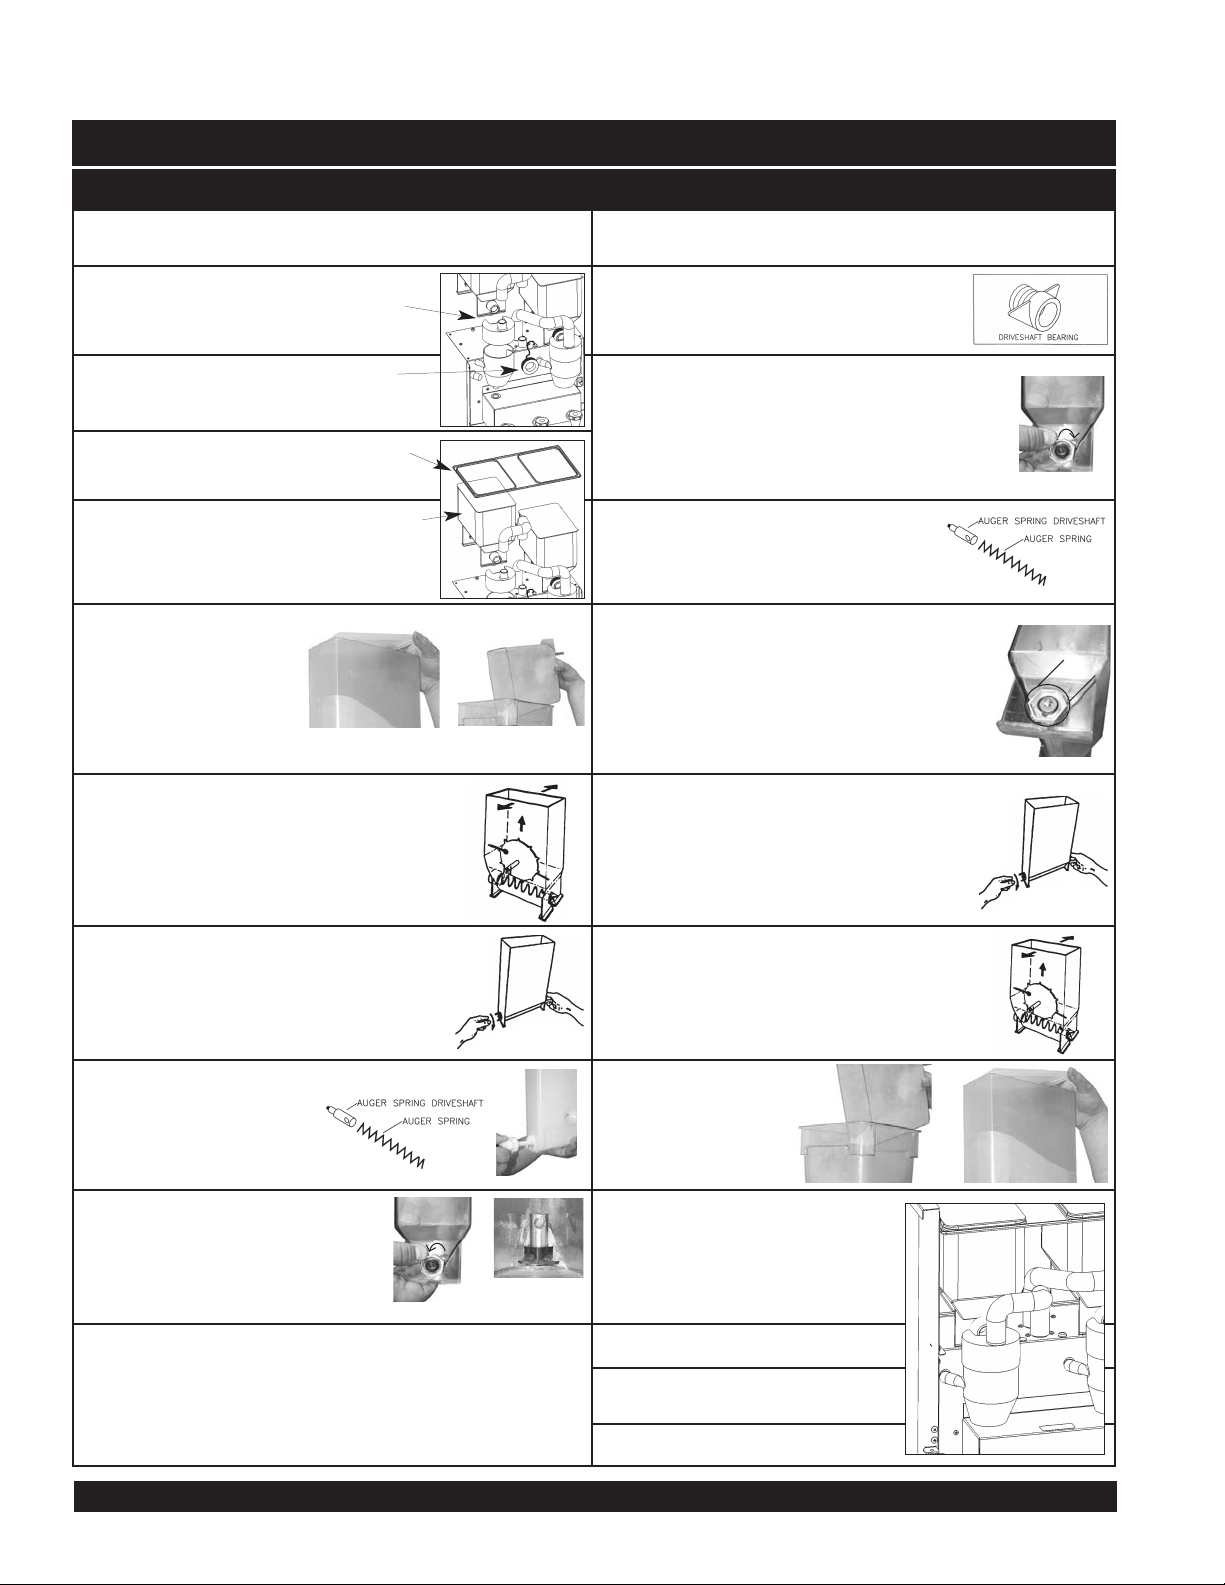
1.
Open the door and remove the large tube
from the funnel cover, then remove the
cover.
1.
Place funnel into position, then
connect hoses.
2.
Remove the mixing funnel by removing silicone tube at the side, then remove funnel.
2.
Place funnel cover on funnel and connect
large tube.
3.
PARTS IN CONTACT WITH FOOD MUST BE WASHED,
RINSED, SANITIZED, AND AIR DRIED.
Cleaning (cont.)
Weekly Cleaning (cont.)
Cleaning Hoppers – Disassembly Cleaning Hoppers – Reassembly
CAUTION: Do not wash hopper without first
disassembling.
IMPORTANT: All components must be completely dry prior
to reassembly.
1.
Open door, disconnect large hose from
funnel cover and then lift off funnel
cover.
11.
Place driveshaft bearing inside hopper
with threads going through hole in the
rear of the hopper.
2.
Lift off ring heater and set aside.
12.
Secure the bearing by attaching the palnut
to the bearing outside rear hopper opening.
Use one hand inside the hopper to push
the bearing outward while turning the
palnut clockwise.
3.
Lift open lid and remove coffee spill
pan.
4.
Remove the hopper from the cabinet.
3.
Install the auger spring driveshaft
and the auger spring by inserting the
flat end of the spring into the
hole in the auger spring driveshaft.
5.
Remove the hopper
cover and empty
hopper contents.
4.
Insert assembly into lower front hopper
opening, making sure the threaded end of
the auger spring driveshaft completely
inserts into the plastic driveshaft bearing in
the rear of the hopper. The driveshaft
bearing threads should be accessible
from the outside rear of the hopper.
6.
Remove the auger pinwheel by pulling it
forward while stretching out the sides of
the hopper.
5.
Place the washer over the driveshaft
bearing threads followed by securing
the drivelink onto the driveshaft bearing
by turning counterclockwise. Secure
the auger spring with one hand while
attaching the drivelink with the other.
7.
Remove the drivelink and washer at
the rear of the hopper by holding the
auger spring with one hand at the front
of the hopper while turning the drivelink
clockwise with the other hand.
6.
Replace the auger pinwheel making sure
the pins are securely positioned inside the
locator holes in the hopper.
8.
Remove the auger
spring and auger spring
driveshaft by pulling out
through the lower front opening of the hopper.
7.
Carefully fill
the hopper
with product
and replace
the cover.
9.
Remove the palnut at the
rear of the hopper by turning
it counterclockwise then remove
the driveshaft bearing from the
inside of the hopper.
8.
Reinstall hopper into the
machine, making sure it is
properly aligned.
10.
All parts in contact with food must be washed, rinsed,
sanitized, and air dried.
1
Install ring heater to front spout.
Open lid and install coffee
spill pan.
11.
Driveshaft
Bearing
PULL
Auger Spring
Driveshaft
9.
10.
Install funnel cover with large
tube attached.
Page 2 Model FDD2500

PROGRAMMING MACHINE FROM TOUCHPADS
Tools Required: None
MACHINE PROGRAMMING: The machine operating parameters can be changed from the touchpad and LCD display
without opening up the machine. (See illustration below).
To enter Programming Mode:
Press and hold (>) and (+) at the same time for approximately 5 seconds.
Tip: Use the eraser end of two pencils to press the buttons if you are having difficulty entering programming mode.
To Exit programming mode at anytime:
• Wait 20 seconds without pressing a button.
• The display will prompt “Exit?”
• Press (+) or (-) to toggle between YES and NO.
• After selecting YES, you MUST press (>) to SAVE changes, or wait for ready message and machine
will exit without saving.
Tip: To verify changes successfully save, re-enter programming mode and check settings.
1) Press (>) to select Language. (1A)
Press (+) to choose English, Spanish, German, or French.
2) Press (>) to set the Time of day on the machine.
Press (+) or (-) to change the time.
3) If password is activated, enter password now.
a) Press (+) to enter first number.
b) Press (>), then (+) to enter second number.
c) Press (>), then (+) to enter third number.
4) Press (>) to change Password settings. (2B)
Press (+) or (-) to toggle between ON (enable password) and OFF (disable password).
If ON is selected, press (>) to change password.
a) Press (>) to enter new password. (following steps 3 a, b, c)
b) Press (>) to confirm new password. (following steps 3 a, b, c)
5) Press (>) to program Dispense Settings. (to change Portion Sizes) (2E) (For FDD2500-**-3A models only)
a) Press (+) for message “Select Dispense Button”. (5A)
b) Press the dispense button for the dispense head you wish to adjust the settings. LCD will display L, M,
or R for left, middle, or right dispense head to acknowledge your selection.
c) Once the dispense head is selected, press (+) or (-) to change the amount of time (portion size) for the
beverage being dispensed.
6) Press (>) to change Whipper Settings. (5A1)
a) Press the dispense button for the dispense head you wish to adjust the settings. LCD will display L, M,
or R for left, middle, or right dispense head to acknowledge your selection.
b) Once the dispense head is selected, press (+) or (-) to toggle between ON (turn whipper ON) and OFF
(turn whipper OFF).
7) Press (>) to return to Dispense Settings. (2E)
Repeat steps 6 & 7 for remaining heads.
8) Press (>) to modify Drink Strength. (7A)
a) Press (>) to Select a Dispense Button. (7B)
b) Press the dispense button for the dispense head that you want to change the drink strength for.
c) Press (+) or (-) to modify the auger speed which changes the drink strength (0-100% of maximum auger
speed in 1% increments).
Note: A faster speed will result in a stronger drink and a slower speed will result in a weaker drink.
PROCEED
POWER ON/OFF
(STANDBY)
INCREMENT UP
INCREMENT DOWN
Model FDD2500 Page 3

Programming Machine from Touchpads (cont.)
9) Press (>) to modify Auger Delay.
a) Press (>) and select dispense button.
b) Press the dispense button for the dispense head that you want to change the auger ON delay time.
c) Press (+) or (-) to modify the time in tenths of a second.
10) Press (>) to modify Auger Off Delay.
a) Press the dispense button for the dispense head that you want to change the auger OFF delay time.
b) Press (+) or (-) to modify the time in tenths of a second.
11) Press (>) to change Heater settings. (8A)
Press (+) or (-) to toggle between ON (water tank heater ON) and OFF (water tank heater OFF).
12) Press (>) to modify Water Tank Temperature. (7A)
Press (+) or (-) to increase or decrease water tank temperature.
13) Press (>) to modify Low Temp/No Brew settings. (7B)
Press (+) or (-) to toggle between ON (will not allow drinks to dispense if water temperature is below
programmed temperature) and OFF.
a) If turned ON press (>) to modify Minimum Dispensing Temp.
b) Press (+) or (-) to increase or decrease Minimum Dispensing Temp.
14) Press (>) to change Sleep Mode settings. (8A)
Press (+) or (-) to toggle between OFF and ON (forces the water tank temperature to a programmed temperature
after a programmed time of inactivity – used for energy savings).
a) If turned ON, press (>) to change Sleep Mode Settings.
b) Press (+) or (-) to increase or decrease the amount of time the unit is inactive before going into sleep mode.
c) Press (>) to change sleep mode water tank temperature setting.
d) Press (+) or (-) to increase or decrease the water tank temperature during sleep mode.
15) Press (>) to view Manual Dispense mode. (9A)
(Models with manual Free-Flow Tomlinson handles cannot be changed to portion control.)
16) Press (>) for Sales Mode. (14A) (This option for future use. “Free” is currently the default setting.)
17) Press (>) to retrieve Sales Data. (15A)
18) Press (>) to view Total Dispense data (number of drinks dispensed per head). (15B)
Press the dispense buttons that you want to retrieve information about.
After viewing each head’s data, proceed to next step.
19) Press (>) to view Total Brews data. (15E)
LCD will display total number of drinks dispensed by the unit.
20) Press (>) for Clear Data options. (16A)
Press (+) or (-) to toggle between YES (resets sales data counter to “0”) and NO.
Important: After selecting YES and then pressing (>) all data will be cleared immediately.
21) Press (>) to view Dispenser Type. (17A)
LCD will display type of dispenser.
22) Press (>) to display Date Code information. (18A)
LCD will display manufacture date.
23) Press (>) to display Software Version on controller. (19A)
Displays current software version stored in controller memory.
24) Press (>) to Retrieve Error Codes. (20A)
Press (+) or (-) to toggle through and review all error codes. The LCD will display the number of times each
error code has occurred. Error Codes:
SC1: No Water Pressure
SC2: Reset Power (Error has occurred that requires power to be reset).
SC3: Low Water Level (Inlet valve ON for more than 5 minutes.)
Page 4 Model FDD2500
 Loading...