


Effective: June, 2008
American Dish Service
ADS MODEL ASQ
GLASSWASHER
900 Blake Street
SERVICE MANUAL Edwardsville, Kansas 66111
(913)-422-3700
© 05/08
IMPORTANT:
American Dish Service provides this information as a service to our customers. Keep all instructions for future reference. Although ADS will make every effort to make sure the information in this service manual is correct and up-to-date, ADS does not certify that this is the case, and should you decide to utilize this manual, you do so at your own risk. ADS reserves the right to alter or update this information at any time without notice. Should you desire to make sure that you have the most up-to-date information, we would direct you to the appropriate document on our website: www.AmericanDish.com. The instructions and guidelines in this owners manual are given with the assumption that the dishwasher has been installed, operated, and maintained properly and in accordance with all applicable Codes, Ordinances, and Safety requirements. Failure to install, operate, and maintain the machine in this manner will void the ADS Warranty. ADS assumes no liability or control over the installation, maintenance (service), or operation of the equipment. Product failure due to improper installation, maintenance, and operation is not covered under the ADS Warranty.
WARNING:
During the operation of all dishmachines, chemicals, high voltage electricity, and normal operational functions can cause harm, bodily injury, or worse if proper installation, operation, and maintenance are not observed. It is imperative that the operator(s) are trained in the operation and made aware of the hazards that can exist. This is the responsibility of the owner of this equipment. When installing, operating, or maintaining your dishwasher you must follow all applicable safety requirements, including the wearing of approved personal protective equipment.
TABLE OF CONTENTS
1.0GENERAL
2.0OPERATOR PROCEDURE
3.0INSTALLATION
4.0CHEMICALS
5.0PREVENTIVE MAINTENANCE
6.0TROUBLESHOOTING
7.0REPAIR PROCEDURES
8.0REPLACEMENT PARTS
1.0 GENERAL
The Model ASQ Glass washing machine is intended for under counter installation in bars and restaurants. The unit has a circular rack divided into three compartments. This rack is indexed manually so that one compartment is at the back of the machine in the wash zone while the other two compartments are used for loading and unloading. The machine uses liquid chemicals for sanitizing, rinse-aid and detergent.
During the first part of the cycle detergent is metered and the machine washes glasses. It then drains and pre-rinses. Fresh water continues to flow into the machine until the sump is full and the recirculating pump starts for the pumped rinse. Chlorine based sanitizing chemicals are introduced during the rinse. When the cycle is complete the rinse water remains in the machine to serve as wash water for the following load.
The rack is manually indexed bringing freshly washed glasses to the front compartment and taking soiled glassware into the wash compartment. When the cycle start button is pressed the next cycle begins.
Chemicals are stored in the front compartment accessible through the main door. Electrical controls are enclosed in a cabinet on this door for accessibility. A small heater maintains wash temperature when there are long periods between cycles.
2.0OPERATOR PROCEDURES
2.1DAILY START-UP
The following procedure should be followed at the beginning of each shift:
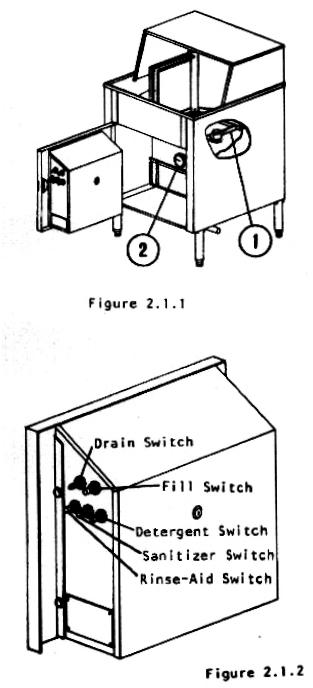
1.Inspect spray arm, screen and sump (1) for cleanliness.
2.Inspect chemical containers to insure an adequate supply for the entire shift.
3.Turn on power switch (Green) at the front of the machine.
4.Depress the fill button on the side of the control cabinet until the machine begins its cycle.
5.When the machine has finished its first cycle check the water temperature (2). If it has not reached 120° F. (49°C.) then press the cycle start button on the front of the machine (Red). Repeat this procedure until water is at the proper temperature.
6.Load the first glasses into the left hand side of the carousel. Unlatch and rotate the carousel 1/3 revolution.
7.Press the cycle start button
(Red).
8.Subsequent loads of soiled glasses may be placed on the left hand side of the carousel and clean glasses may be removed from the right hand side of the carousel while the machine is in operation.
2.2 DAILY MAINTENANCE
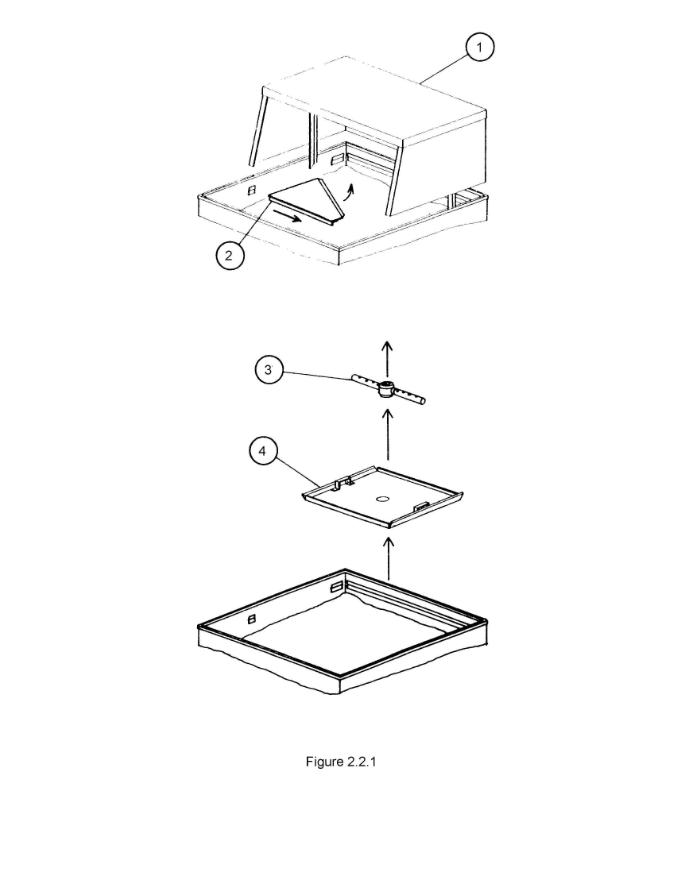
At the end of his shift the operator should do the following (See Figure 2.2.1):
1.Drain water from the machine using the drain switch inside the door.
2.Remove the hood top (1) by lifting up approximately 1 inch and pulling forward.
3.Remove the carousel by lifting approximately 1 ½ inches and pulling forward.
4.Remove the splash shields (2) on either side of the carousel pivot by pulling up at the center and sliding inward.
5.Remove the spray arm (3) by lifting it off the pivot.
6.Remove the scrap screen (4) and dispose of accumulated debris.
7.Thoroughly clean the inside of the sump and drain pan as well as all removed parts.
8.Clean the spray arm.
9.Reassemble in reverse order.
10.Refill with water.
3.0 INSTALLATION
Adjust height and level of the machine (See Section 7.1.3).
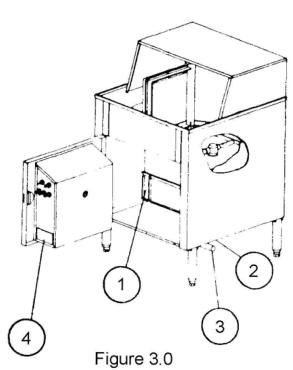
Connect the machine (1) to a separately fused 20 amp circuit using ½ inch Sealtite. All electrical work shall conform to the current edition of the National Electric Code or to applicable local codes, whichever is most stringent. Check building wiring for proper polarity and grounding.
Connect the fresh water inlet (2) to a suitable source of hot water. Source must be capable of supplying 140° F. (60° C.) water with a recovery rate of 50 GPH.
Connect tail piece (3) to drain.
Place chemical suction tubes in their proper containers.
RED – DETERGENT
GREEN – SANITIZER
BLUE – RINSE-AID
3.1 START-UP
Perform the following start-up procedures. This should be done by a qualified service representative.
1.Check voltage rating on name plate (4) and confirm that electrical supply is correct.
2.Visually inspect machine for defects, shipping damage or improper installation.
3.Prime chemical pumps (See Figure 2.1.2).
4.Adjust chemical pump delivery in accordance with the recommendations of Section 4.0 and 7.4.3.
5.Fill and operate machine. Insure that water level is correct and all components work properly. Water level may be checked at the clear plastic tube inside the front compartment.
6.Wash several loads. Insure that chemicals are metered in the appropriate quantities and that glasses are clean.
7.Re-check for leakage at plumbing or cabinet.
8.Confer with owner to insure that he understands the operation and is satisfied with the start-up.
3.2WARRANTY
Record Model #, Serial #, and other necessary information on Warranty Card and forward to:
AMERICAN DISH SERVICE
900 BLAKE STREET
EDWARDSVILLE, KS 66111-3820
4.0 CHEMICALS
All ADS machines require detergent and sanitizer for proper operation. A rinse-aid may be used if desired.
Selection of the proper chemicals and the correct amounts will depend on several factors. Proper selection is vital if optimum results are to be realized. It may be necessary to change chemicals or adjust the quantity after the initial selection.
4.1 DETERGENT
Detergent is used to “emulsify” grease and loosen soil. Emulsification is a process which breaks down grease into very small particles which then mix with water. The detergent also reduces surface tension of the water to dissolve soluble matter.
The detergent selected must be designed for low-temperature dishwashing. Always use established brands.
The proper quantity of detergent may vary over a wide range, and depends on the following factors:
1.Water hardness.
2.Type and amount of grease.
3.Length of time the dishes stand.
4.Iron content of water.
5.Detergent formulation.
For this reason, your chemical distributor should be consulted to determine the amount which will give good results with lowest detergent usage. Your distributor should use the Hatch Test Kit to test water hardness before making a recommendation. After the machine has been in use or if conditions change, the setting can be readjusted for optimum results.
4.2 SANITIZER
Sanitizer should be 6% solution of sodium hypochlorite. Initial setting is 5cc and this should be checked periodically with a Chlorine Test Kit. Free chlorine in the final rinse should be 50ppm or more.
4.3 RINSE-AID
Rinse-aid reduces surface tension and causes the rinse water to run off in sheets rather than collect in droplets. This exposes more water surface to the air which allows the glasses to dry faster and prevents spot formation.
The optimum amount of rinse-aid varies depending on many of the same factors that affect detergent usage. Consult your chemical supplier and use
nationally recognized brands.
5.0 PREVENTIVE MAINTENANCE
The machine should be inspected approximately once a month. The following steps will prevent many costly repairs.
1.Check that Operator Procedures have been followed.
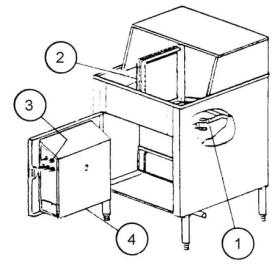
2.Inspect spay arm hub (1) for tightness and spray arm for free rotation (See Section 7.2.0).
3.Assemble machine and check for distortion of sheet metal parts, ease of assembly and proper operation of carousel and
latch (2). Check for proper gap between carousel and splash guards (See Section 7.1.1).
4.Using manual fill switch (3), check fill rate and water level.
5.During the machine cycle, check the following:
a.Leakage at vacuum breaker or cabinet.
b.Timer for proper operation.
c.Operation and flow of chemical pumps.
d.Operation of pilot lights and switches.
6.Remove control box cover (4) and check the following:
a.Cycle counter and drive tube.
b.Chemical pumps and rotors (lubricate if required).
c.Squeeze tubes.
d.Chemical intake and discharge tubes.
e.Timer and switches.
f.Wiring for loose connections.
7.Inspect door hinges and latch.
TROUBLESHOOTING INDEX
DESCRIPTION
6.0 TROUBLESHOOTING
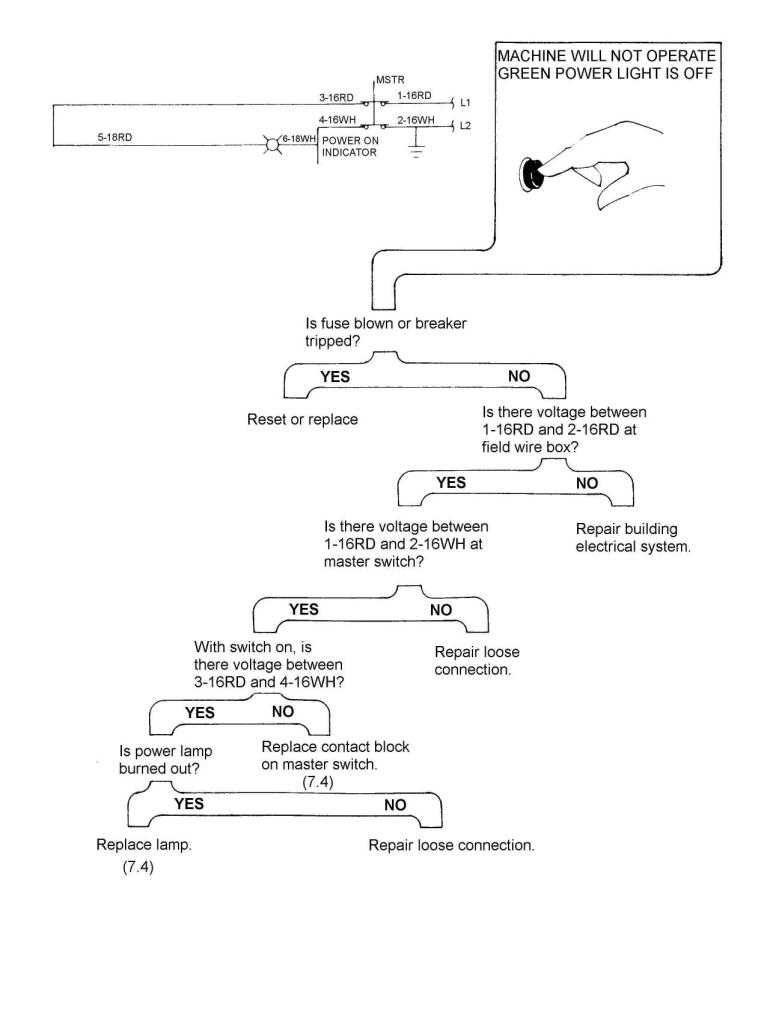
Machine Will Not Operate – Green Light Off
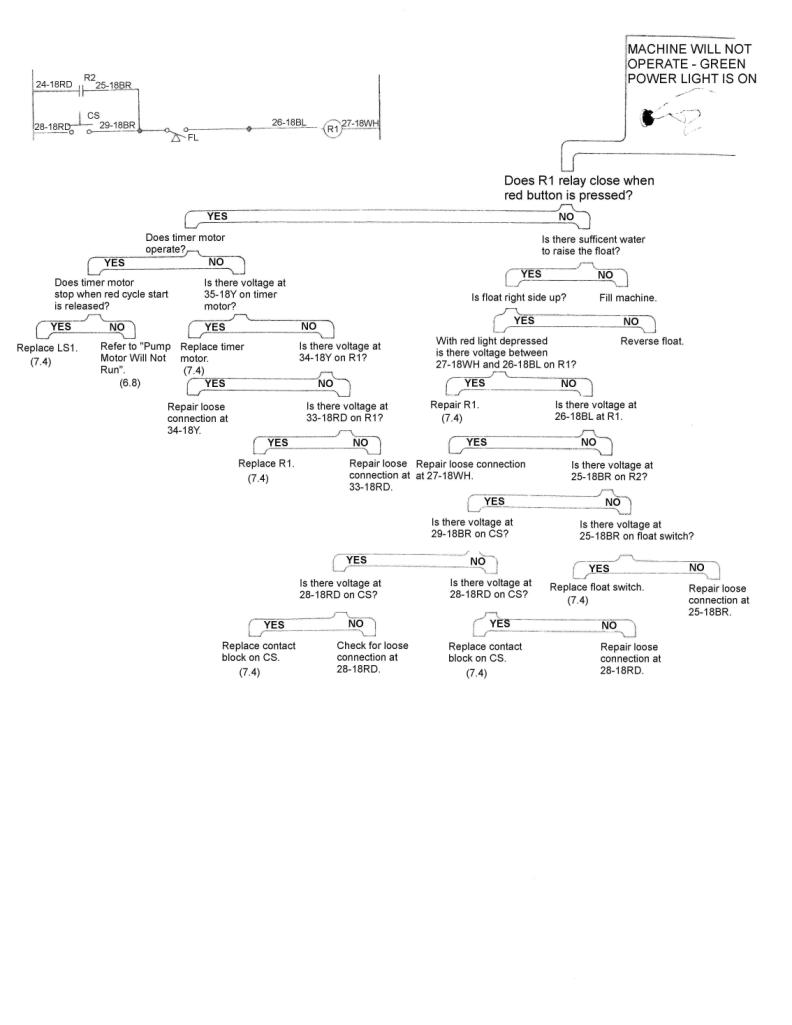
Machine Will Not Operate – Green Light On
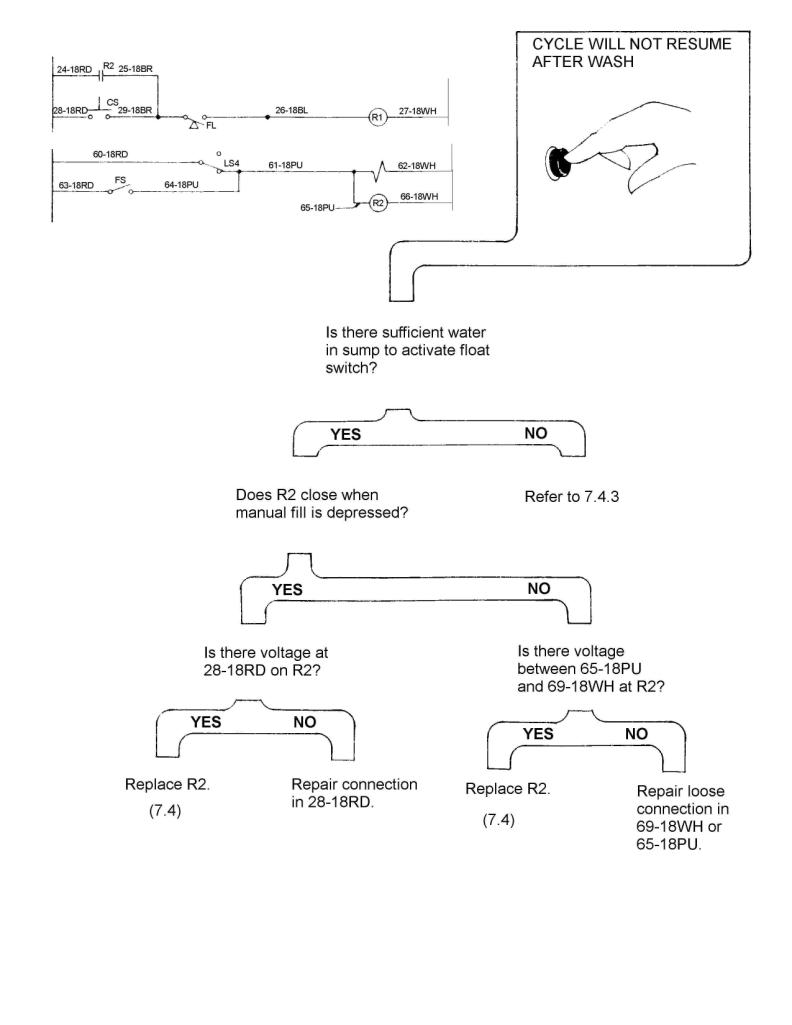
Cycle Will Not Resume After Wash
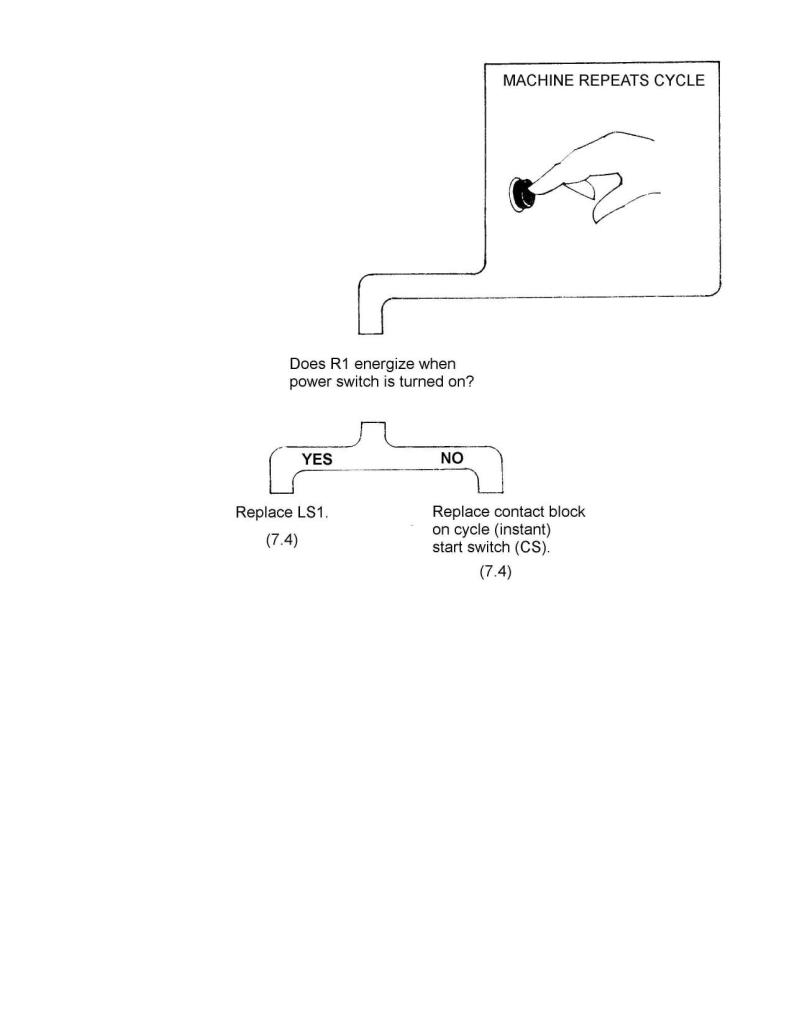
Machine Repeats Cycle
Pump Motor Will Not Operate
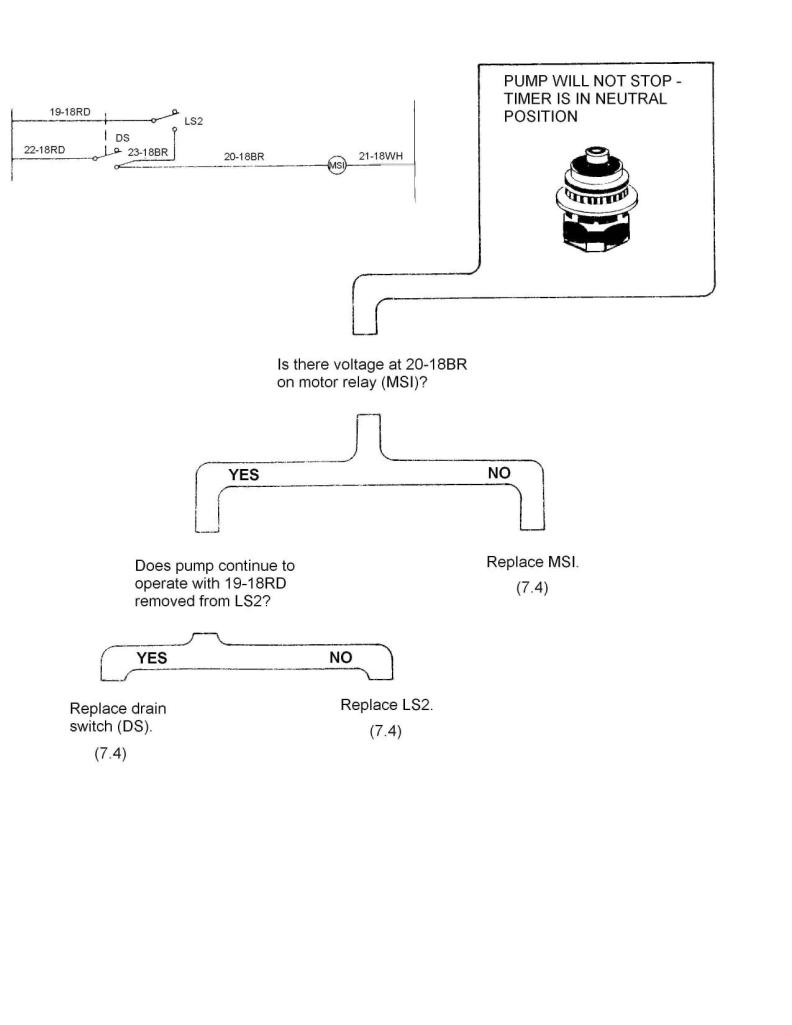
Pump Will Not Stop - Timer Is In Neutral
Motor Stops After Short Time
Recirculating Pump Leaks
Noisy Recirculating Pump
Low or Unsteady Pump Pressure
Detergent Pump Will Not Operate
Detergent Pump Will Not Stop
Sanitizer Pump Will Not Operate
Sanitizer Pump Will Not Stop
Rinse-Aid Pump Will Not Operate
Rinse-Aid Pump Will Not Stop
Chemical Does Not Flow
Heater Will Not Shut Off
Heater Will Not Operate
Fill Water Will Not Stop
Machine Does Not Fill
Water Leaks From Vacuum Breaker
Spray Arm Does Not Spin Properly
Glasses Not Clean – But Machine Operates
Excessive Foaming
DIAGRAMS
Electrical Component Identification Interconnection Diagram with Chemical Alert Ladder Diagram with Chemical Alert Interconnection Diagram without Chemical Alert Ladder Diagram without Chemical Alert
PAGE
2
3
4
5
6
7
8
9
10
11
12
13
14
15
16
17
18
19
20
21
22
23
24
25
26
27
91-0001
91-0002
91-0003
91-9004

6.0 TROUBLESHOOTING
Scope – This section should be used to isolate problems if the machine malfunctions. When a diagnosis has been made and confirmed, refer to Section 7.0 for repair procedures.
CAUTION
ALWAYS turn off Power Switch when removing or replacing electrical covers.
ALWAYS use extreme care when checking voltages.
ALWAYS turn off Power Switch and disconnect circuit breaker or fuses before making electrical repairs.
To use the troubleshooting charts, find the chart which describes the problem best
in the upper left hand corner. A series of questions is asked and should be answered “YES” or “NO”. This answer leads to the next question until the problem is isolated and a repair is described. When the electrical control system is involved, a portion of the circuit diagram is included on the chart to assist in understanding.
Unless otherwise stated, voltage measurements should be taken from the neutral buss.

 Loading...