


1
American Dish Service
INSTALLATION INSTRUCTIONS
Model 5AGES (ENERGY STAR) or WS2
Available in 90, 120, 150-second Time Cycles
Door-type, Double-Rack, Chemical Sanitizer, Dump & Fill Dishmachine
Listed by UL #E68594, NSF/ANSI 3, ASSE 1004 #933, LA Test Labs File M-780089, Mass. License P3-0111-306
If you have questions, call 800-922-2178 or visit our website at www.AmericanDish.com
The electrical power supplied to this machine is an imminent hazard that could result in severe bodily injury or death if not properly installed or hooked up correctly. When working in the control box or on electrical parts, always disconnect power and tag-out before servicing. Replace cover to control box and other protective covers when finished servicing this equipment.
Copyright ADS Installation Manual Model 5AGES/WS2, Revision 3.0 6/7/2013

2
READ Manufacturer’s Manual before Using this Product. For your safety read and observe all cautions shown throughout these instructions. While performing installations described in this booklet, wear approved Personal Protective Equipment, including Safety Eye-Wear.
CHEMICALS— There are potentially hazardous situations when working with industrial cleaning chemicals for dishmachines. See chemical manufacturer’s safe practices and MSDS sheets for handling and installing chemicals and supply containers.
#1 BEFORE YOU BEGIN— American Dish Service provides this information as a service to our customers. Keep all instructions for future reference. ADS reserves the right to alter or update this information at any time. Should you desire to make sure that you have the most up-to-date information, we would direct you to the appropriate document on our web site: www.americandish.com. Set out below are the specifications and requirements that you must use and follow to properly install the type or types of equipment listed above. It is your obligation as the customer to ensure that the machine is installed safely and properly, and when completed, the machine is left in proper and safe working order. Electrical, Plumbing, and Chemical hookup should be performed by a qualified professional who will ensure that the equipment is installed
in accordance with all applicable Codes, Ordinances, and Safety requirements. Failure to follow the installation instructions could void the warranty. ADS assumes no liability or control over the installation of the equipment. Product failure due to improper installation is not covered under the ADS Warranty.
#2 FLUSH OUT—Do not install spray arms until machine is flushed with water. When this machine is turned on, it is normal for it to start and complete one cycle. First, fill and run a cycle. Do this before installing the spray arms. Draining the water will flush installation debris from the tank and pumps; this prevents damage to spray arm bearings. To drain, pull the two drain balls out of the sumps.
#3 WATER HEATERS or boilers must provide the minimum temperature of 120°F required by the machine listed above, which has a minimum hourly demand of 62.5 gallons per hour. The recommended temperature range for optimal performance is 130-140°F. These specifications are for the dishmachine only, which typically accounts for 70% of a restaurant’s hot water demand.
#4 IMPORTANT—The models of dishmachine listed in this document must be installed with space around the outside to allow for servicing of motor and scrap accumulator as well as a 4” space behind the machine from the wall.
#5 INSPECT FOR DAMAGE—If you receive a damaged dishmachine, do not sign “Clear” but write “Damaged” on the documents.
#6 LOOSE ELECTRICAL CONNECTIONS—Damage to equipment can occur if the following precautions are not observed. Before connecting power to the machine, check all electrical terminals in the control box. Screws can loosen in transit. Loose connections on high amp load terminals such as the pump motor will cause wire burning and component damage during operation and will not be covered under ADS warranty.
Copyright ADS Installation Manual Model 5AGES/WS2, Revision 3.0 6/7/2013
3
#7 “CLEAN CIRCUIT” means the electrical circuit breaker for the dishmachine supplies no other outlets, machines, or lights. GFCI outlets are not recommended for commercial dishmachines; ADS recommends that a double-rack machine be installed with the wire connection (hard-wired) directly from the circuit breaker. If a plug and socket are used to provide electrical power to a dishmachine in a commercial kitchen, then according to electrical code it must be a GFCI, but not all GFCIs are the same. They must be rated for the draw of the circuit.
Reference NEC Article 210.8 GFCI Protection (B) Other Than Dwelling Units (2) Commercial and
Institutional Kitchens. All 15 and 20A, 125V receptacles installed in kitchens, even those that do not supply the countertop surface, must be GFCI protected.
#8 This equipment is considered an item of heavy use. It is not rated for outdoor use.
ELECTRICAL SECTION
The electrical power supplied to this machine is an imminent hazard that could result in severe bodily injury or death if not properly installed or hooked up correctly
Electrical—5AGES, WS2 Double Rack (120 volt, 30 amps)
This equipment CANNOT BE CONNECTED TO OR OPERATED by 208-240v power.
A time cycle of 90-seconds is the shortest time available for this model and is compliant with NSF listing. To change to a longer time cycle, the entire cam timer assembly must be changed because of motor gearing. It is recommended that this equipment be installed using new circuit breaker or breakers.
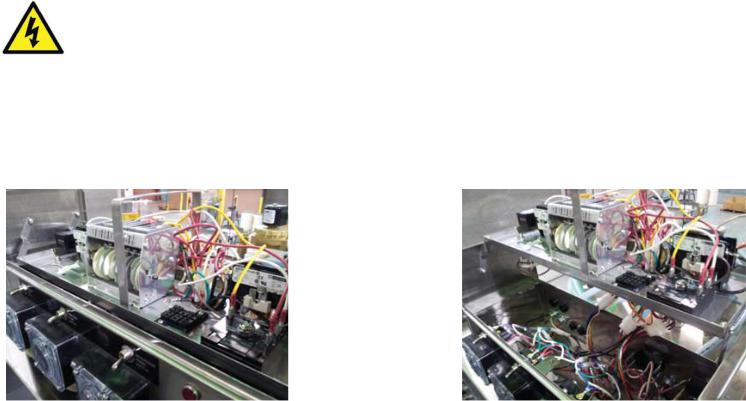
Showing 5AGES control box w/tray in operating |
Showing tray raised for service of pump motors |
position |
|
Top Mount Control Box: This dishmachine has two main/master switches. These are located on the back of the control box and face to the rear. These switches open and close the power supply to their respective motors: the right-hand switch controls the right-hand motor contactor and the right-hand pump motor; the left-hand switch controls the left-hand motor contactor and the left-hand motor. The right master switch (as you face the machine) controls power to the cam timer and control circuit. To
DISCONNECT power to the machine, both switches must be toggled to the left as you face the machine’s front.
Copyright ADS Installation Manual Model 5AGES/WS2, Revision 3.0 6/7/2013

4
Showing single circuit wire combination |
Showing the two master switches |
If you choose Single Circuit Connection with One 30-Amp Power Supply: The power supply of 120 volt, 30 amps must consist of two 10-gauge copper wires and a suitable green ground wire. The breaker must be on a clean circuit. ADS has provided a junction box for electrical hook-up with a threaded conduit hole for
1/2" conduit. The Junction box is attached to the back of the control box.
Remove the junction box cover and attach the 120 volt black supply wire to both black wires in the junction box. Attach the white neutral supply wire to both white wires in the junction box. Attach a green ground wire to the green ground screw located in the junction box and tighten all wires. After the machine is powered up, TEST THE WHITE NEUTRAL WIRE to a ground source with a volt meter, it should read
0 to 6 volts. TEST THE BLACK WIRE to a ground source, it should read 110-120 volts. Attach a building green ground wire to the green ground screw located in the junction box and tighten all wires. Replace the junction box cover and control box lid. Label the 30 amp circuit breaker, “DISHMACHINE.”
Showing the dual circuit wire combination |
Inside view of the junction box w/green ground |
|
screw |
If you choose Dual Circuit Connection with Two 15-Amp Power Supplies: For this optional connection, the power supply to the dishmachine shall be two 120 volt, 15 amp circuits. The breakers or fuses must be clean circuits. Each circuit must consist of two 12-gauge copper wires, one white and one black. Only one single green ground wire is required for these power connections. ADS has provided a junction box attached to the back of the control box for the electrical hook-up, with a threaded conduit hole for 1/2" conduit. Bring both power circuits and a ground wire to this conduit box. The black and white wires with solid color are for the first motor and control circuit, the black and white wires with red tracer lines are for the second motor only. After connecting the wires and powering up the machine, test each circuit. TEST THE WHITE NEUTRAL WIRE to a ground source with a volt meter, it should read 0 to 6 volts. TEST THE BLACK WIRE to a ground source, it should read 110-120 volts. Replace the junction box cover and close the control box lid.
Copyright ADS Installation Manual Model 5AGES/WS2, Revision 3.0 6/7/2013
5
Label the two 15 amp circuit breakers, “DISHMACHINE” noting there are twin circuits supplying the machine.
The two motors for these models are rated 1HP at 9.5 amps at 115volts each for a total running draw of
19 amps allowing it to be installed on two 15-amp breakers or a single 30-amp breaker.
EXPLANATORY NOTE: The use of two solid color wires and two wires with red tracer stripes started in
2003, the solid color denotes the first motor (right-hand side) and control circuit wires. The red tracer wires only go to the second motor (left-hand).
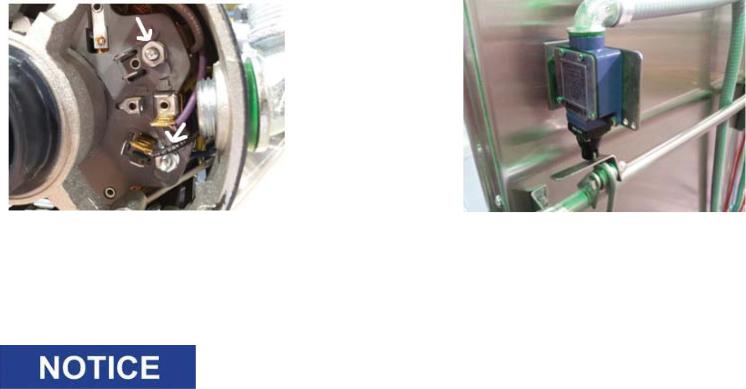
Showing connection points in 1 HP, 120v motor |
5AGES Door cut-off switch and lever arm |
black & white wires attach to spades left of two nuts |
|
THIS MACHINE DOES NOT USE A BOOSTER OR TANK SUSTAINER HEATER.
PLUMBING SECTION
#1 TANKLESS water heaters can be problematic for commercial dishmachines. The ADS model 5AGES & WS2 dishmachine requires the full cycle amount of water (1.9 gallon) supplied within 7 seconds. It has been the experience of ADS that tankless supply systems require multiple units plumbed in sequence with a recirculation loop to achieve proper pressure and temperature.
Check with the tankless water heater manufacturer, they may recommend a storage tank to guarantee proper flow and line pressure to the machine. Failure to provide adequate water quantity, pressure and temperature to the machine will cause the machine to function improperly and is not the responsibility of ADS. Improperly installing ADS equipment in this manner could void the warranty. All costs associated with providing an adequate water supply to the machine is the sole responsibility of the user.
#2 HOODS—Follow all local plumbing and mechanical codes. IMC 2012, section 507.2.2 requires Type II hoods for all commercial dishwashers except where the heat and moisture loads are incorporated into the building’s HVAC systems or dishwashing equipment designed with separate heat and moisture removal systems. A door-type, chemical sanitizing dishwasher is rated at 4770 Btu/h by table 5E, ASHRAE Research Project #1362, 8/5/2008. ADS DOES NOT SPECIFY BUILDING HVAC VALUES
#3 DRAIN SIZE—Gravity drain lines are 2” pipe size. Do not use reducing adapters for drain lines, always use same diameter pipe or larger. Close pump petcocks if equipped.
Copyright ADS Installation Manual Model 5AGES/WS2, Revision 3.0 6/7/2013
 Loading...