

Page 1

WebStore by Amazon 3.5.1
Merchant Manual
Beta Version
Page 2

INTRODUCTION TO WEBSTORE BY AMAZON 1
Overview 1
WebStore by Amazon and Your Products on Amazon.com 1
Getting Started 1
Registering for WebStore by Amazon 1
What is a Storefront? 2
Why would I want multiple storefronts? 2
SETTING UP YOUR WEBSTORE 3
Overview 3
About Setup Methods 3
Using 1-Click Store Setup 3
Using the Setup Wizard 4
Step 1: Enter Company Information 4
Step 2: Setting Up Your Catalog 5
Step 3: Review/E dit Navigation Structure 6
Step 4: Choosing a Layout U sing Theme Ma nager 7
Step 5: Review and Edit Theme 8
Step 6: Publish Your WebStore 9
Configuring your Domain 9
About Domain Names 9
Configuri ng your Do ma in 10
Next Steps: Customize and Market Your WebSt ore 11
MANAGING YOUR WEBSTORE 12
Managing your categories 12
WebStore by Amazon 3.5.1: Merchant Manual
ii
Page 3

About Category Manager 12
Uploading Your Product Information 12
Using Categor y Ma na ger 12
Managing products within categories 15
Locating products 15
Using Excel to manage products 21
Managing the Display of Your WebStore 23
About Themes 23
About Template Manager 23
Setting Site Properties 25
Setting Page Properties 25
Working with Widgets 25
Editing existing content 29
Adding new pages 29
Publishing Your WebStore 30
Marketing your WebStore 31
Advanced Customizations: Tips and Tricks 33
Using Tips and Tricks 33
Embed a New Cascading Style Sheet 33
Add a Background Image to Your Site 34
Add Flash to Your WebStore 34
Add an Advanced Search 35
Code Snippet Library 37
Monitoring Your WebStore Perfor mance 40
WebStore by Amazon 3.5.1: Merchant Manual
iii
Page 4

Introduction to WebStore by Amazon
Overview
WebStore by Amazon lets you create an independent WebStore to sell products using
pre-existing inventory information from Amazon.com. Your WebStore becomes your
storefront on the Internet.
Your storefront, branded with your logo and colors, displays just the products you sell.
Customers can add products to their shopping cart as easily as they do on Amazon.com.
At checkout, payment transactions are handled by Amazon.com as well. You process
orders and shipments, and receive your settlements, just like you do on Amazon.com.
WebStore by Amazon and Your Products on Amazon.com
Information about your inventory, including products and in-stock quantities, is always
stored in the Amazon.com catalog. When customers browse Amazon.com, they see your
products through the Amazon.com interface including the familiar tabs, the product detail
pages, along with browse and search features.
When you create a WebStore by Amazon, it displays just the products you select from
Amazon.com. This custom WebStore uses your branding, colors, and other information.
With WebStore, you can:
• Manage inventory on Amazon.com through the Seller Central Inventory tab.
• Manage your WebStore through the Seller Central Store Design tab.
• Use your own domain—www.mystore.com, for example—to display your
WebStore.
Getting Started
Registering for WebStore by Amazon
Interested in your own e-commerce Web site? Get started at
http://www.amazon.com/webstore. After you have submitted your information, an
Amazon sales associate will contact you to explain how to register for WebStore by
Amazon.
To register for WebStore by Amazon, you must:
• Read the WebStore by Amazon Terms and Conditions Agreement
• Enter your name and contact information and then verify it
• Accept the WebStore by Amazon Terms and Conditions Agreement
1
Page 5

Once you accept the WebStore by Amazon Terms and Conditions and provide the
required information, you can create your storefront and begin selling on the Internet and
taking your first orders within minutes.
What is a Storefront?
Your Storefront is the public Web site that consumers visit through your domain name or
URL. Your storefront holds your product catalog, provides shoppers the ability to search
and browse merchandise, and allows shoppers to purchase your products online. Amazon
provides all the technology for your storefront – you simply have to configure it.
WebStore by Amazon allows you to have as many storefronts as you like, as long as each
has a unique domain name associated with it. Each individual storefront allows you to
present a unique look and feel and a customized product catalog to your customers.
Why would I want multiple storefronts?
Storefronts allow you to customize sites to a specific market segment or customer. For
example, if you sell jewelry and apparel, you can have one storefront that sells jewelry,
one that sells apparel, and one that sells both. You can also tailor storefronts along
themes like clearance, back to school, or free shipping.
WebStore by Amazon 3.5.1: Merchant Manual
2
Page 6

Setting Up Your WebStore
Overview
WebStore by Amazon provides a suite of tools to setup and maintain your WebStore.
Access these tools through Seller Central
(https://sellercentral.amazon.com/gp/homepage.html
by Amazon site are available only if you have selected one of your storefronts in the
storefront drop-down box.
The following is a table of the tabs in Seller Central and the tasks you can complete on
each:
Tab/Tool Tasks
Inventory Search, view, edit, or remove your products for sale.
Orders Search and view a list of current orders, and view details
on individual orders. Issue refunds from the order details
page.
Store Design Manage categories, web design and layout, use Traffic
Manager.
). Tools that manage your WebStore
Reports Statistics on sales, refunds, customer feedback, and A-to-
Z Guarantee claims.
Settings Change the name, email address, or password associated
with your Amazon.com account.
About Setup Methods
You can choose between two methods of creating your store:
1-Click Store Setup: You specify a theme (or template) to use, a color, and your store’s
logo, and WebStore automatically creates your store. After store setup is complete, you
can customize it for more impact.
Setup Wizard: The Setup Wizard walks you through six steps to create your store. After
store setup is complete, you can customize it for more impact.
Using 1-Click Store Setup
To setup your WebStore using 1-Click Store Setup:
1. Log on to Seller Central. You’ll see a different screen, depending on your
account:
WebStore by Amazon 3.5.1: Merchant Manual
3
Page 7

a. If you’re new to WebStore, you see the WebStore Agreement when you
first sign-in. Read the agreement and accept its terms to proceed to the
Store Creation page.
b. If you’re a returning user, click the Store Design tab and then click the
Create a New Store button.
2. In the 1-Click Store Setup section on the left, select a set of templates to use for
your store from the Theme menu. (For specific information on each Theme, see
About Themes later in this document.
3. Select a color for your store from the Color menu.
4. Select the content to use for your logo:
c. Image: To specify an image, click the Browse button to locate the image
you want to use.
d. Merchant name: Enter your merchant name as you want it to appear.
WebStore creates a logo using your merchant name.
5. Click the Build my store using 1-Click Store Setup button.
Using the Setup Wizard
To setup your WebStore using the Setup Wizard complete the following six steps:
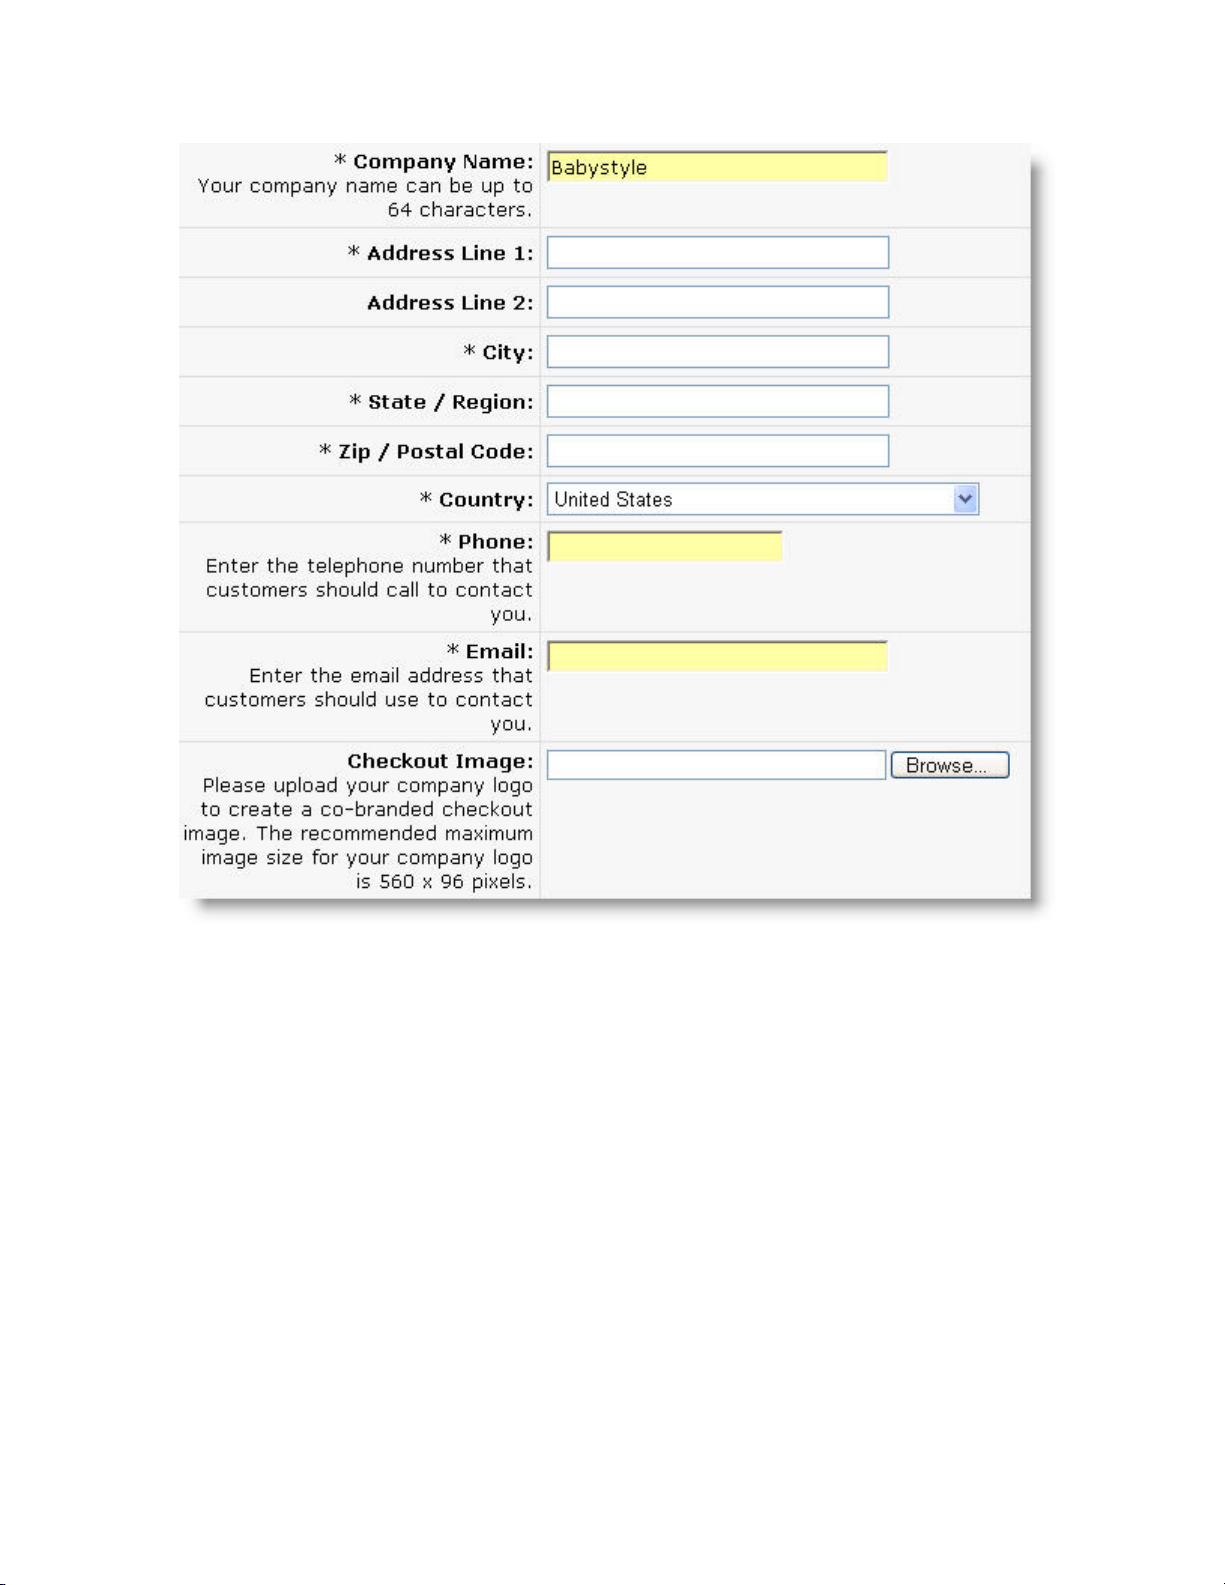
Step 1: Enter Company Information
The first page of the wizard allows you to enter information about your company. This
page automatically fills in the fields you completed on the WebStore by Amazon
agreement page. Review your company information carefully. Information you enter will
be visible to your customers and is used in the copyright information displayed in the
footer on the bottom of each page in your store. Enter the exact name you want displayed
in the footer.
Please Note: After you create your WebStore, you must edit the Contact Us page to
specify other contact info for your store. For more information, see the Need Help? tab
on the Company Information screen.
You may also upload an image of your company logo on the company information page.
This image is visible to your customers on checkout. Click the Browse button to search
for the image you wish to display in your WebStore. You can always upload a different
logo file later if it doesn’t look the way you would like. You can also upload a company
logo. Your company logo is displayed during the co-branded checkout process and is
available to display anywhere on your site.
Please Note: For optimal display, the company logo should have a maximum size of
580x96 pixels.
WebStore by Amazon 3.5.1: Merchant Manual
4
Page 8
Step 2: Setting Up Your Catalog
The Category Manager section of the wizard automatically detects how many products
you currently have and then allows you to determine how to set up your WebStore
category structure. Consider this step carefully, if you change your mind later, you will
lose the category structure that was created. You have two options for building a category
structure:
Build Your Own: Use our interface to design a category structure from scratch and then
manually add products to each category.
To build your own categories:
1. Click the Radio button for Build Your Own, and then click Next. You’re taken to
Step 3.
WebStore by Amazon 3.5.1: Merchant Manual
5
Page 9

2. Follow the instructions in Step 3: Review/Edit Navigation Structure.
Auto Categorize:
WebStore by Amazon automatically creates a category structure that
mirrors the way your ASINs are currently categorized on Amazon.com.
To build your categories automatically:
1. Click the Radio button for Auto Categorize, and then click Next. You’re taken to
step 3.
2.
Follow the instructions in Step 3: Review/Edit Navigation Structure
Please Note:
When considering how to create your categories, remember that
categories created within one option are lost if you change to another option. Click the
radio button next to the type of category structure you would like to use and then click
the Next button.
Step 3: Review/Edit Navigation Structure
Creating Your Categories and Adding Products to them
The Category Manager interface is divided into two steps, each with a separate tab.
Click the Need Help? tab to view step-by-step instructions to guide you through creating
categories and adding products.
The Step 1 tab of the category manager allows you to create, rename, move, or delete
categories. You must create at least one cate gory before you can add products in step
two.
The Step 2 tab allows you to add products to the categories you created and organized in
Step 1. You can also search for products, run a report that locates products not yet
assigned to a category, and view the products in each category.
WebStore by Amazon 3.5.1: Merchant Manual
6
Page 10

Step 4: Choosing a Layout Using Theme Manager
WebStore by Amazon allows you to choose of three website designs, Natural, Modern,
and WebStore Classic. Each design offers slightly different layouts for products, images,
and product information. Click on the image to see a larger view of each layout.
The themes you can choose from:
Natural: Based on a large center image layout with a horizontal menu bar, Natural
includes the following features:
• Large amounts of open whitespace for a clean look.
• You can place a homepage element spanning the center column for visual impact.
WebStore by Amazon 3.5.1: Merchant Manual
7
Page 11

• For pages with sub-categories, a menu bar can also appear in the left column.
• A search field appears in the header.
Modern: Based on a three-column layout with vertical and horizontal menu bars,
Modern includes the following features:
• You can customize the background color and graphic.
• You can place a homepage element spanning the center column for visual impact.
• The menu bar appears in the left column.
• A search field appears in the header.
Classic: Based on a three-column layout, Classic includes the following features:
• The layout is well-suited for stores with large numbers of products
• The left column contains a search area, menu bar, and space for customized items.
• The center column can contain any type of content. Typically, the center column
emphasizes the store's main attractions.
• The right column can contain a search field and additional customized items.
In the next step, you can further customize the theme you have selected using the
Template Manager.
Step 5: Review and Edit Theme
Template Manager allows you to customize the layout of each page in your WebStore.
You can add or delete WebStore pages, as well as edit items on the pages. You can also
add custom pages.
For more detailed information on how to customize WebStore pages, see Managing the
Display of Your WebStore.
WebStore by Amazon 3.5.1: Merchant Manual
8
Page 12
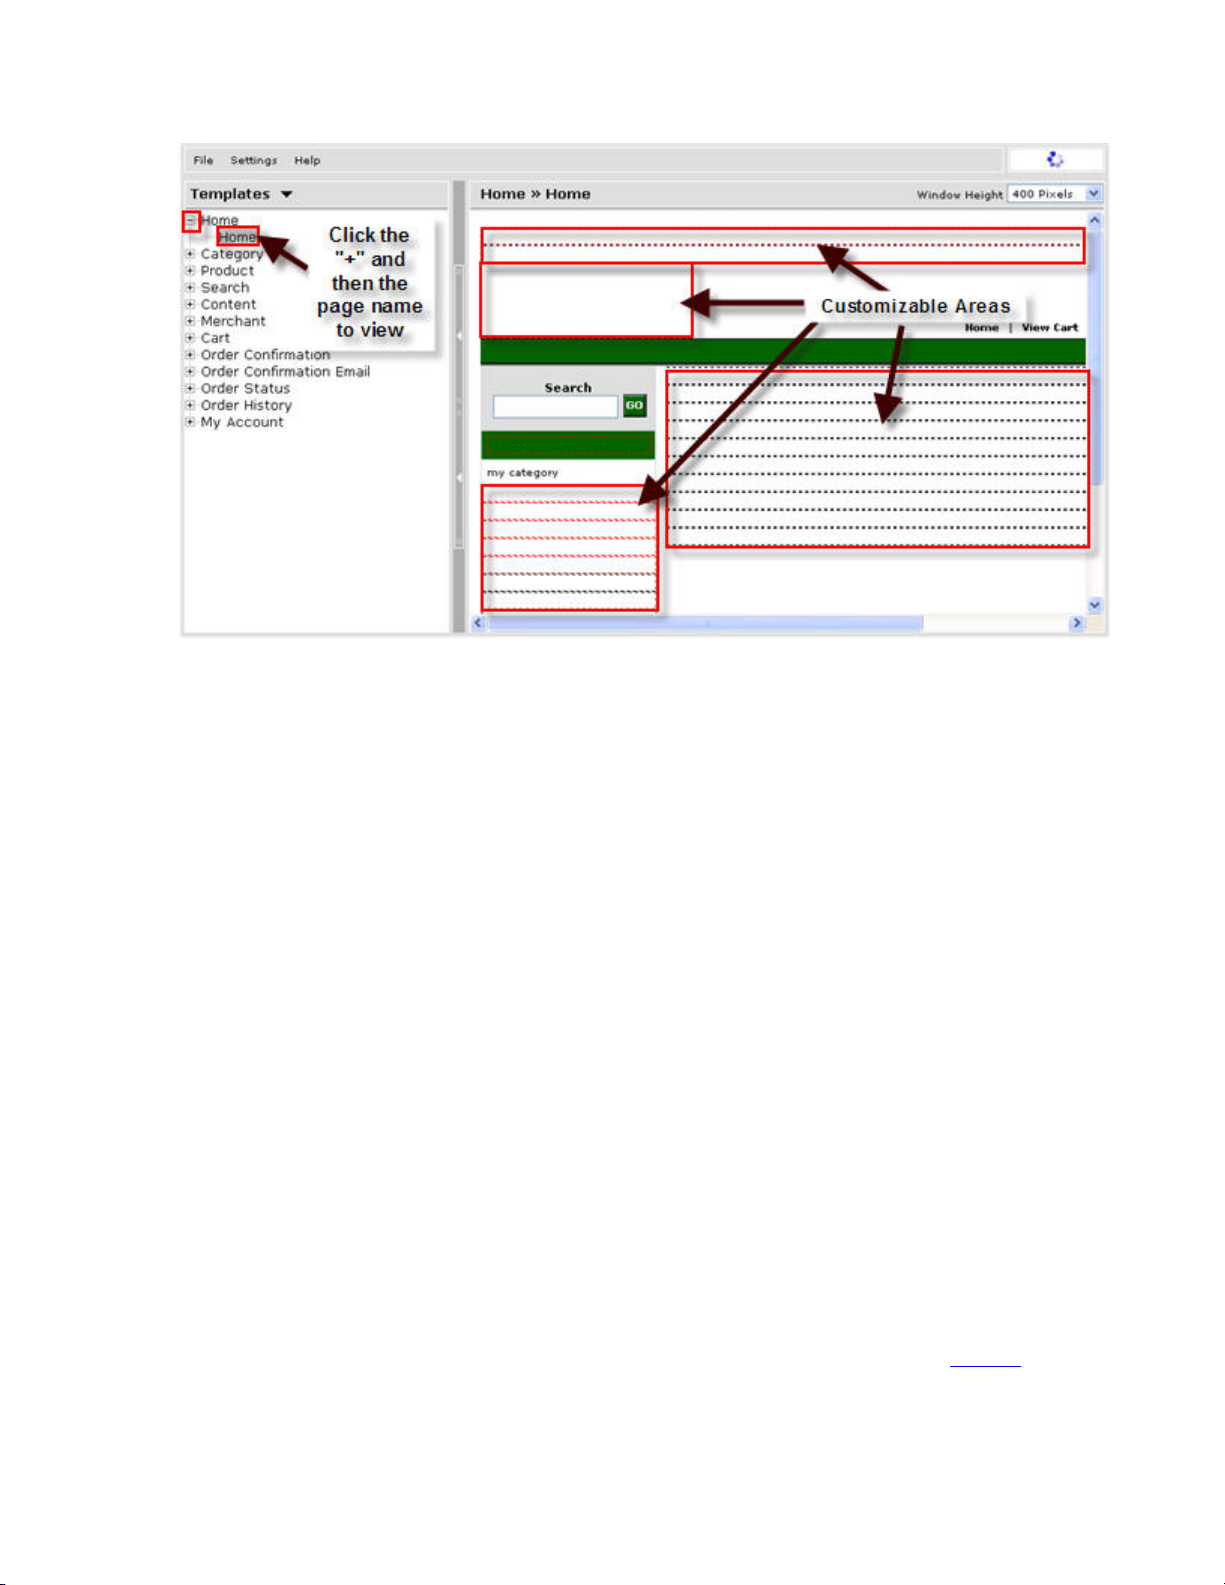
Customizable areas of the Home page in Template Manager
Step 6: Publish Your WebStore
WebStore by Amazon allows you to publish the site you have just created. Publishing
copies your WebStore to your domain server. You must configure your Domain before
the store becomes available to customers.
Configuring your Domain
About Domain Names
An internet domain name is a unique text name that points to a Web site. Domain names
point to Web sites by referencing the IP address of the computer that contains the Web
site. For example, the domain name "www.amazon.com" is the text that corresponds to
the numeric IP address for the computer that hosts the Amazon Web site.
Rather than remember a numeric IP address, Web viewers need only remember a simple
name. When a viewer enters a domain name, the corresponding IP address is retrieved
from a central registry of domain names.
Note: You use Domain Registrars, such as GoDaddy.com, NetworkSolutions.com and
Enom.com, to purchase a domain name, and then link it to the corresponding IP address.
After creating your WebStore, you must configure your domain name, and then publish
your store to make it available to customers.
WebStore by Amazon 3.5.1: Merchant Manual
9
Page 13

Configuring your Domain
To configure your domain name, you need to complete two tasks:
• Change your domain name in Amazon Services Seller Central
• Customize settings with your domain registrar
To Change Your Domain Name on Seller Central:
1. On the Seller Central WebStore Management page, click the Manage button next
to the storefront you want to change. The Store Management page opens.
2. Click the Change Domain Name link. The Change Domain Name page opens.
3. In the white text box type your domain name. For example, “myapparel.com”.
4. In the yellow text box, type a sub-domain, if you're only running your WebStore
as a subdomain. For example, “shop” is the sub-domain in
“shop.myapparel.com.”
Please note: Leave the sub-domain field blank if you do not want to create a subdomain. Also, you should not enter the prefixes “www” or “http” in this text box.
5. Use the drop-down to select the correct suffix. For example, .com, .net.
6. Select the publish option.
7. Click Save.
Important: If you currently receive e-mail through your domain name, for example
sales@mydomain.com, complete the steps in Forwarding E-mail from Your Domain
before you change your domain name servers with your registrar.
To Customize Settings with your Domain Registrar:
Customize domain name settings using your registrar's account management tools. You
will need your login name or ID and password to complete the required steps:
Step 1: Create an Address record
An Address Record, or A record for short, specifies the IP address you want your domain
to point to. You create two A records to point your domain name to the WebStore by
Amazon IP addresses.
Step 2: Create a CNAME record
A Canonical Name Record, or CNAME Record for short, lets you point your subdomain
to your main domain name. For example, in www.mystore.com, www is a subdomain of
mystore.com. You must create a CNAME record, to point the www subdomain to your
main domain.
The Propagation Period
WebStore by Amazon 3.5.1: Merchant Manual
10
Page 14

Once you create the appropriate records, they must propagate across the Web before your
WebStore is visible at your domain name. The propagation period varies from a couple of
minutes to up to 48 hours for changes to Address and CNAME records.
General Instructions
If your registrar is GoDaddy.com, Enom, or Network Solutions, follow the detailed
instructions in Step 2: Customize Settings with Your Domain Registrar of Configuring
Your Domain Name in Seller Central Help.
If your domain registrar is not one of those listed above, follow these general
instructions:
1. Login to your account on your registrar's Web site, and go to the account
management console.
2. Select the domain(s) you want to change.
3. Locate the appropriate section of the account management console for advanced
DNS settings.
4. Delete all existing A records that point to your main domain and @. Do not delete
A records for subdomains, such as mail.domainname.com.
5. Create two new A records that point your domain (mydomain.com)
to 207.171.166.53, and 72.21.206.30.
6. Create a CNAME record that points the subdomain "www" for your domain to
storefront.amazon.com.
7. Log in to Seller Central, navigate to the Store Management tools and then click
the Publish Site link.
Next Steps: Customize and Market Your WebStore
Now that you have your initial site created, you're ready to customize it and market it.
There are several tools available to help you manage and update your site(s). For more
information, click the links below:
• Category Management - Assign products to your WebStore categories and add,
remove, or rename a category.
• Template Management
• Traffic Manager
• Store Settings - Manage item content preferences.
• Publish Store
• Change Domain Name - Change the domain name (URL) of your live
WebStore.
- Publish a WebStore to your preview or public domain.
WebStore by Amazon 3.5.1: Merchant Manual
- Choose the layout template and global color preferences.
- Manage your traffic driving tools and market your site.
11
Page 15

Managing Your WebStore
Managing your storefronts encompasses a number of tasks:
• Managing your catalog
• Managing the display of your WebStore
• Driving traffic to your WebStore
• Updating your company’s contact information
• Publishing your WebStore after updates
• Updating your domain when needed
Managing your categories
About Category Manager
CategoryManager lets you create and manage your own category structure, as well as
organize products within categories. Your category structure provides the basic means of
navigation for visitors to your storefront. A logical category structures helps visitors
quickly locate the products they want.
Uploading Your Product Information
Before setting up your catalog, you need to upload products to Amazon.com. The
information you upload includes pricing and inventory data. Seller Central provides a
number of tools to help you complete the task of uploading products. Please see Manage
My Inventory in Seller Central Help for more information.
Using Category Manager
Category Manager allows you to create a category structure and organize your
products within the categories. Category Manager includes two tabs:
• Step One: create and customize your category structure. You can add,
delete, move, rename and sort categories.
• Step Two: assign your products to categories. You can add or remove
products from categories, search for products, and view all your products
uploaded to Amazon.com.
WebStore by Amazon 3.5.1: Merchant Manual
12
Page 16

To add your first category:
1. Click the Add New Category button. The Add New Category window opens.
2. In the Category Name text box, type your category name.
3. Click the Add Category button. Your new category appears in the category
tree. Since this is your first category, it appears below the My WebStore
category.
To add additional categories:
1. Click the category under which you would like to create a new category.
2. Click the Add New Category button. The Add Category window opens.
3. In the Category Name text box, type your category name.
4. Click the Add Category button. Your new category appears under the
category you selected.
To Delete a Category:
WebStore by Amazon 3.5.1: Merchant Manual
13
Page 17

If you selected the Auto-Categorize option on the first screen of Category Manager,
duplicate categories may have been created in your category structure that you want to
delete. Occasionally, you may want to delete a category rather than move it to another
location in your category structure. Use the delete category feature carefully; deleting a
category also deletes any subcategories under that category.
Note: Deleting a category deletes all subcategories contained in it.
1. Click the category you want to delete.
2. Click the Delete Category button. A dialog box opens.
3. Confirm you want to delete the category selected and click OK. The category is
deleted from your category structure.
To Rename a Category:
You can rename any category under the MyWebStore category using the Rename
Category feature. However, the MyWebStore categor y cannot be renamed.
1. Click the category you want to rename. The category is selected.
2. Click the Rename Category button. The current name of the category is
highlighted.
3. Type the new name in the text box and press ENTER. The category name is
changed.
To Move a Category:
You can rearrange or reorganize your categories using the Move Category feature. You
can move categories to appear below any category or move a subcategory up to create to
a new category. To view your category structure, click on the plus "+" signs next to the
categories.
1. Click the category you want to move. The category is selected.
2. Click the Move Category button. A dialog opens, advising you to select a
destination category. Click OK.
3. Click the destination category. A dialog box opens.
Verify you want to complete the move and click OK. The category you selected is
4.
moved to the destination category.
To Move a Category Using the Right-Click Menu:
1. Click the category you want to move. The category is selected.
2. Right-click the category. A right-click menu appears.
3. Select Move To, Move After, or Move Before from the right-click menu.
4. A dialog opens, advising you to select a destination category, click OK.
5. Click the category you want to move the selected category to, before, or
after. A dialog opens.
6. Click OK. The selected category is moved to the new location.
WebStore by Amazon 3.5.1: Merchant Manual
14
Page 18

To arrange categories:
• You can also move categories up or down clicking the up arrow or down arrow
next to the category name.
To sort your categories:
You can alphabetically sort categories and subcategories using the sort feature. Sorting is
useful if you have a large number of subcategories and would like to organize them for
easier viewing.
1. Click the category that contains the subcategories you want to sort.
2. Right-click the category. A right-click menu appears.
3. Select Sort A->Z or Sort Z->A from the menu. A dialog opens.
4. Confirm you want to sort the categories and then click OK. The categories are
sorted according to the criteria you selected.
Managing products within categories
The Step 2 tab lets you manage products. This tab includes additional tabs you use to
add, remove, view, and search for products. There’s also an Excel tab, that lets you use
Microsoft Excel to manage products.
Managing products typically involves locating the products to work with, and then
adding them to, or removing them from, categories.
Locating products
The Step 2 tab includes five additional tabs to help you find and manage products:
• All Products displays all the products in your catalog (up to the display limit
of 4,000 products).
WebStore by Amazon 3.5.1: Merchant Manual
15
Page 19

• Unassigned Products generates a list of any products not currently assigned
to a category.
• Category displays all products assigned to the selected category.
• Search lets you find specific products using search parameters.
• Excel Upload lets you use Microsoft Excel to manage products.
Products are displayed on tabs. On each product tab, you can view the SKU, ASIN,
product name, and the category(s) each product is associated with, if any.
Searching for Products
The Search tab allows you to search for products in your inventory or for products in
Amazon.com catalog. When the results of your search are displayed, you can add the
products to your categories using the steps described in the To add Products to a
category section below.
To search for products:
1. Click the Search tab. In the Product Search field, enter the product name.
2. Use the Look In drop-down box, to select a section.
3. If you want to search the Amazon.com catalog, click the checkbox next to Search
Amazon Catalog.
4. Click the Search button. Your search results appear.
To View All products:
Click the All Products tab. All the products you have uploaded to Amazon.com are
displayed.
WebStore by Amazon 3.5.1: Merchant Manual
16
Page 20

To Change the number of products displayed per tab:
Click the Show [10] Products per page drop-down box to select the number of products
to display on the tab. You can select 10, 25, or 50 products to display.
To scroll through product pages:
Use the ">", "<", ">>", or "<<" buttons to scroll through all of the product pages within
a tab.
To view category associations:
The column titled Category displays a link to the category. Click the link to view the
products in the category. If the product is associated with more than one category, it is
WebStore by Amazon 3.5.1: Merchant Manual
17
Page 21

listed as 'Multiple'. Mouse over the Multiple link. A list of categories is displayed. Click
on a category to view the products associated with that category.
To view products in a category:
1. Click the Category tab. The products in the selected category appear.
2.
If the product is associated with a category, a link appears in Category column.
Mouse-over the link to view the categories the product is currently assigned to.
Click one of the categories to view all products in it.
To find unassigned products
In order for customers to view and purchase a product, it must be associated with at least
one category. Products not associated with a category are called "unassigned" products.
Category Manager allows you to search for products that are unassigned and put them
into one or more categories.
1. Click the Unassigned Products tab.
2. Click the Create New Unassigned Products Report button. The status bar
displays as your report is created.
3. All products not assigned to a category are displayed.
4. To assign the products to a category, complete the topics in Adding Products to a
Category.
After you have assigned products to a category, click the Create New Unassigned
Products Report button again to refresh your report.
WebStore by Amazon 3.5.1: Merchant Manual
18
Page 22

To add products to a category:
After you have created your category structure in Step 1, you are ready to add products.
Category Manager automatically searches for and displays all the products you have
uploaded to Seller Central. Products must be assigned to categories so your customers
can view them on your WebStore.
1. Click the checkbox next to the product(s).
2. Click the Add to Category button. The Add to Category window opens.
3. Click a category to select it. You can select multiple categories by clicking each
category you want to select.
4. Click Apply. The product(s) are added to the selected category(s).
5. Keep in mind that your category tree to the right represents how your customers
will navigate through your store.
WebStore by Amazon 3.5.1: Merchant Manual
19
Page 23

To remove products from a category:
1. Click the checkbox next to the product(s).
2. Click the Remove from Category button. The Remove from Category
window opens.
3. Click the Apply button to remove the products from the category.
Note:
Products are not removed from your inventory, just from the category.
WebStore by Amazon 3.5.1: Merchant Manual
20
Page 24

To add a product name:
Product names are displayed under the Product Name column on each tab. If a product
name is blank, you have not uploaded any name information for the product. To upload a
product name, please see Add a Product in Seller Central Help.
Using Excel to manage products
If you're experienced with Microsoft Excel, you can use it to edit your product
categorization. The All Products, Unassigned Products, Category, and Search tabs
include an Export to Excel link.
WebStore by Amazon 3.5.1: Merchant Manual
21
Page 25

Clicking this link creates an Excel spreadsheet of the tab's contents, and then downloads
it to your hard drive for editing. When you've finished editing the file, you can upload it
using the Excel Upload tab.
To edit downloaded Excel files:
1. Open the downloaded file.
2. Specify whether a product should be assigned or unassigned by entering either
"A" for assign, or "U" for unassign in the Action column.
3. Edit the Category column as necessary. To indicate a parent/child relationship,
use the ">" sign. For example, "Backpacks > Daypacks".
4. Save the file.
To upload Excel files:
After you edit your downloaded Excel file, you upload it using the Excel Upload tab.
1. Click the Excel Upload tab.
2. Select to either Update Current Catalog, or to Delete and Replace Current
Catalog. If you downloaded the Excel file from a tab other than Excel Upload,
you should select Update Current Catalog.
3. Click Browse, locate the file you edited, then click Submit.
WebStore by Amazon 3.5.1: Merchant Manual
22
Page 26

Managing the Display of Your WebStore
WebStore creates your storefront using themes, a collection of page templates. After
creating your WebStore, you can customize its look-and-feel using Template Manager.
About Themes
WebStore by Amazon offers different themes, or site templates, that you can use to build
your store. Each theme contains a collection of site pages, such as product and category
pages, used to create your store.
After creating your store, you can further customize it using the Template Manager.
You can choose from the following themes:
Natural: Based on a large center image layout with a horizontal menu bar, Natural
includes the following features:
• Large amounts of open whitespace for a clean look.
• You can place a homepage element spanning the center column for visual impact.
• For pages with sub-categories, a menu bar can also appear in the left column.
• A search field appears in the header.
Modern: Based on a three-column layout with vertical and horizontal menu bars,
Modern includes the following features:
• You can customize the background color and graphic.
• You can place a homepage element spanning the center column for visual impact.
•
The menu bar appears in the left column.
•
A search field appears in the header.
Classic: Based on a three-column layout, Classic includes the following features:
• The layout is well suited for stores with large numbers of products
• The left column contains a search area, menu bar, and space for customized items.
• The center column can contain any type of content. Typically, the center column
emphasizes the store's main attractions.
• The right column can contain a search field and additional customized items.
About Template Manager
WebStore by Amazon lets you customize the look and feel of your WebStore using
Template Manager. You can customize the templates in two ways: set page and site
properties, and add and customize content using widgets. You can also create new pages
based on existing templates.
WebStore by Amazon 3.5.1: Merchant Manual
23
Page 27

Note: In order to optimize your pages for search engines, you must enter Custom Page
Titles in the General tab of page properties. Search engines use this field to rank your
Web site. This text also appears as the title of your page in search results and at the top
bar of Web browsers.
The template list shows the templates you have available. Selecting a template will
display that template in the template window. It will also display the page attributes of
that template in the page attributes window.
Each theme includes a number of standard page templates:
• Home Page – this is the default page displayed when merchants navigate to
http://www.yourdomain.com
• Category Page – this page is displayed when a visitor selects one of your
categories. You customize how many products you want displayed on this
page.
• Product Page – displays the details of a particular product when a visitor
clicks on one of your products
• Search Page – defines how search results are displayed on your site
• Cart – defines how the shopping cart page is displayed
• Order Confirmation Page – the page that is displayed when a customer
completes placing an order
• Order Conformation E-mail – the e-mail that is sent to the customer
confirming their order
• Order Status – page that provides customers information about their orders
• Order History – page that provides customers information about their past
orders
• My Account – this is the page that allows your customers to access their
Amazon Global Account, including their order status and order history.
• Content pages – these are special pages that are used to provide information
to your visitors, such as Privacy Policies, Shipping, Returns, etc. You can
create as many Content pages as you wish, and you can link to them through
the Menu Bar Widget.
WebStore by Amazon 3.5.1: Merchant Manual
24
Page 28

Setting Site Properties
Site properties affect all pages in your WebStore. You can specify site properties as
follows:
1. Choose Site Wide Properties from the Settings menu.
2. On the General tab, choose a Text Font Schema, and then enter your color
preferences.
3. Text Font Schema specifies the font to use for WebStore. In general, common
fonts such as Arial, Verdana, and Times New Roman work best.
4. Site Color Schema specifies the color used in your store's CSS (cascading style
sheet). This setting, which affects CSS-styled content (i.e., it affects text, but not
images), overrides the color you chose when creating your WebStore. For
example, if you chose purple when creating your store, and then change the Site
Color Schema to green, headers and other CSS-styled text will display in green,
while images, such as buttons, appear in the original color, purple.
5. Left Nav Hover specifies the color that appears when you mouse-over the left
navigation bar.
6. Click the Head Tags tab, and add any custom head tags you require. For more
information on using tags, see Utilizing title, description, keyword, and alt tags.
7. Click Save.
Setting Page Properties
Page properties are specific to each page of your WebStore. Set page properties as
follows:
1. Choose Page Pro perties from the Settings menu.
2. Enter a custom page title on the General tab. This title appears at the top of the
browser window. Search engines also use the information in this field to rank
your pages, and as the title in search results.
3. Click the Head Tags tab, and then add any custom head tags you require. For
more information on using tags, see Utilizing title, description, keyword, and alt
tags.
4. Click Save.
Working with Widgets
Widgets are small applettes that help you create and edit content for customizable areas,
or frames, within your site. The Image widget, for example, lets you add and work with
images on your site.
Note: You typically need to edit the information on the Contact page. See the HTML
widget section below for more information.
WebStore by Amazon 3.5.1: Merchant Manual
25
Page 29

Site Widgets, denoted by a red frame, create content for frames that appear on all pages
of the site. Page Widgets, denoted by a black frame, create content that appears only on
pages based on the template. A given widget can be either a site widget or a page widget,
depending on the frame it's used in.
Not all frames can contain all widgets. The widgets available for a given frame appear in
the Widget Configuration window that opens when you click the frame. Available
widgets include:
• Image Widget
• HTML Widget
• Menu Bar Widget
• Category Widget
• Product Widget
To Use the Image Widget:
The Image Widget lets you select images for display, link an image to another page in
your store, and enter alternate text. You can also upload images to the Image Library.
1. In Template Manager, select the page template you want to work with.
2. Click the frame where you want to add an image.
3. When the Widget Configuration window appears, select Image from the Choose
Widget menu. (If Image doesn't appear as a choice, you cannot add images to the
selected frame.)
4. Specify an image to work with:
• To use an image in your library, or to upload an image to the library, click the
Open button. Click the Select button to specify an image, or click the Upload
an Image button. After you upload an image, you can select it.
• To use an image at a remote URL, select the Image URL radio button, and
then enter the URL for the remote image.
5. If desired, click the Links button to link the image to another page in your site.
Choose the type of target page from the Please choose a page to link: menu. A
window appears listing all pages of the specified type. Select the page you want to
link to, and then click Next.
6. Enter your alternate text in the Alt Tag field. (Alternate text appears when
viewers mouse-over the image, and in browsers that don't display images.)
7. Click Save.
To use the HTML widget:
The HTML Widget lets you add customized HTML to your store. You can use either the
"What You See Is What You Get", or WYSIWYG editor; or the Custom Script editor.
WebStore by Amazon 3.5.1: Merchant Manual
26
Page 30

1. In Template Manager, select the page template you want to work with.
2.
Click the frame where you want to add HTML.
When the Widget Configuration window appears, select HTML from the
3.
Choose Widget menu. If HTML doesn't appear as a choice, you cannot add
HTML content to the frame. Select another frame.
4.
Choose the editor to work with:
WYSIWYG works much like popular word processing software. You see the
•
content and its formatting in the editor as you enter it. You don't have to add the
formatting tags, as the editor adds them for you.
With this editor, most content appears in the template. Some content, however,
does not display. For this type of content, you can specify whether or not to
Show visual aid. If you choose Yes, a colored HTML icon appears in the
template, denoting html content.
•
Custom Script lets you enter your HTML directly. You do need to enter
formatting tags within the code. Use the Custom Script editor to add Flash or
JavaScript content. Click Preview to view the content generated by your script.
A colored Script icon appears in the template, denoting the content of the
frame.
5. Enter your content in the chosen editor.
6. Click Save.
To use the Menu Bar widget:
The Menu Bar Widget lets you create a menu bar.
Note: If you create menu bars using the widget, and then change your category structure,
you will need to recreate the menu bar.
1. In Template Manager, select the page template you want to work with.
2. Click the frame where you want to add a menu bar.
3. When the Widget Configuration window appears, select Menu Bar from the
Choose Widget menu. If Menu Bar doesn't appear as a choice, you cannot add
HTML content to the frame. Select another frame.
4. Choose an Orientation.
5. Choose the text Alignment for menu bar links.
6. Click the New Link button to add the first link in the menu bar.
7. Enter a Link Label, and then click the Links button.
8. Choose a page type in your site to link to from the pull-down menu, and then
click next. If you choose a page type with multiple pages, you'll be prompted to
narrow your choice.
9. Repeat Steps 6-8 to add the rest of your links.
10. Click Save.
WebStore by Amazon 3.5.1: Merchant Manual
27
Page 31

To use the Category widget:
The Category Widget lets you create a link to one or more categories. For each specified
category, the widget frame displays a random product from that category, and can include
the product image, description, and a customized label. When a visitor clicks the frame,
they're taken to the category page.
1. In Template Manager, select the page template you want to work with.
2. Click the frame where you want to add a category widget.
3. When the Widget Configuration window appears, select Category from the
Choose Widget menu. If Category doesn't appear as a choice, you cannot add a
Category Widget to the frame. Select another frame.
4. Enter a Category Label, and then choose its size. The label appears at the top of
the frame.
5. Choose the number of Columns to split the frame into. Pick a multiple of the
number of categories you want to display. For example, if you want to display
items from six categories, choose three--the frame will display two rows, each
with three categories.
6. To display a random image from the chosen category, check Category Image,
and then choose a size for it.
7. To display the category name, check Category Name, and then choose a size for
it.
8. Click the Add A Category button, then click the Search button.
9. Select the category you want to use in the category tree. Click the Next button.
10. To add an overlay image on top of the randomly chosen product image, click the
Image button. Select an image from the Image Type menu that appears. For
example, choose Best Seller Image to display a Best Seller banner on top of the
product image.
11. Repeat Steps 8-10 to add more categories.
12. Click Save.
To use the Product widget:
The Product Widget lets you highlight specific products on your site, such as "Recently
Viewed", and "Best Sellers". You can also choose to highlight specific products by
ASIN. For highlighted products, you can choose to display the product image, name,
description, features, and pricing. You can also add a "Buy Now" button.
1. In Template Manager, select the page template you want to work with.
2. Click the frame where you want to add featured products.
3. When the Widget Configuration
Choose Widget menu. If Product doesn't appear as a choice, you cannot add a
Product Widget to the frame. Select another frame.
4. Enter a Feature Label, and then choose its size. The label appears at the top of
the frame.
WebStore by Amazon 3.5.1: Merchant Manual
window appears, select Product from the
28
Page 32

5. Choose the number of Columns to split the frame into, and the alignment of text
within columns.
6. In the Featured Product Widget - Properties section, check the product
properties you want to include. Some properties, such as Product Image require
you to make additional choices.
7. Choose the means of locating products using the Product Definition menu:
• Best Seller identifies the best selling products based on the Amazon sales
rank. For this option, you must also choose the Maximum Number of Best
Sellers, and the Source to retrieve them from, the entire catalog or a category.
• Note: If you want to manually create a Best Sellers listing, choose ASIN as
the Product Definition, and enter "Best Sellers" in the Feature Label field.
• Recently Viewed locates recently viewed products. For this option, you must
also specify the Maximum Number of Recently Viewed items.
• ASIN specifies an individual product. You can specify additional ASINs by
clicking the Add A Product button. If you don't know the product ASIN, you
can search for it using keywords.
8. Click Save.
Editing existing content
Use widgets to edit existing content. A common editing task, for example, is to update
the company's contact information:
1. In the Templates panel of Template Manager, click Merchant to display the
merchant pages.
2. Select Contact Us. The Contact Us page template appears.
3. Click the area in the template that contains the information you want to edit. In
this example, click By Mail to edit the address. The widget used to generate the
content opens--the HTML widget for this example.
4. Edit the mail address in the Editor portion of the widget.
5. Click Save
6. Publish the store to make the updates visible to customers.
Adding new pages
You can add new pages to your WebStore as necessary. New pages are created from page
templates in your chosen theme. Typically, you'll only need to add category and content
pages.
1. Choose New Page from the File menu.
2. Enter a name for the new page in the Page Name field.
3. Choose the type of page you want to create: category, content, merchant, or
product.
WebStore by Amazon 3.5.1: Merchant Manual
29
Page 33

4. Click the Add Page button. WebStore by Amazon adds the page to the location
selected in Step 3.
5. After adding the page, you must link it to your menu bars for it to be accessible to
customers.
Publishing Your WebStore
When you are ready for the public to access your site, you will publish your site.
Publishing your site makes all of the changes site setup, or last publish, available to
the public. Depending on the size of your catalog, publishing might take a while – up
to 15 minutes for a catalog of 10,000 products. A progress bar will be displayed to
show you the status of the publishing process.
During the Setup Process, you can publish your site as the last step in your process.
If you choose not to publish there, you can publish from the Store Design tab.
When publishing is complete, you will receive a confirmation message and will be
able to go back to the Store Manager.
WebStore by Amazon 3.5.1: Merchant Manual
30
Page 34

Marketing your WebStore
Congratulations! You now have a live Web site. The next question you are no doubt
wondering: how do I get visitors to my site? WebStore by Amazon has the answers.
Froogle
Froogle is a shopping directly by Google. It's free to upload products to Froogle, and
WebStore by Amazon customers have reported great success in driving traffic to
their site through Froogle.
WebStore by Amazon will automatically create a Froogle file that you can upload to
Froogle. Simply request a feed, check back in 24 hours, then upload the file to
Froogle. For more details on how Froogle works, see http://www.froogle.com
Constant Contact
If you have a Constant Contact account, you can add your Constant Contact HTML
code to your templates that allow your visitors and customers to sign up for your
mailing lists. For more information on Constant Contact, or to register for a Constant
Contact account, see http://www.constantcontact.com/index.jsp?pn=amazon
Search Engine Marketing
.
Search Engine Marketing (SEM) is the marketing of your WebStore by Amazon
through search engines such as Google or Yahoo. WebStore by Amazon has
partnered with multiple reputable SEM companies. See the Traffic Manager page
under Store Design for more details.
Google Sitemap
Google Sitemaps allow site owners the ability to provide a special file on their Web
site that Google uses to crawl their site. WebStore by Amazon can automatically
create this file for you! You will need a Google Sitemap account and a file name at
the Google Sitemap page.
WebStore by Amazon 3.5.1: Merchant Manual
31
Page 35

Once you enter a file name, enter that same file name in WebStore by Amazon. For
more information on Google Sitemap and how it works, please see the Google help
topic.
WebStore by Amazon 3.5.1: Merchant Manual
32
Page 36

Advanced Customizations: Tips and Tricks
Using Tips and Tricks
You can use the tips and tricks below to get started developing an interesting and
unique WebStore. We provide these tips and tricks to get you started, but you can
experiment and invent your own methods to develop a site that suits the needs of
your business.
Change the Layout of Your WebStore
WebStore by Amazon offers several out-of-the-box themes for the layout of your
WebStore, but you can also create your own layout. To create and insert a custom
WebStore layout, you need to override the existing cascading style sheet (CSS) for
the theme you’ve chosen in the setup wizard.
Embed a New Cascading Style Sheet
CSS controls formatting such as font color and size, and background colors and
images. The following are instructions on how to insert a customized CSS onto your
site.
Download the Default Style Sheet
• Download the default style sheet and view the source of any page on your
store front. Click view>source in your browser to view the source code.
• In the source code you will find a line like this: <link
href="/themes/natural/variations/sky/styles/natural.css"rel="stylesheet"
type="text/css">
• Paste the “href” path into your browser after your site URL. For example,
http://www.yoursite.com/themes/natural/variations/sky/styles/natural.css.
Save the CSS file to your computer by clicking File> Save As > Web Page,
Complete.
• After the CSS file is saved, you can view styles associated with particular site
elements and customize those elements by overriding the existing style
sheet.
Override the Existing Style Sheet
The following is an example of overriding the default CSS is the top navigation link
bar. In the Template Manager tool, create a top link bar using the link bar widget.
Paste the following CSS into the topmost red (global) widget holder. Pasting into the
global widget holder applies the styles across the entire site:
<style type="text/css"> body td p{ font-family: Trebuchet MS, Verdana, Arial,
Helvetica, sans-serif; font-size: small; color:#182c6b; } /* topnav*/ .navDots{
width:1px; background-image: none; background-color:#5f534c; }
a.topNav:link,a.topNav:visited {color:#333; font-size:xx-small; } a.topNav {
display:block; text-decoration:none; color: #333; font-weight:bolder; font-size:xsmall; padding:3px 4px; border-top: 1px #182c6b solid; border-bottom: 0;
WebStore by Amazon 3.5.1: Merchant Manual
33
Page 37

background-color:#ffe7c5; } a.topNav:hover {background-color:#fcd297;
color:#666;} </style>
This changes the site’s default font to Trebuchet MS and updates the top navigation
bar. The top navigation will now have borders and background colors, and a colored
rollover effect similar to a tabbed menu.
Please Note: The previous example assumes that you are using the “Natural”
theme.
Add a Background Image to Your Site
Another example of how to customize the CSS is to add a background image to your
site. Insert the following code into top global widget.
body{ background:url(/images/bg2.gif) top center repeat-y; } This CSS adds an
image named bg2.gif, which has been uploaded to the image library through an
image widget, to the background of the entire site. Another technique is to hide
content that has a style applied to it: .colorBar, .date, .line{ display:none;}
This hides the colored bars on the page, the horizontal lines and date at the top of
every page.
Add Flash to Your WebStore
Embedding flash can be done using the following steps:
1. Upload your ShockWave Flash Player file into the image library using an
image widget. Create a JavaScript file that will embed your object tag similar
to this:
document.write('<object classid="clsid:d27cdb6e-ae6d-11cf-96b8444553540000"
codebase="http://fpdownload.macromedia.com/pub/shockwave/cabs/flash/s
wflash.cab#version=8,0,0,0" width="389" height="245" id="home"
align="middle"><param name="allowScriptAccess" value="sameDomain"
/><param name="movie" value="/images/home.swf" /><param
name="quality" value="high" /><param name="bgcolor" value="#ffffff"
/><embed src="/images/home.swf" quality="high" bgcolor="#ffffff"
width="389" height="245" name="home" align="middle"
allowScriptAccess="sameDomain" type="application/x-shockwave-flash"
pluginspage="http://www.macromedia.com/go/getflashplayer"
/></object>');
2. The object tag above is replaced with the object tag in the HTML source of the
HTML file generated by Flash during publishing.
3. Save the JavaScript file as “activate.js” and upload to your image library.
4. Create an HTML widget on your page where you would like the flash to
appear, and then paste the following HTML into the Custom Script window:
WebStore by Amazon 3.5.1: Merchant Manual
34
Page 38

<table align="center" width="100%" border="0" cellspacing="0"
cellpadding="0"> <tr> <td width="100%" align="center"> <script
type="text/javascript" src="/images/activate.js"></script> </td> </tr>
</table>
Publish your site and view the flash on your live storefront. Embedding your Flash
this way allows your customers to avoid confusing warnings in Internet Explorer.
Add an Advanced Search
A technique to add some additional functionality to your WebStore is to create a
custom search widget. The following JavaScript and HTML are an example of an
advanced search widget created for a watch merchant:
SCRIPT type=text/javascript> /*Compile (concatenate) the search terms from the
form into a string and pass to the search page*/ function compileSearch(o){
searchValues = "";
/*If the keywords field is not empty remove any extra spaces*/
if(o.terms.value.replace(/\s/g, "")!='')
searchValues=o.terms.value.replace(/\s*([^\s]+)(\s)*/g, "$1 ");
/*If the brand field is selected append the value onto the string*/
if(o.brand.selectedIndex > 0) searchValues +=
o.brand.options[o.brand.selectedIndex].value;
/*If the gender field is selected append the value onto the string separating with
ampersands*/ if(o.gender.selectedIndex > 0){ if(searchValues != null &&
searchValues != "") searchValues += " && " ; searchValues +=
o.gender.options[o.gender.selectedIndex].value; }
/*If the color field is selected append the value onto the string separating with
ampersands*/ if(o.color.selectedIndex > 0){ if(searchValues != null && searchValues
!= "") searchValues += " && " ; searchValues +=
o.color.options[o.color.selectedIndex].value; }
/*If the features field is selected append the value onto the string separating with
ampersands*/ if(o.features.selectedIndex > 0){ if(searchValues != null &&
searchValues != "") searchValues += " && " ; searchValues +=
o.features.options[o.features.selectedIndex].value; }
/*Copy the search values string into the hidden keyword field*/
o.keyword.value=searchValues;
/*If there are search terms, send the form, otherwise send an error message*/
if(searchValues!='') o.submit(); else alert('Please enter your search requirements.');
}
('Please enter your search requirements.'); } </script>
WebStore by Amazon 3.5.1: Merchant Manual
35
Page 39

<!-- Search Form HTML --> <form name="advSearchForm" id="advSearchForm"
action="/search.htm" method="post">
<!-- Hidden keyword field --> <input type="hidden" name="keyword" value="" />
<!-- Gender Select Box --> <b>Gender:</b> <select name="gender"
class="menu"> <option value=""></option> <option
value="Mens">MENS</option> <option value="Unisex">UNISEX</option> <option
value="Midsize">MIDSIZE</option> <option value="Ladies">LADIES</option>
<option value="Mini">MINI</option> </select>
<!-- Brand Name Select Box --> <b>Brand name: </b> <select name="brand"
class="menu"> <option value=""></option> <option value="Tag Heuer">TAG
HEUER</option> <option value="Omega">OMEGA</option> <option
value="Baume & Mercier">BAUME & MERCIER</option> <option
value="Breitling">BREITLING</option> <option value="Oris">ORIS</option>
<option value="Technomarine">TECHNOMARINE</option> <option
value="Rado">RADO</option> <option value="Cartier">CARTIER</option>
<option value="Movado">MOVADO</option> <option
value="Chopard">CHOPARD</option> <option value="Gucci">GUCCI</option>
<option value="Ebel">EBEL</option> <option
value="Longines">LONGINES</option> <option value="Jaeger">JAEGER</option>
<option value="Zenith">ZENITH</option> </select>
<!-- Color Select Box --> <b>Color:</b> <select name="color" class="menu">
<option value=""></option> <option value="Black">BLACK</option> <option
value="Silver">SILVER</option> <option value="White">WHITE</option> <option
value="Blue">BLUE</option> <option value="Mother of Pearl">MOTHER OF
PEARL</option> <option value="Pink">PINK</option> <option
value="Red">RED</option> </select>
<!-- Features Select Box --> <b>Features:</b> <select name="features"
class="menu"> <option value=""></option> <option
value="Chronograph">CHRONOGRAPH</option> <option
value="Quartz">QUARTZ</option> <option
value="Automatic">AUTOMATIC</option> <option
value="Manual">MANUAL</option> <option value="Alarm">ALARM</option>
<option value="Titanium">TITANIUM</option> <option value="Gold">CONTAINS
GOLD</option> <option value="Diamonds">CONTAINS DIAMONDS</option>
<option value="Digital">DIGITAL</option> <option value="Leather">LEATHER
STRAPS</option> <option value="Rubber">RUBBER STRAPS</option> </select>
<!-- Keywords Field --> <b>Keywords:</b> (optional) <input name="terms"
type="text" class="menu" value="" />
<!-- Submit Button --> <button value="Search!" type="button"
onClick="compileSearch(document.advSearchForm);"
class="btn">Search!</button> </form>
WebStore by Amazon 3.5.1: Merchant Manual
36
Page 40

Code Snippet Library
There are several options to add a new look or functionality to your WebStore. The
following code snippets can be used to customize your WebStore. Please follow the
inline documentation.
Add a Repeating Background Image
<style type="text/css"> <!-- /*Add a vertical-repeating background image to the
body of the WebStore that has been uploaded to the Image Library in a Image
Widget*/ body { background-repeat: repeat-y; background-position:center top;
background-image: url(/images/bg.gif); }
Set Font Properties
/*Set the font properties for the WebStore*/ body, td, p, p.subcontent{ font-family:
Arial, Helvetica, sans-serif; font-size: small; color: #3B3B3B; }
Increase the Size of Your Logo
/*Extend the width of the logo to fill the entire header using an image uploaded to
the Image Library from an Image Widget*/ .logo { background-repeat: no-repeat;
background:url(/images/header_bg.gif); width: 760px; height: 85px; }
Create a Custom Heading 1 tag
/*Set the font properties for the Heading 1 tag*/ h1{ font-size: medium; color:
#CB2C31; } /* topnav*/
Customize the Top Navigation
/*Replace the vertical dots image separating the top navigation links with a solid
grey bar*/ .navDots{ width:1px; background-image: none; backgroundcolor:#D1D1D1; }
Set Font Properties for Top Navigation
/*Set the font properties for the top navigation links*/
a.topNav:link,a.topNav:visited{ color:#213184; font-weight:bolder; }
Customize the Top Navigation Links
/*This CSS turns the top navigation links into buttons using “display:block”, a fixed
height and padding, and a background image uploaded to the Image Library from an
Image Widget*/ a.topNav { height: 24px; display:block; text-decoration:none;
color: #213184; font-weight:bolder; font-size:smaller; padding:6px 3px; bordertop: 0; border-bottom: 0; background-color:#F0F0F0; background-image:
url(/images/top_nav_off.gif); background-repeat: repeat-x; }
Make Top Navigation Buttons Three-Dimensional
WebStore by Amazon 3.5.1: Merchant Manual
37
Page 41

/*The “hover” pseudo class controls the behavior of a link on mouse roll-over this
CSS swaps out the button background with another image to give it a push button
look*/ a.topNav:hover { color:#000000; background-color:#F9DDDF; backgroundimage: url(/images/top_nav_on.gif); background-repeat: repeat-x; }
Remove Date from the Top Navigation
/*Hide the date to make room for more navigation links in the top navigation bar*/
.date{ display:none; } /*leftnav*/
Customize the Left Navigation
/*Set the font color for the left navigation links*/ a.leftNav:link,a.leftNav:visited {
color:#213184;; }
Add a Button Background to the Top Navigation
/*Similar to a.topNav (see above) this CSS class adds a button background //image.
In this case it is a non-tiling image.*/ a.leftNav { display:block; color: #213184;
font-family:Verdana, Arial; font-weight:normal; font-size:10px; border-bottom: 0;
background-color:#DEDEDE; width:166px; height:18px; margin-bottom: 1px;
background-image: url(/images/left_nav_off.gif); background-repeat: no-repeat;
background-position: left top; padding-top: 3px; padding-right: 4px; paddingbottom: 0px; padding-left: 12px; text-decoration: none; }
Make Left Navigation Buttons Three-Dimensional
/*Similar to a.topNav (see above) the hover class adds a push button effect to the
left navigation links*/ a.leftNav:hover { color: #000000; background-image:
url(/images/left_nav_on.gif); background-repeat: no-repeat; background-position:
left top; background-color:#F3BFC4; } /*****/
Set the Height of the Grey Bar
/*Set the greyBar height to 0*/ .greyBar{height: 0px;}
Hide Lines on Your WebStore Layout
/*Hide line class elements on your WebStore*/ .line{ display:none; }
Add a Repeating Background Image to the lightGrey Bar
/*Add a repeating background image to the lightGreyBar class*/
.lightGreyBar,.lightGreyBarW{ background-image:url(/images/crumbpast_bg.gif);
background-repeat: repeat-x; background-color:#E5E5E5; }
Change colorBar Elements
WebStore by Amazon 3.5.1: Merchant Manual
38
Page 42

/*Change the appearance of colorBar elements*/ .colorBar{ height: 22px;
background-color:#9C1310; background-image:url(/images/red_bg.gif);
background-repeat: repeat-x; }
Hide Border for All Images on the WebStore
/*Hide the border on all images. This is important for images in Custom Script
widgets that have “a href” links associated with them*/ img {border:0;}
Customize Fonts for Product Titles
/*Set font properties of product title links*/ a.homeProductTitle,
a.homeProductTitle:link, a.homeProductTitle:visited, a.homeProductTitle:hover
{color: #333; font-size:medium; font-weight:bolder} --> </style>
WebStore by Amazon 3.5.1: Merchant Manual
39
Page 43

Monitoring Your WebStore Performance
There are two primary areas you'll want to monitor performance of your WebStore by
Amazon:
1. How many orders are being generated by WebStore by Amazon?
2. How many visitors are visiting my site, where are they coming from, what are
they doing on the site, etc.?
Orders from your WebStore can be viewed in Seller Central > Orders >Your WBA
Orders. You have to select "WebStore by Amazon" from the drop-down menu before you
can view your WBA orders. Note that orders in this list might include frauded or
cancelled orders. Please see the orders in your Amazon.com marketplace (by selecting
Amazon.com from the drop-down menu) for an authoritative list of orders you need to
fulfill.
For Web site analytics, WebStore by Amazon lets you integrate with Google Analytics.
Please contact Google Analytics to set up an account at http://www.google.com/analytics.
Once you have a Google Analytics Account, you can copy the Google Analytics
JavaScript code into the Google Analytics text box.
WebStore by Amazon 3.5.1: Merchant Manual
40
 Loading...