

Page 1

ELECTRIC RANGE
USERINSTRUCTIONS
THANK YOU for purchasing this high-quality product. Register your range at www.amanacanada.ca.
For future reference, please make a note of your product model and serial numbers. These can be found on the label located
on the upper right corner of the front frame.
Model Number _________________________________________ Serial Number __________________________________________
Table of Contents
RANGE SAFETY .............................................................................2
The Anti-Tip Bracket
FEATURE GUIDE
COOKTOP USE
Cookware
Home Canning
OVEN USE
Electronic Oven Controls
Sabbath Mode..............................................................................9
Warm
Aluminum Foil
Positioning Racks and Bakeware
Oven Vent
Baking and Roasting
Broiling........................................................................................10
RANGE CARE
Self-Cleaning Cycle
General Cleaning
Oven Light
TROUBLESHOOTING
ACCESSORIES
WARRANTY
.....................................................................................7
.......................................................................................8
............................................................................................9
...................................................................................10
...............................................................................11
..................................................................................13
..................................................................................16
....................................................................2
............................................................................4
..............................................................................6
.............................................................................8
.............................................................8
...............................................................................9
................................................9
..................................................................10
....................................................................11
........................................................................12
..................................................................14
.............................................................................15
W10881063C
09-Nov-2017 15:22:46 EST | RELEASED
In some European factories the letter "W" of the part code mentioned herein will be automatically
replaced by the number "4000" (e.g. "W12345678" becomes "400012345678")
Page 2
RANGE SAFETY
Your safety and the safety of others are very important.
We have provided many important safety messages in this manual and on your appliance. Always read and obey all safety
messages.
This is the safety alert symbol.
This symbol alerts you to potential hazards that can kill or hurt you and others.
All safety messages will follow the safety alert symbol and either the word “DANGER” or “WARNING.”
These words mean:
You can be killed or seriously injured if you don't immediately
DANGER
WARNING
All safety messages will tell you what the potential hazard is, tell you how to reduce the chance of injury, and tell you what can
happen if the instructions are not followed.
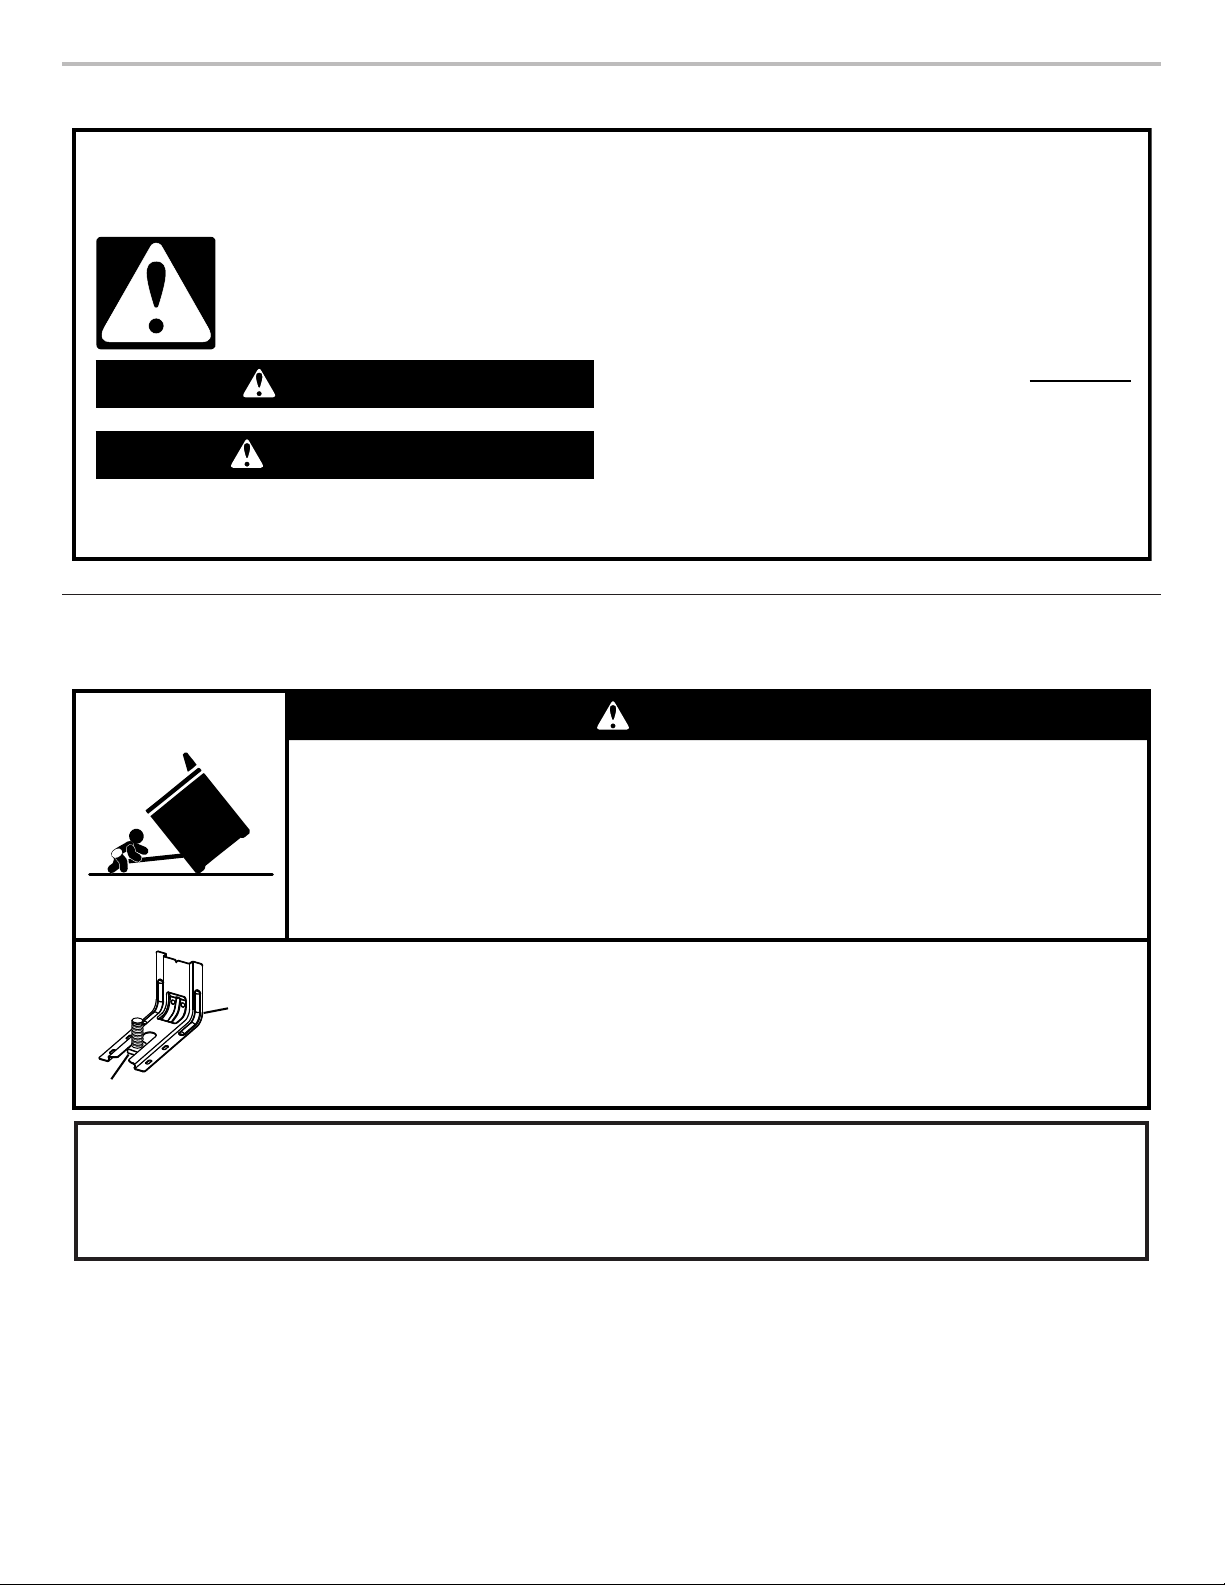
The Anti-Tip Bracket
The range will not tip during normal use. However, the range can tip if you apply too much force or weight to the open door without the
anti-tip bracket fastened down properly.
follow instructions.
You
can be killed or seriously injured if you don't
instructions.
follow
WARNING
Tip Over Hazard
A child or adult can tip the range and be killed.
Verify the anti-tip bracket has been properly installed and engaged per installation instructions.
Re-engage anti-tip bracket if range is moved.
Do not operate range without anti-tip bracket installed and engaged.
Failure to follow these instructions can result in death or serious burns to children and adults.
To verify the anti-tip bracket is installed and engaged:
Anti-Tip
Bracket
Range Foot
State of California Proposition 65 Warnings:
WARNING: This product contains one or more chemicals known to the State of California to cause cancer.
WARNING: This product contains one or more chemicals known to the State of California to cause birth defects or other
reproductive harm.
• Slide range forward.
• Look for the anti-tip bracket securely attached to floor or wall.
• Slide range back so rear range foot is under anti-tip bracket.
• See installation instructions for details.
2
09-Nov-2017 15:22:46 EST | RELEASED
In some European factories the letter "W" of the part code mentioned herein will be automatically
replaced by the number "4000" (e.g. "W12345678" becomes "400012345678")
Page 3

IMPORTANT SAFETY INSTRUCTIONS
WARNING: To reduce the risk of fire, electrical shock,
injury to persons, or damage when using the range, follow
basic precautions, including the following:
■ WARNING:
THE RANGE, THE RANGE MUST BE SECURED BY
PROPERLY INSTALLED ANTI-TIP DEVICES. TO CHECK
IF THE DEVICES ARE INSTALLED PROPERLY, SLIDE
RANGE FORWARD, LOOK FOR ANTI-TIP BRACKET
SECURELY ATTACHED TO FLOOR OR WALL, AND
SLIDE RANGE BACK SO REAR RANGE FOOT IS
UNDER ANTI-TIP BRACKET.
■ CAUTION: Do not store items of interest to children in
cabinets above a range or on the backguard of a range –
children climbing on the range to reach items could be
seriously injured.
■ Proper Installation – Be sure the range is properly installed
and grounded by a qualified technician.
■ Never Use the Range for Warming or Heating the Room.
■ Do Not Leave Children Alone – Children should not be left
alone or unattended in area where the range is in use.
They should never be allowed to sit or stand on any part of
the range.
Wear Proper Apparel – Loose-fitting or hanging garments
■
should never be worn while using the range.
User Servicing – Do not repair or replace any part of the
■
range unless specifically recommended in the manual. All
other servicing should be referred to a qualified technician.
■ Storage in or on the Range – Flammable materials should
not be stored in an oven or near surface units.
■ Do Not Use Water on Grease Fires – Smother fire or flame
or use dry chemical or foam-type extinguisher.
■ Use Only Dry Potholders – Moist or damp potholders on
hot surfaces may result in burns from steam. Do not let
potholder touch hot heating elements. Do not use a towel
or other bulky cloth.
■ DO NOT TOUCH SURFACE UNITS OR AREAS NEAR
UNITS – Surface units may be hot even though they are
dark in color. Areas near surface units may become hot
enough to cause burns. During and after use, do not touch,
or let clothing or other flammable materials contact surface
units or areas near units until they have had sufficient time
to cool. Among those areas are the cooktop and surfaces
facing the cooktop.
■ Use Proper Pan Size – The range is equipped with one or
more surface units of different size. Select utensils having
flat bottoms large enough to cover the surface unit heating
element. The use of undersized utensils will expose a
portion of the heating element to direct contact and may
result in ignition of clothing. Proper relationship of utensil to
burner will also improve efficiency.
■ Never Leave Surface Units Unattended at High Heat
Settings – Boilover causes smoking and greasy spillovers
that may ignite.
■ Make Sure Reflector Pans or Drip Bowls Are in Place –
Absence of these pans or bowls during cooking may
subject wiring or components underneath to damage.
TO REDUCE THE RISK OF TIPPING OF
■ Protective Liners – Do not use aluminum foil to line surface
unit drip bowls or oven bottoms, except as suggested in
the manual. Improper installation of these liners may result
in a risk of electric shock, or fire.
Glazed Cooking Utensils – Only certain types of glass,
■
glass/ceramic, ceramic, earthenware, or other glazed
utensils are suitable for range-top service without breaking
due to the sudden change in temperature.
■ Utensil Handles Should Be Turned Inward and Not Extend
Over Adjacent Surface Units – To reduce the risk of burns,
ignition of flammable materials, and spillage due to
unintentional contact with the utensil, the handle of a
utensil should be positioned so that it is turned inward, and
does not extend over adjacent surface units.
■ Do Not Soak Removable Heating Elements – Heating
elements should never be immersed in water.
■ Do Not Cook on Broken Cooktop – If cooktop should
break, cleaning solutions and spillovers may penetrate the
broken cooktop and create a risk of electric shock. Contact
a qualified technician immediately.
■ Clean Cooktop With Caution – If a wet sponge or cloth is
used to wipe spills on a hot cooking area, be careful to
avoid steam burn. Some cleaners can produce noxious
fumes if applied to a hot surface.
Use Care When Opening Door – Let hot air or steam
■
escape before removing or replacing food.
Do Not Heat Unopened Food Containers – Build-up of
■
pressure may cause container to burst and result in injury.
■ Keep Oven Vent Ducts Unobstructed.
■ Placement of Oven Racks – Always place oven racks in
desired location while oven is
cool. If rack must be moved
while oven is hot, do not let potholder contact hot heating
element in oven.
DO NOT TOUCH HEATING ELEMENTS OR INTERIOR
■
SURFACES OF OVEN – Heating elements may be hot even
though they are dark in color. Interior surfaces of an oven
become hot enough to cause burns. During and after use,
do not touch, or let clothing or other flammable materials
contact heating elements or interior surfaces of oven until
they have had sufficient time to cool. Other surfaces of the
appliance may become hot enough to cause burns – among
these surfaces are oven vent openings and surfaces near
these openings, oven doors, and windows of oven doors.
For self-cleaning ranges –
■ Do Not Clean Door Gasket – The door gasket is essential
for a good seal. Care should be taken not to rub, damage,
or move the gasket.
■ Do Not Use Oven Cleaners – No commercial oven cleaner
or oven liner protective coating of any kind should be used
in or around any part of the oven.
■ Clean Only Parts Listed in Manual.
■ Before Self-Cleaning the Oven – Remove broiler pan and
other utensils.
For units with ventilating hood –
■ Clean Ventilating Hoods Frequently – Grease should not
be allowed to accumulate on hood or filter.
■ When flambeing foods under the hood, turn the fan on.
SAVE THESE INSTRUCTIONS
09-Nov-2017 15:22:46 EST | RELEASED
In some European factories the letter "W" of the part code mentioned herein will be automatically
replaced by the number "4000" (e.g. "W12345678" becomes "400012345678")
3
Page 4
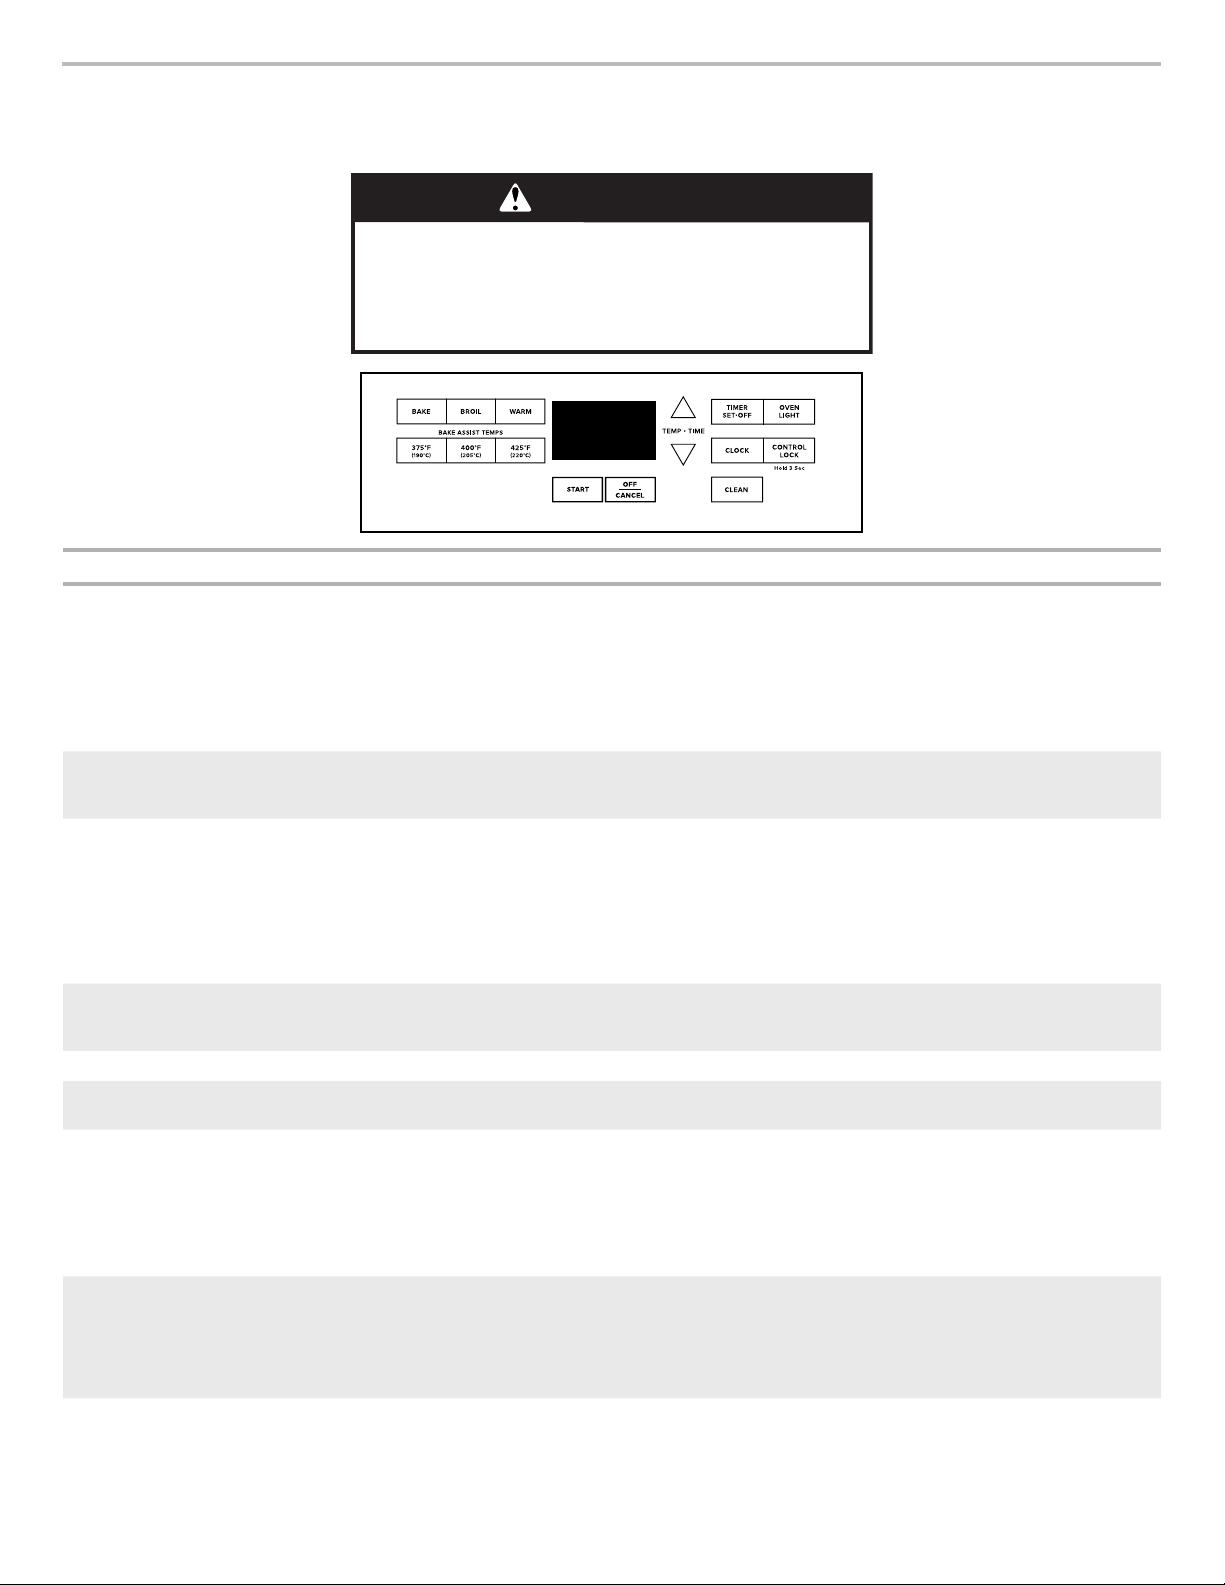
FEATURE GUIDE
This manual covers several models. Your model may have some or all of the items listed. Refer to this manual or the Frequently Asked
Questions section of our website at www.amanacanada.ca for more detailed instructions.
WARNING
Food Poisoning Hazard
Do not let food sit in oven more than one hour before
or after cooking.
Doing so can result in food poisoning or sickness.
Keypad Feature Instructions
CLOCK Clock
OVEN LIGHT Oven cavity light
TIMER SET•OFF Oven timer
START Cooking start
OFF/CANCEL Range function
TEMP/TIME Temperature and
BAKE Baking and
BAKE ASSIST
TEMPS
time adjust
roasting
Baking and
roasting
The Clock uses a 12-hour cycle.
1. Check that the oven is OFF.
2. Press CLOCK.
3. Press the Temp/Time “up” or “down” arrow keypad to set the hours. Press CLOCK
to switch to the minutes. Press the Temp/Time “up” or “down” arrow keypad to set
the minutes.
4. Press CLOCK or START.
While the oven door is closed, press OVEN LIGHT to turn the light on and off. The oven light
will come on when the oven door is opened. The oven light will not come on during the
Self-Cleaning cycle.
The Timer can be set in hours or minutes up to 9 hours and 59 minutes.
1. Press TIMER SET•OFF.
2. Press the Temp/Time “up” or “down” arrow keypad to set the length of time.
3. Press START to begin the countdown. If enabled, end-of-cycle tones will sound at end
of countdown.
4. Press TIMER SET•OFF to cancel the Timer. Do not press OFF/CANCEL because the oven
will turn off.
The Start keypad beg
will sound and Start will blink until pressed or canceled. If Start is not pressed within
3
0 seconds
The Off/Cancel keypad stops any function except the Timer and Oven Control Lockout.
The Temp/Time “up” and “down” arrow keypads are used to adjust time and
temperature settings.
1. Press BAKE.
2. Press the Temp/Time “up” or “down” arrow keypad until desired temperature is reached.
A tone will sound if the minimum or maximum temperature is reached.
3. Press START.
4. To change the temperature, repeat Step 2. Press START.
5. Press OFF/CANCEL when finished.
1. Press the desired Bake Assist Temps keypad.
2. Press the Temp/Time “up” or “down” arrow keypad to set a temperature other than the
Bake Assist Temp. A tone will sound if the minimum or maximum temperature is reached.
3. Press START.
4. Press OFF/CANCEL when finished.
aft
ins any oven function. If Start is not pressed within 10 seconds, a tone
er pressing a keypad, the function is canceled and the time of day is displayed.
4
09-Nov-2017 15:22:46 EST | RELEASED
In some European factories the letter "W" of the part code mentioned herein will be automatically
replaced by the number "4000" (e.g. "W12345678" becomes "400012345678")
Page 5

Keypad Feature Instructions
BROIL Broiling
WARM Hold warm
CLEAN
(on some models)
CONTROL LOCK
(Hold 3 Sec)
Self-Cleaning
cycle
Oven control
lockout
1. Position cookware in the oven and close the oven door.
2. Press BROIL.
3. Press the Temp/Time “up” or “down” arrow keypad until desired temperature is reached.
A tone will sound if the minimum or maximum temperature is reached.
4. Press START.
5. To change the temperature, repeat Step 3 and press START.
6. Press OFF/CANCEL when finished.
ood must be at serving temperature before placing it in the warmed oven.
F
1. Press WARM.
2. Press the Temp/Time “up” or “down” arrow keypad until desired temperature is reached.
A tone will sound if the minimum or maximum temperature is reached.
3. Press START.
4. Press OFF/CANCEL when finished.
NOTE: The oven will automatically turn off after 60 minutes.
See the “Self-Cleaning Cycle” section.
1. Check that the oven is OFF.
2. Press and hold CONTROL LOCK for 3 seconds.
3. A tone will sound and a lock will be displayed.
4. Repeat to unlock. No keypads will function with the controls locked.
09-Nov-2017 15:22:46 EST | RELEASED
In some European factories the letter "W" of the part code mentioned herein will be automatically
replaced by the number "4000" (e.g. "W12345678" becomes "400012345678")
5
Page 6
COOKTOP USE
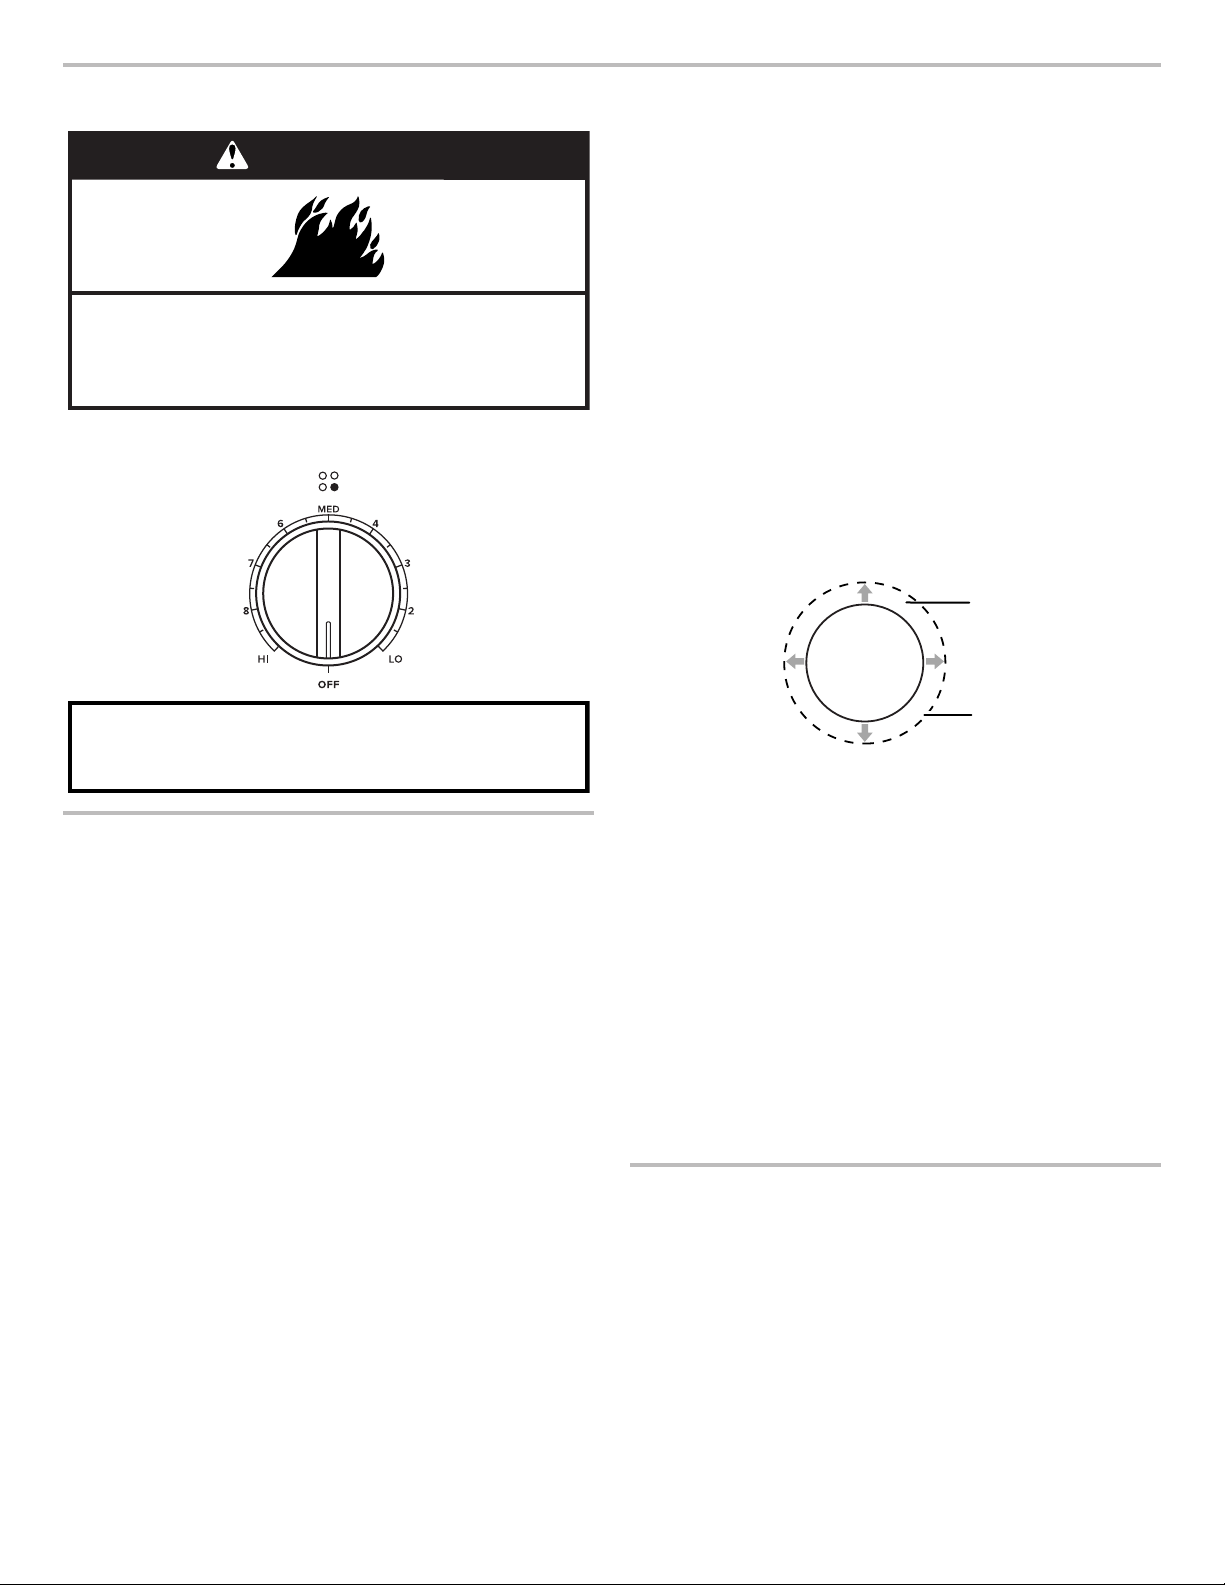
WARNING
Fire Hazard
Turn off all controls when done cooking.
Failure to do so can result in death or fire.
The control knobs can be set to anywhere between HI and LO.
Push in and turn to setting.
■ For foods containing sugar in any form, clean up all spills and
soils as soon as possible. Allow the cooktop to cool down
slightly. Then, while wearing oven mitts, remove the spills
using a scraper while the surface is still warm. If sugary spills
are allowed to cool down, they can adhere to the cooktop and
can cause pitting and permanent marks.
■ To avoid scratches, do not slide cookware or bakeware across
the cooktop. Aluminum or copper bottoms and rough finishes
on cookware or bakeware could leave scratches or marks on
the cooktop.
■ Do not cook popcorn in prepackaged aluminum containers on
the cooktop. They could leave aluminum marks that cannot be
removed completely.
■ To avoid damage to the cooktop, do not allow objects that
could melt, such as plastic or aluminum foil, to touch any part
of the entire cooktop.
■ To avoid damage to the cooktop, do not use the cooktop as a
cutting board.
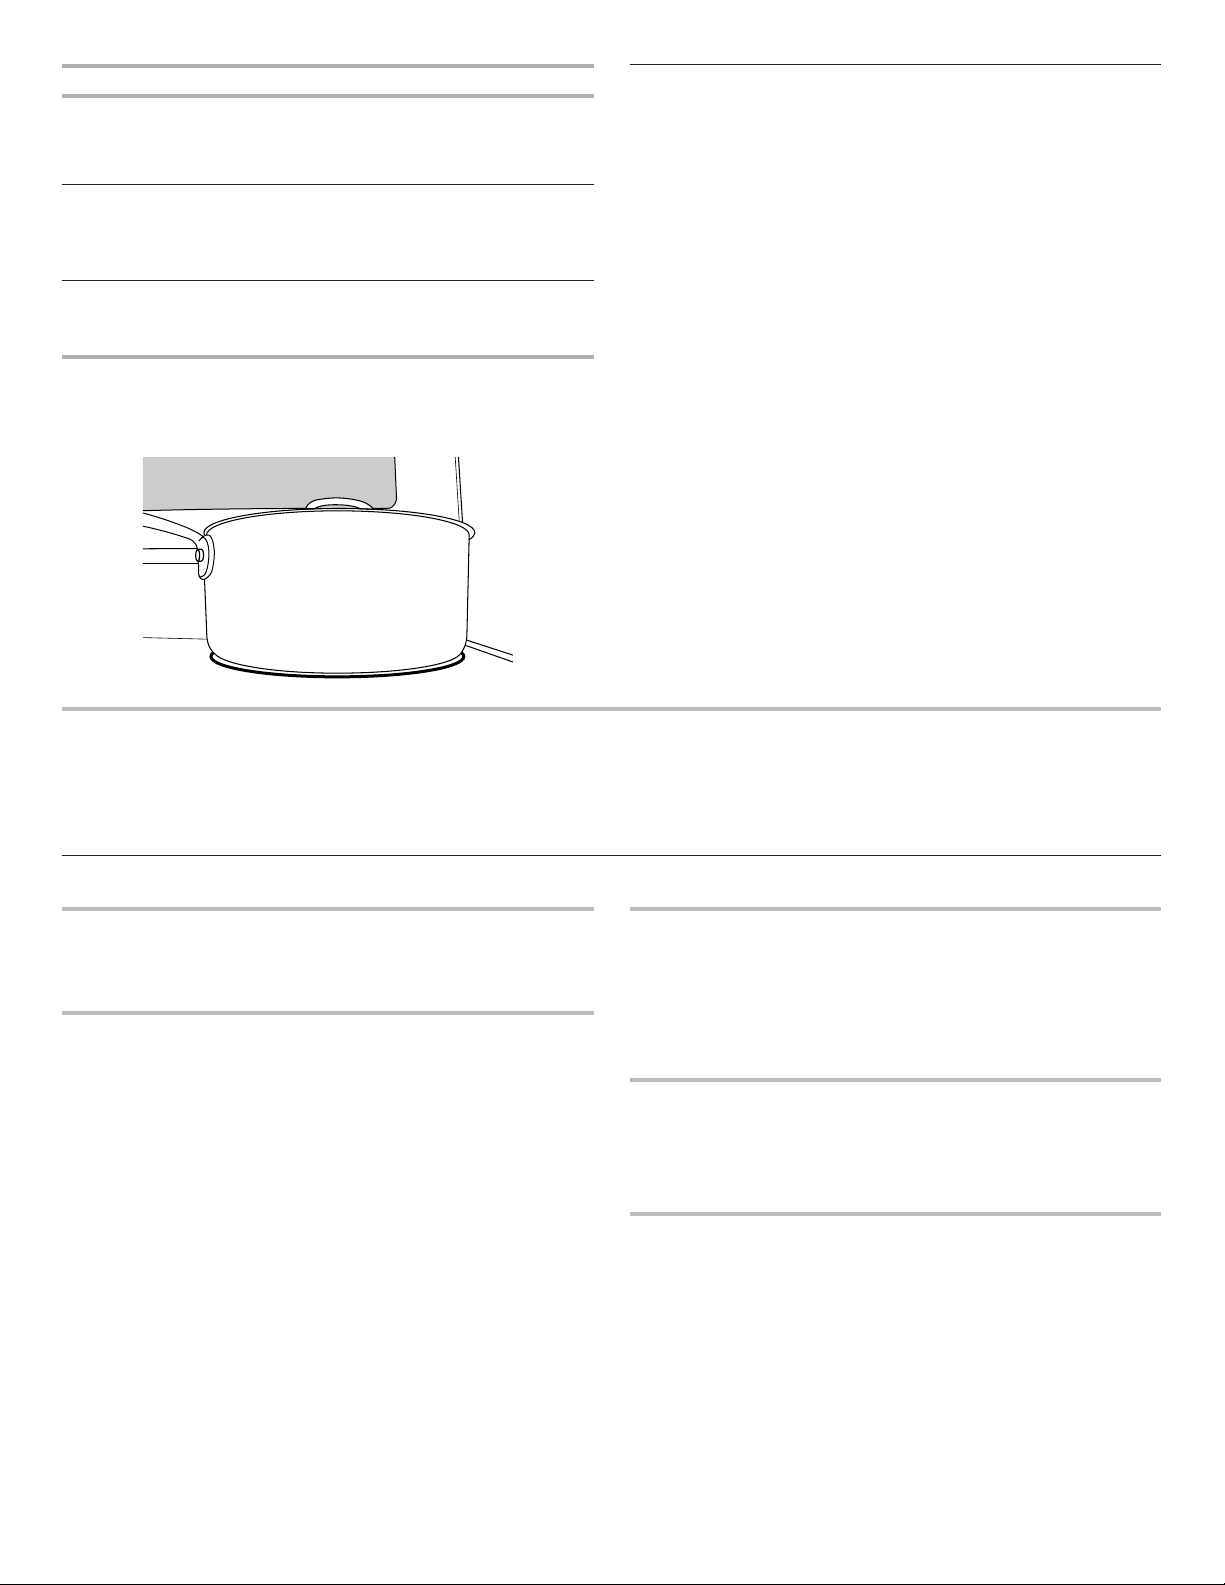
■ Use cookware about the same size as the surface cooking
area. Cookware should not extend more than 1/2" (1.3 cm)
outside the area.
B
A
REMEMBER: When range is in use or (on some models)
during the Self-Cleaning cycle, the entire cooktop area may
become hot.
Ceramic Glass (on some models)
The surface cooking area will glow red when an element is ON.
Some parts of the surface cooking area may not glow red when an
element is ON. This is normal operation. It will also randomly cycle
off and back on again, even while on Hi, to keep the cooktop from
extreme temperatures.
It is normal for the surface of light-colored ceramic glass to appear
to change color when surface cooking areas are hot. As the glass
cools, it will return to its original color.
Clean the cooktop after each use to help avoid scratches, pitting,
abrasions, and to condition the glass surface. Ceramic glass
cooktop cleaner and a cooktop scraper are also recommended
for stubborn soils. Do not use abrasive cleaners, cleaning pads,
or harsh chemicals for cleaning. The Cooktop Care Kit Part
Number 31605 contains all of the items needed to clean and
condition your ceramic glass cooktop. Refer to the “Range Care”
section for additional information.
IMPORTANT: To avoid permanent damage to the cooktop surface
and to make soils easier to remove, clean the cooktop after each
use to remove all soils.
■ Avoid storing jars or cans above the cooktop. Dropping
a heavy or hard object onto the cooktop could crack
the cooktop.
■ To avoid damage to the cooktop, do not leave a hot lid on
the cooktop. As the cooktop cools, air can become trapped
between the lid and the cooktop and the ceramic glass could
break when the lid is removed.
C
A. Surface cooking area
B. Cookware/canner
1
C.
/2" (1.3 cm) maximum overhang
■ Use flat-bottomed cookware for best heat conduction and
energy efficiency. Cookware with rounded, warped, ribbed,
or dented bottoms could cause uneven heating and poor
cooking results.
■ Determine flatness by placing the straight edge of a ruler
across the bottom of the cookware. While you rotate the
ruler, no space or light should be visible between it and
the cookware.
■ Cookware designed with slightly indented bottoms or small
expansion channels can be used.
■ Make sure the bottoms of pots and pans are clean and dry
before using them. Residue and water can leave deposits
when heated.
■ To avoid damage to the cooktop, do not cook foods directly
on the cooktop.
Ceramic Glass Cooktop Cleaning (on some models)
Clean the cooktop after each use to help avoid scratches, pitting,
abrasions, and to condition the glass surface. Ceramic glass
cooktop cleaner and a cooktop scraper are also recommended
for stubborn soils. Do not use abrasive cleaners, cleaning pads, or
harsh chemicals for cleaning. The Cooktop Care Kit Part Number
31605 contains all of the items needed to clean and condition
your ceramic glass cooktop. Refer to the “Range Care” section
for additional information.
IMPORTANT: To avoid permanent damage to the cooktop surface
and to make soils easier to remove, clean the cooktop after each
use to remove all soils.
6
09-Nov-2017 15:22:46 EST | RELEASED
In some European factories the letter "W" of the part code mentioned herein will be automatically
replaced by the number "4000" (e.g. "W12345678" becomes "400012345678")
Page 7

Cooktop On Indicator Light
The Cooktop On indicator light is located on the display panel.
When any cooktop element on the console panel is turned on,
the Cooktop On indicator light will glow.
Hot Surface Indicator Light
On ceramic glass models, the Hot Surface indicator light is located
on the display panel.
The Hot Surface indicator light will glow as long as any surface
cooking area is too hot to touch, even after the surface cooking
area is turned off.
Coil Elements and Burner Bowls (on some models)
Coil elements should be level for optimal cooking results. Burner
bowls, when clean, reflect heat back to the cookware. They also
help catch spills.
Cookware should not extend more than 1/2" (1.3 cm) over the coil
element. If cookware is uneven or too large, it can produce excess
heat, causing the burner bowl to change color.
Dual Zone Cooking Element (on some models)
The Dual Zone cooking element offers flexibility depending on the
size of the cookware. Single size can be used in the same way as
a regular element. The dual size combines both the single and
outer elements and is recommended for larger size cookware.
Cookware
IMPORTANT: Do not leave empty cookware on a hot surface
cooking area, element, or surface burner.
Ideal cookware should have a flat bottom, straight sides, and a
well-fitting lid, and the material should be of medium-to-heavy
thickness.
Rough finishes may scratch the cooktop. Aluminum and
copper may be used as a core or base in cookware. However,
when used as a base, they can leave permanent marks on
the surfaces.
Cookware material is a factor in how quickly and evenly heat
is transferred which affects cooking results. A nonstick finish
has the same characteristics as its base material. For example,
aluminum cookware with a nonstick finish will take on the
properties of aluminum.
Cookware with nonstick surfaces should not be used under
the broiler.
Check for flatness by placing the straight edge of a ruler across
the bottom of the cookware. While you rotate the ruler, no space
or light should be visible between it and the cookware.
1
2
3
4
1
5
6
7
2
8
9
3
1 0
1 1
1 2
4
1 3
1 4
5
1 5
1 6
6
1 7
1 8
1 9
7
2 0
A B
A. Single
B. Dual
Melt Cooking Element (on some models)
The Melt cooking element offers flexibility due to a wide range of
settings between Hi and Melt. The Hi heat option can be used to
boil small amounts of liquid quickly. The lowest setting can be
used to prepare sauces and to keep foods at a low temperature.
Use cookware appropriate in size for the Melt element.
A
A. Hi heat option
B. Melt option
B
Use the following chart as a guide for cookware material
characteristics.
Cookware Characteristics
Aluminum
■ Heats quickly and evenly.
■ Suitable for all types of cooking.
■ Medium or heavy thickness is best
for most cooking tasks.
■ May leave aluminum residues
which may be diminished if cleaned
immediately after cooking.
Cast iron
■ Heats slowly and evenly.
■ Good for browning and frying.
■ Maintains heat for slow cooking.
■ Rough edges or burrs may scratch
the cooktop.
Ceramic or
ceramic glass
■ Follow manufacturer’s instructions.
■ Heats slowly, but unevenly.
■ Ideal results on low to medium heat
settings.
■ May scratch the cooktop.
Copper
■ Heats very quickly and evenly.
■ May leave copper residues which may
be diminished if cleaned immediately
after cooking.
■ Can leave a permanent stain or bond
to the cooktop if overheated.
09-Nov-2017 15:22:46 EST | RELEASED
In some European factories the letter "W" of the part code mentioned herein will be automatically
7
replaced by the number "4000" (e.g. "W12345678" becomes "400012345678")
Page 8
Cookware Characteristics
Earthenware
Porcelain
enamel-on-steel
or cast iron
■ Follow manufacturer’s instructions.
■ Use on low heat settings.
■ May scratch the cooktop.
■ See stainless steel or cast iron.
■ Porcelain enamel bakeware without the
metal base may bond to the cooktop if
overheated.
Stainless steel
■ Heats quickly, but unevenly.
■ A core or base of aluminum or copper
on stainless steel provides even heating.
se flat-bottomed cookware for best cooking results and energy
U
efficiency. The cookware should be about the same size as the
cooking area outlined on the cooktop. Cookware should not
extend more than 1/2" (1.3 cm) outside the area.
Home Canning
Canning can be performed on a glass smoothtop cooking surface
or traditional coil element cooktop. When canning for long periods,
alternate the use of surface cooking areas or elements between
batches. This allows time for the most recently used areas to cool.
■ C
enter the canner on the largest surface cooking area or
element. On electric cooktops, canners should not extend
more than 1/2" (1.3 cm) beyond the surface cooking area
or element.
■ Do not place canner on 2 surface cooking areas or elements
at the same time.
■ On ceramic glass models, use only flat-bottomed canners
to avoid damage to the cooktop and elements.
■ For more information, contact your local agricultural extension
office or refer to published home canning guides. Companies
that manufacture home canning products can also offer
assistance.
OVEN USE
Odors and smoke are normal when the oven is used the first few
times or when it is heavily soiled.
Electronic Oven Controls
Control Display
The display will flash when powered up or after a power loss.
Press OFF/CANCEL to clear. When oven is not in use, the time of
day is displayed. Indicator lights show functions that are in use.
Tones
Tones are audible signals, indicating the following:
Basic Functions
One Tone
■ Valid keypad press
■ Oven is preheated (long tone).
■ Function has been entered.
■ Reminder, repeating every 20 seconds after the
end-of-cycle tones
Three Tones
■ Invalid keypad press
Four Tones
■ End of cycle
IMPORTANT: The health of some birds is extremely sensitive
to the fumes given off. Exposure to the fumes may result in
death to certain birds. Always move birds to another closed
and well-ventilated room.
Fahrenheit and Celsius
The temperature is preset to Fahrenheit but can be changed
to Celsius.
To change: Press and hold the Temp/Time “up” arrow keypad
for 5 seconds. “°C” or “°F” will appear on the display. Repeat to
change back.
To exit mode, press OFF/CANCEL.
Keypress Tones
Activates or turns off the tones when a keypad is pressed.
To change: Press and hold OVEN LIGHT for 5 seconds.
Repeat to change back.
To exit mode, press OFF/CANCEL.
Demo Mode
IMPORTANT: This feature is intended for use on the sales floor
with 120 V power connection and permits the control features
to be demonstrated without heating elements turning on. If this
feature is activated, the oven will not work.
To change: Press OFF/CANCEL, OFF/CANCEL, the Temp/Time
“up” arrow keypad, TIMER SET•OFF. Repeat to change back and
end Demo mode.
8
09-Nov-2017 15:22:46 EST | RELEASED
In some European factories the letter "W" of the part code mentioned herein will be automatically
replaced by the number "4000" (e.g. "W12345678" becomes "400012345678")
Page 9
Oven Temperature Control
WARNING
IMPORTANT: Do not use a thermometer to measure oven
temperature. Elements will cycle on and off as needed to provide
consistent temperature but may run slightly hot or cool at any
point in time due to this cycling. Most thermometers are slow
to react to temperature change and will not provide an accurate
reading due to this cycling.
The oven provides accurate temperatures; however, it may cook
faster or slower than your previous oven, so the temperature can
be adjusted to personalize it for your cooking needs. It can be
changed in Fahrenheit or Celsius.
To Adjust Oven Temperature:
1. Press and hold the Temp/Time “down” arrow keypad for
5 seconds until the oven display shows the current setting,
for example “0°F CAL” or “00.”
2. Press the Temp/Time “up” or “down” arrow keypad to increase
or decrease the temperature in 5°F (3°C) amounts. The
adjustment can be set between 30°F (18°C) and -30°F (-18°C).
3. Press START.
Sabbath Mode
(on some models)
For guidance on usage and a complete list of models with
Sabbath mode, visit www.star-k.org.
The Sabbath mode sets the oven to remain on in a Bake setting
until turned off. The Oven Control Lockout feature will be disabled
during the Sabbath mode. After the Sabbath mode is set, no tones
will sound, the display will not show the temperature, the Kitchen
Timer mode will be canceled (if active), and only the following
keypads will function:
■ Temp/Time “up” and “down” arrow keypads
■ Off/Cancel
When the oven door is opened or closed, the oven light will not
turn on or off and the heating elements will not turn on or off
immediately.
When power is restored after a power failure, the oven will return
to Sabbath mode and remain Sabbath compliant with the bake
elements OFF until Off/Cancel is pressed.
Pressing OFF/CANCEL at any time returns the oven to the normal
cooking mode (not Sabbath compliant).
Before entering the Sabbath mode, it must be decided if the oven
light is to be ON or OFF for the entire Sabbath mode period. If
the light is ON when entering Sabbath mode, it will remain ON for
the entire time Sabbath mode is in use. If the light is OFF when
entering Sabbath mode, it will remain OFF for the entire time
Sabbath mode is in use. Opening the oven door or pressing OVEN
LIGHT will not affect the oven light once Sabbath mode has been
entered.
On the Holiday, the oven temperature can be changed once the
oven is in Sabbath mode by pressing the Temp/Time “up” or
“down” arrow keypad. The oven temperature will change 25°F
(14°C) each time the Temp/Time “up” and “down” arrow keypads
are pressed. Press START to activate the new temperature. The
display will not change and there will be no sounds during this
adjustment.
To Activate and Bake Using Sabbath Mode:
1. Press BAKE.
2. Press the Temp/Time “up” or “down” arrow keypad.
3. Press START.
4. Press and hold TIMER SET•OFF for 5 seconds. “SAb” will
flash in the display.
5. Press START while “SAb” is flashing to enter Sabbath mode;
otherwise, the entire cycle cancels out. “SAb” will stop flashing
and remain on in the display. The oven is now in Sabbath
mode and is Sabbath compliant.
Pressing OFF/CANCEL at any time returns the oven to the normal
cooking mode (not Sabbath compliant).
NOTE: If “SAb” does not appear in your display, the Sabbath
mode is not active. After Sabbath mode is deactivated, you must
activate Sabbath mode by completing steps 1 through 5.
Warm
Food Poisoning Hazard
Do not let food sit in oven more than one hour before
or after cooking.
Doing so can result in food poisoning or sickness.
IMPORTANT: Food must be at serving temperature before placing
it in the warmed oven. Food may be held up to 1 hour; however,
breads and casseroles may become too dry if left in the oven
during the Warm function. For best results, cover food.
The Warm feature allows hot cooked foods to stay at
serving temperature.
To Use:
1. Press WARM.
2. Press the Temp/Time “up” or “down” arrow keypad until
desired temperature is reached. A tone will sound if the
minimum or maximum temperature is reached.
3. Press START.
4. Place food in the oven.
5. Press OFF/CANCEL when finished.
NOTE: The temperature may be changed at any time by pressing
the Temp/Time “up” or “down” arrow keypad to reach the desired
temperature and then pressing START.
Aluminum Foil
IMPORTANT: To avoid permanent damage to the oven bottom
finish, do not line the oven bottom with any type of foil or liner.
For best cooking results, do not cover entire oven rack with foil
because air must be able to move freely.
Positioning Racks and Bakeware
IMPORTANT: To avoid permanent damage to the porcelain
finish, do not place food or bakeware directly on the oven door
or bottom.
Bakeware
To cook food evenly, hot air must be able to circulate. Allow
2" (5 cm) of space around bakeware and oven walls. Make
sure that no bakeware piece is directly over another.
Racks
■ Position racks before turning on the oven.
■ Do not position racks with bakeware on them.
■ Make sure racks are level.
To move a rack, pull it out to the stop position, raise the front
edge, and then lift out. Use the following illustration as a guide.
5
4
3
2
1
09-Nov-2017 15:22:46 EST | RELEASED
In some European factories the letter "W" of the part code mentioned herein will be automatically
replaced by the number "4000" (e.g. "W12345678" becomes "400012345678")
9
Page 10

Rack Positions
A
Rack 5: Toasting bread or broiling thin, non-fatty foods
Rack 4: 2-rack baking and broiling
Rack 3: Most baked goods on a cookie sheet, muffin pan,
or jelly roll pan; layer cakes; broiling chicken pieces
Rack 2: Pies, casseroles, yeast bread, quick breads, frozen
convenience foods, 2-rack baking
Rack 1: Roasting large and small cuts of meat and poultry
Multiple Rack Cooking
2-rack: Use rack positions 2 and 4.
Baking Layer Cakes on 2 Racks
For best results when baking cakes on 2 racks, place flat racks
in positions 2 and 4. Place the cakes on the racks as shown.
Baking Cookies on 2 Racks
For best results when baking cookies on 2 racks, place flat racks
in positions 2 and 4.
Oven Vent
Baking and Roasting
Before baking and roasting, position racks according to the
“Positioning Racks and Bakeware” section. When roasting, it is not
necessary to wait for the oven preheat cycle to end before putting
food in unless it is recommended in the recipe.
Oven Temperature
While in use, the oven elements will cycle on and off as needed
to maintain a consistent temperature, but they may run slightly
hot or cool at any point in time due to this cycling. Opening the
oven door while in use will release the hot air and cool the oven
which could impact the cooking time and performance. It is
recommended to use the oven light to monitor cooking progress.
NOTE: On models with convection, the convection fan may run in
the non-convection bake mode to improve oven performance.
Temperature Management System
The Temperature Management System electronically regulates the
oven heat levels during preheat and bake to maintain a precise
temperature range for optimal cooking results. The bake and broil
elements or burners cycle on and off in intervals. On convection
range models, the fan will run while preheating and may be cycled
on and off for short intervals during Bake to provide the best
results. This feature is automatically activated when the oven is
in use.
Preheating
When START is pressed, the oven will begin preheating. Once
100ºF (38ºC) is reached, the display temperature will increase as
the actual temperature of the oven increases. When the preheat
temperature is reached, a tone will sound, and the selected
temperature will appear on the display.
A
A. Oven vent (ceramic glass model) A. Oven vent (coil element model)
The oven vent releases hot air and moisture from the oven
and should not be blocked or covered. Blocking or covering the
oven vent will cause poor air circulation, affecting cooking and
cleaning results. Do not set plastics, paper, or other items that
could melt or burn near the oven vent.
On coil element models, the element can be used when the oven
is in use as long as the cookware does not extend more than
(1.3 cm) over the element.
1
/2"
Broiling
When broiling, preheat the oven for 5 minutes before putting food
in unless recommended otherwise in the recipe. Position food on
grid in a broiler pan, then place it in the center of the oven rack.
IMPORTANT: Close the door to ensure proper broiling
temperature.
Changing the temperature when broiling allows more precise
control when cooking. The lower the broil setting is, the slower the
cooking. Thicker cuts and unevenly shaped pieces of meat, fish,
and poultry may cook better at lower broil settings. Refer to the
“Positioning Racks and Bakeware” section for more information.
On lower settings, the broil element will cycle on and off to
maintain the proper temperature.
■ For best results, use a broiler pan and grid. It is designed to
drain juices and help avoid spatter and smoke.
If you would like to purchase a broiler pan, one may be
ordered. See the “Accessories” section.
NOTE: Odors and smoke are normal the first few times the oven
is used or if the oven is heavily soiled.
10
09-Nov-2017 15:22:46 EST | RELEASED
In some European factories the letter "W" of the part code mentioned herein will be automatically
replaced by the number "4000" (e.g. "W12345678" becomes "400012345678")
Page 11
RANGE CARE
Self-Cleaning Cycle
(on some models)
WARNING
Burn Hazard
Do not touch the oven during the Self-Cleaning cycle.
Keep children away from oven during
Self-Cleaning cycle.
Failure to follow these instructions can result in burns.
IMPORTANT: The health of some birds is extremely sensitive to
the fumes given off during the Self-Cleaning cycle. Exposure to the
fumes may result in death to certain birds. Always move birds to
another closed and well-ventilated room.
Do not block the oven vent(s) during the Self-Cleaning cycle. Air
must be able to move freely. Depending on your model, see the
“Oven Vent” section.
Do not clean, rub, damage, or move the oven door gasket.
Prepare Range
■ Remove the broiler pan, grid, cookware and bakeware, all
cooking utensils, oven racks, and aluminum foil and, on some
models, the temperature probe from the oven.
■ Use a damp cloth to clean inside door edge and the 1
(3.8 cm) area around the inside oven cavity frame, being
certain not to move or bend the gasket.
■ Remove plastic items from the cooktop because they
may melt.
■ Remove all items from the storage drawer.
1
/2"
How t
he Cycle Works
IMPORTANT: The heating and cooling of porcelain on steel in the
oven may result in discoloring, loss of gloss, hairline cracks, and
popping sounds.
Before cleaning, make sure the door is completely closed or the
door will not lock and the Self-Cleaning cycle will not begin.
Once the oven has completely cooled, remove ash with a damp
cloth. To avoid breaking the glass, do not apply a cool damp
cloth to the inner door glass before it has completely cooled.
To stop the Self-Cleaning cycle at any time, press OFF/CANCEL.
If the temperature is too high, the oven door will remain locked
and “cool” and “ ” will be displayed. The cooling fan may
cont
inue to run.
The oven light will not function during the Self-Cleaning cycle.
e the cleaning temperature has been reached, the electronic
Onc
control requires a 12-hour delay before another Self-Cleaning
cycle can be started.
Electronic Oven Control with Adjustable Clean Time
(on some models)
The Self-Cleaning cycle is time adjustable between 2 hours
30 minutes and 4 hours 30 minutes in 30-minute increments.
Suggested clean times are 2 hours 30 minutes for light soil,
and 4 hours 30 minutes for heavy soil.
To Self-Clean:
1. Press CLEAN.
2. Press the Temp/Time “up” or “down” arrow keypad to enter
the desired Self-Cleaning cycle time.
3. Press START.
The oven door will automatically lock. The Door Locked and
Clean indicator lights will be displayed. The time remaining will
also be displayed.
4. When the Self-Cleaning cycle is complete and the oven cools,
the Door Locked and Clean indicator lights will turn off.
5. When the oven is completely cooled, remove ash with a
damp cloth.
To exit the Self-Cleaning cycle before completed, press
OFF/CANCEL. The door will unlock once the oven cools.
09-Nov-2017 15:22:46 EST | RELEASED
In some European factories the letter "W" of the part code mentioned herein will be automatically
replaced by the number "4000" (e.g. "W12345678" becomes "400012345678")
11
Page 12

General Cleaning
IMPORTANT: Before cleaning, make sure all controls are OFF and
the oven and cooktop are cool. Always follow label instructions
on cleaning products. For additional information, you can visit
the Frequently Asked Questions (FAQs) section of our website at
www.amanacanada.ca.
Soap, water, and a soft cloth or sponge are suggested first
unless otherwise noted.
EXTERIOR PORCELAIN ENAMEL SURFACES
(on some models)
Food spills containing acids, such as vinegar and tomato, should
be cleaned as soon as the entire range is cool. These spills may
affect the finish.
Cleaning Method:
■ Gl
ass cleaner, mild liquid cleaner, or nonabrasive
scrubbing pad:
Gently clean around the model/serial/rating plate
because scrubbing may remove numbers.
■ Affresh
STAINLESS STEEL (on some models)
NOTE: To avoid damage to stainless steel surfaces, do not use
soap-filled scouring pads, abrasive cleaners, Cooktop Cleaner,
steel-wool pads, gritty washcloths, or abrasive paper towels.
Damage may occur to stainless steel surfaces, even with one-time
or limited use.
Cleaning Method:
Rub in direction of grain to avoid damaging.
■ A
METALLIC PAINT (on some models)
Do not use abrasive cleaners, cleaners with bleach, rust removers,
ammonia, or sodium hydroxide (lye) because paint surface
may stain.
CERAMIC GLASS (on some models)
Cleaning Method:
To avoid damaging the cooktop, do not use steel wool, abrasive
powder cleansers, chlorine bleach, rust remover, or ammonia.
1. Remove food/residue with the Cooktop Scraper.
®
Kitchen and Appliance Cleaner Part Number
W10355010 (not included):
See the “Accessories” section for more information.
ffresh® Stainless Steel Cleaner Part Number W10355016
(not included):
See the “Accessories” section for more information.
2. Apply a few dime-sized drops of affresh® Cooktop Cleaner
to the affected areas.
■ Rub affresh
®
Cooktop Cleaner onto the cooktop surface
with the blue Cooktop Cleaning Pad. Some pressure is
needed to remove stubborn stains.
■ Allow the cleaner to dry to a white haze before proceeding
to Step 3.
3. Polish with a clean, dry cloth or a clean, dry paper towel.
■ Repeat steps 1 through 3 as necessary for stubborn
or burned-on stains.
The Complete Cooktop Cleaner Kit is available for order and
includes the following:
■ Cook
■ Affresh
■ Blue Cooktop Cleaning Pads
top Scraper
®
Cooktop Cleaner
See the “Accessories” section for part numbers and information
on ordering.
COOKTOP CONTROLS
To avoid damage to the cooktop controls, do not use steel wool,
abrasive cleansers, or oven cleaner.
To avoid damage, do not soak knobs.
When replacing knobs, make sure knobs are in the Off position.
On some models, do not remove seals under knobs.
Cleaning Method:
■ Soap and water:
Pull knobs straight away from control panel to remove.
■ For best results, use the Cooktop Scraper while the
cooktop is still warm but not hot to the touch. It is
recommended to wear an oven mitt while scraping
the warm cooktop.
■ Hold the Cooktop Scraper at approximately a 45° angle
against the glass surface and scrape the residue. It will
be necessary to apply pressure in order to remove the
residue.
Allow the cooktop to cool down completely before proceeding
to Step 2.
12
09-Nov-2017 15:22:46 EST | RELEASED
CONTROL PANEL AND OVEN DOOR EXTERIOR
To avoid damage to the control panel, do not use abrasive
cleaners, steel-wool pads, gritty washcloths, or abrasive
paper towels.
Cleaning Method:
lass cleaner and soft cloth or sponge:
■ G
Apply glass cleaner to soft cloth or sponge, not directly
on panel.
■ Affresh
In some European factories the letter "W" of the part code mentioned herein will be automatically
replaced by the number "4000" (e.g. "W12345678" becomes "400012345678")
®
Kitchen and Appliance Cleaner Part Number
W10355010 (not included):
See the “Accessories” section for more information.
Page 13

COIL ELEMENTS (on some models)
Cleaning Method:
■ Damp cloth:
Make sure control knobs are OFF and elements are cool.
Do not clean or immerse in water. Soil will burn off when hot.
BURNER BOWLS (on some models)
Before removing or replacing coil elements and burner
bowls, make sure they are cool and the control knobs are
in the Off position.
Remove the coil element by pushing the edge of the coil element
toward the receptacle. Lift it enough to clear the burner bowl.
Pull the coil element straight away from the receptacle to remove.
Lift out the burner bowl.
Cleaning Method:
Chrome burner bowls
Wash frequently in warm, soapy water. (It is not recommended to
wash chrome bowls in a dishwasher.) A mild abrasive cleaner and
a plastic scrubber can be used to remove stubborn stains.
For heavily soiled bowls, place an ammonia-soaked paper towel
on the stains and allow to soak for a short time, then gently scrub
with a plastic scrubber.
SURFACE UNDER COOKTOP (on some models)
The coil cooktop will lift up to provide easy access for cleaning
beneath. Lift the cooktop by both front corners until the support
locks into place.
Cleaning Method:
■ Glass cleaner, mild liquid cleaner or nonabrasive
scrubbing pad.
■ A
ffresh® Kitchen and Appliance Cleaner Part Number
W10355010 (not included):
See the “Accessories” section for more information.
To avoid damage to the range, do not remove the cooktop.
OVEN RACKS
Cleaning Method:
■ Steel-wool pad
■ For racks that have discolored and are harder to slide,
a light coating of vegetable oil applied to the rack guides
will help them slide.
STORAGE DRAWER (on some models)
Check that storage drawer is cool and empty before cleaning.
Cleaning Method:
■ Mild detergent
OVEN CAVITY
Do not use oven cleaners on models with Self-Cleaning.
Food spills should be cleaned when oven cools. At high
temperatures, foods react with porcelain. Staining, etching,
pitting, or faint white spots can result.
Cleaning Method:
■ See “Self-Cleaning Cycle” section.
Oven Light
The oven light is a standard 40-watt appliance bulb. Before
replacing, make sure the oven and cooktop are cool and the
control knobs are in the Off position.
To Replace:
1. Unplug range or disconnect power.
2. Turn the glass bulb cover in the back of the oven
counterclockwise to remove.
3. Turn bulb counterclockwise to remove from socket.
4. Replace bulb, then bulb cover by turning clockwise.
5. Plug in range or reconnect power.
09-Nov-2017 15:22:46 EST | RELEASED
In some European factories the letter "W" of the part code mentioned herein will be automatically
replaced by the number "4000" (e.g. "W12345678" becomes "400012345678")
13
Page 14

TROUBLESHOOTING
F
irst try the solutions suggested here. If you need further assistance or more recommendations that may help you avoid a service
v
isit http://www.amanacanada.ca.
Contact us by mail with any questions or concerns at the address below:
Amana Brand Home Appliances
Customer eXperience Centre
200 - 6750 Century Ave.
Mississauga, Ontario L5N 0B
Please include a daytime phone number in your correspondence.
Operation
Problem Possible Causes Solutions
Nothing will operate
Cooktop will not operate
Excessive heat around
cookware on cooktop
Cooktop cooking results
not what expected
Cooktop element cycles
on and off on High setting
Oven will not operate
Oven temperature
too high or too low
Oven indicator lights flash
Display shows messages
Self-Cleaning cycle
will not operate
Power supply cord is unplugged. Plug into a grounded outlet.
Household fuse is blown or a
circuit breaker is tripped.
The control displays an F9 or
F9 E0 error code.
The control knob is set incorrectly. Push in knob before turning to a setting.
On ceramic glass models, the
oven control lockout is set.
A Self-Cleaning cycle has been
selected.
Cookware that is not the
proper size.
Control knob set to incorrect
heat level.
Range is not level. Level the range. See the Installation Instructions.
Element cycling due to a
temperature limiter
Control lock is ON. Press and hold CONTROL LOCK for 3 seconds to unlock.
Control is in Demo mode. Demo mode will deactivate all oven elements. See “Demo Mode”
Electronic oven control set
incorrectly.
Oven temperature needs
adjustment.
Power to range is turned on
or restored.
Power failure (display shows
flashing time).
Error code (display shows letter
followed by number).
Start needs to be pressed so
a cycle can begin.
The oven door is not closed. Make sure the oven door is fully closed.
The Self-Cleaning function has
not been entered correctly.
Replace the fuse or reset the circuit breaker. If the problem
continues, call an electrician.
The electrical outlet in the home may be miswired. Contact
a qualified electrician to verify the electrical supply.
See the “Control Lock” keypad feature in the “Feature
Guide” section.
On some ceramic glass models, the cooktop will not operate
during a Self-Cleaning cycle.
Use cookware about the same size as the surface cooking area,
element, or surface burner. Cookware should not extend more
1
/2" (1.3 cm) outside the cooking area.
than
See the “Cooktop Use” section.
This is normal operation. The element may cycle on and off to
keep the cooktop from overheating.
in the “Electronic Oven Controls” section.
See the “Electronic Oven Controls” section.
See “Oven Temperature Control” in the “Electronic Oven
Controls” section.
See “Control Display” in the “Electronic Oven Controls” section.
If the indicator light(s) keep flashing, call for service. See the
“Warranty” section for contact information.
Clear the display. On some models, reset the clock, if needed.
See “Clock” keypad feature in the “Feature Guide” section.
Depending on your model, press OFF/CANCEL to clear the
display. See “Control Display” in the “Electronic Oven Controls”
section. If it reappears, call for service. See the “Warranty”
section for contact information.
See the “Start” keypad feature in the “Feature Guide” section.
See the “Self-Cleaning Cycle” section.
call, or
14
09-Nov-2017 15:22:46 EST | RELEASED
In some European factories the letter "W" of the part code mentioned herein will be automatically
replaced by the number "4000" (e.g. "W12345678" becomes "400012345678")
Page 15

Problem Possible Causes Solutions
Oven cooking results not
what expected
Range is not level. Level the range. See the Installation Instructions.
The temperature set was incorrect. Double-check the recipe in a reliable cookbook.
Oven temperature is calibrated
incorrectly.
Oven was not preheated. See the “Baking and Roasting” section.
Racks were positioned improperly. See the “Positioning Racks and Bakeware” section.
Not enough air circulation around
bakeware.
Batter distributed unevenly in pan. Check that batter is level in the pan.
Darker browning of food caused
by dull or dark bakeware.
Lighter browning of food
caused by shiny or light-colored
bakeware.
Incorrect length of cooking time
was used.
Oven door was not closed. Be sure that the bakeware does not keep the door from closing.
Oven door was opened
during cooking.
Rack is too close to bake burner,
making baked items too brown
on bottom.
Pie crusts browning too quickly. Use aluminum foil to cover the edge of the crust and/or reduce
Temperature scale was changed
from Fahrenheit to Celsius.
See “Oven Temperature Control” in the “Electronic Oven
Controls” section.
See the “Positioning Racks and Bakeware” section.
Lower oven temperature 25°F (15°C) or move rack to a higher
position in the oven.
Move rack to a lower position in the oven.
Adjust cooking time.
Oven peeking releases oven heat and can result in longer
cooking times.
Move rack to higher position in the oven.
baking temperature.
Foods are overdone or burnt, even at low temperatures.
See “Fahrenheit and Celsius” in the “Electronic Oven
Controls” section.
For accessories, you can visit our website at www.amanacanada.ca or call us at 1-800-807-6777.
Canning Element Kit
(coil element models)
Order Part Number 242905
Cooktop Care Kit
(ceramic glass models)
(includes cleaner, protectant,
scraper, and applicator pads)
Order Part Number 31605
Cooktop Protectant
(ceramic glass models)
Order Part Number 31463A
Affresh® Stainless Steel
Cleaning Wipes
(stainless steel models)
Order Part Number W10355049
ACCESSORIES
Affresh® Cooktop Cleaner
(ceramic glass models)
Order Part Number W10355051
Affresh® Stainless Steel
Cleaner
(stainless steel models)
Order Part Number W10355016
Affresh® Kitchen and Appliance
Cleaner
Order Part Number W10355010
Cooktop Scraper
(ceramic glass models)
Order Part Number WA906B
Granite Cleaner and Polish
Order Part Number W10275756
Split Oven Rack
Order Part Number 4396927
Porcelain Broiler Pan and Grid
Order Part Number 4396923
Premium Broil Pan and Roasting Rack
Order Part Number W10123240
Gas Grate and Drip Pan Cleaner
Order Part Number 31617A
09-Nov-2017 15:22:46 EST | RELEASED
In some European factories the letter "W" of the part code mentioned herein will be automatically
replaced by the number "4000" (e.g. "W12345678" becomes "400012345678")
15
Page 16

ATTACH YOUR RECEIPT HERE. PROOF OF PURCHASE IS REQUIRED
TO OBTAIN WARRANTY SERVICE.
Please have the following information available when you call the
AMANA® MAJOR APPLIANCE
LIMITED WARRANTY
Customer eXperience Center:
■ Name, address and telephone number
■ Model number and serial number
■ A clear, detailed description of the problem
■ Proof of purchase including dealer or retailer name and address
IF YOU NEED SERVICE:
1. Before contacting us to arrange service, please determine whether your product requires repair. Some questions
service. Please take a few minutes to review the Troubleshooting or Problem Solver section of the Use and Care Guide, or visit
http://amana.custhelp.com.
2. All warranty service is provided exclusively by our authorized Amana Service Providers. In the U.S. and Canada, direct all requests for
warranty service to:
Amana Customer eXperience Center
In the U.S.A., call 1-800-843-0304. In Canada, call 1-800-807-6777.
If outside the 50 United States or Canada, contact your authorized Amana dealer to determine whether another warranty applies.
can be addressed without
ONE YEAR LIMITED WARRANTY
WHAT IS COVERED
For one year from the date of
purchase, when this major appliance
is installed, operated and maintained
according to instructions attached to
or furnished with the product, Amana
brand of Whirlpool Corporation or
Whirlpool Canada LP (hereafter
“Amana”) will pay for Factory
Specified Replacement Parts and
repair labor to correct defects in
materials or workmanship that existed
when this major appliance was
purchased, or at its sole discretion
replace the product. In the event of
product replacement, your appliance
will be warranted for the remaining
term of the original unit’s warranty
period.
YOUR SOLE AND EXCLUSIVE
REMEDY UNDER THIS LIMITED
WARRANTY SHALL BE PRODUCT
REPAIR AS PROVIDED HEREIN.
Service must be provided by a Amana
designated service company. This
limited warranty is valid only in the
United States or Canada and applies
only when the major appliance is
used in the country in which it was
purchased. This limited warranty is
effective from the date of original
consumer purchase. Proof of original
purchase date is required to obtain
service under this limited warranty.
IMPLIED WARRANTIES, INCLUDING ANY IMPLIED WARRANTY OF MERCHANTABILITY OR IMPLIED WARRANTY OF FITNESS FOR A
PARTICULAR PURPOSE, ARE LIMITED TO ONE YEAR OR THE SHORTEST PERIOD ALLOWED BY LAW. Some states and provinces do not allow
limitations on the duration of implied warranties of merchantability or fitness, so this limitation may not apply to you. This warranty gives you specific
legal rights, and you also may have other rights that vary from state to state or province to province.
Amana makes no representations about the quality, durability, or need for service or repair of this major appliance other than the representations
contained in this warranty. If you want a longer or more comprehensive warranty than the limited warranty that comes with this major appliance, you
should ask Amana or your retailer about buying an extended warranty.
LIMITATION OF REMEDIES; EXCLUSION OF INCIDENTAL AND CONSEQUENTIAL DAMAGES
YOUR SOLE AND EXCLUSIVE REMEDY UNDER THIS LIMITED WARRANTY SHALL BE PRODUCT REPAIR AS PROVIDED HEREIN. AMANA
SHALL NOT BE LIABLE FOR INCIDENTAL OR CONSEQUENTIAL DAMAGES. Some states and provinces do not allow the exclusion or limitation of
incidental or consequential damages, so these limitations and exclusions may not apply to you. This warranty gives you specific legal rights, and you
also may have other rights that vary from state to state or province to province.
1. Commercial, non-residential, multiple-family use, or use inconsistent with published user, operator or
installation instructions.
2. In-home instruction on how to use your product.
3. Service to correct improper product maintenance or installation, installation not in accordance with
electrical or plumbing codes or correction of household electrical or plumbing (i.e. house wiring, fuses or
water inlet hoses).
4. Consumable parts (i.e. light bulbs, batteries, air or water filters, preservation solutions, etc.).
5. Defects or damage caused by the use of non-genuine Amana parts or accessories.
6. Conversion of products from natural gas or p ropane gas.
7. Damage from accident, misuse, abuse, fire, floods, acts of God or use with products not approved by
Amana.
8. Repairs to parts or systems to correct product damage or defects caused by unauthorized service,
alteration or modification of the appliance.
9. Cosmetic damage including scratches, dents, chips, and other damage to the appliance finishes unless
such damage results from defects in materials and workmanship and is reported to Amana within 30
days.
10. Discoloration, rust or oxidation of surfaces resulting from caustic or corrosive environments including but
not limited to high salt concentrations, high moisture or humidity or exposure to chemicals.
11. Food or medicine loss due to product failure.
12. Pick-up or delivery. This product is intended for in-home repair.
13. Travel or transportation expenses for service in remote locations where an authorized Amana servicer is
not available.
14. Removal or reinstallation of inaccessible appliances or built-in fixtures (i.e. trim, decorative panels,
flooring, cabinetry, islands, countertops, drywall, etc.) that interfere with servicing, removal or
replacement of the product.
15. Service or parts for appliances with original model/serial numbers removed, altered or not easily
determined.
The cost of repair or replacement under these excluded circumstances shall be borne by
the customer.
DISCLAIMER OF IMPLIED WARRANTIES
DISCLAIMER OF REPRESENTATIONS OUTSIDE OF WARRANTY
WHAT IS NOT COVERED
11/14
16
09-Nov-2017 15:22:46 EST | RELEASED
In some European factories the letter "W" of the part code mentioned herein will be automatically
replaced by the number "4000" (e.g. "W12345678" becomes "400012345678")
Page 17

INSTRUCTIONS D’UTILISATION
DE LA CUISINIÈRE ÉLECTRIQUE
Nous vous REMERCIONS d’avoir acheté ce produit de haute qualité. Enregistrez votre cuisinière sur www.amanacanada.ca.
Pour référence ultérieure, consignez par écrit les numéros de modèle et de série de votre produit. Ces numéros figurent sur
l’étiquette située dans le coin supérieur droite du cadre avant.
Numéro de modèle _____________________________________ Numéro de série ________________________________________
Table des matières
SÉCURITÉ DE LA CUISINIÈRE ...................................................18
Le pied antibasculement ............................................................18
GUIDE DES CARACTÉRISTIQUES .............................................21
UTILISATION DE LA TABLE DE CUISSON ................................23
Plat de cuisson ...........................................................................24
Mise en conserve à la maison....................................................25
UTILISATION AU FOUR ...............................................................26
Commandes électroniques du four ...........................................26
Mode Sabbat ..............................................................................26
Maintien au chaud ......................................................................27
Papier d’aluminium ....................................................................27
Positionnement des grilles et
des ustensiles de cuisson au four .............................................27
Évent du four ..............................................................................28
Cuisson au four et rôtissage ......................................................28
Cuisson au gril ............................................................................28
ENTRETIEN DE LA CUISINIÈRE .................................................29
Programme de nettoyage ..........................................................29
Nettoyage général ......................................................................30
Lampe du four ............................................................................31
DÉPANNAGE .................................................................................32
ACCESSOIRES .............................................................................34
GARANTIE .....................................................................................35
09-Nov-2017 15:22:46 EST | RELEASED
In some European factories the letter "W" of the part code mentioned herein will be automatically
replaced by the number "4000" (e.g. "W12345678" becomes "400012345678")
17
Page 18

SÉCURITÉ DE LA CUISINIÈRE
Votre sécurité et celle des autres est très importante.
Nous donnons de nombreux messages de sécurité importants dans ce manuel et sur votre appareil ménager.
Assurez-vous de toujours lire tous les messages de sécurité et de vous y conformer.
Voici le symbole d’alerte de sécurité.
Ce symbole d’alerte de sécurité vous signale les dangers potentiels de décès et de blessures graves
à vous et à d’autres.
Tous les messages de sécurité suivront le symbole d’alerte de sécurité et le mot “DANGER” ou
“AVERTISSEMENT”. Ces mots signifient :
Risque possible de décès ou de blessure grave si
DANGER
AVERTISSEMENT
Tous les messages de sécurité vous diront quel est le danger potentiel et vous disent comment réduire le risque de
blessure et ce qui peut se produire en cas de non-respect des instructions.
Le pied antibasculement
La cuisinière ne basculera pas pendant une utilisation normale. Cependant, la cuisinière peut basculer, si vous appliquez trop de force ou
de poids à la porte de la cuisinière, sans avoir adéquatement fixé le pied antibasculement.
vous ne suivez pas immédiatement les instructions.
Risque possible de décès ou de blessure grave
si vous ne suivez pas les instructions.
AVERTISSEMENT
Risque de basculement
Un enfant ou une personne adulte peut faire basculer la cuisinière, ce qui peut causer un
décès.
Vérifier que la bride antibasculement est bien installée et engagée, conformément aux
instructions d'installation.
Réengager la bride antibasculement si la cuisinière a été déplacée.
Ne pas faire fonctionner la cuisinière si la bride antibasculement n'est pas installée et engagée.
Le non-respect de ces instructions peut causer un décès ou des brûlures graves aux enfants et
aux adultes.
Pour vérifier que la bride antibasculement est bien installée et engagée :
Bride
antibasculement
Pied de la cuisinière
Avertissements de la proposition 65 de l'État de Californie :
AVERTISSEMENT : Ce produit contient au moins un produit chimique connu par l’État de Californie pour être à l’origine de
cancers.
AVERTISSEMENT : Ce produit contient au moins un produit chimique connu par l’État de Californie pour être à l’origine de
malformations et autres déficiences de naissance.
• Faire glisser la cuisinière vers l'avant.
• Vérifier que la bride antibasculement est bien fixée au plancher ou au mur.
• Faire de nouveau glisser la cuisinière vers l'arrière de sorte que le pied de la cuisinière
se trouve sous la bride antibasculement.
• Voir les instructions d'installation pour plus de détails.
18
09-Nov-2017 15:22:46 EST | RELEASED
In some European factories the letter "W" of the part code mentioned herein will be automatically
replaced by the number "4000" (e.g. "W12345678" becomes "400012345678")
Page 19

IMPORTANTES INSTRUCTIONS DE SÉCURITÉ
AVERTISSEMENT : Pour réduire le risque d’incendie, de
choc électrique, de blessures ou de dommages lors de
l’utilisation de la cuisinière, il convient d’observer certaines
précautions élémentaires dont les suivantes :
■ AVERTISSEMENT : POUR MINIMISER LE RISQUE
DE BASCULEMENT DE LA CUISINIÈRE, ELLE DOIT
ÊTRE BIEN IMMOBILISÉE PAR DES DISPOSITIFS
ANTIBASCULEMENT CORRECTEMENT INSTALLÉS.
POUR VÉRIFIER SI LES DISPOSITIFS SONT
CORRECTEMENT INSTALLÉS, GLISSER LA CUISINIÈRE
VERS L’AVANT ET VÉRIFIER SI LA BRIDE
ANTIBASCULEMENT EST BIEN FIXÉE AU PLANCHER
OU AU MUR, ET GLISSER LA CUISINIÈRE VERS
L’ARRIÈRE POUR QUE LE PIED ARRIÈRE DE LA
CUISINIÈRE SOIT SOUS LA BRIDE
ANTIBASCULEMENT.
■ MISE EN GARDE : Ne pas remiser dans des armoires
au-dessus de la cuisinière ou sur le dosseret d’une
cuisinière, des objets que des enfants pourraient vouloir
atteindre. Les enfants pourraient se brûler ou se blesser en
grimpant sur la cuisinière.
■ Installation appropriée – S’assurer que la cuisinière est
correctement installée et reliée à la terre par un technicien
qualifié.
■ Ne jamais utiliser la cuisinière pour réchauffer ou chauffer
la pièce.
■ Ne pas laisser les enfants seuls – Les enfants ne doivent
pas être laissés seuls ou sans surveillance dans la pièce
où la cuisinière est en service. Ne jamais laisser les
enfants s’asseoir ou se tenir sur une partie quelconque de
la cuisinière.
Porter des vêtements appropriés – Des vêtements amples
■
ou détachés ne doivent jamais être portés pendant
l’utilisation de la cuisinière.
Entretien par l’utilisateur – Ne pas réparer ni remplacer
■
toute pièce de la cuisinière si ce n’est pas spécifiquement
recommandé dans le manuel. Toute autre opération
d’entretien ou de réparation doit être confiée à un
technicien qualifié.
Remisage dans ou sur la cuisinière – Des matériaux
■
inflammables ne doivent pas être remisés dans un four ou
près des éléments de surface.
Ne pas utiliser d’eau pour éteindre un feu de graisse –
■
Étouffer le feu ou les flammes ou utiliser un extincteur à
produits chimiques secs, ou un extincteur à mousse.
N’utiliser que des mitaines sèches de four – Des mitaines
■
de four mouillées ou humides sur des surfaces chaudes
peuvent provoquer des brûlures provenant de la vapeur.
Ne pas laisser les mitaines de four toucher les éléments
chauffants. Ne pas utiliser une serviette ou un tissu épais.
■ NE PAS TOUCHER LES ÉLÉMENTS DE SURFACE OU
L’ESPACE PRÈS DES ÉLÉMENTS – Les éléments de
surface peuvent être chauds même lorsqu’ils ont une teinte
foncée. Les endroits près des éléments de surface peuvent
devenir assez chauds pour causer des brûlures. Pendant
et après l’utilisation, ne pas toucher les éléments
chauffants et ne pas laisser les vêtements ou autres
matériaux inflammables entrer en contact avec ces
éléments de surface ou les endroits près des éléments,
avant qu’ils soient suffisamment refroidis. Ces endroits
comprennent la table de cuisson et les surfaces près de la
table de cuisson.
■ Utiliser des ustensiles de dimension appropriée – La
cuisinière est munie d’un ou de plusieurs
éléments
chauffants de différentes grandeurs. Choisir les ustensiles
qui ont un fond plat assez grand pour couvrir l’élément
chauffant de la surface de cuisson. L’utilisation d’ustensiles
trop petits exposera une partie de l’élément chauffant, ce
qui peut provoquer l’inflammation des vêtements.
L’utilisation d’un récipient de dimension correcte améliore
aussi l’efficacité de la cuisson.
Ne jamais laisser les éléments de la table de cuisson sans
■
surveillance alors qu’ils chauffent à la puissance maximale.
Il pourrait en résulter une ébullition qui cause de la fumée
et des renversements de corps gras qui peuvent
s’enflammer.
S’assurer que les cuvettes réfléchissantes ou les bols de
■
renversement sont en place – L’absence de ces cuvettes
ou bols au cours de la cuisson peut causer des dommages
aux fils ou aux composants en dessous des éléments.
Garnissages protecteurs – Ne pas recouvrir les cuvettes
■
ou le fond du four de papier d’aluminium sauf tel que
suggéré dans le manuel. L’installation incorrecte de papier
d’aluminium ou d’autre matériau peut causer un risque de
choc électrique ou d’incendie.
■ Ustensiles de cuisson vitrifiés – Seulement certains types
d’ustensiles de verre, vitrocéramique, céramique, faïence
ou autres surfaces vitrifiées conviennent pour le service
sur une table de cuisson, sans bris attribuables aux
changements soudains de température.
■ Les poignées des ustensiles doivent être tournées vers
l’intérieur et non vers le dessus des éléments adjacents –
Pour réduire le risque de brûlures, d’inflammation de
produits inflammables et de renversements dus à
l’entrechoquement non intentionnel des ustensiles, la
poignée d’un ustensile doit être positionnée de sorte
qu’elle est tournée vers l’intérieur et non au-dessus des
éléments de surface adjacents.
Ne pas tremper les éléments de chauffage amovibles –
■
Les éléments de chauffage ne doivent jamais être
immergés dans l’eau.
Ne pas faire cuire sur une table de cuisson endommagée –
■
Si la table de cuisson est brisée, les solutions de nettoyage
et les renversements peuvent pénétrer dans la table de
cuisson brisée et créer un risque de choc électrique.
Contacter immédiatement un technicien qualifié.
CONSERVEZ CES INSTRUCTIONS
09-Nov-2017 15:22:46 EST | RELEASED
In some European factories the letter "W" of the part code mentioned herein will be automatically
replaced by the number "4000" (e.g. "W12345678" becomes "400012345678")
19
Page 20

IMPORTANTES INSTRUCTIONS DE SÉCURITÉ
■ Nettoyer la table de cuisson avec prudence – Si une
éponge ou un chiffon mouillé est utilisé pour essuyer les
renversements sur une surface de cuisson chaude, éviter
les brûlures causées par la vapeur chaude. Certains
nettoyants peuvent produire des émanations désagréables
lorsqu’ils sont utilisés sur une surface chaude.
Exercer une grande prudence lors de l’ouverture de la
■
porte – Laisser l’air chaud ou la vapeur s’échapper avant
d’enlever ou de replacer un plat.
Ne pas faire chauffer des contenants fermés –
■
L’accumulation de pression peut causer une explosion du
contenant et des blessures.
■ Ne jamais obstruer les ouvertures des évents.
■ Positionnement des grilles du four – Toujours placer les
grilles du four en position désirée pendant que le four est
froid. Si la grille doit être déplacée pendant que le four est
chaud, ne pas laisser les mitaines de four toucher l’élément
chaud du four.
NE PAS TOUCHER LES ÉLÉMENTS CHAUFFANTS OU
■
LES SURFACES INTÉRIEURES DU FOUR – Les
éléments chauffants peuvent être chauds même s’ils ont
une teinte foncée. Les surfaces intérieures d’un four
deviennent assez chaudes pour causer des brûlures.
Pendant et après l’utilisation, ne pas toucher ou laisser des
vêtements ou autres matériaux inflammables venir en
contact avec les éléments chauds ou les surfaces
intérieures chaudes du four avant qu’ils aient eu assez de
temps pour refroidir. D’autres surfaces de l’appareil
peuvent devenir assez chaudes pour causer des brûlures.
Ces surfaces comprennent les ouvertures de l’évent du
four et les surfaces près de ces ouvertures, les portes du
four, et les hublots des portes du four.
Pour les cuisinières avec programme d’autonettoyage –
Ne pas nettoyer le joint de la porte – Le joint de la porte
■
est essentiel pour l’étanchéité. Veiller à ne pas frotter,
endommager ou déplacer le joint.
Ne pas utiliser des produits commerciaux de nettoyage du
■
four – On ne doit pas utiliser un produit commercial de
nettoyage de four ou un enduit de protection des surfaces
internes du four quel qu’en soit le type, sur les surfaces du
four ou les surfaces voisines.
Nettoyer uniquement les pièces indiquées dans le manuel.
■
Avant d’exécuter le programme d’autonettoyage du four –
■
Ôter la lèchefrite et son plat et les autres ustensiles.
Pour les
■ Nettoyer les hottes de ventilation fréquemment – La
appareils avec hotte de ventilation –
graisse ne doit pas s’accumuler sur la hotte ou le filtre.
■ Lorsque vous flambez des aliments sous la hotte, mettre le
ventilateur en marche.
CONSERVEZ CES INSTRUCTIONS
20
09-Nov-2017 15:22:46 EST | RELEASED
In some European factories the letter "W" of the part code mentioned herein will be automatically
replaced by the number "4000" (e.g. "W12345678" becomes "400012345678")
Page 21

GUIDE DES CARACTÉRISTIQUES
Ce manuel concerne plusieurs modèles. Le modèle que vous avez peut comporter toutes les caractéristiques énumérées ou seulement
certaines d’entre elles. Reportez-vous à ce manuel ou à la section Foire Aux Questions de notre site Web sur www.amanacanada.ca
pour des instructions plus détaillées.
AVERTISSEMENT
Risque d'empoisonnement alimentaire
Ne pas laisser des aliments dans un four plus d'une
heure avant ou après la cuisson.
Le non-respect de cette instruction peut causer un
empoisonnement alimentaire ou une maladie.
TOUCHE FONCTION INSTRUCTIONS
CLOCK
(horloge)
OVEN LIGHT
(lampe du four)
TIMER SET•OFF
(réglage•arrêt de
la minuterie)
START
(mise en marche)
OFF/CANCEL
(arrêt/annulation)
TEMP/TIME
(température/
durée)
BAKE
(cuisson au four)
Horloge
Lampe de la
cavité du four
Minuterie du four
Démarrage
de la cuisson
Fonction de
la cuisinière
Réglage de la
durée et de la
température
de cuisson
Cuisson au four
et rôtissage
L'horloge peut utiliser un format 12 heures.
1. Vérifier que le four est éteint.
2. Appuyer sur CLOCK (horloge).
3. Appuyer sur la touche à flèche “vers le haut” ou “vers le bas” de Temp/Time
(température/durée) pour régler l’heure. Appuyer sur CLOCK (horloge) pour passer aux
minutes. Appuyer sur la touche à flèche “vers le haut” ou “vers le bas” de Temp/Time
(température/durée) pour régler les minutes.
4. Appuyer sur CLOCK (horloge) ou START (mise en marche).
Alors que la porte du four est fermée, appuyer sur OVEN LIGHT (lampe du four) pour allumer
ou éteindre la lampe. La lampe du four s'allume à l'ouverture de la porte. La lampe du four ne
s’allume pas durant le programme d’autonettoyage.
La minuterie peut être réglée en heures ou en minutes jusqu’à concurrence de 9 heures
et 59 minutes.
1. Appuyer sur TIMER SET•OFF (réglage•arrêt de la minuterie).
2. Appuyer sur la touche à flèche “vers le haut” ou “vers le bas” de Temp/Time
(température/durée) pour régler la durée.
3. Appuyer sur START (mise en marche) pour commencer le compte à rebours. Si activés,
les signaux sonores de fin de programme retentissent à la fin du compte à rebours.
4. Appuyer sur TIMER SET•OFF (réglage•arrêt de la minuterie) pour annuler la minuterie.
Ne pas appuyer sur OFF/CANCEL (arrêt/annulation), sinon le four s’éteindra.
La touche Start (mise en marche) met en marche n’importe quelle fonction du four. Si l’on
n’appuie pas sur Start (mise en marche) dans les 5 secondes qui suivent, un signal sonore
retentit et Start clignote jusqu’à ce que la fonction soit sélectionnée ou annulée. Si, après
avoir appuyé sur une touche, on n’appuie pas sur Start dans la minute qui suit, la fonction
est annulée et l’heure s’affiche.
La touche Off/Cancel (arrêt/annulation) désactive toutes les fonctions à l’exception de la
minuterie et du verrouillage des commandes du four.
Les touches à flèche “vers le haut” et “vers le bas” de Temp/Time (température/durée) servent
à régler la durée et la température.
1. Appuyer sur BAKE (cuisson au four).
2. Appuyer sur la touche à flèche “vers le haut” ou “vers le bas” de Temp/Time
(température/durée) jusqu’à ce que la température souhaitée soit atteinte. Un
signal sonore retentit lorsque la température minimum ou maximum est atteinte.
3. Appuyer sur START (mise en marche).
4. Pour changer la température, répéter l’étape 2. Appuyer sur START (mise en marche).
5. Appuyer sur OFF/CANCEL (arrêt/annulation) après avoir terminé.
09-Nov-2017 15:22:46 EST | RELEASED
In some European factories the letter "W" of the part code mentioned herein will be automatically
replaced by the number "4000" (e.g. "W12345678" becomes "400012345678")
21
Page 22

TOUCHE FONCTION INSTRUCTIONS
BAKE ASSIST
TEMPS
(temp. assistant
cuisson au four)
BROIL
(cuisson au gril)
WARM (maintien
au chaud)
CLEAN
(nettoyage)
(sur certains
modèles)
CONTROL LOCK
(Hold 3 Sec)
(verrouillage
des commandes
[appuyer
pendant 3 s])
Cuisson au four
et rôtissage
Cuisson au gril
Maintien au
chaud
Programme
de nettoyage
Verrouillage
des commandes
du four
1. Appuyer sur la touche BAKE ASSIST TEMPS (temp. assistant cuisson au four) souhaitée.
2. Appuyer sur la touche à flèche “vers le haut” ou “vers le bas” de Temp/Time (température/
durée) pour entrer une température autre que celle de la fonction Bake Assist Temp (temp.
assistant cuisson au four). Un signal sonore retentit lorsque la température minimum ou
maximum est atteinte.
3. Appuyer sur START (mise en marche).
4. Appuyer sur OFF/CANCEL (arrêt/annulation) après avoir terminé.
1. Placer le plat dans le four et fermer la porte du four.
2. Appuyer sur BROIL (cuisson au gril).
3. Appuyer sur la touche à flèche “vers le haut” ou “vers le bas” de Temp/Time
(température/durée) jusqu’à ce que la température souhaitée soit atteinte. Un signal
sonore retentit lorsque la température minimum ou maximum est atteinte.
4. Appuyer sur START.
5. Pour changer la température, répéter l'étape 3 et appuyer sur START (mise en marche).
6. Appuyer sur OFF/CANCEL (arrêt/annulation) après avoir terminé.
Les aliments doivent être à la température de serv
ice avant d’être placés dans le four chaud.
1. Appuyer sur WARM (maintien au chaud).
2. Appuyer sur la touche à flèche “vers le haut” ou “vers le bas” de Temp/Time
(température/durée) jusqu'à ce que la température souhaitée soit atteinte. Un signal
sonore retentit lorsque la température minimum ou maximum est atteinte.
3. Appuyer sur START (mise en marche).
4. Appuyer sur OFF/CANCEL (arrêt/annulation) après avoir terminé.
REMARQUE : Le four s'éteint automatiquement après 60 minutes.
Voir la section “Programme de nettoyage”.
1. Vérifier que le four est éteint.
2. Appuyer pendant 3 secondes sur CONTROL LOCK (verrouillage des commandes).
3. Un signal sonore retentit et un verrou s'affiche.
4. Répéter l’opération pour déverrouiller. Aucune touche ne fonctionne lorsque les
commandes sont verrouillées.
22
09-Nov-2017 15:22:46 EST | RELEASED
In some European factories the letter "W" of the part code mentioned herein will be automatically
replaced by the number "4000" (e.g. "W12345678" becomes "400012345678")
Page 23

UTILISATION DE LA TABLE DE CUISSON
AVERTISSEMENT
Risque d'incendie
Fermer tous les réglages lorsque la cuisson est
terminée.
Le non-respect de cette instruction peut causer un
décès ou un incendie.
Les boutons de commande peuvent être réglés à n’importe quelle
position entre HI (élevée) et LO (basse). Pousser et tourner le
bouton au réglage.
N’OUBLIEZ PAS : Quand l’appareil est utilisé ou (sur
certains modèles) durant le programme d’autonettoyage,
toute la surface de la table de cuisson peut devenir chaude.
■ Ne pas ranger de bocaux ou de boîtes de conserve au-dessus
de la table de cuisson. La chute d’un objet lourd ou dur sur la
table de cuisson pourrait la fêler.
■ Afin d’éviter d’endommager la table de cuisson, ne pas laisser
un couvercle chaud sur la table de cuisson. Lorsque la table
de cuisson refroidit, de l’air peut se trouver piégé entre le
couvercle et la table de cuisson, et la vitrocéramique pourrait
se casser lorsqu’on enlève le couvercle.
■ Nettoyer dès que possible tous les renversements et toutes
les salissures des aliments contenant du sucre sous n’importe
quelle forme. Laisser la table de cuisson refroidir légèrement.
Ensuite, tout en portant des mitaines de four, nettoyer les
renversements avec un grattoir pendant que la surface est
encore tiède. Si on laisse le sucre refroidir sur la table de
cuisson, il se peut que celui-ci adhère à la surface et laisse
un creux et des marques permanentes.
■ Afin d’éviter toute égratignure, ne pas faire glisser de plats
de cuisson sur la table de cuisson. Les fonds en aluminium
ou en cuivre et les finis rugueux des ustensiles de cuisson
pourraient laisser des égratignures ou des marques sur la
table de cuisson.
■ Ne pas faire cuire de maïs soufflé dans son emballage en
aluminium d’origine sur la table de cuisson. Il pourrait rester
des traces d’aluminium qui ne peuvent être complètement
enlevées.
■ Afin d’éviter d’endommager la table de cuisson, ne pas laisser
d’objets qui pourraient fondre, comme du plastique ou du
papier d’aluminium, toucher une partie quelconque de la table
de cuisson.
■ Afin d’éviter d’endommager la table de cuisson, ne pas
l’utiliser en guise de planche à découper.
■ Utiliser des ustensiles de cuisson de la même taille environ
que la surface de cuisson. L’ustensile de cuisson ne doit pas
dépasser de plus de 1/2" (1,3 cm) hors de la zone de cuisson.
B
Vitrocéramique (sur certains modèles)
La surface de cuisson rougeoie lorsqu’un élément est allumé.
Il est possible que certaines zones de la surface de cuisson ne
rougeoient pas lorsqu’un élément est allumé. Ce phénomène est
normal. Il fonctionne également par intermittence et de façon
aléatoire (même en position élevée) afin de protéger la table de
cuisson contre des températures extrêmes.
Il est normal que la surface de vitrocéramique claire semble
changer de couleur lorsque les zones de cuisson à la surface sont
chaudes. Lorsque le verre refroidit, il revient à sa couleur originale.
Nettoyer la table de cuisson après chaque utilisation afin d’éviter
les égratignures, les piqûres et l’abrasion et pour entretenir
la surface de verre. Un nettoyant pour table de cuisson en
vitrocéramique et un grattoir de table de cuisson sont aussi
recommandés pour les saletés tenaces. Ne pas utiliser de produits
de nettoyage abrasifs, de tampons de nettoyage ou de produits
chimiques agressifs. La trousse d’entretien de la table de cuisson
(référence 31605) contient tous les articles nécessaires pour
nettoyer et entretenir votre table de cuisson en vitrocéramique.
Consulter la section “Entretien de la cuisinière” pour plus de
renseignements.
IMPORTANT : Pour éviter d’endommager la surface de la table
de cuisson et faciliter l’élimination des saletés, nettoyer la table de
cuisson après chaque utilisation pour enlever toutes les saletés.
A
C
A. Surface de cuisson
B. Ustensiles de cuisson/autoclave
C. Dépassement maximum de
■ Utiliser des ustensiles de cuisson à fond plat pour une
1
/2" (1,3 cm)
meilleure conduction de la chaleur et une meilleure utilisation
de l’énergie. Les ustensiles de cuisson à fond arrondi,
déformé, cannelé ou bosselé pourraient causer un chauffage
inégal et de mauvais résultats de cuisson.
■ Contrôler la planéité du récipient en plaçant une règle plate
en travers du fond du plat. Lorsque l’on fait tourner la règle,
aucun espace ou jour ne doit être visible entre celle-ci et
le plat.
■ Les ustensiles de cuisson à fond légèrement cannelé ou
à petites stries de dilatation peuvent être utilisés.
■ S’assurer que les fonds des casseroles et poêles sont propres
et secs avant de les utiliser. Les résidus et l’eau peuvent
laisser des dépôts quand ils sont chauffés.
■ Afin d’éviter d’endommager la table de cuisson, ne pas
faire cuire d’aliments directement sur la table de cuisson.
09-Nov-2017 15:22:46 EST | RELEASED
In some European factories the letter "W" of the part code mentioned herein will be automatically
replaced by the number "4000" (e.g. "W12345678" becomes "400012345678")
23
Page 24

Nettoyage de la table de cuisson en vitrocéramique
(sur certains modèles)
Nettoyer la table de cuisson après chaque utilisation afin d’éviter
les égratignures, les piqûres et l’abrasion et pour entretenir
la surface de verre. Un nettoyant pour table de cuisson en
vitrocéramique et un grattoir de table de cuisson sont aussi
recommandés pour les saletés tenaces. Ne pas utiliser de produits
de nettoyage abrasifs, de tampons de nettoyage ou de produits
chimiques agressifs. La trousse d’entretien de la table de cuisson
(référence 31605) contient tous les articles nécessaires pour
nettoyer et entretenir votre table de cuisson en vitrocéramique.
Consulter la section “Entretien de la cuisinière” pour plus de
renseignements.
IMPORTANT : Pour éviter d’endommager la surface de la table
de cuisson et faciliter l’élimination des saletés, nettoyer la table de
cuisson après chaque utilisation pour enlever toutes les saletés.
Témoin lumineux d’allumage de la table de cuisson
Le témoin lumineux d’allumage de la table de cuisson se trouve
sur le panneau de l’affichage. Lorsqu’un élément de la table
de cuisson sur le panneau de la console est activé, le témoin
lumineux d’allumage de la table de cuisson s’allume.
Témoin lumineux de surface chaude
Sur les modèles avec vitrocéramique, le témoin lumineux de
surface chaude est situé sur le panneau de l’affichage.
Le témoin de surface chaude reste allumé tant qu’une surface de
cuisson est trop chaude au toucher, même si la surface de cuisson
est éteinte.
Éléments à spirale et cuvettes de brûleur
(sur certains modèles)
Pour une cuisson optimale, les éléments en spirale doivent être
horizontaux. Lorsqu’elles sont propres, les cuvettes de brûleur
réfléchissent la chaleur et la redirigent vers le plat. Elles permettent
de contenir les renversements.
L’ustensile de cuisson ne doit pas dépasser de plus de 1/2"
(1,3 cm) l’élément en spirale. Si le fond de l’ustensile de cuisson
est irrégulier ou trop grand, il peut produire une chaleur excessive
et entraîner la décoloration de la cuvette de brûleur.
Zone de cuisson à double fonction (sur certains modèles)
La zone de cuisson à double fonction offre une souplesse
d’utilisation en fonction de la taille de l’ustensile de cuisson. La
dimension simple peut être utilisée de la même manière qu’un
élément ordinaire. La dimension double combine l’élément simple
et l’élément externe; elle est recommandée pour les ustensiles de
cuisson de plus grande taille.
A B
Élément Melt (faire fondre) (sur certains modèles)
L’élément Melt (faire fondre) offre plus de souplesse de chauffe
grâce à une grande amplitude de réglages entre HI (élevé) et MELT
(faire fondre). L’option de chauffage Hi heat (chaleur élevée) peut
être utilisée pour faire bouillir rapidement de petites quantités de
liquide. Pour réduire le réglage du niveau de puissance, tourner le
bouton dans le sens horaire. Le réglage Melt (faire fondre) est
destiné aux aliments délicats qui nécessitent une température
basse, comme pour faire fondre du chocolat ou maintenir des
sauces au chaud. Utiliser des ustensiles de cuisson de dimensions
appropriées pour l’élément Melt (faire fondre).
A
A. Option Hi heat (chauffage élevé)
B. Option Melt (faire fondre)
B
Plat de cuisson
IMPORTANT : Ne pas laisser d’ustensile de cuisson vide sur une
surface de cuisson, un élément ou un brûleur de surface chaud.
Les ustensiles de cuisson idéals doivent avoir un fond plat, des
parois droites, un couvercle qui ferme hermétiquement et le
matériau doit être d’épaisseur moyenne à forte.
Les finis rugueux peuvent égratigner la table de cuisson.
L’aluminium et le cuivre peuvent être utilisés comme fond ou base
d’un ustensile de cuisson. Toutefois, lorsqu’ils sont utilisés comme
base, ils peuvent laisser des marques permanentes sur la surface
de cuisson.
Le matériau d’un ustensile a une influence sur la rapidité et
l’uniformité de la transmission de la chaleur, lesquelles contribuent
aux résultats de cuisson. Un fini antiadhésif a les mêmes
caractéristiques que son matériau de base. Par exemple, un
ustensile de cuisson en aluminium avec un fini antiadhésif aura
les propriétés de l’aluminium.
Les ustensiles de cuisson avec surface antiadhésive ne doivent
pas être utilisés sous le gril.
Vérifier que le récipient est plat en plaçant le bord plat d’une règle
en travers du fond du récipient. Lorsque l’on fait tourner la règle,
aucun espace ou jour ne doit être visible entre celle-ci et le plat.
1
2
3
4
1
5
6
7
2
8
9
3
1 0
1 1
1 2
4
1 3
1 4
5
1 5
1 6
6
1 7
1 8
1 9
7
2 0
A. Simple
B. Double
24
09-Nov-2017 15:22:46 EST | RELEASED
In some European factories the letter "W" of the part code mentioned herein will be automatically
replaced by the number "4000" (e.g. "W12345678" becomes "400012345678")
Page 25

Utiliser le tableau suivant comme guide pour les caractéristiques
du matériau d’ustensile de cuisson.
USTENSILE CARACTÉRISTIQUES
Aluminium
■ Chauffe rapidement et uniformément.
■ Convient à tous les genres de cuisson.
■ L’épaisseur moyenne ou forte convient
le mieux pour la plupart des tâches de
cuisson.
■ Peut laisser des résidus d’aluminium.
Pour en réduire la quantité, les nettoyer
immédiatement après la cuisson.
Fonte émaillée
■ Chauffe lentement et uniformément.
■ Convient pour le brunissage et la friture
■ Maintient la chaleur pour une cuisson
lente.
■ Des rebords anguleux ou mal poncés
peuvent érafler la table de cuisson..
Céramique ou
vitrocéramique
■ Suivre les instructions du fabricant.
■ Chauffe lentement, mais inégalement.
■ Les meilleurs résultats sont obtenus
sur les réglages de chaleur basse à
moyenne.
■ Peut érafler la table de cuisson.
Cuivre
■ Chauffe très rapidement et
uniformément.
■ Peut laisser des résidus de cuivre.
Pour en réduire la quantité, les nettoyer
immédiatement après la cuisson.
■ Peut laisser une tache indélébile ou
adhérer à la table de cuisson en cas de
surchauffe du matériau.
Terre cuite
■ Suivre les instructions du fabricant.
■ Utiliser des réglages de température
basse.
■ Peut érafler la table de cuisson.
Émail à la
porcelaine sur
acier ou fonte
■ Voir acier inoxydable ou fonte.
■ Les ustensiles de cuisson au four en
émail vitrifié dépourvus d’une base
métallique peuvent adhérer à la table
de cuisson en cas de surchauffe du
matériau.
Acier inoxydable
■ Chauffe rapidement, mais inégalement.
■ Un fond ou une base d’aluminium ou de
cuivre sur l’acier inoxydable procure un
chauffage uniforme.
Utiliser des ustensiles de cuisson à fond plat pour obtenir de
meilleurs résultats de cuisson et une meilleure utilisation de
l’énergie. Les ustensiles de cuisson doivent avoir la même taille
que la zone de cuisson indiquée sur la table de cuisson.
L’ustensile de cuisson ne doit pas dépasser de plus de
1
/2" (13 mm) hors de la zone de cuisson.
Mise en conserve à la maison
La mise en conserve peut se faire sur une surface de cuisson
lisse en verre ou sur une table de cuisson à éléments tubulaires
traditionnels. Lors de la préparation de conserves pendant de
longues périodes, alterner l’utilisation des surfaces de cuisson
ou des éléments entre les quantités préparées. Ceci permet aux
dernières surfaces utilisées de refroidir.
■ Centrer l’autoclave sur la plus grande surface de cuisson ou
sur le plus grand élément. L’autoclave ne doit pas dépasser de
plus de 1/2" (13 mm) hors de la surface de cuisson ou l’élément
de cuisson.
■ Ne pas placer l’autoclave sur deux surfaces de cuisson ou
deux éléments à la fois.
■ Sur les modèles en vitrocéramique, utiliser seulement des
boîtes de conserve à fond plat pour éviter d’endommager la
table de cuisson et les éléments.
■ Pour plus de renseignements, contacter votre bureau de
développement agricole local, ou consulter les guides publiés
sur la mise en conserve domestique Les compagnies qui
fabriquent des produits pour la préparation de conserves
peuvent aussi offrir de l’aide.
09-Nov-2017 15:22:46 EST | RELEASED
In some European factories the letter "W" of the part code mentioned herein will be automatically
replaced by the number "4000" (e.g. "W12345678" becomes "400012345678")
25
Page 26

UTILISATION AU FOUR
Des odeurs et de la fumée sont normales lorsque le four est utilisé
les premières fois et lorsqu’il est très sale.
IMPORTANT : La santé de certains oiseaux est très sensible aux
émanations de fumée. L’exposition aux émanations peut entraîner
la mort de certains oiseaux. Toujours déplacer les oiseaux dans
une autre pièce fermée et bien aérée.
Commandes électroniques du four
Affichage des commandes
L’affichage clignote à la mise sous tension ou après une coupure
de courant. Appuyer sur OFF/CANCEL (arrêt/annulation) pour
effacer. Lorsque le four n’est pas utilisé, l’heure s’affiche.
Signaux sonores
Les signaux sonores avertissent l’utilisateur de divers
événements :
Fonctions basiques
Un seul signal sonore
■ Appui sur une touche valide
■ Préchauffage du four terminé (signal sonore long)
■ Saisie d’une fonction
■ Rappel, se répétant toutes les 20 secondes après les signaux
sonores de fin du programme
Trois signaux sonores
■ Appui sur une touche non valide
Quatre signaux sonores
■ Fin de programme
Fahrenheit et Celsius
La température est préréglée pour un affichage en degrés
Fahrenheit, mais on peut la permuter en degrés Celsius.
Pour modifier : Appuyer sur la flèche “vers le haut” de Temp/Time
(température/durée) pendant 5 secondes. “°C” ou “°F” apparaît
sur l’affichage. Répéter l’opération pour permuter à nouveau.
Pour sortir du mode, appuyer sur OFF/CANCEL (arrêt/annulation).
Signaux sonores d’appui sur une touche
Active ou désactive les signaux sonores lorsqu’on appuie sur une
touche.
Pour modifier : Appuyer sur OVEN LIGHT (lampe du four) pendant
5 secondes. Répéter l’opération pour permuter à nouveau.
Pour sortir de ce mode, appuyer sur CANCEL (arrêt/annulation).
Mode de démonstration
IMPORTANT : Destinée au personnel en magasin, cette fonction
permet, avec un raccordement au secteur 120 V, de présenter les
fonctions des commandes sans pour autant activer les éléments
chauffants. Si cette fonction est activée, le four ne fonctionnera
pas.
Pour modifier : Appuyer sur OFF/CANCEL (arrêt/annulation),
OFF/CANCEL (arrêt/annulation), la flèche “vers le haut” de Temp/
Time (température/durée), TIMER SET•OFF (réglage•arrêt de la
minuterie). Répéter l’opération pour permuter à nouveau et mettre
fin au mode Démo.
Commande de la température du four
IMPORTANT : Ne pas utiliser de thermomètre pour mesurer
la température du four. Les éléments chauffants s’allument
et s’éteignent en alternance pour maintenir une température
constante, mais leur température peut varier légèrement dans un
sens ou dans l’autre du fait de cette alternance. De nombreux
thermomètres réagissent lentement à un changement de
température, et ne donneront pas une mesure exacte du fait
de cette alternance.
Le four fournit des températures précises; toutefois, il peut cuire
plus rapidement ou plus lentement que votre ancien four, c’est
pourquoi la température peut être ajustée à vos besoins de
cuisson. Elle peut être modifiée en degrés Fahrenheit ou Celsius.
Ajustement de la température du four :
1. Appuyer sur la flèche “vers le bas” de Temp/Time
(température/durée) pendant 5 secondes jusqu’à ce que
l’afficheur du four indique le réglage actuel, par exemple
“0°F CAL” ou “00”.
2. Appuyer sur la touche à flèche “vers le haut” ou “vers le
bas” de Temp/Time (température/durée) pour augmenter
ou diminuer la température par tranches de 5°F (3°C).
L’ajustement peut être réglé entre 30°F (18°C) et -30°F (-18°C).
3. Appuyer sur START (mise en marche).
Mode Sabbat
(sur certains modèles)
Pour obtenir de l’aide concernant l’utilisation de ce produit, ainsi
qu’une liste des modèles munis du mode Sabbat, consulter le
www.star-k.org.
Le mode Sabbat permet au four de continuer à fonctionner
sur un réglage de cuisson au four jusqu’à ce qu’on l’éteigne.
La caractéristique de verrouillage des commandes du four est
désactivée pendant le mode Sabbat. Une fois le mode Sabbat
réglé, aucun signal sonore ne retentit, l’affichage n’indique pas la
température, le mode de minuterie de cuisine est annulé (si activé)
et seules les touches suivantes fonctionnent :
■ Touches à flèche “vers le haut” et “vers le bas” de Temp/Time
(température/durée)
■ Off/Cancel (arrêt/annulation)
Lorsque la porte du four est ouverte ou fermée, la lampe du four
ne s’allume ou ne s’éteint pas et les éléments de chauffage ne
s’allument ou ne s’éteignent pas immédiatement.
Lorsque le courant est rétabli après une panne de courant, le four
retourne au mode Sabbat et conserve les modalités du mode
Sabbat avec les éléments de cuisson au four désactivés jusqu’à
ce que l’on appuie sur OFF/CANCEL (arrêt/annulation).
Si l’on appuie sur OFF/CANCEL (arrêt/annulation) à tout moment,
le four revient au mode de cuisson normal (ne présente plus les
modalités du mode Sabbat).
Avant d’entrer au mode Sabbat, l’utilisateur doit décider s’il
souhaite que la lampe du four soit allumée ou éteinte pendant
toute la période du mode Sabbat. Si la lampe est allumée au
moment où le four entre au mode Sabbat, elle restera allumée
durant toute la période d’utilisation du mode Sabbat. Si la lampe
est éteinte au moment où le four entre au mode Sabbat, elle
restera éteinte durant toute la période d’utilisation du mode
Sabbat. Le fait d’ouvrir la porte du four ou d’appuyer sur OVEN
LIGHT (lampe du four) n’affecte pas le statut de la lampe du four
une fois que le four est entré au mode Sabbat.
26
09-Nov-2017 15:22:46 EST | RELEASED
In some European factories the letter "W" of the part code mentioned herein will be automatically
replaced by the number "4000" (e.g. "W12345678" becomes "400012345678")
Page 27

Au mode de vacances, la température peut être modifiée une fois
AVERTISSEMENT
2
3
4
5
que le four est au mode Sabbat en appuyant sur la touche à flèche
“vers le haut” ou “vers le bas” de Temp/Time (température/durée).
La température du four change de 25°F (14°C) à chaque pression
des touches à flèche “vers le haut” ou “vers le bas” de Temp/Time
(température/durée). Appuyer sur START (mise en marche) pour
activer la nouvelle température. L’affichage ne change pas
et aucun signal sonore ne retentit durant cet ajustement.
Activation et cuisson au four avec le mode Sabbat :
1. Appuyer sur BAKE (cuisson au four).
2. Appuyer sur la touche à flèche “vers le haut” ou “vers le bas”
de Temp/Time (température/durée).
3. Appuyer sur START (mise en marche).
4. Appuyer sur TIMER SET•OFF (réglage•arrêt de la minuterie)
pendant 5 secondes. “SAb” clignote sur l’affichage.
5. Appuyer sur START (mise en marche) tandis que “SAb”
clignote pour permettre d’entrer en mode Sabbat, sans quoi
le programme tout entier est annulé. “SAb” cesse de clignoter
et reste affiché. Le four est à présent au mode Sabbat et
respecte les modalités du mode Sabbat.
Si l’on appuie sur OFF/CANCEL (arrêt/annulation) à tout moment,
le four revient au mode de cuisson normal (ne présente plus les
modalités du mode Sabbat).
REMARQUE : Si “SAb” ne s’affiche pas, le mode Sabbat n’est
pas actif. Pour activer de nouveau le mode Sabbat après l’avoir
désactivé, suivre les étapes 1 à 5.
Maintien au chaud
Papier d’aluminium
IMPORTANT : Pour éviter des dommages permanents au fini du
fond du four, ne pas recouvrir le fond avec du papier d’aluminium
ou un revêtement quelconque.
Pour obtenir les meilleurs résultats de cuisson, ne pas couvrir
entièrement la grille d’aluminium, car l’air doit pouvoir circuler
librement.
Positionnement des grilles et des
ustensiles de cuisson au four
IMPORTANT : Afin d’éviter des dommages permanents au fini
en porcelaine, ne pas placer d’aliments ou d’ustensiles de cuisson
au four directement sur la porte ou sur le fond du four.
Ustensiles de cuisson
L’air chaud doit pouvoir circuler autour de l’aliment pour le cuire
uniformément. Laisser 2" (5 cm) entre les ustensiles de cuisson et
les parois du four. S’assurer qu’aucun ustensile de cuisson ne se
trouve directement au-dessus d’un autre.
Grilles
■ Placer les grilles avant d’allumer le four.
■ Ne pas installer les grilles lorsque des ustensiles de cuisson
au four se trouvent dessus.
■ S’assurer que les grilles sont horizontales.
Pour déplacer une grille, la tirer jusqu’à la butée, soulever l’avant
puis la retirer. Se servir de l’illustration suivant comme guide.
Risque d'empoisonnement alimentaire
Ne pas laisser des aliments dans un four plus d'une
heure avant ou après la cuisson.
Le non-respect de cette instruction peut causer un
empoisonnement alimentaire ou une maladie.
IMPORTANT : Les aliments doivent être à la température de
service avant de les placer dans le four chaud. Les aliments
peuvent être gardés au four jusqu’à une heure; toutefois, les pains
et les mets en sauce peuvent devenir trop secs s’ils sont laissés
dans le four durant la fonction Warm (maintien au chaud). Pour de
meilleurs résultats, couvrir les aliments.
La caractéristique Warm (maintien au chaud) permet de garder les
aliments cuits chauds à la température de service.
Pour utiliser:
1. Appuyer sur WARM (maintien au chaud).
2. Appuyer sur la touche à flèche “vers le haut” ou “vers le bas”
de Temp/Time (température/durée) jusqu’à ce que la durée
souhaitée s’affiche. Un signal sonore retentit lorsque
la température minimum ou maximum est atteinte.
3. Appuyer sur START (mise en marche).
4. Placer les aliments dans le four
5. Appuyer sur OFF/CANCEL (arrêt/annulation) après avoir
terminé.
REMARQUE : La température peut être modifiée à tout moment
en appuyant sur la touche à flèche “vers le haut” ou “vers le bas”
de Temp/Time (température/durée) jusqu’à ce que la température
souhaitée s’affiche, puis en appuyant sur START (mise en marche).
1
Position de la grille
Grille 5 : Faire griller du pain ou des aliments peu épais et sans
matières grasses
Grille 4 : À utiliser pour la cuisson au four et cuisson au gril sur
2 grilles
Grille 3 : La plupart des aliments cuits au four sur une tôle à
biscuits, un moule à muffins ou une tôle à roulés; ainsi que les
gâteaux à étages. Cuisson au gril de morceaux de poulet
Grille 2 : Tartes, mets en sauce, pain à levure, pains éclairs, plats
surgelés, et cuisson sur 2 grilles
Grille 1 : Pour le rôtissage de grands et petits morceaux de viande
et de volaille
09-Nov-2017 15:22:46 EST | RELEASED
In some European factories the letter "W" of the part code mentioned herein will be automatically
replaced by the number "4000" (e.g. "W12345678" becomes "400012345678")
27
Page 28

Cuisson sur plusieurs grilles
A
Cuisson sur 2 grilles : Utiliser les positions de grille 2 et 4.
Cuisson au four des gâteaux à étages, sur 2 grilles
Pour des résultats optimaux lors de cuisson au four de gâteaux
sur 2 grilles, utiliser les grilles plates en positions 2 et 4. Placer
les gâteaux sur les grilles tel qu’indiqué.
Cuisson au four de biscuits sur 2 grilles
Pour des résultats optimaux lors de la cuisson au four de biscuits
sur 2 grilles, placer les grilles plates en positions 2 et 4.
Évent du four
A
A. Évent du four (modèle
en vitrocéramique)
L’évent du four permet l’évacuation de l’air chaud et de l’humidité
du four. Il ne doit pas être obstrué ou couvert. Le fait d’obstruer ou
de couvrir l’évent nuit à la circulation adéquate de l’air et affecte
les résultats de cuisson et de nettoyage. Ne pas placer près de
l’évent du four des objets en plastique, en papier ou susceptibles
de fondre ou de brûler.
Sur les modèles à éléments en spirale, l’élément peut être utilisé
lorsque le four est en marche, pour autant que l’ustensile de
cuisson ne dépasse pas le bord de l’élément de plus de
1" (1,3 cm).
A. Évent du four (modèle
avec éléments en spirale)
Cuisson au four et rôtissage
Avant la cuisson au four et le rôtissage, placer les grilles tel
qu’indiqué à la section “Positionnement des grilles et des
ustensiles de cuisson”. Lors du rôtissage, il n’est pas nécessaire
d’attendre la fin du préchauffage du four avant d’y placer la
nourriture, sauf si la recette le recommande.
Température du four
En cours d’utilisation, les éléments chauffants du four s’allument
et s’éteignent en alternance pour maintenir une température
constante, mais leur température peut varier légèrement dans un
sens ou dans l’autre du fait de cette alternance. L’ouverture de
la porte du four en cours d’utilisation laisse échapper l’air chaud
et refroidit le four, ce qui peut modifier la durée nécessaire et le
résultat de la cuisson. Pour suivre l’avancement de la cuisson,
il est conseillé d’utiliser l’éclairage du four.
REMARQUE : Sur les modèles équipés d’une fonction de
convection, le ventilateur de convection peut tourner dans le mode
de cuisson sans convection pour améliorer la performance du four.
Système de gestion de la température
Le système de contrôle de la température contrôle
électroniquement les niveaux de température du four durant le
préchauffage et la cuisson afin de maintenir une gamme précise
de températures pour des résultats de cuisson optimaux. Les
éléments de cuisson au four et au gril ou brûleurs s’allument et
s’éteignent par intermittence. Pour les cuisinières à convection, le
ventilateur fonctionne pendant le préchauffage et peut s’allumer et
s’éteindre par intermittence pendant de courts intervalles dans le
mode Bake (cuisson au four) afin de produire un meilleur résultat.
Ce comportement est automatique lorsque le four est utilisé.
Préchauffage
Lorsque l’on appuie sur Start (mise en marche), le four commence
à préchauffer. Une fois que la température de 100ºF (38ºC) est
atteinte, la température affichée augmente au fur et à mesure
de l’augmentation de la température réelle du four. Lorsque la
température de préchauffage est atteinte, un signal sonore est
émis et la température sélectionnée apparaît sur l’affichage.
Cuisson au gril
Po
ur la cuisson au gril, préchauffer le four pendant 5 minutes
avant d’y placer des aliments, à moins que la recette ne
recommande autre chose. Placer l’aliment sur la grille de la
lèchefrite, puis placer celle-ci au centre de la grille du four.
IMPORTANT : Fermer la porte pour une température de cuisson
au gril adéquate.
Le changement de température lors de la cuisson au gril permet
un contrôle plus précis de la cuisson. Plus le réglage du gril est
bas, plus la cuisson est lente. Les morceaux épais et de forme
irrégulière de viande, de poisson et de volaille cuisent mieux à
des réglages de gril plus bas. Consulter la section
“Positionnement des grilles et ustensiles de cuisson” pour plus
d’informations.
À des réglages inférieurs, l’élément de cuisson au gril s’allume et
s’éteint par intermittence afin de maintenir une température
adéquate.
■ Po
ur de meilleurs résultats, utiliser une lèchefrite et une grille.
La grille est conçue pour laisser s’écouler les jus et aider à
éviter les éclaboussures et la fumée. Il est possible de
commander une lèchefrite. Voir la section “Accessoires”.
REMARQUE : Des odeurs et de la fumée sont normales lorsque
le
four est utilisé les premières fois, ou lorsqu'il est très sale.
28
09-Nov-2017 15:22:46 EST | RELEASED
In some European factories the letter "W" of the part code mentioned herein will be automatically
replaced by the number "4000" (e.g. "W12345678" becomes "400012345678")
Page 29

ENTRETIEN DE LA CUISINIÈRE
Programme de nettoyage
(sur certains modèles)
AVERTISSEMENT
Risque de brûlures
Ne pas toucher le four au cours du programme
d'autonettoyage.
Garder les enfants loin du four au cours du programme
d'autonettoyage.
Le non-respect de ces instructions peut causer des
brûlures.
IMPORTANT : La santé de certains oiseaux est très sensible aux
émanations qui surviennent durant le programme de nettoyage.
L’exposition aux émanations peut entraîner la mort de certains
oiseaux. Toujours déplacer les oiseaux dans une autre pièce
fermée et bien aérée.
Ne pas obstruer le ou les évents du four durant le programme
de nettoyage. L’air doit pouvoir circuler librement. Selon votre
modèle, voir la section “Évent du four”.
Ne pas nettoyer, frotter, endommager ou déplacer le joint
d’étanchéité de la porte du four.
Préparation de la hotte
■ Sortir du four la lèchefrite, la grille, les ustensiles de cuisson au
four et de rôtissage, les grilles du four, le papier d’aluminium et
sur certains modèles, la sonde thermométrique.
■ Utiliser un chiffon humide pour nettoyer l’intérieur de la porte
et une zone de 1
cavité du four, en prenant soin de ne pas déplacer ni plier le
joint d’étanchéité.
■ Enlever les articles de plastique de la table de cuisson car ils
peuvent fondre.
■ Enlever tous les articles du tiroir de remisage.
1
/2" (3,8 cm) sur le pourtour du cadre de la
Comment fonctionne le programme
IMPORTANT : Le chauffage et le refroidissement de la porcelaine
sur l’acier dans le four peuvent causer une décoloration, une
perte de lustre, des fissures minuscules et des craquements.
Avant le nettoyage, s’assurer que la porte est complètement
fermée sinon elle ne se verrouillera pas et le programme
d’autonettoyage ne commencera pas.
Lorsque le four a complètement refroidi, retirer la cendre avec un
chiffon humide. Afin d’éviter de briser le verre, ne pas appliquer
de chiffon humide et froid sur la partie interne du hublot de la
porte avant qu’il n’ait complètement refroidi.
Pour arrêter le programme de nettoyage à tout moment, appuyer
sur OFF/CANCEL (arrêt/annulation). Si la température est trop
élevée, la porte du four reste verrouillée et “cool” (froid) et “ ”
(verrouillée) s’affichent. Le ventilateur de refroidissement peut
continuer à fonctionner.
La lampe du four ne fonctionne pas durant le programme
d’autonettoyage.
Une fois la température de nettoyage atteinte, la commande
électronique nécessite un délai de 12 heures avant qu'un autre
programme d'autonettoyage puisse être lancé.
Commande électronique de four avec temps de
nettoyage ajustable (sur certains modèles)
La durée du programme Clean (nettoyage) est réglable entre
2 h 30 et 4 h 30 par tranches de 30 minutes. Les durées de
nettoyage suggérées sont de 2 h 30 pour des saletés légères
et de 4 h 30 pour des saletés abondantes.
Pour utiliser l’autonettoyage :
1. Appuyer sur CLEAN (nettoyage).
2. Appuyer sur la touche à flèche “vers le haut” ou “vers le bas”
de Temp/Time (température/durée) pour entrer la durée du
programme d’autonettoyage désirée.
3. Appuyer sur START (mise en marche).
La porte du four se verrouille automatiquement. Les témoins
lumineux Door Locked (porte verrouillée) et Clean (nettoyage)
s’allument. La durée résiduelle est également affichée.
4. Lorsque le programme de nettoyage est terminé et que le four
est froid, les témoins lumineux Door Locked (porte verrouillée)
et Clean (nettoyage) s’éteignent.
5. Lorsque le four a complètement refroidi, retirer la cendre avec
un chiffon humide.
Pour quitter le programme Clean (nettoyage) avant la fin,
appuyer sur OFF/CANCEL (arrêt/annulation). La porte se
déverrouille dès que le four est froid.
09-Nov-2017 15:22:46 EST | RELEASED
In some European factories the letter "W" of the part code mentioned herein will be automatically
replaced by the number "4000" (e.g. "W12345678" becomes "400012345678")
29
Page 30

Nettoyage général
IMPORTANT : Avant le nettoyage, s’assurer que toutes les
commandes sont éteintes et que le four et la table de cuisson sont
froids. Toujours suivre les instructions figurant sur les étiquettes
des produits de nettoyage. Pour plus de renseignements, vous
pouvez consulter la section Foire Aux Questions (FAQ) de notre
site Web sur www.amanacanada.ca.
L’usage de savon, d’eau et d’un chiffon doux ou d’une éponge est
suggéré en priorité, sauf indication contraire.
SURFACES EN EMAIL VITRIFIÉ UNIQUEMENT
(sur certains modèles)
Les éclaboussures alimentaires acides, telles que vinaigre et
tomate, doivent être nettoyées dès que la cuisinière a refroidi.
Ces salissures peuvent endommager le fini.
Méthode de nettoyage :
■ Nettoyant à vitre, nettoyant doux liquide ou tampon à récurer
non abrasif :
Nettoyer délicatement autour de la plaque signalétique/des
numéros de modèle et de série, car le frottement pourrait en
effacer les chiffres.
■ Nettoyant affresh
numéro W10355010 (non fourni) :
Voir la section “Accessoires” pour plus de renseignements.
ACIER INOXYDABLE (sur certains modèles)
REMARQUE : Afin d’éviter d’endommager les surfaces en acier
inoxydable, ne pas utiliser de tampons à récurer savonneux,
de nettoyants abrasifs, de crème à polir pour table de cuisson,
de tampons en laine d’acier, de chiffons de lavage rêches ou
d’essuie-tout abrasifs. Ils peuvent endommager les surfaces
en acier inoxydable, même après une seule application ou
quelques-unes.
Méthode de nettoyage :
Frotter dans la direction du grain pour éviter les dommages.
■ Nettoyant affresh
W10355016 (non fournie) :
Voir la section “Accessoires” pour plus de renseignements.
PEINTURE MÉTALLIQUE (sur certains modèles)
Ne pas utiliser de nettoyants abrasifs, de nettoyants avec agent
de blanchiment, de produits antirouille, d’ammoniaque ou
d’hydroxyde de sodium (soude), car la surface peinte pourrait
se tacher.
VITROCÉRAMIQUE (sur certains modèles)
Méthode de nettoyage :
Afin d’éviter d’endommager la table de cuisson, ne pas utiliser
de laine d’acier, de nettoyants en poudre abrasifs, d’eau de
Javel, de produit antirouille ou d’ammoniaque.
1. Éliminer les salissures alimentaires avec le grattoir
pour table de cuisson.
®
pour cuisine et appareils ménagers - pièce
®
pour acier inoxydable – pièce n°
■ Tenir le grattoir pour table de cuisson à un angle
d’environ 45° par rapport à la surface de verre et
gratter les salissures. Il convient d’appuyer fermement
pour éliminer les salissures.
Laisser la table de cuisson refroidir complètement avant
de passer à l’étape 2.
2. Appliquer quelques gouttes de nettoyant pour table de cuisson
affresh® sur les zones concernées.
■ Frotter le nettoyant affresh
®
sur la surface de la table
de cuisson avec le tampon bleu de nettoyage des
tables de cuisson. Il convient d’appuyer fermement
pour éliminer les taches rebelles.
■ Laisser le produit nettoyant sécher en une pellicule
blanchâtre avant de passer à l’étape 3.
3. Faire briller avec un chiffon ou essuie-tout propre et sec.
■ Répéter éventuellement les étapes 1 à 3 pour les taches
les plus tenaces ou incrustées.
Le nécessaire complet de nettoyage des tables de cuisson
est disponible à la commande. Il contient :
■ Grattoir pour table de cuisson
■ Nettoyant pour table de cuisson affresh
■ Tampons bleus de nettoyage des tables de cuisson
®
Consulter la section “Accessoires” pour les références
et les informations de commande.
COMMANDES DE LA TABLE DE CUISSON
Afin d’éviter d’endommager les commandes de la table de
cuisson, ne pas utiliser de laine d’acier, de nettoyants abrasifs
ou de nettoyant pour four.
Afin d’éviter toute détérioration, ne pas laisser tremper les boutons
de commande.
Lors de la réinstallation des boutons, s’assurer que chaque bouton
est à la position arrêt.
Sur certains modèles, ne pas enlever les joints sous les boutons.
Méthode de nettoyage :
■ Savon et eau :
Tirer les boutons directement hors du tableau de commande
pour les enlever.
■ Pour de meilleurs résultats, utiliser le grattoir pendant que
la table de cuisson est encore tiède, mais non brûlante au
toucher. Il est recommandé de porter des mitaines de four
pour gratter la table de cuisson tiède.
30
09-Nov-2017 15:22:46 EST | RELEASED
In some European factories the letter "W" of the part code mentioned herein will be automatically
replaced by the number "4000" (e.g. "W12345678" becomes "400012345678")
Page 31

TABLEAU DE COMMANDE ET EXTÉRIEUR
DE LA PORTE DU FOUR
Afin d’éviter d’endommager le tableau de commande, ne pas
utiliser de nettoyants abrasifs, de tampons en laine d’acier, de
chiffons de lavage rêches ou d’essuie-tout abrasifs.
Méthode de nettoyage :
■ Nettoyant à vitre et chiffon doux ou éponge :
Appliquer le nettoyant à vitre sur un chiffon doux ou une
éponge, et non directement sur le tableau.
■ Nettoyant affresh
pièce numéro W10355010 (non fourni) :
Voir la section “Accessoires” pour plus de renseignements.
®
pour cuisine et appareils ménagers -
GRILLES DU FOUR
Méthode de nettoyage :
■ Tampon en laine d’acier
■ Pour les grilles ternies qui glissent difficilement, enduire
légèrement les glissières d’huile végétale; cela facilitera
leur glissement.
TIROIR DE REMISAGE (sur certains modèles)
S’assurer que le tiroir est froid et vide avant le nettoyage.
Méthode de nettoyage :
■ Détergent doux
ÉLÉMENTS EN SPIRALE (sur certains modèles)
Méthode de nettoyage :
■ Chiffon humide :
S’assurer que les boutons de commande sont sur Off (arrêt)
et que les éléments sont froids.
Ne pas nettoyer ni immerger dans l’eau. Les salissures brûlent
lorsqu’elles chauffent.
CUVETTES DES BRÛLEURS (sur certains modèles)
Avant de retirer ou de remplacer les éléments en spirale et les
cuvettes de brûleur, s’assurer qu’ils sont froids et que les boutons
de commande sont en position OFF (arrêt).
Retirer l’élément en spirale en poussant son pourtour vers le
réceptacle. Le soulever suffisamment pour pouvoir dégager la
cuvette de brûleur. Tirer l’élément en spirale en ligne droite pour
le dégager du réceptacle. Soulever la cuvette du brûleur pour la
dégager.
Méthode de nettoyage :
Cuvettes de brûleur chromées
Laver fréquemment à l’eau savonneuse tiède. (Il n’est pas
recommandé de laver les cuvettes chromées au lave-vaisselle).
Il est possible d’utiliser un produit de nettoyage modérément
abrasif et une spatule à récurer en plastique pour éliminer les
taches tenaces.
Pour les cuvettes de brûleur très sales, placer un morceau
d’essuie-tout imbibé d’ammoniaque sur les taches et laisser
tremper pendant une courte durée. Frotter ensuite doucement
avec une spatule à récurer en plastique.
CAVITÉ DU FOUR
Ne pas utiliser de nettoyants pour four sur les modèles avec
autonettoyage.
Les éclaboussures alimentaires doivent être nettoyées lorsque le
four a refroidi. À haute température, les aliments réagissent avec
l’émail et peuvent provoquer la formation de taches, une attaque
acide, des piqûres ou des décolorations blanchâtres.
Méthode de nettoyage :
■ Voir la section “Programme de nettoyage”.
Lampe du four
La lampe du four est une ampoule standard de 40 watts pour
appareil ménager. Avant le remplacement, s’assurer que le four
et la table de cuisson sont froids et que les boutons de commande
sont à la position Off (arrêt).
Remplacement :
1. Débrancher l’appareil ou déconnecter la source de courant
électrique.
2. Tourner le couvercle en verre de l’ampoule à l’arrière du four
dans le sens antihoraire et l’enlever.
3. Tourner l’ampoule dans le sens antihoraire et la retirer de la
douille.
4. Remplacer l’ampoule et replacer le couvercle de l’ampoule
en le tournant dans le sens horaire.
5. Brancher l’appareil ou reconnecter la source de
courant électrique.
SURFACE SOUS LA TABLE DE CUISSON
(sur certains modèles)
Le dessous de la table de cuisson à éléments en spirale est
facilement accessible pour le nettoyage. Soulever la table de
cuisson par les deux coins avant jusqu’à ce que le support
s’emboîte.
Méthode de nettoyage :
■ Nettoyant à vitre, nettoyant doux liquide ou tampon à récurer
non abrasif.
■ Nettoyant affresh
®
pour cuisine et appareils ménagers -
pièce numéro W10355010 (non fourni) :
Voir la section “Accessoires” pour plus de renseignements.
Afin d’éviter d’endommager la cuisinière, ne pas retirer la table
de cuisson.
In some European factories the letter "W" of the part code mentioned herein will be automatically
09-Nov-2017 15:22:46 EST | RELEASED
31
replaced by the number "4000" (e.g. "W12345678" becomes "400012345678")
Page 32

DÉPANNAGE
Essa
yer d’abord les solutions suggérées ici. Pour obtenir de l’aide ou des conseils qui permettront peut-être d’éviter une intervention
de dépannage, ou visitez le site Internet http://www.amanacanada.ca.
Il est possible d’adresser ses commentaires ou questions par courrier à l’adresse ci-dessous :
Amana Brand Home Appliances
Customer eXperience Centre
200 - 6750 Century Ave.
Mississauga, Ontario L5N 0B
Dans votre correspondance, veuillez indiquer un numéro de téléphone où l’on peut vous joindre dans la journée.
Utilisation
Problème Causes possibles Solutions
Rien ne fonctionne
La table de cuisson ne
fonctionne pas
Chaleur excessive autour des
ustensiles de cuisson sur la
table de cuisson
La cuisson ne produit pas les
résultats escomptés
L’élément de la table de
cuisson s’allume et s’éteint en
alternance sur le réglage élevé
Le four ne fonctionne pas
La température du four est
trop élevée ou trop basse
Les témoins lumineux du four
clignotent
Des messages s’affichent
Le cordon d'alimentation électrique
est débranché.
Un fusible domestique est grillé ou
le disjoncteur est ouvert.
Le code d’erreur F9 ou F9 E0 est
affiché.
Le bouton de commande est mal
réglé.
Sur les modèles en vitrocéramique,
le verrouillage des commandes du
four est réglé.
Un programme d’autonettoyage
a été sélectionné
Ustensiles de cuisson n’ayant pas
la bonne taille.
Le bouton de commande est réglé
sur un niveau de chaleur incorrect.
La cuisinière n’est pas d'aplomb. Régler l’aplomb de la cuisinière. Voir les Instructions
Alternance marche/arrêt de
l’élément en raison du limiteur
de température
Le verrouillage des commandes est
activé.
La commande est en mode Démo. Le mode démonstration désactivera tous les éléments au four.
La commande électronique du four
est mal réglée
Il faut ajuster la température du
four.
L’alimentation de la cuisinière vient
d’être établie ou rétablie.
Panne de courant (l’afficheur
indique une heure clignotante).
Code d’erreur (l’afficheur indique
une lettre suivie d'un numéro).
Il faut appuyer sur Start (mise en
marche) pour qu’un programme
puisse commencer.
Brancher sur une prise reliée à la terre.
Remplacer le fusible ou réenclencher le disjoncteur. Si le
problème persiste, appeler un électricien.
Le câblage de la prise électrique du domicile est peut-être
défectueux. Demander à un électricien qualifié d’inspecter
le circuit d’alimentation électrique.
Enfoncer le bouton avant de le tourner à un réglage.
Voir la caractéristique de la touche “Control Lock” (verrouillage
des commandes) dans “Guide des caractéristiques”.
Sur les modèles en vitrocéramique, la table de cuisson ne
fonctionne pas durant un programme d’autonettoyage.
Utiliser un ustensile de cuisson à peu près de la même
dimension que la surface de cuisson, l’élément ou le brûleur
de surface. L’ustensile de cuisson ne doit pas dépasser de
plus de
Voir la section “Utilisation de la table de cuisson”.
d’installation.
Ce phénomène est normal. L’élément fonctionne par
intermittence pour éviter toute surchauffe de la table de
cuisson.
Appuyer sur la touche CONTROL LOCK (verrouillage des
commandes) pendant 3 secondes pour déverrouiller.
Voir “Mode de démonstration” dans la section “Commandes
électroniques du four”.
Voir la section “Commandes électroniques du four”.
Voir “Commande de température du four” dans la section
“Commandes électroniques du four”.
Voir “Affichage des commandes” dans la section “Commandes
électroniques du four”. Si le(s) témoin(s) lumineux clignote(nt)
toujours, faire un appel de service. Voir la section “Garantie”
pour des renseignements de contact.
Effacer l’affichage. Sur certains modèles, régler de nouveau
l’horloge au besoin. Voir la fonction de la touche “Clock”
(horloge) à la section “Guide des caractéristiques”.
En fonction du modèle, appuyer sur OFF/CANCEL (arrêt/
annulation) pour effacer l’affichage. Voir “Affichage des
commandes” dans la section “Commandes électroniques du
four”. S’il réapparaît, appeler le service de dépannage. Voir la
section “Garantie” pour des renseignements de contact.
Voir la caractéristique de touche “Start” (mise en marche)
à la section “Guide des caractéristiques”.
1
/2" (1,3 cm) hors de la zone de cuisson.
32
09-Nov-2017 15:22:46 EST | RELEASED
In some European factories the letter "W" of the part code mentioned herein will be automatically
replaced by the number "4000" (e.g. "W12345678" becomes "400012345678")
Page 33

Problème Causes possibles Solutions
Le programme
d’autonettoyage ne fonctionne
pas
La cuisson au four ne produit
pas les résultats prévus
La porte du four n’est pas fermée. S’assurer que la porte du four est complètement fermée.
La fonction d’autonettoyage n’a
Voir la section “Programme d’autonettoyage”.
pas été correctement entrée.
La cuisinière n’est pas d'aplomb. Régler l’aplomb de la cuisinière. Voir les Instructions
d’installation.
Le réglage de température était
Vérifier la recette dans un livre de recettes fiable.
incorrect.
La température du four est mal
calibrée.
Voir “Commande de température du four” dans la section
“Commandes électroniques du four”.
Le four n’a pas été préchauffé. Voir la section “Cuisson au four et rôtissage”.
Les grilles ont été positionnées
de façon inappropriée.
La circulation d’air est insuffisante
autour des ustensiles de cuisson
Voir la section “Positionnement des grilles et ustensiles de
cuisson au four”.
Voir la section “Positionnement des grilles et ustensiles de
cuisson au four”.
au four.
La pâte est distribuée de façon
Vérifier que la pâte est répartie uniformément dans le plat.
inégale dans le plat.
Brunissage plus foncé des aliments
à cause d’ustensiles de cuisson au
Diminuer la température du four de 25°F (15°C), ou déplacer
la grille plus haut dans le four.
four plus ternes ou plus foncés.
Brunissage moins prononcé des
Déplacer la grille à une position moins élevée dans le four.
aliments à cause d’ustensiles de
cuisson au four brillants ou plus
clairs.
Une durée de cuisson incorrecte
Ajuster la durée de cuisson.
a été utilisée.
La porte du four n'a pas été
fermée.
La porte du four a été ouverte
durant la cuisson.
Vérifier que les ustensiles de cuisson au four n’empêchent
pas la porte de se fermer.
L’ouverture de la porte pour vérifier la cuisson laisse la chaleur
du four s’échapper et peut nécessiter des durées de cuisson
plus longues.
La grille est trop proche du brûleur
Déplacer la grille à une position plus élevée dans le four.
de cuisson, ce qui fait que les
éléments cuits au four sont trop
bruns à la base.
Les croûtes de tarte brunissent
trop tôt.
L’échelle de température a été
changée de Fahrenheit à Celsius.
Utiliser du papier d’aluminium pour couvrir le bord de la croûte
ou réduire la température de cuisson du four.
Les aliments sont trop cuits ou brûlés même aux basses
températures. Voir “Fahrenheit et Celsius” dans la section
“Commandes électroniques du four”.
09-Nov-2017 15:22:46 EST | RELEASED
In some European factories the letter "W" of the part code mentioned herein will be automatically
replaced by the number "4000" (e.g. "W12345678" becomes "400012345678")
33
Page 34

ACCESSOIRES
Pour les accessoires, consulter notre site Web www.amanacanda.ca ou nous contacter au 1-800-807-6777.
Ensemble pour la mise en conserves
(modèles avec éléments en spirale)
Commander la pièce nº 242905
Ensemble d'entretien de la table
de cuisson
(modèles en vitrocéramique)
(comprend le nettoyant, le protecteur,
le grattoir et les tampons d'application)
Commander la pièce n° 31605
Protecteur de table de cuisson
(modèles en vitrocéramique)
Commander la pièce n° 31463A
Lingettes nettoyantes pour acier
inoxydable affresh
(modèles en acier inoxydable)
Commander la pièce n° W10355049
®
Nettoyant pour table de cuisson
affresh
(modèles en vitrocéramique)
Commander la pièce n° W10355051
Nettoyant pour acier inoxydable
affresh
(modèles en acier inoxydable)
Commander la pièce n° W10355016
®
®
Nettoyant affresh® pour cuisine
et appareils ménagers
Commander la pièce n° W10355010
Grattoir pour table de cuisson
(modèles en vitrocéramique)
Commander la pièce n° WA906B
Nettoyant et poli pour granit
Commander la pièce n° W10275756
Grille de four en deux pièces
Commander la pièce nº 4396927
Lèchefrite et grille en porcelaine
Commander la pièce n° 4396923
Lèchefrite et grille de rôtissage
de qualité supérieure
Commander la pièce n° W10123240
Nettoyant pour plateau d’égouttement
et grille de cuisinière à gaz
Commander la pièce nº 31617A
34
09-Nov-2017 15:22:46 EST | RELEASED
In some European factories the letter "W" of the part code mentioned herein will be automatically
replaced by the number "4000" (e.g. "W12345678" becomes "400012345678")
Page 35

ATTACHEZ ICI VOTRE REÇU DE VENTE. UNE PREUVE D’ACHAT EST
OBLIGATOIRE POUR OBTENIR L’APPLICATION DE LA GARANTIE.
GARANTIE LIMITÉE
DES GROS APPAREILS
MÉNAGERS AMANA
®
Lorsque vous appelez le centre d’eXpérience de la clientèle, veuillez garder
à disposition les renseignements suivants :
■ Nom, adresse et numéro de téléphone
■ Numéros de modèle et de série
■ Une description claire et détaillée du problème rencontré
■ Une preuve d’achat incluant le nom et l’adresse du marchand
ou du détaillant
SI VOUS AVEZ BESOIN DE SERVICE :
1. Avant de nous contacter pour obtenir un dépannage, veuillez déterminer si des réparations sont nécessaires pour votre produit. Certains
problèmes peuvent être résolus sans intervention de dépannage. Prenez quelques minutes pour parcourir la section Dépannage ou
Résolution de problèmes du guide d’utilisation et d’entretien,
2. Tout service sous garantie doit être effectué exclusivement par nos fournisseurs de dépannage autorisés Amana. Aux É.-U. et au Canada,
dirigez toutes vos demandes de service sous garantie au
Centre d’eXpérience de la clientèle Amana
Aux É.-U., composer le 1-800-843-0304. Au Canada, composer le 1-800-807-6777.
Si vous résidez à l’extérieur du Canada et des 50 États des États-Unis, contactez votre marchand Amana autorisé pour déterminer si une autre
garantie s’applique.
ou rendez-vous sur le site http://www.amanacanada.ca.
GARANTIE LIMITÉE DE UN AN
CE QUI EST COUVERT CE QUI N’EST PAS COUVERT
Pendant un an à compter de la date
d’achat, lorsque ce gros appareil
ménager est installé, utilisé et entretenu
conformément aux instructions jointes
à ou fournies avec le produit, la marque
Amana de Whirlpool Corporation ou
Whirlpool Canada, LP (ci-après désignées
“Amana”) décidera à sa seule discrétion
de remplacer le produit ou de couvrir le
coût des pièces spécifiées par l’usine
et de la main-d’œuvre nécessaires pour
corriger les vices de matériaux ou de
fabrication qui existaient déjà lorsque ce
gros appareil ménager a été acheté. S’il
est remplacé, l’appareil sera couvert pour
la période restant à courir de la garantie
limitée d’un an du produit d’origine.
LE SEUL ET EXCLUSIF RECOURS
DU CLIENT DANS LE CADRE DE
LA PRÉSENTE GARANTIE LIMITÉE
CONSISTE EN LA RÉPARATION PRÉVUE
PAR LA PRÉSENTE. Le service doit être
fourni par une compagnie de service
désignée par Amana. Cette garantie
limitée est valide uniquement aux
États-Unis ou au Canada et s’applique
exclusivement lorsque le gros appareil
ménager est utilisé dans le pays où il a
été acheté. La présente garantie limitée
est valable à compter de la date d’achat
initial par le consommateur. Une preuve
de la date d’achat initial est exigée pour
obtenir un dépannage dans le cadre de la
présente garantie limitée.
1. Usage commercial, non résidentiel ou par plusieurs familles, ou non-res
l’utilisateur, de l’opérateur ou des instructions d’installation.
2. Visite d’instruction à domicile pour montrer à l’utilisateur comment utiliser l’appareil.
3. Visites de service pour rectifier une installation ou un entretien fautifs du produit, une installation non
conforme aux codes d’électricité ou de plomberie, ou la rectification de l’installation électrique ou
de la plomberie du domicile (ex : câblage électrique, fusibles ou tuyaux d’arrivée d’eau
du domicile).
4. Pièces consomptibles (ex : ampoules, batteries, filtres à air ou à eau, solutions de
conservation, etc.).
5. Défauts ou dommage résultant de l’utilisation de pièces ou accessoires Amana non authentiques.
6. Conversion de votre produit du gaz naturel ou du gaz
7. Dommages causés par : accident, mésusage, abus, incendie, inondations
l’utilisation de produits non approuvés par Amana.
8. Réparations aux pièces ou systèmes dans le but de rectifier un dommage ou des défauts résultant
d’une réparation, altération ou modification non autorisée faite à l’appareil.
9. Défauts d’apparence, notamment les éraflures, traces de choc, fissures ou tout autre dommage
subi par le fini de l’appareil ménager, à moins que ces dommages ne résultent de vices de
matériaux ou de fabrication et ne soient signalés à Amana dans les 30 jours suivant la date d’achat.
10. Décoloration, rouille ou oxydation des surfaces résultant d’environnements caustiques ou corrosifs
incluant des concentrations élevées de sel, un haut degré d’humidité ou une exposition à des
produits chimiques (exemples non exhaustifs).
11. Perte d’aliments ou de médicaments due à la défaillance du produit.
12. Enlèvement ou livraison. Ce produit est conçu pour être réparé à l’intérieur du domicile.
13. Frais de déplacement et de transport pour le dépannage/la réparation dans une région éloignée où
une compagnie de service Amana autorisée n’est pas disponible.
14. Retrait ou réinstallation d’appareils inaccessibles ou de dispositifs préinstallés (ex : garnitures,
panneaux décoratifs, plancher, meubles, îlots de cuisine, plans de travail, panneaux de gypse, etc.)
qui entravent le dépannage, le retrait ou le remplacement du produit.
15. Service et pièces pour des appareils dont les numéros de série et de modèle originaux ont été
enlevés, modifiés ou ne peuvent pas être facilement identifiés.
Le coût d’une réparation ou d’un remplacement dans le cadre de ces circonstances exclues est à
la charge du client.
de propane.
pect des instructions de
, catastrophe naturelle ou
09-Nov-2017 15:22:46 EST | RELEASED
In some European factories the letter "W" of the part code mentioned herein will be automatically
replaced by the number "4000" (e.g. "W12345678" becomes "400012345678")
35
Page 36

CLAUSE D’EXONÉRATION DE RESPONSABILITÉ AU TITRE DES GARANTIES IMPLICITES
LES GARANTIES IMPLICITES, Y COMPRIS LES GARANTIES APPLICABLES DE QUALITÉ MARCHANDE OU D’APTITUDE À UN USAGE
PARTICULIER, SONT LIMITÉES À UN AN OU À LA PLUS COURTE PÉRIODE AUTORISÉE PAR LA LOI. Certains États et provinces ne permettent
pas de limitation sur la durée des garanties implicites de qualité marchande ou d’aptitude à un usage particulier, de sorte que la limitation ci-dessus
peut ne pas être applicable dans votre cas. Cette garantie vous confère des droits juridiques spécifiques et vous pouvez également jouir d’autres
droits qui peuvent varier d’une juridiction à l’autre.
EXONÉRATION DE RESPONSABILITÉ DANS LES DOMAINES NON COUVERTS PAR LA GARANTIE
Amana décline toute responsabilité au titre de la qualité, de la durabilité ou en cas de dépannage ou de réparation nécessaire sur ce gros appareil
ménager autre que les responsabilités énoncées dans la présente garantie. Si vous souhaitez une garantie plus étendue ou plus complète que
la garantie limitée fournie avec ce gros appareil ménager, adressez-vous à Amana ou à votre détaillant pour obtenir les modalités d’achat d’une
garantie étendue.
LIMITATION DES RECOURS; EXCLUSION DES DOMMAGES FORTUITS OU INDIRECTS
LE SEUL ET EXCLUSIF RECOURS DU CLIENT DANS LE CADRE DE LA PRÉSENTE GARANTIE LIMITÉE CONSISTE EN LA RÉPARATION PRÉVUE
PAR LA PRÉSENTE. AMANA N’ASSUME AUCUNE RESPONSABILITÉ POUR LES DOMMAGES FORTUITS OU INDIRECTS. Certains États et
certaines provinces ne permettent pas l’exclusion ou la limitation des dommages fortuits ou indirects de sorte que ces limitations et exclusions
peuvent ne pas être applicables dans votre cas. Cette garantie vous confère des droits juridiques spécifiques et vous pouvez également jouir
d’autres droits qui peuvent varier d’une juridiction à l’autre.
11/14
W10881063C
09-Nov-2017 15:22:46 EST | RELEASED
®
/™ ©2017. Used under license in Canada. All rights reserved.
Utilisé sous licence au Canada. Tous droits réservés.
In some European factories the letter "W" of the part code mentioned herein will be automatically
replaced by the number "4000" (e.g. "W12345678" becomes "400012345678")
10/17
 Loading...