

Page 1
Owner's ManualOwner's Manual
Owner's Manual
Owner's ManualOwner's Manual
Side by Side
Refrigerator
English ........................................................... 2
Deutsch ....................................................... 27
Français ....................................................... 51
Sección española......................................... 75
Svenskt avsnitt ............................................. 99
Suomalainen osa ....................................... 123
Nederlands ................................................. 147
Sezione italiana ......................................... 171
Norsk seksjon ............................................ 195
Dansk afsnit ............................................... 219
ЕгчейсЯдйп ЙдйпкфЮфз ................................. 243
Secção portuguesa .................................... 267
Türkçe ........................................................ 291
Part No. 12591314
Printed in U.S.A. 07/02
Page 2

Thank you for purchasing this refrigerator!
Please read this Owner's Manual thoroughly. This manual provides proper
maintenance information.
Warranty service must be performed by an authorized servicer. The
manufacturer also recommends contacting an authorized servicer if service is
required after warranty expires. To locate an authorized servicer, contact your
distributor.
When contacting your servicer, please provide the following information. Product
information is on the serial plate, located on ceiling of fresh food section.
Model Number _____________________________________________________
'P' Number ________________________________________________________
Serial Number _____________________________________________________
Purchase Date _____________________________________________________
Dealer Name ______________________________________________________
Dealer Address _____________________________________________________
Dealer Phone ______________________________________________________
Contents
Introduction .............................................................................. 2
Contents .................................................................................. 2
Important Safety Information ................................................... 3
Installing Your Refrigerator...................................................... 4
How to Transport Your Unit ................................................. 4
How to Select the Best Location ......................................... 4
How to Install and Remove Handles .................................. 5
How to Level Your Refrigerator ............................................ 6
How to Adjust the Temperature Controls ............................ 7
About Your Filtration System ................................................... 8
Refrigerator Features .............................................................. 9
Interior Shelves .................................................................... 9
Door Storage ...................................................................... 10
Drawers ............................................................................. 11
Freezer Features ...................................................................12
Primary Features ...............................................................12
Shelves .............................................................................. 13
Door Storage ...................................................................... 13
Dispenser Features ..............................................................14
Primary Features ...............................................................14
Water Dispenser Operation .............................................. 14
Control Features (5-button control) ................................... 15
Control Features (Electronic control) ................................ 1 6
Hints and Care ...................................................................... 19
How to Clean Your Unit ..................................................... 19
How to Remove and Replace Light Bulbs ........................ 20
Before Calling Service ........................................................... 21
Water Filter Data .................................................................... 25
How to Obtain Replacement
Parts and Services?
Problems? Save yourself the nuisance
of unnecessary service calls; check the
“Before Calling Service” section of the
owner’s manual.
Your new refrigerator has been carefully
engineered and manufactured under
strict quality standards and should give
you satisfactory and dependable
operation. However, like all mechanical
merchandise, it may occasionally
require adjustment, replacement parts,
or maintenance. Should you ever need
assistance, please contact the dealer
from whom you purchased the
refrigerator.
Provide the following:
• Model
• Manufacturing Number
• Serial Number and all of the other
data shown on the model serial
plate.
• State briefly the trouble you are
having.
The page area to the left has been
provided to record valuable information.
Keep instructions for
future reference!
Keep this manual and your sales receipt
together in a safe place in case warranty
service is required.
What if These Features
are Different from Mine?
This book is intended to show the
variety of features that are available in
the product line. If interested in
purchasing additional items available
for your unit, please contact your
distributor.
2
Page 3

Features at a Glance
11
10
18
16
13
15
20
19
3
1
5
3
2
8
7
7
6
9
12
12a
10
11
1. Temp Assure® controls
2. Spill Saver™ shelf
3. Spill Saver™ Easy Glide™ shelf
4. Side Glide™ shelves–not shown
5. Rear shelf extensions
6. Deli/Crisper drawer
7. Crisper drawer
8. Beverage Organizer™
9. Dairy center
10. Door buckets
10a. Bucket grippers–not shown
11. Tilt-out bucket
12. Beverage Chiller™
12a. Mini-Beverage Chiller ™
13. Ice storage bin
14. Ice maker–not shown
15. Ice Cream Shelf
16. Stor-Mor
17. Hanging wire shelf–not shown
18. Fixed freezer shelf
19. Water filter–not shown
20. Air filter–not shown
21. Lights–not shown
®
system
Upper fresh food
Lower fresh food
Freezer
Dispenser
Important Safety Information
Recognize Safety Symbols, Words, Labels
DANGER
!
DANGER—Immediate hazards which WILL result in severe personal injury or
death.
WARNING
!
WARNING—Hazards or unsafe practices which COULD result in severe personal
injury or death.
CAUTION
!
CAUTION—Hazards or unsafe practices which COULD result in minor personal
injury or product or property damage.
DANGER
!
To reduce risk of injury or death, follow basic precautions,
including the following:
Proper Disposal of Your Refrigerator
IMPORTANT: Child entrapment and suffocation are not problems of the past. Junked or
abandoned refrigerators are still dangerous–even if they sit out for "just a few days". If you are
getting rid of your old refrigerator, please follow the instructions below to help prevent accidents.
What You Need to Know
about Safety Instructions
Warning and Important Safety
Instructions appearing in this manual
are not meant to cover all possible
conditions and situations that may
occur. Common sense, caution, and care
must be exercised when installing,
maintaining, or operating refrigerator.
Always contact your dealer, distributor,
service agent, or manufacturer about
problems or conditions you do not
understand.
BEFORE YOU THROW AWAY YOUR OLD REFRIGERATOR OR FREEZER:
• Take off the doors.
• Leave the shelves in place so children may not easily climb inside.
3
Page 4
Installing Your Refrigerator
These instructions were provided to aid you in the installation of your unit. The manufacturer cannot be responsible for
improper installation.
Steps to Follow...
A qualified engineer must connect refrigerator in accordance with these installation instructions. Measure door opening
and depth and width of refrigerator. Remove handles or doors if required. Engineer must also do the following:
1. Follow local water and electrical company connection regulations.
2. Complete water supply connection before electrical supply connection.
Service to or replacement of power cord must be performed by a qualified servicer.
Installation Requirements
1. Install on an earthed outlet with a separate 230-240 volt, 50hz., 10A circuit Y-connection type power cord.
2. Protect soft flooring with cardboard or rugs.
3. Install on a floor which supports up to 429 kg.
4. Provide 5 mm clearance at side of refrigerator and for models more than 60 cm deep, provide 12.7 mm clearance at top
of refrigerator.
5. 60 cm deep models.
Trim corners of counter top to a 45° angle if counter top has 25 mm overhang.
Provide 5 mm clearance on both sides of refrigerator, and allow 7 mm on top for ease of installation and leveling.
No minimum clearance is required at the rear of the cabinet.
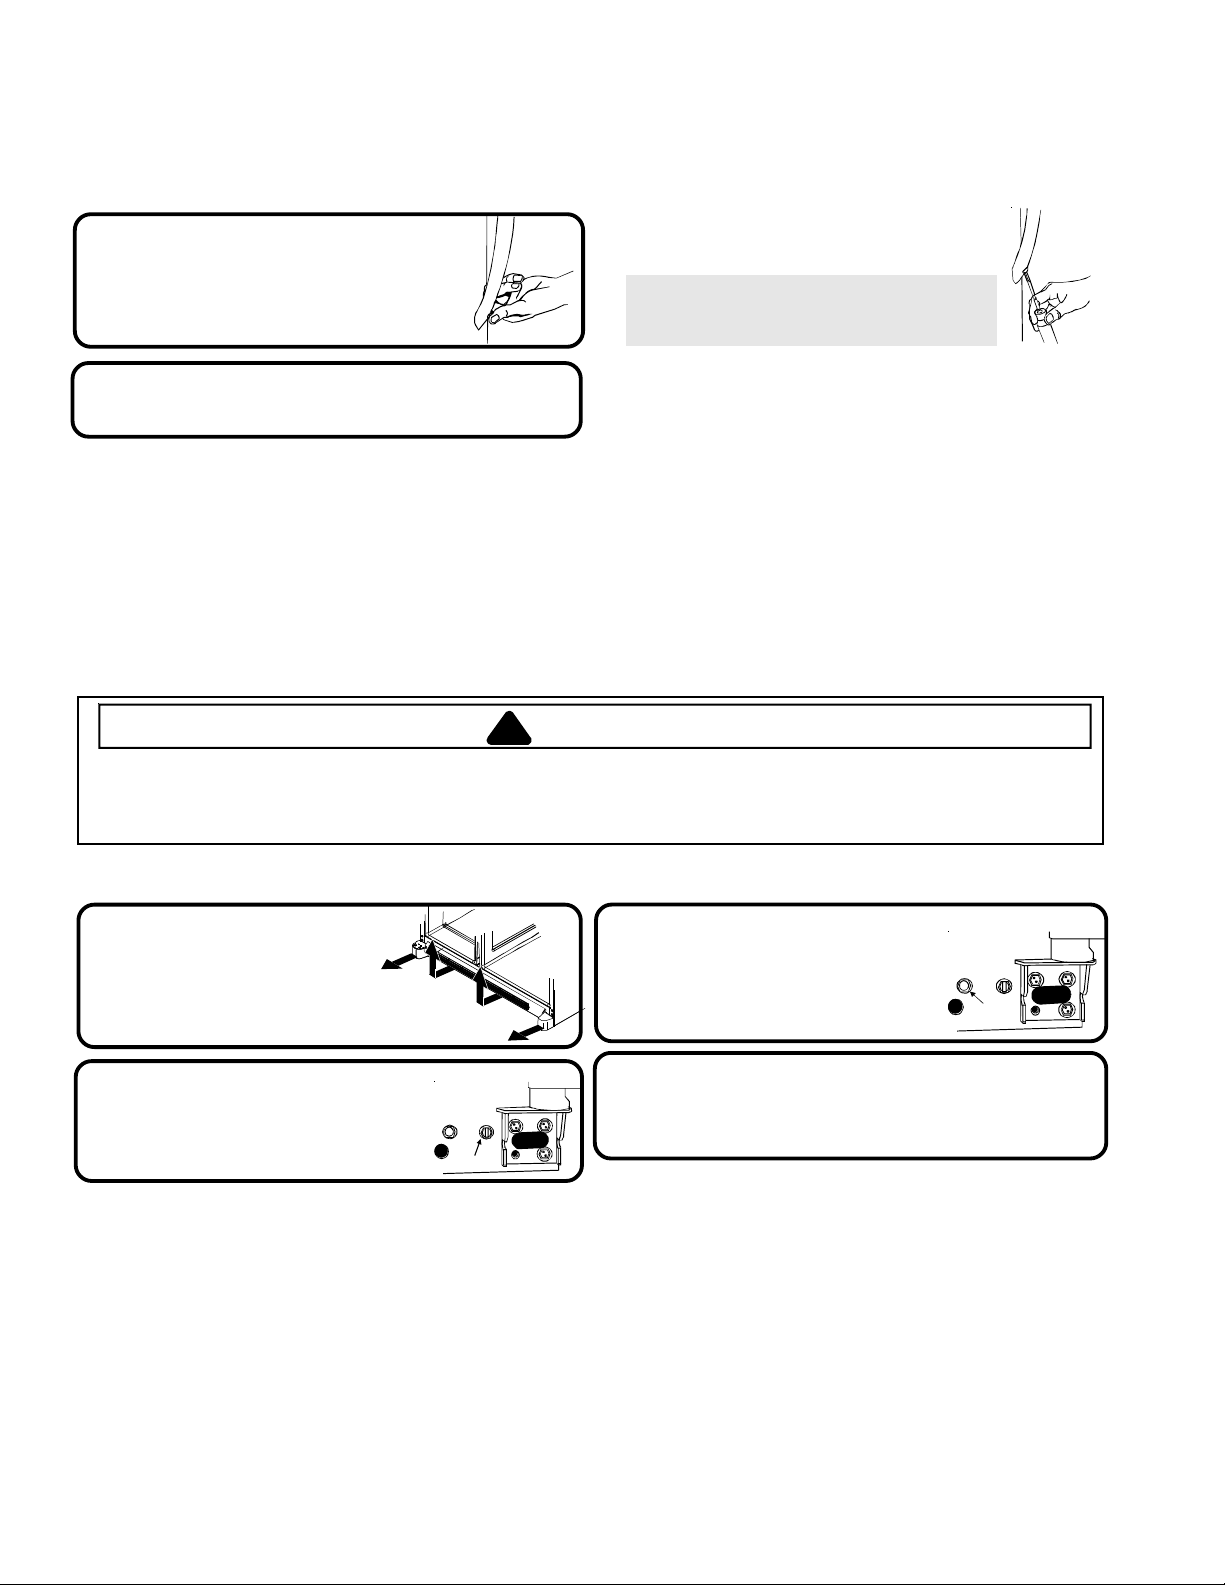
How to Remove Wooden Base
CAUTION!
To avoid personal injury or property damage, two people must remove wooden base.
1. Tape doors shut to prevent doors from opening unexpectedly.
2. Slide appliance cart under side of refrigerator.
3. Wrap refrigerator with blanket or pad. Thread strap around refrigerator. Put foam shipping pads, located in shipping
carton, under strap. Tighten strap securely.
4. Lower appliance cart to floor with appliance cart handles on bottom.
5. Remove top two bolts from skid.
6. Return refrigerator and appliance cart to an upright position. Remove strap.
7. Slide appliance cart under opposite side of refrigerator.
8. Repeat steps 3–5.
9. Remove wooden base.
10. Return refrigerator and appliance cart to an upright position and remove appliance cart.
IMPORTANT:
Do not leave refrigerator on its side longer than necessary to remove bolts.
How to Remove and Replace Doors and Hinges
• Contact a qualified engineer to perform this task.
4
Page 5

Installing Your Refrigerator
How to Install and Remove Handles
Handles are located within fresh food section of refrigerator. Trim, plugs, and accent pieces will be located within the
literature assembly.
Full-Length Grab Handles (non-stainless steel)
Remove two 1/4" hex nut
1
screws from bottom of
refrigerator
and freezer door.
Align door handles with top
2
and bottom sets of door clips,
and slide down until screw
holes on bottom of handles
match with door screw holes.
Half-Length Grab Handles (non-stainless steel)
Remove four 1/4" hex nut
1
screws from top and
bottom of doors.
Insert screws removed in step 1
3
into screw holes at bottom of
handle section.
Snap trim over bottom portion
4
of handles and retainers on
bottom of door
To remove after initial install...
• Follow steps 3 through 4 in reverse order.
NOTE: Fit may be tight. When removing handle, pull up and
out.
Snap colored handle trim over
3
screw holes at top and bottom of
handles.
• Snap in trim by inserting large round
end first.
To remove after initial install...
Align door handles with
2
screw holes and insert screws
removed in step 1.
WARNING
!
To avoid risk of serious personal injury from sharp edges, use extreme caution when removing & installing handles.
Stainless Steel Models
Loosen lower door clip on
1
refrigerator door with 1/4"
hex nut driver.
Locate predrilled hole at
2
base of handle, and fit
hollow end of handle over
lower door clip.
Handles may need to be removed if transporting unit
through tight spaces.
• Follow steps 2 and 3 in reverse order.
IMPORTANT: To avoid damage to handle, use a
flat blade screwdriver edge wrapped in masking
tape to remove colored handle trim.
Fit other end of handle over
3
upper door clip and slide
up as far as possible.
Insert 1/4" hex nut driver into
4
predrilled hole at base of handle
and tighten screw.
5
Page 6
Installing Your Refrigerator
How to Install the Handles continued
Stainless Steel Handles
Insert screw plug into predrilled
5
hole.
Repeat steps 2 through 5 to install
6
freezer handle.
continued
To remove after initial install...
• Follow steps 2 through 5 in reverse order.
IMPORTANT: To avoid damage to unit, use
a flat blade screwdriver edge wrapped in
masking tape to remove screw plugs.
How to Connect the Water Supply
• Contact a qualified engineer to perform this task.
How to Level Your Refrigerator
CAUTION
!
• To avoid damage to walls and flooring, protect soft vinyl or other flooring with cardboard, rugs, or other protective material.
• To avoid damage or breakage to adjusting bolt, do not use power tools to correct leveling.
• DO NOT adjust unit to be any shorter than 173.9 cm tall (minus hinge and cap). Doing so may damage underside
components.
Materials Needed
•3/8" hex head driver • Level
Remove Toe Grille and
1
Bottom Hinge Covers
• Open both doors 180°, or as wide as
possible, to remove.
Turn both front adjustment
2
screws (A) clockwise to raise
and counterclockwise to
lower.
A
What if my doors are not aligned?
• Locate the higher door, and turn front adjustment screw
counterclockwise. Continue until doors are level.
• If bottom of adjustment range is reached, and doors are
not level–raise opposite door by turning front
adjustment screw clockwise.
• Replace toe grille
Turn both rear adjustment
3
screws (B) clockwise to raise
and counterclockwise to
lower.
Check with level to verify 6 mm tilt to the
4
back for proper door closure.
• If unit is aligned and stable, replace toe grille.
What if my unit rocks?
• Turn rear adjustment screw clockwise to raise
rocking corner.
• Replace toe grille.
B
6
Page 7

Installing Your Refrigerator
How to Adjust the Temperature Controls
This refrigerator is designed to operate at a household temperature of 16° to 43° C.
Locate refrigerator and freezer controls on
1
upper left wall of fresh food section, and
set both controls to 4.
IMPORTANT: Neither section will cool if freezer control is
Off.
set to
Check to see that fresh food section
4
is 3° to 4° C.
• Turn control to next highest number if too warm.
• Turn control to next lowest number if too cold.
• Allow 5 to 8 hours for adjustments to take effect.
r
e
z
e
e
r
F
r
o
t
a
r
e
g
i
r
f
e
R
Allow 24 hours for temperatures to stabilize.
2
IMPORTANT: Due to design of unit, always start temperature
adjustments with freezer section.
Check to see if freezer temperature is -17°
3
to -16° C.
• Turn control to next highest number if too warm.
• Turn control to next lowest number if too cold.
• Allow 5 to 8 hours for adjustments to take effect.
Repeat process, as necessary.
5
How do I perform a temperature test?
Materials needed
• 2 thermometers measuring -21° to 10°C
• 2 drinking glasses
For Freezer
• Place thermometer in glass
of vegetable oil in middle
of freezer and continue
with step 3 of Temperature
Adjustment section.
Electronic Temperature Control Models
To set temperature of the freezer, use the buttons next to the
1
button. A setting of 0° to 2° F (-17° to -16° C) is recommended.
• Use the button to raise the temperature of the freezer section, or the to lower it.
• Press the
button to confirm the settings.
For Refrigerator
• Place thermometer in glass
of water in middle of unit
and continue with step 3
of Temperature Adjustment
section.
To set temperature of the fresh food section, use the buttons next to the
2
button. A setting of 38° to 40° F (3° to 4° C) is reommended.
• Use the button to raise the temperature of the fresh food section, or the to lower it.
• Press the
Allow 24 hours for temperatures to stabilize.
3
NOTE: If adjusting the temperature of an operational unit, only 5 to 8 hours is
required for temperatures to take effect.
button to confirm the settings.
7
Page 8
About Your Filtration System...
Water Filter Removal and Installation
WARNING
!
To avoid serious illness or death, do not use unit where water is unsafe or of unknown quality without adequate
disinfection before or after use of filter.
CAUTION
!
• Bypass cartridge DOES NOT filter water. Be sure to have replacement cartridge available when filter change is required.
• If water filtration system has been allowed to freeze, replace filter cartridge.
• If system has not been used for several months, and water has an unpleasant taste or odor, flush system by dispensing
2–3 glasses of water. If unpleasant taste or odor persists, change filter cartridge.
Initial Install of Water Filter
Remove blue bypass cap and
1
retain for later use.
Remove sealing label from
2
end of filter and insert into
filter head.
• Rotate gently clockwise until filter stops
and snap filter cover closed.
Reduce water spurts by flushing air from
3
system. Run water continuously
(approximately 2 minutes) through
dispenser until water runs steady.
• Additional flushing may be required in some households
where water is of poor quality.
I'm trying to dispense water to
flush the system. Where's the water?
During initial use, allow about a 1 to 2 minute delay to
allow internal water tank to fill.
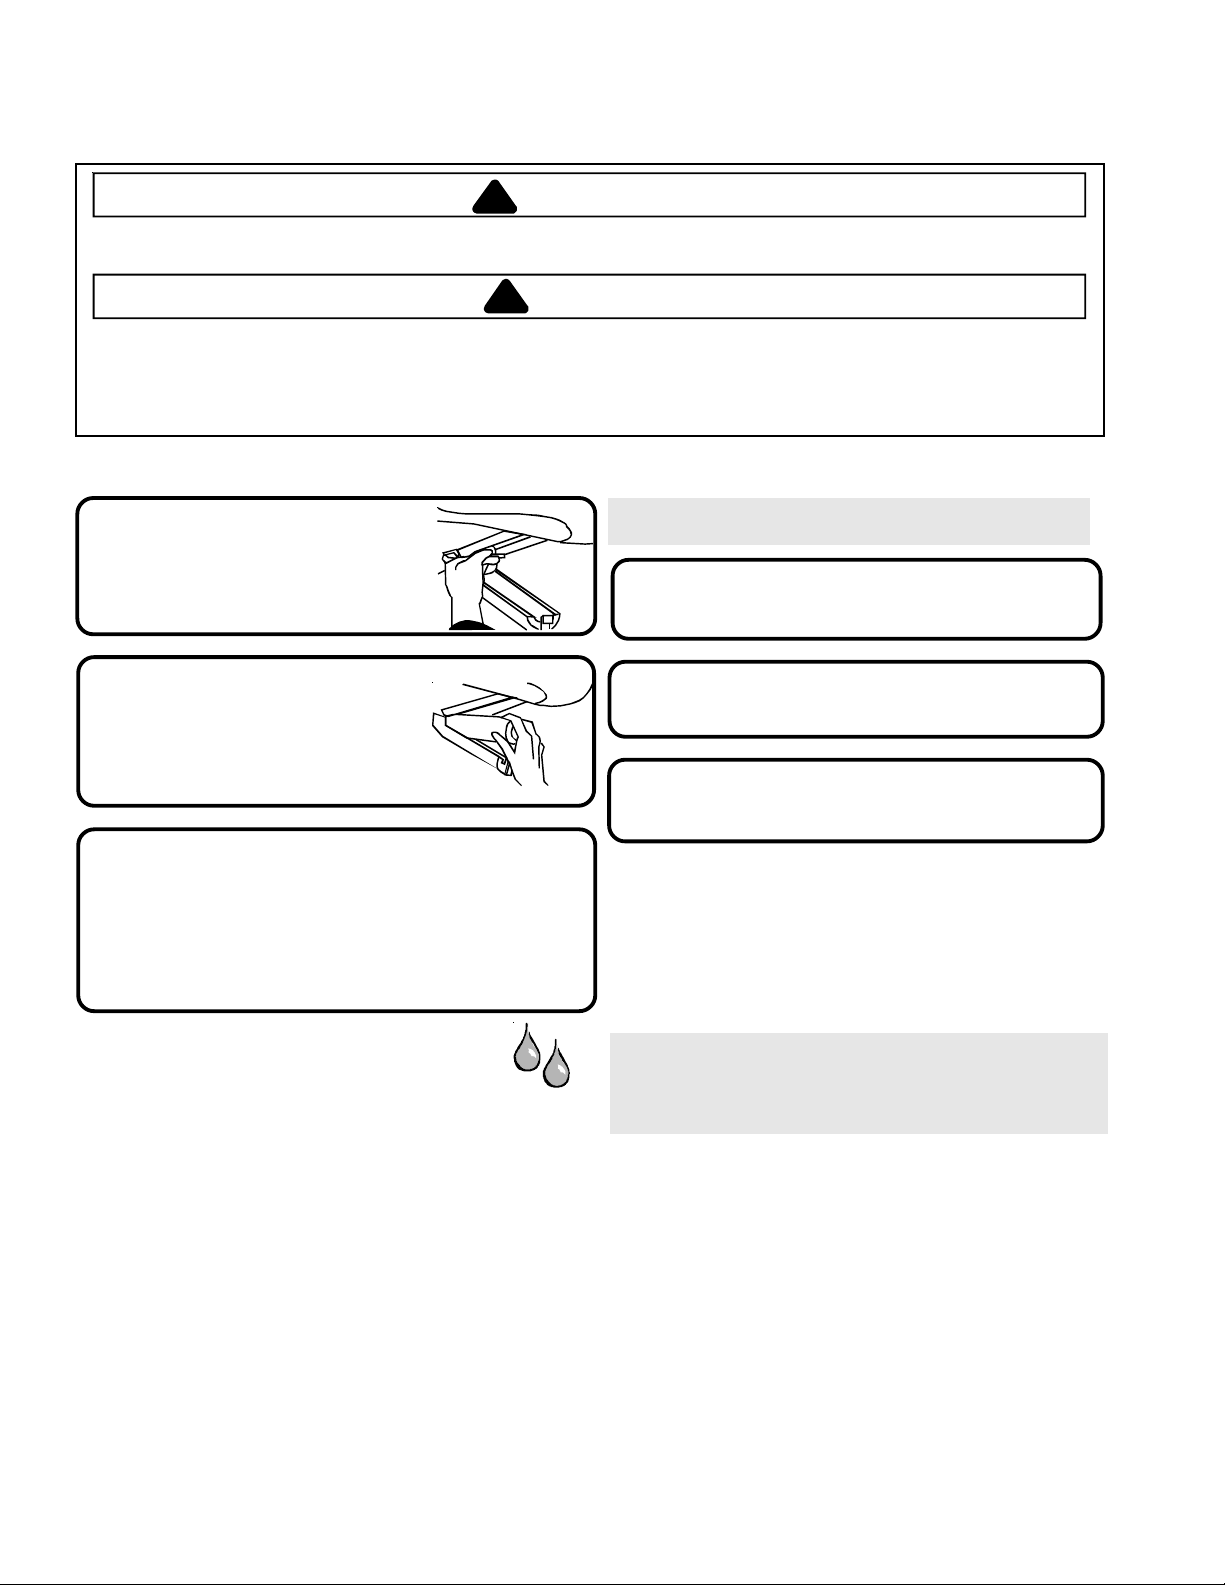
Replacing Water Filter
IMPORTANT: Air trapped in system may cause water and
cartridge to eject. Use caution when removing.
Turn filter counterclockwise until it
1
releases from filter head.
Drain water from filter into sink or toilet,
2
and dispose in normal household garbage.
Wipe up excess water in filter cover and
3
continue with installation steps 2 and 3.
When do I change the water filter?
Select dispenser models feature a water filter change indicator.
For instructions on how to operate and reset this feature, refer
to the dispenser features section in your manual.
For units without indicator feature, filter should be changed
approximately every 6 months.
IMPORTANT: Condition of water and amount used
determines life span of water filter cartridge. If water use is
high, or if water is of poor quality, replacement may need to
take place more often.
What if I choose not to use the water
filtration system?
Dispenser feature may be used without water filter cartridge.
If you choose this option, replace filter with blue bypass
cap.
How do I order a replacement filter
cartridge?
Replacement Water Filter cartridge model OWF51
is available through your dealers and servicers. Contact
your local distributor for more information.
8
Page 9
Fresh Food Features
What if These Features
are Different from Mine?
This book is intended to show the variety of features that are available in the product
line. If your refrigerator does not have all the options that are shown, many of these
options may be purchased by contacting your local distributor.
Interior Shelves
CAUTION
!
To avoid personal injury or property damage, observe the following:
• Confirm shelf is secure before placing items on shelf.
• Handle tempered glass shelves carefully. Shelves may break suddenly if nicked, scratched, or exposed to sudden
temperature change.
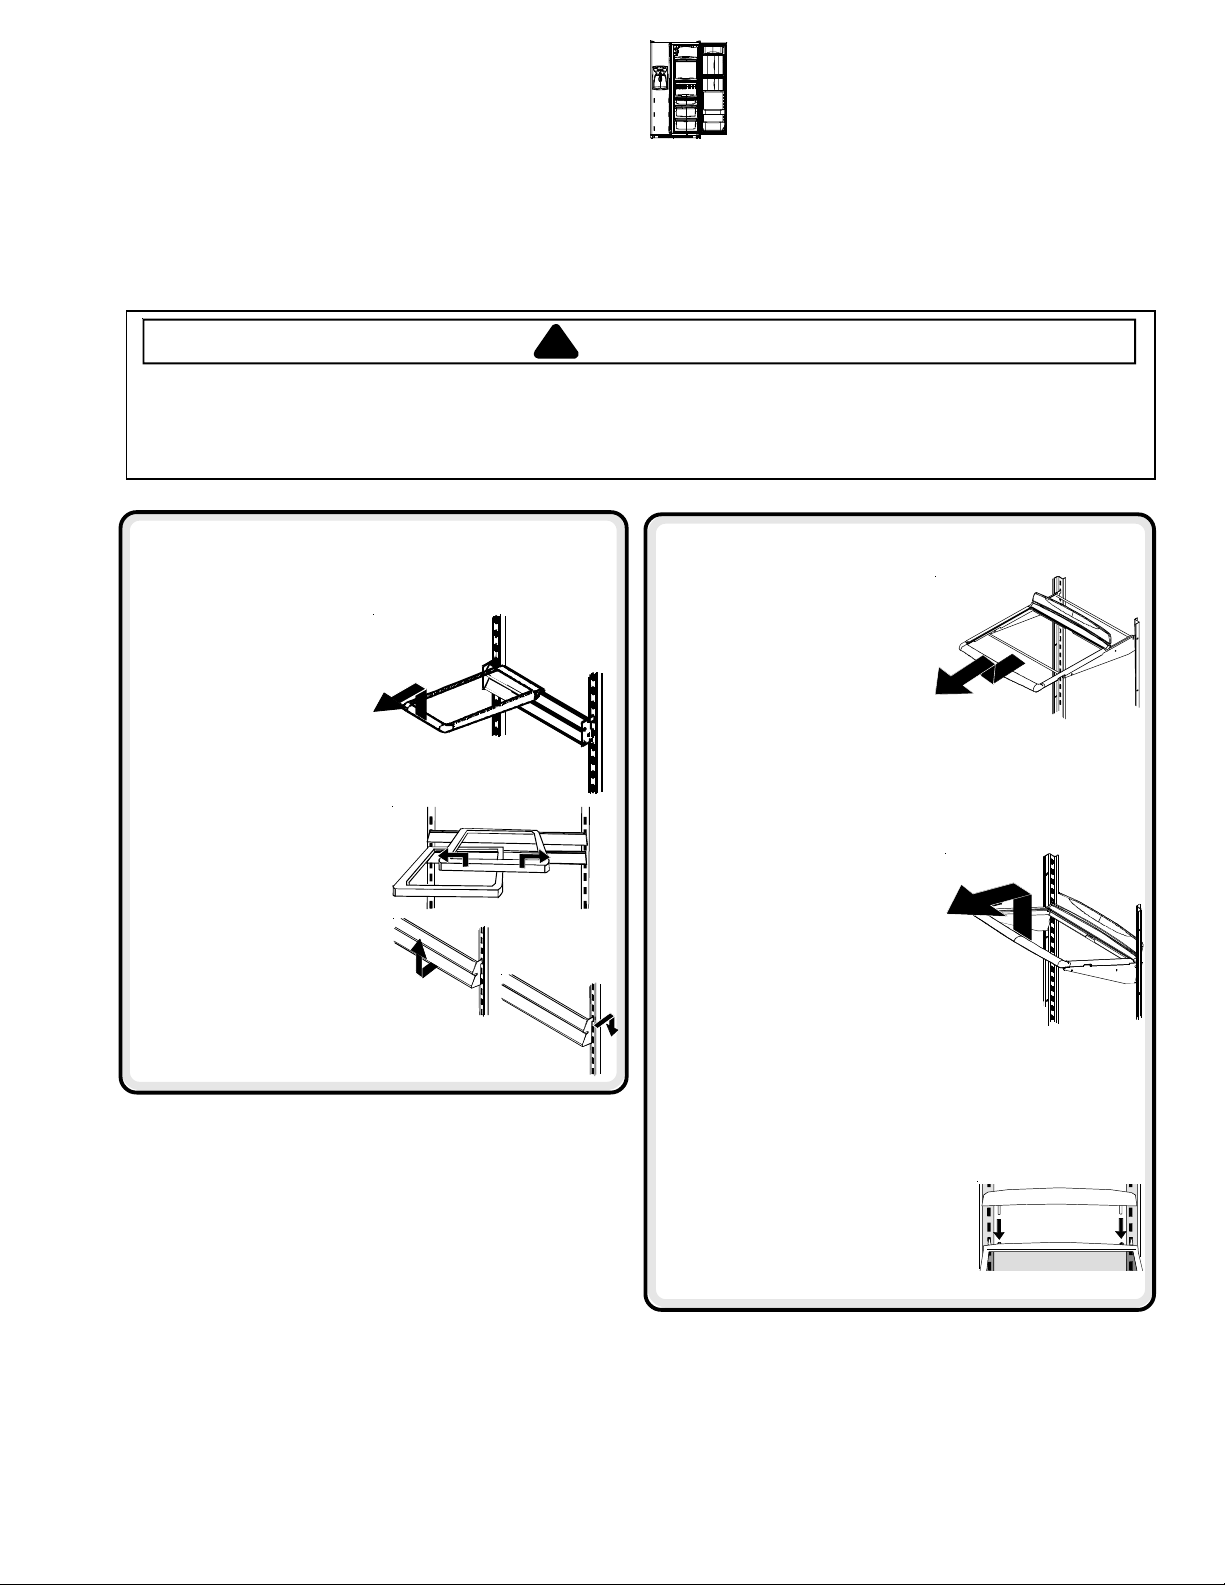
Side Glide™ Shelves (some models)
Side Glide™ shelves hook onto a rear
double-crossbar assembly. Shelves may be aligned side
by side to create a full width level surface,
or if attached to separate crossbars, the
shelves may slide left or right to
accommodate storage needs.
To remove and install shelf:
• To remove shelf, raise shelf
10° to unhook from double crossbar and lift out.
• To install, reverse above procedure.
Spillsaver™ Easy Glide™
(some models)
Spillsaver™ Easy Glide™
shelves feature the convenience
of easy cleaning with a pull-out
design to reach items in the
back. For ease of cleaning,
glass shelf may be removed by pulling to full
extension and lifting out of frame.
• To remove shelf and frame, see instructions for
Spillsaver™ stationary shelves.
To slide shelves:
• Lift front of shelf slightly
and slide left or right.
To remove and install
double-crossbar assembly:
• To remove, slide assembly
up to unhook from metal
track.
• To install, reverse above procedure.
Spillsaver™
Spillsaver™ stationary shelves
hold simple spills for easier
cleaning.
• To remove shelves, lift up and out.
• To install shelves, reverse above
procedure.
Rear Shelf Extensions
(some models)
Rear shelf extensions help prevent articles from falling
off the back of the shelf.
To remove and install shelf extension:
• To remove, pull extension straight
up from rear of shelf.
• To install, insert posts of the shelf
extension into holes in the shelf
frame.
9
Page 10
Fresh Food Features
A
Door Storage
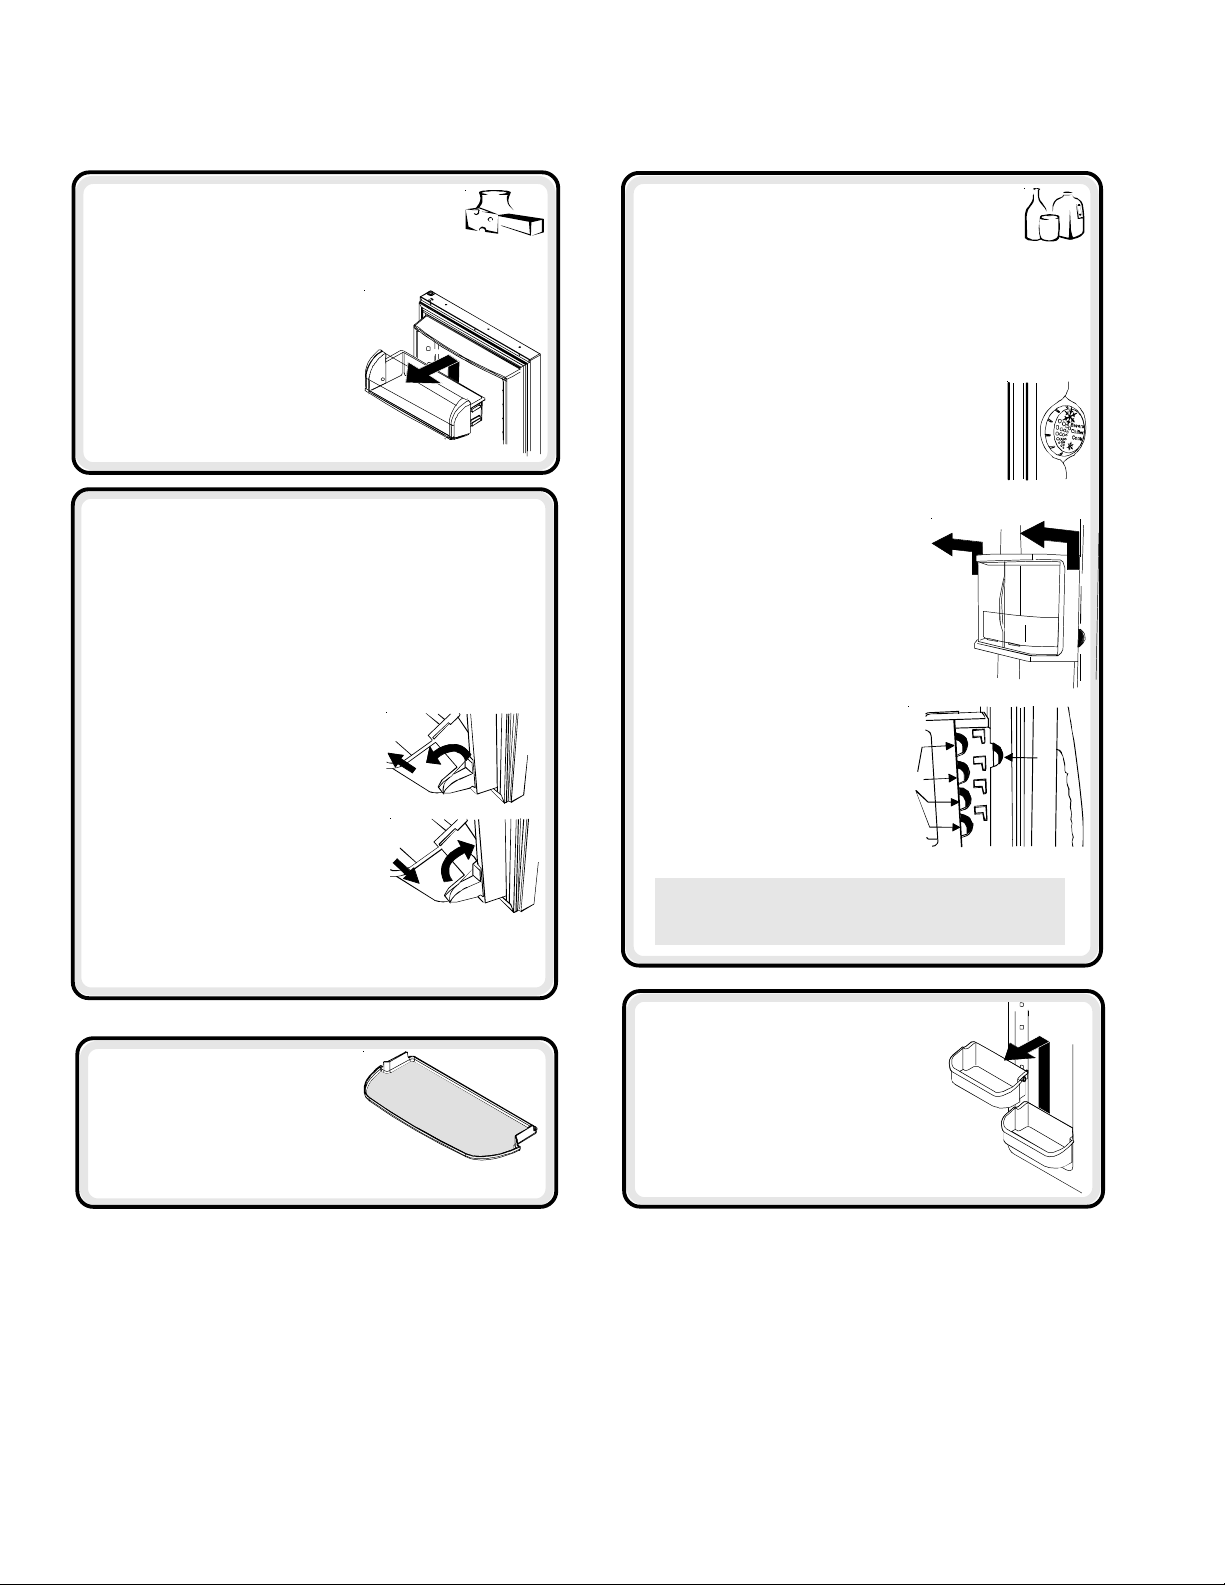
Dairy Center
The dairy center provides convenient storage
for items such as butter, yogurt, cheese, etc.
This compartment is an adjustable feature
located in the door. It can be moved to
several different locations to
accommodate storage needs.
• To remove, slide dairy center
up and pull straight out.
• To install, reverse above
procedure.
Tilt-Out Door Buckets
(some models)
The Tilt-Out Bucket assembly consists of a bucket and
frame, providing adjustable, convenient storage for
food items in door. The bucket assembly tilts forward
for easy access of items, and lifts out for ease in
cleaning and adjusting.
To remove and install bucket:
• To remove bucket, tip bucket
forward and pull straight out
to remove.
• To install bucket, slide bucket
into bucket frame and push
bucket upright.
Beverage Chiller™/
Mini-Chiller™
The Temperature-Controlled Beverage Chiller™ and
Temperature-Controlled Mini Beverage Chiller™ keep
beverages and other items up to 3°C colder than the
rest of the fresh food section. Air inlet allows air from
the freezer section to pass to Beverage Chiller™.
The Beverage Chiller™ control is located
on the left wall of fresh food section.
Control adjusts amount of air circulating in
Beverage Chiller™. Turn control toward the
large snowflake icon for colder temperature.
To remove and install Beverage Chiller™:
• If located directly above Chiller,
dairy center or door bucket may
need to be removed. Refer to
appropriate instructions and
remove item. Slide Beverage
Chiller™ assembly up and pull
straight out.
• To install, align one of the
Beverage Chiller™ cold air
intake holes
the two air inlets
liner. Push assembly down
onto door liner retainer until
it stops.
(some models)
(A)
with one of
(B)
in door
B
To adjust bucket frame:
• Remove bucket per above instructions.
• Lift frame off door support and place in desired
door location.
Grip Pads
The Grip Pads prevent objects
from sliding in the door bucket.
Grip Pads are removable and are
top-rack dishwasher safe for easy
cleaning.
IMPORTANT: Beverage Chiller™ will not operate
properly if air intake holes are not aligned with air
inlet in door liner.
Door Buckets
Door buckets adjust to meet
individual storage needs.
• To remove, slide bucket up and
pull straight out.
• To install, reverse above procedure.
10
Page 11
Drawers
Fresh Food Features
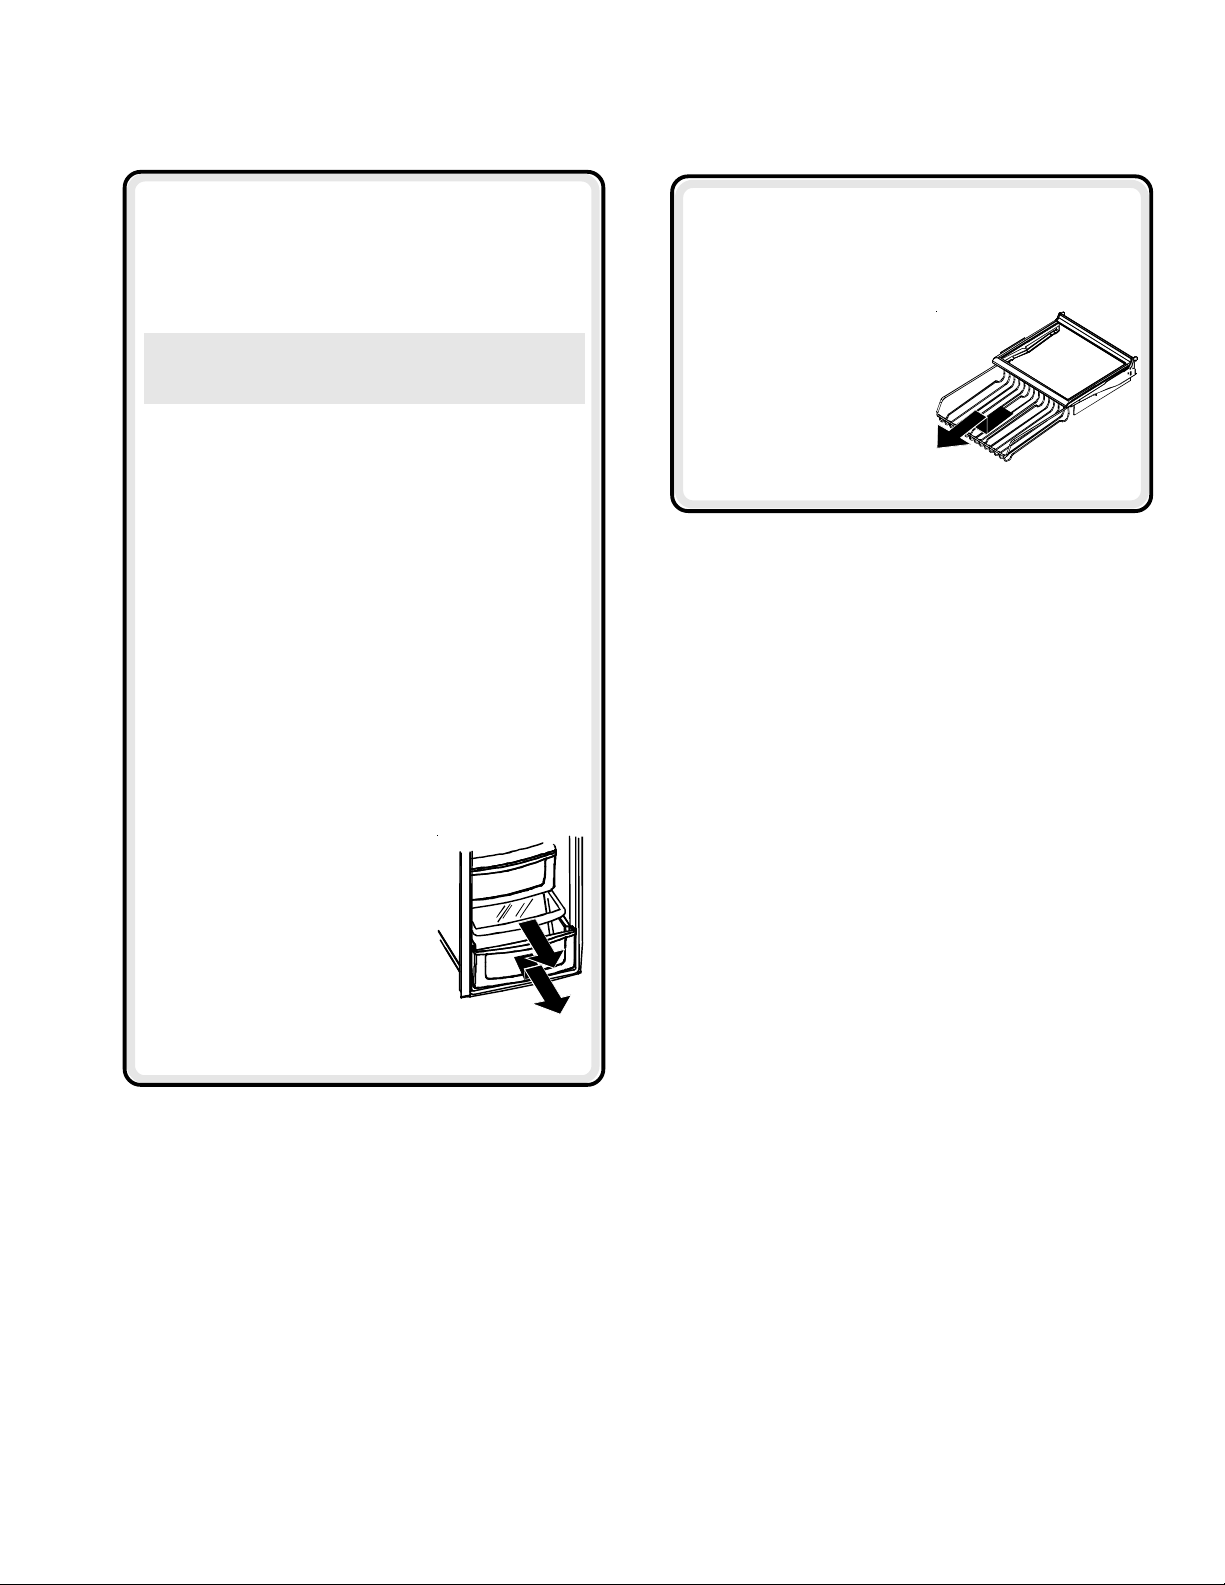
Deli/Crisper Drawer climate controlled
The Deli/Crisper system provides a drawer with a
variable temperature control that keeps the
compartment up to 3°C colder than refrigerator
temperature. This drawer can be used for deli storage
or additional produce storage.
NOTE: Cold air directed to the Deli/Crisper System
can decrease refrigerator temperature. Refrigerator
control may need to be adjusted.
Controls
Located on the wall to the left of the drawer, the
climate controls regulate the air temperature in the
cold
Deli/Crisper drawer. Set control level to
normal refrigerator temperature for produce with outer
coldest
skins. Use the
items.
setting for meats or other deli
to provide
Crisper Drawer climate controlled
Garden Fresh™ crisper keeps produce fresh longer
by providing an environment with adjustable humidity.
Controls
The Garden Fresh™ controls regulate the amount of
low
humidity in the crisper drawer. Use the
produce with outer skins. Use the
produce.
high
setting for
setting for leafy
Beverage Organizer™
(some models)
The Beverage Organizer™ slides out from underneath
the Spillsaver™ Easy Glide™ shelf. The Organizer
holds up to twelve 12-ounce beverage cans.
To remove and install Organizer:
• To remove, empty contents
of Organizer. Pull Organizer
forward to full extension
and lift front to release
from shelf rail. Pull
straight out to remove.
• To install, reverse above procedure.
To remove and install drawers:
• To remove drawer, pull drawer out
to full extension. Tilt up front of
drawer and pull straight out.
• To install, reverse above
procedure.
To remove and install crisper shelf:
• Lift off wall supports and remove.
• To install shelf, lower shelf onto wall supports
and push in until shelf is flush with rear wall.
11
Page 12

Freezer Features
What if These Features
are Different from Mine?
line. If your refrigerator does not have all the options that are shown, many of these
options may be purchased by contacting your local distributor.
Primary Features
To avoid property damage, observe the following:
• Do not force ice maker arm down or up.
• Do not place or store anything in ice storage bin.
Automatic Dispensing Ice Maker
This ice maker creates the ice used in the dispensing
system.
Using Ice Maker for the First Time
• Confirm ice bin is in place
and ice maker arm is down.
• After freezer section reaches
between -18° to -17° C, ice
maker fills with water and
begins operating.
•
Allow approximately 24 hours
after installation to receive first harvest of ice.
• Discard ice created within first 12 hours of
operation to verify system is flushed of impurities.
Operating Instructions
• Confirm ice bin is in place and ice maker arm is
down.
• After freezer section reaches -18° to -17° C, ice
maker fills with water and
begins operating. You will
have a complete harvest
of ice approximately every
3 hours.
• Stop ice production by
raising ice maker arm until
click is heard.
off
This book is intended to show the variety of features that are available in the product
• Ice maker will remain in the
is pushed down.
IMPORTANT: Ice Cream Shelf should not be
installed if ice maker arm is in “off” position
position until arm
CAUTION
!
Ice Cream Shelf
The Ice Cream Shelf provides a space for items to be
chilled or frozen quickly.
• To remove, lift Ice Cream Shelf
from ice bin rails and pull
straight out.
• To install, reverse above
procedure.
IMPORTANT: Ice Cream Shelf should not be
installed if ice maker arm is in “off” position
Ice Storage Bin
The ice storage bin is located below the automatic
dispensing ice maker.
To remove and install ice storage bin:
• To remove bin, remove Ice Cream
Shelf. Raise ice maker arm to
deactivate ice maker.
• Lift front of bin and pull out to its full extension. Lift up
front of bin and remove.
• To install, slide bin into rails below ice maker until
bin locks into place. Drop ice maker arm to activate
ice maker, and replace Ice Cream Shelf.
IMPORTANT: Ice bin must
be locked in proper place for
proper ice dispensing. If freezer
door does not close, bin is not
in proper location. Turn auger
driver as shown to properly align
ice bin with back of unit.
12
Page 13

Shelves
Freezer Features
Stor-Mor® System
Baskets slide out for easy access of items in back.
Shelves can be removed to meet individual storage
needs.
®
To remove and install Stor-Mor
• To remove, snap right side of
shelf from cabinet railing and
remove from wall mounting
clips.
• To install, reverse above procedure.
NOTE: Back of shelf must be flush with back of
cabinet to secure firmly in cabinet railing. Improper
alignment will cause shelf to slide.
To remove and install baskets:
• To remove, pull basket forward
to full extension. Lift front handle
to release basket from rails and
remove.
• To install, reverse above procedure.
shelf:
Fixed Freezer Shelf
To remove and install shelves:
• Remove shelf from wall
mounting clips and pull out
of left side mounting holes.
• To install, reverse above procedure.
Hanging Wire Shelf (some models)
Hanging wire shelf provides extra storage for ice cube
trays, boxed frozen foods, ice packs, etc.
To remove shelf:
• Pinch rung hook of hanging
wire shelf inward to release
hanging wire shelf from right
side of Stor-Mor
will swing downward.
• Press rung hook of hanging
wire shelf outward to remove
shelf from freezer section.
To install shelf:
• Perform above steps in reverse order.
®
shelf. Shelf
Door Storage
Door Buckets
• Refer to Fresh Food section for instructions.
Tilt-Out Door Buckets
(some models)
• Refer to Fresh Food section for instructions.
13
Page 14
Dispenser Features
Primary Features
Dispenser Light not shown
A light activates within the dispenser area at full power when dispensing ice or water.
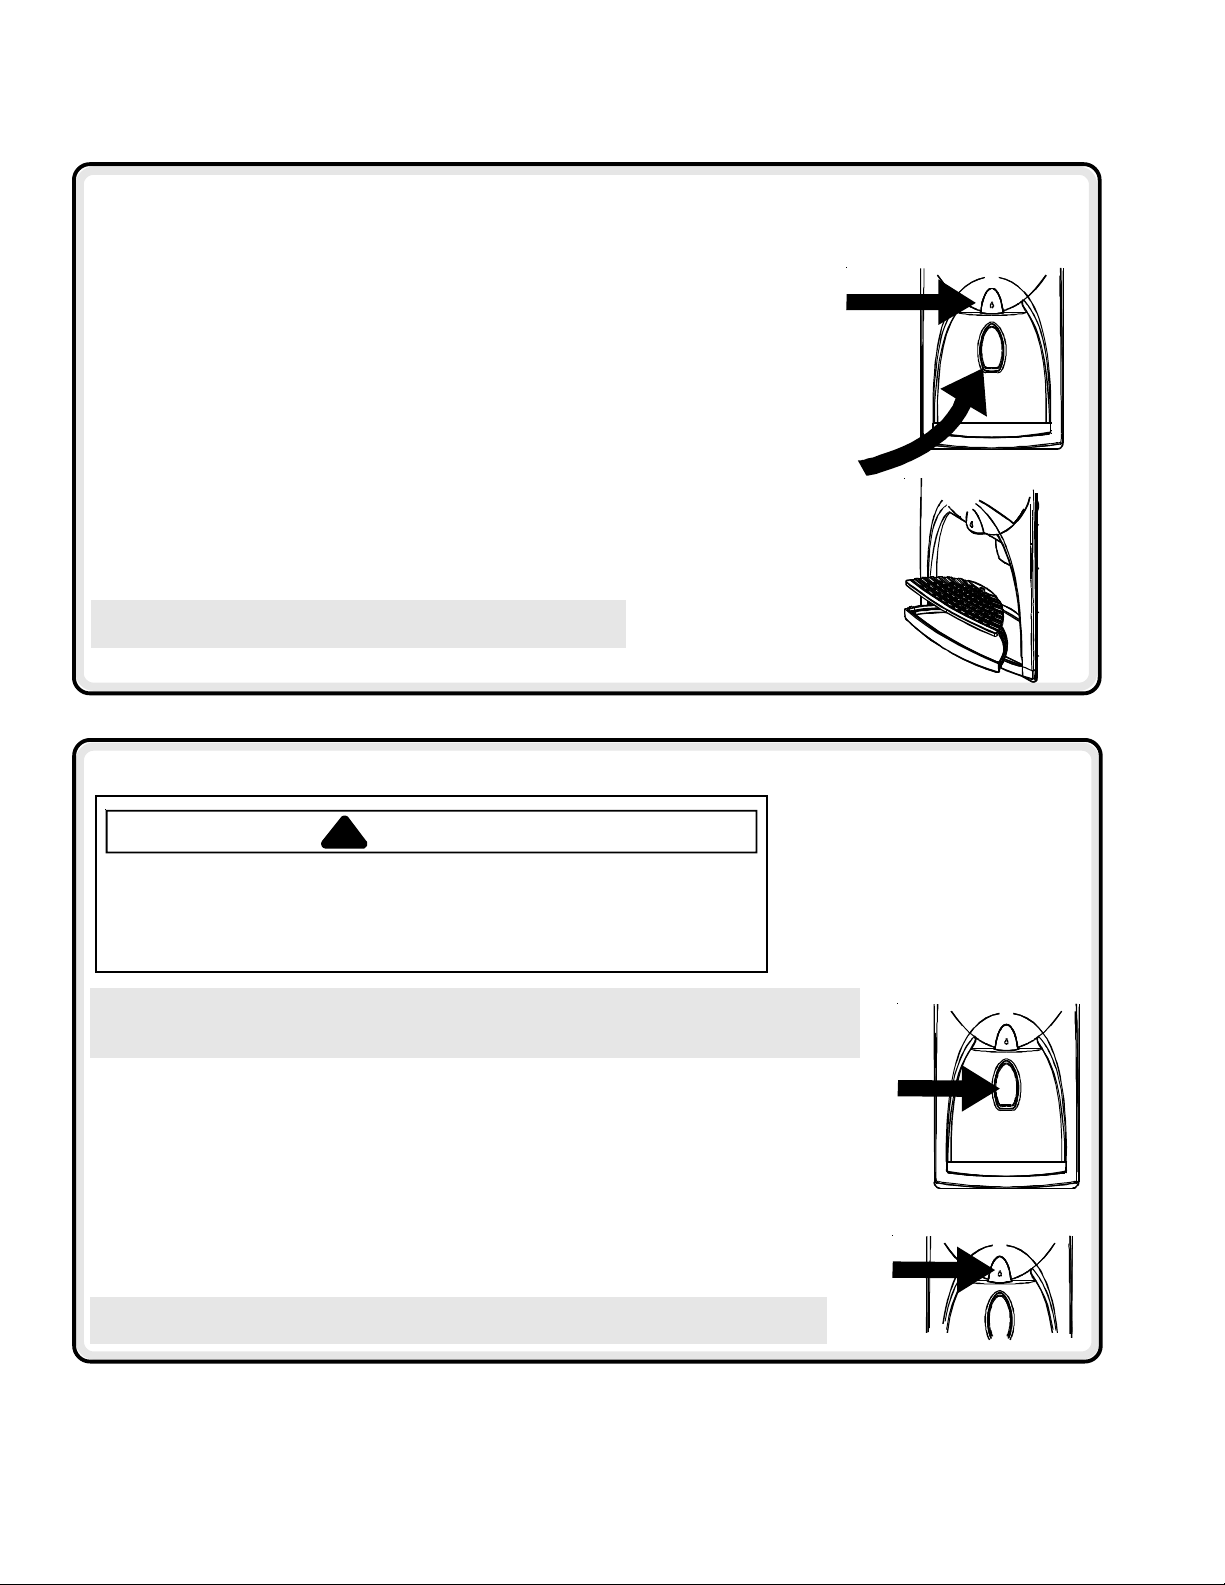
Front Fill Button (some models)
The Front Fill button works independently of the dispenser controls, providing an up-front
alternative to the dispenser pad for dispensing water. This feature is convenient for filling
large items that will not fit into the dispenser area (i.e. sport bottles, pitchers, large pans,
coffee pots).
This feature allows added convenience of dispensing ice and water simultaneously.
To use, choose your preferred ice mode from dispenser control panel. Press container
against dispenser pad while pressing the Front Fill button.
Dispenser Pad
The dispenser pad is located on the back wall of the dispensing area. When the dispenser
pad is pressed, the selection chosen on your dispenser control panel will dispense.
Removable Tray
The removable tray at the bottom of the dispenser area is designed to collect
small spills and may be easily removed for cleaning and emptying purposes.
IMPORTANT: Removable tray does not drain. Continuous water
running into tray will cause tray to overflow.
Water Dispenser Operation
CAUTION!
To avoid personal injury or property damage, observe following instructions:
• Do not put fingers, hands, or any foreign object into dispenser opening.
• Do not use sharp objects to break ice.
• Do not dispense ice directly into thin glass, fine china, or delicate crystal.
NOTE: During initial use of water dispenser, allow an approximate 1-2 minute delay in water
dispersal to allow internal water tank to fill. Discard first 10-14 containers of water after initially
connecting refrigerator to household water supply and extended periods of nonuse
To use dispenser pad:
• Choose water selection from dispenser control panel.
• Press sturdy, wide-mouthed container against dispenser pad.
• Release pressure on dispenser pad to stop water from dispensing. A small amount of
water may continue to dispense, and collect in dispenser tray. Large spills should be wiped dry.
To use Front Fill button (some models):
• Align container under Front Fill button using water droplet as guide.
• Press and hold Front Fill button.
• Release button when desired fill is reached. A small amount of water may continue
to dispense, and collect in dispenser tray. Large spills should be wiped dry.
NOTE: If water dispenser is active for more than 5 minutes, an automatic lock out sensor
will shut down power to dispenser area. See Automatic Lock Out for further information.
.
14
Page 15

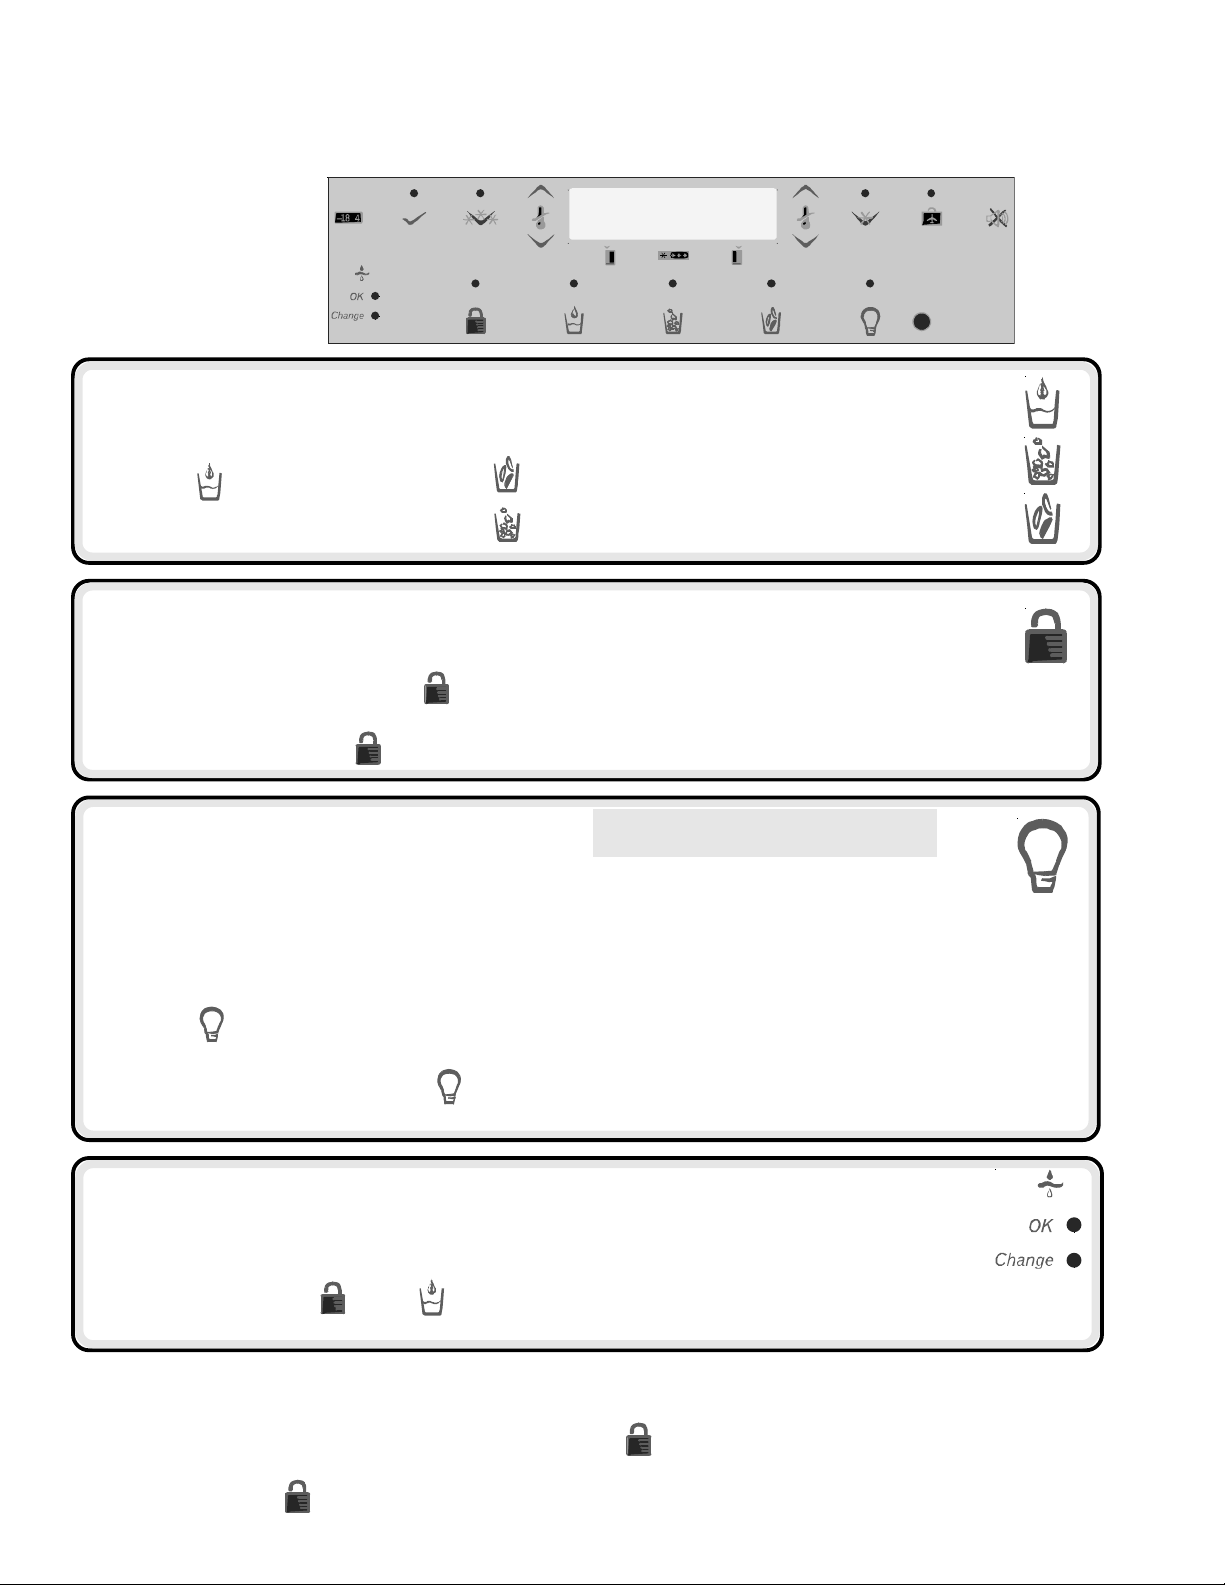
Dispenser Features
Control Features
(Five button control)
Ice Dispenser Operation
To dispense ice:
Cubed
or
• Select
indicator light above button shows mode selection.
• Press container against dispenser pad. When dispensing crushed ice, hold container as close
to chute as possible to reduce spraying. Selection mode may not be changed while ice dispenser
is in operation.
NOTE: If dispenser is active for more than 3 minutes, an automatic lock out sensor will shut down power
to dispenser area. See Automatic Lock Out for further information.
Crushed
ice mode by pushing button on dispenser control panel. A green
Dispenser Lock
This feature prevents ice or water from being dispensed.
To lock and unlock dispenser:
• To lock dispenser, press and hold
3 seconds. A green indicator light above button confirms
dispenser is locked.
• To unlock dispenser, hold
Green indicator light above button will go out.
Dispenser Lock
Dispenser Lock
button for 3 seconds.
button for
What is the Automatic Lock Out feature?
The Automatic Lock Out feature shuts down power to the
water and ice dispenser when either dispenser has run
continuously for approximately 3 minutes. If this mode goes
into effect, the green light will activate above the Dispenser
Lock button.
To unlock dispenser:
• To unlock dispenser, hold Dispenser Lock button for 3
seconds. Green indicator light above button will go out.
Filter Status Indicator Light
The Filter Status Indicator Light serves as a reminder to replace the water filter. A green light indicates that the
filter is in good condition. A red light indicates the filter should be changed. Once light turns red, it will remain
red until function is reset.
To reset indicator:
• Press and hold both
Indicator Light will flash 3 times when the function has successfully reset.
Dispenser Lock
and
Auto Light
buttons simultaneously for 4 seconds. The green Filter Status
Auto Light
The
Auto Light
detects that the light levels in room are low.
To activate and deactivate
• To activate, press
indicator light above button displays to show that sensor is active.
• To deactivate, press
function offers the ability to activate the dispenser light at half-power when the
Auto Light
Auto Light
Auto Light
:
button located on control panel. A green
button. Green indicator light will go out.
NOTE: Dispenser light will operate whether
or not Auto Light is selected.
Light Sensor
Sabbath Mode (some models)
This mode is intended to deactivate power to the LED and dispenser lights,
while allowing the controls to remain operational.
To activate Sabbath Mode:
• Press and hold both
for 3 to 4 seconds. After 3 to 4 seconds, the LED and dispenser lights will turn
off. Dispenser light will not activate during dispensing while in this mode.
To deactivate Sabbath Mode:
• Press and hold both
the LED and dispenser lights will activate.
Dispenser Lock
Dispenser Lock
and
and
Auto Light
Auto Light
buttons simultaneously
buttons simultaneously for 3 to 4 seconds. After 3 to 4 seconds,
15
+
NOTE: In the event that power is
interrupted while the Sabbath Mode
is active, the control will remain in
Sabbath Mode when power returns.
Page 16
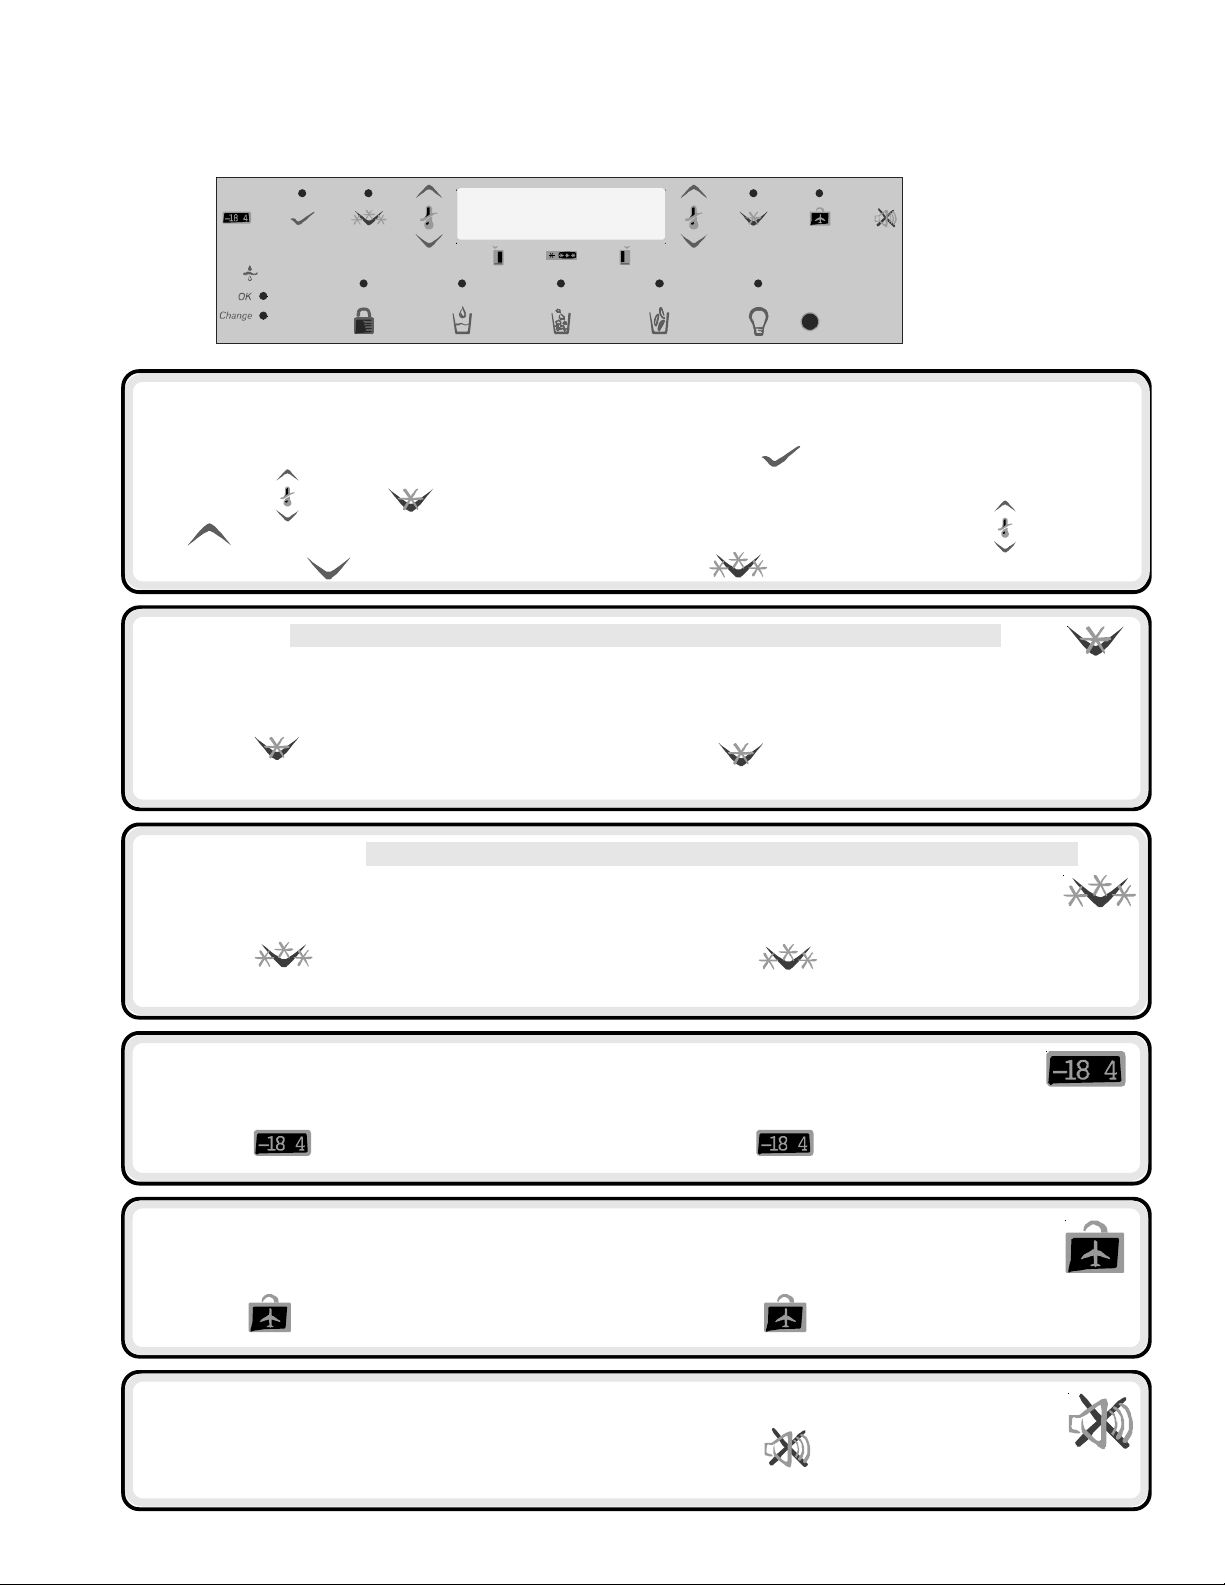
Dispenser Features
Control Features
(Electronic control)
Water and Ice Dispensing (main activator)
The water and ice dispensing functions work independently of each other.
To dispense water:
To dispense ice:
• Press the
button
• Press water activator
• Press the
• Press the
button for crescent ice.
button for crushed ice.
Dispenser Lock
This feature prevents ice or water from being dispensed.
To lock and unlock dispenser:
• To lock dispenser, press and hold the
is locked.
• To unlock dispenser, hold the button for 3 seconds. Green indicator light above button will go out.
Light Function
The Light function offers offers two setting: OFF and AUTO.
The OFF setting allows the light to function only as a dispenser cavity light.
The AUTO setting allows the
the cavity light accordingly. When the sensor registers lower light levels (night time, darkened kitchen), the cavity light will
respond at 50% power. When the sensor registers high light levels (lighted kitchen, direct sunlight), the cavity light will not
activate.
To deactivate the AUTO setting:
• Press the button located on control panel. When the green indicator light above button display is off, the light will
function only when dispensing ice or water.
• To activate the AUTO setting, press the button. When the green indicator light above the button display is on, the
cavity dispenser light will use the AUTO setting.
SENSOR
button for 3 seconds. A green indicator light above button confirms dispenser
NOTE: Dispenser light will operate at full
power when ice or water functions are in use.
to measure the surrounding light levels and adjust the power of
Filter Status Indicator Light
The Filter Status Indicator Light serves as a reminder to replace the water filter. A green light indicates that the
filter is in good condition. A red light indicates the filter should be changed. Once light turns red, it will remain red
until function is reset.
To reset indicator:
• Press and hold both the and the buttons simultaneously for 4 seconds. The green Filter Status Indicator Light
will flash 3 times when the function has successfully reset.
What is the Automatic Lock Out feature?
The Automatic Lock Out feature shuts down power to the water and ice dispenser when either dispenser has run continuously for approximately
2 minutes. If this mode goes into effect, the green light will activate above the button.
To unlock dispenser:
• To unlock dispenser, hold
button for 3 seconds. Green indicator light above button will go out.
16
Page 17
Dispenser Features
Temperature Keys
These keys will lower or raise the freezer or fresh food compartment temperature.
To set the fresh food temperature:
• Press the button to confirm the setting.
Control Features continued
(Electronic control)
• Locate the
button to raise the temperature of the fresh food
section, or the
Max Cool
This function causes the fresh food temperature to drop to the Minimum Refrigerator Temperature Setting preset
by the control. This setting remains in effect for approximately 10 hours.
To activate Max Cool:
• Press the
button will indicate active status.
Max Freeze
This function causes the freezer temperature to drop to the Minimum Freezer Temperature Setting preset by
the control. This setting remains in effect for approximately 24 hours.
To activate Max Freeze:
• Press the
button will indicate active status.
next to the button. Use the
to lower it.
NOTE: The temperature setting cannot be changed if Max Cool or Max Freeze setting is active.
button. The green light above the
NOTE: The temperature setting cannot be changed if Max Cool or Max Freeze setting is active.
button. The green light above the
To set the freezer temperature:
• Repeat the above instructions with the
the
To deactivate Max Cool:
• Press the
turn off.
To deactivate Max Freeze:
• Press the
button will go out.
button on the display.
button. The green light above the button will
button. The green light above the
buttons next to
Display On/Off
The Display On/Off switch controls power to the LED display.
To deactivate display:
• Press the button. The display will turn off.
To reactivate display:
• Press the button. The display will turn back on.
Vacation Mode
This key, if enabled, causes less frequent defrost cycles. This conserves energy.
To place refrigerator into Vacation Mode:
• Press the
button.
Alarm Off
This key is used to turn the HI TEMP Warning Indicator and
audio alarm, as well as the OPEN DOOR audio
alarm off.
To deactivate Vacation Mode:
• Press the
To turn the alarm off:
• Press the button.
17
button, or open either refrigerator door.
Page 18

Dispenser Features
Hidden Control Features (Electronic Control)
Sabbath Mode
This mode is intended to deactivate power to the LED and dispenser lights, while allowing the
controls to remain operational. No visual or audio alarms will be available while in this mode.
To activate Sabbath Mode:
• Press and hold both the
simultaneously for 3 seconds. After 3 seconds, the
LED and dispenser lights will turn off. Dispenser
light will not activate during dispensing while in
this mode.
and buttons
NOTE: In the event that power is interrupted while the Sabbath Mode is active, the control will remain in
Sabbath Mode when power returns.
Auto Display
The AUTO Display controls the illumination of the LED display based on the light readings received from the
In AUTO mode, if the
periods. In ON mode, the display will have only one illumination setting and will not change due to light levels.
To set the power level of the display:
SENSOR
indicates low light levels, the display will be dimmer than if displaying during well-lit
To deactivate Sabbath Mode:
• Press and hold both
seconds. After 3 seconds, the LED and dispenser lights will
activate.
and buttons simultaneously for 3
+
SENSOR
.
• Press and hold both the
the display by using
• Use the refrigerator button to scroll through the display states.
• Activate the chosen setting by pressing the
Temperature Conversion Mode
This mode is available to change the Temperature
Display between Fahrenheit and Celsius.
button and the freezer button for 3 seconds. The current active state will show in
O for on, AL for auto.
button.
To change temperature reading:
• Press the
for 3 seconds. Pressing the same button combination will allow
the user to toggle between the two selections .
and freezer buttons simultaneously
Hidden Lockout for Upper Keypad
The purpose of this mode is to prevent tampering with the upper set of dispenser controls.
This includes the Display On/Off , Max Freeze, Max Cool, Vacation Mode, and Temperature Set
functions.
To activate Hidden Dispenser Lockout:
• Press the
3 seconds.
and buttons simultaneously for
To deactivate Hidden Dispenser Lockout:
• Press the and buttons simultaneously
for 3 seconds.
° F
° C
+
ON/OFF Function
The ON/OFF function turns off cooling to the
fresh food and freezer sections.
To turn the unit off:
• Press the freezer button until the readout registers
beyond the maximum allowable freezer temperature. At
-- ---- --
this point, the LED displays:
• Press the button to confirm the selection.
-- --
-- ---- --
WARNING!
To avoid electrical shock which can cause severe personal
injury or death, do not perform maintenance or service on
refrigerator unless unit is unplugged.
To reactivate the unit:
• Press the freezer button.
• Press the
18
button to confirm the selection.
Page 19

How to Clean Your Unit
WARNING
!
To avoid electrical shock which can cause severe personal injury or death,
disconnect power to refrigerator before cleaning. After cleaning, connect power.
CAUTION!
To avoid personal injury or property damage:
• Read and follow manufacturer's directions for all cleaning products.
• Do not place buckets, shelves, or accessories in dishwasher. Cracking or
warping of accessories may result.
• Handle tempered glass shelves carefully. Shelves may break suddenly if
nicked, scratched, or exposed to sudden temperature change.
• Protect soft vinyl or other flooring with cardboard, rugs, or other protective
material.
Hints and Care
What cleaners are
recommended
for my stainless steel
product?
Your manufacturer has a cleaner
available for purchase (Part #
31960801). Please contact your local
distributor for purchase.
IMPORTANT: Damage to stainless
steel finish due to improper use of
cleaning products or nonrecommended productions is not
covered under any warranty.
General
1. Wash surfaces with a warm water and baking soda solution. Use a soft clean
cloth to clean surfaces.
2. Rinse surfaces with warm water. Dry surfaces with a soft, clean cloth.
Adhesives
1. Remove glue residue by rubbing toothpaste into adhesive with fingers until
adhesive loosens.
2. Rinse surface with warm water. Dry surface with a soft, clean cloth.
Door Gaskets
1. Keep gaskets clean at all times. Clean door gaskets thoroughly every 3 months
according to “General” instructions.
Condenser Coils
Clean condenser coil every 3 months to ensure maximum performance of
refrigerator. Accumulated dust and lint may cause the following:
• reduced cooling performance
• increased energy usage
• in extreme cases, premature compressor failure
1. Remove toe grille and bottom hinge covers as
shown right.
2. Clean front surface of condenser coil with a vacuum cleaner hose nozzle.
3. Replace toe grille by inserting clips in holes and snapping in. Snap bottom
hinge covers over bottom hinges.
Glass Shelves
Remove shelf by lifting front, releasing hooks from metal track then pulling out.
Place shelf on a towel. Allow shelf to adjust to room temperature before cleaning.
Clean crevices by completing the following steps:
1. Dilute mild detergent and brush solution into crevices using a plastic bristle
brush. Let set for 5 minutes.
2. Spray warm water into crevices using faucet spray attachment.
3. Dry shelf thoroughly and replace shelf by inserting hooks into metal track and
lowering front.
How do I remove
an odor from my
refrigerator?
1. Remove all food and disconnect power
to refrigerator.
2. Clean all interior surfaces including
ceiling, floor, and walls according to
“General” instructions. Pay special
attention to corners, crevices, and
grooves. Include all drawers, shelves,
and gaskets.
3. Connect power to refrigerator and return
food to refrigerator. Wash and dry all
bottles, containers and jars. Wrap foods
in tightly sealed containers to prevent
further odor. After 24 hours, check if
odor was eliminated.
Complete the following steps if odor was not
eliminated.
4. Complete steps 1–2.
5. Place garden fresh crispers on top shelf
of refrigerator section. Pack refrigerator
and freezer
crumpled sheets of black and white
newspaper.
6. Place charcoal briquettes randomly
throughout newspaper.
7. Close doors and let stand 24–48 hours.
8. Remove charcoal briquettes and
newspapers.
9. Complete steps 2–3.
If odor was still not eliminated, contact your
local retailer for assistance.
sections including doors with
19
Page 20
Hints and Care
How to Get the
$
Most Out of
Your Energy
Dollar
This refrigerator is designed to be one
of the most energy efficient
refrigerators available. Reduce energy
use by observing the following.
• Operate in normal household
temperatures of 16° to 43°C away
from heat sources and direct
sunlight.
• Set refrigerator, freezer, and Chiller
• Keep freezer section full.
• Keep door gaskets clean and
• Keep condenser coils clean.
™
system controls no colder
Fresh
than necessary.
pliable. Replace gaskets if worn.
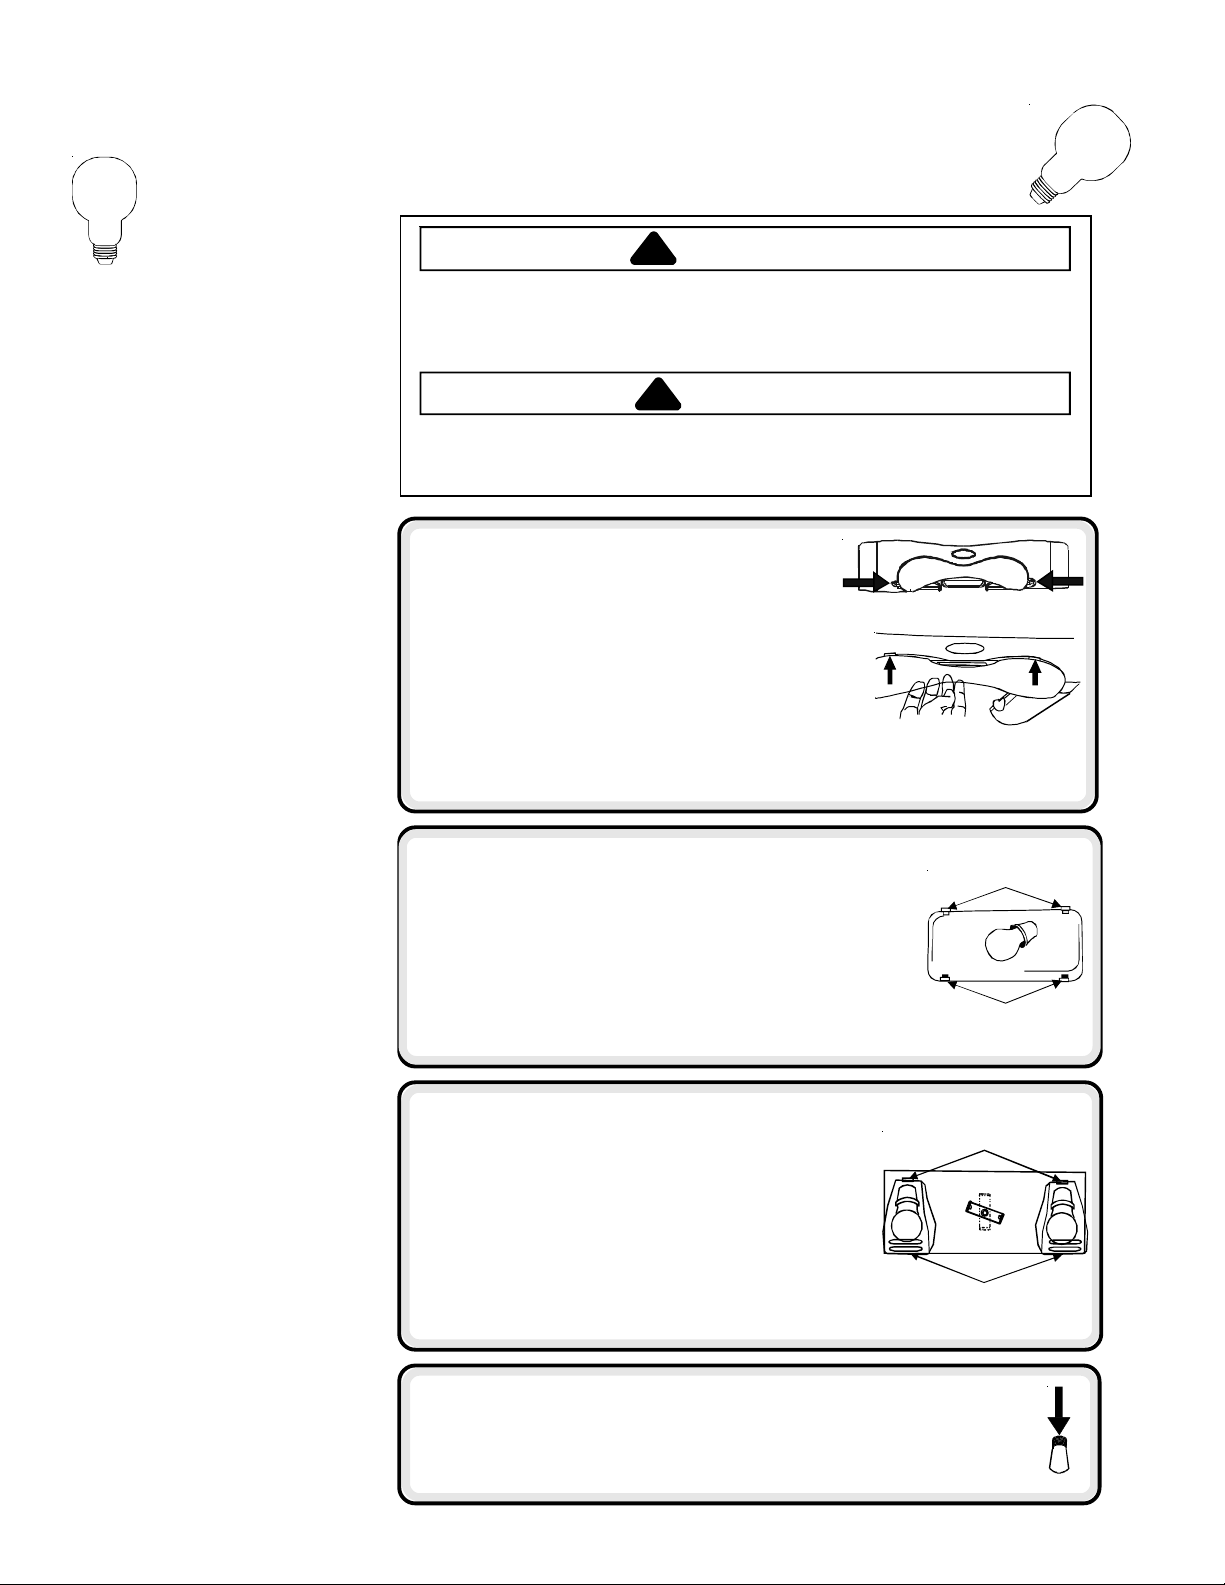
How to Remove and Replace Light Bulbs
WARNING
!
To avoid electrical shock which can cause severe personal injury or death,
disconnect power to refrigerator before replacing light bulb. If unable to
disconnet power by unplugging power cord then remove the fuse at mains.
After replacing light bulb, connect power.
CAUTION!
To avoid personal injury or property damage, observe the following:
• Allow light bulb to cool.
• Wear gloves when replacing light bulb.
Upper fresh food section
1. Locate finger gaps on each side of clear light
shield. Insert fingers and press in on each side
of shield. Pull shield down and remove.
2. Remove light bulbs.
3. Replace with appliance bulbs, type Krypton E27,
no greater than 25 watts.
4. Replace light bulb cover by inserting front tabs of
light shield into holes in liner directly in front of light assembly.
5. Snap back of light cover into place.
Lower fresh food section and
Non-dispensing model freezer section
1. Pinch bottom tabs
out.
2. Remove light bulb.
3. Replace with appliance bulbs, type Krypton E27,
no greater than 25 watts.
4. Insert top tabs
snap bottom portion over light assembly.
(A)
on light cover and pull straight
(B)
of light cover into refrigerator liner and
B
A
Dispensing model freezer section
1. Remove ice bin by lifting front of bin and pulling out.
2. Remove light bulb cover by pinching top tab
pulling cover out of liner.
3. Replace with appliance bulbs, type Krypton E27,
no greater than 25 watts.
4. Insert bottom tab
top portion over light assembly.
5. Replace ice bin by sliding in until bin locks into place.
(B)
of light cover into liner and snap
(A)
and
A
B
Ice ’N Water dispenser
1. Locate light bulb inside top edge of dispenser frame. Unscrew to remove.
2. Replace bulbs with a 230/240VAC bulb no greater than 12 watts. Extra
light bulbs are provided in crisper due to local unavailability.
20
Page 21
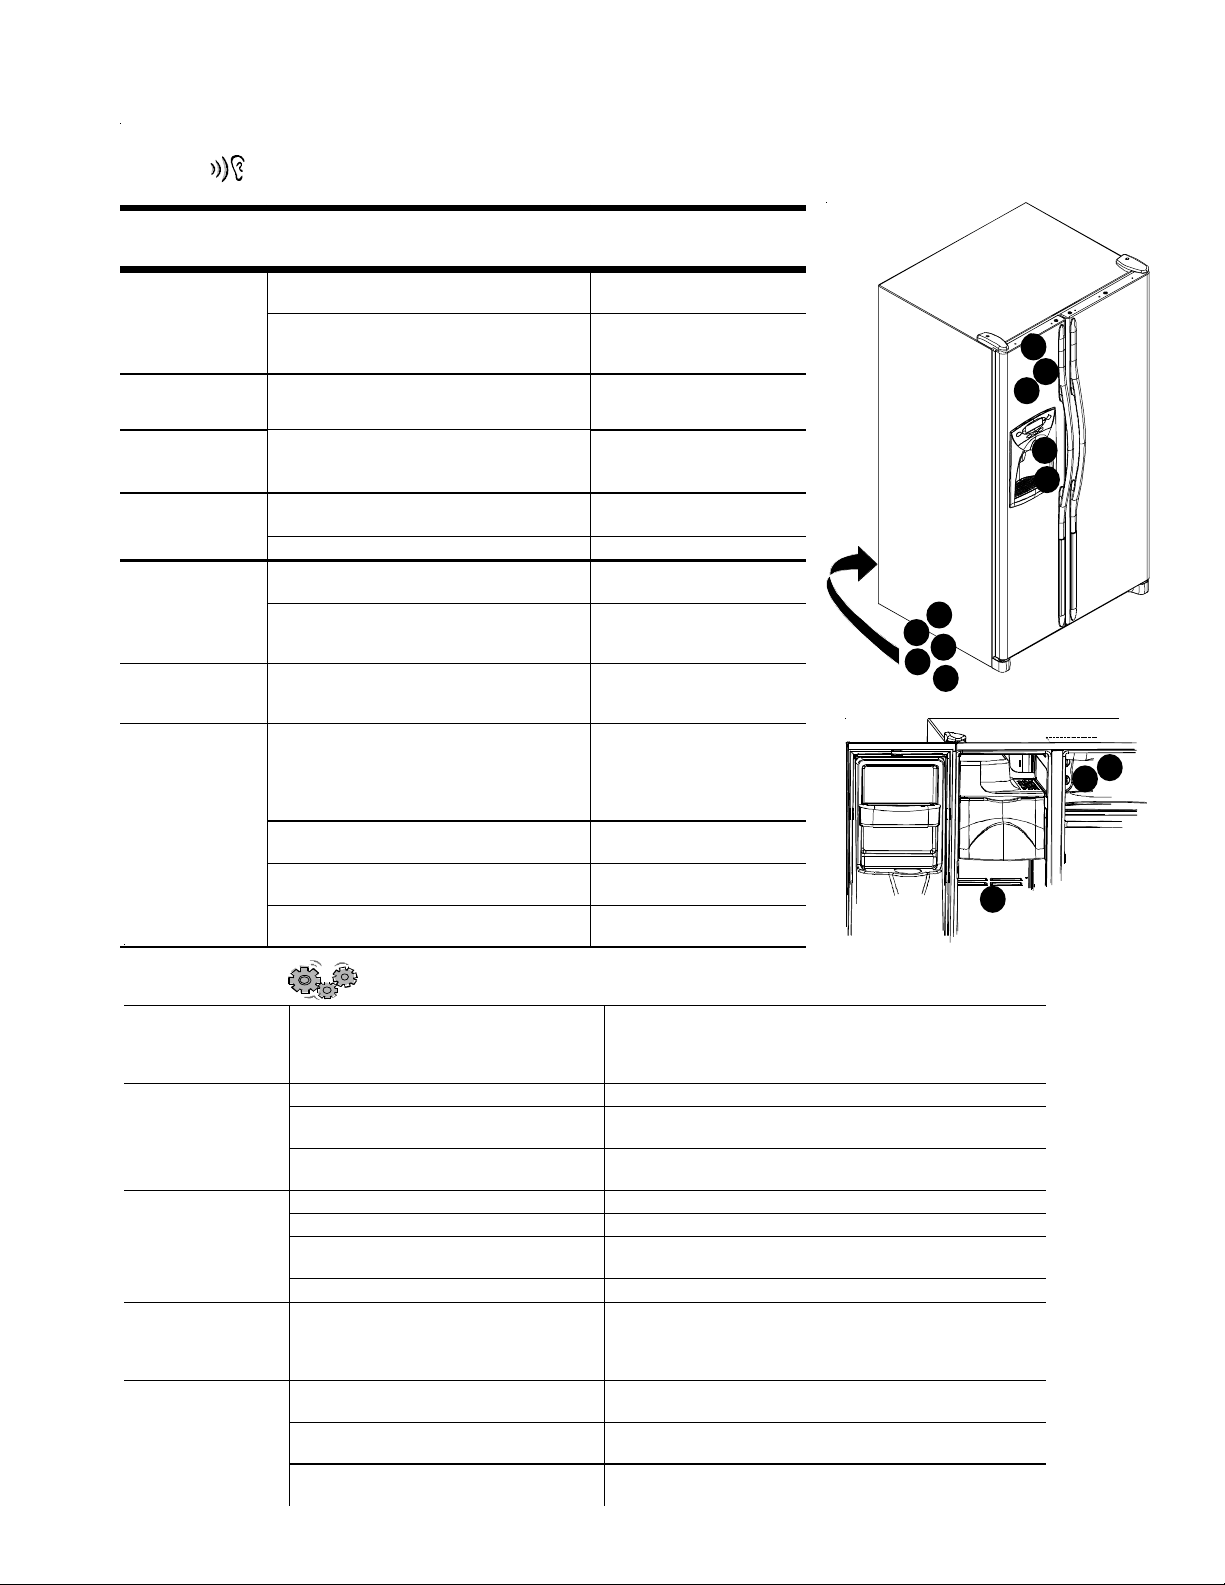
Before Calling Service
Today’s refrigerators have new features and are more energy efficient. Foam insulation is very energy efficient and has
NOISE
TOPIC POSSIBLE CAUSE SOLUTION
excellent insulating capabilities, however, foam insulation is not as sound absorbent. As a result, certain sounds may be
unfamiliar. In time, these sounds will become familiar. Please refer to this information before calling service.
Clicking
Air rushing or
whirring
Gurgling or
boiling sound
Thumping
Buzzing Ice maker water valve
Humming
Freezer control
stopping compressor.
Defrost timer
electric clock and snaps in and out
of defrost cycle.
Freezer fan
make this noise while operating.
Evaporator
refrigerant makes this noise when flowing.
Ice cubes from ice maker(some models)
drop into ice bucket
Dispenser ice chute
Compressor
while running.
Refrigerator is not level.
models) buzzes when ice m aker fills
with water.
Ice maker
water connection.
Ice auger
auger agitates ice during dispensing.
Compresser
hum while operating.
Solenoid valve
chute door.
(A)
clicks when starting or
(B)
sounds like an
(C)
and condenser fan
(E)
and heat exchanger
(I)
makes a pulsating sound
(K)
is in the ‘on’ position without
(L)
(some models) hums as
(I)
can make a high pitched
(M)
operating ice
OPERATION
Freezer control
and lights are on,
but compressor
is not operating.
Deli/Crisper
system
temperature
is too warm
Refrigerator does
not ope rate
Refrigerator still
won’t operate
Fresh f ood
temperature is
too c old
Refrigerator is in defrost mode. Normal operation Wait 40 minutes to see if refrigerator
Control settings are too low. See sectio n on Deli/Crisper system to adjust co ntrols.
Freezer co ntrols are set too low. See co ntrols section in Owner’s Manua l on how to adjust
Drawer is improperly positioned. See sectio n on Deli/Crisp er system to verify drawer
Refrigerator is not plugge d in. Plug in unit.
Freezer co ntrol is not o n. See sectio n on controls in your Owner’s Manual.
Fuse is blown, or circuit breaker needs
to be reset.
Power o utage has occurred Call loca l power company listi ng to report o utage.
Unit is malfunctio ning. Unplug refrigerator and transfer food to another unit. If
Condenser coils are dirty. Clean according to cleaning i nstructions in your
Refrigerator or freezer controls are set
too high.
Beverage Chiller™ (some models) is
improperly positioned.
Normal operation
Normal operation
(D)
Normal operation
(F)
Normal operation
(G)
.
(H)
closing. Normal operation
(J)
hookup (some
Normal operation
Normal operation Vibrating noise
Installation
See
Instructions
on how to level your unit.
Normal operation
Stop sound by raising ice
maker arm to ‘off’ position.
See
Automatic Ice Maker
section in your owner’s
manual for details.
Normal operation
Normal operation
Normal operation
restarts.
your controls.
positioning.
Replace any blown fuses. Check circuit breaker and reset
if necessary.
another unit is not avai lable, p lace dry ice i n freezer
section to preserve food. Warranty does not co ver
food loss . Contact service for assistance.
Owner’s Manual.
See co ntrols section in Owner’s Manua l on how to adjust
your controls.
See sectio n o n Temperature-Controlled Beverage Chiller™
to verify proper positioning.
21
for details
K
G
L
H
M
E
D
F
I
J
B
A
C
Page 22
Before Calling Service
OPERATION
TOPIC POSSIBLE CAUSE SOLUTION
Food temperature
appears too warm
Water droplets form on
outside of refrigerator
Water droplets form on
inside of ref rig erator
Refrigerator or ice maker
make unfamiliar sounds
or seems too lo ud
Deli/Crisper System and/or
crisper drawers do not
close freely
Refrigerat or runs
too frequently
Door is not closing properly.
Controls need to be adjusted. See t he co ntrols section in your Owner’s Manual fo r assista nce
Condenser coils are dirty. Clean accordi ng to cleaning instructions in your
Rear air grille is blocked on models
over 60 cm d eep.
Door has been opened frequent ly,
or has been opened for long periods
of time.
Food has recently been added. Allow time for recently-added food to reach refrigerator or
Compartment is di rty or has odorcausing food.
Air filter (some models) needs to
be changed.
Check gaskets for proper seal. Clean, if necessary, according to cleaning instructio ns in
Humidity levels are hig h. Normal during times of high humidity.
Controls require adjustment See the co ntrols sectio n in yo ur Owner’s Manual for assistance
Humidity levels are hig h or door has
been opened frequently.
Check gaskets for proper seal.
Normal operation Refer to “Noise” section of
Contents of drawer, or positioning of
items in the surrounding compartment
could be o bstructing drawer
Drawer is not in proper positio n See sectio n on Deli/Crisper System and/or crisper drawer
Refrigerator is not level.
Drawer channels are dirty or
need treat ment.
Doors have been opened frequently
or have been opened for long periods
of time.
Humidity or heat i n surrounding area
is high.
Food has recently been added.
Unit is exposed to heat by
environment or by appliances nearby.
Condenser coils are dirty.
Refrigerator is not level.
on how to level yo ur unit.
Check gaskets for proper seal. Clean, if necessary, according to
cleaning instructions in Owner’s Manual.
Check fo r internal obstructions that are keepi ng door from
closing properly (i.e. improperly closed drawers, ice buckets,
oversized or improperly stored containers or foodstuffs, etc.).
in how to adjust yo ur co ntrols.
Owner’s M anual.
Check the positioning of food items in refrigerator to make
sure grille is not blocked. Rear ai r grille is located behind
crisper drawers.
Reduce time door is open. Organize food items efficiently to
assure door is open for as short a time as possible.
Allow interior environment to adjust for period t he doo r has
been open.
freezer temperature.
Refer to o dor removal instructions in Owner’s Manual. Refrigerat or has a n odor
Change air filter.
Owner’s M anual.
in how to adjust yo ur co ntrols.
See the co ntrols sectio n in your Owner’s Manua l for assista nce
in how to adjust yo ur co ntrols.
Reduce time door is open. Organize food items efficiently to
assure door is open for as short a time as possible.
Clean, if necessary, according to cleaning instructio ns in
Owner’s M anual.
Owner’s M anual.
Reposition food items a nd containers to avoid interference with
the drawers.
section for proper place ment.
See
Installation Instructions
Clean drawer channels with warm, soapy water. Ri nse and
dry thoro ughly.
Apply a thin layer of petroleum jelly to drawer channels.
Reduce time door is open. Organize food items efficiently to
assure door is open for as short a time as possible.
Allow interior environment to adjust for period t he door has
been open.
Normal operation
Allow time for recently-added fo od to reach refrigerator or
freezer temperature.
Evaluate your unit’s environment. Unit may need to be moved
to run more efficiently.
Clean according to cleaning instructio ns in your
Owner’s M anual.
22
See Installation Instructions
Before Calling Service
for details on how to level your unit.
for details
in your
Page 23

Before Calling Service
OPERATION (continued)
TOPIC POSSIBLE CAUSE SOLU TION
Refrigerator runs too
frequently (continued)
ICE & WATER
Water appears cloudy
Particles in water and/or
ice cubes.
No indicator lights are lit
on dispenser control
(some models)
Neither ice nor water is
dispensed when pads are
pushed (some models)
Ice maker is not producing
enough ice or ice is
malformed (some models)
Ice maker is not producing
ice (some models)
Controls need to be adjusted.
Door is not closing properly
Air or air bubbles in water. This is normal when first using dispenser and will
Carbon dust from water filter cartridge. Initial water ejected through cartridge may contain
Concentrations of minerals in water will
form particles when water becomes frozen
and melts.
Freezer door is not closed.
Refrigerator is not plugged in. Plug in unit.
Fuse is blown, or circuit breaker needs to
be reset.
Power outage has occurred. Call local power company listing to report outage.
Freezer door is not closed. Verify that freezer door is closed. Power is removed from the
Controls are in lock mode. See Dispenser control instructions.
Water tank is filling. At initial use, there is an approximate 45-second delay in
Ice maker or ice maker-equipped unit has just
recently been installed or a large amount of ice
has just been used.
Water filter is clogged or needs to be changed. Change water filter.
Ice maker has just recently been installed or a
large amount of ice has just been used.
Water pressure is too low. Low water pressure can cause valve to leak. Water pressure
Water filter is clogged or needs to be changed. Change water filter.
Ice maker arm is not in correct position Confirm ice maker arm is down. See
Household water supply is not reaching
water valve
Water supply tubing has kinks. Turn off water supply and rem ove kinks. If kinks cannot be
Water pressure is too low. Water pressure must be between 20 to 100 pounds per square
Check freezer temperature. See the controls section in your Owner’s Manual for assistance
Ice bin is not installed properly See ice bin section for proper installation and alignment.
See the controls section in your Owner’s Manual for
assistance in how to adjust your controls.
Refrigerator is not level. See
details on how to level your unit
Check for internal obstructions that are keeping door
from closing properly (i.e. improperly closed drawers,
ice buckets, oversized or improperly stored containers
or foodstuffs, etc.).
Check gaskets for proper seal. Clean, if necessary,
according to cleaning instructions in Owner’s Manual.
disappear with use.
harmless carbon dust flushed from cartridge. Particles are
safe for consumption. Will disappear after the first few
uses.
Particles are not harmful and naturally occur in
water supplies.
Verify that freezer door is closed. Power is removed from
the control when freezer door is opened.
Replace any blown fuses. Check circuit breakers for any
tripped circuits.
control when freezer door is opened.
dispensing while the internal water tank is filling.
Wait 24 hours for ice production to begin and for ice maker to
restock after emptied.
Wait 24 hours for ice production to begin and for ice maker to
restock after emptied.
must be between 20 to 100 pounds per square inch to function
properly. A minimum pressure of 35 pounds per square inch is
recommended for units with water filters.
section in your Owner’s Manual for details.
Check water connection procedure in your
Instructions
removed, replace tubing.
inch to function properly. A minimum pressure of 35 pounds
per square inch is recommended for units with water filters.
on how to adj ust your controls. Freezer must be between 0 to
2°F (-18 to –17°C) to produce ice.
.
23
Installation Instructions
Automatic Ice Maker
Installation
for
Page 24
Before Calling Service
ICE & WATER
TOPIC POSSIBLE CAUSE SOLUTION
Ice maker is not producing
ice (some models-continued)
Unit is leaking water
Ice forms in inlet tube to
ice maker
Wate r f low is slow er
than normal
Dispenser water is not cold
Improper water valve was installed. Check water connection procedure in your
Plastic tubing was used to complete
water connectio n.
Improper water valve was installed.
Water pressure is low. Water pressure must be between 20 to 100 pounds per
Freezer temperature is too high.
Water pressure is low. Water pressure must be between 20 to 100 pounds per
Improper water valve was installed. Check water connectio n proced ure i n your
Water inlet tubing has kinks.
Water filter is clogged or needs to
be changed.
Refrigerator has been recently installed
Water supp ly in holding ta nk has
been depleted.
Water has settle into water lines outside
holding tank and has warmed to
room temp erature.
Check water connection procedure in your
Instructions
low water pressure and may clog the line over time. The
manufacturer is not responsible for property damage
due to improper installation or water connection.
The manufacturer recommends using copper tubing
for installatio n. Plastic is less durable and can cause
leakage. The manufacturer is not responsible for
property damage due to improper installation or
water connection.
Instructions
low water pressure and may clog the line over ti me. The
manufacturer is not responsible for property damage
due to improper installation or w ater connection.
square inch to function properly. A minimum pressure of
35 pounds per square inch is recommended for units with
water filters.
See the controls sectio n in yo ur Owner’s Manual for
assistance on how to adjust yo ur controls. Freezer is
recommended to b e bet ween 0 to 2°F (-18 to –17°C).
square inch to function properly. A minimum pressure of
35 pounds per square inch is recommended for units with
water filters.
Instructions
low water pressure and may clog the line over ti me. The
manufacturer is not responsible for property damage
due to improper installation or w ater connection.
Turn of f water supply and remo ve kinks. If kinks cannot be
removed, replace tubing.
Change water filter.
Allow approximat ely 12 hours for water in holding ta nk
to chill.
Discard first glass of water and refill.
. Self-piercing and 3/16” s addle valves cause
. Self-pie rcing and 3/16” saddle valves cause
. Self-pie rcing and 3/16” saddle valves cause
Ins tall ation
Installation
Installation
24
Page 25
Water Filter Data
System Specification and Performance Data Sheet
Refrigerator Water Filter Cartridge Model OWF-51
Specifications
Service Flow Rate (Maximum) ............................................. 0.75 GPM (2.83 L/min)
Rated Service Life OWF-51-NI300 (Maximum) .................... 300 gallons/ 1135 liters
Rated Service Life OWF-51-WI500 (Maximum) .................... 500 gallons/ 1892 liters
Maximum Operating Temperature ........................................ 100° F/38° C
Minimum Pressure Requirement .......................................... 35 psi/ 138 kPa
Minimum Operating Temperature ......................................... 33° F/ 1° C
Maximum Operating Pressure .............................................. 120 psi/ 827 kPa
General Use Conditions: Read this Performance Data Sheet and compare the capabilities of this unit with your actual
water treatment needs.
DO NOT use this product where water is microbiologically unsafe or of unknown quality without adequate disinfection
before or after the system. System certified for cyst reduction may be used on disinfected water that may contain
filterable cysts.
The retractable water filtration system uses a OWF-51 replacement cartridge (see your distributor to order). Timely
replacement of filter cartridge is essential for performance satisfaction from this filtration system. Please refer to the
applicable section in this Owner's Manual for general operation, maintenance requirements and troubleshooting.
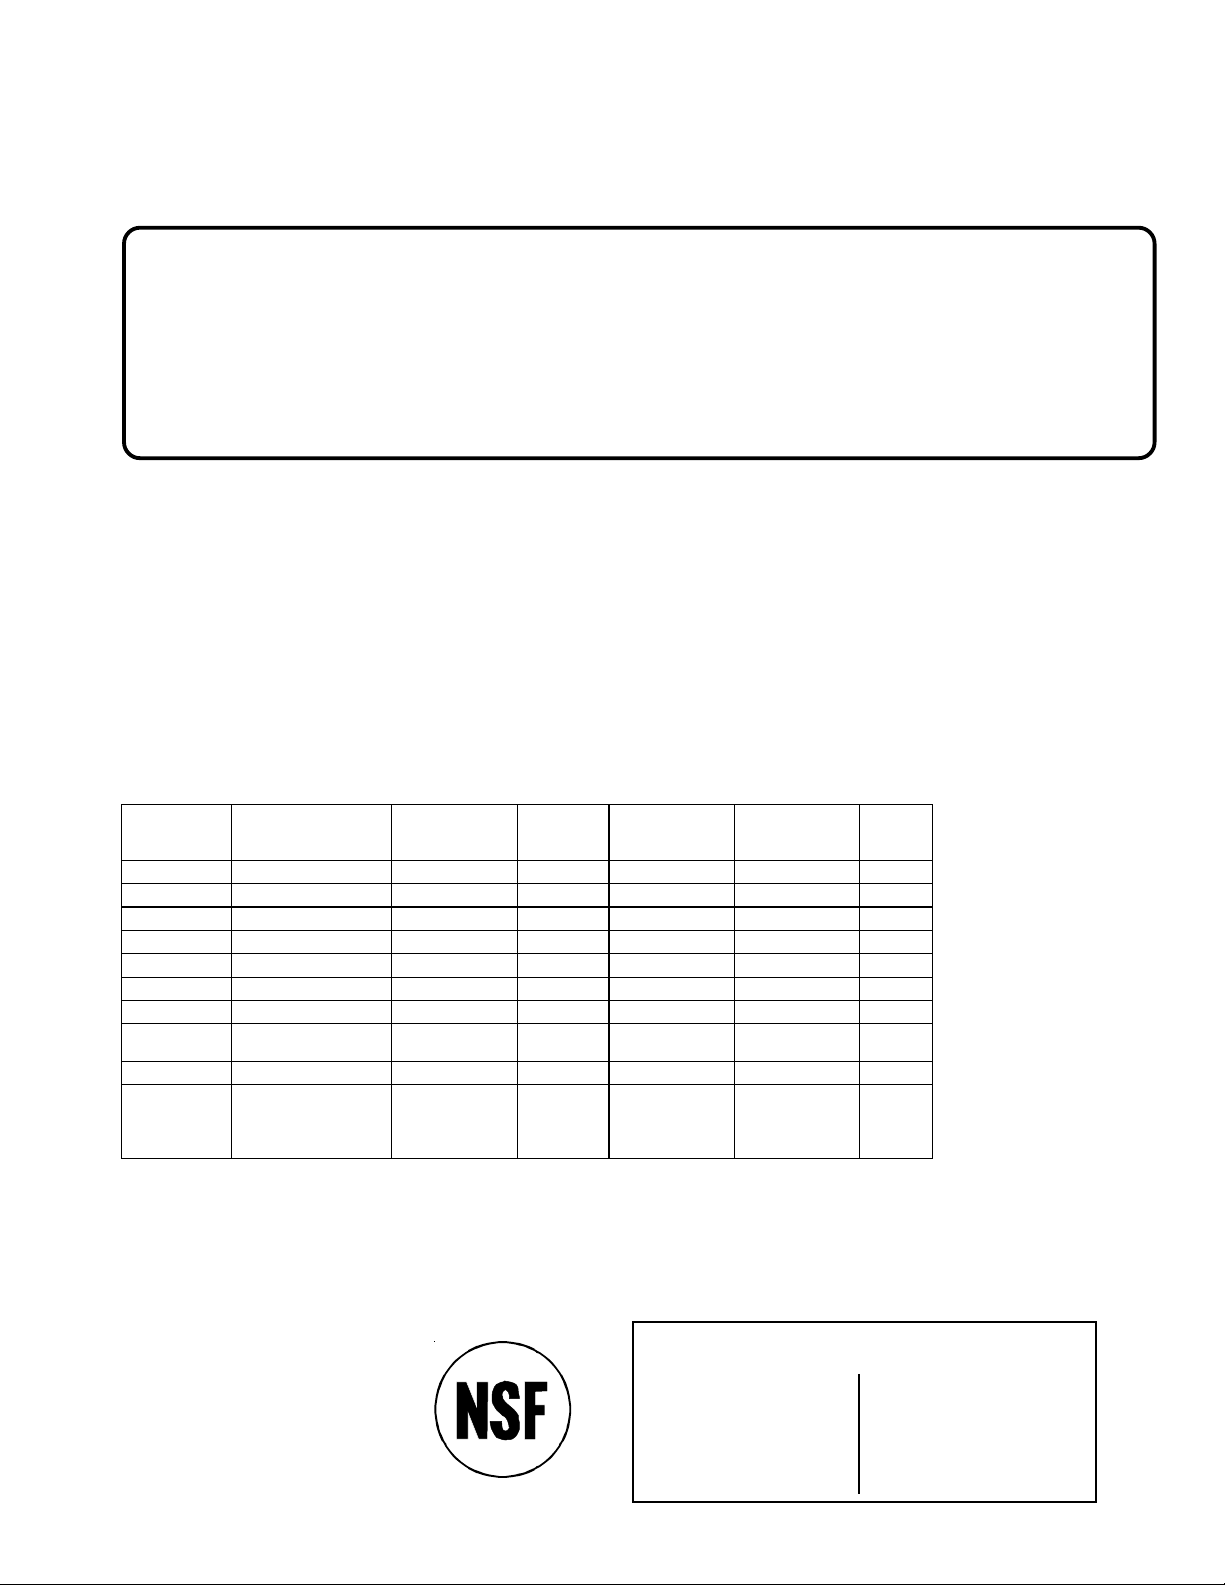
This systems has been tested according to ANSI/NSF 42 and 53 for reduction of the substances listed
below. The concentration of the indicated substances in water entering the system was reduced to a
concentration less than or equal to the permissible limit for water leaving the system, as specified in
ANSI/NSF 42 and 53.
Performance Data*
Substance
Lead 0.15 mg/L +/- 10% 0.001 mg/L 99.33% 0.001 mg/L 0.010 mg/L 6.5
Lead 0.15 mg/L +/- 10% 0.002 mg/L 98.66% 0.003 mg/L 0.010 mg/L 8.5
Cyst Minimum 50,000/L 1count/mL 99.99% 3 count/mL > 99.95% NA
Turbidity 11 +/- 1 NTU 0.12 NTU 98.98% 0.18 NTU 0.5 NTU NA
Lindane 0.002 mg/L +/- 10% 0.00005 m g/L 97.62% 0.00005 m g/L 0.00002 m g/L NA
Atrazine 0.009 mg/L +/- 10% 0.0002 mg/L 97.93% 0.0006 mg/L 0.003 m g/L NA
Chlorine 2.0 mg/L +/- 10% 0.09 mg/L 95.26% 0.17 mg/L 75% NA
Particulate**
2,4-D 0.210 mg/L +/- 10% 45.45 ug/L 84.42% 100 ug/L 0.0017 m g/L NA
Asbestos
* Tested using a flow rate of 0.75 GPM (2.83 L/min.) and a maximum pressure of 120 psi (827 kPa)
Influent challenge
concentration
at least 10,000
particles/mL 900 count/mL 99.68% 2400 count/mL 85% NA
7
to 108 fibers/L;
10
fibers greater than
10 micometers
in length
Effluent
Average
0.16 MFL/mL 99.96% 0.16 MFL/mL 99% NA
under standard laboratory conditions, however, actual performance may vary. Health Claim
Performance tested and certified by NSF International
** Particle size range classification of test. Particles used were 0.5 –1 microns.
Average
%
Reduction
Maximum
Effluent
Min. Required
Reduction
>
–
>
–
Inle t
pH
Pentapure, Incorporated
1000 Apollo Road
Eagan, Minnesota U.S.A.
EPA EST #35917-MN-1
Tested and Certified by NSF International against ANSI/NSF Standards
42 & 53 in models OWF50-W1500 and OWF50-N1300 for the reduction of:
Standard No. 42: Authetic Effects
Taste & Odor Reduction
®
Chlorine Reduction Class 1
Mechanical Filtration Unit
Particlate Reduction Class 1
Standard No. 53: Health Effects
Chemical Reduction Unit
Lead, Atrazine, Lindane & 2,4-D Reduction
Mechanical Filtration Unit
Cyst, Turbidity, & Asbestos Reduction
25
Page 26

Page 27

Vielen Dank, dass Sie sich für diesen
Kühlschrank entschieden haben!
Lesen Sie bitte diese Gebrauchsanweisung sorgfältig durch. Sie finden hierin
Informationen für eine ordnungsgemäße Wartung Ihres Kühlschranks.
Der Garantieservice muss von einem autorisierten Service-Techniker
vorgenommen werden. Der Hersteller empfiehlt Ihnen, sich auch nach der
Garantiezeit an einen autorisierten Service-Techniker zu wenden. Bei Ihrem
Fachhändler erfahren Sie, wo Sie autorisierte Service-Techniker finden.
Wenn Sie sich an den Service-Techniker wenden, teilen Sie ihm bitte die folgenden
Informationen mit. Diese Produktinformationen finden Sie auf dem Typenschild oben
im Kühlschrankteil.
Modellnummer _____________________________________________________
Herstellungsnummer_________________________________________________
Seriennummer _____________________________________________________
Kaufdatum_________________________________________________________
Name des Händlers _________________________________________________
Adresse des Händlers _______________________________________________
Telefonnummer des Händlers __________________________________________
Wie erhalte ich Ersatzteile
und Reparaturleistungen?
Probleme? Rufen Sie nicht gleich unnötig
den Kundendienst an. Lesen Sie zuerst in der
Gebrauchsanweisung im Abschnitt „Bevor
Sie den Kundendienst rufen“ nach.
Ihr neuer Kühlschrank wurde sorgfältig
unter Einhaltung strenger Qualitätsstandards
entwickelt und hergestellt. Daher sollte er
zuverlässig funktionieren. Eventuell muss
er jedoch wie alle mechanischen Geräte
gelegentlich eingestellt, repariert oder
gewartet werden. Sollten Sie den
Kundendienst in Anspruch nehmen müssen,
dann wenden Sie sich bitte an Ihren
Fachhändler, bei dem Sie den Kühlschrank
gekauft haben.
Geben Sie ihm die folgenden Informationen:
• Modellnummer
• Herstellungsnummer
• Seriennummer und alle anderen Daten,
die auf dem Typenschild vermerkt sind
• Eine kurze Beschreibung des Problems
In der linken Spalte dieser Seite finden Sie
einen Bereich, in den Sie diese wichtigen
Informationen eintragen können.
Inhalt
Einführung ............................................................................. 27
Inhalt ...................................................................................... 27
Wichtige Sicherheitsinformationen ....................................... 28
Installation Ihres Kühlschranks ............................................. 29
So transportieren Sie Ihr Gerät ......................................... 29
So wählen Sie den besten Standort aus ........................... 29
So montieren und demontieren Sie die Griffe .................. 30
So bringen Sie Ihren Kühlschrank in die Waage .............. 31
So stellen Sie die Temperaturregler ein ............................ 32
Informationen zu Ihrem Filtersystem .................................... 33
Merkmale des Kühlschrankteils ............................................ 34
Innere Regale .................................................................... 34
Lagermöglichkeiten in der Tür........................................... 35
Fächer ................................................................................ 36
Merkmale des Gefrierschrankteils ........................................ 37
Grundfunktionen ................................................................ 37
Roste .................................................................................. 38
Lagermöglichkeiten in der Tür........................................... 38
Merkmale des Spenders ....................................................... 39
Grundfunktionen ................................................................ 39
Betrieb des Wasserspenders ............................................ 39
Einstellfunktionen (Einstellung mit 5 Tasten) .................... 40
Einstellfunktionen (Elektronische Einstellung).................. 41
Hinweise und Pflege.............................................................. 44
So reinigen Sie Ihr Gerät ................................................... 44
So entfernen und ersetzen Sie Glühlampen ..................... 45
Bevor Sie den Kundendienst rufen ....................................... 46
Daten zum Wasserfilter ......................................................... 50
27
Bewahren Sie diese Anleitung
zum späteren Nachschlagen auf!
Bewahren Sie dieses Handbuch und Ihre
Rechnung zusammen an einem sicheren
Ort für den Fall auf, dass Sie während der
Garantiezeit den Kundendienst in Anspruch
nehmen müssen.
Was ist, wenn diese Merkmale
bei meinem Gerät anders sind?
Dieses Handbuch deckt die zahlreichen
Merkmale ab, die in dieser Produktlinie
verfügbar sind. Wenn Sie für Ihren
Kühlschrank zusätzliche Elemente kaufen
möchten, wenden Sie sich bitte an Ihren
Fachhändler.
Page 28
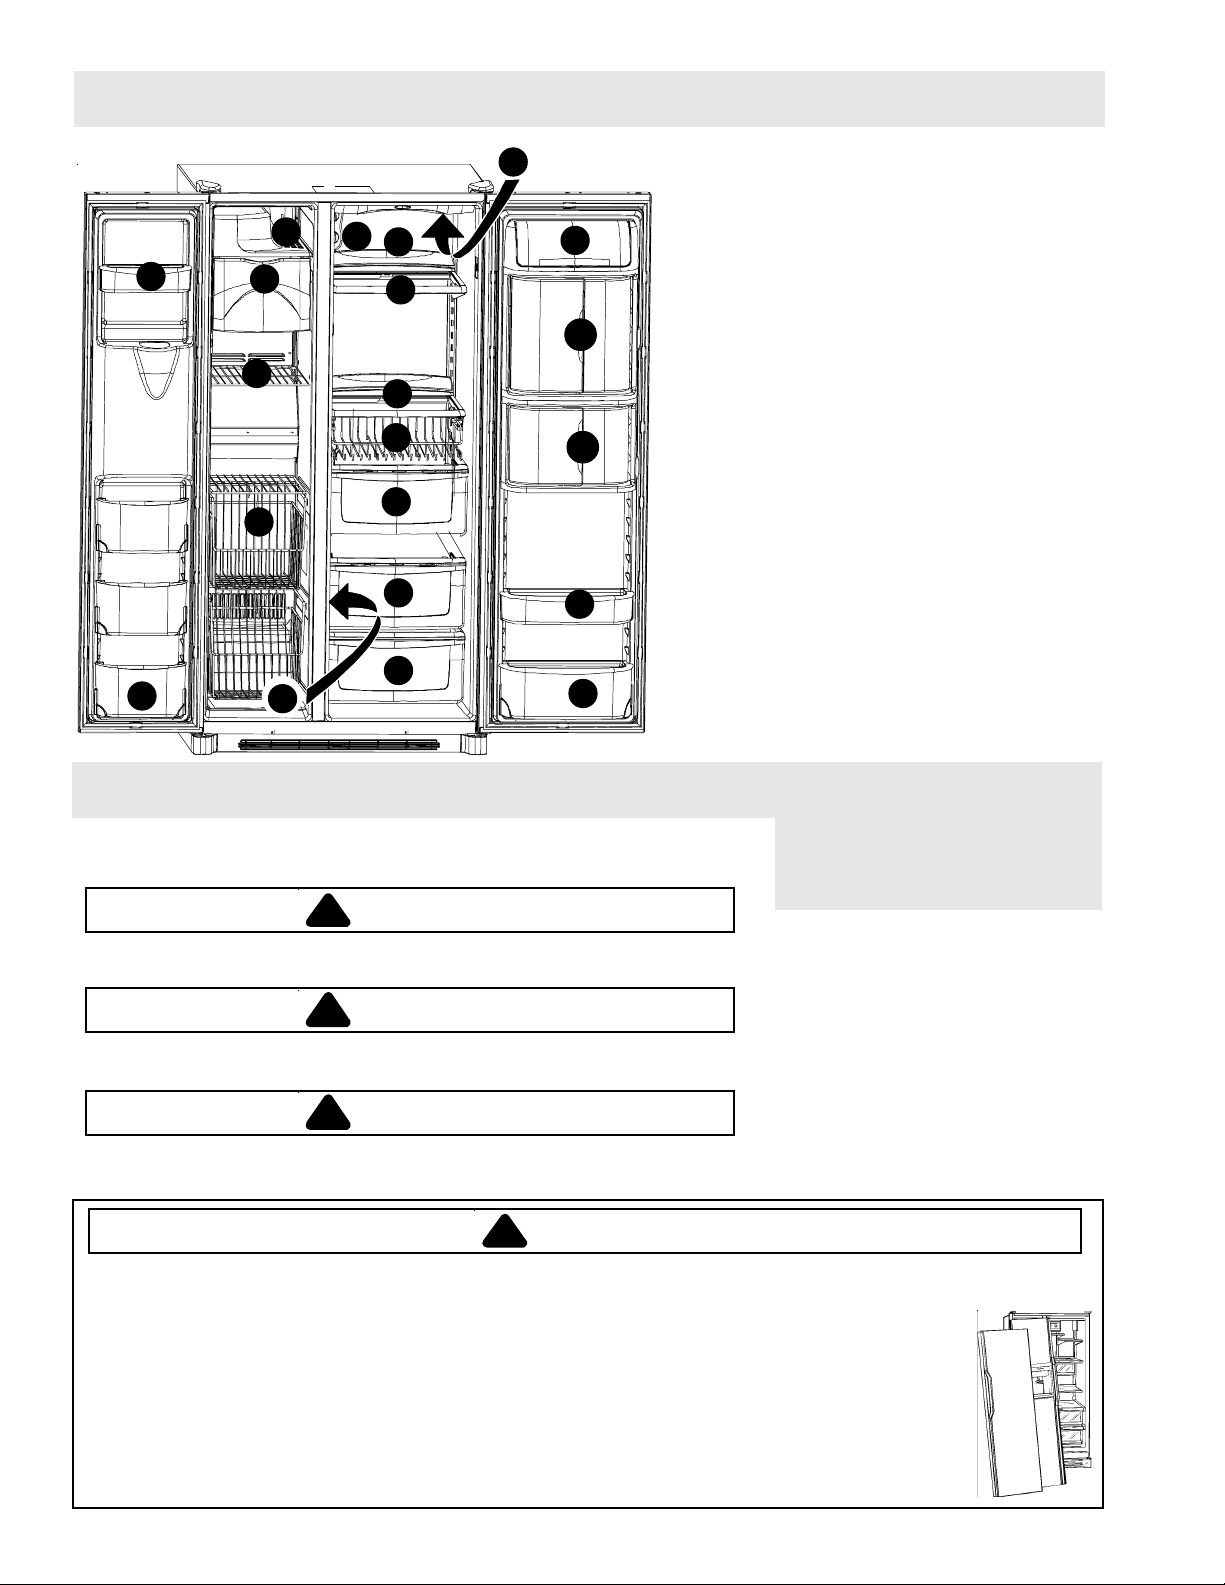
Alle Merkmale auf einen Blick
11
10
18
16
13
15
20
19
3
1
5
3
2
8
7
7
6
9
12
12a
10
11
1. Temp Assure® Regler
2. Spill Saver™ Regal
3. Spill Saver™ Easy Glide™ Regal
4. Side Glide™ Regale – nicht abgebildet
5. Hintere Regalerweiterungen
6. Delikatessen-/Gemüse-Fach
7. Gemüsefach
8. Beverage Organizer™
9. Dairy Center
10. Türkörbe
10a. Anti-Rutschmatten - nicht abgebildet
11. Herausklappbarer Türkorb
12. Beverage Chiller™
12a. Mini-Beverage Chiller™
13. Eisbehälter
14. Eiserzeuger – nicht abgebildet
15. Speiseeisregal
16. Stor-Mor
17. Hängendes Drahtregal – nicht abgebildet
18. Festes Gefrierschrank-Regal
19. Wasserfilter – nicht abgebildet
20. Luftfilter – nicht abgebildet
21. Lampen – nicht abgebildet
®
-System
Oberer Kühlschrankteil
Unterer Kühlschrankteil
Gefrierschrankteil
Spender
Wichtige Sicherheitsinformationen
Bedeutung von Sicherheitssymbolen, -wörtern
und -etiketten
GEFAHR
!
GEFAHR–Unmittelbare Gefahren, die zu schwerem Personenschaden oder zum
Tode FÜHREN.
WARNUNG
!
WARNUNG – Gefahren und gefährliche Vorgehensweisen, die zu schwerem
Personenschaden oder zum Tod führen KÖNNTEN.
VORSICHT
!
VORSICHT – Gefahren oder gefährliche Vorgehensweisen, die zu leichtem
Personenschaden bzw. Produkt- oder Sachschaden führen KÖNNTEN.
WARNUNG
!
Um die Gefahren von Personenschaden und Tod zu verringern, befolgen Sie bittedie
grundlegenden Vorsichtsmaßnahmen, einschließlich der folgenden:
Die richtige Entsorgung Ihres Kühlschranks
WICHTIG: Leider kommt es immer noch vor, dass sich Kinder in einem Kühlschrank einschließen und
darin ersticken. Kühlschränke, die im freien Gelände oder auf Müllhalden weggeworfen werden, sind
immer noch gefährlich, auch wenn sie „nur ein paar Tage“ dort bleiben. Wenn Sie sich von Ihrem alten
Kühlschrank trennen, halten Sie sich bitte an die nachstehenden Anweisungen, um Unfälle zu vermeiden.
BEVOR SIE IHREN ALTEN KÜHLSCHRANK ODER IHR ALTES GEFRIERGERÄT WEGWERFEN:
• Montieren Sie die Türen ab.
• Lassen Sie die Fächer und Roste im Kühlschrank, damit Kindern das Hineinklettern erschwert wird.
Was Sie über
Sicherheitsanweisungen
wissen müssen
Warnungen und wichtige
Sicherheitsanweisungen in diesem
Handbuch können nicht alle möglichen
Bedingungen und Situationen abdecken,
die auftreten können. Gesunder
Menschenverstand, Vorsicht und
Verantwortung müssen bei der Installation,
Wartung und dem Betrieb des
Kühlschranks angewendet werden. Wenden
Sie sich stets an Ihren Fachhändler,
Vertragshändler, Kundendienst oder
Hersteller, wenn es Probleme oder
Bedingungen gibt, die Sie nicht verstehen.
28
Page 29
Installation Ihres Kühlschranks
Die folgenden Anweisungen sollen Sie bei der Aufstellung Ihres Geräts unterstützen. Amana ist nicht für eine
unsachgemäße Installation verantwortlich.
Gehen Sie wie folgt vor...
Der Kühlschrank muss von einem qualifizierten Techniker gemäß den Installationsanweisungen angeschlossen
werden. Messen Sie die Türöffnung sowie die Breite und Tiefe des Kühlschranks aus. Montieren Sie, falls erforderlich, Griffe
oder Türen ab. Der Techniker muss darüber hinaus Folgendes tun:
1. Die Anschlussvorschriften der lokalen Wasser- und Stromversorgungsgesellschaft einhalten.
2. Den Wasseranschluss einrichten, bevor er den Stromanschluss herstellt.
Servicearbeiten am Stromkabel oder dessen Austausch müssen von qualifizierten Kundendienstleuten
durchgeführt werden.
Voraussetzungen für die Installation
1. Der Kühlschrank muss mit einem für Sternschaltung ausgelegten Netzkabel an einer geerdeten Steckdose mit separatem
230 V, 50 Hz, 10A-Stromkreis angeschlossen werden.
2. Ein empfindlicher Boden muss mit Pappe oder Teppichen geschützt werden.
3. Der Kühlschrank darf nur auf einem Boden aufgestellt werden, der mindestens 429 kg trägt.
4. An den Seiten muss ein Abstand von 5 mm eingehalten werden. Bei Modellen mit einer Tiefe von mehr als 60 cm muss
außerdem über dem Kühlschrank ein Abstand von 12,7 mm eingehalten werden.
5. 60 cm tiefe Modelle.
Schneiden Sie die Ecken der oberen Platte in einem Winkel von 45° ab, falls sie einen Überhang von 25 mm hat.
Der Kühlschrank lässt sich einfacher aufstellen und in die Waage bringen, wenn an den Seiten jeweils ein Abstand von
5 mm und oben einen Abstand von 7 mm eingehalten wird. An der Rückseite ist kein Mindestabstand erforderlich.
Holzunterlage entfernen
VORSICHT
!
Um Verletzungen oder Beschädigungen zu vermeiden, muss die Holzunterlage von zwei Personen entfernt werden.
1. Verkleben Sie die Türen, um zu verhindern, dass sie sich unerwartet öffnen.
2. Schieben Sie einen Gerätekarren seitlich unter den Kühlschrank.
3. Umwickeln Sie den Kühlschrank mit einer Decke oder einem Kissen. Befestigen Sie sie mit einem Gurt. Schieben Sie die
Schaumeinlagen des Versandkartons unter den Gurt und ziehen Sie dem Gurt fest an.
4. Senken Sie den Gerätekarren zu Boden, so dass seine Griffe auf den Boden zu liegen kommen.
5. Entfernen Sie die beiden oberen Schrauben vom Beschlag.
6. Stellen Sie den Kühlschrank und den Gerätekarren wieder in eine aufrechte Position. Entfernen Sie den Gurt.
7. Schieben Sie den Gerätekarren unter die gegenüberliegende Kühlschrankseite.
8. Wiederholen Sie die Schritte 3 - 5.
9. Entfernen Sie die Holzunterlage.
10. Stellen Sie den Kühlschrank und den Gerätekarren wieder aufrecht und entfernen Sie den Gerätekarren.
WICHTIG:
Lassen Sie den Kühlschrank für das Entfernen der Schrauben nicht länger als notwendig horizontal liegen.
Türen und Scharniere entfernen und anbauen
• Wenden Sie sich hierfür an einen qualifizierten Techniker.
29
Page 30
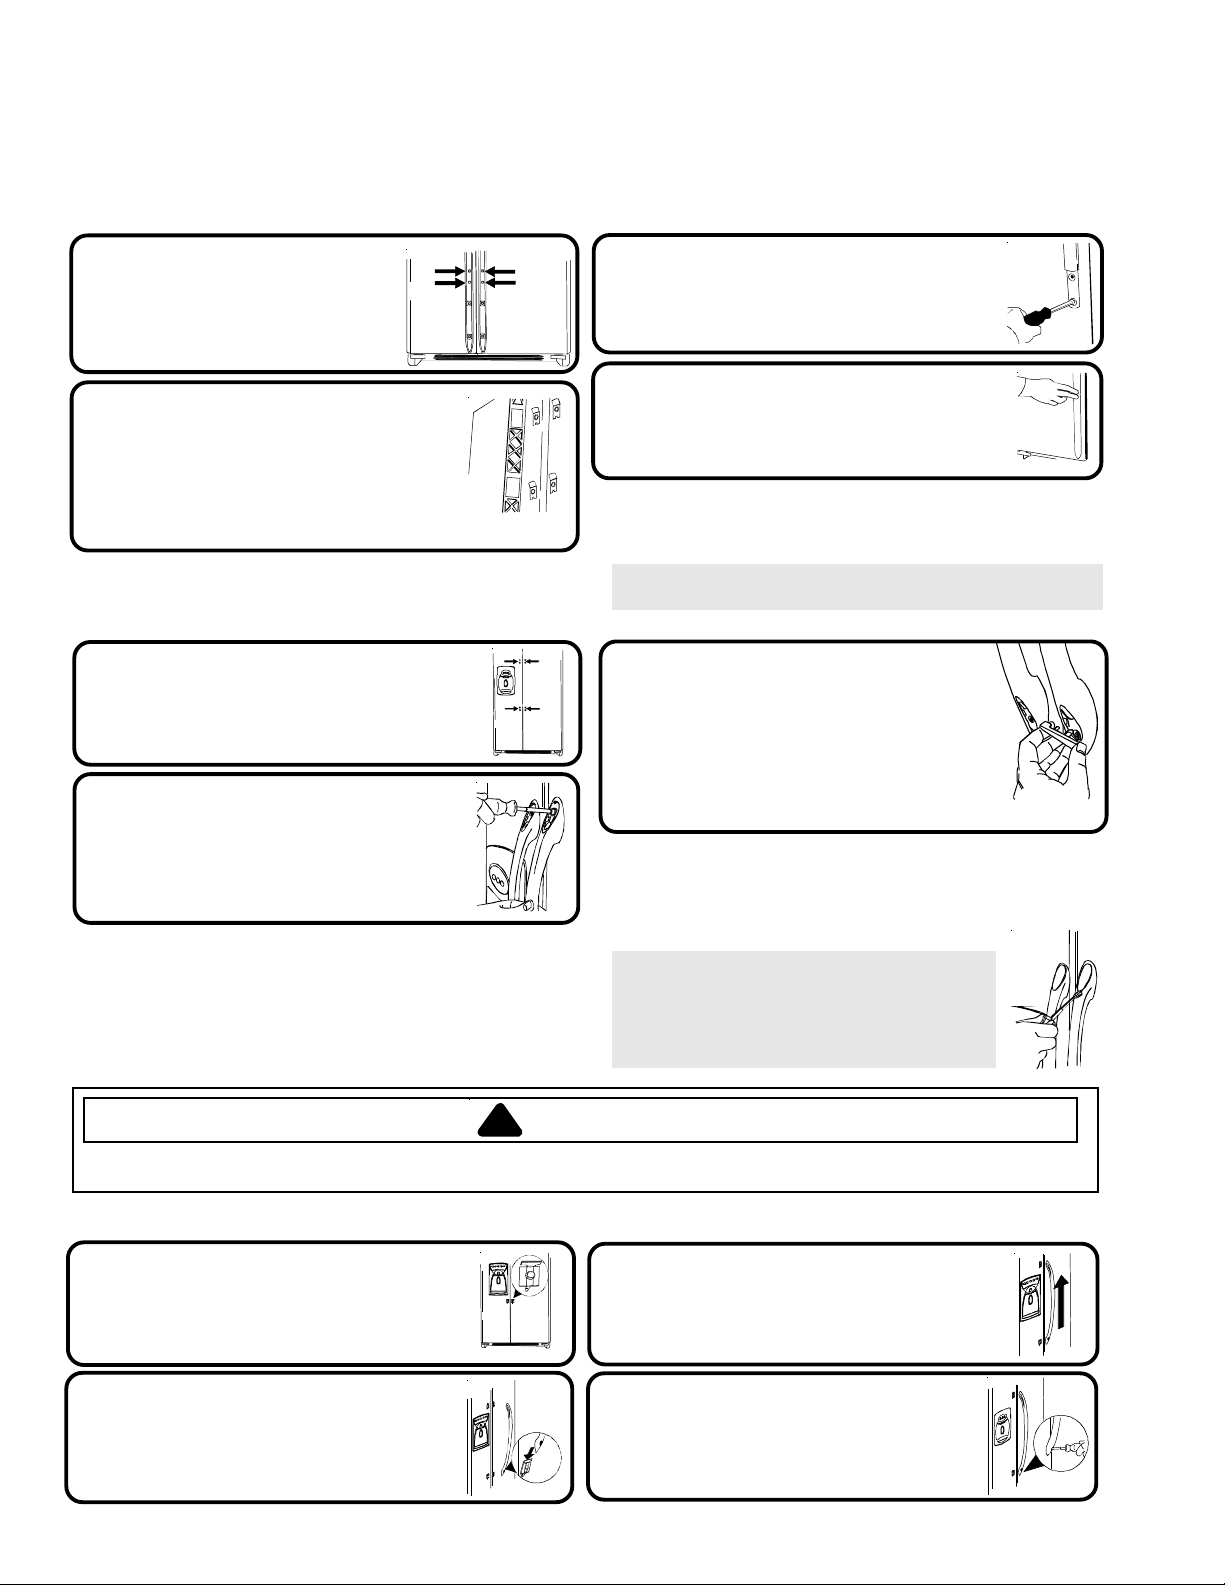
Installation Ihres Kühlschranks
So montieren und demontieren Sie die Griffe
Griffe befinden sich im Kühlschrankteil. Leisten, Stopfen und Zierteile befinden sich bei der Dokumentation.
Griffleisten über die gesamte Höhe (kein Edelstahl)
Entfernen Sie die beiden ¼
1
Zoll Sechskantschrauben
unten an der Kühlschrankund Gefrierschranktür.
Richten Sie die Türgriffe mit den
2
Halterungen oben und unten an der
Tür aus und schieben Sie sie nach
unten, bis die Schraubenlöcher
der Griffe mit den Schraubenlöchern
der Tür übereinstimmen.
Griffleisten über die halbe Höhe (kein Edelstahl)
Entfernen Sie die beiden ¼ Zoll
1
Sechskantschrauben oben und
unten an den Türen.
Richten Sie die Türgriffe mit
2
Schraubenlöchern aus, setzen Sie
die in Schritt 1 entfernten
Schrauben in die Schraubenlöcher
ein und ziehen Sie sie fest.
Setzen Sie die in Schritt 1 entfernten
3
Schrauben in die Schraubenlöcher
im unteren Teil des Griffes
ein und ziehen Sie sie fest.
Drücken Sie die Leiste auf
4
den unteren Teil des Griffes
sowie die Halterungen unten
an der Tür, bis sie einrastet.
Griffe abbauen, nachdem sie montiert wurden...
• Führen Sie die Schritte 3 bis 4 in umgekehrter
Reihenfolge aus.
HINWEIS: Die Griffe können fest sitzen. Ziehen Sie beim
Entfernen den Griff nach oben und zu sich hin.
Drücken Sie die farbige
3
Griffabdeckung über die
Schraubenlöcher oben und unten
an den Griffen bis sie einrasten.
• Lassen Sie die Leiste einrasten,
indem Sie zuerst das lange runde
Ende einsetzen.
Griffe abbauen, nachdem sie montiert wurden...
Die Griffe müssen eventuell entfernt werden, um das
Gerät durch enge Passagen im Haus zu transportieren.
• Führen Sie die Schritte 2 bis 3 in umgekehrter
Reihenfolge aus.
WICHTIG: Verwenden Sie zum Entfernen der
farbigen Griffabdeckungen die flache Klinge
eines Schraubenziehers, die Sie mit
Abdeckband umwickelt haben, um den
Griff nicht zu beschädigen.
WARNUNG
!
Bei Montage und Demontage der Griffe äußerst vorsichtig vorgehen, um schwere Verletzungen an scharfen Kanten
zu vermeiden.
Modelle aus Edelstahl
Lockern Sie die untere
1
Griffhalterung am Kühlschrank
mit einem ¼" SechskantSteckschlüssel.
Setzen Sie das hohle Ende des
2
Griffs mit dem vorgebohrten
Loch über die untere
Halterung.
Setzen Sie das andere Ende des
3
Griffs über die obere Halterung
und schieben Sie den Griff so
weit wie möglich nach oben.
Setzen Sie den ¼" Sechskant-
4
Steckschlüssel im vorgebohrten
Loch unten am Griff an und
ziehen Sie die Schraube fest.
30
Page 31
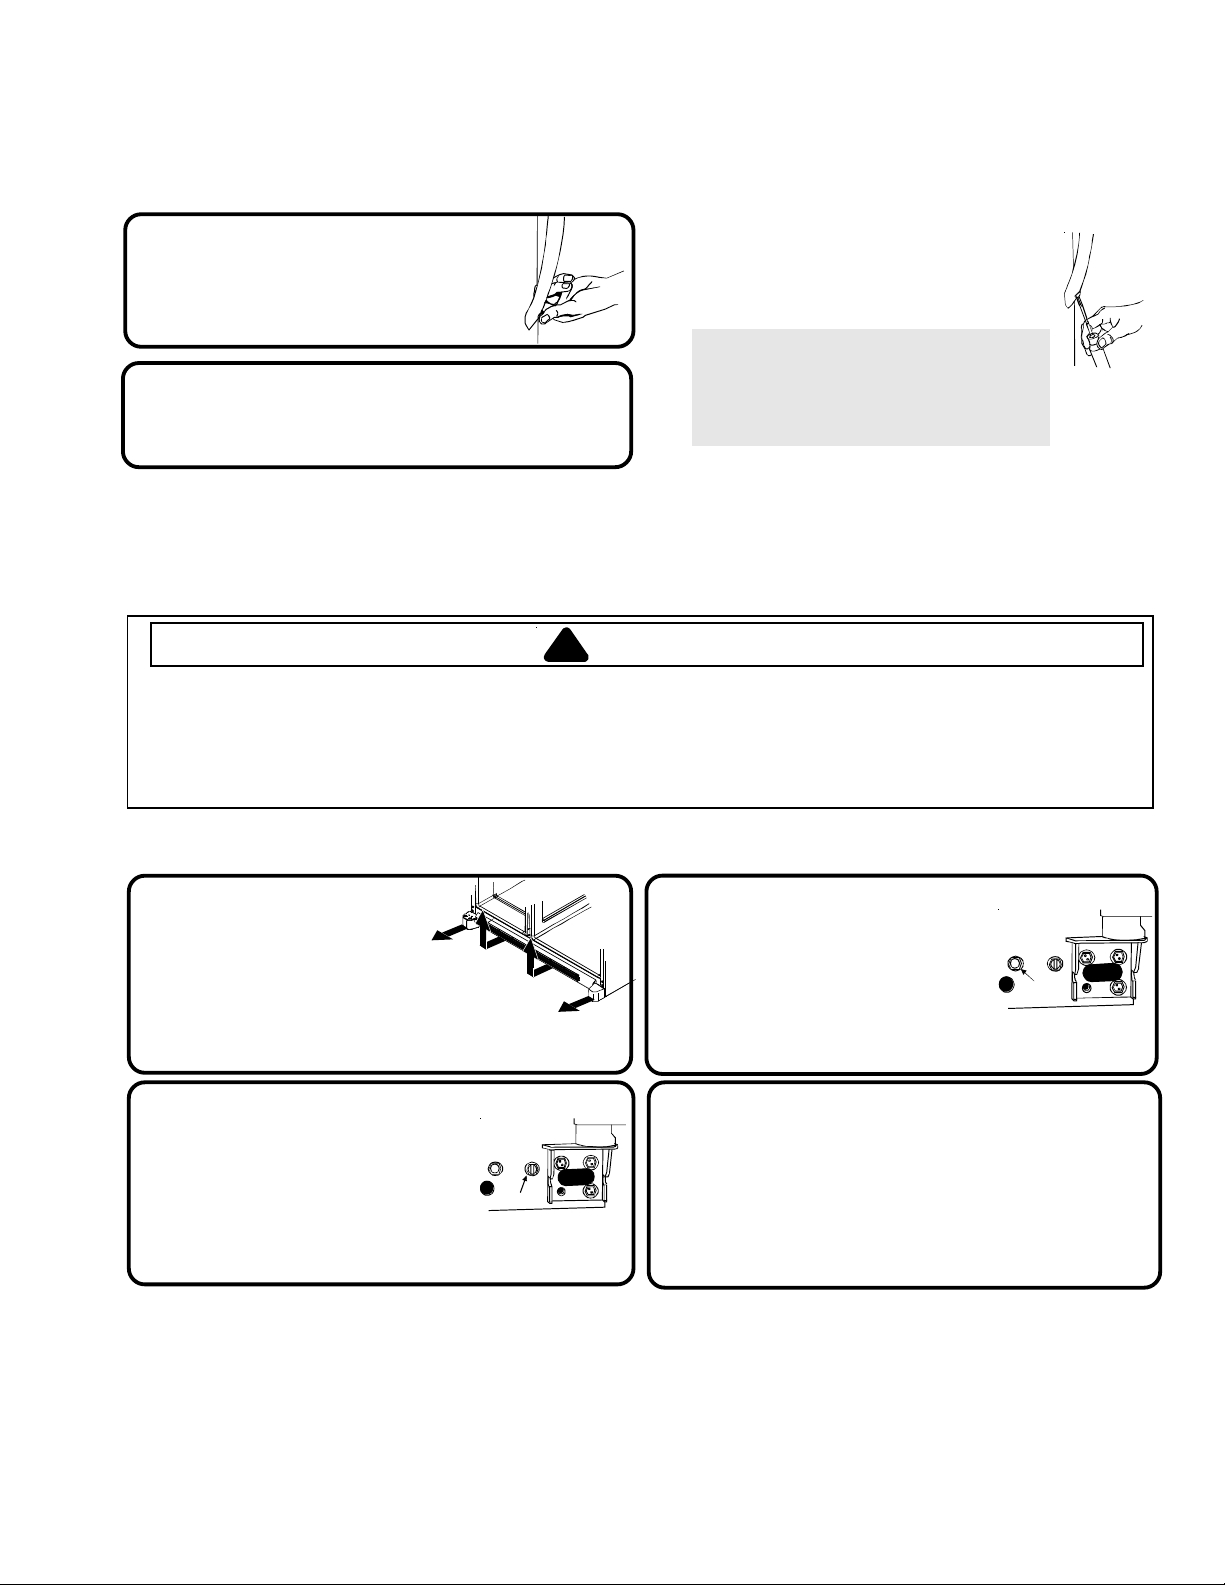
Installation Ihres Kühlschranks
So montieren Sie die Griffe Fortsetzung
Edelstahlgriffe
Setzen Sie den Schraubenverschluss
5
in das vorgebohrte Loch.
Wiederholen Sie zur Montage
6
der Griffe am Gefrierschrank
die Schritte 2 bis 5.
Fortsetzung
Griffe abbauen, nachdem sie montiert
wurden...
• Griffe abbauen, nachdem sie montiert wurden.
WICHTIG: Verwenden Sie zum Entfernen
der Schraubenverschlüsse die flache
Klinge eines Schraubenziehers, die
Sie mit Abdeckband umwickelt haben,
um das Gerät nicht zu beschädigen.
Gerät an die Wasserversorgung anschließen
• Wenden Sie sich hierfür an einen qualifizierten Techniker.
So bringen Sie Ihren Kühlschrank in die Waage
VORSICHT
!
• Decken Sie empfindliche Vinyl- und andere Fußböden mit Pappe, Teppichen oder anderen schützenden Materialien ab,
um Beschädigungen an Wänden und Fußböden zu vermeiden.
• Verwenden Sie keine Elektrowerkzeuge, um den Kühlschrank in die Waage zu bringen, da sonst der Einstellbolzen
beschädigt werden bzw. zerbrechen könnte.
• Stellen Sie das Gerät MINDESTENS auf 173,9 cm Höhe ein (minus Scharniere und Abdeckung). Bei einer geringeren
Höhe könnten die Bauteile auf der Unterseite beschädigt werden.
Notwendiges Werkzeug
•3/8" Sechskant-Steckschlüssel • Wasserwaage
Entfernen Sie den
1
Fußgrill und die unteren
Scharnierabdeckungen.
• Öffnen Sie hierfür die Türen 180°
oder so weit wie möglich.
Drehen Sie die beiden vorderen
2
Einstellschrauben (A) im
Uhrzeigersinn, um
die Seite anzuheben,
und entgegen dem
Uhrzeigersinn, um
die Seite zu senken.
A
Was ist zu tun, wenn die Türen nicht
ausgerichtet sind?
• Stellen Sie fest, welche Tür höher ist und drehen Sie die vordere
Einstellschraube entgegen dem Uhrzeigersinn. Drehen Sie solange,
bis die Türen ausgerichtet sind.
• Wenn Sie am Ende des Einstellbereichs angelangt sind, und die
Türen immer noch nicht bündig sind, heben Sie die andere Tür an,
indem Sie die vordere Einstellschraube im Uhrzeigersinn drehen.
• Setzen Sie den Fußgrill wieder ein.
31
Drehen Sie die beiden hinteren
3
Einstellschrauben (B) im
Uhrzeigersinn, um die Seite
anzuheben, und entgegen
dem Uhrzeigersinn, um die
Seite zu senken.
Überprüfen Sie mit einer Wasserwaage, ob
4
der Kühlschrank in der Waage steht. Dabei
sollten Sie auf eine Neigung von 6 mm nach
hinten achten, damit sich die Türen
ordnungsgemäß schließen.
• Wenn das Gerät in der Waage und stabil steht,
können Sie den Fußgrill wieder einsetzen.
B
Was ist zu tun, wenn das Gerät
wackelt?
• Drehen Sie die hintere Einstellschraube im Uhrzeigersinn,
um die wackelnde Ecke anzuheben.
• Setzen Sie den Fußgrill wieder ein.
Page 32

Installation Ihres Kühlschranks
So stellen Sie die Temperaturregler ein
Dieser Kühlschrank ist für einen Betrieb bei normalen Raumtemperaturen von 16° bis 43° C ausgelegt.
Stellen Sie den Kühlschrank- und
1
Gefrierschrankregler an der oberen
linken Kühlschrankwand auf 4.
WICHTIG: Wenn der Gefrierschrankregler auf „Off“ steht,
kühlt weder der Kühl- noch der Gefrierschrankteil.
Warten Sie 24 Stunden, bis sich die
2
Temperaturen stabilisiert haben.
Überprüfen Sie, ob die Temperatur
4
im Kühlschrankteil zwischen 3°
und 4° C liegt.
• Drehen Sie den Regler auf die nächst höhere Zahl,
wenn die Temperatur zu hoch ist.
• Drehen Sie den Regler auf die nächst niedrigere
Zahl, wenn die Temperatur zu niedrig ist.
• Überprüfen Sie die Temperatur nach 5 bis 8
Stunden.
r
e
z
e
e
r
F
r
o
t
a
r
e
g
i
r
f
e
R
WICHTIG: Aufgrund des Gerätedesigns sollten Sie immer
mit der Einstellung der Temperatur für den
Gefrierschrankteil beginnen.
Überprüfen Sie, ob die Temperatur
3
im Gefrierschrank zwischen
-17° und -16° C liegt.
• Drehen Sie den Regler auf die nächst höhere Zahl,
wenn die Temperatur zu hoch ist.
• Drehen Sie den Regler auf die nächst niedrigere
Zahl, wenn die Temperatur zu niedrig ist.
• Überprüfen Sie die Temperatur nach 5 bis 8
Stunden.
Wiederholen Sie diese Schritte, wenn
5
notwendig.
Wie führe ich einen Temperaturtest durch?
Benötigte Gegenstände
• 2 Thermometer mit einem Messbereich von
-21 °bis 10 °C
• 2 Gläser
Für den Gefrierschrank
• Stellen Sie das
Thermometer in ein mit
Pflanzenöl gefülltes Glas in
die Mitte des
Gefrierschrankteils und
fahren Sie mit Schritt 3 im
Abschnitt zur
Temperatureinstellung fort.
Modelle mit elektronischer Temperaturreglung
Stellen Sie die Temperatur für den Gefrierschrank mit den Tasten
1
neben der Taste ein. Ein Temperaturbereich von –17 bis
–16°C (0 bis 2°F) ist empfehlenswert.
• Mit der Taste können Sie die Temperatur im Gefrierteil erhöhen und mit der Taste senken.
• Drücken Sie die Taste , um die Einstellungen zu bestätigen.
Für den Kühlschrank
• Stellen Sie das
Thermometer in ein mit
Wasser gefülltes Glas in
die Mitte des
Kühlschrankteils und
fahren Sie mit Schritt 3
im Abschnitt zur
Temperatureinstellung
fort.
Stellen Sie die Temperatur für den Kühlschrankteil mit den Tasten
2
neben der Taste ein. Ein Temperaturbereich von 3 bis 4°C (38 bis
40°F) ist empfehlenswert.
• Mit der Taste können Sie die Temperatur im Kühlschrankteil erhöhen und mit der Taste senken.
• Drücken Sie die Taste , um die Einstellungen zu bestätigen.
Warten Sie 24 Stunden, bis sich die Temperaturen stabilisiert haben.
3
HINWEIS: Wenn Sie die Temperaturen in einem laufenden Teil ändern, dauert es lediglich 5 bis 8 Stunden,
bis die gewünschte Temperatur erreicht ist.
32
Page 33

Informationen zu Ihrem Filtersystem...
Wasserfilter entfernen und installieren
WARNUNG
!
Zur Vermeidung von schweren und lebensbedrohlichen Krankheiten sollten Sie das Gerät in Gegenden mit
gefährlicher oder unbekannter Wasserqualität nicht ohne die entsprechenden Desinfektionsmaßnahmen vor
oder nach dem Filtern verwenden.
VORSICHT
!
• Der Bypass-Einsatz filtert KEIN Wasser. Sorgen Sie dafür, dass Sie stets einen Ersatzfiltereinsatz parat haben, wenn ein
Filterwechsel erforderlich wird.
• Wenn das Wasserfiltersystem gefroren war, muss der Filtereinsatz ausgetauscht werden.
• Wenn das System mehrere Monate lang nicht verwendet wurde und das Wasser einen unangenehmen Geschmack oder
Geruch aufweist, spülen Sie das System durch, indem Sie 2 bis 3 Gläser Wasser entnehmen. Wenn das Wasser
weiterhin einen unangenehmen Geschmack oder Geruch hat, sollten Sie den Filtereinsatz wechseln.
Wasserfilter erstmalig installieren
Entfernen Sie die blaue
1
Bypass-Kappe und heben
Sie sie für eine spätere
Verwendung auf.
Ziehen Sie die
2
Versiegelungsstreifen am Ende
des Filters ab und setzen Sie
ihn in den Filterhalter ein.
• Drehen Sie ihn vorsichtig bis zum Anschlag und
schließen Sie den Deckel der Filterhalterung.
Verringern Sie Wasserspritzer, indem Sie die
3
Luft aus dem System spülen. Lassen Sie das
Wasser (etwa 2 Minuten) ununterbrochen aus
dem Spender laufen, bis es gleichmäßig fließt.
• Bei schlechter Wasserqualität müssen Sie eventuell
mehr Wasser ablaufen lassen.
Ich versuche, Wasser zum Spülen
des Systems auszugeben.
Es kommt aber keins?
Warten Sie bei erstmaliger Verwendung etwa 1 bis 2 Minuten,
damit der interne Wassertank gefüllt werden kann.
Was ist, wenn ich das Wasserfiltersystem
nicht verwenden möchte?
Der Wasserspender kann auch ohne den Wasserfilter verwendet
werden. Wenn Sie sich für diese Option entscheiden, ersetzen
Sie den Filter durch die blaue Bypass-Kappe.
Wasserfilter ersetzen
WICHTIG: Durch im System eingeschlossene Luft
kann Wasser herausspritzen und der Filtereinsatz
herausgeschleudert werden. Seien Sie daher beim
Entfernen des Filters vorsichtig.
Drehen Sie den Filter entgegen dem
1
Uhrzeigersinn, bis er sich aus der
Filterhalterung entnehmen lässt.
Lassen Sie das Wasser im Filter in das
2
Waschbecken oder die Toilette laufen
und entsorgen Sie den Filter im
normalen Hausmüll.
Wischen Sie den Filterdeckel trocken und
3
fahren Sie mit den Installationsschritten
2 und 3 fort.
Wann muss ich den Wasserfilter
auswechseln?
Einige Spendermodelle verfügen über eine Filterwechselanzeige.
Hinweise zur Bedienung und zum Zurücksetzen dieser Funktion
finden Sie im Abschnitt „Merkmale des Spenders“ in
diesem Handbuch.
Bei Geräten ohne Anzeige sollte der Filter etwa alle 6 Monate
gewechselt.
WICHTIG: Die Beschaffenheit und die Menge des
verwendeten Wassers bestimmen die Lebensdauer des
Wasserfiltereinsatzes. Bei hohem Wasserverbrauch oder
schlechter Wasserqualität muss er eventuell öfter
gewechselt werden.
Wie bestelle ich einen Ersatzfiltereinsatz?
Der Ersatz-Wasserfiltereinsatz Modell OWF51 ist bei Ihrem
Fachhändler oder beim Kundendienst erhältlich. Weitere
Informationen erhalten Sie bei Ihrem örtlichen Fachhändler.
33
Page 34

Merkmale des Kühlschrankteils
Was ist, wenn diese Merkmale
bei meinem Gerät anders sind?
Dieses Handbuch deckt die zahlreichen Merkmale ab, die in dieser Produktlinie
verfügbar sind. Wenn Sie für Ihren Kühlschrank zusätzliche Elemente kaufen
möchten, wenden Sie sich bitte an Ihren Fachhändler.
Innere Regale
VORSICHT
!
Um Personen- oder Sachschäden zu vermeiden, beachten Sie bitte Folgendes:
• Vergewissern Sie sich, dass das Regal fest eingesetzt ist, bevor Sie etwas darauf legen.
• Gehen Sie vorsichtig mit Glasfächern um. Glasböden können brechen, wenn sie gebogen, zerkratzt oder einer
plötzlichen Temperaturveränderung ausgesetzt werden.
Slide Glide™ Regale
(einige Modelle)
Slide Glide™ Regale werden an eine Konstruktion
aus zwei Querschienen angehängt. Die Regale
können nebeneinander
ausgerichtet werden, um
eine Lagerfläche mit der
vollen Breite zu schaffen,
oder sie können an
getrennten Querschienen
befestigt werden, so dass
die Regale nach links oder
rechts entsprechend dem
Bedarf an Lagerfläche
geschoben werden
können.
Spillsaver™
Easy Glide™
(einige Modelle)
Spillsaver™ Easy Glide™
Regale lassen sich leicht
reinigen; sie können nämlich
herausgezogen werden, um
Kühlgut im hinteren Bereich
zu erreichen. Für eine leichte
Reinigung können Glasböden herausgenommen werden,
indem sie bis zum Anschlag herausgezogen und dann
aus dem Rahmen gehoben werden.
• Anweisungen zum Entfernen von Regalen und Rahmen
finden Sie unter Spillsaver™ feststehende Regale.
Regal herausnehmen und einsetzen:
• Zum Entfernen des Regals heben Sie es um
10° an, um es aus der Doppel-Querschiene
auszuhaken und nehmen
Sie es dann heraus.
• Zum Installieren gehen
Sie in umgekehrter
Reihenfolge vor.
Regale verschieben:
• Heben Sie das Regal vorne
leicht an und schieben
Sie es nach rechts
oder links.
Doppelquerschienen
herausnehmen und
einsetzen:
• Zum Entfernen der Schienen schieben
Sie sie nach oben, um sie aus dem
Metallgestänge auszuhaken.
• Zum Installieren gehen Sie in umgekehrter
Reihenfolge vor.
Spillsaver™
SpillsaverTM- feststehende
Regale halten für eine leichtere
Reinigung kleinere Mengen von
ausgeschütteten Flüssigkeiten
zurück.
• Zum Entfernen der Regale
heben Sie sie an und
nehmen sie dann heraus.
• Zum Installieren der Regale gehen
Sie in umgekehrter Reihenfolge vor.
Hintere Regalbodenerweiterungen
(einige Modelle)
Hintere Regalbodenerweiterungen verhindern, dass
Kühlgut hinten über den Rand des Regalbodens fällt.
Regalbodenerweiterungen herausnehmen
und einsetzen:
• Zum Entfernen der
Regalbodenerweiterung
ziehen Sie sie gerade nach
oben vom Regalboden ab.
• Zum Einsetzen stecken
Sie die Stifte der
Regalbodenerweiterung
in die Löcher des
Regalbodenrahmens ein.
34
Page 35

A
Merkmale des Kühlschrankteils
Lagermöglichkeit in der Tür
Dairy Center
(Milchproduktabteil)
Das Dairy Center ermöglicht
eine zweckmäßige Lagerung
von Lebensmitteln wie Butter,
Joghurt, Käse, usw. Dieses
einstellbare Fach befindet
sich in der Tür. Es kann an
mehreren Stellen platziert
werden und passt sich so
den verschiedensten
Lagererfordernissen an.
• Nehmen Sie das Dairy Center heraus, indem
Sie es anheben und herausziehen.
• Zum Installieren gehen Sie in umgekehrter
Reihenfolge vor.
Herausklappbare Türkörbe
(einige Modelle)
Die herausklappbaren Türkorbeinheiten bestehen
aus einem Türkorb und einem Rahmen für eine
komfortable und anpassungsfähige Lagerung von
Lebensmitteln in der Tür. Die Türkorbeinheit lässt sich
für einen leichteren Zugang zu den Lebensmitteln nach
vorne klappen und zum Reinigen und Einstellen
herausnehmen.
Türkörbe herausnehmen
und einsetzen:
• Zum Herausnehmen kippen
Sie den Korb nach vorne und
ziehen ihn heraus.
• Zum Einsetzen schieben Sie
den Korb in den Rahmen und
klappen ihn hoch.
Türkorbrahmen einstellen:
• Nehmen Sie den Türkorb gemäß
den Anweisungen heraus.
• Ziehen Sie den Rahmen von der Halterung in
der Tür und setzen Sie ihn an der gewünschten
Stelle wieder ein.
Anti-Rutschmatten
Anti-Rutschmatten verhindern,
dass Gegenstände im Türkorb
hin- und herrutschen. AntiRutschmatten können
herausgenommen und für eine
leichte Reinigung im oberen Korb
des Geschirrspülers gewaschen werden.
Beverage Chiller™ /
Mini-Chiller™Mini-Chiller™
Mini-Chiller™
Mini-Chiller™Mini-Chiller™
(einige Modelle)
Der temperaturgesteuerte Beverage Chiller™ und der
temperaturgesteuerte Mini-Beverage Chiller™ halten
Getränke und andere Lebensmittel um bis zu 3° C
kälter als die restlichen Lebensmittel im normalen
Kühlbereich. Durch einen Lufteinlass strömt Luft aus
dem Gefrierteil in den Beverage Chiller™.
Der Regler für den Beverage Chiller™
befindet sich an der linken Wand des
Kühlteils. Über den Regler kann die
Luftmenge eingestellt werden, die im
Beverage Chiller™ zirkuliert. Drehen Sie
den Regler auf das große
Schneeflockensymbol, um die
Temperatur zu senken.
Beverage Chiller™ herausnehmen und einsetzen:
• Wenn sich das Dairy
Center oder ein Türkorb
direkt über dem Beverage
Chiller™ befinden,
müssen diese eventuell
herausgenommen werden.
Entfernen Sie diese
Elemente gemäß den
jeweiligen Anweisungen.
Schieben Sie die Beverage
Chiller™-Einheit nach oben
und nehmen Sie sie heraus.
• Zum Einsetzen richten Sie
eines der Einströmlöcher
für Kaltluft
Chiller™ mit einem der
beiden Lufteinlässe
der Türverkleidung aus.
Drücken Sie die Einheit bis
zum Anschlag in die
Türverkleidung.
WICHTIG: Der Beverage Chiller™ funktioniert
nicht ordnungsgemäß, wenn die Einströmlöcher
nicht mit den Lufteinlässen in der Türverkleidung
ausgerichtet sind.
(A)
am Beverage
(B)
in
B
Türkörbe
Die Türkörbe lassen sich auf
verschiedene Lagererfordernisse
einstellen.
• Zum Entfernen eines Türkorbs
drücken Sie ihn nach oben und
ziehen ihn heraus.
• Zum Einsetzen gehen Sie in
umgekehrter Reihenfolge vor.
35
Page 36

Merkmale des Kühlschrankteils
Fächer
Delikatessen-/Gemüse-Fach
mit Klimaregelung
Im Delikatessen-/Gemüse-System kann die
Temperatur reguliert werden, so dass in diesem Fach
eine bis zu 3° C kältere Temperatur herrscht als im
normalen Kühlbereich. Dieses Fach kann für die
Lagerung von Delikatessen oder anderen
Produkten verwendet werden.
HINWEIS: Die kalte Luft, die in das
Delikatessen-/Gemüse-System geleitet wird,
kann zu einer Absenkung der Temperatur im
normalen Kühlbereich führen. Daher muss
die Kühlschranktemperatur eventuell neu
eingestellt werden.
Regler
Der Klimaregler befindet sich an der Wand rechts
neben dem Fach und regelt die Lufttemperatur
im Delikatessen-/Gemüse-Fach. Stellen Sie
den Regler auf
Kühlschranktemperatur für Produkte mit äußerer
Haut. Verwenden Sie die Einstellung
(am kältesten) für Fleisch und andere Delikatessen.
GemGem
üsefüsef
Gem
üsef
GemGem
üsefüsef
Das Garden Fresh™-Gemüsefach hält Gemüse
länger frisch, da sich die Luftfeuchtigkeit
anpassen lässt.
Regler
Mit dem Regler für das Garden Fresh™-Fach lässt
sich die Feuchtigkeit im Gemüsefach einstellen.
Verwenden Sie die Einstellung
Gemüse mit äußerer Haut. Verwenden Sie die
Einstellung
cold
(kalt) für eine normale
acac
hh
ac
h mit Klimaregelung
acac
hh
high
(hoch) für Blattgemüse.
coldest
low
(niedrig) für
Berverage Organizer™
(einige Modelle)
Der Beverage Organizer™ lässt sich unter dem
Spillsaver™ Easy Glide™ Regal hervorziehen.
Der Organizer kann bis zu
12 Getränkedosen fassen.
Organizer herausnehmen
und einsetzen:
• Zum Entfernen nehmen
Sie zuerst den Inhalt
heraus. Ziehen Sie den
Organizer dann nach
vorne bis zum Anschlag
heraus und heben Sie die Vorderseite an,
um ihn aus der Regalschiene auszuhaken.
Ziehen Sie ihn gerade heraus.
• Zum Einsetzen gehen Sie in umgekehrter
Reihenfolge vor.
Lade herausnehmen und einsetzen:
• Zum Herausnehmen ziehen
Sie die Lade ganz heraus,
heben sie vorne an und
nehmen sie heraus.
• Zum Einsetzen gehen Sie in
umgekehrter Reihenfolge vor.
Einlegeboden im Gemüsefach
herausnehmen und einsetzen:
• Heben Sie ihn von den
Wandhalterungen ab und nehmen Sie ihn heraus.
• Zum Einsetzen legen Sie den Boden wieder auf die
Wandhalterungen auf und schieben ihn nach hinten
bis er mit der Rückwand abschließt.
36
Page 37

Merkmale des Gefrierschrankteils
Was ist, wenn diese
Merkmale bei meinem
Dieses Handbuch deckt die zahlreichen Merkmale ab, die in dieser Produktlinie verfügbar sind.
Wenn Sie für Ihren Kühlschrank zusätzliche Elemente kaufen möchten, wenden Sie sich bitte
an Ihren Fachhändler.
Gerät anders sind?
Grundfunktionen
VORSICHT
!
Um Sachschäden zu vermeiden, sollten Sie Folgendes beachten:
• Drücken Sie den Arm des Eiserzeugers niemals mit Gewalt nach oben oder nach unten.
• Legen Sie nichts in den Eisbehälter und lagern Sie nichts darin.
Automatische Eiserzeuger
mit Spender
Dieser Eiserzeuger produziert das Eis, das durch den
Spender ausgegeben wird.
Erstmaliger Einsatz des Eiserzeugers
• Vergewissern Sie sich,
dass der Eisbehälter
eingesetzt ist und der
Arm des Eiserzeugers
nach unten weist.
• Nachdem der Gefrierteil
eine Temperatur zwischen 18° und -17° C erreicht hat,
füllt sich der Eiserzeuger mit Wasser
und nimmt den Betrieb auf.
• Etwa 24 Stunden nach der Installation kann
zum ersten Mal Eis entnommen werden.
• Werfen Sie das Eis, das in den ersten 12
Betriebsstunden produziert wurde weg, um
sicherzustellen, dass Verschmutzungen
aus dem System gespült wurden.
Anweisungen für den Betrieb
• Vergewissern Sie sich, dass der Eisbehälter
eingesetzt ist und der Arm des Eiserzeugers
nach unten weist.
• Nachdem das Gefrierteil eine Temperatur zwischen
-18° und -17° C erreicht hat,
füllt sich der Eiserzeuger
mit Wasser und nimmt
den Betrieb auf. Etwa
alle 3 Stunden ist der
Eisbehälter vollständig
mit Eis gefüllt.
• Die Eisproduktion kann
durch das Anheben des
Eiserzeugerarms
eingestellt werden. Wenn die richtige Position
erreicht ist, ist ein deutliches Klicken zu hören.
• Der Eiserzeuger bleibt solange in der
(Aus), bis der Arm niedergedrückt wird.
WICHTIG: Das Speiseeisregal sollte nicht
eingesetzt werden, solange sich der
Eiserzeugerarm in Off-Stellung befindet.
off
-Position
Speiseeisregal
Im Speiseeisregal können Lebensmittel
schnell heruntergekühlt oder eingefroren werden.
• Zum Herausnehmen heben Sie
das Speiseeisregal aus dem
Eisbehälter heraus und ziehen
es gerade heraus.
• Zum Einsetzen gehen Sie in
umgekehrter Reihenfolge vor.
WICHTIG: Das Speiseeisregal sollte nicht
eingesetzt werden, solange sich der
Eiserzeugerarm in Off-Stellung befindet.
Eisbehälter
Der Eisbehälter befindet sich unter dem
automatischen Eiserzeuger mit Spender.
Eisbehälter herausnehmen
und einsetzen:
• Bevor Sie den Eisbehälter
herausnehmen können,
müssen Sie zuerst das
Speiseeisregal entfernen.
Heben Sie den
Eiserzeugerarm, um den
Eiserzeuger zu deaktivieren.
• Heben Sie den Eisbehälter vorne an und ziehen
Sie ihn bis zum Anschlag heraus. Heben Sie ihn
vorne an und nehmen Sie ihn heraus.
• Zum Einsetzen lassen Sie den Behälter in die
Schienen unter dem Eiserzeuger gleiten, bis er
einrastet. Drücken Sie den Eiserzeugerarm wieder
nach unten, um den Eiserzeuger zu aktivieren,
und setzen Sie das Speiseeisregal wieder ein.
WICHTIG: Der Eisbehälter muss richtig sitzen,
damit das Eis ordnungsgemäß ausgegeben werden
kann. Wenn die Gefrierschranktür nicht schließt,
sitzt der Eisbehälter nicht richtig. Drehen Sie den
Eisbohrer-antrieb wie gezeigt, um den Eisbehälter
korrekt mit dem Gerät auszurichten.
37
Page 38

Merkmale des Gefrierschrankteils
Roste
Stor-Mor®-System
Die Körbe lassen sich leicht herausziehen, um einen
einfachen Zugang zu Lebensmitteln zu ermöglichen,
die weiter hinten gelagert sind. Die Drahtroste lassen
sich verschieden anordnen, um den unterschiedlichen
Lagerbedürfnissen gerecht zu werden.
Stor-Mor
• Entfernen Sie das Regal, indem Sie die rechte Seite
• Zum Einsetzen gehen Sie in
HINWEIS: Die Rückseite des Regals muss mit der
Geräterückwand abschließen, damit es sicher in
den Schienen sitzt. Andernfalls rutscht das Regal.
Körbe herausnehmen und einsetzen:
• Zum Herausnehmen ziehen Sie den Korb bis zum
• Zum Einsetzen gehen Sie in
®
-Regal herausnehmen und einsetzen:
von der Schiene ausrasten und
von der Halterung entfernen.
umgekehrter Reihenfolge vor.
Anschlag heraus. Heben Sie
den vorderen Griff an, um
den Korb aus den Schienen
auszuhaken und nehmen
Sie ihn heraus.
umgekehrter Reihenfolge vor.
Fester Gefrierschrank-Rost
Roste herausnehmen und einsetzen:
• Heben Sie den Rost aus den
Wandhalterungen und ziehen
Sie sie dann aus den
Montagelöchern auf der
linken Seite heraus.
• Zum Einsetzen gehen Sie in
umgekehrter Reihenfolge vor.
Hängender Drahtrost
(einige Modelle)
Hängende Drahtroste bieten zusätzliche Lagerfläche
für Eiswürfelschalen, Frostware in Kartons,
Eispackungen, usw.
Rost herausnehmen:
• Drücken Sie den Haken des
Rosts, der auf den Sprossen
hängt, nach innen, um den
hängenden Rost von der
rechten Seite des Stor-Mor
Regals zu lösen. Der Rost
schwenkt nach unten.
• Drücken Sie den Haken des
Rosts, der auf den Sprossen
hängt, nach außen, um den
Rost aus dem Gefrierschrankteil herauszunehmen.
®
-
Lagermöglichkeiten in der Tür
Türkörbe
• Anweisungen finden Sie im Abschnitt zum
Kühlschrankteil.
Rost einsetzen:
• Zum Einsetzen gehen Sie in umgekehrter
Reihenfolge vor.
Herausklappbare Türkörbe
(einige Modelle)
• Anweisungen finden Sie im Abschnitt zum
Kühlschrankteil.
38
Page 39
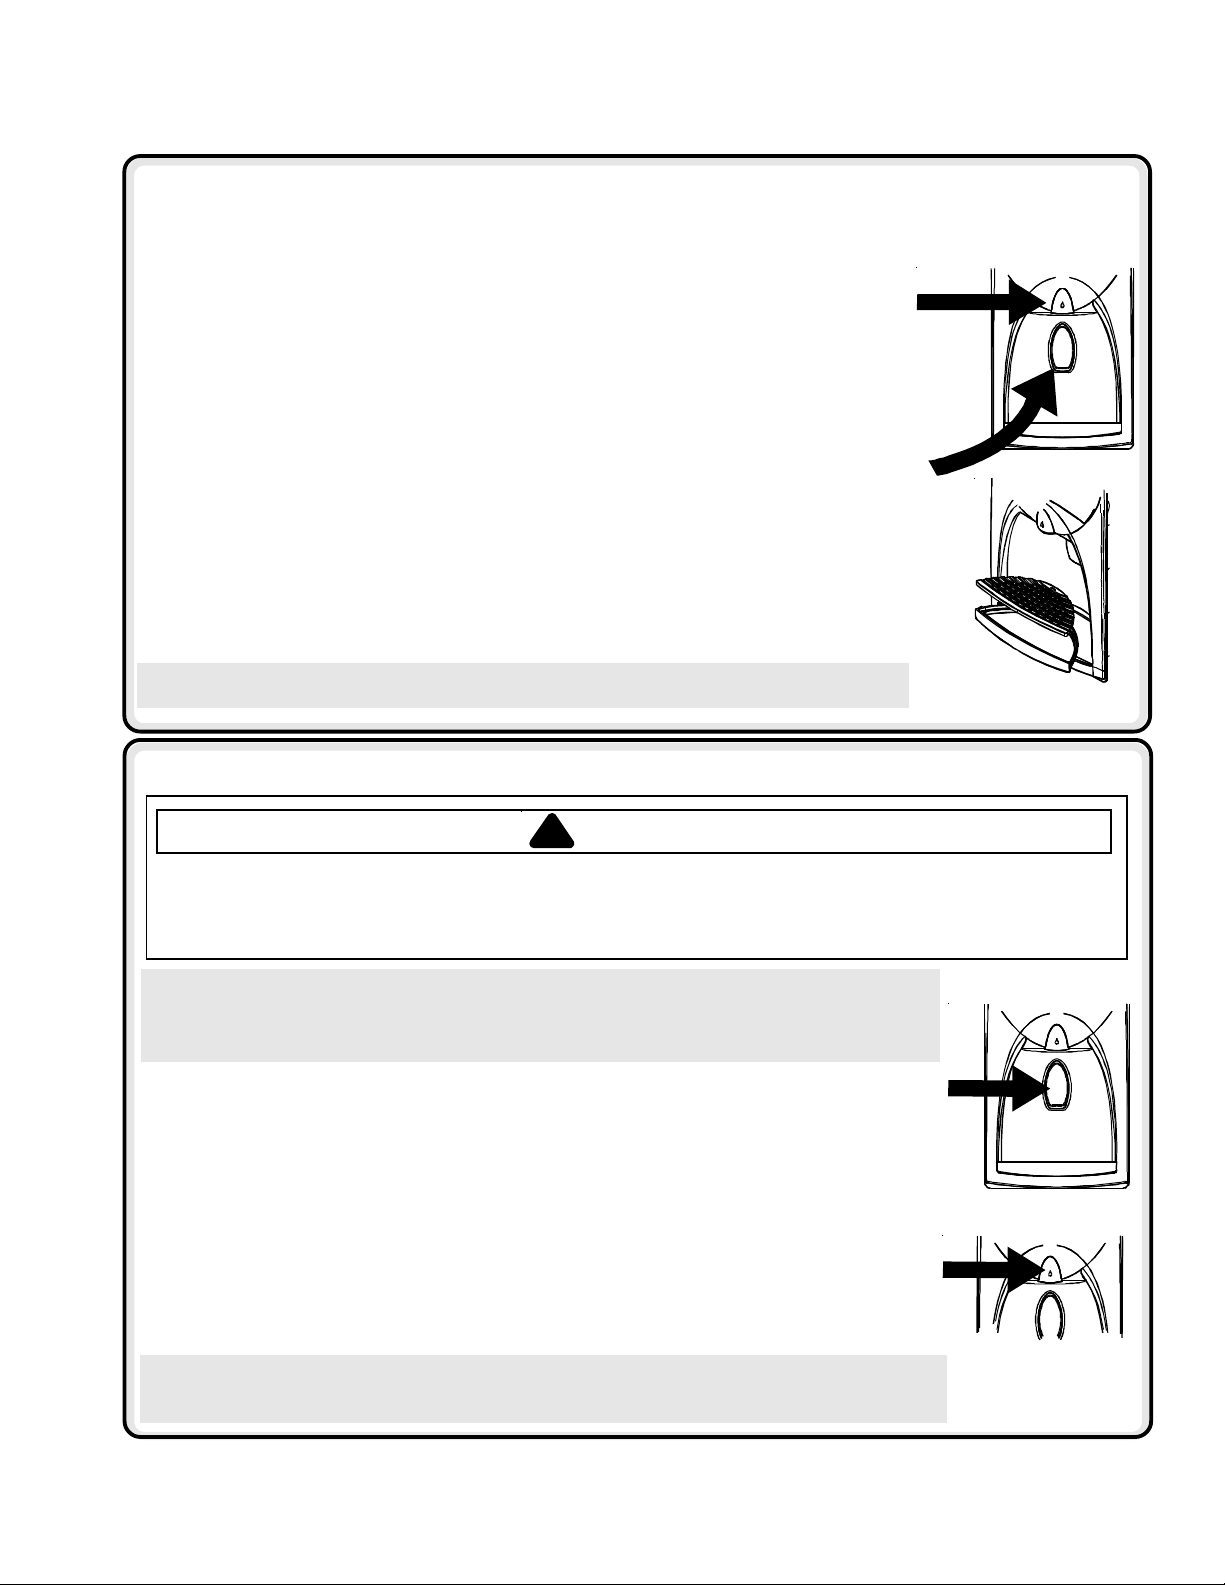
Merkmale des Spenders
Grundfunktionen
Spenderbeleuchtung nicht abgebildet
Bei der Abgabe von Eis oder Wasser leuchtet ein Lämpchen im Spenderbereich auf.
Front Fill vorderer (Abfüllknopf) (einige Modelle)
Der vordere Front Fill (Abfüllknopf) funktioniert unabhängig vom Regler des Spenders und
bietet eine Alternative zur Wasserabgabe gegenüber dem Kontaktschalter des Spenders.
Diese Funktion eignet sich hervorragend zum Füllen großer Gegenstände, die nicht in den
Spenderbereich passen (z.B. Sportflaschen, Krüge, Kaffeekannen).
Mit dieser Funktion kann außerdem Wasser und Eis gleichzeitig ausgegeben werden. Wählen
Sie hierfür auf dem Bedienfeld des Spenders den gewünschten Eismodus. Drücken Sie den
Behälter gegen den Kontaktschalter des Spenders, während Sie gleichzeitig den vorderen
Front Fill (Abfüllknopf) drücken.
Kontaktschalter des Spenders
Der Kontaktschalter befindet sich an der Rückwand des Spenderbereichs. Wenn der
Kontaktschalter gedrückt wird, erfolgt die Ausgabe entsprechend der Auswahl auf dem
Bedienfeld des Spenders.
Herausnehmbare Schale
In der herausnehmbaren Schale im unteren Teil des Spenderbereichs werden kleinere
Mengen verschütteten Wassers aufgefangen; die Schale kann zur Reinigung und Entleerung
herausgenommen werden.
WICHTIG: Die herausnehmbare Schale hat keinen Abfluss. Wenn ununterbrochen Wasser
hinein fließt, läuft die Schale über.
Betrieb des Wasserspenders
VORSICHT
!
Um Verletzungen oder Beschädigungen zu vermeiden, sollten Sie folgende Vorsichtsmaßnahmen einhalten:
• Stecken Sie Finger, Hände oder Fremdgegenstände nicht in die Öffnung des Spenders.
• Verwenden Sie zum Brechen des Eises keine scharfen Gegenstände.
• Fangen Sie Eis nicht direkt in dünnwandigen Glasbehältern, feinem Porzellan oder empfindlichem Kristall auf.
HINWEIS: Bei der erstmaligen Benutzung des Wasserspenders dauert es etwa 1 bis 2 Minuten,
bis der interne Wassertank gefüllt ist. Schütten Sie nach dem Erstanschluss an die häusliche
Wasserversorgung und nach längeren Zeiten der Nichtbenutzung die ersten 10 bis 14
Wasserfüllungen weg.
Kontaktschalter des Spenders verwenden:
• Wählen Sie auf dem Bedienfeld „Water“ (Wasser) aus.
• Drücken Sie einen Behälter mit großer Öffnung fest gegen den Kontaktschalter.
• Unterbrechen Sie die Wasserentnahme, indem Sie den Kontaktschalter loslassen. Es kann
sein, dass immer noch etwas Wasser nachläuft; dieses Wasser wird in der Überlaufschale
aufgefangen. Große Mengen ausgelaufenen Wassers sollten aufgewischt werden.
Vorderen Front Fill (Abfüllknopf) verwenden (einige Modelle):
• Richten Sie den Behälter unter dem vorderen Front Fill (Abfüllknopf) aus, indem Sie sich am
Wassertropfen-Symbol orientieren.
• Drücken und halten Sie den vorderen Front Fill (Abfüllknopf) gedrückt.
• Lassen Sie den Knopf los, wenn die gewünschte Füllmenge erreicht ist. Es kann sein, dass
immer noch etwas Wasser nachläuft; dieses Wasser wird in der Überlaufschale aufgefangen.
Große Mengen ausgelaufenen Wassers sollten aufgewischt werden.
HINWEIS: Wenn der Wasserspender länger als 5 Minuten aktiviert ist, schaltet ein automatischer
Sperrsensor die Stromversorgung für den Spenderbereich ab. Weitere Informationen finden Sie
unter Automatische Sperre.
39
Page 40

Merkmale des Spenders
Einstellfunktionen
(Einstellung mit 5 Tasten)
Betrieb des Eisspenders
Eis ausgeben:
• Wählen Sie
des Spenders drücken. Eine grüne Lampe über der Taste zeigt den ausgewählten Modus an.
• Drücken Sie den Behälter gegen den Kontaktschalter des Spenders. Bei der Ausgabe von Stoßeis müssen
Sie den Behälter so nah wie möglich an den Eisauswurfschacht des Spenders halten, damit das Eis nicht
spritzt. Während der Eisspender in Betrieb ist, kann der Auswahlmodus nicht geändert werden.
HINWEIS: Wenn der Eisspender länger als 2 bis 3 Minuten aktiviert ist, schaltet ein automatischer Sperrsensor
die Stromversorgung für den Spenderbereich ab. Weitere Informationen finden Sie unter Automatische Sperre.
Cubed
(Würfel-) oder
Crushed
(Stoßeis), indem Sie die entsprechende Taste auf dem Bedienfeld
Dispenser Lock (Spendersperre)
Diese Funktion verhindert die Ausgabe von Eis oder
Wasser.
Spender sperren und entsperren:
• Halten Sie die Taste
(Spendersperre) 3 bis 4 Sekunden lang gedrückt,
um den Spender zu sperren.
Eine grüne Lampe über der Taste zeigt an, dass
der Spender gesperrt ist.
• Zum Entsperren des Spenders halten Sie die
Dispenser Lock
Taste
Sekunden lang gedrückt.
Die grüne Anzeigelampe über der Taste erlischt.
Dispenser Lock
(Spendersperre) 3 bis 4
Worin besteht die Funktion „Automatische Sperre“?
Die automatische Sperre unterbricht die Stromversorgung
zum Wasser- und Eisspender, wenn einer der beiden Spender
ununterbrochen aktiviert war. Wenn sich dieser Modus einschaltet,
leuchtet eine grüne Lampe über der Taste Dispenser
Lock (Spendersperre).
Spender entsperren:
• Zum Entsperren halten Sie die Taste Dispenser Lock
(Spendersperre) 3 bis 4 Sekunden lang gedrückt. Die grüne
Anzeigelampe leuchtet auf.
Anzeigelampe für den Filterzustand
Die Anzeigelampe für den Filterzustand erinnert daran, dass der Wasserfilter ausgewechselt werden muss.
Eine grüne Lampe zeigt an, dass der Filter in gutem Zustand ist. Die rote Lampe zeigt an, dass der Filter ausgewechselt
werden sollte. Wenn die rote Lampe einmal brennt, leuchtet sie so lange, bis die Funktion zurückgesetzt wird.
Anzeigefunktion zurücksetzen:
• Halten Sie die Tasten
3 bis 4 Sekunden lang gedrückt.
Die grüne Lampe für die Filterzustandsanzeige blinkt dreimal, wenn die Funktion erfolgreich zurückgesetzt wurde.
Dispenser Lock
(Spendersperre) und
Water
(Wasser) gleichzeitig
Auto Light (Automatisches Licht)
Mit der Funktion
werden, wenn der
Auto Light (Automatisches Licht) aktivieren und deaktivieren:
• Zum Aktivieren drücken Sie die Taste
dem Bedienfeld. Eine grüne Lampe zeigt an, dass der Sensor aktiviert ist.
• Zum Deaktivieren drücken Sie die Taste
Die grüne Anzeigelampe erlischt.
Auto Light
Light Sensor
(Automatisches Licht) kann die Spender-Beleuchtung mit halber Leistung aktiviert
(Lichtsensor) feststellt, dass die Beleuchtung im Raum niedrig ist.
Auto Light
(Automatisches Licht) auf
Auto Light
(Automatisches Licht).
HINWEIS: Die Spender-Beleuchtung funktioniert
unabhängig davon, ob das Auto Light
(Automatisches Licht) aktiviert ist oder nicht
.
Sabbath Mode (Sabbat-Modus)
Dieser Modus unterbricht die Stromzufuhr zur LED und zur Spender-Lampe; die Einstelltasten
bleiben jedoch funktionsbereit.
So aktivieren Sie den Sabbath Mode (Sabbat-Modus):
• Halten Sie die Tasten
Licht) 3 bis 4 Sekunden lang gleichzeitig gedrückt. Nach 3 bis 4 Sekunden schalten
sich LED und Spender-Lampe aus. In diesem Modus leuchtet die Spender-Lampe
bei der Ausgabe nicht.
So deaktivieren Sie den Sabbath Mode (Sabbat-Modus):
• Halten Sie die Tasten
Licht) 3 bis 4 Sekunden lang gleichzeitig gedrückt. Nach 3 bis 4 Sekunden sind LED
und Spender-Lampe aktiviert.
Dispenser Lock
Dispenser Lock
(Spendersperre) und
(Spendersperre) und
Auto Light
Auto Light
(Automatisches
(Automatisches
40
+
HINWEIS: Falls die
Stromversorgung zum Kühlschrank
unterbrochen wird und der Sabbath
Mode (Sabbat-Modus) aktiviert ist,
bleibt er auch aktiviert, wenn die
Stromversorgung wieder hergestellt wird.
Page 41

OK
Austausch en
Wasser- und Eisausgabe (Hauptaktivator)
Wasser-und Eisausgabe funktionieren unabhängig voneinander.
Wasser ausgeben:
• Drücken Sie die Taste
Eis ausgeben:
• Drücken Sie die Taste
Merkmale des Spenders
Einstellfunktionen
(Elektronische Einstellung)
für Würfeleis.
• Drücken Sie den Wasseraktivator.
• Drücken Sie die Taste
für Stoßeis.
Spendersperre
Diese Funktion verhindert die Ausgabe von Eis oder Wasser.
Spender sperren und entsperren:
• Halten Sie die Taste
Taste zeigt an, dass der Spender gesperrt ist.
• Zum Entsperren des Spenders halten Sie die Taste
über der Taste erlischt.
Licht
Für das Licht gibt es zwei Einstellmöglichkeiten: OFF (AUS)
und AUTO (AUTOMATISCH).
Wenn das Licht auf OFF eingestellt ist, funktioniert es lediglich als Spenderbeleuchtung.
Bei Einstellung auf AUTO misst der SENSOR die Lichtstärke der Umgebung und passt die Leistung der
Spenderbeleuchtung entsprechend an. Wenn der Sensor eine geringe Lichtstärke feststellt (z.B. nachts oder
abgedunkelte Küche), leuchtet die Spenderbeleuchtung mit halber Leistung. Wenn der Sensor eine hohe Lichtstärke
feststellt (z.B. eingeschaltete Küchenbeleuchtung oder direktes Sonnenlicht), wird die Spenderbeleuchtung nicht aktiviert.
Einstellung AUTO deaktivieren und aktivieren:
• Zum Deaktivieren drücken Sie die Taste
leuchtet, funktioniert das Licht nur, wenn Eis oder Wasser ausgegeben werden.
• Zum Aktivieren drücken Sie die Taste
Spenderbeleuchtung mit der Einstellung AUTO.
3 Sekunden lang gedrückt, um den Spender zu sperren. Eine grüne Lampe über der
3 Sekunden lang gedrückt. Die grüne Anzeigelampe
HINWEIS: Das Spenderlicht leuchtet mit voller
Leistung, wenn Eis oder Wasser ausgegeben wird
auf dem Bedienfeld. Wenn die grüne Anzeigelampe über der Taste nicht
. Wenn die grüne Anzeigelampe über der Taste leuchtet, funktioniert die
.
Anzeigelampe für den Filterzustand
Die Anzeigelampe für den Filterzustand erinnert daran, dass der Wasserfilter ausgewechselt werden muss.
Eine grüne Lampe zeigt an, dass der Filter in gutem Zustand ist. Eine rote Lampe zeigt an, dass der Filter
ausgewechselt werden sollte. Wenn die rote Lampe einmal brennt, leuchtet sie so lange, bis die Funktion
zurückgesetzt wird.
Anzeigefunktion zurücksetzen:
• Halten Sie die Tasten und gleichzeitig 4 Sekunden lang gedrückt. Die grüne Lampe für die
Filterzustandsanzeige blinkt dreimal, wenn die Funktion erfolgreich zurückgesetzt wurde.
Worin besteht die Funktion „Automatische Sperre“?
Die automatische Sperre unterbricht die Stromversorgung zum Wasser- und Eisspender, wenn einer der beiden Spender etwa 2 Minuten
ununterbrochen aktiviert war. Wenn sich dieser Modus einschaltet, leuchtet die grüne Lampe über der Taste
Spender entsperren:
• Zum Entsperren halten Sie die Taste
3 Sekunden lang gedrückt. Die grüne Anzeigelampe über der Taste erlischt.
.
41
Page 42
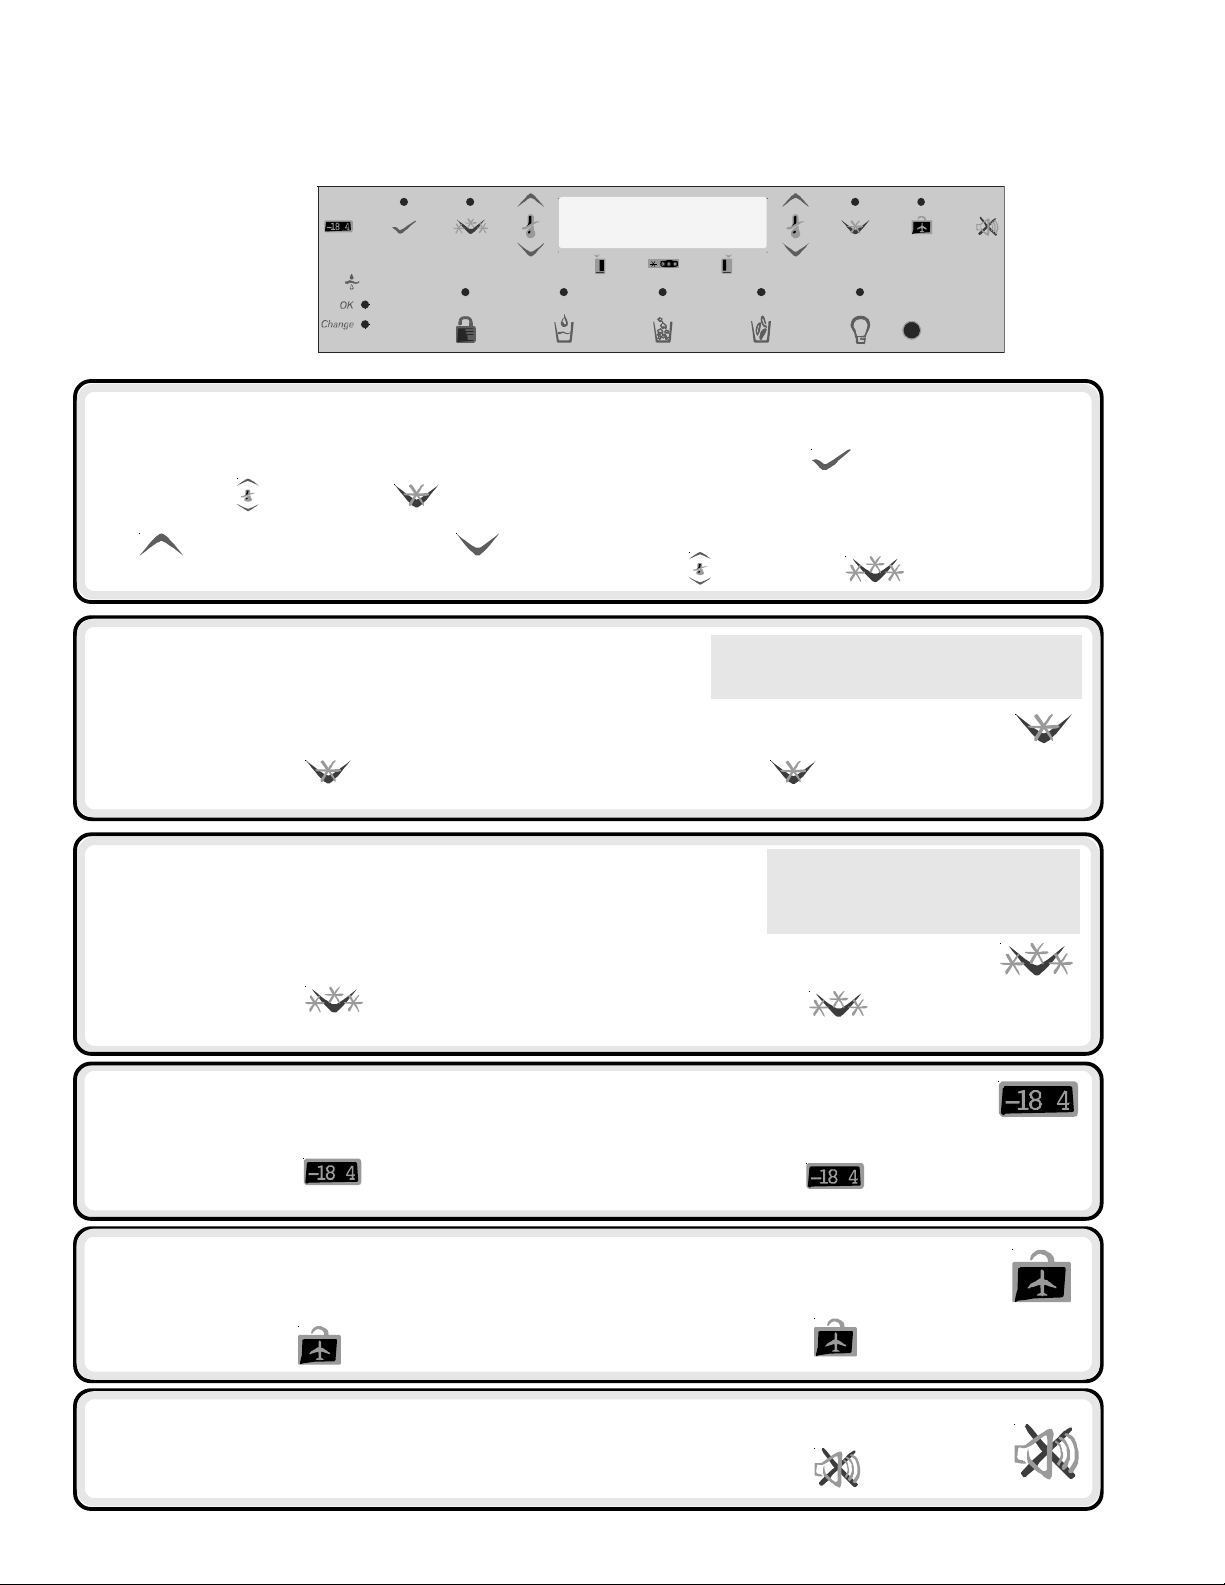
Merkmale des Spenders
Einstellfunktionen Forts.
(Elektronische Einstellung)
Temperaturtasten
Mit Hilfe dieser Tasten kann die Temperatur im Gefrierteil bzw. Kühlschrankteil erhöht oder gesenkt werden.
Temperatur im Kühlschrankteil einstellen:
• Suchen Sie
die Temperatur im Kühlschrankteil mit der Taste
bzw. senken Sie sie mit der Taste .
neben der Taste und erhöhen Sie
• Drücken Sie die Taste
zu bestätigen.
Temperatur im Gefrierteil einstellen:
• Wiederholen Sie die oben genannten Schritte mit den
Tasten
neben der Taste auf dem Bedienfeld.
, um die Einstellung
Max Cool (Maximale Kühlung im Kühlschrank)
Mit dieser Funktion wird die Temperatur im
Kühlschrankteil auf die mit dem Regler voreingestellte
Mindesttemperatur für den Kühlschrank gesenkt. Diese Einstellung bleibt für etwa 10 Stunden wirksam.
Max Cool aktivieren:
• Drücken Sie die Taste
der Taste zeigt die Aktivierung an.
. Die grüne Lampe über
Max Cool deaktivieren:
• Drücken Sie die Taste
Taste erlischt.
Max Freeze (Maximale Kühlung im Gefrierschrank)
Mit dieser Funktion wird die Temperatur im
Gefrierschrankteil auf die mit dem Regler
voreingestellte Mindesttemperatur für den Gefrierschrank
gesenkt. Diese Einstellung bleibt für etwa 24 Stunden wirksam.
Max Freeze aktivieren:
• Drücken Sie die Taste
der Taste zeigt die Aktivierung an.
. Die grüne Lampe über
Max Freeze deaktivieren:
• Drücken Sie die Taste
der Taste erlischt.
HINWEIS: Die Temperatureinstellung kann
nicht geändert werden, wenn die Einstellung
Max Cool oder Max Freeze aktiviert ist
. Die grüne Lampe über der
HINWEIS: Die Temperatureinstellung
kann nicht geändert werden,
wenn die Einstellung Max Cool
oder Max Freeze aktiviert ist
. Die grüne Lampe über
Display On/Off (Display Ein/Aus)
Mit der Taste Display Ein/Aus wird die Stromversorgung des LED-Displays gesteuert.
Display deaktivieren:
• Drücken Sie die Taste
wird ausgeschaltet.
. Das Display
Display reaktivieren:
• Drücken Sie die Taste
wieder eingeschaltet
. Das Display wird
.
Vacation Mode (Urlaubsmodus)
Wenn diese Taste aktiviert ist, werden weniger Abtauvorgänge durchgeführt. Dadurch wird Energie gespart.
Vacation Mode (Urlaubsmodus) aktivieren:
• Drücken Sie die Taste
.
Vacation Mode (Urlaubsmodus) deaktivieren:
• Drücken Sie die Taste
Sie die Kühlschranktür.
oder öffnen
Alarm Off (Alarm aus)
Mit dieser Taste können Warnanzeige und Warnton bei zu
hoher Temperatur sowie der Warnton bei geöffneter Tür
abgeschaltet werden.
Alarm abschalten:
• Drücken Sie die Taste
.
42
Page 43

Merkmale des Spenders
Einstellfunktionen Forts. (Elektronische Einstellung)
Sabbath Mode (Sabbat-Modus)
Dieser Modus unterbricht die Stromzufuhr zur LED und den Spenderlampen; die Einstelltasten
bleiben jedoch funktionsbereit. In diesem Modus funktioniert weder der visuelle noch der
akustische Alarm.
Sabbath Mode (Sabbat-Modus) aktivieren:
• Halten Sie die Tasten
gleichzeitig gedrückt. Nach 3 Sekunden schalten
sich LED und Spenderlampen aus. In diesem
Modus leuchtet die Spenderlampe bei der
Ausgabe nicht.
und 3 Sekunden lang
Auto Display
Auto Display steuert die Beleuchtung des LED-Displays anhand der Messergebnisse des Sensors. Wenn der
Sensor eine niedrige Lichtstärke anzeigt, wird im Modus AUTO das Display schwächer beleuchtet als bei hoher
Umgebungsbeleuchtung. Im Modus EIN hat das Display nur eine Beleuchtungseinstellung und passt sich nicht
der Lichtstärke der Umgebung an.
Beleuchtungsstärke des Displays einstellen:
• Halten Sie die Taste
wird im Display angezeigt, wobe
und die Taste für das Gefrierteil 3 Sekunden lang gedrückt. Die aktuelle Einstellung
O für „Ein“ und Auto für AL steht.
Sabbath Mode (Sabbat-Modus) deaktivieren:
• Halten Sie die Tasten
gleichzeitig gedrückt. Nach 3 Sekunden sind LED
und Spenderlampen aktiviert.
HINWEIS: Falls die Stromversorgung zum Kühlschrank unterbrochen
wird und der Sabbat-Modus aktiviert ist, bleibt er auch aktiviert, wenn
die Stromversorgung wieder hergestellt wird.
und 3 Sekunden lang
+
• Blättern Sie mit der Taste
• Aktivieren Sie die gewünschte Einstellung, indem Sie auf die Taste
Temperaturkonvertierungsmodus
Mit diesem Modus können Sie die im Display
angezeigte Temperatur entweder in Fahrenheit
oder in Celsius anzeigen.
für das Kühlschrankteil durch die Displayeinstellungen.
drücken.
Temperatureinheit ändern:
• Halten Sie die Taste
das Gefrierteil gleichzeitig 3 Sekunden lang gedrückt.
Durch Drücken derselben Tastenkombination können
Sie von einer Einheit auf die andere umschalten.
Verborgene Sperre für das obere Tastenfeld
Dieser Modus soll unerlaubte Änderungen mit den oberen Tasten der Spendereinstellungen
verhindern. Hierzu gehören: Display ein/aus, Max Freeze, Max Cool, Urlaubsmodus und
die Temperaturtasten.
Verborgene Spendertasten-Sperre aktivieren:
• Halten Sie die Tasten und 3 Sekunden
lang gleichzeitig gedrückt.
EIN/AUS
Mit der Funktion EIN/AUS wird die Kühlung für
Kühlschrank und Gefrierschrank ausgeschaltet.
Gerät ausschalten:
• Drücken Sie die Taste für den Gefrierschrank,
bis in der Anzeige die maximal zulässige
Gefrierschranktemperatur erscheint. Auf dem
LED-Display wird dann „— —“ angezeigt
• Drücken Sie die Taste , um die Auswahl
zu bestätigen.
Verborgene Spendertasten-Sperre deaktivieren:
• Halten Sie die Tasten und 3 Sekunden
lang gleichzeitig gedrückt.
WARNUNG
!
Um einen elektrischen Schlag, der zu schweren
Verletzungen oder zum Tod führen kann, zu vermeiden,
muss bei Wartungs- und Reparaturarbeiten der Stecker
des Kühlschranks aus der Steckdose gezogen werden.
Gerät wieder einschalten:
• Drücken Sie die Taste
• Drücken Sie die Taste , um die Auswahl
zu bestätigen.
° F
und die Taste für
° C
+
für den Gefrierschrank.
43
Page 44

Hinweise
und Pflege
Welche
Reinigungsmittel
sind für meine
Edelstahl-Produkte
zu empfehlen?
Der Hersteller bietet einen Reiniger
an (Artikel-Nummer 31960801).
Dieses Produkt erhalten Sie bei
Ihrem örtlichen Fachhändler.
WICHTIG: Beschädigungen an
der Edelstahloberfläche aufgrund
unsachgemäßer Verwendung
von Reinigungsmitteln bzw. nicht
empfohlenen Produkten fallen
nicht unter die Garantie.
Wie beseitige
ich Gerüche
aus meinem
Kühlschrank?
1. Nehmen Sie sämtliche Lebensmittel aus
dem Kühlschrank und ziehen Sie das
Stromkabel aus der Steckdose.
2. Reinigen Sie alle inneren Oberflächen
einschließlich der Decke, des Bodens
und der Wände gemäß den „allgemeinen“
Anweisungen. Achten Sie besonders
auf Ecken, Spalten und Ausnehmungen.
Reinigen Sie auch alle Laden, Regale
und Dichtungen.
3. Stecken Sie das Stromkabel des
Kühlschranks wieder ein und legen
Sie die Lebensmittel zurück in den
Kühlschrank. Waschen und trocknen
Sie alle Flaschen, Behälter und Gläser.
Legen Sie die Lebensmittel in dicht
schließende Behälter, um eine weitere
Geruchsentwicklung zu vermeiden.
Überprüfen Sie nach 24 Stunden,
ob der Geruch weg ist.
Führen Sie die folgenden Schritte durch,
falls der Geruch noch vorhanden ist.
4. Führen Sie die Schritte 1 - 2 durch.
5. Legen Sie die Garden Fresh
Gemüselade auf das obere Regalfach
des Kühlteils. Packen Sie den Kühlund Gefrierteil einschließlich der
Türen mit zerknüllten Schwarz-WeißZeitungsblättern voll.
6. Durchsetzen Sie die Zeitungen mit
Holzkohlebriketts.
7. Schließen Sie die Türen und warten
Sie 24 bis 48 Stunden.
8. Entfernen Sie die Holzkohlebriketts
und die Zeitungen.
9. Führen Sie die Schritte 2-3 durch.
Falls der Geruch weiterhin anhält, setzen
Sie sich bitte mit Ihrem örtlichen
Fachhändler in Verbindung.
So reinigen Sie Ihr Gerät
WARNUNG
!
Um einen elektrischen Schlag, der zu schweren Verletzungen und sogar zum
Tod führen kann, zu vermeiden, muss der Stecker vor der Reinigung aus der
Steckdose gezogen werden. Stecken Sie das Stromkabel nach der Reinigung
wieder ein.
VORSICHT
!
Zur Vermeidung von Verletzungen oder Beschädigungen sollten Sie
Folgendes beachten:
• Lesen Sie alle Anweisungen des Herstellers des Reinigungsmittels
und halten Sie sich daran.
• Geben Sie die Behälter, Fächer usw. nicht in den Geschirrspüler.
Zubehör kann dadurch eventuell brechen oder sich verformen.
• Gehen Sie sehr vorsichtig mit Fächern aus Glas um. Die Glasplatten
können brechen, wenn sie gebogen, zerkratzt oder plötzlichen
Temperaturveränderungen ausgesetzt werden.
• Schützen Sie weiche Vinyl- oder andere Bodenbeläge mit Pappe,
Teppichen oder anderen Schutzunterlagen.
Allgemein
1. Waschen Sie die Oberflächen mit einer Lösung aus Wasser und Speisesoda.
Verwenden Sie zur Reinigung der Oberflächen ein weiches Tuch.
2. Spülen Sie die Oberflächen mit warmem Wasser. Trocknen Sie sie mit einem
weichen, sauberen Tuch.
Klebstoffe
1. Klebstoffrückstände können Sie entfernen, indem Sie mit den Fingern
Zahnpasta auf den Klebstoff reiben, bis er sich lockert.
2. Spülen Sie die Oberfläche mit warmem Wasser und trocknen Sie sie mit einem
weichen, sauberen Tuch.
Türdichtungen
1. Halten Sie die Dichtungen immer sauber. Reinigen Sie sie alle 3 Monate gemäß
den „allgemeinen“ Anweisungen gründlich.
Kühlschlange
Um eine maximale Leistung des Kühlschranks zu gewährleisten, sollten die
Kühlschlangen alle 3 Monate gereinigt werden. Angesammelter Staub und
Schmutz kann zu Folgendem führen:
• verringerte Kühlleistung
• erhöhter Energieverbrauch
• in Extremfällen zu vorzeitigem Versagen des
Kühlverdichters
1. Entfernen Sie den Fußgrill und die unteren Türscharniere
wie rechts abgebildet.
2. Reinigen Sie die Vorderseite der Kühlschlange mit der
Schlauchdüse des Staubsaugers.
3. Setzen Sie den Fußgrill wieder auf, indem Sie die Schnappvorrichtungen
in die Löcher einsetzen und einschnappen lassen. Setzen Sie die
Scharnierabdeckungen wieder über die unteren Türscharniere.
Glasfächer
Entfernen Sie das Regalfach, indem Sie es vorne anheben, die Haken aus der
Metallschiene heben und herausziehen. Legen Sie das Regalfach auf ein Handtuch.
Lassen Sie es sich an die Raumtemperatur anpassen, bevor Sie es reinigen.
Reinigen Sie die Spalten, indem Sie wie folgt vorgehen:
1. Bereiten Sie eine milde Waschlösung und bürsten Sie mit einer Bürste die
Spalten aus. Lassen Sie die Lösung 5 Minuten lang einwirken.
2. Sprühen Sie mit einem Sprühaufsatz warmes Wasser in die Spalten.
3. Trocknen Sie das Regalfach gründlich und setzen Sie es wieder ein, indem
Sie die Haken in die Metallschiene einsetzen und die Vorderseite absenken.
44
Page 45
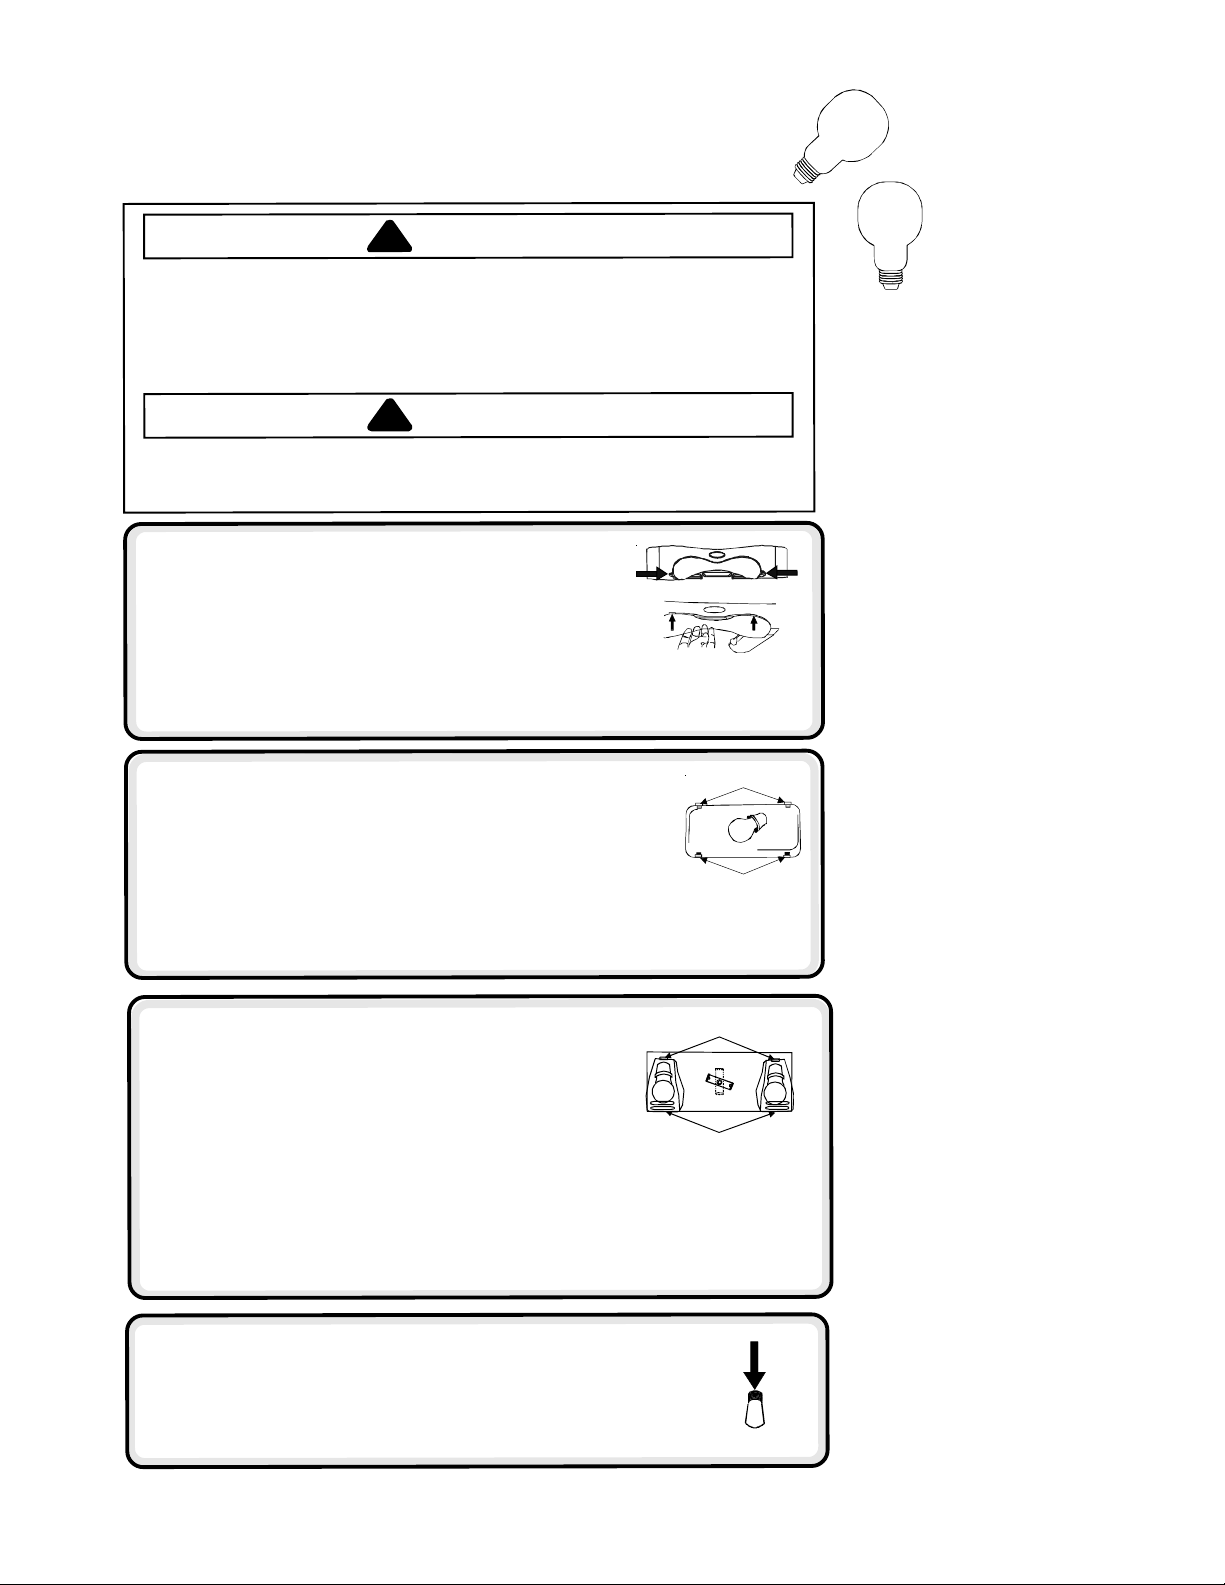
A
B
A
B
!
!
$
Hinweise
So entfernen und ersetzen Sie Glühlampen
WARNUNG
Um einen elektrischen Schlag, der zu schweren Verletzungen und sogar zum
Tod führen kann, zu vermeiden, ziehen Sie das Stromkabel des Kühlschranks
aus der Steckdose, bevor Sie die Glühlampe austauschen. Wenn Sie die
Stromversorgung nicht unterbrechen können, indem Sie den Stecker aus der
Steckdose ziehen, nehmen Sie bitte die Netzsicherung heraus. Nachdem Sie
die Glühlampe wieder eingesetzt haben, stecken Sie das Stromkabel wieder ein.
VORSICHT
Um Personen- oder Sachschäden zu vermeiden, sollten Sie wie folgt vorgehen:
• Lassen Sie die Glühlampe abkühlen.
• Tragen Sie beim Austauschen der Glühlampe Handschuhe.
Oberer Kühlschrankteil
1. Drücken Sie mit den Fingern in die Öffnungen auf jeder
Seite des Blendschutzes. Entfernen Sie den Blendschutz.
2. Nehmen Sie die Glühlampen heraus.
3. Ersetzen Sie sie durch eine Glühlampe vom Typ Krypton
4. Setzen Sie den Blendschutz wieder ein, indem Sie die vorderen Laschen in
5. Lassen Sie die Lampenabdeckung wieder einrasten.
Unterer Kühlschrankteil und Gefrierteil
von Modellen ohne Spender
1. Drücken Sie die unteren beiden Laschen an der
2. Nehmen Sie die Glühlampe heraus.
3. Ersetzen Sie sie durch eine Glühlampe vom Typ Krypton E27
4. Stecken Sie die beiden oberen Laschen
mit maximal 25 Watt.
E27
die Schlitze in der Verkleidung direkt vor dem Lampenelement einstecken.
zusammen und ziehen Sie sie heraus.
Glühlampenabdeckung
mit maximal 25 Watt.
drücken Sie den unteren Teil auf das Lampenelement, bis die Abdeckung einrastet.
(A)
in die Kühlschrankverkleidung und
(B)
und Pflege
Energiespartipps
Dieser Kühlschrank ist in seiner
Konstruktion einer der Kühlschränke
mit dem höchsten energetischen
Wirkungsgrad auf dem Markt. Sie
können Energie sparen, indem Sie
die folgenden Hinweise beachten.
Betrieb bei normalen
•
Haushaltstemperaturen zwischen
16 °C und 43 °C; unmittelbare
Nähe von Wärmequellen und
direkte Sonneneinstrahlung
vermeiden.
Kühlschrank, Gefrierteil und
•
Chiller Fresh™-System nicht
kälter einstellen als nötig.
Gefrierteil mit Lebensmitteln
•
gefüllt halten.
Türdichtungen sauber und
•
geschmeidig halten. Verschlissene
Dichtungen austauschen.
Kühlschlangen sauber halten.
•
Gefrierteil von Modellen mit Spender
1. Nehmen Sie den Eisbehälter heraus, indem Sie ihn
vorne anheben und herausziehen.
2. Entfernen Sie die Glühlampenabdeckung, indem Sie
die oberen beiden Laschen
und die Abdeckung von der Kühlschrankverkleidung abziehen.
3. Ersetzen Sie sie durch eine Glühlampe vom Typ Krypton
4. Stecken Sie die beiden unteren Laschen
5. Setzen Sie den Eisbehälter wieder ein, indem Sie ihn in die Schienen gleiten
mit maximal 25 Watt.
E27
in die Verkleidung ein und drücken Sie den oberen Teil auf das Lampenelement,
bis die Abdeckung einrastet.
lassen, bis er einrastet.
zusammendrücken
(A)
(B)
der Glühlampenabdeckung wieder
Eis- und Wasser-Spender
1. Die Glühlampe befindet sich in der oberen Ecke des
Spenderrahmens. Drehen Sie sie heraus.
2. Ersetzen Sie die Glühlampe durch eine 230/240 VAC-Glühlampe mit
maximal 12 Watt. Da Ersatzglühlampen mancherorts nicht erhältlich
sind, finden Sie welche im Gemüsefach.
45
Page 46
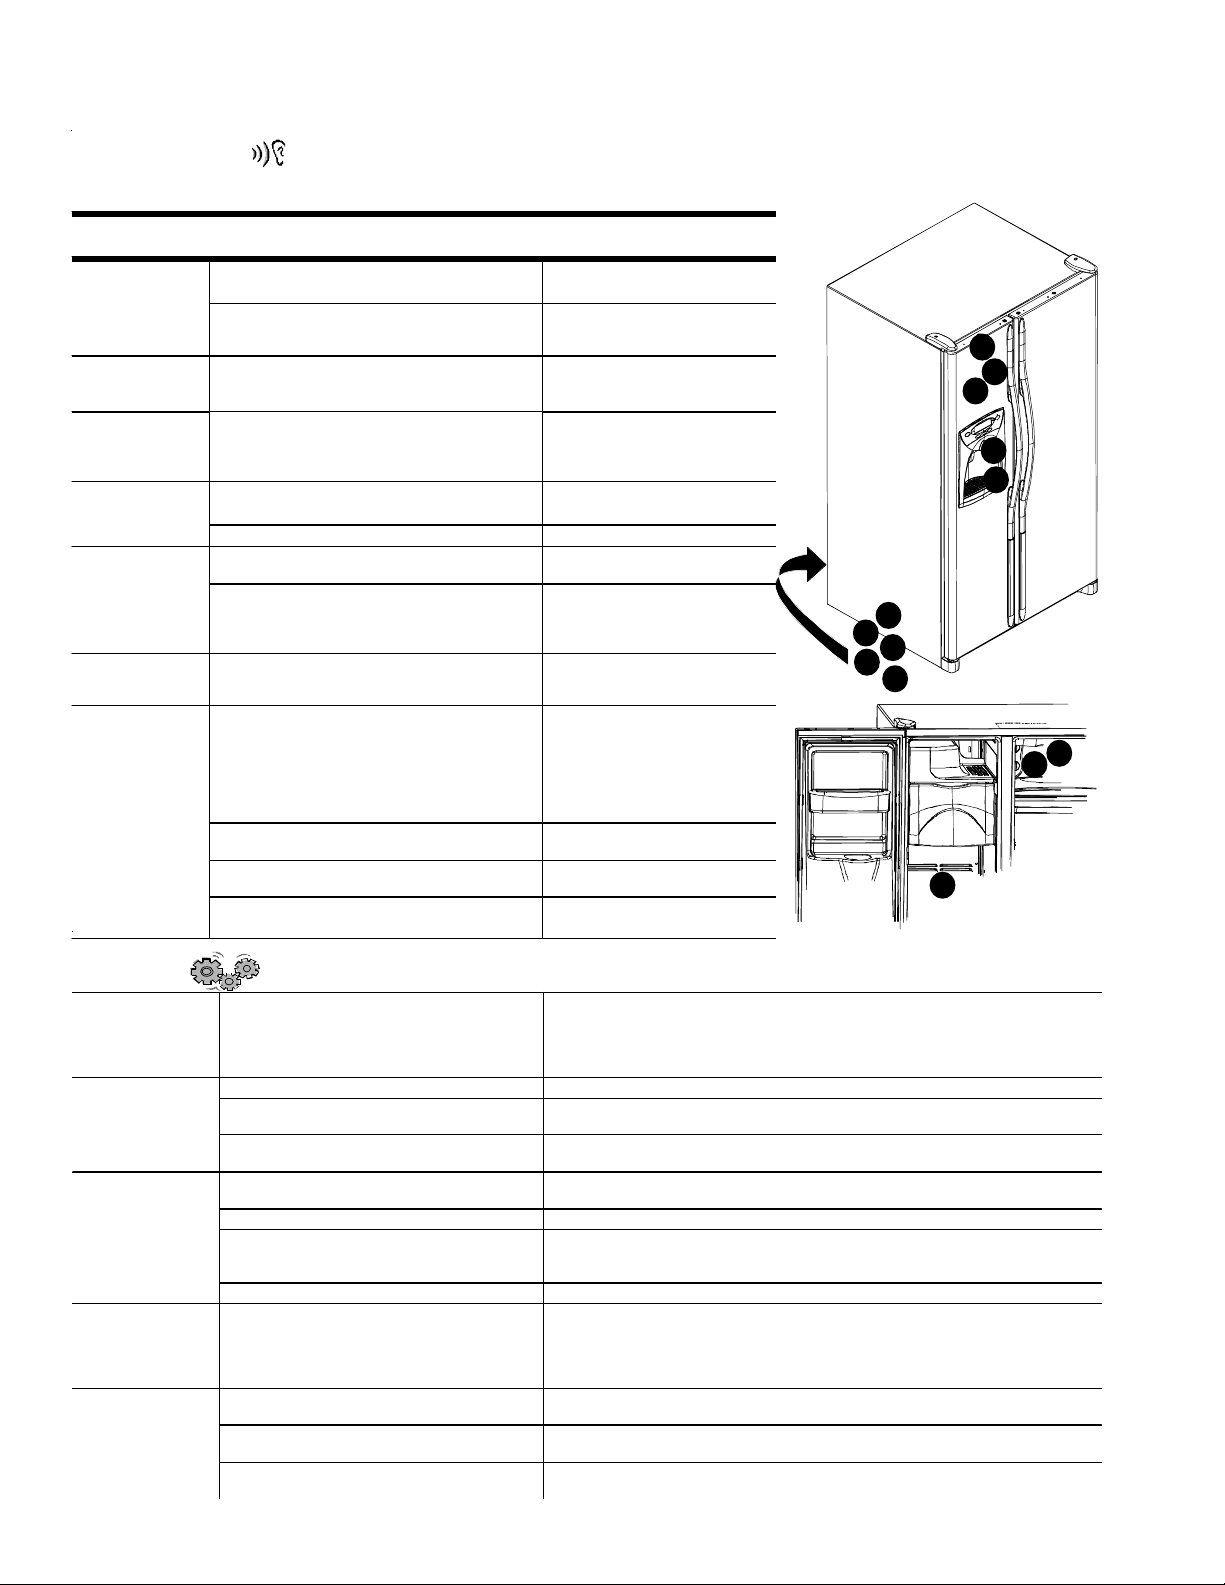
Bevor Sie den Kundendienst rufen
Die modernen Kühlschränke haben neue Merkmale und sind sparsamer im Energieverbrauch. Schaumisolierungen
haben einen sehr hohen energetischen Wirkungsgrad und ein hervorragendes Isoliervermögen; allerdings sind sie
GERÄUSCHE
THEMA MÖGLICHE URSACHE LÖSUNG
Klicken
Rauschen und
Surren von Luft
Gurgeln bzw.
Geräusch wie
kochendes
Wasser
Dumpfes
Schlaggeräush
Vibrierendes
Geräusch
Summendes
Geräusch
Brummendes
Geräusch
BETRIEB
Regler und Lampen
des Gefrierteils
sind an, aber
der Verdichter
arbeitet nicht.
Temperatur im
Delikatessen/Gemüse-System
ist zu hoch
Kühlschrank
funktioniert n icht
Kühlschrank
funktioniert immer
noch nicht
Temperatur
im Kühlteil ist
zu niedrig
Regler des Gefrierteils
oder Stoppen des Verdichters.
Abtau-Schaltuhr
elektrische Uhr und schaltet sich in den
Abtauzyklus ein und wieder aus.
Gebläse des Gefrierteils
Verflüssigers
während des Betriebs.
Das Kältemittel im Verdampfer
Wärmetauscher
wenn es fließt.
Eiswürfel fallen aus dem Eiser zeuger (einige
Modelle) in den Eisbehälter
Eisauswurfs chac ht
Verdichter (I) macht während des Betriebs ein
pulsiere ndes Geräusch.
Kühlschrank ist nic ht in der Waag e.
Wasserventilanschluss des Eiserzeugers
(J)
(einige Modelle) summt, wenn sich der
Eiserzeuger m it Wasser füllt.
Eiserzeuger
(eingeschaltet), ohne dass Wasser
angeschlossen ist.
Eisbohrer
das Eis bei der Entnahme bewegt.
Verdichter
hohe n brumme nden To n verursachen.
Magnetventil
des Eisauswurfschachts.
Kühlschrank befindet sich im
Abtau-Modus.
Reglereins tel lunge n sind zu niedr ig. Siehe Abschnitt zum Delikatessen/Gem üse-Syste m, um die Regler ei nzustellen.
Regler des Gefrierteils sind zu
niedrig eingestellt.
Fach ist nicht ordnungsgemäß eingesetzt.
Stro mkabel des Kühlsc hranks ist
nic ht e inge steckt.
Regler des Gefrierteils ist nicht eingeschaltet. Siehe Abschnitt zu Reglereinstellungen im Benutzerhandbuch.
Sicherung ist durchgebrannt oder
Leistungsschutzschalter muss zurückgesetzt
werde n.
Stro mausfall Rufen S ie Ihr örtliche Stromgesellschaf t an, um den Strom ausfall zu melden.
Gerät ist fehlerhaft.
Kühlschlange ist verschmutzt.
Regler des Kühlschrank- oder Gefrierteils sind
zu hoch eingestellt.
Bever age Chiller™ (einige Modelle)
ist nicht richtig eingesetzt.
nicht schalldämpfend. Die Folge ist, dass Ihnen manche Betriebsgeräusche vielleicht nicht vertraut sein werden.
Diese Geräusche sind jedoch normal und werden ihnen bald nicht mehr auffallen. Lesen Sie bitte zuerst die
nachstehenden Hinweise, bevor Sie den Kundendienst anrufen.
(A)
klickt beim Starten
(B)
hört sic h an wie eine
(C)
(D)
machen dieses Geräusch
(F)
(K)
ist eingeschaltet On
(L)
(einige Modelle) brummt, wenn sich
(I)
kann während des Betriebs einen
(M)
betätigt die Klappe
und Gebläse des
(E)
(G).
und
macht dieses Geräusch,
(H)
des Spender schließt sich. Normales Betriebsgeräusch
Normales Betriebsgeräusch
Normales Betriebsgeräusch
Normales Betriebsgeräusch
Normales Betriebsgeräusch
Normales Betriebsgeräusch
Normales Betriebsgeräusch
Hinweise, wie Sie Ihren
Kühlschrank in die Waage
bring en, f inden Sie unter
Installation Ihres Kühlschranks
Normales Betriebsgeräusch
Sie beenden dieses Geräusch,
indem Sie den Arm des
Eiserze ugers anhebe n in Of fStellung (anheben). Siehe
Abschnitt
Eiserzeuger
Benutzerhandbuc h.
Normales Betriebsgeräusch
Normales Betriebsgeräusch
Normales Betriebsgeräusch
Autom atischer
in Ihrem
Normaler Betrieb. Warten Sie 40 Minuten, um festzustellen, ob der Kühlschrank den
Betrieb wieder aufnimmt.
Siehe Abschnitt zu Reglereinstellungen im Benutzerhandbuch, um die
Regler einzustellen.
Siehe Abschnitt zum Delikatessen-/Gemüse-System, um den Sitz des
Fachs zu überprüfen.
Stecken Sie das Stromkabel in die Steckdose.
Ersetzen Sie durchgebrannte Sicherungen. Überprüfen Sie den
Leistungsschutzschalter und setzen Sie ihn ggf. zurück.
Ziehen Sie das Kabel des Kühlschranks aus der Steckdose und legen Sie die
Lebensmittel in ein anderes Gerät. Wenn Sie kein anderes Gerät zur Verfügung
haben, legen Sie Trockeneis in den Gefrierteil, um die Lebensmittel zu konservieren.
Lebensmittelverlust wird von der Garantie nicht abgedeckt. Rufen Sie den
Kundendienst an.
Reinige n Sie die K ühlschlange n entspreche nd de n Reinigungsanweisunge n in
Ihrem Benutzerhandbuch.
Siehe Abschnitt zu Reglereinstellungen im Benutzerhandbuch, um die
Regler einzustellen.
Siehe Abschnitt zum Tempe rat urgesteue rte n Beverag e Chil ler™, um de n richtige n
Sitz zu üb erp rüfen.
.
46
K
G
L
H
M
E
D
F
I
J
B
A
C
Page 47
Bevor Sie den Kundendienst rufen
Ü
d
BETRIEB
THEMA MÖGLICHE URSACHE LÖSUNG
Temperatur der
Lebensmittel
erscheint zu warm
Im Kühlschrank
riecht es schlecht
An der Außenseite
des Kühlsch ranks
bilden sich
Wassertropfen
Im Inneren des
Kühlschranks
bilden sich
Wassertropfen
Der Kühlschrank
oder der
Eiserzeuger
produziert
ungewöhnliche
Geräusche oder
erscheint zu laut
Delikatessen/Gemüse-System
und oder GemüseFächer lassen sich
nicht leicht
schließen
Kühlschrank läuft
zu oft
Tür schließt nicht richtig.
Regler müssen eingestellt werden. Siehe Abschnitt zu Reglereinstellungen im Benutzerhandbuch, um die Regler
Kühlschlangen sind verschmutzt. Reinigen Sie die Kühlschlangen entsprechend den Reinigungsanweisungen in
Bei Modellen mit über 60 cm Tiefe ist der
hintere Luftgrill blockiert.
Tür wurde zu oft oder über einen langen
Zeitraum geöffnet.
Kurz zuvor wurden Lebensmittel eingelagert. Warten Sie, bis die neu eingelagerten Lebensmittel die Temperatur im
Kühlteil ist schmutzig oder enthält stark
riechende Lebensmittel.
Luftfilter (einige Modelle) muss ausgewechselt
werden.
Überprüfen Sie, ob die Dichtungen richtig
schließen.
Feuchtigkeit zu hoch. Normal in Zeiten mit hoher Luftfeuchtigkeit.
Regler müssen eingestellt werden. Siehe Abschnitt zu Reglereinstellungen im Benutzerhandbuch, um die Regler
Feuchtigkeit zu hoch oder Tür wurde oft
geöffnet.
Überprüfen Sie, ob die Dichtungen richtig
schließen.
Normaler Betrieb
Inha lt des Fachs bzw. der daneben liegende n
Fächer behindert das Schließen der Lade
Fach ist nicht richtig eingesetzt Hinweise zum korrekten Sitz finden Sie im Abschnitt zu Delikatessen-
Kühlschrank ist nicht in der Waage. Hinweise, wie Sie Ihren Kühlschrank in die Waage bringen, finden Sie unter
Ladenkanäle sind schmutzig oder müssen
gewartet werden.
Türen wurden häufig oder für einen längeren
Zeitraum geöffnet.
Hohe Luftfeuchtigkeit oder hohe Temperaturen
in Bet riebs umgebung.
Kurz zuvor wurden Lebensmittel eingelagert.
Gerät war hohen Temperaturen durch
Umgebung oder benachbartes Gerät
ausgesetzt.
Küh lschlangen sind verschmutzt.
Kühlschrank ist nicht in der Waage. Unter
finden Sie Hinweise, wie Sie Ihr Gerät in die Waage bringen.
berprüf en Sie, ob die Dichtungen ri chtig schließen. Reinigen Sie, wenn nötig,
Dichtungen gemäß den Anweisungen im Benutzerhandbuch.
Überpr üfen Sie , ob die Tür nicht durc h Gege nstä nde i m Kühlschrank blocki ert
wird und sich daher nicht richtig schließen lässt (z.B. nicht vollständig
geschlossene Fächer, Eisbehälter, zu große bzw. nicht richtig gelagerte
Behälter oder Lebensmittel, usw.)
einzustellen.
Ihrem Benutzerhandbuch.
Überprüfen Sie, dass der Grill nicht durch Lebensmittel blockiert wird. Der
hintere Luftgrill befindet sich hinter den Gemüsefächern.
Lassen Sie die Tür nicht so lange geöffnet. Ordnen Sie die Lebensmittel so
an, dass Sie den Kühlschrank nur für einen kurzen Zeitraum öffnen müssen.
Warten Sie bis der Kühlraum wieder heruntergekühlt ist, nachdem die Tür
geöffnet war.
Kühlschrank oder Gefrierschrank erreicht haben.
Siehe Abschnitt zur Geruchsbeseitigung im Benutzerhandbuch.
Wechseln Sie den Luftfilter aus.
Reinigen Si e, wenn nöti g, die Dichtungen gemäß den Anweisungen i m
Benutzerhandbuch.
einzustellen.
Siehe Abschnitt zu Reglereinstellungen im Benutzerhandbuch, um die Regler
einzustellen.
Lassen Sie die Tür nicht so lange geöffnet. Ordnen Sie die Lebensmittel so
an, dass Sie den Kühlschrank nur für einen kurzen Zeitraum öffnen müssen.
Reinigen Si e, wenn nöti g, die Dichtungen gemäß den Anweisungen i m
Benutzerhandbuch.
Siehe Abschnitt „Geräusche“ unter
Ihrem Benutzerhandbuch.
Stapeln Sie Lebensmittel und Pakete um, so dass die Laden nicht behindert
werden.
/Gemüse-System und/oder Gemüsefach.
Installation Ihres Kühlschranks
Reinigen Sie die Ladenkanäle mit warmem Seifenwasser. Spülen und
trocknen Sie sie gründlich.
Geben Sie eine dünne Schicht Vaseline in die Ladenkanäle.
Lassen Sie die Tür nicht so lange geöffnet. Ordnen Sie die Lebensmittel so
an, dass Sie den Kühlschrank nur für einen kurzen Zeitraum öffnen müssen.
Warten Sie bis der Kühlraum wieder heruntergekühlt ist, nachdem die Tür
geöffnet war.
Normaler Betrieb
Warten Sie, bis die neu eingelagerten Lebensmittel die Temperatur im
Kühlschrank oder Gefrierschrank erreicht haben.
Beurteilen Sie die Umgebungstemperaturen Ihres Kühlschranks. Gerät muss
eventuell an einer anderen Stelle aufgestellt werden, um effizienter zu
arbeiten.
Reinigen Sie die Kühlschlangen entsprechend den Reinigungsanweisungen
in Ihrem Benutzerhandbuch.
47
Installation Ihres Kühlschranks
Bevor Sie den Kundendienst rufen
.
in
Page 48

Bevor Sie den Kundendienst rufen
BETRIEB (Fortetzung)
THEMA MÖGLICHE URSACHE LÖSUNG
Kühlschrank läuft zu
oft. (Fortsetzung)
Regle r müssen ei ngestellt werden.
Siehe Abschnitt zu Reglereinstellungen im Benutzerhandbuch, um die
Regler einzustellen.
Tür schließt nicht richtig
EIS UND WASSER
Wasser ist trüb Luft oder Luftblasen im Wasser.
Partikel im Wasser
und/oder Eis.
Am Spender-Regler (einige
Mode lle) leuchten keine
Lampen
Weder Eis noch Wasser
wird ausgegeben, wenn der
Kontaktschalter gedrückt
wird (e inige Modelle)
Eiserzeuger produziert
nicht genug Eis oder
Eis ist verformt
(ein ige M odelle )
Eiserzeuger produziert kein
Eis (einige Modelle)
Kohlenstaub aus Wasserfiltereinsatz.
Bei einem hohen Ante il vo n Mineralie n im Wass er
bilden sich Partikel, wenn das Wasser gefroren
wird und wieder schmilzt.
Tür des Gefrierteils ist nicht geschlossen.
Stecker des Kühlschranks ist nicht in
der Steckdose.
Sicherung ist durchgebrannt oder
Leistungsschutzschalter muss
zurückgesetzt werden.
Stro mausfall.
Tür des Gefrierteils ist nicht geschlossen.
Regler sind gesperrt. Siehe Anweisungen zum Regler des Spenders.
Wassertank wird aufgefüllt.
Eiserzeuger bzw. Gerät mit Eiserzeuger wurde
erst kürzlic h installiert oder es wurde gerade eine
große Menge Eis ve rb rauc ht.
Wasserfilter ist verstopft oder muss
ausgewechselt werden.
Eiserzeuger wurde erst kürzlich installiert
oder es wurde gerade eine große Menge
Eis verb raucht.
Wasserdruck ist zu niedrig.
Wasserfilter ist verstopft oder muss
ausgewechselt werden.
Arm des Eiserzeugers ist nicht in der
richtigen Position.
Haushaltswasserversorgung erreicht das
Wasserventil nicht.
Wasserversorgung hat Knicke.
Wasserdruck ist zu hoch.
Überprüfen Sie die Temperatur im Gefrierteil.
Eisbehälter ist nicht ordnungsgemäß installiert
Kühlschrank ist nicht in der Waage. Unter
Kühlschranks
Waage bringen.
Überprüfen Sie, ob die Tür nicht durch Gegenstände im Kühlschrank
blockiert wird und sich daher nicht richtig schließen lässt (z.B. nicht
vollständig geschlossene Fächer, Eisbehälter, zu große bzw. nicht
richtig gelagerte Behälter oder Lebensmittel, usw.
Überprüfen Sie, ob die Dichtungen richtig schließen. Reinigen
Sie, wenn nötig, die Dichtungen gemäß den Anweisungen
im Be nutzerhandbuch .
finden Sie Hinweise, wie Sie Ihr Gerät in die
Installation Ihres
Das ist normal, wenn der Spender zum ersten Mal verwendet wird und
verschwindet währe nd der Ve rwendung.
Wenn zum ersten Mal Wasser durch den Filter fließt, kann es harmlose
Kohlenstaubteilchen enthalten. Die Partikel können ohne Risiko
mitgetrunken werden. Nach kurzer Zeit der Verwendung
verschwinden sie.
Diese Teilchen sind ungefährlich und kommen auf natürliche Weise
in der Wasserversorgung vo r.
Überprüfen Sie, ob die Gefrierschranktür geschlossen ist. Die
Stromversorgung zum Regler wird unterbrochen, wenn die
Gefrierschranktür geöffnet ist.
Stecken Sie den Stecker in die Steckdose.
Ersetzen Sie durchgebr annte Sicherungen. Überprüfen Sie die
Leistungsschutzschalter auf eventuell unterbrochene Stromkreise.
Rufen S ie Ihr örtlic he Stromges ells chaft an, um den S tromausfall
zu melden.
Überprüfen Sie, ob die Gefrierschranktür geschlossen ist. Die
Stromversorgung zum Regler wird unterbrochen, wenn die
Gefrierschranktür geöffnet ist.
Bei der erstmaligen Verwendung wird die Ausgabe etwa 45 Sekunden
verzögert, da der interne Wassertank gefüllt wird.
Warten Sie 24 Stunden, bis die Eisproduktion beginnt und der
Eiserzeuger wieder genügend Eis produziert hat.
Wechseln Sie den Wasserfilter aus.
Warten Sie 24 Stunden, bis die Eisproduktion beginnt und der
Eiserzeuger wieder genügend Eis produziert hat.
Niedrig er Wasse rdr uck kann ei n Leck im Ve ntil verursac hen. Der
Wasserdruck muss zwischen 20 und 100 Pfund je Quadratzoll liegen,
damit das Gerät ordnungsgemäß funktioniert. Ein Minimaldruck von
35 Pfund je Quadratzoll wird für Geräte mit Wasserfiltern empfohlen.
Wechseln Sie den Wasserfilter aus.
Vergewissern Sie sich, dass der Arm des Eiserzeugers unten ist. Siehe
Au toma tisch er E iserzeuger
Abschnitt
Überprüfen Sie den Wasseranschluss unter
Ihres Kühlschranks
Schließen Sie die Wasserversorgung und entfernen Sie die Knicke.
Wenn die Knicke nic ht entf ern t werde n könne n, erse tzen Sie
die Leitungen.
Der Wasserdruck muss zwischen 20 und 100 Pfund je Quadratzoll
liegen, damit das Gerät ordnungsgemäß funktioniert. Ein
Minimaldruck von 35 Pfund je Quadratzoll wird für Geräte mit
Wasserfiltern empfohlen.
Siehe Abschnitt zu Reglereinstellungen im Benutzerhandbuch, um die
Regler einzustellen. Für die Eisproduktion muss die Temperatur im
Gefrierteil zwischen -18° und -17° C (0 und 2° F) liegen.
Siehe Abschnitt zum Eisbehälter für eine ordnungsgemäße Installation
und Ausrichtung.
.
48
im Be nutzer handbuch.
Installation
Page 49

EIS UND WASSER
Bevor Sie den Kundendienst rufen
THEMA
Eiserzeuger produziert kein Eis
(einige Modelle) Fortsetzung
Aus dem Gerät läuft Wasser aus
Im Eingangsrohr zum Eiserzeuger
bildet sich Eis
Wasserdurchfluss ist niedriger
als normal
Wasser aus dem Spender ist nicht kalt
MÖGLICHE
LÖSUN G
URSACHE
Falsches Wasserventil wurde installiert. Überprüfen Sie den Wasseranschluss unter
Kunststoffrohre wurden für den gesamten
Wasseranschluss verwendet.
Falsches Wasserventil wurde installiert. Überprüfen Sie den Wasseranschluss unter
Wasserdruck ist zu niedrig. Der Wasserdruck muss zwischen 20 und 100 Pfund je
Temperatur im Gefrierteil ist zu hoch.
Wasserdruck ist zu niedrig. Der Wasserdruck muss zwischen 20 und 100 Pfund je
Falsches Wasserventil wurde installiert. Überprüfen Sie den Wasseranschluss unter
Wassereinlassleitung hat Knicke.
Wasserfilter ist verstopft oder muss
ausgewechselt werden.
Kühlschrank wurde erst kürzlich installiert.
Wassertank wurde vollständig geleert.
Wasser stagniert in den Wasserleitungen
außerhalb des Tanks und hat sich auf
Zimmertemperatur erwärmt.
Ihres Kühlschranks
Sattelventile reduzieren den Wasserdurchfluss und
können mit der Zeit die Leitung verstopfen. Der
Hersteller haftet nicht für Schäden, die sich aus
einer unsachgemäßen Installation oder einem
falschen Wasseranschluss ergeben.
Der Hersteller empfiehlt die Verwendung von
Kupferrohren für die Installation. Kunststoffrohre sind
weniger haltbar und können undicht werden. Der
Hersteller haftet nicht für Schäden, die sich aus
einer unsachgemäßen Installation oder einem
falschen Wasseranschluss ergeben.
Ihres Kühlschranks
Sattelventile reduzieren den Wasserdurchfluss und
können mit der Zeit die Leitung verstopfen. Der
Hersteller haftet nicht für Schäden, die sich aus
einer unsachgemäßen Installation oder einem
falschen Wasseranschluss ergeben.
Quadratzoll liegen, damit das Gerät ordnungsgemäß
funktioniert. Ein Minimaldruck von 35 Pfund je
Quadratzoll
wird für Geräte mit Wasserfiltern empfohlen.
Siehe Abschnitt zu Reglereinstellungen im
Benutzerhandbuch, um die Regler einzustellen. Für die
Eisproduktion muss die Temperatur im Gefrierteil
zwischen -18° und -17° C (0 und 2° F) liegen.
Quadratzoll liegen, damit das Gerät ordnungsgemäß
funktioniert. Ein Minimaldruck von 35 Pfund je
Quadratzoll wird für Geräte mit Wasserfiltern empfohlen.
Ihres Kühlschranks
Sattelventile reduzieren den Wasserdurchfluss und
können mit der Zeit die Leitung verstopfen. Der
Hersteller haftet nicht für Schäden, die sich aus
einer unsachgemäßen Installation oder einem
falschen Wasseranschluss ergeben.
Schließen Sie die Wasserversorgung und entfernen Sie
die Knicke. Wenn die Knicke nicht entfernt werden
können, ersetzen Sie die Leitungen.
Wechseln Sie den Wasserfilter aus.
Warten Sie etwa 12 Stunden, bis das Wasser im Tank
abgekühlt ist.
Gießen Sie das erste Glas Wasser weg und füllen Sie
es neu.
. Selbstdurchbohrende und 3/16"
. Selbstdurchbohrende und 3/16"
. Selbstdurchbohrende und 3/16"
Installation
Installation
Installation
49
Page 50

Daten zum Wasserfilter
®
Systemspezifikation und Leistungsdatenblatt
Wasserfiltereinsatz Modell OWF-51 für Kühlschränke
Technische Daten
Filtergeschwindigkeit (maximal) ......................................... 0,75 GPM (2,83 L/min)
Sollnutzungsdauer OWF51-NI300 (maximal) ....................... 300 Gallonen /1135 Liter
Sollnutzungsdauer OWF51-WI500 (maximal) ...................... 500 Gallonen /1892 Liter
Maximale Betriebstemperatur ............................................. 38° C/100° F
Mindestdruck ........................................................................ 35 psi/ 138 kPa
Minimale Betriebstemperatur .............................................. 1°C/33°F
Maximaler Betriebsdruck .................................................... 120 psi/ 827 kPa
Allgemeine Nutzungsbedingungen: Lesen Sie dieses Leistungsdatenblatt und vergleichen Sie die Fähigkeiten dieses
Filters mit Ihren tatsächlichen Anforderungen bei der Wasseraufbereitung.
Verwenden Sie diesen Filter in Gegenden mit mikrobiologisch fraglicher oder unbekannter Wasserqualität NICHT
ohne die entsprechenden Desinfektionsmaßnahmen vor oder nach dem Filtersystem. Das System ist für die
Reduzierung von Zysten zertifiziert und kann mit desinfiziertem Wasser verwendet werden, das eventuell
filtrierbare Zysten enthält.
Im abnehmbaren Wasserfiltersystem wird ein OWF-51 Ersatzfilter verwendet (wenden Sie sich für eine Bestellung an Ihren
Fachhändler). Für eine zufriedenstellende Leistung des Filtersystems ist das rechtzeitige Auswechseln des Filtereinsatzes
unerlässlich. Im entsprechenden Abschnitt des Benutzerhandbuchs finden Sie Informationen zur allgemeinen Verwendung,
Wartung und Fehlersuche.
Dieses System wurde gemäß ANSI/INSF 42 und 53 für die Reduzierung der unten aufgeführten Substanzen getestet. Die
Konzentration der angegebenen Substanzen im Wasser bei Eintritt in das System wurde auf eine Konzentration reduziert,
die kleiner bzw. gleich dem zulässigen Grenzwert gemäß ANSI/NSF 42 und 53 für das System verlassende Wasser liegt.
Leistungsdaten*
Substanz
Blei 0,15 mg/l +/-10% 0,001 mg/l 99,33% 0,001 mg/l 0,010 mg/l 6,5
Blei 0,15 mg/l +/-10% 0,002 m/l 98,66% 0,003 mg/l 0,010 mg/l 8,5
Zysten
Trübung 11 +/-10% NTU 0,12 NTU 98,98% 0,18 NTU 0,5 NTU Entfällt
Lindan 0,002 mg/l +/-10% 0,00005 mg/l 97,62% 0,00005 mg/l 0,00002 mg/l Entfällt
Atrazin 0,009 mg/l +/-10% 0,0002 mg/l 97,93% 0,0006 mg/l 0,003 mg/l Entfällt
Chlor 2,0 mg/l +/-10% 0,09 mg/l 95,26% 0,17 mg/l 75% Entfällt
Partikel**
2,4-D 0,210 mg/l +/-10% 45,45 µg/l 84,42% 100 µg/ l 0,0017 mg/l Entfällt
Asbest
* Getestet mit einer Fließgeschwindigkeit von 0,75 GPM (2,83 l/min) und einem maximalen
** Bereich der Partikelgröße während des Tests. Partikel hatten eine Größe von 0,5 bis 1 Mikron.
Testko nzentration
10.000 Partikel/ml
107 bis 108 Fasern /l;
Druck von 120 psi (827 kPa) unter normalen Laborbedingungen. Die tatsächliche Leistung
kann jedoch abweichen. Health Claim durch NSF International getestet und zertifiziert.
Pentapure Incorporated
1000 Appollo Road
Eagan, Minnesota U.S.A.
EPA EST #35917-MN-1
Zulaufende
Mindestens/l
50.000
Mindestens
Fasern länger
als 10 µm
Mittlerer
Abfluss
1 zählbare
Einheit/ml
900 zählbare
Einheiten/ml
0,16 MFL/ml
®
Mittlere
prozentuale
Reduzierung
99,99%
99,68%
99,96%
Die Modelle OWF50-WI500 und OWF50-NI300 wurden von NSF International unter
Anwendung der ANSI/NSF-Normen 42 & 53 auf die Reduktion der folgenden
Wasserverunreinigungen getestet und zertifiziert:
Norm Nr. 42: Ästhetische Wirkung
Geschmacks- und Geruchsreduzierung
Chlorreduktion
Mechanische Filtriereinheit
Reduktion von Partikeln Klasse 1
Maximaler
Abfluss
3 zählbare
Einheiten/ml >99,95% Entfällt
2400 zählbare
Einheiten/ml
0,16 MFL/ml
Min.
erforderliche
Reduzierung
>
–
>
85%
–
99%
Norm Nr. 53: Gesundheitliche Wirkung
Chemische Reduktionseinheit
Reduktion von Blei, Atrazin, Lindan und 2,4-D
Mechanische Filtriereinheit
Reduktion von Zysten, Trübungen und Asbest
Einlauf-
pH-Wert
Entfällt
Entfällt
50
Page 51

Merci d’avoir choisi ce réfrigérateur !
Veuillez lire entièrement ce manuel d’utilisation. Il contient toutes les directives
d’entretien.
Le service de garantie doit être assuré par un technicien autorisé. Le fabricant
recommande également de contacter un technicien autorisé pour assurer le service
après-vente après expiration de la garantie. Pour obtenir l’adresse d’un technicien
autorisé, veuillez vous adresser à votre distributeur.
En prenant contact avec le service après-vente, veuillez lui transmettre les
renseignements ci-dessous. Les caractéristiques de l’appareil sont indiquées
sur la plaque de série, apposée sur la partie supérieure du compartiment des
produits frais.
Numéro de modèle __________________________________________________
Numéro « P » ______________________________________________________
Numéro de série ____________________________________________________
Date d’acquisition ___________________________________________________
Nom du vendeur ____________________________________________________
Adresse du vendeur _________________________________________________
N° de tél. du vendeur ________________________________________________
Sommaire
Introduction ................................................................................... 51
Sommaire ..................................................................................... 51
Informations importantes de sécurité .......................................... 52
L’installation de votre réfrigérateur .............................................. 53
Comment transporter votre appareil ........................................ 53
Comment choisir le meilleur emplacement.............................. 53
Comment monter et démonter les poignées ........................... 54
Comment mettre votre réfrigérateur de niveau........................ 55
Comment régler les commandes de température ................... 56
Au sujet du système de filtration .................................................. 57
Les équipements du réfrigérateur ................................................ 58
Les étagères intérieures ........................................................... 58
Le stockage dans les portes .................................................... 59
Les tiroirs .................................................................................. 60
Les équipements du congélateur................................................. 61
Les équipements de base ........................................................ 61
Les étagères ............................................................................. 62
Le stockage dans les portes .................................................... 62
Les équipements du distributeur d’eau........................................ 63
Les équipements de base ........................................................ 63
Le fonctionnement du distributeur d’eau................................... 63
Les équipements de contrôle (contrôle avec 5 boutons) .......... 64
Les équipements de contrôle (contrôle électronique)............... 65
Les conseils d’entretien ............................................................... 68
Comment entretenir votre appareil .......................................... 68
Comment enlever et remettre les ampoules électriques ......... 69
Avant d’appeler le service après-vente ....................................... 70
Les données du filtre à eau.......................................................... 74
Comment se procurer
des pièces de rechange
et des services ?
Avez-vous des problèmes ? Vous
pouvez éviter une visite d’un technicien
du service après-vente si cela n’est pas
nécessaire, en vous référant au chapitre
« Avant d’appeler le service aprèsvente » dans le manuel de l’utilisateur.
Votre nouveau réfrigérateur a été conçu
et fabriqué avec soin, conformément à
des standards de qualité rigoureux, et
devrait donc fonctionner de manière
fiable et satisfaisante. Toutefois, comme
c’est le cas pour tous les produits
mécaniques, il peut être éventuellement
nécessaire d’intervenir au niveau du
réglage, des pièces de rechange ou de
la maintenance. Si vous avez besoin
d’aide, n’hésitez pas à contacter le
distributeur chez lequel vous avez
acheté le réfrigérateur.
Fournissez alors les informations
suivantes :
• Modèle
• Numéro de fabrication
• Numéro de série et toutes les autres
indications inscrites sur la plaque
d’identification du modèle.
• Décrivez en quelques mots la nature
du problème.
L’espace à gauche est prévu pour
noter les informations qui pourront
vous servir.
Conservez ces
informations à portée
de la main !
Conservez ce manuel et votre facture
d’achat en lieu sûr pour en disposer le
jour où vous aurez besoin du service
de garantie.
Que faire si les
équipements sont
différents des miens ?
Ce livret présente toute la gamme
d’équipements disponibles pour la ligne
de modèles. Si vous êtes intéressé(e) par
l’acquisition d’équipements optionnels
pour votre appareil, veuillez contacter
votre distributeur.
51
Page 52

Les équipements d’un seul coup d’œil
10
18
16
13
15
19
3
1
5
3
2
8
7
7
6
9
12
12a
10
11
1. Commandes Temp Assure™
2. Étagère Spill Saver™
3. Étagère Spill Saver™ Easy Glide™
4. Étagères Side Glide™- non illustrées
5. Extension postérieure d’étagère
6. Tiroir bac à légumes / produits fins
7. Tiroirs bacs à légumes
8. Tiroir à boissons Beverage Organizer™
9. Centrale de produits laitiers
10. Balconnets de porte
10a Plaquettes anti-glisse – non illustrées
11. Balconnet inclinable
12. Compartiment à boissons Beverage Chiller™
12a. Mini-compartiment à boissons Mini-Chiller™
13. Bac à glaçons
14. Distributeur de glaçons – non illustré
15. Étagère à crèmes glacées
16. Système Stor-Mor™
17. Clayette suspendue – non illustrée
18. Clayette fixe de congélateur
19. Filtre à eau – non illustré
20. Filtre à air – non illustré
21. Éclairages – non illustrés
Zone supérieure du compartiment des
produits frais
Zone inférieure du compartiment des
produits frais
Congélateur
Distributeur d’eau
Informations importantes de sécurité
Sachez reconnaître les mots, les étiquettes et les
symboles de sécurité
20
DANGER
!
DANGER–Risques immédiats qui PEUVENT provoquer la mort ou des
blessures graves.
AVERTISSEMENT
!
AVERTISSEMENT–Risques ou pratiques hasardeuses qui POURRAIENT
provoquer la mort ou des blessures graves.
ATTENTION
!
ATTENTION–Risques ou pratiques hasardeuses qui POURRAIENT provoquer
des blessures légères ou des dommages matériels, ou endommager l’appareil
lui-même.
DANGER
!
Pour réduire les risques de mort ou de blessure, prenez les précautions qui
s’imposent, y compris les suivantes :
Débarrassez-vous correctement de votre ancien réfrigérateur
IMPORTANT : De nos jours encore, il arrive que des enfants restent enfermés dans un réfrigérateur
ou même y meurent asphyxiés. Les réfrigérateurs jetés ou abandonnés restent dangereux, même
s’ils sont entreposés « pour quelques jours seulement ». Si vous jetez votre ancien réfrigérateur,
veuillez suivre les directives ci-dessous afin de prévenir tout accident :
Ce que vous devez savoir
au sujet des directives
de sécurité
Les avertissements et les importantes
directives de sécurité contenues dans ce
manuel ne prétendent pas couvrir toutes
les conditions et situations de risque
pouvant se produire. Le bon sens,
l’attention et la prudence sont de mise
au cours de l’installation, de l’entretien
et du fonctionnement du réfrigérateur.
Faites appel à vos vendeur, distributeur,
service après-vente ou fabricant pour
éclaircir tout problèmes ou toute
condition que vous ne comprendriez pas.
AVANT DE JETER VOTRE ANCIEN RÉFRIGÉRATEUR OU CONGÉLATEUR :
• Démontez les portes.
• Laissez les étagères à leur place afin que des enfants ne puissent pas s’introduire facilement
à l’intérieur.
52
Page 53
L’installation de votre réfrigérateur
Ces instructions vous sont fournies dans le but de faciliter l’installation de votre appareil. L’entreprise Amana ne peut être
tenue responsable d’une installation non conforme.
Les étapes à suivre...
Un technicien qualifié devra être chargé d’installer le réfrigérateur conformément aux instructions d’installation.
Prenez les mesures d’ouverture de portes, de profondeur et de largeur du réfrigérateur. Enlevez les poignées et les portes
si nécessaire. Le technicien devra également :
1. Se conformer aux prescriptions de raccordement des compagnies locales d’approvisionnement en eau et en électricité.
2. Terminer le raccordement d’approvisionnement en eau avant de commencer le raccordement au circuit électrique.
Le remplacement ou la réparation du cordon d’alimentation électrique doit être effectué par un technicien qualifié.
Conditions d’installation
1. Branchez le réfrigérateur sur une prise reliée à la terre avec un câble électrique spécial (230-240 Volts, 50 Hz,
raccordement Y pour circuit de 10 A).
2. Protégez les revêtements de sol avec des couvertures ou du carton épais.
3. Assurez-vous que le sol supporte un poids de 429 kg.
4. Prévoir un dégagement de 5 mm sur le côté du réfrigérateur et, pour les modèles d’une profondeur supérieure à 60 cm,
prévoir un dégagement de 12,7 mm au-dessus du réfrigérateur.
5. Modèles d’une profondeur de 60 cm.
Rabattez les coins du plateau supérieur selon un angle de 45° si le plateau déborde de 25 mm.
Prévoir un dégagement de 5 mm sur les deux côtés du réfrigérateur et 7 mm sur le dessus, pour faciliter l’installation et la
mise d’aplomb. Aucun dégagement minimum n’est nécessaire à l’arrière de la caisse
Comment enlever le support en bois
ATTENTION
!
Afin d’éviter tout risque de dommage corporel ou matériel, le support en bois devra être enlevé par deux personnes.
1. Immobilisez les portes avec du ruban adhésif afin d’éviter leur ouverture inopinée.
2. Glissez le chariot sous un côté de l’appareil.
3. Enveloppez l’appareil avec une couverture ou un tissu, passez une sangle sur le pourtour, placez les protections en mousse
contenues dans le carton d’expédition sous la sangle et serrez-la fortement.
4. Abaissez le chariot vers l’arrière jusqu’à poser ses poignées sur le sol.
5. Enlevez du socle les deux boulons supérieurs.
6. Replacez le réfrigérateur et le chariot en position verticale et retirez la sangle.
7. Glissez le chariot sous le côté opposé du réfrigérateur.
8. Répétez les étapes 3 à 5.
9. Enlevez le support en bois.
10.Replacez le réfrigérateur et le chariot en position verticale, enlevez la sangle et retirez le chariot.
IMPORTANT :
Ne laissez pas le réfrigérateur en position latérale plus longtemps que le temps nécessaire au dévissage des boulons.
Comment enlever et remettre les portes et les charnières
• Confiez cette tâche à un technicien qualifié.
53
Page 54

L’installation de votre réfrigérateur
Comment monter et démonter les poignées
Les poignées se trouvent à l’intérieur du compartiment des produits frais. Les garnitures, les caches et les pièces accessoires se
trouvent dans la pochette de documents.
Poignées pleine porte (acier non-inox)
Enlevez les deux vis à
1
tête cruciforme de ¼"
situées en bas des
portes du réfrigérateur
et du congélateur.
Alignez les poignées de porte
2
au-dessus des jeux de clips
situés en haut et en bas des
portes, et faites-les glisser
vers le bas jusqu’à ce que les
trous de vissage en bas des
poignées correspondent aux
trous de vissage des portes.
Poignées demi-porte (acier non-inox)
Enlevez les quatre vis
1
à tête cruciforme de
¼" situées en haut
et en bas des portes.
Insérez les vis enlevées à l’étape
3
1 dans les trous de vissage situés
en bas de la section de la poignée.
Enclenchez les garnitures sur la
4
section des poignées et les butoirs
sur le bas des portes.
Pour enlever les poignées après le
premier montage...
• Suivez les étapes 3 à 4 en sens inverse.
NOTE : le montage peut être très serré. Au démontage
des poignées, tirez vers le haut pour les enlever.
Enclenchez les garnitures de
3
couleur à l’emplacement des vis
en haut et en bas des poignées.
• Enclenchez les garnitures en
insérant la grande extrémité
arrondie en premier.
Alignez les poignées avec les trous
2
de vissage et insérez les vis
enlevées à l’étape 1.
AVERTISSEMENT
!
Pour éviter tout risque de blessures graves par suite de bords coupants, user d’une extrême prudence pour enlever et
installer les poignées.
Poignées en acier inox
Desserrez les clips inférieurs
1
de la porte avec un tournevis
cruciforme de ¼".
Repérez le trou de vissage pré-
2
garni à la base de la poignée, et
faites coïncider l’extrémité creuse
avec le clip inférieur de la porte.
Pour enlever les poignées après le
premier montage...
Vous pouvez avoir à enlever les poignées
au cours d’un transport dans un espace étroit.
• Suivez les étapes 2 et 3 en sens inverse.
IMPORTANT : Afin de ne pas abîmer les
poignées, servez-vous d’un tournevis plat dont
vous aurez masqué l’extrémité avec du ruban
adhésif pour enlever les garnitures de couleur
des poignées.
Faites coïncider l’autre
3
extrémité de la poignée avec le
clip supérieur et glissez-la vers
le haut aussi loin que possible.
Insérez un tournevis
4
cruciforme de ¼" dans
le trou de vissage et
serrez la vis.
54
Page 55

L’installation de votre réfrigérateur
Comment monter les poignées suite
Poignées en acier inox
Insérez les caches de vis dans
5
les trous de vissage.
Répétez les étapes 2 à 5
6
pour monter les poignées
du congélateur.
suite
Pour enlever les poignées après le
premier montage…
• Suivez les étapes 2 à 5 en sens inverse.
IMPORTANT : Afin de ne pas abîmer les
poignées, servez-vous d’un tournevis plat
dont vous aurez masqué l’extrémité avec
du ruban adhésif pour enlever les caches
de vis.
Comment effectuer le raccordement à l’alimentation en eau
• Confiez cette tâche à un technicien qualifié.
Comment mettre votre réfrigérateur de niveau
ATTENTION
!
• Pour éviter d’endommager les murs et les sols, protégez-les avec des couvertures, du carton épais ou tout autre
matériau de protection.
• Pour éviter d’endommager ou de casser les molettes de réglage, n’utilisez pas d’outils électriques pour corriger
le niveau.
• NE RÉGLEZ PAS la hauteur de votre réfrigérateur à moins de 173,9 cm (moins charnières et garnitures). Des éléments
internes pourraient être endommagés.
Matériel nécessaire
• Tournevis cruciforme de 3/8" • Niveau
Enlevez la plinthe de
1
protection et les caches des
charnières inférieures.
• Pour ce faire, ouvrez les deux
portes à 180° ou aussi largement
que possible.
Tournez les deux molettes
2
de réglage avant (A) dans
le sens des aiguilles d’une
montre pour monter et
dans le sens contraire des
aiguilles d’une montre
pour descendre.
A
Que faire si mes portes ne sont
pas alignées ?
• Repérer la porte la plus haute des deux et tourner la molette
de réglage avant correspondante dans le sens inverse des
aiguilles d’une montre.
• Si la limite maximum d’ajustement est atteinte et que les
portes ne sont pas alignées, faire monter la porte opposée
en tournant la molette de réglage avant dans le sens des
aiguilles d’une montre.
• Remettre la plinthe en place.
55
Tournez les deux molettes
3
de réglage arrière (B) dans
le sens des aiguilles d’une
montre pour monter et dans
le sens contraire des aiguilles
d’une montre pour descendre.
Contrôlez avec le du niveau afin d’obtenir une
4
inclinaison de 6 mm vers l’arrière pour une
fermeture adéquate des portes.
• Si l’appareil est de niveau et stable, replacez
la plinthe.
Que faire si mon appareil
est instable ?
• Tourner la molette de réglage arrière dans le sens
des aiguilles d’une montre pour stabiliser le
coin instable.
• Remettre la plinthe en place.
B
Page 56

L’installation de votre réfrigérateur
Comment régler les commandes de température
Ce réfrigérateur est conçu pour fonctionner à une température ambiante située entre 16 °C et 43 °C.
Repérez les commandes du réfrigérateur
1
et du congélateur situées sur la cloison
supérieure gauche du compartiment
des produits frais et réglez les deux
commandes sur 4.
IMPORTANT : Aucun des deux compartiments ne refroidira
si la commande du congélateur est réglée sur Off (arrêt).
Laissez les températures se stabiliser
2
pendant 24 heures.
IMPORTANT : En raison de la conception de l’appareil,
commencez toujours le réglage des températures par le
compartiment congélateur.
Vérifiez que la température du congélateur
3
est située entre -17 °C et -16 °C.
• Tournez le bouton de commande sur le chiffre
supérieur si la température est trop élevée.
• Tournez le bouton de commande sur le chiffre
inférieur si la température est trop basse.
• Laissez 5 à 8 heures de délai au nouveau
réglage pour être effectif.
Vérifiez que la température du
4
réfrigérateur est 3 °C et 4 °C.
• Tournez le bouton de commande sur le chiffre
supérieur si la température est trop élevée.
• Tournez le bouton de commande sur le chiffre
inférieur si la température est trop basse.
• Laissez 5 à 8 heures de délai au nouveau
réglage pour être effectif.
Répétez la procédure si nécessaire.
5
Comment puis-je effectuer un test
de température ?
Matériel nécessaire
• 2 thermomètres pouvant mesurer des températures
entre -21 °C et 10 °C
2 verres à eau
•
Pour le congélateur
• Placez un thermomètre dans un
verre rempli d’huile végétale
au milieu du congélateur puis
effectuez l’étape 3 du
paragraphe consacré au
réglage de la température.
Pour le congélateur
• Placez un thermomètre
r
e
z
e
e
r
F
r
o
t
a
r
e
g
i
r
f
e
R
dans un verre rempli d’eau
au milieu du compartiment
puis effectuez l’étape 3 du
paragraphe consacré
au réglage de la
température.
Modèles à commande électronique de température
Pour régler la température du congélateur, utilisez les boutons à côté
1
du bouton . Il est recommandé de sélectionner une température
située entre -17 °C à -16 °C (0 °F et 2 °F).
• Utilisez le bouton pour augmenter la température de la zone du congélateur,
ou le bouton pour la diminuer.
• Appuyez sur le bouton
pour confirmer les réglages.
Pour régler la température du réfrigérateur, utilisez les boutons à
2
côté du bouton . Il est recommandé de sélectionner une température
située entre 3 °C à 4 °C (38 °F et 40 °F).
• Utilisez le bouton pour augmenter la température de la zone du
réfrigérateur, ou le bouton pour la diminuer.
• Appuyez sur le bouton
pour confirmer les réglages.
Laissez les températures se stabiliser pendant 24 heures.
3
NOTE : Si le réglage de température s’effectue sur les unités en fonctionnement,
5 à 8 heures suffisent pour la température se soit stabilisée.
56
Page 57
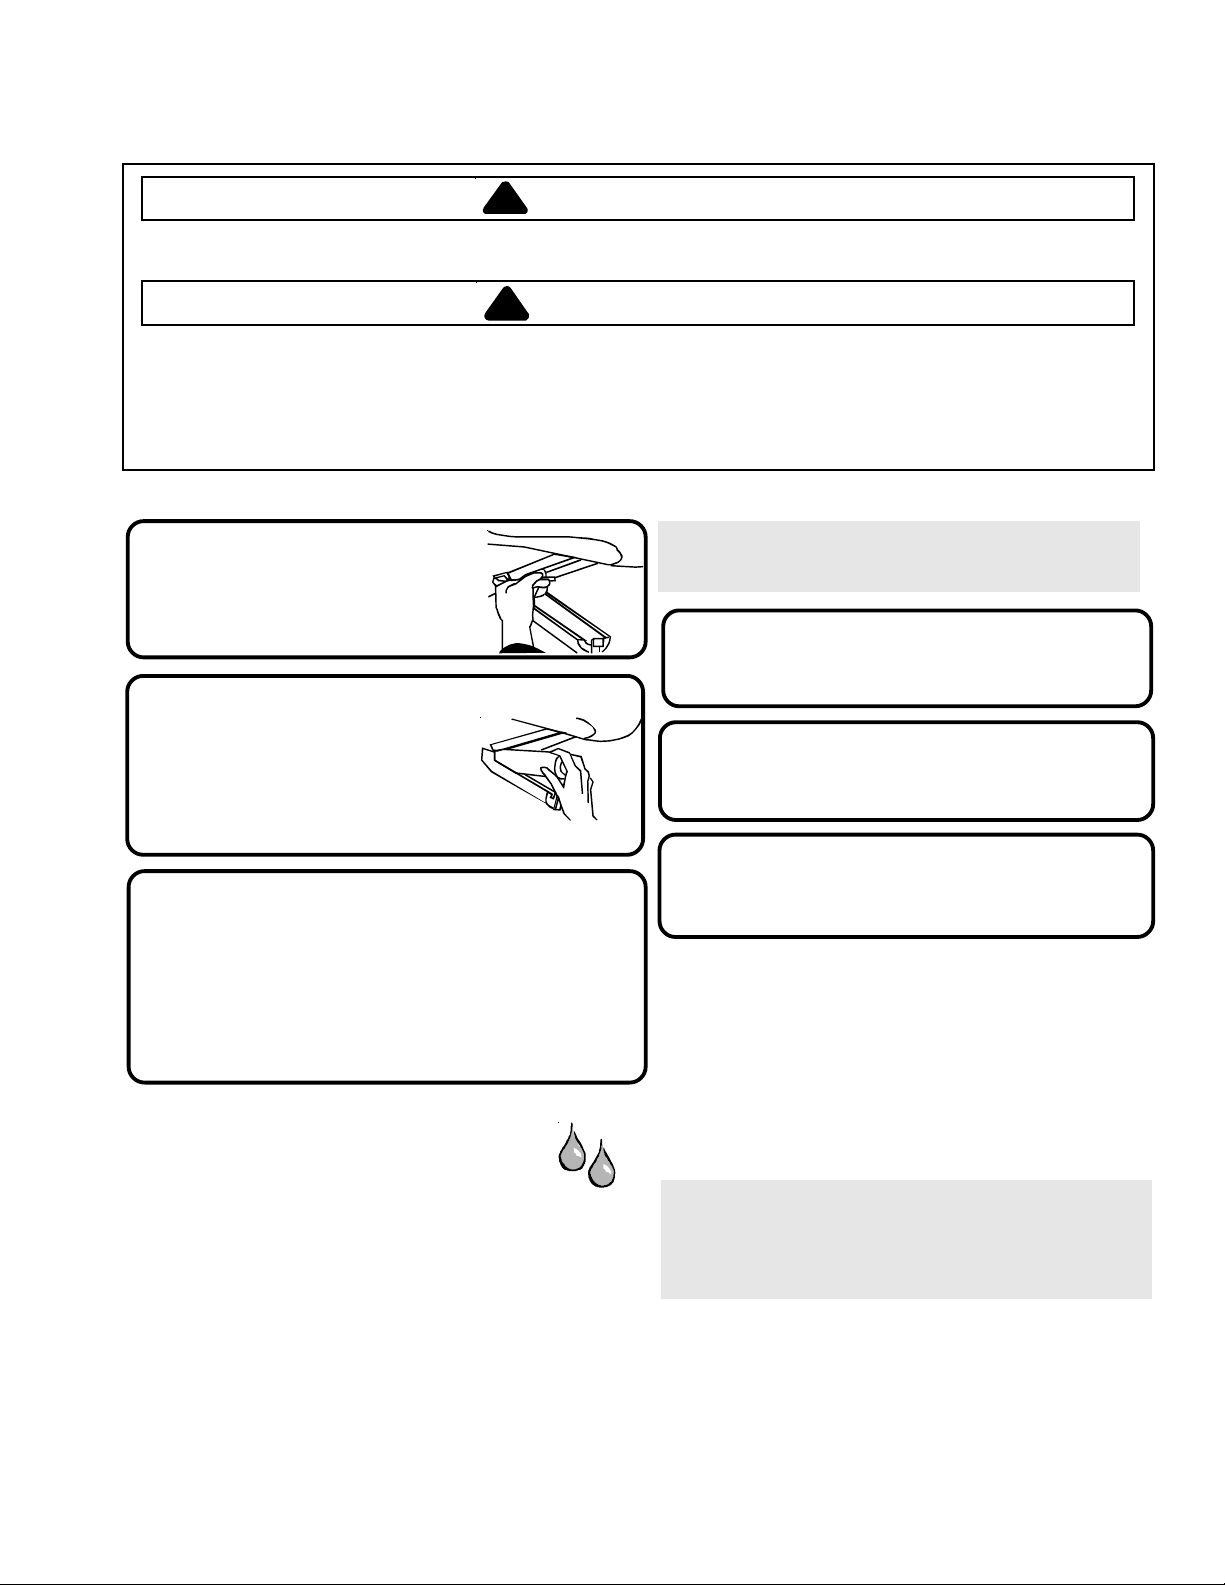
Au sujet du système de filtration…
Enlever et réinstaller le filtre à eau
AVERTISSEMENT
!
Pour éviter tout risque de maladies graves ou mortelles, n’utilisez pas un appareil dont l’eau est polluée ou de qualité
indéfinie sans effectuer une désinfection adéquate avant ou après l’utilisation du filtre.
ATTENTION
!
• Une cartouche périmée NE FILTRE PAS l’eau. Assurez-vous d’avoir toujours une cartouche de remplacement disponible
au moment de renouveler le filtre.
• Si le système de filtration de l’eau a été congelé, remplacez la cartouche du filtre.
• Si le système n’a pas été utilisé pendant plusieurs mois et que l’eau a un goût ou une odeur désagréable, vidangez le
système en retirant 2 à 3 verres d’eau. Si le goût ou l’odeur désagréable persistent, procédez au remplacement de la
cartouche du filtre.
Installation initiale du filtre à eau
Enlevez le capuchon
1
d’isolation bleu et gardez-le
pour un usage ultérieur.
Otez le sceau de garantie
2
à l’extrémité du filtre et
introduisez celui-ci dans
l’embout de filtre.
• Faites tourner doucement le filtre jusqu’à
ce qu’il se bloque et referme le capot.
Réduisez le giclement d’eau en vidangeant
3
petit à petit l’air contenu dans le système.
Faites couler l’eau par le distributeur pendant
environ 2 minutes jusqu’à ce qu’elle coule
régulièrement.
• Une vidange supplémentaire peut se révéler nécessaire
dans certaines zones où l’eau est de mauvaise qualité.
J’essaie de faire couler l’eau pour
vidanger le système, mais où est l’eau ?
Lors d’une première utilisation, vous devez patienter environ
1 à 2 minutes afin que le réservoir interne se remplisse.
Que se passe-t-il si je choisis de ne pas
utiliser le système de filtration d’eau ?
Le distributeur d’eau peut être utilisé sans cartouche de
filtration. Si vous choisissez cette option, remplacez le
filtre par la capsule d’isolation bleue.
Le remplacement du filtre à eau
IMPORTANT : De l’air emprisonné dans le système peut
provoquer l’éjection d’une quantité d’eau ou de la
cartouche. Enlevez la cartouche avec prudence.
Tournez le filtre dans le sens inverse des
1
aiguilles d’une montre jusqu’à ce qu’il
se sépare de l’embout de filtre.
Videz l’eau contenue dans le filtre dans un
2
évier ou dans les toilettes, puis jetez-le dans
la poubelle d’ordures ménagères.
Essuyez l’eau en excès dans le capot du
3
filtre et continuez l’installation par les
étapes 2 et 3.
Quand dois-je changer le filtre à eau ?
Certains modèles de distributeurs d’eau sont munis d’un
indicateur de renouvellement de cartouche. Les instructions
relatives à son fonctionnement et à sa remise en marche
sont indiquées dans le paragraphe relatif au distributeur
d’eau dans votre manuel.
Le filtre des appareils dépourvus d’indicateur doit être
changé tous les 6 mois environ.
IMPORTANT : La qualité de l’eau et la quantité utilisée
déterminent la durée d’utilisation de la cartouche du filtre à
eau. Si la quantité utilisée est importante et si la qualité de
l’eau est mauvaise, le changement de cartouche peut
devoir être effectué plus souvent.
Comment puis-je me procurer une
nouvelle cartouche de filtre ?
La cartouche de rechange de filtre à eau Amana® modèle
OWF-51 est disponible chez les revendeurs et techniciens
Amana®. Veuillez contacter votre distributeur local pour
plus de renseignements.
57
Page 58
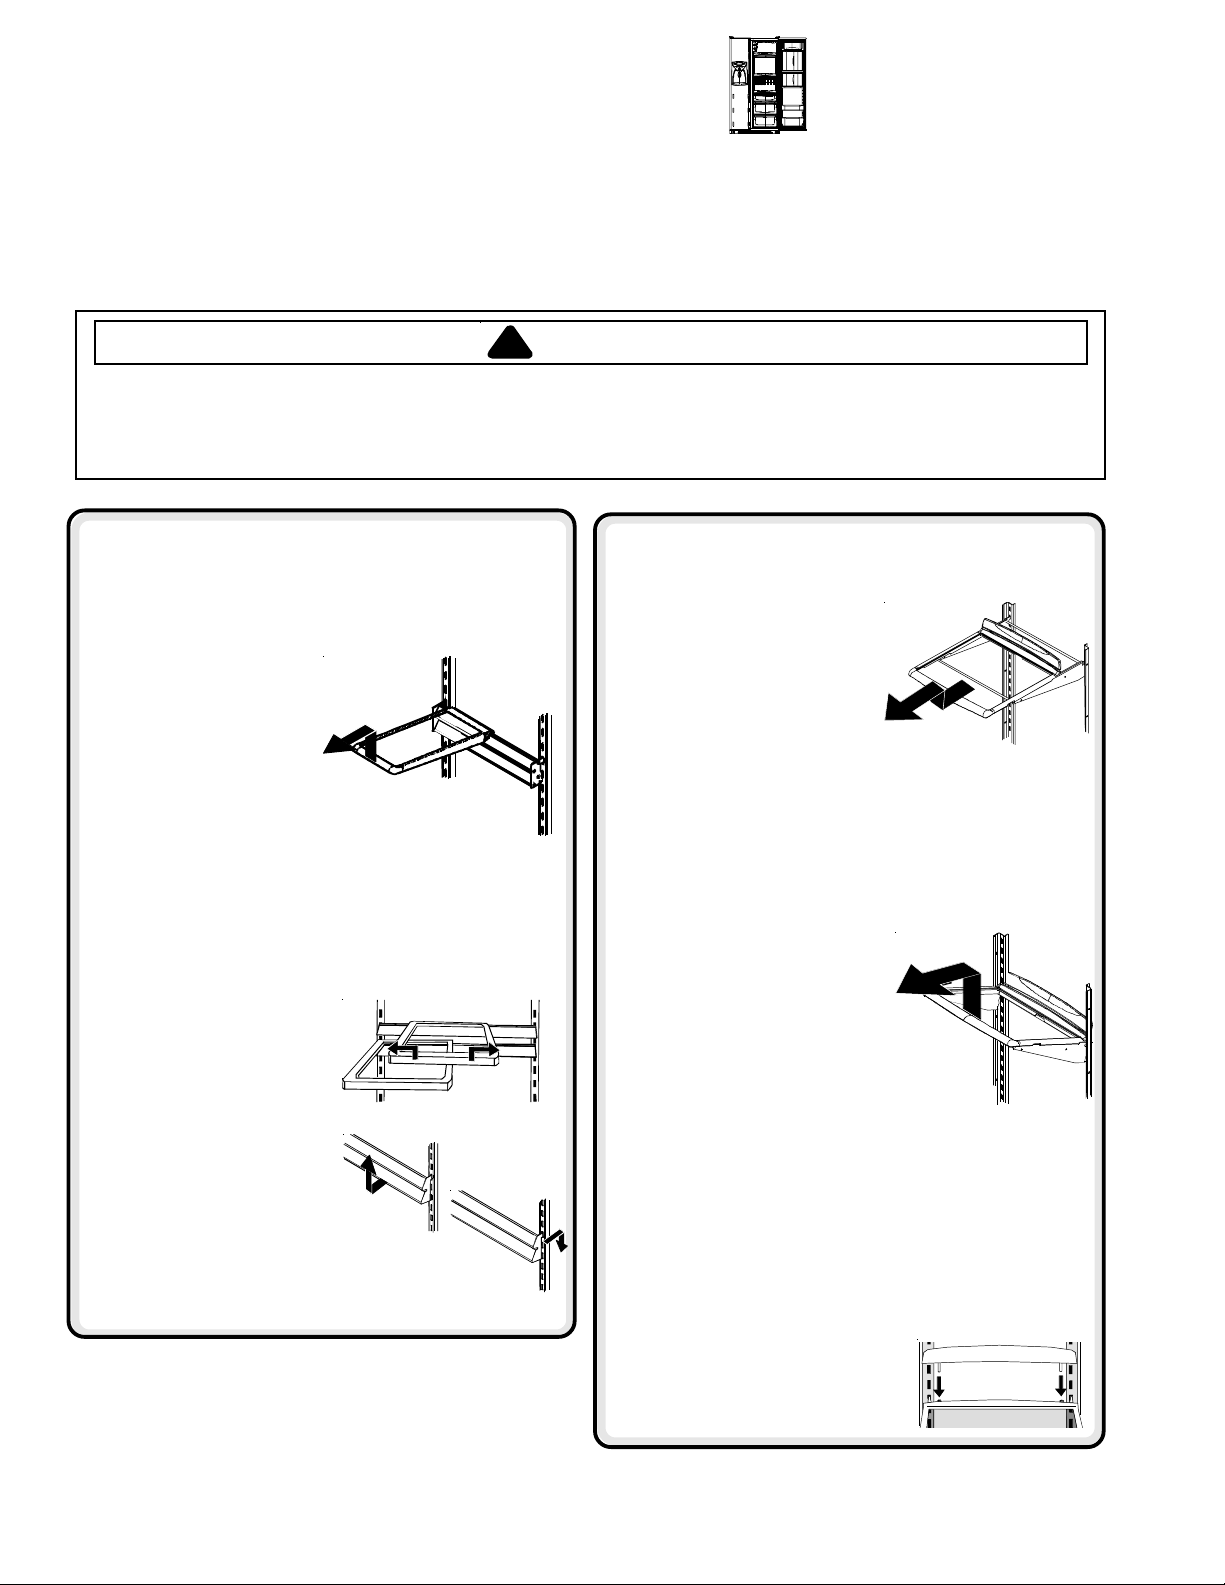
Les équipements du réfrigérateur
Que faire si ces
équipements sont
Ce livret présente toute la gamme d’équipements disponible pour la ligne de
produits. Si votre réfrigérateur ne possède pas toutes les options décrites, la
plupart d’entre elles peuvent être achetées auprès de votre distributeur local.
différents des miens ?
Les étagères intérieures
ATTENTION
!
Pour éviter tout risque de dommage corporel ou matériel, observez les directives suivantes :
• Assurez-vous que les étagères sont stables avant d’y placer des produits alimentaires.
• Manipulez soigneusement les étagères en verre trempé. Ces étagères peuvent se briser soudainement
si elles sont ébréchées, rayées ou exposées à un changement brusque de température.
Étagères Side Glide™
(sur certains modèles)
Les étagères Side Glide™ sont montées sur une barre
arrière à double rail. Elles peuvent être placées côte à côte
pour offrir une grande
surface à un seul niveau
ou, si elles sont montées
sur chaque rail de la barre,
peuvent glisser
séparément vers la droite
ou vers la gauche pour
s’adapter aux besoins
de rangement.
Pour enlever et remettre
l’étagère :
• Pour enlever l’étagère, soulevez-la de 10°
pour la décrocher du double rail et sortez-la.
• Pour la réinstaller, procédez en sens inverse.
Pour faire glisser les
étagères :
• Soulevez légèrement
l’avant de l’étagère et
faites-la glisser vers la
droite ou vers la gauche.
Étagères Spillsaver™ Easy Glide™
(sur certains modèles)
Les étagères Spillsaver™ Easy
Glide™ conjuguent la facilité
d’entretien et la facilité
d’atteindre les produits rangés
dans le fond. Pour faciliter
l’entretien, la plaque en verre
de l’étagère peut être sortie de
son cadre après avoir tiré
l’étagère au maximum de son
extension vers l’extérieur.
• Pour enlever l’étagère et son cadre, voir les
instructions relatives aux étagères fixes Spillsaver™.
Étagères Spillsaver™
Les étagères fixes Spillsaver™
retiennent les petits
renversements accidentels.
Il est plus facile de les nettoyer.
• Pour enlever les étagères,
soulevez-les en les tirant.
• Pour les remettre en place,
procédez en sens inverse.
Pour monter et démonter
la barre à double rail :
• Pour enlever la barre,
décrochez-la des
montants métalliques
verticaux.
• Pour la réinstaller, procédez en
sens inverse.
Extension postérieure d’étagère
(sur certains modèles)
Les extensions placées à l’arrière des étagères
empêchent les articles de tomber au fond du
compartiment.
Pour enlever et remettre une extension :
• Pour enlever une extension, soulevez-la à la
verticale au-dessus de l’arrière de l’étagère.
• Pour la remettre en place,
insérez les plots de l’extension
dans les orifices
correspondants du cadre de
l’étagère.
58
Page 59

Les équipements du réfrigérateur
A
Le stockage dans les portes
Centrale de
produits laitiers
La centrale de produits laitiers offre
un espace de rangements pour
le beurre, les yaourts, le
fromage etc. C’est un
compartiment amovible de la
porte qui peut être déplacé à
différents emplacements selon
les besoins.
• Pour l’enlever, soulevez-le
vers le haut puis dégagez-le.
• Pour le réinstaller, procédez
en sens inverse.
Balconnet inclinable
(sur certains modèles)
L’ensemble du balconnet inclinable est composé du
balconnet et de son cadre, il offre un rangement facile
et ajustable des produits alimentaires dans la porte.
L’ensemble balconnet s’incline vers l’avant – facilité
d’accès aux produits, et s’enlève complètement –
facilité de nettoyage et d’ajustement.
Pour enlever et remettre
le balconnet :
• Pour enlever le balconnet,
faites-le basculer vers l’avant
puis tirez-le vers le haut.
• Pour le remettre en place,
faites-le glisser dans son
cadre et poussez-le vers
l’arrière.
Pour ajuster le cadre
du balconnet :
• Enlevez le balconnet comme indiqué ci-dessus.
• Retirez le cadre de la porte en le soulevant et
replacez-le à l’emplacement souhaité de la porte.
Plaquettes
anti-glisse
Les plaquettes anti-glisse
empêchent le glissement des
objets dans les balconnets de
la porte. Elles sont amovibles et facilement lavables
dans le panier supérieur d’un lave-vaisselle.
Compartiment à boissons
Beverage Chiller™ et
Mini-Chiller™
(sur certains modèles)
Le compartiment Beverage Chiller™ et le minicompartiment Mini-Chiller™ à température contrôlée
conservent les boissons et autres produits à une
température inférieure de 3 °C à celle du reste du
compartiment des produits frais. Une entrée d’air
permet le passage d’air froid du congélateur vers
le compartiment Beverage Chiller™.
La commande de température du
compartiment à boissons Beverage
Chiller™ se trouve sur la paroi gauche du
compartiment des produits frais. Cette
commande contrôle la quantité d’air froid
admise dans le compartiment Beverage
Chiller™. Tournez le bouton de commande
vers le grand icône « flocon de neige »
pour baisser la température.
Pour monter et démonter le
compartiment à boissons
Beverage Chiller™ :
• S’ils sont placés directement
au-dessus du compartiment
Beverage Chiller™, la
centrale de produits laitiers
ou les balconnets de porte
devront être enlevés en
premier. Reportez-vous aux
instructions appropriées
pour les enlever. Faites glisser l’ensemble
du compartiment Beverage Chiller™
vers le haut et retirez-le.
• Pour le réinstaller,
alignez l’une des entrées
d’air froid
compartiment Beverage
Chiller™ sur l’une des
deux arrivées d’air froid
(B)
Appuyez sur l’ensemble
vers le bas, jusqu’au butoir du fourreau de porte.
IMPORTANT : Le compartiment à boissons
Beverage Chiller™ ne fonctionnera pas
correctement si les entrées d’air froid ne sont
pas alignées sur les arrivées d’air froid du
fourreau de porte.
(A)
du
du fourreau de porte.
B
Balconnets de porte
Les balconnets de porte s’ajustent
selon les besoins individuels
de stockage.
• Pour les enlever, faites-les glisser
vers le haut et retirez-les.
• Pour les remettre en place,
procédez en sens inverse.
59
Page 60
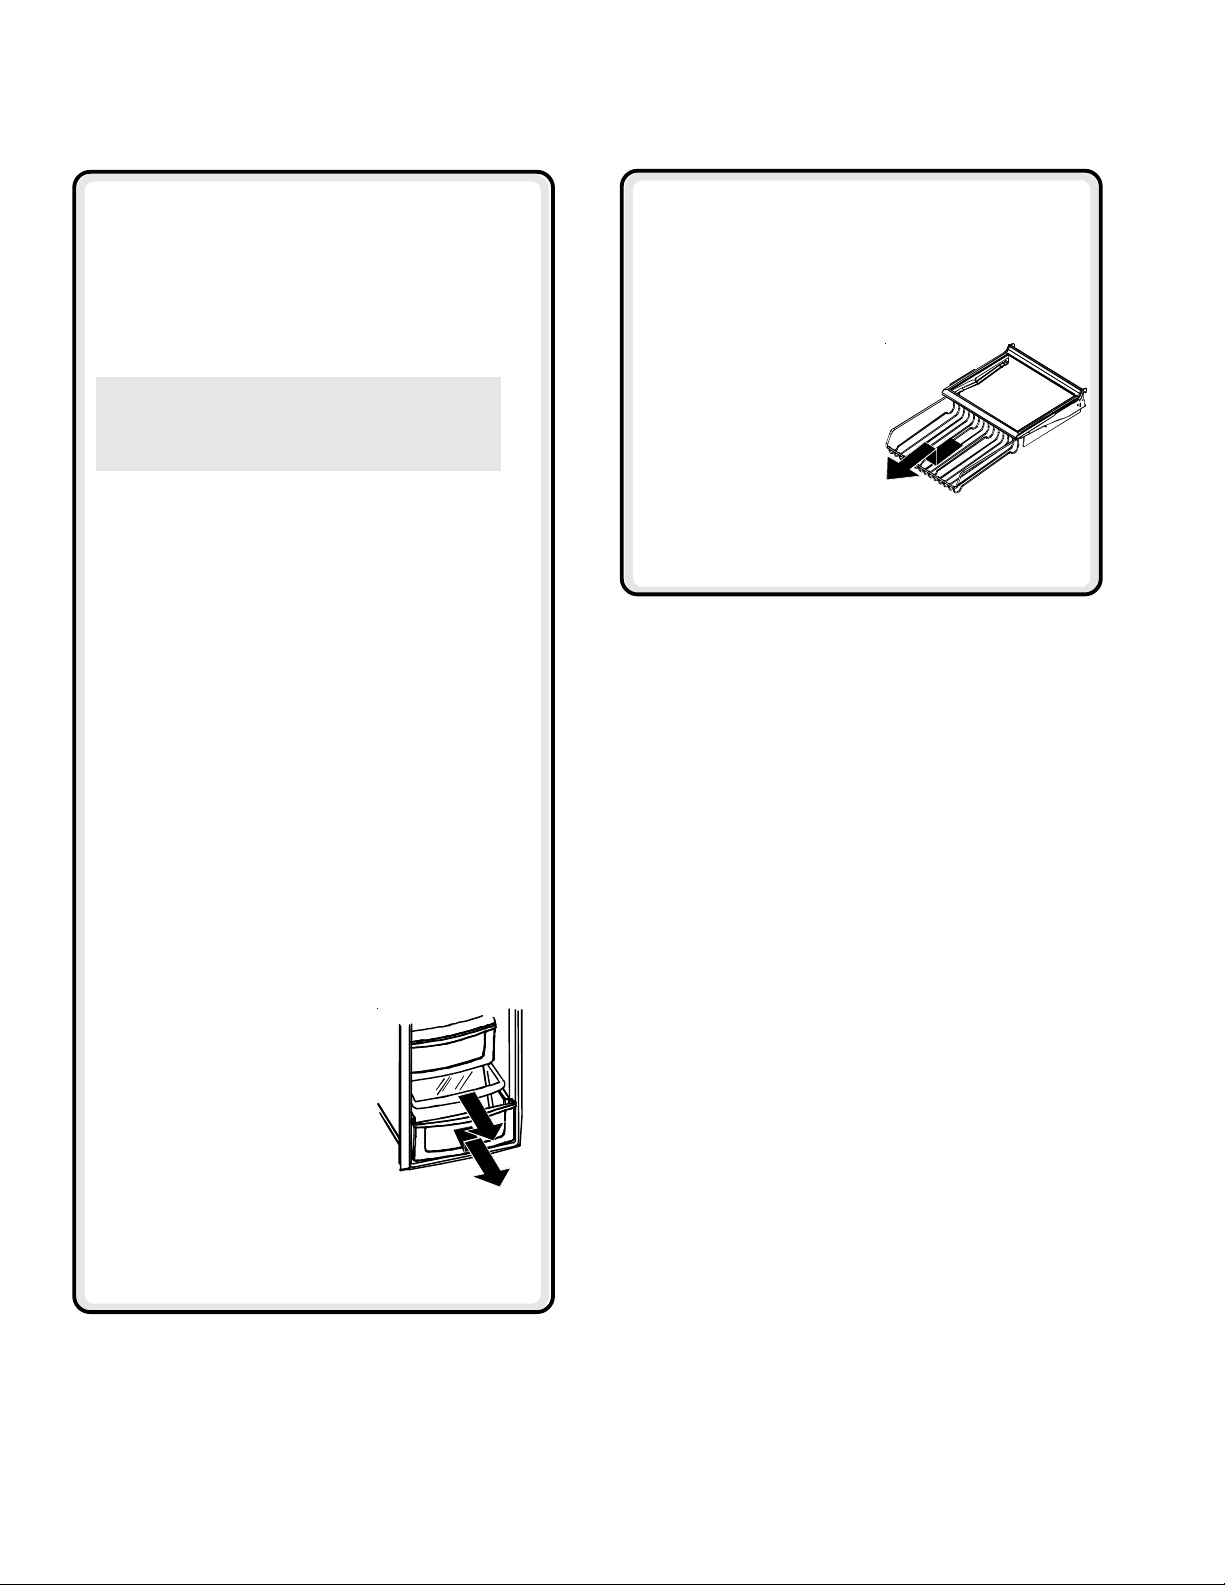
Les équipements du réfrigérateur
Les Tiroirs
Tiroir bac à légumes /
produits fins
Le système bac à légumes / produits fins est
composé d’un tiroir muni d’une commande de
température contrôlée qui maintient le bac à
une température inférieure de 3 °C à celle du
réfrigérateur. Ce tiroir est utilisé pour le stockage des
produits fins ainsi que d’autres produits périssables.
NOTE : L’air froid dirigé sur le système bac à
légumes / produits fins peut faire baisser la
température du réfrigérateur. La commande
du réfrigérateur devra alors être ajustée.
Commandes
Situées sur la paroi à gauche du tiroir, les
commandes de climatisation contrôlent la
température de l’air dans le tiroir des légumes et
produits fins. Réglez le niveau sur
obtenir une température de froid qui convienne à des
fruits et des légumes recouverts d’une peau. Réglez
le niveau sur
température plus froide pour viandes
et produits fins.
climat contrôlé
cold
coldest
(le plus froid) pour obtenir une
(froid) pour
Bac à légumes climat contrôlé
Le bac à légumes Garden Fresh™ permet de
conserver des produits frais plus longtemps en leur
procurant un environnement à humidité contrôlée.
Beverage Organizer™ de
boissons (sur certains modèles)
Le tiroir Organizer™ de boissons est situé sous
l’étagère Spillsaver™ Easy Glide™ et coulisse hors
de son emplacement. L’Organizer peut contenir
jusqu’à 12 canettes de boissons gazeuses.
Pour enlever et remettre
l’Organizer :
• Pour l’enlever, videz-le
de son contenu. Tirez
l’Organizer vers l’avant
jusqu’à extension
complète et soulevez
la partie avant pour la
dégager du rail de
l’étagère. Puis retirez le tiroir.
• Pour le remettre en place,
procédez en sens inverse.
Commandes
Les commandes Garden Fresh™ règlent le taux
d’humidité dans le bac à légumes. Utilisez le réglage
low
(bas) pour les fruits et légumes recourerts d’une
peau, le réglage
légumes à feuilles.
Pour enlever et remettre les tiroirs :
• Pour enlever le tiroir, tirez-le
jusqu’à extension complète,
inclinez l’avant du tiroir et
retirez-le.
• Pour le remettre en place,
procédez en sens inverse.
Pour enlever et remettre le
bac à légumes :
• Tirez-le vers le haut pour le
libérer de son support mural
et enlevez-le.
• Pour réinstaller le bac, abaissez-le sur
son support mural et poussez-le dans le
compartiment jusqu’au fond.
high
(élevé) pour les fruits et
60
Page 61
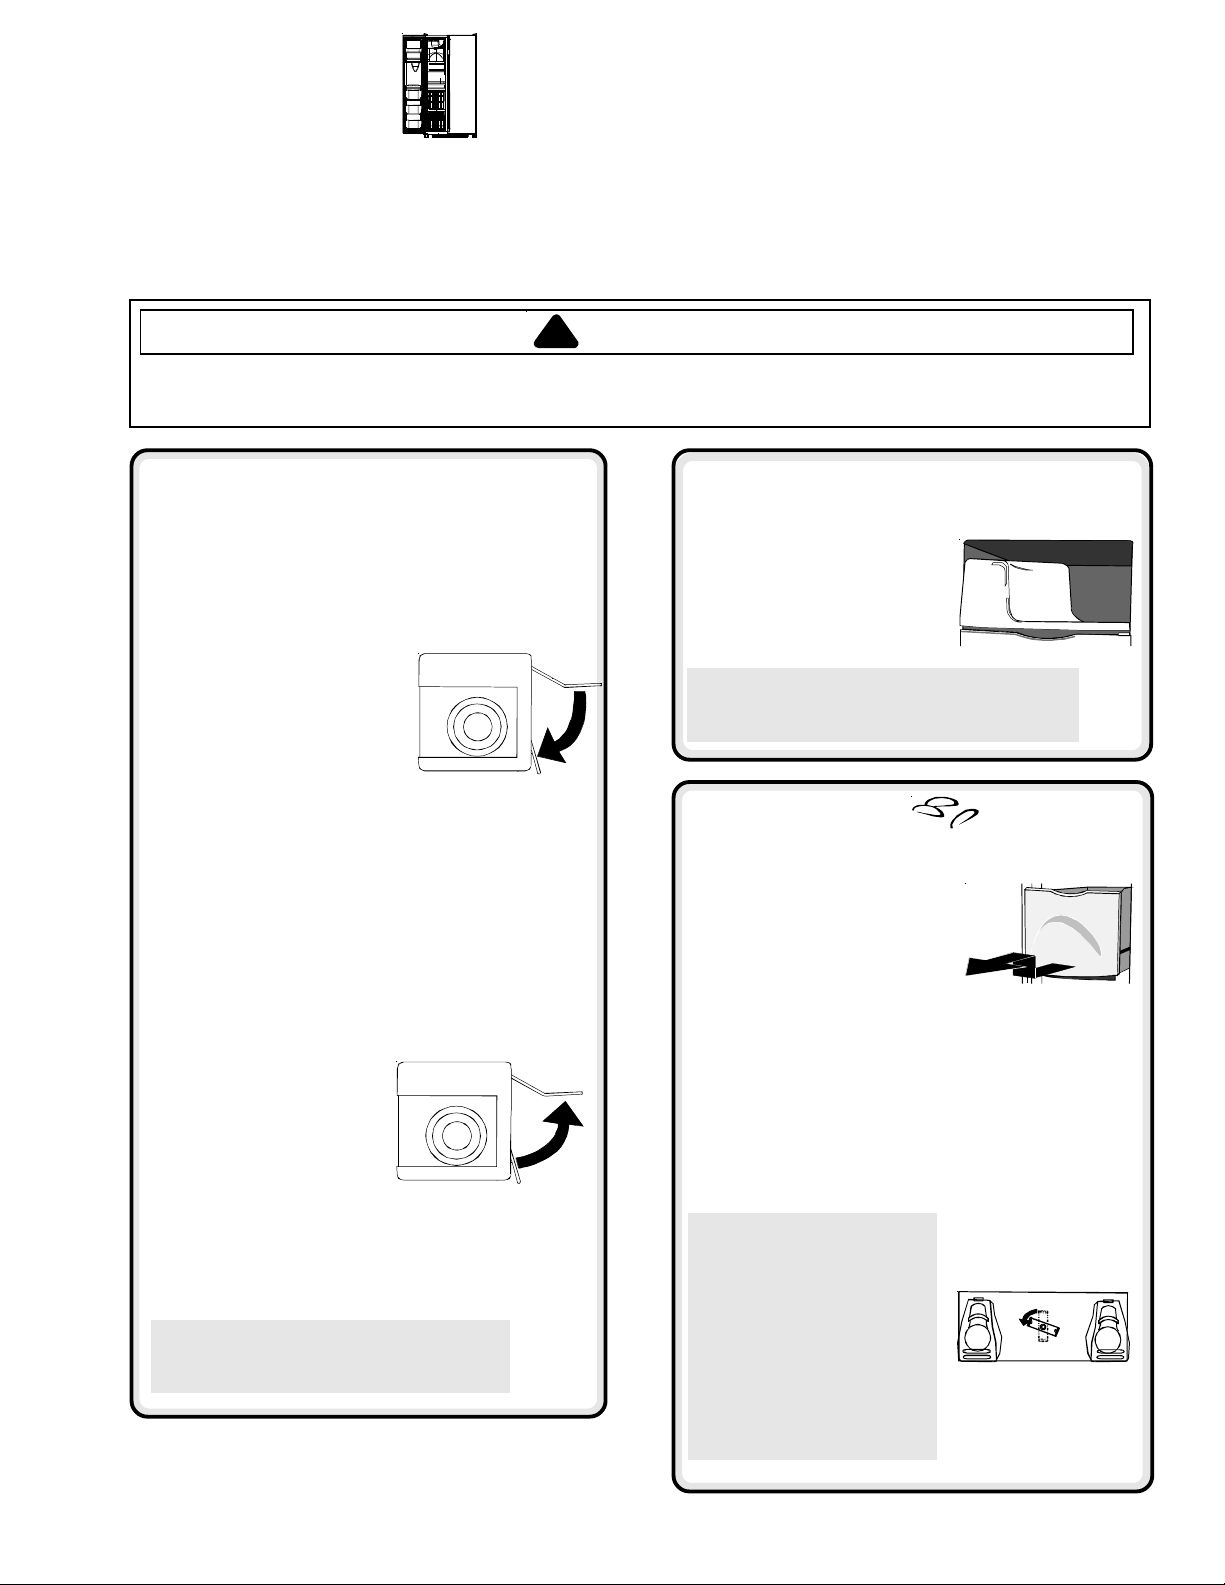
Les équipements du congélateur
Que faire si ces
équipements sont
Ce livret présente toute la gamme d’équipements disponible dans la ligne
de produits. Si votre réfrigérateur ne possède pas toutes les options décrites,
la plupart d’entre elles peuvent être achetées auprès de votre distributeur local.
différents des miens ?
Les équipements de base
ATTENTION
!
Pour éviter tout risque de dommages matériels, appliquez les directives suivantes :
• Ne forcez pas le bras de la machine à glace vers le haut ou vers le bas.
• Ne placez et ne stockez aucune denrée dans le bac à glace.
Machine à glace et distributeur
automatique
Cette machine à glace fabrique les glaçons pour le
système de distribution.
Mise en marche de la machine à glace
• Assurez-vous que le bac à glace est en place et
que le bras de la machine est en position basse.
• Lorsque le compartiment
congélateur a atteint une
température entre -18 °C
et -17 °C, la machine à
glace se remplit d’eau
et se met en marche.
• Laissez à la machine un
délai de 24 heures
environ après l’installation pour fabriquer
une première quantité de glaçons.
• Jetez les glaçons fabriqués pendant les
12 premières heures de fonctionnement
afin de vous assurer que le système est
dépourvu d’impuretés.
Instructions de fonctionnement
• Assurez-vous que le bac à glace est en place
et que le bras de la machine à glace est en
position basse.
• Lorsque le compartiment congélateur
a atteint une température
entre -18 °C et -17 °C, la
machine à glace se
remplit d’eau et se met en
marche. Vous disposerez
d’une récolte complète de
glaçons toutes les
3 heures environ.
• Pour arrêter la production de glace, relevez
le bras de la machine vers le haut jusqu’à
l’audition d’un déclic.
• La machine à glace restera à
ce que le bras soit ramené en position basse.
IMPORTANT : Ne pas installer l’étagère à
crèmes glacées si le bras de la machine à
glace est à la position OFF (Arrêt).
off
(arrêt) jusqu’à
Étagère à crèmes glacées
L’étagère à crèmes glacées offre un espace
pour les denrées à glacer ou à
congeler rapidement.
• Pour enlever l’étagère,
soulevez-la des rails du
bac à glace et retirez-la.
• Pour la remettre en place,
procédez en sens inverse.
IMPORTANT Ne pas installer l’étagère à
crèmes glacées si le bras de la machine à
glace est à la position OFF (Arrêt).
Bac à glace
Le bac à glace est situé sous le distributeur
automatique de glaçons.
Pour enlever et remettre le
bac à glace :
• Pour enlever le bac, enlevez
d’abord l’étagère à crèmes
glacées. Placez le bras de la
machine à glace en position
haute pour désactiver la
production de glace.
• Soulevez l’avant du bac et tirez-le à fond, puis
relevez l’avant du bac et tirez-le vers l’extérieur.
• Pour le réinstaller, faites glisser le bac dans les
rails sous la machine à glace jusqu’à ce qu’il
s’enclenche à sa place. Rabaissez le bras de la
machine à glace pour réactiver la production de
glaçons et replacez l’étagère à crèmes glacées.
IMPORTANT : Le bac à glace
doit être parfaitement mis en
place pour que la production
de glace soit correcte. La
fermeture défectueuse de la
porte du congélateur signifie
que le bac à glace est mal
positionné. Dans ce cas,
tournez la vis de l’agitateur
comme illustré à droite pour
aligner le bac à glace sur
l’arrière de l’appareil.
61
Page 62

Les équipements du congélateur
Les étagères
Système Stor-Mor™
Grâce à ce système, les paniers coulissent vers l’avant
afin de faciliter l’accès aux denrées rangées au fond.
Les clayettes peuvent s’enlever pour s’adapter à un
système de rangement personnalisé.
Pour enlever et remettre une
clayette Stor-Mor™ :
• Pour l’enlever, dégagez des rails
le côté droit de la clayette et
faites-la sortir des clips de
montage sur la paroi.
• Pour la réinstaller, procédez en sens inverse.
NOTE : L’arrière de la clayette doit être de niveau
avec l’arrière du compartiment pour reposer
parfaitement dans les rails. Un alignement imparfait
peut provoquer le glissement de la clayette.
Pour enlever et remettre
les paniers :
• Pour l’enlever, tirez le panier
vers l’avant jusqu’à extension
complète. Soulevez la poignée
avant pour libérer le panier des
rails et l’enlever.
• Pour le remettre en place,
procédez en sens inverse.
Clayettes fixes de congélateur
Pour enlever et remettre les clayettes :
• Faites sortir la clayette des
clips de montage de la paroi
et des orifices de montage
du côté gauche.
• Pour la remettre en place,
procédez en sens inverse.
Clayette suspendue
(sur certains modèles)
La clayette suspendue procure un espace
supplémentaire de stockage pour bacs à glaçons,
produits congelés emballés, crèmes glacées etc.
Pour enlever la clayette :
• Débloquez le crochet souple
de la clayette suspendue
du côté droit de la clayette
Stor-Mor™. La clayette
basculera vers le bas.
• Pressez le crochet souple du
côté gauche de la clayette
pour la dégager entièrement.
Pour réinstaller la clayette suspendue :
• Suivez les étapes précédentes en ordre inverse.
Le stockage dans les portes
Balconnets de porte
• Reportez-vous aux instructions des paragraphes
relatifs aux produits frais.
Balconnets de porte inclinables
(sur certains modèles)
• Reportez-vous aux instructions des
paragraphes relatifs aux produits frais.
62
Page 63
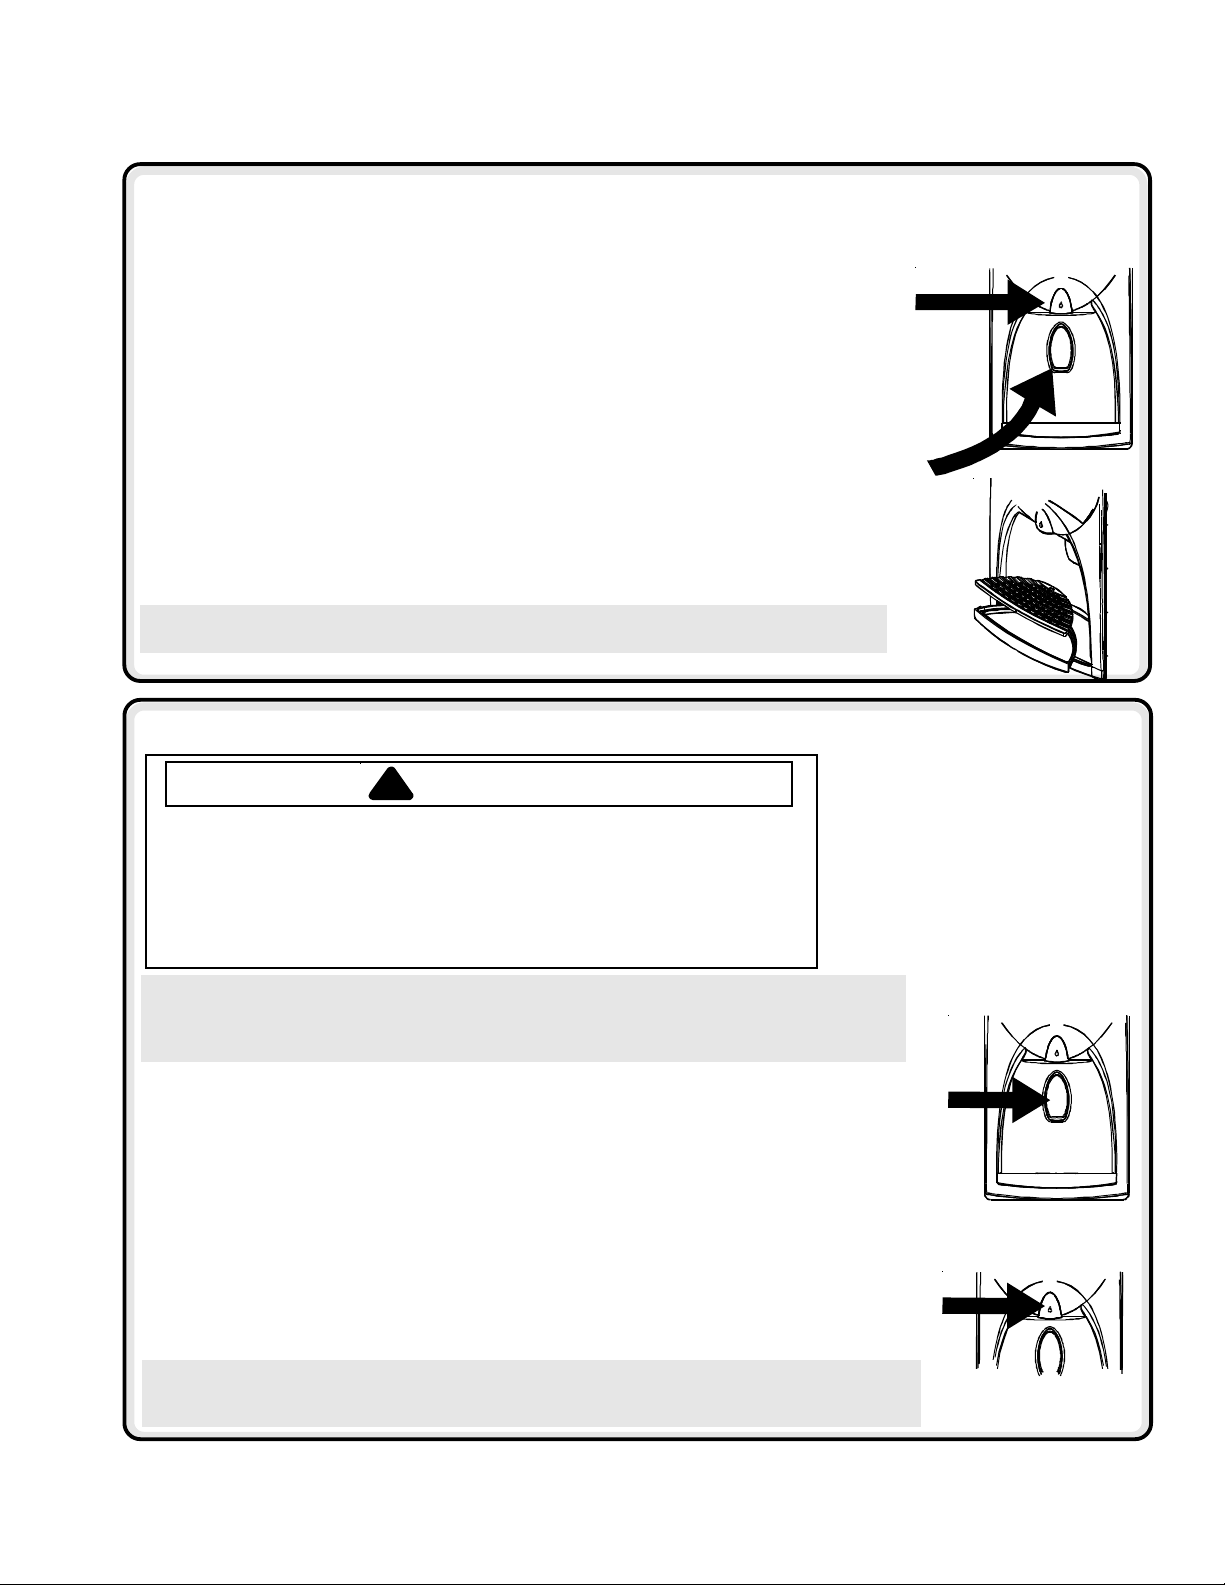
Les équipements du distributeur d’eau
Les équipements de base
Éclairage du distributeur pas d'illustration
Une lampe s’allume à pleine puissance dans la zone de distribution d’eau ou de glace.
Commande Front Fill (remplissage frontal)
(certains modèles)
Cette commande Front Fill (remplissage frontal) fonctionne indépendamment des commandes
du distributeur, offrant une alternative d’utilisation de la distribution d’eau. Elle permet le
remplissage de récipients d’une dimension supérieure à la capacité de la niche du distributeur
(tels que pichets, pots à café, bouteilles, casserole large etc.).
Cet équipement facilite la distribution simultanée d’eau et de glace. Pour l’utiliser, sélectionnez
le mode choisi sur le panneau de commande du distributeur. Pressez le récipient contre le
poussoir de distribution tout en appuyant sur la commande Front Fill (remplissage frontal).
Poussoir de distribution
Le poussoir de distribution est situé au fond de la niche du distributeur. Quand le poussoir est
pressé, la sélection choisie sur le panneau de commande du distributeur se déverse.
Plateau amovible
Le plateau amovible situé en bas de la niche du distributeur est conçu pour recueillir les petits
écoulements d’eau. Il est facile à enlever pour être vidé et nettoyé.
IMPORTANT : Le plateau amovible n’évacue pas l’eau qu’il recueille. L’eau s’écoulant
en trop grande quantité peut déborder du plateau.
Le fonctionnement du distributeur d’eau
ATTENTION
!
Pour éviter tout risque de dommage corporel ou matériel, observez les
directives suivantes :
• N’introduisez pas les doigts, la main ou tout objet étranger dans
l’embouchure du distributeur.
• N’utilisez pas d’ustensile pointu pour casser la glace.
• Ne déversez pas directement de la glace dans un verre fin, en
porcelaine ou en cristal fragile.
NOTE : Durant la phase initiale d’utilisation du distributeur, attendez 1 à 2 minutes avant de
faire couler de l’eau afin de permettre le remplissage du réservoir d’eau. Jetez les 10 à 14
premiers verres d’eau après que le réfrigérateur ait été raccordé à l’alimentation en eau ou
après une longue période d’arrêt de fonctionnement.
Utilisation du poussoir de distribution :
• Choisissez une sélection d’eau sur le panneau de commande du distributeur.
• Pressez un récipient solide et à embouchure large contre le poussoir de distribution.
• Relâchez la pression sur le poussoir pour arrêter l’eau de couler. Une petite quantité
d’eau peut s’écouler ensuite, recueillie par le plateau du distributeur. Un écoulement
plus important devra être essuyé.
Utilisation de la commande Front Fill (remplissage frontal) (certains modèles) :
• Positionnez le récipient sous la commande Front Fill (remplissage frontal) en vous
orientant sur l’égouttoir à eau.
• Pressez la commande Front Fill (remplissage frontal) en la maintenant enfoncée.
• Relâchez la commande quand le remplissage est terminé. Une petite quantité d’eau peut
s’écouler ensuite, recueillie par le plateau du distributeur. Un écoulement plus important
devra être essuyé.
NOTE : Si le distributeur d’eau fonctionne pendant plus de 5 minutes, un capteur de sécurité
coupera le courant du système de distribution. Reportez-vous au paragraphe Verrouillage
automatique pour plus d’informations.
63
Page 64

Les équipements du distributeur d’eau
Les équipements de contrôle
(contrôle avec 5 boutons)
Fonctionnement du distributeur de glace
Pour distribuer des glaçons :
• Sélectionner le mode
appuyant sur le bouton correspondant du panneau de commande du distributeur. Un signal lumineux vert
au-dessus du bouton indique le mode sélectionné.
• Appuyez le récipient contre le poussoir de distribution. Dans le cas de glace pilée, tenez le récipient aussi
près que possible de l’arrivée de glace pour éviter sa dispersion. Le mode de sélection ne doit pas être
modifié en cours de distribution.
NOTE : Si le distributeur fonctionne pendant plus de 2 á 3 minutes, un capteur de sécurité coupera le courant
du système de distribution. Reportez-vous au paragraphe Verrouillage automatique pour plus d’informations.
Cubed
(glaçon) pour des glaçons ou
Crushed
(glace pilée) pour de la glace pilée en
Verrouillage du distributeur
Cet équipement empêche l’écoulement de
l’eau ou de la glace.
Pour verrouiller et déverrouiller le distributeur :
• Pour verrouiller le distributeur, appuyez sur le bouton
Dispenser Lock
3 á 4 secondes. Un signal lumineux vert au-dessus
du bouton confirme que le distributeur est verrouillé.
• Pour déverrouiller le distributeur, appuyez sur le bouton
Dispenser Lock
3 á 4 secondes. Le signal lumineux vert au-dessus
du bouton s’éteindra.
(blockage distributeur) pendant
(blockage distributeur) pendant
Qu’est-ce que la fonction Verrouillage
automatique ?
La fonction Verrouillage automatique coupe l’alimentation
électrique du distributeur d’eau ou de glace quand celui-ci
fonctionne, dans l’une ou l’autre sélection. Quand le mode de
verrouillage s’enclenche, le signal lumineux situé au-dessus
du bouton Dispenser Lock (blockage distributeur) s’allume.
Pour déverrouiller le distributeur :
• Pour déverrouiller le distributeur, appuyez sur le bouton
Dispenser Lock (blockage distributeur) pendant 3 á 4 secondes.
L’indicateur lumineux vert au-dessus du bouton s’éteindra.
Indicateur lumineux de statut du filtre
L’indicateur lumineux de statut du filtre rappelle la nécessité de remplacer la cartouche de filtre à eau. Un signal
lumineux vert indique que le filtre est en bon état. Un signal lumineux rouge indique que le filtre doit être changé.
Une fois que le signal devient rouge, il reste rouge jusqu’à ce que la fonction soit remise à jour.
Pour remettre le signal lumineux à jour :
• Appuyez sur
Le signal lumineux vert clignotera 3 fois pour confirmer la mise à jour.
Dispenser Lock
(blockage distributeur) et
Water
(eau) simultanément pendant 3 á 4 secondes.
Auto Light (autocontrôle lumineux)
La fonction
dudistributeur lorsque le
Pour activer et désactiver
• Pour activer la fonction, appuyez sur le bouton
lumineux) situé sur le panneau de commande. Un signal lumineux
vert au-dessus du bouton indique que le capteur est activé.
• Pour désactiver la fonction, appuyez sur le bouton
Auto Light
(autocontrôle lumineux) permet de réduire de moitié la puissance de l’éclairage
Light Sensor
Auto Light
(capteur lumineux) détecte une lumière ambiante tamisée.
(autocontrôle lumineux) :
Auto Light
Auto Light
(autocontrôle
(autocontrôle lumineux). Le signal lumineux vert s’éteindra.
NOTE : L’éclairage du distributeur fonctionnera
normalement, qu’Auto Light (autocontrôle
lumineux) soit activé ou qu’il ne le soit pas.
Sabbath Mode (mode sabbatique)
Ce mode est destiné à désactiver le courant vers le DEL et la lampe du distributeur, tout en
permettant aux fonctions de contrôle de rester en service.
Pour activer le Sabbath Mode (mode sabbatique) :
• Appuyez simultanément sur les deux boutons
Auto Light
Après ces 3 à 4 secondes, le DEL et la lampe du distributeur vont s’éteindre. Lorsque
ce mode est enclenché, la lampe du distributeur ne sera pas activée lors de la
distribution.
Pour désactiver le Sabbath Mode (mode sabbatique) :
• Appuyez simultanément sur les deux boutons
maintenez-les enfoncés 3 à 4 secondes. Après ces 3 à 4 secondes, le DEL et la lampe du distributeur seront activés.
(auto contrôle lumineux) et maintenez-les enfoncés pendant 3 à 4 secondes.
Dispenser Lock
Dispenser Lock
(blockage distributeur) et
(blockage distributeur) et
NOTE : Même s’il y a une interruption
de courant pendant que le Sabbath
Mode (mode sabbatique) est
enclenché, le contrôle restera en
Sabbath Mode (mode sabbatique)
lorsque le courant reviendra.
Auto-Light
(autocontrôle lumineux) et
+
64
Page 65
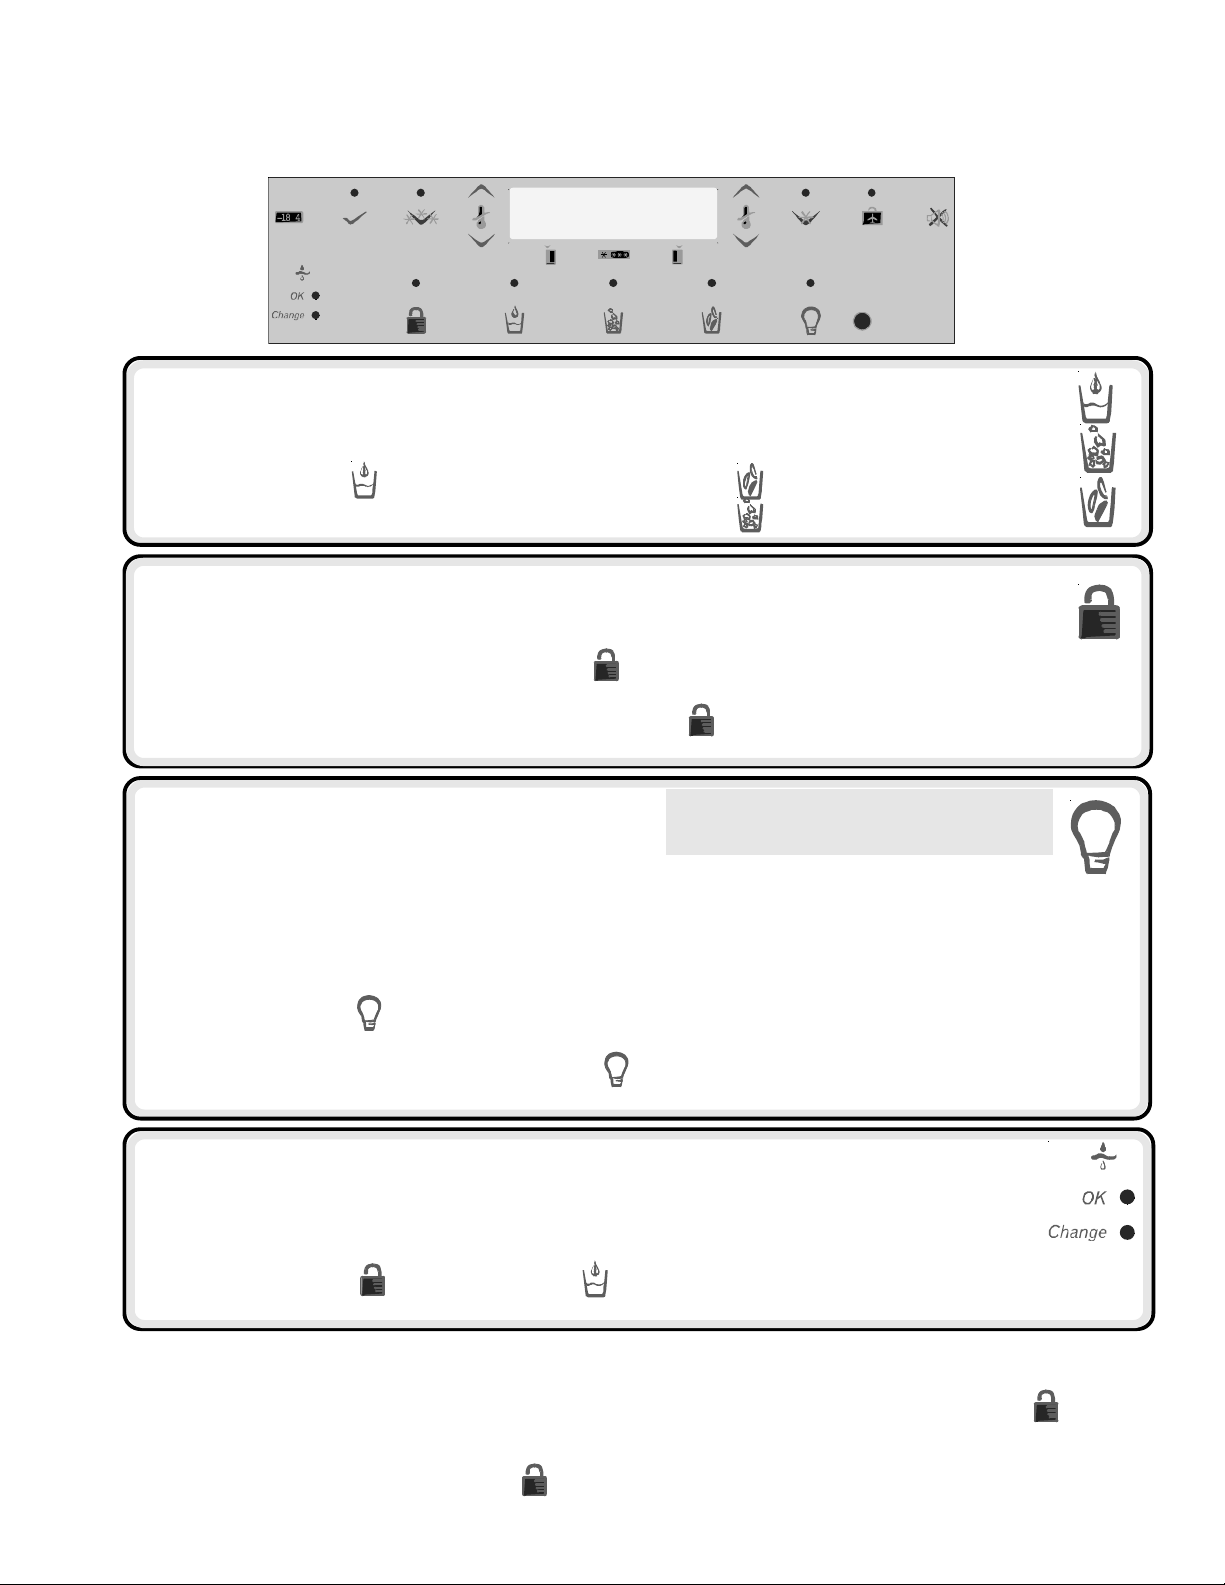
Les équipements du distributeur d’eau et de glace
Les équipements de contrôle
(contrôle électronique)
Distribution d’eau et de glace (activateur principal)
Les fonctions de distribution d’eau et de glace marchent indépendamment
l’une de l’autre.
Pour distribuer de l’eau :
• Appuyer sur le bouton
• Appuyez sur l’activateur d’eau
Verrouillage du distributeur
Cet équipement empêche la distribution d’eau ou de glace.
Pour verrouiller et déverrouiller le distributeur :
• Pour verrouiller le distributeur, appuyez sur le bouton
au-dessus du bouton confirme que le distributeur est verrouillé.
• Pour déverrouiller le distributeur, maintenez à nouveau le bouton
Le signal lumineux vert au-dessus du bouton s’éteindra.
Pour distribuer de la glace :
• Appuyez sur le bouton
• Appuyez sur le bouton
pendant 3 secondes. Un signal lumineux vert
enfoncé pendant 3 secondes.
pour des glaçons.
pour de la glace pilée.
Fonction éclairage
La fonction éclairage dispose de deux modes de réglage :
OFF et AUTO.
Le réglage OFF limite la fonction d’éclairage à celle de l’intérieur du distributeur.
Le réglage AUTO permet au
du distributeur en conséquence. Lorsque le capteur enregistre une intensité lumineuse réduite (pendant la nuit, dans une
cuisine non éclairée), l’éclairage interne se règle à 50% de sa puissance électrique. Lorsque le capteur, en revanche,
enregistre une forte intensité lumineuse (cuisine éclairée, ensoleillement direct), l’éclairage interne n’est pas activé.
Pour désactiver le réglage AUTO :
• Appuyez sur le bouton
bouton est éteint, l’éclairage ne fonctionnera que lors d’une distribution de glace ou d’eau.
• Pour activer le réglage AUTO, appuyez sur le bouton
est allumé, l’éclairage de l’intérieur du distributeur fonctionnera en réglage AUTO.
CAPTEUR
situé sur le tableau de commande. Lorsque le signal lumineux vert situé au-dessus du
de mesurer l’intensité de la lumière ambiante et d’adapter l’intensité de l’éclairage
NOTE : L’éclairage du distributeur fonctionnera
au maximum lors de l’utilisation des fonctions
de distribution de glace ou d’eau.
. Lorsque le signal lumineux vert situé au-dessus du bouton
Indicateur limineus de statut de filtre
L’indicateur lumineux de statut de filtre sert à se souvenir de remplacer la cartouche de filtre à eau. Un signal
lumineux vert indique que le filtre est en bon état. Un signal lumineux rouge indique que le filtre doit être
changé. Si le signal lumineux est devenu rouge, il le restera jusqu’à ce que la fonction soit remise à zéro.
Pour remettre le signal lumineux à zéro :
• Pour activer le réglage
allumé, l’éclairage de l’intérieur du distributeur fonctionnera en réglage AUTO.
, appuyez sur le bouton Lorsque le signal lumineux vert situé au-dessus du bouton est
Qu’est-ce que la fonction Verrouillage automatique ?
La fonction Verrouillage automatique coupe l’alimentation électrique du distributeur d’eau et de glace lorsque celui-ci fonctionne continuellement depuis
environ 2 minutes dans l’une ou l’autre sélection. Quand le mode de verrouillage s’enclenche, le signal lumineux situé au-dessus du bouton
s’allume.
Pour déverrouiller le distributeur :
• Pour déverrouiller le distributeur, appuyez sur le bouton pendant 3 secondes. L’indicateur lumineux vert situé au-dessus du bouton s’éteindra.
65
Page 66

Les équipements du distributeur d’eau et de glace
Les équipements de contrôle (suite)
(contrôle électronique)
Touches de température
Ces touches servent à diminuer ou à augmenter la température du congélateur ou du réfrigérateur.
Pour régler la température du réfrigérateur :
• Repérez la touche
le bouton
réfrigérateur, ou le
à côté du bouton . Utilisez
pour augmenter la température du
pour l’abaisser.
• Appuyez sur le bouton
Pour régler la température du congélateur :
• Répétez les instructions ci-dessus avec les boutons
situés à côté du bouton sur le panneau
d’affichage.
pour confirmer le réglage.
Froid max.
Cette fonction provoque l’abaissement
de la température du réfrigérateur jusqu’au Réglage de température minimale du
réfrigérateur prédéfinie par la commande. Ce réglage restera effectif pendant environ 10 heures.
Pour activer Froid max. :
• Appuyez sur le bouton
vert au-dessus du bouton indiquera que la
fonction est activée.
Le signal lumineux
Congélation max.
Cette fonction provoque l’abaissement
de la température du congélateur jusqu’au Réglage de température minimale du
congélateur prédéfinie par la commande. Ce réglage restera effectif pendant environ 24 heures.
Pour activer Congélation max. :
• Appuyez sur le bouton
vert au-dessus du bouton indiquera que la fonction
est activée.
. Le signal lumineux
NOTE : Le réglage de température ne peut pas être modifié lorsque
les fonctions Froid max. ou Congélation max. sont activées.
Pour désactiver Froid max. :
• Appuyez sur le bouton . Le signal lumineux
vert au-dessus du bouton s’éteindra.
NOTE : Le réglage de température ne peut pas être modifié lorsque
les fonctions Froid max. ou Congélation max. sont activées.
Pour désactiver Congélation max. :
• Appuyez sur le bouton
vert au-dessus du bouton s’éteindra.
Affichage activé/désactivé
L’interrupteur d’affichage contrôle l’alimentation électrique de l’affichage DEL.
Pour désactiver l’affichage :
• Appuyez sur le bouton
. L’affichage disparaîtra.
Pour réactiver l’affichage :
• Appuyez sur le bouton . L’affichage retournera.
. Le signal lumineux
Mode vacant
L’activation de cette touche diminue la fréquence des cycles de dégivrage, ce qui permet d’économiser de l’énergie.
Pour mettre le réfrigérateur en Mode vacant :
• Appuyez sur le bouton .
Alarme désactivé
Cette touche est utilisée pour désactiver le voyant et
l’alarme acoustique HI TEMP, ainsi que l’alarme
acoustique OPEN DOOR.
Pour désactiver le Mode vacant :
• Appuyez sur le bouton
du réfrigérateur.
Pour désactiver l’alarme :
• Appuyez sur le bouton
, ou ouvrez la porte
.
66
Page 67

Les équipements du distributeur d’eau et de glace
Equipements de contrôle masqués (contrôle électronique)
Mode sabbatique
Ce mode est conçu pour désactiver l’alimentation électrique du DEL et de l’éclairage du distributeur,
tout en permettant aux contrôles de rester opérationnels. Dans ce mode, on ne dispose pas
d’alarmes visuelles ni acoustiques.
Pour activer le mode sabbatique :
• Appuyez sur les deux boutons
temps, et maintenez-les enfoncés pendant 3
secondes. Au bout de 3 secondes, les éclairages
DEL et du distributeur s’éteindront. En mode
sabbatique, l’éclairage du distributeur ne
fonctionnera pas pendant la distribution.
et en même
Pour désactiver le mode sabbatique :
• Appuyez sur les deux boutons
maintenez-les enfoncés pendant 3 secondes. Au bout de 3
secondes, les éclairages DEL et du distributeur s’allumeront.
NOTE : S’il y a une interruption de l’alimentation électrique pendant
que le Mode sabbatique est activé, la commande restera en mode
sabbatique lorsque l’alimentation reprendra.
et en même temps, et
Affichage Auto
L’affichage AUTO contrôle l’intensité lumineuse de l’affichage DEL en fonction des relevés effectués par le
mode AUTO, l’affichage sera plus sombre lorsque le
forte luminosité.
Pour régler le niveau d’alimentation électrique de l’affichage :
• Appuyez sur les deux boutons
actuel sera indiqué dans l’affichage en utilisant O pour ON et AL pour Auto.
• Utilisez le bouton
• Activez le réglage sélectionné en appuyant sur le bouton .
du réfrigérateur pour faire défiler les différents états d’affichage.
et et maintenez-les enfoncés pendant 3 secondes. Le niveau d’activation
CAPTEUR
indique une luminosité réduite, que lors de périodes de
+
CAPTEUR
. En
Mode de conversion de
température
Ce mode est disponible pour passer de Fahrenheit
en Celsius et vice-versa sur l’affichage de
température.
Pour changer l’indication de température :
• Appuyez en même temps, pendant 3 secondes, sur le bouton
et le bouton du congélateur. En appuyant sur la
même combinaison de boutons, l’utilisateur peut basculer
d’une sélection à l’autre.
Verrouillage masqué pour le bloc de touches supérieur
Ce mode a été prévu pour éviter de toucher par inadvertance la série supérieure des commandes
du distributeur. Cela comprend les fonctions d’activation et désactivation d’affichage, de
Congélation max., de Froid max., de Mode vacant et de Réglage de température.
Pour activer le verrouillage masqué du distributeur :
• Appuyez simultanément sur les boutons
et pendant 3 secondes.
Pour désactiver le verrouillage masqué du
distributeur :
• Appuyez simultanément sur les boutons
et pendant 3 secondes.
Fonction ON/OFF
AVERTISSMENT
La fonction ON/OFF sert à arrêter le refroidissement
des blocs de réfrigération et de congélation.
Pour éteindre l’unité :
• Appuyez sur le bouton du congélateur jusqu’à
ce que l’affichage enregistre une température du
congélateur supérieure au maximum admissible.
A ce moment, le DEL affiche : — —
• Appuyez sur le bouton
pour confirmer la sélection.
Afin d’éviter une décharge électrique qui pourrait
occasionner de graves blessures ou même la mort de la
victime, n’effectuez aucun travail de réparation ou d’entretien
relatif au réfrigérateur sans prendre soin de débrancher
préalablement l’appareil.
Pour réactiver l’unité :
• Appuyez sur le bouton
• Appuyez sur le bouton
!
sélection.
° F
° C
+
du congélateur.
pour confirmer la
67
Page 68

Les conseils d’entretien
Quels produits
d’entretien sont
recommandés pour
ce produit en acier
inoxydable ?
Votre fabricant vous propose d’acheter
un produit d’entretien adéquat (Réf.
n°31960801). Pour l’obtenir, veuillez
contacter votre distributeur local.
IMPORTANT : Les endommagements
constatées sur les accessoires en
acier inoxyable, dus à l’usage d’un
produit d’entretien inadéquat ou d’un
produit non recommandé, ne sont
couverts par aucune garantie.
Comment faire
disparaitre une
mauvaise odeur de
mon réfrigérateur ?
1. Enlevez toutes les denrées alimentaires
et débranchez l’alimentation électrique
de votre réfrigérateur.
2. Nettoyez toutes les surfaces intérieures,
y compris les parois supérieures,
inférieures et latérales, selon les
instructions générales d’entretien.
Accordez une attention particulière
aux recoins, fentes et cannelures.
Incluez les tiroirs, les étagères
et les joints du réfrigérateur.
3. Rebranchez l’alimentation électrique
et remettez en place les denrées
alimentaires. Lavez et essuyez les
bouteilles et les récipients. Enveloppez
les aliments dans des emballages fermés
pour éviter de nouvelles odeurs. Au
bout de 24 heures, vérifiez que l’odeur
a bien été éliminée.
Dans le cas où l’odeur n’a pas été éliminée,
suivez les étapes suivantes :
4. Exécutez les étapes 1 et 2.
5. Placez les bacs à légumes sur
l’étagère supérieure du compartiment
de réfrigération. Remplissez les
compartiments du réfrigérateur et du
congélateur, y compris l’intérieur des
portes, avec du papier journal chiffonné.
6. Parsemez le papier journal avec des
briquettes de charbon.
7. Fermez les portes et laissez passer
24 à 48 heures.
8. Retirez le charbon et le papier journal.
9. Suivez les étapes 2 et 3.
Si l’odeur n’a toujours pas disparu,
veuillez contacter votre détaillant
local pour lui demander conseil.
Comment entretenir votre appareil
AVERTISSEMENT
!
Pour éviter tout risque de choc électrique pouvant causer des blessures
graves ou même la mort, débranchez l’alimentation électrique du
réfrigérateur avant de procéder à l’entretien. Après l’entretien, rebranchez
l’alimentation électrique.
ATTENTION
!
Pour éviter tout risque de dommage corporel ou matériel :
• Lisez et appliquez les directives du fabriquant relatives à tous les
produits d’entretien.
• Ne mettez pas les balconnets, les étagères ni les accessoires au
lave-vaisselle. Il pourrait en résulter un gauchissement ou un
craquèlement des accessoires.
• Manipulez prudemment les étagères en verre trempé. Ces étagères
peuvent se briser brusquement si elles sont ébréchées, rayées ou
exposées à un changement brusque de température.
• Protégez les revêtements de sol synthétiques ou autre avec du carton,
des couvertures ou tout autre matériau de protection.
Instructions générales
1. Lavez les surfaces avec de l’eau chaude additionnée d’une solution de
bicarbonate de soude, à l’aide d’un chiffon doux.
2. Rincez les surfaces avec de l’eau chaude. Essuyez-les avec un chiffon doux
et propre.
Produits adhésifs
1. Enlevez les résidus de colle en les frottant du doigt avec de la pâte dentifrice
jusqu’à ce qu’ils se détachent.
2. Rincez à l’eau chaude. Essuyez avec un chiffon doux et propre.
Joints de porte
1. Maintenez les joints propres en permanence. Nettoyez-les à fond tous les
3 mois, en procédant selon les instructions générales d’entretien.
Circuit du condenseur
Nettoyez le circuit du condenseur tous les 3 mois afin de garantir un fonctionnement
optimal du réfrigérateur. L’accumulation de poussières et de peluches peut
provoquer les problèmes suivants :
• réduction des performances de réfrigération
• accroissement de la consommation électrique
• dans les cas extrêmes, disfonctionnement prématuré du
compresseur
1. Enlevez la plinthe de protection et les protections de
charnière comme illustré à droite.
2. Nettoyez la surface frontale du circuit de condenseur à
l’aide de l’embout tubulaire de l’aspirateur.
3. Remettez la plinthe en place en enclenchant les clips dans les trous
correspondants. Replacez les protections de charnière.
Étagères en verre
Pour enlever chaque étagère, soulevez la partie avant, détachez les crochets
des glissières métalliques et tirez-la vers vous. Placez l’étagère sur un torchon
et laissez-la prendre la température ambiante avant de la nettoyer.
Nettoyez les fentes en suivant les étapes suivantes :
1. Préparez une solution de détergent doux et passez là dans les fentes à l’aide
d’une brosse en plastique. Laisser détremper 5 minutes.
2. Vaporisez de l’eau chaude dans les fentes en utilisant l’embout à jet large
d’un vaporisateur.
3. Essuyez entièrement l’étagère et remettez-la en place en insérant les crochets
dans la glissière métallique et en rabaissant la partie avant de l’étagère.
68
Page 69

Les conseils d’entretien
Comment enlever et remettre les ampoules électriques
AVERTISSEMENT
!
Pour éviter tout risque de choc électrique pouvant causer des blessures
corporelles graves ou la mort, débrancher l’alimentation électrique du
réfrigérateur avant de procéder au remplacement des ampoules électriques.
S’il vous est impossible de couper l’alimentation électrique de votre appareil
en débranchant directement la prise, enlever le fusible correspondant sur
l’interrupteur. Après le remplacement, rebranchez l’alimentation électrique.
ATTENTION
!
Pour éviter tout risque de dommage corporel ou matériel, appliquez les
directives suivantes :
• Laissez les ampoules électriques refroidir.
• Portez des gants lors du remplacement de l’ampoule électrique.
Compartiment supérieur du
produits frais
1. Repérez les encoches de chaque côté du diffuseur
de lumière. Y introduire un doigt et pressez de chaque
côté pour détacher et enlever le diffuseur.
2. Retirez l’ampoule électrique.
3. Remplacez-la par une ampoule de type Krypton E27,
d’une puissance de 25 watts au plus
4. Remettez le diffuseur de lumière en place en
introduisant les plots dans les trous du fourreau placé
directement en face de l’éclairage.
5. Ré-emboîtez l’arrière du couvercle de l’ampoule à sa place.
Compartiment inférieur des produits
frais et compartiment congélateur des
modèles non équipés d’un distributeur
1. Débloquez les plots situés en bas du diffuseur
celui-ci .
2. Enlevez l’ampoule électrique.
3. Remplacez-la par une ampoule de type Krypton E27,
25 watts au plus
4. Insérez les plots supérieurs du diffuseur
et enclenchez la partie inférieure pour recouvrir l’éclairage.
.
.
(A)
et retirez
d’une puissance de
(B)
dans les trous correspondants
$
Ce réfrigérateur est conçu pour être
l’un des appareils existants les plus
économes en énergie. Réduisez encore
sa consommation d’énergie en
observant les conseils suivants :
• Maintenez le réfrigérateur à une
• Ne réglez pas les températures des
• Maintenez un remplissage complet
• Maintenez les joints des portes
B
A
• Maintenez le circuit du condenseur
Comment tirer le
meilleur parti de
votre budget
« Énergie »
température ambiante comprise
entre 13 °C et 43 °C, éloigné de
toute source de chaleur et de la
lumière solaire directe.
compartiments du réfrigérateur, du
congélateur et du système Chiller
Fresh™ à un niveau plus bas que
nécessaire.
du congélateur.
propres et souples. Remplacez les
joints usés.
toujours propre.
Compartiment congélateur des modèles équipés
d’un distributeur
1. Enlevez le bac à glace en le soulevant par l’avant et tirez-le.
2. Enlevez le diffuseur en débloquant les plots du haut
retirez-le du réfrigérateur.
3. Remplacez-la par une ampoule de type Krypton E27,
d’une puissance de 25 watts au plus
4. Insérez les plots inférieurs du diffuseur
correspondants et enclenchez la partie supérieure pour recouvrir l’éclairage.
5. Remettez le bac à glace en le faisant glisser jusqu’à ce qu’il s’enclenche
à sa place.
.
(B)
dans les trous
(A)
et
A
B
Distributeur d’eau et de glace
1. Repérez l’ampoule électrique dans la partie supérieure du cadre du
distributeur. Enlevez-la en la dévissant.
2. Remplacez-la par une ampoule électrique de 230/240 volts, d’une
puissance de 12 watts au plus. Des ampoules électriques sont fournies
dans le compartiment légumes, en raison d’indisponibilité locale.
69
Page 70

Avant d’appeler le service après-vente
Les réfrigérateurs d’aujourd’hui sont pourvus d’équipements nouveaux et sont plus économes en énergie. L’isolation
en mousse expansée est très performante de ce point de vue mais, en tout état de cause, n’est pas un isolant acoustique
efficace. En conséquence, certains bruits peuvent paraître inhabituels. Avec le temps, ils passeront inaperçus. Merci de
BRUIT
PROBLÈME CAUSE POSSIBLE SOLUTION
Cliquetis
Sou fflem ent ou
ronronnement
d'air
Bruit de
gargouillement
ou d'ébullition
Bruit de chute
assourdie
Vibration
Bourdonnement
Ronflement
bien vouloir vous référer à ces informations avant de faire appel au service après-vente.
La commande du congélateur
au démarrage et à l'arrêt du compresseur.
La commande de dégivrage
le mê me so n qu' une horloge et se
déclenche au départ et à l'arrêt du
cyc le de dégivrage.
Le ventilateur du congélateur
du condenseur
de bruit en fonctionnant.
L'évaporateur
chaleur
bruit en circulant.
Les glaçons produits par la machine à
glace (sur certains modèles) tombent
dans le bac à glace
Fin du déversement de la glace dans le
distributeur
Le compresseur
pulsation en fonctionnant.
Le réfrigérateur n'est pas de niveau. Voir, dans
Le relais de la valve d'eau
machine à glace (sur certains modèles)
bourdonne quand la machine se
remplit d'eau.
La machine à glace
marche sans être alimentée en eau.
L' agitateur
modè les) ro nfle lorsqu'il agite la gla ce
en c ours de distribution.
Le compresseur
ronflement aigu en fonctionnant.
La valve solénoïde
de chute de glace.
(D)
produisent ce genre
(E)
(F)
et l'échangeur de
du réfrigérant produisent ce
(G).
(H).
(I)
produit un bruit de
(K)
(L)
de glace (sur certains
(I)
peut produire un
(M)
(A)
cliquette
(B)
a
(C)
et celui
(J)
de la
a été mise en
actionnant le volet
Fonctionnement normal
Fonctionnement normal
Fonctionnement normal
Fonctionnement normal
Fonctionnement normal
Fonctionnement normal
Fonctionnement normal
d'installation
mise à niveau de l'appareil.
Fonctionnement normal
Supprimez le bruit en plaçant le
bras de la machine à glace en
position haute. Pour plus de
détails, voir le paragraphe
Machine à glace automatique
dans votre manuel de l'utilisateur.
Fonctionnement normal
Fonctionnement normal
Fonctionnement normal
Instructions
, les détails de la
K
G
L
H
M
E
D
F
I
J
B
A
C
FUNCTIONNEMENT
Les commandes et
l'éclairage du
congélateur sont
« allumés », mais
le compresseur
ne démarre pas.
La température
du tiroir bac à
légumes / produits
frais est trop élevée
Le réfrigérateur ne
fonctionne pas
Le réfrigérateur
ne fonctionne
toujours pas
La température des
produits frais est
trop basse
L'appareil est en mode de dégivrage.
Le contrôle de la température est réglée
trop bas.
La température du congélateur est réglée
trop bas.
Le tiroir est mal positionné. Voir le paragraphe relatif au système Bac à légumes / Produits fins pour
Le réfrigérateur n'est pas branché.
La commande du congélateur n'est
pas activée.
Le fusible a sauté ou le coupe-circuit doit
être réactivé.
Une coupure de courant s'est produite. Appeler la compagnie de fourniture de courant pour l'informer de la coupure
Disfonctionnement de l'appareil. Débrancher le réfrigérateur et transférer les denrées alimentaires dans un
Le circuit de condenseur est sale. Le nettoyer suivant les indications de votre manuel de l'utilisateur.
Les commandes du réfrigérateur ou du
congélateur sont réglées trop haut.
Le compartiment à boissons Beverage
Chiller™ (sur certains modèles) est
mal positionné.
Fonctionnement normal. Attendre 40 minutes pour voir si l'appareil se remet
en marche.
Voir le paragraphe relatif au système Bac à légumes / Produits fins pour
ajuster le contrôle de température.
Voir le paragraphe relatif aux réglages de température dans votre manuel
de l'utilisateur.
ajuster le positionnement du tiroir.
Brancher l'appareil.
Voir le paragraphe relatif aux réglages de température du congélateur dans
votre manuel de l'utilisateur.
Remplacer le fusible. Vérifier le coupe-circuit et le réactiver si nécessaire.
de courant.
autre appareil. Si un autre appareil n'est pas disponible, placer de la glace
artificielle dans le compartiment du congélateur pour préserver les aliments.
La garantie ne couvre pas les risques de perte de denrées alimentaires.
Faites appel au service après-vente.
Voir le paragraphe relatif aux réglages de température dans votre manuel
de l'utilisateur.
Voir le paragraphe relatif au compartiment à boissons Beverage Chiller™
pour vérifier le positionnement adéquat.
70
Page 71

Avant d’appeler le service après-vente
FUNCTIONNEMENT
PROBLÈME CAUSE POSSIBLE SOLUTION
La température des
aliments paraît trop élevée
Le réfrigérateur a une odeur
Formation de gouttelettes
d'eau sur les parois
extérieures du réfrigérateur
Formation de gouttelettes
d'eau à l'intérieur
du réfrigérateur
Le réfrigérateur ou la
machine à glace produisent
des bruits inhabituels ou qui
semblent trop forts
Le compartiment Bac à
légumes / Produits fins et /
ou les bacs à légumes ne
se ferment pas facilement
Le réfrigérateur se met en
marche trop souvent
La porte ne ferme pas parfaitement.
Les contrôles de température doivent
être réglés.
Le circuit du condenseur est sale. Le nettoyer suivant les instructions d'entretien de votre manuel
La grille d'aération postérieure est
obstruée (sur les modèles d'une
profondeur supérieure à 60 cm).
La porte a été ouverte fréquemment ou est
restée ouverte pendant un long moment.
Une quantité de denrées a été récemment
ajoutée.
Le compartiment est sale ou contient un
aliment à odeur forte.
Le filtre à air (sur certains modèles) doit
être renouvelé.
Vérifier le bon état des joints de porte. Nettoyer, si nécessaire, suivant les indications d'entretien de votre
Le taux d'humidité ambiante est élevé. Normal pendant les saisons très humides.
Les contrôles de température doivent
être réajustés
Le taux d'humidité est élevé ou la porte a
été ouverte fréquemment.
Vérifier le bon état des joints de porte.
Fonctionnement nor mal
Le contenu des tiroirs ou le rangement des
denrées dans les comparti ments
environnants pourraient être la cause
de l'obstruc tion du tiroir
Le tiroir est mal positionné Voir le paragraphe relatif au positionnement correct du système
Le réfrigérateur n'est pas de niveau. Voir, dans les
Les glissières des tiroirs sont sales ou
nécessitent un graissage.
La porte a été ouverte fréquemment ou est
restée ouverte pendant un long moment.
L'humidité ou la chaleur dans la zone
environnante sont élevées.
Une quantité de denrées a été
récemment ajoutée.
L'appareil est exposé à une source de
chaleur excessive dans son
environnement immédiat ou produite
par un autre appareil.
Le circuit du condenseur est sale. Le nettoyer suivant les instructions d'entretien de votre manuel
Le réfrigérateur n'est pas de niveau. Voir, dans
d'installation
Vérifier le bon état des joints de porte. Les nettoyer, si nécessaire,
suivant les indications d'entretien du manuel de l'utilisateur.
Vérifier les causes éventuelles d'une obstruction interne à la
fermeture correcte de la porte, telles que tiroirs mal fermés, bac à
glace surdimensionné, emballages volumineux etc.
Voir le paragraphe relatif aux réglages de température du
congélateur dans votre manuel de l'utilisateur.
de l'utilisateur.
Vérifier le rangement des produits alimentaires pour s'assurer que la
grille n'est pas obstruée. La grille d'aération postérieure est située
derrière le bac à légumes.
Limiter le temps d'ouverture de la porte. Organiser un rangement
efficace afin de laisser la porte ouverte aussi peu de temps
que possible.
Laisser la température intérieure se réajuster en fonction du temps
d'ouverture de la porte.
Laisser les denrées récemment ajoutées atteindre la température
des compartiments du réfrigérateur ou du congélateur.
Se reporter au paragraphe relatif à la suppression des odeurs dans
votre manuel de l'utilisateur.
Renouveler le filtre à air.
manuel de l'utilisateur.
Voir le paragraphe relatif aux réglages de température du
congélateur dans votre manuel de l'utilisateur.
Voir le paragraphe relatif aux réglages de température du
congélateur dans votre manuel de l'utilisateur.
Limiter le temps d'ouverture de la porte. Organiser un rangement
efficace afin de laisser la porte ouverte aussi peu de temps
que possible.
Les nettoyer, si nécessaire, suivant les indications d'entretien de
votre manuel de l'utilisateur..
Se reporter au paragraphe "Bruits" du chapitre
service après-vente
Repositionner les denrées et les récipients pour éviter le
disfonctionnement des tiroirs.
Bac à légumes / Produits fins et / ou des bacs à légumes.
niveau de l'appareil.
Les nettoyer avec de l'eau chaude savonneuse. Rincer et
essuyer soigneusement.
Appliquer une fine couche de vaseline sur les glissières.
Limiter le temps d'ouverture de la porte. Organiser un rangement
efficace afin de laisser la porte ouverte aussi peu de temps
que possible.
Laisser la température intérieure se réajuster en fonction du temps
d'ouverture de la porte.
Fonctionnement normal
Laisser les denrées récemment ajoutées atteindre la température
des compartiments du réfrigérateur ou du congélateur.
Évaluer l'environnement de l'appareil et envisager un changement
d'emplacement pour son fonctionnement normal.
de l'utilisateur.
, les détails de la mise à niveau de l'appareil.
instructions d'installation
lnstructions
Avant d'appeler le
dans votre manue l de l' utilisateur.
, les détails de la mise à
71
Page 72

Avant d’appeler le service après-vente
p
FUNCTIONNEMENT (suite)
PRO BLÈM E C AU SE PO SSI BL E SO LU T I O N
Le réfrigérateur se met en
marche trop souvent (suite)
Les contrôles de température doivent
être réajustées.
La porte ne ferme pas parfaitement.
GLACE ET EAU
L'eau a une apparence trouble Il y a de l'air ou des bulles d'air dans l'eau. Ce phénomène est normal lors des premières utilisations du
Présence de particules dans
l'eau ou dans la glace.
Les signaux lumineux sont
éteints sur le panneau de
commande du distributeur
(sur certains modèles)
Ni glace ni eau ne s'écoulent
quand le poussoir du distributeur
est pressé (sur certains modèles)
La machine à glace ne produit
pas une quantité suffisante de
glaçons ou les cubes sont mal
formés (sur certains modèles)
La machine à glace ne
produit pas de glaçons
(sur certains modèles)
Poussières de carbone provenant de la
cartouche de filtre.
Des concentrations de sels minéraux
apparaissent sous forme de particules quand
l'eau se transforme en glace et fond.
La porte du congélateur n'est pas fermée. Vérifier que la porte est fermée. Le courant électrique est coupé
Le réfrigérateur n'est pas branché. Brancher l'appareil.
Le fusible a sauté ou le coupe-circuit doit
être réactivé.
Une coupure de courant s'est produite. Appeler la compagnie de fourniture de courant pour l'informer de
La porte du congélateur n'est pas fermée. Vérifier que la porte est fermée. Le courant électrique est coupé
Les commandes sont sur le mode
Verrouillage.
Le réservoir d'eau est en cours
de remplissage.
La machine à glace ou les modèles équipés
d'une machine à glace ont été installés
récemment ou une grande quantité de glace
vient d'être prélevée.
Le filtre à eau est bouché ou doit
être remplacé.
La machine à glace ou les modèles équipés
d'une machine à glace ont été installés
récemment ou une grande quantité de
glace vient d'être prélevée.
La pression de l'eau est trop faible. Une pression d'eau trop faible peut provoquer une fuite au niveau
Le filtre à eau est bouché ou doit
être remplacé.
Le bras de la machine n'est pas
positionné correctement
L'eau du circuit de fourniture n'atteint pas
la valve d'admission d'eau
La tuyauterie d'alimentation est déformée. Couper l'alimentation en eau et redresser la tuyauterie.
La pression de l'eau est trop faible. La pression de l'eau doit être de 20 à 100 livres par pouce carré
Vérifier la température du congélateur. Voir le paragraphe relatif aux réglages de température du
Le bac à glace n'est pas
ositionné correctement
Voir le paragraphe relatif aux réglages de température du
congélateur dans votre manuel de l'utilisateur.
Le réfrigérateur n'est pas de niveau. Voir, dans les
d'installation
Vérifier les causes éventuelles d'une obstruction interne à la
fermeture correcte de la porte telles que tiroirs mal fermés, bac
à glace surdimensionné, emballages volumineux etc.
Vérifier le bon état des joints de porte. Les nettoyer, si nécessaire,
suivant les indications d'entretien du manuel de l'utilisateur.
distributeur et disparaîtra avec le temps.
L'eau filtrée lors des utilisations initiales peut contenir des
poussières de carbone inoffensives provenant de la cartouche.
L'absorption de ces particules est sans danger pour la santé.
Elles disparaîtront au bout de quelques utilisations.
Ces particules sont inoffensives et se trouvent naturellement
dans l'eau.
lorsque la porte du congélateur est ouverte.
Remplacer le fusible. Vérifier le coupe-circuit et le réactiver
si nécessaire.
la coupure du courant.
lorsque la porte du congélateur est ouverte.
Voir les instructions relatives aux commandes du distributeur.
Lors d'une première utilisation, il y a un délai de remplissage du
réservoir interne d'eau d'environ 45 secondes avant le premier
écoulement d'eau.
Laisser 24 heures de délai à la machine pour produire une
première quantité de glaçons ou pour reconstituer la réserve
de glaçons.
Changer le filtre à eau.
Laisser 24 heures de délai à la machine pour produire la première
quantité de glaçons ou pour reconstituer la réserve de glaçons.
de la valve. La pression de l'eau doit être de 20 à 100 livres par
pouce carré pour qu'un fonctionnement correct soit assuré. Une
pression minimum de 35 livres par pouce carré est recommandée
pour le fonctionnement des appareils équipés d'un filtre à eau.
Changer le filtre à eau.
S'assurer que le bras est en position basse. Pour plus de détails,
voir le paragraphe
manuel de l'utilisateur.
Vérifier la procédure de raccordement dans les
instructions d'installation.
En cas de déformation irrémédiable, remplacer la tuyauterie.
pour qu'un fonctionnement correct soit assuré. Une pression
minimum de 35 livres par pouce carré est recommandée pour le
fonctionnement des appareils équipés d'un filtre à eau.
congélateur dans votre manuel de l'utilisateur. La température du
congélateur doit être comprise entre -18 °C et -17 °C (0 et 2 °F)
pour produire de la glace.
Voir le paragraphe relatif au positionnement et à l'alignement du
bac à glace.
, les détails de la mise à niveau de l'appareil.
Machine à glace automatique
instructions
dans votre
72
Page 73

Avant d’appeler le service après-vente
GLACE ET EAU
PROBLÈME CAUSE POSSIBLE SOLUTION
La machine à glace ne produit
pas de glaçons (sur certains
modèles) (suite)
L'appareil perd de l'eau
Formation de glace dans la
canalisation d'arrivée de la
machine à glace
L'écoulement de l'eau est plus lent
que la normale
L'eau distribuée n'est pas froide
Une valve d'alimentation en eau inadéquate
a été installée.
Une tuyauterie de plastique a été utilisée
pour le raccordement d'eau.
Une valve d'alimentation en eau inadéquate
a été installée.
La pression de l'eau est trop faible. La pression de l'eau doit être de 20 à 100 livres par pouce carré
La température du congélateur est
trop élevée.
La pression de l'eau est trop faible. La pression de l'eau doit être de 20 à 100 livres par pouce carré
Une valve d'alimentation en eau inadéquate
a été installée.
La tuyauterie d'alimentation est déformée. Couper l'alimentation en eau et redresser la tuyauterie. En cas
Le filtre à eau est bouché ou doit
être remplacé.
Le réfrigérateur a été installé récemment
L'alimentation en eau du réservoir réfrigéré
a été ralentie.
L'eau a séjourné dans les conduites
extérieures au réservoir réfrigéré et s'est
réchauffée à la température ambiante.
Vérifier la procédure de raccordement dans les
d'installation
pression d'eau faible et peut se boucher avec le temps.
L'entreprise le fabricant ne peut être tenue pour responsable
des dommages matériels dus à une installation ou un
raccordement d'eau non conformes.
L'entreprise le fabricant recommande l'utilisation d'une tuyauterie
de cuivre pour l'installation. Les tuyauteries en plastique sont
moins durable et peuvent provoquer des fuites. L'entreprise le
fabricant ne peut être tenue pour responsable des
dommages matériels dus à une installation ou un
raccordement d'eau non conformes.
Vérifier la procédure de raccordement dans les
d'installation
pression d'eau faible et peut se boucher avec le temps.
L'entreprise le fabricant ne peut être tenue pour responsable
des dommages matériels dus à une installation ou un
raccordement d'eau non conformes.
pour qu'un fonctionnement correct soit assuré. Une pression
minimum de 35 livres par pouce carré est recommandée pour
le fonctionnement des appareils équipés d'un filtre à eau.
Voir le paragraphe relatif aux réglages de température du
congélateur dans votre manuel de l'utilisateur. La température du
congélateur doit être comprise entre -18 °C et -17 °C (0 et 2 °F).
pour qu'un fonctionnement correct soit assuré. Une pression
minimum de 35 livres par pouce carré est recommandée pour
le fonctionnement des appareils équipés d'un filtre à eau.
Vérifier la procédure de raccordement dans les
d'installation
une pression d'eau faible et peut se boucher avec le temps.
L'entreprise le fabricant ne peut être tenue pour responsable
des dommages matériels dus à une installation ou un
raccordement d'eau non conformes.
de déformation irrémédiable, remplacer la tuyauterie.
Changer le filtre à eau.
Un délai de 12 heures environ est normal avant que l'eau
soit glacée.
Jeter le premier verre d'eau et remplir à nouveau.
. Une valve auto-perforée de 3/16" provoque une
. Une valve auto-perforée de 3/16" provoque une
. Une valve auto-perforée de 3/16" provoque
instructions
instructions
instructions
73
Page 74

Les données du filtre à eau
®
Fiche des données de performances et
de spécifications du système Amana
®
Cartouche de filtre à eau pour réfrigérateur Modèle OWF-51
Spécifications
Débit d’écoulement de service (Maximum) ................................... 2,83 l/min. (0,75 GPM)
Durée de service nominale OWF51 NI300 (Max.) .......................... 1135 litres/300 gal.
Durée de service nominale OWF51-WI500 (Max.) .......................... 1892 litres/500 gal.
Température de fonctionnement maximum................................... 38 °C/100 °F
Pression minimum requise ............................................................. 138 kgPa/35 psi
Température de fonctionnement minimum.................................... 1 °C/3 °F
Pression maximum de fonctionnement ......................................... 827 kgPa/120 psi
Conditions générales d’utilisation : Lisez cette fiche de données de performances et comparez les capacités de cet
appareil avec vos besoins réels en eau traitée.
N’UTILISEZ PAS ce produit avec une eau biologiquement polluée ou de qualité indéterminée sans effectuer une
désinfection adéquate en amont ou en aval du système. Un système certifié pour l’élimination des kystes peut être
appliqué à des eaux désinfectées censées contenir des kystes filtrables.
Le système rechargeable de filtration d’eau utilise une cartouche de remplacement OWF-51 (à commander chez votre
distributeur). Le renouvellement périodique de la cartouche de filtre est essentiel au fonctionnement performant de ce système
de filtration. Veuillez vous référer aux paragraphes de ce manuel de l’utilisateur relatifs au fonctionnement général, aux
directives d’entretien et au dépannage.
Ces systèmes ont été testés conformément aux normes ANSI / NSF 42 et 53 de l’ American National Standards Institute /
National Science Foundation (Institut Américain des Standards Nationaux / Fondation Nationale des Sciences) pour
l’élimination des substances comprises dans la liste ci-dessous. La concentration des substances indiquées dans l’eau
affluente du système a été réduite à un niveau inférieur ou égal aux limites autorisées dans l’eau effluente du système,
comme spécifié par les normes ANSI/NSF 42 et 53.
Données de performances *
Substa nce
Plomb 0,15 mg/l +/- 10% 0,001 mg/l 99,33% 0,001 mg/l 0,010 mg/l 6,5
Plomb 0,15 mg/l +/- 10% 0,002 mg/l 98,66% 0,003 mg/l 0,010 mg/l 8,5
Kyste Minimum 50 000/l 1nombre/ml 99,99% 3 nombre/ml 99,95% N/A
Turbidité 11 +/- NTU 0,12 NTU 98,98% 0,18 NTU 0,5 NTU N/A
Lindane 0,002 mg/l +/- 10% 0,00005 mg/l 97,62% 0,00005 mg/l 0,00002 mg/l N/A
Atrasine 0,009 mg/l +/- 10% 0,0002 mg/l 97,93% 0,0006 mg/l 0,003 mg/l N/A
Chlore 20 mg/l +/- 10% 0,09 mg/l 95,26% 0,17 mg/l 75% N/A
Particules**
2,4-D 0,210 mg/l +/- 10% 45,45 µg/l 84,42% 100 µg/l 0,0017 mg/l N/A
Amiante
* Tests réalisés avec un débit de 2,83 litres/min. (0,75 GPM) et une pression maximum de
827 kgPa (120 psi) dans des conditions standard de laboratoire. En tout état de cause, les
performances réelles peuvent être variables. « Performance Droit et Santé » testée et certifiée
par NSF International.
** La taille des particules est conforme à la classification du test. Les particules utilisées mesurent
de 0,5 à 1 micron.
Concentration de
test d’affluent Effluent moyen
Au moins 10 000
particules /ml
7
10
à 108 fibres/l ; fibres
de plus de 10 µm
900 nombre/ml 99,68% 2400 count/ml 85% N/A
0,16 MFL/ml 99,96% 0,16 MFL/ml 99% N/A
% d’élimination
moyen Effluent max.
Élimination min.
requise
>
–
>
–
PH de
sortie
Pentapure, Incorporated
1000 Apollo Road
Eagan, Minnesota U.S.A.
EPA EST #35917-MN-1
Les modèles OWF50-WI500 et OWF50-NI300 ont fait l’objet de tests et d’une certification par NSF
International, conformément aux normes 42 et 53 ANSI/NSF portant sur la réduction de :
Norme n° 42 : effets esthétiques
Réduction des odeurs et saveurs
®
Réduction de chlore
Ensemble de filtration mécanique
Réduction des particules – catégorie 1
Norme n° 53 : effets physiologiques
Ensemble de réduction de produits chimiques
Réduction du plomb, de l’atrazine, du lindane et du 2,4-D
Ensemble de filtration mécanique
Réduction des spores, de la turbidité et de l’amiante
74
Page 75

Gracias por adquirir este frigorífico
Lea detenidamente este manual del propietario. Este manual proporciona
información para un mantenimiento adecuado.
El servicio de garantía debe ser proporcionado por un proveedor de servicio
técnico autorizado. Asimismo, el fabricante recomienda ponerse en contacto con
un técnico autorizado si precisa servicio técnico una vez finalizado el período de
garantía. Para localizar un proveedor de servicio técnico autorizado, póngase en
contacto con su distribuidor.
Cuando se ponga en contacto con el servicio técnico, proporcione la siguiente
información. La información del producto se encuentra en la placa de serie
que se encuentra en la parte superior de la sección de alimentos frescos.
Número del modelo _________________________________________________
Número de referencia ________________________________________________
Número de serie ____________________________________________________
Fecha de la compra _________________________________________________
Nombre del comercio ________________________________________________
Dirección del comercio _______________________________________________
Teléfono del comercio ________________________________________________
Índice
Introducción ........................................................................... 75
Índice ..................................................................................... 75
Información de seguridad importante ................................... 76
Instalación del frigorífico ....................................................... 77
Transporte de la unidad .................................................... 77
Selección de la mejor ubicación ....................................... 77
Instalación y extracción de los tiradores ........................... 78
Nivelación del frigorífico .................................................... 79
Ajuste de los controles de temperatura ............................ 80
Sistema de filtrado................................................................. 81
Características de la sección de alimentos frescos ............. 82
Bandejas interiores ............................................................ 82
Compartimentos de las contrapuertas .............................. 83
Cajones .............................................................................. 84
Características del congelador ............................................. 85
Características principales ................................................ 85
Bandejas ............................................................................ 86
Almacenamiento en contrapuertas ................................... 86
Características del dispensador ........................................... 87
Características principales ................................................ 87
Funcionamiento del dispensador de agua........................ 87
Características de los control de (control con 5 botones) . 88
Características de los control de (control electrónico)....... 89
Consejos y cuidados ............................................................. 92
Limpieza de la unidad. ...................................................... 92
Extracción y sustitución de bombillas ............................... 93
Pasos previos antes de llamar al servicio técnico ............... 94
Información acerca del filtro de agua ................................... 98
75
Adquisición de piezas
de repuesto y obtención
de servicios
¿Tiene problemas? Evite las molestas
llamadas innecesarias al servicio técnico
y consulte la sección «Pasos previos antes
de llamar al servicio técnico» del manual
del propietario.
El diseño y la fabricación de este
frigorífico se ha llevado a cabo con sumo
cuidado de acuerdo con los estrictos
estándares de calidad y debe proporcionarle
un funcionamiento satisfactorio y fiable.
No obstante, al igual que otros aparatos
mecánicos, es posible que, esporádicamente,
sea necesario efectuar ajustes, sustituir
piezas y llevar a cabo trabajos de
mantenimiento. Si necesita ayuda,
póngase en contacto con el proveedor
del establecimiento en el que adquirió
el frigorífico.
Deberá proporcionarle la siguiente
información:
• Modelo
• Número de fabricación
• Número de serie y el resto de la
información que aparece en la placa
de serie del modelo.
• Breve descripción del problema.
Dispone de un área en la parte izquierda
de la página para registrar información
importante.
Guarde estas instrucciones
para futuras consultas!
Guarde este manual y el recibo de compra
juntos en un lugar seguro por si los necesita
durante el período de garantía!
¿Qué ocurre si las
características descritas
son diferentes a las del
frigorífico adquirido?
Este manual se ha creado para mostrar las
diferentes características disponibles para
esta línea de productos. Si su frigorífico no
cuenta con todas las opciones que se
muestran, puede adquirir muchos de estos
componentes opcionales poniéndose en
contacto con su proveedor.
Page 76
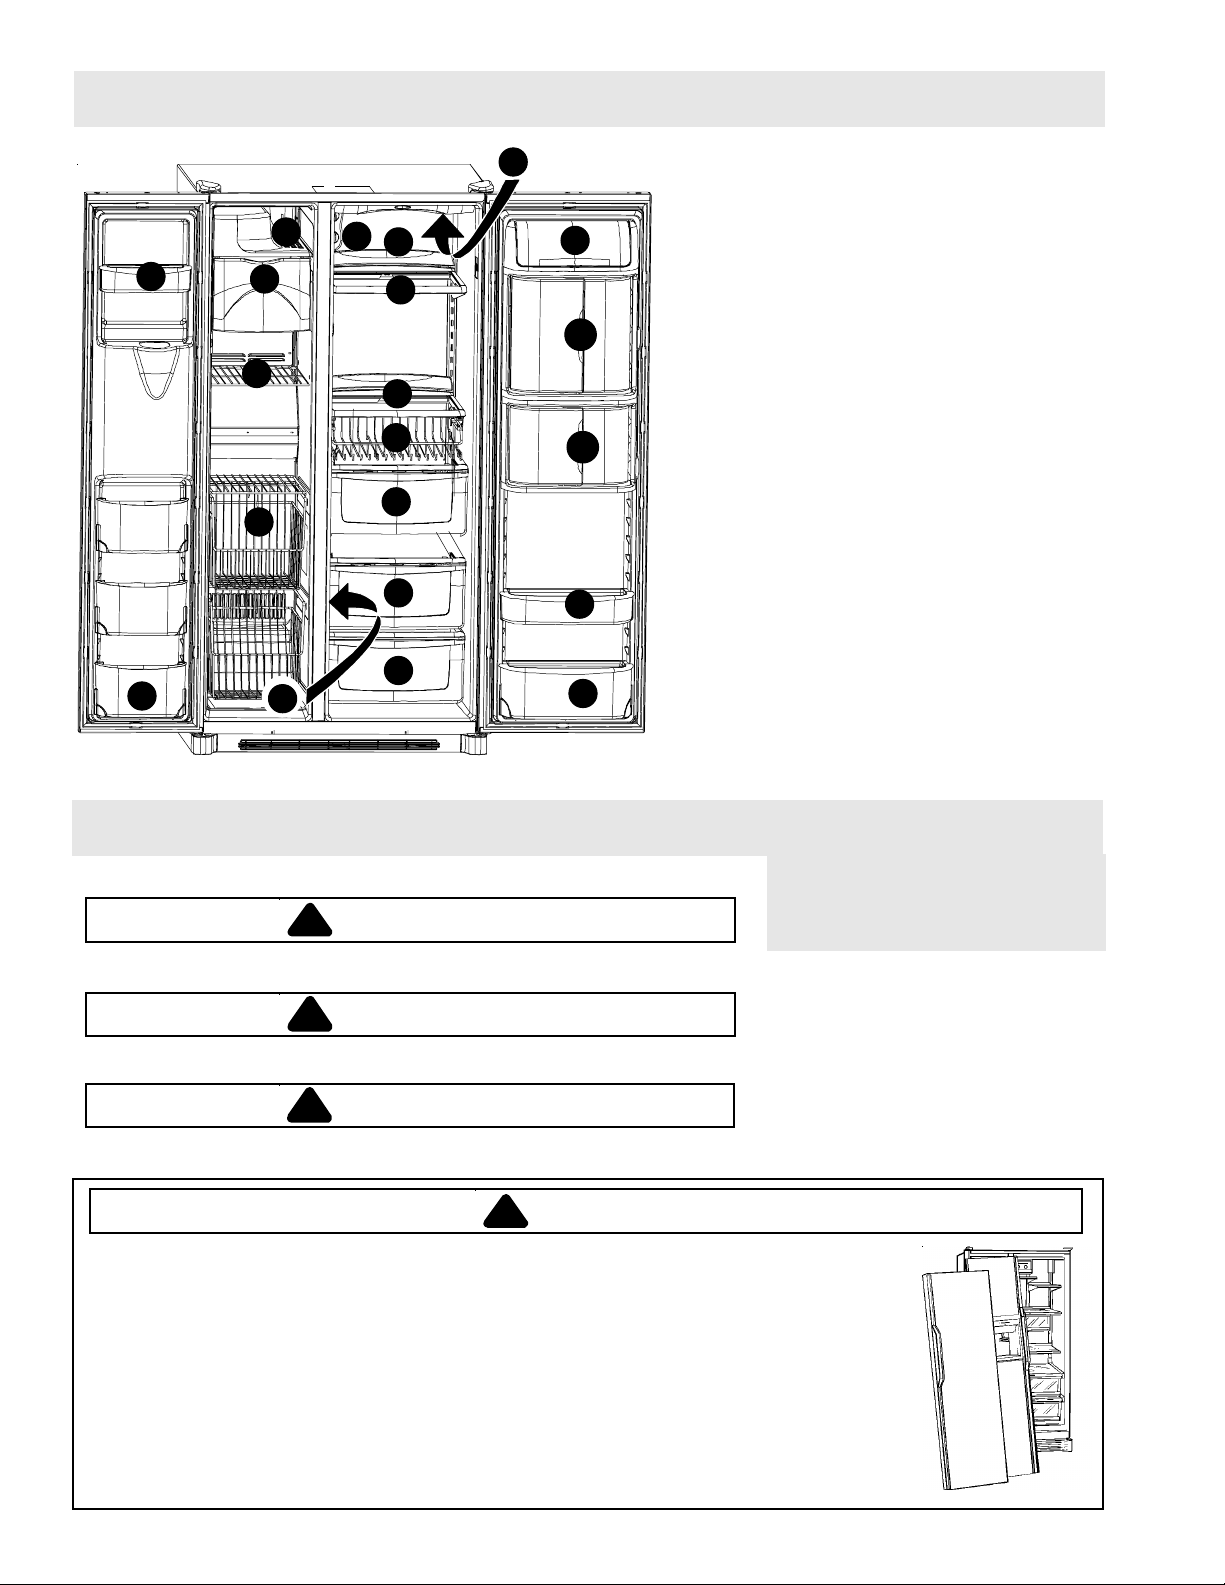
Características principales
11
10
18
16
13
15
20
19
3
1
5
3
2
8
7
7
6
9
12
12a
10
11
1. Controles Temp Assure
2. Bandeja Spill Saver™
3. Bandeja Easy Glide™ Spill Saver™
4. Bandejas Side Glide™; no se muestran
5. Extensiones posteriores de la bandeja
6. Cajón de carne/verduras
7. Cajón de verduras
8. Beverage Organizer™
9. Compartimento para productos lácteos
10. Estantes de las contrapuertas
10a. Soporte de los estantes; no se muestran
11. Estante inclinable
12. Beverage Chiller™
12a. Mini-Beverage Chiller™
13. Cubeta de almacenamiento de hielo
14. Cubitera; no se muestra
15. Bandeja para helados
16. Sistema Stor-Mor
17. Bandejas colgantes de rejilla; no se muestran
18. Bandeja fija del congelador
19. Filtro de agua; no se muestra
20. Filtro de aire; no se muestra
21. Luces; no se muestran
Alimentos frescos; parte superior
Alimentos frescos; parte inferior
Congelador
Dispensador
®
®
Información de seguridad importante
Símbolos, palabras y etiquetas de seguridad
PELIGRO
!
PELIGRO—Riesgos inmediatos que OCASIONAN daños personales graves o
incluso la muerte.
ADVERTENCIA
!
ADVERTENCIA—Riesgos que PODRÍAN OCASIONAR daños personales
graves o incluso la muerte.
PRECAUCIÓN
!
PRECAUCIÓN—Riesgos que PODRÍAN OCASIONAR pequeños daños
personales o materiales.
PELIGRO
!
Para reducir el riesgo de lesiones o, incluso, la muerte, siga una serie de
precauciones básicas, entre las que se incluyen las siguientes:
Eliminación correcta del frigorífico
IMPORTANTE: Existe la posibilidad de que un niño pueda quedar atrapado dentro de un frigorífico
abandonado, con lo que el riesgo de asfixia es muy elevado. Los frigoríficos abandonados o
desechados en vertederos suponen un riesgo, aunque se trate de una situación temporal. Si va a
deshacerse de su frigorífico viejo, siga las instrucciones que se indican a continuación para evitar
accidentes.
ANTES DE DESHACERSE DE SU FRIGORÍFICO O CONGELADOR VIEJO:
• Extraiga las puertas.
• Deje las bandejas en su lugar, de modo que a un niño le resulte más difícil introducirse
en el frigorífico.
76
Conocimientos básicos
acerca de las instrucciones
de seguridad
Las advertencias y la información de
seguridad importante de este manual
no pretenden abarcar todos los casos
posibles. Siempre se deberá instalar,
mantener y utilizar el frigorífico con
sentido común, precaución y cuidado.
Póngase en contacto con su proveedor,
distribuidor, agente de servicios o
fabricante para consultar los problemas
o condiciones sobre los que tenga dudas.
Page 77
Instalación del frigorífico
Estas instrucciones se proporcionan como ayuda para la instalación de la unidad. Amana no se hace responsable de
una instalación inadecuada.
Instrucciones...
Un técnico cualificado debe conectar el frigorífico según estas instrucciones de instalación. Mida la apertura de la
puerta, así como la profundidad y el ancho del frigorífico. Extraiga los tiradores de las puertas en caso de que sea necesario.
El técnico debe seguir el procedimiento que se muestra a continuación:
1. Cumplir la legislación local relativa a conexiones de toma de agua y electricidad.
2. Completar la conexión de la toma de agua antes de realizar la conexión de la toma eléctrica.
La reparación o sustitución del cable de alimentación debe llevarse a cabo por un técnico cualificado.
Requisitos para la instalación
1. Efectuar la instalación en una toma de tierra con un cable de alimentación de conexión en Y de circuito independiente
de 230-240 voltios, a 50 Hz y 10 A.
2. Proteger el suelo blando con cartones o mantas.
3. Realizar la instalación en un suelo que soporte hasta 429 kg.
4. Deje un espacio libre de 5 mm en el lateral del frigorífico y para los modelos de más de 60 cm de profundidad, deje un
espacio libre de 12,7 mm en la parte superior.
5. Modelos de 60 cm de profundidad.
Ajustar las esquinas de la parte superior del contador hasta formar un ángulo de 45° si sobresale más de 25 mm.
Deje un espacio libre de 5 mm en ambos lados del frigorífico y de 7 mm en la parte superior para facilitar la instalación
y la nivelación. No es necesario dejar ningún espacio libre mínimo en la parte posterior.
Extracción de la base de madera
PRECAUCIÓN
!
Para evitar daños personales o materiales, dos personas deben extraer la base de madera.
1. Coloque cinta aislante en las puertas para evitar que se abran de forma inesperada.
2. Deslice el carro bajo el lateral del frigorífico.
3. Envuelva el frigorífico con una manta o un acolchado. Coloque la correa alrededor del frigorífico. Coloque el acolchado
de espuma para transporte, que se encuentra en el caja de transporte, bajo la correa. Asegure las correas.
4. Baje el carro hasta el suelo con las asas en la parte inferior.
5. Extraiga los dos pernos de la protección.
6. Coloque de nuevo el frigorífico y el carro en posición vertical. Retire la correa.
7. Deslice el carro bajo el lateral contrario del frigorífico.
8. Repita los pasos del 3 al 5.
9. Extraiga la base de madera.
10. Coloque de nuevo el frigorífico y el carro en posición vertical y retire el carro.
IMPORTANTE:
Apoye el frigorífico en un lateral tan sólo el tiempo necesario para extraer los tornillos.
Extracción y sustitución de puertas y bisagras
• Póngase en contacto con un técnico cualificado para realizar esta tarea.
77
Page 78
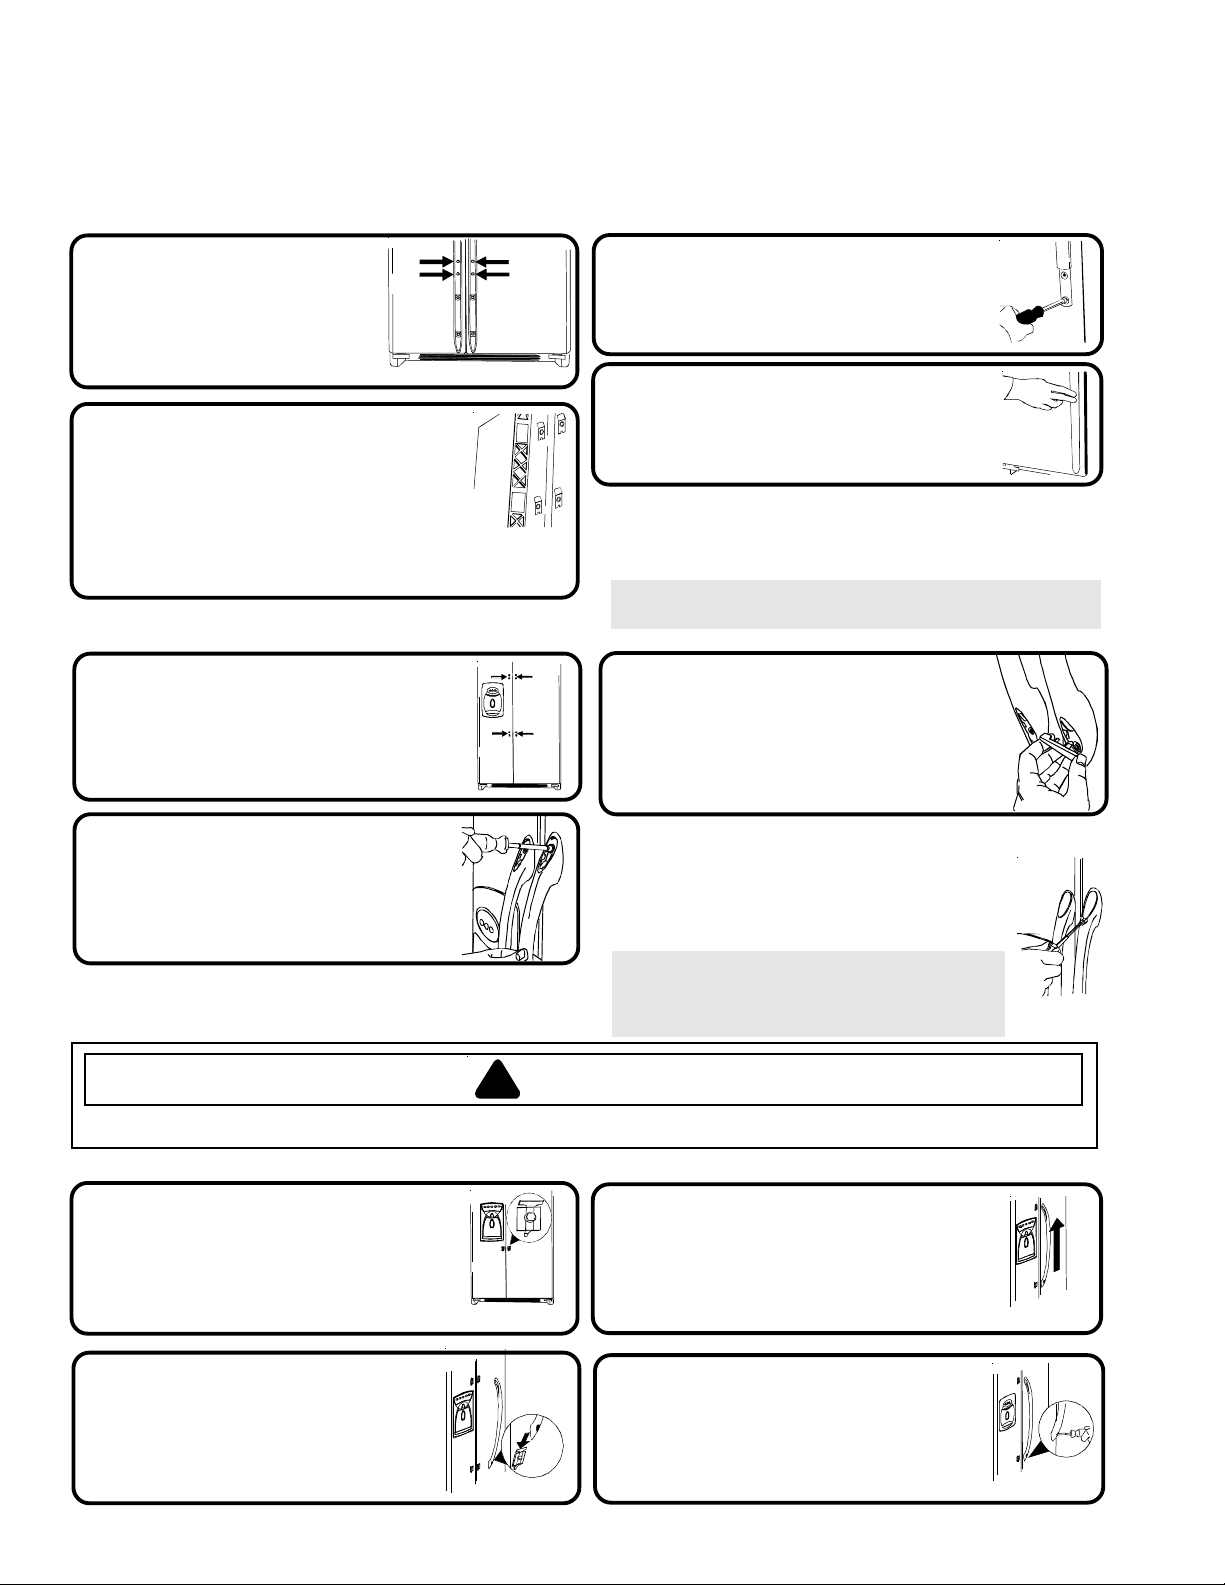
Instalación del frigorífico
Instalación y extracción de los tiradores
Los tiradores se encuentran dentro de la sección de alimentos frescos del frigorífico. Los acabados, cubiertas y embellecedores se encuentran
con la documentación.
Tirador de longitud completa (acero oxidable)
Extraiga dos tuercas
1
hexagonales de 1/4 "
de la parte inferior
del frigorífico y de la
puerta del congelador.
Alinee los tiradores de las puertas
2
con los conjuntos de enganches
superior e inferior de las puertas
hasta que los orificios de los
tornillos de la parte inferior de los
tiradores coincidan con los orificios
de los tornillos de la puerta.
Tiradores de longitud media (acero oxidable)
Extraiga cuatro tuercas
1
hexagonales de 1/4"
de la parte inferior
y superior de las puertas.
Alinee los tiradores de las
2
puertas con los orificios de
los tornillos e introduzca
los tornillos extraídos en
el paso 1.
Introduzca los tornillos extraídos
3
en el paso 1 en la parte inferior
de la sección del tirador.
Encaje el acabado sobre la
4
parte inferior de los tiradores
y los dispositivos de sujeción
de la parte inferior de la puerta.
Para realizar la extracción tras la
instalación inicial…
• Siga los pasos del 3 al 4 en orden inverso.
NOTA: Los aprietes pueden estar muy ajustados.
Para extraer el tirador, tire hacia arriba y hacia afuera.
Coloque el acabado de color del
3
tirador sobre los orificios de los
tornillos en la parte superior
e inferior de los tiradores.
• Encaje el acabado, introduciendo
primero el extremo redondeado.
Para realizar la extracción tras la
instalación inicial…
Puede que resulte necesario extraer los tiradores
para transportar la unidad en espacios reducidos.
• Siga los pasos del 2 al 3 en orden inverso.
IMPORTANTE: Para evitar dañar los tiradores,
emplee un destornillador de hoja plana
envuelto con cinta aislante para extraer el
acabado de color del tirador.
ADVERTENCIA
!
Tenga mucho cuidado cuando retire e instale las asas con el fin de evitar lesiones personales graves producidas por
bordes afilados.
Modelos de acero inoxidable
Afloje el enganche inferior de
1
la puerta del frigorífico con una
llave para tuercas hexagonales
de 1/4 ".
Localice un orificio taladrado
2
en la parte inferior del tirador
y ajuste el extremo hueco del
tirador sobre el enganche
inferior de la puerta.
Ajuste el otro extremo del
3
tirador sobre la parte superior
del enganche de la puerta y
deslícelo hacia arriba tanto
como sea posible.
Introduzca una llave para
4
tuercas hexagonales de
1
/4 " en el orificio perforado
en la parte inferior del
tirador y ajuste la tuerca.
78
Page 79
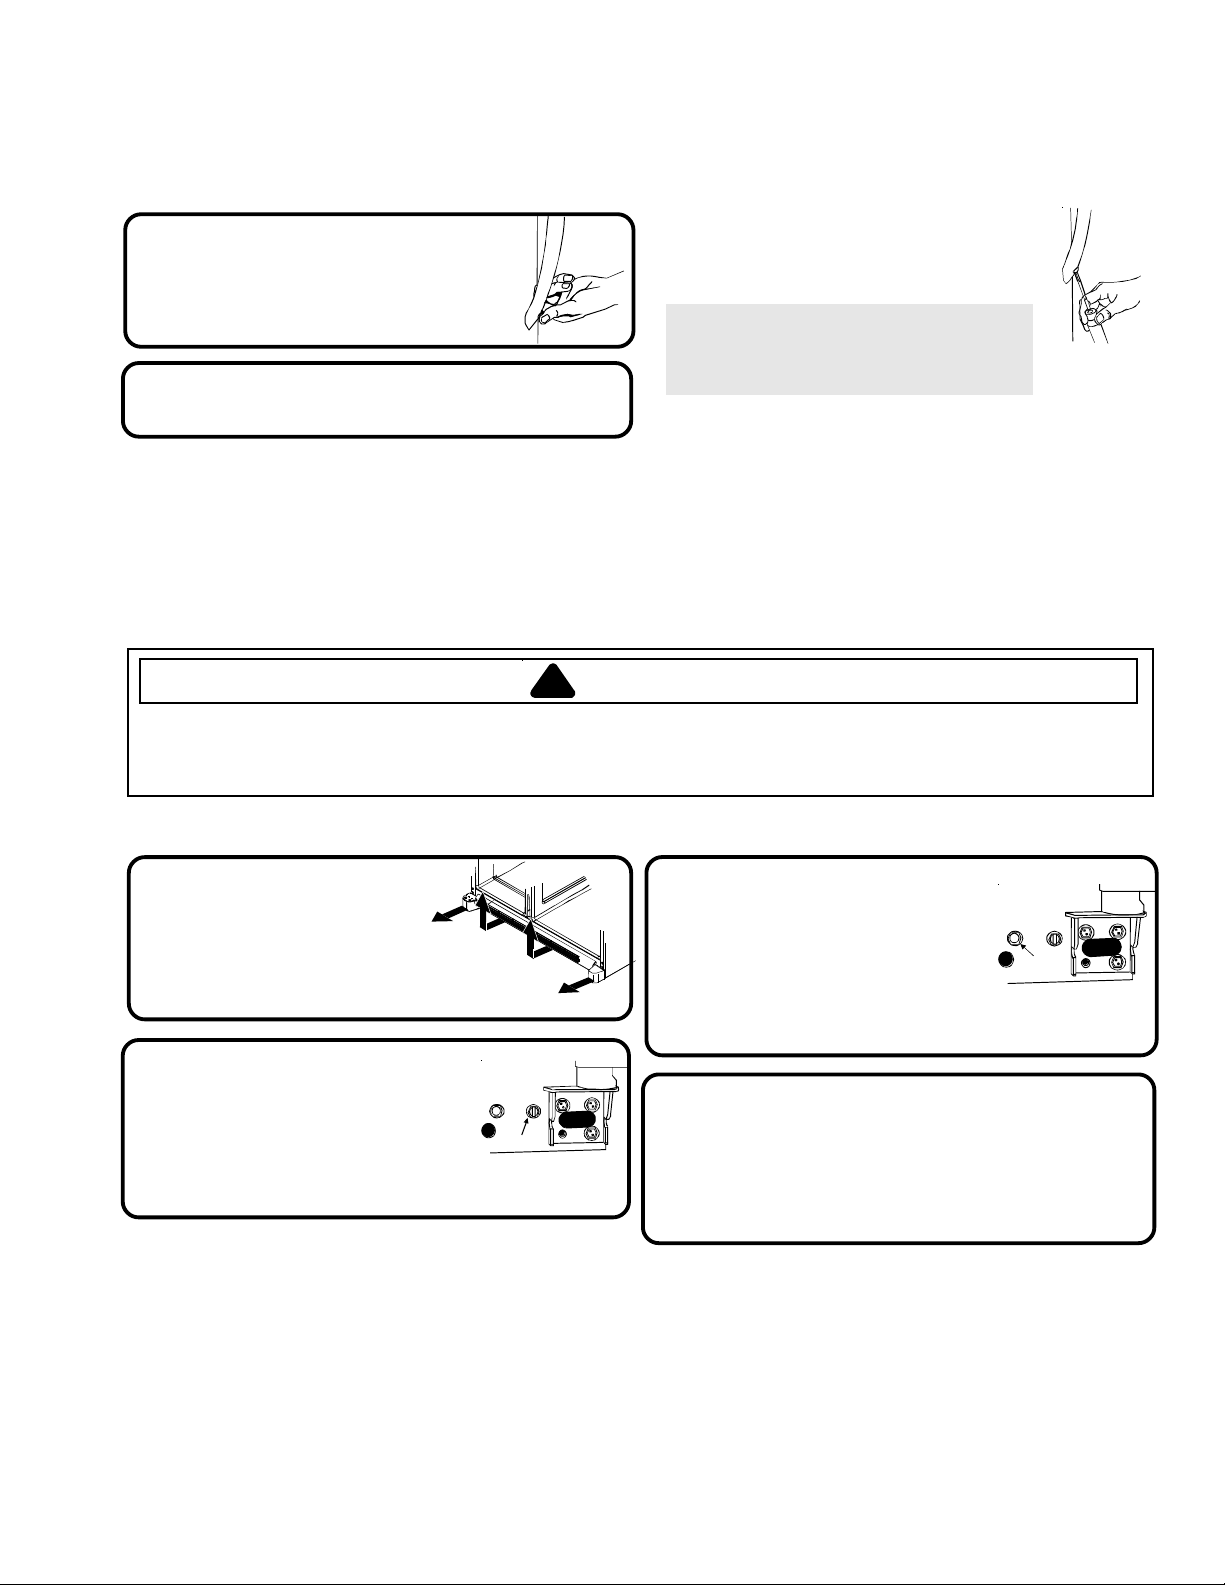
Instalación de los tiradores continuación
Instalación del frigorífico
Tiradores de acero inoxidable
Introduzca la cubierta en el
5
orificio perforado.
Repita los pasos del 2 al 5 para
6
instalar el tirador del congelador.
continuación
Para realizar la extracción tras la
instalación inicial…
• Siga los pasos del 2 al 5 en orden inverso.
IMPORTANTE: Para evitar dañar la unidad,
emplee un destornillador de hoja plana
envuelto con cinta aislante para extraer las
cubiertas de las tuercas.
Conexión de la toma de agua
• Póngase en contacto con un técnico cualificado para realizar esta tarea.
Nivelación del frigorífico
PRECAUCIÓN
!
• Para evitar dañar las paredes y el suelo, utilice cartones, mantas u otros materiales protectores.
• Para evitar daños o roturas al ajustar el perno, no utilice herramientas eléctricas para ajustar la nivelación.
• NO ajuste la unidad de modo que su altura sea inferior a 173,9 cm (excepto bisagras y cubierta). De lo contrario,
se pueden producir daños en los elementos de la parte inferior.
Material necesario
• Destornillador de cabeza hexagonal de 3/8" • Nivelador
Extraiga la rejilla
1
inferior y las cubiertas
de las bisagras inferiores
• Abra ambas puertas 180°, o lo
máximo posible, para extraerlas.
Gire en el sentido de las
2
agujas del reloj los dos
tornillos de ajuste frontales
(A) para elevarlo y en
sentido contrario
para descenderlo.
A
¿Qué ocurre si las puertas no se
encuentran alineadas?
• En la puerta superior, gire en el sentido contrario a las agujas
del reloj los tornillos de ajuste frontales. Gire el tornillo hasta
que se nivelen las puertas.
• Si se alcanza el margen de ajuste más bajo y las puertas no se
han nivelado, eleve la puerta contraria girando
en el sentido de las agujas del reloj el tornillo de
ajuste frontal.
• Vuelva a colocar la rejilla inferior.
Gire en el sentido de las
3
agujas del reloj los dos
tornillos de ajuste posteriores
(B) para elevarlo y en
sentido contrario para
descenderlo.
Compruebe con el nivelador que existe
4
una inclinación de 6 mm en la parte
posterior para que el cierre de las
puertas sea adecuado.
• Si la unidad se encuentra alineada y estable,
se puede volver a colocar la rejilla inferior.
B
¿Qué ocurre si la unidad no está fija?
• Gire en el sentido de las agujas del reloj el tornillo
de ajuste posterior para elevar la esquina inestable.
• Vuelva a colocar la rejilla inferior.
79
Page 80

Instalación del frigorífico
Ajuste de los controles de temperatura
Este frigorífico está diseñado para funcionar a una temperatura de 16° a 43° C.
Los controles del frigorífico y el congelador se
1
encuentran en la pared superior izquierda de
la sección de alimentos frescos. Ajuste los
controles en el punto 4.
IMPORTANTE: Ninguna sección se enfriará si
Off
el control del congelador está
(apagado).
Las temperaturas se estabilizan en un plazo
2
de 24 horas.
Compruebe que la sección de alimentos
4
frescos se encuentra entre 3º y 4º C.
• Suba un punto el control si la temperatura es
demasiado alta.
• Baje un punto el control si la temperatura es
demasiado baja.
• Debe transcurrir un plazo de 5 a 8 horas para
que los ajustes tengan efecto.
Repita el proceso según sea necesario.
5
¿Realización de una prueba
IMPORTANTE: Debido al diseño de la unidad, siempre
debe comenzar a ajustar las temperaturas en la sección
del congelador.
Compruebe que la temperatura del congelador
3
se encuentra entre -17º y -16º C.
• Suba un punto el control si la temperatura es
demasiado alta.
• Baje un punto el control si la temperatura es
demasiado baja.
• Debe transcurrir un plazo de 5 a 8 horas para que
los ajustes tengan efecto.
de temperatura?
Material necesario
• 2 termómetros con escala de -21º a 10º C
• 2 vasos
Para el congelador
• Coloque el termómetro en un
vaso de aceite vegetal en el
centro del congelador y
continúe con el paso 3 de la
sección Ajuste
de temperatura.
r
e
z
e
e
r
F
r
o
t
a
r
e
g
i
r
f
e
R
Para el frigorífico
• Coloque el termómetro en
un vaso de agua en el
centro de la unidad y
continúe con el paso 3
de la sección Ajuste
de temperatura.
Modelos electrónicos de control de temperatura
Para establecer la temperatura del congelador, emplee los botones
1
que se encuentran junto al botón . Se recomienda establecer
la temperatura entre –17 ó –16 ºC (0 ó 2 ºF).
• Con el botón podrá elevar la temperatura del congelador o disminuirla
con el botón
• Pulse el botón
.
para confirmar la temperatura.
Para establecer la temperatura de la sección de alimentos frescos, emplee
2
los botones que se encuentran junto al botón . Se recomienda
establecer una temperatura entre 3 ó 4 ºC (38 ó 40 ºF).
• Con el botón podrá elevar la temperatura de la sección de alimentos
frescos o disminuirla con el botón
• Pulse el botón
para confirmar la temperatura.
.
Las temperaturas se estabilizan en un plazo de 24 horas.
3
NOTA: Al ajustar la temperatura de una unidad en funcionamiento, sólo serán
necesarias de 5 a 8 horas para que ésta se estabilice.
80
Page 81

Sistema de filtrado...
Extracción e instalación del filtro de agua
ADVERTENCIA
!
Para evitar enfermedades graves e incluso la muerte, no utilice la unidad en lugares donde no se conozca la calidad
del agua o donde sea mala sin efectuar una desinfección antes o después de utilizar el filtro.
PRECAUCIÓN
!
• Un cartucho de toma auxiliar NO filtra el agua. Asegúrese de que dispone de un cartucho de toma auxiliar cuando
resulte necesario el cambio de filtro.
• Si se ha congelado el sistema de filtrado de agua, sustituya el cartucho del filtro.
• Si el sistema no se ha utilizado en varios meses y el agua tiene un sabor y un olor desagradables, limpie el sistema
con 2 ó 3 vasos de agua. Si el agua continúa teniendo un sabor y un olor desagradables, cambie el cartucho del filtro.
Instalación inicial del filtro de agua
Extraiga la cubierta azul de
1
la toma auxiliar y guárdela
para usos posteriores.
Retire la etiqueta de sellado
2
del extremo del filtro e
introdúzcala en el
cabezal del filtro.
• Gire suavemente en el sentido de
las agujas del reloj hasta que el
filtro se detenga y se encaje la
cubierta del filtro.
Reduzca el chorro de agua extrayendo aire
3
del sistema. Deje que el agua fluya por el
dispensador (aproximadamente 2 minutos)
hasta que el chorro sea regular.
• Puede ser necesaria una mayor toma de agua
en aquellas ubicaciones en las que el agua es
de baja calidad.
Sustitución del filtro de agua
IMPORTANTE: El aire que se encuentra en el sistema
puede provocar la expulsión de agua y del cartucho.
Tenga cuidado al realizar la extracción.
Gire el filtro en el sentido contrario a
1
las agujas del reloj hasta que se libere
del cabezal.
Drene el agua del filtro en el lavabo
2
o WC y deposite el filtro en la basura.
Recoja el agua de la cubierta del filtro y
3
continúe con los pasos 2 y 3 de
la instalación.
¿Cuándo debo cambiar el filtro de agua?
Seleccione un modelo de dispensador con indicador de cambio
de filtro. Para obtener instrucciones acerca de cómo manejar y
restablecer esta función, consulte la sección de características
del dispensador de este manual.
En las unidades sin indicador, el filtro debe cambiarse cada
6 meses aproximadamente.
¿Dónde se encuentra el agua para
purgar el sistema?
Durante el uso inicial, existe un retraso de uno o dos minutos hasta
que se llena el depósito de agua interno.
¿Qué ocurre si no utilizo el sistema de
filtrado de agua?
El dispensador se puede utilizar sin cartucho para filtro de agua.
Si no va a utilizar el cartucho, coloque de nuevo el filtro con la
cubierta azul de la toma auxiliar.
IMPORTANTE: Las condiciones y la cantidad de agua
utilizada determina la duración del cartucho del filtro de
agua. Si el uso de agua es elevado, o la calidad es baja,
el filtro se deberá cambiar con más frecuencia.
¿Cómo se solicita un cartucho de filtro
de repuesto?
El cartucho para filtro de agua de repuesto modelo OWF51 está
a su disposición a través de los proveedores y el servicio técnico.
Si desea obtener más información, póngase en contacto con su
distribuidor local.
81
Page 82
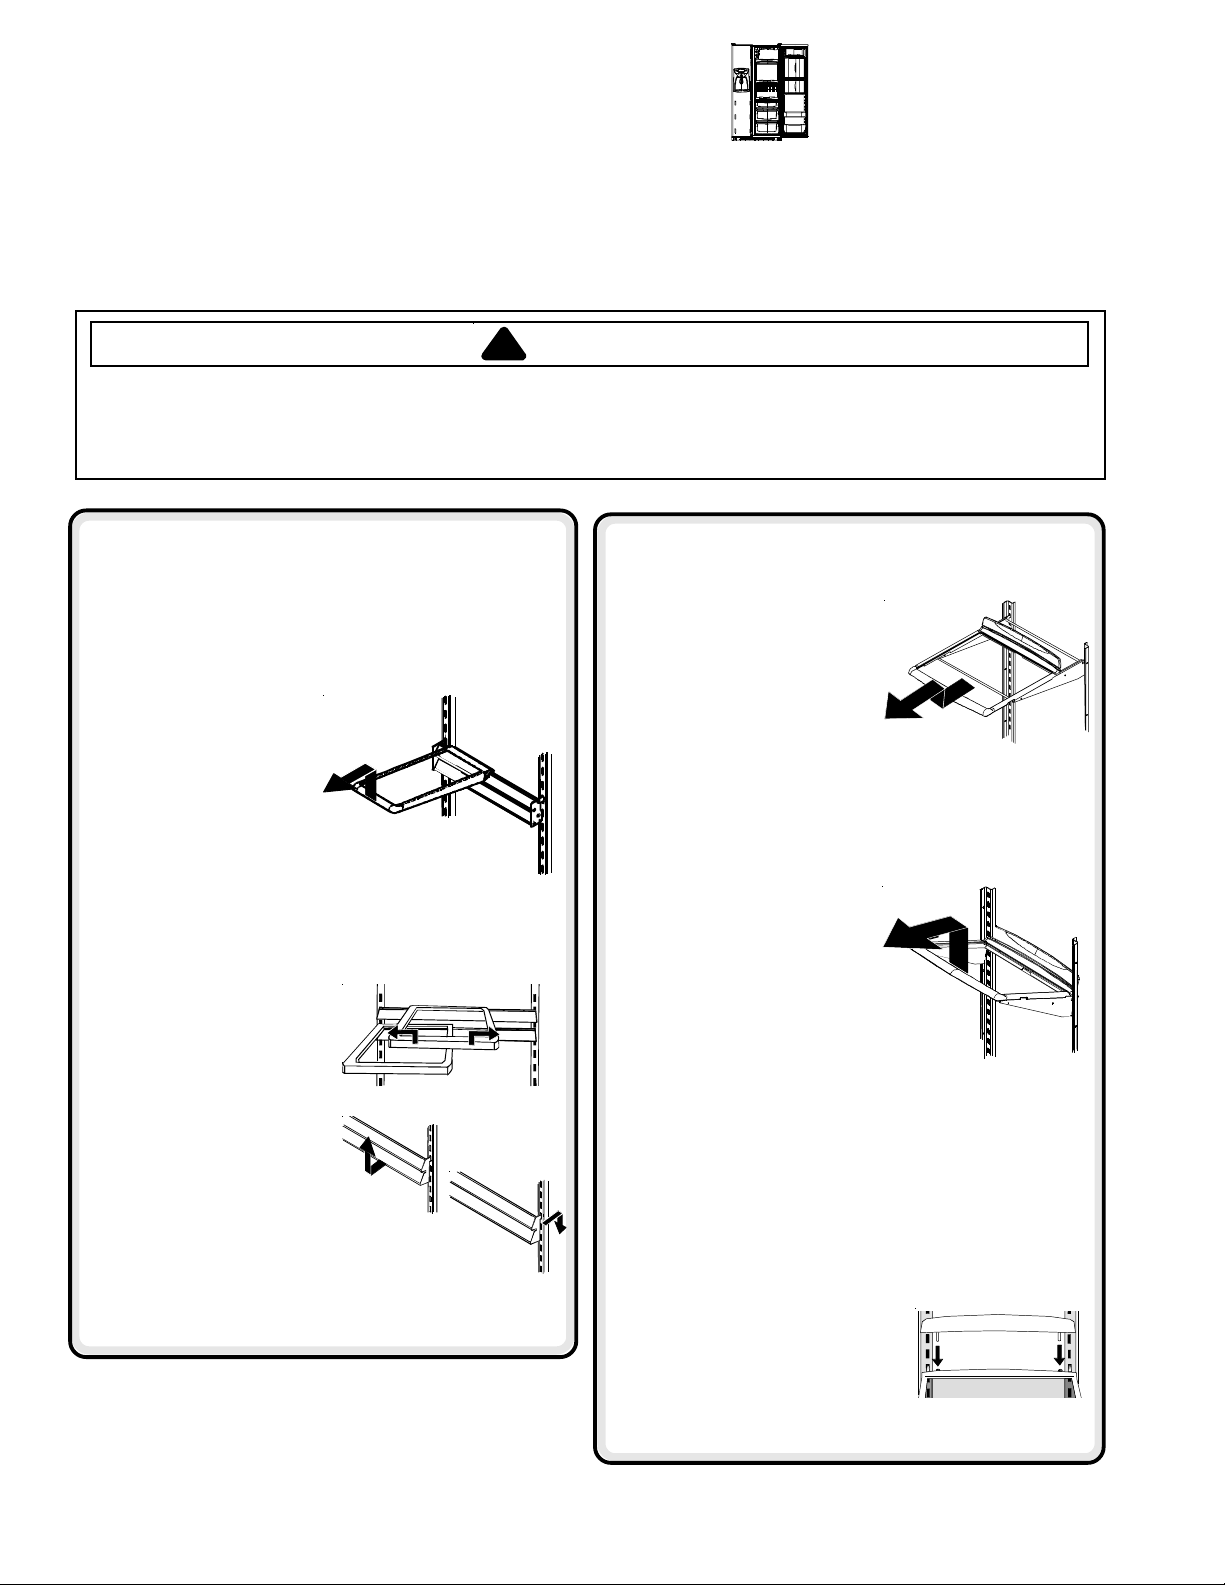
Características de la sección de
alimentos frescos
¿Qué ocurre si estas
características son
diferentes a las mías?
Bandejas interiores
Para evitar daños personales o materiales, tenga en cuenta las siguientes instrucciones:
• Compruebe que la bandeja está fija antes de colocar nada encima.
• Maneje con cuidado las bandejas de cristal reforzado. Las bandejas se pueden romper si tienen muescas, rasguños
o se exponen a cambios bruscos de temperatura.
Este manual se ha creado para mostrar las diferentes características disponibles para esta línea
de productos. Si su frigorífico no cuenta con todas las opciones que se muestran, puede adquirir
muchos de estos componentes opcionales poniéndose en contacto con su proveedor.
PRECAUCIÓN
!
Bandejas Side Glide™
(en algunos modelos)
Las bandejas Side Glide™ se enganchan en
un ensamblaje de travesaños dobles en la parte
posterior. Las bandejas se pueden alinear para
crear una superficie completa a la misma altura
o se pueden colocar por
separado gracias a los
travesaños, deslizándolas
a derecha o izquierda para
ajustarse a las
necesidades.
Para extraer e instalar
la bandeja:
• Para extraer la
bandeja, elévela 10°
para desengancharla de los
travesaños dobles y levántela.
• Para instalarla siga el mismo
procedimiento en
orden inverso.
Para deslizar las bandejas:
• Eleve suavemente la
parte superior de la
bandeja y deslícela a
izquierda o derecha.
Para extraer e instalar los
ensamblajes de travesaños
dobles:
• Para extraerlos, deslice hacia arriba el
ensamblaje para desengancharlo
de las guías metálicas.
• Para instalarlos, siga el mismo procedimiento
en orden inverso.
Easy Glide™ Spillsaver™
(en algunos modelos)
Las bandejas Easy Glide™
Spillsaver™ se limpian de
forma sencilla gracias a su
diseño de fácil extracción para
alcanzar la parte posterior.
Para que su limpieza resulte
más fácil, la bandeja de
cristal se puede extraer
completamente, sacándola
del marco.
• Para extraer la bandeja y el marco consulte las
instrucciones para bandejas fijas Spillsaver™.
Spillsaver™
Las bandejas fijas Spillsaver™
evitan pequeños derrames
para que la limpieza resulte
más sencilla.
• Para extraer las bandejas
tire hacia arriba y
hacia afuera.
• Para instalarlas, siga el
mismo procedimiento
en orden inverso.
Extensiones posteriores de la
bandeja (en algunos modelos)
Las extensiones posteriores de la bandeja ayudan
a evitar que los productos se caigan en la parte
posterior de la bandeja.
Para extraer e instalar la extensión de la bandeja:
• Para extraerla, tire de la
extensión hacia arriba
desde la parte posterior
de la bandeja.
• Para instalarla, introduzca las
sujeciones de la extensión
de la bandeja en el marco.
82
Page 83

Características de la sección de alimentos frescos
A
Compartimentos de las contrapuertas
Compartimento para
productos lácteos
La sección de productos lácteos sirve para
guardar alimentos como mantequilla, yogur,
queso, etc. Se trata de un compartimento
ajustable que se encuentra en
la contrapuerta. Se puede
mover a diferentes ubicaciones
según sea necesario.
• Para extraerlo, deslice
y tire hacia arriba del
compartimento de
productos lácteos.
• Para instalarlo, siga el
mismo procedimiento
en orden inverso.
Estantes inclinables de las
contrapuertas (en algunos
modelos)
El ensamblaje del estante inclinable consta de
un estante y un marco, de forma que ofrece una
organización ajustable y conveniente para los
alimentos en la contrapuerta. El ensamblaje del
estante se inclina hacia delante para que se pueda
acceder mejor a los alimentos y se puede extraer
para una limpieza más sencilla y un mejor ajuste.
Para extraer e instalar el estante:
• Para extraer el estante,
colóquelo hacia delante
y tire hacia arriba.
• Para instalar el estante,
deslícelo dentro del
marco y presione.
Para ajustar el marco
del estante:
• Extraiga el estante según las
instrucciones anteriores.
• Eleve el marco y sáquelo de la puerta,
colóquelo en la ubicación deseada.
Beverage Chiller™/
Mini-Chiller™
(en algunos modelos)
Beverage Chiller™ y Mini Beverage Chiller™
mantienen las bebidas y otros alimentos hasta 3° C
más fríos que el resto de la sección de alimentos.
La entrada de aire permite que el aire pase del
congelador al Beverage Chiller™.
El control del Beverage Chiller™ se
encuentra en la pared izquierda de la
sección de alimentos frescos. El control
ajusta la cantidad de aire que circula en el
Beverage Chiller™. Mueva el control hasta
el icono del copo de nieve para obtener
una temperatura más baja.
Para extraer e instalar Beverage Chiller™:
• Si el compartimento de
productos lácteos o
uno de los estantes de la
contrapuerta se encuentran
directamente encima de
este enfriador, se tendrán
que extraer. Consulte
las instrucciones
correspondientes y extraiga
los elementos. Deslice el
ensamblaje del Beverage
Chiller™ hacia arriba
y tire.
• Para instalarlo, alinee uno
de los orificios de entrada
de aire frío
Beverage Chiller™ con
una de las dos tomas de
aire
de la puerta. Presione el ensamblaje
en el dispositivo de sujeción del revestimiento
de la puerta hasta que se detenga.
IMPORTANTE: Beverage Chiller™ no funcionará
de forma adecuada si los orificios de toma no se
encuentran alineados con la toma de aire del
revestimiento de la puerta.
(A)
del
(B)
del revestimiento
B
Cubierta de los
estantes de las
contrapuertas
Las cubiertas de los estantes
de las contrapuertas evitan
que se deslicen alimentos
dentro de estos estantes. Las cubiertas de los
estantes de las contrapuertas son extraíbles
y se pueden lavar sin problemas en el lavavajillas
para que su limpieza resulte más sencilla.
Estantes de las
contrapuertas
Los estantes de las contrapuertas
se ajustan para satisfacer las
necesidades particulares.
• Para extraerlos, deslice y
tire hacia arriba del estante.
• Para instalarlos, siga el
mismo procedimiento en
orden inverso.
83
Page 84

Características de la sección de alimentos frescos
Cajones
Cajón de carne/verduras
temperatura controlada
El sistema para carne/verduras ofrece un cajón
con un control de temperatura que mantiene el
compartimento hasta 3° C por debajo de la
temperatura del frigorífico. Este cajón se puede
utilizar para guardar carne u otro tipo de productos.
NOTA: Al dirigir aire frío al sistema para carne y
verduras es posible que disminuya la temperatura
del frigorífico. Puede que resulte necesario ajustar
el control del frigorífico.
Controles
Los controles de refrigeración que se encuentran en
la pared izquierda del cajón regulan la temperatura
del aire del cajón de carne/verduras. Establezca
el nivel de control en
temperatura normal del frigorífico para productos
con envoltorio. Utilice
u otros productos de charcutería.
cold
(frío) para obtener una
coldest
(más frío) para carnes
Cajón de carne/verduras
temperatura controlada
El cajón de verduras Garden Fresh™ mantiene los
productos frescos durante más tiempo, ya que
ofrece un ambiente de humedad graduable.
Controles
Los controles de Garden Fresh™ regulan la cantidad
de humedad del cajón de verduras. Establezca
el nivel de control en
con envoltorio. Utilice
productos vegetales.
Para extraer e instalar los cajones:
• Para extraer el cajón, sáquelo por completo.
Incline la parte superior del
cajón y tire hacia afuera.
• Para instalarlo siga el
mismo procedimiento
en orden inverso.
Para extraer e instalar la
bandeja de verduras:
• Levántela de los soportes
de las paredes y sáquela.
• Para instalar la bandeja,
colóquela encima de
los soportes de la pared hasta que se encuentre
al mismo nivel que la pared posterior.
low
(bajo) para productos
high
(alto) para otros
Beverage Organizer™
(en algunos modelos)
Beverage Organizer™ se desliza de la parte inferior de
la bandeja Easy Glide™ Spillsaver™. El organizador
admite hasta 12 onzas de latas de bebidas.
Para extraer e instalar
el organizador:
• Para extraerlo, vacíe
el contenido del
organizador. Tire hacia
afuera del organizador
y eleve la parte frontal
para liberarlo de la
guía de la bandeja.
Tire hacia afuera.
• Para instalarla siga el mismo procedimiento
en orden inverso.
84
Page 85

Características del congelador
¿Qué ocurre si estas
características son
diferentes a las mías?
Este manual se ha creado para mostrar las diferentes características disponibles para esta
línea de productos. Si su frigorífico no cuenta con todas las opciones que se muestran,
puede adquirir muchos de estos componentes opcionales poniéndose en contacto con
su proveedor.
Características principales
PRECAUCIÓN
!
Para evitar daños materiales, debe seguir el procedimiento que se muestra a continuación:
• No tire del brazo de la cubitera hacia arriba o hacia abajo.
• No coloque ni guarde nada en la cubitera.
Dispensador automático de hielo
Esta cubitera crea el hielo que utiliza el dispensador.
Primer uso de la cubitera
• Compruebe que la cubeta de hielo está
bien colocada y el brazo
se encuentra hacia abajo.
• Una vez que la sección del
congelador alcanza una
temperatura entre -18° y
-17° C, la cubitera se
llena de agua y empieza
a funcionar.
• Una vez transcurridas 24 horas desde
la instalación podrá obtener hielo.
• Deseche el hielo creado en las primeras
12 horas de funcionamiento para verificar
que el sistema está limpio de impurezas.
Instrucciones de funcionamiento
• Compruebe que la cubeta de hielo está bien
colocada y el brazo se encuentra hacia abajo.
• Una vez que la sección del congelador alcanza
una temperatura entre
-18° y -17° C, la
cubitera se llena de
agua y empieza a
funcionar. Podrá
obtener la cantidad
completa de hielos
cada 3 horas.
• Detenga la producción de hielo elevando el
brazo de la cubitera hasta que se oiga un clic.
• La cubitera se mantendrá en la posición
(desconectado) hasta que se baje el brazo.
IMPORTANTE No se debe instalar la bandeja
de los helados si la máquina de hacer hielo
está en la posición “off” (apagado).
off
Bandeja de helados
La bandeja de helados ofrece espacio para los
alimentos que se quieren enfriar o congelar de
forma rápida.
• Para extraerla, eleve la
bandeja de helados de
los raíles de la cubeta
de hielo y tirar.
• Para instalarla, siga el
mismo procedimiento
en orden inverso.
IMPORTANTE No se debe instalar la bandeja
de los helados si la máquina de hacer hielo
está en la posición “off” (apagado).
Cubitera
La cubitera se encuentra bajo el dispensador
automático de hielo.
Para extraer e instalar
la cubitera:
• Para extraer la cubitera,
extraiga la bandeja de
helados. Eleve el brazo
del dispensador de hielo
para desactivarlo.
• Eleve la parte frontal de la cubitera y tire.
Eleve la parte frontal de la cubitera y extráigala.
• Para instalarla, deslícela en las guías que se
encuentran bajo el dispensador de hielo hasta
que la cubitera encaje en su sitio. Baje el brazo
del dispensador de hielo para activarlo y vuelva
a colocar el estante de helados.
IMPORTANTE: La cubeta de
hielo debe estar sujeta en el
lugar adecuado para poder
obtener hielo de forma correcta.
Si no se cierra la puerta del
congelador, la cubitera no
estará bien colocada. Gire el
tope como se muestra en la
figura para alinear de forma
adecuada la cubeta de hielo
con la parte posterior de
la unidad.
85
Page 86

Características del congelador
Bandejas
Sistema Stor-Mor
Las cestas se deslizan para acceder mejor a los
alimentos que se encuentran en la parte posterior.
Las bandejas se pueden extraer para satisfacer
las necesidades particulares.
Para extraer e instalar la bandeja Stor-Mor
• Para extraerla, desencaje la
parte derecha de la bandeja
de las guías de la estructura
y retírela de los enganches
de montaje de la pared.
• Para instalarla, siga el mismo
procedimiento en orden inverso.
NOTA: La parte posterior de la bandeja debe
encontrarse al mismo nivel que la estructura para
fijarla en las guías. Un alineamiento inadecuado
puede dar lugar a que la bandeja se deslice.
Para extraer e instalar
las cestas:
• Para extraer la cesta, sáquela
por completo. Eleve la parte
frontal del tirador para liberar
la cesta de las guías
y extráigala.
• Para instalarla siga el
mismo procedimiento
en orden inverso.
®
®
:
Bandeja fija del congelador
Para extraer e instalar las bandejas:
• Extraiga la bandeja de los
enganches de sujeción de
montaje de la pared y tire
de la parte izquierda de
los orificios de montaje.
• Para instalarla siga el
mismo procedimiento
en orden inverso.
Bandejas colgantes de rejilla
(en algunos modelos)
Las bandejas colgantes de rejilla proporcionan un
espacio adicional para bandejas para cubitos de
hielo, alimentos congelados, bolsas de hielo, etc.
Para extraer la bandeja:
• Presione hacia dentro el
gancho circular de la
bandeja para liberar el
lado derecho de la bandeja
Stor- Mor
deslizará hacia abajo.
• Tire hacia afuera del
gancho circular de la
bandeja colgante de rejilla
para extraer la bandeja de
la sección del congelador.
Para instalar la bandeja:
• Siga los pasos anteriores en orden inverso.
®
. La bandeja se
Almacenamiento en contrapuertas
Compartimentos de las
contrapuertas
• Consulte la sección de alimentos frescos para
obtener instrucciones.
Estantes inclinables de las
contrapuertas
(en algunos modelos)
• Consulte la sección de alimentos frescos para
obtener instrucciones.
86
Page 87

Características del dispensador
Características principales
Luz del dispensador no se muestra
Se enciende una luz en la zona del dispensador mientras se obtiene agua o hielo.
Botón de Front Fill (llenado frontal) (en algunos modelos)
El botón de Front Fill (llenado frontal) es independiente de los controles del dispensador
y ofrece una alternativa a la almohadilla del dispensador para dispensar agua desde el
frente. Esta opción resulta muy útil para llenar grandes recipientes que no caben dentro
de la zona del dispensador (p. ej. botellas, jarras, cazuelas, cafeteras).
Además, también ofrece la posibilidad de obtener hielo y agua de forma simultánea. Para
utilizarlo, seleccione el modo de hielo que desee en el panel de control del dispensador.
Coloque el recipiente contra la almohadilla del dispensador mientras pulsa el botón de
Front Fill (llenado frontal).
Almohadilla del dispensador
La almohadilla del dispensador se encuentra en la parte posterior de la zona del dispensador.
Cuando se presiona la almohadilla del dispensador, se obtendrá la selección elegida en el
panel de control.
Bandeja extraíble
La bandeja extraíble en la parte inferior del área del dispensador está diseñada para
recoger los pequeños derrames; se puede extraer fácilmente para su vaciado y limpieza.
IMPORTANTE: La bandeja extraíble se debe vaciar, ya que no drena. Un chorro
de agua continuo daría lugar a un desbordamiento de la bandeja.
Funcionamiento del dispensador de agua
PRECAUCIÓN
!
Para evitar daños personales o materiales, debe seguir las instrucciones
que se muestran a continuación:
• No introduzca los dedos, manos o cualquier objeto en el orificio
del dispensador.
• No emplee objetos afilados para romper el hielo.
• No introduzca hielos directamente en recipientes de cristal fino, porcelana
o cristal delicado.
NOTA: Durante el uso inicial del dispensador de agua, deben transcurrir aproximadamente
1 ó 2 minutos hasta que el agua llene el depósito. Deseche los primeros 10 ó 14 recipientes
de agua obtenidos tras la conexión inicial del frigorífico a la toma de agua y tras largos
períodos de desuso.
Para utilizar la almohadilla del dispensador:
• Elija la opción de agua del panel de control del dispensador.
• Presione los recipientes de boca ancha resistentes contra la almohadilla del dispensador.
• Ejerza menos presión en la almohadilla del dispensador para detener el chorro de agua.
Se mantendrá un pequeño chorro que se recogerá en la bandeja del dispensador. Si la
cantidad de agua derramada es grande se debe secar.
Para utilizar el botón de Front FIll (llenado frontal) (en algunos modelos):
• Alinee el recipiente bajo el botón de Front Fill (llenado frontal) utilizando como guía
el goteo de agua.
• Mantenga pulsado el botón de Front Fill (llenado frontal).
• Deje de presionar el botón cuando haya terminado de llenar el recipiente. Se mantendrá
un pequeño chorro, que se recogerá en la bandeja del dispensador. Si se derrama gran
cantidad de agua, se deberá secar.
NOTA: Si el dispensador de agua se mantiene activo durante más de 5 minutos, un sensor de
bloqueo automático cortará la energía de la zona del dispensador. Consulte la sección sobre
bloqueo automático para obtener más información.
87
Page 88

Características del dispensador
Características de los controles
(Control de 5 botones)
Funcionamiento del dispensador de hielo
Para obtener hielo:
• Seleccione el modo
del dispensador. Una luz indicadora de color verde muestra el modo elegido.
• Presione el recipiente contra la almohadilla del dispensador. Cuando obtenga hielo triturado, mantenga
el recipiente lo más cerca posible del conducto para evitar que salpique. El modo de selección no se
puede cambiar mientras el dispensador de hielo está en funcionamiento.
NOTA: Si el dispensador de hielo se mantiene activo durante más de 2 ó 3 minutos, un sensor de bloqueo automático cortará
la energía de la zona del dispensador. Consulte la sección sobre bloqueo automático para obtener más información.
Cubed
(en cubitos) o
Crushed
(picado) pulsando los botones del panel de control
Dispenser Lock
(Bloqueo del dispensador)
Esta función evita que se dispense agua o hielo de
forma accidental.
Para bloquear y desbloquear el dispensador:
• Para bloquear el dispensador, mantenga pulsado el botón
Dispenser Lock
segundos. del dispensador). Una luz indicadora color verde
sobre el botón confirma que el dispensador se encuentra
bloqueado.
• Para desbloquear el dispensador, mantenga pulsado el
Dispenser Lock
botón
ó 4 segundos. se apagará. La luz indicadora verde encima
del botón se apagará.
(bloqueo del dispensador) durante 3 ó 4
(bloqueo del dispensador) durante 3
¿Qué es el bloqueo automático?
El bloqueo automático interrumpe la energía del dispensador
de agua y hielo después de que esté en funcionamiento continuo.
Si se activa este modo, la luz verde se ilumina encima del botón
Dispenser Lock (bloqueo del dispensador).
Para desbloquear el dispensador:
• Para desbloquear el dispensador, mantenga pulsado el
botón Dispenser Lock (bloqueo del dispensador) durante
3 ó 4 segundos. La luz indicadora verde encima del botón
se apagará.
Luz indicadora del estado del filtro
La luz indicadora del estado del filtro sirve para recordar que ha llegado el momento de reemplazar el filtro. Una luz
verde indica que el filtro se encuentra en buenas condiciones. Una luz roja indica que el filtro se debe cambiar. Una
vez que la luz se ilumine de color rojo, se mantendrá de este color hasta que se reemplace.
Para restablecer el indicador:
• Mantenga pulsado los botones de
simultánea durante 3 ó 4 segundos. La luz verde indicadora del estado del filtro parpadea 3 veces cuando
se ha restablecido la función de forma correcta.
Dispenser Lock
(bloqueo del dispensador) y
Water
(agua) de forma
Auto Light (iluminación automática)
La función
a media potencia cuando el
Para activar y desactivar la
• Para activarla, pulse el botón
encuentra en el panel de control. Una luz indicadora verde sobre el botón
muestra que el sensor está activo.
• Para desactivarla, pulse el botón
La luz indicadora verde se apagará.
Auto Light
(iluminación automática) ofrece la capacidad de activar la luz del dispensador
Light Sensor
Auto Light
Auto Light
(sensor de luz) detecta que los niveles de luz de la habitación son bajos.
(iluminación automática):
(iluminación automática) que se
Auto Light
(iluminación automática).
NOTA: La luz del dispensador
funcionará independientemente de
que se encuentre seleccionada la
Auto Light (iluminación automática).
Sabbath Mode (modo sin iluminación exterior)
Este modo tiene la función de desactivar los indicadores luminosos y las luces del
dispensador, manteniendo los controles operativos.
Para activar Sabbath Mode (modo sin iluminación exterior):
• Mantenga pulsados simultáneamente los botones
y
Auto Light
segundos, se apagarán los indicadores luminosos y las luces del dispensador. La luz del
dispensador no se encenderá cuando se utilice en este modo.
Para desactivar Sabbath Mode (modo sin iluminación exterior):
• Mantenga pulsados simultáneamente los botones
durante 3 ó 4 segundos. Transcurridos los 3 ó 4 segundos, se encenderán los indicadores luminosos y las luces del dispensador.
(iIuminación automática) durante 3 ó 4 segundos. Transcurridos los 3 ó 4
Dispenser Lock
Dispenser Lock
(bloqueo del dispensador)
(bloqueo del dispensador) y
NOTA: En caso de que se produjese
un corte de electricidad mientras esté
activo Sabbath Mode (modo sin
iluminación exterior), el control
seguirá en este modo cuando vuelva
a disponer de electricidad.
Auto Light
(iluminación automática)
+
88
Page 89

Características del dispensador
Características de los controles
Dispensador de agua y hielo (activador principal)
Las funciones del dispensador de agua y hielo son independientes.
Para obtener agua:
• Pulse el botón
Para obtener hielo:
• Pulse el botón
para obtener cubitos de hielo.
(control electrónico)
• Pulse el activador de agua
• Pulse el botón
para obtener hielo picado.
Dispenser Lock (Bloqueo del dispensador)
Esta función evita que se dispense agua o hielo de forma accidental.
Para bloquear y desbloquear el dispensador:
• Para bloquear el dispensador, mantenga pulsado el botón
sobre el botón confirma que el dispensador se encuentra bloqueado.
• Para desbloquear el dispensador, mantenga pulsado el botón
verde situada encima del botón.
Función de iluminación
La función de iluminación dispone de dos funciones:
OFF (desconectado) y AUTO (automática).
La función OFF (desconectado) permite que la luz funcione sólo como luz del alojamiento del dispensador.
La función AUTO (automática) permite que el
alojamiento según el caso. Cuando el sensor registra niveles de luz inferiores (noche, cocina a oscuras), la luz del
alojamiento utilizará un 50% de energía. Cuando el sensor registra niveles de luz superiores (cocina iluminada, luz solar),
no se activará la luz del alojamiento.
Para desactivar la opción AUTO (automática):
• Pulse el botón situado en el panel de control. Cuando la luz indicadora de color verde situada sobre el botón está
apagada, la luz funcionará sólo cuando dispense hielo o agua.
• Para desactivar la opción AUTO (automática), pulse el botón . Cuando la luz indicadora de color verde situada
sobre el botón está encendida, la luz del alojamiento del dispensador empleará la opción AUTO (automática).
SENSOR
mida los niveles de luz del entorno y ajuste la energía de la luz del
durante 3 segundos. Una luz indicadora de color verde
durante 3 segundos. Se apagará la luz indicadora
NOTA: La luz del dispensador se iluminará
al 100% cuando las funciones de hielo y
agua se encuentran en uso.
Luz indicadora del estado del filtro
La luz indicadora del estado del filtro sirve para recordar que ha llegado el momento de reemplazar el filtro del
agua. Una luz verde indica que el filtro se encuentra en buenas condiciones. Una luz roja indica que el filtro
se debe cambiar. Una vez que la luz se ilumine de color rojo, se mantendrá de este color hasta que se reemplace.
Para restablecer el indicador:
• Mantenga pulsados los botones
del estado del filtro parpadea 3 veces cuando se ha restablecido la función de forma correcta.
y de forma simultánea durante 4 segundos. La luz verde indicadora
¿Qué es el bloqueo automático?
El bloqueo automático interrumpe la energía del dispensador de agua y hielo después de que esté en funcionamiento continuo durante
aproximadamente 2 minutos. Si se activa este modo, la luz verde se ilumina encima del botón .
Para desbloquear el dispensador:
Para desbloquear el dispensador, mantenga pulsado el botón
encima del botón.
durante 3 segundos. Se apagará la luz indicadora verde situada
89
Page 90

Características del dispensador
Características de los controles (continuación)
(control electrónico)
Teclas de temperatura
Estas teclas permiten elevar y disminuir la temperatura del congelador o del compartimento de alimentos frescos.
Para establecer la temperatura del compartimento de
alimentos frescos:
• Sitúe los botones junto al botón. Use el
para elevar la temperatura de la sección de
alimentos frescos o el botón
para disminuirla.
• Pulse el botón
Para establecer la temperatura del congelador:
• Repita las instrucciones anteriores con los botones
situados junto al botón en la pantalla.
para confirmar los valores.
Max Cool (Frío máximo)
Esta función hace que la temperatura del compartimento
de alimentos frescos descienda hasta la Opción de Temperatura
Mínima del Frigorífico establecida previamente mediante el control.
Esta función permanece activa durante 10 horas aproximadamente.
Para activar Max Cool (Frío máximo):
• Pulse el botón.
botón indica que la función se encuentra activa.
La luz de color verde sobre el
Para desactivar Max Cool (Frío máximo):
• Pulse el botón
Max Freeze (Congelado máximo)
Esta función hace que la temperatura del congelador descienda
hasta la Opción de Temperatura Mínima del Congelador establecida
previamente mediante el control. Esta función permanece activa
durante 24 horas aproximadamente.
Para activar Max Freeze (Congelado máximo):
• Pulse el botón . La luz de color verde sobre
el botón indica que la función se encuentra activa.
Para deactivate Max Freeze (Congelado máximo):
• Pulse el botón. La luz de color verde situada
Pantalla On/Off (Encendido/Apagado)
El interruptor de la pantalla On/Off (Encendido/Apagado) comprueba
la alimentación de la pantalla de cristal líquido.
Para desactivar la pantalla:
• Pulse el botón
). La pantalla se apagará.
Para activar la pantalla de nuevo:
• Pulse el botón . La pantalla volverá
NOTA: No se pueden cambiar los valores
de la temperatura si las opciones Max
Cool o Max Freeze se encuentran activas
. La luz de color verde sobre
el botón se apagará.
NOTA: No se pueden cambiar los valores
de la temperatura si las opciones Max
Cool o Max Freeze se encuentran activas.
sobre el botón se apagará.
a encenderse.
.
Vacation Mode (modo ausencia)
Al pulsar esta tecla, la frecuencia de los ciclos de descongelación
será menor, con el correspondiente ahorro de energía.
Para activar Vacation Mode:
• Pulse el botón .
Alarm Off (alarma desactivada)
Esta tecla sirve para activar el indicador de advertencia HI
TEMP (Temperatura) y la alarma de sonido, así como para
desactivar la alarma de sonido OPEN DOOR (Abrir Puerta).
90
Para deactivate Vacation Mode:
• Pulse el botón
Para desactivar la alarma:
• Pulse el botón
o abra la puerta del frigorífico.
.
Page 91

Características del dispensador
Características de los controles ocultos (control electrónico)
Sabbath Mode (modo sin iluminación exterior)
Este modo tiene la función de desactivar los indicadores luminosos y las luces del dispensador,
manteniendo los controles operativos. Las alarmas visuales y de sonido no se encuentran
disponibles cuando se utilice en este modo.
Para activar Sabbath Mode
(modo sin iluminación exterior):
• Mantenga pulsados simultáneamente los botones
y durante 3 segundos. Transcurrido este
tiempo, se apagarán los indicadores luminosos
y las luces del dispensador. La luz del
dispensador no se encenderá cuando
se utilice en este modo.
Para desactivar Sabbath Mode
(modo sin iluminación exterior):
• Mantenga pulsados simultáneamente los
botones
este tiempo, se encenderán los indicadores luminosos
y las luces del dispensador.
NOTA: En caso de que se produjese un corte de electricidad
mientras esté activo Sabbath Mode (modo sin iluminación
exterior), el control seguirá en este modo cuando vuelva a
disponer de electricidad
y durante 3 segundos. Transcurrido
.
Pantalla Auto
La pantalla AUTO (automática) controla la iluminación de la pantalla del indicador LED (Indicador LED) según las lecturas
de luz que recibe del
la pantalla aparecerá más oscura que en períodos que gozan de buena iluminación. En modo ON (encendido), la pantalla
dispondrá únicamente de un valor de iluminación y no cambiará dependiendo de los niveles de luz.
Para establecer los niveles de alimentación de la pantalla:
• Mantenga pulsados el botón
actual se mostrará en la pantalla con
• Emplee el botón
• Active el valor que desea seleccionar pulsando el botón
SENSOR
(sensor). En modo AUTO (automática), si el SENSOR (sensor) indica niveles de luz bajos,
y el botón del congelador durante 3 segundos. El estado activo
O para ON (encendido) y AL para AUTO (automática).
del frigorífico para desplazarse por los diferentes estados de la pantalla.
.
+
Modo de conversión
de temperatura
Este modo permite seleccionar entre grados
Fahrenheit y Celsius en la pantalla de temperatura.
Para cambiar la lectura de la temperatura:
• Pulse simultáneamente los botones
del congelador durante 3 segundos. Al pulsar la misma
combinación de botones, el usuario podrá alternar
entre las dos selecciones.
y
Hidden Lockout for Upper Keypad
(bloqueo oculto para el teclado superior)
Este modo está diseñado para evitar la manipulación del conjunto superior de controles
del dispensador, entre los que se encuentran pantalla On/Off (encendido/apagado), Max Freeze (congelado máximo),
Max Cool (Frío máximo), Vacation Mode (modo ausencia) y las funciones de configuración de temperaturas.
Para activar Hidden Dispenser Lockout:
• Pulse simultáneamente los botones
y durante 3 segundos.
Para desactivar Hidden Dispenser Lockout:
• Pulse simultáneamente los botones
durante 3 segundos.
y
+
Función ON/OFF (encendido/apagado)
ADVERTENCIA
La función ON/OFF (encendido/apagado) desactiva la
refrigeración de las secciones de alimentos frescos
y del congelador.
Para desactivar la unidad:
• Pulse el botón
produzca una lectura superior a la temperatura máxima
admitida del congelador. Llegado a este punto, en la
pantalla del indicador LED (indicador LED) aparece: — —
• Pulse el botón del congelador.
del congelador hasta que se
Para evitar descargas eléctricas que podrían causar daños
personales graves e incluso la muerte, efectúe las tareas
de servicio y mantenimiento del frigorífico siempre que la
unidad se encuentre desconectada.
Para activar de nuevo la unidad:
• Pulse el botón
• Pulse el botón
!
del congelador.
para confirmar la selección.
° F
° C
91
Page 92
Consejos y
cuidados
¿Qué productos de
limpieza son
recomendables para
el acero inoxidable?
Su fabricante dispone de un producto
de limpieza que podrá adquirir (N.º de
referencia: 31960801). Si desea comprar
este producto, póngase en contacto con su
distribuidor local.
IMPORTANTE: Los daños causados
en el acabado del acero inoxidable
por un uso indebido de productos
de limpieza o productos no
recomendados no están cubiertos por
ninguna garantía.
¿Cómo puedo
eliminar los olores
del frigorífico?
1. Saque todos los alimentos y desconecte
la alimentación del frigorífico.
2. Limpie todas las superficies interiores,
los techos, el suelo y las paredes según
las instrucciones que se recogen en la
sección “General”. Preste especial
atención a las esquinas, grietas y ranuras.
Limpie los cajones, bandejas y estantes.
3. Conecte la alimentación y vuelva a
colocar los alimentos en el frigorífico.
Limpie y seque todas las botellas,
recipientes y jarras. Coloque los
alimentos en recipientes bien cerrados
para evitar olores. Transcurrido un
período de 24 horas, compruebe si
se ha eliminado el olor.
Siga estos pasos si no se ha eliminado
completamente el olor.
4. Siga los pasos 1 y 2.
5. Coloque los cajones de verdura en la
bandeja superior de la sección del
frigorífico. Forre las secciones del
frigorífico y el congelador incluidas las
puertas con hojas arrugadas de papel de
periódico.
6. Coloque briquetas de carbón de forma
aleatoria en el periódico.
7. Cierre las puertas y déjelo así de
24 a 48 horas.
8. Retire las briquetas de carbón y
los periódicos.
9. Siga los pasos 2 y 3.
Si todavía no se ha eliminado el mal olor,
póngase en contacto con su distribuidor
local para obtener ayuda.
Limpieza de la unidad
ADVERTENCIA
!
Para evitar descargas eléctricas que podrían causar lesiones personales graves
e incluso la muerte, desconecte la alimentación del frigorífico antes
de limpiarlo. Tras acabar la limpieza, conecte de nuevo la alimentación.
PRECAUCIÓN
!
Para evitar daños personales o materiales:
• Lea y respete las instrucciones del fabricante para todos los productos
de limpieza.
• No introduzca en el lavavajillas estantes, bandejas u otros accesorios.
En caso contrario, podrían producirse deformaciones o grietas en
los accesorios.
• Maneje con cuidado las bandejas de cristal reforzado. Las bandejas se
puede romper si tienen muescas, rasguños o se exponen a cambios
bruscos de temperatura.
• Para evitar dañar el suelo, utilice cartones, mantas u otros
materiales protectores.
General
1. Limpie las superficies con una solución de agua templada y bicarbonato. Utilice
un paño limpio y suave para limpiar las superficies.
2. Aclare las superficies con agua templada. Seque las superficies con un paño
limpio y suave.
Adhesivos
1. Elimine los restos de pegamento frotándolos con pasta de dientes utilizando
los dedos hasta que se despegue.
2. Aclare la superficie con agua templada. Seque la superficie con un paño limpio
y suave.
Juntas de las puertas
1. Mantenga siempre limpias las juntas de las puertas. Limpie las juntas de las
puertas cada 3 meses, tal como se indica en las instrucciones que se recogen
en la sección “General”.
Bobinas del condensador
Limpie las bobinas del condensador cada 3 meses para garantizar un rendimiento
máximo del frigorífico. La suciedad o pelusas acumuladas
pueden dar lugar a:
• una reducción del rendimiento de la refrigeración
• un aumento del consumo de energía
• en casos extremos, un fallo prematuro del compresor
1. Extraiga la rejilla inferior y las cubiertas de las bisagras
inferiores tal como se muestra.
2. Limpie la superficie frontal de la bobina del condensador
con la boquilla del tubo de una aspiradora.
3. Vuelva a colocar la rejilla inferior introduciendo los enganches en los orificios
hasta que encaje. Encaje las cubiertas de las bisagras inferiores en las
bisagras inferiores.
Bandejas de cristal
Extraiga la bandeja elevando la parte frontal, soltando los ganchos de la guía
metálica y tirando. Coloque la bandeja sobre una toalla. Deje que la bandeja se
adapte a la temperatura ambiente antes de limpiarla.
Limpie las ranuras, siguiendo estos pasos:
1. Diluya un detergente suave y reparta la solución en las ranuras utilizando un
cepillo de púas de plástico. Deje que la solución haga efecto 5 minutos.
2. Rocíe agua templada en las ranuras utilizando un accesorio de rociado
para grifos.
3. Seque la bandeja y vuelva a colocarla introduciendo los ganchos en la guía
metálica y bajando la parte frontal.
92
Page 93
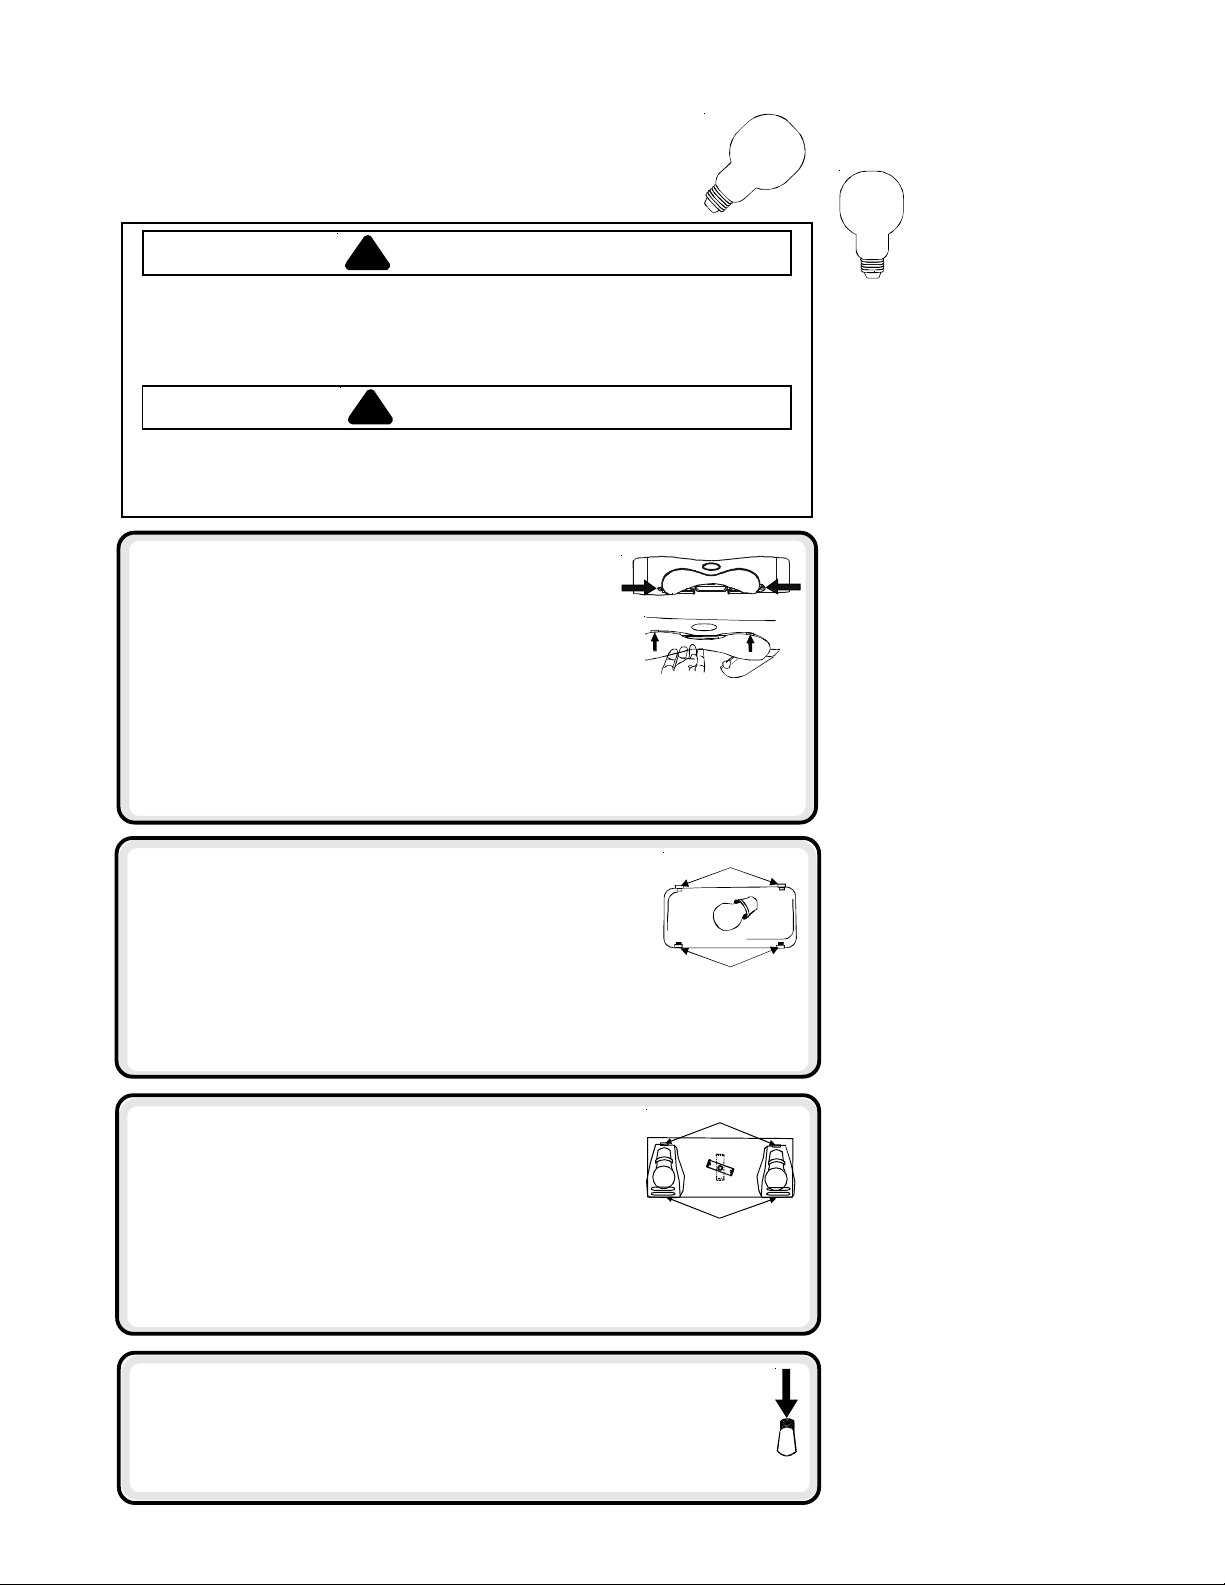
Extracción y sustitución de bombillas
Consejos y cuidados
ADVERTENCIA
!
Para evitar descargas eléctricas que podrían causar lesiones personales
graves e incluso la muerte, desconecte la alimentación del frigorífico antes
de reemplazar la bombilla. Si no puede cortar la alimentación desenchufando
el cable, retire el fusible de la red eléctrica general. Una vez reemplazada la
bombilla, conecte la alimentación.
PRECAUCIÓN
!
Para evitar daños personales o materiales, tenga en cuenta las siguientes
instrucciones:
• Deje que se enfríe la bombilla.
• Utilice guantes siempre que tenga que reemplazar una bombilla.
Parte superior de la sección de
alimentos frescos
1. Localice los orificios para los dedos a ambos lados de
la carcasa de la luz. Introduzca los dedos y haga presión
en ambos lados de la carcasa. Tire hacia abajo de la
carcasa y extráigala.
2. Extraiga las bombillas.
3. Sustituya las bombillas por otras de tipo Krypton E27 que
25 vatios.
4. Vuelva a colocar la carcasa de la bombilla introduciendo las lengüetas frontales de
la carcasa en los orificios del revestimiento que se encuentran directamente
delante del ensamblaje de la luz.
5. Encaje de nuevo la carcasa de la bombilla.
no sean superiores a
$
Bajo consumo
energético
Gracias a su diseño, éste es uno de los
frigoríficos que reducen en mayor
medida el consumo de energía.
Reduzca al máximo el consumo de
energía siguiendo estas indicaciones.
• El frigorífico debe funcionar a una
temperatura ambiente de entre
16° y 43° C, alejado de fuentes de
calor y de la luz directa.
• No establezca los controles del
sistema del frigorífico, congelador
y Chiller Fresh™ a una temperatura
más baja de la necesaria.
• Mantenga llena la sección del
congelador.
• Mantenga las juntas de las puertas
limpias y flexibles. Sustituya las
juntas si están gastadas.
• Mantenga limpias las bobinas
del condensador.
Parte inferior de la sección de alimentos
B
frescos y sección del congelador del
modelo sin dispensador
1. Presione las lengüetas inferiores
bombilla y tire hacia afuera.
2. Extraiga la bombilla.
3. Sustituya las bombillas por otras de tipo Krypton E27 que
a 25 vatios.
4. Introduzca las lengüetas superiores
revestimiento del frigorífico y encaje la parte inferior en el ensamblaje de la luz.
Sección del congelador del modelo
(A)
de la carcasa de la
(B)
de la carcasa de la luz en el
A
no sean superiores
A
con dispensador
1. Extraiga la cubeta de hielo elevando la parte frontal y tirando.
2. Extraiga la carcasa de la bombilla apretando la lengüeta
superior
3. Sustituya las bombillas por otras de tipo Krypton E27 que
no sean superiores a 25 vatios.
4. Introduzca las lengüetas inferiores
el revestimiento y encaje la parte superior en el ensamblaje de la luz.
5. Vuelva a colocar la cubeta de hielo deslizándola hasta que encaje en su sitio.
(A)
y tirando hasta extraer la carcasa del revestimiento.
(B)
de la carcasa de la bombilla en
B
Dispensador de agua y hielo
1. Localice la bombilla dentro del extremo superior del marco del dispensador.
Desenrósquela para extraerla.
2. Sustituya las bombillas por otras de 230/240 VCA que no sean superiores a
12 vatios. En el cajón de verduras encontrará bombillas de repuesto a
causa de la falta de disponibilidad local.
93
Page 94

Pasos previos antes de llamar al servicio técnico
Los frigoríficos actuales poseen nuevas características y su consumo de energía es inferior. El aislante de espuma es
muy útil para ahorrar en el consumo de energía, además sus capacidades aislantes son excelentes. Sin embargo, el
SONIDO
PROBLEMA POSIBLE CAUSA SOLUCIÓN
Una corriente de aire
o un zumbido
Un sonido de gorgoteo
o burbujeo
Golpes
Zumbido La conexión de la válvula de agua de la cubitera
Zumbido
FUNCIONAMIENTO
aislante de espuma no actúa como absorbente acústico. Por lo tanto, algunos sonidos pueden parecer extraños. Es
una cuestión de tiempo acostumbrarse a estos sonidos. Consulte esta información antes de llamar al servicio técnico.
El control del congelador
pone en m archa o detiene el compresor.
El temporizador para descongelar
como un reloj eléctrico y hace ruido al pasar
de un ciclo de descongelación a otro.
Los ventiladores del congelador
condensador
cuando se encuentran en funcionamiento.
El refrigerante del evaporador
intercambiador de calor
sonido cuando fluye.
Los cubitos del hielo de la cubitera
(en algunos modelos) caen en la cubeta
de hielo
Se cierra el dispensador de hielo
El compresor
cuando está en funcionamiento.
El frigorífico no se e ncuentra nivelado. Consulte las
(J)
(en algunos modelos) zumba mientras se
llena de agua la cubitera.
La cubitera
pero no dispone de toma de agua.
A veces se produce un zumbido en el
dispositivo giratorio
ya q ue éste s e mueve mient ras funcion a
el dispensador.
El compresor
zumbido alto mie ntras se encuentra
en funcionamiento.
Válvula de solenoide
la puerta del dispensador de hielo.
(D)
(G
).
(I)
(K)
se encuentra encendida
(I)
(A)
hace clic cuando
(B)
suena
(C)
producen este sonido
(F)
produce un sonido vibrante
(L)
(en algunos modelos),
puede producir un
(M )
activando
y del
(E)
y del
produce este
(H).
Funcionamiento norm al
Funcionamiento norm al Clics
Funcionamiento norm al
Funcionamiento norm al
Funcionamiento norm al
Funcionamiento norm al
Funcionamiento norm al Sonido vibrante
Instrucciones de
Instalación
info rmació n detallad a sobre la
nivelación de la unidad.
Funcionamiento norm al
El sonido se detiene al elevar
el brazo de la cubitera a la
posición de desactivado.
Consulte la sección
Dispensador automático
de hielo
propietario para obtener
info rmació n det allada.
Funcionamiento norm al
Funcionamiento norm al
Funcionamiento norm al
para obtener
en el manual de
K
L
E
D
F
I
J
C
G
H
M
B
A
El control y las luces
del congelador están
activados, pero el
compresor no está
en funcionamiento.
La temperatura
del cajón de
carne/verduras es
demasiado alta
El frigorífico no
funciona
El frigorífico sigue
sin funcionar
La temperatura
de los alimentos
frescos es muy baja
El frigorífico se encuentra en el modo de
descongelación.
Los valores del control son muy bajos. Consulte la sección del sistema para carne/verduras para ajustar
Los valores de los controles del congelador
son demasiado bajos.
Los cajones no están colocados de
forma adecu ad a.
El frigorífico no está co nectado. Co necte la unid ad.
El control del c ongelador no está activado. Consulte la sección de controles e n el Manual del p ropietario.
Han saltado los fusibles o se tiene que
restablecer el interruptor de con trol
de potencia.
Ha tenido lugar un corte de electricidad
La unidad no funciona correctamente. Desconecte el frigorífico y coloque los alimentos en otra unidad.
Las bobinas del condensador están sucias. Realice la limpieza según las instrucciones de limpieza del Manual
Los valores de los controles del frigorífico
y del congelador son demasiado altos.
Beverage Chiller™ (en algunos modelos)
no está en la posición adecuada.
Funcionamiento normal. Espere 40 m inutos para comprobar q ue el
frigorífico vuelve a ponerse en marcha.
los contro les.
Consulte la sección de controles del Manual del propietario
para ajustarlos.
Consulte la sección del sistema para carne/verduras para
comprobar la posición de los cajones.
Reemplace los fusibles necesarios. Compruebe el interruptor de
control de potencia y restablézcalo si es necesario.
Póngase e n co ntacto con la empresa de electricidad p ara inf ormar
acerca del corte de electricidad.
Si no dispone de otra unidad, coloque hielo seco en la sección
del congelado r p ara co nserva r los al ime ntos. L a garantí a no cubre
la pérdida de alime ntos. Póngase en contacto con el servicio
de asistencia.
del propietario.
Consulte la sección de controles del Manual del propietario
para ajustarlos.
Consulte la sección Beve rage Chille r™ de temper atura controlada
para comprobar si la posición es adecuada.
94
Page 95

Pasos previos antes de llamar al servicio técnico
FUNCIONAMIENTO
PROBLEMA POSIBLE CAUSA SOLUCIÓN
La temperatura de los
alimentos parece
demasiado alta
El frigor ífico tiene un
olor inusual
Se forman gotas de agua en
la parte ex t erior de l f rig oríf ic o
Se forman gotas de agua en
la parte in terior del f rigo rífic o
El frigor ífico o la cu bitera
emiten sonidos inusuales
o demasiado altos
El sistema para carne/
verduras o los cajones
de verduras no cierran
correctamente
El frigor ífico se pone en
marcha con demasiada
frecuencia
La puerta no cierra bien.
Resulta necesario ajustar los controles. Consulte la sección de controles del Manual del propietario para
Las bobinas del condensador
están sucias.
La rejilla de aire posterior está
bloqueada en modelos con una
profundidad superior a los 60 cm.
Se ha abierto la puerta con mucha
frecuencia o se ha mantenido abierta
durante mucho tiempo.
Recientemente se han guardado
alimentos.
Algún compartimento está sucio o algún
alimento está causando ese olor.
Es e l mome nto de cambiar e l fi lt r o de
aire (en algunos modelos).
Compruebe que las juntas cierran de
forma adecuada.
Los niveles de humedad son altos. Normal en periodos de gran humedad.
Es necesario ajustar los controles Consulte la sección de controles del Manual del propietario para
Los niveles de humedad son altos o se
ha abierto la puerta con frecuencia.
Compruebe que las juntas cierran de
forma adecuada.
Funcionamie nto normal Consulte la sección "Sonidos" de
El contenido del cajón o la posición de
los alimentos de los compartimentos
contiguos pueden estar obstruyendo
el cajón
El cajón no se encuentra en la
posición adecuada
El frigorífico no se encuentra nivelado. Consulte las
Los canales de los cajones están sucios
o necesitan cuidados.
Se ha abierto la puerta con mucha
frecuencia o se ha mantenido abierta
durante mucho tiempo.
La humedad o el calor del entorno son
muy altos.
Recientemente se han guardado
alimentos.
La unidad se encuentra expuesta
al calor del ambiente o de los
electrodomésticos cercanos.
Las bobinas del condensador
están sucias.
El frigorífico no se encuentra nivelado. Consulte las
Instalación
la uni da d.
Compruebe que las juntas cierran de forma adecuada. Realice una
limpieza, si resulta necesario, según las instrucciones de limpieza
del Manual del propi etari o.
Compruebe que no existen obstrucciones internas que no permitan
un cierre adecuado de la puerta (p. ej. cajones mal cerrados, hielo
en los estantes, recipientes demasiado grandes o colocados de
forma inadecuada, etc.).
obtener ayuda acerca de la forma de ajustarlos.
Realice una limpieza según las instrucciones de limpieza del Manual
del propie tario.
Compruebe la posición de los alimentos para evitar que obstruyan la
rejilla. La rejilla de aire posterior se encuentra detrás de los cajones
de ver duras .
Reduzca el tiempo durante el que está abierta la puerta. Organice
los alimentos de modo que resulte necesario abrir la puerta durante
el menor tiempo posible.
Dejar que el ambiente interior se adapte durante un periodo similar
al que ha estado abierta la puerta.
Deje pasar un tiempo hasta que los alimentos guardados alcancen
la temperatura del frigorífico o congelador.
Consulte las instrucciones para la eliminación de olores del Manual
del propie tario.
Cambie el filtro de aire.
Realice una limpieza, si resulta necesario, según las instrucciones
de limpieza del Manual del propietario.
obtener ayuda acerca de la forma de ajustarlos.
Consulte la sección de controles del Manual del propietario para
obtener ayuda acerca de la forma de ajustarlos.
Reduzca el tiempo durante el que está abierta la puerta. Organice
los alimentos de modo que resulte necesario abrir la puerta durante
el menor tiempo posible.
Realice una limpieza, si resulta necesario, según las instrucciones
de limpieza del Manual del propietario.
al servicio técnico
Vuelva a colocar los alimentos y los recipientes para evitar que
molesten a los cajones.
Consulte la sección del sistema para carne/verduras o la sección
del cajón de v erduras pa ra conocer la posición adecuada.
detallada sobr e la ni ve lación de la unidad.
Limpie los canales de los cajones con agua jabonosa templada.
Aclárelos y séquelos.
Aplique una capa fina de vaselina a los canales del cajón.
Reduzca el tiempo durante el que está abierta la puerta. Organice
los alimentos de modo que resulte necesario abrir la puerta durante
el menor tiempo posible.
Deje que el ambiente interior se adapte durante un periodo similar al
que ha estado abierta la puerta.
Funcionamiento normal
Deje pasar un tiempo hasta que los alimentos guardados alcancen
la temperatura del frigorífico o congelador.
Compruebe el ambiente en el que se encuentra la unidad. Puede
que resulte necesario mover la unidad para que funcione de una
forma más adecuada.
Realice una limpieza según las instrucciones de limpieza del
Manual del propietario.
para obtener información detallada sobre la nivelación de
Instrucciones de Instalación
Instru cc iones de
Pasos previos antes de llamar
en el Manual del propietario.
para obtener información
95
Page 96

Pasos previos antes de llamar al servicio técnico
FUNCIONAMIENTO (continuación)
PROBLEMA POSIBLE CAUSA SOLUCIÓN
El frig orífico se pone en
marcha con demasiada
frecuencia (continuación)
HIELO Y AGUA
El agua no es clara Hay aire o b urbujas de aire en el agua. Normal al utilizar el dispensador las primeras veces, desaparecerá con
Partículas en el agua o en los
cubitos de hielo.
No se iluminan las luces
indicadoras del control del
dispensador (en algunos
modelos)
No se obtiene agua ni hielo
al presionar las almohadillas
(en algunos modelos)
La cubitera no pr oduce
suficiente o el hielo está
deformado (en algunos
modelos)
La cubitera no pr oduce hielo
(en algunos modelos)
Resulta necesario ajustar los controles. Consulte la sección de controles del Manual del propietario para obtener
La puerta no cierra bien.
ayuda acerca de la forma de ajustarlos.
El frigorífico no se encuentra nivelado. Consulte las
Instalación
de la unidad.
Compruebe que no existen obstrucciones internas que no permitan un
cierre adecuado de la puerta (p. ej. cajones mal cerrados, hielo en los
estantes, recipientes demasiado grandes o colocados de forma
inadecuada, etc.).
Compruebe que las juntas cierran de forma adecuada. Realice una
limpieza, si resulta necesario, según las instrucciones de limpieza del
Manual del propietario.
para obtener información detallada sobre la nivelación
Instrucciones de
el uso.
Hay residuos de carbono del cartucho para filtro
de agua.
Las concentraciones de minerales en el agua forman
partículas cuando se congela el agua y cuando se funde.
La puerta del congelador no está cerrada. Compruebe que la puerta del congelador está cerrada. Se corta la
El frigoríf ico no está conectado. Conecte l a unidad.
Han saltado los fusibles o se tiene que restablecer
el interruptor de control de potencia.
Ha tenido lugar un corte de electricidad. Póngase en contacto con la empresa de electricidad para informar
La puerta del congelador no está cerrada. Compruebe que la puerta del congelador está cerrada. Cuando se abre
Los controles están en modo de bloqueo. Consulte las instrucciones de Control del dispensador.
Se está llenando el depósito de agua. Durante su uso inicial, existe un retraso aproximado de 45 segundos del
Se ha instalado recientemente el dispensador o la
unidad del dispensador, o se ha utilizado recientemente
una gran cantidad de hielo.
El filtro de agua está obstruido o necesita cambiarse. Cambie el filtro de agua.
Se ha instalado recientemente el dispensador o se ha
utilizado recie ntemente una gran cantidad de hielo.
La presión del agua es demasiado baja.
El filtro de agua está obstruido o necesita cambiarse. Cambie el filtro de agua.
La posición del brazo del dispensador de hielo no
es correcta
El agua de la toma no llega a la válvula de agua Compruebe el procedimiento para la toma de agua en las
Los tubos de la toma de agua están retorcidos.
La presión del agua es demasiado baja. La presión del agua se debe encontrar entre 20 y 100 libras por pulgada
Compruebe la temperatura del congelador. Consulte la sección de controles del Manual del propietario para obtener
No se ha instalado correctamente la cubeta de hielo Consulte la sección de la cubeta de hielo para realizar una instalación y
El agua expulsada inicialme nte a través del cartucho puede contener
residuos de carbono inofensivos procedentes del cartucho. No existe
riesgo en el consumo de las partículas. Desaparecerán después de los
primeros usos.
Las partículas no son dañinas, es algo normal en las tomas de agua.
energía del control cuando se abre la puerta del congelador.
Reemplace los fusibles necesarios. Compruebe los interruptores o si
existe alguna desconexión en los circuitos.
acerca del corte de electricidad.
la puerta del congelador se interrumpe la alimentación.
dispensador mientras se llena el depósito de agua.
Espere 24 horas para que empiece a producirse el hielo y para que la
cubitera se reponga después de vaciarse.
Espere 24 horas para que empiece a producirse el hielo y para que la
cubitera se reponga después de vaciarse.
Si la presión del agua es baja pueden aparecer goteras en la válvula.
La presión del agua se debe encontrar entre 20 y 100 libras por pulgada
cuadrada para que el funcio namiento sea correcto. Se recomienda una
presión mínima de 35 libras por pulgada cuadrada para aquellas
unidades que dispongan de filtro de agua.
Compruebe que el b razo del dispensador de hielo se encuentra abajo.
Consulte la sección
propietario para obtener información detallada.
de instalación.
Desconecte la toma de agua y coloque bien los tubos. S i los tubos
siguen estando retorcidos, sustitúyalos.
cuadrada para que el funcio namiento sea correcto. Se recomienda una
presión mínima de 35 libras por pulgada cuadrada para aquellas
unidades que dispongan de filtro de agua.
ayuda acerca de la forma de ajustarlos. El congelador se debe enco ntrar
entre -18 y -17° C (0 y 2° F) para producir hielo.
una alineación adecuadas.
Dispensador automático de hielo
96
en el manual de
Instrucciones
Page 97

Pasos previos antes de llamar al servicio técnico
HIELO Y AGUA
PROBLEMA POSIBLE CAUSA SOLUCIÓN
La cubitera no produce hielo (en
algunos modelos- continuación)
La unidad gotea
Se forma hielo en el tubo de
entrada a la cubitera
El agua fluye de forma más lenta
El agua del dispensador no
está fría
Se ha instalado una válvula de agua
inadecuada.
Se utilizaron tubos de plástico en la conexión
de agua.
Se ha instalado una válvula de
agua inadecuada.
La presión del agua es baja. La presión del agua se debe encontrar entre 20 y 100 libras por
La temperatura d el conge lador es
demasiado alta.
La presión del agua es baja. La presión del agua se debe encontrar entre 20 y 100 libras por
Se ha instalado una válvula de
agua inadecuada.
Los tubos de la entrada de agua
están retorcid os.
El filtro de agua está obstruido o
necesita cambiarse.
El frigorífico se ha instalado recientemente.
Se ha reducido la toma de agua del depósito.
El agua se encuentra en los conductos
exteriores del depósito y se ha calentado
a la temperat ur a ambiente.
Compruebe el procedimiento para la toma de agua en las
Instrucciones de instalación.
pueden dar lugar a una presión baja del agua y pueden obturar
temporalmente la toma. El fabricante no se hace responsable de
los daños materiales derivados de una instalación o conexión
de agua inadecuada.
El fabricante recomienda utilizar tubos de cobre para la instalación.
El plástico es menos duradero y puede dar lugar a goteras. El
fabricante no se hace responsable de los daños materiales
derivados de una instalación o conexión de agua inadecuada.
Compruebe el procedimiento para la toma de agua en las
Instrucciones de instalación.
pueden dar lugar a una presión baja del agua y pueden obturar
temporalmente la toma. El fabricante no se hace responsable de
los daños materiales derivados de una instalación o conexión
de agua inadecuada.
pulgada cuadrada para que el funcionamiento sea correcto. Se
recomienda una presión mínima de 35 libras por pulgada cuadrada
para aquellas unidades que dispongan de filtro de agua.
Consulte la sección de controles del Manual del propietario para
obtener ayuda acerca de la fo rma de aj ust arlos. Se re comie nda
que la temperatura del congelador se encuentre entre
-18 y -17° C (0 y 2° F) .
pulgada cuadrada para que el funcionamiento sea correcto. Se
recomienda una presión mínima de 35 libras por pulgada cuadrada
para aquellas unidades que dispongan de filtro de agua.
Compruebe el procedimiento para la toma de agua en las
Instrucciones de instalación.
pueden dar lugar a una presión baja del agua y pueden obturar
temporalmente la toma. El fabricante no se hace responsable de
los daños materiales derivados de una instalación o conexión
de agua inadecuada.
Desconecte la toma de agua y coloque bien los tubos. Si los tubos
siguen estando retorcidos, sustitúyalos.
Cambie el filtro de agua.
Debe transc urrir un plazo aproximado de 12 horas para que se
enfríe el agua del depósito.
Deseche el primer vaso de agua y vuélvalo a llenar.
Las perforaciones y válvulas 3/16”
Las perforaciones y válvulas 3/16”
Las perforaciones y válvulas 3/16”
97
Page 98

Información acerca del filtro de agua
®
Hoja de información acerca del rendimiento y
las características técnicas del sistema AMANA
Cartucho para filtro de agua modelo OWF-51 del frigorífico
Características técnicas
Toma de agua en funcionamiento (máximo) ...................... 0,75 GPM (2,83 L/min)
Vida útil estimada OWF-51-NI300 (máximo) .................... 300 galones/ 1.135 litros
Vida útil estimada OWF-51-WI500 (máximo) ...................... 500 galones/ 1.892 litros
Temperatura máxima en funcionamiento ........................... 38° C/100° F
Presión mínima necesaria ................................................... 35 psi/ 138 kPa
Temperatura mínima en funcionamiento ............................ 1° C/33° F
Presión máxima en funcionamiento .................................... 120 psi/ 827 kPa
Condiciones de uso general: Lea esta hoja de información acerca del rendimiento y compare las características de esta
unidad con sus necesidades de tratamiento de agua.
NO utilice este producto en aquellos lugares en los que el agua no sea microbiológicamente segura, o cuya calidad
se desconozca, sin una desinfección adecuada. En agua desinfectada que pueda contener cisto filtrable debe
utilizarse un sistema autorizado para la reducción del cisto.
El sistema de filtrado de agua utiliza un cartucho de repuesto OWF-51 (póngase en contacto con su distribuidor para efectuar
los pedidos). La sustitución periódica del cartucho del filtro resulta esencial para que el rendimiento de este sistema de
filtrado sea satisfactorio. Consulte las secciones correspondiente al funcionamiento general, requisitos de mantenimiento
y solución de problemas en este Manual del propietario.
®
Este sistema se ha probado según ANSI/ NSF 42 y 53 para la reducción de las sustancias que se muestran a continuación.
La concentración de las sustancias indicadas en el agua que entra al sistema se ha reducido a una concentración menor o
igual al límite permisible para el agua saliente del sistema, tal como se especifica en ANSI/NSF 42 y 53.
Información de rendimiento*
Sustancia
Plomo 0,15 mg/L +/- 10% 0,001 mg/L 99,33% 0,001 mg/L 0,010 mg/L 6,5
Plomo 0,15 mg/L +/- 10% 0,002 mg/L 98,66% 0,003 mg/L 0,010 mg/L 8,5
Cisto 50.000/L mínimo 1unidades/mL 99,99% 3 unidades/mL >99,95% ND
Turbiedad 11 +/-1 NTU 0,12 NTU 98,98% 0,18 NTU 0,5 NTU ND
Lindano 0,002 mg/L +/- 10% 0,00005 mg/L 97,62% 0,00005 mg/L 0,00002 mg/L ND
Atracina 0,009 mg/L +/- 10% 0,0002 mg/L 97,93% 0,0006 mg/L 0,003 mg/L ND
Cloro 2,0 mg/L +/- 10% 0,09 mg/L 95,26% 0,17 mg/L 75% ND
Particulado**
2,4-D 0,210 mg/L +/- 10% 45,45 ug/L 84,42% 100 ug/L 0,0017 mg/L ND
Amianto
* Prueba realizada utilizando una toma de agua de 0,75 GPM (2,83 L/min.) y una presión
** Clasificación de la gama de tamaños de las partículas para la prueba. Las partículas
10.000 partículas/mL,
De 107 a 108 fibras/L;
las fibras deben ser
más grandes que
10 micrómetros de
máxima de 120 psi (827 kPa) en condiciones estándar de laboratorio. Sin embargo, el
rendimiento real puede ser diferente. Certificado de sanidad de NSF International.
utilizadas eran de 0,5 a 1 micras.
Pentapure, Incorporated
1000 Apollo Road
Eagan, Minnesota,
Estados Unidos
EPA EST N.º 35917-MN-1
Agua entrante Media saliente
como mínimo
longitud.
900 unidades/
mL
0,16 MFL/mL
Los modelos OWF50-WI500 y OWF50-NI300 han sido probados y certificados por
NSF International de acuerdo con las Normas 42 y 53 de ANSI/NSF para la
reducción de:
Norma N.º 42: Efectos estéticos
®
Reducción de sabores y olores
Reducción de cloro
Dispositivo de filtración Mecánica
Reducción de partículas - Clase 1
Reducción
media %
99,68%
99,96%
Entrante máximo
2400 unidades/
mL
0,16 MFL/mL
Reducción mín.
necesaria
>
–
>
85%
–
99%
Norma N.º 50: Efectos sobre la salud
Dispositivo de reducción de productos químicos
Reducción de plomo, antracina, lindano y 24-D
Dispositivo de filtración mecánica
Reducción de cisto, turbiedad y asbesto
pH
entrante
ND
ND
98
Page 99

Tack för att Du köpte det här kylskåpet!
Var god läs den här bruksanvisningen ordentligt. Den innehåller viktig information
om hur Du underhåller Ditt kylskåp.
Garantiservice måste utföras av en auktoriserad servicetekniker. Tillverkaren
rekommenderar att Du kontaktar ett auktoriserat serviceställe om service är
nödvändig även efter det att garantin gått ut. Kontakta Din leverantör för information
om hur Du hittar ett auktoriserat serviceställe.
När Du kontaktar servicestället bör Du ge dem informationen nedan.
Produktinformationen återfinns på namnplattan som sitter i taket på
färskvarusektionen.
Modellnummer _____________________________________________________
“P”-nummer ________________________________________________________
Serienummer ______________________________________________________
Inköpsdatum _______________________________________________________
Återförsäljarens namn ________________________________________________
Återförsäljarens adress _______________________________________________
Återförsäljarens telefonnummer ________________________________________
Innehåll
Inledning! ...............................................................................99
Innehåll .................................................................................. 99
Viktig säkerhetsinformation.................................................. 100
Installera Ditt kylskåp ...........................................................101
Hur du transporterar din enhet ......................................... 101
Hur du väljer den bästa placeringen ................................ 101
Hur man tar bort och monterar handtagen....................... 102
Hur man ser till att kylskåpet står plant ............................ 103
Hur man justerar temperaturen ........................................ 104
Ditt filtersystem .................................................................... 105
Kylfunktioner ........................................................................ 106
Inre hyllor ......................................................................... 106
Förvaring i dörren ............................................................. 107
Lådor ................................................................................ 108
Frysfunktioner ...................................................................... 109
Primära funktioner............................................................ 109
Hyllor ................................................................................ 110
Fövaring i dörren .............................................................. 110
Is- och vattenautomat .......................................................... 111
Primära funktioner............................................................ 111
Vattenautomaten .............................................................. 111
Kontrollfunktioner (5-knappars kontroll) ........................... 112
Kontrollfunktioner (elektronisk kontroll)............................ 113
Tips och skötsel ................................................................... 116
Hur man rengör sitt kylskåp ............................................. 116
Hur man byter glödlampor ............................................... 117
Innan du kallar på hjälp........................................................ 118
Vattenfilter, data ................................................................... 122
Hur anskaffar man
reservdelar och service?
Problem? Spara Dig själv besväret med
onödiga samtal till service. Läs avsnittet
“Innan Du kallar på hjälp” i den här
bruksanvisningen.
Ditt nya kylskåp har utformats och
tillverkats inom strikta kvalitetsstandarder
och skall ge Dig tillfredsställande och
driftsäker funktion. Precis som andra
tekniska apparater kan det dock då och då
erfordra justering, utbyte av delar eller
underhåll. Skulle Du någon gång behöva
hjälp, tveka inte att kontakta återförsäljaren
där Du köpte kylskåpet.
Se till att ha följande uppgifter till hands:
• Modell
• Tillverkningsnummer
• Serienummer och alla andra data som
anges på namnplattan.
• Beskrivning på de problem Du har.
Anteckna viktig information på avsedd
plats till vänster på den här sidan.
Spara denna
bruksanvisning för
framtida referens!
Förvara bruksanvisningen tillsammans
med kvittona på inköpet på ett säkert
ställe i det fall garantiservice behövs.
Om några av funktionerna
är annorlunda än mina?
Det är tänkt att denna bok ska visa
alla olika funktioner som finns i
produktserien. Kontakta Din leverantör
om Du är intresserad av att köpa
ytterligare tillbehör till Ditt kylskåp.
99
Page 100

Snabbguide till kylskåpets funktioner
11
10
18
16
13
15
20
19
3
1
5
3
2
8
7
7
6
9
12
12a
10
11
1. Temp Assure® temperaturkontroller
2. Spill SaverTM-hylla
3. Spill Saver
4. Side Glide
5. Bakre förlängning av hylla
6. Deli/Crisper-låda
7. Crisper-låda
8. Beverage Organizer
9. Mejerifacket
10. Dörrskålar
10a. Skålhållare - visas ej
11. Tippbar dörrskål
12. Beverage Chiller
12a. Mini-Beverage Chiller
13. Isfack
14. Ismaskin - visas ej
15. Glashylla
16. Stor-MorTM-systemet
17. Hängande trådhylla - visas ej
18. Fast fryshylla
19. Vattenfilter - visas ej
20. Luftfilter - visas ej
21. Lampor - visas ej
TM
Easy GlideTM-hylla
TM
-hyllor - visas ej
TM
TM
TM
Övre färskvarusektion
Nedre färskvarusektion
Frys
Is- och vattenautomat
Viktig säkerhetsinformation
Lär Dig känna igen säkerhetssymboler, ord och etiketter
FARA
!
FARA - Omedelbara risker som KOMMER ATT leda till allvarliga personskador
eller dödsfall.
VARNING
!
VARNING - Risker eller farliga beteenden som KAN leda till allvarliga
personskador eller dödsfall.
FÖRSIKTIGT
!
FÖRSIKTIGT - Risker eller farliga beteenden som KAN leda till mindre
allvarliga personskador eller skada på produkten eller annan egendom.
FARA
!
Reducera riskerna för personskada och dödsfall genom att iaktta grundläggande
försiktighetsåtgärder inklusive följande:
Kassera ditt kylskåp på rätt sätt
OBS! Även idag kan barn låsas in och kvävas i kylskåp. Kasserade och övergivna kylskåp är
fortfarande farliga – även om de bara ska stå där “några dagar”. Om du ska kassera ditt
gamla kylskåp, ber vi dig att följa nedanstående instruktioner för att undvika olyckor.
INNAN DU KASSERAR DIN GAMLA KYL ELLER FRYS:
• Lyft av dörrarna.
• Lämna kvar hyllorna så att barn får svårare att klättra in.
Vad Du behöver veta om
säkerhetsföreskrifter
Styckena “Varning” och “Viktiga
säkerhetsföreskrifter” i denna
bruksanvisning är ej avsedda att täcka alla
upptänkliga tillstånd och situationer som
skulle kunna uppstå. Använd sunt förnuft,
försiktighet och omsorg när Du installerar,
underhåller eller använder kylskåpet.
Kontakta alltid Din leverantör, distributör,
serviceställe eller tillverkare angående
problem eller tillstånd som Du inte förstår.
100
 Loading...