

Page 1

FRONT-LOADING
LAVEUSE AUTOMATIQUE
AUTOMATIC WASHER
USE & CARE GUIDE
Para una versión de estas instrucciones en español, visite www.amana.com
Table of Contents
WASHER SAFETY .........................................................2
CONTROL PANEL AND FEATURES ............................3
CYCLE GUIDE ............................................................... 4
USING YOUR WASHER ................................................5
WASHER MAINTENANCE ............................................8
TROUBLESHOOTING ................................................. 10
WARRANTY .................................................................17
ASSISTANCE OR SERVICE ........................ Back Cover
À CHARGEMENT FRONTAL
GUIDE D’UTILISATION ET
D’ENTRETIEN
Table des matières
SÉCURITÉ DE LA LAVEUSE ......................................18
TABLEAU DE COMMANDE ET
CARACTÉRISTIQUES ................................................. 19
GUIDE DE PROGRAMMES ........................................20
UTILISATION DE LA LAVEUSE ..................................21
ENTRETIEN DE LA LAVEUSE ....................................24
DÉPANNAGE ...............................................................27
GARANTIE ................................................................... 35
ASSISTANCE OU SERVICE ............ Couverture arrière
W10410362A
Page 2

WASHER SAFETY
2
Page 3

CONTROL PANEL AND FEATURES
6
2
1
5
Not all features and options are available on all models.
1
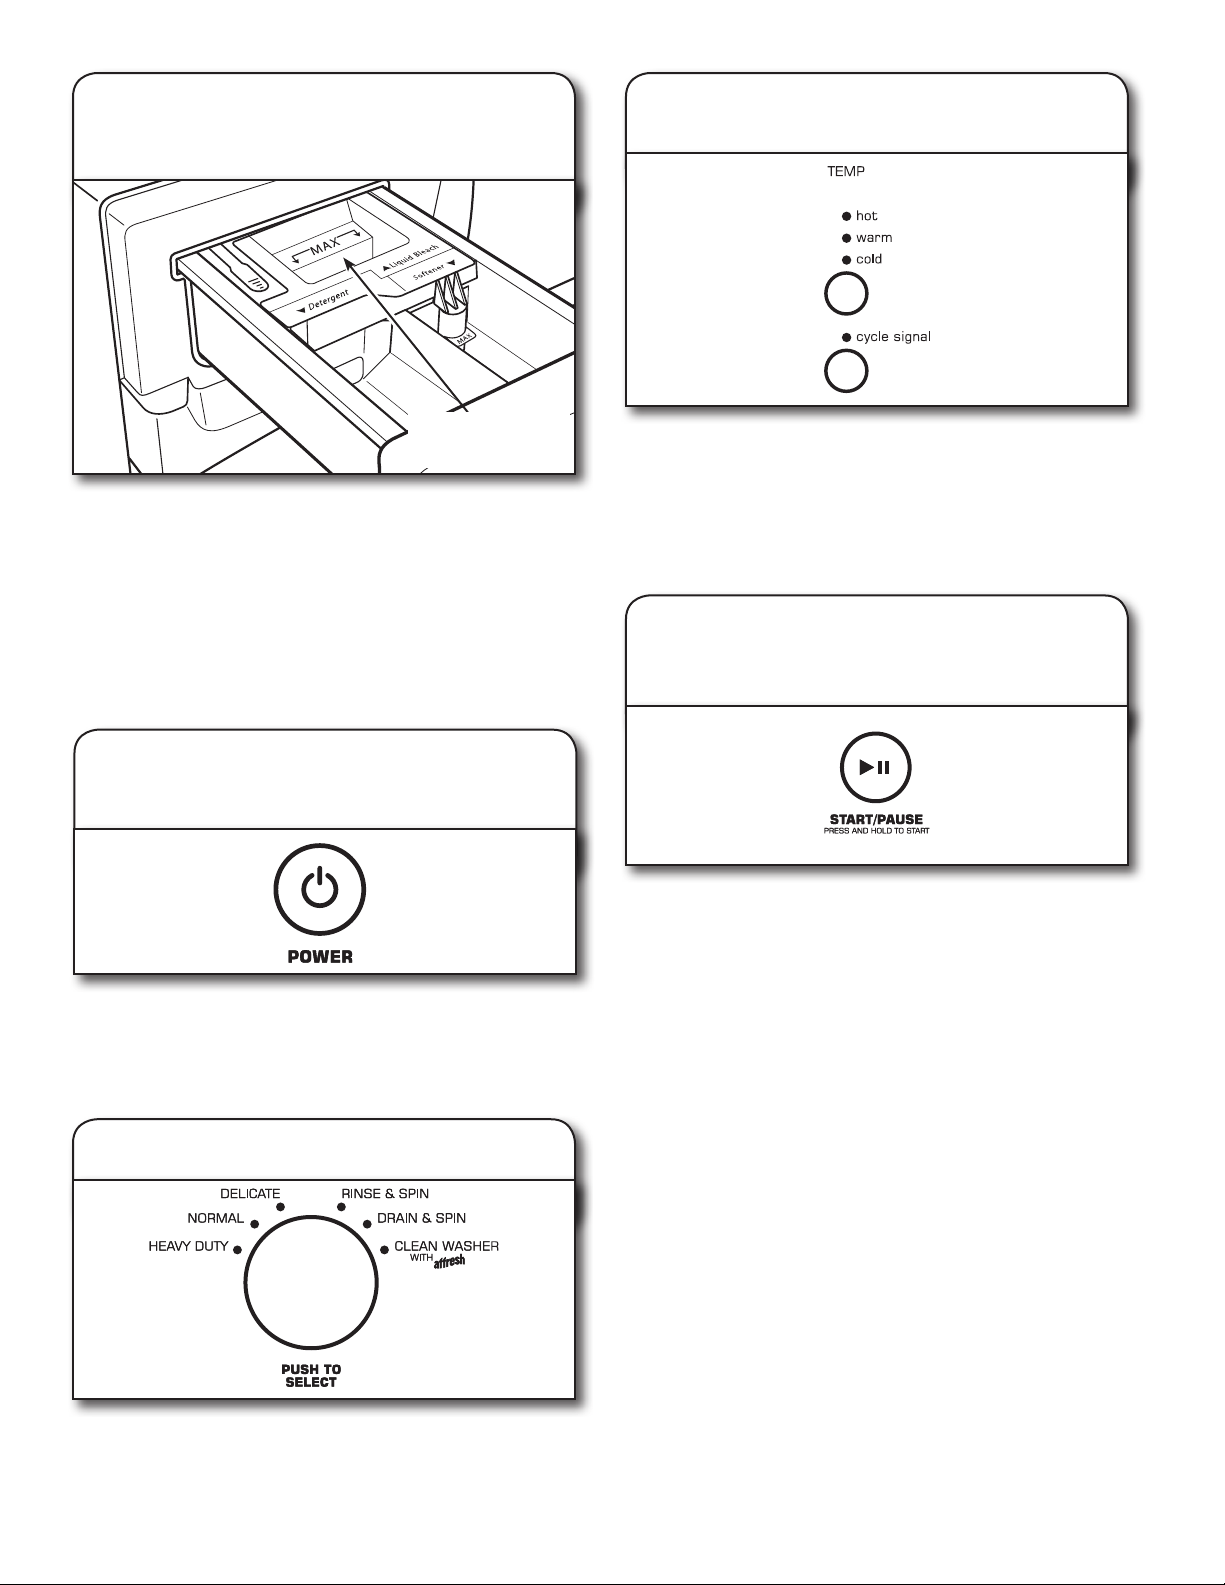
WASH CYCLE KNOB
Turn the Wash Cycle knob to select a cycle for your laundry
load. See “Cycle Guide” for detailed descriptions of cycles
that best suit your load.
TEMP
2
Temperature Control senses and maintains uniform
water temperatures by regulating incoming hot and
cold water.
Select a wash temperature based on the type of fabric
and soils being washed. For best results and following
the garment label instructions, use the warmest wash
water safe for your fabric.
• Warm and hot water will be cooler than what your
previous washer provided.
•Even in a cold water wash, some warm water may
be added to the washer to maintain a minimum
temperature.
CYCLE SIGNAL
3
This cycle signal is helpful when you are removing items
from the washer as soon as it stops. Select ON or OFF.
START/PAUSE BUTTON
4
Press and hold to start a cycle, or press once while a cycle
is in process to pause and press again to continue the cycle.
If you do not press START/PAUSE within 5 minutes of
choosing a cycle, the washer automatically shuts off.
Appearance may vary.
STATUS INDICATORS
6
The Status Indicators show the progress of a cycle. At each
stage of the process, you may notice sounds or pauses
that are different from traditional washers.
ADD GARMENT
When Add Garment is lit, you may pause the washer,
open the door, and add 2 or 3 additional items.
WASH
This is the main portion of the wash cycle. You will see the
washer tumble the load. The motor sounds may change at
different stages in the cycle. The wash time is determined
by the selected cycle, along with your load size.
RINSE
You will hear sounds similar to the wash cycle as the
washer rinses and moves the load.
SPIN
The washer spins the load at increasing speeds for
proper water removal, based on the selected cycle
and spin speed.
COMPLETE
Once the cycle is complete, this light will come on.
Remove the load promptly for best results.
DOOR LOCK
The Door Lock avoids unintended use of the washer.
When Door Lock is lit, all buttons are disabled except for
Start/Pause, Power, and Cycle Signal.
4
3
5
POWER BUTTON
Press to turn the washer on and off. Press again to STOP/
CANCEL a cycle at any time.
3
Page 4

CYCLE GUIDE
For best fabric care, choose the cycle that best ts the load being washed.
Not all cycles and options are available on all models.
Items to wash:
Sturdy fabrics,
colorfast items,
towels, jeans
Cottons, linens,
sheets, and mixed
garment loads
Machine-wash
silks, lingerie,
washable wools
Swimsuits and
items requiring
rinsing without
detergent
Dripping wet or
hand-washed
items
No clothes in
washer
Cycle:
Heavy
Duty
Normal
Delicate Low
Rinse &
Spin
Drain &
Spin
Clean Washer
with Affresh
®
Temp*:
Hot
Warm
Cold
Hot
Warm
Cold
Hot
Warm
Cold
Cold
N/A
N/A
Spin
Speed:
High
High
High
High
High
Cycle Details:
Use this cycle for heavily soiled or sturdy items. This cycle
combines fast-speed tumbling, longer wash time, and
high-speed spin to shorten drying times.
Use this cycle for normally soiled cottons and mixed
fabric loads. This cycle combines medium-speed tumbling,
high-speed spin, and a load cooling process to reduce
wrinkling.
Use this cycle to wash lightly soiled garments indicating
“Machine Washable Silks” or “Gentle” cycle on the care
label. Place small items in mesh garment bags before
washing.
Combines a rinse and high-speed spin for loads requiring
an additional rinse cycle or to complete a load after power
interruption. Also use for loads that require rinsing only.
This cycle uses a spin to shorten drying times for heavy
fabrics or special-care items washed by hand. Use this
cycle to drain washer after cancelling a cycle or completing
a cycle after a power failure.
Use monthly with Affresh® washer cleaner to clean the
interior of the washer. Make sure no clothes are in washer.
*All rinses are cold.
4
Page 5

USING YOUR WASHER
Choosing the Right Detergent
Use only High Efciency detergents. The package will be
marked “HE” or “High Efciency.” Low-water washing creates
excessive sudsing with a regular non-HE detergent. Using regular
detergent will likely result in longer cycle times and reduced
rinsing performance. It may also result in component failure and,
over time, build-up of mold or mildew. HE detergents are made
to produce the right amount of suds for the best performance.
Follow the manufacturer’s instructions to determine the amount
of detergent to use.
Use only High Efciency (HE) detergent.
First wash cycle without laundry
Before washing clothes for the rst time, if not completed
during the nal installation step, choose the Normal cycle and
run it without clothes. Use only HE detergent. Use 1/2 the
manufacturer’s recommended amount for a medium-size load.
This initial cycle serves to ensure the interior is clean before
washing clothes.
1. Sort and prepare your laundry
IMPORTANT:
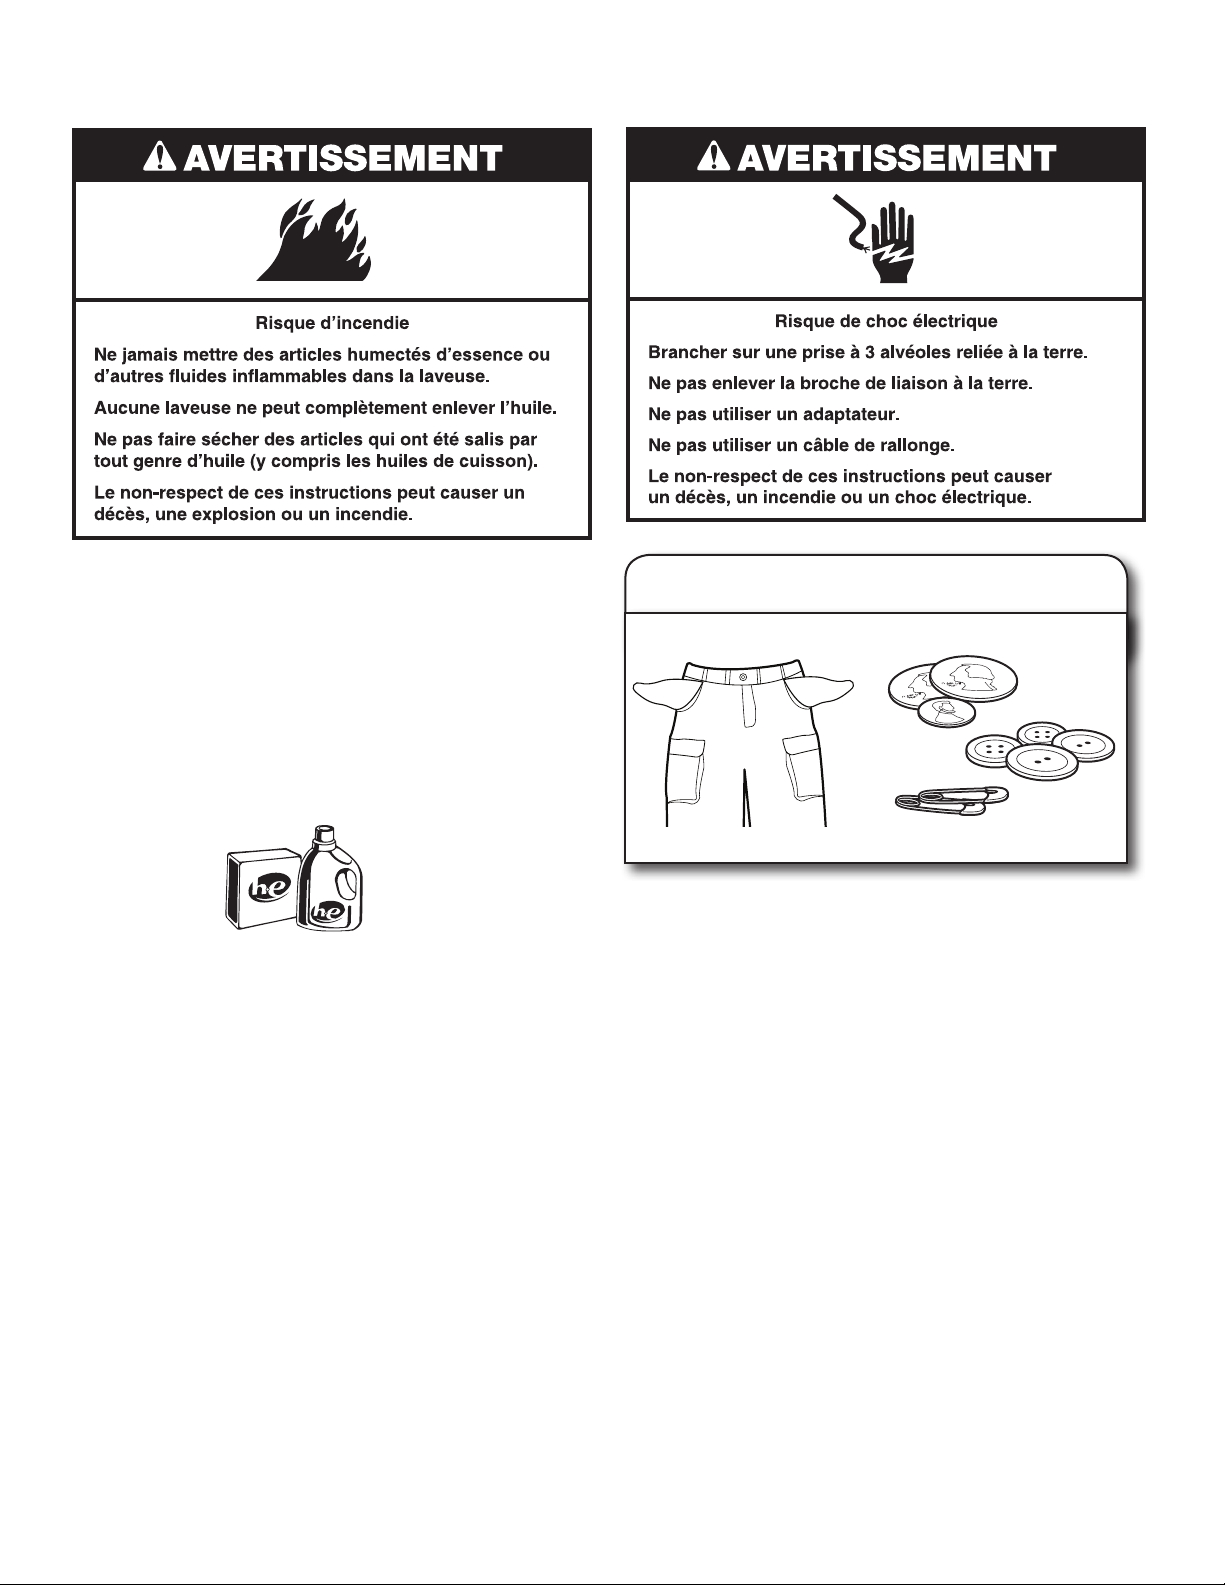
n Empty pockets. Loose change, buttons, or any small object
can plug pumps and may require a service call.
n Close zippers, fasten hooks, tie strings and sashes, and
remove non-washable trim and ornaments.
n Mend rips and tears to avoid further damage to items
during washing.
n Turn knits inside out to prevent pilling. Separate lint-takers
from lint-givers. Synthetics, knits, and corduroy fabrics will
pick up lint from towels, rugs, and chenille fabrics.
n Do not dry garments if stains remain after washing, because
heat can set stains into fabric.
n Always read and follow fabric care labels and laundry
product instructions. Improper usage may cause damage
to your garments.
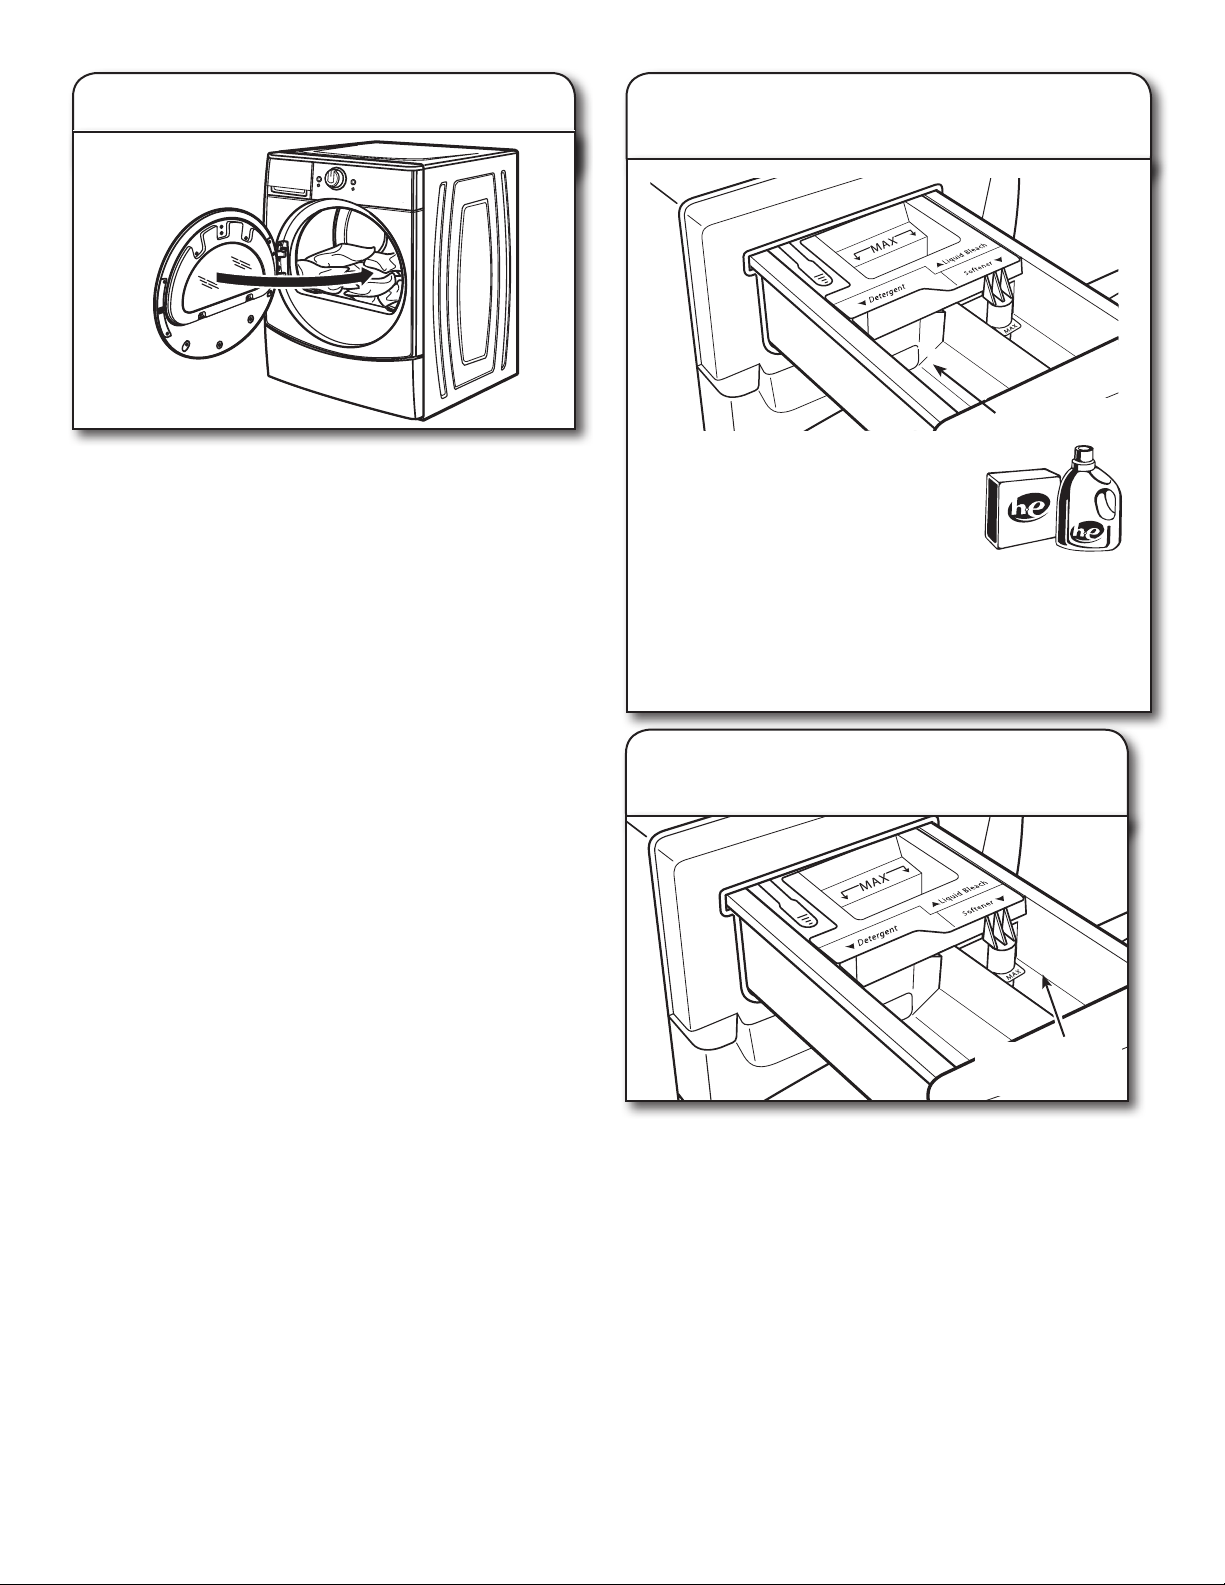
2. Load laundry into washer
Sort items by recommended cycle, water temperature, and
colorfastness. Separate heavily soiled items from lightly soiled.
Separate delicate items from sturdy fabrics. Treat stains
promptly and check for colorfastness by testing stain remover
products on an inside seam.
Open the washer door. Place a load of sorted clothes loosely
in the washer. Items need to move freely for best cleaning and
to reduce wrinkling and tangling. Close the washer door by
pushing it rmly until the latch clicks.
n Depending on load type and cycle, the washer can be fully
loaded, but not tightly packed. Washer door should close
easily. See “Cycle Guide” for loading suggestions.
n Mix large and small items and avoid washing single items.
Load evenly.
n Wash small items in mesh garment bags. For multiple items,
use more than one bag and ll bags equally.
5
Page 6

Using the Dispenser
To use the dispenser drawer:
1. Open the dispenser drawer.
2. Add laundry products as described in steps 3–5.
3. Slowly close the dispenser drawer. Make sure it is
completely closed.
NOTE: A small amount of water may remain in the dispensers
from the previous wash cycle. This is normal.
3. Add HE detergent to dispenser
HE detergent
compartment
Add liquid or powdered HE detergent
to this compartment.
Color-safe bleach or oxi products may
be added to this compartment along
with the same type of detergents.
NOTE: Do not mix powdered products
with liquid ones.
Do not overll; adding too much
detergent may cause detergent to be
dispensed into the washer too early.
Use only High
Efciency (HE)
detergent.
4. Add fabric softener to dispenser
(if desired)
Liquid fabric
softener
compartment
Pour a measured amount of liquid fabric softener into liquid
fabric softener compartment. Always follow manufacturer’s
directions for correct amount of fabric softener based on your
load size.
Fabric softener is always dispensed in the nal rinse.
IMPORTANT: Do not overll, dilute, or use more than 1/4 cup
(60 mL) of fabric softener. Do not ll past the MAX line.
Overlling dispenser will cause fabric softener to immediately
dispense into washer.
n
Do not spill or drip any fabric softener onto the clothes.
n
Do not use liquid fabric softener dispenser balls in this
washer. They will not dispense correctly.
5. Add liquid chlorine bleach
to dispenser (if desired)
Liquid chlorine
bleach
compartment
Add a measured amount of liquid chlorine bleach to the
bleach compartment. Do not overll, dilute, or use more than
2/3 cup (165 mL). Use a measuring cup with a pour spout; do
not guess.
n Do not ll beyond the “MAX” level. Overlling will cause
bleach to dispense too soon and may cause garment
damage.
n Do not add color-safe bleach or oxi-product to this
dispenser.
6
Page 7

6. Press POWER to turn on washer
9. Press and hold START/PAUSE
to begin wash cycle
Slowly close the dispenser drawer. Make sure the drawer is
closed completely, then press and hold POWER to turn on
the washer. To cancel a cycle press POWER, then the washer
powers down, the door unlocks, and clothes can be removed.
7. Select CYCLE
Turn cycle knob to select your wash cycle. See “Cycle Guide”
for details on cycle features. Not all options are available on
all cycles.
8. Select additional options, if desired
Press and hold the START/PAUSE button to start the wash
cycle. To pause a cycle in progress, press the START/PAUSE
button once, then press and hold again to continue the cycle.
To cancel a cycle, press the POWER button.
Door Locked
Once you press and hold START/PAUSE, you will hear
the door lock, unlock, and lock again. When the door locked
light illuminates, the door is locked. The door is locked
and unlocked automatically, depending on the stage of
the wash cycle.
Unlocking the door to add garments:
If you need to open the door to add 1 or 2 missed garments,
you may do so while the “Add Garment” light is lit.
Press START/PAUSE once; the door will unlock once the
washer movement has stopped. This may take several
minutes. Then close door and press START/PAUSE again
to continue the cycle.
To add garments after the “Add Garment” period is over, the
wash cycle needs to be canceled, the items added, and a new
wash cycle started.
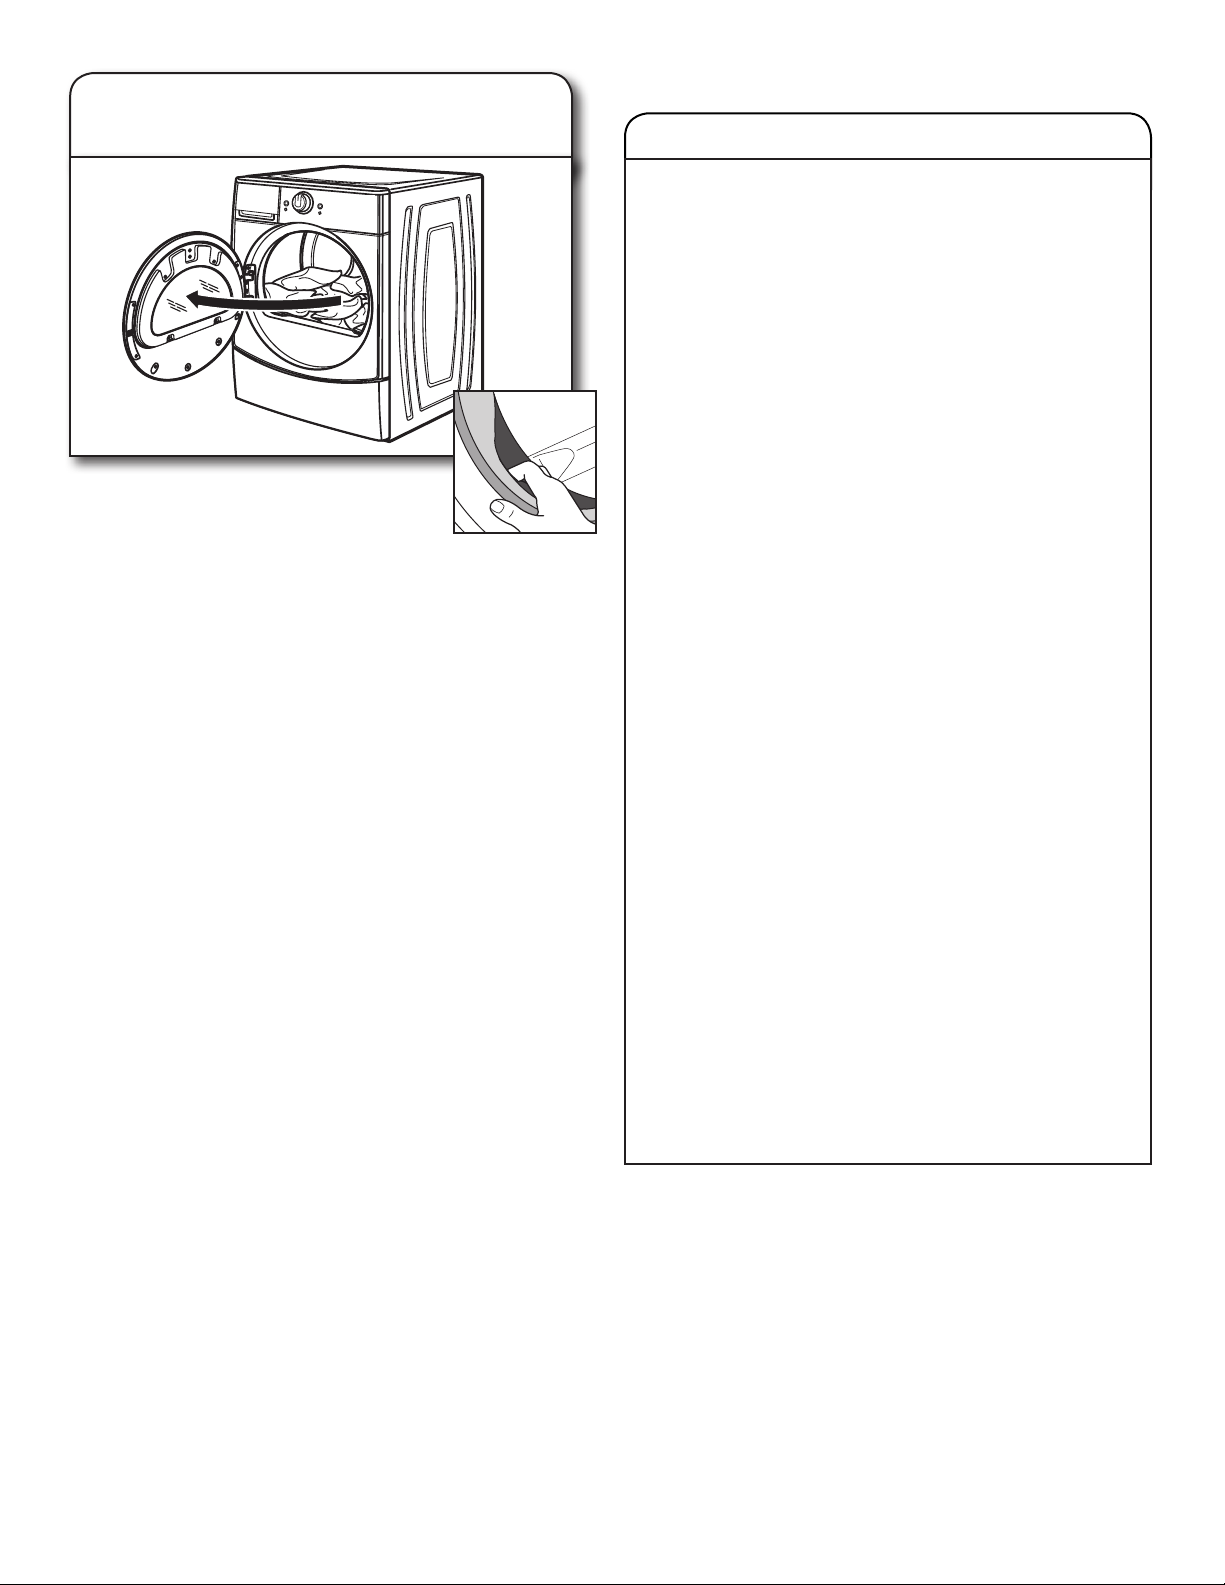
10. Remove garments promptly
after cycle is nished
To add additional options to the cycle, press the button for
the desired option until light glows to add them to the
selected cycle.
NOTE: Not all options are available with all cycles. See
“Cycle Guide” for available options.
Promptly remove garments after cycle has
completed to avoid odor and rusting of
metal objects on garments. When unloading
garments, pull back the door seal and check
for small items between the tub and the basket.
NOTE:
n
After any wash cycle is completed, the door must be
opened and then closed before a new cycle can begin.
n
A small amount of water may remain in the dispensers
after the wash cycle is complete. This is normal.
n
This washer has a tight seal to avoid water leaks. To
avoid odors, leave the door open to allow the washer
to dry between uses.
7
Page 8

WASHER MAINTENANCE
CLEANING YOUR WASHER
Keep your washer as clean and fresh as your clothes.
To keep washer interior odor-free, follow this recommended
cleaning procedure at least once a month:
1. Make sure laundry drum is empty.
2. Using recommended Affresh® washer cleaner, add one
tablet to washer basket
OR
If using liquid chlorine bleach, add 2/3 cup (160 mL) to
liquid chlorine bleach dispenser.
IMPORTANT: Do not add detergent to Clean Washer
with Affresh™ cycle. Do not use more than recommended
amount of bleach to avoid damaging product over time.
3. Close washer door and dispenser drawer.
4. Select CLEAN WASHER with Affresh™ cycle.
5. Press and hold START/PAUSE.
NOTE: The basket will rotate, then the door will unlock,
lock again, and then the cycle will continue. The washer will
not ll, and the basket will rotate while the washer runs a
short sensing cycle. This will take approximately 3 minutes.
6. The cycle will determine whether clothing or other items
are in the washer. If no items are detected in the washer,
it will proceed to Step 8.
If the Wash LED light ashes, the door will unlock.
Remove clothing or items in the washer. Press POWER
to cancel the ashing LED light. Then repeat steps 1, 2,
and 6 to start the cycle again.
7. Once the cycle has started, allow cycle to complete.
8. After the cycle has ended, leave the door open slightly,
to allow for better ventilation and drying of washer
interior.
To clean exterior:
1. Use a soft, damp cloth or sponge to wipe up any spills.
2. Use mild soap and water if needed.
IMPORTANT: To avoid damaging washer nish, do not use
abrasive products.
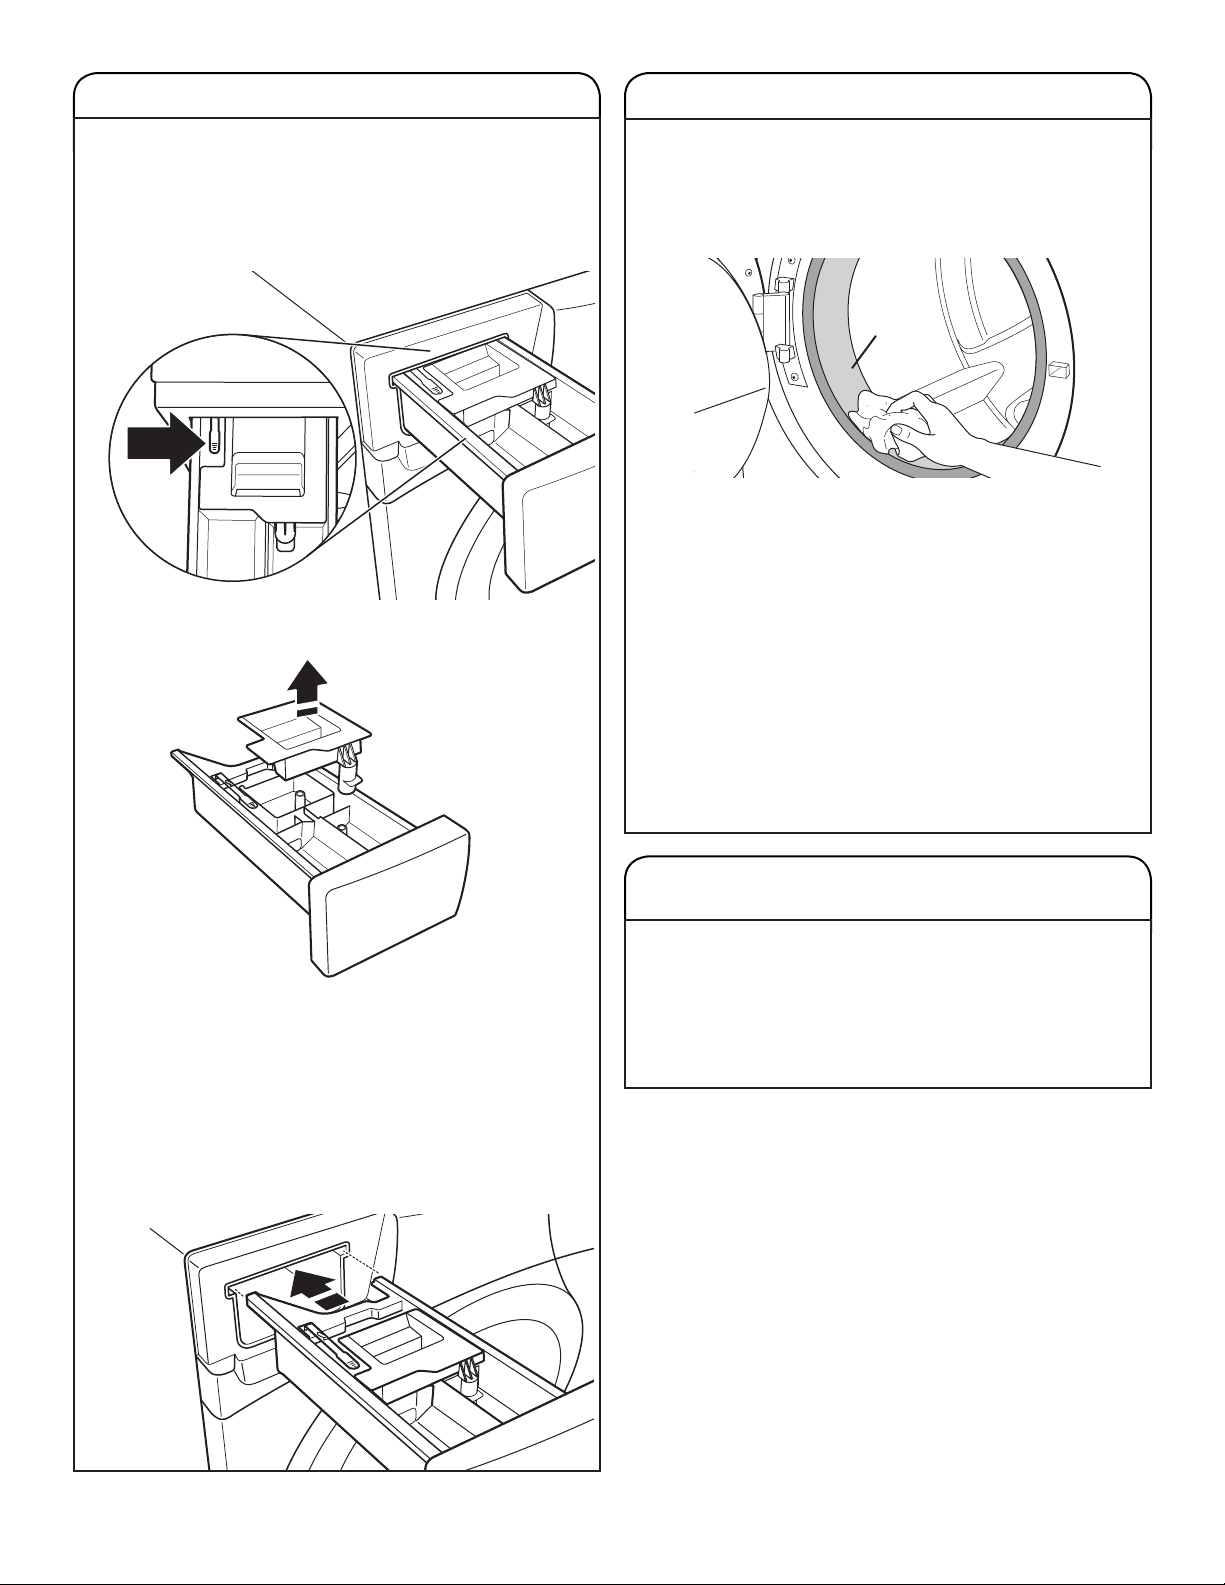
CLEANING THE DISPENSER
You may nd laundry product residue leftover in your
dispenser compartments. To remove residue, follow this
recommended cleaning procedure:
1. Pull dispenser drawer out until it stops.
2. Press down on the release lever and pull straight out to
remove the dispenser.
3. Remove the insert (the siphon from the softener and
bleach compartments).
4. Wash dispenser and cover panel in warm, soapy water,
using a mild detergent.
5. Rinse with warm water.
6. Air dry or wipe with a clean towel. Replace the insert.
7. Align edges of dispenser with guides in washer, then slide
dispenser back into slot.
IMPORTANT: Dispenser is not dishwasher safe.
8
Page 9
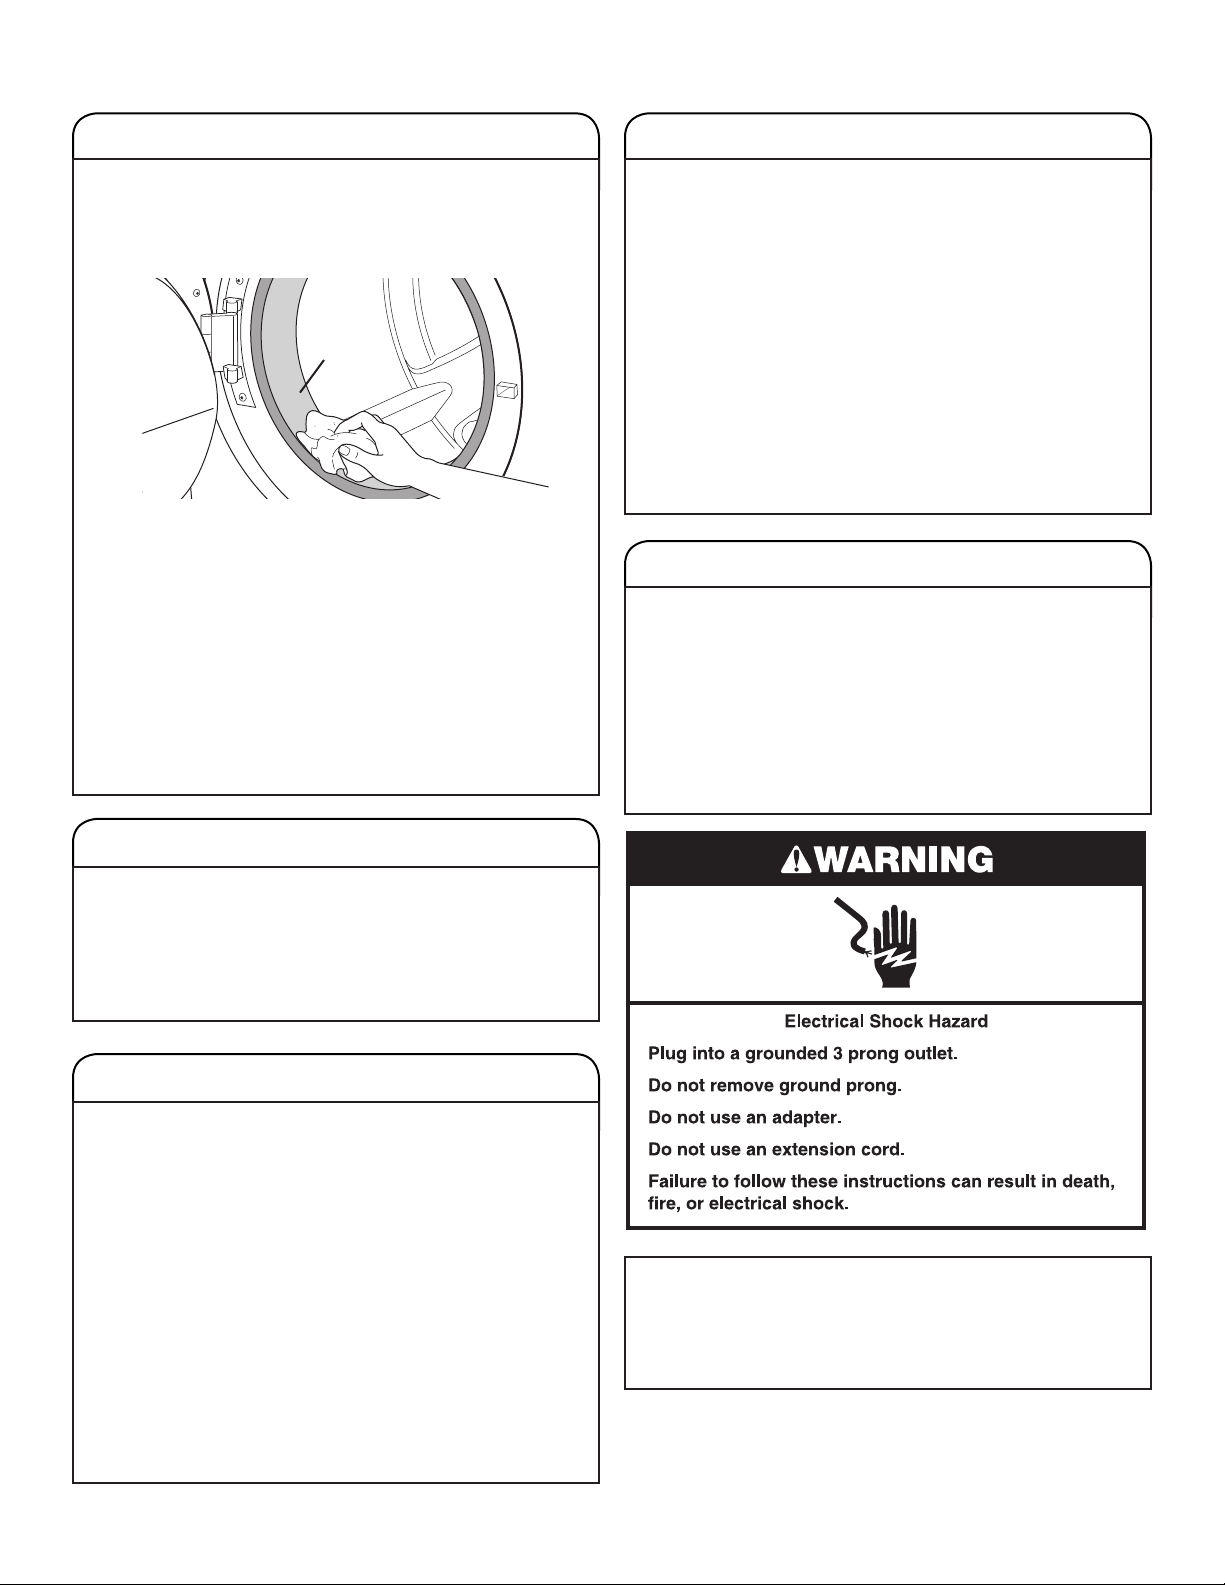
CLEANING THE DOOR SEAL
TRANSPORTING YOUR WASHER
1. Open the washer door and remove any clothing or items
from the washer.
2. Inspect the seal between the door opening and the basket
for stained areas. Pull back the seal to inspect all areas
under the seal and to check for foreign objects.
Seal
3. If stained areas are found, wipe down these areas of the
seal, using the procedure that follows.
a) Mix a dilute solution, using 3/4 cup (177 mL) of liquid
chlorine bleach, and 1 gal. (3.8 L) of warm tap water.
b) Wipe the seal area with the dilute solution, using
a damp cloth.
c) Let stand 5 minutes.
d) Wipe down area thoroughly with a dry cloth and let the
washer interior air dry with door open.
IMPORTANT: Wear rubber gloves when cleaning for
prolonged periods. Refer to the bleach manufacturer’s
instructions for proper use.
1. Shut off both water faucets. Disconnect and drain water
inlet hoses.
2. If washer will be moved during freezing weather, follow
WINTER STORAGE CARE directions before moving.
3. Disconnect drain hose from drain system and from back
of washer.
4. Unplug power cord.
5. Place inlet hoses and drain hose inside washer basket.
6. Bundle power cord with a rubber band or cable tie to
keep it from hanging onto the ground.
IMPORTANT: Call for service to install transport bolts.
Washer must be moved with transport bolts and in the
upright position. To avoid structural damage to your
washer, it must be properly set up for relocation by a
certied technician.
REINSTALLING/USING WASHER AGAIN
To reinstall washer after non-use, vacation, winter storage,
or moving:
1. Refer to Installation Instructions to locate, level, and
connect washer.
2. Before using again, run washer through the following
recommended procedure:
To use washer again:
1. Flush water pipes and hoses. Reconnect water inlet
hoses. Turn on both water faucets.
NON-USE AND VACATION CARE
Operate your washer only when you are home. If moving,
or not using your washer for a period of time, follow these
steps:
1. Unplug or disconnect power to washer.
2. Turn off water supply to washer to avoid ooding due
to water pressure surges.
WINTER STORAGE CARE
IMPORTANT: To avoid damage, install and store washer
where it will not freeze. Because some water may stay in
hoses, freezing can damage washer. If storing or moving
during freezing weather, winterize your washer.
To winterize washer:
1. Shut off both water faucets; disconnect and drain water
inlet hoses.
2. Put 1 qt. (1 L) of R.V.-type antifreeze in basket and
run washer on RINSE & SPIN cycle for about
30 seconds to mix antifreeze and remaining water.
3. Unplug washer or disconnect power.
IMPORTANT: To reduce risk of hose failure, replace inlet
hoses every ve years and periodically inspect for kinks,
cuts, wear, or water leaks.
HELPFUL TIP: When replacing your inlet hoses, mark
replacement date on label with a permanent marker.
2. Plug in washer or reconnect power.
3. Run washer through NORMAL cycle to clean washer
and remove antifreeze, if used. Use only HE detergent.
Use half the manufacturer’s recommended amount for
a medium-size load.
9
Page 10

TROUBLESHOOTING
First try the solutions suggested here or visit our website at www.amana.com/help
for assistance and to possibly avoid a service call.
If you experience
Error Code Appears in Display
Once any possible issues are corrected, press START/PAUSE once to clear the code.
Then press START/PAUSE again to restart washer. If code appears again, call for service.
Sd (Excess suds)
appears in display
F8E1 (long ll - no
water supply error)
appears in display
F9E1 (drain pump
system error) appears
in display
F--E-- code (Washer
problem)
Excessive suds in washer. Washer is
running a suds reduction routine.
Check for proper water supply. Make sure hot and cold inlet hoses are not reversed.
Check plumbing for correct
drain hose installation. Drain hose
extends into standpipe farther than
4.5" (114 mm).
System error code.
Possible Causes
Allow the machine to continue. Use only HE detergent.
Always measure detergent, and base detergent quantity on
load size. Follow detergent manufacturer’s instructions. If the
dial is ashing, reselect your desired cycle using a cold wash
temperature, and press START/PAUSE. Do not add detergent.
Both hoses must be attached and have water owing to the
inlet valve.
Both hot and cold water faucets must be on.
Inlet valve screens on washer may be clogged.
Remove any kinks in the inlet hose.
Press START/PAUSE once to clear the code. Then press
START/PAUSE again to restart washer. If code appears again,
call for service.
Check drain hose for proper installation.
Make sure the drain hose is not kinked, pinched, or blocked.
Remove any clogs from drain hose.
Use drain hose form and securely attach to drainpipe or tub.
Lower drain hose if the end is higher than 96" (2.4 m) above
the oor.
Press POWER to cancel cycle and clear the code. Then press
POWER and select Drain & Spin if there is excessive
water in the washer. If the code appears again, call for service.
Solution
Vibration or Off-Balance
Vibration, rocking, or
“walking”
Feet may not be in contact with the
oor and locked.
Washer may not be level.
Load could be unbalanced
or too large.
The transport bolts are still in the
back of the washer.
Front and rear feet must be in rm contact with oor, and washer
must be level to operate properly. Jam nuts must be tight
against the bottom of the cabinet.
Check oor for exing or sagging. If ooring is uneven, a 3/4"
(19 mm) piece of plywood under your washer will reduce sound.
See “Level Washer” in Installation Instructions.
Avoid tightly packing the load. Avoid washing single items.
Balance a single item such as a rug or jacket with a few extra
items.
Use Heavy Duty cycle for oversized, non-absorbent items such
as comforters or poly-lled jackets. Other items are not
appropriate for Heavy Duty cycle. See “Cycle Guide”.
Item or load not suitable for selected cycle. See “Cycle Guide”
and “Using Your Washer” in this Use and Care Guide.
See “Installation Instructions.”
10
Page 11

TROUBLESHOOTING
First try the solutions suggested here or visit our website at www.amana.com/help
for assistance and to possibly avoid a service call.
If you experience
Noises
Clicking or metallic
noises
Gurgling or humming It is normal to hear the pump making a humming sound with
Water Leaks
Check the following for
proper installation:
Water or suds leaking
from door or rear of
cabinet
Door locking or unlocking.
Objects caught in washer
drain system.
Washer may be
draining water.
Fill hoses not attached tightly. Tighten ll-hose connection.
Fill hose washers.
Drain hose connection. Check that the drain hose is properly secured to drainpipe or
Check household plumbing for leaks
or clogged sink or drain.
Not using HE detergent or using too
much HE detergent.
Door opened during “Add Garment.” Water can drip off the inside of the door when the door is
Residue on door glass. Periodically clean the underside of the glass window to avoid
Possible Causes
Solution
The door will lock unlock and lock again. You will hear three
clicks after pushing START/PAUSE. This is normal.
Empty pockets before washing. Loose items such as coins
could fall between basket and tub or may block pump.
It may be necessary to call for service to remove items.
It is normal to hear metal items on clothing such as metal snaps,
buckles, or zippers touch against the stainless steel basket.
periodic gurgling or surging as nal amounts of water are removed
during the spin/drain cycles.
Make sure all four ll hose at washers are properly seated.
laundry tub.
Water can backup out of a clogged sink or drainpipe. Check all
household plumbing for leaks (laundry tubs, drain pipe, water
pipes, and faucets.)
Only use HE detergent. Suds from regular detergents can
cause leaking from the door or rear of cabinet. Always measure
detergent and follow manufacturer’s directions based on your
load requirements.
opened after the start of a cycle.
potential leaks.
Washer not performing as expected
Load not completely
covered in water
Washer won’t run
or ll, washer stops
working
Water level not visible on door or
does not cover clothes.
Check for proper water supply. Both hoses must be attached and have water owing to
This is normal for an HE front load washer. The washer senses load
sizes and adds the correct amount of water for optimal cleaning.
inlet valve.
Both hot and cold water faucets must be turned on.
Check that inlet valve screens have not become clogged.
Check for any kinks in inlet hoses, which can restrict water ow.
11
Page 12

TROUBLESHOOTING
First try the solutions suggested here or visit our website at www.amana.com/help
If you experience
Washer not performing as expected (cont.)
Washer won’t run
or ll, washer stops
working (cont.)
Check proper electrical supply.
Normal washer operation. Door must be completely closed and latched for washer to run.
The washer door is not rmly shut. The door must be closed during operation.
Washer not loaded as recommended. Remove several items, rearrange load evenly in drum.
Not using HE detergent or using too
much HE detergent.
Door not opened between cycles.
for assistance and to possibly avoid a service call.
Possible Causes
Solution
Plug power cord into a grounded 3 prong outlet.
Do not use an extension cord.
Ensure there is power to outlet.
Check electrical source or call an electrician to check if voltage
is low.
Reset a tripped circuit breaker. Replace any blown fuses.
NOTE: If problems continue, contact an electrician.
Press and hold START/PAUSE for 1 second.
Washer will pause during certain phases of cycle.
Do not interrupt cycle.
The washer pauses for about 2 minutes during certain cycles.
Allow the cycle to continue. Some cycles feature periods of
tumbling and soak.
Washer may be stopped to reduce suds.
Close door and press START/PAUSE.
Do not add more than 1 or 2 additional garments after cycle has
started to avoid tightly packing or unbalancing.
Do not add more water to the washer.
Only use HE detergent. Suds from regular detergents can slow
or stop the washer. Always measure detergent and follow
manufacturers directions based on your load requirements.
To remove suds, cancel cycle. Select RINSE & SPIN. Press
START/PAUSE. Do not add more detergent.
After any wash cycle is completed, the door must be opened
and then closed before a new cycle can begin.
12
Page 13

TROUBLESHOOTING
First try the solutions suggested here or visit our website at www.amana.com/help
for assistance and to possibly avoid a service call.
If you experience
Washer not performing as expected (cont.)
Washer not draining/
spinning, loads are
still wet
Door locked at end of
wash cycle
Empty pockets and use garment bags
for small items.
Drain hose extends into standpipe
farther than 4.5" (114 mm).
The drain hose is clogged, or the
end of the drain hose more than
96" (2.4 m) above the oor.
The drain hose ts too tightly
in the standpipe, or is it taped
to the standpipe.
Using cycles with a lower spin speed.
Washer not loaded as recommended.
The load may be out of balance.
Not using HE detergent or using too
much HE detergent.
The drum has clothing stuck between
spin basket and outer tub.
Water remaining in washer after cycle.
Possible causes
Solution
Small items may have been caught in pump.
Check drain hose for proper installation. Use drain hose form
and securely attach to drainpipe or tub. Do not tape over drain
opening.
Lower drain hose if the end is higher than 96" (2.4 m) above the
oor. Remove any clogs from drain hose. See “Installation
Requirements” in Installation Instructions.
The drain hose should be loose yet t securely. Do not seal the
drain hose with tape. The hose needs an air gap. See “Connect
Drain Hose” in Installation Instructions.
Cycles with lower spin speeds remove less water than cycles
with high spin speeds. Use the recommended cycle/speed spin
for your garment.
A tightly packed or unbalanced load may not allow the washer
to spin correctly, leaving the load wetter than normal. See “Cycle
Guide” for load size recommendations for each cycle.
Avoid washing single items. Balance a single item such as a rug
or jacket with a few extra items.
Use only HE detergent. Suds from regular detergent or using
too much detergent can slow or stop draining or spinning.
Always measure and follow manufacturer’s directions for your
load. To remove extra suds, Select RINSE & SPIN. Do not add
detergent.
Rotate drum by hand to check for any binding of the spin
basket and outer tub. Move open end drum up and down while
holding outer tub steady and check for looseness (more than
1/4" (6.35 mm) of movement).
Select DRAIN & SPIN to remove any water remaining in the
washer. The washer door will unlock at the end of the drain.
Door will not unlock
Desired option or setting
does not light
Incorrect or wrong
wash or rinse
temperatures
Load not rinsed
Door locks when cycle has started.
For best performance, not all settings
are available with each cycle, and some
options cannot be used together.
Check for proper water supply.
Washing many loads. Your hot water tank may not have enough hot water to keep up
Check for proper water supply.
If the “Add Garment” light is lit, press START/PAUSE once. The
door will unlock.
See the “Cycle Guide” for the available settings and options for
each cycle.
Make sure hot and cold inlet hoses are not reversed.
Both hoses must be attached to both washer and faucet, and
have both hot and cold water owing to inlet valve.
Check that inlet valve screens are not clogged.
Remove any kinks in hoses.
with the number of hot or warm washes. This is normal.
Make sure hot and cold inlet hoses are not reversed.
Both hoses must be attached and have water owing to the
inlet valve.
Both hot and cold water faucets must be on.
Inlet valve screens on washer may be clogged.
Remove any kinks in the inlet hose.
13
Page 14

TROUBLESHOOTING
First try the solutions suggested here or visit our website at www.amana.com/help
for assistance and to possibly avoid a service call.
If you experience
Washer not performing as expected (cont.)
Load not rinsed
Load is wrinkled,
twisted, or tangled
Not cleaning or
removing stains
Not using HE detergent or using too
much HE detergent.
Washer not loaded as recommended. Avoid tightly packing the washer. The washer will not rinse well
The washer is tightly packed. Add load loosely. Items need to move freely to reduce
Wash action and/or spin speed too
fast for load.
The washer is not unloaded promptly.
Not choosing the right cycle for the
load being washed.
The wash water was not warm
enough to relax wrinkles.
Washer not loaded as recommended.
Not using HE detergent or using too
much HE detergent.
Hard water or high level of iron (rust)
in water.
Fabric softener dispensing ball used.
Powdered detergent used for
low-speed cycle.
Not using correct cycle for fabric type.
Not using dispensers.
Possible Causes
Solution
The suds from regular detergent can cause the washer
to operate incorrectly.
Use only HE detergent. Always measure detergent and follow
manufacturer’s directions based on load size and soil level.
if tightly packed. Load with dry items only. See the “Cycle
Guide” for load size recommendations for each cycle.
Use cycle designed for the fabrics being washed.
Add only 1 or 2 additional garments after washer has started.
wrinkling and tangling. See the “Cycle Guide” for load
size recommendations for each cycle.
Reduce tangling by mixing types of load items. Use the
recommended cycle for the type of garments being washed.
Select a slower spin speed. Note that items will be wetter
than when using a higher speed spin.
Unload the washer as soon as it stops.
Use the Delicate cycle with a low spin speed to reduce
wrinkling.
If safe for load, use warm or hot wash water.
Add load loosely. Items need to move freely for best cleaning.
See the “Cycle Guide” for load size recommendations for each
cycle.
Add only 1 or 2 additional garments after washer has started.
Use only HE detergent. Always measure detergent and follow
manufacture’s directions based on load size and soil level.
The suds from non-HE detergent can cause a lm residue.
You may need to install a water softener and/or iron lter.
Dispensing balls will not operate correctly with this washer.
Add liquid fabric softener to the fabric softener compartment.
Consider using liquid detergent.
Use Heavy Duty cycle for tough cleaning.
Use dispensers to avoid chlorine bleach and fabric softener
staining.
Load dispensers before starting a cycle.
Avoid overlling.
Do not add products directly to load.
14
Page 15

TROUBLESHOOTING
First try the solutions suggested here or visit our website at www.amana.com/help
for assistance and to possibly avoid a service call.
If you experience
Washer not performing as expected (cont.)
Not cleaning or
removing stains (cont.)
Odors
Fabric Damage
Gray whites, dingy
colors
Incorrect dispenser
operation
Not washing like colors together.
Not enough detergent used,
or hard water.
Monthly maintenance not done as
recommended.
Not using HE detergent or using too
much HE detergent.
Door not left open after use.
Sharp items were in pockets during
wash cycle.
Strings and straps could have tangled.
Items may have been damaged before
washing.
Fabric damage can occur if washer is
tightly packed.
Liquid chlorine bleach may have been
added incorrectly.
Load not sorted properly.
Wash temperatures too low.
Not enough detergent used,
or hard water.
Clogged dispensers or laundry
products dispensing too soon.
Liquid chlorine bleach added to
wrong compartment.
Color-safe bleach or oxi products
was added to liquid chlorine bleach
compartment.
Water in dispenser after cycle has
nished.
Possible Causes
Solution
Wash like colors together and remove promptly after the cycle
is complete to avoid dye transfer.
Use more detergent for washing heavy soils in cold or
hard water.
Run the Clean Washer with Affresh™ cycle monthly.
See “Cleaning Your Washer” in Washer Maintenance .
Use only HE detergent. Be sure to measure correctly. Always
follow the manufacturer’s directions.
The suds from non-HE detergent can cause a lm residue which
can result in odor.
See “Cleaning Your Washer” section.
This washer has a tight seal to avoid water leaks. To avoid
odors, leave the door open to allow the washer to dry
between uses.
Empty pockets, zip zippers, and snap or hook fasteners before
washing to avoid snags and tears.
Tie all strings and straps before starting wash load.
Mend rips and broken threads in seams before washing.
Avoid tightly packing the washer. Load with dry items only.
Use cycle designed for the fabrics being washed.
Add only 1 or 2 additional garments after washer is started.
Do not pour liquid chlorine bleach directly onto load. Wipe up
bleach spills.
Undiluted bleach will damage fabrics. Do not use more than
recommended by manufacturer.
The transfer of dye can occur when mixing whites and colors in
a load. Sort dark clothes from whites and lights.
Use hot or warm washes if safe for the load. Make sure your hot
water system is adequate to provide a hot water wash.
Use more detergent for washing heavy soils in cold or
hard water.
Do not overll dispenser. Overlling causes immediate dispensing.
Clean the dispenser compartments, see “Cleaning the Dispenser”
for more information.
Load dispensers before starting a cycle.
Measure detergent and fabric softener. Slowly pour into the
dispensers. Wipe up all spills.
Homes with low water pressure may result in residual powder in the
dispenser. To avoid, select a warmer wash temperature if possible,
depending on your load.
Use only liquid chlorine bleach in the liquid chlorine bleach
compartment.
Add color-safe bleach or oxi products to the HE detergent
compartment or directly to the washer basket before adding the
load. Do not use the chlorine bleach dispenser for color-safe bleach
or oxi products.
It is normal for small amounts of water to remain in dispenser at the
end of the cycle.
15
Page 16
TROUBLESHOOTING
First try the solutions suggested here or visit our website at www.amana.com/help
for assistance and to possibly avoid a service call.
If you experience
Washer not performing as expected (cont.)
Cycle time changes or
cycle time too long
Normal washer operation. The cycle times vary automatically based on your water
Excessive suds in washer.
Load may be out of balance.
Not using correct cycle for load type.
Possible Causes
Solution
pressure, water temperature, detergent, and clothes load.
The options you select will also affect the cycle times that are
shown in the “Cycle Guide.”
When excessive suds are detected, a special suds routine
automatically starts to remove extra suds and ensure proper
rinsing of your garments. This routine will add time to the
original cycle.
When load unbalance occurs, an washing process will start
to redistribute the load. This extends the cycle time. Avoid
washing single items. Balance a single item such as a rug or
jacket with a few extra items.
Spin time is added if an unbalanced load is detected. The
washer will attempt to redistribute the load with additional
tumbling.
The Delicate cycle is designed for smaller load sizes (3-5 items)
of lightly soiled garments. If larger loads are washed in this
cycle, wash time will be increased.
When using the Delicate cycle, you should wash small loads. This
ensures a gentle wash for your garments without increasing cycle
times.
16
Page 17

AMANA® LAUNDRY WARRANTY
LIMITED WARRANTY
For one year from the date of purchase, when this major appliance is operated and maintained according to instructions attached to or
furnished with the product, Amana brand of Whirlpool Corporation or Whirlpool Canada LP (hereafter “Amana”) will pay for factory
specified parts and repair labor to correct defects in materials or workmanship that existed when this major appliance was purchased.
Service must be provided by a Amana designated service company. YOUR SOLE AND EXCLUSIVE REMEDY UNDER THIS LIMITED
WARRANTY SHALL BE PRODUCT REPAIR AS PROVIDED HEREIN. This limited warranty is valid only in the United States or Canada
and applies only when the major appliance is used in the country in which it was purchased. Proof of original purchase date is required
to obtain service under this limited warranty.
ITEMS EXCLUDED FROM WARRANTY
This limited warranty does not cover:
1. Replacement parts or repair labor if this major appliance is used for other than normal, single-family household use or when it is
used in a manner that is inconsistent to published user or operator instructions and/or installation instructions.
2. Service calls to correct the installation of your major appliance, to instruct you on how to use your major appliance, to replace or
repair house fuses, or to correct house wiring or plumbing.
3. Service calls to repair or replace appliance light bulbs, air filters or water filters. Consumable parts are excluded from warranty
coverage.
4. Damage resulting from accident, alteration, misuse, abuse, fire, flood, acts of God, improper installation, installation not in
accordance with electrical or plumbing codes, or use of products not approved by Amana.
5. Cosmetic damage, including scratches, dents, chips or other damage to the finish of your major appliance, unless such damage
results from defects in materials or workmanship and is reported to Amana within 30 days from the date of purchase.
6. Pick up and delivery. This major appliance is intended to be repaired in your home.
7. Repairs to parts or systems resulting from unauthorized modifications made to the appliance.
8. Expenses for travel and transportation for product service if your major appliance is located in a remote area where service by an
authorized Amana servicer is not available.
9. The removal and reinstallation of your major appliance if it is installed in an inaccessible location or is not installed in accordance
with Amana’s published installation instructions.
10. Replacement parts or repair labor on major appliances with original model/serial numbers that have been removed, altered, or
cannot be easily determined.
DISCLAIMER OF IMPLIED WARRANTIES
IMPLIED WARRANTIES, INCLUDING ANY IMPLIED WARRANTY OF MERCHANTABILITY OR IMPLIED WARRANTY OF FITNESS FOR
A PARTICULAR PURPOSE, ARE LIMITED TO ONE YEAR OR THE SHORTEST PERIOD ALLOWED BY LAW. Some states and provinces
do not allow limitations on the duration of implied warranties of merchantability or fitness, so this limitation may not apply to you. This
warranty gives you specific legal rights, and you also may have other rights that vary from state to state or province to province.
LIMITATION OF REMEDIES; EXCLUSION OF INCIDENTAL AND CONSEQUENTIAL DAMAGES
YOUR SOLE AND EXCLUSIVE REMEDY UNDER THIS LIMITED WARRANTY SHALL BE PRODUCT REPAIR AS PROVIDED HEREIN.
AMANA SHALL NOT BE LIABLE FOR INCIDENTAL OR CONSEQUENTIAL DAMAGES. Some states and provinces do not allow the
exclusion or limitation of incidental or consequential damages, so these limitations and exclusions may not apply to you. This warranty
gives you specific legal rights, and you also may have other rights that vary from state to state or province to province.
If outside the 50 United States and Canada, contact your authorized Amana dealer to determine if another warranty applies.
If you think you need repair service, first see the “Troubleshooting” section of the Use & Care Guide. If you are unable to resolve the
problem after checking “Troubleshooting,” additional help can be found by checking the “Assistance or Service” section or by calling
Amana. In the U.S.A., call 1800843-0304. In Canada, call 1800607-6777.
Keep this book and your sales slip together for future
reference. You must provide proof of purchase or installation
date for in-warranty service.
Write down the following information about your major appliance
to better help you obtain assistance or service if you ever need it.
You will need to know your complete model number and serial
number. You can find this information on the model and serial
number label located on the product.
Dealer name____________________________________________________
Address ________________________________________________________
Phone number__________________________________________________
Model number __________________________________________________
Serial number __________________________________________________
Purchase date __________________________________________________
12/08
17
Page 18

SÉCURITÉ DE LA LAVEUSE
18
Page 19
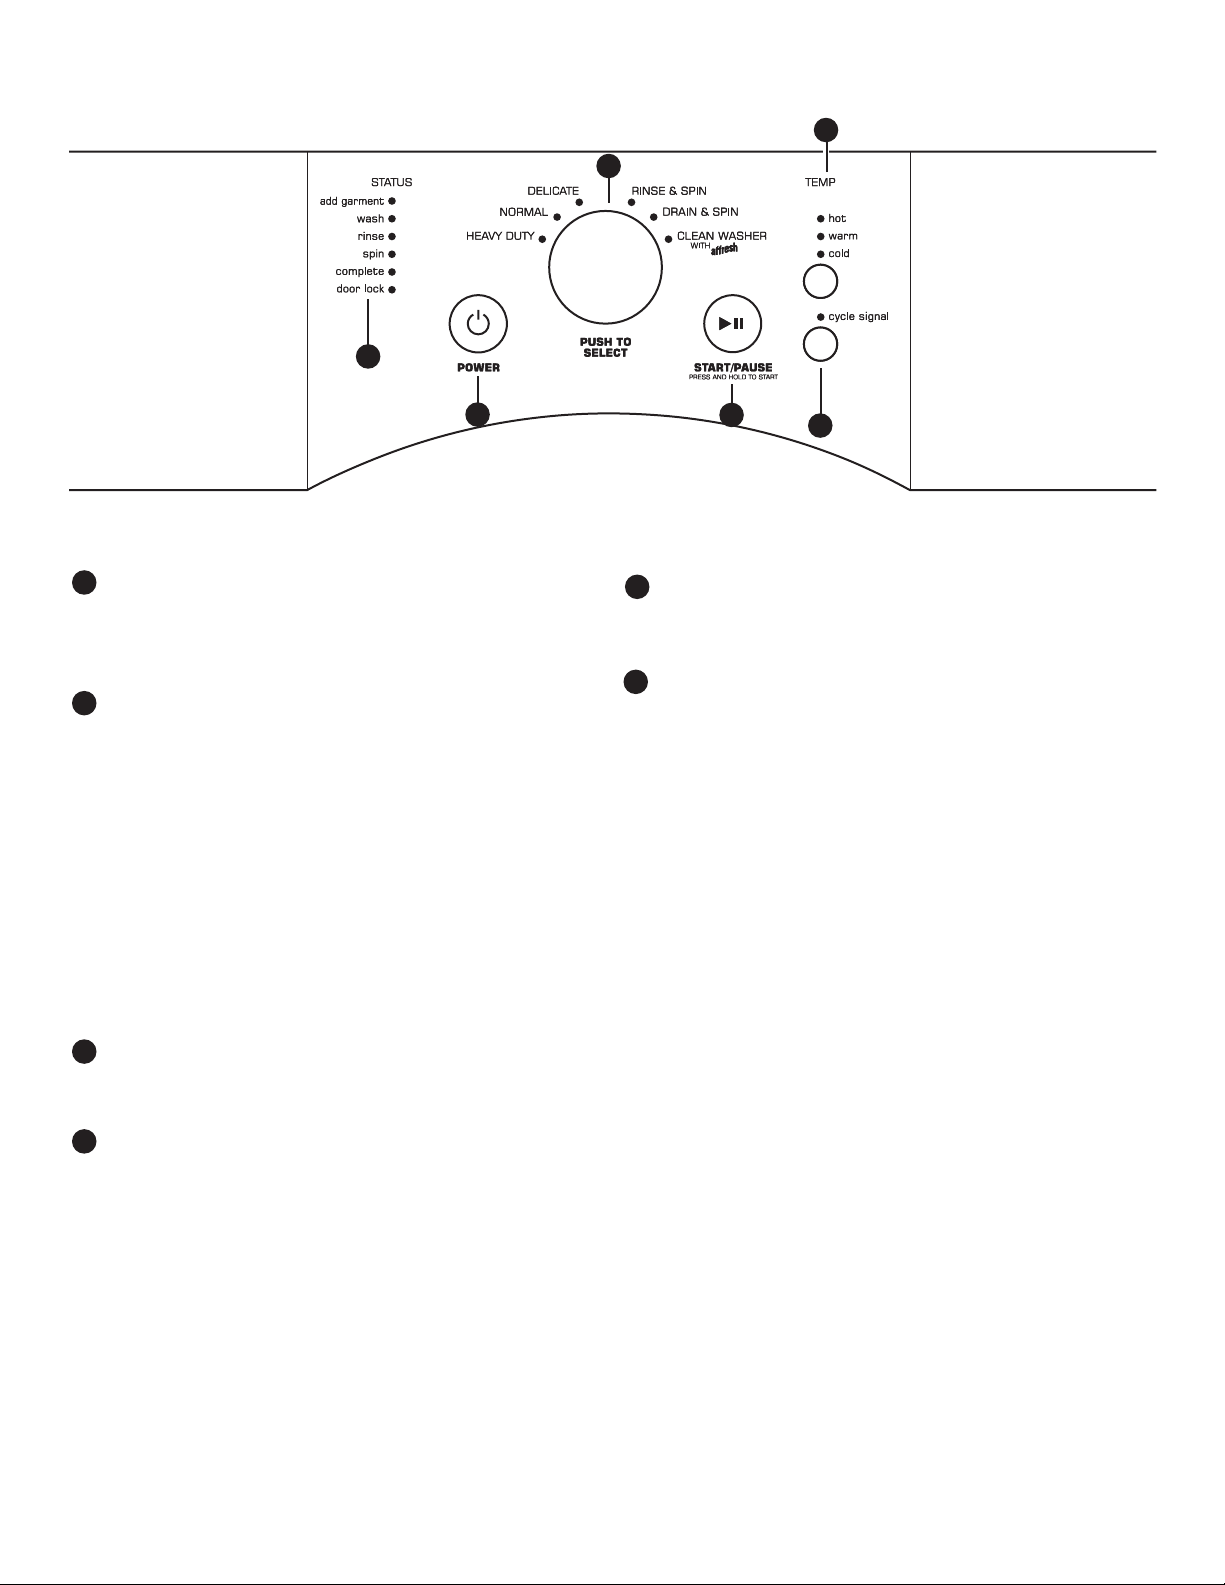
TABLEAU DE COMMANDE ET CARACTÉRISTIQUES
2
1
6
5
Certainsprogrammesetoptionsnesontpasdisponiblessurcertainsmodèles.
L’apparence des appareils peut varier.
1
BOUTON DE PROGRAMME DE LAVAGE
Tourner le bouton de programme pour sélectionner un
programme correspondant à la charge de linge. Voir “Guide
de programmes” pour des descriptions de programmes
détaillées.
2
TEMP (TEMPÉRATURE)
La fonction de contrôle de température détecte et
maintient une température uniforme de l’eau en régulant
le débit d’arrivée d’eau chaude et d’eau froide.
Sélectionner une température de lavage en fonction du type
de tissu et de saleté à laver. Pour des résultats optimaux,
suivre les instructions sur l’étiquette du vêtement et utiliser
la température d’eau de lavage la plus chaude possible qui
reste sans danger pour le tissu.
• Lestempératuresdel’eautièdeetdel’eauchaude
seront inférieures à celles de votre précédente laveuse.
•Mêmepourleslavagesdontlatempératureaétéréglée
surCool(frais),ilestpossiblequedel’eautièdesoit
ajoutée à la laveuse pour maintenir une température
minimale.
SIGNAL DE FIN DE PROGRAMME
3
Ce signal est utile lorsqu’on retire les articles de la laveuse
aussitôt qu’elle s’arrête. Sélectionner ON (marche) ou OFF
(arrêt).
4
BOUTON START/PAUSE (mise en marche/pause)
Appuyer sans relâcher sur ce bouton pour démarrer un
programme ou appuyer une fois dessus pour suspendre un
programme en cours et appuyer de nouveau pour reprendre
le programme. Si l’on n’appuie pas sur START/PAUSE (mise
en marche/pause) dans les 5 minutes suivant le choix d’un
programme, la laveuse s’éteint automatiquement.
4
BOUTON POWER (mise sous tension)
5
Appuyer sur ce bouton pour mettre la laveuse en marche
et pour l’éteindre. Appuyer de nouveau sur ce bouton pour
arrêter/annuler un programme à tout moment.
TÉMOINS LUMINEUX (status)
6
Les témoins lumineux indiquent la progression d’un
programme. À chaque étape du processus, il est possible
que l’on remarque des pauses ou des sons différents de
ceux des laveuses ordinaires.
ADD GARMENT (ajouter un vêtement)
Lorsque Add Garment (ajouter un vêtement) est allumé,
on peut suspendre le programme de la laveuse, ouvrir
la porte et ajouter 2 ou 3 articles supplémentaires.
WASH (lavage)
Il s’agit là de la partie principale du programme de lavage.
On peut voir la laveuse faire culbuter la charge. Les bruits
émis par le moteur peuvent changer lors des différentes
étapes du programme. La durée de lavage est déterminée
par le programme sélectionné ainsi que par la taille de
la charge.
RINSE (rinçage)
On entend des sons similaires à ceux entendu lors du
programme de lavage à mesure que la laveuse rince et
déplace la charge.
SPIN (essorage)
La laveuse essore la charge à des vitesses augmentant
graduellement pour une bonne extraction de l’eau, en
fonction du programme et de la vitesse d’essorage
sélectionnée.
COMPLETE (terminé)
Une fois le programme terminé, ce témoin s’allume.
Retirer la charge rapidement pour un résultat optimal.
DOOR LOCK (verrouillage de porte)
La fonction Door Lock (verrouillage de la porte) permet
d’éviter l’utilisation involontaire de la laveuse. Lorsque le
témoin Door Lock (verrouillage de la porte) est allumé,
tous les boutons sont désactivés à l’exception de Start/
Pause (mise en marche/pause), Power (mise sous
tension), et Cycle Signal (signal de programme).
3
19
Page 20

GUIDE DES PROGRAMMES
Pour un meilleur soin des tissus, choisir le programme qui convient le mieux à la charge à laver.
Certainsprogrammesetoptionsnesontpasdisponiblessurcertainsmodèles.
Articles à laver :
Tissus résistants,
articles
grand-teint,
serviettes, jeans
Articles en coton,
linge de maison,
draps,et charges
mixtes
Articles en soie ou
en laine lavables en
machine et lingerie
Maillots et articles
nécessitant un
rinçage sans
détergent
Articlestrès
humides
et articles
lavés à la main
Pas de
vêtements
dans la laveuse
*Tous les rinçages se font à l’eau froide.
Programme :
Heavy Duty
(service
intense)
Normal
Delicate
(articles
délicats)
Rinse & Spin
(Rinçage et
essorage)
Drain & Spin
(Vidange
et essorage)
Clean Washer
with Affresh®
(nettoyage de
la laveuse avec
Affresh®)
Temp*:
Hot (Chaude)
Warm(Tiède)
Cold (Froide)
Hot (Chaude)
Warm (Tiède)
Cold (Froide)
Hot (Chaude)
Warm(Tiède)
Cold (Froide)
Cold (Froide)
N/A
N/A
Vitesse
d’essorage :
High
(Élevée)
High
(Élevée)
Low
(Basse)
High
(Élevée)
High
(Élevée)
High
(Élevée)
Détails du programme :
Utiliserceprogrammepourlesarticlestrèssalesou
robustes. Ce programme combine un culbutage à
vitesse rapide, une durée de lavage prolongée et un
essorage à vitesse élevée pour réduire les durées de
séchage.
Utiliser ce programme pour les articles en coton et
les charges de tissus mixtes présentant un degré de
saleté normal. Ce programme combine un culbutage
à vitesse moyenne, un essorage à vitesse élevée et un
processus de refroidissement de la charge pour réduire
le froissement.
Utiliser ce programme pour laver des vêtements
légèrementsalesdontl’étiquettedesoinindique
“Soie lavable en machine” ou “Programme délicat”.
Placer les petits articles dans des sacs en let avant
le lavage.
Combine un rinçage et un essorage à vitesse élevée
pour les charges nécessitant un programme de
rinçage supplémentaire ou pour nir de prendre soin
d’unechargeaprèsunecoupuredecourant.Utiliser
également pour les charges nécessitant uniquement
un rinçage.
Ce programme utilise un essorage pour réduire les
durées de séchage pour les tissus lourds ou les
articles lavés à la main nécessitant un soin spécial.
Utiliserceprogrammepourvidangerlalaveuseaprès
avoir annulé un programme ou avoir terminé un
programmeaprèsunecoupuredecourant.
Utiliser le nettoyant pour laveuse Affresh® tous les
mois pour nettoyer l’intérieur de la laveuse. S’assurer
qu’aucun vêtement ne se trouve dans la laveuse.
20
Page 21
UTILISATION DE LA LAVEUSE
Choix du détergent approprié
Utiliser uniquement des détergents Haute efcacité. L’emballage
portera la mention “HE” ou “High Efciency” (haute efcacité).
Unlavageavecfaibleconsommationd’eauproduitunexcès
de mousse avec un détergent non HE ordinaire. Il est probable
que l’utilisation d’un détergent ordinaire prolongera la durée
des programmes et réduira la performance de rinçage. Ceci
peut aussi entraîner des défaillances de composants et, avec le
temps, une accumulation de moisissure. Les détergents HE sont
conçus pour produire la quantité de mousse adéquate pour le
meilleur rendement. Suivre les recommandations du fabricant
pour déterminer la quantité de détergent à utiliser.
1. Trier et préparer le linge
Utiliser uniquement un détergent
Haute efcacité (HE).
Premier programme de lavage sans
vêtements
Avantdelaverlesvêtementspourlapremièrefois,choisirle
programme NORMAL et l’exécuter sans linge (si cela n’a pas
déjà été fait au cours de l’étape d’installation nale). Utiliser
uniquement un détergent HE. Utiliser la moitié de la quantité
recommandée par le fabricant pour une charge de taille
moyenne. Ce programme préalable sert à garantir que l’intérieur
est propre avant de laver des vêtements.
Trier les articles en fonction du programme et de la
température d’eau recommandés, ainsi que la solidité des
teintures.Séparerlesarticlestrèssalesdesarticlespeu
sales. Séparer les articles délicats des tissus résistants.
Traiter les taches sans délai et contrôler la solidité des
teintures en essayant les produits d’élimination de taches
sur une couture intérieure.
IMPORTANT :
n Viderlespoches.Lespiècesdemonnaie,boutonsetautres
petits objets peuvent obstruer les pompes et nécessiter une
intervention de dépannage.
n Fermerlesfermeturesàglissière,attacherlescrochets,
cordons et ceintures en tissu, et retirer tout accessoire et
ornement non lavables.
n Réparer les déchirures pour éviter que les articles ne
s’endommagent encore davantage lors du nettoyage.
n Retourner les tricots pour éviter le boulochage. Séparer
les articles qui forment la charpie de ceux qui la retiennent.
Les articles synthétiques, tricots et articles en velours
retiennent la charpie provenant des serviettes, des tapis
et des tissus chenille.
n Ne pas sécher les vêtements si les taches sont toujours
présentesaprèslelavagecarlachaleurpourraitxerles
taches sur le tissu.
n Toujours lire et suivre les instructions gurant sur les
étiquettes de soin des tissus et sur les produits de
lessive. Une mauvaise utilisation pourrait endommager les
vêtements.
21
Page 22
2. Charger les vêtements dans la laveuse
Ouvrir la porte de la laveuse. Placer une charge de linge trié
dans la laveuse sans les tasser. Les articles doivent pouvoir
se déplacer librement pour un nettoyage optimal et pour
réduire le froissement et l’emmêlement. Fermer la porte de
la laveuse en la poussant fermement jusqu’à ce que le loquet
émette un clic.
n Ilestpossibledechargercomplètementlalaveuse,selon
le type de charge et le programme, mais les vêtements ne
doivent pas être tassés. La porte de la laveuse doit fermer
facilement. Voir “Guide de programmes” pour des suggestions
sur le mode de chargement.
n Mélanger les gros articles avec les petits et éviter de laver
des articles seuls. Charger de façon uniforme.
n Laver les petits articles dans des sacs à linge en let. Si les
petits articles sont nombreux, utiliser plus d’un sac et remplir
les sacs de façon égale.
Utilisation du distributeur
Pour utiliser le tiroir de distribution :
1. Ouvrir le tiroir distributeur.
2. Ajouter les produits de lessive tel que décrit dans
les étapes 3 à 5.
3. Fermer lentement le tiroir du distributeur. Vérier qu’il est
complètementfermé.
REMARQUE : Il est possible qu’une petite quantité d’eau
provenant du programme de lavage précédent reste dans les
distributeurs. Ceci est normal.
3. Ajouter du détergent HE au
distributeur
Compartiment pour
détergent HE
Verser le détergent HE liquide ou en poudre
dans ce compartiment.
Les produits oxi ou l’agent ou de
blanchiment sans danger pour les
couleurs peuvent être versés dans
ce compartiment avec des détergents
similaires.
REMARQUE : Ne pas mélanger les
produits en poudre avec les produits liquides.
Ne pas remplir excessivement le distributeur – le fait
d’ajouter trop de détergent peut entraîner sa distribution
prématurée dans la laveuse.
Use only High Efciency
(HE) detergent.
4. Verser de l’assouplissant pour tissu
dans le distributeur (si désiré)
Compartiment
d’assouplissant
pour tissu liquide
22
Verser une mesure de l’assouplissant pour tissu liquide dans
le compartiment d’assouplissant pour tissu liquide. Toujours
suivre les instructions du fabricant pour connaître la quantité
d’assouplissant pour tissu adéquate en fonction de la taille
de la charge.
L’assouplissant pour tissu est toujours distribué lors du
rinçage nal.
IMPORTANT : Ne pas remplir excessivement le distributeur,
diluer le produit ou utiliser plus de 1/4 de tasse (60 mL)
d’assouplissant pour tissu. Ne pas remplir au-delà du
niveau MAX. Si l’on remplit excessivement le distributeur,
l’assouplissant pour tissu sera distribué dans la laveuse
immédiatement.
n
Ne pas renverser ou faire couler d’assouplissant pour tissu
sur les vêtements.
n
Ne pas utiliser de boules distributrices d’assouplissant pour
tissu dans cette laveuse. Elles ne distribueront pas leur
contenu correctement.
Page 23
5. Ajouter de l’agent de blanchiment
liquide au chlore dans le distributeur
(si désiré)
8. Sélectionner des options
supplémentaires si désiré
Compartiment pour
agent de blanchiment
liquide au chlore
Ajouter une mesure d’agent de blanchiment liquide au
chlore dans le compartiment d’agent de blanchiment. Ne
pas remplir excessivement le distributeur, diluer le produit
ou utiliser plus de 2/3 de tasse (165 mL). Utiliser une tasse
à mesurer avec un bec verseur; ne pas utiliser une quantité
approximative.
n
Ne pas remplir au-delà du niveau “MAX”. Un remplissage
excessif peut entraîner la distribution prématurée de l’agent
de blanchiment et endommager les vêtements.
n
Ne pas ajouter d’agent de blanchiment sans danger pour
les couleurs ou de produit Oxi dans ce distributeur.
6. Appuyer sur POWER (mise sous
tension) pour mettre la laveuse
en marche
Fermer lentement le tiroir du distributeur. S’assurer que
letiroirestcomplètementfermé,puisappuyersurPOWER
(mise sous tension) pour mettre la laveuse en marche. Pour
annuler un programme, appuyer sur POWER (mise sous
tension); la laveuse s’éteint alors, la porte se déverrouille
et les vêtements peuvent être retirés.
7. Sélectionner le PROGRAMME
Tourner le bouton de programme pour choisir un programme
de lavage. Voir “Guide de programmes” pour plus de
détails concernant les caractéristiques de programmes.
Toutes les et options ne sont pas disponibles sur tous les
programmes.
Pour ajouter des options au programme, appuyer sur le
bouton correspondant à l’option souhaitée jusqu’à ce que
le témoin lumineux s’allume pour ajouter cette option au
programme sélectionné.
REMARQUE: Toutes les options ne sont pas disponibles
avec tous les programmes. Voir “Guide de programmes” pour
consulter les options disponibles.
9. Appuyer sans relâcher sur START/
PAUSE (mise en marche/pause) pour
démarrer le programme de lavage
Appuyer sans relâcher sur le bouton START/PAUSE (mise en
marche/pause) pour démarrer le programme de lavage. Pour
suspendre un programme en cours, appuyer une fois sur le
bouton START/PAUSE puis appuyer de nouveau sans relâcher
pour poursuivre le programme. Pour annuler un programme,
appuyer sur le bouton POWER (mise sous tension).
Door Locked (porte verrouillée)
Une fois que l’on a appuyé sans relâcher sur START/PAUSE
(mise en marche/pause), on entend la porte se verrouiller, se
déverrouiller puis se verrouiller à nouveau. Lorsque le témoin
lumineux de porte verrouillée s’allume, la porte est verrouillée.
La porte se verrouille et se déverrouille automatiquement, en
fonction de l’état d’avancement du programme de lavage.
Déverrouillage de la porte pour pouvoir ajouter
des vêtements :
Si l’on doit ouvrir la porte pour pouvoir ajouter 1 ou 2
vêtements oubliés, on peut le faire lorsque le témoin lumineux
“Add Garment” (ajouter vêtement) est allumé.
Appuyer une fois sur START/PAUSE (mise en marche/pause); la
porte se déverrouille une fois que le mouvement de la laveuse
a cessé. Cela peut prendre plusieurs minutes. Fermer ensuite
la porte et appuyer de nouveau sur START/PAUSE (mise en
marche/pause) pour poursuivre le programme.
Pour ajouter des articles une fois que la période Add Garment
est terminée, il est nécessaire d’annuler le programme de
lavage, d’ajouter les articles et de commencer un nouveau
programme de lavage.
23
Page 24
10. Retirer rapidement les vêtements
une fois le programme terminé
Retirer rapidement les vêtements une fois
le programme terminé pour éviter que des
odeurs ne se développent et que les objets
métalliques faisant partie des vêtements ne
rouillent. Lorsqu’on décharge les vêtements, irer le dispositif
de verrouillage de la porte et vérier qu’il ne reste pas de petits
articles entre la cuve et le panier.
REMARQUE :
n
Lorsqu’un programme de lavage est terminé, la porte doit
être ouverte puis refermée avant qu’un nouveau programme
puisse commencer.
n
Il est possible qu’une petite quantité d’eau reste dans les
distributeurs une fois le programme de lavage terminé.
Ceci est normal.
n
Cette laveuse dispose d’une fermeture étanche pour éviter
les fuites d’eau. Pour éviter la formation d’odeurs, laisser la
porte ouverte an de permettre à la laveuse de sécher entre
deux utilisations.
ENTRETIEN DE LA LAVEUSE
NETTOYAGE DE LA LAVEUSE
Votre laveuse doit rester aussi propre et fraîche que
vos vêtements. Pour que l’intérieur de la laveuse reste
libre de toute odeur, suivre la procédure de nettoyage
recommandée suivante au moins une fois par mois :
1. S’assurer que le tambour à linge est vide.
2. Ajouter une pastille de nettoyant pour laveuse
recommandé AFFRESH® dans le panier de la laveuse
OU
Si l’on utilise de l’agent de blanchiment liquide au
chlore, ajouter 2/3 tasse (160 mL) dans le distributeur
d’agent de blanchiment liquide au chlore.
IMPORTANT : Ne pas ajouter de détergent au programme
CLEAN WASHER with Affresh™ (nettoyage de la laveuse
avec Affresh™). Pour éviter tout dommage à long terme,
ne pas utiliser plus que la quantité d’agent de blanchiment
recommandée.
3. Fermer la porte de la laveuse et le tiroir distributeur.
4. Sélectionner le programme CLEAN WASHER with
Affresh™ (nettoyage de la laveuse avec AFFRESH™).
5. Appuyer sans relâcher sur START/PAUSE (mise en
marche/pause).
REMARQUE : Le panier pivote, la porte se déverrouille, se
verrouille à nouveau et le programme se poursuit ensuite.
La laveuse ne se remplit pas et le panier pivote tandis que
la laveuse effectue un court programme de détection. Ceci
prend environ 3 minutes.
6. Le programme détermine si des vêtements ou autres
articles se trouvent dans la laveuse. Si aucun article
n’est détecté dans la laveuse, il passera à l’étape 8.
Si la DEL de lavage clignote, la porte se déverrouille.
Retirer tout vêtement ou article de la laveuse. Appuyer
sur POWER (mise sous tension) pour annuler la DEL
clignotante. Répéter ensuite les étapes 1, 2 et 6 pour
remettre le programme en marche.
7. Une fois que le programme a commencé, on doit le
laisser se terminer.
8. Une fois le programme terminé, laisser la porte
légèrementouvertepourpermettreunemeilleure
ventilation et pour que l’intérieur de la laveuse puisse
sécher.
Nettoyage de l’extérieur :
1. Utiliser une éponge ou un chiffon doux et humide pour
essuyer les renversements.
2. Au besoin, utiliser un savon doux et de l’eau.
IMPORTANT : An d’éviter d’endommager le ni de la
laveuse, ne pas utiliser de produits abrasifs.
24
Page 25
NETTOYAGE DU DISTRIBUTEUR
NETTOYAGE DU JOINT DE LA PORTE
On trouvera peut-être des traces de produits de
lessive dans les compartiments de distributeurs. Pour
éliminer ces traces, suivre la procédure de nettoyage
recommandée suivante :
1. Tirer le tiroir du distributeur jusqu’à la butée.
2. Appuyer sur la patte de déverrouillage et dégager le
distributeur en le tirant tout droit.
3. Retirerlapièceamovible(lesiphondescompartiments
de l’assouplissant pour tissu et de l’agent de
blanchiment).
1. Ouvrir la porte de la laveuse et retirer tout vêtement ou
article de la laveuse.
2. Examiner le joint entre l’ouverture de la porte et le panier
pour déceler d’éventuelles zones tachées. Tirer sur le joint
pourexaminercomplètementlazonequisetrouveen
dessous et vérier qu’elle est libre de tout objet étranger.
Joint
3. Sil’ondécèledeszonestachées,essuyerceszonesen
respectant la procédure indiquée ci-dessous.
a) Mélanger une solution diluée en utilisant 3/4 de tasse
(177 mL) d’agent de blanchiment liquide au chlore
et1gal.(3,8L)d’eautièdedurobinet.
b) Essuyer la zone du joint avec la solution diluée, en
utilisant un chiffon humide.
c) Laisser agir pendant 5 minutes.
d)Essuyerlazonecomplètementavecunchiffonsecet
laisser l’intérieur de la laveuse sécher à l’air en laissant
la porte ouverte.
IMPORTANT : Porter des gants en caoutchouc en cas de
nettoyage pendant une période prolongée. Consulter les
instructions du fabricant de l’agent de blanchiment pour
une utilisation correcte.
4. Laver le distributeur et le panneau du couvercle à l’eau
tièdeetsavonneuseavecundétergentdoux.
5. Rinceràl’eautiède.
6. Faire sécher à l’air ou essuyer avec une serviette
propre.Réinstallerlapièceamovible.
7. Aligner les bords du distributeur avec les guides situés
dans la laveuse puis réinsérer le distributeur dans la
fente en le faisant glisser.
IMPORTANT : Le distributeur n’est pas lavable au
lave-vaisselle.
NON UTILISATION ET ENTRETIEN
EN PÉRIODE DE VACANCES
Faire fonctionner la laveuse seulement lorsqu’on est
présent. En cas de déménagement ou si l’on n’utilise pas
la laveuse pendant longtemps, suivre les étapes suivantes :
1. Débrancher la laveuse ou déconnecter la source de
courant électrique.
2. Fermer l’alimentation en eau à la laveuse pour éviter
toute inondation due à une surpression.
25
Page 26

ENTRETIEN POUR
ENTREPOSAGE HIVERNAL
IMPORTANT : Pour éviter tout dommage, installer et
remiser la laveuse à l’abri du gel. L’eau qui peut rester
dans les tuyaux risque d’abîmer la laveuse en temps de
gel. Si la laveuse doit faire l’objet d’un déménagement ou
d’entreposage au cours d’une période de gel, hivériser la
laveuse.
Hivérisation de la laveuse :
1. Fermer les deux robinets d’eau; déconnecter et vidanger
les tuyaux d’arrivée d’eau.
2. Placer 1 L d’antigel pour véhicule récréatif dans le panier
et faire fonctionner la laveuse sur un programme RINSE &
SPIN (rinçage et essorage) pendant environ
30 secondes pour mélanger l’antigel et l’eau restante.
3. Débrancher la laveuse ou déconnecter la source de
courant électrique.
IMPORTANT : Pour réduire le risque de défaillance
intempestive, remplacer les tuyaux d’arrivée d’eau tout les
cinqansetlesinspecterrégulièrementpourvérierl’absence
de déformations, de coupures, d’usure ou de fuites d’eau.
CONSEIL UTILE : Lors du remplacement des tuyaux
d’arrivée d’eau, noter la date de remplacement au marqueur
indélébile sur l’étiquette.
TRANSPORT DE LA LAVEUSE
RÉINSTALLATION/RÉUTILISATION
DE LA LAVEUSE
Pourréinstallerlalaveuseaprèsunepériodede
non-utilisation, de vacances, de remisage pour l’hiver
ouaprèsundéménagement:
1. Consulter les instructions d’installation pour choisir
l’emplacement, régler l’aplomb de la laveuse et la
raccorder.
2. Avant de réutiliser la laveuse, exécuter la procédure
recommandée suivante :
Remise en marche de la laveuse :
1. Vidanger les canalisations d’eau et les tuyaux.
Reconnecter les tuyaux d’arrivée d’eau. Ouvrir
les deux robinets d’eau.
1. Fermer les deux robinets d’eau. Débrancher et vidanger
les tuyaux d’arrivée d’eau.
2. Si l’on déplace la laveuse pendant une période de gel,
suivre les instructions de la section ENTRETIEN POUR
ENTREPOSAGE HIVERNAL avant de la déplacer.
3. Déconnecterletuyaud’évacuationdusystème
d’évacuationetdel’arrièredelalaveuse.
4. Débrancher le cordon d’alimentation.
5. Placer les tuyaux d’arrivée d’eau et le tuyau
d’évacuation dans le panier de la laveuse.
6. Enrouler le cordon d’alimentation et l’attacher avec un
élastique ou avec un attache-câble pour l’empêcher de
traîner sur le plancher.
IMPORTANT: Demander une intervention de dépannage
si l’on doit installer de nouveau boulons de transport. La
laveuse doit être transportée en position verticale avec les
boulons de transport installés. An d’éviter d’endommager
la structure de la laveuse, celle-ci doit être correctement
installée pour pouvoir être déplacée par un technicien
agréé.
2. Brancher la laveuse ou reconnecter la source de courant
électrique.
3. Faire exécuter à la laveuse le programme NORMAL pour
nettoyer la laveuse et éliminer l’antigel, le cas échéant.
Utiliser uniquement un détergent HE. Utiliser la moitié
de la quantité recommandée par le fabricant pour une
charge de taille moyenne.
26
Page 27

DÉPANNAGE
Essayer d’abord les solutions suggérées ici ou consulter le site Web www.amana.com/help
pour obtenir de l’aide et pour éviter une intervention de réparation.
Si les phénomènes
suivants
se produisent
Un code d’erreur apparaît sur l’afchage
Unefoisquetoutproblèmeéventuelaétérésolu,appuyersurSTART/PAUSE(miseenmarche/pause)poureffacerlecode.
Puis appuyer de nouveau sur START/PAUSE pour redémarrer la laveuse. Si le code réapparaît, faire un appel de service.
Sd (mousse excessive)
apparaît sur l’afchage
F8E1 (remplissage
trop long - erreur : pas
d’approvisionnement
en eau) apparaît sur
l’afchage
F9E1 (erreur du
systèmedepompe
de vidange) apparaît
sur l’afchage
Code F--E--
(Problèmeavec
la laveuse)
Il y a trop de mousse dans la laveuse.
La laveuse exécute une procédure de
réduction de la quantité de mousse.
Vérier que l’alimentation en eau
est correcte.
Inspecter le circuit de plomberie
pour vérier que le tuyau de vidange
est correctement installé. Le tuyau de
vidange se prolonge dans le tuyau
rigide de rejet à l’égout au-delà de
4,5" (114 mm).
Coded’erreurdusystème.
Causes possibles
Solution
Laisser la machine continuer. Utiliser uniquement un détergent
HE. Toujours mesurer le détergent et baser la quantité de
détergent sur la taille de la charge. Suivre les instructions du
fabricant du détergent. Si le cadran clignote, sélectionner à
nouveau le programme désiré à l’aide d’une température de
lavage froide et appuyer sur START/PAUSE (mise en marche/
pause). Ne pas ajouter de détergent.
S’assurer que les tuyaux d’arrivée d’eau chaude et froide n’ont
pas été inversés.
Les deux tuyaux doivent être xés et l’eau doit pénétrer dans
la valve d’arrivée.
Les robinets d’eau chaude et d’eau froide doivent être ouverts
tous les deux.
Les tamis des valves d’arrivée d’eau de la laveuse sont
peut-être obstrués.
Éliminer toute déformation du tuyau d’arrivée.
Appuyer une fois sur START/PAUSE (mise en marche/pause)
pour effacer le code. Puis appuyer de nouveau sur START/
PAUSE pour redémarrer la laveuse. Si le code réapparaît, faire
un appel de service.
Vérier que le tuyau de vidange est correctement installé.
Vérier que le tuyau d’évacuation n’est pas déformé, écrasé ou
obstrué.
Retirer toute obstruction du tuyau de vidange.
Utiliser la bride de retenue pour tuyau de vidange et la xer
solidement au tuyau de rejet à l’égout ou à la cuve.
Abaisser le tuyau de vidange si l’extrémité se trouve à plus de
96" (2,4 m) au-dessus du plancher.
Appuyer sur POWER (mise sous tension) pour annuler le
programme et effacer le code. Appuyer ensuite sur POWER
(mise sous tension) et sélectionner Drain & Spin (vidange et
essorage)encasd’excèsd’eaudanslalaveuse.Silecode
réapparaît, faire un appel de service.
Vibrations ou déséquilibre
Vibrations,
balancement ou
effet de “marche”
de la laveuse
Les pieds ne sont peut-être pas
en contact avec le plancher ou
verrouillés.
La laveuse n’est peut-être pas
d’aplomb.
La charge est peut-être déséquilibrée
ou de trop grande taille.
Lespiedsavantetarrièredoiventêtreencontactfermeavec
le plancher et la laveuse doit être d’aplomb pour fonctionner
correctement. Les contre-écrous doivent être bien serrés contre
le bas de la caisse.
Vérier que le plancher n’est pas incurvé ou qu’il ne s’affaisse
pas. Si le plancher est irrégulier, un morceau de contreplaqué de
3/4" (19 mm) placé sous la laveuse permettra de réduire le bruit.
Voir “Réglage de l’aplomb de la laveuse” dans les Instructions
d’installation.
Éviter de tasser la charge. Éviter de laver un article seul.
Compenser le poids d’un article seul tel qu’un tapis ou une
veste par quelques articles supplémentaires pour équilibrer le
tout.
27
Page 28

DÉPANNAGE
Essayer d’abord les solutions suggérées ici ou consulter le site Web www.amana.com/help
pour obtenir de l’aide et pour éviter une intervention de réparation.
Si les phénomènes
suivants
se produisent
Vibrations ou déséquilibre
Vibrations,
balancement ou
effet de “marche” de
la laveuse
Bruits
Cliquetis ou bruits
métalliques
Gargouillement ou
bourdonnement
Fuites d’eau
Vérier ce qui suit pour
que l’installation soit
correcte :
Causes possibles
La charge est peut-être déséquilibrée
ou de trop grande taille.
Les boulons de transport se trouvent
toujoursàl’arrièredelalaveuse.
Porte qui se verrouille ou
se déverrouille.
Des objets sont coincés dans le
systèmedevidangedelalaveuse.
La laveuse est peut-être en
train d’évacuer de l’eau.
Les tuyaux de remplissage ne sont
pas solidement xés.
Rondelles d’étanchéité des tuyaux
de remplissage.
Raccord du tuyau de vidange. Vérier que le tuyau d’évacuation est bien xé au tuyau de rejet
Inspecter le circuit de plomberie du
domicile pour vérier qu’il n’y a pas
de fuites ou que l’évier ou le tuyau
de vidange n’est pas obastrué.
Utiliser le programme Heavy Duty (service intense) pour les
articles surdimensionnés et non absorbants tels les couettes
ou les vestes avec rembourrage en polyester. Certains articles
ne conviennent pas au programme Heavy Duty. Voir “Guide de
programmes”.
L’article ou la charge ne convient pas au programme
sélectionné. Voir “Guide de programme” et “Utilisation de
la laveuse” dans ce guide d’utilisation et d’entretien.
Voir “Instructions d’installation”.
La porte se verrouillera, se déverrouillera puis se verrouillera à
nouveau. Trois déclics se font entendre une fois que l’on appuie
sur START/PAUSE (mise en marche/pause). Ceci est normal.
Vider les poches avant le lavage. Les articles mobiles tels des
piècesdemonnaiesontsusceptiblesdetomberentrelepanier
et la cuve; ils peuvent aussi obstruer la pompe. Un appel pour
intervention de dépannage s’avérera peut-être nécessaire pour
retirer ces objets.
Il est normal d’entendre des articles métalliques faisant partie des
vêtements comme les boutons-pression métalliques, boucles ou
fermeturesàglissièretoucherlepanierenacierinoxydable.
Il est normal d’entendre la pompe produire un bourdonnement
continu accompagné de gargouillements ou de bruits de pompage
périodiques lorsque l’eau de n de programme est éliminée au
cours des programmes d’essorage/de vidange.
Serrer le raccord du tuyau de remplissage.
Assurez-vous que les quatre rondelles d’étanchéité plates des
tuyaux de remplissage d’eau sont correctement installées.
à l’égout ou à l’évier de buanderie.
De l’eau pourrait refouler de l’évier ou du tuyau de rejet à
l’égout obstrué. Inspecter tout le circuit de plomberie du
domicile (éviers de buanderie, tuyau de vidange, conduites
d’eau et robinets) pour vérier qu’il n’y a aucune fuite.
Solution
Eau ou mousse
suintant par la porte
ouparl’arrièrede
la caisse
La laveuse ne fonctionne pas comme prévu
La charge n’est pas
complètement
submergée dans l’eau
28
Détergent HE non utilisé ou
utilisation excessive de
détergent HE.
Porte ouverte pendant que
la fonction “Add Garment”
(ajouter vêtement) est activée.
Résidus sur le hublot de la porte. Nettoyerrégulièrementledessousduhublotenverrepour
Niveau d’eau non visible par la
porte ou eau ne recouvrant pas les
vêtements.
Utiliser uniquement un détergent HE. La mousse produite par
des détergents ordinaires peut causer des fuites au niveau
delaporteoudel’arrièredelacaisse.Toujoursmesurerla
quantité de détergent et suivre les instructions du détergent en
fonction des modalités de nettoyage de la charge.
De l’eau peut suinter de l’intérieur de la porte si celle-ci est
ouverteaprèsledébutd’unprogramme.
éviter toute fuite éventuelle.
Ceci est normal pour une laveuse HE à chargement frontal. La
laveuse détecte la taille de la charge et ajoute la quantité d’eau
adéquate pour un nettoyage optimal.
Page 29

DÉPANNAGE
Essayer d’abord les solutions suggérées ici ou consulter le site Web www.amana.com/help
pour obtenir de l’aide et pour éviter une intervention de réparation.
Si les phénomènes
suivants
se produisent
La laveuse ne fonctionne pas comme prévu (suite)
La laveuse ne
fonctionne pas ou
ne se remplit pas; elle
cesse de fonctionner
Vérier que l’alimentation en eau est
correcte.
Vérier que l’alimentation électrique
à la machine est correcte.
Fonctionnement normal de
la laveuse.
La porte de la laveuse n’est pas
bien fermée.
Causes possibles
Solution
Les deux tuyaux doivent être xés et l’eau doit pénétrer dans
la valve d’arrivée.
Les deux robinets d’eau chaude et d’eau froide doivent être
ouverts.
Vérier que les tamis des valves d’arrivée ne sont pas obstrués.
Vérier que les tuyaux d’arrivée d’eau ne sont pas déformés;
ceci peut réduire le débit.
Brancher le cordon d’alimentation dans une prise à 3 alvéoles
reliée à la terre.
Ne pas utiliser de câble de rallonge.
Vérier que la prise est alimentée.
Inspecter la source de courant électrique ou appeler un électricien
pour vérier si la tension est basse.
Remettre un disjoncteur qui serait ouvert en marche. Remplacer
tout fusible grillé.
REMARQUE :Sileproblèmepersiste,appelerunélectricien.
Laportedoitêtrecomplètementferméeetverrouilléepourque
la laveuse puisse fonctionner.
Appuyer sur START/PAUSE (mise en marche/pause) pendant
1 seconde.
La laveuse fait des pauses durant certaines phases du
programme. Ne pas interrompre le programme.
La laveuse fait une pause d’environ 2 minutes au cours de
certains programmes. Laisser le programme se poursuivre.
Certains programmes comprennent des périodes de culbutage
et de trempage.
On peut arrêter la laveuse pour réduire la production de
mousse.
La porte doit être fermée lorsque la laveuse est en marche.
29
Page 30

DÉPANNAGE
Essayer d’abord les solutions suggérées ici ou consulter le site Web www.amana.com/help
pour obtenir de l’aide et pour éviter une intervention de réparation.
Si les phénomènes
suivants
se produisent
La laveuse ne fonctionne pas comme prévu (suite)
La laveuse ne
fonctionne pas ou
ne se remplit pas; elle
cesse de fonctionner
(suite)
La laveuse ne se
vidange/n’essore pas;
les charges restent
mouillées
30
La laveuse n’a pas été chargée tel
que recommandé.
Détergent HE non utilisé ou utilisation
excessive de détergent HE.
La porte n’a pas été ouverte entre
deux programmes.
Vider les poches et utiliser des sacs à
linge pour les petits articles.
Le tuyau de vidange se prolonge dans
le tuyau rigide de rejet à l’égout au-delà
de 4,5" (114 mm).
Le tuyau de vidange est obstrué,
ou l’extrémité du tuyau de vidange
se trouve à plus de 96" (2,4 m)
au-dessus du plancher.
Le tuyau de vidange est trop serré
dans le tuyau rigide de rejet à l’égout,
ou est xé au tuyau rigide de rejet à
l’égout avec du ruban adhésif.
Utiliser des programmes comportant
une vitesse d’essorage inférieure.
La laveuse n’a pas été chargée tel que
recommandé.
La charge est peut-être déséquilibrée.
Détergent HE non utilisé ou utilisation
excessive de détergent HE.
Des vêtements sont coincés entre
le panier d’essorage et la cuve
extérieure dans le tambour.
Causes possibles
Solution
Retirer plusieurs articles et ré-agencer la charge dans le
tambour. Fermer la porte et appuyer sur START/PAUSE (mise
en marche/pause).
Nepasajouterplusde1ou2articlessupplémentairesaprèsque
le programme a commencé an d’éviter que les vêtements ne
soient pas tassés ou la charge déséquilibrée.
Ne pas ajouter d’eau dans la laveuse.
Utiliser uniquement un détergent HE. La mousse produite
par des détergents ordinaires peut ralentir ou arrêter la
laveuse. Toujours mesurer la quantité de détergent et suivre
les instructions du fabricant en fonction des modalités de
nettoyage de la charge.
Pour éliminer la mousse, annuler le programme. Sélectionner
RINSE & SPIN (rinçage et essorage). Appuyer sur START/PAUSE
(mise en marche/pause). Ne pas ajouter de détergent.
Lorsqu’un programme de lavage est terminé, la porte doit être
ouverte puis refermée avant qu’un nouveau programme puisse
commencer.
Des petits articles sont peut-être coincés dans la pompe.
Vérier que le tuyau de vidange est correctement installé. Utiliser
la bride de retenue pour tuyau de vidange et la xer solidement au
tuyau rigide de rejet à l’égout ou à la cuve. Ne pas placer de ruban
adhésifsurl’ouverturedusystèmedevidange.
Abaisser le tuyau de vidange si l’extrémité se trouve à plus de
96" (2,4 m) au-dessus du plancher. Retirer toute obstruction du
tuyau de vidange. Voir “Exigences d’installation” dans Instructions
d’installation.
Le tuyau de vidange doit être lâche mais bien xé. Ne pas
sceller le tuyau de vidange avec du ruban adhésif. Le tuyau
a besoin d’une ouverture pour l’air. Voir “Raccordement du
tuyau de vidange” dans Instructions d’installation.
Les programmes avec vitesses d’essorage réduites éliminent
moins d’eau que les programmes qui comportent des vitesses
d’essorage supérieures. Utiliser la vitesse d’essorage/le
programme recommandé approprié pour le vêtement.
Des vêtements tassés ou une charge déséquilibrée empêchent
la laveuse d’essorer correctement, ce qui laisse la charge plus
mouillée qu’elle ne devrait l’être. Voir “Guide de programmes”
pour consulter le volume de charge recommandé pour chaque
programme.
Éviter de laver un article seul. Compenser le poids d’un
article seul tel qu’un tapis ou une veste par quelques articles
supplémentaires pour équilibrer le tout.
UtiliseruniquementundétergentHE.Unexcèsdemousse
causé par l’utilisation d’un détergent ordinaire ou d’un surplus
de détergent peut ralentir ou arrêter la vidange ou l’essorage.
Toujours mesurer le détergent et suivre les instructions du
fabricantenfonctiondelacharge.Pouréliminertoutexcèsde
mousse, sélectionner RINSE & SPIN (rinçage et essorage). Ne
pas ajouter de détergent.
Faire tourner le tambour à la main pour vérier que rien ne
retient le panier d’essorage et la cuve extérieure. Déplacer
la partie ouverte du tambour vers le haut et vers le bas tout
en maintenant la cuve extérieure en place et déterminer s’il y
a du jeu (plus de 1/4" (6,35 mm) de déplacement).
Page 31

DÉPANNAGE
Essayer d’abord les solutions suggérées ici ou consulter le site Web www.amana.com/help
pour obtenir de l’aide et pour éviter une intervention de réparation.
Si les phénomènes
suivants
se produisent
La laveuse ne fonctionne pas comme prévu (suite)
Porte verrouillée à la
n du programme de
lavage
La porte ne se
déverrouille pas.
L’option ou le réglage
souhaité ne s’allume pas
Températures de
lavage ou de rinçage
incorrectes
Charge non rincée
La charge est
froissée, entortillée
ou enchevêtrée
Ilrestedel’eaudanslalaveuseaprès
le programme.
La porte se verrouille une fois que le
programme a démarré.
Pour une performance optimale, tous les
réglages ne sont pas disponibles sur tous
les programmes et certaines options ne
peuvent pas être combinées.
Vérier que l’alimentation en eau est
correcte.
Lavage de plusieurs charges. Votre réservoir d’eau chaude n’a peut-être pas sufsamment
Vérier que l’alimentation en eau est
correcte.
Détergent HE non utilisé
ou utilisation excessive de
détergent HE.
La laveuse n’a pas été chargée tel
que recommandé.
Les vêtements sont tassés dans
la laveuse.
Causes possibles
Solution
Sélectionner DRAIN & SPIN (vidange et essorage) pour évacuer
toute eau restée dans la laveuse. La porte de la laveuse se
déverrouillera à la n de la vidange.
Si le témoin lumineux “Add Garment” (ajouter vêtement) est
allumé, appuyer une fois sur START/PAUSE (mise en marche/
pause). La porte se déverrouille.
Consulter le “Guide de programmes” pour connaître les
réglages et options possibles pour chaque programme.
S’assurer que les tuyaux d’arrivée d’eau chaude et froide n’ont
pas été inversés.
Les deux tuyaux doivent être raccordés à la fois à la laveuse et
au robinet, et la valve d’arrivée doit recevoir à la fois de l’eau
chaude et de l’eau froide.
Vérier que les tamis des valves d’arrivée ne sont pas obstrués.
Éliminer toute déformation des tuyaux.
d’eau chaude à fournir pour le nombre de lavages à l’eau
chaudeoutièderequis.Ceciestnormal.
S’assurer que les tuyaux d’arrivée d’eau chaude et froide n’ont
pas été inversés.
Les deux tuyaux doivent être xés et l’eau doit pénétrer dans
la valve d’arrivée.
Les robinets d’eau chaude et d’eau froide doivent être ouverts
tous les deux.
Les tamis des valves d’arrivée d’eau de la laveuse sont
peut-être obstrués.
Éliminer toute déformation du tuyau d’arrivée.
La mousse produite par un détergent ordinaire peut empêcher
la laveuse de fonctionner correctement.
Utiliser uniquement un détergent HE. Toujours mesurer
la quantité de détergent et suivre les instructions du fabricant
en fonction de la taille et du niveau de saleté de la charge.
Éviter de tasser le linge dans la laveuse. La laveuse ne rincera
pas bien si les vêtements sont tassés. Charger la laveuse
uniquement avec des articles secs. Voir “Guide de programmes”
pour consulter le volume de charge recommandé pour chaque
programme.
Utiliser le programme conçu pour les tissus à laver.
Si l’on souhaite ajouter des vêtements une fois que la laveuse
a démarré, n’en rajouter qu’un ou deux.
Ajouter les vêtements sans les tasser. Les articles doivent
pouvoir se déplacer librement pour réduire le froissement
et l’emmêlement. Voir “Guide de programmes” pour consulter
le volume de charge recommandé pour chaque programme.
Réduire l’emmêlement en mêlant plusieurs types d’articles dans
la charge. Utiliser le programme recommandé correspondant
aux types de vêtements à laver.
31
Page 32

DÉPANNAGE
Essayer d’abord les solutions suggérées ici ou consulter le site Web www.amana.com/help
pour obtenir de l’aide et pour éviter une intervention de réparation.
Si les phénomènes
suivants
se produisent
La laveuse ne fonctionne pas comme prévu (suite)
La charge est
froissée, entortillée
ou enchevêtrée (suite)
Ne nettoie pas, ne
détache pas
Action de lavage et/ou vitesse
d’essorage trop rapide pour
la charge.
Les vêtements n’ont pas été retirés
rapidement.
Le programme choisi ne correspond
pas au programme qui doit être utilisé
pour la charge de lavage.
L’eau de lavage n’est pas
sufsamment chaude pour
réduire le froissement.
La laveuse n’a pas été chargée tel
que recommandé.
Détergent HE non utilisé ou utilisation
excessive de détergent HE.
Eau dure ou niveau élevé de fer
(rouille) dans l’eau.
Une boule distributrice d’assouplissant
pour tissu
a été utilisée.
Du détergent en poudre a été utilisé
pour le programme à basse vitesse.
Programme utilisé incorrect par
rapport au type de tissu.
Causes possibles
Solution
Sélectionner une vitesse d’essorage plus basse. Notons que
les articles seront plus mouillés que si l’on utilise une vitesse
d’essorage supérieure.
Déchargerlalaveusedèsqu’elles’arrête.
Utiliser le programme Delicate (articles délicats) ou un autre
programme avec basse vitesse d’essorage pour réduire
le froissement.
Si c’est sans danger pour la charge, utiliser une eau de lavage
tièdeouchaude.
Ajouter les vêtements sans les tasser. Les articles doivent
pouvoir se déplacer librement pour réduire le froissement
et l’emmêlement. Voir “Guide de programmes” pour consulter
le volume de charge recommandé pour chaque programme.
Si l’on souhaite ajouter des vêtements une fois que la laveuse
a démarré, n’en rajouter qu’un ou deux.
Utiliser uniquement un détergent HE. Toujours mesurer la
quantité de détergent et suivre les instructions du fabricant
en fonction de la taille et du niveau de saleté de la charge.
La mousse produite par un détergent non HE peut former une
pellicule résiduelle.
Il faut peut-être installer un adoucisseur d’eau et/ou
un ltre à fer.
Les boules distributrices ne fonctionnent pas correctement
avec cette laveuse. Verser un assouplissant pour tissu liquide
dans le compartiment d’assouplissant pour tissu.
Essayer d’utiliser du détergent en liquide.
Utiliser le programme Heavy Duty (service intense) pour un
nettoyage puissant.
Odeurs
32
Les distributeurs ne sont pas utilisés. Utiliser les distributeurs pour éviter que l’agent de
blanchiment au chlore ou l’assouplissant pour tissu ne
tachent les vêtements.
Remplir les distributeurs avant de démarrer un programme.
Éviter de les remplir excessivement.
Ne pas verser de produits directement sur la charge.
Les couleurs similaires ne sont pas
lavées ensemble.
Quantité de détergent utilisée
insufsante ou eau dure.
L’entretien mensuel n’est pas effectué
tel que recommandé.
Détergent HE non utilisé ou utilisation
excessive de détergent HE.
Laver ensemble les couleurs semblables et les retirer
rapidement une fois le programme terminé pour éviter
tout transfert de teinture.
Utiliser plus de détergent pour laver la saleté intense à l’eau
froide ou dure.
Faire fonctionner le programme Clean Washer With Affresh™
(nettoyage de la laveuse avec Affresh™) une fois par mois.
Voir “Nettoyage de la laveuse” dans la section Entretien de
la laveuse.
Utiliser uniquement un détergent HE. Veiller à mesurer
correctement. Toujours suivre les directives du fabricant.
La mousse produite par un détergent non HE peut provoquer
une pellicule résiduelle à l’origine d’odeurs.
Page 33
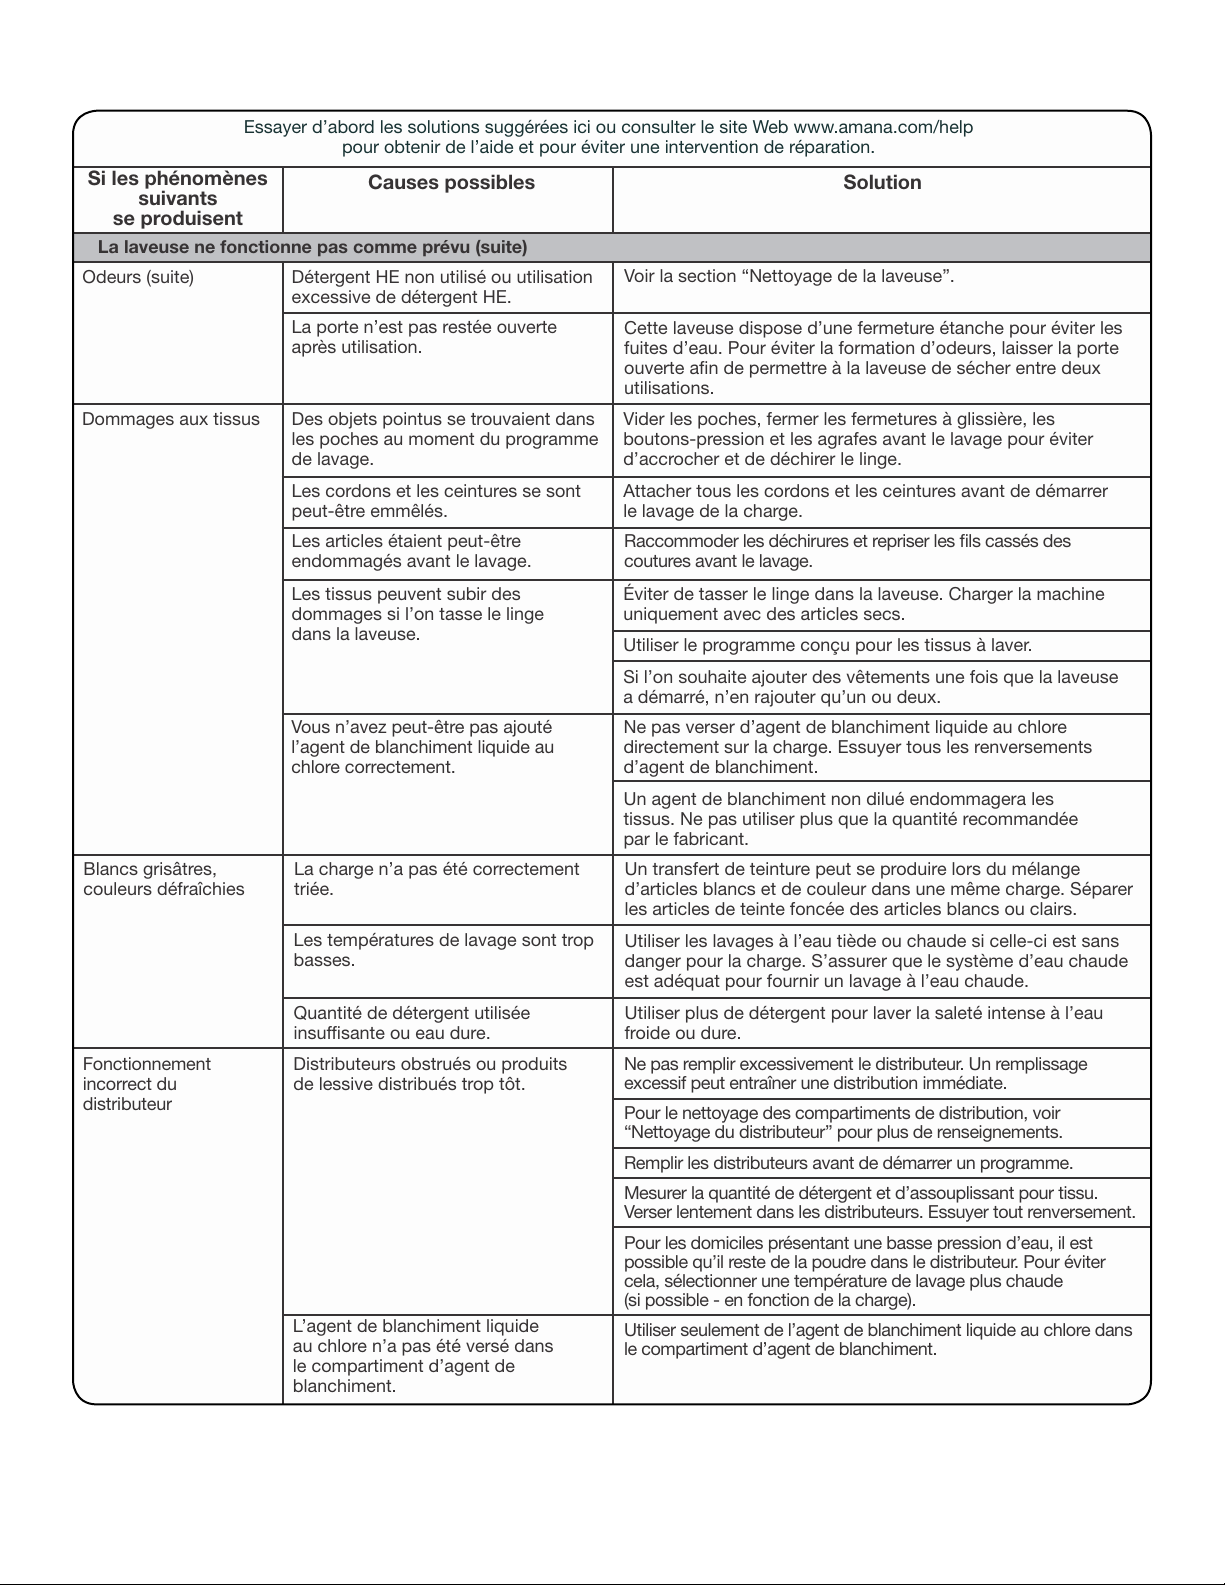
DÉPANNAGE
Essayer d’abord les solutions suggérées ici ou consulter le site Web www.amana.com/help
pour obtenir de l’aide et pour éviter une intervention de réparation.
Si les phénomènes
suivants
se produisent
La laveuse ne fonctionne pas comme prévu (suite)
Odeurs (suite)
Dommages aux tissus
Blancs grisâtres,
couleurs défraîchies
Fonctionnement
incorrect du
distributeur
Détergent HE non utilisé ou utilisation
excessive de détergent HE.
La porte n’est pas restée ouverte
aprèsutilisation.
Des objets pointus se trouvaient dans
les poches au moment du programme
de lavage.
Les cordons et les ceintures se sont
peut-être emmêlés.
Les articles étaient peut-être
endommagés avant le lavage.
Les tissus peuvent subir des
dommages si l’on tasse le linge
dans la laveuse.
Vous n’avez peut-être pas ajouté
l’agent de blanchiment liquide au
chlore correctement.
La charge n’a pas été correctement
triée.
Les températures de lavage sont trop
basses.
Quantité de détergent utilisée
insufsante ou eau dure.
Distributeurs obstrués ou produits
de lessive distribués trop tôt.
L’agent de blanchiment liquide
au chlore n’a pas été versé dans
le compartiment d’agent de
blanchiment.
Causes possibles
Solution
Voir la section “Nettoyage de la laveuse”.
Cette laveuse dispose d’une fermeture étanche pour éviter les
fuites d’eau. Pour éviter la formation d’odeurs, laisser la porte
ouverte an de permettre à la laveuse de sécher entre deux
utilisations.
Viderlespoches,fermerlesfermeturesàglissière,les
boutons-pression et les agrafes avant le lavage pour éviter
d’accrocher et de déchirer le linge.
Attacher tous les cordons et les ceintures avant de démarrer
le lavage de la charge.
Raccommoder les déchirures et repriser les ls cassés des
coutures avant le lavage.
Éviter de tasser le linge dans la laveuse. Charger la machine
uniquement avec des articles secs.
Utiliser le programme conçu pour les tissus à laver.
Si l’on souhaite ajouter des vêtements une fois que la laveuse
a démarré, n’en rajouter qu’un ou deux.
Ne pas verser d’agent de blanchiment liquide au chlore
directement sur la charge. Essuyer tous les renversements
d’agent de blanchiment.
Un agent de blanchiment non dilué endommagera les
tissus. Ne pas utiliser plus que la quantité recommandée
par le fabricant.
Un transfert de teinture peut se produire lors du mélange
d’articles blancs et de couleur dans une même charge. Séparer
les articles de teinte foncée des articles blancs ou clairs.
Utiliserleslavagesàl’eautièdeouchaudesicelle-ciestsans
dangerpourlacharge.S’assurerquelesystèmed’eauchaude
est adéquat pour fournir un lavage à l’eau chaude.
Utiliser plus de détergent pour laver la saleté intense à l’eau
froide ou dure.
Ne pas remplir excessivement le distributeur. Un remplissage
excessif peut entraîner une distribution immédiate.
Pour le nettoyage des compartiments de distribution, voir
“Nettoyage du distributeur” pour plus de renseignements.
Remplir les distributeurs avant de démarrer un programme.
Mesurer la quantité de détergent et d’assouplissant pour tissu.
Verser lentement dans les distributeurs. Essuyer tout renversement.
Pour les domiciles présentant une basse pression d’eau, il est
possible qu’il reste de la poudre dans le distributeur. Pour éviter
cela, sélectionner une température de lavage plus chaude
(si possible - en fonction de la charge).
Utiliser seulement de l’agent de blanchiment liquide au chlore dans
le compartiment d’agent de blanchiment.
33
Page 34
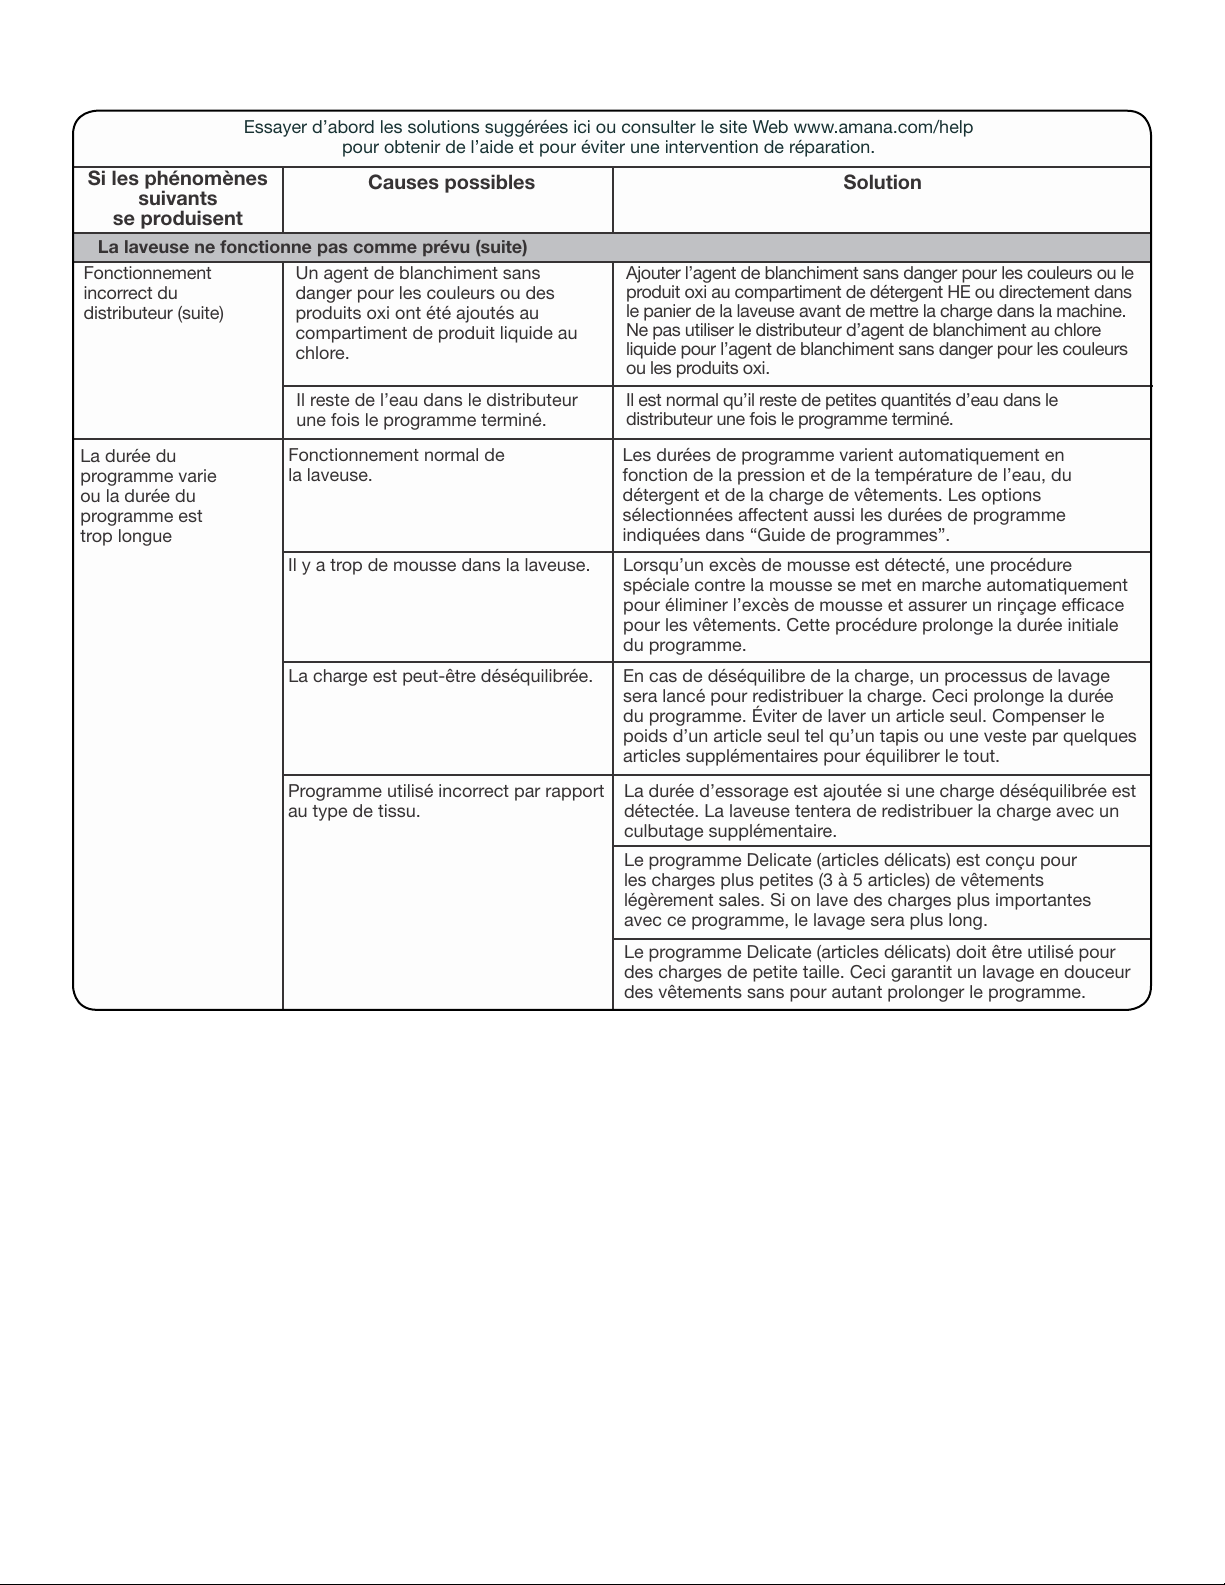
DÉPANNAGE
Essayer d’abord les solutions suggérées ici ou consulter le site Web www.amana.com/help
pour obtenir de l’aide et pour éviter une intervention de réparation.
Si les phénomènes
suivants
se produisent
La laveuse ne fonctionne pas comme prévu (suite)
Fonctionnement
incorrect du
distributeur (suite)
Un agent de blanchiment sans
danger pour les couleurs ou des
produits oxi ont été ajoutés au
compartiment de produit liquide au
chlore.
Il reste de l’eau dans le distributeur
une fois le programme terminé.
Causes possibles
Solution
Ajouter l’agent de blanchiment sans danger pour les couleurs ou le
produit oxi au compartiment de détergent HE ou directement dans
le panier de la laveuse avant de mettre la charge dans la machine.
Ne pas utiliser le distributeur d’agent de blanchiment au chlore
liquide pour l’agent de blanchiment sans danger pour les couleurs
ou les produits oxi.
Il est normal qu’il reste de petites quantités d’eau dans le
distributeur une fois le programme terminé.
La durée du
programme varie
ou la durée du
programme est
trop longue
Fonctionnement normal de
la laveuse.
Il y a trop de mousse dans la laveuse.
La charge est peut-être déséquilibrée.
Programme utilisé incorrect par rapport
au type de tissu.
Les durées de programme varient automatiquement en
fonction de la pression et de la température de l’eau, du
détergent et de la charge de vêtements. Les options
sélectionnées affectent aussi les durées de programme
indiquées dans “Guide de programmes”.
Lorsqu’unexcèsdemousseestdétecté,uneprocédure
spéciale contre la mousse se met en marche automatiquement
pouréliminerl’excèsdemousseetassurerunrinçageefcace
pour les vêtements. Cette procédure prolonge la durée initiale
du programme.
En cas de déséquilibre de la charge, un processus de lavage
sera lancé pour redistribuer la charge. Ceci prolonge la durée
du programme. Éviter de laver un article seul. Compenser le
poids d’un article seul tel qu’un tapis ou une veste par quelques
articles supplémentaires pour équilibrer le tout.
La durée d’essorage est ajoutée si une charge déséquilibrée est
détectée. La laveuse tentera de redistribuer la charge avec un
culbutage supplémentaire.
Le programme Delicate (articles délicats) est conçu pour
les charges plus petites (3 à 5 articles) de vêtements
légèrementsales.Sionlavedeschargesplusimportantes
avec ce programme, le lavage sera plus long.
Le programme Delicate (articles délicats) doit être utilisé pour
des charges de petite taille. Ceci garantit un lavage en douceur
des vêtements sans pour autant prolonger le programme.
34
Page 35

GARANTIE DES APPAREILS DE BUANDERIE AMANA
GARANTIE LIMITÉE
Pendant un an à compter de la date d'achat, lorsque ce gros appareil ménager est utilisé et entretenu conformément aux instructions
jointes à ou fournies avec le produit, Amana, une marque de Whirlpool Corporation ou Whirlpool Canada LP (ci-après désignées
“Amana”) paiera pour les pièces spécifiées par l'usine et la main-d'œuvre pour corriger les vices de matériaux ou de fabrication qui
existaient déjà lorsque ce gros appareil ménager a été acheté. Le service doit être fourni par une compagnie de service désignée par
Amana. LE SEUL ET EXCLUSIF RECOURS DU CLIENT DANS LE CADRE DE LA PRÉSENTE GARANTIE LIMITÉE CONSISTE EN LA
RÉPARATION PRÉVUE CI-DESSUS. Cette garantie limitée est valide uniquement aux États-Unis ou au Canada et s'applique
exclusivement lorsque le gros appareil ménager est utilisé dans le pays où il a été acheté. Une preuve de la date d'achat d’origine est
exigée pour obtenir un service dans le cadre de la présente garantie limitée.
ÉLÉMENTS EXCLUS DE LA GARANTIE
La présente garantie limitée ne couvre pas :
1. Les pièces de rechange ou la main d'œuvre lorsque ce gros appareil ménager est utilisé à des fins autres que l'usage unifamilial
normal ou lorsque les instructions d'installation et/ou les instructions de l'opérateur ou de l’utilisateur fournies ne sont pas
respectées.
2. Les visites de service pour rectifier l'installation du gros appareil ménager, montrer à l'utilisateur comment utiliser l’appareil,
remplacer ou réparer des fusibles ou rectifier le câblage ou la plomberie du domicile.
3. Les visites de service pour réparer ou remplacer les ampoules électriques, les filtres à air ou les filtres à eau de l'appareil. Les pièces
consomptibles ne sont pas couvertes par la garantie.
4. Les dommages imputables à : accident, modification, usage impropre ou abusif, incendie, inondation, actes de Dieu, installation
fautive ou installation non conforme aux codes d'électricité ou de plomberie, ou l'utilisation de produits non approuvés par Amana.
5. Les défauts apparents, notamment les éraflures, les bosses, fissures ou tout autre dommage au fini du gros appareil ménager, à
moins que ces dommages soient dus à des vices de matériaux ou de fabrication et soient signalés à Amana dans les 30 jours
suivant la date d'achat.
6. L'enlèvement et la livraison. Ce gros appareil ménager est conçu pour être réparé à domicile.
7. Les réparations aux pièces ou systèmes résultant d'une modification non autorisée faite à l’appareil.
8. Les frais de déplacement et de transport pour le service d'un produit si votre gros appareil ménager est situé dans une région
éloignée où un service d'entretien Amana autorisé n'est pas disponible.
9. La dépose et la réinstallation de votre gros appareil ménager si celui-ci est installé dans un endroit inaccessible ou n'est pas installé
conformément aux instructions d'installation fournies par Amana.
10. Les pièces de rechange ou la main d'œuvre pour les gros appareils ménagers dont les numéros de série et de modèle originaux ont
été enlevés, modifiés ou qui ne peuvent pas être facilement identifiés.
®
CLAUSE D'EXONÉRATION DE RESPONSABILITÉ AU TITRE DES GARANTIES IMPLICITES
LES GARANTIES IMPLICITES, Y COMPRIS LES GARANTIES APPLICABLES DE QUALITÉ MARCHANDE OU D'APTITUDE À UN
USAGE PARTICULIER, SONT LIMITÉES À UN AN OU À LA PLUS COURTE PÉRIODE AUTORISÉE PAR LA LOI. Certains États et
certaines provinces ne permettent pas de limitation sur la durée de garanties implicites de qualité marchande ou d'aptitude à un usage
particulier, de sorte que la limitation ci-dessus peut ne pas être applicable dans votre cas. Cette garantie vous confère des droits
juridiques spécifiques, et vous pouvez également jouir d'autres droits qui peuvent varier d'une juridiction à l'autre.
LIMITATION DES RECOURS, EXCLUSION DES DOMMAGES FORTUITS OU INDIRECTS
LE SEUL ET EXCLUSIF RECOURS DU CLIENT DANS LE CADRE DE LA PRÉSENTE GARANTIE LIMITÉE CONSISTE EN LA
RÉPARATION PRÉVUE CI-DESSUS. AMANA N'ASSUME AUCUNE RESPONSABILITÉ POUR LES DOMMAGES FORTUITS OU
INDIRECTS. Certains États et certaines provinces ne permettent pas l'exclusion ou la limitation des dommages fortuits ou indirects de
sorte que ces limitations et exclusions peuvent ne pas être applicables dans votre cas. Cette garantie vous confère des droits juridiques
spécifiques, et vous pouvez également jouir d'autres droits qui peuvent varier d'une juridiction à l'autre.
Si vous résidez à l'extérieur du Canada et des 50 États des États-Unis, contactez votre marchand Amana autorisé pour déterminer si
une autre garantie s'applique.
Si vous avez besoin d'un service de réparation, voir d'abord la section “Dépannage” du Guide d'utilisation et d'entretien. Si vous n'êtes
pas en mesure de résoudre le problème après avoir consulté la section “Dépannage”, vous pouvez trouver de l'aide supplémentaire en
consultant la section “Assistance ou Service” ou en appelant Amana. Aux É.U., composer le 1800843-0304. Au Canada, composer
le 1800807-6777.
Conservez ce manuel et votre reçu de vente ensemble pour
référence ultérieure. Pour le service sous garantie, vous
devez présenter un document prouvant la date d'achat ou
d'installation.
Inscrivez les renseignements suivants au sujet de votre gros
appareil ménager pour mieux vous aider à obtenir assistance ou
service en cas de besoin. Vous devrez connaître le numéro de
modèle et le numéro de série au complet. Vous trouverez ces
renseignements sur la plaque signalétique située sur le produit.
12/08
Nom du marchand ______________________________________________
Adresse ________________________________________________________
Numéro de téléphone ___________________________________________
Numéro de modèle______________________________________________
Numéro de série ________________________________________________
Date d'achat____________________________________________________
35
Page 36

AssistAnce or service
Before calling for assistance or service, please check “Troubleshooting” or visit www.amana.com/help.
It may save you the cost of a service call. If you still need help, follow the instructions below.
When calling, please know the purchase date and the complete model and serial number of your appliance.
These parts will t right and work right because they are made with the same precision
To locate FSP® replacement parts, assistance in your area, or accessories:
Maytag Services, LLC Customer Assistance
1-800-253-1301 www.amana.com/help
or call your nearest designated service center or refer to your Yellow Pages telephone directory.
In the U.S.A.
Features and specications on our full line of appliances.
Installation information.
Specialized customer assistance (Spanish speaking,
hearing impaired, limited vision, etc.).
Maytag Services, LLC
ATTN: CAIR
Cleveland, TN 37320-2370
This information will help us to better respond to your request.
If you need replacement parts or to order accessories
We recommend that you use only FSP® Factory Specied Parts.
used to build every new MAYTAG® appliance.
Our consultants provide assistance with
You can write with any questions or concerns at:
®
P.O. Box 2370
Center
Please include a daytime phone number in your correspondence.
Whirlpool Canada LP
Customer eXperience Centre
1-800-807-6777
www.amana.com/help
In the U.S.A. and Canada
Use and maintenance procedures.
Accessory and repair parts sales.
Referrals to local dealers, repair parts distributors,
and service companies. Maytag® designated service
technicians are trained to fulll the product warranty
and provide after-warranty service, anywhere in the
United States and Canada.
Customer eXperience Centre
Whirlpool Canada LP
Unit 200-6750 Century Ave
Mississauga, Ontario L5N 0B7
AssistAnce oU service
Avant de faire un appel pour assistance ou service, veuillez vérier la section “Dépannage” ou consulter
www.amana.com/help. Cette vérication peut vous faire économiser le coût d’une visite de réparation.
Lors d’un appel, veuillez connaître la date d’achat et les numéros au complet de modèle et de série de votre appareil.
Si vous avez besoin de pièces de rechange ou pour commander des accessoires
Si vous avez besoin de commander des pièces de rechange, nous vous recommandons d’utiliser seulement des pièces
spéciées par l’usine FSP®. Ces pièces conviendront et fonctionneront bien parce qu’elles sont fabriquées selon les mêmes
Pour trouver des pièces de rechange FSP® ou des accessoires dans votre région :
Nos consultants fournissent
l’assistance pour :
Procédés d’utilisation et d’entretien.
Vente d’accessoires et de pièces de rechange.
Les références aux concessionnaires, compagnies
de service de réparation et distributeurs de pièces de
rechange locaux. Les techniciens de service désignés par
Maytag® sont formés pour remplir la garantie des produits
et fournir un service après la garantie, partout au Canada.
Si vous avez encore besoin d’aide, suivre les instructions ci-dessous.
Ces renseignements nous aideront à mieux répondre à votre demande.
spécications précises utilisées pour construire chaque nouvel appareil MAYTAG®.
Whirlpool Canada LP Centre pour l’eXpérience de la clientèle
1-800-807-6777 www.amana.com/help
Pour plus d’assistance
Vous pouvez nous soumettre toute question ou problème
en écrivant à l’adresse ci-dessous :
Centre pour l’eXpérience de la clientèle
Whirlpool Canada LP
Unit 200-6750 Century Ave
Mississauga, Ontario L5N 0B7
Dans votre correspondance, veuillez indiquer un numéro
de téléphone où on peut vous joindre dans la journée.
W10410362A
© 2011 5/11
All rights reserved Printed in Mexico
Tous droits réservés. Imprimé au Mexique
 Loading...