

Page 1
Owner's Manual
Top Loading Washer
®
™
Keep instructions for future reference. Be sure
manual stays with washer.
Part No. 40118601
Printed in U.S.A. 12/00
Contents
Important Safety Information................ 3
Starting the Wash ............................... 4
Cycles ................................................ 6
Dispensers.......................................... 7
Features, Hints, and Care ................... 8
Moving and Storage............................. 9
Trouble Shooting ................................. 10
Warranty ............................................. 12
2000 Amana Appliances
Amana, Iowa 52204
Page 2
!
!
!
Thank you for buying an Amana washer!
Please take the time to complete the registration card and return promptly . If
registration card is missing, call Amana Consumer Affairs Department. When
contacting Amana, provide product information from serial plate found on lower
right hand corner of inner lid:
Model Number __________________________________
Manufacturing (P) Number _________________________
Serial Number (S/N) ______________________________
Purchase Date __________________________________
Dealer Name ___________________________________
Dealer Address _________________________________
Dealer Phone ___________________________________
Keep this manual and your sales receipt together in a safe place for
future reference or if warranty service is required.
For answers to questions or to locate an authorized servicer, call 1-800-NATLSVC (1-800-628-5782) inside USA or 319-622-5511 outside USA. W arranty
service must be performed by an authorized servicer. Amana Appliances also
recommends contacting an authorized servicer if service is required after
warranty expires.
For more information on this and other Amana
products, visit our Web site
www.amana.com
or
call Consumer Affairs Department at
1-800-843-0304
Asure Extended
Service Plan
Amana Appliances offers long-term
service protection for this new washer.
Asure™ Extended Service Plan,
covering functional parts, labor, and
travel charges, is specially designed to
supplement a strong warranty. Call 1800-528-2682 for information.
Parts and Accessories
Purchase replacement parts and
additional accessories by phone.
T o order accessories for your Amana
product, call 1-800-843-0304 inside
USA or 319-622-5511 outside USA.
Save Time and Money
If something seems unusual, please
check “Trouble Shooting” section,
which is designed to help you solve
problems before calling service. If you
have a question, write or call us
(include model number and phone
number) at:
Consumer Affairs Department Amana
Appliances
2800 - 220th Trail
Amana, Iowa 52204
Ph# 1-800-843-0304
What You Need to Know
about Safety Instructions
Warning and Important Safety
Instructions appearing in this manual
are not meant to cover all possible
conditions and situations that may
occur. Common sense, caution, and care
must be exercised when installing,
maintaining, or operating washer.
Always contact your dealer, distributor,
service agent, or manufacturer about
problems or conditions you do not
understand.
Recognize Safety Symbols, Words, Labels
DANGER
DANGER—Immediate hazards which WILL result in severe personal injury
or death.
WARNING
WARNING—Hazards or unsafe practices which COULD result in severe
personal injury or death.
CAUTION
CAUTION—Hazards or unsafe practices which COULD result in minor
personal injury or product or property damage.
2
Page 3

Important Safety Information
!
WARNING
To reduce risk of fire, electric shock, serious injury, or death when using your
washer, follow these basic precautions, including the following:
1. Read all instructions before
using washer.
2. Be sure washer is properly
grounded.
3. Do not wash articles that have
been cleaned in, washed in,
soaked in, or spotted with
gasoline, dry-cleaning solvents,
or other flammable or explosive
substances. Vapors could
ignite or explode.
4. Do not add gasoline, drycleaning solvents, or other
flammable or explosive
substances to wash water.
Vapors could ignite or explode.
5. Do not store or use gasoline or
other flammable vapors and
liquids near this or any other
appliance.
6. Do not allow children to play on
or in washer. Close supervision
of children is necessary when
washer is used near children, a
safety rule for all appliances.
7. Before washer is removed from
service or discarded, remove
door to washing compartment.
8 . Do not reach into washer if wash
tub is moving or agitator is moving.
9. Do not install or store washer
where it will be exposed to
water and/or weather.
10. Do not tamper with washer
controls.
11. Do not repair or replace any
part of washer or attempt any
service, unless specifically
recommended in usermaintenance instructions or in
published user-repair
instructions that you
understand and have skills to
carry out.
12. To reduce risk of electric shock
or fire, do not use extension
cords or adapters to connect
washer to electrical power
source.
13. Use your washer only for its
intended purpose: noncommercial clothes washing.
14. Always disconnect washer from
electrical supply before
attempting any service.
Disconnect power cord by
grasping the plug, not the cord.
15. Install washer according to
Installation Instructions. All
connections for water, drain,
electrical power, and grounding
must comply with local codes
and be made by licensed
personnel when required.
16. To reduce risk of fire, do not use
washer to launder clothes which
have traces of any flammable
substance, such as vegetable
oil, cooking oil, machine oil,
flammable chemicals, thinner,
etc., or anything containing wax
or chemicals, such as mops and
cleaning cloths. Flammable
substances may cause fabric to
catch fire by itself.
17. Use only fabric softeners or
products to eliminate static that
are appropriate for automatic
washers.
18. Keep your washer in good
condition. Bumping or dropping
washer can damage safety
features. If damage occurs, have
washer checked by qualified
service technician.
19. Replace worn power cords and/or
loose plugs.
20. Loading door must be closed
whenever washer is agitating or
spinning. Do not bypass loading
door switch by permitting
washer to operate with loading
door open.
21. Always read and follow
manufacturer’s instructions on
packages of laundry and
cleaning aids. Heed all
warnings or precautions. To
reduce risk of poisoning or
chemical burns, keep products
away from children at all times,
preferably, in a locked cabinet.
22. Never operate washer with
guards and/or panels removed.
23. Do not operate washer with
missing or broken parts.
24. Do not bypass safety devices.
25. Under certain conditions,
hydrogen gas may be produced
in a hot water system that has
not been used for 2 weeks or
more. HYDROGEN GAS IS
EXPLOSIVE. If the hot water
system has not been used
before using a washing
machine, turn on all hot water
faucets and let the water flow
from each for several minutes.
This will release any
accumulated hydrogen gas. As
the gas is flammable, do not
smoke or use an open flame
during this time.
Save These Instructions
3
Page 4
Starting the Wash
If These Controls
are Different from
Yours
These controls are intended to
show the variety of features that are
available in the product line. If your
washer does not have all the options
that are shown, it is not a mistake. The
information provided applies to several
of the models in the product line.
1. Prepare clothes for washing
For best wash results:
• Remove items from pockets and cuffs
• Close zippers and fasteners; mend rips and tears
• Sort items into separate loads
• Pre-treat stains and heavily soiled areas
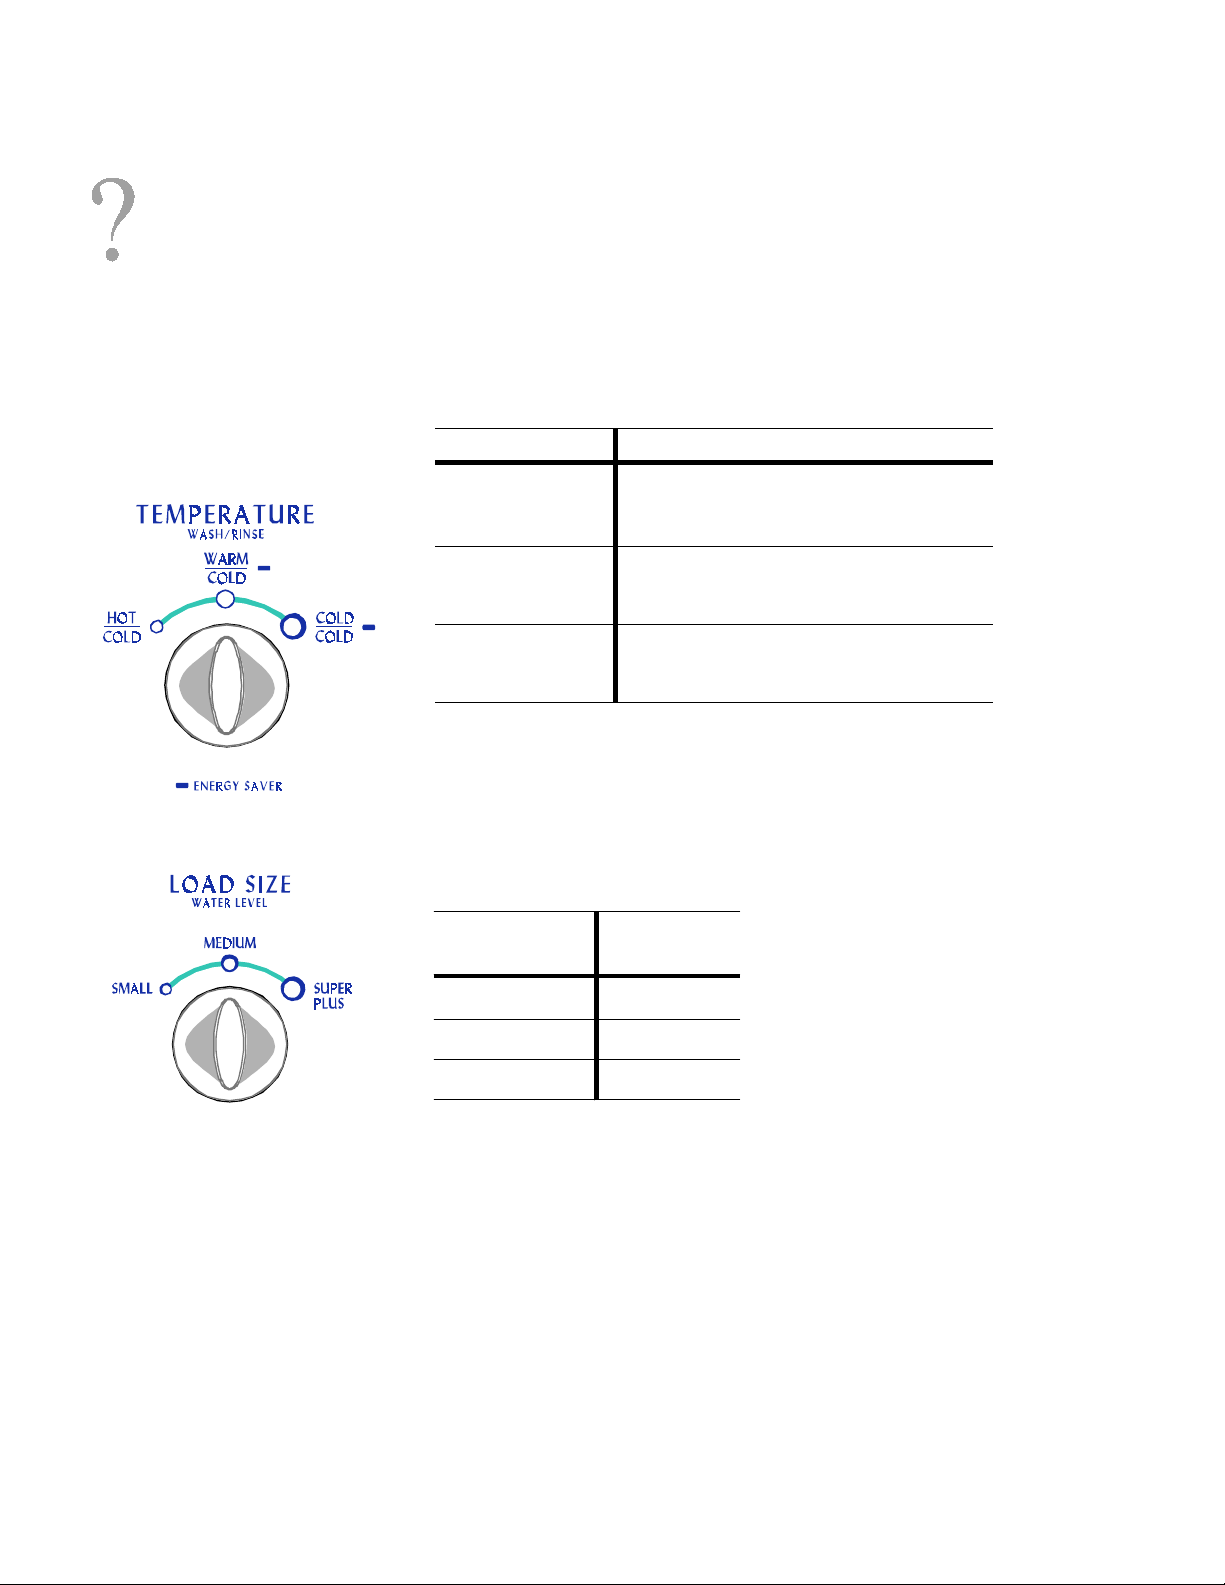
2. Select WASH/RINSE temperature
Always follow garment manufacturer’s care labels for each fabric. See
chart below.
WASH / RINSE TYPE OF CLOTHING
Hot/Cold
Warm/Cold −
Cold/Cold −
NOTE: Energy Saver settings, marked with a dash (–), show
temperature settings that use the least energy .
Sturdy whites and colorfast items;
work clothes, soiled items, and cloth
diapers
Moderately soiled permanent press,
silks, woolens, nylon, acrylic
Rinsing of some items
Non-colorfast items
Extra-delicate clothing
Rinsing of most items
3. Select LOAD SIZE / WATER LEVEL
V ariable control allows you to select the most appropriate
setting for each wash load. Do not fill above top row of holes in tub
with clothes. Use Water Level chart below to determine setting.
LOAD SIZE WATER
LEVEL
Super Plus
Medium
Small
Max. Fill
3/4 Full
1/2 Full
4
Page 5

Starting the Wash (cont'd)
4. Select wash cycle and time
Push timer knob in and turn to desired cycle and wash
time. Timer knob can be turned in either direction. Wash
cycle and time selection depends upon type of fabric and
amount of soil. For best results when cleaning heavily
soiled items, use longer wash time, up to 15 minute
maximum.
Lightly soiled items require less wash time. See "Cycles"
section for more information.
5. Pull OUT timer knob to start
Water fill begins.
6. Measure and add detergent to wash
tub
Use only detergent recommended for top-loading
washers.
7. Add clothing to water in wash tub
DO NOT pack clothes into tub. Loosely fill tub with
clothes no higher than top row of holes. Items must move
freely through water.
8. Adjust water level, if necessary
Bulky fabrics need more water added after agitation
begins.
Why does my agitation
stop and start during the
cycle?
Wash action consists of periods of
agitation, with pauses or periods of
soak. This is normal operation.
9. Close lid of unit
Unit will not operate when lid is open.
What if I want to use only
the spin portion of my
cycle?
This may be useful if you need to
remove excessive moisture from handwashed objects or just wanting to
remove as much moisture as
possible from your items.
To find the spin setting,
locate the notch in the
colored controls between
the rinse cycle and the end of the cycle.
5
Page 6

Cycles
What do the little
numbers mean?
There are three methods use to clean
your clothes: agitation, soaking
periods, and spin/spray periods.
These are referred to as the wash
action of the cycle. The numbers
next to the cycles refer to the wash
action time, or the time that the
clothes are actually being cleaned.
These numbers do not include the
time of the final rinse and final spin
portion of the cycle.
HAND WASH
Use for fine fabrics normally washed
by hand. T o protect fragile fabrics,
washer speed automatically runs at
Gentle/Slow, regardless of position of
speed selector switch.This cycle
features gentle wash action, including
short periods of agitation and long
periods of soaking.
REGULAR
Use for sturdy items, like play or
work clothes, towels, T-shirts, etc.
CASUALS/
PERMANENT
PRESS
Use for clothes that recommend a
permanent press cycle and other
synthetics.
DELICATE
Designed to care for items such as
blouses, nylons, lingerie, and other
hand washables, this cycle features
gentle wash action, including short
periods of agitation and long periods
of soaking.
6
Page 7

Dispensers
Bleach Dispenser
Bleach dispenser is located in left
front corner under loading door.
Bleach
dispenser
Fabric Softener
Dispenser
Fabric softener dispenser is
located on top of agitator.
Dispenser automatically releases
liquid fabric softener at proper time
during rinse cycle.
Fabric
softener
dispenser
Fabric Softener Use Tips
• Liquid fabric softeners are
dispensed during final rinse. Do
not combine with bleach, bluing,
starch, detergents, soaps, or
packaged water conditioners
during rinse.
• Do not mix powdered detergent
with liquid softener in dispenser or
softener will become gummy.
Use only liquid bleach in
dispenser. To use powdered
bleach, add to wash tub with
detergent.
BLEACH
(Max Amt.)
Carefully pour recommended amount
of bleach into dispenser during first
washer fill. See table.
Be careful not to spill undiluted
bleach. It is a strong chemical and
can damage cabinet finishes and
some fabrics if not properly diluted.
Follow bleach manufacturer’s label for
proper use.
LOAD SIZE
SUPER PLUS 1 cup
MEDIUM 3/4 cup
SMALL 1/2 cup
To use dispenser, follow these steps:
1. Pour liquid fabric softener into dispenser , using amount recommended
on package.
2. Add water up to fill level, but do not exceed tip of fill arrow indicator .
FABRIC SOFTENER MUST BE DILUTED FOR USE.
• Do not stop washer during first spin or dispenser will empty too
soon.
• Never pour fabric softener directly onto clothes or spots and stains
may result. T o remove softener stains, soak in soapy solution of
Sard™ Wonder Soap or Ivory™ soap, or rub stain with bar of Sard™ or
Ivory™ soap and wash garment as usual.
• For best softener performance, set water level to medium or higher .
3. Clean softener dispenser after
each use. Remove dispenser
housing from agitator by
squeezing lower part of dispenser
and pulling up on housing while
tilting slightly to expose
dispenser cup. Rinse dispenser
housing and cup in hot soapy
water.
Clean funnel shape in top of
agitator and inside of agitator. Use small brush on hole and slots in two
funnel rings for thorough cleaning.
After cleaning, re-install dispenser cup. Push dispenser housing
directly down onto top of agitator until firmly snapped together.
T o prevent build-up, fill dispenser with clean water in wash cycles when
not using softener.
7
Page 8

Features, Hints, and Care
Need more Time? Reset
the Timer Knob.
Although wash cycles are automatic,
timer may be reset to lengthen, shorten,
or repeat a portion of a cycle.
To set or reset timer, push in timer knob
to stop washer. Hold in timer knob
firmly while slowly turning it to desired
setting. Pull out timer knob to start
washer.
Stops and Starts
Wash action consists of periods of
agitation, with pauses or periods of
soaking. For best results, do not turn
timer through pauses, which are normal
part of wash cycles.
Cleaner Clothes
Wa ter temperature af fects how clean
clothes become. If your clothes are not
as clean as you would like, check your
water heater temperature. Check your
water heater manufacturer's
recommendations, as well as local
codes, for assistance. Also, check that
your water hoses are hooked up
correctly. If they are switched you might
be getting cold water in your warm and
hot cycles.
Motor Overload Protector
Internal overload protector automatically stops motor in event of overload.
Overload protector resets in approximately 3 minutes and motor automatically
restarts. If overload protector stops motor again, stop using washer and call
service technician. Loading wash tub too full may result in motor overload.
Safety Lid Switch
The washer will not spin when the lid is open for any reason. This is for your
personal safety . If the lid is opened mid-cycle, operation will automatically
start when lid is closed.
General Washer Care
• Use only damp or sudsy cloth for cleaning control panel. Some cleaning
product sprays may harm control panel finish or may damage interior of
hood.
• Wipe washer cabinet as needed. If detergent, bleach, or other washing
products are spilled on cabinet, wipe immediately . Some products will
cause permanent damage if spilled on cabinet.
• Top of washer should not be used for removing garment stains. Some stain
removers, such as rust remover, may damage cabinet finish.
• Do not use scouring pads or abrasive cleansers.
• Do not lay sharp or rough objects on or against washer . Finish could be
damaged.
• Remove pins, buckles, or other sharp objects from clothes to prevent
scratching interior parts.
• Leave lid open after use to allow inside of washer to dry, and to help
prevent musty odors from developing.
• Do not allow small children to play on or around washer .
• Do not move washer without reinstalling shipping brace (Part #39365) and
shipping plug (Part #38149). See
Moving Washer to New Location
section.
Hard water does not remove soil as
well as soft water. Check with your local
water company to see if you have hard
water. If y ou hav e hard water, try
softening it with a packaged
conditioner or use a little more
detergent.
Risers
Risers or air cushions may be installed
if pipes knock or pound when flow of
water stops. Risers are more efficient
when installed as close as possible to
water supply faucets.
8
Page 9

Moving and Storage
!
Cold Storage and Non-Use Periods
WARNING
Explosive hydrogen gas may be produced in a hot water system that
has not been used for two weeks or more. Before using washer, if
hot water system has not been used for such a period, turn on all hot
water faucets and let water flow for several minutes to release
accumulated hydrogen gas. Hydrogen gas is flammable: Do not
smoke or use an open flame when flushing water lines.
Cold Weather Care
If washer is delivered when outside temperature is below freezing or if washer
is stored in unheated room or area during cold months, do not operate until
washer has warmed to room temperature. Do not install or operate
washer where temperatures will drop below freezing.
Cold Weather Storage
If washer must be stored in seasonal home or storage building, use one of the
following storage methods.
METHOD 1
1. Turn off water supply faucets and disconnect hoses. Drain water from
both hoses.
2. Add one gallon of non-toxic RV antifreeze (available from hardware or
recreational vehicle dealers) to washer tub.
3. Push in cycle selector knob and turn to SPIN.
4. Pull knob out and let washer spin for 1–2 minutes to drain water . Some
antifreeze will also be lost. (If you have a septic system, contact
antifreeze manufacturer and make sure it will not harm system.)
5. Push in cycle selector knob to stop washer . Dry inner wash tub,
disconnect electrical plug, and close washer lid. If moving washer,
disconnect drain hose. Move and store washer ONL Y in upright position.
T o remove antifreeze after storage, run washer through a complete cycle
using ½ cup of detergent. DO NOT ADD CLOTHES TO CYCLE.
METHOD 2
1. Push in cycle selector knob and turn to SPIN. Run through complete
spin cycle to remove excess water.
2. When spin cycle is complete, push in cycle selector knob to stop
washer.
3. Turn off water supply faucets and disconnect hoses. Drain water from
both hoses.
4. Dry inner wash tub, disconnect electrical plug, and close washer lid. If
moving washer, disconnect drain hose. Move and store washer ONLY in
upright position.
5. It is normal for some water to remain inside pump. To prevent damage to
washer and pump if remaining water freezes, allow washer to warm to 24
to 48 hours after removing from storage, so water can thaw before use.
Vacations and
Extended Non-Use
IMPORTANT: T o avoid possible
property damage from flooding, turn
off water supply to washer during
extended periods of non-use.
T o prevent mold or mildew , leave lid
open so moisture inside machine can
evaporate.
When closing your home for extended
periods, have service technician drain
washer to avoid stagnant water.
Unplug cord from electrical outlet.
Disconnect hoses from faucets.
Moving Washer to
New Location
Replace shipping plug under motor
and shipping brace in tub. Refer to
Installation Instructions
procedures whenever washer is
moved. See illustration.
Tilt washer back slightly
and slide shipping
plug into position
under washer
for proper
Shipping
brace
Shipping
plug and
location
in washer
9
Page 10

Trouble Shooting
Y ou may save time and money by checking items below before calling for service. List includes common concerns that
are not the result of defective workmanship or materials. If your question is not explained below, contact Amana
Consumer Affairs Department at 800-843-0304.
TOPIC POSSIBLE CAUSE SOLUTION
NOISE
Gear sounds or a low hum
Rattling and clanking noise
Squealing sound or hot
rubber odor
Thumping sound
Vibrating noise
Water splashing or slapping
noise
Whistling or whirling noise
OPERATION
Normal mechanical sounds in commercialquality washer
Loose objects, such as coins or pins, in tub
or pump
Belt buckles, metal fasteners hitting wash tub Close zippers, buttons, and fasteners. Cl othing wit h
Overloaded wash tub
Heavy wash loads; unbalanced loads Usually normal, but unbalanced loads should be
Washer not resting firmly on floor Make sure floor is strong enough for washer. Adjust
Wash load distributed unevenly in tub Stop washer and rearrange load.
Shipping plug not removed during installation
Spray rinse Normal operation. Washer sprays water inside tub while
Drum spinning without cloths Normal operation. Holes in the tub can cause this sound.
Normal operation.
Stop washer and check tub. Remove loose objects. If noise
continues after washer is restarted, objects m ay be in
pump: call your authorized servicer.
buckles must be turned inside out.
Do not overload washer. Stop washer and reduce size of
load.
redistributed. Stop washer and rearrange load.
leveling legs so washer rests firmly on floor. See
Installation Instructions
Installation Instructions
See
shipping plug.
running at high speed during rinse and spin.
for leveling details.
for details on removing
Washer does not start
Washer won’t spin
Residue left in tub
Electrical power cord may not be plugged in,
or connection may be loose
Fuse blown, circuit breaker tripped, or power
outage occurred
Water supply faucets not turned on Turn on water supply faucets.
Timer knob/cycle selector set incorrectly Move indicator slightly clockwise. Pull out on timer knob.
Motor overheated Internal overload protector automatically stops motor in
Lid partially open Close lid completely.
Heavily soiled items
Make sure plug from power cord fits tightly into wall outlet.
Replace fuse or reset circuit breaker. Do NOT increase
fuse capacity. Call qualified electrici an to correct circuit
overload problem. Call local utility com pany to correc t
power outage.
event of overload. Protector resets in approximat ely 3
minutes and motor automatically restarts. If overload
protector stops motor again, quit using washer and call
service technician.
Do not overload washer. Largest dry load level should not
be higher than bottom of fabric softener dispenser or top of
agitator.
Wipe tub with non-abrasive household cleaner and rinse.
Before washing, shake or brush excess dirt and sand from
items.
10
Page 11

Trouble Shooting (cont'd)
TOPIC POSSIBLE CAUSE SOLUTION
WATER
Wash load too wet after spin
Water enters slowly or does
not enter washer
Water level does not cover
clothes
Warm or hot water not hot
enough
Overloaded wash tub Do not overload washer.
Unbalanced load Rearrange load to allow proper spin.
Kinked drain hose Straighten drain hose.
Inadequate main water supply
Water supply faucets partly closed Fully open hot and cold water supply faucets.
Water being used elsewhere in house
Clogged water inlet filters
Kinked water inlet hoses Straighten hoses.
Incorrect water level/load size select ion Select higher water level/load size.
Overloaded wash tub
Water heater temperature set too low; water
heater too far from washer
Hot water being used elsewhere in house
Check water pressure at another faucet in house. Wait for
water supply and pressure to increase.
Water pressure must be at least 20 psi (138 kPa). Avoid
running water elsewhere when washer is filling.
Disconnect water fill hoses from faucet. Clean and
reposition screen filters. Reconnect water f ill hoses.
Do not overload washer. Largest dry load level should not
be higher than bottom of fabric softener dispenser or top of
agitator.
You may need to raise the temperature on your water
heater. Check your water heater manufacturer’s
recommendations, as well as local codes for assistance.
Avoid using hot water elsewhere before or during washer
use, or there may not be enough hot water for proper
cleaning. If problem continues, enlarge capacit y of hot
water system, or use for only one application at a time.
Water drains slowly or does
not drain
Water leaks
Incorrect wash and rinse
temperatures
Water enters washer, but tub
does not fill
Drain hose kinked or clogged Clean and straighten drain hose.
Loose fill hose connections Check and tighten all hose/faucet connections. Install
Clogged drain pipes Unclog drain pipes. Call plumber if necessary.
Oversudsing Use less detergent.
Hot and cold water hoses connected to
wrong supply faucets
Incorrect standpipe height for drain hose Recommended standpipe height is 36” (91.44 cm); for low
rubber sealing washers provided.
Check hose connections. Connect hot water hose to hot
water faucet; connect cold water hose to cold water faucet.
standpipes, install Siphon Break Kit (part #562P3). See
Installation Instructions
for details.
11
Page 12

Amana Washer Warranty
Full ONE Year Warranty
For one (1) year from the date of original retail purchase, Amana will repair or replace any part that fails due to a
defect in materials or workmanship.
Limited Warranty
After one year from the date of original retail purchase, Amana will provide a free part, as listed below, to replace
any part that fails due to a defect in materials or workmanship. The owner will be responsible for paying all other
costs, including labor, mileage, and transportation.
Second through Fifth Year
Amana will provide the transmission assembly and seal kit.
Second through Tenth Year
Amana will provide the cabinet assembly should the part rust through.
Lifetime
Amana will provide the inner wash basket.
What is not covered by these
warranties
• Replacement of household fuses, resetting of circuit
breakers, or correction to household wiring
or plumbing.
• Products with original serial numbers removed,
altered, or not readily determined.
• Products purchased for commercial, industrial,
rental, or leased use.
• Products located outside of the United States
or Canada.
• Premium service charges, if the servicer is
requested to perform service in addition to normal
service or outside normal service hours or area.
• Adjustments after the first year.
• Damage to clothing.
Repairs resulting from the following:
• Improper installation or maintenance.
• Any modification, alteration, or adjustment not
authorized by Amana.
• Accident, misuse, abuse, fire, flood, or
acts of nature.
• Connections to improper electrical current,
voltage, or supply .
To Receive Warranty Service
Service must be performed by an authorized Amana
service representative. T o schedule service, contact the
Amana dealer where you purchased your appliance or
contact Amana Appliances Factory Service.
Amana Appliances Factory Service
1-800-628-5782 inside USA
For more information,
Amana Appliances Consumer Services
Amana Appliances
2800 220th Trail
Amana, Iowa 52204
1-800-843-0304 inside USA
(319) 622-5511 worldwide
When contacting Amana Appliances please
include the following information:
• Y our name, address, and telephone number .
• Model number and serial number of your appliance
(found on inside of lid in the bottom right corner).
• The name and address of your dealer and the date
of purchase.
• A clear description of the problem.
• Proof of purchase (sales receipt).
IN NO EVENT SHALL AMANA BE LIABLE FOR INCIDENTAL OR CONSEQUENTIAL DAMAGES.
This warranty gives you specific legal rights, and you may have others which vary from state to state. For example, some states
do not allow the exclusion or limitation of incidental or consequential damages, so this exclusion may not apply to you.
Part No. 40118601
Printed in U.S.A. 12/00
Amana Appliances Online
• http://www.amana.com
2000 Amana Appliances
Amana, Iowa 52204
 Loading...