


Wave Oven™ AOWS2030
Owner’s Manual

Contents
Model Identification .................................................2
Parts and Accessories............................................2
Service....................................................................2
Important Safety Instructions......................................3
Grounding Instructions ...............................................5
Installation
Unpacking Oven......................................................5
Oven Placement .....................................................5
Built-in Capability....................................................5
Oven Features
Halogen Lamp Banks..............................................6
Defrost ....................................................................6
Standard Recipes ...................................................6
Custom Recipes .....................................................7
Timed Cooking ........................................................7
Cooking Time..........................................................7
Add Time ................................................................ 7
Control Lock ...........................................................7
Changing Oven Signal ............................................. 7
Add or Remove Scrolling Messages........................7
Oven Fan ................................................................7
Auto V oltage Compensation....................................7
Cooking Displays
Scrolling Messages ................................................8
Displays..................................................................8
Pads ..........................................................................9
Operation
30 Second Pad .......................................................10
Defrost ....................................................................1 0
Cooking with Standard Recipe ................................10
Cooking with Custom Recipe .................................. 1 1
Manual Time Entry Cooking ....................................1 1
Saving Recipe .........................................................11
Amana Wave Oven™ Cooking
Cooking Guidelines ................................................. 12
Frozen or Thick Food Guidelines.............................12
Converting Conventional Recipes.............................12
Eliminating or Reducing Oven Smoke .....................12
Grill.........................................................................13
Removing Grill and Rack .........................................14
Utensils ..................................................................14
Care and Cleaning
Eliminating or Reducing Oven Smoke .....................15
Cleaning Oven Cavity and Exterior ..........................15
Cleaning Grill ..........................................................15
Cleaning Oven Racks..............................................15
Cleaning Glass Shields...........................................15
Removing Glass Shields .........................................16
Cleaning Air Filter ...................................................16
Cleaning Oven Cavity Filter ..................................... 17
Cleaning Side Air Vents ..........................................17
Replacing Halogen Bulbs ........................................18
Service Codes ............................................................ 19
Before Calling for Service............................................20
Cooking Guides
Standard Recipe Guide ...........................................21
Custom Recipe Guide .............................................24
Recipes
Appetizers ..............................................................28
Breads ....................................................................29
Desserts .................................................................30
Eggs ....................................................................... 32
Fish ........................................................................33
Meat ....................................................................... 34
Poultry .................................................................... 35
Sandwiches ............................................................36
Quick Reference Instructions.................................. 38
Model Identification
Complete enclosed registration card and promptly return.
Any questions or if registration card is missing, call
Consumer Affairs Department at 1-800-843-0304 inside
U.S.A. 1-319-622-551 1 outside U.S.A.
When contacting Amana, provide product information.
Product information is on oven serial plate located on
lower right-hand side of oven. Record the following
information:
Model Number: ______________________________
Manufacturing Number: ________________________
Serial or S/N Number: _________________________
Date of purchase: ____________________________
Dealer’s name and address:
__________________________________________
__________________________________________
__________________________________________
Parts and Accessories
Purchase replacement parts and additional accessories
(e.g. refrigerator shelves, dryer racks, or cooktop
modules) over the phone. T o order accessories for your
Amana product, call 1-800-843-0304 inside U.S.A. or
319-622-551 1 outside U.S.A.
Service
Keep a copy of sales receipt for future reference or in
case warranty service is required. Any questions or to
locate an authorized servicer, call 1-800-NA T-LSVC
(1-800-628-5782) inside U.S.A. 319-622-551 1 outside
U.S.A. Warranty service must be performed by an
authorized servicer. Amana also recommends contacting
an authorized servicer if service is required after warranty
expires.
2
IMPORTANT SAFETY INSTRUCTIONS
Recognize this symbol as a SAFETY message
Recognize this symbol as a HOT SURF ACE warning
WARNING
When using electrical oven, basic safety precautions should be followed to reduce the risk of burns, electrical
shock, fire, or injury to persons.
1. READ all instructions before using oven.
2. This oven MUST BE GROUNDED. Connect only to
properly grounded outlet. See
INSTRUCTIONS
on page 5.
GROUNDING
9. This oven, including power cord, must be
serviced ONL Y by qualified service personnel.
Special tools are required to service oven.
Contact nearest authorized service facility for
examination, repair, or adjustment.
3. Install or locate this oven ONL Y in accordance with
the installation instructions in this manual.
4. Use this oven ONL Y for its intended use as
described in this manual. Do not use corrosive
chemicals or vapors in this oven. This type of oven
is specifically designed to heat or cook. It is not
designed for industrial or laboratory use.
5. DO NOT store any materials, other than
manufacturer's recommended accessories, in this
oven when not in use.
6. As with any oven, CLOSE SUPERVISION is
necessary when used by CHILDREN.
7. DO NOT operate this oven if it has a damaged cord
or plug, if it is not working properly , or if it has been
damaged or dropped.
8. Do not operate oven without air filters in place.
10. DO NOT cover or block any openings on the
oven.
11. DO NOT store or use this oven outdoors. DO
NOT use this product near water – for example,
near a kitchen sink, in a wet basement, or near
a swimming pool, and the like.
12. DO NOT immerse cord or plug in water.
13. Keep cord AWAY from HEA TED surfaces.
14. DO NOT let cord hang over edge of table or
counter.
15. DO NOT place paper or plastic products in oven.
16. Replace glass shields ONL Y with glass shields
provided by Amana or an authorized oven
supplier.
17. DO NOT clean with metal scouring pads. Pieces
can break off the pad and touch electrical parts
involving risk of electrical shock.
SAVE THESE INSTRUCTIONS
3
IMPORTANT SAFETY INSTRUCTIONS
10. Use only dry fireproof oven mitts. Moist or damp
WARNING
potholders on hot surfaces can result in burns
from steam. Do not use towel or other bulky cloth.
T o avoid severe burns, wear dry fireproof oven mitts
or use pan grips when handling utensils, racks,
glass shields, and door. Oven interior becomes hot
during operation.
CAUTION
T o avoid personal injury or property damage,
observe the following:
1. Do not use glass cookware not intended for
cooking in oven. Glass can shatter when
exposed to high temperatures.
2. Do not unplug oven immediately after use.
Internal fan must cool oven to avoid damage of
electrical components.
3. Do not use oven without glass shields in place.
Shields must be in place to prevent contact of
food with lamps.
1 1. Use care when opening oven door. Let hot air or
steam escape before removing or replacing food.
12. Do not heat unopened food containers. Pressure
build-up can cause container to burst resulting in
injury.
13. Keep oven vent ducts unobstructed.
14. Always place oven racks in desired position while
oven is cool. If rack must be moved while oven is
hot, use care not to touch hot surfaces.
15. Do not use oven in poorly ventilated areas.
CAUTION
T o reduce the risk of fire:
1. DO NOT overcook food.
4. Do not immerse hot glass utensils or glass
shields in water. Glass utensils and shields
can shatter if exposed to extreme temperature
change.
5. Never use your oven to warm or heat room.
6. Do not leave children alone. Children should not
be left alone or unattended in area where oven is
in use. They should never be allowed to sit or
stand on any part of the appliance.
7. Wear proper apparel. Loose fitting or hanging
garments should never be worn while using the
oven.
8. Never store flammable materials in or near oven.
9. Do not use water on grease fires. Smother or
use dry chemical extinguisher to extinguish fire
or flame.
2. Do not use paper , plastic, or other combustible
materials in oven. Material can ignite.
3. KEEP oven DOOR CLOSED, turn oven off, and
disconnect the power cord, or shut off power at
the fuse or circuit breaker panel, if materials
inside the oven should ignite. Fire may spread if
door is opened.
SAVE THESE INSTRUCTIONS
4
Grounding Instructions
WARNING
T o avoid the risk of electrical shock or death, this oven
must be grounded.
To avoid the risk of electrical shock or death, do not
alter the plug.
This oven MUST be grounded. In the event of an
electrical short circuit, grounding reduces the risk of
electric shock by providing an escape wire for the electric
current. This oven is equipped with a cord having a
grounding wire with a grounding plug. The plug must be
plugged into a properly installed and grounded outlet.
Consult a qualified electrician or servicer if grounding
instructions are not completely understood, or if doubt
exists as to whether the oven is properly grounded.
Installation
Unpacking Oven
• Remove packing and printed material from oven cavity .
• Report any dents or breakage to source of purchase
immediately.
• Inspect oven for damage such as dents in door or
inside oven cavity .
• Inspect grill accessory in oven cavity for damage.
• Inspect cord and plug for damage.
Oven Placement
• Leave at least 1 inch/2.54 centimeters on side of oven
with air vents to ensure adequate air flow around oven.
Restricted airflow may cause oven to operate
improperly and shorten life of electrical parts.
• Do not block air exhaust duct or air filter.
• Install according to all local building codes and
ordinances.
• Amana Wave Oven™ must be built into cabinets. Use
only Amana “AXL” trim kit.
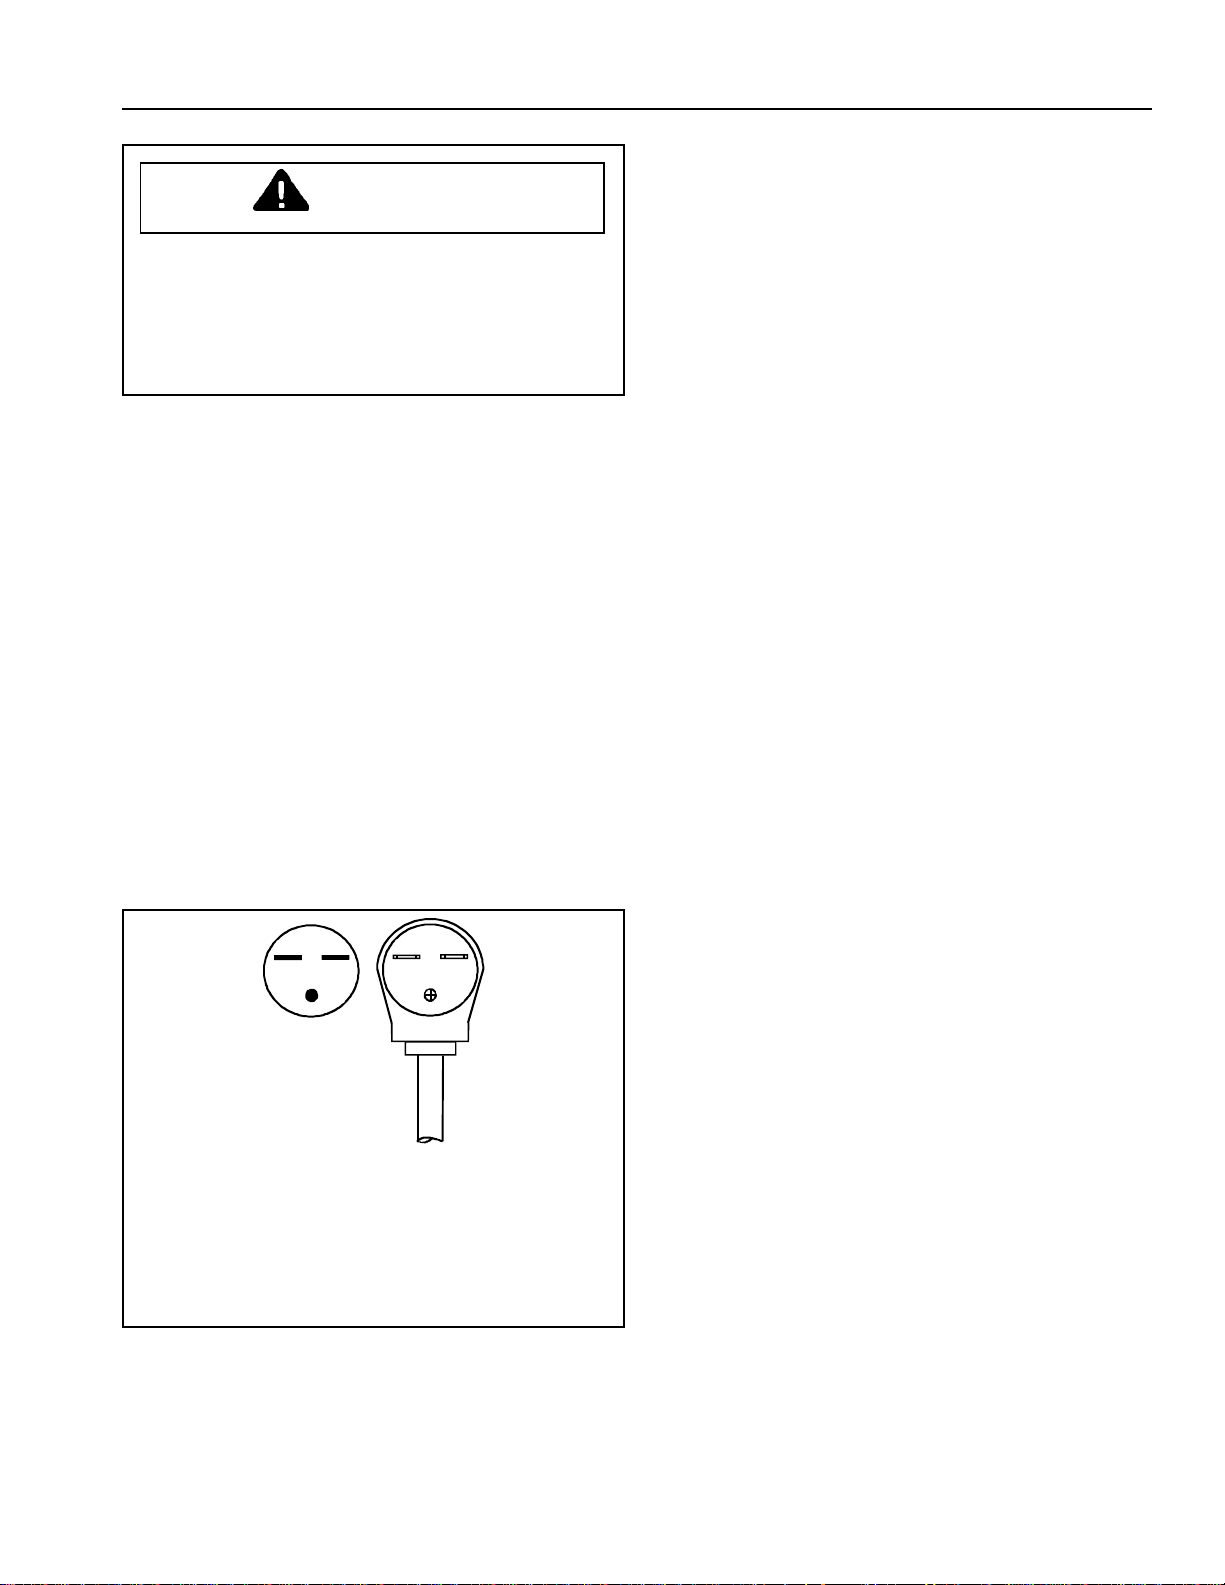
Do not use an extension cord. If the oven power cord is
too short, have a qualified electrician install a three-slot
receptacle. This oven should be plugged into a separate
60 hertz circuit with the electrical rating as shown in the
appropriate drawing. Models rated at 240 supply
voltage. When Amana Wave Oven™ is on a circuit with
another appliance or supply voltage varies, an increase in
cooking times may be required and fuses can be blown.
Receptacle / Plug
NEMA 6-30R/6-30P
250V–30AMP
AOWS2030*
5
Oven Features
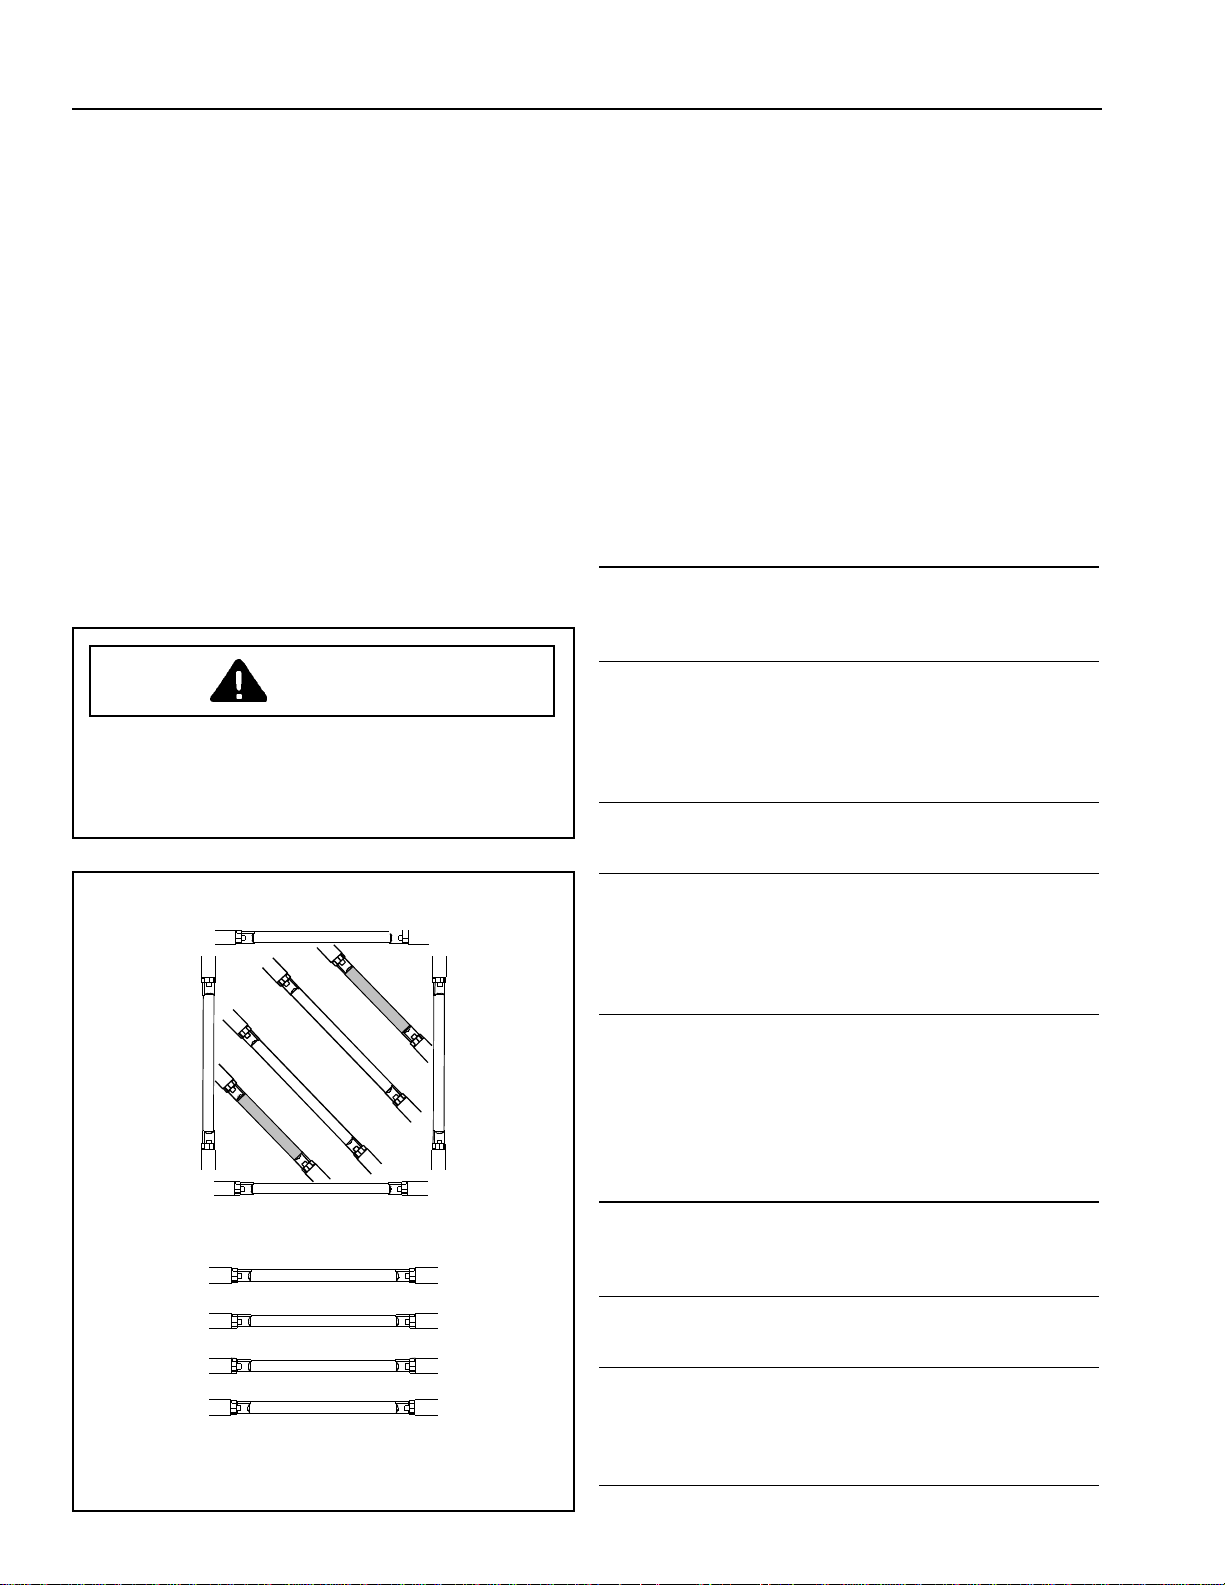
Halogen Lamp Banks
The Amana Wave Oven™ has 2 banks of halogen bulbs.
Upper lamp bank is located on oven ceiling and has 8
bulbs. Lower lamp bank is located oven floor and has 4
bulbs. Upper lamp bank heats center and edge of food
while lower lamp bank heats utensil. Each lamp bank
can be adjusted independently .
Upper and lower lamp banks do not heat simultaneously .
When upper lamp bank is operating, lower lamp bank is
off. However, to provide light for the oven cavity, outer
bulbs in upper lamp bank turn on while lower bank heats.
Oven display shows “OFF” when upper lamp bank
provides light for oven cavity .
Lamp banks have 4 settings, “OFF”, “LO”, “MED”, and
“HI”. Adjust lamp bank intensity on top and bottom
independently to perfect recipes. Press
or
HI
pad to adjust before or during cooking.
OFF, LO, MED
,
CAUTION
T o avoid burns, cuts, and damaging halogen bulb,
wear cotton gloves or grasp bulb with clean cotton
cloth when handling halogen bulbs. Oil from hands will
reduce halogen bulb life.
Upper lamp bank
Lower lamp bank
Shaded—500 watt bulbs
Not shaded—750 watt bulbs
Defrost
Amana Wave Oven™ defrosts frozen food. After
defrosting, cook food with standard or custom recipes in
Amana Wave Oven™. Press
select food type to be defrosted. Select pad 8 for
seafood, pad 9 for poultry , or pad 0 for meat. Check food
and add time if food is not defrosted.
DEFROST/2
pad, then
Standard Recipes
Cook with Amana’s recipes. Pads
preprogrammed recipes. Standard recipes can not be
lost or changed. T o view recipes, press number pad
repeatedly until desired recipe shows. See table for pads
and recipes. See “Standard Recipe Guide” section for
cooking times.
3-9, 0
contain
Pad Type Recipe
3 Appetizers NACHOS
QUESADILLAS
BUFFALO WINGS
MOZZARELLA STIX
4 Vegetables FROZEN CORN
FROZEN CARROTS
FROZEN PEAS
FROZEN BROCCOLI
FRESH CARROTS
FRESH BROCCOLI
5 Toasted
Items
6 Baked Items CRESCENT ROLLS
7 Pizza/
Sandwiches
8 Seafood FISH FILLETS
9 Poultry CHICKEN BREASTS
0 Meat NEW YORK STRIP
BAGELS
ENGLISH MUFFINS
FRENCH BREAD
BISCUITS
BREAD STICKS
MUFFINS
COOKIES
CINNAMON ROLLS
RAW DOUGH CRUST
PARBAKED CRUST
FROZEN PIZZA
FRENCH BR PIZZA
GRILLED CHEESE
HAM & CHEESE
RUEBEN
ROAST BEEF
FISH STEAKS
FISH STICKS
SHRIMP
CHICKEN FINGERS
CHICKEN NUGGETS
SIRLOIN
T-BONE STEAK
HAMBURGER
PORK CHOPS
6

Custom Recipes
Cook with recipes you have saved. Recipes you create
can be saved under pads
or improved. Use food types beside pads to categorize
recipes.
1-9, 0
. Recipes can be changed
Timed Cooking
The Amana Wave Oven™ does not require preheating.
Set time, lamp intensity , and press
lamp bank intensity independently while cooking. When
oven stops heating or is paused, display prompts user to
continue or save recipe. T o continue, press numbered
pads to enter additional cooking time. If food is cooked to
preference, cooking sequence can be saved for future
use in programmable number pad. See “Saving Recipe”
section of manual.
ST ART
pad. Adjust
Changing Oven Signal
Change end-of-cycle signal volume. Simultaneously ,
press
SEAFOOD
change oven signal volume. Settings include “HI”, “MED”,
“LO”, and “OFF”. Continue to press pads to advance
through settings.
pad and
MEAT
pad on words to
Add or Remove Scrolling Messages
Add or remove scrolling messages from display.
Simultaneously , press
words to add or remove scrolling messages.
POUL TRY
pad and
MEA T
pad on
Oven Fan
Oven fan operates while oven cooks. Fan can operate at
any time to cool oven cavity and components.
Cooking Time
Cooking times range from 1 second (00:01) to 19
minutes, 99 seconds (19:99).
Add Time
Oven signals and “ADD TIME” shows in display when
cooking time counts down to 10 seconds. To add
additional cooking time in 30 second increments, press
number pad.
Control Lock
Press
LOCK
pad once to disable pads. If pads are
pressed, oven does not operate. Press
to enable pads. Number pads signal when disabled.
“Locked” shows in display .
LOCK
pad again
Auto Voltage Compensation
Standard recipes were created with 240 oven supply
voltage. If supply voltage is above or below 240, cooking
times can vary . High voltage shortens cooking times. Low
voltage lengthens cooking times. Amana Wave Oven™
measures supply voltage and adjusts Standard Cooking
Times and defrosting automatically .
1
7

Cooking Displays
Scrolling Messages
While operating Amana Wave Oven™, messages can
scroll across display. Scrolling messages instruct user
what to do or press. If unsure of next step, wait and in
most displays scrolling message appears.
After
TIME ENTRY
changed during standard recipe, lamp intensity settings,
”MANUAL COOK”, and cooking time show. “MANUAL
COOK” indicates oven is no longer cooking according to
standard recipe.
pad is pressed or lamp intensity is
Displays
Display descriptions do not cover all possible displays.
Some displays prompt user to next step or describe
options. Descriptions below help interpret commonly
encountered displays. See displays below text.
When oven is connected to power or
is pressed, “Amana Wave Oven” and scrolling message
show in display .
STOP/RESET
pad
Amana Wave Oven
Select FOOD, DEFROST or
If pad
3-9
, or 0 is pressed, display shows recipe
information for standard recipe or saved custom recipe.
“MED” indicates upper lamp bank setting. “OFF”
indicates lower lamp bank setting. "NACHOS" indicates
menu item. “3:00” is cooking time.
Lamp banks have 4 settings, “OFF”, “LO”, “MED”, and
“HI”. Adjust lamp bank intensities on top and bottom
independently to perfect recipes. Press
or
HI
pad to adjust before or during cooking.
OFF, LO, MED
,
OFF MANUAL COOK
OFF COOKING 0:00
“CHECK LAMP SHIELDS” and scrolling message show
in display if shields are removed or are not in place while
oven is connected to power. Oven does not operate if
shields are not in place.
Amana Wave Oven
CHECK LAMP SHIELDS
“COOKING” shows in display after
pressed. If
opened, “P AUSE” shows instead of "COOKING".
Oven signals and "ADD TIME" shows in display when
cooking time counts down to 10 seconds. To add
additional cooking time in 30 second increments, press
number pad.
STOP/RESET
pad is pressed or oven door
ST ART
pad is
OFF NACHOS
OFF COOKING 3:00
“Oven Cool Down” and scrolling message show in display
after cooking while fan cools oven.
1
Oven Cool Down
cooking
“OVEN HOT!” and “OVEN COOL DOWN, Please Wait.”
show in display if oven temperature exceeds temperature
limit. See “Before Calling for Service” section if oven
continues to overheat.
Scrolling message
OVEN HOT!
OVEN COOL DOWN, Please
8
Pads
UPPER HALOGEN LAMPS
LO
LO
LOWER HALOGEN LAMPS
MED
MED
CUSTOM
RECIPE
SAVE
RECIPE
LOCK
OFF
OFF
CUSTOM RECIPE
Selects “CUSTOM RECIPES” and sets back to “ST ANDARD
RECIPES” .
SAVE RECIPE
Saves last cooking cycle to custom recipe when oven is
paused or finished cooking.
OFF/LOW/MED/HI
Lamp banks have 4 settings, “OFF”, “LO”, “MED”, and
“HI”. Adjust lamp bank intensities on top and bottom
independently to perfect recipes. Press
and
HI
pad to adjust before or during cooking.
OFF, LO, MED
,
LOCK
Press
LOCK
pad once to disable pads. Press
LOCK
pad
again to enable pads. Number pads signal when disabled.
“Locked” shows in display .
TIME ENTRY
Selects “Manual Time Entry Cooking”. Oven cooks according
to time and lamp intensity entered.
HI
HI
TIME
ENTRY
30 SEC.
DEFROST
APPE-
TIZERS
VEGE-
TABLES
TOASTED
ITEM S
BAKED
ITEMS
PIZZA
SANDWICHES
SEAFOOD
1
2
3
4
5
6
7
8
1-9,0
Begins preprogrammed “ST ANDARD” or programmed
“CUSTOM” recipes. Sets time. Press on numbers unless
instructed differently .
30 SEC/1
Adds 30 seconds of cooking time.
DEFROST/2
Selects “Defrost” heating. Choose to defrost
Poultry , or Meat
.
Seafood,
RESET• /STOP • •
Pauses cooking and cancels cooking after pause. Cancels
entries.
ST ART
Begins and resumes cooking.
POULTRY
RESET
STOP
MEAT
9
0
START
9

Operation
30 Second Pad
Cook in 30 second increments. Oven must show
“ST ANDARD RECIPES” in scrolling message.
1. Place food in oven.
• Always place food on rack. Food placed on lower
glass shield will burn.
2. Press
3. Set lamp intensities. See “Halogen Lamp Banks“
4. Press
Pause, Continue, or Stop Cooking
• To pause cooking, open door or press
pad once.
• To continue cooking, close door, and press
STAR T
• To stop cooking cycle, press
30 SEC/1.
• Press
section.
30 SEC./1
twice for 1 minute, or more for more time.
ST ART
• Press
• Adjust lamp bank intensities at any time while
30 SEC./1
cooking or after cooking stops.
cooking. See “Halogen Lamp Banks” section.
pad.
pad once to add 30 seconds,
pad to begin cooking.
pad to add cooking time while
STOP/RESET
pad.
STOP/RESET
pad twice.
Defrost
Defrost frozen food. Oven must show “ST ANDARD
RECIPES” in scrolling message.
1. Place food in oven.
• Always place food on rack. Food placed on lower
glass shield will burn.
2. Press preprogammed number 2 pad.
3. Press preprogrammed number 8, 9, or 0 pad to
select seafood, poultry, or meat.
4. Press
5. Stop oven when defrosting is finished.
ST ART
• Watch food while it defrosts. Defrost time is no set
according to portion.
• If lamps are adjusted above “LO” setting, oven
cooks according to “Manual Time Entry Cooking”
instructions.
pad.
Cooking with Standard Recipe
Cook with Amana’s recipes.
1. Place food in oven.
• Always place food on rack. Food placed on lower
glass shield will burn.
2. Press preprogammed pad number (
• Each number pad is next to cooking time or food
type. When pad is pressed, settings and title
display . Press pad repeatedly to view different
recipes under food type.
3. Press
Pause, Continue, or Stop Cooking
• To pause cooking, open door or press
pad once.
• T o continue cooking, close door , and press
STAR T
• To stop cooking cycle, press
ST ART
• Adjust lamp bank intensities at any time while
cooking. See “Halogen Lamp Banks” section.
• Press
oven is cooking.
• Press
finished cooking to save last cooking cycle. See
“Saving Recipes” section.
pad.
pad when correct recipe displays.
30 SEC./1
SAVE RECIPE
pad to add cooking time while
pad when oven is paused or
STOP/RESET
3-9,0
).
STOP/RESET
pad twice.
Pause, Continue, or Stop Cooking
• To pause cooking, open door or press
pad once.
• To continue cooking, close door, and press
STAR T
• To stop cooking cycle, press
pad.
STOP/RESET
STOP/RESET
pad twice.
10

Manual Time Entry Cooking
Oven cooks according to time and lamp intensity
entered. The Amana Wave Oven™ does not require
preheating. Time and lamp intensity can be adjusted
while cooking. Save cooking sequence when finished if
desired.
1. Place food in oven.
• Always place food on rack. Food placed on lower
glass shield will burn.
2. Press
3. Press number pads to enter cooking time.
4. Set lamp intensities. See “Halogen Lamp Banks“
5. Press
Pause, Continue, or Stop Cooking
• To pause cooking, open door or press
pad once.
• To continue cooking, close door, and press
STAR T
• To stop cooking cycle, press
TIME ENTRY
• For example, press 2, 3, and 0 pad for 2 minutes
and 30 seconds of cooking.
section.
ST ART
• Adjust lamp bank intensities at any time while
cooking.
• Press
• Press
30 SEC./1
cooking stops or when oven displays “ADD TIME?”.
SAVE RECIPE
finished cooking to save last cooking cycle as a
custom recipe. See “Saving Recipes” section.
pad.
pad to begin cooking.
pad to add cooking time after
pad when oven is paused or
STOP/RESET
pad.
STOP/RESET
pad twice.
Cooking with Custom Recipe
Cook with recipes you have saved.
1. Place food in oven.
• Always place food on rack. Food placed on lower
glass shield will burn.
2. Press
3. Press pad number (
4. Press
Pause, Continue, or Stop Cooking
• To pause cooking, open door or press
pad once.
• To continue cooking, close door, and press
STAR T
• To stop cooking cycle, press
CUSTOM RECIPE
• If “CUSTOM RECIPES” displays, go to step 3.
• If “ST ANDARD RECIPES” displays, press
CUSTOM RECIPE
• Select number pad according to food type.
STAR T
• Adjust lamp bank intensities at any time while
cooking. See “Halogen Lamp Banks” section.
• Press
cooking stops or when oven displays “ADD TIME?”.
• Press
finished cooking to save last cooking cycle. See
“Saving Recipes” section.
pad.
30 SEC./1
SAVE RECIPE
pad.
pad again.
1-9,0
).
pad to add cooking time after
pad when oven is paused or
STOP/RESET
pad.
STOP/RESET
pad twice.
Saving Recipe
Cook according to “Manual Time Entry Cooking”,
“Standard Recipes”, or “Custom Recipes” section. If
desired, save cooking cycle when cooking is paused or
after cooking is finished. Oven retains times, lamp
intensity level, and changes while cooking to create
recipes. Save recipes on preprogrammed pads. Save up
to 10 custom recipes. Standard recipes are never
replaced.
1. Pause or finish cooking.
2. Press
3. Press number pad (1-9,0).
SAVE RECIPE
• Select pad according to food type.
• Recipe is saved as custom recipe.
pad.
11

Amana Wave Oven™ Cooking
Cooking Guidelines
The Amana Wave Oven™ uses high intensity radiant
energy to cook, brown, grill, sear, and heat foods.
Amana Wave Oven™ minimizes cooking times while
maximizing food quality .
The Amana Wave Oven™ does not require preheating.
Amana Wave Oven™ uses 2 independent lamp banks to
heat food. The upper lamp banks heat food directly while
the lower bank heats cooking utensil or grill. Because
the grill or utensils absorb radiant energy , light does not
need to shine on the bottom of the food.
Upper and lower lamp banks do not heat simultaneously .
When upper lamp bank is operating, lower lamp bank is
off. However , to provide light for the oven cavity , upper
lamp bank turns on while lower bank heats. Oven display
shows “OFF” when upper lamp bank provides light for
oven cavity.
When developing recipes, watch the food while it cooks.
How food looks and smells while cooking provides the
best indication of how the food is cooking.
Use “Manual Time Entry Cooking” section to create a
new recipe and “Saving Recipe” section to quickly save
the recipe. If food bubbles or browns excessively , adjust
lamp bank intensities to lower radiant energy intensity .
By watching the food, recipes can be developed,
perfected, and saved quickly .
Recipes were developed when oven cavity was at room
temperature. If oven cavity is warm, decrease cooking
times slightly.
Use these guidelines to achieving best results.
• Use only rack or grill while cooking. When utensils are
placed over each other, food is shielded from radiant
energy and cooks unevenly .
• Distribute small pieces of food evenly . Overlapping
food, like beef or chicken fajita strips, fish fillets, french
fries, and appetizers, shields food from radiant energy
and food cooks unevenly.
• Use dark, aluminum pan when cooking foods that
require uniform bottom cooking. Foods like pizza,
fajitas, grilled sandwiches, and appetizers, require a
dark aluminum pan.
• Watch irregularly shaped foods closely. Edges or high
points of food, like bone-in chicken breast or rack of
ribs, can burn quickly if not watched closely .
• Use recommended utensils when following “Cooking
Guide” or “Recipes” section. Size, shape, and material
impact cooking times and results.
• Use recommended cooking times. Most recipes give
ranges of cooking times. Set your oven to the lowest
cooking time, check the food, and add time if
necessary.
• Measure ingredients carefully .
• Allow food to stand after cooking. Food continues to
cook after it is removed from oven.
Frozen or Thick Food Guidelines
Heat frozen foods using lower lamp intensity and longer
heating times. Frozen foods require a long heating period
at low lamp intensity to defrost before cooking.
Repeatedly increase and then decrease lamp intensity
levels while cooking food over 4 inches thick. This
cooking method grills exterior while allowing food to cook
to center.
Converting Conventional Recipes
See “Cooking Guide” or “Recipes” section and find food
similar to conventional recipe. Use cooking time and
utensil recommended for Amana Wave Oven™ recipe.
Watch the food while it cooks. How food looks and
smells while cooking provides the best indication of how
the food is cooking. Adjust time and lamp intensity as
needed.
Eliminating or Reducing Oven Smoke
Clean Amana Wave Oven™ and grill frequently to reduce
or eliminate oven smoke. When cooking with Amana
Wave Oven™, food can create smoke comparable to
open door oven broiling or a downdraft grill. Foods that
are high in sugar and fat content will create more smoke
than most foods. However, to eliminate or reduce oven
smoke follow the points below:
• Clean oven and grill frequently . Clean grill after every
cooking cycle. Though the grill does not appear to be
soiled, small amounts of grease and food residue can
create smoke.
• Do not allow drippings to fall on glass shield. Because
glass shield becomes very hot, food that falls onto
glass shield will create smoke.
• Do not over season or over baste. Because utensils
become very hot, seasonings or marinades on exposed
utensil will create smoke.
• Use properly sized utensils. Areas on grill or utensils
that are not covered by food will smoke if grease or food
residue falls on them. T o minimize the exposed area,
use utensils that are approximately the size of the food
item.
12

Grill
Use grill accessory for cooking meat, poultry , fish,
vegetables, or fruits. T o use, place food on grill and slide
in rack guides. Grill design directs grease and juices
away from food. Grill tines create grill marks on
underside of food while cooking. Wells on sides of grill
collect grease and juices. After grill cools remove grill
from oven and pour off grease and juices after each
cooking cycle or before wells fill.
WARNING
T o avoid severe burns, wear fireproof oven mitts or use
pan grips when handling grill, utensils, racks, glass
shields, and door. Allow oven to cool before reaching
into oven. Oven interior becomes hot during operation.
CAUTION
T o avoid damaging grill surface, do not use grill without
food.
13

Removing Grill and Rack
WARNING
T o avoid severe burns, wear fireproof oven mitts or use
pan grips when handling grill, utensils, racks, glass
shields, and door. Oven interior becomes hot
during operation.
T o avoid burns and damage to countertop, do not
remove grill until cool. Grease and juices can splash
and burn skin. A hot grill will burn or discolor
countertops and combustible surfaces.
Grill and rack must be tilted to place in or remove from
oven. Grill tabs and bend in rack contact guide stop when
sliding grill and rack out of oven. Guide stop prevents
rack and grill from sliding out of oven unintentionally.
Utensils
Use correct cookware to achieve best cooking results. If
unsure of cookware see “Cooking Guide” section and
choose similar food type.
• Use dark metal pans for searing foods, flat grilling
sandwiches, cooking pizza, stir frying, and to sauté.
• Use shiny metal pans to create golden brown surfaces
on baked goods.
• Use metal skewers for kabobs.
• Use glass utensils to steam or bake food. Glass does
not convey heat to food as well as metal.
• Use properly sized utensils. Areas on grill or utensils
that are not covered by food will smoke if grease or
food residue falls on them. T o minimize the exposed
area, use utensils that are approximately the size of
the food item.
CAUTION
After grill cools remove grill from oven and pour off grease
and juices after each cooking cycle or before wells fill. If
grill is removed when wells are full, grease and juices can
spill into oven. If wells become full, allow grill to cool and
use baster or towels to remove grease and juices from
grill.
Guide
Grill tab
Guide stop
T o avoid fire in oven, do not use paper , plastic, or other
combustible materials in oven. Material can ignite.
Utensils
Use Do not use
Grill accessory Paper
Dark metal pans Plastic wrap, containers,
or utensils with plastic
handles
Shiny metal pans Wooden skewers
Glass Cloth napkins or
dishcloths
Metal Skewers Ceramic dishes
Straw baskets
14

Care and Cleaning
Clean Amana Wave Oven™ frequently to maximize oven
life, performance, and efficiency . A dirty oven cooks
inefficiently because moisture, spills, and grease shield
radiant energy . If oven is not cleaned frequently , residual
grease in Amana Wave Oven™ will smoke during and
after cooking.
WARNING
T o avoid electrical shock which can cause severe
personal injury or death, unplug power cord or open
circuit breaker to oven before cleaning.
T o avoid severe burns, wear fire proof oven mitts or use
pan grips when handling utensils, racks, glass
shields, and door. Allow oven to cool before reaching
into oven. Oven interior can become hot during
operation.
Eliminating or Reducing Oven Smoke
Clean Amana Wave Oven™ and grill frequently to reduce
or eliminate oven smoke. When cooking with Amana
Wave Oven™, food can create smoke comparable to
conventional oven broiling or downdraft grilling. Foods that
are high in sugar or fat content can create smoke. T o
eliminate or reduce oven smoke follow points below:
• Clean oven and grill frequently . Clean grill after every
cooking cycle. Though the grill does not appear to be
soiled, small amounts of grease and food residue can
create smoke.
• Avoid food or food residue on glass shields. Because
glass shields become very hot, food that falls onto
glass shield will create smoke. Check shield for food
residue before cooking or after oven cools.
• Do not over season or over baste. Because utensils
become very hot, seasonings or marinades on exposed
utensil will create smoke.
• Use properly sized utensils. Areas on grill or utensils
not covered by food will smoke if grease or food residue
falls on them. To minimize the exposed area, use
utensils close to the size of the food item.
Cleaning Oven Cavity and Exterior
Before cleaning, allow oven to cool for 15 minutes. Clean
surfaces with a clean cloth, sponge, or nylon pad, and
mild detergent diluted in warm water. Use degreaser if
heavily soiled. Wipe interior with damp, clean cloth or
sponge thoroughly and dry after cleaning.
• Do not use harsh or abrasive cleaners, or cleaners
containing ammonia.
• Remove excess water from cloth before wiping oven.
• Always clean oven cavity with shields in place to avoid
damaging halogen bulbs.
Cleaning Grill
Before cleaning, allow grill to cool for 15 minutes. Wear
fireproof oven mitts or use pan grips when hot. Grill is
dishwasher safe.
1. Pour off grease and juices from grill.
2. Wipe grill surface with paper towel.
• If heavily soiled, wash with mild detergent diluted in
warm water, and clean cloth or sponge.
• T o remove baked-on material, use a plastic
nonabrasive cleaning pad. Do not use an abrasive
pads. Abrasive pads can damage nonstick grill
surface.
Cleaning Oven Racks
Clean oven racks and rack guides with detergent diluted
in warm water or in dishwasher. Scrub with soft nylon pad
to remove baked-on material. Do not remove oven rack
guides.
Cleaning Glass Shields
Wipe shields regularly when cooking greasy food for best
performance. Most cleaning does not require removing
upper shield.
For more thorough cleaning, remove oven racks and then
glass shields. Remove upper shield before lower shield
so any falling material is caught by lower shield. If food
falls onto bulb gently brush off with clean dry cloth. See
“Removing Glass Shields” section.
Clean surfaces with a clean cloth, sponge, or nylon pad,
and mild detergent diluted in warm water. Glass cleaner
can also be used oven surfaces. Wipe dry after cleaning.
• Use degreasers for grease laden surfaces.
• Use safety scraper to remove baked-on material and
stains from glass shields.
• Do not touch halogen bulbs with bare fingers. Oil from
hands can cause premature bulb failure. If bulbs are
touched with bare fingers, clean with rubbing alcohol.
15

Removing Glass Shields
Remove upper shield before lower shield so any falling
material is caught by lower shield. If material falls onto
bulb gently brush off with clean dry cloth. Oven does not
operate if shields are not in place. Filter is customer
replaceable.
1. Disconnect power to oven.
2. Remove screws located on front of oven cavity
ceiling.
• Use Phillips screwdriver.
Cleaning Air Filter
Some ovens include air filter located directly below oven
door. Filter is customer replaceable. Clean if filter shows
debris or lint build-up.
CAUTION
T o avoid overheating and oven damage, clean air filter
regularly .
Metal Cover
Remove Screws
3. Remove metal cover and place aside.
4. Slide upper glass shield out of oven cavity .
• Wipe up any food that falls on lower glass shield.
5. Grasp edge of lower glass shield, lift, and slide out of
oven cavity.
1. Remove air filter by removing thumb screws, located
on outside edges of filter.
Air Filter Screws
2. Wash filter with mild detergent diluted in warm
water. Rinse and dry thoroughly .
3. Replace filter by reversing step 1.
Edge of Lower Shield
6. Reverse instructions to reinstall.
16

Cleaning Oven Cavity Filter
After cooking, clean oven cavity filter with mild detergent
diluted in warm water. A clean filter assures proper
airflow. Filter and filter cover can be cleaned in
dishwasher. Filter is customer replaceable. Remove filter
to clean.
WARNING
T o avoid property damage, including fire damage, do
not operate oven without filter and filter cover in place.
1. Open oven door and locate filter cover on rear wall of
oven cavity .
3. Remove filter from filter cover.
• Filter sets inside filter cover.
4. Reverse process to reinstall.
2. Place fingers on right side of filter cover and slide
towards center of filter.
• Filter cover clips will disengage from slots in rear
wall. Remove from oven cavity .
Cleaning Side Air Vents
Check for a buildup of cooking vapors along discharge
louvers on side of oven. Clean air vent with damp cloth to
ensure proper airflow. Dry thoroughly .
Side Air Vents
17

Replacing Halogen Bulbs
WARNING
T o avoid severe burns, wear fire proof oven mitts or use
pan grips when handling utensils, racks, glass
shields, and door. Allow oven to cool before reaching
into oven. Oven interior becomes hot during operation.
T o avoid electrical shock which can cause severe
personal injury or death, unplug power cord or open
circuit breaker to oven before changing bulbs.
CAUTION
T o avoid burns, cuts, and damaging halogen bulb,
wear cotton gloves or grasp bulb with clean cotton
cloth when handling halogen bulbs. Oil from hands will
reduce halogen bulb life.
Before changing bulbs, allow oven to cool for 15 minutes.
Failed halogen bulbs affect cooking performance.
Replace failed halogen bulbs immediately. Always wear
cotton gloves when replacing halogen bulbs. Cotton
gloves protect hands against cuts if the bulb breaks and
protects halogen bulbs against oils from hands that
reduce bulb life. Bulbs are customer replaceable. T o
purchase replacement halogen bulbs, contact Amana at
1-800-843-0304 or your oven supplier.
1. Disconnect power to oven.
2. Remove glass shields.
• See “Removing Glass Shield” section.
3. Grasp halogen bulb at end and slide bulb towards
opposite socket until end of bulb clears near socket.
• Do not touch halogen bulbs with bare fingers. Oil
from hands can cause premature bulb failure. If
bulbs are touched with bare fingers, clean with
rubbing alcohol.
Do not touch glass with bare fingers
4. Lift bulb end up and away from near socket until bulb
is clear of both sockets.
5. Reverse steps 2-4 to reinstall halogen bulb.
• Verify halogen bulb configuration. See “Halogen
Lamp Banks” section.
6. Reconnect power and confirm new bulb operates.
18

Service Codes
During operation, oven display may show service codes.
If service code appears in display , press
pad to reset oven. If service code continues to appear,
disconnect power to oven (turn off at circuit breaker), wait
for 1 minute, and reconnect power to oven. Contact an
authorized servicer if oven display still shows codes.
STOP/RESET
Servi ce code: 10
Service code: 20
Service code: 21
If service codes below show in oven display , call
electrician or electric company . Extreme high or low
supply voltage is present.
Service code: 40
LINE VOLTAGE LOW
Service code: 41
LINE VOLTAGE HIGH
Servi ce code: 30
Servi ce code: 31
Service code: 50
Servi ce code: 60
19

Before Calling for Service
Any questions or to locate an authorized servicer, call
1-800-843-0304 inside U.S.A. 1-319-622-5511 outside
WARNING
T o avoid electrical shock which can cause severe
personal injury or death, do not remove outer case at
any time. Only authorized servicer should remove
outer case.
Problem Cause/Solution
Wave Oven™ smokes during or after cooking. Clean oven before next use.
U.S.A.
Warranty service must be performed by an authorized
servicer. Amana also recommends contacting an
authorized servicer if service is required after warranty
expires.
If Amana Wave Oven™ repeatedly shows “AUTO
COOL DOWN” or “OVEN HOT!” in display:
Wave Oven™ does not operate. • Confirm oven is plugged into dedicated circuit.
Wave Oven™ operates intermittently. Check air inlet and discharge areas for obstructions.
Wave Oven™ does not accept entries when pad is
pressed.
Wave Oven™ shows service code, malfunctions or
displays random characters.
• Verify if oven was operating for an extended
period of time.
• Clean air filter. See “Cleaning Air Filter” section.
• Confirm proper air vent side clearance. Leave at
least 1 inch/2.54 centimeters on oven side with air
vents to ensure adequate air flow around oven.
• Confirm air exhaust is not blocked.
• Confirm oven is not placed above heat source like
an oven or fryer.
• Confirm oven is on grounded and polarized circuit.
(Contact electrician to confirm.)
• Check fuse or circuit breaker.
Open and close oven door. Press pad again.
Disconnect power to oven (turn off at circuit breaker),
wait for 1 minute, and plug in oven. If oven continues
to malfunction, call for service.
Wave Oven™ constantly cooks unevenly. Check for failed and halogen bulbs configuration. See
“Halogen Lamp Banks” section.
If Amana Wave Oven™ display show “OFF” when outer
bulbs of upper lamp bank are turned on:
If Standard Recipe or defrost times change: Auto Voltage Compensation feature has adjusted
If Wave Oven™ displays service code 40 or 41. If service codes below show in oven display, call
Oven fan turns on while oven is cooking. Wave Oven™ is operating normally.
Light is visible through lower air filter or oven bottom. Wave Oven™ is operating normally.
Oven is operating normally. Upper lamp bank turns on
to provide light for the oven cavity.
cooking times. See “Auto Voltage Compensation”
section.
electrician or electric company. Extreme high or low
supply voltage is present.
20

Cooking Guides
Standard Recipe Guide
best cooking results, duplicate the information in
recipe pads. These recipes cannot be changed or deleted.
Defrost Guide
defrosting results, watch food while defrosting. Defrost times often exceed required defrost time. These recipes
cannot be changed or deleted.
consists of the defrost cycles that are programmed in The Amana Wave Oven™. To achieve the best
Custom Recipe Guide
creating and saving new recipes.
consists of the recipes that are programmed in The Amana Wave Oven™. To achieve the
Standard Recipe Guide
consists of recipes for commonly cooked foods. The recipes should be used as a reference for
when using the preprogrammed standard
Standard Recipe Guide
Cook with Amana’s recipes. Pads
changed. Cooking times can change because Amana Wave Oven™ measures supply voltage and adjusts times
automatically . Recipe times listed in this manual are for 240 supply voltage. For best results, always check food at
minimum time.
Food Items Food
Quantity
Appetizers
Nachos
Buffalo wings,
frozen
Mozzarella sticks,
frozen
Quesadillas Two 8"
Vegetables
Corn, frozen 10 oz. 1 qt. glass dish
Carrots, frozen 1 lbs. 1½ qt. glass
Carrots, fresh
baby whole
Peas, frozen 1 lbs. 1 qt. glass dish
Broccoli, frozen 10 oz. 1½ qt. glass
Broccoli, fresh 1 lbs. 1½ qt. glass
Toasted Items
Bagels 2 Oven rack Middle 1:35 B/H
English muffins 2 Oven rack Middle 1:30 B/H
French bread one half loaf
5 oz. chips
6 oz. cheese,
shredded
¾ C salsa
14 oz. 9 x 13 shiny Middle 8:00 B/L, turn over at 5:00
8 oz. 10 x 12
tortillas, ¼ C
beans, ¼ C
hamburger, ¾
C cheese
10 oz. 1½ qt. glass
with butter and
seasonings
3-9, 0
contain preprogrammed recipes. Standard recipes can not be lost or
Utensils
Glass, Grill,
Shiny or Dark
Metal
12" round dark Middle 3:00 T/M
insulated shiny
9" round dark Middle 1:45 T/H
with lid
dish with lid
dish with lid,
Add 3 T water
with lid
dish with lid
dish with lid,
Add 3 T water
Oven rack Middle 1:00 T/H
Rack Position
Upper, Middle, or
Lower
Middle 1:30 T/H
Lower 4:30 B/H
Lower 7:00 B/H
Lower 6:30 B/H
Lower 4:30 B/H
Lower 4:30 B/H, stir
Lower 4:30 B/H
21
Cook Time (min.) and
Lamp Setting
(T)op or (B)ottom Lamp/
(L)O, (M)ED, or (H)I
2:00 T/M
3:00 T/M
0:45 B/H
0:40 T/H
3:00 T/H
2:30 T/H
0:55 T/H
1:05 T/H
1:00 B/M

Food Items Food
Quantity
Baked Items
Crescent rolls 8 oz. tube
refrigerated
Bread sticks 8 sticks
refrigerated
tube
Biscuits 7.5 oz. 10 x 12
Cookies,
refrigerated raw
dough
Muffins 6 muffins from
Cinnamon rolls 12.4 oz. tube 8" round shiny Middle 8:00 B/L
Pizza
12" parbaked
crust
12" raw dough
crust
12" frozen 22 oz. Oven rack Middle 1:45 T/M
Frozen French
bread pizza
Sandwiches
Ham and cheese 2 sandwiches,
Grilled cheese 2 sandwiches.
9 cookies
approx. 2 tbls
dough per
cookie
batter. Fill
muffin cup
2
3
full.
/
17 oz. crust,
single topping
regular
thickness
crust, single
topping
4.65 oz. 10 x 12
per sandwichsame as
grilled cheese
plus 2.5 oz.
ham
per sandwich2 slices bread
buttered
2 slices
American
cheese
Utensils
Glass, Grill,
Shiny or Dark
Metal
10 x 12
insulated shiny
10 x 12
insulated shiny
insulated shiny
10 x 12
insulated shiny
Muffin tin, shiny Middle 9:30 B/M, turn pan at 4:50
Oven rack Middle 1:30 B/H
12" round dark Middle 3:45 B/M
insulated shiny
12" round dark Middle 0:40 T/H
12" round dark Middle 0:50 T/H
Rack Position
Upper, Middle, or
Lower
Middle 8:15 B/M
Middle 8:15 B/M
Middle 7:00 B/M
Middle 6:00 B/M
Middle 4:00 T/L
Cook Time (min.) and
Lamp Setting
T)op or (B)ottom Lamp/
(
(L)O, (M)ED, or (H)I
0:15 T/M
2:15 T/H
2:05 T/M
0:45 B/M
1:10 B/H
1:00 T/M
2:00 T/H
2:00 T/M
3:15 B/M
1:25 B/M
0:15 B/H
1:30 B/H
22

Food Items Food
1
1
Quantity
Sandwiches
Rueben 2 sandwiches,
per sandwich2 slices rye
bread buttered
on 1 side,
1000 Island
dressing,
2.5 oz. Corn
beef, 2 slices
Swiss Cheese,
/8 C
sauerkraut
Roast beef 2 sandwiches,
per sandwich3 oz. shaved
roast beef,
bun buttered
on both sides.
Seafood
Fish sticks 15 sticks 10 x 12 shiny
Fish filets 1.5 lbs. for 2
fillets
Fish steaks 1 lb. for 2
steaks
Shrimp 12 oz. jumbo
shrimp, 2T.
butter, parsley,
garlic
Poultry
Breast 1-1¼ lbs.
boneless and
skinless
Chicken fingers,
frozen
Chicken nuggets,
frozen
Meat
NY strip 2, 1¼" thick
Sirloin 2, 1¼" thick
T-bone 2, ¾" thick
Hamburger 4, 1/3 lb.
Pork chops 4, ¾" thick
9 oz. 10 x 12 shiny
13.5 oz. 10 x 12 shiny
steaks,
1½ lbs. total
steaks, 1 lb.
total
steaks,
medium, 2 lbs.
total
patties
chops
Utensils
Glass, Grill,
Shiny or Dark
Metal
12" round dark Middle 1:00 T/H
/8 C
12" round dark Middle 2:00 T/M
insulated
Grill Middle 5:50 B/H
Grill Middle 5:00 B/H
9” glass pie
plate
Grill Middle 4:00 B/H
insulated
insulated
Grill Middle 5:30 B/H
Grill Middle 5:00 B/H
Grill Middle 5:30 B/H
Grill Middle 3:15 B/H
Grill Middle 6:00 B/H
Rack Position
Upper, Middle, or
Lower
Middle 3:50 T/M
Middle 2:05 T/H
Middle 6:00 T/M
Middle 5:00 B/M
Cook Time (min.) and
Lamp Setting
(T)op or (B)ottom Lamp/
(L)O, (M)ED, or (H)I
1:30 B/M
0:10 B/H
0:45 B/M
0:20 T/H
4:00 T/H
2:30 T/H
1:15 B/H
3:00 T/H
2:15 T/H
3:00 T/H
2:30 T/H
3:00 T/H
3:30 B/H
3:15 T/H
7:00 T/M
23

Defrost Guide
Follow these recommendations as a guide for times and lamp intensities. Times, rack position, and lamp intensities
may vary depending on conditions and food type. For best results, always watch food at minimum time.
Food Items Utensils
Glass, Grill, Shiny or Dark Metal
Seafood
Poultry
Meat
Grill Middle 18:00 B/D
Grill Middle 18:00 B/D
Grill Middle 18:00 B/D
Rack Position
Upper, Middle, or
Lower
Cook Time (min.) and
Lamp Setting
(D)efrost
Custom Recipe Guide
Follow these recommendations as a guide for times and lamp intensities. Times, rack position, and lamp intensities
may vary depending on conditions and food type. For best results, always check food at minimum time.
Oven can sear a roast prior to conventional oven roasting. For example, place a 3 lb. boneless beef chuck roast in a
dark metal pan in the middle rack position. Set 3:00 B/H, then 3:00 T/H.)
Meat
Food Items Food
Quantity
Hamburger patties
pre-pressed,
pierce with fork
prepressed,
pierce with fork
Beef cube steak
NY Strip
1¼-inch
med. rare
1¼-inch
med. rare
Ribeye Steak
¾-inch
med. rare
¾-inch
medium
¾-inch
med. well
1¼-inch
med. rare
1¼-inch
med. rare
4 to 6
¼ lb. patties
2 to 4
1
/3 lb. patties
2 to 4
1
/3 lb. each
2 steaks
1½ lbs.
4 steaks
3 lbs.
4 steaks
½ lb. each
4 steaks
½ lb. each
4 steaks
½ lb. each
2 steaks
2 lbs.
4 steaks
4 lbs.
Utensils
Glass, Metal, or
Grill
Grill Middle 3:00 to 3:30 B/H
Grill Middle 3:00 to 3:30 B/H
Grill Middle 3:30 to 4:00 B/H
Grill Middle 5:00 B/H
Grill Middle 5:00 B/H
Grill Middle 3:00 B/H
Grill Middle 3:30 B/H
Grill Middle 3:30 B/H
Grill Middle 5:00 B/H
Grill Middle 5:00 B/H
Rack Position
Upper, Middle, or
Lower
Cook Time (min.) and
Lamp Setting
(T)op or (B)ottom Lamp/
(L)O, (M)ED, or (H)I
2:30 to 3:00 T/H
3:00 to 3:30 T/H
1:30 to 2:00 T/H
2:30 to 3:00 T/H
3:30 T/H
2:00 to 2:30 T/H
2:30 T/H
3:00 to 3:30 T/H
3:15 T/H
4:00 T/H
24

Food Items Food
Quantity
T-Bone Steak
¾-inch
rare
¾-inch
medium
¾-inch
medium
1¼-inch 2 steaks
Porterhouse Steak
¾-inch
med. rare
¾-inch
med. well
1¼-inch 2 steaks
Bacon wrapped
filet
med. rare
Beef tenderloin
1¼-inch
med. rare
Wieners
Bratwurst
Ham steak
Pork tenderloin
raw, breaded
Pork patties
raw, breaded
Pork minute steak
Pork loin
center cut
Pork chops
¾" thick
Pork chops
1¼ “ thick
Lamb chops
2 steaks
¾ lb. each
2 steaks Grill Middle 3:30 B/H
4 steaks Grill Middle 3:30 B/H
2 lb.
2 steaks
1½ lbs.
2 steaks
1½ lbs.
2 lbs.
2 steaks
1lb.
6 steaks
3 lbs.
4 Grill Middle 1:30 B/H
4 Grill Middle 3:00 B/H
1½ lbs. Grill Middle 3:00 B/H
2 loins
1
/3 lb. each
4 patties
5 oz. each
2 loins
1
/3 lb. each
4 loins
1
/3 lb. each
6 loins
1
/3 lb. each
4 loins
1
/3 lb. each
4 chops Grill Middle 6:00 B/H
2 chops
¾ lbs. each
4 chops
¼ lb. each
Utensils
Glass, Metal, or
Grill
Rack Position
Upper, Middle, or
Lower
Cook Time (min.) and
Lamp Setting
(T)op or (B)ottom Lamp/
(L)O, (M)ED, or (H)I
Grill Middle 2:30 B/H
2:30 T/H
2:30 T/H
2:30 T/H
Grill Middle 5:00 B/H
3:30 T/H
Grill Middle 3:30 B/H
3:00 to 3:30 T/H
Grill Middle 3:30 B/H
4:00 to 4:30 T/H
Grill Middle 5:00 B/H
3:30 T/H
Grill Middle 5:30 B/H
6:30 T/M
Grill Middle 5:00 B/H
3:30 T/H
2:30 T/H
2:30 to 3:00 T/H
1:00 B/H
2:00 T/H
Grill Middle 3:00 to 3:30 B/H
2:00 to 2:30 T/H
Grill Middle 3:30 to 4:00 B/H
3:00 to 3:30 T/H
Grill Middle 3:00 B/H
2:30 T/H
Grill Middle 4:00 B/H
2:00 T/H
Grill Middle 4:00 B/H
3:00 T/H
Grill Middle 4:00 B/H
3:00 to 3:30 T/H
7:00 to 7:30 T/M
Grill Middle 7:00 B/H
8:00 to 8:30 T/M
Grill Middle 3:30 B/H
3:00 T/H
25

Food Items Food
Quantity
Chicken breast
Boneless/skinless
Chicken patties
Raw, breaded
Turkey filet
Haddock
Lobster tail
with 3 T water
Orange roughy
Salmon steak
Scallops
6 to 8/serving
Shrimp
6 to 8/serving
6 to 8/serving 1 serving
Asparagus
frozen
Beans, Green
fresh
Add 3 T water
Beans, Green
frozen
Broccoli
fresh
Add 3 T water
frozen 10 oz. 1.5 qt. glass
Carrots, Baby
whole, fresh
Add 3 T water
whole, frozen 1 lb. 1.5 qt. glass
20 oz. pkg 3 or
4 pcs
2 to 4
6 oz. each
1.5 to 3 lbs. Grill Middle 4:30 B/H
2 fillets
1 lb. each
2 tails
5 oz. ea.
2 fillets
8 oz. each
2 to 4 steaks
8 oz ea.
2 servings
1 lb.
2 servings
1 lb.
½ lb.
10 oz. 1 qt. glass dish
1 lb. 1 qt. glass dish
1 lb. 1.5 qt. glass
1 lb. 1.5 qt. glass
1 lb. 1.5 qt. glass
Utensils
Glass, Metal, or
Grill
Grill Middle 3:00 B/H
Grill Middle 4:00 B/H
Grill Middle 4:00 B/H
1 qt. glass dish
with lid
Grill Middle 4:00 B/H
Grill Middle 4:00 B/H
Grill Middle 3:00 B/H
Grill Middle 2:00 B/H
1 qt. glass dish
with lid
with lid
with lid
dish with lid
dish with lid
dish with lid
dish with lid
dish with lid
Poultry
Rack Position
Upper, Middle, or
Lower
Sea Food
Lower 6:00 B/H
Lower 2:00 B/H
Vegetables
Lower 4:00 to 4:30 B/H
Lower 4:00 to 4:30 B/H
Lower 4:30 to 5:00 B/H
Lower 4:00 to 4:30 B/H
Lower 4:00 B/H
Lower 5:30 to 6:00 B/H
Lower 6:00 to 6:30 B/H
Cook Time (min.) and
Lamp Setting
(T)op or (B)ottom Lamp/
(L)O, (M)ED, or (H)I
3:00 T/H
3:00 to 3:30 T/H
2:30 to 3:00 T/H
3:30 to 4:00 T/H
3:00 to 4:00 T/H
3:30 to 4:00 T/H
4:00 to 4:30 T/H
2:30 to 3:00 T/H
2:00 - 2:30 T/H
2:00 T/H
2:00 to 2:30 T/H
2:00 to 2:30 T/H
3:00 to 3:30 T/H
26

Food Items Food
Quantity
Carrots, Cut
frozen
Mushrooms
sliced Portabella,
fresh brushed
with garlic butter
sliced or whole,
fresh
Peas
frozen
1 lb. 1.5 qt. glass
10 oz. 1 qt. glass dish
1 lb. 1 qt. glass dish
6 oz. dark metal pan Lower 1:00 B/H
8 oz. 1 qt. glass dish
10 oz. 1 qt. glass dish
Utensils
Glass, Metal, or
Grill
dish with lid
with lid
with lid
with lid
with lid
Rack Position
Upper, Middle, or
Lower
Lower 4:30 to 5:00 B/H
Lower 3:45 to 4:15 B/H
Lower 5:30 to 6:00 B/H
Lower 3:00 to 3:30 B/H
Lower 3:45 to 4:15 B/H
Cook Time (min.) and
Lamp Setting
(T)op or (B)ottom Lamp/
(L)O, (M)ED, or (H)I
1:00 to 1:30 T/H
1 lb. 1 qt. glass dish
with lid
Pea pods
frozen
Squash
acorn, fresh
quartered and
cleaned
winter, frozen 12 oz. 1 qt. glass dish
Vegetable mixture
frozen
Zucchini
fresh, sliced
lengthwise
Sliced
Add 3 T water
,
1 lb. 1 qt. glass dish
with lid
1 medium 2 qt. glass dish
with lid
with lid
1 lb. 1.5 qt. glass
dish with lid
2 medium grill Middle 3:00 B/H
2 medium 1 qt. glass dish
with lid
Lower 4:00 to 4:30 B/H
Lower 4:30 to 5:00 B/H
Lower 5:00 to 5:30 B/H
4:00 to 4:30 T/H
Lower 4:00 to 4:30 B/H
4:00 to 4:30 T/H
Lower 6:00 to 6:30 B/H
2:00 to 2:30 T/H
Lower 3:00 B/H
2:00 to 2:30 T/H
27

Recipes
Appetizers
Honey-Glazed Snack Mix
4 cups crispy corn squares cereal
1 (5 ounce) container chow mein noodles
1 cup peanuts
¼ cup butter or margarine, melted
¼ cup honey
2 tablespoons soy sauce
1 teaspoon five-spice powder
½ teaspoon garlic powder
½ teaspoon ground ginger
¼ teaspoon ground red pepper
In medium bowl combine cereal, noodles and peanuts.
In small bowl combine butter or margarine, honey, soy
sauce, five-spice powder, garlic powder , ginger and red
pepper. Pour butter mixture over cereal, mixing well.
Spread in greased 9x13-inch pan. Bake on middle oven
rack with lower halogen lamps on “LO” for 7 to 8 minutes
or until toasted. Stir mixture every 2 minutes. Makes 8
cups.
Mexican Chicken Nuggets
1 cup crushed corn chip crumbs (about 3 cups whole
chips)
1 teaspoon Mexican seasoning
½ teaspoon ground cumin
1 whole chicken breast (12 oz.) cut into 1¼ inch cubes
1 egg white, slightly beaten
Dipping Sauce:
½ cup chunky salsa
¼ sour cream
In a resealable plastic storage bag combine crumbs,
seasoning and cumin. Dip chicken into beaten egg white.
Transfer chicken to crumb mixture. Seal bag, shaking to
coat chicken with crumb mixture.
Place chicken pieces on 12x14-inch insulated baking
sheet. Bake on middle oven rack with lower halogen
lamps on “HI” for 1½ minutes. Rotate pan. Continue
baking on middle oven rack with upper halogen lamps on
“HI” for 1½ to 2 minutes or until chicken is no longer pink
and juices run clear.
Orange Spiced Nuts
2 tablespoons butter or margarine, melted
2 tablespoons brown sugar
2 teaspoons finely shredded orange peel
2 teaspoons ground cinnamon
1 teaspoon ground coriander
½ teaspoon ground allspice
¼ teaspoon ground red pepper
1 (12-ounce) can mixed nuts
In medium bowl combine butter, brown sugar , orange
peel, cinnamon, coriander, allspice and red pepper . Stir
in nuts, mixing until well coated. Spread nuts in 9x13inch baking pan. Bake on middle oven rack with lower
halogen lamps on “LO” for 5 to 7 minutes or until nuts are
toasted. Stir every 2 minutes. Makes 3 cups.
Pesto Cheese Braid
½ cup (2-ounces) finely crumbled feta cheese
1
/3 cup prepared pesto sauce
1 (2-ounce) jar diced pimento, drained
1 (8-ounce) package refrigerated crescent rolls
Sesame seeds
In medium mixing bowl combine feta cheese, pesto
sauce and pimento. Set aside.
Unroll crescent dough onto a lightly floured sheet of
waxed paper. Pinch together seams and pat or roll dough
into a 12x8-inch rectangle. Invert dough onto an insulated
12x14-inch baking sheet. Remove waxed paper.
Spread pesto mixture lengthwise down center 2-inches of
dough. Make cuts 1-inch apart on each side of rectangle
just to edge of filling. T o give braided appearance, fold
strips of dough at an angle halfway across filling,
alternating from side to side. Sprinkle braid with sesame
seeds. Bake on middle oven rack with lower halogen
lamps on “LO” for 10 to 12 minutes or until golden brown.
Rotate pan halfway through baking time. Cut into slices.
Serves 8.
For sauce, combine salsa and sour cream in small bowl.
Serve with nuggets. Makes 2 to 2½ dozen.
28

Crab and Spinach Stuffed Mushrooms
1 (10-ounce) package frozen, chopped spinach,
thawed and well drained
1 (8-ounce) package imitation crab meat, finely chopped
1 (5-ounce) container garlic and herb cheese
½ grated Parmesan cheese
2 tablespoons lemon juice
18 large mushroom caps (approximately 2½-inches in
diameter)
Grated Parmesan cheese
In medium bowl combine spinach, imitation crab, garlic
and herb cheese, ½ cup Parmesan cheese and lemon
juice. Stuff mushroom caps with 1 rounded tablespoon of
spinach mixture. Sprinkle with additional Parmesan
cheese. Place 9 mushrooms in 9x13-inch baking pan,
Bake on middle oven rack with lower halogen lamps on
“LO” 8 to 10 minutes or until heated through. Continue
baking with upper halogen lamps on “HI” for 1½ to 2
minutes or until bubbly and cheese is golden. Repeat
with remaining mushrooms. Makes 18.
Breads
Cranberry Orange Scones
2½ cups all-purpose flour
¼ cup sugar
1 tablespoon baking powder
½ teaspoon salt
3 tablespoons butter or margarine
¾ cup dried cranberries
2 teaspoons finely shredded orange peel
1 cup whipping cream
1 egg white, slightly beaten
Granulated sugar
In medium mixing bowl combine flour, sugar , baking
powder and salt. Cut in butter or margarine until crumbly .
Stir in dried cranberries and orange peel. Add whipping
cream, stirring just until moistened.
Almond Crusted Coffeecake
T opping:
¼ cup sugar
1 tablespoon flour
1 tablespoon milk
3 tablespoons butter or margarine
½ cup sliced almonds
½ teaspoon almond extract
Cake:
¼ cup butter or margarine
2
/3 cup butter or margarine
1 egg
½ teaspoon almond extract
1 cup all-purpose flour
1½ teaspoons baking powder
½ cup milk
For topping, in 2-cup glass measure blend together ¼
cup sugar and 1 tablespoon flour. Gradually blend in 1
tablespoon milk. Add butter. Heat in microwave on high
for 45 seconds to 1 minute 15 seconds until thickened
and bubbly. Stir halfway through cooking time. Stir in
almonds and ½ teaspoon almond extract. Set aside.
For cake, combine flour and baking powder in small bowl;
set aside. In medium mixer bowl cream ¼ cup butter or
margarine and 2/3 cup sugar until fluffy . Beat in egg and ½
teaspoon almond extract. Add flour mixture to creamed
mixture alternately with milk just until blended. Spread
batter into 9-inch round baking pan. Bake on middle oven
rack with lower halogen lamps on “LO” for 7 to 9 minutes
or until top springs back when pressed lightly with finger.
Rotate pan one quarter turn half way through baking time.
Immediately spread topping evenly over warm cake.
Continue baking on middle oven rack with upper halogen
lamps on “HI” for 1 to 1½ minutes or until topping is
bubbly and edges begin to brown. Serves 8.
Turn dough out onto a lightly floured surface. Knead
dough by folding and pressing gently for 10 to 12 strokes.
Pat or lightly roll dough into an 8-inch diameter circle.
Cut dough into 12 wedges. Brush top of dough with
beaten egg white; sprinkle with sugar.
Place scones in rows on insulated 12x14-inch baking
sheet. Bake on middle oven rack with lower halogen
lamps on “LO” for 8 to 9 minutes or until set. Rotate pan
halfway through baking time. Continue baking on middle
oven rack with upper halogen lamps on “HI” for 30 to 45
seconds or until tops are golden brown. Makes 12.
29

Caramel Pecan Rolls
¼ cup butter or margarine, melted
¼ cup brown sugar
2 tablespoons light corn syrup
¼ cup chopped pecans
¼ teaspoon cinnamon
1 (16-ounce) loaf frozen white bread dough, thawed
2 tablespoons butter or margarine, softened
3 tablespoons sugar
1 teaspoon cinnamon
In small bowl whisk together melted butter or margarine,
brown sugar, corn syrup and cinnamon until well blended.
Spread evenly into a greased 9½-inch deep dish pie
plate. Sprinkle with pecans. Set aside.
Place dough onto a lightly floured surface. Roll into a
12x8-inch rectangle. Spread with softened butter or
margarine. In small bowl combine sugar and l teaspoon
cinnamon; sprinkle over rectangle. Tightly roll up
rectangle, jelly-roll style, starting from one of the long
sides. Pinch dough along seam to seal.
Cut roll into 12 pieces. Place into prepared pan. Cover
and let rise in warm place until nearly double (about 1
hour).
Cheese and Jalapeno Cornbread
1 cup yellow cornmeal
1 cup all-purpose flour
¼ cup sugar
4 teaspoon baking powder
¼ teaspoon salt
1 cup milk
2 eggs
¼ cup cooking oil
1 cup (4-ounces) shredded Monterey Jack cheese with
jalapenos
In medium bowl combine cornmeal flour, sugar , baking
powder and salt. In small bowl combine oil, milk and
eggs. Add liquid ingredients to dry ingredients, stirring
just until moistened and smooth. Gently stir in cheese.
Pour batter into greased 7x11-inch glass baking dish.
Bake on middle oven rack with lower halogen lamps on
“LO” for 8 to 9½ minutes or until top springs back when
lightly pressed with finger. Rotate pan halfway through
baking time. Continue baking on middle oven rack with
upper halogen lamps on “HI” for 20 to 30 seconds or until
top is golden brown. Serves 8 to 9.
Desserts
Uncover rolls. Bake on middle oven rack with lower
halogen lamps on “LO” for 8 to 9½ minutes or until golden
brown. Invert rolls onto a serving platter. Makes 12.
Parmesan Chive Bread
½ cup mayonnaise
¼ cup grated Parmesan cheese
1 tablespoon snipped chives
1 teaspoon Worcestershire sauce
1 clove garlic, minced
1 (8-ounce) loaf French bread
¼ cup butter or margarine, softened
In small bowl combine mayonnaise, Parmesan cheese,
chives, Worcestershire sauce and garlic until well
blended. Set aside.
Slice bread in half lengthwise. Spread butter or margarine
evenly over each half. Place bread on an insulated 12x14inch baking sheet. Bake on middle oven rack with lower
halogen lamps on “MED” for 6 to 7 minutes or until bread
is heated through and slightly toasted. Spread
mayonnaise mixture evenly over bread halves. Continue
baking on middle oven rack with upper halogen lamps on
“HI” for 1 to 1½ minutes or until top is bubbly and
browned. Serves 6 to 8.
Cinnamon Apple Crumble
6 cups peeled and cored apple slices
½ cup sugar
1 tablespoon cornstarch
½ teaspoon cinnamon
½ cup apple juice or water
T opping:
1 cup all-purpose flour
¾ cup sugar
2 teaspoons baking powder
½ teaspoon cinnamon
1 egg, slightly beaten
3 tablespoons butter or margarine, melted
V anilla ice cream
Place apples in an 1 1x7-inch glass baking dish. In small
bowl combine ½ cup sugar, cornstarch and ½ teaspoon
cinnamon. Whisk in apple juice or water. Pour over apple
slices, stirring to coat. Set aside.
For topping, combine flour, ¾ cup sugar , baking powder
and cinnamon. Add egg and butter or margarine, stirring
to blend. (Mixture will be stiff.) Spread batter evenly over
apples. Bake on middle oven rack with lower halogen
lamps on “LO” for 13 to 15 minutes or until apples are
tender. Rotate pan halfway through cooking time. Serve
warm with vanilla ice cream. Serves 6 to 8.
30

Chocolate Mint Shortbread
½ cup powdered sugar
½ cup butter
½ teaspoon mint extract
1 cup all-purpose flour
3 tablespoons unsweetened cocoa
¼ cup miniature semi-sweet chocolate chips
Glaze:
3 tablespoons miniature semi-sweet chocolate chips
½ teaspoon shortening
In medium mixer bowl cream powdered sugar, butter and
extract until fluffy . Add flour and cocoa, mixing just until
combined. Stir in ¼ cup chocolate chips. Spread dough
into a 9-inch round baking pan. Bake on middle oven
rack with lower halogen lamps on “LO” for 5 to 6 minutes
or until top appears dry and set. Rotate pan one quarter
turn halfway through cooking time. Immediately cut
shortbread into 12 wedges.
For glaze, combine 3 tablespoons chocolate chips and
shortening in 1 cup glass measure. Heat in microwave
oven on high for 30 to 60 seconds or until melted and
smooth. Stir halfway through cooking time. Drizzle over
shortbread. Makes 1 dozen.
Lemon Bars
Crust:
2 cups all-purpose flour
2
/3 cup powdered sugar
1 cup butter or margarine
T opping:
2 cups sugar
¼ cup all-purpose flour
4 eggs, slightly beaten
6 tablespoons lemon juice
2 teaspoons finely shredded lemon peel
Powdered sugar
For crust, combine flour and powdered sugar in medium
bowl. Cut in butter or margarine until crumbly . Pat into
9x13-inch baking pan. Bake on middle oven rack with
lower halogen lamps on “LO” for 5 to 6 minutes or until
crust appears dry and set. Rotate pan halfway through
baking time.
For topping, combine sugar and flour in medium bowl.
Whisk in eggs, lemon juice and peel. Pour over warm
crust. Continue baking on middle oven rack with lower
halogen lamps on “LO” for 7½ to 9½ minutes or until set
and edges begin to brown. Rotate pan halfway through
baking time. Cool completely . Sprinkle top of bars with
additional powdered sugar. Makes 2 dozen.
Chocolate Macaroon Bars
Crust:
1¼ cups all-purpose flour
1 cup sugar
1
/3 cup unsweetened cocoa
1 teaspoon baking powder
½ cup butter or margarine
2 eggs
Filling:
1 (7-ounce) package flaked coconut
1 (14-ounce) can sweetened condensed milk
T opping:
1 (12-ounce) package semi-sweet chocolate chips
½ cup peanut butter
In a medium mixing bowl combine flour, sugar , cocoa and
baking powder. Cut in butter or margarine until crumbly .
Add eggs; mix well. Spread in greased 9x13-inch pan.
Bake on middle oven rack with lower halogen lamps on
“LO” for 3½ to 4½ minutes or until crust is slightly set.
Rotate pan halfway through baking time.
For filling, sprinkle warm crust with coconut; drizzle with
sweetened condensed milk. Continue baking on middle
oven rack with lower halogen lamps on “LO” for 6 to 7½
minutes or until bubbly and edges begin to brown. Rotate
pan halfway through baking time.
For topping, combine chocolate chips and peanut butter
in 1-quart glass measure. Heat in microwave oven on
high for 1½ to 2½ minutes or until melted. Stir halfway
through cooking time. Spread over coconut layer. Makes
2 dozen bars.
Mocha Chip Pecan Pie
¾ cup sugar
¼ cup cornstarch
1
/3 cup butter or margarine, melted
2 eggs, slightly beaten
¼ cup coffee flavored liqueur or strong coffee
½ cup semi-sweet chocolate chips
½ cup coarsely chopped pecans
1, 9-inch unbaked pie crust in glass pie plate
¾ cup whole pecans
In medium mixing bowl combine sugar and cornstarch.
Whisk in butter or margarine, eggs and liqueur or coffee.
Stir in chocolate chips and chopped pecans. Pour into
unbaked pie crust. Arrange whole pecans decoratively
on top of pie. Bake on middle oven rack with lower
halogen lamps on “LO” for 10 to 12 minutes or until filling
is set. Rotate pie one quarter turn halfway through
baking time. Serves 8.
31

Eggs
Four Cheese and Bacon Quiche
1 (3-ounce ) package cream cheese with chives,
softened
4 eggs
½ cup milk
¼ cup grated Parmesan cheese
¼ teaspoon pepper
1 cup (4-ounces) shredded Gouda cheese
1 cup (4-ounces) shredded cheddar cheese
6 slices bacon, cooked and crumbled
1, 9-inch unbaked pie crust
In a large bowl beat cream cheese until smooth. Add
eggs one at time, beating well after each addition. Add
milk, Parmesan cheese and pepper; mix well. Sprinkle
Gouda cheese, cheddar cheese and bacon over bottom
of pie crust. Toss lightly to mix. Pour egg mixture over
cheeses and bacon. Bake on middle oven rack with lower
halogen lamps on “LO” for 11 ½ to 13 minutes or until
egg mixture is set. Rotate quiche one quarter turn
halfway through baking time. Serves 6.
Country Egg Bake
1 (24-ounce) package frozen shredded hash browns,
thawed
2 cups diced ham (about 12 ounces)
½ cup chopped green bell peppers
½ cup chopped red bell peppers
1 cup (4-ounces) shredded cheddar cheese
¼ cup (1-ounce) grated Parmesan cheese
1 teaspoon instant minced onion
8 eggs
1 cup milk
1 tablespoon Dijon mustard
½ teaspoon basil leaves, crushed
¼ teaspoon garlic powder
¼ teaspoon hot pepper sauce
In a greased 9x13-inch baking pan layer hash browns,
ham, peppers, cheeses and instant minced onion. Stir
gently to mix. In a medium mixing bowl whisk together
eggs, milk, mustard, basil, garlic powder and pepper
sauce. Pour over potato mixture. Bake on middle oven
rack with lower halogen lamps on “MED” for 14 to 15
minutes or until eggs are set. Rotate pan halfway through
baking time. Let stand 10 minutes before serving. Serves
12.
Fiesta Omelet
4 eggs
¼ cup sliced black olives
¼ cup canned, diced green chilies
1
/8 teaspoon salt
½ cup finely shredded cheddar and Monterey Jack
cheeses with jalapeno peppers
salsa
sour cream
In a small bowl beat eggs. Add olives, chilies, hot pepper
sauce and salt. Pour mixture into a dark, non-stick 9inch round baking pan. Bake on middle oven rack with
lower halogen lamps on “HI” for 1½ minutes. Continue
baking with upper halogen lamps on "HI" for 30 to 60
seconds or until omelet is set. Immediately sprinkle
cheese on ½ of the omelet; fold in half. Transfer to plate,
topping with salsa and sour cream to taste. Serves 2.
Baked Praline French Toast
6 1-inch thick slices white bread
6 eggs
2 cups light cream or milk
1 teaspoon vanilla
1 teaspoon cinnamon
½ teaspoon nutmeg
T opping:
1 cup brown sugar
½ cup butter or margarine, softened
½ chopped pecans
Arrange bread in greased 9x13-inch baking pan. In
medium bowl beat together eggs, light cream or milk,
vanilla, cinnamon and nutmeg; mix well. Pour egg
mixture over bread slices, cover and refrigerate overnight.
For topping, cream together brown sugar and butter or
margarine. Stir in pecans. Spread mixture evenly over
refrigerated bread. Bake on middle oven rack with lower
halogen lamps on “MED” for 10 to 12 minutes or until
bread begins to puff and topping is bubbly and golden.
Rotate pan one half turn halfway through cooking time.
Serves 6.
*Note: May be prepared ahead and refrigerated
overnight. 1 to 2 additional minutes may need to be
added to the baking time.
32

Creamy Tomato and Chive Scrambled Eggs
12 eggs
½ cup milk
2 tablespoons snipped chives
¼ teaspoon salt
¼ teaspoon pepper
1 (3-ounce) package cream cheese, cubed
1 medium tomato, chopped (about 1 cup)
In large bowl whisk together eggs and milk until light.
Stir in chives, salt and pepper. Pour egg mixture into a
greased 9½ -inch deep dish pie plate. Cook on middle
oven rack with lower halogen lamps on “HI” for 4
minutes. Stir. Continue cooking eggs with upper halogen
lamps on “HI” for 1 minute. Stir in cream cheese and
tomatoes. Cook with upper halogen lamps on “HI” for 30
to 60 seconds or until eggs are set and cheese begins to
melt. Serves 6.
Fish
Steamed Fish and Vegetables
1 pound orange roughy, cut into serving pieces
2 teaspoons parsley flakes
1 teaspoon lemon and pepper seasoning
1 teaspoon dill weed
4 cups any combination julienne vegetables (carrots,
celery , any color bell pepper , zucchini, summer squash,
etc.)
¼ cup lemon juice
Place fish in greased 7x11-inch glass baking dish.
In small bowl combine parsley flakes, lemon and pepper
seasoning and dill weed. Sprinkle half of the mixture
evenly over fish. Spread vegetables evenly over fish.
Sprinkle with remaining herb mixture. Drizzle lemon juice
over all. Cover dish with foil. Cook on middle oven rack
with lower halogen lamps on “HI” 8 to 10 minutes or until
fish flakes easily with a fork. Serves 4.
Baked Lemon Cod
1 pound cod fillets (or other fish)
½ cup seasoned dry bread crumbs
2 tablespoons butter or margarine, melted
2 teaspoons parsley flakes
l teaspoon finely shredded lemon peel
½ teaspoon dill weed
¼ teaspoon garlic powder
Grilled Lemon Pepper Salmon
4 ( 7 to 8-ounce) salmon fillets, 3/4 to 1-inch thick
½ cup lemon juice
1/4 cup olive oil
2 cloves garlic, minced
1 tablespoon finely shredded lemon peel
1 teaspoon parsley flakes
1 teaspoon dried thyme leaves, crushed
½ teaspoon pepper
½ teaspoon salt
Place salmon in a gallon-size resealable plastic bag.
In small bowl combine all remaining ingredients. Pour
over salmon. Seal bag and marinate at least 4 hours or
overnight. Discard marinade.
Place salmon, skin side down, on grill. Cook on middle
oven rack with lower halogen lamps on “HI” for 6 minutes.
Continue cooking with upper halogen lamps on “HI” for
3½ to 4½ minutes or until fish flakes easily with a fork.
Serves 4.
Lime Tarragon Shrimp Kabobs
1 pound large shrimp, peeled and deveined
2 tablespoons olive oil
2 tablespoons butter or margarine, melted
2 tablespoons lime juice
1 teaspoon dried tarragon leaves, crushed
1 teaspoon finely shredded lime peel
2 cloves garlic, minced
Place shrimp in gallon-size resealable bag.
In small bowl combine all remaining ingredients; pour
over shrimp. Seal bag and refrigerate 4 to 6 hours.
(Mixture will thicken.) Discard marinade.
Divide shrimp evenly among 4 (10-inch) wooden skewers.
Place skewers on grill. Cook on middle oven rack with
lower halogen lamps on “HI” for 3 minutes. Continue
cooking with upper halogen lamps on “HI” for 2 to 3
minutes or until shrimp is done. Serves 4.
Cut fish into serving size pieces. Place in a greased
8x8x2-inch baking dish.
Thoroughly combine remaining ingredients in small bowl;
sprinkle over fish. Cook on middle oven rack with lower
halogen lamps on “MED” for 6½ to 7½ minutes or until
fish flakes easily with a fork. Serves 4.
33

Baked Salmon Cups
1 (14.75-ounce) can pink salmon, drained,
skin and bones removed
½ cup seasoned dry bread crumbs
½ cup milk
1
/3 cup finely chopped onion
1 egg, slightly beaten
2 teaspoons finely shredded lemon peel
1 teaspoon parsley flakes
½ teaspoon rosemary , crushed
¼ teaspoon garlic powder
¼ teaspoon pepper
Prepared lemon and herb or regular tartar sauce
Ham Balls
Sauce:
1 (10 3/4-ounce) can tomato soup
½ cup vinegar
1 cup brown sugar
1 tablespoon dry mustard
Ham Balls:
1 pound ground, precooked ham
1 pound lean ground pork
1 cup graham cracker crumbs
2 eggs
1
/3 cup milk
In medium bowl thoroughly combine all ingredients
except tartar sauce. Evenly divide mixture among 6
greased muffin cups (about 1/3 cup each). Cook on middle
oven rack with lower halogen lamps on “MED” for 12 to
13 minutes or until cups are set and edges begin to
brown. Serve with lemon and herb tartar sauce. Serves 6.
Meat
Fajitas
1 pound pork tenderloin cut into bite-size strips
½ cup lime juice
2 to 3 cloves garlic, minced
1 teaspoon leaf oregano, crushed
1 teaspoon ground cumin
¼ teaspoon crushed red pepper
¼ teaspoon salt
1 small onion, thinly sliced
1 small red pepper, cut into strips
1 small green pepper, cut into strips
8 (7-inch) flour tortillas
Salsa
Shredded cheese
Sour cream
In a gallon-size resealable plastic bag combine pork, lime
juice, garlic, oregano, cumin, pepper and salt. Seal bag;
shake to mix. Marinate in refrigerator 4 hours or
overnight. Drain.
Place drained pork, onion, red pepper and green pepper
in greased dark, nonstick 7x1 1-inch pan. Cook on middle
oven rack with upper halogen lamps on “HI” for 3 minutes.
Stir. Continue cooking with upper halogen lamps on “HI”
for 2½ to 3½ minutes or until pork is thoroughly cooked
and no longer pink.
For sauce, combine all sauce ingredients in small bowl.
Set aside.
For ham balls, combine all ham ball ingredients, mixing
thoroughly. Form into balls using a rounded tablespoon
for each ham ball. Place ham balls in 9x13-inch baking
pan. Cook on middle oven rack with lower halogen lamps
on “HI” for 5 minutes. Continue cooking with upper
halogen lamps on “HI” for 3 to 4 minutes or until ham
balls are done. Drain. Pour sauce over ham balls.
Continue cooking with lower halogen lamps on “MED” for
5 to 6 minutes or until sauce is heated through and
bubbly. Serves 6 to 8.
Grilled Ham Steak
¼ cup cranberry orange or crushed
berry cranberry sauce*
¼ cup apricot preserves
1 (1 to 1¼-pounds) fully cooked ham steak cut ½ to ¾inch thick
In a small bowl blend together cranberry sauce and
apricot preserves.
Place ham steak on cooking grill. Spread cranberry
mixture on ham steak. Cook on middle oven rack with
lower halogen lamps on “HI” for 4 minutes. Continue
cooking with upper halogen lamps on “HI” for 2 to 3
minutes or until heated through and glaze is bubbly .
Serves 4 to 5.
*Note: If cranberry orange sauce is unavailable, add ½
teaspoon of finely shredded orange peel to the crushed
berry cranberry sauce.
Place pork and vegetables on tortillas. T op with salsa,
cheese and sour cream as desired; roll up and serve
immediately . Serves 4.
34

Peppery London Broil
1 (1 to 1¼-pound) beef flank steak
1 clove garlic, minced
½ teaspoon seasoned salt
½ teaspoon ground coriander
¼ teaspoon crushed red pepper
3 tablespoons Worcestershire sauce
With a meat fork, poke holes in both sides of meat.
Make a paste with garlic, seasoned salt, coriander and
crushed red pepper; rub over both sides of meat. Place
steak in a gallon-size resealable plastic bag. Add
Worcestershire sauce and close bag. Refrigerate for at
least 4 hours or overnight, turning occasionally . Remove
meat; discard marinade. Place on grill. Cook on middle
rack with lower halogen lamps on “HI” or 5 minutes.
Continue cooking with upper halogen lamps on “HI” or 3
to 5 minutes or until desired doneness. Serves 4 to 5.
Salisbury Steak
1 pound lean ground beef
1 egg, slightly beaten
1
/3 cup finely chopped onion
1
/3 cup finely chopped green pepper
¼ cup seasoned dry bread crumbs
1 tablespoon prepared horseradish
1 clove garlic, minced
¼ teaspoon salt
¼ teaspoon pepper
1 (12-ounce) jar beef gravy
1½ cups sliced fresh mushrooms
Poultry
Orange Teriakyi Chicken
½ cup orange marmalade
¼ cup teriakyi sauce
2 teaspoons cornstarch
½ teaspoon dry mustard
¼ teaspoon ground ginger
4 teaspoons olive oil
Fresh ground black pepper
In small saucepan blend together marmalade, teriakyi
sauce, cornstarch, mustard and ginger. Heat over
medium heat until thickened and bubbly , stirring
constantly. Set aside.
Brush both sides of breasts with olive oil. Sprinkle with
pepper. Place chicken in greased 8x8x2-inch baking
dish. Cook on middle oven rack with lower halogen lamps
on “HI” for 4 minutes. Continue cooking with upper
halogen lamps on “HI” for 3 minutes. Pour sauce over
chicken. Cook with upper halogen lamps on "HI" for 45
seconds to l minute 15 seconds or until heated through
and bubbly. Serve with rice. Serves 4.
Oriental Turkey Salad
Sauce:
1 (10½-ounce) can cream of chicken soup
1
/3 cup mayonnaise
1 tablespoon lemon juice
1 tablespoon soy sauce
1½ teaspoons curry powder
In a medium bowl combine ground beef, egg, onion,
green pepper, bread crumbs, horseradish, garlic, salt
and pepper. Mix thoroughly; shape into four patties.
Place in 9x9x2-inch glass baking dish. Cook on middle
oven rack with lower halogen lamps on “HI” for 4 minutes.
Continue cooking with upper halogen lamps on “HI” for 3
minutes. Drain.
In small bowl combine gravy and mushrooms. Pour over
patties. Cover top of dish with foil. Cook with lower
halogen lamps on “MED” for 5 to 6 minutes or until
heated through and bubbly . Serves 4.
Salad:
2½ cups cooked and cubed turkey
1 (15 to 16-ounce) can pineapple tidbits, drained
1 cup chopped celery
1 cup seedless green grapes, halved
1 (8-ounce) can sliced water chestnuts, drained
1/4 cup sliced green onions
1 (2-ounce) jar pimento, drained
2
/3 cup sliced almonds
For sauce, combine soup, mayonnaise, lemon juice, soy
sauce and curry powder in medium mixing bowl. Set
aside.
For salad, combine turkey, pineapple, celery, grapes,
water chestnuts, onions and pimento in large bowl. Pour
sauce over turkey mixture, stirring until thoroughly
combined. Pour salad into greased 7x1 1-inch baking
dish. Sprinkle with almonds. Bake on middle oven rack
with lower halogen lamps on “MED” for 8½ to 10 minutes
or until mixture is heated through and bubbly . Serves 6.
35

Chicken Parmesan
½ cup Italian seasoned dry bread crumbs
1
/3 cup grated Parmesan cheese
2 eggs, slightly beaten
6 boneless, skinless chicken breast halves (about 1 1/2
1bs.)
1 (14-ounce) jar spaghetti sauce
1½ cups (6-ounces) finely shredded 6 blend Italian
cheese or mozzarella cheese
In a gallon-size resealable plastic bag combine bread
crumbs and Parmesan cheese. Place eggs in a 9-inch
pie plate. Dip chicken in egg then in crumb mixture,
shaking bag to coat. Place chicken in greased 9x13-inch
pan. Cook on middle oven rack with lower halogen lamps
on "HI" for 4½ minutes. Continue cooking with upper
halogen lamps on "HI" for 3 to 4 minutes or until chicken
is done. Pour spaghetti sauce over chicken; sprinkle with
cheese. Continue cooking with lower halogen lamps on
"MED" for 4 to 5 minutes or until sauce is heated through
and cheese is melted. Serves 6.
Chicken Almond Stir Fry
1 (2.25-ounce) package whole almonds (1/3 cup)
1 pound boneless, skinless chicken breast cut
into bite-size strips
1 cup sugar snap pea pods
1 cup sliced yellow squash or zucchini
1 cup julienne carrots
½ cup red pepper chunks
½ cup sliced green onions
1 cup prepared stir fry sauce
Hot cooked rice
Sandwiches
Grilled Chicken Sandwiches
4 boneless, skinless chicken breast halves
4 teaspoons olive oil
2 cloves garlic, minced
Salt and pepper
4 Kaiser rolls, split
¼ cup prepared dill or ranch dip
Spinach leaves
4 tomato slices
In small bowl combine olive oil and garlic. Spread on
each side of breast halves. Season with salt and pepper
to taste. Place chicken on grill. Cook on middle oven
rack with lower halogen lamps on "HI" for 4 minutes.
Continue cooking with upper halogen lamps on "HI" for 3
to 4 minutes or until chicken is fork tender and juices run
clear.
Spread 1 tablespoon dill dip on each roll. On bottom half
of each roll, layer spinach leaves, tomato slice and
chicken breast; replace top half of roll. Serves 4.
Italian Meatball Subs
1 pound bulk Italian sausage
¼ cup Italian seasoned dry bread crumbs
1 egg, slightly beaten
2 tablespoons grated Parmesan cheese
2 teaspoons instant minced onion
1 (14-ounce) jar pizza sauce
4 hoagie buns, split
1 cup (4-ounces) shredded mozzarella cheese
Place almonds in greased 7x1 1-inch dark, nonstick
baking pan. Cook on middle oven rack with upper
halogen lamps on "HI" for 1 minute. Stir. Continue
cooking with upper halogen lamps on "HI" for 30 to 45
seconds or until almonds are toasted. Remove almonds
from pan and set aside.
Add chicken to pan. Cook on middle oven rack with
upper halogen lamps on "HI" for 2 minutes. Stir. Continue
cooking with upper halogen lamps on "HI" for 30
seconds. Add vegetables. Continue cooking with upper
halogen lamps on "HI" for 2 minutes. Stir. Continue
cooking with upper halogen lamps on "HI" for 1 minute
more. Add stir fry sauce, stirring until well blended. Cook
with upper halogen lamps on "HI" for 30 to 60 seconds or
until sauce is heated through. Serve stir fry over cooked
rice. Sprinkle with toasted almonds. Serves 4.
In medium bowl combine sausage, bread crumbs, egg,
Parmesan cheese and minced onion; mix well. Shape
into 16 (1½-inch) meatballs. Place meatballs in 9-inch
round baking pan. Cook on middle oven rack with lower
halogen lamps on "HI" for 5 minutes. Continue cooking
with upper halogen lamps on "HI" for 3 to 4 minutes or
until meatballs are done.
Transfer meatballs to a 1-quart glass casserole. Add
pizza sauce, stirring to coat meatballs with sauce. Cover
casserole with lid or aluminum foil. Cook on middle oven
rack with lower halogen lamps on "MED" for 4 to 5
minutes or until sauce is heated through and bubbly .
Place 4 meatballs in each hoagie bun; spoon sauce over
meatballs. Sprinkle with cheese. Serves 4.
36

Mexican Pork Burgers
1 pound lean ground pork
¼ cup finely chopped onion
¼ cup salsa
1 teaspoon Mexican seasoning
¼ teaspoon pepper
½ (2-ounces) finely shredded cheddar and
Monterey Jack cheeses with jalapeno peppers
4 hamburger buns, split
lettuce leaves
salsa
sour cream
Toasted Tuna Salad Sandwiches
1 (3-ounce) package cream cheese with chives
2 tablespoons mayonnaise
1 tablespoon lemon juice
1 teaspoon dill weed
1
/8 teaspoon pepper
1 (6-ounce) can tuna, drained
½ cup shredded carrots
¼ cup chopped celery
¼ cup chopped red bell pepper
¼ cup butter or margarine, softened
8 slices bread
In a medium bowl combine pork, onion, 1/4 cup salsa,
Mexican seasoning and pepper; mix well. Shape meat
mixture into 4 patties. Place patties on grill. Cook on
middle oven rack with lower halogen lamps on “HI” for 6
minutes. Continue cooking with upper halogen lamps on
“HI” for 3 to 4 minutes or until pork is thoroughly cooked.
Immediately sprinkle cheese evenly over burgers.
Place lettuce leaves and burgers on bun bottoms. T op
sandwiches with salsa and sour cream as desired.
Replace top half of bun. Serves 4.
Zesty Sloppy Joes
1 pound lean ground beef
½ cup catsup
1 tablespoon brown sugar
1 tablespoon Worcestershire sauce
1 tablespoon vinegar
1 tablespoon prepared yellow mustard
2 teaspoons instant minced onion
1 teaspoon chili powder
½ teaspoon salt
¼ teaspoon pepper
6 hamburger buns
In a medium mixing bowl, beat cream cheese,
mayonnaise, lemon juice, dill weed and pepper until
smooth. Add the tuna, carrots, celery and red pepper;
mix well.
Spread 1½ teaspoons softened butter over each slice of
bread. Place 4 slices of bread, buttered side down, on a
12-inch round dark, nonstick pan. Evenly divide ½ of the
tuna mixture on 2 of the bread slices on the pan. Cook
on middle rack of the oven with lower halogen lamps on
“HI” for 1 minute 15 seconds. Continue cooking with
upper halogen lamps on “HI” for 1 minute to 1 minute 15
seconds or until tuna is heated through. Place empty
toasted slice of bread atop hot tuna mixture. Repeat
with remaining slices of bread and tuna mixture.*
Serves 4.
*Note: Cooking times may need to be cut back slightly
with the remaining 2 sandwiches.
Place ground beef in 1-quart glass casserole dish. Cook
on middle oven rack with lower halogen lamps on “HI” for
4 minutes. Stir. Continue cooking with upper halogen
lamps on “HI” for 1½ to 2 minutes or until done. Drain.
Add remaining ingredients except buns, stirring until
thoroughly blended. Cover casserole dish with lid or
aluminum foil. Cook on lower oven rack with lower
halogen lamps on “MED” for 3 to 4 minutes or until
heated through and bubbly . Serve on buns. Serves 6.
37

Quick Reference Instructions
Read “Important Safety Information” before using “Quick
Reference Instructions”. If there are unanswered questions,
see detailed sections of this manual.
30 Second Pad
Cook in 30 second increments.
1. Place food in oven.
2. Press
3. Set lamp intensities.
4. Press
Defrost
Defrost frozen food.
1. Place food in oven.
2. Press preprogammed
3. Press preprogrammed number 8, 9, or 0 pad.
4. Press
Cooking with Standard Recipe
Cook with Amana’s recipes.
1. Place food in oven.
2. Press preprogammed pad number (
3. Press
Manual Time Entry Cooking
Cook with any time entered. The Amana Wave Oven™
does not require preheating.
1. Place food in oven.
2. Press
3. Set lamp intensities.
4. Press number pads to enter cooking time.
5. Press
30SEC./1
ST ART
ST ART
displays.
ST ART
TIME ENTRY
ST ART
pad.
pad to begin cooking.
DEFROST/2
pad.
pad when correct recipe displays.
pad.
pad to begin cooking.
pad.
3-9,0
) until recipe
Pause, Continue, or Stop Cooking
• To pause cooking, open door or press
pad once.
• To continue cooking, close door and press
• To stop cooking cycle, press
Adjusting Lamps
Lamp banks have 4 settings, “OFF”, “LO”, “MED”, and
“HI”. Adjust lamp bank intensities on top and bottom
independently to perfect recipes. Press
and
HI
pad to adjust before or during cooking.
Control Lock
Press
LOCK
again to enable pads. Number pads signal when disabled.
“Locked” shows in display.
Changing Oven Signal
Change end-of-cycle signal volume. Simultaneously ,
press
change oven signal volume. Settings include “HI”, “MED”,
“LO”, and “OFF”. Continue to press pads to advance
through settings.
Add or Remove Scrolling Messages
Add or remove scrolling messages from display.
Simultaneously, press
words to remove or restore scrolling messages.
pad once to disable pads. Press
SEAFOOD
pad and
POUL TRY
STOP/RESET
MEAT
pad on words to
STOP/RESET
OFF, LO, MED
pad and
MEAT
ST ART
pad twice.
LOCK
pad
pad on
pad.
,
Saving Recipe
Save up to 10 custom recipes. Standard recipes are never
replaced.
1. Pause or finish cooking.
2. Press
3. Press number pad (1-9,0).
Cooking with Custom Recipe
Cook with recipes you have saved.
1. Place food in oven.
2. Press
3. Press pad number (1-9,0).
4. Press
Part No. 12153405
Printed in U.S.A.
SAVE RECIPE
• Recipe is saved as custom recipe.
CUSTOM RECIPE
ST ART
pad.
pad.
pad.
1997 Amana
Amana, Iowa 52204
Patent Pending
38
 Loading...