

Page 1
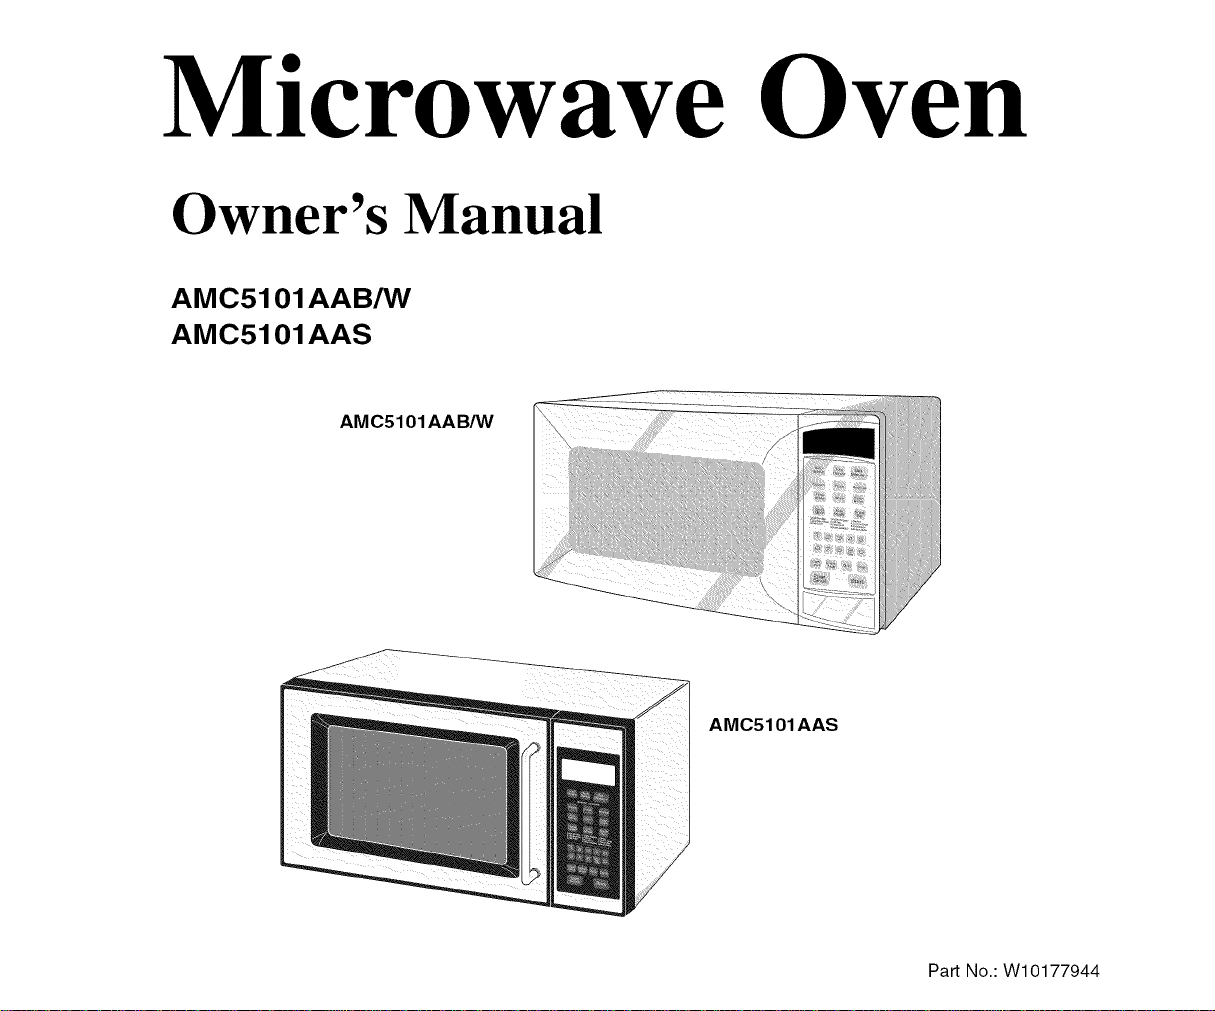
Microwave Oven
Owner's Manual
AMC5101AAB/W
AMC5101AAS
AMC5101AAB/W
AMC5101AAS
Pa_ No.:W10177944
Page 2
Safety
PRECAUTIONSTOAVOID
POSSIBLEEXPOSURETO
EXCESSIVEMICROWAVE
ENERGY:
(a) Do not attempt to operate this oven withthe door open _'
since open-door operation can resultin harmful exposure to
microwave energy. It is important notto defeat or tamper
with the safety interlocks.
(b) Do notplace any object between the oven front face and the
door or allow soil or cleaner residue to accumulate on
sealing surfaces.
(c) Do not operate the oven if it is damaged. It is particularly
important that the oven door close properly and that there is
no damage to the °
1) Door (bent or dented),
2) Hinges and latches (broken or loosened),
3) Door seals and sealing surfaces.
(d) The oven should not be adjusted or repaired by anyone
except properly qualified service personnel.
WARNING
Always observe Safety Precautions when using your
oven. Never try to repair the oven on your own - there
is dangerous voltage inside. Ifthe oven needs to be
repaired, call 1-800-843-0304 U. S. A, 1-800-807-6777
CANADA for the name of an authorized service
center near you.
IMPORTANTSAFETY INSTRUCTIONS
When using any electrical appliance, basic safety precautions
should be followed, including the following:
WARNING
To reduce risk of burns, electric shock, fire, personal
injury or exposure to excessive microwave energy:
• Read all safety instructions before usingthe appliance.
• Readandfollowthe specific"PRECAUTIONS TO AVOID POSSIBLE
EXPOSURE TO EXCESSIVE MICROWAVE ENERGY"onthis page.
• Thisappliance mustbegrounded. Connect onlyto properly grounded
outlets. See "IMPORTANT GROUNDING INSTRUCTIONS" on page
3 of this manual.
• Install or place this appliance only in accordance with the installation
instructions provided.
• Some items, like whole eggs and food in sealed containers, may
explode if heated inthis oven.
• Usethis appliance onlyfor its intended use as described in the
manual. Do not use corrosive chemicals orvapors inthis appliance.
This type ofoven is specifically designedto heat, cook, or dry food. It
is not designedfor industrial or laboratory use.
• As with any appliance, close supervision is necessary when usedby
children.
• Do not operatethis appliance if it has a damagedcord or plug, if it is
not working properly, or if it has been damaged.
• Thisappliance should be serviced only by qualifiedservice
personnel. Contact the nearest authorized servicefacility for
examination, repair, or adjustment.
• Do not cover or block any of the openings on this appliance.
SAVE THESE INSTRUCTIONS
Page 3
Safety
Important Safety Instructions, continued
• Do notstore this appliance outdoors. Do not use near water - for
example, near a kitchensink, in a wet basement,or near a swimming
pool, etc.
• Keepthe inside ofthe oven clean. Food particlesor spattered oils
stuck to the oven walls or floor can cause paint damage and reduce
the efficiency of the oven.
• Do not immersecord or plug in water.
• Keepcord awayfrom heated surfaces. "
• Do not letcord hang over edge oftable or counter.
• When cleaning door and ovensurfaces, use only mild, nonabrasive
soaps or detergents applied with a sponge or soft cloth.
• To reduce the risk of fire in the oven:
a. Do not overcookfood. Watch appliance carefully if paper, plastic,
or other combustible materials are inside.
b. Remove wiretwist-ties from plasticcooking bags before placing
bags in oven.
c. If materials inside the oven ignite, keepthe oven doorclosed, turn
the oven off, disconnect the power cord, or shut off the power at
the fuse or circuit breaker panel.
d. Do not usethe oven compartmentfor storage purposes. Do not
leave paper products, cooking utensils, or food in the ovenwhen
not in use.
• Do nottry to preheat oven oroperate while empty.
• Donotcook without the glass tray in place on the ovenfloor. Foodwill
notcook properly without thetray.
• Do not defrostfrozen beverages in narrow-necked bottles.The
containers can break.
• Dishes and containers can become hot. Handle withcare. "
• Carefully remove containercoverings, directing steam away from
hands and face.
• Remove lidsfrom babyfood before heating. After heating babyfood,
stir well and test temperature by tasting before serving.
• Ashort power-supplycord is provided to reducethe risk of becoming
entangled in or tripping over a longer cord. Longer cord sets or
extensioncords are available and may be used with caution.
• Do not operate any other heating or cooking appliance beneaththis
appliance.
• Do not mount unitover or near any portion of a heating or cooking
appliance.
• Do not mount over a sink.
• Do not store anything directly on top of the appliance when it is in
operation.
• Ifmaterials inside oven should ignite, keepthe oven door closed,turn
the oven off and disconnect the power cord, or shut off power at the
fuse or circuit breaker panel. If the door is opened,the fire may
spread.
• Precautionfor safe useto avoid possible exposureto excessive
micro oven energy:
Do not attemptto pull any part of the door by hand to open the door.
Open the door only utilizing the push button located at front-right-
bottom side.
@
IMPORTANTGROUNDING
INSTRUCTIONS
This appliance must be grounded. In the event of an electrical
short circuit, grounding reduces the risk of electric shock by
providing an escape wire for the electrical current. This
appliance isequipped with a cord that includes a grounding wire
and a grounding plug. The plug must be plugged into an outlet
that is properly installed and grounded. Plug the three-prong
power cord into a properly grounded outlet of standard 115-120
voltage, 60 Hz. Your oven should be the only appliance on this
circuit.
SAVE THESE INSTRUCTIONS
Page 4
Safety
WARNING
Improper use of the grounding plug can result in a risk
of electric shock. Consult a qualified electrician or
servicer if you do not understand the grounding
instructions or if you are not sure if the appliance is
properly grounded.
Use of Extension Cords
A short power-supply cord is provided to reduce the risk of
becoming entangled in or tripping over a longer cord. Longer
cord sets or extension cords are available and may be used if
care is exercised in their use. If a long cord or extension cord is
used:
1. The marked electrical rating of the cord setor extension cord
should be at least as great as the electrical rating of the
appliance.
2. The extension cord must be a grounding-type 3-wire cord
and it must be plugged into a 3-slot outlet.
3. The longer cord should be arranged so that it will not drape
over the counter top or tabletop where it can be pulled on by
children or tripped over accidentally. Ifyou use an extension
cord, the interior light may flicker and the blower may vary
when the microwave oven is on. Cooking times may be
longer, too. "
WARNING
Do not cut or remove the third (ground) prong from the
power cord under any circumstances.
Note
Connect the oven to a 20A circuit.
When connecting the oven to a 15A circuit, make sure
that circuit breaker is operable.
Liquids, such as water, coffee, or tea are able to be overheated
beyond the boiling point without appearing to be boiling. Visible
bubbling or boiling when the container is removed from the
microwave oven is not always present. THIS COULD RESULT
INVERY HOT LIQUIDS SUDDENLY BOILING OVER WHEN
THE CONTAINER IS DISTURBED OR A SPOON OR OTHER
@
UTENSIL IS INSERTED INTO THE LIQUID.
To reduce the risk of injury to persons:
1. Do not overheat the liquid.
2. Stir the liquid both before and halfway through heating it.
3. Do not use straight-sided containers with narrow necks.
4. After heating, allow the container to stand in the microwave
oven for a short time before removing the container.
5. Use extreme care when inserting a spoon or other utensil
intothe container.
SAVE THESE INSTRUCTIONS
4
Page 5
Your New Microwave oven
Table of Contents
Safety ............................................................................................ 2
Your New Microwave oven .......................................................... 5
Checking Parts ........................................................................... 5
Setting Up Your Microwave Oven .............................................. 6
Control Panel Buttons AMC5101AAB/W .................................... 6
Control Panel Buttons AMC5101AAS ........................................ 7
Operation ...................................................................................... 8
Turning on the Power and Selecting a Weight ........................... 8
Setting the Clock ........................................................................ 8
Using the Pause/Cancel Button ................................................. 8
Using the Instant Cook Buttons .................................................. 9
Using the One Minute + Button ................................................ 10
Using the Handy Helper Button ................................................ 10
Using the Kids Meals Button .................................................... 11
Using the Snack Bar Button ..................................................... 11
Defrosting Automatically ........................................................... 12
Setting Cooking Times & Power Levels ................................... 12
One-stage Cooking .................................................................. 12
Multi-stage Cooking .................................................................. 13
Using the More/Less Buttons ................................................... 13
Switching the Beeper On/Off .................................................... 13
Using the Kitchen Timer ........................................................... 14
Demonstration Mode ................................................................ 14
Setting the Child Protection Lock ............................................. 14
Reheating Automatically ........................................................... 14
Cooking Instructions ................................................................. 15
Cooking Utensils ...................................................................... 15
Testing Utensils ........................................................................ 15
Cooking Techniques ................................................................. 16
General Tips ............................................................................. 16
Cooking Guide .......................................................................... 17
Auto Defrosting Guide .............................................................. 19
Recipes .................................................................................... 20
Appendix ..................................................................................... 22
Troubleshooting Guide ............................................................. 22
Care and Cleaning ................................................................... 22
Specifications ........................................................................... 23
AMANA e MAJOR APPLIANCE WARRANTY ............................. 24
Quick Reference ........................................................ Back Cover
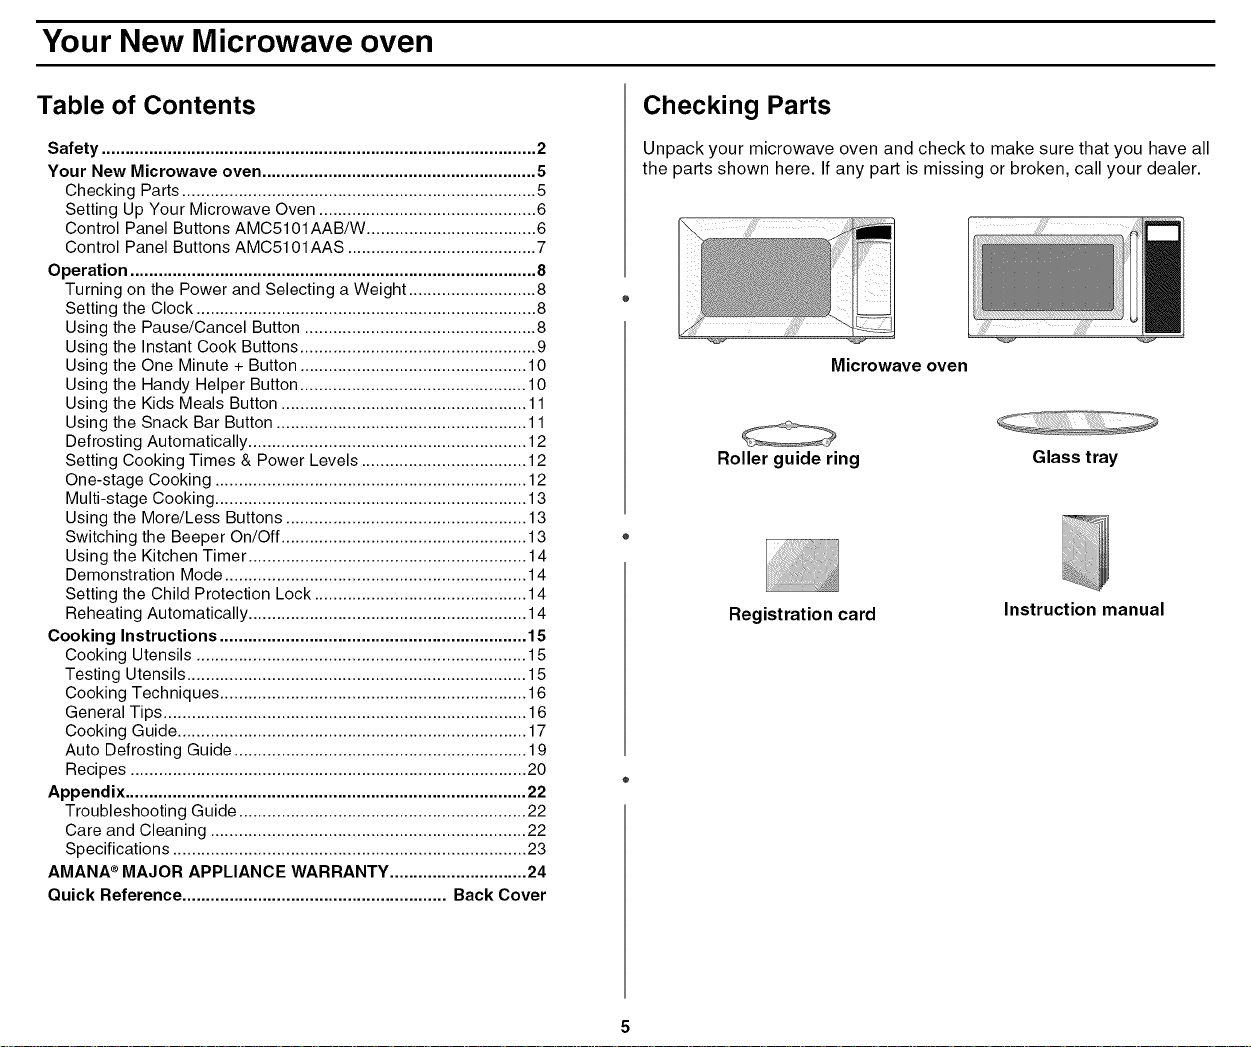
Checking Parts
Unpack your microwave oven and check to make sure that you have all
the parts shown here. If any part is missing or broken, call your dealer.
Microwave oven
Roller guide ring
Registration card
Glass tray
Instruction manual
Page 6
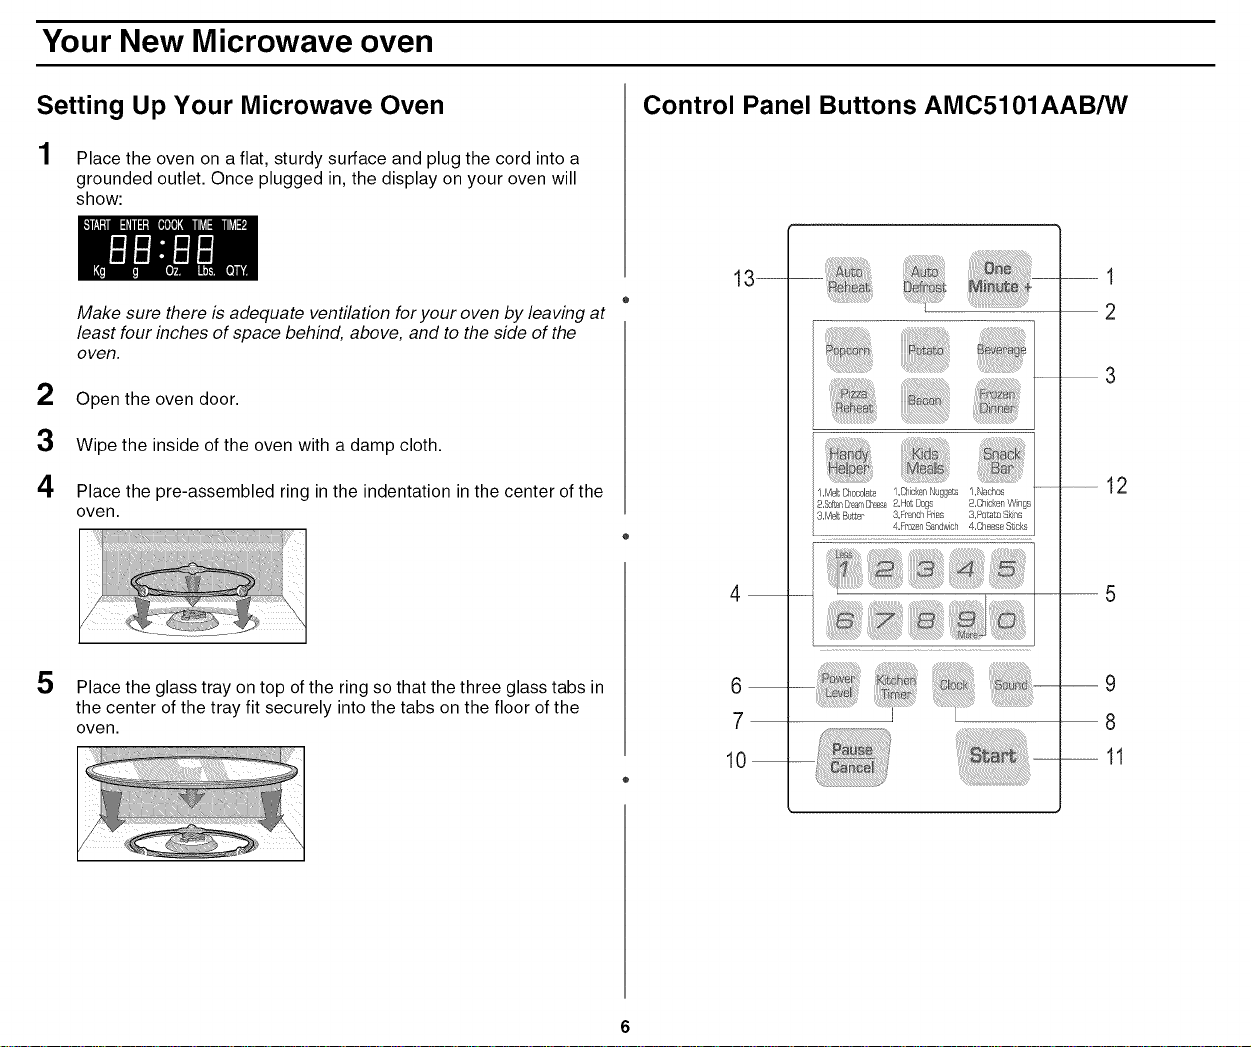
Your New Microwave oven
Setting Up Your Microwave Oven
1 Place the oven on a flat, sturdy surface and plug the cord into a
grounded outlet. Once plugged in, the display on your oven will
show:
Make sure there is adequate ventilation for your oven by leaving at
least four inches of space behind, above, and to the side of the
oven.
2 Open the oven door.
3 Wipe the inside of the oven with a damp cloth.
4 Place the pre-assembled ring in the indentation in the center of the
oven.
5 Place the glass tray on top of the ring so that the three glass tabs in
the center of the tray fit securely into the tabs on the floor of the
oveR.
Control Panel Buttons AMC5101AAB/W
13--
r_
l,N4eltChocolate 1=ChickenNuggets 1,Nachos [ ...........................................................
6
7
10
2,SoFtenC'-eamCheese2.Ho_,G_gs 2,Chickel: W ngs|
&Melt ButLer 3.Fr'e_'chFries |
4=Fmzen88ndwich 4,Cheese St_cks
3,Po1:a_oSkins
]
--11
12
9
8
Page 7
Your New Microwave oven
Control Panel Buttons AMC5101AAS
2
12
5
9
8
=
One Minute+ p.10
Press once for every minute of cooking at High Power
=
Auto Defrost p.12
Sets weight of food to be defrosted.
=
Instant Cook Buttons p.9
Instant settings to cook popular foods.
o4.
1
"8.
°12.
Number Buttons
Sets cooking times or amounts and power levels other than high.
=
More/Less p.13
Increase or decrease cooking time.
=
Power Level p.12
Press this pad to set a _ower level other than high.
=
Kitchen Timer p.14
Sets kitchen or convenience timer.
Clock p.8
Sets current time.
=
Sound Button p.13
Sets sound on or off.
10.
Pause/Cancel p.8
Press to pause oven or correct a mistake.
11.
Start
Press to start cooking.
Handy Helper, Kids Meals, Snack Bar p.10
Selects type of dish to be reheated.
13.
Auto Reheat p.14
7
Page 8
Operation
Turning on the Power and Selecting a Weight
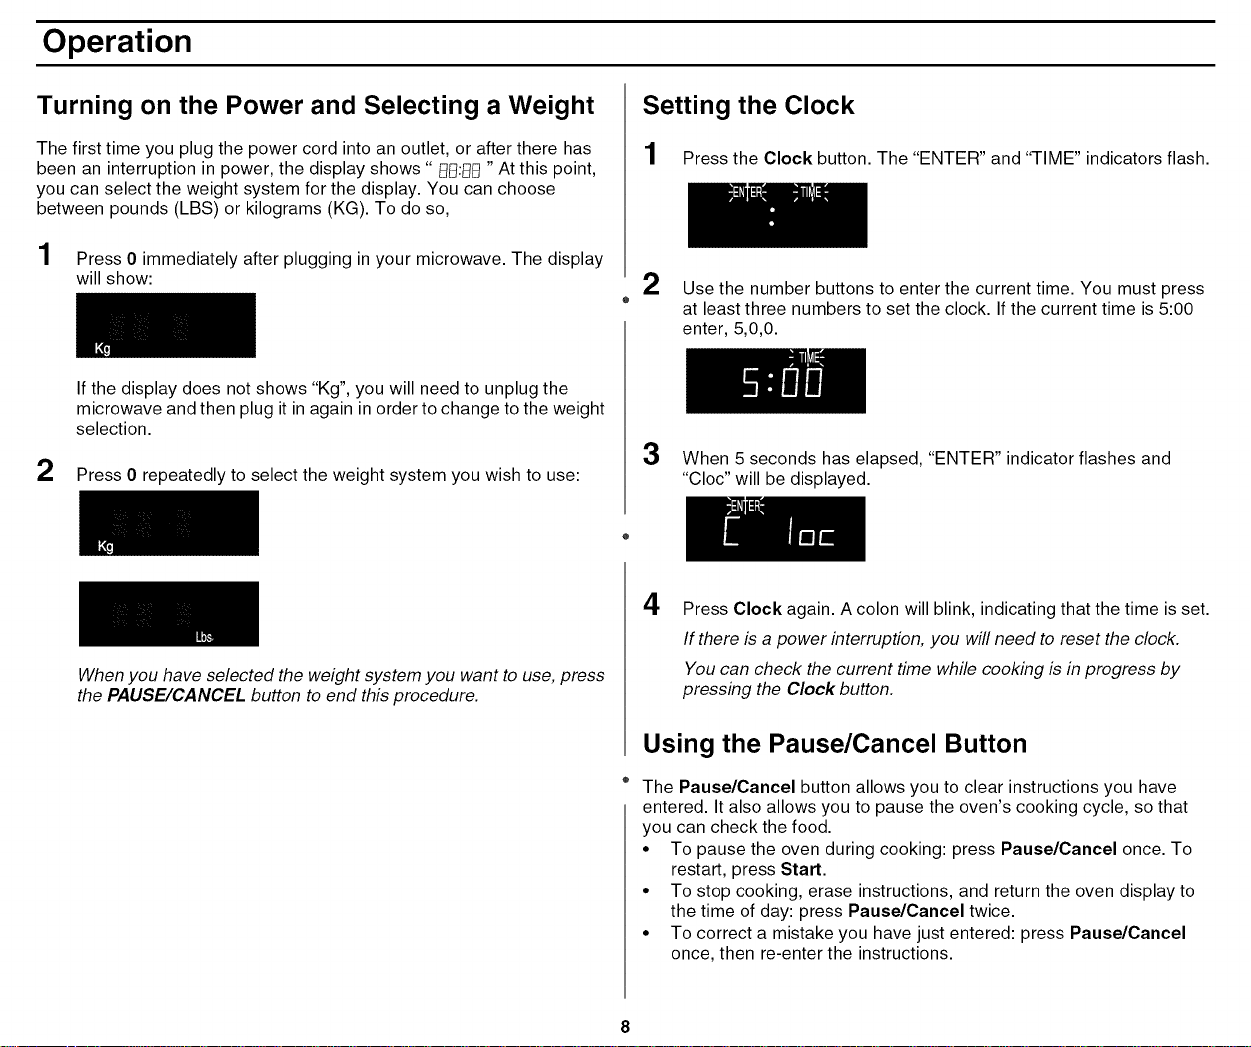
The first time you plug the power cord into an outlet, or after there has
been an interruption in power, the display shows" E]_:B_"At this point,
you can select the weight system for the display. You can choose
between pounds (LBS) or kilograms (KG). To do so,
1 Press 0 immediately after plugging inyour microwave. The display
will show:
If the display does not shows "Kg", you will need to unplug the
microwave and then plug it in again in order to change to the weight
selection.
2 Press 0 repeatedly to select the weight system you wish to use:
When you have selected the weight system you want to use, press
the PAUSE/CANCEL button to end this procedure.
Setting the Clock
1 Press the Clock button. The "ENTER" and "TIME" indicators flash.
2 Use the number buttons to enter the current time. You must press
at least three numbers to set the clock. If the current time is 5:00
enter, 5,0,0.
3 When 5 seconds has elapsed, "ENTER" indicator flashes and
"Cloc" will be displayed.
4
Press Clock again. A colon will blink, indicating that the time is set.
If there is a power interruption, you will need to reset the clock.
You can check the current time while cooking is in progress by
pressing the Clock button.
Using the Pause/Cancel Button
The Pause/Cancel button allows you to clear instructions you have
entered. It also allows you to pause the oven's cooking cycle, so that
you can check the food.
• To pause the oven during cooking: press Pause/Cancel once. To
restart, press Start.
• To stop cooking, erase instructions, and return the oven display to
the time of day: press Pause/Cancel twice.
• To correct a mistake you have just entered: press Pause/Cancel
once, then re-enter the instructions.
Page 9
Operation
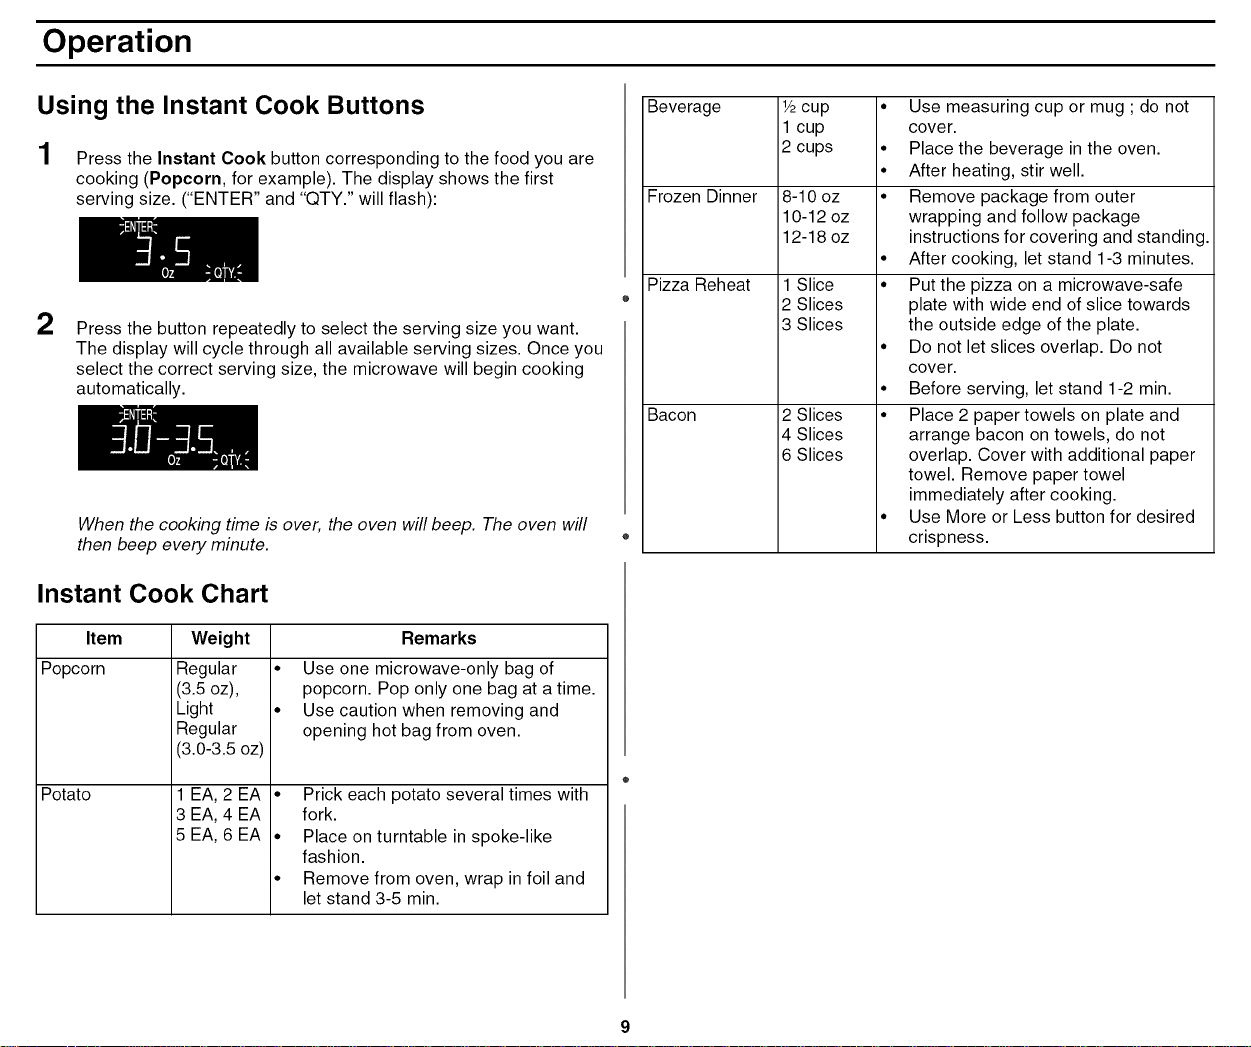
Using the Instant Cook Buttons
1 Press the Instant Cook button corresponding to the food you are
cooking (Popcorn, for example). The display shows the first
serving size. ("ENTER" and "QTY." will flash):
2
Press the button repeatedly to select the serving size you want.
The display will cycle through all available serving sizes. Once you
select the correct serving size, the microwave will begin cooking
automatically.
When the cooking time is over, the oven will beep. The oven will
then beep every minute.
Instant Cook Chart
Item Weight Remarks
Popcorn
Regular
(3.5oz),
Light
Regular
(3.0-3.5 oz)
• Use one microwave-only bag of
popcorn. Pop only one bag at a time.
• Use caution when removing and
opening hot bag from oven.
Beverage
Frozen Dinner
Pizza Reheat
Bacon
1/2cup
1 cup
2 cups
8-10 oz
10-12 oz
12-18 oz
1Slice
2 Slices
3 Slices
2 Slices
4 Slices
6 Slices
• Use measuring cup or mug ; do not
cover.
• Place the beverage in the oven.
• After heating, stir well.
• Remove package from outer
wrapping and follow package
instructions for covering and standing.
• After cooking, let stand 1-3 minutes.
• Put the pizza on a microwave-safe
plate with wide end of slice towards
the outside edge of the plate.
• Do not let slices overlap. Do not
cover.
• Before serving, let stand 1-2 min.
• Place 2 paper towels on plate and
arrange bacon on towels, do not
overlap. Cover with additional paper
towel. Remove paper towel
immediately after cooking.
• Use More or Less button for desired
crispness.
Potato
1 EA, 2 EA
3 EA, 4 EA
5 EA, 6 EA
• Prick each potato several times with
fork.
• Place on turntable inspoke-like
fashion.
• Remove from oven, wrap in foil and
let stand 3-5 min.
Page 10
Operation
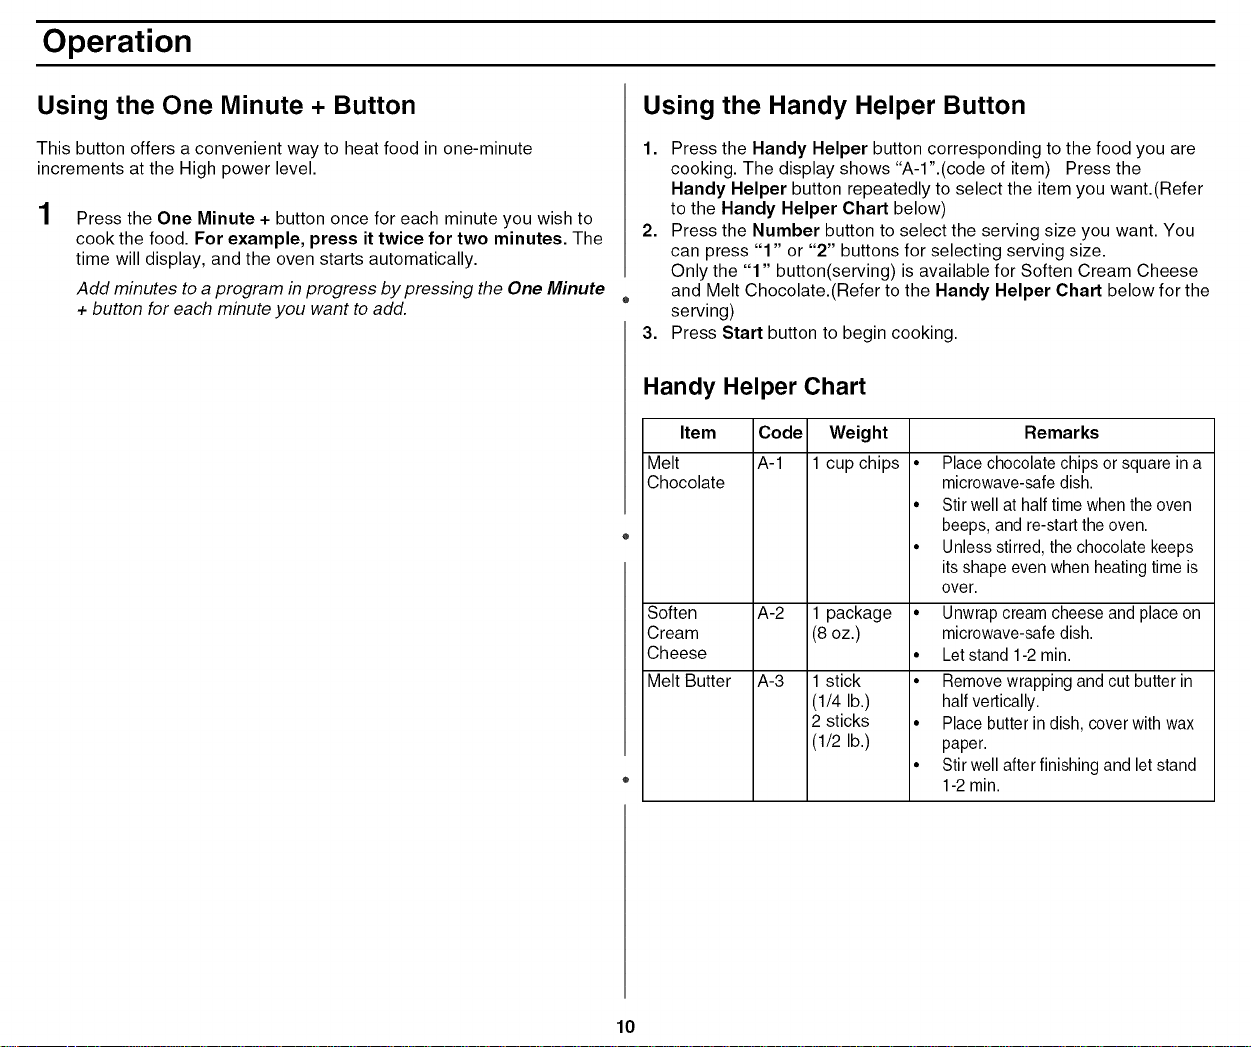
Using the One Minute + Button
This button offers a convenient way to heat food in one-minute
increments at the High power level.
Press the One Minute + button once for each minute you wish to
cook the food. For example, press it twice for two minutes. The
time will display, and the oven starts automatically.
Add minutes to a program in progress by pressing the One Minute
+ button for each minute you want to add.
Using the Handy Helper Button
1. Press the Handy Helper button corresponding to the food you are
cooking. The display shows "A-l".(code of item) Press the
Handy Helper button repeatedly to select the item you want.(Refer
to the Handy Helper Chart below)
2. Press the Number button to select the serving size you want. You
can press "1" or "2" buttons for selecting serving size.
Only the "1" button(serving) is available for Soften Cream Cheese
and Melt Chocolate.(Refer to the Handy Helper Chart below for the
serving)
3. Press Start button to begin cooking.
Handy Helper Chart
Item Code Weight
Melt A-1 1 cup chips
Chocolate
Soften A-2 1 package
Cream (8 oz.)
Cheese
Melt Butter A-3 1 stick
(1/4 lb.)
2 sticks
(1/2 lb.)
• Place chocolate chips or square in a
microwave-safe dish.
• Stir well at half time when the oven
beeps, and re-start the oven.
• Unless stirred, the chocolate keeps
its shape even when heating time is
over.
• Unwrap cream cheese and place on
microwave-safe dish.
• Letstand 1-2 rain.
• Remove wrapping and cut butter in
half vertically.
• Place butterin dish, cover with wax
paper.
• Stir well after finishing and let stand
1-2 rain.
Remarks
10
Page 11

Operation
Using the Kids Meals Button
1. Press the Kids Meals button corresponding to the food you are
cooking. The display shows "A-l"(Code of item).
Press the Kids Meals button repeatedly to select the item you
want.(Refer to the Kids Meals Chart below)
2. Press the Number button to select the serving size you want. You
can press "1" or "2" buttons for selecting serving size.(Refer to the
Kids Meals Chart below for the serving.)
3. Press Start button to begin cooking.
Kids Meals Chart
Item Code Weight
Chicken A-1 4-5 oz
Nuggets 6-7 oz
Hot Dogs A-2 2 EA
4 EA
French Fries A-3 4-5 oz
6-7 oz
Frozen A-4 1 EA
Sandwich 2 EA
• Put a paper towel on topof plate and
arrange nuggets in spoke fashion on
papertowel.
• Do not cover. Let stand 1 rain.
• Prick hot dogs, place on plate. When the
oven beeps, add bunsand re-start the
oven.
• Place 2 paper towels on plate and
arrange french fries on towels, do not
overlap.
• Blot with additional paper towel after
removalfrom oven.
• Place frozen sandwich in susceptor
"sleeve" (which is in package) and put on
plate.
Remarks
Using the Snack Bar Button
1. Press the Snack Bar button corresponding to the food you are
cooking. The display shows "A-l".(Code of item)
Press the Snack Bar button repeatedly to select the item you
want.(Refer to the Snack Bar Chart below)
2. Press the Number button to select the serving size you want. You
can press "1" or "2" buttons for selecting serving size.
Only the "1" button(serving) is available for Nachos.
(Refer to the Snack Bar Chart below for the serving)
3. Press Start button to begin cooking.
Snack Bar Chart
Item Code Weight
Nachos A-1 1serving
Chicken Wings A-2 5-6 oz
Potato Skins A-3
Cheese Sticks A-4
7-8 oz
1cooked
potato
2 cooked
potatoes
5-6 pcs
7-10 pcs
• Place tortilla chips on plate without
overlapping.
• Sprinkle evenlywith cheese.
• Contents :
- 2 cups tortilla chips
- 1/3 cup grated cheese
• Use pre-cooked, refrigerated chicken
wings.
• Place chicken wings around plate in
spoke fashion and cover withwax
paper.
• Cut cooked potato into 4 even
wedges. Scoop or cut out potato flesh,
leaving about 1/4" of skin.
• Place skins in spoke fashion around
plate.
• Sprinkle with bacon, onionsand
cheese. Do not cover.
Place cheese sticks on plate in spoke
fashion.
Do not cover.
Remarks
11
Page 12
Operation
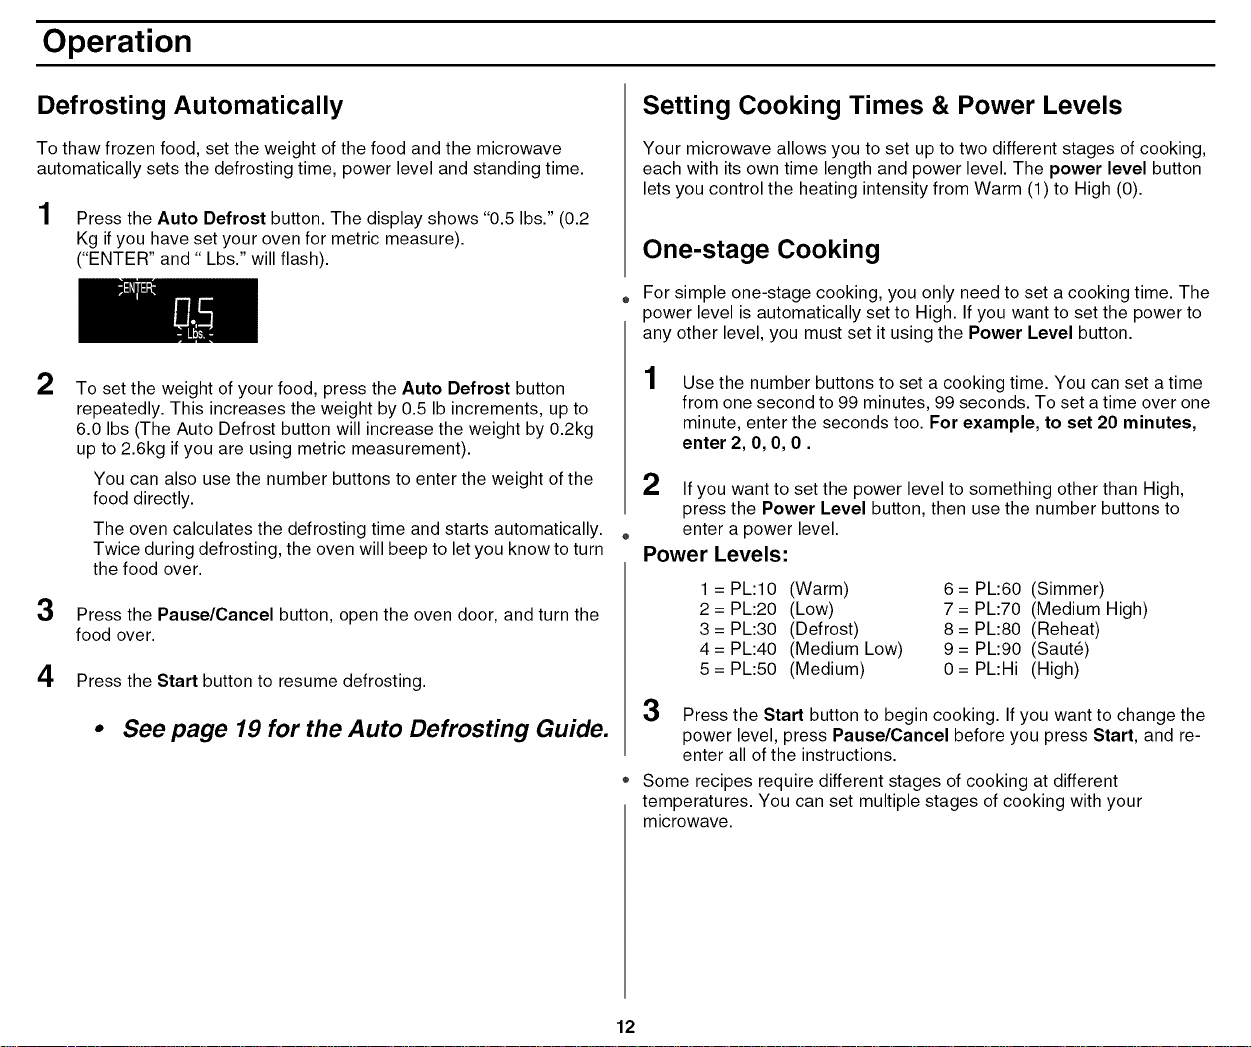
Defrosting Automatically
To thaw frozen food, set the weight of the food and the microwave
automatically sets the defrosting time, power level and standing time.
1 Press the Auto Defrost button. The display shows "0.5 Ibs." (0.2
Kg if you have set your oven for metric measure).
("ENTER" and" Lbs." will flash).
2
To set the weight of your food, press the Auto Defrost button
repeatedly. This increases the weight by 0.5 Ib increments, up to
6.0 Ibs (The Auto Defrost button will increase the weight by 0.2kg
up to 2.6kg if you are using metric measurement).
You can also use the number buttons to enter the weight of the
food directly.
The oven calculates the defrosting time and starts automatically.
Twice during defrosting, the oven will beep to let you know to turn
the food over.
3
Press the Pause/Cancel button, open the oven door, and turn the
food over.
4 Press the Start button to resume defrosting.
• See page 19 for the Auto Defrosting Guide.
Setting Cooking Times & Power Levels
Your microwave allows you to set up to two different stages of cooking,
each with its own time length and power level. The power level button
lets you control the heating intensity from Warm (1) to High (0).
One-stage Cooking
For simple one-stage cooking, you only need to set a cooking time. The
power level is automatically set to High. If you want to set the power to
any other level, you must set it using the Power Level button.
Use the number buttons to set a cooking time. You can set a time
from one second to 99 minutes, 99 seconds. To set a time over one
minute, enter the seconds too. For example, to set 20 minutes,
enter 2, 0, 0, 0.
2 Ifyou want to set the power level to something other than High,
press the Power Level button, then use the number buttons to
enter a power level.
Power Levels:
1 = PL:10 (Warm)
2 = PL:20 (Low)
3 = PL:30 (Defrost)
4 = PL:40 (Medium Low)
5 = PL:50 (Medium)
6 = PL:60 (Simmer)
7 = PL:70 (Medium High)
8 = PL:80 (Reheat)
9 = PL:90 (Saute)
0= PL:Hi (High)
3 Press the Start button to begin cooking. If you want to change the
power level, press Pause/Cancel before you press Start, and re-
enter all of the instructions.
Some recipes require different stages of cooking at different
temperatures. You can set multiple stages of cooking with your
microwave.
12
Page 13
Operation
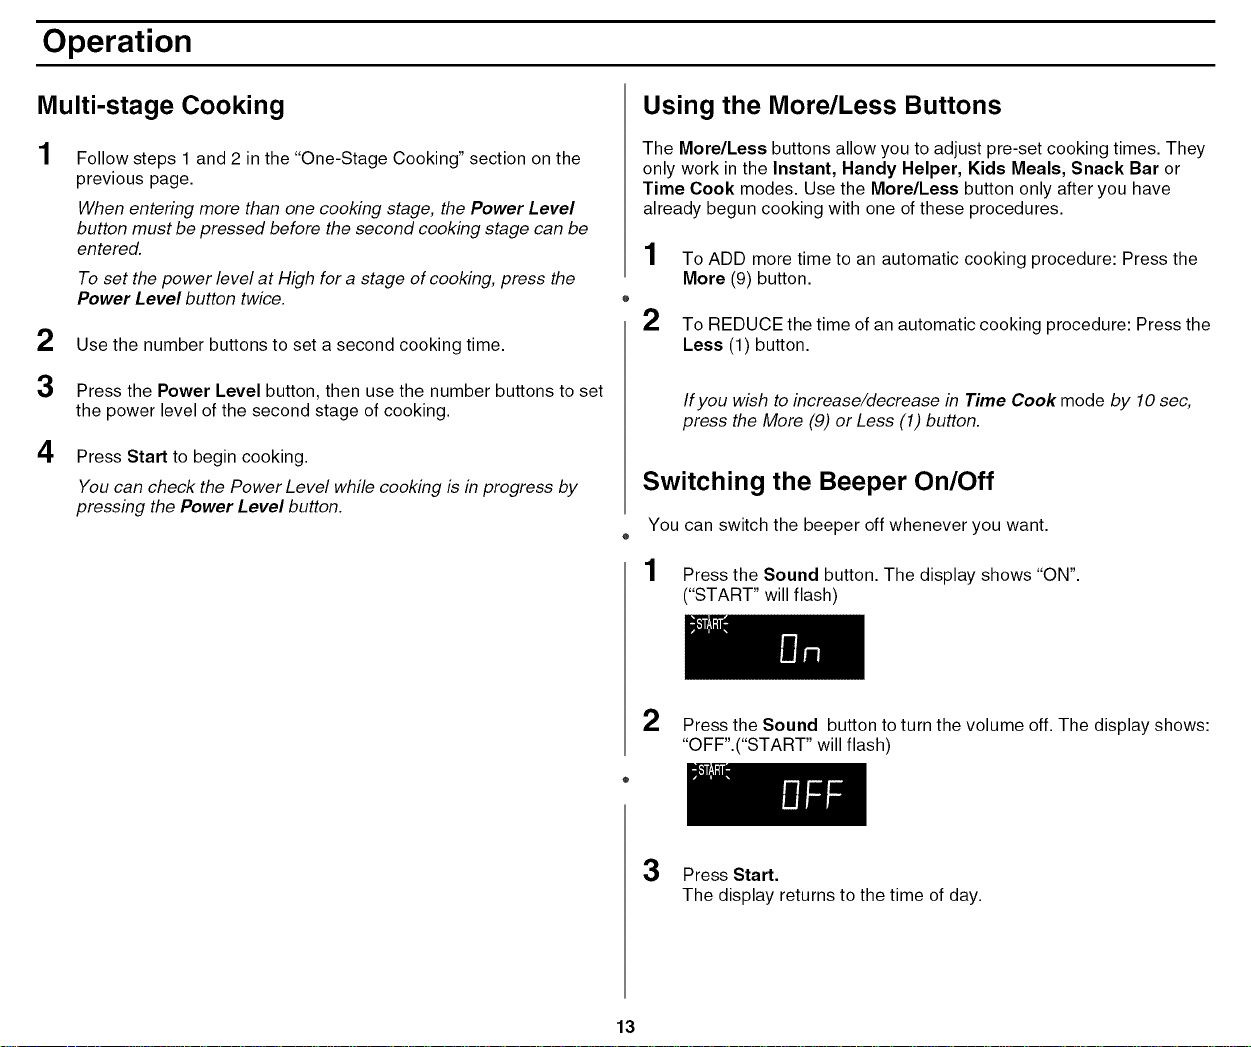
Multi-stage Cooking
Follow steps 1 and 2 in the "One-Stage Cooking" section on the
previous page.
When entering more than one cooking stage, the Power Level
button must be pressed before the second cooking stage can be
entered.
To set the power level at High for a stage of cooking, press the
Power Level button twice.
2 Use the number buttons to set a second cooking time.
3 Press the Power Level button, then use the number buttons to set
the power level of the second stage of cooking.
4 Press Start to begin cooking.
You can check the Power Level while cooking is in progress by
pressing the Power Level button.
Using the More/Less Buttons
The MorelLess buttons allow you to adjust pre-set cooking times. They
only work in the Instant, Handy Helper, Kids Meals, Snack Bar or
Time Cook modes. Use the More/Less button only after you have
already begun cooking with one of these procedures.
1 To ADD more time to an automatic cooking procedure: Press the
More (9) button.
2 To REDUCE the time of an automatic cooking procedure: Press the
Less (1) button.
Ifyou wish to increase/decrease in Time Cook mode by 10 sec,
press the More (9) or Less (1) button.
Switching the Beeper On/Off
You can switch the beeper off whenever you want.
1 Press the Sound button. The display shows "ON".
("START" will flash)
2 Press the Sound button to turn the volume off. The display shows:
"OFF".("START" will flash)
3 Press Start.
The display returns to the time of day.
13
Page 14
Operation
Using the Kitchen Timer
1 Press the Kitchen Timer button.
2 Use the Number buttons to set the length of time you want the
timer to run.
3 Press Start to begin Kitchen Timer.
4 The display counts down and beeps when the time has elapsed.
"Note: The microwave does not turn on when the Kitchen timer
is used."
Demonstration Mode
You can use the Demonstration Mode to see how your microwave oven
operates without the oven heating.
1 Hold the 0 button and then press the 1 button.
To turn demo mode off, repeat step 1 above.
Setting the Child Protection Lock
You can lock your microwave oven so it can't be used by unsupervised
children.
Hold the "0" button and then press the 2 button.
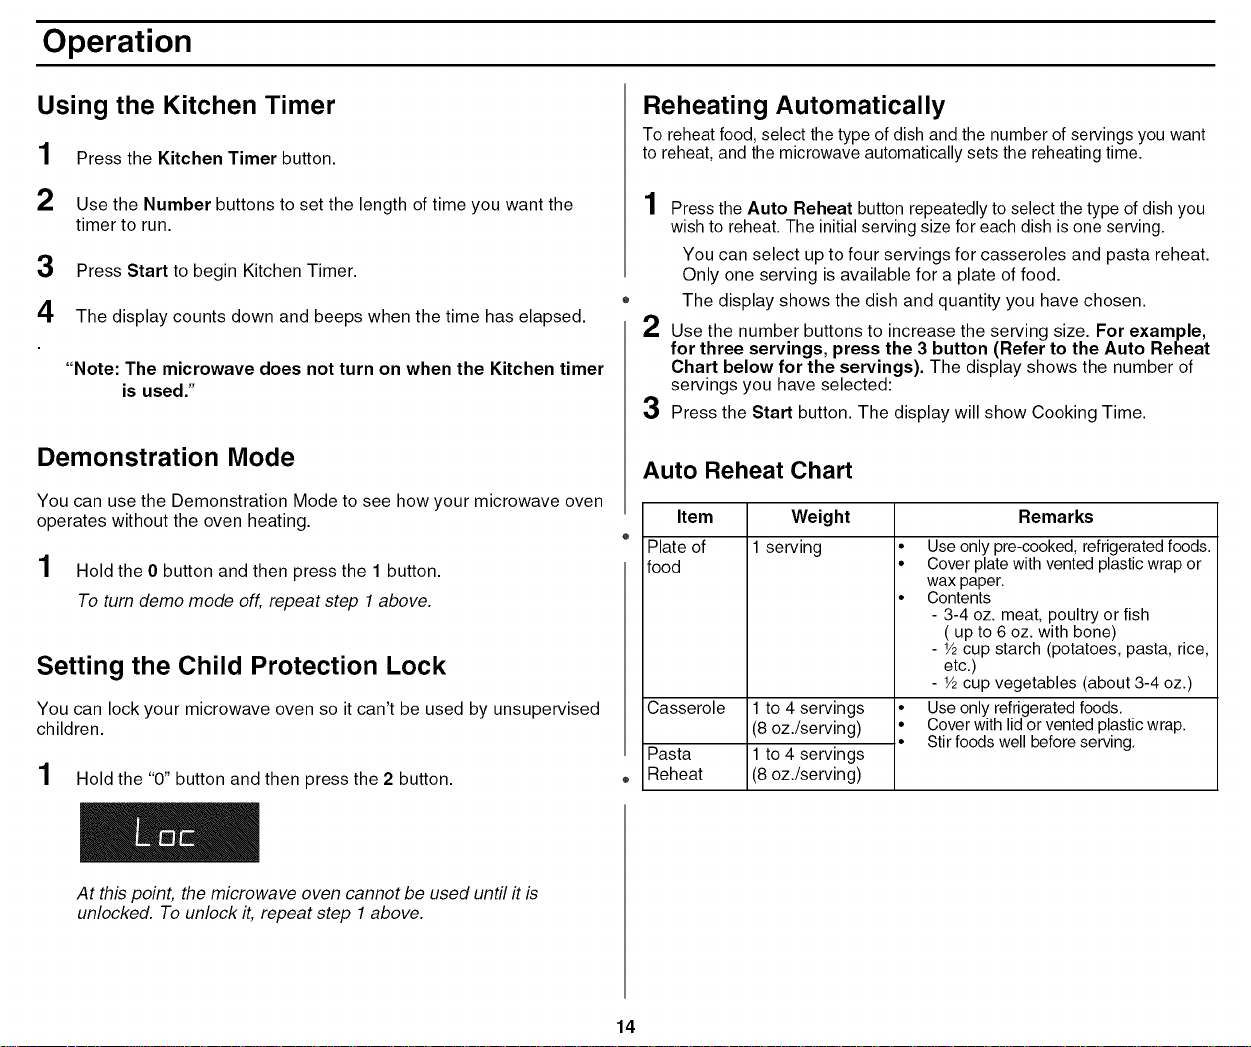
Reheating Automatically
To reheat food, select the type of dish and the number of servings you want
to reheat, and the microwave automatically sets the reheating time.
Press the Auto Reheat button repeatedly to select the type of dish you
wish to reheat. The initial serving size for each dish is one serving.
You can select up to four servings for casseroles and pasta reheat.
Only one serving is available for a plate of food.
The display shows the dish and quantity you have chosen.
2
Use the number buttons to increase the serving size. For example,
for three servings, press the 3 button (Refer to the Auto Reheat
Chart below for the servings). The display shows the number of
servings you have selected:
3
Press the Start button. The display will show Cooking Time.
Auto Reheat Chart
item
Plate of
food
Casserole
Pasta
Reheat
Weight
1 serving
1 to 4 servings
(8 oz./serving)
1 to 4 servings
(8 oz./serving)
• Use only pre-cooked, refrigerated foods.
• Cover plate with vented plastic wrap or
wax paper.
• Contents
- 3-4 oz. meat, poultry or fish
( up to 6 oz. with bone)
- 1/2cup starch (potatoes, pasta, rice,
etc.)
- 1/2cup vegetables (about 3-4 oz.)
• Use only refrigerated foods.
• Cover with lid or vented plastic wrap.
• Stir foods well before serving.
Remarks
At this point, the microwave oven cannot be used until it is
unlocked. To unlock it, repeat step 1 above.
14
Page 15
Cooking Instructions
Cooking Utensils
Recommended Use
• Glass and glass-ceramic bowls and dishes i Use for heating or
cooking.
• Microwavable browning dish -- Use to brown the exterior of small
items such as steaks, chops, or pancakes. Follow the directions
provided with your browning dish.
• Microwavable plastic wrap -- Use to retain steam. Leave a small
opening for some steam to escape and avoid placing it directly on o
the food.
• Wax paper i Use as a cover to prevent spattering.
• Paper towels and napkins -- Use for short-term heating and
covering; they absorb excess moisture and prevent spattering. Do
not use recycled paper towels, which may contain metal and can
catch fire.
• Paper plates and cups -- Use for short-term heating at low
temperatures. Do not use recycled paper, which may contain metal
and can catch fire.
• Thermometers i Use only those labeled "Microwave Safe" and
follow all directions. Check the food in several places. Conventional o
thermometers may be used once the food has been removed from
the oven.
Limited Use
• Aluminum foil -- Use narrow strips of foil to prevent overcooking of
exposed areas. Using too much foil can damage your oven, so be
careful.
• Ceramic, porcelain, and stoneware-- Use these if they are
labeled "Microwave Safe". If they are not labeled, test them to make
sure they can be used safely. Never use dishes with metallic trim.
• Plastic i Use only if labeled "Microwave Safe". Other plastics can
melt.
• Straw, wicker, and wood i Use only for short-term heating, as
they can be flammable.
Not Recommended
• Glass jars and bottles -- Regular glass is too thin to be used in a
microwave, and can shatter.
• Paper bags -- These are a fire hazard, except for popcorn bags that
are designed for microwave use.
• Styrofoam plates and cups i These can melt and leave an
unhealthy residue on food.
• Plastic storage and food containers i Containers such as
margarine tubs can melt in the microwave.
• Metal utensils i These can damage your oven. Remove all metal
before cooking.
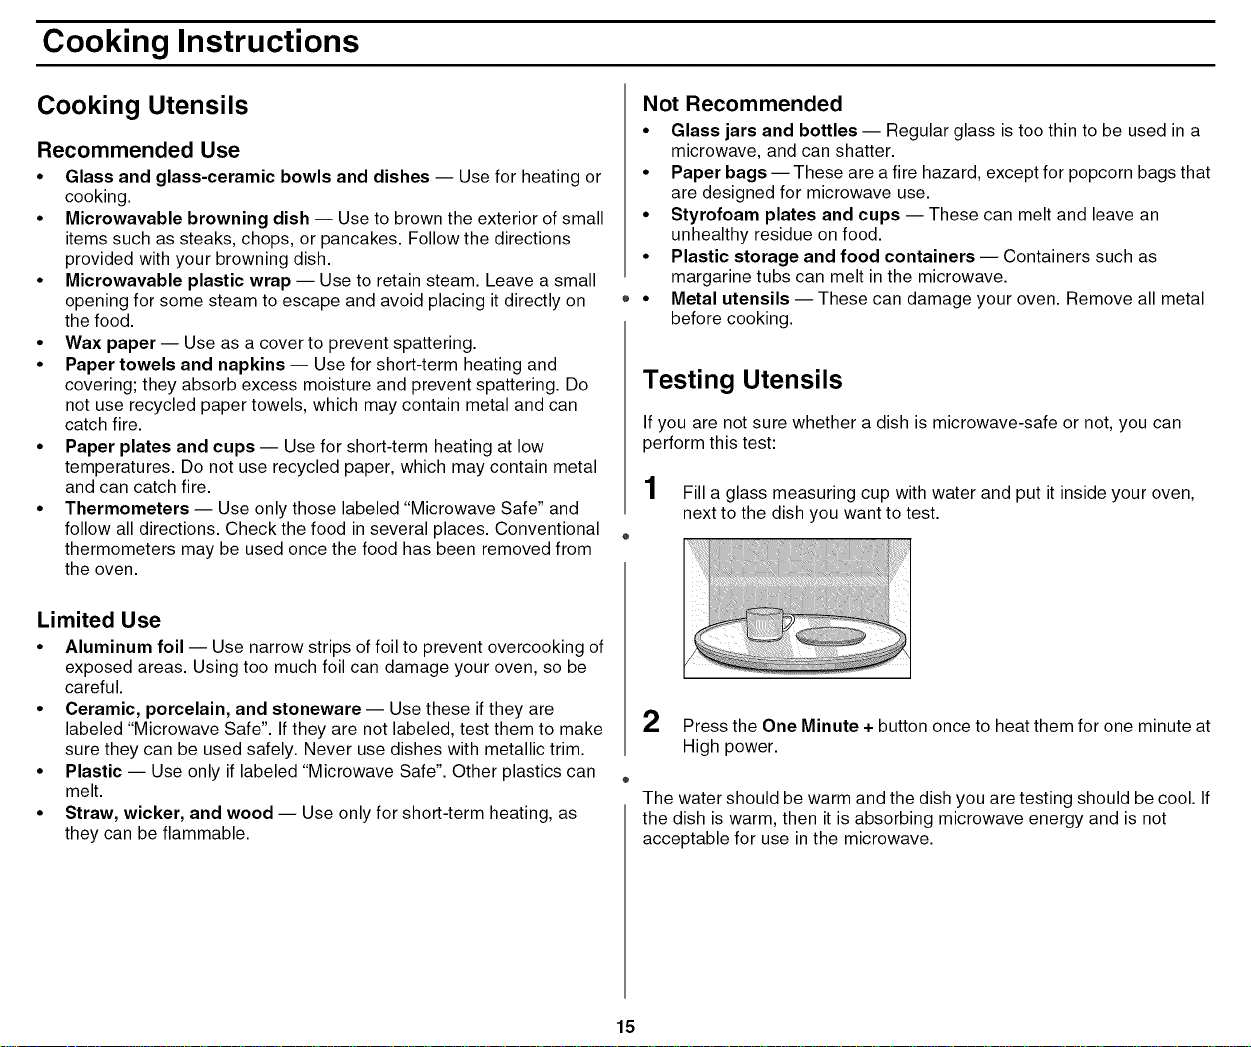
Testing Utensils
If you are not sure whether a dish is microwave-safe or not, you can
perform this test:
1 Fill a glass measuring cup with water and put it inside your oven,
next to the dish you want to test.
2 Press the One Minute + button once to heat them for one minute at
High power.
The water should be warm and the dish you are testing should be cool. If
the dish is warm, then it is absorbing microwave energy and is not
acceptable for use in the microwave.
15
Page 16

Cooking Instructions
Cooking Techniques
Stirring
Stir foods such as casseroles and vegetables while cooking to distribute
heat evenly. Food at the outside of the dish absorbs more energy and
heats more quickly, so stir from the outside to the center. The oven will
turn off when you open the door to stir your food.
Arrangement
Arrange unevenly shaped foods, such as chicken pieces or chops, with
the thicker, meatier parts toward the outside of the turntable where they
receive more microwave energy. To prevent overcooking, place thin or
delicate parts toward the center of the turntable.
Shielding
Shield food with narrow strips of aluminum foil to prevent overcooking.
Areas that need shielding include poultry wing-tips, the ends of poultry
legs, and corners of square baking dishes. Use only small amounts of
aluminum foil. Larger amounts can damage your oven.
Turning
Turn foods over midway through cooking to expose all parts to
microwave energy. This is especially important with large items such as
roasts.
Standing
Foods cooked in the microwave build up internal heat and continue to
cook for a few minutes after the oven stops. Let foods stand to complete
cooking, especially foods such as roasts and whole vegetables. Roasts
need this time to complete cooking in the center without overcooking the
outer areas. All liquids, such as soup or hot chocolate, should be shaken
or stirred when cooking is complete. Let liquids stand a moment before
serving. When heating baby food, stir well and test the temperature
before serving.
Adding Moisture
Microwave energy is attracted to water molecules. Food that is uneven
in moisture content should be covered or allowed to stand so that the
heat disperses evenly. Add a small amount of water to dry food to help it
cook.
General Tips
• Dense foods, such as potatoes, take longer to heat than lighter
foods. Foods with a delicate texture should be heated at a low power
level to avoid becoming tough.
• Altitude and the type of cookware you are using can affect cooking
time. When using a new recipe, use the minimum cooking time and
check the food occasionally to prevent overcooking.
• Foods with a non-porous skin or shell, such as potatoes, eggs, or hot
dogs, should be pierced to prevent bursting.
• Frying with heating oil or fat is not recommended. Fat and oil can
suddenly boil over and cause severe burns.
• Some ingredients heat faster than others. For example, the jelly
inside a jelly doughnut will be hotter than the dough. Keep this in
mind to avoid burns.
• Home canning in the microwave oven is not recommended because
all harmful bacteria may not be destroyed by the microwave heating
process.
• Although microwaves do not heat the cookware, the heat is often
transferred to the cookware. Always use pot holders when removing
food from the microwave and instruct children to do the same.
16
Page 17

Cooking Instructions
Cooking Guide
Guide for Cooking Meat in Your Microwave
• Place meat on a microwave-safe roasting rack in a microwave-safe
dish.
• Start meat fat-side down. Use narrow strips of aluminum foil to shield
any bone tips or thin meat areas.
• Check the temperature in several places before letting the meat
stand the recommended time.
• The following temperatures are removal temperatures. The
temperature of the food will rise during the standing time.
Roast Cooking Time: Place roast fat-side down on
Beef 7'11 rain./lb, for 1150F. roasting rack, Cover with wax
Boneless Rare paper. Turn over when
8,12 min. / lb. for 120_ F .... cooking time is half up. Let
Up to 4 Ibs. Medium stand 10 min. ...................
9,14 min. /lb. for 145£ F,
Well Done ............
Power Level; High(Hi)fo[ •
first5 min. then
Medium(50)
Pork Cooking Time: Place roast fat.side down on
Boneless 11,15 min./lb, for 160£ F roasting rack. Cover with
or bone,in Well Done vented plastic wrap. Turn over
Power Level: High(Hi) for when cooking time is half up.
Up to 4 !bs. first 5 min., then .............. Let stand 10 min. ...............
..... Medium(50)i ......
Guide for Cooking Poultry in Your Microwave
• Place poultry on a microwave-safe roasting rack in a microwave-safe
dish.
• Cover poultry with wax paper to prevent spattering.
• Use aluminum foil to shield bone tips, thin meat areas, or areas that
start to overcook.
• Check the temperature in several places before letting the poultry
stand the recommended time.
Whole Cooking Time:
Chicken 6-9 min. /Ib.180°F
Up to 4 Ibs. Power Level: Medium
High(70).
Chicken
Pieces
Up to 2 Ibs.
Cooking Time:
6-9 min / lb.
180°F dark meat
170°F light meat
Power Level: Medium
High(70).
Place chicken breast-side
down on roasting rack. Cover
with wax paper. Turn over
when the cooking time is half
up. Cook until juices run clear
and meat near the bone is no
longer pink. Let stand 5-10
rain.
Place chicken bone-side down
on dish, with the thickest
portions towards the outside
of the dish. Cover with wax
paper. Turn over when the
cooking time is half up. Cook
until juices run clear and meat
near the bone is no longer
pink. Let stand 5-10 min.
17
Page 18

Cooking Instructions
Guide for Cooking Seafood in Your Microwave
• Cook fish until it flakes easily with a fork.
• Place fish on a microwave-safe roasting rack in a microwave-safe
dish.
• Use atight cover to steam fish. A lighter cover of wax paper or paper
towel provides less steaming.
• Do not overcook fish; check it at minimum cooking time.
Steaks Cooking Time:
6-10 min. / lb.
Up to 1.5 Ibs.
Power Level: Medium-
High(70).
Fillets Cooking Time:
3-7 min. / Ib
Up to 1.5 Ibs.
Power Level: Medium-
High(70).
Shrimp Cooking Time: Arrange shrimp in a baking
3-5 Y2min. / lb. dish without overlapping or
Up to 1.5 Ibs. layering. Cover with wax
Power Level: Medium- paper. Cook until firm and
High(70). opaque, stirring 2 or 3 times.
.......... steaks on roasting
rack with meaty portions
towards the outside of rack.
Cover with wax paper. Turn
over and rearran ge when
cooking time is half up. Cook
until fish flakes easily with a
fork. Let stand 3-5 mn.
Arrange fillets in a baking
dish. turning any thin pieces
under. Cover with wax paper.
If over 1/2inch thick, turn over
and rearrange when cooking
time is half up. Cook until fish
flakes easily with a fork. Let
stand 2-3 min
Let stand 5 min.
Guide for Cooking Eggs in Your Microwave
• Never cook eggs in the shell, and never warm hard-cooked eggs in
the shell; they can explode.
• Always pierce whole eggs to keep them from bursting.
• Cook eggs just until set; they become tough if overcooked.
Guide for Cooking Vegetables in Your Microwave
• Vegetables should be washed just before cooking. Often, no extra
water is needed. If dense vegetables such as potatoes, carrots and
green beans are being cooked, add about 1_cup water.
• Small vegetables (sliced carrots, peas, lima beans, etc.) will cook
faster than larger ones.
• Whole vegetables, such as potatoes, acorn squash or corn on the
cob, should be arranged in a circle on the turntable before cooking.
They will cook more evenly if turned over after half the cooking time.
• Always place vegetables like asparagus and broccoli with the stem
ends pointing towards the edge of the dish and the tips toward the
center.
• When cooking cut vegetables, always cover the dish with a lid or
vented microwavable plastic wrap.
• Whole, unpeeled vegetables such as potatoes, squash, eggplant,
etc., should have their skin pricked in several spots before cooking to
prevent them from bursting.
• For more even cooking, stir or rearrange whole vegetables halfway
through the cooking time.
• Generally, the denser the food, the longer the standing time.
(Standing time refers to the time necessary for dense, large foods
and vegetables to finish cooking after they come out of the oven.) A
baked potato can stand on the counter for five minutes before
cooking is completed, while a dish of peas can be served
immediately.
18
Page 19

Cooking Instructions
Auto Defrosting Guide
• Follow the instructions below when defrosting different types of food.
Roast 2.5-6.0 Ibs.
Beef, Pork
Steaks,
Chops,
Fish
Ground 0.5-3.0 Ibs.
Meat
0.5-3.0 Ibs.
Whole 2.5-6.0 Ibs.
Chicken
Chicken 0.5-3.0 Ibs.
Pieces
Start withthe food placed fat side down.
After each stage, turn the food over and
shield any warm portions with narrow
strips of aluminum foil.
After each stage, rearrange the food. If
there are any warm or thawed portions of
food, shield them with narrow flat pieces of
aluminum foil. Remove any pieces of food
that are nearly defrosted. Let stand,
coverea, for 5-10 minutes.
After each stage, remove any pieces of
food that are nearly defrosted. Let stand,
covered with foil, for 5-10 minutes.
Remove giblets before freezing poultry.
Start defrosting with the breast side aown.
After the first stage, turn the chicken over
and shield any warm portions with narrow
strips of alumi hum foil. After the second
stage, again shield any warm portions with
narrow strips of aluminu m foil. Let stand,
covered, for 30-60 minutes in the
refrigerator.
After each stage, rearrange or remove any
pieces of food that are nearly defrosted.
Let stand for 10-20 minutes.
Notes
Check foods when the oven signals. After the final stage, small sections
may still be icy; let them stand to continue thawing. Do not defrost until
all ice crystals have thawed. Shielding roasts and steaks with small
pieces of foil prevents the edges from cooking before the center of the
food has defrosted. Use narrow, flat, smooth strips of aluminum foil to
cover the edges and thinner sections of the food.
19
Page 20

Cooking Instructions
Recipes
Beef and Barley Stew
11/2Ibs. beef stew cubes, cut into 1/2-inchpieces
1/2cup chopped onion
2 Tbs. all-purpose flour
1Tbs. Worcestershire sauce
1can (13.75-14.5 oz.) beef broth
2 medium carrots, cut into 1/2-inchslices (about 1 cup)
1/2cup barley
1 bay leaf
1_tsp. pepper
1 pkg. (9-10 oz.) frozen peas, thawed
1. In a 2-quart casserole, combine beef, onion, flour, and
Worcestershire; mix well. Cover with lid. Cook at High for 6 to 8
minutes until beef is no longer pink, stirring once.
2. Stir in beef broth, carrots, barley, bay leaf, and pepper. Cover with
lid. Cook at Medium for 1 to 11/2hours until carrots and beef are
tender, stirring 2 to 3 times.
3. Stir in peas. Cover with lid. Cook at Medium for 10 minutes. Let
stand for 10 minutes. Remove bay leaf before serving.
Makes 6 servings.
Broccoli and Cheese Casserole
1_cup butter or margarine
_ cup chopped onion
11/2Tbs. flour
1/2tsp. salt
_ tsp. dry mustard
1/8tsp. pepper
1_/2cups milk
_ cup chopped red pepper
8 oz. (2 cups) cheddar cheese, shredded
1 pkg. (9-10 oz.) frozen chopped broccoli, thawed
4 cups cooked spiral shaped pasta (8 oz. dry)
1. In a 2-quart casserole, cook butter and onion at High for 1 to 2
minutes until onion is soft, stirring once.
2. Add flour, salt, mustard, and pepper; mix well. Cook at High for 30 to
60 seconds until mixture boils. Stir in milk until smooth.
3. Stir in red pepper. Cook at High for 2 to 3 minutes until mixture boils
and thickens slightly, stirring twice. Stir in cheese until melted.
4. Add broccoli and pasta, mix well. Cover with lid. Cook at High for 4 to
6 minutes until heated through, stirring once. Stir before serving.
Makes 6 servings.
20
Page 21

Cooking Instructions
Warm Potato Salad
2 Ibs. small red potatoes, cut into Y2-inch pieces
4 slices bacon (uncooked), cut into 1/2-inchpieces
1_cup chopped onion
2 tsp. sugar
1tsp. salt
1tsp. flour
1/2tsp. celery seed
1/8tsp. pepper
21/2Tbs. apple cider vinegar
1. In a 2-quart casserole, combine potatoes and 1_cup water. Cover
with lid. Cook at High until potatoes are tender (7-10 min.); stir twice.
Drain and set aside to cool slightly.
2. In a medium bowl, cook bacon at High until crisp (2Y2-31/2min.); stir
once. Place bacon on a paper towel. Reserve 1 Tbs. drippings.
3. Combine drippings and onion. Cover with plastic wrap; turn back a
corner to vent steam. Cook at High until tender (11/2-21/2min.); stir
once.
4. Stir in sugar, salt, flour, celery seed, and pepper. Cook at High until
mixture boils (30-40 sec.). Stir in vinegar and Y2cup water. Cook at
High until liquid boils and thickens slightly (1-2 min.); stir once. Add
bacon to dressing. Pour dressing over potatoes. Stir well.
Makes 6 servings.
Black Bean Soup
1 cup chopped onion
1 clove garlic, minced
2 cans (15 oz. each) black beans, drained
1 can (c) stewed tomatoes, chopped
1 can (13.75-14.5 oz.) chicken broth
1 can (7-8.5 oz.) corn
1 can (4 oz.) chopped green chilies
1-2 tsp. ground cumin, or to taste
1. Place onion and garlic in a 3-quart casserole. Cover with lid. Cook at
High for 2 to 4 minutes until tender.
2. Add one can of beans, mash beans with a fork. Add remaining
ingredients; mix well.
3. Cook uncovered, at High for 10 minutes; stir. Reduce power to
Medium and cook for 5 minutes. Stir before serving.
Makes about 2 quarts.
21
Page 22

Appendix
Troubleshooting Guide
Before you call a repair person for your oven, check this list of possible
problems and solutions.
Neither the oven's display nor the oven operate.
• Properly insert the plug into a grounded outlet.
• If the outlet is controlled by a wall switch, make sure the wall switch
is turned on.
• Remove the plug from the outlet, wait ten seconds, then plug it in again.
• Reset the circuit breaker or replace any blown fuse. o
• Plug another appliance into the outlet; if the other appliance doesn't
work, have a qualified electrician repair the outlet.
• Plug the oven into a different outlet.
The oven's display works, but the power won't come on.
• Make sure the door is closed securely.
• Check to see if packing material or other material is stuck to the door seal.
• Checkfor door damage.
• Press Cancel twice and re-enter all cooking instructions.
The power goes off before the set time has elapsed.
• If there has not been a power outage, remove the plug from the o
outlet, wait ten seconds, then plug it in again. Ifthere was a power
outage, the time indicator will display" _:_ " Reset the clock and
any cooking instructions.
• Reset the circuit breaker or replace any blown fuse.
The food is cooking too slowly.
• Make sure the oven is on its own 20 amp circuit line. Operating
another appliance on the same circuit can cause a voltage drop. If
necessary, move the oven to its own circuit.
You see sparks or arcing.
• Remove any metallic utensils, cookware, or metal ties. If using foil,
use only narrow strips and allow at least one inch between the foil
and interior oven walls.
The turntable makes noises or sticks.
• Clean the turntable, roller ring and oven floor.
• Make sure the turntable and roller ring are positioned correctly.
Using your microwave causes TV or radio interference.
• This is similar to the interference caused by other small appliances,
such as hair dryers. Move your microwave further away from other
appliances, like your TV or radio.
Note :
If the oven is set more than 25 minutes at 80, 90 or 100 percent
power level, after the first 25 minutes the power level will
automatically adjust itself to 70 percent power to avoid
overcooking.
Care and Cleaning
Follow these instructions to clean and care for your oven.
• Keep the inside of the oven clean. Food particles and spilled liquids
can stick to the oven walls, causing the oven to work less efficiently.
• Wipe up spills immediately. Use a damp cloth and mild soap. Do not
use harsh detergents or abrasives.
• To help loosen baked on food particles or liquids, heat two cups of
water (add the juice of one lemon if you desire to keep the oven
fresh) in a four-cup measuring glass at High power for five minutes
or until boiling. Let stand in the oven for one or two minutes.
• Remove the glass tray from the oven when cleaning the oven or tray.
To prevent the tray from breaking, handle it carefully and do not put it
in water immediately after cooking. Wash the tray carefully in warm
sudsy water or in the dishwasher.
• Clean the outside surface of the oven with soap and a damp cloth.
Dry with a soft cloth. To prevent damage to the operating parts of the
oven, don't let water seep into the openings.
• Wash the door window with very mild soap and water. Be sure to use
a soft cloth to avoid scratching.
• If steam accumulates inside or outside the oven door, wipe with a
soft cloth. Steam can accumulate when operating the oven in high
humidity and in no way indicates microwave leakage.
• Never operate the oven without food in it; this can damage the
magnetron tube or glass tray. You may wish to leave a cup of water
o
in the oven when it is not in use to prevent damage if the oven is
accidentally turned on.
If you have a problem you cannot solve,
please call our service line:
1-800-843-0304 U. S. A.
1-800-807-6777 CANADA
22
Page 23

Appendix
Specifications
Model Number AMC5101AAB/W
Oven Cavity 1.0 cu.ft
Controls ! 0 power levels, including defrost
Timer 99 minutes, 99 seconds
Power Source 120 VAC; 60 Hz
Power Output 1000 Watts
Power Consumption 1500 Watts
Outside Dimensions 20 11/32"(W) X 11 11/16"(H) X 14 15/16"(D)
Oven Cavity Dimensions ! 3 7/32 (W) X 9 t/8 (H)X !3 ! !/! 6 (D)
Shipping Dimensions 22 23/32"(W) X 14 19/32"(H) X 16 31/32"(D)
Net/Gross Weight 30.1/34:3 Ibs
Model Number AMC5101AAS ,,
Oven Cavity 1.0 cu.ft
Controls !0 power levels, including defros t
Timer 99 minutes, 99 seconds
Power Source ! 20 VAC; 60 Hz
Power Output 1000 Watts
Power Consumption ! 500 Watts
Outside Dimensions 20 11/32"(W) X 11 11/16"(H) X 16 1/8"(D)
Oven Cavity Dimensions ! 3 7/32,!(W) X 9 t/8,!(H)X 13 ! 1/16,!(D) ®
Shipping Dimensions 22 23/32"(W) X 14 19/32"(H) X 19 7/16"(D)
Net/Gross Weight 31.2/35.5 Ibs
23
Page 24

AMANA ®MAJOR APPLIA--A--NCEWARRANTY
LIMITED WARRANTY
For one year from the date of purchase, when this major appliance is operated and maintained according to instructions attached to or furnished with
the product, Amana brand of Whirlpool Corporation or Whirlpool Canada LP (hereafter "Amana") will pay for factory specified parts and repair labor to
correct defects in materials or workmanship. Service must be provided by a Amana designated service company. This limited warranty isvalid only in
the United States or Canada and applies only when the major appliance is used in the country in which it was purchased. Outside the 50 United
States and Canada, this limited warranty does not apply. Proof of original purchase date is required to obtain service under this limited warranty.
ITEMS EXCLUDED FROM WARRANTY
This limited warranty does not cover:
1. Service calls to correct the installation of your major appliance, to instruct you on how to use your major appliance, to replace or repair house
fuses, or to correct house wiring or plumbing.
2. Service calls to repair or replace appliance light bulbs, air filters or water filters. Consumable parts are excluded from warranty coverage.
3. Repairs when your major appliance is used for other than normal, single-family household use or when it is used in a manner that is contrary to
published user or operator instructions and/or installation instructions.
4. Damage resulting from accident, alteration, misuse, abuse, fire, flood, acts of God, improper installation, installation not in accordance with
electrical or plumbing codes, or use of consumables or cleaning products not approved by Amana.
5. Cosmetic damage, including scratches, dents, chips or other damage to the finish of your major appliance, unless such damage results from
defects in materials or workmanship and is reported to Amana within 30 days from the date of purchase.
6. Any food loss due to refrigerator or freezer product failures.
7. Costs associated with the removal from your home of your major appliance for repairs. This major appliance is designed to be repaired inthe
home and only in-home service is covered by this warranty.
8. Repairs to parts or systems resulting from unauthorized modifications made to the appliance.
9. Expenses for travel and transportation for product service if your major appliance is located in a remote area where service by an authorized
Amana servicer is not available.
10. The removal and reinstallation of your major appliance if it is installed in an inaccessible location or is not installed in accordance with published
installation instructions.
11. Major appliances with original model/serial numbers that have been removed, altered or cannot be easily determined. This warranty is void if the
factory applied serial number has been altered or removed from your major appliance.
The cost of repair or replacement under these excluded circumstances shall be borne by the customer.
DISCLAIMER OF IMPLIED WARRANTIES; LIMITATION OF REMEDIES
CUSTOMER'S SOLE AND EXCLUSIVE REMEDY UNDER THIS LIMITED WARRANTY SHALL BE PRODUCT REPAIR AS PROVIDED HEREIN.
IMPLIED WARRANTIES, INCLUDING WARRANTIES OF MERCHANTABILITY OR FITNESS FOR A PARTICULAR PURPOSE, ARE LIMITED TO
ONE YEAR OR THE SHORTEST PERIOD ALLOWED BY LAW. AMANA SHALL NOT BE LIABLE FOR INCIDENTAL OR CONSEQUENTIAL
DAMAGES. SOME STATES AND PROVINCES DO NOT ALLOW THE EXCLUSION OR LIMITATION OF INCIDENTAL OR CONSEQUENTIAL
DAMAGES, OR LIMITATIONS ON THE DURATION OF IMPLIED WARRANTIES OF MERCHANTABILITY OR FITNESS, SO THESE EXCLUSIONS
OR LIMITATIONS MAY NOT APPLY TO YOU. THIS WARRANTY GIVES YOU SPECIFIC LEGAL RIGHTS, AND YOU MAY ALSO HAVE OTHER
RIGHTS WHICH VARY FROM STATE TO STATE OR PROVINCE TO PROVINCE.
If outside the 50 United States and Canada, contact your authorized Amana dealer to determine if another warranty applies.
If you need service, first see the "Troubleshooting" section of the Use & Care Guide. After checking "Troubleshooting," you may find additional help by
checking the "Assistance or Service" section or by calling Amana. In the U.S.A., call 1-800-843-0304. In Canada, call 1-800-807-6777.
24
Page 25

Quick Reference
Feature
Set Clock
One Stage
Cooking
One Minute+
Cooking
Instant Cook
Buttons
Auto Defrost
Set Cooking Time
and Power Levels
Auto Reheat
Handy Helper, 1. Press HANDY HELPER(KIDS MEALS,
Kids Meals, SNACK BAR) repeatedly to select type of
Snack Bar dish to reheat,
1. Press CLOCK.
2. Use number buttons to enter the current
time.
3, Press CLOCK again.
1. Use number buttons to set cooking time.
2, Set power level or leave at high
3, Press START.
1, Press the ONE MINUTE + button once for
each minute of cooking.
2. The time will display and the oven will start,
1. Press button that corresponds to the food
you are cooking (for example, POPCORN).
2, Press the button repeatedly to select serving
size,
1, Press AUTO DEFROST.
2, Enter weight of food by pressing AUTO
DEFROST button repeatedly or using the
number buttons.
3, When the ove_ beeps, press PAUSE/
CANCEL button and turn food over. Press
START to resume defrosting cycle.
1, Use number buttons to set cooking time.
2, To set power level at otherthan HIGH, press
POWER LEVEL and use the number buttons
to enter the power level.
3. Press START to begin cooking.
1. Press AUTO REHEAT repeatedly to select
type of dish to reheat.
2, To increase serving size, press the
corresponding number button.
3. Press START to begin reheating cycle
2, To increase serving size, press the
corresponding number button.
3, Press START to begin cooking.
Operation
DE68-02903B
12/07
Printed in Malaysia
Page 26

Horno de Microondas
Manual del Usuario
AMC5101AAB/W
AMC5101AAS
AMC5101AAB/W
((((((((((((((((((((((((((((((((((((((((((((((((
AMC5101AAS
Part No. •W10177944
Page 27

Seguridad
PRECAUClONESPARA
Servicio autorizado cerca de usted. (1-800-843-0304
U. S. A, 1-800-807-6777 CANADA)
EVITARUNAPOSlBLE
EXPOSIClONEXCESIVAALA
ENERGIADE MICROONDAS
(a) No trate de operar este homo con la puerta abierta ya que
la operacion con la puerta abierta puede resultar en
exposicion dahina a la energia de microondas. Es
importante el no anular o jugar con los entrecierres de
seguridad.
(b) No coloque ningQnobjeto entre la cara frontal del homo y la
puerta, tampoco permita que la suciedad o los residuos de
limpiadores se acumulen sobre las superficies que sellan.
(c) No opere el homo si esta dahado. Es particularmente
importante que la puerta del homo cierre apropiadamente y
que no haya daho en:
1) La puerta (torcida o abollada),
2) Bisagras y seguros (rotos o flojos),
3) Sellos de la puerta u superficies que sellan.
(d) El homo no debe ser ajustado o reparado por ninguna
persona excepto por el personal de servicio
apropiadamente calificado.
ADVERTENCIA
Siempre acate precauciones de seguridad cuando
use su homo. Nunca trate de reparar su horno usted
mismo: hay voltaje peligroso en el interior. Si el horno
necesita ser reparado, entonces Ilame a un Centro de
INSTRUCClONESIMPORTANTESDE
SEGURIDAD
Cuando se usa cualquier aparato electrico, se deben seguir
precauciones basicas de seguridad incluyendo las siguientes:
ADVERTENCIA
Para reducir el riesgo de quemaduras, choque
electrico, fuego, lesiones personales o exposici6n
excesiva a la energia de microondas:
• Lea todas las instrucciones de seguridad antes de usar el aparato.
• Leay siga lasinstrucciones especificas bajo el subtitulo
,, "PRECAUCIONES PARA EVlTAR UNA POSIBLE EXPOSICION
EXCESIVA A LA ENERGIA DE MICROONDAS" en esta p_tgina.
• Este aparto debe estar conectado a tierra. Conectelo solamente a
contactos electricos apropiadamente aterrizados. Consulte las
"lnstrucciones Importantes de Conexi6n aTierra" en la pagina 3 de
este manual.
• Instale o coloque este aparato solamente de acuerdo con las
instrucciones de instalaci6n proporcionadas.
• Algunos articulos como los huevos enteros y alimentos en
contenedores sellados pueden explotar si son calentados en este
horno.
• Use este aparatosolamente para el prop6sito quefue diseSado
,, como se describe en este manual. No use quimicos o vapores
corrosives en este aparato. Este tipo de homo esta.disen-ado
especificamente para calentar, cocinar o secar alimentos. No esta.
diseSadopara use industrial o de laboratorio.
CONSERVE ESTAS INSTRUCCIONES
Page 28

Seguridad
Instrucciones Importantes de Seguriad,
continuacion
• Comocon cualquier aparato, se requiere de unasupervisi6n cercana
cuando es usado por niSos.
• Noopere este aparatosi el cord6n electrico esta,daSado,si no esta,
trabajando apropiadamente, o si ha sido daSado.
• Este aparato debe recibirservicio del personal de servicio calificado
solamente. Contacte las oficinasdel servicio autorizadomas cercano
para revisi6n, reparaci6n o ajuste.
• Nocubra o bloquee lasaberturas de este aparato.
• Noguarde este aparato en el exterior. No Iouse cerca del agua, por
ejemplocerca de unatarja de la cocina, en un s6tano humedoo
cerca de una piscina, etc.
• Mantenga limpio el interior del homo. Las particulas de los alimentos
o las salpicaduras de grasa se pegan alas paredes o al #iso del
homoy pueden causar daSoa la pintura reduciendo la eficiencia del
homo.
• Nosumerja en agua el cord6n electrico o la clavija.
• Mantenga el cord6n electricoalejado de superficies calientes.
• Nopermita que el cord6n electrico cuelgue sobre la orilla de la mesa
o de la cubierta de la cocina.
• Cuando limpie la puerta del homoy sus superficies, usesolamente
jabones o detergentes suaves no abrasivos aplica,ndolos con una
esponja o con un trapo suave.
• Para reducir el riesgode fuego dentro del homo:
a. Nococine de ma'slosalimentos. Vigile cuidadosamente el aparato
si en el interior hay papel, plastico uotros materiales
combustibles.
b. Retire los alambres que se usan para cerrar algunas bolsas para
cocinar antes de colocar dichas bolsas dentro del homo.
c. Si los materialesque se encuentran dentro del homo se
incendian, entonces mantenga cerrada la puerta del homo,
apa,guelo, desconecte el cord6n electrico o interrumpa el
suministro de energia desde el panel de fusibles o de disyuntores
de circuito.
d. No use el compartimiento del homo para almacenar. No deje
productos de papel, utensilios para cocinar o alimentos dentro del
homo cuando no se esta usando.
• Notrate de precalentar el homo ni de operarlo mientras esta vacio.
• Se proporciona un cord6n electricocorto para reducir el riesgo de
enredarse en el o detropezarse usando un cord6n largo. Hayjuegos
de cordones electricos mas largos o extensiones y pueden ser
usados.
• No use ningunotro aparato para cocinar o generador de calor junto a
este aparato.
• No coloque la unidad sobre o cerca de ninguna partede un aparato
generador de calor o que sirva para cocinar.
• No coloque el homo sobre un fregadero.
• No coloque nada directamente sobre la superficie superior del
" aparato mientras este en operaci6n.
• No cocine sin colocar primero la bandeja de cristal sobre la base del
homo. Los alimentos no se coceran adecuadamentesin esta
bandeja.
• No descongele bebidas en botellas de cuello estrecho. Los
recipientes pueden romperse.
• Los platos y recipientespueden calentarse demasiado. Manipt_lelos
con precauci6n.
• Retire con cuidado las tapas de los recipientes y evite que el vapor
vaya directamente a la cara o las manos.
• Quite la tapa del alimento para bebe antes de calentarlo. Una vez
,, calentado, y antes de dar de comer al niSo,remuevalo bien y
pruebelo para comprobar que la temperatura sea correcta.
INSTRUCCIONESIMPORTANTESDE
CONEXIONA TIERRA
Esteaparato debe estar conectado a tierra. En el caso de un
corto circuito electrico, laconexi6n a tierra reduce el riesgo de
sufrir un choque electrico proporcionando un cable de escape
para la corriente electrica. Este aparato esta equipado con un
cord6n electrico que incluye un cable de tierra y una clavija
para conexi6n a tierra. La clavija debe conectarse dentro de un
contacto que este apropiadamente instalado y aterrizado.
Conecte el cord6n electrico de tres cables en un contacto
apropiadamente aterrizado que proporcione un voltaje de
120 Volts y 60 Hertz. Su homo debe ser el Qnicoaparato
conectado en este circuito.
CONSERVE ESTAS INSTRUCClONES
Page 29

Seguridad
ADVERTENCIA
El uso inapropiado de la clavija puede resultar en el
riesgo de sufrir un choque electrico. Consulte a un
electricista calificado o a una persona del servicio si
usted no entiende las instrucciones de conexi6n a
tierra o si no est,. seguro de que el aparato este
apropiadamente aterrizado.
Uso de extensiones electricas
Se proporciona un cordon electrico corto para reducir el riesgo
de enredarse o de tropezarse con un cordon electrico mas
largo. Hay disponibles juegos de cordones electricos largos o
extensiones electricas y pueden usarse si se ejercita cuidado
en su uso. Si se usa un cordon electrico largo o una extension
electrica:
,
Laclasificacion electrica marcada del cordon electrico o de °
la extension electrica debe ser por Iomenos tan grande
como la clasificacion electrica del aparato.
,
La extension electrica debe set de tipo conexion a tierra de
tres conductores y debe conectarse en un contacto de 3
ranuras.
,
Elcordon electrico mas largo debe ser arreglado de manera
que no cuelgue sobre la cubierta de la cocina o de la mesa
en donde puede ser jalado por los nihos o en donde puede
causar untropiezo accidental. Si usted usa una extension o
electrica, entonces la luz interior puede fluctuar y el
ventilador puede variar cuando el horno de microondas esta
encendido. Los tiempos de coccion pueden alargarse
tambien.
Nota
Concete el horno con un circuito 20A.
AI conectar el horno con un circuito 15A, cerciorese
de que el interruptor es operable.
ADVERTENCIA
Bajo ninguna circunstancia corte o retire la tercera
para(de conexion a tierra) de la clavija.
Los Iiquidos tales como agua, cafe o te pueden ser
sobrecalentados mas alia del punto de ebullicion sin tener que
estos se vean hirviendo. Las burbujas que aparecen en el
Iiquido cuando estan en su punto de ebullicion no siempre se
aprecian cuando se retira el recipiente del homo de
microondas. ESTO PUEDE OCURRIR EN LIQUIDOS MUY
CALIENTES CUANDO ES TRASLADADO EL RECIPIENTE O
SE INTRODUCE DENTRO DEL LiQUIDO UNA CUCHARA O
ALGUN OTRO UTENSILIO.
Para reducir el riesgo de dahos a
personas:
1. No sobre caliente Iiquidos
2. Remueva el Iiquido antes y durante el calentamiento
3. No use recipientes pianos con entradas muydelgadas
4. Despues de calentar, deje reposar el recipiente en el horno
de microondas por un lapso pequeho antes de retirarlo
5. Sea cuidadoso cuando inserte una cuchara o algQnotto
utensilio dentro del recipiente.
CONSERVE ESTAS INSTRUCCIONES
4
Page 30

Su Nuevo Horno de Microondas
Tabla de Contenido
Seguridad ........................................................................................... 2
Su Nuevo Horno de Microondas ...................................................... 5
Tabla de Contenido .......................................................................... 5
Verificando las partes ....................................................................... 5
Preparando su homo de microondas ............................................... 6
Funciones del Panel de Control (AMC5101AAB/W) ........................ 6
Funciones del Panel de Control (AMC5101AAS) ............................. 7
Funcionamiento ................................................................................. 8
Encendido y selecci6n de peso ........................................................ 8
Ajuste del Clock (Reloj) .................................................................... 8
Uso de la funcidn Pause/Cancel (Pausa/Cancelar) ......................... 8
Uso de la funcidn Instant Cook (Cocinado Instant_.nea) .................. 9
Uso de la funcidn One Minute + (Un Minuto +) .............................. 10
Uso de la funcidn Handy Helper (Tips de ayuda) ........................... 10
Uso de la funcidn de Kids Meals (Comida para niSos) .................. 11
Uso de la funcidn de Snack Bar (Botanas) .................................... 11
Defrosting Automatically (Descongelado Autom_.tico) ................... 12
Ajuste del tiempo de coccidn y los
Power Levels (niveles de potencia) ................................................ 12
Cocinado de una etapa .................................................................. 12
Cocinado de varias Etapas ............................................................ 13
Uso de la Funcidn More/Less (M_.s/Menos) ................................... 13
Cambio de Encendido y apagado de la seSal sonora .................... 13
Uso del Kitchen Timer (Crondmetro) .............................................. 14
Modo de Demostraci6n .................................................................. 14
Ajuste del Seguro de Proteccidn para NiSos .................................. 14
Recalentado Autom_.tico ................................................................ 14
Instrucciones para cocinar ............................................................. 15
Utensilios de cocina ....................................................................... 15
Probando Utensilios ....................................................................... 15
T6cnicas de Cocinado .................................................................... 16
Consejos Generales ....................................................................... 16
Guia para cocinar ........................................................................... 17
Guia de Auto Descongelado .......................................................... 19
Recetas .......................................................................................... 20
Apendix ............................................................................................. 22
Guia para resolver problemas ........................................................ 22
Cuidado y Limpieza ........................................................................ 22
Especificaciones ............................................................................. 23
GARANT|A DE LOS ELECTRODOMleSTICOS PRINCIPALES
DE AMANA _..................................................................................... 24
Referencia R_pida ......................................................... Parte Trasera
Verificando las partes
Desempaque su horno de microondas y verifique para asegurarse que
todas las partes estan contenidas. Si alguna de las partes Ilegara a
faltar o esta rota, Ilame a su distribuidor.
Horno de Microondas
Plato giratorio
Tarjeta de Reistro
Anillo Guia deslizante
Manual de
Instucciones
Page 31

Su Nuevo Horno de Microondas
Preparando su horno de microondas
1 Coloque el homo en una superficie plana y fija y conecte el cord6n
en una toma de corriente trifasica. Una ves conectado, en la
pantalla aparecera:
Aseg#rese que exista una ventilaci6n adecuada para su homo
dejando pot Io menos 4 pulgadas de espacio de cada lado, atr#s y
debajo de su homo.
2
Abra la puerta del homo presionando el botSn debajo del panel de
control.
3
Limpie el interior con un trapo ht_medo.
4
Coloque el anillo pre ensamblado dentro de la cavidad en el centro del
interior del horno.
5
Coloque el plato sobre la guia de modo que las tres leng0etas del
centro del plato embonen con las del piso del horno.
Funciones del Panel de Control
AMC5101AAB/W
13--
r,
--12
9
--11
8
Page 32

Su Nuevo Horno de Microondas
Funciones del Panel de Control
AMC5101AAS
13
6
7
10
1. One Minute+ (Un Minuto +) p.10
Presione una vez por cada minuto adicional.
2. Auto Defrost (Descongelado Autom_tico) p.12
Fija el peso del platillo para ser descongelado.
3. Instant Cook Buttons p.9
(Funciones de cocinado instant_nea)
o Ajuste automatico para cocinar alimentos mas tradicionales.
4. Number Buttons (Funciones num_ricas)
Ajustan el tiempo de cocci6n o cantidades y niveles de potencia
excepto el mas alto.
1
2
5. More/Less (M_s/Menos) p.13
Incrementa o disminuye el tiempo de cocci6n.
6. Power Level (Niveles de Potencia) p.12
7. Kitchen Timer (Cronbmetro) p.14
o Establece el tiempo de cocci6n.
8. Clock (Reloj) p.8
Ajuste la hora actual.
2
9. Sound Button (Funcibn de sonido) p.13
Ajusta el sonido en apagado o encendido.
10. Pause/Cancel (Pausa/Cancelar) p.8
5
• Presione para iniciar la cocci6n
Presione para fijar una pausa o corregir un error.
11. Start (Inicio)
12. Handy Helper, Kids Meals, Snack Bar p.10,11
(Tips de ayuda, Comida para ni_os, Botanas)
Selecciona tipo de platillo para ser recalentado.
13. Auto Reheat (Recalentado Autom_tico) p.14
Selecciona el tipo de platillo para ser recalentado.
7
Page 33

Funcionamiento
Encendido y seleccibn de peso
La primera vez que conecte el cord6n el6ctrico a un enchufe, o despues
de que hubo una interrupci6n en su funcionamiento, la pantalla muestra
"_:_" En ese momento, usted puede seleccionar el sistema de peso
para que aparezca en su pantalla. Usted puede seleccionar entre libras
(LBS) o kilogramos (KG) Para hacerlo:
1 Presione 0 inmediatamente despu6s de conectar su horno de
microondas. La pantalla mostrara:
2
Utilice los funciones de Numericas para introducir la hora exacta.
Tiene que presionar al menos tres nt_meros para ajustar el Clock
(Reloj). Si la hora actual es 5:00 introduzca, 5,0,0.
3
Cuando 5 segundos hayan transcurrido, el indicador "ENTER"
parpadea y se desplegara "Cloc" en la pantalla.
Si la pantalla no muestra "Kg", usted tendra que desconectar el
microondas y luego conectarlo de nuevo para cambiar la selecci6n
de la unidad de peso.
2
Presione 0 repetidamente para seleccionar el sistema de peso que
desea utilizar:
Cuando haya seleccionado el sistema de peso que desea usar,
presione la funci6n PAUSE/CANCEL (Pausa/Cancelar) para
terminar con este procedimiento.
Ajuste del Clock (Reloj)
1 Presione la funci6n del Clock (Reloj). Los indicadores de
"ENTER" y "TIME" parpadean.
4
Presione Clock (Reloj) de nuevo. Dos puntos apareceran
parpadeando, indicando que la hora esta ajustada.
Si hay una interrupci6n en el funcionamiento electrico, tendr# que
reajustar el reloj.
Puede verificar la hora exacta mientras la cocci6n este en proceso
presionando la funci6n de Clock (Reloj).
Uso de la funcibn Pause/Cancel (Pausa/
Cancelar)
La funci6n de Pause/Cancel (Pausa/Cancelar) le permite borrar las
instrucciones que ha introducido. Tambi6n le permite poner en pausa el
ciclo de cocci6n del homo para que pueda vigilar la comida.
• Para poner en pausa el homo durante la cocci6n: Presione Pause/
Cancel (Pausa/Oancelar) una vez. Para reiniciar, presione Start
(Inicio).
• Para detener la cocci6n, borre las instrucciones, y regrese a la
pantalla de hora del dia: Presione Pause/Cancel (Pausa/Oancelar)
dos veces.
• Para corregir un error que acaba de ingresar: Presione Pause/
Cancel (Pausa/Cancelar) una vez, y luego reingrese las
instrucciones.
Page 34

Funcionamiento
Uso de la funcibn Instant Cook (Cocinado
Instant nea)
Presione la funci6n de Instant Cook (Cocinado Instantanea)
que corresponda al alimento que va a cocinar (Por ejemplo,
palomitas). La pantalla muestra el primer tamaSo de porci6n.
("ENTER" y "QTY" parpadear&n):
2
Presione la funci6n repetidamente para seleccionar el tamaSo de la
porci6n que desee. La pantalla mostrar& todos los tamafios de porci6n
disponibles. Una vez que haya seleccionado el tamafio de la porci6n
correcta, el microondas comenzar& acocinar autom&ticamente.
Cuando el tiempo de coccidn haya terminado, el homo emitira una
se#al sonora. Entonces el homo emitira un bip cada minuto.
Tabla de Cocinado Instant, nea
Alimento
Popcorn
(Palomitas)
Potato
(Papas)
Beverage 1/2taza • Use una taza medidora; No la tape.
(Bebida) 1 taza • Coloque la bebida en el horno.
Acomodar Comentarios
Regular 100g
(3,5 onzas),
Ligero Regular
85 a 100g
(3,0 a 3,5
onzas)
1 Pza, 2 Pza
3 Pza, 4 Pza
5 Pza, 6 Pza
2 tazas
• Use una sola bolsa de palomitas para
microondas a la vez.
• Tenga cuidado al remover o abrir una
bolsa caliente del homo.
• Pique cada papa varias veces con un
tenedor.
• Coloque en lacharola en forma
esparcida.
• Saque del horno, envuelva en
aluminio y deje reposar de 3 a 5
minutos.
• Despu_s de calentar, revuelva.
Frozen Dinner
(Alimentos
Congelados)
Pizza Reheat
(Recalentado
de Pizza)
Bacon
(Tocino)
200 a 290g
(8-10 onzas)
290 a 340g
(10-12 onzas)
340 a 510g
(12-18 onzas)
1 rebanada
2 rebanadas
3 rebanadas
2 rebanadas
4rebanadas
6 rebanadas
• Quite el empaque de la envoltura
exterior y siga las instrucciones de
tapado y reposado del empaque.
• Despues de cocinar, deje reposar de
1 a 3 minutos.
• Ponga la pizza en un plato para
microondas con la orilla ancha de la
pizza hacia el borde exterior del
plato.
• No permita que se traslapen las
rebanadas. No cubra.
• Antes de servir, deje reposar de 1 a 2
minutos.
• Coloque dos toallas de papel en un
plato y arregle el tocino sobre la toalla
de papel, no las encime. Cubra con
una toalla de papel adicional. Quite la
toalla de papel inmediatamente
despu_s de cocinar.
Use la funci6n mas/menos para Io
crujiente que se desee.
Page 35

Funcionamiento
Uso de la funcibn One Minute + (Un Minuto +)
Este funci6n ofrece una forma muy conveniente de calentar el alimento
en incrementos de 1 minuto en el nivel alto de potencia.
Presione la funci6n de One Minute + (Un Minuto +) una vez para
cada minuto adicional que desee cocinar el alimento. Por
ejemplo, presibnelo dos veces para dos minutos. El
tiempo se desplegar&, y el homo comenzar& a funcionar
autom&ticamente.
Agregue minutos a un programa en proceso presionando la
funcidn de One Minute + (Un Minuto +) para cada minuto que
desee agregar.
Uso de la funcibn Handy Helper (Tips de
ayuda)
1. Presione la funci6n Handy Helper (Tips de ayuda) correspondiente
al alimento que esta cocinando. La pantalla mostrara "A-I". (C6digo
del alimento). Presione la funci6n Handy Helper (Tips de ayuda)
repetidamente para seleccionar el alimento que desea. (Referirse a
la tabla de Handy Helper (Tips de ayuda) de abajo)
2. Presione la funci6n Hum_rica para seleccionar el tama_o de
porci6n que desea. Puede presionar la funci6n "1" o "2" para
seleccionar el tama_o de porci6n. Solo la funci6n "1" esta disponible
para ablandar quesos crema y derretir chocolate. (Referirse a la
tabla de Handy Helper (Tips de ayuda) de abajo para las
porciones)
3. Presione Start (Inicio) para empezar la cocci6n.
Tabla de Helper Chart (Tips de ayuda)
Alimento
Melt
Chocolate
(Derretir
Chocolate)
Soften
Cream
Cheese
(Ablandar
Queso
Crema)
Melt Butter
(Derretir
Mantequilla)
Cbdigo Acomodar
A-1 1 taza de
chispas
1Paquete
230g
(8 onzas)
1 barra
110g
('_ tb.)
2 barras
230g
('_ tb.)
• Coloque elchocolateen cuadros o
• Revuelva a la mitad del tiempo
• A menos que revuelva, el
• Desenvuelva el queso crema y
• Deje reposar de 1 a 2 minutos.
• Quite la envoltura y corte la
• Coloque lamantequilla en el plato,
• Revuelva bien despues de
Comentarios
chispas en un plato para
microondas.
cuando el homo emita un bip, y
reinicie el homo.
chocolate mantiene su forma
aunque eltiempo de calentado
haya terminado
col6quelo en un plato para
microondas.
mantequilla a la mitad
verticalmente.
cubra con papel encerado.
terminary deje reposar de 1 a 2
minutos.
10
Page 36

Funcionamiento
Uso de la funcibn de Kids Meals (Comida para
nihos)
1. Presione la funci6n de Kids Meals (Comida para niSos)
correspondiente al alimento que esta cocinando. La pantalla
muestra "A-I" (C6digo del alimento). Presione la funci6n de Kids
Meals (Comida para niSos) repetidamente para seleccionar el
alimento que desea. (Refi@ase a la tabla de Kids Meals (Comida
para ni5os) que a continuaci6n se presenta)
2. Presione la funci6n Num_rica para seleccionar el tamaSo de la
porci6n que desea. Puede presionar la funci6n "1" o "2" para
seleccionar el tamaSo de la porci6n (Refi@ase a la tabla de Kids
Meals (Comida para ni5os) que a continuaci6n se presenta para
las porciones).
3. Presione la funci6n Inicio para empezar con la cocci6n.
Tabla de Kids Meals (Comida para nihos)
Alimento Cbdigo
Chicken A-1 110 a 140g
Nuggets (4 a 5 onzas)
(Nuggets 170 a 200g
De Polio) (6 a 7 onzas)
Hot Dogs A-2 2 Pza
(Hot dogs) 4 Pza
French
Fries
(Papas
Fritas)
Sandwich
(Sandwich)
A-3
A-4Frozen
Acomodar
110 a 140g
(4 a 5 onzas)
170 a 200g
(6 a 7 onzas)
1Pza
2 Pza
• Coloque una toalla de papel sobre
• No cubra. Deje reposar 1 minutos.
• Pique las salchichas con un
• Coloque dos toallas de papel en el
• Seque con una toalla de papel
Comentarios
el plato y arregle los nuggets en
forma esparcida sobre la toalla.
tenedor y col6quelas en el plato.
Cuando el homo emita un bip,
agregue el pan y reinicie el homo.
plato y arregle las papas fritas
sobre la toalla, no las encime.
adicional despues de removerdel
homo.
Coloque los emparedados
congelados en la manga contenida
dentro del paquetey ponga en el
plato.
Uso de la funcibn de Snack Bar (Botanas)
1. Presione la funci6n Snack Bar (Botanas) que corresponda al
alimento que est& cocinando. La pantalla mostrar& "A-I" (c6digo del
alimento). Presione la funci6n de Snack Bar (Botanas)
repetidamente para seleccionar el alimento que desea. (Refi@ase a
la tabla de Snack Bar (Botanas) de abajo.)
2. Presione la funci6n Numerica para seleccionar el tamafio de la
porci6n. Puede presionar la funci6n "1" o "2" para seleccionar el
tamafio de la porci6n solo la funci6n "1" esta disponible para nachos.
(Refi@ase a la tabla de Snack Bar (Botanas) que a continuaci6n se
presenta para las porciones.)
3. Presione la funci6n Start (Inicio) para comenzar con la cocci6n.
Tabla de Snack Bar (Botanas)
Alimento Cbdigo Acomodar
Nachos A-1 1 porci6n
(Nachos)
Chicken A-2 140 a 170g
Wings (5 a 6 onzas)
(Alitas de 200 a 230g
Polio) (7 a 8 onzas)
Potato A-3 1 papa cocida
Skins 2 papas
(Cascams cocidas
de Papa)
Cheese A-4 5 a6 pzas.
Sticks 7 a 10 pzas.
(Palitos de
Queso)
• Coloque lostronzasos de tortillas
• Espolvoree uniformemente con
• Contenido
• Utilice alitas de polio precocidas y
• Coloque lasalitas de polio al
• Corte la papa cocida en 4 partes
• Coloque la cascara en forma
• Espolvoree con tocino, cebollas y
• Coloque los palitos de queso en el
• No cubrir.
Comentarios
en un plato sin encimar.
queso
- 2 tazas de trozos de tortilla
1/3 de taza de queso rallado
refrigeradas.
rededordel platoesparcidas y
cubra con papel encerado.
iguales. Pele o corte la cascara de
la papa, dejando como 1_,,de la
misma.
esparcida alrededor del plato.
queso. No cubra.
platoen forma esparcida.
11
Page 37

Funcionamiento
Defrosting Automatically (Descongelado
Autom_tico)
Para descongelar comida congelada, ajuste el peso del alimento y el
microondas automaticamente ajustara el tiempo de descongelado, el
nivel de potencia y el tiempo de reposo.
Presione la funci6n de Auto Defrost (Auto Descongelado). La
pantalla muestra" 0.5 Ibs." (0,2 Kg si ha seleccionado las
unidades m_tricas en su homo).
(ENTER y Lbs." Estara parpadeando.)
2
Para ajustar el peso de su alimento, presione lafunci6n Auto Defrost
(Auto Descongelado) repetidamente. Este incrementa el valor del
peso cada 0,5 lb., hasta 6,0 Ibs (La funci6n de Auto Defrost (Auto
Descongelado) incrementar& el peso cada 0,2 Kg hasta 2,6 Kg si
usted seleccion6 las unidades metricas).
Usted tambi_n puede usar las funciones num@icas para
introducir el peso del alimento directamente.
El homo calcula el tiempo de descongelado y comienza
autom&ticamente. El homo durante el descongelado, emitir& un
bip dos veces para hacerle saber cuando debe voltear el
alimento.
3
Presione la funci6n Pause/Cancel (Pausa/Cancelar), abra la puerta
del homo y de vuelta al alimento.
4
Presione la funci6n de Start (Inicio) para continuar con el
descongelado.
Ajuste del tiempo de coccibn y los Power
Levels (niveles de potencia)
Su microondas le permite seleccionar hasta dos diferentes grados de
cocci6n, cada una con su propia duraci6n de tiempo y nivel de potencia.
La funci6n de power level (Nivel de Potencia) le permite controlar la
intensidad de calor desde caliente (1) hasta alto (0).
Cocinado de una etapa
Para el cocinado simple de una etapa, usted solo necesita ajustar un
tiempo de cocci6n. El nivel de potencia est& autom&ticamente
seleccionado en "alto". Si usted desea seleccionar cualquier otro nivel,
usted tiene que ajustarlo utilizando la funci6n de Power Level (Nivel de
Potencia).
Utilice las funciones Numericas para seleccionar el tiempo de
cocci6n. Usted puede ajustar el tiempo desde un segundo hasta 99
minutos, 99 segundos. Para ajustar el tiempo mayor a un minuto,
introduzca tambien los segundos. Por ejemplo, para ajustar a 20
minutos, introduzca 2, 0, 0, 0.
2 Si usted quiere ajustar el nivel de potencia a uno diferente de "alto",
presione la funci6n de Power Level (Nivel de Potencia), y luego
utilice los funciones num@icas para introducir el nivel de potencia.
Niveles de Potencia:
1 = PL : 10 (Caliente) 6 = PL : 60 (Lento)
2 = PL : 20 (Bajo) 7 = PL : 70 (Medio-alto)
3 = PL : 30 (Descongelar) 8 = PL : 80 (Recalentar)
4 = PL : 40 (Medio-bajo) 9 = PL : 90 (Freir)
5=PL:50 (Medio) 0=PL:Hi (Alto)
• Ver pagina 19 para la Gu(a de Auto
Descongelado.
3
Presione la funci6n de Start (Inicio) para empezar la cocci6n. Si usted
desea cambiar el nivel de potencia, presione Pause/Cancel (Pausa/
Cancelar) antes de presionar Start (Inicio), y reingrese todas las
instrucciones.
Algunas recetas requieren diferentes grados de cocci6n a diferentes
temperaturas. Usted puede ajustar diferentes grados de cocci6n con su
microondas.
12
Page 38

Funcionamiento
Cocinado de varias Etapas
Siga los pasos 1 y 2 del "Cocinado de una etapa" secci6n de la
pagina anterior.
Cuando introduzca mas de una etapa de coccidn, la funcidn de
Power Level (Nivel de Potencia) debe ser presionado antes de
que la segunda etapa de coccidn sea introducida.
Para ajustar el nivel de potencia a uno mas alto para una etapa de
coccidn, presione la funcidn de Power Level (Nivel de Potencia)
dos veces.
2
Utilice las funciones Num_ricas para ajustar el segundo tiempo de
cocci6n.
3
Presione la funci6n de Power Level (Nivel de Potencia), luego utilice
las funciones num@icas para ajustar el nivel de potencia de la
segunda etapa de cocci6n.
4
Presione Start (Inicio) para empezar la cocci6n.
Usted puede verificar el nivel de potencia mientras la coccidn este
en proceso, presionando la funcidn de Power Level (Nivel de
Potencia).
Uso de la Funcibn More/Less (M_s/Menos)
La funci6n More/Less (M_s/Menos) le permite a usted preajustar los
tiempos de cocci6n. Estos solo funcionan en los modos de Instant,
Handy Helper, Kids Meals, Snack Bar (Concinado Instant_nea, Tips
de ayuda, Comida para niSos, Botanas) o Time Cook (tiempo de
cocci6n). Utilice la funci6n More/Less (M_s/Menos) solo despues de
que haya comenzado la cocci6n con alguno de estos procedimientos.
Para agregar mas tiempo a un procedimiento de cocci6n
automatico: Presione la funci6n More (M_s) (9).
Para reducir el tiempo a un procedimiento automatico: Presione la
funci6n Less (Menos) (1).
Si usted desea incrementar/disminuir en la funcidn de Time Cook
(Tiempo de Coccion) por 10 seg, presione la funcidn Mas (9) o
Menos (1).
Cambio de Encendido y apagado de la sehal
sonora
Usted puede cambiar a apagado la seSal sonora (bip) cuando Io desee.
1 Presione la funci6n Sound (Sonido).
La pantalla mostrara "ON" (Encendido).("START" estara
parpadeando)
° 2 Presionelafunci6ndeSound(Sonido)paraapagarelvolumen.
La pantalla mostrara: "OFF" (Apagado). ("START" estara
parpadeando)
3 Presione Start (Inicio).
La pantalla mostrarA la hora del dia.
13
Page 39

Funcionamiento
Uso del Kitchen Timer (Cronbmetro)
1 Presione la funci6n de Kitchen Timer (Cronbmetro).
2 Utilice las funciones Num_ricas para ajustar la duraci6n del tiempo
que usted desea que el cron6metro corra.
3 Presione Start (Inicio) para que el cron6metro comience.
4 La pantalla hara un conteo regresivo y emitira un sonido "hip" cuando
haya terminado.
"Nota: El microondas no se apaga cuando el cronbmetro
esta en uso.
Modo de Demostracibn
Usted puede usar el modo de demostraci6n para ver como funciona su
homo de microondas sin utilizar el calentamiento.
1 Mantenga la funci6n 0 presionado y luego presione la funci6n 1.
Para apagar el modo de demostracidn, repita el paso 1
mencionado arriba.
Ajuste del Seguro de Proteccibn para Nihos
Usted puede poner el seguro a su homo de microondas para que no
sea utilizado por un niSo sin supervisi6n.
1 Mantenga presionado la funci6n 0 y luego presione la funci6n 2.
Desde este momento, el homo de microondas no puede ser
utilizado mientras este puesto el seguro. Para quitar el seguro,
repita el paso 1arriba mencionado.
Recalentado Autom_tico
Para recalentar el alimento, seleccione el tipo de platillo y la cantidad de
porciones que desea recalentar y el microondas automAticamente
ajusta el tiempo de recalentado.
Presione la funci6n de Auto Reheat (Auto Recalentado)
repetidamente para seleccionar el tipo de platillo que desea
recalentar. El tamaSo de la porci6n inicial para cada platillo es de
una porci6n.
Puede seleccionar hasta cuatro porciones para guisados y
recalentado de pasta. $61o una porci6n estA disponible para el
plato de comida.
La pantalla muestra el platillo y la cantidad que ha seleccionado.
2
Utilice las funciones Num_ricas para incrementar el tamaSo de la
porci6n. Por ejemplo, para tres porciones, presione la funcion 3
(referirse a la tabla de Auto Reheat (Auto Recalentado) para las
porciones). La pantalla mostrara el numero de porciones que ha
seleccionado:
3 Presione la funci6n de Start (Inicio). La pantalla mostrar& el tiempo de
cocci6n.
Tabla de Auto Reheat (Auto Recalentado)
Alimento Acomodar Comentarios
Plate of
food
(Plato de
Comida)
Casserole
(Guisado)
Pasta
Reheat
(Pasta)
1porci6n
1a4 porciones •
(230g/porciones) •
1a4 porciones •
(230g/porciones)
Use solamente alimentos precocidos
y refrigerados.
Cubra el plato con papel envoltura de
pl&stico ventilado o papel encerado.
Contenido
- 85 a 110g. Came, pescado o came
de aves (hasta 170g. Con hueso)
- 1/2taza de almid6n (papas, pasta,
arroz, etc.)
- 1/2taza de vegetales (como 85 a 110g)
Utilice solo alimentos refrigerados.
Cubra con una tapa o pl&stico.
Revuelva los alimentos muy bien
antes de servir.
14
Page 40

Instrucciones para cocinar
Utensilios de cocina
Uso recomendado
• Vidrio y ceramica, tazones y platos -- Use para calentar o
cocinar
• Plato de microondas para dorar i Use para dorar el exterior
de cosas pequeSas como bifes, costillas o pancakes. Siga las
instrucciones incluidas en el plato para dorar.
• Envoltura de plastico para microondas i Use para retener
el vapor. Deje una pequeSa abertura como salida de escape y evitar o
ponerlo directamente en el alimento.
• Papel encerado i Use para cubrir y prever salpicaduras
• Toallas desechables y servilletas i Use para tiempos cortos
de cocinado; absorben el exceso de humedad y prev_n
salpicaduras. No usar toallas desechables que pueden contener
metales y provocar un incendio.
• Platos y vasos desechables i Use para tiempos cortos de
cocinado a temperatura baja. No usar papel reciclado que puede
contener metales y provocar un incendio.
• Termbmetros i Use solamente aquellos con la etiqueta de
"seguro para microondas" y siga todas las instrucciones. Verifique el o
alimento en varios puntos. Term6metros convencionales pueden
usarse una ves que el alimento sea removido del homo.
Uso limitado
• Papel aluminio i Utilice tiras delgadas de papel aluminio para
prevenir el sobre cocinado de algunas &reas expuestas. Usar mucho
papel aluminio puede daSar su homo, por Io que tenga cuidado.
• Ceramica, porcelana, y vajillas i Use solo si la etiqueta dice
"seguro para microondas". Si no es asi, pruebe para asegurar que
su uso es seguro. Nunca use platos con la orilla met&lica.
• Pl_stico i use solamente si la etiqueta dice "seguro para
microondas", otros pl&sticos se pueden derretir.
• Popotes, mimbre y madera i Use solamente por tiempos
cortos de cocinado debido a que podrian encender.
No se recomienda
• Jarras de vidrio y botellas i El vidrio normal es muy delgado
para usarse en el microondas y puede explotar.
• Bolsas de papel i Estas son de alto riesgo de incendio excepto
el de palomitas de maiz que son diseSadas para uso con
microondas.
• Platos y vasos de unicel i Estos se pueden derretir y dejar un
residuo daSino en el alimento.
• Contenedores de pl_stico i Contenedores en tubo como los
de la margarina pueden derretirse en el microondas.
• Utensilios de metal i Estos pueden daSar su homo. Remueva
todo Io de metal antes de cocinar.
Probando Utensilios
Si Ud. no esta seguro de si el traste es para microondas o no, puede
realizar la siguiente prueba:
1 Llene una taza con agua y p6ngala dentro del horno, junto al plato
que quiere probar.
2 Presione el bot6n One Minute + (Un Minuto+) una ves para
calentarlos por Un Minuto.
El agua debe estar caliente y el plato que esta probando debe estar fifo.
Si el plato esta caliente, entonces esta absorbiendo la energia de
microondas por Io que no es de uso en microondas.
15
Page 41

Instrucciones para cocinar
T cnicas de Cocinado
Batido
Bata el alimento como estofados y vegetales mientras cocina para
distribuir el calor al parejo. El alimento mas cerca del plato absorbe mas
energia y se calienta mas rapido. Por eso bata de afuera hacia adentro.
El horno se apagara luego de abrir la puerta para batir su comida.
Arreglo
Arregle alimentos de formas irregulares, como polio o costillas con las
partes mas gruesas hacia afuera del plato giratorio donde reciben mas
calor de microondas. Para prever un sobre cocinado, coloque las partes
mas delgadas o delicadas hacia el centro del plato giratorio.
Protegiendo
Proteja el alimento con tiras de papel aluminio delgadas para prevenir el
sobre cocinado. Las Areas que necesitan protecci6n son entre otras
puntas de alas de polio, puntas de muslos de polio y puntas de platillos
cuadrados. Use solamente pequeSas cantidades de Io contrario podria
daSar su homo.
Voltear
Voltee el alimento a mitad del proceso de cocimiento para exponer
todas las partes a la energia de microondas. Esto es especialmente
importante con productos grandes como rostizados.
Esperar
Los alimentos cocinados en el microondas crean un calor interno que
hace que contint_e la cocci6n por unos minutos despu_s de que el horno
se detiene.
Permita que el alimento repose para que termine su proceso de
cocimiento, especialmente alimentos como rostizados y vegetales
enteros. Los rostizados necesitan de este tiempo para terminar su
cocimiento en el centro si sufrir un sobre cocimiento en las partes
exteriores. Todos los liquidos, tales como sopas, chocolate caliente,
deben mezclarse o agitarse despues de completar el cocimiento. Deje
que los liquidos reposen un momento antes de servir.
AI calentar alimento para bebe, mezcle bien y verifique la temperatura
antes de servir.
Humedeceer
La energia de microondas es atraido alas mol_culas de agua.
El alimento con el contenido de humedad irregular debe ser cubierto o
dejarlo reposar para que la temperatura se distribuya al parejo. Agregue
un poco de agua a los alimentos secos para ayudarlos a cocinarse.
Consejos Generales
o • Alimentos densos como las papas, toman mas tiempo para
calentarse que los alimentos ligeros.
• Alimentos con texturas delicadas deben calentarse con un nivel de
poder bajo, para evitar que se endurezcan.
• La altitud y el tipo de vajilla que utilice puede afectar el tiempo de
cocinado. AI usar una nueva receta, use el minimo tiempo de
cocinado y verifique ocasionalmente el alimento para evitar un sobre
cocimiento.
• Los alimentos sin piel porosa o concha como papas, huevos, o hot
dogs deben pelarse pare evitar que se quemen.
• El freir con aceite caliente o grasa no es recomendable. El aceite y
la grasa pueden repentinamente hervir y provocar quemaduras
@
severas.
• Algunos ingredientes se calientan mas rapido que otros.
• El envasado casero en el microondas no es recomendable porque
no todas las bacterias pat6genas son destruidas por el calor de las
microondas.
• Aunque las microondas no calienten la vajilla, el calor es
frecuentemente transferido a esta. Siempre utilice protectores para
sacar el utensilio del homo e instruya a los niSos.
16
Page 42

Instrucciones para cocinar
Guia para cocinar
Guia para cocinar carne en su microondas
• Coloque la carne en el recipiente para microondas.
• Empezando con la grasa hacia abajo, use tiras de papel aluminio
para proteger las puntas.
• Verifique la temperatura en diferentes puntos y dejar reposar la
carne el tiempo recomendado.
• Las siguientes temperaturas son variables. La temperatura del
alimento se incrementara durante el tiempo de reposo.
Roast Tiempo de coccibn: Coloque la came con la grasa
Beef 7 a 11 m!npot cada Ib, para hacia abajo en el plato. Cubra
sin hueso t15°F- Crudo con papel encerado. Voltee
hasta4 Ibsl 120°F_ Medio cocci6n, geje reposar por 10
Cerdo Tiempo de cocci6n: Coloque la carne con la grasa
sin hueso 11a 15 min,por cada 454g hacia abajo en el plato. Cubra
ocon para 71°C i Bien Cocido con plastico con ventilaci6n.
hueso Voltee cuando termine la
hasta 4 Ibs. por los primeros 5 minutos, reposar por !0 rninutos,
8 a 12 m!npor cada lb. para cuando termine la mitad de la
9 a 14 min porcada lb. para minutos.
1450F, !!Bien Cocido'!
luego medi0 (50)por losNivel de poder:primeros 5a!t0(Hi)minut0s, e
Nivel de poder: alto(Hi) mitad de !acocci6n. Deje
luego medio (50)
Guia para cocinar ayes en su microondas
• Coloque el ave en un plato para microondas.
• Cubra el ave con papel encerado y prever el salpicado.
• Use papel aluminio para proteger las puntas, Areas delgadas o
Areas que comiencen a sobre cocinarse.
• Verifique la temperatura en diferentes puntos antes de dejar reposar
el tiempo recomendado.
Polio
entero
hasta 4 Ibs. Nivel de poder: medio alto
Piezas de Tiempo de coccibn:
polio 6 a 9 min por cada lb.
hasta 2 Ibs. 170°F carne clara
Tiempo de coccion:
6a 9 mln por cada lb. 180°F
(70)
180°F came obscura
Nivel de poder: medio alto
(70)
Coloque el polio con la
pechuga hacia abajo. Cubra
con papel encerado. Voltee
cuando termine la mitad del
tiempo de cocci6n. Cocine
hasta que el jugo corra y la
carne cerca del hueso ya no
este rosada. Deje reposar 5 a
10 minutos.
Coloque con los huesos hacia
abajo en el plato, con la
porci6n mas gruesa hacia
afuera. Cubra con papel
encerado. Voltee cuando
term ne la primera mitad del
tiempo de cocci6n. Cocine
hasta que el jugo corra y a
came cerca del hueso ya no
este rosada. Deje reposar 5 a
10 minutos.
17
Page 43

Instrucciones para cocinar
Guia para cocinar vegetales en su microondas
• Cocine el pescado hasta que sea facil de desprender en escamas
con un tenedor.
• Coloque el pescado en una repisa para rostizar para microondas
• Use una cubierta bien cerrada. Una cubierta mas ligera de papel
encerado o toalla desechable provee de menos vapor.
• No sobre cocine el pescado; verifiquelo en un tiempo de cocci6n
minimo.
Bife
hasta 1.5 bs.
Filetes
hasta 1.5Ibs.
Camarones Tiempo de cocci6n: Acomode el camar6n en un
hasta 1.5 bs. Cubra con papel encerado.
Tiempo de coccibn: Acomode los bifes en una
6 a 10 min por cada lb. repisa para rostizar con las
partes carnosas hacia afuera.
Nivel de poder: medio Cubra con papel encerado.
alto (70) Voltee y re acomode cuando la
mitad del tiempo de cocci6n
haya terminado. Cocine hasta
que el pescado pueda
escamarse f_.cilmente con un
tenedor. Deje reposar 3 a 5
minutos.
Tiempo de coccibn: Acomode los f: etes en un plato
3 a 7 min por cada lb. doblando las orillas delgadas
hacia abajo. Cubra con papel
Nivel de poder: medio encerado. Voltee y re acomode
alto (70) cuando la mitad del tiempo de
cocci6n haya terminado. Cocine
hasta que el pescado pueda
escamarse f_.cilmente con un
tenedor. Deje reposar 2 a 3
minutos.
3 a 5 Y2min por cada lb. plato sin empalmar o encimar.
Nivel de poder: medio Cocine hasta que este firme y
alto (70) opaco, moviendo dos o tres
veces. Deje reposar 5 minutos.
Guia para cocinar huevos en su microondas
• Nunca cocine los huevos con cascaron, y nunca haga huevos duros
o tibios; pueden explotar.
• Siempre perfore el huevo entero para evitar que estallen.
• Cocine los huevos solo hasta donde debe; se endurecen si se sobre
cocinan.
Guia para cocinar alimentos del mar en su
microondas
• Los vegetales deben lavarse antes de cocinarse. Generalmente no
se necesita agua. Si vegetales densos como papa, zanahoria, y
alubias se van a cocinar, agregue cerca de-de taza de agua.
• Vegetales pequeSos (zanahoria rebanada, chicharos, judias, etc.)
se cocinan mas rApido que las grandes.
• Vegetales enteros como papas, calabazas o elote en mazorca,
deben acomodarse en circulo. Se cocinaran mas uniforme si se
voltean a la mitad del proceso del tiempo de cocci6n.
• Siempre coloque los vegetales como esp#trragos y broccoli con las
puntas de los rabos hacia adentro y el extremo con mas volumen
o hacia afuera.
• Cuando cocine vegetales cortados, siempre cubra el plato con una
tapa o una bolsa de plastico ventilada para microondas.
• Vegetales enteros y sin pelar como papas, calabazas, berenjenas,
etc., deben tener su cascara o piel picada en diferentes puntos para
evitar que estallen.
• Para un cocinado mas parejo, revuelva o re acomode los vegetales
enteros a la mitad del proceso del tiempo de cocci6n.
• Generalmente, mientras mas denso el alimento, mayor el tiempo de
reposo. (tiempo de reposo se refiere al tiempo necesario para dejar
que los alimentos de mayor tamaSo se terminen de cocinar despues
de sacados del homo). Una papa horneada puede dejarse reposar
o por 5 minutos hasta que se complete su cocci6n, mientras un plato
con chicharos puede ser servido de inmediato.
18
Page 44

Instrucciones para cocinar
GuJa de Auto Descongelado
• Siga las instrucciones del siguiente cuadro para diferentes tipos de
alimento.
Bife. 2.5-6.0 Ibs.
ce rdo
Filete,
0.5-3.0 Ibs.
chuleta,
pescado
Carne 0.5-3.0 Ibs.
molida
Polio 2.5-6.0 Ibs.
entero
Piezas de 0.5-3.0 Ibs. Despu6s de cada fase. re acomode o quite
polio cualquler pieza del alimento que este casi
Comience colocando el alimento con la
grasa hacia abajo. Despu6s de cada fase,
voltee el alimento y proteja las porciones
cocinadas con tiras angostas de papel
aluminio.
Despu6s de cada fase. re acomode el
alimento. Si existen &reas cocidas o
derretidas, proteja con tiras angostas de
papel aluminio. Quite cualquJer pieza de
alimento que este casi descongelada. Deje
reposar, cubra de 5 a 10 minutos.
Despu6s de cada tase. remueva cualquier
pieza de alimento que esta casi
descongelada, Deje reposar, cubra con
papel aluminio de 5-10 minutos.
Quite los menudillos antes de congelar
cualquier ave. Empiece a descongelar con
la pechuga hacia abajo. Despu6s de la
primera fase. voltee el polio y proteja
cualquier parte cocinada con tiras
angostas de papel aluminio. Despu6s de la
segunda fase, de nuevo, proteja cualquier
porci6n cocinada con papel aluminio. Deje
reposar, cubra de 30 a 60 minutos en el
refrigerador.
descongelada. Deje reposar de 10 a 20
minutos.
Notas
Verifique el alimento cuando la seSal Io indique. Despu_s de la fase
final, pequeSas secciones pueden seguir congeladas; d_jelo reposar
para que contint_e el deshielo. No descongele hasta que todos los
cristales de hielo se hayan derretido.
Proteger bifes y filetes con pequeSos pedazos de papel aluminio
previene que las orillas se cocines antes que el centro del alimento se
descongele. Utilice liras delgadas yen hojas de papel aluminio para
cubrir las orillas y secciones delgadas del alimento.
19
Page 45

Instrucciones para cocinar
Recetas
Guisado de res y cebada
11/2Ibs. de cubos de carne de res, cortados en piezas de 1/2-inch
1/2Taza de cebolla picada
2 Cucharadas de harina para todo prop6sito.
1 Cucharada de salsa Worcestershire.
1 Lata (13.75-14.5 oz.) de caldo de res.
2 Zanahorias medianas, cortadas en rebanadas de 1/2-inch
(aproximadamente 1 taza)
1/2Taza de cebada
1 Hoja (seca) de laurel
1_Cucharada de pimienta
1 Paquete (9-10 oz.) de chicharos congelados (ya descongelados)
1. En una cacerola de 1,893 litros de capacidad combine lares, la
cebolla, la harina y la salsa Worcestershire; mezcle bien. Cubra con
una tapa. Cocine en el nivel alto de potencia durante 6 a 8 minutos
hasta que la carne de res ya no este rosa, mezclando una vez.
2. Agregue el caldo de res, las zanahorias, la cebada, la hoja de laurel
y la pimienta. Cubra con una tapa. Cocine al nivel medio de potencia
de 1 hora a 1_/2horas hasta que las zanahorias y la carne de res
est6n suaves, mezclando 2 o 3 veces.
3. Agregue los chicharos. Cubra con una tapa. Cocine al nivel medio
de potencia durante 10 minutos. Deje reposar por 10 minutos. Retire
la hoja de Laurel antes de servir.
Rinde 6 Raciones.
Cacerola de brocoli y queso
1_Taza de mantequilla o margarina
_ Taza de cebolla picada
11/2Cucharadas de harina
1/2Cucharada de sal
_ Cucharada de mostaza seca
1/8 Cucharada de pimienta
1_/2Tazas de leche
_ Taza de pimiento rojo picado
2 Tazas de queso Cheddar, rayado
1 Paquete (9-10 oz.) de br6coli congelado picado (ya descongelado)
4 Tazas de pasta en forma de espirales ya cocinada (8 oz.)
1. En una cacerola de 1,893 litros de capacidad cocine la mantequilla y
la cebolla en el nivel alto de potencia durante 1 o 2 minutos hasta
que la cebolla este suave, mezclando una vez.
2. Agregue la harina, la sal, la mostaza y la pimienta; mezcle bien.
Cocine en el nivel Alto de potencia durante 30 a 60 segundos hasta
que la mezcla hierva. Incorpore y mezcle la leche hasta que se
suavice.
3. Agregue el pimiento rojo. Cocine en el nivel Alto de potencia de 2 a 3
minutos hasta que la mezcla hierva y se espese ligeramente
mezclando dos veces. Vacie el queso y mezcle hasta que se derrita.
4. Agregue el br6coli y la pasta, mezcle bien. Cubra con una tapa.
Cocine en el nivel Alto de potencia durante 4 a 6 minutos hasta que
se caliente completamente mezclando una vez. Mezcle antes de
servir.
Rinde 6 raciones.
20
Page 46

Instrucciones para cocinar
Ensalada templada de papa
2 Ibs. de papas rojas peque_as, cortadas en piezas de 1/2-inch
4 Rebanadas de tocino (sin cocinar), cortadas en piezas de 1/2-inch
1_Taza de cebolla picada
2 Cucharadas de azt_car
1 Cucharada de sal
1 Cucharada de harina
1/2Cucharada de semillas de apio
1/8Cucharada de pimienta
21/2Cucharadas de vinagre de sidra de manzana
1. En una cacerola de 1,893 litros de capacidad combine las papas y
1_de taza de agua. Cubra con una tapa. Cocine en el nivel Alto de
potencia hasta que las papas esten suaves (7 a 10 minutos); mezcle
dos veces. Drene y p6ngalas a un lado para que se enfrfen
ligeramente.
2. En un taz6n mediano, cocine el tocino en el nivel Alto de potencia
hasta que quede crujiente (21/2a 31/2minutos); mezcle una vez.
Coloque el tocino sobre una toalla de papel. Guarde 1 cucharada de o
la grasa del tocino.
3. Combine la grasa del tocino con la cebolla. Cubra con pelicula
plastica; doble una esquina de la pelicula plastica para ventilar el
vapor. Cocine en el nivel Alto de potencia hasta que se suavice
(1_/2a 2_/2minutos); mezcle una vez.
4. Incorpore el azOcar, la sal, la harina, las semillas de apio y la
pimienta. Cocine en el nivel Alto de potencia hasta que la mezcla
hierva (30 a 40 segundos). Incorpore el vinagre y 1/2taza de agua.
Cocine en el nivel alto de potencia hasta que el liquido hierva y se
espese ligeramente (1 a 2 minutos); mezcle una vez. Agregue el
tocino a este aderezo. Vacie el aderezo sobre las papas. Mezcle
bien. •
Rinde 6 raciones.
Sopa de frijol negro
1 Taza de cebolla picada
1 Diente de ajo picado
2 Latas (de 15 oz. cada una) de frijoles negros drenados.
1 Lata (14-16 oz.) de tomates guisados, picados
1 Lata (13.75-14.5 oz.) de caldo de polio
1 Lata (7-8.5 oz.) de maiz
1 Lata (4 oz.) de chiles verdes en trozos
1 a 2 Cucharadas de comino, o al gusto
1. Coloque la cebolla y el ajo en una cacerola de 2,8 litros de
capacidad. Cubra con una tapa. Cocine en el nivel Alto de potencia
de 2 a 4 minutos hasta que se suavicen
2. Agregue una lata de frijoles, apachurre los frijoles con un tenedor.
Agregue los ingredientes restantes; mezcle bien.
3. Cocine sin cubrir, en el nivel de potencia Alto durante 10 minutos;
mezcle. Reduzca el nivel de potencia a Medio y cocine por 5
minutos. Mezcle antes de servir.
Rinde 1,8 litros aproximadamente.
21
Page 47

Apendix
Guia para resolver problemas
Antes de que Ilame a una persona del servicio para que repare su
homo, revise esta lista de posibles problemas y soluciones.
Ni la pantalla ni el homo funcionan.
• Introduzca apropiadamente la clavija dentro de un contacto aterrizado.
• Si el contacto esta controlado por un interruptor de pared, entonces
asegt_rese de que el interruptor de pared este encendido.
• Retire la clavija del contacto, espere 10 segundos y despu_s
con_ctela de nuevo.
• Reinicialice el disyuntor de circuito o reemplace cualquier fusible o
quemado.
• Conecte otro aparato en el contacto; si el otro aparato no funciona,
entonces haga que un electricista calificado repare el contacto.
• Conecte el homo en otro contacto.
La pantalla del horno funciona, pero el horno no cocina.
• Asegt_rese de que la puerta est_ bien cerrada.
• Revise para ver si hay material de empaque u otro material pegado
al sello de la puerta.
• Revise la puerta buscando daSos.
• Presione el bot6n Pausa/Cancelar dos veces y reingrese todas las
instrucciones de cocci6n, o
El horno se apaga antes de que el tiempo programado haya
terminado.
• Si no ha habido una interrupci6n en el suministro de energia
el_ctrica, entonces retire la clavija del contacto, espere diez
segundos, despu_s con_ctela de nuevo. Si hubo una interrupci6n en
el suministro de energia el_ctrica, entonces el indicador de tiempo
mostrara: _:_ Reprograme el reloj y las instrucciones de cocci6n.
• Reinicialice el disyuntor de circuito o reemplace cualquier fusible
quemado.
Los alimentos se estan cocinando muy lentamente.
• Aseg_rese de que el horno este en su propia linea de circuito de 20
Amperes. El operar otro aparato en el mismo circuito puede causar
una caida de voltaje. Si es necesario cambie el horno a su circuito
propio.
Se ven chispas o formacibn de "arco" electrico.
• Retire cualquier utensilio, traste o cinta met&lica. Si est& usando
papel metAlico, entonces use solamente tiras angostas y deje por Io
menos un espacio libre de 2,54 cm entre el papel metAlico y las
paredes interiores del homo.
La tornamesa produce ruidos o se atora.
• Limpie la tornamesa, el anillo giratorio y el piso del homo.
• AsegOresede que la tornamesa y el anillo giratorio esten
correctamente colocados.
El usar el homo de microondas causa interferencia en la
televisi6n o radio.
• Esto es similar a la interferencia causada por otros aparatos
electrodom_sticos pequeSos, como secadoras de pelo. Aleje su
horno de microondas de otros aparatos, como su televisi6n o radio.
Notas:
Si el homo se programa mas de 25 minutos a 80, 90 o 100% del
nivel de potencia, despues de los primeros 25 minutos, el nivel de
potencia se ajustara automaticamente al 70% evitando la sobre
coccion del alimento.
Cuidado y Limpieza
Siga estas instrucciones para cuidar y limpiar su homo.
• Mantenga limpio el interior del homo. Las particulas de alimento y
los liquidos derramados pueden pegarse a las paredes del homo,
causando que el homo pierda eficiencia.
• Limpie inmediatamente los derrames. Use un trapo ht_medo y un
jab6n suave. No use detergentes agresivos o abrasivos.
• Para ayudar a aflojar las particulas pegadas de los alimentos o los
liquidos pegados, caliente en el nivel de potencia Alto 2 tazas de agua
(agregue el jugo de un lim6n si desea mantener fresco el homo) dentro
de un taz6n de 4 tazas de capacidad durante 5 minutos o hasta que
hierva. Deje reposar en el homo durante uno o dos minutos.
• Retire la charola de vidrio cuando limpie el homo o charola. Para
evitar que la charola se rompa, man_jela con cuidado y no la
coloque en agua inmediatamente despues de cocinar. Lave
cuidadosamente la charola en agua templada y jabonosa o en la
lavavajillas.
• Limpie la superficie exterior del homo con jab6n y un trapo ht_medo.
Seque usando un trapo seco. Para prevenir daSos alas partes
operativas del homo, no permita que el agua resbale dentro de las
aberturas.
• Lave la ventana del homo usando un jab6n muy suave y agua.
Asegt_rese de usar un trapo suave para evitar rayarla.
• Si se acumula vapor en el interior o exterior de la puerta del homo,
entonces limpielo con un trapo suave. El vapor se puede acumular
cuando se opera el homo en condiciones de humedad alta y de
ninguna manera indica una fuga de microondas.
• Nunca haga funcionar el homo sino hay alimentos en su interior;
esto puede daSar al tubo del magnetr6n o a la charola de vidrio.
Quiz& desee dejar una taza de agua dentro del homo cuando no
estA en uso para evitar daSos si el homo es encendido
accidentalmente.
22
Page 48

Apendix
Especificaciones
Numero de modelo AMC510iAAB!W
Capacidad 1.0 cu.ft
Controles .... 10 Niveles de potencia incluyend0
Cronometro 99 minutos, 99 segundos
Fuente de poder 120 VAC, 60 Hz
Salida 1000 Watts
Salida de Potencia 1500 Watts
Dimensiones exteriores 20 11/32"(Ancho) X 11 11/16"(Alto) X 14 15/
16"(Fondo)
Dimensi0nes interiores 13 7/32"(Ancho) X 9 1/8"(Alto)X 13 11/
Dimensiones envio 22 23/32"(Ancho) X 14 19/32"(Alto) X 16 31/
Peso gr0sso!Net0 30A/34,3 !b&
Numero de modelo AMC5101AAS
Capacidad 1.0 cu.ft
Contro!es 10 Niveles de potencia incluyend0
Cronometro 99 minutos, 99 segundos
Fuente de poder 120 VAC, 60 Hz
Salida 1000 Watts
Salida de Potencia 1500 Watts
Dimensiones exteriores 20 11/32"(Ancho) X 11 11/16"(Alto) X 16 1/
Dimensiones interiores 13 7/32"(Ancho) X 9 !!8"(A!to) X 13 t 1/
Dimensiones envio 22 23/32"(Ancho) X 14 19/32"(Alto) X 19 7/
Peso grosso/Neto 14,2/16,1 kg
!6 (F0ndo)
32"(Fondo)
desconge!ado
8"(Fondo)
! 6,!(Fondo)s
16"(Fondo)
23
Page 49

GARANTIA DE LOS ELECTRODOMESTICOS PRINCIPALES
DE AMANA ®
GARANTIA LIMITADA
Durante un a_o.a partir de la fecha de compra siempre y cuando se d6 a este electrodom6stico principal un uso ymantenimiento de conformidad con las
instrucciones adjuntas o provistas con el producto, la marca Amana de Whirlpool Corporation o Whirlpool Canadal_P (en Iosucesivo denominado "Amana") se
hara cargo del costo de las piezas especlficadas de fabrica y del trabajo de reparaci6n #ara corregir defectos en los materiales o en la_mano de obra. El
servicio deberA ser suministrado por una compaSfa de servicio designada por Amana. Esta garanfia limitada es v_.lidasolamente en Estados Unidos o en
CanadA, y se aplica solamente cuando el electrodom6stico principal se use en el pals en el que se ha comprado. Esta garanfia limitada no tiene vigor fuera de
los cincuenta Estados Unidos y CanadA. Se requiere una prueba de la fecha de compra original para obtener servicio bajo esta garantfa limitada.
EXCLUSIONES DE LA GARANTiA
Esta garanfia limitada no cubre:
1. Visitas de servicio t6cnico para corregir la instalaci6n de su electrodom6stico principal, para enseSarle a usar su electrodom6stico principal, para cambiar o
reparar fusibles dom6sticos o para corregir la instalaci6n el6ctrica o de la tuberfa de la casa.
2. Visitas de servicio t6cnicopara reparar o reemplazar focos para electrodom6sticos, filtros de aire o filtros de agua. Estas piezas de consumo estan
excluidas de la cobertura de la garantfa.
3. Reparaciones cuando su electrodom6stico principal se use de un modo diferente al dom6stico normal de una familia, o cuando se use de un modo
contrario a las instrucciones publicadas para el usuario u operador y/o las instrucciones de instalaci6n.
4. DaSoscausados p.oraccidente alteraci6n, uso indebido, abuso, incendio, inundaci6n, actos fortuitos, instalaci6n incorrecta, instalaci6n que no est6 de
acuerdo con os c6d gos e 6ctr cos o de p omerfa, o e emp eo de artfcu os de consumo o productos de mp eza no aprobados por Amana.
5. DaSosest6ticos incluyendo rayaduras, abolladuras, desportilladuras u otro daSo al acabado de su electrodom6sticoprincipal, a menos que el mismo sea
debido a defectos en los matena es o a mano de obra y se e nforme a Amana en un apso de 30 dfas a part r de a fecha de compra.
6. Cualquier p6rdida de comida debido a fallas del refrigerador o del congelador.
7. Costos relativos a la remoci6n de su electrodom6stico principal desde su hogar para obtener reparaciones. Este electrodom6stico principal esta diseSado
para ser reparado en el hogar y t]nicamente el servicio de reparaci6n en el hogar esta cubierto bajo esta garanfia.
8. Reparaciones de piezas o sistemas como resultado de modificaciones no autorizadas que se hayan efectuado en el electrodomestico.
9. Gastos de viaje y transporte para obtener servicio para el producto, si su electrodom6stico principal esta ubicado en un lugar remoto en el cual no haya
disponible un t6cnico de servicio autorizado por Amana.
10.La remoci6n y reiqstalaci6n de su electrodom6stico principal, si estuviera instalado en un lugar inaccesible o si no estuviera instalado de conformidad con
las instrucciones de instalaci6n publicadas.
11 .Electrodom6sticos principales con nt]meros de modelo/serie que se hayan removido, alterado o que no puedan ser identificados con facilidad. Esta
garantfa se anular_ si el nt]mero de serie aplicado en la fabrica ha sido alterado o removido de su electrodom6stico principal.
El costo de la reparaci6n o el reemplazo bajo estas circunstancias excluidas, correra por cuenta del cliente.
EL UNICO Y EXCLUSIVO RECURSO DEL CLIENTE SEGUN LOS TC:RMINOSDE ESTA GARANTIA LIMITADASER,_ EL DE REPARAR EL PRODUCTO SEGUN
EXCLUSION DE GARANTJAS IMPLJCITAS; LIMITACION DE RECURSOS
SE ESTIPULA EN LA PRESENTE..LAS GARANTIAS IMPLICITAS, INCLUYENDO LAS GARANTIAS DE COMERCIABILIDAD O DE CAPACIDAD PARA U.N
PROPOSITO PARTICULAR SERAN LIMITADAS A UN ANO O AL PERIODO MAS CORTO PERMITIDO POR LEY. AMANA NO SE RESPONSABILIZAI3APOR
DANOS NC DENTALES O CONSECUENTES. ALGUNOS ESTADOS Y PROV NCAS NO PERM TEN LAS EXCLUS ONES O L MTAC ONES POR DANOS
INCIDENTALES O CONSECUENTES, O
LIMITACIONES ACERCA DE CU,_NTODEBE DURAR UNA GARANTIA IMPLICITA DE COMERCIABILIDADO CAPACIDAD, DE MODOQUE LAS LIMITACIONES
O EXCLUSIONESARRIBA MENCIONADAS PUEDEN NOAPLICARSE EN SU CASO. ESTA GARANTIA LE OTORGA DERECHOS LEGALES ESPECIFICOSY ES
POSIBLE QUE USTEDTENGA TAMBIEN OTROS DERECHOS QUE PUEDEN VARIAR DE UN ESTADOA OTRO O DE UNA PROVlNCIA A OTRA.
Si usted se encuentrafuera de los cincuenta Estados Unidosy CanadA, p6ngase en contacto con su distribuidor autorizado de Amana para determinar si corresponde
otra garantfa.
Si necesita servicio, consulte primero la secci6n <'Soluci6ndeproblemas" del Manual de uso y cuidado. Despuesde consultar la secci6n <'Soluci6nde problemas"
puede encontrar ayuda adicional en la secci6n <'Ayudao servicio tecnico," o Ilamandoa Amana. En EE.UU., Ilame al 1-800-843-0304. En CanadA, ame a 1-800-807-
6777.
24
Page 50

Referencia Rapida
Funcibn
Ajustede Clock
(Reloj)
Coccibnen una
etapa
Cocinado One
Minute+ (Un Minuto
+)
Botones de
Cocinado
Instant_inea
AutoDefrost
(Auto
Descongelado)
Ajuste de
Niveles de Poder y
Tiempo de
Cocinado
Operacibn
1. Presione CLOCK (RELOJ).
2. Use botones numericos para seleccionar
hora
3. Presiones CLOCK (RELOJ) de nuevo.
1. Use botones numericos para selecciona _
tiempo.
2. Seleccione nivel de poder o deje alto.
3. Presione START (INICIO).
1. Presione el bot6n ONE MINUTE + (Un
Minuto +) por cada minuto de cocci6n.
2. El tiempo severa en pantalla y el homo
come nzara.
1. Presione bot6n que corresponde al alimento
que esta cocinando.
2. Presione el bot6n para seleccionar el tamar_o
de la porci6n.
1. Presione AUTO DEFROST (AUTO
DESCONGELADO).
2. Ingrese el peso del alimento presionando el
bot6n de AUTO DEFROST (AUTO
DESCONGELADO) repetidamente o con los
botones numericos.
3. Despu_s de medio tiempo, presione PAUSE/
CANCEL (PAUSA/CANCELAR) voltee el
alimento, y presiones START (INICIO) para
re iniciar.
1. Use botones numericos para tiempo de
cocci6n.
2. Para programar un nivel de potencia
diferente a ALTO, entonces presione el
boton NIVEL DE POTENCIA y use los
botone numericos para ingresar el nivel de
potencia
3. Presione START (INICIO) para empezar a
cocinar.
Auto Reheat 1: Presione AUTO REHEAT(AUTO
(Auto Recalentado) RECALENTADO)repetidamente para selec-
cionar tiP0 de p!atil o.
2: Para incrementar tamaS0 de porci6n
presione los botones num_ricos.
3. Presione START (INICIO) paiacomenzar.
Handy Helper, 1, Presione HANDY HELPER, KIDS MEALS,
Kids Meals, SNACK BAR (TIPS DE AYUDA, COMIDA
Snack Bar PARA N NOS, BOTANAS) repetidamente
(T ps de ayuda,
Com ^ -ar ^ -"_'os pare seleccionar tipo de platillo
d=_, =.,. , .. _, : : . L . " ..
Botanas) z. _'ara _ncrememar _amano ae poraon,
..................... presJone los botones numeric0s.
3. Presione START (INICIO) para comenzar.
DE68-02903B
12/07
Imprimido en Malasia
 Loading...