

Page 1
Mode d’emploi Guía del usuarioUser’s guide
PT7031
Page 2

2
Page 3

T
he lightning flash with arrowhead, within an equilateral
t
riangle, is intended to alert the user to the presence of
uninsulated “dangerous voltage” within the product’s
e
nclosure that may be of sufficient magnitude to
c
onstitute a risk of electric shock to persons.
C
aution: To prevent the risk of electric shock, do not
remove cover (or back). No user-serviceable parts
i
nside. Refer servicing to qualified service personnel.
T
he exclamation point within an equilateral triangle is
intended to alert the user to the presence of important
o
perating and maintenance (servicing) instructions in
the literature accompanying the appliance.
CAUTION
To prevent electric shock do not use this (polarized) plug with an extension cord, receptacle or other
o
utlet unless the blades can be fully inserted to prevent blade exposure.
WARNING
T
o reduce the risk of fire or electric shock, do not expose this appliance to rain or moisture.
MPORTANT SAFETY INSTRUCTIONS
I
1
. Read these instructions.
2
. Keep these instructions.
Heed all warnings.
3
.
4
. Follow all instructions.
5
. Do not use this apparatus near water — This apparatus shall not be exposed to dripping or
s
plashing, and no objects filled with liquids, such as vases, shall be placed on the apparatus.
6
. Clean only with dry cloth.
7
. Do not block any ventilation openings. Install in accordance with the manufacturer’s
instructions. The apparatus should not be situated on a bed, sofa, rug or similar surface that
may block
such as a closed bookcase or cabinet that may impede the flow of air through the ventilation
openings.Ventilation should not be impeded by cove
newspapers,tablecloths, curt
8. Do not install near any heat sources such as radiators, heat registers, stoves, or other apparatus
(
including amplifiers) that produce heat.
9. N
o naked flame sources, such as lighted candles, should be placed on the apparatus.
10. Do not defeat the safety purpose of the polarized or grounding-type plug.A polarized plug has
two blades with one wider than the other. A grounding type plug has two blades and a third
ounding pr
gr
plug does not fit into your outlet, consult an electrician for the replacement of the obsolete
outlet.
11. Protect the power cord from being walked on or pinched — particularly at plugs, convenience
receptacles, and the point w
12. Do not install in an area which impedes the access to the power plug. Disconnecting the power
plug is the only way to completely remove power to the product and must be readily
accessible at all times.
13. Power source — Use only power supplies of the type specified in the operating instructions or
as marked on the appliance. If a separ
substitute with any other power suppl
14. Unplug this apparatus during lightning storms or when unused for long periods of time.
efer all servicing to qualified service personnel. Servicing is required when the apparatus has
R
15.
been damaged in any way, such as power-supply cord or plug is damaged, liquid has been
spilled or objects ha
moisture, does not operate normally, or has been dropped. For service, refer to qualified service
personnel, return to the dealer, or call the Altec Lansing service line for assistance.
or pr
F
16.
disposal.
17. Only use attachments/accessories specified by the manufacturer.
18. Use only with the cart, stand, tripod, bracket, or table specified by the manufacturer
or sold with the apparatus. When a cart is used, use caution when moving the cart/
appar
entilation openings. T
the v
. The wide blade or the third pr
ong
e fallen into the apparatus, the apparatus has been exposed to rain or
v
h incorporate batteries, please refer to local regulations for proper battery
hic
oducts w
atus combination to a
atus must not be placed in a built
he appar
ains, etc.
y exit fr
e the
her
ate power suppl
y — use only manufacturer-provided power supplies.
oid injury fr
v
om tip-over.
ring the openings with items such as
ong are provided for your safety.If the provided
om the apparatus.
y is included with this appar
-in installation,
atus, do not
Altec Lansing. One Year Limited Warranty
(Two-Year Limited Warranty in the European Union and Asia)
What Does The Warranty Cover?:Altec Lansing warrants that its products shall be free from defects
i
n materials or workmanship, with the exceptions stated below.
W
hat Is The Period Of Coverage?:For units purchased in European Union or Asia, this warranty runs
for two years from the date of purchase. For units not purchased in Europe or Asia, this warranty
r
uns for one year from the date of purchase.The term of any warranties implied by law shall expire
w
hen your limited warranty expires. Some states and/or Member States in the European Union do
not allow limitations on how long an implied warranty lasts, so the above limitation may not apply
t
o you.
W
hat Does The Warranty Not Cover?:This warranty does not cover any defect, malfunction or
f
ailure that occurs as a result of: improper installation; misuse or failure to follow the product
directions; abuse; or use with improper, unintended or faulty equipment. (For information on proper
i
nstallation, operation and use consult the manual supplied with the product. If you require a
replacement manual, you may download a manual from
c
onsequential and incidental damages are not recoverable under this warranty. Some states do not
allow the exclusion or limitation of incidental or consequential damages, so the above limitation or
exclusion may not apply to you.
What Will Altec Lansing Do To Correct The Problem?: Altec Lansing will, at its option, repair or
r
eplace any product that proves to be defective in material or workmanship. If your product is no
l
onger being manufactured, or is out of stock, at its option,Altec Lansing may replace your product
w
ith a similar or better Altec Lansing product.
How To Get Warranty Service: To get a covered product repaired or replaced, you must contact Altec
L
ing the warranty period by email (csupport@alteclansing.com).You must include in your
ansing dur
email, your name, address, email address, telephone number, date of purchase and a complete
d
escription of the problem you are experiencing. In the United States, you may alternatively contact
A
ltec Lansing by telephone at 1-800-ALTEC88 — please be prepared to provide the same information.
I
f the problem appears to be related to a defect in material or workmanship,Altec Lansing will provide
you a return authorization and instructions for return shipment. Return shipments shall be at the
c
ustomer’sexpense,
should insur
tec Lansing.
Al
at
How Will State Law Affect Your Rights?:This warranty gives you specific legal rights, and you may
ve other rights w
o ha
als
a consumer might have other legal rights under national legislation of European Union Member
ov
States g
The above limited warranties and remedies are sole warranties and remedies available to purchaser,
, and to the extent
if
and the return must be accompanied by the original proof of purchase.You
e the shipment as appr
erning the sale o
, valid and enf
opriate because you are responsible for the product until it arrives
h vary from state to state. Please note that in the European Union, you as
hic
f Altec Lansing’s goods. Those rights are not affected by this guarantee.
orceable under the applicable law.
www.alteclansing.com.) Also,
Customer Service
s to most setup and performance questions can be found in the Troubleshooting guide.You
The answer
can also consult the FAQs in the customer support section of our Web site at www.alteclansing.com.
If you live in North America and still can’t find the information you need, please call our customer
service team f
Tel: 800-258-3288
Email:
If you live outside of North America, please visit our website at
your region to locate your country’s distributor.
For the most up-to-date information, be sure to check our Web site at
or assistance before returning the speakers to your retailer under their return policy.
csupport@alteclansing.com
www.alteclansing.com and select
www.alteclansing.com.
International Distribution
For information regarding the distribution of Altec Lansing products in your
International customer
country, please visit
s:
www.alteclansing.com and click on your region.
Disposal of Old Electrical & Electronic Equipment
This symbol on the product or on its packaging indicates that this product shall not be
treated as household waste. Instead it shall be handed over to the applicable collection
point for the recycling of electrical and electronic equipment. By ensuring this product is
disposed o
environment and human health, which could otherwise be caused by inappropriate waste
oduct
f this pr
handling o
detailed information about recycling of this product, please contact your local city office or your
household waste disposal service.
y, you will help prevent potential negative consequences for the
ectl
f corr
. The recycling of materials will help to conserve natural resources. For more
3
ENGLISH
Page 4
PT7031 Surround Sound System
1
2
3
4
5
1
2
3
4
5
6
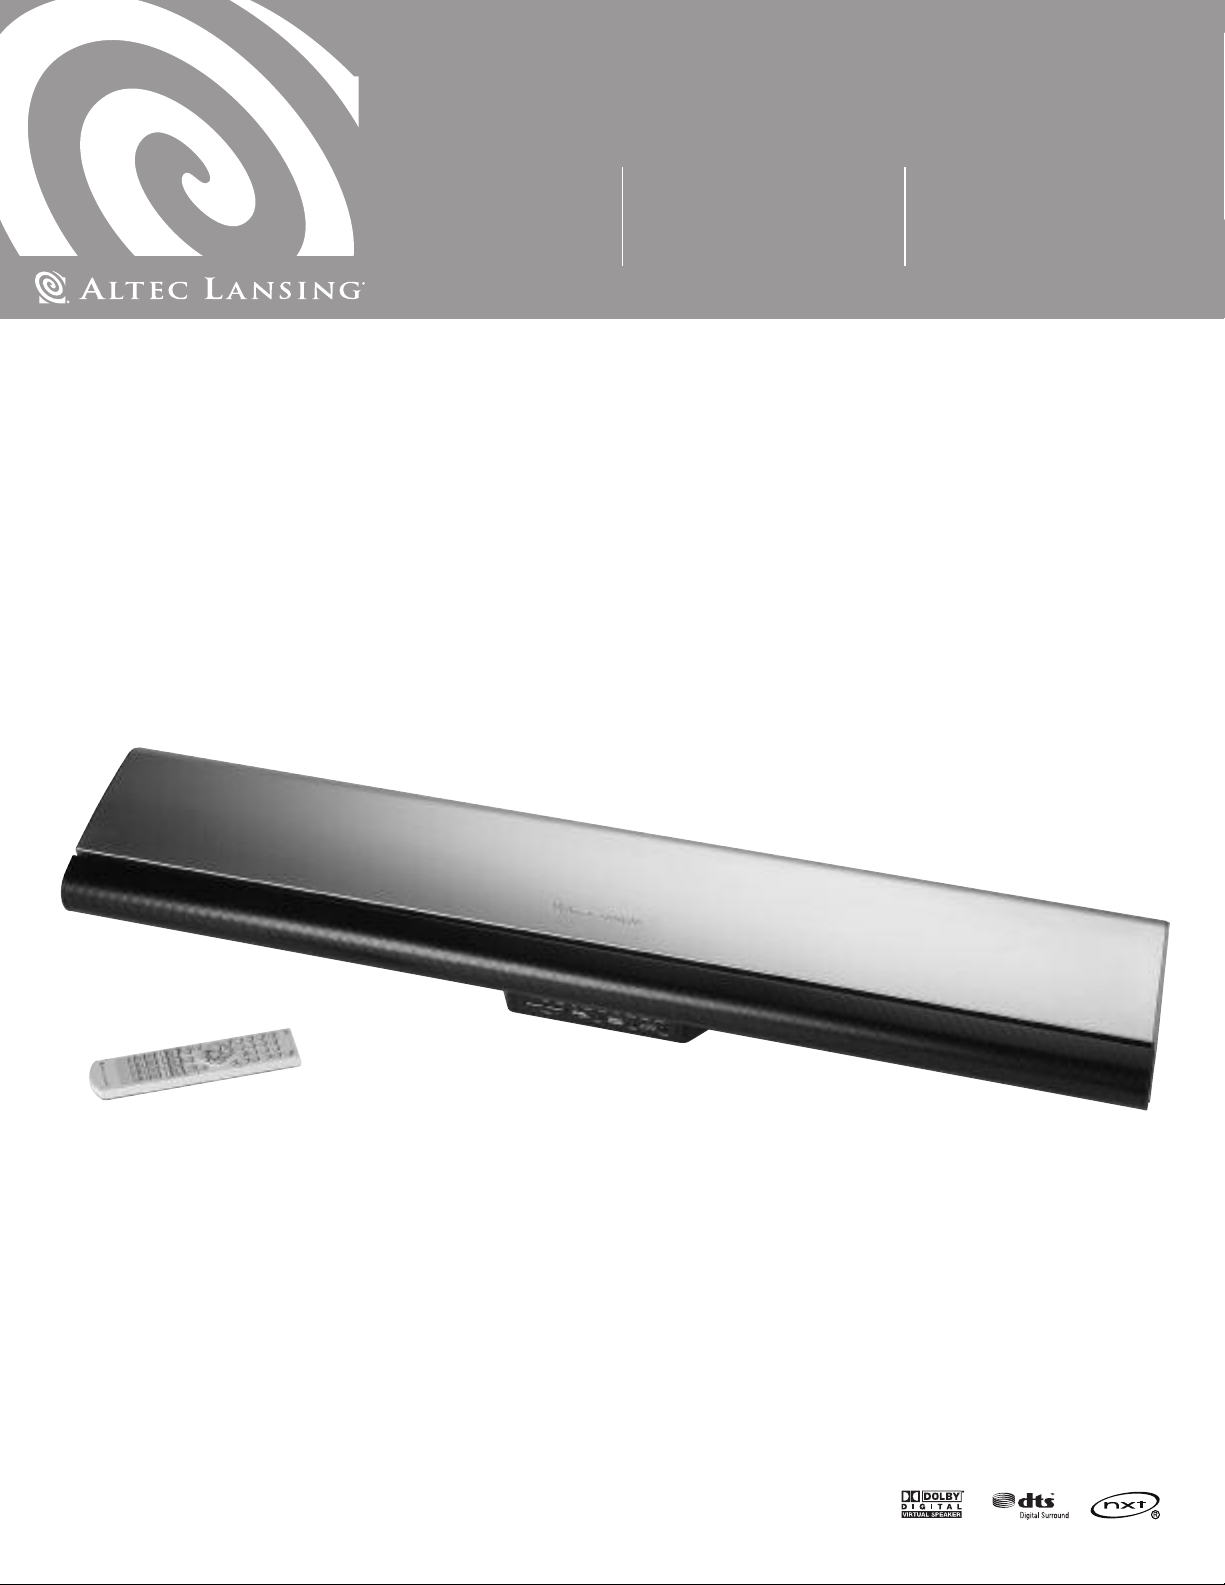
Thank you for purchasing the Altec Lansing PT7031 Surround
Sound System.
The PT7031 is designed to replace the traditional A/V receiver and
separate speakers and provide a complete, multi-channel surround
sound from a single component using DTS, Dolby Digital and Dolby’s
Virtual Speaker processing. The PT7031 system’s NXT Digital flat-panel
driver technology accurately reproduces the full frequency range and
delivers all the subtleties and spatial depth that today’s digital formats
are capable of.
The PT7031’s design is well suited for use with today’s large format
LCD and plasma flat panel displays and it can be wall mounted with
them using the supplied bracket. A universal remote control is included
hat allows you to consolidate remote controls from various devices
t
such as your TV, DVD player and VCR.
Contents
Refer to the PT7031 Quick Connect Card to identify these items.
• PT7031
• Remote control and batteries
• A/V Cable
• Wall mount bracket (hardware not included)
• User’s guide and quick connect instructions
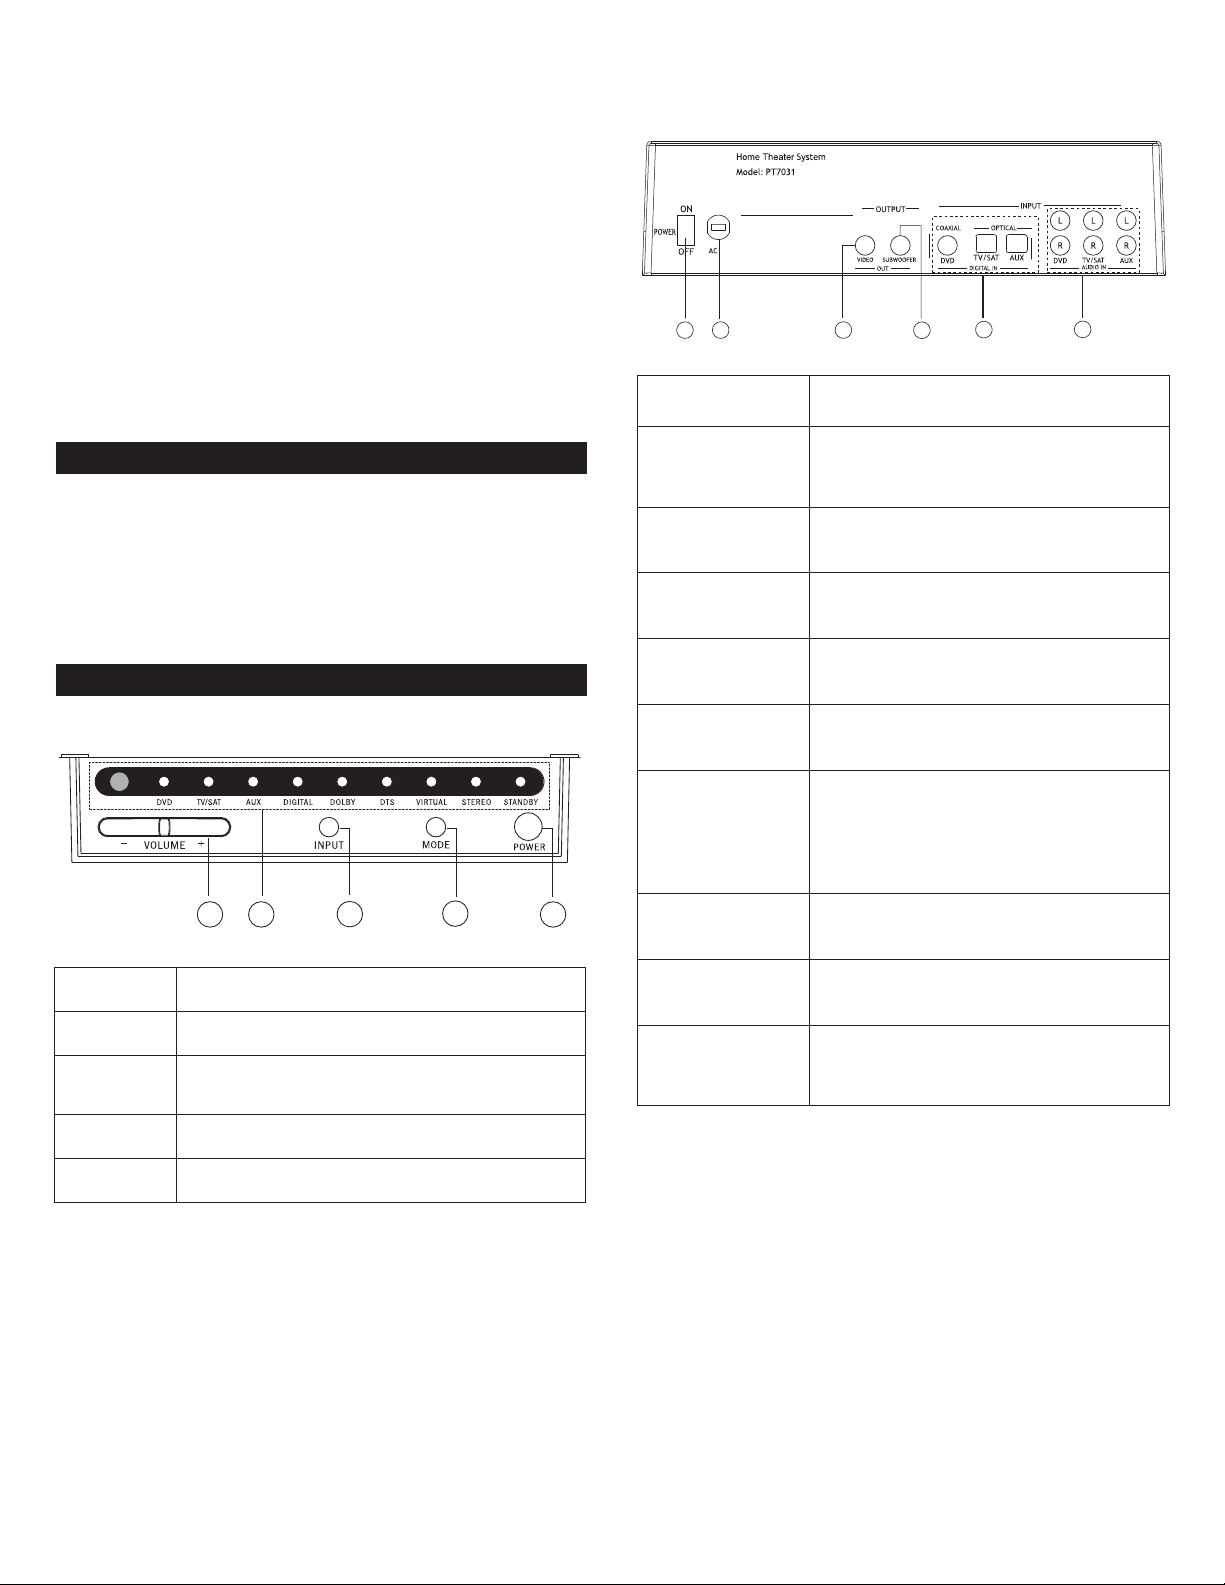
Your PT7031
ols and Connections f
Contr
or
Rear Panel
. Power ON/OFF Switches power on or off.
1
Connect to standard AC outlet. Refer to
2. AC Power Cord
3.VIDEO OUT
4. SUBWOOFER OUT
5. DIGITAL INPUT:
COAXIAL (DVD IN)
frequency and voltage range for Power Source
as indicated on r
Used to display on-screen display information.
Connect to composite video input of TV.
Use to connect an optional subwoofer if
additional bass is required from the system.
Use to connect a DVD player that has a coaxial
digital output.
ear panel.
Front Panel
1.Volume +/– Controls the volume level of all audio channels.
2. LEDs Displays information about the operational status.
3. Input
4. Mode Press to select virtual or stereo mode.
ower
P
5.
Press to switc
UX, DVD digital,TV/SAT digital or AUX digital).
A
ess to power on the system or switc
Pr
h between input sources (DVD,TV/SAT,
h to standby.
OPTICAL
(TV/SAT IN)
OPTICAL (AUX IN)
6. AUDIO ANALOG
INPUT: DVD IN
TV/SAT IN
UX IN
A
Use to connect a digital satellite tuner or cable
TV tuner that has an optical audio output.
Use to connect to an auxiliary sound source
such as a PVR or second TV tuner that has an
optical audio output. Can also be used to
connect a DVD player that has an optical
output but not a coaxial output.
Use to connect to a DVD player with audio an
analog output.
Use to connect to a TV or satellite tuner with
audio analog output.
Use to connect to an auxiliary sound s
CR or CD player with analog audio
such as a
output.
V
ource
4
Page 5
R
1
2
3
4
5
6
7
8
9
10
(50 mm)
2 inches
PT7031
emote Control
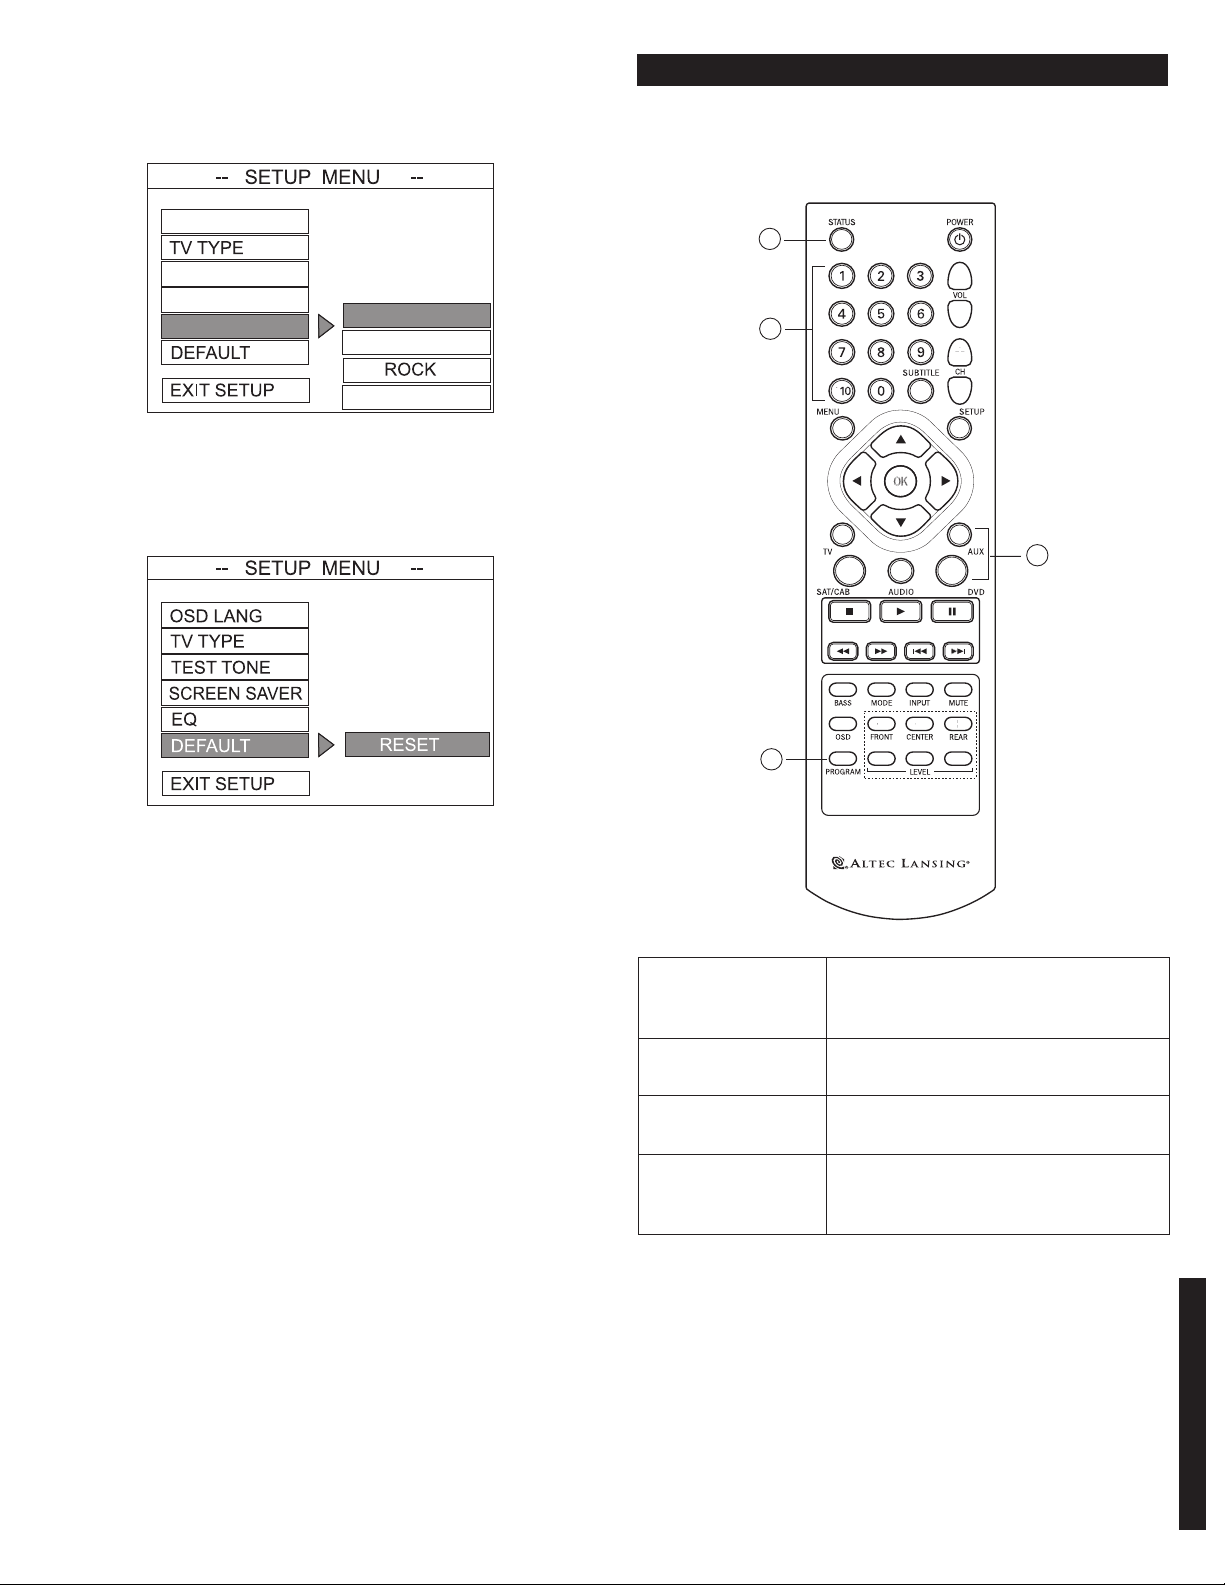
This section describes the function of each control on the remote
control used to control the PT7031.
Note:You can also control other components using the remote control
once you set the appropriate remote control codes. See the
“Programming device remote control codes” section of this manual.
Installing the PT7031
his section provides guidelines for locating and installing your new
T
PT7031.
The PT7031 creates a realistic surround sound experience from a single
unit by using Dolby’s Virtual Speaker technology.While placement is
less critical than similar systems, the following general guidelines
should be followed where possible to ensure best sound quality.
• Avoid placement where furniture or other items would obstruct the
grill area.
• Center the PT7031 below the TV so that dialogue appears to be
oming from it.
c
• Locate your PT7031 and TV in the center of the wall.
• Listening position should be no less than six feet (2 meters) from the
PT7031.
• Avoid placing the PT7031 on or near surfaces that may vibrate.
Locating the PT7031
The PT7031 can be placed on a suitable level surface or mounted on
the wall using the supplied wall mounting bracket.
Safety Notes:
1. POWER Use to toggle between On and Standby modes.
2.VOL +/–
3456
3.
and OK
4. AUDIO
5. INPUT
Increases or decreases the overall volume level
of the unit.
Move to highlight items in the on-screen display
(OSD) setup menu. Press OK to confirm.
Sets the remote to control the PT7031 as
opposed to DVD,TV, SAT/CAB or AUX devices.
ess to cycle through inputs – DVD,TV/SAT,
Pr
AUX, DVD digital, TV/SAT digital and AUX digital.
6. MUTE Press to turn off or restore sound.
CENTER,
FRONT
7.
REAR +/
,
–
LEVELS
eases or decreases the v
Incr
individual c
hannels f
olume lev
or the system.
8. BASS Enhances low frequency or bass output.
9.
10.
MODE
OSD
Use to select vir
depending on the s
our audio source.
y
Press to enter or exit the on-screen display
(OSD) setup menu.
tual or ster
ound modes a
eo mode o
el of the
f system
ailable fr
v
om
• Be sure to leave adequate ventilation space – at least 2 inches
(50mm) above the PT7031
• We do not recommend installing this unit so that it is directly on
the floor.
• The PT7031 weighs approximately (18.1 lbs.) (8.2 kg). Be sure to
secure it where it will not fall and where it is out of the reach of
children.
• Do not install this unit directly above a cathode-ray tube (CRT) TV as
stray magnetic fields may distort the TV.
Wall Mounting
If you ar
1.
2. P
3. Being careful to avoid any items (wires, pipes, etc.) hidden inside the
4. Place the speaker on the mounting bracket by aligning the two
e mounting the PT7031 on the wall please follow these steps:
Determine a suitable w
each of the unit’s AC cord.
within r
all location f
or mounting the wireless speaker
osition and level the supplied metal mounting bracket in the desired
location on the wall.
wall secure the metal mounting bracket using appropriate fasteners
for the application. If you are unsure which type of fasteners to use
e unable to determine if there are items within the wall that
or ar
could be damaged please consult a licensed contractor.
buttonholes on the rear of the speaker with the posts on the
mounting bracket. Check to make sure the wall mount bracket and
y fixed in place.
el
speaker ar
e secur
ENGLISH
5
Page 6
aution: The wall-mounting bracket should be installed only by
SATELLITE
OR
CABLE TV
TUNER
O
PTICAL
DVD
PT7031
GAME
CONSOLE
OPTICAL
SATELLITE
OR
C
ABLE TV
TUNER
OPTICAL
V
CR
A
UDIO OUT
L
R
DVD
PT7031
C
qualified personnel. The mounting plate can be installed on many
different types of walls.When installed, the mounting plate must
support at least 100 lbs. The installer must be sure that the installing
urface can support the 100 lb. weight requirement.The qualified
s
installer must also determine and use the proper hardware to obtain
he weight requirements for the wall.
t
Placing the PT7031 on a Stand
You can mount your TV on a commercially-available stand and place
he PT7031 under your TV. Ensure that the stand being used can
t
support the weight of the TV, the PT7031 and any other items it will be
required to support.
Note: Consult the instructions supplied with the stand for details on
how to install the stand and how to mount the PT7031 and the TV on
the stand.
NOTE: Placement of this product on wood surfaces with certain types
of finishes, such as clear varnish, may result in damage to the finish.
Consult the furniture manufacturer’s care instructions for direction as
to the types of objects that may safely be placed on the wood surface.
Altec Lansing shall not be responsible for any damage to wood surfaces
from contact with this product.
Setting Up the PT7031
Warning: Do not insert the PT7031’s power plug into a wall outlet until
you connect other sources such as your TV, DVD player, satellite tuner
or alternate audio source. Also, turn off audio sources before connecting
them to the PT7031.
The PT7031 is designed to connect external components such as your
DVD player, satellite TV tuner, cable TV tuner, VCR, game console and
TV. The PT 7031 can be connected to the source equipment (DVD,VCR,
etc.) using either a digital (coaxial or optical) or analog connection. In
cases where there are both digital and analog outputs such as a DVD
player we recommend using the digital output to ensure best sound
quality and optimal surround sound reproduction.
Use an optical cable to connect the OPTICAL IN (AUX) jack on the
•
PT7031 to the optical output jack on a digital audio source such as a
game console or digital video recorder.
• Use an optical cable to connect the OPTICAL IN (TV/SAT) jack on the
T7031 to the optical output jack on the satellite tuner or cable TV
P
tuner.
Note: When connecting a DVD player we recommend using the coaxial
input found on the rear of the PT7031. However, if your DVD player
nly has an optical output it can be connected to the AUX input.
o
ote: If you connect the PT7031 to the analog audio and digital audio
N
output jacks of the same source equipment such as a DVD player the
digital audio output will take priority over the analog audio signal.This
is not a typical case as we would recommend using the digital output.
If the device you are connecting does not have a digital output or if all
of the digital inputs on the PT7031 are being used, we recommend
using the analog output.
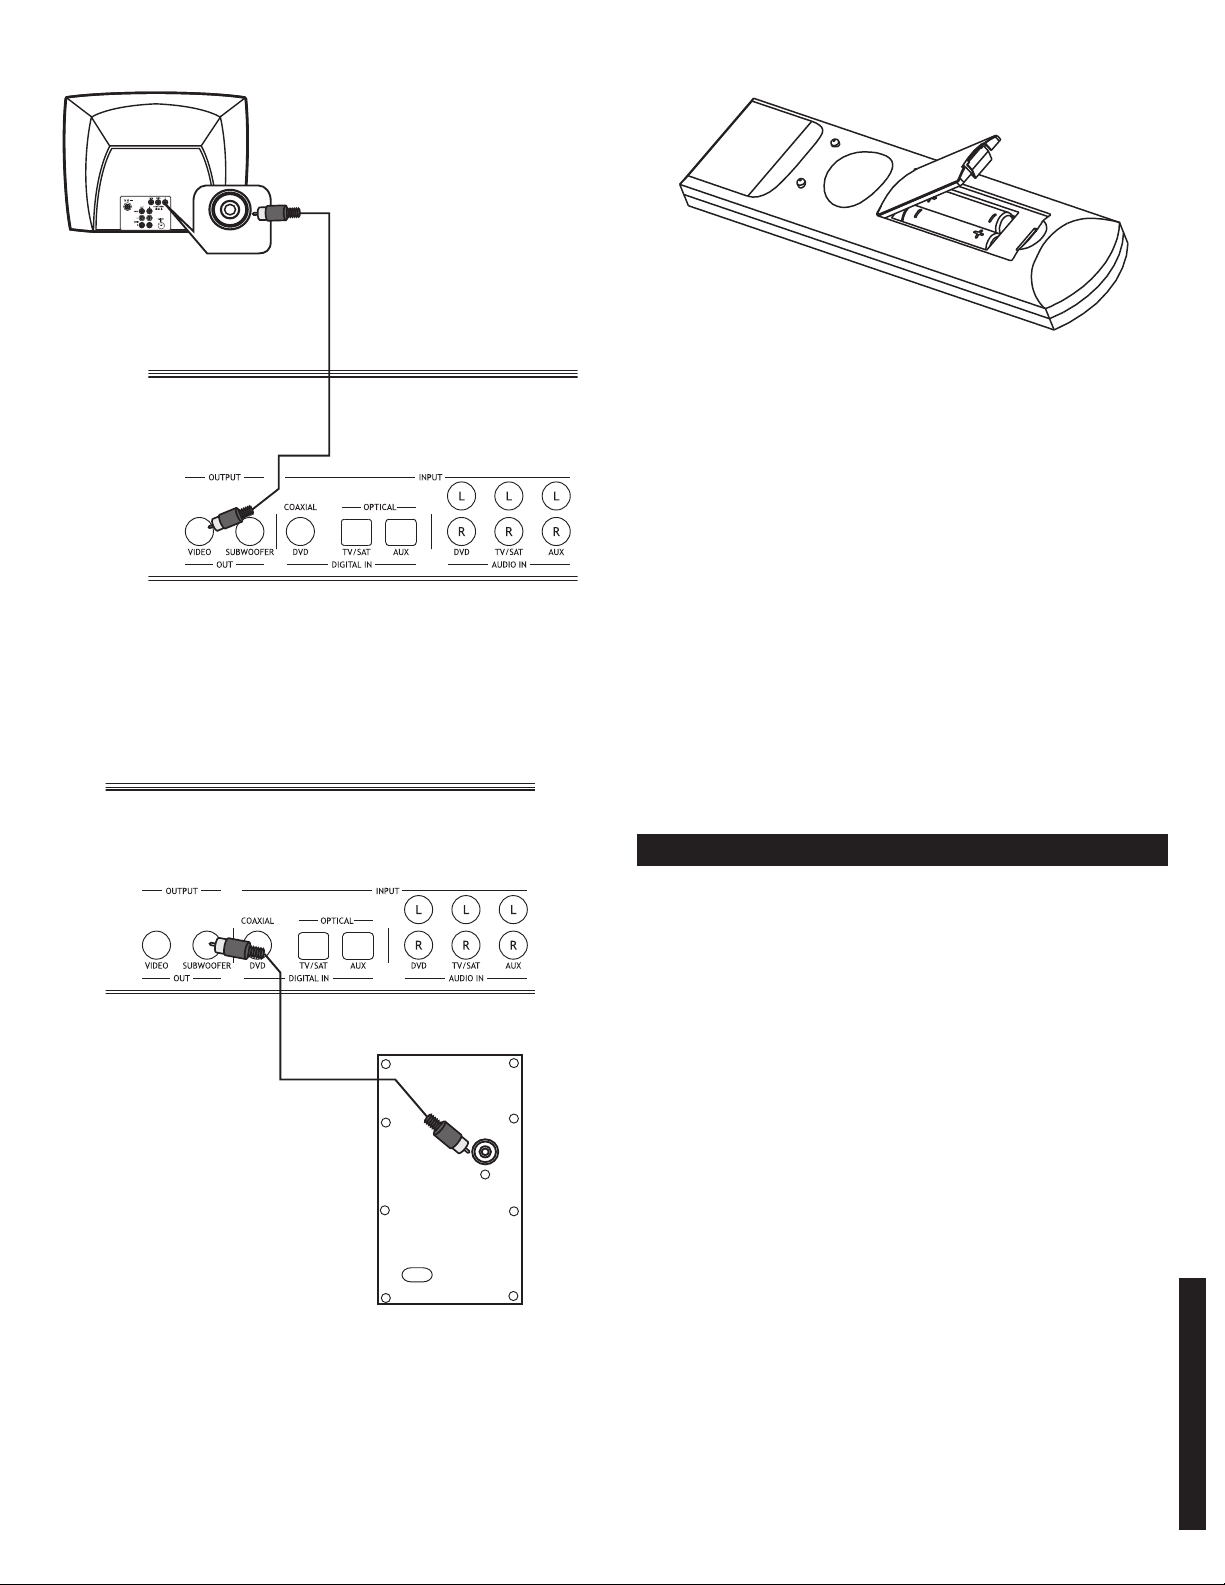
Connecting Devices Equipped with an Analog Audio
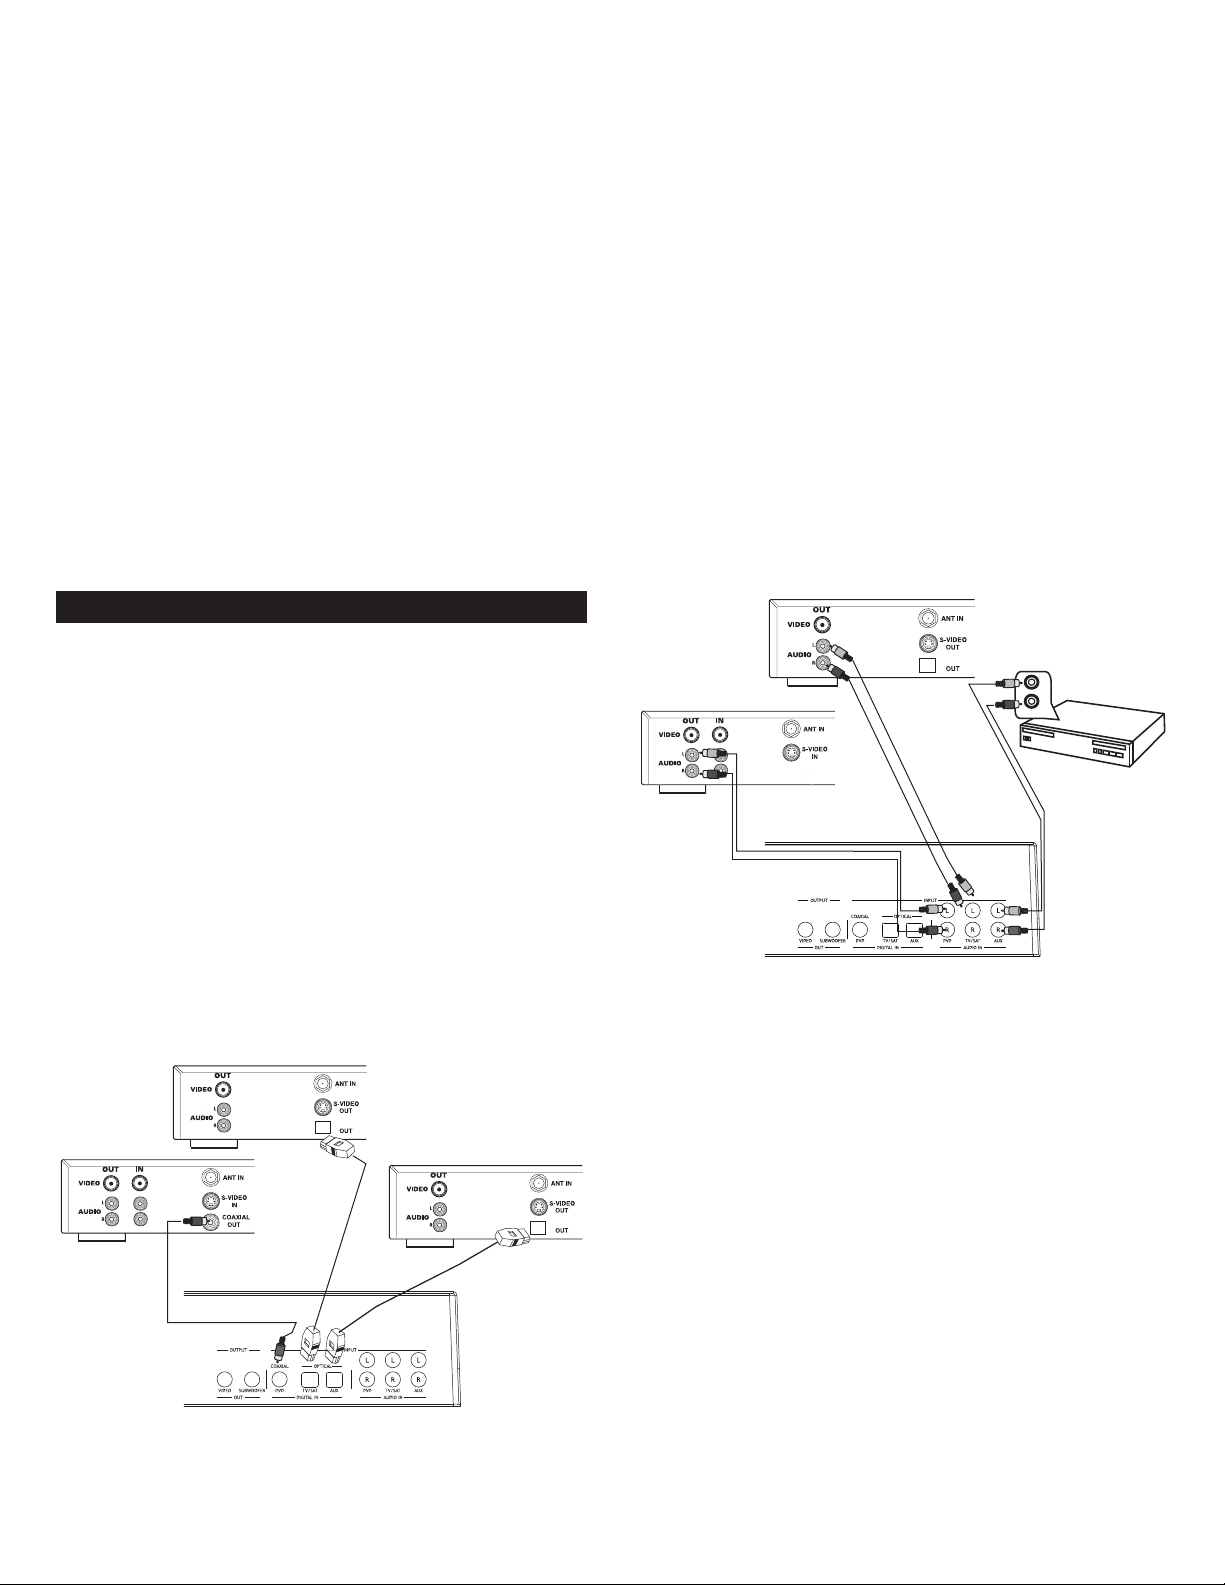
Output (VCR or Similar Device)
To connect the PT7031 to a VCR or similar analog audio device, connect
the cables as shown in the diagram below.
Analog Audio Connections
Connecting Devices E
quipped with a Dig
ital Audio
Output (DVD Player, DVR, etc.)
The PT7031 can accept digital input signals using standard,
commercially available optical or coaxial cables.
ypical Digital Connections
T
ce:
o connect a dig
T
ital audio s
• Use a coaxial cable to connect the COAXIAL IN (DVD) jack on the
PT7031 to the coaxial output jac
our
k on the D
VD pla
.
yer
To connect audio from an analog (VCR, etc.) audio device:
• Use a standard stereo audio cable to connect the AUDIO IN (AUX)
jacks on the PT7031 to the audio output jacks on the VCR or similar
audio sour
ce. Ensur
observing left and r
ce device.
our
s
Use a standar
•
ks to the audio output jacks on the satellite TV or cable TV tuner.
jac
e that the cables ar
ight connections at both the PT7031 and the
eo audio cable to connect the
d ster
e connected correctl
AUDIO IN (TV/SAT)
If your satellite TV or cable TV tuner has a digital output this input
can be used f
or another device.
• Use a standard stereo audio cable to connect the AUDIO IN (DVD)
. If you have
jack to the audio output jac
connected y
our DVD pla
yer using an optical or coaxial digital cable
k on the DVD pla
yer
you can use this input for another device.
6
y
Page 7
ideo Connection
T
V
V
IDEO IN
AC IN
INPUT
PT7031
POWERED
SUBWOOFER
V
To connect the video out:
• Using the supplied A/V cable, connect one yellow end to connect the
VIDEO OUT on the PT7031 and the other yellow end to the video
input jack on the TV. This connection allows you to view the onscreen display (OSD) on your TV screen when the corresponding
input is selected.
Connecting a Subwoofer
etting up the Remote Control
S
Installing Batteries
• Depress the latch on the back of the remote as shown to remove the
battery cover.
• Insert two AAA batteries.
• Close the battery cover.
Notes:
• Change all of the batteries if you notice that the operation range of
the remote decreases or the indicator does not blink or its light
becomes dim.
• Do not use old batteries together with new ones.
• Do not use different types of batteries such as alkaline and
manganese batteries together. Read the packaging carefully as these
different types of batteries may have the same shape and color.
• Exhausted batteries may leak. If the batteries have leaked, dispose of
them immediately.Avoid touching the leaked material or letting it
come into contact with skin or clothing. Clean the battery
compartment thoroughly before installing new batteries.
• Do not throw away batteries with general house waste. Dispose of
them correctly according to local regulations.
To connect an optional subwoofer:
• Use an optional commercially available mono audio cable to connect
the SUBWOOFER OUT jack on the rear of the PT7031 to the
SUBWOOFER INPUT jack on the subwoofer.
Basic Operation
• After all audio and video connections are secure; you can plug in the
PT7031’s AC cord into a suitable AC outlet.
• Turn on the power switch on the rear panel of the PT7031 to the on
position. The PT7031 will enter into STANDBY mode. The power LED
on front panel will turn red indicating that the unit is in standby
mode.
• Press the POWER button on the front panel to power on the PT7031.
The power LED will switch from red to green indicating the unit is on.
• Begin playback on the DVD player or other device that you want to
listen to.
• Select the desired input using the INPUT button on the front panel or
remote control.The corresponding LED will illuminate to indicate the
input that has been selected
• Select the desired audio mode by using the MODE button on the
front panel or remote control. For most devices you can choose
between stereo or virtual surround modes.
• Adjust the system volume using the VOL +/– buttons on the remote
control or front panel.
ENGLISH
7
Page 8
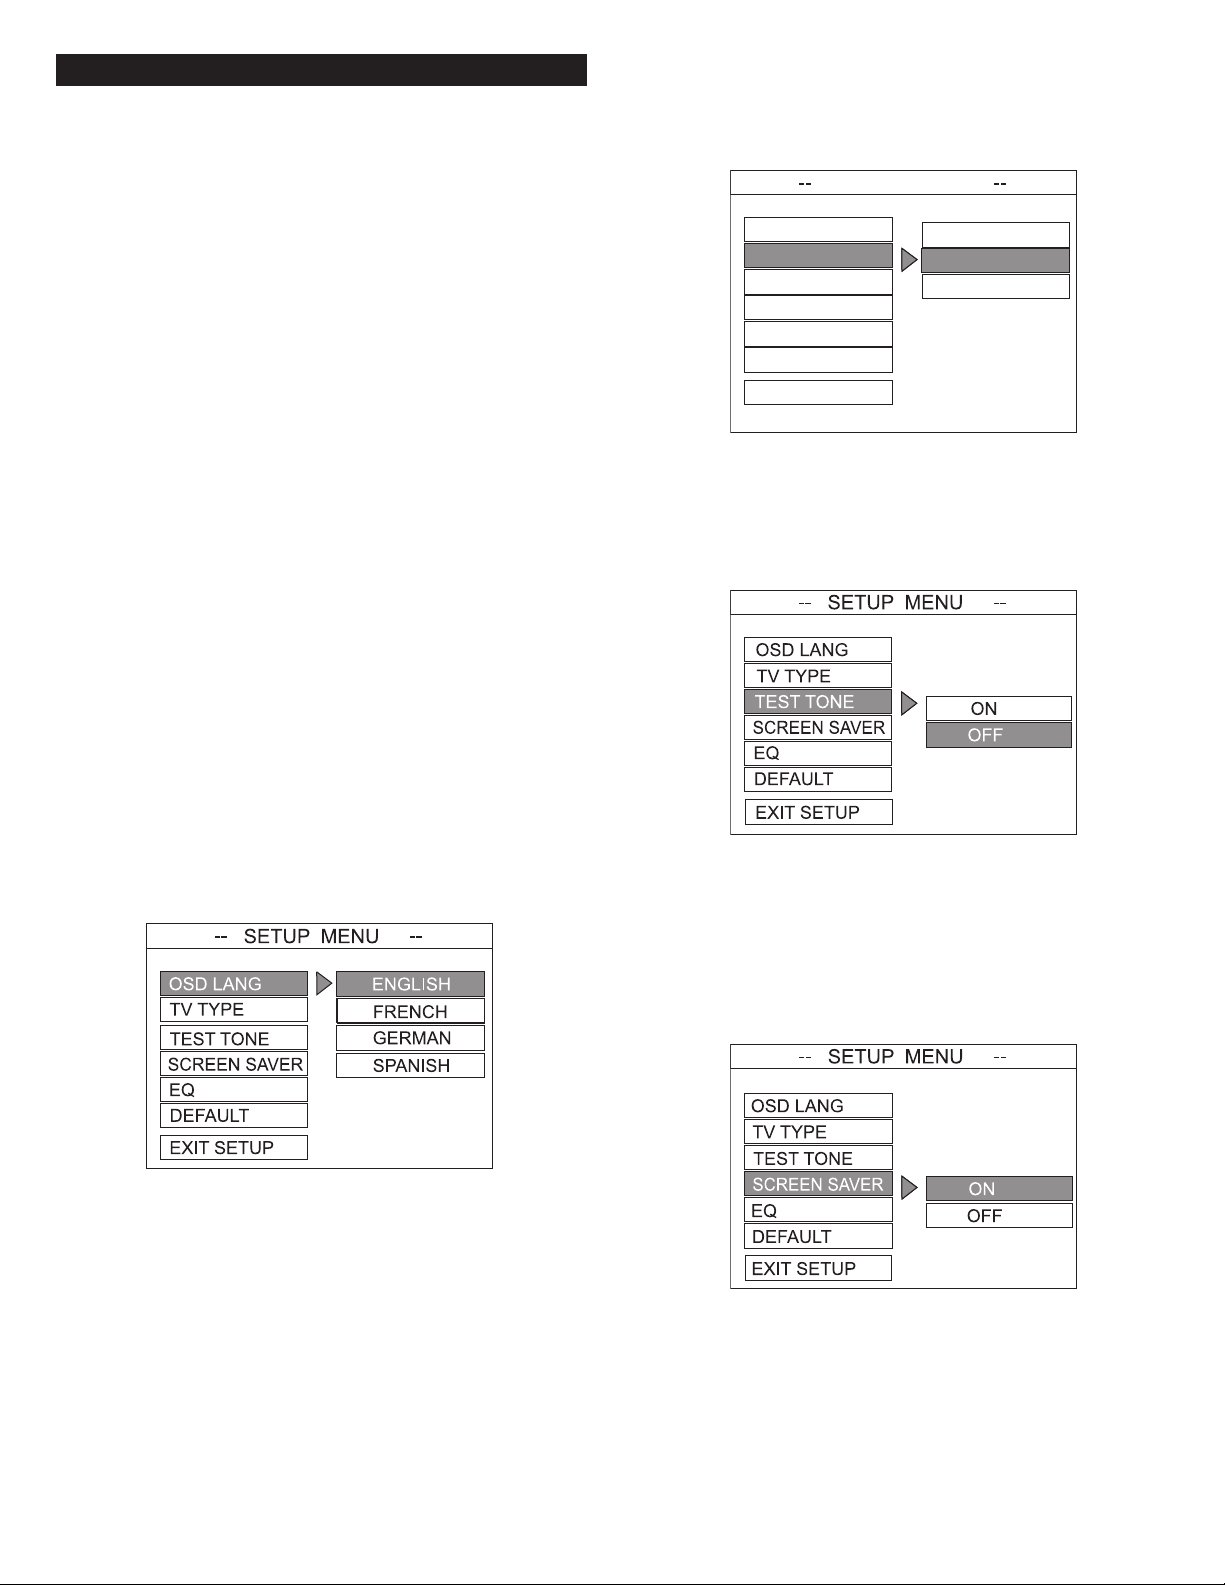
Advanced Operation
MENUSETUP
OSD LANG
TV TYPE
TEST TONE
SCREEN SAVER
EQ
D
EFAULT
E
XIT SETUP
AUTO
NTSC
PAL
S
etting Channel (Speaker) Levels
ndividual levels can be set for front, center and rear or surround
I
channels by using the corresponding +/– level buttons on the remote.
hese levels should be adjusted so that all channels are at a similar
T
volume when the listener is seated using the Test Tone function as
escribed in the Setup Menu section that follows.
d
Adjustments are made by:
• Pressing LEVEL (Front +/–, Center +/– and Rear +/–) for each channel
to be set. The level of the channel will appear on the TV screen.
• The range for each level is -10 dB to +10 dB, in 1 dB steps. The initial
volume is 00 dB.
Setup Menu
The setup menu is displayed on your TV screen using the OSD.The OSD
will only work if a video connection has been established as described
in “video connection” section of this manual.You can customize your
PT7031 for language,TV type, test tone setting, screen saver, and EQ.
The setup menu can also be used to reset the unit to factory default
settings if necessary.
NTSC: Select this if the connected TV has the NTSC color system. It
will change the video signal of a PAL disc and output it to NTSC format.
PAL : Select this setting if the connected TV has the PAL color system. It
will change the video signal of an NTSC disc and output it to PAL format.
Test Tone Setting
When set to the ON position, the system will test the speaker output
by using an internally generated test tone.The test signal is output
sequentially through various channels.The default setting is OFF.
Displaying the On-
• Press the OSD button on the remote to display the setup menu.
• Use the
selections.
• Highlight your desired option.
• Press the OK button on the remote to confirm your selection.
• To exit the setup menu, press the OSD button or select EXIT SETUP
from the menu.
3456 buttons on the remote to toggle through the
screen Display
Setting the OSD Language
Select the language for on-screen display. The default setting for the
OSD is ENGLISH.
Screen Saver Setting
When set to ON the PT7031 will automatically enter the screen saver
mode when no changes have been made after five minutes.This is
useful for preventing image burn from occurring that can damage
certain plasma TVs. The default setting is ON.
TV Type Setting
The color system of the DVD system, DVD and TV should match. Only
then will it be possible to play a DVD on this system. Before changing
the TV system, determine the color system of your TV.
The default setting is NTSC. NTSC is used in several countries including
the United States, Canada and Japan. PAL is used in most European and
Asian countries.
AUTO: Select this if the connected TV is compatible with both NTSC
and PAL. The output format will be in accordance with the video signal
f the D
o
VD disc
.
8
Page 9
E
OSD LANG
TEST TONE
SCREEN SAVER
EQ
CLASSIC
POP
JAZZ
1
2
4
3
Q (Equalizer)
Use this function to select equalizer settings. Choose from CLASSIC,
POP, ROCK, or JAZZ.The default setting is CLASSIC.
Default Setting
If RESET is selected, all the items in the setup menu will be reset to the
factory default settings as previously indicated.
Operating the PT7031 Remote Control
In addition to controlling your PT7031 you can program the remote
ontrol to operate audio/video components from other manufacturers.
c
Codes can be set up for each device to be controlled:TV, SAT/CAB,
AUDIO, DVD, and AUX.
1. STATUS
2. NUMERIC BUTTONS
3. DEVICE BUTTONS
4. PROGRAM
9
Indicates operation of remote when specific
buttons are pressed. Illuminates continuously
to indicate remote is in program mode.
Use to enter pr
for other devices.
Use to program or switch remote modes
for operating other devices.
Use to enter program mode when
programming remote control codes for
other devices.
eprogrammed remote codes
ENGLISH
Page 10

Default Preprogrammed Remote Control Codes
Your PT7031 remote control is preset to the default codes listed in the
table below. If your component is not listed please consult the list in
the Preprogrammed Remote Control Codes section.You can also use the
earch procedure in the Searching for Remote Control Codes section of
s
this manual.
emote Button
R
TV 082 Philips TV
SAT/CAB 039 Philips Cable Box
AUDIO 900 Altec Lansing PT7031
AUX 144 Panasonic VCR
DVD 124 Sony DVD
nitial code
I
quipment
E
Programming Device Remote Control Codes
Find the brand, model and code number of your components in the
Preprogrammed Remote Control Codes section of this manual, then
follow these steps:
• While holding down the PROGRAM button, press the button for the
device to be programmed, i.e., TV or DVD or CAB/SAT or AUX.
• The Status LED illuminates.
• Release both buttons.
• Enter the CODE NUMBER using the numeric buttons on the remote.
If the CODE NUMBER is valid the LED will flash twice and then turn
off, indicating the code has been programmed. If the code number is
not valid the LED flashes twice and turns on;
• Check to see that the remote can control the device that was
programmed by using the CH+/– or similar button to control the
device that was programmed. If it does not control the device, repeat
this procedure.
Note: If you want to leave the setup mode, press the device button
(TV, SAT/CAB, DVD, etc.). If you do not press any buttons after 10
seconds, SETUP MODE exits automatically.
Once the device you wish to control powers off, immediately stop
•
pressing the POWER button and press the device (TV, SAT/CAB, DVD,
AUX, etc) button again.
• The PT7031 should now be programmed to control your device.
• You can verify this by turning the device on, and entering other
applicable commands such as PLAY or STOP for a DVD player or
CHANNEL +/– for a SAT box.
Note: While the POWER button was used for searching here, you can
use other commands such as the PLAY button for devices that do not
ave a POWER button. In this case the PT7031 uses the PLAY button to
h
search. Simply use the PLAY button instead of the POWER button as
described below ensuring that the device you wish to control is ready
to enter the play mode and has a DVD or tape loaded, is on, etc.
Searching for Remote Control Codes
If you cannot find a code n
ontrol Codes section of this manual that matches your equipment, the
C
PT7031 remote can search its database for a suitable control code from
the codes programmed into the remote.The PT7031 remote control
will find the best possible component code f
To search for codes follow these steps:
• Turn the device (TV, SAT/CAB, DVD, AUX, etc) that you wish to locate
emote contr
the r
• On the PT7031 remote press and hold the PROGRAM button while
essing the device button you wish to search for (TV, SAT/CAB, DVD,
pr
AUX, etc).
• The STATUS LED on the PT7031 will illuminate and remain on.
• Press and release the PROGRAM button again.The LED will flash to
indicate that the remote has entered the search mode.
• Aiming the PT7031 remote at the device you want to control
repeatedly and slowly press and release the POWER button.The
PT7031 will send a different POWER code to the device each time
OWER button is pressed.
the P
umber fr
ol code for to the on position.
om the Preprogrammed Remote
y audio sour
or an
ce.
10
Page 11

T
roubleshooting
Symptom Possible Problem Solution
o power. The power cord is not connected or the PT7031
N
has not been turned on.
Power switch on the back panel is not turned on. Turn it on.
A safety mechanism powered down the PT7031. Unplug the PT7031 from the AC outlet briefly and then plug it in again so
No sound
comes from
the PT7031.
No on-screen
display.
No sound when
playing back
specific DVDs.
The volume is set too low. The “+/–” buttons on the top of the PT7031 remote are the master volume
Loose or no cable connections on the PT7031 or
source equipment.
MUTE is on. Be sure mute function is not activated.
Video cable is loose or not connected. Check that the video cable is connected and properly seated at both the
The wrong input is selected on the TV. Select the correct input on the TV, the one that corresponds to where the
The DVD audio track is recorded at 96kHz. Select 48kHz in the DVD menu or connect and use the analog output from
lug the PT7031’s AC cord into a suitable AC outlet. Then, turn on the
P
PT7031 by pushing the on/off switch in the rear of the unit.
it will reset itself.
controls. Press and hold the “+” button to increase the volume.
Check that the cables are correctly and firmly seated on both the PT7031
and the source equipment.
PT7031 VIDEO OUTPUT and the TV input.
VIDEO OUT cable from the PT7031 is connected.
the DVD player.
Specifications
Power Supply Rating 120 VAC/60 Hz
Power Consumption
Signal-to-Noise Ratio (A-weighted) >75dB
Dimensions (W x H x D) 40" x 6
Weight 18.1 lbs. (8.2 kg)
Output Power 75 Watts (3 x 25) Continuous Average Power
Drivers Three NXT Digital 2" x 8" (50mm x 200mm) Flat Panel Drivers
Digital Inputs Two Optical/One Coaxial
Analog Inputs Stereo x 3
ideo Output
V
Frequency response 70 Hz – 20 kHz +/– 3dB
25W
3
⁄4" x 6" (1016mm x 170mm x 152mm)
omposite x 1
C
Specifications are subject to change without notice.
11
ademark o
r
T
f New
ansducers Limited.
r
T
ENGLISH
Page 12

12
Page 13

L
e symbole figurant un éclair dans un triangle
é
quilatéral est destiné à attirer l’attention de
l’utilisateur sur la présence d’une “tension dangereuse”
n
on isolée pouvant être d’amplitude suffisante pour
c
onstituer un risque d’électrocution.
A
ttention : Pour prévenir tout risque d’électrocution,
ne retirez pas le couvercle (ou le dos) de l’appareil. Il
n
e se trouve à l’intérieur aucune pièce susceptible
d’être réparée par l’utilisateur.Confiez la réparation
e
t l’entretien à un personnel qualifié.
L
e point d’exclamation à l’intérieur d’un triangle
équilatéral est destiné à prévenir l’utilisateur qu’il
t
rouvera d’importantes instructions concernant
l’utilisation et la maintenance (entretien) dans la
d
ocumentation jointe à l’appareil.
ATTENTION
P
our éviter tout risque d’électrocution, n’utilisez pas cette fiche (polarisée) avec une rallonge
électrique, une prise de courant ou une autre sortie, si les lames ne peuvent pas être insérées
c
omplètement, afin d’éviter qu’elles ne soient exposées.
AVERTISSEMENT
A
fin de limiter le risque d’incendie ou d’électrocution, n’exposez pas cet appareil à la pluie ou à
l
’humidité.
CONSIGNES DE SÉCURITÉ IMPORTANTES
1
. Lisez ces instructions.
2
. Conservez ces instructions.
3
. Suivez l’ensemble des avertissements.
4
. Respectez l’ensemble des instructions.
5
. N’utilisez pas l’appareil à proximité d’un point d’eau. Cet appareil ne doit pas être exposé à des
gouttes ou des éclaboussures. Aucun objet rempli de liquide (vase, par exemple) ne doit être
placé sur l’appareil.
6. Nettoyez uniquement l’appareil à l’aide d’un chiffon sec.
7.N’obstruez pas les orifices de ventilation. Installez l’appareil conformément aux instructions du
fa
bricant. L’appareil ne doit pas être placé sur un lit, un divan, un tapis ou une surface similaire
p
ouvant obstruer les orifices de ventilation. L’appareil ne doit pas être inséré dans une
i
nstallation intégrée, telle qu’une armoire ou une étagère fermée. Le flux d’air via les orifices de
v
entilation risquerait d’être bloqué. Les orifices ne doivent pas être recouverts avec des objets
tels que des journaux, des nappes, des rideaux, etc. La ventilation risquerait d’être bloquée.
8. N’installez pas l’appareil à proximité de sources de chaleur telles que des radiateurs, des
r
egistres de chaleur, des fourneaux ou autres appareils produisant de la chaleur (amplificateurs
inclus).
Aucune sour
9.
l’appareil.
10. N’allez pas à la rencontre des objectifs de sécurité de la fiche polarisée ou mise à la terre. Les
fiches polarisés disposent de deux lames (une plus large que l’autre). Les fiches de mise à la
terr
broche est fournie pour votre sécurité. Si la fiche fournie ne correspond pas à votre prise
électr
11. Faites-en sorte que le cordon d’alimentation ne puisse être piétiné ou plié, notamment aux
points d’entrée et de sortie des fiches et des prises.
N’installez pas l’appar
12.
Le débranchement de la fiche d’alimentation est la seule manière de mettre le produit
complètement hors tension.Vous devez pouvoir accéder facilement à la fiche à tout moment.
13. Source d’alimentation — utilisez uniquement des blocs d’alimentation du type défini dans les
instructions de fonctionnement ou indiqué sur l’appareil. Si un bloc d’alimentation distinct est
ourni a
f
les blocs d’alimentation fournis par le fabricant.
14. Débranchez l’appareil en cas d’orage ou lorsque vous ne l’utilisez pas pendant des périodes de
temps pr
15. Confiez l’ensemble des travaux d’entretien à du personnel d’entretien qualifié. Des travaux
d’
d’alimentation est endommagé, du liquide s’est renversé ou des objets sont tombés dans
l’appareil, l’appareil a été exposé à la pluie ou à l’humidité, l’appareil ne fonctionne pas
normalement ou l’appar
du per
d’assistance Altec Lansing.
P
16.
mettre les piles au rebut de manière adaptée.
17. Utilisez uniquement les accessoires spécifiés par le fabricant.
Utilisez uniquement le c
18.
par le fabricant ou vendu(e) avec l’appareil. Si vous utilisez un chariot, déplacez avec
précaution l’ensemble chariot-appareil afin d’éviter toute blessure en cas de
c
ce de flammes n
e disposent de deux lames et d’une br
tez un électricien afin de remplacer la prise obsolète.
consul
ique,
ec l’appar
v
olongées.
ont nécessaires lorsque l’appareil est endommagé (la fiche ou le cordon
etien s
entr
sonnel d’entretien qualifié, retournez l’appareil au distributeur ou contactez la ligne
oduits compor
our les pr
e.
ag
vir
ha
ues (bougies allumées, par exemple) ne doit être placée sur
ge ou la
etien, adressez-vous à
a
aux d’
v
La lame plus lar
entr
he de mise à la terre.
oc
eil dans une zone où l’accès à la fiche d’alimentation n’est pas garanti.
, ne le remplacez par aucun autre bloc d’alimentation. Utilisez uniquement
eil
eil est tombé).
tant des piles, veuillez vous reporter aux régulations locales pour
iot
har
Dans le cadr
, le présentoir, le pied, le support ou la table spécifié(e)
e des tr
Garantie Altec Lansing. limitée d’un an
(garantie limitée de deux ans en Union européenne et en Asie)
Q
uels éléments sont couverts par la garantie ?Altec Lansing garantit que ses produits sont
dépourvus de défauts au niveau des matériaux ou de la main d’oeuvre, à l’exception des conditions
d
étaillées ci-dessous.
Q
uelle est la durée de la garantie ?Pour les appareils achetés en Union européenne ou en Asie, cette
g
arantie est valable pendant deux ans à compter de la date d’achat. Pour les appareils non achetés en
U
nion européenne ou en Asie, cette garantie est valable pendant un an à compter de la date d’achat.
L
es conditions des garanties légales implicites prennent fin à l’issue de la période de validité de la
garantie limitée. Certains états et/ou états membres de l’Union européenne n’acceptent pas les
r
estrictions relatives à la durée des garanties implicites. Il est donc possible que la restriction
s
usmentionnée ne s’applique pas à votre cas.
Q
uels éléments ne sont pas couverts par la garantie ?Cette garantie ne couvre pas les défauts,
mauvais fonctionnements ou anomalies qui peuvent survenir à l’aide des événements suivants :
i
nstallation incorrecte, utilisation incorrecte ou non-respect des instructions se rapportant au
produit, utilisation abusive ou utilisation avec un équipement incorrect, inadapté ou défectueux
(pour obtenir des informations relatives à l’installation, au fonctionnement et à l’utilisation du
p
roduit, consultez le manuel fourni avec le produit). Si vous avez besoin d’un manuel de
remplacement, vous pouvez télécharger un manuel sous www.alteclansing.com. En outre, les
dommages consécutifs ou secondaires ne sont pas pris en charge par cette garantie.Certains états
n
’autorisent pas l’exclusion ou la restriction des dommages consécutifs ou secondaires, il est donc
possible que l’exc
ue fera Altec Lansing pour corriger le problème ? Altec Lansing réparera ou remplacera, à sa
Q
discré
tion, les produits qui s’avèrent défectueux au niveau des matériaux ou de la main d’oeuvre. Si
v
otre produit n’est plus fabriqué ou n’est plus disponible en stock, Altec Lansing remplacera à sa
d
iscrétion votre produit par un produit Altec Lansing similaire ou de meilleure qualité.
Comment obtenir un service de garantie : pour obtenir la réparation ou le remplacement d’un produit
sous garantie, vous devez contacter Altec Lansing par courrier électronique (csupport@alteclansing.com)
au cours de la période de garantie. Le courrier électronique doit inclure votre nom, votre adresse, votre
adresse électronique, votre numéro de téléphone,la date d’achat ainsi qu’une description détaillée du
problème rencontré.Aux Etats-Unis, vous pouvez également contacter Altec Lansing par téléphone au
1-800-ALTEC88 — soyez pr
anomalie au niveau des matériaux ou de la main d’oeuvre,Altec Lansing vous enverra une autorisation
de retour et des instructions relatives au retour du produit. Le retour du produit s’effectue aux frais du
client et le retour doit êtr
manière adaptée : vous êtes en effet responsable du produit jusqu’à ce qu’il parvienne à Altec Lansing.
Dans quelle mesure les lois nationales affectent vos droits ? Cette garantie vous accorde des droits
aux spécifiques.
lég
noter qu’au sein de l’Union européenne, vous, en tant que consommateur, pouvez disposer d’autres
droits légaux selon la législation nationale des états membres de l’Union européenne gouvernant la
vente des mar
aranties et remèdes limités détaillés ci-dessus sont les seuls garanties et remèdes disponibles à
Les g
heteur si et dans la mesure où ils sont valables et applicables selon la loi en vigueur.
l’ac
lusion ou la r
Vous pouv
chandises Al
estri
ction susmentionnée ne s’applique pas à v
êt à fournir les mêmes informations. Si le problème s’avère lié à une
e originale d’achat. Vous devez assurer l’expédition de
compagné de la pr
e ac
ez également disposer de droits qui v
tec Lansing. Ces droits ne sont pas affectés par cette garantie.
euv
arient d’un état à l’autre.Veuillez
otre
cas.
Service clientèle
éponses à la plupart des questions relatives à la configuration et aux performances sont disponibles
Les r
dans le guide de dépannag
clientèle de notre site Internet (
parvenez pas à trouver les informations dont vous avez besoin, veuillez demander l’aide de notre équipe
d’assistance clientèle avant de renvoyer l’unité au détaillant selon la politique de retour en vigueur.
Tel: 800-258-3288
Courrier électronique : csupport@alteclansing.com
ez pas en Amérique du Nord, veuillez consulter notre site Internet
ous ne viv
Si v
(
www.alteclansing.com) et sélectionnez le pays dans lequel vous vivez pour localiser le distributeur
de votre pays.
Pour obtenir les informations les plus récentes, veuillez consulter notre site Internet à l’adresse
ante
suiv
Distr
Clients internationaux : pour plus d’informations au sujet de la distribution des produits Altec
Lansing dans votre pays, veuillez consulter le site Internet (www.alteclansing.com) et cliquez sur
e pa
otr
v
teclansing.com
.al
www
ibution internationale
ys.
ous pouv
V
e.
www.alteclansing.com). Si vous vivez en Amérique du Nord et ne
alement consulter la foire aux questions de la section service
ez ég
.
Élimination de l’équipement électrique et électronique obsolète
Ce symbole sur le produit ou sur son emballage indique que ce produit ne sera pas traité
en tant que déc
recyclage de l’équipement électrique et électronique. En vous assurant que ce produit est
éliminé corr
potentielles pour l’environnement et la santé de l’homme qui sont susceptibles d’être
engendrées par une mise au rebut inadéquate de ce produit dans le cas contraire. Le recyclage des
iaux contr
matér
complémentaire concernant le recyclage de ce produit, veuillez contacter votre mairie ou votre
service local de tr
het ménag
ectement, vous contribuerez à la prévention des conséquences néfastes
a à la pr
ibuer
aitement des déc
. Ledit produit sera remis au point de collecte applicable au
er
essources naturelles. Pour toute information
ation des r
éserv
hets.
13
FRANÇAIS
ENGLISH
Page 14

Système PT7031 Surround
1
2
3
4
5
1
2
3
4
5
6
Nous vous remercions de votre acquisition du système PT7031
Surround d’Altec Lansing.
Le PT7031 a été conçu pour remplacer le récepteur A/V traditionnel
avec ses enceintes séparées. Il apporte un son surround complet
multicanaux, à partir d’un composant unique en tirant parti du DTS, du
Dolby Digital et du traitement Dolby Virtual Speaker. La technologie
numérique de son pilote NXT flat-panel reproduit fidèlement la plage
de fréquence et apporte toutes les subtilités et la profondeur spatiale
du son dont sont capables les formats numériques d’aujourd’hui.
La conception du PT7031 est parfaitement adaptée aux écrans grand
format LCD et plasma actuels, et le montage mural est possible avec le
support fourni. Une télécommande universelle est incluse ; elle permet
e rassembler sur une seule commande les fonctions de votre TV,
d
lecteur DVD et magnétoscope.
Contenu
Pour identifier ces éléments, consultez le Programme de connexion rapide
du PT7031.
• PT7031
• Télécommande et piles
• Câble A/V
• Support de montage mural (les vis ne sont pas incluses)
• Mode d’emploi et instructions de branchement rapide
Commandes et connexions de votre PT7031
Panneau avant
Panneau arrière
1. Mise sous/
hors tension
2. Cordon
d’alimentation CA
3.VIDEO OUT
4. SUBWOOFER OUT
5. ENTRÉE
NUMÉRIQUE :
COAXIAL (DVD IN)
OPTICAL
(TV/SAT IN)
OPTICAL (AUX IN)
et le système sous ou hors tension.
M
Se connecte à une prise secteur (C.A.). Se
reporter aux indications de fréquence et de
plage pour la source de tension, sur le panneau
ière.
arr
Permet d’afficher les informations d’affichage
sur écran. Connecter cette sortie à l’entrée
vidéo mixte (composite) de la TV.
Permet de connecter un subwoofer (caisson
de basses) optionnel si la présence d’un hautparleur d’infra-graves est souhaitée.
Permet de connecter un lecteur de DVD équipé
d’une sortie numérique coaxiale.
Permet de connecter un tuner satellite
numérique ou un tuner câble équipé d’une
sortie audio optique.
Permet de connecter une source audio
auxiliaire venant d’un enregistreur PVR ou d’un
second tuner TV équipé d’une sortie audio
optique. Permet aussi de connecter un lecteur
DVD équipé d’une sortie optique, mais non
d’une sortie coaxiale.
1.Volume +/– Contrôle le niveau sonore de tous les canaux audio.
2. LED
Input
3.
Elles affichent les informations concernant l’état
du système.
ppuyer sur cette touc
A
ources d’entrée audio (TV/SAT, AUX, DVD
s
he pour fair
e défiler les
numérique,TV/SAT numérique ou AUX numérique).
4. Mode
5. Alimentation
Appuyer sur cette touche pour sélectionner le mode
virtuel ou stéréo.
ppuyer sur cette touche pour mettr
A
ous tension ou le f
s
aire passer en mode de veille.
e le système
6. AUDIO ANALOG
INPUT: DVD IN
TV/SAT IN
UX IN
A
14
Permet de connecter un lecteur DVD équipé
d’une sortie audio analogique.
Permet de connecter l’appareil à une TV ou à
un tuner satellite équipé de sortie analogique.
ermet de connecter l’appar
P
eil à une sour
ce
audio auxiliaire telle qu’un magnétoscope ou
lecteur de CD équipé d’une sortie audio
analogique.
Page 15

T
1
2
3
4
5
6
7
8
9
10
(50 mm)
2 inches
PT7031
élécommande
Cette section décrit la fonction de chacune des commandes de la
élécommande utilisée avec le PT7031.
t
emarque : vous pouvez aussi contrôler chacun des autres composants
R
de votre système avec cette télécommande une fois que vous l’aurez
programmée avec les codes de commande à distance appropriés.
onsultez la section consacrée à la programmation des codes de la
C
télécommande dans ce manuel.
Installation du PT7031
Cette section présente des recommandations pour le choix de
’emplacement et l’installation de votre nouveau PT7031.
l
Le PT7031 permet la restitution du son en surround à partir d’un seul
appareil en exploitant la technologie Dolby Virtual Speaker. Bien que
l’emplacement de l’appareil soit moins important que dans le cas de
ystèmes similaires, nous vous conseillons de suivre ces quelques
s
recommandations pour assurer une qualité sonore optimale.
• Évitez de placer l’appareil derrière des meubles ou objets qui peuvent
bloquer la grille.
• Positionnez le PT7031 en dessous de la TV, les dialogues paraîtront
émaner de celle-ci.
• Placez le PT7031 et la TV au centre du mur ou de la cloison.
La position d’écoute idéale se situe à deux mètres au moins du
•
PT7031.
• Évitez de placer le PT7031 sur, ou à proximité de surfaces
susceptibles de vibrer.
Placement du PT7031
Le PT7031 peut êtr
support mural à l’aide du matériel fourni.
e placé sur une surface plane ou monté sur son
Notice de sécurité du matériel :
1. POWER
2.VOL +/–
3456
3.
et OK
UDIO
A
4.
5. INPUT
6. MUTE
7. FRONT, CENTER,
REAR +/– LEVELS
Permet de faire passer le système du mode actif
au mode de veille.
Augmente ou diminue le niveau du volume
onore global de l’appareil.
s
Permet de sélectionner les rubriques désirées sur
le menu de configuration (setup) de l’affichage
ppuyez sur OK pour confirmer.
an. A
sur écr
La télécommande ne contrôle que le PT7031, et
la TV Satellite/Câble ou les appareils
non le D
auxiliaires.
Appuyer sur cette touche pour faire défiler les
VD,
sources d’entrée audio (TV/SAT, AUX, DVD
umérique,
n
umér
n
TV/SAT n
ique).
Appuyer sur cette touche pour couper le son ou
le rétablir.
Augmente ou diminue le volume sonore de
chaque canal du système.
8. BASS Accentue les basses fréquences.
Permet de sélectionner le mode virtuel ou le
9. MODE
OSD
10.
mode stéréo, en fonction des modes disponibles
sur la source audio que vous utilisez.
ermet de s
P
sélection des r
configuration (setup) de l’affichage sur écran.
or
tir ou d’
iques désir
ubr
ique ou
umér
er en mode de
entr
UX
A
ées sur le men
u de
• Veiller à laisser l’espace nécessaire à la ventilation – 50 mm au moins
au-dessus du PT7031
• Il n’est pas recommandé de poser l’appareil directement sur le sol.
• Le poids du PT7031 est de 8.2 kg environ. (18,1 livres).Veillez à
assurer sa position à un endroit où il ne risque pas de tomber, hors
de portée des enfants.
• N’installez pas cet appareil directement au-dessus d’une TV à tube
cathodique ; la dispersion des champs magnétiques peut causer des
distorsions d’image.
al
ur
Montag
Si v
e m
ous choisissez de monter le PT7031 sur un m
ur, suivez ces étapes :
1. Choisissez un emplacement favorable pour le haut-parleur sans fil, en
e à la longueur du cordon
éloignant pas d’une distance supér
ne l’
ieur
d’alimentation de l’appareil.
2. Positionnez, puis mettez à niveau le support de montage à l’endroit
choisi sur le mur.
3. En évitant de toucher câbles, fils ou tuyaux éventuellement cachés à
l’intérieur de la cloison, fixez le support au mur en vous servant des
vis ou des douilles de centrage appropriées. Si vous ne trouvez pas les
systèmes de fixation adéquats ou si v
ous êtes dans l’impossibilité de
déterminer si la cloison contient fils ou tuyaux, consultez un homme
de métier.
4. Placez l’enceinte sur le support de montage en faisant correspondre
les deux orifices en forme de boutonnière à l’arrière de l’enceinte
avec les montants du support. Vérifiez si le support de montage et
l’enceinte sont fermement fixés au mur.
15
FRANÇAISFRANÇAIS
Page 16

ttention : Le support de montage ne doit être installé que par les
SATELLITE
OR
CABLE TV
TUNER
OPTICAL
DVD
PT7031
GAME
CONSOLE
OPTICAL
S
ATELLITE
OR
C
ABLE TV
TUNER
O
PTICAL
VCR
AUDIO OUT
L
R
DVD
PT7031
A
personnes qualifiées. La plaque de montage peut être installée sur
plusieurs types de murs. Correctement installée, la plaque de montage
peut supporter au moins 45 kg. L’installateur doit s’assurer que la paroi
ur laquelle est monté le support est capable de supporter un poids de
s
45 kg. L’installateur qualifié doit aussi choisir les vis et matériels de
ixation de manière à satisfaire aux tolérances de poids imposées par le
f
type de mur ou cloison.
Placement du PT7031 sur un socle ou trépied
ous pouvez monter votre TV sur un socle ou trépied disponible dans le
V
commerce et placer le PT7031 sous votre TV. Assurez-vous que le
support utilisé est capable de supporter le poids de la TV, du PT7031 et
de tous autres objets que vous posez dessus.
Remarque : Consultez les instructions fournies avec le support choisi
pour déterminer la manière d’y agencer le PT7031 et la TV.
REMARQUE : Le placement de cet appareil sur les meubles en bois
recouverts de certaines finitions, telles que les vernis transparents, est
susceptible de les endommager. Consultez les instructions fournies par
le fabricant du meuble pour déterminer les types d’objets qui peuvent
être placés sur la surface de bois. Altec Lansing ne saurait être
responsable pour tout dommage causé aux surfaces de bois mises en
contact avec cet appareil.
Installation du PT7031
Avertissement : Ne branchez pas le cordon d’alimentation du PT7031
dans une prise de courant avant d’avoir branché d’autres sources audio,
telles que votre TV, lecteur DVD, tuner satellite ou une autre source
audio. Par ailleurs, mettez hors tension toutes les sources audio avant
de les connecter au PT7031.
Le PT7031 est conçu pour connecter les composants externes tels que
lecteur DVD,TV satellite, tuner câble, magnétoscope, console de jeux et
télévision. Le PT 7031 peut se connecter aux matériels dont
proviennent les signaux audio (DVD, magnétoscope, etc.) en utilisant
soit une connexion numérique (coaxiale ou optique), soit une
connexion analogique. Dans les cas où les composants externes
possèdent à la fois des sorties numériques et des sorties analogiques,
par exemple votre lecteur DVD, nous vous recommandons d’utiliser la
sortie numérique pour assurer la meilleure qualité sonore possible, ainsi
qu’une reproduction optimale de l’effet de son surround.
our connecter l’appareil à une source audio numérique :
P
Servez-vous d’un câble coaxial pour connecter la prise COAXIAL IN
•
(DVD) du PT7031 au jack coaxial de sortie côté lecteur DVD.
Utilisez un câble optique pour connecter la prise OPTICAL IN (AUX)
•
du PT7031 à la prise optique de la source audio, par exemple une
console de jeux ou un enregistreur vidéo numérique.
• Utilisez un câble optique pour connecter la prise OPTICAL IN
(TV/SAT) du PT7031 à la prise de sortie optique du tuner satellite ou
du tuner de télévision câblée.
emarque : lors de la connexion d’un lecteur DVD, nous vous
R
recommandons d’utiliser l’entrée coaxiale qui se trouve à l’arrière du
PT7031. Toutefois, si votre lecteur DVD n’a qu’une sortie optique, celleci peut être connectée à l’entrée AUX.
Remarque : si vous connectez le PT7031 aux prises de sortie audio
analogique et de sortie numérique d’une même source, par exemple un
ecteur de DVD, c’est le signal de la sortie audio numérique qui prendra
l
la priorité sur le signal audio analogique. Ceci n’est pas une situation
typique, puisque nous vous recommandons d’utiliser la sortie
numérique. Si l’appareil auquel vous connectez le PT7031 ne possède
pas de sortie numérique, ou si toutes les entrées numériques du PT7031
sont occupées, nous vous recommandons d’utiliser la sortie analogique.
Connexion d’appareils équipés d’une sortie audio
analogique (magnétoscope ou appareil similaire)
Pour connecter le PT7031 à un magnétoscope ou à un appareil audio
analogique similaire, connectez les câbles comme indiqué sur le schéma
ci-dessous.
Connexions audio analogiques
onne
C
xion d’appar
eils équipés d’une s
or
ique
umér
tie n
(lecteur DVD, DVR, etc.)
Le PT7031 peut accepter les signaux numériques à l’entrée utilisant les
câbles optiques ou coaxiaux standard, disponibles dans le commerce.
Exemples de connexions numériques
our connecter un signal audio pr
P
(magnétoscope etc
Utilisez un câble audio stér
•
.) :
enant d’un appar
ov
éo standard pour connecter les prises
eil analogique
AUDIO IN (AUX) du PT7031 aux prises de sortie audio du
magnétoscope ou source audio similaire. Assurez-vous que les câbles
ont connectés corr
s
oites du côté du PT7031 comme de celui de l’appareil s
dr
Utilisez un câble audio stér
•
ectement en vér
éo standard pour connecter les prises
ifiant les connexions g
AUDIO IN (TV/SAT) aux prises sortie audio du tuner TV satellite ou
câble. Si votre tuner TV satellite ou câble possède une sortie
numérique, cette entrée peut servir pour un autre appareil.
• Utilisez un câble audio stéréo standard pour connecter la prise
ortie audio du lecteur DVD. Si vous avez
UDIO IN (D
A
VD) à la pr
utilisé un câble optique ou un câble coaxial n
ise s
umérique pour
connecter votre lecteur DVD, cette entrée peut servir pour un autre
appareil.
16
auches et
ource.
Page 17

onnexion vidéo
T
V
V
IDEO IN
AC IN
INPUT
PT7031
POWERED
SUBWOOFER
C
Pour connecter la sortie vidéo :
• Vous servant du A/V fourni, branchez l’une de ses extrémités codées
en jaune à la prise VIDEO OUT du PT7031 et l’autre extrémité jaune
à l’entrée vidéo de la TV. Cette connexion vous permet de visualiser
l’affichage superposé sur écran sur votre TV lorsque l’entrée
correspondante est choisie.
Connexion d’un subwoofer
réparation de la télécommande
P
Installation des piles
• Appuyez sur le levier, au dos de la télécommande, pour retirer le
couvercle du compartiment des piles.
• Insérez deux piles AAA.
• Remettez le couvercle du compartiment des piles.
Remarques :
• Remplacez toutes les piles si vous remarquez que la distance de
fonctionnement de la télécommande est diminuée, si le voyant
lumineux ne clignote plus, ou si son intensité diminue.
• N’utilisez pas ensemble des piles déjà en partie usées et des piles
neuves.
• N’utilisez pas ensemble de piles de types différents, par exemple des
piles alcalines avec des piles au manganèse. Lisez attentivement
l’emballage des piles, en effet ces piles de types différents peuvent
être de formes et de couleurs similaires.
• Les piles usées peuvent présenter des fuites. Si les piles fuient, jetezles immédiatement. Évitez de toucher ce liquide, ou de le mettre en
contact avec la peau ou les vêtements. Nettoyez soigneusement le
compartiment des piles avant d’y installer de nouvelles piles.
• Ne jetez pas les piles avec les ordures ménagères. Éliminez les piles
conformément à la réglementation locale.
Pour connecter un subwoofer optionnel :
• Utilisez un câble audio mono optionnel du commerce pour connecter
la prise de sortie SUBWOOFER OUT, sur l’arrière du PT7031, à la prise
SUBWOOFER INPUT du subwoofer.
Fonctionnement de base
• Une fois toutes les connexions vidéo assurées, vous pouvez brancher
le cordon d’alimentation CA du PT7031 à une prise de courant
secteur.
• Mettez l’interrupteur marche/arrêt du panneau arrière du PT7031 en
position « marche ». Le PT7031 passe en mode de veille (STANDBY).
yant LED d’alimentation du panneau avant s’allume en rouge,
o
Le v
confirmant que l’appareil est en mode de veille.
Appuyez sur le bouton POWER, sur le panneau avant du PT7031. Le
•
voyant LED d’alimentation passe du rouge au vert, confirmant que
l’appareil est allumé.
• Commencez la lecture sur le lecteur DVD ou sur tout autre appareil
que vous désirez écouter.
• Sélectionnez l’entrée audio adéquate en vous servant du bouton
INPUT du panneau avant ou de la télécommande. Le voyant LED
correspondant s’illumine pour confirmer la sélection de l’entrée.
• Sélectionnez le mode audio adéquat en vous servant du bouton
MODE du panneau avant ou de la télécommande. Pour la plupart des
appareils, vous avez le choix entre le mode stéréo et le mode virtual
surround (son surround simulé).
• Réglez le volume du système à l’aide des boutons VOL +/– sur la
télécommande ou sur le panneau avant.
FRANÇAISFRANÇAIS
17
Page 18

F
MENU DE CONFIGURATION
LANGUE OSD
TYPE TV
TONALITÉ TEST
ÉCRAN VEILLE
ÉGALISATEUR
VAL. DÉFAUT
SORTIE CONFIG
ANGLAIS
FRANÇAIS
ALLEMAND
ESPAGNOL
A
UTO
NTSC
PAL
MENU DE CONFIGURATION
LANGUE OSD
TYPE TV
TONALITÉ TEST
ÉCRAN VEILLE
ÉGALISATEUR
VAL. DÉFAUT
SORTIE CONFIG
MENU DE CONFIGURATION
LANGUE OSD
TYPE TV
TONALITÉ TEST
ÉCRAN VEILLE
ÉGALISATEUR
VAL. DÉFAUT
SORTIE CONFIG
MARCHE
ARRÊT
MENU DE CONFIGURATION
MARCHE
ARRÊT
LANGUE OSD
TYPE TV
TONALITÉ TEST
ÉCRAN VEILLE
ÉGALISATEUR
VAL. DÉFAUT
SORTIE CONFIG
onctionnement avancé
Réglage du niveau des canaux (enceintes)
es niveaux respectifs peuvent être réglés pour l’avant, le centre et
L
l’arrière, ou pour les canaux surround, en utilisant les touches de
réglage du niveau +/- sur la télécommande. Ces niveaux devraient être
réglés pour que tous les canaux soient à un niveau de volume similaire
lorsque l’auditeur est assis, en utilisant la fonction Test Tone, décrite à la
section qui suit, consacrée au menu Setup, le menu de configuration.
Les réglages s’effectuent en :
• Appuyant sur LEVEL (Front [avant] +/–, Center [centre] +/– et Rear
arrière] +/–) pour chacun des canaux. Le niveau des canaux s’affiche
[
sur l’écran de la TV.
• La plage de réglage pour chaque canal va de -10 dB à +10 dB, par pas
de 1 dB. Au départ, le volume est de 00 dB.
Menu Setup
Le menu Setup (configuration) s’affiche sur l’écran de votre TV,
superposé à l’écran. Le menu sur écran ne fonctionne que si une
connexion vidéo a été établie, comme nous l’avons décrit à la section
« Connexion vidéo » de ce manuel. Il vous est possible de modifier la
langue d’affichage de votre PT7031, le type de TV utilisé, le
paramétrage de la tonalité de test, l’écran de veille et l’égalisateur EQ.
Si nécessaire, le menu Setup peut aussi servir à remettre les réglages de
l’appareil dans leur configuration à la sortie d’usine.
e réglage par défaut est NTSC. NTSC est utilisé dans plusieurs pays,
L
parmi lesquels les États-Unis, le Canada et le Japon. PAL est utilisé dans
a plupart des pays d’Europe et d’Asie.
l
AUTO : À sélectionner si la TV qui est connectée à l’appareil est à la fois
ompatible NTSC et PAL. Le format des sorties se fera en conformité
c
avec le signal vidéo du disque DVD.
TSC :Àsélectionner si la TV qui est connectée à l’appareil a le
N
système couleur NTSC. L’effet de ce changement sera de transformer le
ignal vidéo d’un disque PAL pour l’afficher en format NTSC.
s
PAL : À sélectionner si la TV qui est connectée à l’appareil a le système
ouleur PAL. L’effet de ce changement sera de transformer le signal
c
vidéo d’un disque NTSC pour l’afficher en format PAL.
Affichage sur écran
• Pour afficher le menu Setup, appuyez sur la touche OSD (affichage
sur écran) de la télécommande.
• Servez-vous des touches
d’une sélection à l’autre.
• Mettez l’option désirée en surbrillance.
• Appuyez sur la touche OK de la télécommande pour confirmer votre
sélection.
• Pour quitter le menu Setup, appuyez sur la touche OSD ou
sélectionnez EXIT SETUP sur le menu.
Définition de la langue pour l’af
Sélectionnez la langue dans laquelle s’affiche le menu superposé sur
l’écran. Le réglage par défaut du menu sur écran OSD est ENGLISH
(anglais).
3456de la télécommande pour passer
fichage sur écran
Définition de la tonalité de test
Lorsque le réglage de ce paramètre est ON (activé), le système effectue
le test de sortie audio sur les enceintes en utilisant une tonalité
générée par l’appareil de manière interne. Le signal de test est envoyé
tour à tour aux divers canaux. Le réglage par défaut est OFF (désactivé).
écran de veille
e de l’
églag
R
Lorsque ce réglage est ON (activé), le PT7031 passe automatiquement
en mode d’écran de veille si aucun changement n’a été opéré après cinq
minutes. Cette mise de l’écran en état de veille permet de minimiser le
phénomène de marquage, qui peut endommager certaines TV au
plasma. Le réglage par défaut est ON (activé).
Définition du type de
Le système de couleurs choisi pour le système DVD, le lecteur DVD et
la TV devrait être identique. Ce n’est qu’à ce moment qu’il sera possible
de lir
,
TV
VD sur ce système.
e un D
déterminez quel est le système couleur de v
TV
A
ant de modifier le r
v
otr
e
églag
TV.
e du système
18
Page 19

E
MENU DE CONFIGURATION
CLASSIQUE
LANGUE OSD
TYPE TV
T
ONALITÉ TEST
ÉCRAN VEILLE
ÉGALISATEUR
VAL. DÉFAUT
SORTIE CONFIG
MENU DE CONFIGURATION
R.A.Z.
LANGUE OSD
TYPE TV
TONALITÉ TEST
ÉCRAN VEILLE
ÉGALISATEUR
VAL. DÉFAUT
SORTIE CONFIG
1
2
4
3
Q (Égalisateur)
Cette fonction permet de définir les paramètres de l’égalisateur de
réquence.Vous avez le choix entre CLASSIC (musique classique), POP,
f
ROCK ou JAZZ. Le réglage par défaut est CLASSIC.
Réglage par défaut
Si vous sélectionnez RESET, tous les paramètres du menu Setup seront
remis en l’état où ils étaient à la sortie d’usine, comme indiqué
précédemment.
Fonctionnement de la télécommande PT7031
Votre télécommande contrôle votre PT7031 ; vous pouvez aussi la
rogrammer pour lui faire contrôler les autres composants audio et
p
vidéo de votre système qui proviennent d’autres fabricants.
Il est possible de paramétrer des codes permettant le contrôle de
chaque appareil : TV, SAT/CAB,AUDIO, DVD et AUX.
19
TUS
A
T
S
1.
2. TOUCHES
NUMÉRIQUES
AREILS
APP
3.
GRAM
O
4. PR
Indique l’état dans lequel fonctionne la
télécommande apr
Allumé en permanence pour indiquer que la
télécommande est en mode de pr
Permettent d’entrer les codes de télécommande
préprogrammés pour les autres appareils.
P
ermettent de programmer les modes d’autres
eils ou de passer de l’un à l’autr
appar
Permet d’entrer en mode de programmation et de
définir des codes de télécommande pour les autres
appareils.
ès l’appui sur certaines touc
grammation.
o
e.
hes.
FRANÇAISFRANÇAIS
Page 20

Code de contrôle préprogrammés par défaut
La télécommande de votre PT7031 contient les codes par défaut
préprogrammés du tableau ci-dessous. Si l’appareil que vous utilisez ne
figure pas dans la liste, veuillez consulter la liste de la section Codes de
ontrôle préprogrammés des pages suivantes.Vous pouvez aussi utiliser
c
la procédure de recherche décrite à la section Recherche de codes de
ontrôle de télécommande.
c
Appareils Code initial Matériel
TV 082 TV Philips
SAT/CAB 039 Décodeur Philips
AUDIO 900 PT7031 Altec Lansing
AUX 144 Magnétoscope Panasonic
DVD 124 DVD Sony
Programmation des codes de télécommande
Cherchez la marque, le nom de modèle et le numéro de code de vos
composants dans la section Codes de contrôle préprogrammés de ce
manuel, puis procédez comme suit :
• Tout en maintenant l’appui sur la touche PROGRAM, appuyez sur la
touche du type d’appareil que vous désirez programmer, à savoir TV,
DVD, CAB/SAT ou AUX.
• La LED « Status » s’allume.
• Relâchez les deux touches.
• Entrez le NUMÉRO DE CODE de votre appareil en vous servant des
touches numériques de la télécommande. Si le NUMÉRO DE CODE
est correct, la LED clignote deux fois pour indiquer que le code a été
programmé. Si le numéro de code n’est pas correct, la LED clignote
deux fois et s’allume.
• Vérifiez si la télécommande est capable de contrôler l’appareil que
vous venez de programmer en vous servant des touches CH+/– ou
d’une touche similaire pour le contrôler. Si la télécommande ne
contrôle pas l’appareil, recommencez l’opération.
Remarque : si vous désirez quitter le mode Setup, appuyez sur le bouton
de l’appareil (TV, SAT/CAB, DVD, etc.). Si vous n’appuyez sur aucune
autre touche pendant 10 secondes, la télécommande sort
automatiquement du mode SETUP.
En pointant la télécommande du PT7031 vers l’appareil que vous
•
désirez contrôler, appuyez et relâchez, lentement et à plusieurs
reprises, le bouton de mise sous tension POWER. Le PT7031 envoie
un code POWER (alimentation) différent à l’appareil chaque fois que
ous appuyez sur la touche POWER.
v
• Une fois que l’appareil que vous désirez contrôler s’éteint, arrêtez
mmédiatement d’appuyer sur la touche POWER et appuyez une fois
i
encore sur la touche du type d’appareil (TV, SAT/CAB, DVD,AUX,
etc.).
• Le PT7031 devrait maintenant être correctement programmé pour
contrôler votre appareil.
• Vous pouvez vérifier cette programmation en allumant l’appareil et
en donnant une autre commande, telle que PLAY (lecture) ou STOP
(arrêt), pour un lecteur de DVD, ou CHANNEL (canal) +/– pour un
décodeur satellite.
Remarque : bien que, dans cet exemple, c’était la touche POWER qui
était utilisée, vous pouvez utiliser d’autres commandes, telles que la
touche PLAY pour les appareils qui n’ont pas de touche POWER. Dans
ce cas, le PT7031 utilisera la touche PLAY pour faire sa recherche.
Utilisez simplement le bouton PLAY à la place du bouton POWER,
comme décrit ci-dessus, en vous assurant que l’appareil que vous
désirez contrôler est prêt à entrer en mode de lecture et qu’un disque
DVD ou une cassette est chargée, que l’appareil est bien allumé, etc.
Recherche de codes de contrôle de télécommande
ous ne tr
Si v
épr
pr
matériel, la télécommande du PT7031 peut chercher, dans la base de
données qu’elle contient, un code de contrôle approprié. La
télécommande du PT7031 tr
possible,
our f
P
Allumez l’appar
•
(TV, SAT/CAB, DVD, AUX, etc.).
Sur la télécommande du PT7031,
•
touche PROGRAM tout en appuyant sur le bouton du type d’appareil
que vous recherchez (TV, SAT/CAB, DVD, AUX, etc.).
• La LED « STATUS » du PT7031 s’allume et reste allumée.
• Appuyez sur le bouton PROGRAM, puis relâchez-le. La LED clignote
pour indiquer que la télécommande vient de passer en mode de
ec
r
ouvez pas dans la section
ogrammés de ce manuel le numéro de code correspondant à votre
ouv
et ce pour n’importe quelle source audio.
e une recherche de codes, procédez comme suit :
air
eil pour lequel vous r
he.
c
her
Codes de contrôle
era le meilleur code de contr
herchez un code de contrôle
ec
appuyez et maintenez l’appui sur la
ôle
20
Page 21

D
épannage
Symptôme Problème possible Solution
as
P
d’alimentation.
Aucun son ne
rovient du
p
PT7031.
Pas d’affichage
OSD sur écran.
Aucun son ne se
fait entendre lors
de la lecture de
certains DVD.
e PT7031 n’est pas branché sur le secteur ou n’a
L
pas été allumé.
L’interrupteur d’alimentation du panneau arrière
’est pas en position de marche.
n
Un dispositif de sécurité a mis le PT7031 hors
ension.
t
Le réglage du volume est trop faible. Les touches « + » et « – » situées sur la partie supérieure de la
Câble mal connecté ou absent sur le PT7031 ou
l’appareil source.
La fonction MUTE (muet) est activée. Assurez-vous que la fonction MUTE n’est pas activée.
Le câble vidéo est mal attaché ou est manquant. Vérifiez si le câble vidéo est connecté et correctement enfiché dans la
La mauvaise entrée est sélectionnée sur la TV. Sélectionnez l’entrée correcte sur la TV, celle qui correspond à l’endroit où
La piste audio du DVD a été enregistrée à 96 kHz. Sélectionnez 48 kHz sur le menu DVD ou connectez-vous à la sortie
ranchez le cordon d’alimentation CA du PT7031 dans une prise de courant
B
alternatif appropriée. Puis, allumez le PT7031 en appuyant sur l’interrupteur
MARCHE/ARRÊT à l’arrière de l’appareil.
Mettez-le en position « marche ».
Débranchez le cordon d’alimentation du PT7031 de la prise de courant et
ebranchez-le une nouvelle fois pour que l’appareil se réinitialise.
r
élécommande du PT7031 commandent le volume général. Maintenez la
t
touche « + » enfoncée pour augmenter le niveau du volume.
Vérifiez si les câbles sont correctement et fermement enfoncés côté
PT7031 et côté appareil source.
sortie VIDEO OUTPUT du PT7031 et dans l’entrée vidéo de la TV.
le câble VIDEO OUT venant du PT7031 est connecté.
analogique du lecteur de DVD, puis utilisez-la.
Caractéristiques techniques
Tension d’alimentation nominale 120 VCA/60 Hz
Consommation de courant 25W
Rapport signal/bruit (pondéré A) > 75 dB
3
Dimensions (L x P x H) 1016 mm x 170 mm x 152 mm (40 x 6
Poids 8,2 kg. (18,1 livres)
Puissance de sortie 75 Watts (3 x 25) tension moyenne continue
Amplificateurs Trois pilotes numériques NXT Flat Panel 2 x 8 po (50 x 200 mm)
Entrées numériques Trois optiques/une coaxiale
ées analog
Entr
Sortie vidéo Composite x 1
éponse en fréquence
R
iques
téréo x 3
S
70 Hz à -20 kHz (+/- 3 dB)
⁄4 x 6 po.)
FRANÇAIS
Les spécifications sont susceptibles d’être modifiées sans préavis.
Marque déposée de New Transducers Limited.
21
Page 22

22
Page 23

L
a figura de relámpago que termina en punta de flecha
y
se encuentra dentro de un triángulo equilátero, tiene
por finalidad alertar al usuario de la presencia de
“
voltaje peligroso” sin aislamiento en el interior del
p
roducto que podría tener potencia suficiente para
constituir riesgo de choque eléctrico para las personas.
P
recaución: Para evitar el riesgo de choque eléctrico, no
retire la cubierta (o parte posterior). En su interior hay
p
iezas que no debe manipular el usuario. El servicio
debe realizarlo personal de servicio calificado.
E
l signo de exclamación que se encuentra dentro de
un triángulo equilátero tiene por finalidad alertar al
u
suario de la presencia de importantes instrucciones
de operación y mantenimiento (servicio) en la
l
iteratura que viene incluida con el artefacto.
PRECAUCIÓN
P
ara evitar choques eléctricos no utilice este enchufe (polarizado) con una extensión, receptáculo u
o
tra toma de corriente a menos que se pueda insertar completamente las cuchillas para evitar que
estas queden expuestas.
ADVERTENCIA
Para reducir el riesgo de incendio o choque eléctrico, no exponga el artefacto a la lluvia o humedad.
INSTRUCCIONES IMPORTANTES DE SEGURIDAD
1. Lea estas instrucciones.
2. Guarde estas instrucciones.
3. Preste atención a todas las advertencias.
4. Siga todas las instrucciones.
5. No use este aparato cerca del agua — El aparato no debe estar expuesto a goteo o
salpicaduras, y no se deben colocar encima objetos llenos de agua, como jarrones.
6. Limpie únicamente con un paño seco.
7. No bloquee ninguna abertura de ventilación. Efectúe la instalación según las instrucciones del
fabricante. No coloque el aparato sobre una cama, sofá, alfombra o superficie similar que
pueda bloquear las aberturas de ventilación. El aparato no se debe colocar en una instalación
empotrada, como un estante o armario cerrado que pueda impedir el flujo de aire a través de
las aberturas de ventilación. N
como periódico, manteles, cortinas, etc.
8
. No instale el aparato cerca de fuentes de calor como radiadores, termorregistradores, hornos u
o
tros aparatos (incluyendo amplificadores) que produzcan calor.
9.Las fuentes de llama descubierta, como velas encendidas, n
10. No anule el propósito de seguridad del enchufe tipo conector a tierra o polarizado. Un enchufe
polarizado tiene dos puntas, una más ancha que la otra. Un enchufe de tipo conexión a tierra
tiene dos cuchillas y una ter
cuchilla se proporciona para su seguridad. Si el enchufe proporcionado no encaja en su
tomacorriente, consulte con un electricista para reemplazar el tomacorriente obsoleto.
11. Proteja el cordón de alimentación para que no lo pisen o prensen — especialmente en los
puntos de enchufes, receptáculos, y el lugar donde salen del aparato.
12. No lo instale en un área que impida el acceso al enchufe de alimentación. El único medio de
impedir completamente el ingreso de suministr
enchufe de alimentación que debe estar accesible en todo momento.
13. Fuente de alimentación — Use únicamente fuentes de alimentación del tipo especificado en
14. Desenchufe el aparato durante las tormentas eléctricas o cuando permanezca sin uso por
15.
16. Para los productos que usan baterías, refiérase a las normas locales para disponer de ellas de
17. Use solamente dispositivos/accesorios especificados por el fabricante.
18. Use solamente con el carro, plataforma, trípode, soporte o mesa especificados por el
ciones de oper
las instruc
alimentación separada con este aparato no la sustituya con ninguna otra fuente de
alimentación — use únicamente fuentes de alimentación suministradas por el fabricante.
largos periodos de tiempo.
ealizar el servicio técnico acuda al per
a r
ar
P
efectúe el servicio técnico cuando el aparato se haya dañado de alguna forma, como por
ejemplo, cuando el cordón o enchufe de alimentación esté dañado o cuando se haya
derramado líquido o se hayan caído objetos dentro del aparato, o que el mismo haya estado
expuesto a la lluvia o h
el servicio técnico, envíe el artefacto al personal de servicio calificado, devuélvalo al
ibuidor o llame a la línea de servicio de Altec Lansing para solicitar ayuda.
distr
manera adecuada.
fabricante o que se vendan con el aparato. Cuando use un carro, tenga precaución al
mover la combinación carro/aparato para evitar lesionarse si el sistema se da vuelta.
o impida la v
a cuc
cer
ación o como se indique en el artefacto. Si se incluye una fuente de
umedad, no funcione normalmente o se haya dejado caer. Para efectuar
entilación cubri
hilla que se conecta a tierr
o eléctr
sonal de servicio calificado. Es necesario que se
endo las aberturas con artículos
o se deben colocar s
hilla ancha o tercera
a. La cuc
ico al producto es desconectar el
obre el aparato.
Altec Lansing. Garantía limitada de un año
(Garantía limitada de dos años en la Unión Europea y Asia)
¿
Qué cubre la garantía?:Altec Lansing garantiza que sus productos no tendrán defectos de material
o de mano de obra, con las excepciones que se indican a continuación. ¿Cuál es el periodo de
c
obertura? Para las unidades adquiridas en la Unión Europea o Asia, la garantía es de dos años,
c
ontados a partir de la fecha de compra. Para las unidades no adquiridas en la Unión Europea o Asia,
la garantía es de un año, contado a partir de la fecha de compra. El término de cualquiera de las
garantías de acuerdo a ley deberá expirar al vencimiento de la garantía limitada. Algunos estados y/o
E
stados Miembros de la Unión Europea no permiten limitaciones en el periodo de vigencia de la
garantía, por lo tanto, las limitaciones antes mencionadas pueden no aplicarse a su caso.
¿Qué es lo que no cubre la garantía? La presente garantía no cubre cualquier defecto, mal
f
uncionamiento o falla que resulte de: instalación inadecuada, mal uso o incumplimiento de las
instrucciones del producto; abuso o uso con equipo inadecuado, no correspondiente o defectuoso. (Para
obtener información sobre la instalación, operación y uso adecuado consulte el manual proporcionado
c
on el producto. Si necesita un manual de reemplazo, puede descargar un manual visitando
www.alteclansing.com). Asimismo, los daños incidentales e indirectos no son recuperables de acuerdo
con esta garantía.Algunos estados no permiten exclusiones o limitaciones por daños incidentales o
e
i
ctos, por lo tanto, dicha limitación o exclusión es posible que no sea aplicable a su caso.
ndir
¿
Qué hará Altec Lansing para corregir el problema? Altec Lansing, de acuerdo a su criterio, reparará
o reemplazará cualquier producto que presente defectos en el material o en la mano de obra. Si su
pro
ducto yano se f
reemplazarlo con otro producto similar o mejor de Altec Lansing.
Cómo obtener servicio de garantía: Para obtener el reemplazo o reparación de un producto
e
n garantía, debe ponerse en contacto con Altec Lansing durante el periodo de garantía vía correo
e
ónico a (csupport@alt
lectr
dirección, dirección de correo electrónico, número de teléfono, fecha de compra y una descripción
completa del pro
L
ansing llamando al teléf
i
nformación. Si el problema aparenta ser un defecto en el material o mano de obra, Altec Lansing le
oporcionará una autorización de devolución y las instrucciones para el envío de la misma. Los
pr
envíos de devolución deberán ser pagados por el cliente, y el envío deberá incluir el comprobante de
compra original. Deberá asegurar el envío en forma adecuada puesto que usted es el responsable del
producto hasta que éste llegue a Altec Lansing.
¿Cómo afectará la legislación estatal sus derechos? Esta g
específicos, y además puede contar con otros derechos que pueden variar de estado a estado.Tome
nota que en la Unión Europea, en su calidad de consumidor, podría tener otros derechos de ley de
acuerdo a la legislación nacional de los Estados Miembros de la Unión Europea que rigen la venta de
cader
mer
Las garantías y recursos limitados antes mencionados constituyen las garantías y recursos exclusivos
disponibles par
ibles bajo la le
exig
blema exper
Altec Lansing. Es
ía de
a el compr
abri
y aplicable.
o está agotado, de acuerdo a su criterio, Altec Lansing puede
ca más,
.com). E
eclansing
imentado. En los Estados Unidos, también puede comunicarse con Altec
ono 1-800-ALT
os der
ador, siempre y cuando, y en la medida en que tengan validez y sean
n su correo electrónico debe colocar su nombre,
EC88 — por favor esté listo para proporcionar la misma
arantía le brinda derechos legales
hos no se verán afectados por la presente garantía.
ec
Servicio al cliente
En la Guía de solución de problemas encontrará respuestas a la mayoría de las preguntas
sobre configuración y rendimiento. De igual manera, puede consultar la sección de las FAQ
(Preguntas y respuestas frecuentes) de nuestro sitio Web en
América del Norte y todavía no puede encontrar la información que necesita, comuníquese con
nuestro equipo de servicio al cliente para que le proporcione ayuda antes de devolver los parlantes a
su distribuidor en virtud de la política de devolución.
Teléfono: 800-258-3288
Correo electrónico: csupport@alteclansing.com
Si no vive en América del Norte, por favor visite nuestro sitio Web en
selecciones su región para ubicar al distribuidor de su país.
y
Para obtener la información más actualizada, asegúrese de visitar nuestro sitio Web en
www.alteclansing.com.
ibución internacional
Distr
Clientes internacionales: Para obtener información sobre la distribución de los productos Altec
Lansing en su país,
visite
www
teclansing.com
.al
y hag
www.alteclansing.com. Si vive en
www.alteclansing.com
a clic en su r
egión.
Cómo disponer de equipo eléctrico y electrónico antiguo
Este símbolo en el pr
como un desecho doméstico. Por el contrario, debe entregarse en el punto de recolección
apropiado para el reciclado de equipo eléctrico y electrónico.Al asegurar que este
producto se deseche correctamente, ayudará a prevenir consecuencias potencialmente
as par
ativ
neg
el manejo incorrecto en la disposición apropiada de este producto. El reciclado de materiales ayudará
a conservar los recursos naturales. Para obtener información más detallada sobre el reciclado de este
producto, póngase en contacto con su oficina local de la ciudad o servicio de desecho doméstico de
desperdicios.
oducto o en su empaque indica que este pr
a el medio ambiente y la salud h
umana que de otra manera pudiera causar
oducto no debe tr
23
atar
se
ESPAÑOL
Page 24

Sistema de Sonido Envolvente PT7031
1
2
3
4
5
1
2
3
4
5
6
Gracias por comprar el Sistema de Sonido Envolvente PT7031 de Altec
Lansing.
El PT7031 está diseñado para reemplazar el receptor A/V tradicional y
parlantes separados y suministrar sonido envolvente completo de
canales múltiples desde un componente único usando procesamiento
e Parlante Virtual de DTS, Dolby Digital y Dolby. La tecnología de
d
amplificador de panel plano NXT Digital del sistema PT7031 reproduce
de manera exacta el rango de frecuencia completa y suministra todas
las sutilezas y la profundidad espacial que poseen los formatos digitales
e hoy en día.
d
El diseño PT7031 se adapta bien al uso con las presentaciones de
pantallas planas de plasma y LCD de formato grande actuales y se
puede adosar a la pared con estas mismas pantallas usando el soporte
uministrado. Se incluye un control remoto universal el cual le permite
s
consolidar los controles remotos de varios dispositivos tales como TV,
reproductor de DVD y VCR.
Contenido
Refiérase a la Tarjeta Quick Connect de PT7031 para identificar estos
artículos.
• PT7031
• Control remoto y baterías
• Cable A/V
• Soporte para adosar a la pared (hardware no incluido)
• Guía de usuario e instrucciones de conexión rápida.
Controles y conexiones para su PT7031
LED
Entrada
ontal
ola el nivel de v
ontr
C
de audio
.
olumen de todos los canales
Presenta información sobre el estado de las
aciones.
oper
Presione para cambiar entre fuentes de entrada
(D
VD,TV/SAT, AUX, DVD digital, TV/SAT digital o
AUX digital).
Presione para seleccionar el modo estéreo o
tual.
vir
Presione para encender el sistema o pasar al modo
en espera (standby).
Panel fr
1.Volume +/–
2. Los indicadores
3.
4. Modo
5. Encendido
Panel posterior
1. ENCENDIDO/APAGADO Enciende o apaga el sistema.
Conecte al tomacorriente de CA
2. CORDÓN DE
ALIMENTACIÓN DE CA
3. SAL DE VIDEO
4. SAL DE PARLANTE
SECUNDARIO PARA GRAVES
5. ENTRADA DIGITAL:
COAXIAL (ENTRADA DVD)
ÓPTICA (ENTRADA TV/SAT)
ÓPTICA (ENTRADA TV/SAT)
6. ENTRADA ANALÓGICA
DE AUDIO: EN DVD
ENTRADA TV/SAT
ENTRADA AUX
estándar. Consulte el rango de
frecuencia y voltaje para la fuente
de alimentación que aparece en el
panel posterior.
Se utiliza para mostrar información de
presentación en pantalla. Conecte a la
entrada de video compuesto del TV.
Utilice para conectar un parlante
secundario para graves opcional si
se necesita que el sistema brinde
graves adicionales.
Utilice para conectar el reproductor
de DVD que tiene una salida digital
coaxial.
Utilice para conectar un sintonizador
digital satelital o sintonizador de TV
cable que tiene una salida de audio
óptica.
Utilice para conectar a una fuente
de sonido auxiliar como una PVR o
segundo sintonizador de TV que
tiene una salida de audio óptica.
También se puede usar para conectar
a un reproductor de DVD que tenga
una salida óptica pero no una salida
coaxial.
Utilice para conectar a un reproductor
de DVD con una salida analógica.
Utilice para conectar a un
sintonizador satelital o de TV con
una salida de audio analógica.
Utilice para conectar a una fuente de
sonido auxiliar como un reproductor
de VCR o CD con salida de audio
analógica.
24
Page 25

C
1
2
3
4
5
6
7
8
9
10
(50 mm)
2 inches
PT7031
ontrol remoto
La presente sección describe la función de cada control en el control
emoto usado para controlar el PT7031.
r
ota: También puede controlar los demás componentes usando el
N
control remoto una vez que haya establecido los códigos de control
remoto adecuados. “Ver la sección de códigos del control remoto del
ispositivo de Programación de este manual.”
d
Instalación del PT7031
Esta sección le brinda las indicaciones para ubicar e instalar su nuevo
T7031.
P
El PT7031 crea una experiencia de sonido envolvente realista desde una
unidad única usando la tecnología de Parlante Virtual de Dolby. Si bien
la colocación es menos difícil que la de otros sistemas similares, en lo
osible, se deben seguir las siguientes indicaciones generales para
p
asegurar la mejor calidad de sonido:
• Evite ubicar el sistema en donde los muebles u otros artículos
pudieran obstruir el área de la rejilla.
• Coloque en el centro el PT7031 debajo del TV de modo que parezca
que el diálogo proviene de allí.
• Ubique su PT7031 y el TV en el centro de la pared.
La posición de escucha no debe ser menor a seis pies (dos metros)
•
desde el PT7031.
• Evite ubicar el PT7031 sobre o cerca de superficies que puedan vibrar.
Ubicación del PT7031
El PT7031 se puede ubicar en una superficie de nivel apropiado o adosarse
ed usando el soporte para montar en la pared suministrado.
a la par
Notas de seguridad:
1. POWER
2.VOL +/–
3456
3.
and OK
Utilice para cambiar entre los modos de
encendido y en espera (Standby).
Aumenta o disminuye el nivel de volumen
general de la unidad.
Muev
a para destacar los ítemes en el menú de
instalación de presentación en pantalla (OSD).
Presione OK para confirmar.
Configura el control remoto para controlar el
4. AUDIO
PT7031 en contraposición a los dispositivos DVD,
TV, SAT/CAB o AUX.
ital).
5. INPUT
Presione para moverse a través de las entradas –
DVD,TV/SAT, AUX, DVD digital,TV/SAT digital y
UX dig
A
6. MUTE Presione para apagar o restaurar el sonido.
7. FRONT, CENTER,
REAR +/– LEVELS
8. BASS Mejora la frecuencia baja o salida de graves.
MODE
9.
Aumenta o disminuye el nivel de volumen de los
canales individuales para el sistema.
Utilice par
del sistema dependiendo de los modos de s
cionar el modo estér
a selec
disponibles de su fuente de audio.
Presione para entrar o salir del menú de
10.
OSD
instalación de presentación en pantalla (OSD).
eo o vir
tual
onido
• Asegúrese de dejar espacio de ventilación adecuado –mínimo 2
pulgadas (50mm) sobre el PT7031.
• No recomendamos instalar esta unidad directamente sobre el piso.
• El PT7031 pesa aproximadamente (18.1 lb.) (8,2 Kg.). Asegúrelo para
que no se caiga, además de encontrarse fuera del alcance de los niños.
• No instale esta unidad directamente sobre un TV de tubo de rayos
catódicos (CRT) ya que los campos magnético dispersos pueden
distorsionar la imagen del TV.
Montaje en la pared
Si está montando el PT7031 en la pared, siga los siguientes pasos:
1. Determine la ubicación conveniente en la pared para montar el
parlante inalámbrico dentro del alcance del cordón de CA de la unidad.
2. Ubique y nivele el soporte de montaje de metal suministrado en la
ubicación deseada en la pared.
3. Sea cuidadoso y evite cualquier artículo (cables, tubos, etc.)
escondidos dentro de la pared y asegure el soporte de montaje de
metal usando los sujetador
seguro de qué tipo de sujetador usar o no es capaz de determinar si
hay artículos dentro de la pared que se pueden dañar, consulte a un
contratista licenciado.
4. Coloque el parlante en el soporte de montaje, alineando los dos
iores ubicados en la parte posterior del parlante con los
er
os inf
agujer
postes sobre los sujetadores de montaje.Verifique y asegúrese de que
el soporte de montaje en la pared y el parlante se encuentren
firmemente asegurados en el lugar correspondiente.
25
es apropiados para la aplicación. Si no está
ESPAÑOL
Page 26

recaución: Solo personal calificado, debe instalar los soportes de
SATELLITE
OR
CABLE TV
TUNER
OPTICAL
DVD
PT7031
GAME
CONSOLE
OPTICAL
SATELLITE
OR
CABLE TV
T
UNER
OPTICAL
VCR
AUDIO OUT
L
R
DVD
PT7031
P
montaje en la pared. La base de montaje se puede instalar en diferentes
tipos de paredes. Una vez instalada, la base de montaje debe soportar
por lo menos 100 lb. El instalador debe asegurar que la superficie de
nstalación soporte el requerimiento de 100 libras de peso. El instalador
i
calificado también debe determinar y usar el hardware adecuado para
btener los requerimientos de peso para la pared.
o
Ubicación del PT7031 sobre un pedestal
Puede montar su TV en un pedestal disponible a nivel comercial y
olocar el PT7031 debajo del TV. Asegúrese de que el pedestal a ser
c
usado pueda soportar el peso del TV, el PT7031 y cualquier otro artículo
que deba sostener.
Nota: Revise las instrucciones que vienen con el pedestal para obtener
los detalles de cómo instalar el pedestal y el PT7031, además del TV en
el pedestal.
NOTA: La colocación de este producto en superficies de madera con
determinados tipos de acabados, tales como barniz claro, puede dañar
el acabado. Revise las instrucciones de cuidado del fabricante del
mueble para saber qué tipos de objetos se pueden colocar de manera
segura en la superficie de madera. Altec Lansing no se responsabiliza por
los daños ocasionados a las superficies de madera originados por
contacto con este producto.
Instalación del PT7031
Advertencia: No introduzca el enchufe de alimentación del PT7031 en
un tomacorriente de pared hasta que conecte otros dispositivos tales
como su TV, reproductor DVD, sintonizador satelital o fuente de audio
alterna. Asimismo, apague las fuentes de audio antes de conectarlas al
PT7031.
El PT7031 se ha diseñado para conectarse a componentes externos
tales como su reproductor de DVD, sintonizador satelital de TV,
sintonizador de TV por cable,VCR, consola de juegos y TV. El PT 7031 se
puede conectar al equipo de fuente (DVD,VCR, etc.) usando tanto una
conexión digital (coaxial u óptica) o analógica. Cuando hay salidas
digitales y analógicas como las de un reproductor de DVD,
recomendamos usar la salida digital para asegurar la mejor calidad de
sonido y una reproducción de sonido envolvente óptima.
ara conectar una fuente de audio digital:
P
Use un cable coaxial para conectar la clavija de EN COAXIAL (DVD)
•
en el PT7031 a la clavija de salida coaxial en el reproductor de DVD.
Use un cable óptico para conectar la clavija EN ÓPTICA (AUX) en el
•
PT7031 a la clavija de salida óptica en una fuente de audio digital
como una consola de juego o grabador de video digital.
• Use un cable óptico para conectar la clavija OPTICAL IN (TV/SAT) del
PT7031 a la clavija de salida óptica del sintonizador satelital o
sintonizador de TV por cable.
ota: Para conectar el reproductor de DVD recomendamos usar la
N
entrada coaxial que se encuentra en la parte posterior del PT7031. Sin
embargo, si su reproductor de DVD solo tiene salida óptica se puede
conectar a la entrada AUX.
Nota: Si conecta el PT7031 a las clavijas de audio digital y de audio
analógico del mismo equipo de fuente, como un reproductor de DVD, la
alida de audio digital tendrá prioridad sobre la señal de audio
s
analógica. Como no es un caso común, recomendamos usar la salida
digital. Si el dispositivo que está conectando no tiene una salida digital
o si todas las entradas digitales del PT7031 se están usando,
recomendamos usar la salida analógica.
Conexión de los dispositivos equipados con una salida
de audio analógica (VCR o dispositivo similar)
Para conectar el PT7031 a un VCR o dispositivo de audio analógico,
conecte los cables según se muestra en el diagrama que aparece a
continuación.
Conexiones de audio analógicas
Conexión de dispositivos equipados con una salida de
audio digital (reproductor de DVD, DVR, etc.)
El PT7031 puede aceptar señales digitales usando cables coaxiales y
ópticos estándares disponibles comercialmente.
Conexiones digitales comunes
a conectar el audio desde un dispositiv
ar
P
Use un cable de audio estér
•
UDIO) (AUX) en el PT7031 a las clavijas de salida de
UDIO IN (EN
A
A
eo estándar para conectar las cla
o de audio analó
audio en el VCR o fuente de audio similar. Asegúrese de que los cables
están conectados correctamente respetando las conexiones derecha e
izquierda tanto en el PT7031 como en el dispositiv
Use un cable estér
•
UDIO IN (EN
A
eo estándar de audio para conectar las cla
AUDIO) (TV/SAT) a las clavijas de salida de audio en
o de fuente.
el sintonizador satelital de TV o TV por cable. Si su sintonizador de
TV satelital o TV por cable tiene una salida digital, esta salida se
puede usar para otro dispositivo.
• Use un cable estéreo estándar de audio para conectar la clavija
UDIO) (D
UDIO IN (EN
A
eproductor DVD. Si ha conectado su reproductor de DVD usando un
r
A
VD) a la clavija de salida de audio en el
cable óptico o coaxial, puede usar esta entrada para otro dispositivo.
26
gico (VCR, etc.):
vijas
vijas
Page 27

onexión de vídeo
T
V
V
IDEO IN
AC IN
INPUT
PT7031
POWERED
SUBWOOFER
C
Para conectar la salida de video:
• Usando el cable A/V suministrado, conecte uno de los extremos
amarillos al VIDEO OUT (SAL VIDEO) en el PT7031 y el otro extremo
amarillo a la clavija de entrada de video en el TV. Esta conexión le
permite ver la presentación en pantalla (OSD) en su pantalla de TV
cuando se selecciona la entrada correspondiente.
Conexión de un parlante secundario para graves
nstalación del control remoto
I
Instalación de las baterías
• Oprima el seguro ubicado en la parte posterior según se muestra en
la figura para retirar la cubierta de la batería.
• Introduzca dos baterías AAA.
• Cierre la cubierta de la batería.
Notas:
• Cambie todas las baterías si se da cuenta que el rango de operación
del control remoto disminuye o el indicador no oscila o la luz que
sale del mismo se debilita.
• No use baterías usadas con nuevas.
• No use diferentes tipos de baterías tales como alcalina y baterías de
manganeso juntas. Lea el empaque cuidadosamente puesto que, es
posible que, estos tipos de baterías diferentes tengan el mismo
tamaño y color.
• Las baterías gastadas pueden tener fugas. Si las baterías han sufrido
fugas, deséchelas inmediatamente. Evite tocar el material de fuga o
que haga contacto con la piel o ropa. Limpie el compartimiento de la
batería meticulosamente antes de instalar nuevas baterías.
• No tire las baterías junto con los deshechos domésticos. Deséchelas
correctamente de acuerdo a las regulaciones locales.
Para conectar un parlante secundario para graves opcional:
• Utilice un cable opcional de audio mono disponible comercialmente
para conectar la clavija SUBWOOFER OUT (SALIDA DE PARLANTE
SECUNDARIO PARA GRAVES) ubicada en la parte posterior del
PT7031 a la clavija SUBWOOFER INPUT (ENTRADA DE PARLANTE
SECUNDARIO PARA GRAVES) en el parlante secundario para graves.
Operación básica
• Después de asegurar todas las conexiones de audio y video; puede
enchufar el cordón de CA del PT7031 a una salida de CA conveniente.
• Encienda el interruptor de encendido ubicado en la parte posterior
del PT7031 a la posición on (encendido) El PT7031 ingresará al modo
STANDBY (EN ESPERA). El indicador LED del panel frontal se pondrá
rojo lo que indica que la unidad se encuentra en el modo standby
espera).
(en
• Presione el botón POWER (ENCENDIDO) en la parte frontal para
encender el PT7031.
indicando que la unidad está encendida.
• Encienda el reproductor de DVD u otro dispositivo que desee
escuchar.
• Seleccione la entrada deseada usando el botón INPUT (ENTRADA) en
el panel frontal o control remoto. El indicador LED correspondiente se
iluminará indicando que se ha seleccionado la entrada.
• Seleccione el modo de audio deseado usando el botón MODE (MODO)
en el panel frontal o control remoto. En la mayoría de los dispositivos
puede escoger entre los modos envolventes virtual y estéreo.
• Ajuste el volumen del sistema usando los botones VOL +/– en el
control remoto o panel frontal.
El indicador LED cambiará de rojo a verde
ESPAÑOL
27
Page 28

Operación avanzada
MENÚ INSTALACIÓN
IDIOMA OSD
TIPO TV
INGLÉS
FRANCÉS
ALEMÁN
ESPAÑOL
TONO PRUEBA
PROTEC PANTALLA
ECUALIZACIÓN
POR DEFECTO
SALIR INSTALAC
MENÚ INSTALACIÓN
TIPO TV
AUTO
NTSC
PAL
IDIOMA OSD
TONO PRUEBA
PROTEC PANTALLA
ECUALIZACIÓN
POR DEFECTO
SALIR INSTALAC
MENÚ INSTALACIÓN
IDIOMA OSD
TIPO TV
TONO PRUEBA
PROTEC PANTALLA
ECUALIZACIÓN
POR DEFECTO
ENCENDIDO
APAGADO
SALIR INSTAL AC
MENÚ INSTALACIÓN
IDIOMA OSD
TIPO TV
ENCENDIDO
APAGADO
TONO PRUEBA
PROTEC PANTALLA
ECUALIZACIÓN
POR DEFECTO
SALIR INSTALAC
C
onfiguración de niveles de los canales (Parlante)
e pueden ajustar niveles individuales para los canales envolventes
S
frontales, centrales y posteriores usando los botones de niveles +/– en
l control remoto. Estos niveles se deben ajustar de modo que todos los
e
canales tengan un volumen similar para cuando el oyente esté sentado
usando la función Test Tone (Tono de prueba) según se describe en la
y
sección Instalación del Menú siguiente.
Los ajustes se hacen al:
• Presione LEVEL (NIVEL) (Frontal +/–, Centro +/– y posterior +/–) para
cada canal que se va a establecer. El nivel de cada canal debe
aparecer en la pantalla de TV.
• El rango de cada nivel es -10 dB a +10 dB, en 1 dB pasos. El volumen
inicial es 00 dB.
Menú de instalación
El menú de instalación se presenta en la pantalla de su TV usando el
OSD. El OSD solo funcionará si se ha establecido una conexión de video
de acuerdo a lo descrito en la sección “conexión de video” de este
manual. Usted puede personalizar su PT7031 para el idioma, ajuste de
tono de prueba, protector de pantalla y EQ. El menú de instalación
también se puede usar para restaurar la unidad a los parámetros de
fábrica de ser necesario.
Presentación en pantalla
• Presione el botón OSD en el control remoto para presentar el menú
de instalación.
• Use los botones
través de las selecciones.
• Ilumine la opción deseada.
• Presione el botón OK en el control remoto para confirmar su
selección.
• Para salir del menú de instalación, presione el botón OSD o
seleccione EXIT SETUP (INSTALACIÓN DE SALIDA) desde el menú.
3456 en el control remoto para moverse a
AUTO: Seleccione éste si la TV conectada es compatible tanto con el
NTSC como con el PAL. El formato de salida está de acuerdo con la
señal de video en el disco DVD.
NTSC: Seleccione este sistema si el TV conectado cuenta con el sistema
de color NTSC. Esto cambiará la señal de video de un disco PAL y lo
cambiará a formato NTSC.
PAL : Seleccione este sistema si el TV conectado cuenta con el sistema
de color PAL. Esto cambiará la señal de video de un disco PAL y la salida
será en formato PAL.
Configuración de Test Tone (Tono de prueba)
Cuando se configura en la posición ON (ENCENDIDO), el sistema
probará la salida del parlante usando un tono de prueba generado
internamente. La señal de prueba sale secuencialmente a través de
varios canales. La configuración por defecto es OFF (APAGADO).
onfigur
C
Seleccione el lenguaje para la presentación en pantalla. La configuración
por defecto para el OSD es INGLÉS.
onfigur
C
El sistema de color del sistema DVD, DVD y TV debe coincidir. Solo,
entonces,
cambiar el sistema de
La configur
incluyendo los Estados Unidos, Canadá y El PAL se usa en la mayoría de
los países europeos y asiáticos.
ación del idioma OSD
ación del tipo de
á posible r
ser
ación por defecto es NTSC. El NTSC se usa en varios países
eproducir un DVD en este sistema. Antes de
TV, determine el sistema de color de su TV.
TV
Configuración del protector de pantalla
Cuando se configure en ON (ENCENDIDO) el PT7031 automáticamente
ingresa al modo protector de pantalla si es que no se realiza ningún
cambio después de cinco minutos. Esta función es útil para evitar que
se queme la imagen que puede dañar algunos TV de plasma. La
configuración por defecto es ON (ENCENDIDO).
28
Page 29

E
MENÚ INSTALACIÓN
IDIOMA OSD
T
IPO TV
T
ONO PRUEBA
PROTEC PANTALLA
ECUALIZACIÓN
POR DEFECTO
SALIR INSTALAC
CLÁSICO
POP
R
OCK
J
AZZ
MENÚ INSTALACIÓN
IDIOMA OSD
TIPO TV
TONO PRUEBA
PROTEC PANTALLA
ECUALIZACIÓN
POR DEFECTO
SALIR INSTALAC
REINICIAR
1
2
4
3
Q (Ecualizador)
Use esta función para seleccionar las configuraciones de ecualizador.
lija entre; CLASSIC (CLÁSICO), POP, ROCK o JAZZ. La configuración por
E
defecto es CLASSIC (CLÁSICO).
Configuración por defecto
Si se selecciona RESET (RESTAURAR), todos los ítemes del menú de
instalación restaurarán a las configuraciones de fábrica según se indicó
anteriormente.
Funcionamiento del control remoto del PT7031
Además de controlar su PT7031, usted puede programar el control
emoto para operar los componentes de audio/video de otros
r
fabricantes.
Se pueden instalar los códigos para cada dispositivo que se va a
controlar: TV, SAT/CAB, AUDIO, DVD y AUX.
1. STATUS
2. BOTONES
3. BOTONES DE
4.
29
NUMÉRICOS
OSITIVOS
DISP
PROGRAMA
Indica la operación del control remoto cuando se
presionan botones específicos. Se ilumina
continuamente para indicar que el control remoto
se encuentra en modo programa.
Utilice para ingresar códigos del control remoto
preprogramados para otros dispositivos.
Utilice para programar o cambiar los modos del
ol remoto para operar otros dispositivos.
contr
Utilice para ingresar al modo programa al
pr
ogramar los códigos del control remoto para
otros dispositivos.
ESPAÑOL
Page 30

Códigos de control remoto preprogramados por defecto
El control remoto de su PT7031 se configura previamente con
los códigos por defecto enumerados en el cuadro que aparece a
continuación. Si su componente no se encuentra en la lista, revise la
ista en la sección de códigos preprogramados del control remoto.
l
También puede usar el procedimiento de búsqueda en la sección
úsqueda para códigos de control remoto de este manual.
B
Botón remoto Código inicial Equipo
TV 082 TV Philips
AT/CAB 039 Caja de cable Philips
S
UDIO 900 PT7031 de Altec Lansing
A
AUX 144 VCR Panasonic
DVD 124 DVD Sony
Programación de los códigos del control remoto
de los dispositivos
Encuentre la marca, modelo y número de código de sus componentes
en la sección de Códigos del control remoto preprogramados de este
manual, luego siga los siguientes pasos:
• Manteniendo presionado el botón PROGRAM (PROGRAMA), presione
el botón para el dispositivo que se va a programar por Ej., TV o DVD o
CAB/SAT o AUX.
• El indicador LED se ilumina.
• Suelte ambos botones.
• Ingrese el NÚMERO DE CÓDIGO usando los botones numéricos en
el control remoto. Si el NÚMERO DE CÓDIGO es válido el indicador
LED destellará dos veces y, luego se apagará indicando que se ha
programado el código. Si el número del código no es válido el
indicador LED destellará dos veces y se ilumina;
• Verifique si el control remoto puede controlar el dispositivo que se
programó usando el botón similar CH+/– o similar para controlar el
dispositivo que se programó. Si no controla el dispositivo, repita este
procedimiento.
Nota: Si desea mantener el modo de configuración, presione el botón
del dispositivo (TV, SAT/CAB, DVD, etc.). Si no presiona ningún botón
en 10 segundos, saldrá automáticamente del SETUP MODE (MODO
CIÓN).
A
AL
T
INS
Presione y suelte el botón PROGRAM (PROGRAMA) nuevamente.
•
El indicador LED destellará para indicar que el control remoto ha
ingresado al modo búsqueda.
• Enfocando el control remoto del PT7031 al dispositivo que desea
ontrolar repetidamente y lentamente presione y libere el botón
c
POWER (ENCENDIDO). El PT7031 le enviará un código POWER
iferente al dispositivo cada vez que se presiona el botón POWER
d
(ENCENDIDO).
Una vez que el dispositivo que desea controlar se apaga,
•
inmediatamente deje de presionar el botón POWER (ENCENDIDO)
y presione el botón del dispositivo (TV, SAT/CAB, DVD, AUX, etc.)
nuevamente.
• Ahora se debe programar el PT7031 para controlar su dispositivo.
Usted puede verificar esto encendiendo el dispositivo e ingresando
•
otros comandos aplicables tales como PLAY (REPRODUCIR) o STOP
(DETENER) para un reproductor de DVD o CHANNEL (CANAL) +/–
para un casillero SAT.
Nota: Mientras se usó el botón POWER para buscar aquí, puede usar
otros comandos tales como el botón PLAY (REPRODUCIR) para
dispositivos que no cuentan con un botón POWER. En este caso el
PT7031 usa el botón PLAY (REPRODUCIR) para efectuar la búsqueda.
Simplemente use el botón PLAY (REPRODUCIR) en lugar del botón
POWER según se describe a continuación, asegurando que el dispositivo
que desea control está listo para ingresar al modo reproducir y cuenta
con una DVD o cinta cargada, se encuentra encendido, etc.
Búsqueda de códig
Si no puede encontrar un número de código en la sección Códigos
preprogramados del control remoto de este manual que coincida con su
equipo, el control remoto del PT7031 puede buscar en su base de datos
un código de control remoto adecuado en los códigos programados en
el control remoto. El control remoto del PT7031 encontrará el código
de componente más adecuado para cualquier fuente de audio.
Para buscar los códigos siga los siguientes pasos:
• Coloque el dispositivo (TV, SAT/CAB, DVD, AUX, etc.) en donde desea
ubicar el códig
• En el control remoto del PT7031 presione y mantenga presionado el
GRAM (PR
, AUX, etc.).
VD
O
o par
botón PR
dispositiv
D
EL indicador del S
•
iluminará y se mantendrá encendido.
os de contr
o del control remoto en la posición on (encendido).
GRAMA) a la v
O
a el que desea ef
ATUS LED (LED DE ESTADO) del PT7031 se
T
ol remoto
ez que pr
ectuar la búsqueda (
esiona el botón del
, SAT/CAB,
TV
30
Page 31

S
olución de problemas
Síntoma Problema posible Solución
in energía. El cordón de suministro no está conectado o no se
S
ha encendido el PT7031.
El interruptor de alimentación del panel posterior
o está encendido.
n
Un mecanismo de seguridad apagó el PT7031. Desenchufe el PT7031 de la salida de CA brevemente y, luego, enchúfelo
No sale ningún
onido del
s
PT7031.
No hay
presentación
en pantalla.
No hay sonido
cuando se
reproduce en un
DVD específico.
El volumen está fijado demasiado bajo. Los botones “+/–” ubicados en la parte superior del sistema PT7031 son el
Sin conexiones de cable o cables sueltos en el
PT7031 o equipo de la fuente.
MUTE (SILENCIO) está encendido. Asegúrese de que la función mute (silencio) no esté activada.
El cable de video está suelto o no está conectado. Verifique que el cable de video está conectado y colocado de manera
Se ha seleccionado la entrada incorrecta en la TV. Seleccione la entrada correcta en el TV, la que corresponda a donde el cable
La pista de audio del DVD se graba a 96kHz. Seleccione 48kHz en el menú del DVD o conecte y use la salida analógica
nchufe el cordón de CA del PT7031 en una salida de CA apropiada. Luego,
E
encienda el PT7031 presionando el interruptor encendido/apagado ubicado
en la parte posterior de la unidad.
Enciéndalo.
uevamente de modo que se restaure nuevamente.
n
controles del volumen maestro. Presione y mantenga presionado el botón
v
“+” para aumentar el volumen.
Verifique que los cables se encuentran colocados correcta y firmemente
tanto en el PT7031 y el equipo de la fuente.
adecuada tanto en el VIDEO OUTPUT (SALIDA VIDEO) del PT7031 y la
entrada del TV.
VIDEO OUT (SALIDA DE VIDEO) está conectado al PT7031.
del reproductor de DVD.
Técnica
Ficha
Especificación de suministro de potencia 120 VAC/60 Hz
Consumo de energía 25W
oporción señal-ruido
Pr
Dimensiones (L x E x A) 40" x 6
eso
P
Potencia de salida 75 vatios (3 x 25) potencia continua promedio
Amplificador
Entradas digitales Dos ópticos/uno coaxial
adas analóg
Entr
Salida de video Compuesto x 1
recuencia de respuesta
F
es
icas
(A-ponder
18.1 lbs.
Tres NXT Digital de 2" x 8" (50mm x 200mm)
Amplificadores de panel plano
Estér
70 Hz
ado) >75dB
3
⁄4" x 6" (1016mm x 170mm x 152mm)
(8.2 kg)
eo x 3
– 20 kHz +/– 3dB
ESPAÑOL
Las especificaciones están sujetas a cambio sin aviso.
31
Marca comercial de New Transducers Limited.
Page 32

Preprogrammed Remote Control Codes/Codes de contrôle préprogrammés /Códigos de control remoto preprogramados
Brand/Device
TV AUX SAT/CAB DVD/CD/VCD
Marque/Appareil
arca/Dispositivo
M
ABC
Acre 135(DVD)
Acoustic Research 044
ADC 045, 046
ADCOM 038
Addsion 081
Admiral 063, 136, 177, 180, 206, 207 066
Adventura 160 038
Aelanta 089
AEON 055
Aiko 103
Aiwa 006, 007, 008
Akai 113, 114, 164, 181, 190
Akiba 119
Alfa Gold
Alleron 136
Amark 178, 179, 202
Ambassador 098
American High 045, 072
Amstrad 030, 098 107, 038
Amusewell 116
Anam 068, 083, 148, 177, 253
Anitech 119
Anvision 022, 042, 046
AOC
O
AP
Archer 202 069
ASA 045, 047
Asha 103
ASIA Giant 054, 064, 166
Asuka 047
ATLE 052
ynamics
udio D
A
x
o
udiov
A
AWA 040, 082, 193
Baird 019, 038
Basic Line 119
Beaumark 103
BESTLINK 051, 091
Belcor 100, 114
Bell & Howell 063, 136, 177, 195 019, 020, 066
005,
136, 152, 176, 177, 188, 190,
TV
029, 048, 100, 113,
014,
200, 202, 204, 214
202
177,
033, 057, 084, 100, 111,
112, 113, 114, 115, 143
VCR
Magnétoscope
CR
V
032, 034, 035, 036,
038, 107, 108, 120
142
113,
109,
025,
109
047,
32
SATELLITE/CABLE
SATELLITE/CÂBLE
ATÉLITE/CABLE
S
008, 017, 018, 019, 023,
032 040, 049, 130, 140
185
067
CD DVD/VCD
050, 069 109
016, 139
Page 33

Preprogrammed Remote Control Codes/Codes de contrôle préprogrammés /Códigos de control remoto preprogramados
Brand/Device
TV AUX SAT/CAB DVD/CD/VCD
Marque/Appareil
arca/Dispositivo
M
BENJAMIN 151
Blaupunkt 006, 083
Blue Star 054
BPL 054
Bradford 177
Brockwood 100
Broksonic 177, 202, 234 055, 056, 110, 112
Bush 119
Cablestar 022, 042, 046
California Audio Lab 003
Calix 047
Canon 072,
Candle/Citizen
Capehart 139
Caravell 077 (VCD)
Carver 037, 060 045, 144 069
CASIO 138
CCE 119
Celebrity 046
Centurion 114, 175
Century
CGE 038
Changhong 018
Channel Master 096
Chaparral 210
un Yun
Ch
086, 103, 113, 114, 132, 148,
160, 171, 176, 178, 188, 209
005, 014, 029, 041, 076, 089,
100, 113, 121, 202, 204, 214, 242
TV
038, 046, 047, 072, 103,
VCR
Magnétoscope
CR
V
137
109, 138, 139, 141
SATELLITE/CABLE
SATELLITE/CÂBLE
ATÉLITE/CABLE
S
048
075
CD DVD/VCD
ung Hsin
Ch
Cimline 119
tone
Clair
Colortyme 113, 149, 176 025, 109
Colour Voice 005
t
ol
C
Concerto 113, 176
y
on
/C
ontec
C
onado
or
C
Craig 148, 177 047, 070, 103, 119, 141
Crown 177, 178 119
tis Mathes
Cur
005,
081, 121, 190, 204
048
048, 107, 148, 157
173, 177, 192, 201
179
178,
037, 051, 063, 065, 113, 114,
140,
129,
175,
171,
180, 195
176,
178,
049
119
109,
094,
072,
051,
025,
111, 120, 121, 137, 141
33
034
020, 024, 073,
014,
Page 34

Preprogrammed Remote Control Codes/Codes de contrôle préprogrammés /Códigos de control remoto preprogramados
Brand/Device
TV AUX SAT/CAB DVD/CD/VCD
Marque/Appareil
arca/Dispositivo
M
CXC 148, 177
Cybernex 103
Dae Ryung 019
Daewoo
Dansai 119
Daytron
DBS 169
X
DB
Decca 038, 045
De Graaf 064
Denon 001
Diamond 043, 133
Disco Vision
Distar 061 115
Drake
DSS 168
Dual 113
Dumont 100, 236 103, 150
Dynamic Bass 039
Dynatech 038, 066, 097, 107, 109, 120
Eagle 009, 019, 030, 042, 046, 141
Eastern
EchoStar
Electroband 046, 048
Electrohome
ohonic
Electr
ex
Emer
Emerson
Envision 113, 114, 176
Ether 089, 100, 202
EUROSTAR 150
Everquest 016
Ferguson 113
Fidelity 038
Finlandia 019, 045
Finlux 136 019, 038, 045, 064, 107
Firstline 049, 119, 150
086, 100, 103, 113, 114, 118,
153, 167 174, 176, 178, 188, 190,
194, 214, 217, 235, 251, 252
044, 046, 048, 068, 100, 113,
176, 178, 188, 190, 195
048, 054, 084, 097, 098, 100,
112, 113, 137,138, 139, 141136,
148,
178179, 188, 195, 206, 209, 234
TV
100, 103, 113, 114,
175, 176, 178, 188
176,
158169,
157,
177,
020, 105, 106, 138,139,
150, 152, 153, 154, 155
035, 038, 046, 047, 049, 052,
055, 056, 072, 079, 098, 099,
100, 101, 102, 107, 110, 111,
112, 116, 120, 130, 131, 132,
133, 134, 135, 136, 140, 150
VCR
Magnétoscope
CR
V
105
109, 113, 142
025,
047, 049, 100, 103
047
060
34
SATELLITE/CABLE
SATELLITE/CÂBLE
ATÉLITE/CABLE
S
082, 083, 084, 096, 126,
127, 147, 160, 161
041, 059, 060, 061,
062, 070, 156
092, 097, 099, 100,
102, 1003
101,
CD DVD/VCD
133 (DVD)
115
038
Page 35

Preprogrammed Remote Control Codes/Codes de contrôle préprogrammés /Códigos de control remoto preprogramados
Brand/Device
TV AUX SAT/CAB DVD/CD/VCD
Marque/Appareil
arca/Dispositivo
M
Fisher 117, 168, 195
Fortec Star 186, 187
Fuji 060, 072, 083, 084
Funai/Fullness
Funtach 170, 171
Futuretech 177
GAB 119
Garrard 038
G.E.
GEC 045
Gemini 016, 131, 132,134, 135
General (Fujitsu) 033, 136 043 017, 023, 093, 120, 130
General Instrument/
Jerrold
Gibralter
Gintai 205
GMI 052, 071, 073, 142, 155
Golden 030
Goldstar
Goodmans 136 037, 038, 047, 119
Go Video
Gradiente 038
Graetz 113
anada
Gr
andin
Gr
undig
Gr
y
unp
Gr
Haitai 105
Hallmark 100, 113, 136, 176
Hamlin 010,
Harley Davidson 038
don
Harman K
Harvard 100, 136, 177 119
Harwood 119
Hawaii 117
HCM 054
Head Quarter 020
Hinar
Hi-Q 070
Hisa
ar
i
a
w
011, 029, 030, 039, 040,
0
051,
113, 131, 141, 143, 145, 146,
108,
176, 180, 184, 187, 222, 235
096, 100, 113, 157, 171, 175, 176,
178 179, 184, 188, 190, 191, 223
TV
042, 136, 148, 177
54, 061, 065, 068, 083, 100,
100, 114
164 066,
177
054,
177
136,
136 103,
054
051, 072, 085, 086, 094,
025, 046, 047, 091, 109
VCR
Magnétoscope
CR
V
019, 020, 047, 070,
088, 092, 093, 117
038, 039, 040, 103,
107, 119, 120
098, 103, 137, 141
103
072
119
047,
038,
045 069
109
025,
119
35
SATELLITE/CABLE
SATELLITE/CÂBLE
ATÉLITE/CABLE
S
001, 003, 011, 012, 013, 014, 016,
017, 023, 050, 093, 125, 128, 129,
130, 135, 140, 163, 180
030 015
020, 123, 133
019,
CD DVD/VCD
029
Page 36

Preprogrammed Remote Control Codes/Codes de contrôle préprogrammés /Códigos de control remoto preprogramados
Brand/Device
TV AUX SAT/CAB DVD/CD/VCD
Marque/Appareil
arca/Dispositivo
M
004, 014, 019, 034, 069, 086,
Hitachi
Hwalin 124, 164
Hypson 054
Hyundai 118
IEEC 009, 058, 065, 066, 141
Ima 177
IMC 173
Imperial 038
Infinity 037, 082, 167
Inkei 007
Instant Replay 067, 072
Interfunk 045
ITT 019, 020, 103, 113
Janeil 160
Jasco 048, 069
JBL 037, 082, 160, 167 078, 079
JCB 046
JCL 072
095, 099, 100, 107, 113, 157,
162, 164, 173, 176, 178, 179,
184, 188, 201, 203, 204, 207,
TV
011, 038, 064, 065, 069,
214, 224, 225, 238
VCR
Magnétoscope
CR
V
095, 107, 113, 120
SATELLITE/CABLE
SATELLITE/CÂBLE
ATÉLITE/CABLE
S
023, 032, 119, 121 017, 038 115
CD DVD/VCD
047, 050, 051, 065, 100, 101,
JC Penney
Jean
JEBSEE 047, 068
J
ensen
JVC
aisui
K
Kale vision 134
Kawasho 113, 176
KEC 171, 177 047
Kenwood 100, 113, 114, 176
KLH 119
Kloss Nov
KMC 178, 179, 188
K
K
Kolin
K
abeam
odak
OKA
ONKA
113, 114, 131, 141, 145, 171,
175, 176, 178, 180, 184, 187,
190, 201, 202
014, 057, 089, 100,
202, 204, 205, 214
113,
176
075,
067,
024,
023,
022,
081, 093, 107, 129, 157,
165, 166, 187, 201
054 119
160
114,
109,
060,
005, 014, 020, 024, 041,
073, 081, 121, 190, 204
243
006, 025, 047, 064, 067, 072,
088, 095 103, 109, 127, 128,
137, 141, 142
062,
113
030,
025,
020,
018,
017,
016,
046, 062, 087, 088, 096, 109,
113, 127, 139, 142, 151
030, 062, 088, 096,
025,
020,
109,
113,
127,
047,
072
139,
142
36
055,
057,
118,
144
008, 027, 031 129 (DVD)
019,
018,
051
028,
059,060,
130 (D
VD)
Page 37

Preprogrammed Remote Control Codes/Codes de contrôle préprogrammés /Códigos de control remoto preprogramados
Brand/Device
TV AUX SAT/CAB DVD/CD/VCD
Marque/Appareil
arca/Dispositivo
M
Krell 069
KTV
Kyocera 046
Legend 099
LEON 052
LG 114, 156, 179, 223, 248 046 052
Lloyd 038, 107, 109, 116, 119, 120
Lloytron 178
Loewe 082
odgenet 063
L
Logik 063, 177 119
Luxman 113, 176 032
Luxor 019, 020, 037, 049
LXI
Macom 081, 096, 119, 120
Magnavox
Magnin 103
Majestic 063, 236
Marantz
Marta 025, 046, 047
Matsui 098,178 055, 116 069
Matsushita 045, 072
MCS 003
Megatron 100, 164, 202
MEI 048 072
Memor
ex
Metz 006
MGA/Mitsubishi
MGN Technology 103
Micro Formula 107
Midland 065, 178, 187, 236 085
Mina 157
Minolta 064, 095
Mission 069
ola
Motor
Montgomery Ward 066, 097
Time
Movie
utz
Min
MTC 048, 100, 113, 114, 171, 176, 190 038, 103, 107, 120, 141
048, 113, 114, 128, 177,
037, 057, 065, 082, 100,
037, 060, 082, 100, 109, 113,
114, 127, 131, 132, 162, 163
167, 175, 176, 178, 179
037, 060, 082, 109, 113,
005, 020, 021, 044, 090, 097,
113,
100,
176, 188, 190, 206, 226, 227
TV
178, 179, 188, 209
101, 175, 195, 206
114, 125, 176, 190
063,
100,
195
117, 136, 141, 175,
114,
206
187,
083,
037,
184
131,
025, 045, 072, 088, 109,
019, 020, 038, 046, 047, 066,
070, 072, 103, 107, 108, 120
014, 015, 029, 030, 049,
062,
VCR
Magnétoscope
CR
V
038, 046, 047
045, 047, 072, 075,
123, 137, 144
127, 129, 142, 144
087, 089,
064,
063,
090, 096, 100
072
066,
37
SATELLITE/CABLE
SATELLITE/CÂBLE
ATÉLITE/CABLE
S
004, 005, 006, 007, 008,
037, 038, 039, 042, 046
024
158 025 131 (D
016
CD DVD/VCD
022, 056, 069 059
003, 040, 069
VD)
Page 38

Preprogrammed Remote Control Codes/Codes de contrôle préprogrammés /Códigos de control remoto preprogramados
Brand/Device
TV AUX SAT/CAB DVD/CD/VCD
Marque/Appareil
arca/Dispositivo
M
MultiTech 136, 177 038, 085, 107, 119, 120, 141
Multivision 124
Myland 119, 120
NAD 057, 092, 100, 101
NEC
Nesco 136
Newave 089, 106, 205, 206 046
Nikko 100, 103, 114 047
Noblex 103
Nokia 019, 020, 103 188
Novavision 019, 040, 089
Nordmende 113
NSC 036, 134
NSM 069
NTC 103
OAK 033, 034, 139
Olympus 072
Omega 016
Onking 209
Onkyo 010, 011, 012, 013
Onwa 177
Optimus 092, 195, 207
Optonica 206, 207 037
ORBIT 095
ion
Or
PACE 500 183
CE 5000
A
P
PACIFIC 178
Panasonic 010, 015, 016, 017 006, 007, 008, 012 003, 019, 024 003, 020 061, 062, 112
(National)
P
anda
Pansat 094
Paragon (Zenith) 021, 024, 117
PATHER 009
PBI 107
Pentax 064, 095
Philco
Philips
031, 032, 041, 061, 068, 079,
080, 100, 113, 114, 160, 175,
028, 037, 050, 058, 068, 082,
083, 088, 089, 094, 108, 122,
145,
130,
037,
113, 114, 127, 132, 154, 157, 162,
163,
036,
100, 109, 113, 114, 122, 132,
154, 156, 157, 162, 163, 167,
176,
TV
176, 187, 190
177, 234
136,
159, 161, 167, 187, 247
082, 100, 109,
068,
060,
179,
178,
176,
167,
068,
060,
056,
037,
215, 216
198,
179,
019, 020, 025, 026, 030, 041,
042, 046, 062, 088, 096, 109,
113, 121, 126, 127, 129, 139, 142
035,
027, 028, 031, 050, 067,
045, 072, 075, 123, 137
190
082,
VCR
Magnétoscope
CR
V
019, 047, 066
055, 110, 112, 116
072, 112, 118, 137
037, 045, 067, 072,
144, 145, 146
38
SATELLITE/CABLE
SATELLITE/CÂBLE
ATÉLITE/CABLE
S
184
114, 148, 175 121 (DVD), 122
004, 005, 006, 007, 008, 037,
038, 039, 042, 046, 122, 152
CD DVD/VCD
033
019, 039, 041,
042, 043
068 (Tuner), 070
(REC) 071 (VCD)
052, 069
022,
125 (DVD)
108
071 (DVD)
Page 39

Preprogrammed Remote Control Codes/Codes de contrôle préprogrammés /Códigos de control remoto preprogramados
Brand/Device
TV AUX SAT/CAB DVD/CD/VCD
Marque/Appareil
arca/Dispositivo
M
Pilco 072
Pilot 114, 171, 178 047
Pioneer
Polestar 103
Popular Mechanic 068
Portland
Praxis 211
Premier 035
Priceclub 171
Primestar 093
Proline 038
Prosat 088
Protec 119
Proton
Prism 083, 187
Pulsar 100, 103, 236 047, 103 024, 030
Pulser 100, 103, 236
QED 069
Quarter 020
Quartz 020, 088
Quasar 050, 068, 083, 108, 146, 187 006, 072, 137 003, 020
RAMPAGE 174
Randex 047
Radio Shack
Radix 047
Randtek 042, 046
RCA
-AK
RC
Realistic
Regal 019, 020, 123, 133
y
enc
eg
R
Rembrandt 017, 134
Rhapsody 048
Ricoh 072, 083
TEL
O
R
Runco 114, 171, 236 047 024
SABA 113
SAE 069
074, 092, 100, 108, 113,
014, 041, 076, 100, 104, 113,
126, 157, 176, 178, 188, 196,
051,
157, 175, 177, 178, 195, 207
047, 051, 065, 066, 068, 100,
105, 113, 143, 152, 176, 180,
190, 206, 213, 222, 229, 230
100, 107, 114, 169, 175,
TV
123, 176, 187, 228
100, 103, 113, 176,
178, 179, 188, 190
202, 204, 205, 214
065, 087, 107, 114, 148,
177, 178, 195, 207
030, 044, 062, 064, 074,
038, 047, 066, 070, 072, 088,
037,
093, 097, 100, 103, 107, 120
051, 064, 066, 067, 069, 071,
072, 086, 094, 095, 103, 118,
120, 124, 141, 148, 149
019, 020, 037, 038, 046, 047,
066, 070, 072, 088, 093, 097,
100, 103, 107, 120, 137
VCR
Magnétoscope
CR
V
091, 123, 139, 142
105, 138, 139
006, 067 069
39
SATELLITE/CABLE
SATELLITE/CÂBLE
ATÉLITE/CABLE
S
002, 022, 115,116 004, 020, 140
044, 086, 114, 168, 182 029, 038
095
110
123
041,
037,
CD DVD/VCD
023
038, 039,
040, 041
048
047,
059, 064, 065, 098,
115, 125(DVD)
127 (D
058,
132 (DVD)
VD)
Page 40

Preprogrammed Remote Control Codes/Codes de contrôle préprogrammés /Códigos de control remoto preprogramados
Brand/Device
TV AUX SAT/CAB DVD/CD/VCD
Marque/Appareil
arca/Dispositivo
M
Saisho 098 101
Salora 089
Sampo
Samsung
Samsux 178
Sanky 066
ansui 062, 113, 119, 122, 142
S
Sanyo
Schaub Lorenz
024, 041, 042, 052, 073, 086,
100, 106, 113, 114, 142, 175,
176, 178, 205, 206, 214
070, 100, 107, 113, 114, 140,
144, 157, 167, 170, 171, 175,
176, 178, 179, 188, 189, 190,
197, 200, 214, 237, 240, 249, 250
014, 024, 025, 026, 027, 034,
035, 040, 041, 049, 051, 110,
117, 120, 168, 173, 175, 186,
195, 204, 214, 218, 231, 232, 241
TV
059, 085, 086, 103, 104,
111, 115, 133, 141, 150
VCR
Magnétoscope
CR
V
023, 066, 097
019, 020, 021, 022,
068, 070, 088, 103
113
SATELLITE/CABLE
SATELLITE/CÂBLE
ATÉLITE/CABLE
S
004, 022, 030, 098, 134
CD DVD/VCD
021, 035,
069,
137
022, 036,
039, 055
110,113,
128 (DVD)
Scientific Atlanta
Scimitsu 100
Scotch 100
Scott
Sears
Sega 115
SEI 045
SET 098
Sharp
Sherwood
Shinco 107
Shintom 038, 064, 083, 084, 103, 119
gun
Sho
100, 114, 136, 137, 148,
157, 175, 177, 178
030, 037, 051, 057, 065, 067,
100, 101, 110, 111, 113, 117,
136, 168, 171, 175, 176, 178,
179, 195, 201, 235
009, 038, 043, 059, 087, 106,
113, 133, 157, 173, 176, 178,
188,
179,
206,
192,
100 103
207,
208
049, 063, 079, 089, 101,
110, 112, 132, 134, 150
019, 020, 046, 047, 064, 070,
072, 088, 092, 093, 095, 117
024, 037, 058, 066,
097, 100, 138
013, 019, 040, 089, 112, 113, 172
137 019, 040 111
007, 023, 040,
54
053,
Sigma 034
Signal 016, 030
Signature 037, 063, 065, 100 017, 023
Simpson 060, 114, 132
Singer 187 047, 103, 119
Sinudyne 098
40
Page 41

Preprogrammed Remote Control Codes/Codes de contrôle préprogrammés /Códigos de control remoto preprogramados
Brand/Device
TV AUX SAT/CAB DVD/CD/VCD
Marque/Appareil
arca/Dispositivo
M
Sky Giant 063, 075, 138, 153
SL Marx 030
Sony
Soundesign 100, 113, 132, 136, 176, 177
Sowa
Space TV 035
Spectricon 100, 114, 177, 202
Sprucer 114, 148
Squareview 030
SSS 100, 113, 177
Standard 134
Starcom
Stargate
Starlite 100, 177
Starquest 016
STS 064 080
Sun Moon Star 2400 181
Supra 178
Supre-Macy 132, 160, 178
Supreme 046
Sylvania
Symphonic 030, 136,
Synco
TADA 053, 162
TADIRAN 030
Taicom 055
Tai Wah 064, 212
Tandy 065, 178, 206, 207 088, 120
Tashiko 205 046
Tatung
Tay Shoen 058, 154
Teac 038, 107, 113, 120, 127
Technics 050, 083, 108, 187 006, 072 003, 030
TECHNOSA
TECHNOVISION 151
ec
T
Teco
T
hwood
000, 001, 012, 013, 014, 024,
045, 046, 073, 097, 181, 198,
202, 204, 214, 232, 244, 245, 246
005, 014, 024, 057, 068, 072,
73, 172, 199, 200, 204, 214
0
037, 060, 082, 085, 100, 109,
113, 114, 127, 131, 132, 162,
005, 010, 014, 020, 024, 037,
041, 057, 068, 072, 073, 083, 101,
187, 199, 200, 202, 204, 214
172,
050,
002, 014, 028, 029, 061, 077, 078,
079, 086, 091, 183, 187, 204
TV
163, 167, 175, 176
148, 177
137,
014, 024, 073, 198,
202, 204, 206, 214
113, 176, 187, 202
083,
000, 001, 002, 003, 004, 005,
060, 072, 081, 082, 083, 084
045, 049, 067, 072, 075,
013, 038, 062, 113, 127 134 (DVD)
VCR
Magnétoscope
CR
V
089, 120, 123, 137
038, 107,
120
41
SATELLITE/CABLE
SATELLITE/CÂBLE
ATÉLITE/CABLE
S
169
016, 023, 130
016, 030
031, 032 022, 069
149
CD DVD/VCD
000, 037,
049, 136
014,
006,
002,
030, 040
049, 063, 114,
124 (DVD)
Page 42

Preprogrammed Remote Control Codes/Codes de contrôle préprogrammés /Códigos de control remoto preprogramados
Brand/Device
TV AUX SAT/CAB DVD/CD/VCD
Marque/Appareil
arca/Dispositivo
M
Tedelex 104
37, 055, 063, 100, 103, 113,
Teknika
Telecaption II 136, 147, 178
Telefunken 113
Telerent 063, 178
Teleview 030
Ter a
Texscan 029, 031, 032
Theta Digital 114
Thomson/ProScan 051, 065, 180 051, 113 126 (DVD)
Thorn 113
TMK 098, 101, 113, 176
Tocom 000, 001, 008, 111
Tomashi 054
Toshiba
Tosonic
Totevision 178 046, 047, 103, 141
Trans PX
Tri-vision 011, 109, 125 , 137
Tri-Lex 071 (MPEG Card)
Triumph 098 116
Tuntex 100
usa
T
TV 86 030
U-MEN 187
Uniden 079
Unika 004,
Unitech 103, 141
Cable
United
United Satellite 077, 079
Universal 065, 131, 184 026, 027
UPMOST 155 (MPEG Card)
Veccom 107
Vector Research 114 025, 063, 089, 109, 142
Victor 067, 081, 165 063, 142, 150
Videocon 003, 018
Video Concepts 025, 100, 109, 142, 150
Videosonic 038, 103, 119, 141
Videotronic 072
V
ideoway
0
132, 136, 157, 160, 167, 171,
176, 177, 178, 179, 188, 190, 201
003,010, 018, 020, 024, 041, 057,
101, 102, 147, 150, 168, 171, 172,
195, 199, 200, 201, 207, 214
TV
014, 076, 100, 113,
176, 204, 205, 214
093, 113, 117, 134, 150
048
VCR
Magnétoscope
CR
V
038, 043, 046, 047,
072, 080, 107, 120
098, 103, 111, 116
009, 010, 013, 048,
049, 061, 064, 089,
42
SATELLITE/CABLE
SATELLITE/CÂBLE
ATÉLITE/CABLE
S
025
024, 074, 078, 081, 105
112
048, 069, 072, 075,
112, 117, 136, 179
016
028
006,
130
024,
108
CD DVD/VCD
024, 026
059, 064,
123 (DVD)
Page 43

Preprogrammed Remote Control Codes/Codes de contrôle préprogrammés /Códigos de control remoto preprogramados
Brand/Device
TV AUX SAT/CAB DVD/CD/VCD
Marque/Appareil
arca/Dispositivo
M
Vidikron 037
Vidtech 100, 113, 190
Viewstar
Viking 160
Visa 115
Vortec 098
Walmart 068
Warner Amex 022
037, 051, 060, 063, 082, 087,
Wards
Warton 081
Winer 054, 087, 090
WISO 026, 056, 145
XR-1000 038, 072, 103, 119
Yamaha 100, 113, 114, 176, 190
Yorx 114, 175
Zenith 062, 063, 103, 219, 233, 236 047, 062, 083, 084
Zentek 068
Zonda 202
Others
100, 109, 113, 114, 116, 131,
132, 136, 137, 162, 163, 175,
176, 178, 184, 190, 207
053, 054, 119, 151, 182,
TV
037, 038, 046, 064, 066, 070,
072, 094, 097, 100, 103, 107,
025, 088, 109, 113, 127, 142
052, 053, 054, 055, 056,
185, 209, 220, 221
VCR
Magnétoscope
CR
V
119, 120, 125, 141
073, 076, 077, 078
SATELLITE/CABLE
SATELLITE/CÂBLE
ATÉLITE/CABLE
S
004, 005, 006, 007, 008,
037, 038, 039, 042, 046
021, 024, 076, 082, 083,
084, 106, 117, 126, 147
045, 047, 085, 143,
146, 159, 176, 177
CD DVD/VCD
005, 009, 034
080 057
072, 073, 074,
097, 100, 101
43
Page 44

This Class B digital apparatus complies with Canadian ICES-003. • Cet appareillage digital de Classe B est conforme au ICES-003 canadien.
ALTEC, ALTEC LANSING, the Altec Lansing logo, the swirl design, and The Voice of the Theatre logo are registered trademarks or trademarks of Altec Lansing. Manufactured under license from Dolby
Laboratories. Dolby and the double-D symbol are trademarks of Dolby Laboratories. NXT and the NXT logo are registered trademarks of NXT plc. Manufactured under license from one or more of the
following DTS, Inc. U.S. Pat. No's: 5,451,942; 5,956,674; 5,974,380; 5,978,762; 6,226,616; 6,487,535 and other U.S. and world-wide patents issued and pending. "DTS" and "DTS Digital Surround"
are registered trademarks of DTS, Inc.Copyright 1996,2002-2006, DTS,Inc. All Rights Reserved. All other trademarks appearing herein are the property of their respective owners.
ALTEC, ALTEC LANSING, le logo Altec Lansing, le tourbillon et le logo The Voice of the Theatre sont des marques déposées ou des marques de commerce de Altec Lansing. Fabrication sous licence des
Labor
atoir
es Dolby. Dolby et le symbole DD sont des marques de commerce des Laboratoires Dolby. NXT et le logo NXT sont des marques déposées de NXT plc. Fabrication sous licence à partir d’un ou
s des br
plusieur
icains DTS, Inc suivants : 5 451 942 ; 5 956 674 ; 5 974 380 ; 5 978 762 ; 6 226 616 ; 6 487 535 et autres brevets américains et internationaux délivrés et en instance.
ets amér
ev
"DTS" et "DTS Digital Surround" sont des marques déposées de DTS, Inc. Copyright 1996, 2002-2006, DTS, Inc.
Tous droits réservés.Toutes les autres marques de commerce apparaissant ci-contre sont la propriété de leurs propriétaires respectifs.
Corporate Headquarters 535 Rte. 6 & 209, Milford, PA 18337-0277, USA • 866-570-5702 • 570-296-4434 • Fax 570-296-6887
ope
Eur
Asia/Pacific 25 Canton Road, Tsim Sha Tsui, Kowloon, Hong Kong
© 2007 Altec Lansing
-1219 Lux
L
13 Rue Beaumont
Designed in USA. Made in China
,
embour
, Luxembourg
g
A12465 R03
 Loading...