

Page 1

Altec Lansing Octiv® 650 Speaker System for iPhone™ and iPod
Système d’enceinte Altec Lansing Octiv® 650 pour iPhone™ et iPod
Sistema de parlantes Octiv® 650 de Altec Lansing para iPhone™ y iPod
Sistema de alto-falantes Octiv® 650 da Altec Lansing para iPhone™ e iPod
M650
User Guide Guía del usuario
Guide d’utilisation Guia do Usuário
®
®
®
®
Page 2

Welcome
Thank you for purchasing the Altec Lansing Octiv650 speaker system.
Designed specifically to work with your iPhone or iPod, this docking/
charging speaker system re-imagines room-filling sound with elegance
of line and intelligent design that’s as unobtrusive as it is powerful. It’s the
epitome of stylish audio performance.
Please carefully read this User Guide for instructions on setting up and using
your Octiv650 speaker system.
Prior to installing or operating the Altec Lansing Octiv650 speaker system,
refer to the important product safety information.
Getting Assistance
The answers to most setup and performance questions can be found in the
Troubleshooting section of this guide. You can also consult the frequently
asked questions (FAQ) in the customer support section of our Web site at
www.alteclansing.com.
If you live in North America and still can’t find the information you need,
please call our customer service team for assistance before returning this
product to your retailer under their return policy.
Tel: 800-258-3288 (Toll Free in US and Canada)
Email: csupport@alteclansing.com
If you live outside of North America, please visit our Web site
at www.alteclansing.com and select your region to locate your
country’sdistributor.
For the most up-to-date information, be sure to check our Web site at
www.alteclansing.com.
International Distribution
International customers: For information regarding the distribution of Altec
Lansing products in your country, please visit www.alteclansing.com and
click on your region.
Registering Your Product
Visit www.alteclansing.com to register your product online, so we can
provide you with the best possible service and technical support.
FCC Compliance
Changes or modifications not expressly approved by the party responsible
for compliance could void the user’s authority to operate this equipment.
This device complies with Part 15 of the FCC Rules. Operation is subject to
the following two conditions:
1) This device may not cause harmful interference, and
2) This device must accept any interference received, including interference
that may cause undesired operation.
ii
Page 3
Safety Information
The lightning flash with arrowhead, within an equilateral triangle,
is intended to alert the user to the presence of uninsulated
“dangerous voltage” within the product’s enclosure that may be of
sufficient magnitude to constitute a risk of electric shock to persons.
Caution: To prevent the risk of electric shock, do not remove cover
(or back). No user-serviceable parts inside. Refer servicing to
qualified service personnel.
CAUTION
To prevent electric shock do not use this (polarized) plug with an extension cord,
receptacle or other outlet unless the blades can be fully inserted to prevent blade
exposure.
WARNING
To reduce the risk of fire or electric shock, do not expose this appliance to rain
ormoisture.
IMPORTANT SAFETY INSTRUCTIONS
1. Read these instructions.
2. Keep these instructions.
3. Heed all warnings.
4. Follow all instructions.
5. Do not use this apparatus near water. This apparatus shall not be exposed to
dripping or splashing, and no objects filled with liquids, such as vases, shall be
placed on the apparatus.
6. Clean only with dry cloth.
7. Do not block any ventilation openings. Install in accordance with the manufacturer’s
instructions.
8. Do not install near any heat sources such as radiators, heat registers, stoves, or
other apparatus (including amplifiers) that produce heat.
9. Do not defeat the safety purpose of the polarized or grounding-type plug. A
polarized plug has two blades with one wider than the other. A grounding type plug
has two blades and a third grounding prong. The wide blade or the third prong are
provided for your safety. If the provided plug does not fit into your outlet, consult an
electrician for the replacement of the obsolete outlet.
The exclamation point within an equilateral triangle is intended
to alert the user to the presence of important operating
and maintenance (servicing) instructions in the literature
accompanyingthe appliance.
10. Protect the power cord from being walked on or pinched particularly at plugs,
convenience receptacles, and the point where they exit from the apparatus.
11. Only use attachments/accessories specified by the manufacturer.
12. Use only with the cart, stand, tripod, bracket, or table specified by the
13. Unplug this apparatus during lightning storms or when unused for long periods
14. Refer all servicing to qualified service personnel. Servicing is required when the
15. Do not install in an area which impedes the access to the power plug. Disconnecting
manufacturer or sold with the apparatus. When a cart is used, use
caution when moving the cart/apparatus combination to avoid injury
fromtip-over.
oftime.
apparatus has been damaged in any way, such as power-supply cord or plug is
damaged, liquid has been spilled or objects have fallen into the apparatus, the
apparatus has been exposed to rain or moisture, does not operate normally, or
hasbeen dropped.
the power plug is the only way to completely remove power to the product and must
be readily accessible at all times.
Please read FCC information and important safety logos on the bottom of the unit.
EN
1
Page 4

Contents
Welcome ............................................................................................................................................................................................................................... ii
Safety Information ................................................................................................................................................................................................................1
Package Contents ................................................................................................................................................................................................................3
Speaker Features and Indicators .........................................................................................................................................................................................4
Full-featured Remote Details ................................................................................................................................................................................................ 5
Getting Started .....................................................................................................................................................................................................................5
How to Find Your Desired Song or Video ............................................................................................................................................................................. 7
How to Play/Pause Your Music or Video .............................................................................................................................................................................. 7
How to Adjust the Volume .................................................................................................................................................................................................... 7
How to Adjust Bass and Treble Levels ................................................................................................................................................................................. 8
Setting EQ Controls .............................................................................................................................................................................................................. 8
How to Listen to Your iPhone or iPod .................................................................................................................................................................................. 9
How to Output Video to an External Monitor or TV .............................................................................................................................................................. 9
How to Navigate the iPod Menu on Your iPhone or iPod ..................................................................................................................................................10
How to Charge Your iPhone or iPod ..................................................................................................................................................................................10
How to Listen to Your Non-docking Portable Device......................................................................................................................................................... 10
How to Maintain Your Speaker System .............................................................................................................................................................................. 11
Troubleshooting .................................................................................................................................................................................................................. 12
Warranty .............................................................................................................................................................................................................................16
2
Page 5
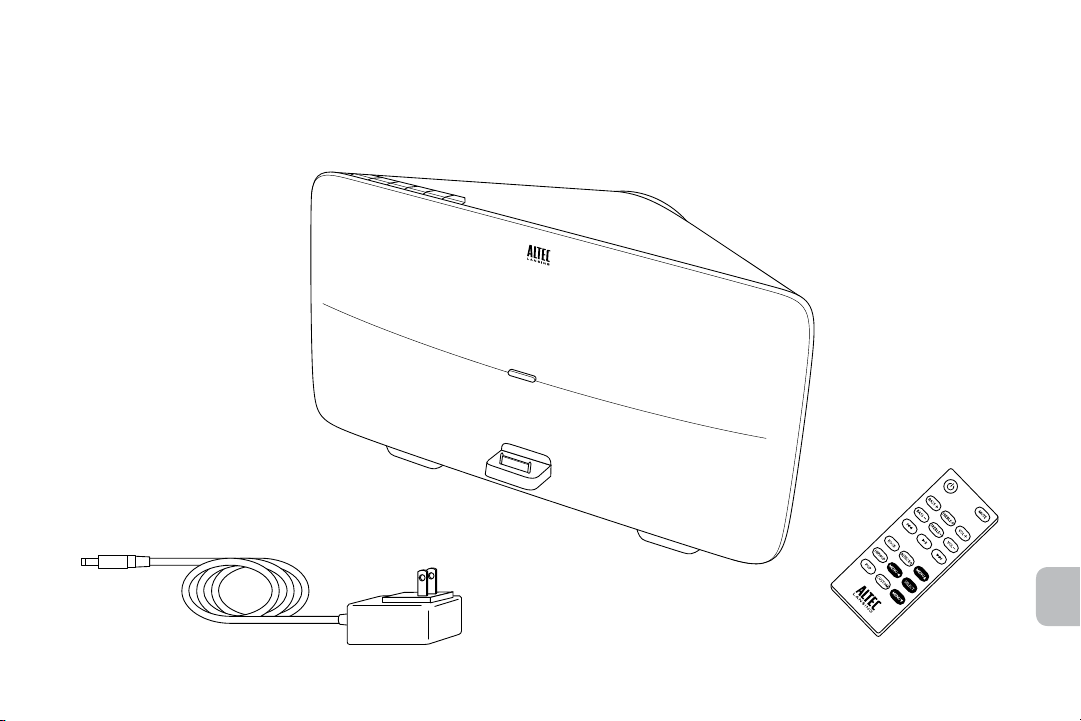
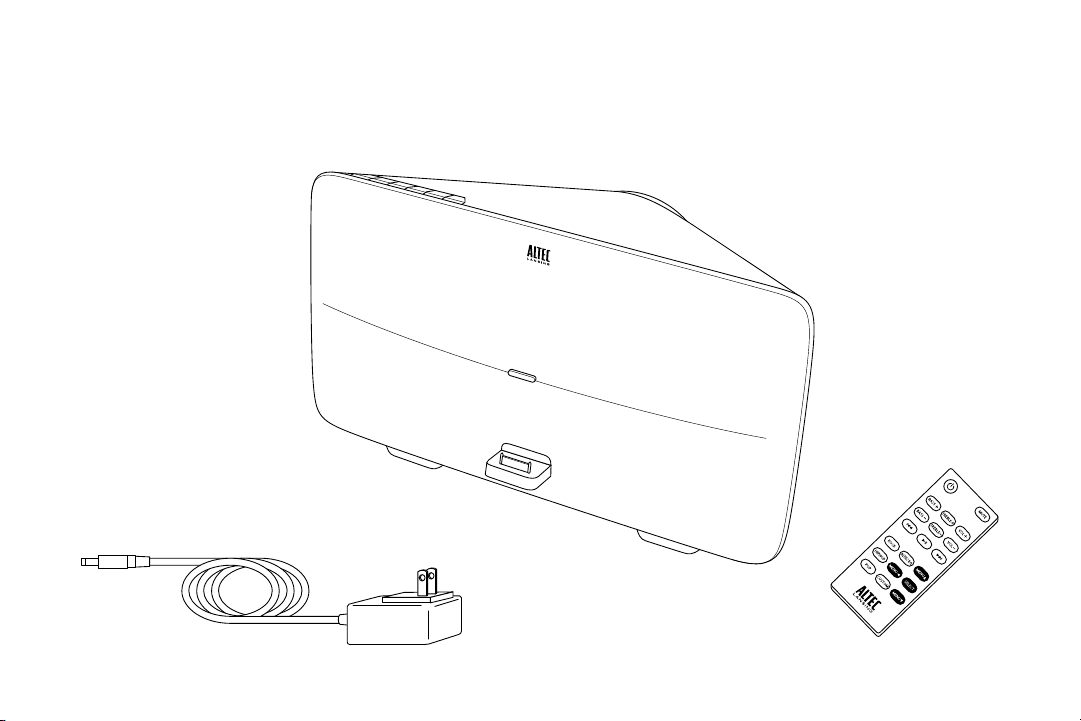
Package Contents
Altec Lansing Octiv650 speaker system
Full-featured remote
AC adapter
EN
3
Page 6
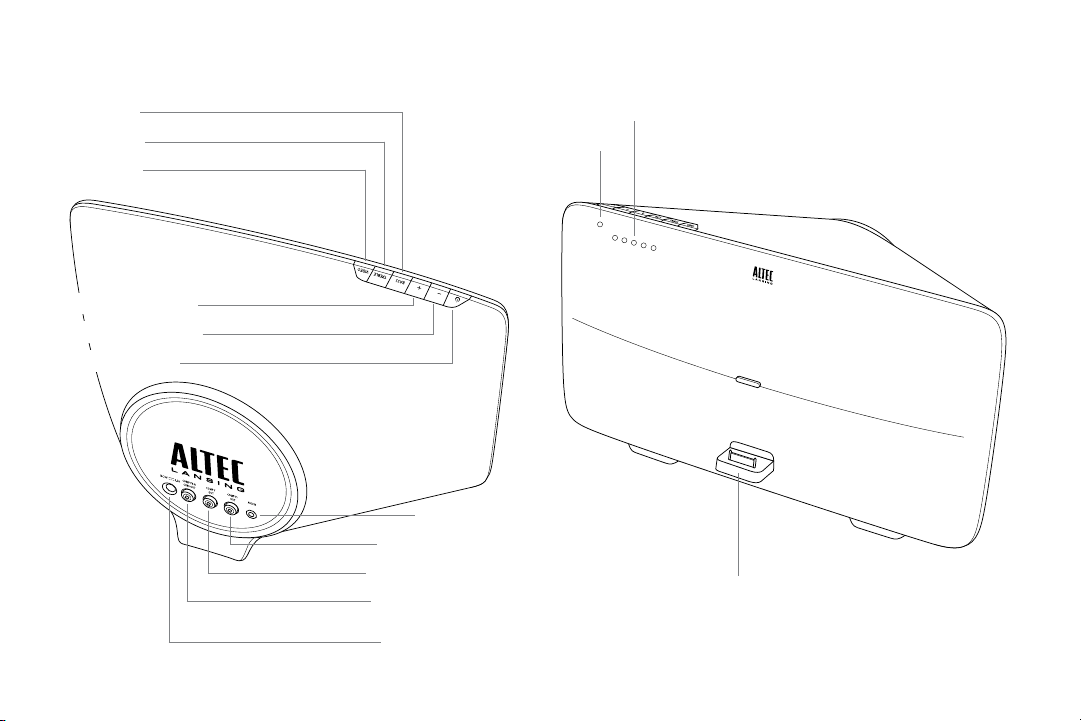
Speaker Features and Indicators
Bass button
Treble button
Video button
Volume increase button
Volume decrease button
Power on/off button
4
Auxiliary input jack
Red component video out
Green component video out
Blue component video out/
composite video out
Input jack for AC adapter
5-segment LED indicators for volume, bass and treble
Power LED
Docking station for iPhone and iPod
Page 7
Full-featured Remote Details
NOTE For best results, aim the full-featured remote toward the Octiv650
speaker system.
Power on/off button
Treble increase
button
Bass increase
button
Bass decrease
button
Track back button
Play/pause button
Rock EQ button
Menu back button
Hip Hop EQ button
Pop EQ button
Mute button
Volume increase
button
Treble decrease
button
Volume decrease
button
Track forward
button
Altec EQ button
Menu up button
Select button
Custom EQ button
Menu down button
Getting Started
Place your Altec Lansing Octiv650 speaker system on a desk, bookshelf,
counter, or other hard surface.
WARNING The Octiv650 features an exposed subwoofer on the bottom
of the speaker system. When placing your Octiv650, be careful to avoid
bumping the subwoofer against sharp corners or setting the system on top
of sharp objects. This could damage the subwoofer.
WARNING In order to prevent accidentally dropping your iPhone or iPod,
be sure to remove it from the docking station before picking up the speaker
system.
How to Install the AC Adapter
1 Connect the AC adapter cable plug
into the speaker system’s jack.
The jack is located on the back of the
system.
2 Plug the AC adapter into the wall
outlet.
WARNING Use of another AC adapter may
damage the product. Use only the supplied AC adapter.
DC IN
EN
5
Page 8

Getting Started
How to Connect the Full-Featured Remote Battery
The remote battery (included) will need to be installed before the remote will
function; in order to do this please follow the instructions below:
1 Pull the battery holder out about halfway.
The battery holder is located on the lower end of the back of the
remote. Use a fingernail to pull the latch toward the centerline of
remote while using another fingernail to simultaneously pull the
battery holder out of the remote.
2 Remove the battery from the plastic bag where you found the
remote and insert into the battery holder so that the “+” sign is
facing up.
3 Push the battery holder back into the remote, making sure the
battery stays in place.
You will hear and feel the latch click.
NOTE Please discard used batteries properly.
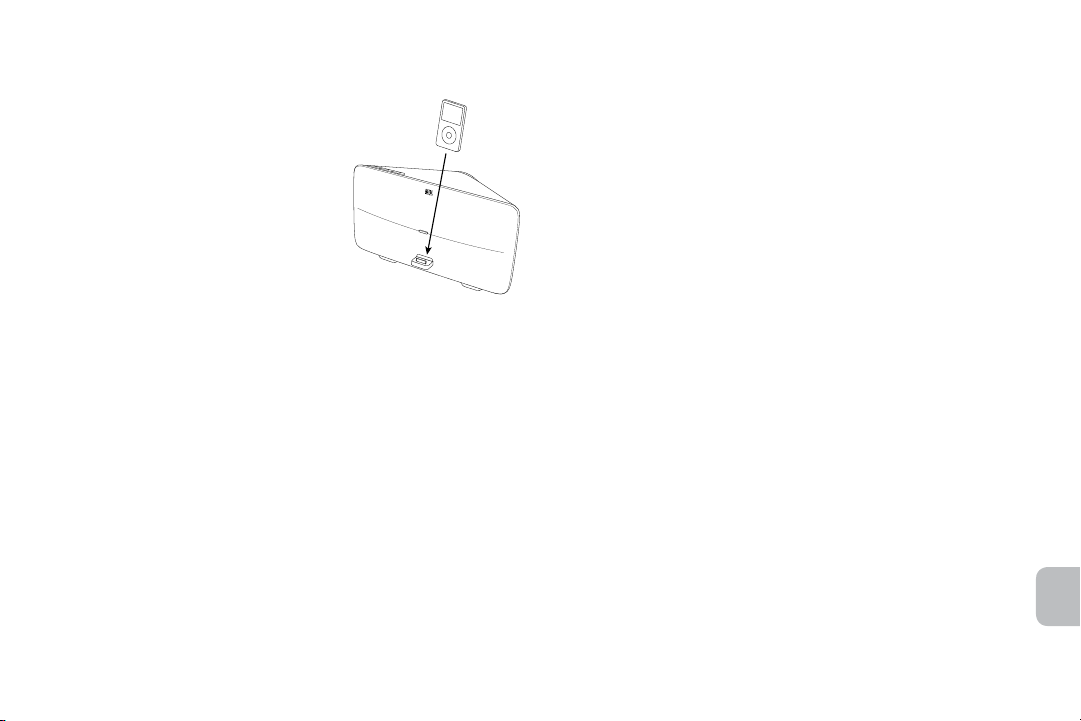
How to Dock Your iPhone or iPod
Place your iPhone or iPod into position.
Align your iPhone or iPod’s connection port
with the dock connector on the Octiv650
speaker system. Slide your iPhone or iPod
onto the dock connector.
How to Turn On Your Speaker System
1 Make sure you have power to the unit.
Ensure the AC adapter is connected to the
system and plugged into the wall. See the Getting Started section for
more information.
2 Turn the unit on.
Press the
How to Turn Off Your Speaker System
Turn off the unit.
Press the
NOTE After a few minutes of no use, the speaker system will automatically
turn itself off.
button on either the speaker system or the remote.
button on either the speaker system or the remote.
6
Page 9

How to Find Your Desired Song
orVideo
Use the remote to locate the song or video you want to enjoy.
Skip to the beginning of the current song or video.
Press the button on the remote.
Skip to the beginning of the next song or video.
Press the
Rewind the currently playing song or video.
While a song or video is playing, press and hold the
remote. This gives you high-speed reverse search of the current song
or video.
Fast-forward the currently playing song or video.
While a song or video is playing, press and hold the
remote. This gives you high-speed forward search of the current song
or video.
button on the remote.
button on the
button on the
How to Play/Pause Your Music or Video
The remote is capable of controlling playback on your iPhone or iPod.
Begin playing a selected music track or video.
Press the button on the remote. Sound from your device will start
playing through the speaker. And if you have your speaker system
configured to do so, video will display on your external monitor or TV.
See the How to Output Video to an External Monitor or TV section.
Pause the selected track or video.
Press the
paused.
button again on the remote. The music or video will be
How to Adjust the Volume
Turn up the volume.
Press the “+” button on the speaker system or the “VOL +” button on
the remote until the desired volume is reached.
Turn down the volume.
Press the “–” button on the speaker system or the “VOL –” button on
the remote until the desired volume is reached.
Mute the sound.
Press the “MUTE” button on the remote. To unmute the sound, press
the “MUTE” button again.
EN
7
Page 10

How to Adjust Bass and Treble Levels Setting EQ Controls
How to Adjust the Bass Level Using the Onboard Controls
Increase the bass level.
While depressing the “BASS” button, repeatedly press the “+” button,
or press and hold the “+” button.
Decrease the bass level.
While depressing the “BASS” button, repeatedly press the “–” button,
or press and hold the “–” button.
How to Adjust the Treble Level Using the Onboard Controls
Increase the treble level.
While depressing the “TREBLE” button, repeatedly press the “+”
button, or press and hold the “+” button.
Decrease the treble level.
While depressing the “TREBLE” button, repeatedly press the “–”
button, or press and hold the “–” button.
How to Adjust the Bass Level Using the Remote
Press the “BASS +” button to increase the bass.
Press the “BASS –” button to decrease the bass.
How to Adjust the Treble Level Using the Remote
Press the “TREBLE +” button to increase the treble.
Press the “TREBLE –” button to decrease the treble.
How to Select Your Desired EQ Preset
On the remote control, press the button that corresponds with your desired
EQ setting:
• ROCK
• ALTEC EQ
• HIPHOP
• POP
• CUSTOM
How to Adjust the Multi-Band Graphic EQ
An app is available from the iTunes store for personalizing the multi-band
equalizer built into the Octiv650. See www.apple.com/itunes for more
information.
How to Restore Factory Default EQ Settings
1 Ensure that your Octiv650 speaker system is powered on.
2 Press and hold the button on the speaker system until the
Power LED stops flashing.
8
Page 11
How to Listen to Your iPhone or iPod
1 Dock your iPhone or iPod in the
Altec Lansing Octiv650 speaker
system.
2 Turn on your speaker system.
3 Find your desired song or video.
4 Start playing your song or video.
5 Adjust the volume.
NOTE Whenever your iPhone or iPod is
docked, it is charging until fully charged.
How to Output Video to an External
Monitor or TV
The “VIDEO” button on the speaker system allows the user to change its
video output mode. There are three available modes:
• Off: Video pass through disabled, indicated by 1 LED when the
video button is pressed. Video will play on the iPhone or iPod
screen only.
• Composite: Indicated by 2 LEDS when the video button is
pressed. Video will play on an external composite video monitor,
if connected. Connect a single RCA cable from the blue RCA jack
labeled “COMP Pb & CVBS OUT” on the back of the speaker to the
composite input jack (yellow RCA) on your monitor or television.
• Component: Indicated by 3 LEDS when the video button is
pressed. Video will play on an external component RGB video
monitor, if connected. Connect the blue, green, and red RCA
outputs labeled “COMP Pb & CVBS OUT,” “COMP Y OUT” and
“COMP Pr OUT” on the back of the speaker to the respective color
inputs on your monitor or television with a 3-connector RCA cable.
Press the “VIDEO” button to cycle through settings: Component, Off and
Composite. The video output mode is set to Component by default at the
factory.
How to Connect a Newer iPhone or iPod touch
On newer iPhone and iPod touch devices that use the iOS operating
system, you need to configure the speaker system to tell the iPhone or
iPod what type of video output you are using. Pressing the “VIDEO” button
cycles through “Component,” “Off” and “Composite” video output modes,
in that order. The factory default setting is “Component.”
1 Ensure your cable connections from the speaker system to
your monitor or TV are correct for your desired output mode.
2 Configure the speaker system for your desired output mode:
For component video playback, you don’t have to do anything. The
Octiv650 speaker system is set to “Component” at the factory. For
composite playback, press the “VIDEO” button twice (assuming the
speaker system is in “Component” mode) to set the speaker system
to “Composite” mode.
3 If video does not automatically start playing on your TV or
external monitor, press play again on your device.
NOTE When the speaker system external video mode is set to “Off,” video
will play back on your iPhone or iPod touch only.
EN
9
Page 12
How to Navigate the iPod Menu on
YouriPhone or iPod
In iPod mode, you can use the navigation keys on the remote to choose
songs from your music library and videos from your video library:
Press the “MENU” button to scroll up within a menu screen.
Press the “MENU” button to scroll down within a menu
screen.
Press the “MENU” button to go up a menu level. (On older
iPod models, pressing and holding this button will take you
back to the top-level menu. On 6th-generation iPod nano
models, this button provides no functionality.)
Press the “SELECT” button to make a selection within a menu.
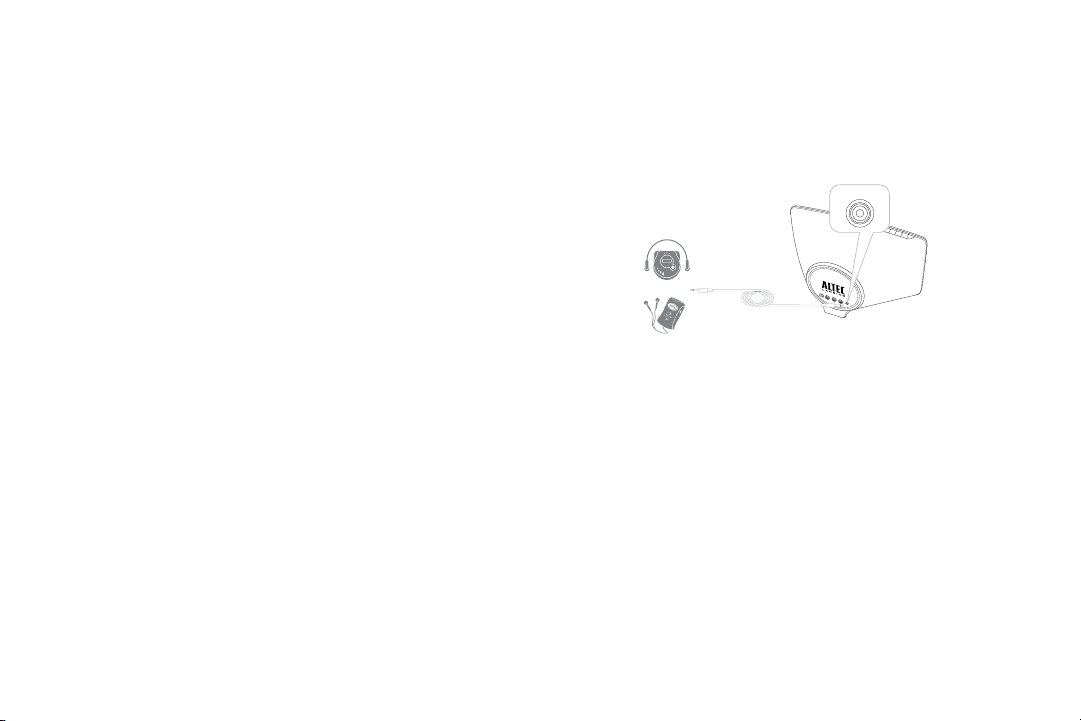
How to Listen to Your Non-docking
Portable Device
If you have a non-docking portable audio or video device, you can enjoy it
through your Altec Lansing Octiv650 speaker system as well. Just connect
it via the AUX jack. Here’s how:
AUX
How to Charge Your iPhone or iPod
Whenever your iPhone or iPod is docked and your Altec Lansing Octiv650
speaker system is plugged into an AC outlet, your iPhone or iPod is
charging (until fully charged) – even if the speaker system is switched off.
10
1 Locate a 3.5mm stereo cable (not included).
2 Plug one end of the stereo cable into your device.
Your device should have either a headphone or LINE OUT jack for
you to plug into.
3 Plug the other end of the stereo cable into your speaker
system’s AUX jack.
The AUX jack is located on the back of the speaker system.
4 Turn on your speaker system.
5 Turn on your device.
6 Find your desired song or video.
7 Start playing the song or video.
8 Adjust the volume.
Page 13

NOTE You may need to adjust the device volume also. Your device’s
volume should be set to approximately ¾ volume and adjusted from there.
How to Maintain Your Speaker System
Place your speaker system on a level surface away from sources of direct
sunlight or excessive heat.
Protect your furniture with a piece of cloth or other protective material when
placing your speaker system on a natural wood or lacquered finish.
Clean your speaker system with only a dry cloth. Cleaning agents, such as
benzene, thinner or similar materials, can damage the surface of the unit.
EN
11
Page 14

Troubleshooting
Symptom Possible Problem Solution
Speaker system
doesn’t respond
(nopower)
iPhone or iPod
doesn’t dock properly
iPhone or iPod
doesn’t respond to
the speaker system
or remote
AC adapter isn’t plugged into a
wall outlet or the connector isn’t
plugged into the power supply jack
on the back of the speaker system.
Wall outlet is not functioning. Plug another device into the same outlet to confirm the outlet is working.
The power isn’t turned on.
iPhone or iPod didn’t install
properly.
Device case is preventing iPhone
or iPod from installing properly.
iPhone or iPod is not installed
properly.
Device case is preventing iPhone
or iPod from installing properly.
Your iPhone or iPod software is
too old.
iPhone or iPod is locked up. Please make sure your iPhone or iPod is working properly before docking into the unit.
Plug the AC adapter into a wall outlet and plug the connector into the power supply jack
on the back of the speaker system.
Turn on the speaker system by pressing the
Remove your iPhone or iPod from the dock and check for obstructions on the connectors
in the dock and on your iPhone or iPod. Then reseat it in thedock.
Remove your iPhone or iPod from the dock. Remove the iPhone or iPod from its case.
Then reseat your iPhone or iPod in the dock.
Remove your iPhone or iPod from the dock and check for obstructions on the connectors
in the dock and on your iPhone or iPod. Then reseat it in the dock.
Remove your iPhone or iPod from the dock. Remove the iPhone or iPod from its case.
Then reseat your iPhone or iPod in the dock.
Upgrade software on your iPhone or iPod. For details, visit
www.apple.com/ipod/download.
Please refer to your iPhone or iPod manual for details.
button. The Power LED lightsup.
12
Page 15

Troubleshooting
Symptom Possible Problem Solution
iPhone or iPod
didn’tcharge
Sound is distorted
iPhone or iPod is not installed
properly.
Device case is preventing iPhone
or iPod from installing properly.
iPhone or iPod is locked up. Please make sure your iPhone or iPod is working properly before docking into the unit.
AC adapter isn’t plugged into a
wall outlet, or the connector is not
plugged into the power supply jack
on the back of the speaker system.
Volume level is set too high. Decrease the volume.
Sound source is distorted. If the iPhone or iPod original sound source (sound file) is of poor quality, distortion and
Remove your iPhone or iPod from the dock and check for obstructions on the connectors
in the dock and on your iPhone or iPod. Then reseat it in the dock.
Remove your iPhone or iPod from the dock. Remove the iPhone or iPod from its case.
Then reseat your iPhone or iPod in the dock.
Please refer to your iPhone or iPod manual for details.
Plug the AC adapter into a wall outlet and plug the connector into the supply jack on the
speaker system.
noise are easily noticed with high-power speakers. Try a different audio source such as a
music CD.
EN
13
Page 16

Troubleshooting
Symptom Possible Problem Solution
On newer iPhone and iPod touch devices that use the iOS operating system:
1. Ensure your cable connections from the speaker system to your monitor or TV are
correct for your selected output mode.
2. Play a movie on your iPhone or iPod touch
3. Press the “VIDEO” button until you get video on your device.
No video output
Full-featured remote
doesn’t work
Speaker system is in the wrong
video mode.
Battery is weak. Replace current battery with a new battery.
Full-featured remote is not pointed
toward the speaker system.
4. Then press the “VIDEO” button once for “Composite” or twice for “Component” output.
On older iPods, you select the video output type via the iPod player’s video settings:
1. Ensure your cable connections from the speaker system to your monitor or TV are
correct for your selected output mode.
2. Cycle through video output modes on your iPod until you see video on your external
monitor or TV.
NOTE The “VIDEO” button provides no functionality for older iPod models.
Point the full-featured remote toward the Altec Lansing speaker system and move within
10feet of the unit.
14
Page 17

Troubleshooting
Symptom Possible Problem Solution
No sound from the
AUX device, such as
an MP3 player or CD
player connected to
the AUX jack
The speaker system
exhibits erratic or
unexpected behavior;
controls do not
function
Cable is not properly connected to
the source or the speaker system.
Volume on the device is set
toolow.
Static electricity, momentary
interruption of power or abnormal
operating conditions may be
responsible.
Ensure the cable is properly connected between the source and the Octiv650 speaker
system.
Increase the volume on the device to approximately ¾ full volume.
1. Remove your iPhone or iPod.
2. Disconnect the AC adapter cable plug from the speaker system’s jack.
3. Wait 20 – 30 seconds.
4. While you wait, reset your iPhone or iPod.
5. Reconnect the AC adapter cable plug to the speaker system’s jack.
6. Turn on the speaker system and check for erratic behavior. For example, adjust the
volume and see if the LEDs change.
7. If the speaker system still exhibits erratic behavior (for example, the LEDs do not
change as you adjust the volume), restore the unit’s factory defaults:
A. Ensure that your Octiv650 speaker system is powered on.
B. Press and hold the
8. Reinstall your iPhone or iPod on the dock.
flashing.
button on the speaker system until the Power LED stops
EN
15
Page 18
Warranty
ALTEC LANSING ONE-YEAR LIMITED WARRANTY
What Does the Warranty Cover?
Altec Lansing warrants that its products shall be free from defects in materials or
workmanship, with the exceptions stated below.
What Is the Period of Coverage?
This warranty runs for one year from the date of purchase. The term of any warranties
implied by law shall expire when your limited warranty expires. Some states and/or
Member States in the European Union do not allow limitations on how long an implied
warranty lasts, so the above limitation may not apply to you.
What Does the Warranty Not Cover?
This warranty does not cover any defect, malfunction or failure that occurs as a result
of: improper installation; misuse or failure to follow the product directions; abuse; or use
with improper, unintended orfaulty equipment. (For information on proper installation,
operation and use consult the manual suppliedwith the product. If you require a
replacement manual, you may download a manual from www.alteclansing.com.) Also,
consequential and incidental damages are not recoverable under this warranty. Some
states do not allow the exclusion or limitation of incidental or consequential damages,
sothe above limitation or exclusion may not apply to you.
What Will Altec Lansing Do to Correct the Problem?
Altec Lansing will, at its option, repair or replace any product that proves to be defective
in material or workmanship. If your product is no longer being manufactured, or is out of
stock, at its option, Altec Lansing may replace your product with a similar or better Altec
Lansing product.
How to Get Warranty Service
To get a covered product repaired or replaced, you must contact Altec Lansing during
the warranty period by email (csupport@alteclansing.com). You must include in your
email, your name, address, email address, telephone number, date of purchase and
a complete description of the problem you are experiencing. In the United States, you
may alternatively contact Altec Lansing by telephone at 1-800-ALTEC88 – please be
prepared to provide the same information. If the problem appears to be related to a
defect in material or workmanship, upon proof of purchase Altec Lansing will provide
you a return authorization and instructions for return shipment. Return shipments shall
be at the customer’s expense. You should insure the shipment as appropriate because
you are responsible for the product until it arrives at Altec Lansing.
How Will State Law Affect Your Rights?
This warranty gives you specific legal rights, and you may also have other rights which
vary from state to state. Please note that in the European Union, you as a consumer
might have other legal rights under national legislation of European Union Member
States governing the sale of Altec Lansing’s goods. Those rights are not affected by this
guarantee.
The above limited warranties and remedies are sole warranties and remedies available to
purchaser, if, and to the extent, valid and enforceable under the applicable law.
DISPOSAL OF OLD ELECTRICAL AND ELECTRONIC EQUIPMENT
health, which could otherwise be caused by inappropriate waste handling of this
product. The recycling of materials will help to conserve natural resources. For more
detailed information about recycling of this product, please contact your local city office
or your household waste disposal service.
This symbol on the product or on its packaging indicates that this product
shall not be treated as household waste. Instead it shall be handed over to
the applicable collection point for the recycling of electrical and electronic
equipment. By ensuring this product is disposed of correctly, you will help
prevent potential negative consequences for the environment and human
16
Page 19

Bienvenue
Nous vous remercions de votre acquisition du système d’enceinte Octiv650
d’Altec Lansing. Spécifiquement conçu pour fonctionner avec votre
iPhone et votre iPod, ce système à double station d’accueil aux lignes
élégantes et au design intelligent, aussi discret qu’il est puissant, réinvente
le son immersif. Il représente l’alliage parfait d’un style recherché avec la
performance sonore.
Veuillez lire attentivement votre guide d’utilisation, vous y trouverez les
instructions nécessaires pour installer et écouter votre système d’enceinte
Octiv650.
Avant d’installer ou d’utiliser le système d’enceinte Octiv650 d’Altec
Lansing, veuillez prendre connaissance d’importantes informations
concernant la sécurité du produit, ci-dessous.
Services d’assistance
Les réponses à la plupart des questions relatives à la configuration et
aux performances sont disponibles dans le guide de dépannage à la
section Dépannage. Vous pouvez aussi consulter la foire aux questions
(FAQ) de la section d’assistance à la clientèle de notre site, à l’adresse
www.alteclansing.com.
Si vous vivez en Amérique du Nord et ne parvenez pas àtrouver les
informations dont vous avez besoin, veuillez demander l’aide de notre
équipe d’assistance clientèle avant de renvoyer ce produit au détaillant
selon la politique de retour en vigueur.
Tél.: 800-258-3288 (appel gratuit aux USA et au Canada)
E-mail: csupport@alteclansing.com
Si vous ne vivez pas en Amérique du Nord, veuillez consulter notre site
Internet www.alteclansing.com et sélectionnez le pays dans lequel vous
vivez pour localiser le distributeur de votre pays.
Veuillez consulter notre site Internet www.alteclansing.com pour obtenir les
informations les plus récentes.
Distribution internationale
Clients internationaux: pour plus d’informations au sujet de la distribution
des produits Altec Lansing dans votre pays, veuillez consulter notre site
Internet www.alteclansing.com et cliquez sur votre pays.
Enregistrer votre produit
Veuillez visiter www.alteclansing.com pour enregistrer votre produit en ligne,
pour que nous puissions vous apporter le meilleur service après-vente
possible, ainsi que notre assistance technique.
FR
17
Page 20

Consignes de sécurité
Le symbole de l’éclair terminé par une flèche au centre d’un triangle
équilatéral indique à l’utilisateur la présence d’une tension non
isolée, «dangereuse», régnant à l’intérieur du boîtier; cette tension
peut être suffisante pour constituer un risque d’électrocution.
Attention: pour prévenir le risque d’électrocution, ne retirez pas le
couvercle (ou le panneau arrière) de l’appareil. L’appareil ne contient
aucune pièce réparable par l’utilisateur. Confiez l’ensemble des
travaux d’entretien et de réparation au personnel qualifié.
ATTENTION
Pour prévenir l’électrocution, ne pas brancher la fiche polarisée dans un prolongateur,
une prise de courant ou toute autre prise d’alimentation si les broches ne peuvent pas
être entièrement insérées et restent exposées.
AVERTISSEMENT
Pour réduire les risques d’incendie ou de choc électrique, ne pas exposer cet appareil à
la pluie ou à l’humidité.
CONSIGNES DE SÉCURITÉ IMPORTANTES
1. Lisez ces instructions.
2. Conservez ces instructions.
3. Suivez l’ensemble des avertissements.
4. Respectez l’ensemble des instructions.
5. N’utilisez pas cet appareil près de l’eau. N’utilisez pas l’appareil à proximité
d’un point d’eau. Cet appareil ne doit pas être exposé à des gouttes ou des
éclaboussures. Aucun objet rempli de liquide (un vase, par exemple) ne doit être
placé sur l’appareil.
6. Nettoyez uniquement l’appareil à l’aide d’un chiffon sec.
7. N’obstruez pas les orifices de ventilation. Installez l’appareil conformément aux
instructions du fabricant.
8. N’installez pas l’appareil à proximité de sources de chaleur telles que des radiateurs,
des registres de chaleur, des fourneaux ou autres appareils produisant de la chaleur
(amplificateurs inclus).
9. N’effectuez pas de dérivation contournant les dispositifs de sécurité de fiche
polarisée ou mise à la terre. Aux États-Unis, les fiches polarisées sont munies de
deux lames (l’une plus large que l’autre). Les fiches assorties d’un dispositif de
mise à la masse disposent de deux lames et d’une broche de mise à la terre. La
18
Le point d’exclamation placé au centre d’un triangle équilatéral
est destiné à attirer l’attention de l’utilisateur sur des instructions
de fonctionnement et d’entretien (ou de réparation) importantes
figurant dans la notice accompagnant le produit.
lame plus large ou la broche est fournie pour votre sécurité. Si la fiche fournie ne
correspond pas à votre prise électrique, consultez un électricien afin de remplacer la
prise obsolète.
10. Faites en sorte que le cordon d’alimentation ne puisse être piétiné ou pincé,
notamment au niveau des prises et près de sa connexion à l’appareil.
11. Utilisez uniquement les accessoires spécifiés par le fabricant.
12. Utilisez uniquement le chariot, le présentoir, le pied, le support ou la table
13. Débranchez l’appareil en cas d’orage ou lorsque vous ne l’utilisez pas pendant des
14. Confiez l’ensemble des travaux d’entretien au personnel d’entretien qualifié. Des
15. N’installez pas l’appareil dans une zone où l’accès à la fiche d’alimentation n’est pas
Veuillez lire les informations de la FCC et les logos de sécurité importants situés sous
l’appareil.
spécifié(e) par le fabricant ou vendu(e) avec l’appareil. Si vous utilisez un
chariot, déplacez avec précaution l’ensemble chariot-appareil afin d’éviter
toute blessure en cas de chavirage.
périodes de temps prolongées.
travaux de réparation sont nécessaires lorsque l’appareil est endommagé (la fiche
ou le cordon d’alimentation est endommagé, du liquide s’est renversé ou des
objets sont tombés dans l’appareil, l’appareil a été exposé à la pluie ou à l’humidité,
l’appareil ne fonctionne pas normalement ou l’appareil est tombé).
garanti. Le débranchement de la fiche d’alimentation est la seule manière de mettre
le produit complètement hors tension. Vous devez pouvoir accéder facilement à la
fiche à tout moment.
Page 21

Sommaire
Bienvenue ........................................................................................................................................................................................................................... 17
Consignes de sécurité ........................................................................................................................................................................................................ 18
Contenu de l’emballage .....................................................................................................................................................................................................20
Caractéristiques et indicateurs de l’enceinte .....................................................................................................................................................................21
Détails de la télécommande multifonctions .......................................................................................................................................................................22
Mise en route ...................................................................................................................................................................................................................... 22
Comment trouver le morceau de musique ou la vidéo que vous recherchez .................................................................................................................... 24
Comment lire la musique ou la vidéo, comment l’interrompre...........................................................................................................................................24
Comment régler le volume ................................................................................................................................................................................................. 24
Comment ajuster le niveau des graves ou des aigus ......................................................................................................................................................... 25
Paramétrage des commandes EQ ..................................................................................................................................................................................... 25
Comment écouter votre iPhone ou iPod ............................................................................................................................................................................ 26
Sortie vidéo vers un moniteur externe ou une télévision ...................................................................................................................................................26
Comment naviguer dans le Menu iPod sur votre iPhone ou iPod .....................................................................................................................................27
Comment recharger votre iPhone ou iPod ......................................................................................................................................................................... 27
Comment écouter votre dispositif audio portable non insérable .......................................................................................................................................28
Comment entretenir votre système d’enceinte ..................................................................................................................................................................28
Recherche de pannes ........................................................................................................................................................................................................29
Garantie ..............................................................................................................................................................................................................................33
FR
19
Page 22
Contenu de l’emballage
Adaptateur CA
Système d’enceintes Altec Lansing Octiv650
Télécommande multifonctions
20
Page 23

Caractéristiques et indicateurs de l’enceinte
Touche des graves
Touche des aigus
Touche vidéo
Touche d’augmentation du volume
Touche de diminution du volume
Touche Marche/Arrêt
Prise jack d’entrée auxiliaire
Sortie vidéo composante (rouge)
Sortie vidéo composante (vert)
Sortie vidéo composante bleu/
Prise d’entrée pour adaptateur CA
composite
Indicateur LED à 5 diodes de niveau du volume, des graves et des aigus
Voyant
d’alimentation
Station d’accueil pour iPhone et iPod
FR
21
Page 24

Détails de la télécommande
multifonctions
REMARQUE Pour obtenir les meilleurs résultats, pointez la télécommande
multifonctions en direction du système d’enceinte Octiv650.
Touche Marche/Arrêt
Touche d’augmentation
des aigus
Touche d’augmentation
des graves
Touche de diminution
des graves
Touche piste arrière
Touche Lecture/Pause
Touche EQ (égalisateur
graphique) Rock
Touche Menu arrière
Touche EQ (égalisateur
graphique) Hip Hop
Touche EQ (égalisateur
graphique) Pop
Touche sourdine
Touche d’augmentation
du volume
Touche de diminution
des aigus
Touche de diminution
du volume
Touche piste avant
Touche Altec EQ
Touche Menu vers
le haut
Touche de sélection
Touche égalisateur
graphique personnalisé
Touche Menu vers
le bas
Mise en route
Placez votre système d’enceinte Altec Lansing Octiv650 sur un bureau,
une bibliothèque, un comptoir ou une autre surface plane et solide.
AVERTISSEMENT L’Octiv650 comporte un caisson de graves, placé en
partie inférieure du système. Lors du choix d’un emplacement pour votre
Octiv650, prenez soin de ne pas heurter le caisson des graves contre des
arêtes proéminentes ou le coin d’un meuble; de même, ne placez pas le
système sur des objets acérés ou saillants. Ceci pourrait endommager le
caisson des graves.
AVERTISSEMENT Afin de ne pas faire tomber accidentellement votre
iPhone ou iPod, assurez-vous d’enlever le dispositif de sa station d’accueil
avant de saisir votre système d’enceinte pour le transporter.
Comment installer l’adaptateur CA
1 Connectez le cordon de
l’adaptateur CA dans la prise
jack d’alimentation du système
d’enceinte.
Ce jack se trouve à l’arrière du
système.
2 Insérez la fiche du cordon de
l’adaptateur CA dans une prise murale.
AVERTISSEMENT L’utilisation d’un autre adaptateur CA peut endommager
le produit. N’utiliser que l’adaptateur CA fourni.
DC IN
22
Page 25

Mise en route
Comment installer la pile de la télécommande multifonctions
La pile de la télécommande (incluse) devra être installée avant de faire
fonctionner la télécommande. Pour cela, veuillez suivre les instructions
ci-dessous:
1 Sortez à moitié le support de pile de son compartiment.
Le compartiment de la pile se trouve au bas du dos de la
télécommande. Avec l’ongle du pouce, tirez le verrou dans l’axe long
de la télécommande, tout en retirant la pile du compartiment à l’aide
d’un ongle de l’autre main.
2 Retirez la pile de l’emballage plastique où vous avez trouvé la
télécommande et insérez-la dans le compartiment à pile de
sorte que le signe « + » soit tourné vers le haut.
3 Replacez le compartiment de la batterie dans la
télécommande en veillant à laisser la pile à sa place.
Vous entendrez et sentirez un déclic de mise en place.
REMARQUE Veuillez disposer des piles usagées comme il convient.
Comment placer votre iPhone ou iPod dans sa station d’accueil
Mettez votre iPhone ou iPod en
position correcte.
Faites correspondre le port de connexion
de votre iPhone ou iPod et le connecteur
du système Octiv650. Glissez votre iPhone
ou iPod dans le connecteur de la station
d’accueil.
Comment mettre votre système d’enceinte
sous tension
1 Assurez-vous que la tension secteur
parvient à l’appareil.
Assurez-vous que l’adaptateur CA est bien connecté au système et
branché dans une prise murale. Consultez la section Mise en route
pour de plus amples informations.
2 Allumez l’appareil.
Appuyez sur la touche
télécommande.
Comment mettre votre système d’enceinte hors tension
Éteignez l’appareil.
Appuyez sur la touche
télécommande.
REMARQUE Après quelques minutes d’inutilisation, le système d’enceinte
se met automatiquement hors tension.
sur le système d’enceinte ou sur la
sur le système d’enceinte ou sur la
FR
23
Page 26

Comment trouver le morceau de
musique ou la vidéo que vous recherchez
Servez-vous de la télécommande pour localiser le morceau de musique ou
la vidéo que vous désirez lire.
Passer au début du morceau ou de la vidéo en cours de lecture.
Appuyez sur la touche
Passer au début du morceau ou de la vidéo suivante.
Appuyez sur la touche
Revenir en arrière sur le morceau ou le fichier vidéo en cours
d’écoute.
Pendant la lecture d’un morceau ou d’une vidéo, appuyez et
maintenez l’appui sur la touche
fait revenir rapidement en arrière dans le morceau ou la vidéo en
cours de lecture.
Avance rapide dans le morceau ou la vidéo en cours de lecture.
Pendant la lecture d’un morceau ou d’une vidéo, appuyez et
maintenez l’appui sur la touche
avancer rapidement dans le morceau ou la vidéo en cours de lecture.
de la télécommande.
de la télécommande.
de la télécommande. Ceci vous
de la télécommande. Ceci vous fait
Comment lire la musique ou la vidéo,
comment l’interrompre
La commande à distance est capable de contrôler toutes les fonctions de
lecture sur votre iPhone ou iPod.
Commencer l’écoute d’une piste musicale ou d’une vidéo
sélectionnée.
Appuyez sur la touche
votre appareil se fera entendre sur les haut-parleurs du système. Si
24
de la télécommande. Le son provenant de
vous avez configuré votre système pour cela, la vidéo s’affichera sur
votre moniteur ou télévision externe. Consultez la section Sortie vidéo
vers un moniteur externe ou une télévision.
Interrompre la lecture du morceau de musique ou de la vidéo
choisie.
Appuyez à nouveau sur la touche
ou la vidéo s’interrompt.
de la télécommande. La musique
Comment régler le volume
Augmenter le volume.
Appuyez et maintenez l’appui sur la touche «+» du système
d’enceinte ou «VOL+» de la télécommande jusqu’à obtention du
niveau sonore souhaité.
Diminuer le volume.
Appuyez et maintenez l’appui sur la touche «–» du système
d’enceinte ou «VOL–» de la télécommande jusqu’à obtention du
niveau sonore souhaité.
Mettre en sourdine
Appuyez sur la touche «MUTE» de votre télécommande. Pour
rétablir le son, appuyez à nouveau sur la touche «MUTE».
Page 27

Comment ajuster le niveau des graves
ou des aigus
Comment changer le niveau des graves en utilisant les commandes
intégrées
Augmenter le niveau des graves.
Tout en appuyant sur la touche «BASS», appuyez à plusieurs reprises
sur la touche «+» ou appuyez et maintenez l’appui sur la touche «+».
Diminuer le niveau des graves.
Tout en appuyant sur la touche «BASS», appuyez à plusieurs reprises
sur la touche «–» ou appuyez et maintenez l’appui sur la touche «–».
Comment changer le niveau des aigus en utilisant les commandes
intégrées
Augmenter le niveau des aigus.
Tout en appuyant sur la touche «TREBLE», appuyez à plusieurs
reprises sur la touche «+» ou appuyez et maintenez l’appui sur la
touche «+».
Diminuer le niveau des aigus.
Tout en appuyant sur la touche «TREBLE», appuyez à plusieurs
reprises sur la touche «–» ou appuyez et maintenez l’appui sur la
touche «–».
Comment changer le niveau des graves en utilisant la télécommande
Appuyez sur la touche «BASS+» pour augmenter le niveau des
graves.
Appuyez sur la touche «BASS–» pour diminuer le niveau des graves.
Comment changer le niveau des aigus en utilisant la télécommande
Appuyez sur la touche «TREBLE+» pour augmenter le niveau des
aigus.
Appuyez sur la touche «TREBLE–» pour diminuer le niveau des aigus.
Paramétrage des commandes EQ
Comment sélectionner la présélection d’égalisateur graphique choisie
Sur la commande à distance, appuyez sur la touche qui correspond à votre
réglage d’égalisateur choisi:
• ROCK
• ALTEC EQ
• HIPHOP
• POP
• CUSTOM
Comment ajuster l’égalisateur graphique multibandes («EQ»)
Le magasin iTunes met à votre disposition une application permettant de
personnaliser l’égalisateur graphique multi-bandes intégré à l’Octiv650.
Voyez www.apple.com/itunes pour de plus amples informations.
Comment rétablir les réglages d’usine par défaut pour l’EQ
1 Assurez-vous que le système d’enceinte Octiv650 est sous
tension.
2 Appuyez et maintenez l’appui sur la touche du système
d’enceinte jusqu’à ce que le témoin LED d’alimentation
s’arrête de clignoter.
FR
25
Page 28

Comment écouter votre iPhone ou iPod
1 Placez votre iPhone ou votre
iPod dans le système d’enceinte
Octiv650 d’Altec Lansing.
2 Mettez votre système sous tension
3 Recherchez le morceau de musique
ou la vidéo que vous souhaitez lire.
4 Commencez la lecture de votre
morceau ou vidéo.
5 Réglez le volume.
REMARQUE Chaque fois que vous insérez
votre iPhone ou iPod dans la station d’accueil, il est rechargé jusqu’à ce
qu’il atteigne pleine charge.
Sortie vidéo vers un moniteur externe
ou une télévision
La touche «VIDEO» sur le système d’enceinte permet à l’utilisateur de
changer de mode de sortie vidéo. Trois modes vidéo sont disponibles:
• Arrêt (Off) : l’intercommunication de la vidéo est désactivée, ce
qui est indiqué par un voyant lorsque l’on appuie sur le bouton
vidéo. Les vidéos ne peuvent être lues que sur un écran d’iPhone
ou d’iPod.
• Composite : indiqué par 2 voyants lorsque l’on appuie sur le
bouton vidéo. Les vidéos seront lues sur un écran externe à vidéo
composite, à condition qu’il soit branché. Il suffit de brancher un
seul câble RCA entre la prise RCA marquée « COMP Pb & CVBS
OUT», à l’arrière de l’enceinte, et la prise jack RCA (jaune) de votre
26
moniteur ou télévision.
• Composante (component) : indiqué par 3 voyants lorsque l’on
appuie sur le bouton vidéo. Les vidéos seront lues sur un écran
externe à vidéo RGB en composante, à condition qu’il soit branché.
Branchez les sorties RCA « bleu », « vert » et « rouge » marquées
«COMP Pb & CVBS OUT », « COMP Y OUT » et « COMP Pr OUT»
à l’arrière de l’enceinte aux entrées correspondantes de votre
moniteur ou télévision à l’aide d’un câble RCA à trois connecteurs.
Appuyez sur la touche «VIDEO» pour faire défiler les réglages suivants:
Component, Off et Composite. Le mode de sortie vidéo est réglé par
défaut, en usine, sur «Component».
Comment brancher un nouvel iPhone ou iPod touch
Dans le cas des nouveaux iPhone et iPod touch qui utilisent le système
d’exploitation iOS, vous devez configurer le système d’enceinte de telle
manière qu’il indique à l’iPhone ou à l’iPod le type de sortie vidéo que vous
utilisez. Le fait d’appuyer sur la touche «VIDEO» fait défiler les modes dans
l’ordre suivant: «Component», «Off» puis «Composite». Le réglage par
défaut effectué à l’usine est «Component».
1 Assurez-vous que les branchements entre le système
d’enceinte et votre moniteur vidéo ou télévision sont corrects
pour le mode de sortie désiré.
2 Configurez le système d’enceinte pour le mode de sortie vidéo
désiré:
Pour la lecture vidéo «Component», il n’y a rien à faire. Le système
d’enceinte Octiv650 a été réglé sur «Component» à l’usine. Pour la
lecture «vidéo composite», appuyez deux fois sur la touche «VIDEO»
(ceci suppose que le système d’enceinte est en mode «Component»)
pour mettre le système d’enceinte en mode «Composite».
Page 29

3 Si la vidéo ne se lance pas automatiquement sur votre
téléviseur ou votre écran externe, veuillez appuyer à nouveau
sur la touche Lecture de votre appareil.
REMARQUE Lorsque le mode vidéo externe du système d’enceinte est
réglé sur «Off», la vidéo ne sera lue que sur votre iPhone ou iPod touch.
Comment naviguer dans le Menu iPod
sur votre iPhone ou iPod
En mode iPod, vous pouvez vous servir des touches de navigation
de la télécommande pour choisir des morceaux de musique de votre
bibliothèque et des vidéos de votre vidéothèque:
Appuyez sur la touche «MENU» pour accéder à la partie
supérieure du menu.
Appuyez sur la touche «MENU» pour accéder à la partie
inférieure du menu.
Appuyez sur la touche «MENU» pour remonter d’un niveau
dans le menu. (Sur les modèles d’iPod plus anciens, le fait
d’appuyer et de maintenir l’appui sur cette touche vous
ramènera au menu de niveau supérieur. Su les iPod nano de 6e
génération, ce bouton n’a aucune fonction.)
Appuyez sur la touche «SELECT» pour sélectionner un
élément du menu.
Comment recharger votre iPhone
ou iPod
Chaque fois que votre iPod est inséré dans la station d’accueil du système
d’enceinte Octiv650 d’Altec Lansing et si celui-ci est branché sur une prise
de courant, votre iPhone ou iPod se recharge (jusqu’à ce qu’il atteigne son
plein niveau de charge) – et ce, même si le système est hors tension.
FR
27
Page 30

Comment écouter votre dispositif audio
portable non insérable
Si vous possédez un autre appareil audio non insérable, vous pouvez
également l’écouter sur votre système d’enceinte Octiv650 d’Altec
Lansing. Il suffit de le connecter au système par l’intermédiaire de la prise
«AUX». Voici comment procéder:
AUX
1 Procurez-vous un câble stéréo 3,5mm (non fourni).
2 Enfichez l’une des extrémités du câble dans le dispositif.
Votre appareil externe devrait posséder une prise de casque ou une
prise jack «LINE OUT» dans laquelle vous pouvez brancher votre
câble.
3 Enfichez l’autre extrémité du câble stéréo dans la prise jack
«AUX» de votre système.
Ce jack se trouve à l’arrière du système d’enceinte.
4 Mettez votre système sous tension
5 Mettez votre appareil sous tension.
6 Recherchez le morceau de musique ou la vidéo que vous
souhaitez lire.
7 Commencez la lecture de votre morceau ou vidéo.
28
8 Réglez le volume.
REMARQUE Vous pourrez être également amené à régler le volume sur
l’appareil externe. Le volume de cet appareil devrait être réglé sur ¾ du
maximum environ, comme réglage de départ.
Comment entretenir votre système
d’enceinte
Placez votre système d’enceinte sur une surface plane, en dehors du soleil
direct et loin de toute chaleur excessive.
Protégez vos meubles avec un tissu ou autre matériau protecteur si vous
placez le système d’enceinte sur une surface de bois naturel ou laqué.
Nettoyez votre système d’enceinte à l’aide d’un chiffon propre et sec. Les
agents de nettoyage, tels que benzène, térébenthine ou produits similaires,
sont susceptibles d’endommager la surface de l’appareil.
Page 31

Recherche de pannes
Symptôme Problème possible Solution
Le système d’enceinte
ne répond pas (il ne
s’allume pas)
L’iPhone ou iPod
ne se loge pas
correctement dans la
station d’accueil
La prise de l’adaptateur AC n’est
pas enfichée dans une prise murale
ou le connecteur n’est pas branché
dans la prise d’alimentation au dos
du système.
La prise murale ne fonctionne pas. Branchez un autre appareil dans la même prise afin de vous assurer qu’elle fonctionne.
L’appareil n’est pas sous tension.
L’iPhone ou iPod n’a pas été
correctement installé.
Le boîtier de l’appareil empêche
l’iPhone ou l’iPod de s’insérer
correctement.
Branchez la prise de l’adaptateur CA dans une prise murale ou enfichez le connecteur
dans la prise jack d’alimentation au dos du système.
Mettez le système en marche en appuyant sur la touche
s’allume.
Retirez l’iPhone ou iPod de la station d’accueil et vérifiez l’absence de toute obstruction
des connecteurs côté station et côté iPhone ou iPod. Ensuite, replacez-le dans la station
d’accueil.
Retirez votre iPhone ou iPod de la station d’accueil. Retirez votre iPhone ou iPod de son
boîtier. Remettez alors votre iPhone ou iPod dans la station d’accueil.
. Le voyant d’alimentation LED
FR
29
Page 32

Recherche de pannes
Symptôme Problème possible Solution
L’iPhone ou iPod
ne répond pas
aux commandes
du système
d’enceinte ou à la
télécommande
L’iPhone ou iPod ne
se recharge pas
L’iPhone ou iPod n’est pas
correctement installé.
Le boîtier de l’appareil empêche
l’iPhone ou l’iPod de s’insérer
correctement.
Le logiciel de l’iPhone ou iPod est
trop ancien.
L’iPhone ou iPod est bloqué. Veuillez vous assurer que l’iPhone ou l’iPod fonctionne correctement avant de le placer
L’iPhone ou iPod n’est pas
correctement installé.
Le boîtier de l’appareil empêche
l’iPhone ou l’iPod de s’insérer
correctement.
L’iPhone ou iPod est bloqué. Veuillez vous assurer que l’iPhone ou l’iPod fonctionne correctement avant de le placer
La prise de l’adaptateur AC n’est
pas enfichée dans une prise murale
ou le connecteur n’est pas branché
dans la prise d’alimentation au dos
du système.
Retirez l’iPhone ou iPod de la station d’accueil et vérifiez l’absence de toute obstruction
des connecteurs côté station et côté iPhone ou iPod. Ensuite, replacez-le dans la station
d’accueil.
Retirez votre iPhone ou iPod de la station d’accueil. Retirez votre iPhone ou iPod de son
boîtier. Remettez alors votre iPhone ou iPod dans la station d’accueil.
Mettez le logiciel de votre iPhone ou iPod à niveau. Pour ce faire, visitez
www.apple.com/ipod/download.
dans l’appareil. Pour les détails, veuillez faire référence au manuel de votre iPhone ou iPod.
Retirez l’iPhone ou iPod de la station d’accueil et vérifiez l’absence de toute obstruction
des connecteurs côté station et côté iPhone ou iPod. Ensuite, replacez-le dans la station
d’accueil.
Retirez votre iPhone ou iPod de la station d’accueil. Retirez votre iPhone ou iPod de son
boîtier. Remettez alors votre iPhone ou iPod dans la station d’accueil.
dans l’appareil. Pour les détails, veuillez faire référence au manuel de votre iPhone ou iPod.
Branchez la prise de l’adaptateur CA dans une prise murale ou enfichez le connecteur
dans la prise jack d’alimentation du système.
30
Page 33

Recherche de pannes
Symptôme Problème possible Solution
Le réglage du volume est trop élevé. Baissez le volume.
Le son est déformé
Pas de sortie vidéo
La télécommande
multifonctions ne
fonctionne pas.
Le son de la source est déformé. Si le son d’origine, tel qu’il provient de l’iPhone ou iPod (fichier audio), est de mauvaise
Le système d’enceinte est réglé sur
un mode vidéo incorrect.
La pile est épuisée. Remplacez la pile par une pile fraîche.
La télécommande multifonctions
n’est pas pointée vers le système
d’enceinte.
qualité, la distorsion et le bruit sont plus évidents encore dans des haut-parleurs haute
puissance. Essayez une autre source audio, telle qu’un CD musical, par exemple.
Sur les iPhone et iPod touch plus récents utilisant le système d’exploitation iOS:
1. Assurez-vous que les branchements entre le système d’enceinte et votre moniteur
vidéo ou télévision sont corrects pour le mode de sortie désiré.
2. Lancez un film sur votre iPhone ou iPod touch
3. Appuyez sur la touche «VIDEO» jusqu’à ce que vous voyez la vidéo s’afficher sur votre
appareil.
4. Ensuite, appuyez une nouvelle fois sur «VIDEO» pour choisir la sortie «Composite» ou
deux fois pour «Component».
Sur les anciens iPods, l’on sélectionne le mode de sortie vidéo par les réglages vidéo de
l’iPod:
1. Assurez-vous que les branchements entre le système d’enceinte et votre moniteur
vidéo ou télévision sont corrects pour le mode de sortie désiré.
2. Faites défiler les modes de sortie vidéo sur votre iPod jusqu’à ce que la vidéo
apparaisse sur votre moniteur ou votre télévision externe.
REMARQUE La touche «VIDEO» n’offre pas de fonction compatible avec les anciens
modèles d’iPod.
Pointez la télécommande multifonctions vers le système d’enceinte Altec Lansing et
approchez-vous à moins de 3m de l’appareil.
FR
31
Page 34

Recherche de pannes
Symptôme Problème possible Solution
Aucun son ne
provient de l’appareil
connecté à la prise
AUX, par exemple un
lecteur MP3 ou un
lecteur de CD.
Le système présente
un fonctionnement
irrégulier ou un
comportement
inattendu; les
commandes ne
fonctionnent pas
Le câble n’est pas correctement
branché côté source ou côté
système d’enceinte.
Le volume de l’appareil n’est pas
assez élevé.
L’électricité statique, une coupure
de courant momentanée ou des
conditions de fonctionnement
anormales peuvent être
responsables.
Assurez-vous que la câble est correctement branché côté source et côté Octiv650.
Augmentez le volume du lecteur à environ ¾ de son niveau maximum.
1. Retirez votre iPhone ou iPod.
2. Débranchez le cordon de l’adaptateur CA de la prise jack d’alimentation du système
d’enceinte.
3. Patientez entre 20 et 30 secondes.
4. Pendant que vous attendez, réinitialisez (RAZ) votre iPhone ou iPod.
5. Rebranchez le cordon de l’adaptateur CA dans la prise jack d’alimentation du système
d’enceinte.
6. Mettez le système d’enceinte sous tension et guettez tout comportement anormal.
Parexemple, ajustez le volume et regardez si le changement se reflète dans l’indication
des LED.
7. Si le système d’enceinte continue à manifester un comportement anormal (par exemple
si les LED ne changent pas quand vous montez et baissez le volume), remettez-le à ses
réglages d’usine:
A. Assurez-vous que le système d’enceinte Octiv650 est sous tension.
B. Appuyez et maintenez l’appui sur la touche
8. Remettez votre iPhone ou iPod dans la station d’accueil.
le témoin LED d’alimentation s’arrête de clignoter.
du système d’enceinte jusqu’à ce que
32
Page 35

Garantie
GARANTIE ALTEC LANSING LIMITÉE D’UN AN
Quels sont les éléments couverts par la garantie?
Altec Lansing garantit que ses produits sont dépourvus de défauts au niveau des
matériaux ou de la main-d’œuvre, à l’exception des conditions détaillées ci-dessous.
Quelle est la durée de la garantie?
Cette garantie couvre une période de deux ans à compter de la date d’achat. Les
conditions des garanties légales implicites prennent fin à l’issue de la période de validité
de la garantie limitée. Certains états et/ou états membres de l’Union européenne
n’acceptent pas les restrictions relatives à la durée des garanties implicites. Il est donc
possible que la restriction susmentionnée ne s’applique pas à votre cas.
Quels éléments ne sont pas couverts par la garantie?
Cette garantie ne couvre pas les défauts, mauvais fonctionnements ou anomalies qui
peuvent survenir à la suite des événements suivants: installation incorrecte, utilisation
incorrecte ou non-respect des instructions se rapportant au produit, utilisation abusive
ou utilisation avec un équipement incorrect, inadapté ou défectueux (pour obtenir des
informations relatives à l’installation, au fonctionnement et à l’utilisation du produit,
consultez le manuel fourni avec le produit). Si vous avez besoin d’un manuel de
remplacement, vous pouvez télécharger un manuel à l’adresse www.alteclansing.com.
En outre, les dommages consécutifs ou indirects ne sont pas pris en charge par cette
garantie. Certains états ne permettent pas l’exclusion ou la restriction des dommages
consécutifs ou secondaires, il est donc possible que l’exclusion ou la restriction
susmentionnée ne s’applique pas à votre cas.
Que fera Altec Lansing pour corriger le problème?
Altec Lansing réparera ou remplacera, à sa discrétion, les produits qui s’avèrent
défectueux au niveau des pièces ou de la main-d’œuvre. Si votre produit n’est plus
fabriqué ou n’est plus disponible en stock, Altec Lansing remplacera à sa discrétion
votre produit par un produit Altec Lansing similaire ou de meilleure qualité.
Comment obtenir une réparation sous garantie
Pour obtenir la réparation ou le remplacement d’un produit sous garantie, vous devez
contacter Altec Lansing par courrier électronique (csupport@alteclansing.com) au cours de
la période de garantie. Le courrier électronique doit inclure votre nom, votre adresse, votre
adresse électronique, votre numéro de téléphone, la date d’achat ainsi qu’une description
détaillée du problème rencontré. Aux États-Unis, vous pouvez également contacter Altec
Lansing par téléphone au 1-800-ALTEC88 – soyez prêt à fournir les mêmes informations.
Si le problème s’avère lié à une anomalie au niveau des matériaux ou de la main-d’œuvre,
Altec Lansing vous enverra, sur présentation d’une preuve d’achat, une autorisation
de retour et des instructions relatives au renvoi du produit. Le renvoi s’effectuera aux
frais du client. Vous devez assurer l’expédition de manière adaptée: vous êtes en effet
responsable du produit jusqu’à ce qu’il parvienne à Altec Lansing.
Dans quelle mesure les lois nationales affectent-elles vos droits?
Cette garantie vous confère des droits légaux spécifiques. Vous pouvez également
disposer de droits qui varient d’un état à l’autre. Veuillez noter qu’au sein de l’Union
européenne, vous pouvez, en tant que consommateur, disposer d’autres droits légaux
selon la législation nationale des états membres de l’Union européenne régissant la vente
des marchandises Altec Lansing. Ces droits ne sont pas affectés par la présente garantie.
Les garanties et recours limités détaillés ci-dessus sont les seuls garanties et recours
disponibles pour l’acheteur si et dans la mesure où ils sont valables et applicables selon
la loi en vigueur.
ÉLIMINATION DE L’ÉQUIPEMENT ÉLECTRIQUE ET ÉLECTRONIQUE OBSOLÈTE
pour l’environnement et la santé de l’homme qui sont susceptibles d’être engendrées
par une mise au rebut inadéquate de ce produit dans le cas contraire. Le recyclage des
matériaux contribuera à la préservation des ressources naturelles. Pour toute information
complémentaire concernant le recyclage de ce produit, veuillez contacter votre mairie ou
votre service local de traitement des déchets.
Ce symbole sur le produit ou sur son emballage indique que ce produit ne
sera pas traité en tant que déchet ménager. Ledit produit sera remis au
point de collecte applicable au recyclage de l’équipement électrique et
électronique. En vous assurant que ce produit est éliminé correctement,
vous contribuerez à la prévention des conséquences néfastes potentielles
FR
33
Page 36

Bienvenido
Gracias por adquirir el sistema de parlantes Octiv650 de Altec Lansing.
Diseñado específicamente para dispositivos iPhone y iPod, el sistema de
parlantes con acoplamiento y carga recrea un sonido que llena la sala y
tiene un diseño inteligente y elegante, tan discreto como potente. Es el
arquetipo de la elegancia en audio.
Por favor, lea atentamente esta Guía del usuario para consultar las
instrucciones sobre cómo configurar y usar su sistema de parlantes
Octiv650.
Antes de instalar o poner en funcionamiento el sistema de parlantes
Octiv650 de Altec Lansing, consulte la información sobre la seguridad del
producto que encontrará a continuación.
Cómo obtener ayuda
En la sección Solución de problemas de esta guía encontrará respuestas
a la mayoría de sus preguntas sobre configuración y funcionamiento.
También puede consultar las preguntas más frecuentes (FAQ) en la sección
Asistencia al cliente de nuestro sitio web www.alteclansing.com.
Si vive en Norteamérica y no encuentra la información que necesita,
llame a nuestro equipo de Asistencia al cliente para obtener ayuda
antes de devolver este producto al punto de venta según su política de
devoluciones.
Tel: 800-258-3288 (Llame gratis en EE. UU. y Canadá)
Correo electrónico: csupport@alteclansing.com
Si reside fuera de Norteamérica, visite nuestro sitio web en
www.alteclansing.com y seleccione su país para localizar el distribuidor
local.
Para obtener la información más actualizada, asegúrese de visitar nuestro
sitio web en www.alteclansing.com.
Distribución internacional
Clientes internacionales: Para obtener información acerca de la distribución
de los productos de Altec Lansing en su país, visite www.alteclansing.com
y haga clic en la región correspondiente.
Cómo registrar el producto
Visite la web www.alteclansing.com para registrar el producto en línea, de
esta forma podremos proporcionarle el mejor servicio y soporte técnico
posible.
34
Page 37

Información de seguridad
La figura del rayo acabado en punta de flecha y encerrada dentro
de un triángulo equilátero tiene por finalidad alertar al usuario de
la presencia de “voltaje peligroso” sin aislamiento en el interior
del producto que podría tener potencia suficiente para que una
persona sufra una descarga eléctrica.
Precaución: Para evitar el riesgo de descarga eléctrica, no retire
la cubierta (o parte posterior). No contiene piezas que puedan ser
reparadas por el usuario. Solo debe ser reparado por personal del
servicio técnico cualificado.
PRECAUCIÓN
Para evitar descargas eléctricas, no utilice este enchufe (polarizado) con un alargador,
toma de pared u otro tipo de toma de corriente a menos que pueda insertar
completamente las clavijas para evitar que estas queden al descubierto.
ADVERTENCIA
Para reducir el riesgo de incendio o descarga eléctrica, no exponga el aparato a la lluvia
o humedad.
INSTRUCCIONES DE SEGURIDAD IMPORTANTES
1. Lea estas instrucciones.
2. Guarde estas instrucciones.
3. Haga caso de todas las advertencias.
4. Siga todas las instrucciones.
5. No utilice este aparato cerca del agua. Este aparato no debe estar expuesto a
goteos o salpicaduras y no deben colocarse objetos llenos de líquido, tales como
jarrones, encima del aparato.
6. Límpielo únicamente con un paño seco.
7. No bloquee los orificios de ventilación. Instálelo según las instrucciones del
fabricante.
8. No instale el aparato cerca de fuentes de calor tales como radiadores, rejillas de
calefacción, cocinas, u otros aparatos (incluidos amplificadores) que generen calor.
9. No neutralice la finalidad de seguridad de los enchufes con toma de tierra o
polarizados. Un enchufe polarizado tiene dos clavijas, una más ancha que la otra.
Un enchufe con toma de tierra tiene una tercera clavija para la toma de tierra.
Esta clavija de toma de tierra se proporciona para su seguridad. Si el enchufe
proporcionado no entra en la toma, consulte con un electricista para sustituir la
toma obsoleta.
El signo de exclamación dentro de un triángulo equilátero tiene
por finalidad alertar al usuario de la presencia de importantes
instrucciones de utilización y mantenimiento en la documentación
10. Proteja el cable de alimentación ante pisadas o golpes, especialmente en los
enchufes, receptáculos y en el punto en que salen del aparato.
que acompaña al aparato.
11. Utilice únicamente conexiones/accesorios especificados por el fabricante.
12. Úselo solamente con el carro, plataforma, trípode, soporte o mesa
13. Desenchufe este aparato durante las tormentas eléctricas o cuando no se utilice
14. Solo debe ser reparado por personal del servicio técnico cualificado. Es necesaria
15. No lo instale en un área que impida el acceso al enchufe de alimentación.
Lea la información de FCC y vea los logotipos de seguridad importantes que aparecen
en la parte inferior de la unidad.
especificados por el fabricante o que se venda con el aparato. Si se
utiliza un carro, tenga cuidado al mover la combinación de carro/aparato
para evitar que caiga y cause daños.
durante largos períodos.
la asistencia del servicio técnico cuando se ha dañado el aparato de alguna
manera, por ejemplo si se ha dañado un cable de alimentación o un enchufe, si se
ha derramado líquido o han caído objetos dentro del aparato, si se ha expuesto el
aparato a lluvia o humedad, si no funciona normalmente o si se ha caído.
Desconectar el enchufe de alimentación es la única manera de eliminar por
completo la alimentación del producto y debe estar accesible en todo momento.
SP
35
Page 38

Contenido
Bienvenido .......................................................................................................................................................................................................................... 34
Información de seguridad ..................................................................................................................................................................................................35
Contenido del paquete ....................................................................................................................................................................................................... 37
Características e indicadores del parlante .........................................................................................................................................................................38
Detalles del mando a distancia completo ..........................................................................................................................................................................39
Introducción .......................................................................................................................................................................................................................39
Cómo buscar la canción o el video que desea reproducir .................................................................................................................................................41
Cómo reproducir/pausar música o video ........................................................................................................................................................................... 41
Cómo ajustar el volumen .................................................................................................................................................................................................... 41
Cómo ajustar los niveles de graves y agudos .................................................................................................................................................................... 42
Cómo configurar los controles del ecualizador .................................................................................................................................................................. 42
Cómo escuchar el iPhone o iPod ....................................................................................................................................................................................... 43
Cómo configurar la salida de video para un monitor externo o TV .................................................................................................................................... 43
Cómo navegar el menú de iPod en su iPhone o iPod........................................................................................................................................................ 44
Cómo cargar el iPhone o iPod ...........................................................................................................................................................................................44
Cómo escuchar su dispositivo portátil sin adaptador........................................................................................................................................................ 45
Mantenimiento del sistema de parlantes ...........................................................................................................................................................................45
Solución de problemas.......................................................................................................................................................................................................46
Garantía ..............................................................................................................................................................................................................................50
36
Page 39

Contenido del paquete
Sistema de parlantes Octiv650 de Altec Lansing
Mando a distancia completo
Adaptador de CA
SP
37
Page 40

Características e indicadores del parlante
Botón de graves
Botón de agudos
Botón de video
Botón para aumentar el volumen
Botón para bajar el volumen
Botones de encendido y apagado
38
Toma de entrada auxiliar.
Componente de salida de video roja
Componente de salida de video verde
Componente de salida video/
salida de video compuesta azul
Toma de entrada del adaptador de CA
5 indicadores LED para volumen, graves y agudos
LED de
encendido
Estación de acople para iPhone y iPod
Page 41

Detalles del mando a distancia completo
NOTA Para mejorar los resultados, apunte con su mando a distancia
completo al sistema de parlantes Octiv650.
Botones de
encendido y apagado
Botón para aumentar
los agudos
Botón para aumentar
los graves
Botón para disminuir
los graves
Botón de retroceso
de pista
Botón reproducir y
pausar
Botón de ecualizador
para Rock
Botón de menú atrás
Botón de ecualizador
para Hip Hop
Botón de ecualizador
para POP
Botón de silencio
Botón para
aumentar el volumen
Botón para disminuir
los agudos
Botón para bajar el
volumen
Botón de avance
de pista
Botón ecualizador
Altec
Botón de menú
arriba
Botón de selección
Botón de
personalización de
ecualizador
Botón de menú abajo
Introducción
Coloque su sistema de parlantes Octiv650 de Altec Lansing sobre un
escritorio, una repisa, una encimera de cocina o cualquier otra superficie
dura.
ADVERTENCIA El Octiv650 cuenta con un subwoofer expuesto en la
parte inferior del sistema de parlantes. Al instalar el Octive 650, tenga
cuidado de no golpear el subwoofer contra esquinas angulosas ni colocar
el sistema sobre objetos filosos, ya que podría dañar el equipo.
ADVERTENCIA Para evitar la caída accidental de un iPhone o iPod,
asegúrese de retirarlo de la estación de acople antes de levantar el sistema
de parlantes.
Cómo instalar un adaptador de CA
1 Conecte el cable del adaptador CA
a la toma del sistema de parlantes.
La toma se encuentra en la parte
posterior del sistema
2 Enchufe el adaptador CA a la toma
de pared.
ADVERTENCIA El uso de otro adaptador CA
puede dañar el producto. Use solamente el adaptador de CA provisto.
DC IN
SP
39
Page 42

Introducción
Cómo conectar la batería del mando a distancia completo
La batería del mando a distancia (incluida) deberá instalarse antes de utilizar
el mando a distancia; para ello, siga las instrucciones a continuación:
1 Extraiga la boquilla del compartimiento de baterías pero no del
todo.
La boquilla del compartimento de las baterías está situada en la
parte trasera del mando. Con una uña, tire del pestillo hacia la línea
del centro del mando a distancia y, al mismo tiempo, con otra uña
empuje la boquilla del compartimiento de la batería hacia afuera
delmando.
2 Quite la batería de la bolsa plástica donde viene el mando a
distancia y colóquela en el compartimento de la batería de
modo que el signo “+” quede hacia arriba.
3 Vuelva a colocar la boquilla de las baterías en el mando y
asegúrese de que las baterías queden en su sitio.
Escuchará y sentirá que el pestillo hace clic.
NOTA Deseche las baterías usadas de forma correcta.
Cómo acoplar el iPhone o iPod
Posicione su iPhone o iPod.
Alínee el puerto de conexión del iPhone
or iPod con el conector del acople del
sistema de parlantes Octiv650. Deslice el
dispositivo iPhone o iPod en el conector
de acople.
Cómo encender el sistema de parlantes
1 Asegúrese de que la unidad tenga
alimentación.
Asegúrese de que el adaptador de CA está conectado al sistema
y enchufado a la pared. Vea la sección Introducción para más
información.
2 Encienda la unidad.
Presione el botón
distancia.
Cómo apagar el sistema de parlantes
Apague la unidad.
Presione el botón
distancia.
NOTA Después de unos minutos sin uso, el sistema de parlantes se
apagará automáticamente.
del sistema de parlantes o del mando a
del sistema de parlantes o del mando a
40
Page 43

Cómo buscar la canción o el video que
desea reproducir
Use el mando remoto para ubicar la canción o el video que desea disfrutar.
Salte al principio de la canción o el video actual.
Presione el botón del mando a distancia.
Salte al principio de la canción o el video siguiente.
Presione el botón
Retroceda la canción o el video actual.
Mientras se reproduce una canción o un video, mantenga presionado
el botón
velocidad dentro de la canción o el video actual.
Avance rápido de la canción o el video actual.
Mientras se reproduce una canción o un video, mantenga presionado
el botón
velocidad dentro de la canción o el video actual.
del mando a distancia.
del mando a distancia. Esto le permitirá retroceder a alta
del mando a distancia. Esto le permitirá avanzar a alta
Cómo reproducir/pausar música o video
El mando a distancia es capaz de controlar la reproducción de su iPhone
o iPod.
Comience a reproducir una canción o un video que haya
seleccionado.
Presione el botón
a través de los parlantes sonido desde su dispositivo. Si ha
configurado su sistema de parlantes, el video aparecerá en el monitor
externo o televisor. Consulte la sección Cómo configurar la salida de
video para un monitor externo o TV.
del mando a distancia. Empezará a reproducirse
Pausar la pista o el video seleccionado
Presione nuevamente el botón
el video se pausará.
del mando a distancia. La música o
Cómo ajustar el volumen
Subir el volumen
Pulse el botón “+” del sistema de parlantes o el botón “VOL +” del
mando a distancia hasta alcanzar el volumen deseado.
Bajar el volumen
Pulse el botón “–” del sistema de parlantes o el botón “VOL –” del
mando a distancia hasta alcanzar el volumen deseado.
Silenciar el sonido
Presione el botón “MUTE” (Silenciar) del mando a distancia. Para
volver a escuchar el sonido, presione el botón “MUTE” otra vez.
SP
41
Page 44

Cómo ajustar los niveles de graves y
agudos
Cómo ajustar el nivel de graves con los controles integrados
Aumentar el nivel de graves.
Al presionar el botón “BASS” (graves), pulse varias veces el botón “+”
o mantenga presionado el botón “+”.
Disminuir el nivel de graves.
Al presionar el botón “BASS” (graves), pulse varias veces el botón “–”
o mantenga presionado el botón “–”.
Cómo ajustar el nivel de agudos con los controles integrados
Aumentar el nivel de agudos.
Al presionar el botón “TREBLE” (agudos), pulse varias veces el botón
“+” o mantenga presionado el botón “+”.
Disminuir el nivel de agudos.
Al presionar el botón “TREBLE” (agudos), pulse varias veces el botón
“–” o mantenga presionado el botón “–”.
Cómo ajustar el nivel de graves con el mando a distancia
Presione el botón “BASS +” para aumentar el nivel de graves.
Presione el botón “BASS –” para disminuir el nivel de graves.
Cómo ajustar el nivel de agudos con el mando a distancia
Presione el botón “TREBLE +” para aumentar el nivel de agudos.
Presione el botón “TREBLE –” para disminuir el nivel de agudos.
Cómo configurar los controles del
ecualizador
Cómo preseleccionar los valores del ecualizador
En el mando a distancia, presione el botón que correponde a la
configuración deseada para el ecualizador:
• ROCK
• ECUALIZADOR ALTEC
• HIPHOP
• POP
• PERSONALIZDO
Cómo ajustar el ecualizador gráfico multibanda
Podrá encontrar una aplicación disponible en la tienda iTunes para
personalizar su ecualizador multibanda integrado- al sistema Octiv650.
Visite www.apple.com/itunes para más información.
Cómo restablecer los parámetros de fábrica del ecualizador
1 Asegúrese de que su sistema de parlantes Octiv650 esté
encendido.
2 Presione y mantenga apretado el botón del sistema
de parlantes hasta que la luz LED del encendido deje de
parpadear.
42
Page 45

Cómo escuchar el iPhone o iPod
1 Acople su iPhone o iPod al sistema
de parlantes Octiv650 de Altec
Lansing.
2 Encienda el sistema de parlantes.
3 Busque la canción o el video que
desea reproducir.
4 Comience a reproducir su canción
o video.
5 Ajuste el volumen.
NOTA Cuando su iPhone o iPod estén
acoplados, seguirán cargándose hasta completar la carga.
Cómo configurar la salida de video
para un monitor externo o TV
El botón “VIDEO” en el sistema de parlantes permite al usuario cambiar el
modo de salida de video. Existen tres modos disponibles:
• Apagado: Función de entrada de video deshabilitada, indicada por
1 LED cuando se pulsa el botón de video. El video se mostrará
únicamente en la pantalla del iPhone o iPod.
• Compuesto: Indicado por 2 LEDS cuando se pulsa el botón de
video. El video aparecerá en un monitor externo compuesto, si está
conectado. Conecte un cable RCA simple desde la clavija RCA
azul denominada “COMP Pb & CVBS OUT” de la parte posterior
del parlante a la clavija de entrada compuesta (RCA amarillo) en su
monitor o televisor.
• Componente: Indicado por 3 LEDS cuando se pulsa el botón de
video. El video aparecerá en un monitor componente externo RGB,
si está conectado. Conecte las salidas RCA de color azul, verde
y rojo denominadas “COMP Pb & CVBS OUT,” “COMP Y OUT” y
“COMP Pr OUT” de la parte posterior del parlante a las entradas
correspondientes según el color en su monitor o televisor, con un
cable RCA de tres conectores.
Presione el botón “VIDEO” para seleccionar entre las opciones de
configuración: Componente, Apagado y Compuesto. El modo salida de
video está configurado en Componente de manera predeterminada desde
fábrica.
Cómo conectar un iPhone o iPod Touch más nuevos
En dispositivos iPhone o iPod Touch más nuevos que utilizan un sistema
operativo iOS, deberá configurar el sistema de parlantes para indicarle al
equipo qué tipo de salida de video está utilizando. Al presionar el botón
“VIDEO”, podrá seleccionar entre las opciones “Componente”, “Apagado”
o “Compuesto”, en ese orden. El parámetro de fábrica es “Componente”.
1 Verifique que las conexiones de los cables desde el sistema de
parlantes al monitor o TV sean las correctas para el modo de
salida seleccionado.
2 Configure el sistema de parlantes para el modo de salida
deseado:
Para la reproducción de videos en modo Componente, no debe
hacer nada. El sistema de parlantes Octiv650 está configurado en
modo “Componente” desde fábrica. Para la reproducción en modo
“Compuesto”, presione el botón “VIDEO” dos veces (en el supuesto
de que el sistema esté en modo “Componente”) para establecer el
modo compuesto.
SP
43
Page 46

3 Si el video no comienza a reproducirse automáticamente
en el televisor o monitor externo, presione el botón [Play]
nuevamente en el dispositivo.
NOTA Cuando modo de video externo del sistema de partlantes esté en
“Apagado”, el video se reproducirá en su dispositivo iPhone o iPod Touch
únicamente.
Cómo navegar el menú de iPod en su
iPhone o iPod
En el modo iPod, puede utilizar las teclas de navegación del mando a
distancia para elegir canciones de su biblioteca de música y videos de su
biblioteca de video:
Presione el botón “MENU” (Menú) para desplazarse hacia
arriba dentro de una pantalla de menú.
Presione el botón “MENU” (Menú) para desplazarse hacia
abajo dentro de una pantalla de menú.
Presione el botón “MENU” (Menú) para seleccionar un nivel
de menú más arriba. (en los modelos de iPod más antiguos,
presione y mantenga presionado el botón para ir más arriba
en el menú. En los modelos de iPod nano de sexta generación,
este botón no funciona).
Presione el botón “SELECT” (SELECCIONAR) para hacer una
selección dentro de un menú.
Cómo cargar el iPhone o iPod
Siempre que su iPhone o iPod estén acoplados y el sistema de parlantes
Octive 650 de Altec Lansing esté enchufado a una toma de CA, se
cargarán las pilas de su iPhone o iPod (hasta que estén completamente
llenas), incluso cuando el sistema de audio esté apagado.
44
Page 47

Cómo escuchar su dispositivo portátil
sin adaptador
Si tiene un tercer dispositivo de audio o video portátil sin adaptador,
también puede disfrutarlo con su sistema de parlantes Octiv650 de Altec
Lansing. Conéctelo a la toma de entrada AUX. Cómo hacerlo:
AUX
1 Busque un cable estéreo de 3,5mm (no incluido).
2 Conecte un extremo del cable estéreo a su reproductor.
Su reproductor debe tener una toma de auriculares o LINE OUT para
conectar el cable.
3 Conecte el otro extremo del cable estéreo a la toma AUX del
sistema de audio.
La entrada AUX se encuentra en la parte posterior del sistema.
4 Encienda el sistema de parlantes.
5 Encienda el dispositivo.
6 Busque la canción o el video que desea reproducir.
7 Comience a reproducir la canción o video.
8 Ajuste el volumen.
NOTA Tal vez deba ajustar el volumen de su reproductor. El volumen de
su reproductor debe estar aproximadamente a ¾ del volumen, y ajustarse
desde allí.
Mantenimiento del sistema de
parlantes
Coloque el sistema de parlantes en una superficie plana, fuera del alcance
de la luz solar directa o de una fuente de calor excesiva.
Si coloca su sistema de parlantes sobre una superficie de madera natural o
con un acabado laqueado, proteja sus muebles con un trozo de tela u otro
material.
Limpie el sistema de parlantes únicamente con un paño seco. Los agentes
de limpieza más fuertes, como por ejemplo el benceno, disolvente u otros
materiales similares, pueden dañar la superficie de la unidad.
SP
45
Page 48

Solución de problemas
Síntoma Posible problema Solución
El sistema de
audio no responde
(sin energía)
El iPhone o iPod
no se acopla
correctamente
El iPhone o iPod no
responde al sistema
de parlantes o al
mando a distancia
El adaptador CA no está
enchufado a la pared o el conector
no está enchufado a la toma de
alimentación de la parte posterior
del sistema de parlantes.
El tomacorriente de pared no
funciona.
El sistema no está encendido.
El iPhone o iPod no se ha instalado
correctamente.
El estuche del dispositivo evita la
correcta instalación.
El iPhone o iPod no está instalado
correctamente.
El estuche del dispositivo evita la
correcta instalación.
El software del iPhone o iPod es
anticuado.
El iPhone o iPod está apagado. Asegúrese de que el iPhone o iPod funciona correctamente antes de acoplarlo a la
Enchufe el adaptador CA a la pared y enchufe el conector a la toma de alimentación de la
parte posterior del sistema de parlantes.
Enchufe otro dispositivo en la misma toma de pared para confirmar si esta funciona.
Encienda el sistema de parlantes al presionar el botón
Retire el iPhone o iPod de la estación de acoplamiento y compruebe que no haya
nada que obstruya las conexiones de la base de acople con el iPhone o iPod. Vuelva a
colocarlo al acoplamiento.
Saque el iPhone o iPod del acople. Quite el dispositivo del estuche. Vuelca a acoplar el
equipo.
Retire el iPhone o iPod de la estación de acoplamiento y compruebe que no haya nada
que obstruya las conexiones de las bases con el iPhone o iPod. Vuelva a colocarlo al
acoplamiento.
Saque el iPhone o iPod del acople. Quite el dispositivo del estuche. Vuelca a acoplar el
equipo.
Actualice el software de su iPhone o iPod. Para más información visite
www.apple.com/ipod/download.
unidad. Consulte el manual del iPhone o iPod para más detalles.
. El LED “Power” se enciende.
46
Page 49

Solución de problemas
Síntoma Posible problema Solución
El iPhone o iPod
no se carga
El sonido está
distorsionado
El iPhone o iPod no está instalado
correctamente.
El estuche del dispositivo evita la
correcta instalación.
El iPhone o iPod está apagado. Asegúrese de que el iPhone o iPod funciona correctamente antes de acoplarlo a la
El adaptador CA no está
enchufado a la pared o el conector
no está enchufado a la toma de
alimentación de la parte posterior
del sistema de parlantes.
El nivel de volumen está fijado
demasiado alto.
La fuente de sonido está
distorsionada.
Retire el iPhone o iPod de la estación de acoplamiento y compruebe que no haya nada
que obstruya las conexiones de las bases con el iPhone o iPod. Vuelva a colocarlo al
acoplamiento.
Saque el iPhone o iPod del acople. Quite el dispositivo del estuche. Vuelva a acoplar el
equipo.
unidad. Consulte el manual del iPhone o iPod para más detalles.
Enchufe el adaptador CA a la pared y enchufe el conector a la toma de alimentación de la
parte posterior del sistema de parlantes.
Baje el volumen.
Si la fuente del sonido original del iPhone o iPod (archivo de sonido) tiene una calidad
pobre, la distorsión y el ruido se perciben fácilmente con parlantes de alta potencia.
Pruébelo con otra fuente de audio como por ejemplo con un CD de música.
SP
47
Page 50

Solución de problemas
Síntoma Posible problema Solución
Para modelos de iPhone o iPod touch más nuevo que utilicen el sistema operativo iOS:
1. Verifique que las conexiones de los cables desde el sistema de parlantes al monitor o
TV sean las correctas para el modo de salida seleccionado.
2. Reproducir una película en su iPhone o iPod Touch
3. Presione el botón “VIDEO” hasta obtener la imagen en su dispositivo.
4. Luego, presione el botón “VIDEO” una vez para Compuesto o dos veces para
No hay salida
de video
El mando a distancia
completo no funciona
No se reproduce
en la función AUX,
habiendo conectado
un reproductor de
CD o de MP3 a la
entrada AUX de la
unidad
El sistema de parlantes está en
modo de video incorrecto.
No tiene pilas Cambie las pilas por otras de nuevas.
No está dirigiendo el mando a
distancia completo al sistema de
parlantes.
El cable no está debidamente
conectado a la fuente o al sistema
de parlantes.
El volumen está demasiado bajo. Ajuste el volumen del dispositivo de audio hasta ¾.
“Componente”.
Para los modelos más antiguos de iPod, seleccione la salida de video a través de la
configuración del reproductor de video del dispositivo:
1. Verifique que las conexiones de los cables desde el sistema de parlantes al monitor o
TV sean las correctas para el modo de salida seleccionado.
2. Seleccione entre los modos de salida de video en su iPod hasta ver la imagen en su
monitor externo o TV.
NOTA El botón “VIDEO” no funciona en los modelos más antiguos de iPod.
Apunte el mando a distancia completo al sistema de parlantes de Altec Lansing y
muévalo a unos 3 metros de la unidad.
Verifique que el cable esté debidamente conectado entre la fuente y el sistema de
parlantes Octiv650.
48
Page 51

Solución de problemas
Síntoma Posible problema Solución
El sistema de
parlantes tiene un
comportamiento
errático o inesperado
y los controles no
funcionan
Esto puede deberse a la
electricidad estática, a la
interrupción momentánea
del suministro eléctrico o a
condiciones de funcionamiento
anómalas.
1. Elimine el iPhone o el iPod.
2. Desconecte el cable del adaptador CA a la toma del sistema de parlantes.
3. Espere de 20 a 30 segundos.
4. Mientras espera, restablezca su iPhone o iPod.
5. Vuelva a conectar el cable del adaptador CA a la toma del sistema de parlantes.
6. Encienda el sistema de parlantes y verifique si presenta comportamiento errático. Por
ejemplo, ajuste el volumen y compruebe si el LED cambia.
7. Si el sistema de parlantes aún presenta comportamiento errático (por ejemplo, el LED
no cambia al ajustar el volumen), restablezca los parámetros de fábrica:
A. Asegúrese de que su sistema de parlantes Octiv650 esté encendido.
B. Presione y mantenga apretado el botón
8. Vuelva a colocar el iPhone o iPod en el acople.
LED del encendido deje de parpadear.
del sistema de parlantes hasta que la luz
SP
49
Page 52

Garantía
GARANTÍA LIMITADA POR UN AÑO DE ALTEC LANSING
¿Qué cubre la garantía?
Altec Lansing garantiza que sus productos no tienen defectos de materiales o de
construcción, con las excepciones que se indican a continuación.
¿Cuál es el periodo de cobertura?
La cobertura es válida por un año a partir de la fecha de compra. El plazo de cualquier
garantía legal implícita caducará cuando caduque la garantía limitada. Algunos estados
y/o estados miembros de la Unión Europea no permiten limitaciones en el periodo de
vigencia de la garantía, por lo tanto, las limitaciones antes mencionadas pueden no
aplicarse a su caso.
¿Qué no cubre la garantía?
Esta garantía no cubre cualquier defecto, anomalía de funcionamiento o error que sea
el resultado de: instalación incorrecta, uso inadecuado o no seguir las instrucciones
del producto; maltrato; o uso con un equipo incorrecto, inadecuado o anómalo. (Para
obtener información sobre instalación, operación y uso adecuado, consulte el manual
proporcionado con el producto. Si precisa un manual de sustitución, puede descargarlo
en www.alteclansing.com). Asimismo, los daños suplementarios y emergentes no están
cubiertos por esta garantía. Algunos países no permiten la exclusión de los daños
suplementarios o emergentes por lo que la limitación o exclusión anteriores pueden no
ser aplicables en su caso.
¿Qué hará Altec Lansing para resolver el problema?
Altec Lansing reparará o sustituirá (según considere adecuado) todo producto que
presente defectos de materiales o construcción. Si el producto ya no se fabrica, o si no
hay existencias del mismo, Altec Lansing puede decidir sustituir el producto por otro
producto de Altec Lansing similar o superior.
Cómo beneficiarse del servicio de garantía
Para reparar o reemplazar un producto cubierto por la garantía, debe ponerse en
contacto con Altec Lansing durante el periodo de garantía por correo electrónico
(csupport@alteclansing.com). En su correo electrónico debe colocar su nombre,
dirección, dirección de correo electrónico, número de teléfono, fecha de compra y una
descripción completa del problema experimentado. En los Estados Unidos, también
puede ponerse en contacto con Altec Lansing llamando al teléfono 1-800-ALTEC88
(por favor, esté preparado para indicar la misma información). Si el problema está
relacionado con un defecto de materiales o de construcción, deberá proporcionar
pruebas de la compra original y Altec Lansing proporcionará una autorización de
devolución e instrucciones para el envío de la devolución. Los gastos del envío de
50
devolución correrán por cuenta del cliente. Deberá asegurar el envío en forma adecuada
puesto que usted es el responsable del producto hasta que éste llegue a Altec Lansing.
¿Cómo afectará la legislación estatal sus derechos?
Esta garantía le otorga derechos legales y usted puede tener otros derechos que
varían de un estado a otro. Tenga en cuenta que en la Unión Europea, en su calidad de
consumidor, podría tener otros derechos de ley de acuerdo a la legislación nacional de
los Estados Miembros de la Unión Europea que rigen la venta de mercadería de Altec
Lansing. Esta garantía no afecta a estos derechos.
Las garantías limitadas y recursos mencionados son garantías y recursos disponibles
únicamente para el comprador si son (y en la medida que sean) válidos y obligatorios
bajo la legislación aplicable.
GESTIÓN DE RESIDUOS DE EQUIPOS ELÉCTRICOS Y ELECTRÓNICOS VIEJOS
negativas para el medio ambiente y la salud humana, que de otra manera pudieran
causarse por el manejo inapropiado en la disposición apropiada de este producto. El
reciclaje de materiales ayudará a conservar los recursos naturales. Para obtener
información más detallada sobre el reciclado de este producto, póngase en contacto
con su oficina local de la ciudad o del servicio de desecho doméstico de desperdicios.
Este símbolo en el producto o en su empaque indica que este producto no
debe tratarse como un desecho doméstico. Por el contrario, debe
entregarse en el punto de recolección apropiado para el reciclado del
equipo eléctrico y electrónico. Al asegurar que este producto se deseche
correctamente, ayudará a prevenir consecuencias potencialmente
Page 53

Bem-vindo
Obrigado por adquirir o sistema de alto-falantes Octiv650 da Altec Lansing.
Projetado especificamente para iPhone ou iPod, este sistema de altofalantes para encaixe/recarga reimagina o som que preenche o ambiente
com design elegante e inteligente, tão discreto como potente. É o máximo
em desempenho de áudio com estilo.
Leia com atenção este Guia do Usuário para obter instruções sobre como
configurar e usar o sistema de alto-falantes Octiv650.
Antes de instalar ou operar o sistema de alto-falantes Octiv650 da Altec
Lansing, consulte as informações importantes de segurança de produto.
Como obter ajuda
As respostas para a maioria das perguntas de ajuste e desempenho
podem ser encontradas na seção Diagnóstico de Falhas deste guia. Você
também pode consultar as FAQs (Perguntas Freqüentes) em nosso site na
Internet, em www.alteclansing.com.
Se você mora na América do Norte e não puder localizar a informação
de que precisa, por favor, telefone para a nossa equipe de atendimento
ao cliente para obter assistência antes de devolver este produto ao seu
revendedor nos termos da política de devolução.
Tel: 800-258-3288 (Ligação gratuita nos EUA e no Canadá)
Email: csupport@alteclansing.com
Se você mora fora da América do Norte, visite o nosso site na Internet em
www.alteclansing.com e selecione a sua região para localizar o distribuidor
em seu país.
Para informações mais atualizadas, não deixe de consultar nosso site na
Web, no endereço www.alteclansing.com.
Distribuição Internacional
Clientes internacionais: Para obter informações sobre a distribuição dos
produtos Altec Lansing em seu país, visite www.alteclansing.com e clique
em sua região.
Como registrar o produto
Visite www.alteclansing.com para registrar o seu produto online, para que
possamos fornecer o melhor atendimento e suporte técnico possível.
PT
51
Page 54

Informações de segurança
O relâmpago com cabeça em seta, dentro de um triângulo
equilátero, tem o objetivo de alertar o usuário sobre a presença de
“voltagem perigosa” não isolada dentro do gabinete do produto, a
qual pode ser de magnitude suficiente para constituir um risco de
choque elétrico para as pessoas.
Cuidado: Para evitar o risco de choque elétrico, não remova a
cobertura (ou a traseira). Não há peças que possam ser trocadas
pelo usuário dentro do produto. O atendimento técnico deverá ser
executado pelo pessoal de manutenção qualificado.
CUIDADO
Para evitar choque elétrico, não use esta tomada (polarizada) com um cabo de
extensão, receptáculo ou outra saída, a menos que os pinos da tomada possam ser
totalmente inseridos para evitar sua exposição.
ADVERTÊNCIA
Para reduzir o risco de incêndio ou choque elétrico, não exponha este equipamento à
chuva ou umidade.
INSTRUÇÕES DE SEGURANÇA IMPORTANTES
1. Leia estas instruções.
2. Guarde estas instruções.
3. Preste atenção a todos os avisos.
4. Siga todas as instruções.
5. Não use este aparelho perto de água. Este aparelho não deve ser exposto a pingos
ou entornamentos de água, e nenhum objeto com líquidos (por exemplo, vasos)
deve ser colocado sobre o aparelho.
6. Limpe apenas com um pano seco.
7. Não bloqueie as aberturas de ventilação. Instale de acordo com as instruções do
fabricante.
8. Não instale próximo a fontes de calor, como radiadores, registros de aquecimento,
fogões ou outros aparelhos (inclusive amplificadores) que produzam calor.
9. Não anule a proteção da tomada polarizada ou aterrada. Uma tomada polarizada
tem dois pinos, com larguras diferentes. Uma tomada aterrada tem dois pinos e um
terceiro pino de aterramento. O pino mais largo ou o terceiro pino é fornecido para
sua segurança. Se a tomada fornecida não se encaixar na sua tomada de parede,
consulte um eletricista para substituir a tomada incorreta.
52
O ponto de exclamação dentro do triângulo equilátero tem o
propósito de alertar o usuário sobre a presença de instruções
importantes de operação e manutenção (atendimento técnico) na
literatura que acompanha o equipamento.
10. Proteja o cabo de alimentação, para que não seja pisado ou amassado especialmente em conexões, receptáculos de conveniência e no ponto em que
saem do aparelho.
11. Use apenas acessórios de fixação especificados pelo fabricante.
12. Use apenas com carrinho, pedestal, tripé, suporte ou mesa
13. Desconecte este aparelho da tomada durante tempestades de raios ou quando não
14. Encaminhe todo atendimento técnico para pessoal de manutenção qualificado.
15. Não instale em uma área que impeça o acesso ao cabo de alimentação.
Favor ler as informações de FCC e os logotipos de segurança importantes na parte
inferior da unidade.
especificados pelo fabricante ou vendidos com o aparelho. Ao usar um
carrinho, cuidado ao mover o conjunto de carrinho/aparelho para evitar
danos decorrentes de tombamento.
for usado durante longos períodos de tempo.
O atendimento técnico é necessário quando ocorrer qualquer tipo de dano no
aparelho. Por exemplo, quando um cabo de fonte de alimentação ou tomada
estiver danificado, se ocorrer derramamento de líquido ou queda de objetos no
aparelho, ou caso o aparelho tenha sido exposto a chuva ou umidade, não opere
normalmente ou tenha caído.
Desconectar o cabo de alimentação é a única forma de remover completamente a
alimentação do produto e deve estar prontamente acessível em todas as ocasiões.
Page 55

Conteúdo
Bem-vindo .......................................................................................................................................................................................................................... 51
Informações de segurança ................................................................................................................................................................................................. 52
Conteúdo da embalagem ................................................................................................................................................................................................... 54
Recursos e indicadores dos alto-falantes .......................................................................................................................................................................... 55
Detalhes do controle remoto completo .............................................................................................................................................................................. 56
Primeiros passos ................................................................................................................................................................................................................ 56
Como encontrar músicas ou vídeos ..................................................................................................................................................................................58
Como reproduzir/pausar músicas ou vídeos .....................................................................................................................................................................58
Como ajustar o volume ......................................................................................................................................................................................................58
Como ajustar os graves e agudos ....................................................................................................................................................................................59
Configurar os controles de EQ .......................................................................................................................................................................................... 59
Como ouvir o iPhone ou o iPod .........................................................................................................................................................................................60
Como reproduzir vídeo em um monitor externo ou TV ...................................................................................................................................................... 60
Como navegar no menu no iPhone ou iPod ......................................................................................................................................................................61
Como recarregar o iPhone ou o iPod ................................................................................................................................................................................. 61
Como ouvir seu dispositivo portátil não-encaixável ..........................................................................................................................................................62
Manutenção do sistema de alto-falantes ........................................................................................................................................................................... 62
Diagnóstico de falhas ......................................................................................................................................................................................................... 63
Garantia ..............................................................................................................................................................................................................................67
PT
53
Page 56

Conteúdo da embalagem
Adaptador CA
Sistema de alto-falantes Octiv650 da Altec Lansing
Controle remoto completo
54
Page 57

Recursos e indicadores dos alto-falantes
Botão de graves
Botão de agudos
Botão de vídeo
Botão Aumentar Volume
Botão Reduzir Volume
Botão Ligar/Desligar
Conector de entrada auxiliar
Saída de vídeo componente vermelha
Saída de vídeo componente verde
Saída de vídeo componente azul/
Saída de vídeo composto
Conector de entrada para adaptador CA
Indicadores LED com 5 segmentos para volume, graves e agudos
LED de
alimentação
Estação de encaixe para iPhone ou iPod
PT
55
Page 58

Detalhes do controle remoto completo
OBS. Para obter melhores resultados, aponte o controle remoto completo
para o sistema de alto-falantes Octiv650.
Botão Ligar/Desligar
Botão Aumentar
agudos
Botão Aumentar
graves
Botão Reduzir
graves
Botão Voltar
Botão Reproduzir/
Pausar
Botão EQ Rock
Botão de menu
voltar
Botão EQ Hip Hop
Botão EQ Pop
Botão Silencioso
Botão Aumentar
Volume
Botão Reduzir
agudos
Botão Reduzir
Volume
Botão Avançar
Botão Altec EQ
Botão de menu
para cima
Botão Selecionar
Botão EQ
Personalizada
Botão de menu
para baixo
Primeiros passos
Coloque o sistema de alto-falantes Octiv650 da Altec Lansing em uma
mesa, estante, balcão ou outra superfície sólida.
AVISO O Octiv650 tem um subwoofer exposto na parte inferior do sistema
de alto-falantes. Ao posicionar o Octiv650, tenha cuidado para evitar
impactos do subwoofer contra cantos e não coloque o sistema em cima de
objetos cortantes. Isso pode danificar o subwoofer.
AVISO Para evitar quedas acidentais de seu iPhone ou iPod, remova-o da
estação de encaixe antes de transportar o sistema de alto-falantes.
Como instalar o adaptador CA
1 Conecte o cabo do adaptador CA
no conector de alimentação do
sistema de alto-falantes.
O conector está localizado na parte
posterior do sistema.
2 Conecte o adaptador CA em uma
tomada de parede.
AVISO O uso de outro adaptador CA pode danificar o produto. Use apenas
o adaptador CA fornecido.
DC IN
56
Page 59

Primeiros passos
Como conectar a pilha do controle remoto completo
A pilha do controle remoto (incluída) deverá ser instalada para que o
controle remoto funcione; para fazer isso, siga as instruções abaixo:
1 Retire o suporte da pilha até cerca da metade.
O compartimento da pilha está localizado na parte posterior
do controle remoto. Use uma unha para empurrar a trava até a
linha central do controle remoto, enquanto usa outra unha para
simultaneamente retirar o compartimento da pilha do controle
remoto.
2 Remova a pilha do envoltório de plástico onde estava o
controle remoto e insira no compartimento de pilha, com o
sinal “+” voltado para cima.
3 Recoloque o suporte da pilha no controle remoto e verifique
se a pilha está no local correto.
Você deverá ouvir e sentir a trava clicar.
OBS. Favor descartar as pilhas usadas de forma adequada.
Como encaixar o iPhone ou iPod
Coloque o iPhone ou iPod em posição.
Alinhe a porta de conexão do iPhone ou
iPod com o conector de encaixe no sistema
de alto-falantes Octiv650. Deslize o iPhone
ou iPod para o conector de encaixe.
Como ligar os alto-falantes
1 Verifique se há energia na unidade.
Verifique se o adaptador CA está conectado no sistema e na
tomada de parede. Consulte a seção Primeiros passos para obter
mais informações.
2 Ligue a unidade.
Pressione o botão
remoto.
Como desligar os alto-falantes
Desligue a unidade.
Pressione o botão
remoto.
OBS. Depois de alguns minutos sem uso, o sistema de alto-falantes será
desligado automaticamente.
no sistema de alto-falantes ou no controle
no sistema de alto-falantes ou no controle
PT
57
Page 60

Como encontrar músicas ou vídeos
Use o controle remoto para localizar a música ou o vídeo que você quer
aproveitar.
Ir para o início da música ou do vídeo atual.
Pressione o botão
Ir para o início da música ou do vídeo seguinte.
Pressione o botão
Voltar ao início da música ou do vídeo que está tocando.
Enquanto uma música ou vídeo está tocando, mantenha pressionado
o botão
em alta velocidade da música ou do vídeo atual.
Avançar a música ou o vídeo que está tocando.
Enquanto uma música ou vídeo está tocando, mantenha pressionado
o botão
em alta velocidade da música ou do vídeo atual.
no controle remoto. Isso fornece uma pesquisa inversa
no controle remoto. Isso fornece uma pesquisa de avanço
no controle remoto.
no controle remoto.
Como reproduzir/pausar músicas ou
vídeos
O controle remoto pode controlar a reprodução no iPhone ou iPod.
Começar a reproduzir uma música ou vídeo.
Pressione o botão no controle remoto. O som de seu dispositivo
começará a tocar pelos alto-falantes. E se o sistema de alto-falantes
estiver configurado para isso, o vídeo será exibido em seu monitor
externo ou TV. Consulte a seção Como reproduzir vídeo em um
monitor externo ou TV.
Pausar a faixa ou o vídeo.
Pressione novamente o botão
vídeo ficará em pausa.
no controle remoto. O música ou o
Como ajustar o volume
Aumentar o volume.
Mantenha pressionado o botão “+” no sistema de alto-falantes ou o
botão “VOL +” no controle remoto até alcançar o volume desejado.
Reduzir o volume.
Mantenha pressionado o botão “–” no sistema de alto-falantes ou o
botão “VOL –” no controle remoto até alcançar o volume desejado.
Colocar no silencioso.
Pressione o botão “MUTE” no controle remoto. Para retirar do
silencioso, pressione o botão “MUTE” novamente.
58
Page 61

Como ajustar os graves e agudos Configurar os controles de EQ
Como ajustar o nível de graves usando os controles embarcados
Aumentar o nível de graves.
Mantendo pressionado o botão “BASS”, pressione repetidamente o
botão “+”, ou mantenha pressionado o botão “+”.
Reduzir o nível de graves.
Mantendo pressionado o botão “BASS”, pressione repetidamente o
botão “–”, ou mantenha pressionado o botão “–”.
Como ajustar o nível de agudos usando os controles embarcados
Aumentar o nível de agudos.
Mantendo pressionado o botão “TREBLE”, pressione repetidamente
o botão “+”, ou mantenha pressionado o botão “+”.
Reduzir o nível de agudos.
Mantendo pressionado o botão “TREBLE”, pressione repetidamente
o botão “–”, ou mantenha pressionado o botão “–”.
Como ajustar o nível de graves usando o controle remoto
Pressione o botão “BASS +” para aumentar os graves.
Pressione o botão “BASS –” para reduzir os graves.
Como ajustar o nível de agudos usando o controle remoto
Pressione o botão “TREBLE +” para aumentar os agudos.
Pressione o botão “TREBLE –” para reduzir os agudos.
Como selecionar a predefinição de EQ desejada
No controle remoto, pressione o botão que corresponde à configuração de
EQ desejada:
• ROCK
• ALTEC EQ
• HIPHOP
• POP
• CUSTOM (Personalizada)
Como ajustar o equalizador gráfico multifaixas
Um aplicativo está disponível na loja iTunes para personalizar o equalizador
multi-faixas integrado no Octiv650. Consulte www.apple.com/itunes para
obter mais informações.
Como restaurar as configurações de EQ padrão de fábrica
1 Verifique se o sistema de alto-falantes Octiv650 está ligado.
2 Mantenha pressionado o botão no sistema de alto-falantes
até que o LED de alimentação pare de piscar.
PT
59
Page 62

Como ouvir o iPhone ou o iPod
1 Encaixe o iPhone ou iPod no
sistema de alto-falantes Octiv650
da Altec Lansing.
2 Ligue o sistema de alto-falantes.
3 Localize a música ou o vídeo que
deseja.
4 Comece a reproduzir a música ou
o vídeo.
5 Ajuste o volume.
OBS. Sempre que o iPhone ou iPod estiver
encaixado, estará carregando até ficar totalmente carregado.
Como reproduzir vídeo em um monitor
externo ou TV
O botão “VÍDEO” no sistema de alto-falantes permite que o usuário altere o
modo de saída de vídeo. Há três modos disponíveis:
• Desligar: A passagem de vídeo está desativada, indicada por 1 LED
quando o botão de vídeo é pressionado. O vídeo será reproduzido
apenas na tela do iPhone ou iPod.
• Composto: Indicado por 2 LEDS quando o botão de vídeo é
pressionado. O vídeo será reproduzido em um monitor de vídeo
composto externo, se estiver conectado. Conecte um único cabo
RCA do conector RCA azul rotulado “COMP Pb & CVBS OUT”
na parte posterior do sistema de alto-falantes com o conector de
entrada composta (RCA amarelo) em seu monitor ou televisão.
• Componente: Indicado por 3 LEDS quando o botão de vídeo é
pressionado. O vídeo será reproduzido em um monitor de vídeo
RGB componente externo, se estiver conectado. Conecte as
saídas RCA azul, verde e vermelha rotulados “COMP Pb & CVBS
OUT,” “COMP Y OUT” e “COMP Pr OUT” na parte posterior do
sistema de alto-falantes com os respectivos conectores de entrada
coloridos em um monitor ou televisão com cabo RCA de três
conexões.
Pressione o botão “VIDEO” para alternar entre as configurações:
Component, Off e Composite. O modo de saída de vídeo é definido como
Componente por padrão na fábrica.
Como conectar um iPhone ou iPod touch mais recente
Em dispositivos iPhone ou iPod touch mais recentes, que usam o sistema
operacional iOS, você precisa configurar o sistema de alto-falantes para
dizer ao iPhone ou iPod qual tipo de saída de vídeo você está usando.
Pressionar o botão “VIDEO” alterna entre os modos de saída de vídeo
“Component”, “Off” e “Composite”, nessa ordem. A configuração padrão
de fábrica é “Component”.
1 Certifique-se de que as conexões de cabos do sistema de
alto-falantes até o monitor ou a TV estão corretas para o
modo de saída desejado.
2 Configure o sistema de alto-falantes para o modo de saída
desejado:
Para reprodução de vídeo componente, você não precisa fazer
nada. O sistema de alto-falantes Octiv650 está configurado como
Componente por padrão na fábrica. Para reprodução composta,
pressione o botão “VIDEO” duas vezes (pressupondo que o sistema
de alto-falantes está no modo “Component”) para definir como modo
“Composite”.
60
Page 63

3 Se o vídeo não começar a ser reproduzido imediatamente
na TV ou no monitor externo, pressione Play (Reproduzir)
novamente no dispositivo.
OBS. Quando o modo de vídeo externo do sistema de alto-falantes estiver
definido como “Off”, o vídeo será reproduzido apenas no iPhone ou iPod
touch.
Como navegar no menu no iPhone
ou iPod
Em modo iPod, você pode usar as teclas de navegação no controle remoto
para escolher músicas em sua biblioteca de músicas e vídeos na biblioteca
de vídeos:
Pressione o botão “MENU” para rolar para cima em uma tela
de menu.
Pressione o botão “MENU” para rolar para baixo em uma
tela de menu.
Pressione o botão “MENU” para subir um nível no menu. (Em
modelos de iPod mais antigos, manter esse botão pressionado
voltará ao menu de nível mais alto. Em modelos de iPod nano
de 6ª geração, este botão não fornece funcionalidade.)
Pressione o botão “SELECT” para fazer uma seleção em um
menu.
Como recarregar o iPhone ou o iPod
Quando o iPhone ou iPod está encaixado e o sistema de alto-falantes
Octiv650 da Altec Lansing está conectado a uma tomada CA, o iPhone ou
iPod está sendo carregado (até que esteja totalmente carregado) – mesmo
que o sistema de alto-falantes esteja desligado.
PT
61
Page 64

Como ouvir seu dispositivo portátil
não-encaixável
Se você tem um dispositivo de áudio ou vídeo portátil não-encaixável,
também pode usá-lo com o sistema de alto-falantes Octiv650 da Altec
Lansing. Basta encaixar no conector AUX. Instruções:
AUX
1 Obtenha um cabo estéreo de 3,5 mm (não incluído).
2 Conecte uma extremidade do cabo estéreo no dispositivo.
O dispositivo deve ter um conector de fone de ouvido ou LINE OUT.
3 Conecte a outra extremidade do cabo estéreo no conector
AUX do sistema de alto-falantes.
O conector AUX está localizado na parte posterior do sistema de
alto-falantes.
4 Ligue o sistema de alto-falantes.
5 Ligue o dispositivo.
6 Localize a música ou o vídeo que deseja.
7 Comece a reproduzir a música ou o vídeo.
8 Ajuste o volume.
OBS. Talvez seja necessário ajustar o volume do dispositivo. O volume do
dispositivo deve ser definido para cerca de ¾ de volume e ajustado a partir
dali.
Manutenção do sistema de alto-falantes
Coloque o sistema de alto-falantes em uma superfície plana, longe de
fontes de luz do sol direta ou calor excessivo.
Proteja seus móveis com um pano ou outro material protetor se colocar o
sistema de alto-falantes sobre madeira ou acabamentos laqueados.
Limpe o sistema de alto-falantes apenas com um pano seco. Agentes de
limpeza, como benzeno, thinner ou materiais similares, podem danificar a
superfície da unidade.
62
Page 65

Diagnóstico de falhas
Sintoma Possível problema Solução
O sistema de
alto-falantes
nãoresponde
(sem energia)
O iPhone ou iPod
não se encaixam
corretamente
O iPhone ou iPod não
responde ao sistema
de alto-falantes ou ao
controle remoto
O adaptador CA não está
conectado em uma tomada
de parede ou na tomada de
alimentação na parte posterior do
sistema de alto-falantes.
A tomada de parede não está
funcionando.
A alimentação não está ligada.
O iPhone ou iPod não se instalou
corretamente.
A capa do dispositivo está
impedindo a instalação do iPhone
ou iPod.
O iPhone ou iPod não está
instalado corretamente.
A capa do dispositivo está
impedindo a instalação do iPhone
ou iPod.
O software do iPhone ou iPod é
antigo demais.
O iPhone ou iPod está travado. Verifique se o iPhone ou iPod está funcionando corretamente antes de conectá-lo à
Conecte o adaptador CA em uma tomada de parede e na tomada de alimentação na
parte posterior do sistema de alto-falantes.
Ligue outro dispositivo à mesma tomada de parede para confirmar se ela está
funcionando.
Ligue o sistema de alto-falantes, pressionando o botão
Remova o iPhone ou iPod da estação de encaixe e verifique se há obstrução nos
conectores da estação e do iPhone ou iPod. Em seguida, reencaixe na estação.
Remova o iPhone ou iPod do conector de encaixe. Remova o iPhone ou iPod da capa.
Em seguida, recoloque o iPhone ou iPod do conector de encaixe.
Remova o iPhone ou iPod da estação de encaixe e verifique se há obstrução nos
conectores da estação e do iPhone ou iPod. Em seguida, reencaixe na estação.
Remova o iPhone ou iPod do conector de encaixe. Remova o iPhone ou iPod da capa.
Em seguida, recoloque o iPhone ou iPod do conector de encaixe.
Atualize o software do iPhone ou iPod. Para detalhes, visite www.apple.com/ipod/download.
unidade. Consulte o manual do iPhone ou iPod para obter detalhes.
. O LED de alimentação acende.
PT
63
Page 66

Diagnóstico de falhas
Sintoma Possível problema Solução
O iPhone ou iPod
não se carregou
O som está distorcido
O iPhone ou iPod não está
instalado corretamente.
A capa do dispositivo está
impedindo a instalação do iPhone
ou iPod.
O iPhone ou iPod está travado. Verifique se o iPhone ou iPod está funcionando corretamente antes de conectá-lo à
O adaptador CA não está
conectado em uma tomada
de parede ou na tomada de
alimentação na parte posterior do
sistema de alto-falantes.
O nível de volume ajustado está
muito alto.
A fonte de som está distorcida. Se o som original no iPhone ou iPod (arquivo de som) é de baixa qualidade, distorção e
Remova o iPhone ou iPod da estação de encaixe e verifique se há obstrução nos
conectores da estação e do iPhone ou iPod. Em seguida, reencaixe na estação.
Remova o iPhone ou iPod do conector de encaixe. Remova o iPhone ou iPod da capa.
Em seguida, recoloque o iPhone ou iPod do conector de encaixe.
unidade. Consulte o manual do iPhone ou iPod para obter detalhes.
Conecte o adaptador CA em uma tomada de parede e na tomada de alimentação do
sistema de alto-falantes.
Reduza o volume.
ruído são facilmente notados com alto-falantes de alta potência. Tente outra origem de
áudio; por exemplo, um CD de música.
64
Page 67

Diagnóstico de falhas
Sintoma Possível problema Solução
Em iPhone e iPod touch mais recentes, que usam o sistema operacional iOS:
1. Certifique-se de que as conexões de cabos do sistema de alto-falantes até o monitor
ou a TV estão corretas para o modo de saída selecionado.
2. Reproduza um filme no iPhone ou iPod touch
3. Pressione o botão “VIDEO” até obter vídeo em seu dispositivo.
4. Em seguida, pressione o botão “VIDEO” uma vez para “Composite” ou duas vezes
para “Component”.
Em iPods mais antigos, você seleciona o tipo de saída de vídeo nas configurações de
vídeo do iPod:
1. Certifique-se de que as conexões de cabos do sistema de alto-falantes até o monitor
ou a TV estão corretas para o modo de saída selecionado.
2. Percorra os modos de saída de vídeo no iPod até ver vídeo no monitor externo ou TV.
OBS. O botão “VIDEO” não fornece funcionalidade para modelos de iPod mais antigos.
Aponte o controle remoto completo para o sistema de alto-falantes Altec Lansing e fique
à distância máxima de 3 metros da unidade.
Verifique se o cabo está conectado corretamente entre a fonte e o sistema de altofalantes Octiv650.
Aumente o volume no dispositivo para aproximadamente ¾ do volume total.
Sem saída de vídeo
O controle remoto
completo não
funciona
Não sai som do
dispositivo AUX,
como um tocador
de MP3 ou CD, que
está conectado à
tomada AUX
O sistema de alto-falantes está no
modo de vídeo errado.
A pilha está fraca. Coloque uma pilha nova.
O controle remoto completo não
está apontado para o sistema de
alto-falantes.
O cabo não está conectado
corretamente à fonte ou ao
sistema de alto-falantes.
O volume do dispositivo está
muito baixo.
PT
65
Page 68

Diagnóstico de falhas
Sintoma Possível problema Solução
O sistema de
alto-falantes tem
comportamento
instável ou
inesperado; os
controles não
funcionam
Eletricidade estática, queda de
energia momentânea ou condições
de operação anormais podem ser
responsáveis.
1. Remova o iPhone ou iPod.
2. Desconecte o cabo do adaptador CA do conector de alimentação do sistema de altofalantes.
3. Aguarde 20 – 30 segundos.
4. Enquanto espera, redefina o iPhone ou iPod.
5. Reconecte o cabo do adaptador CA do conector de alimentação ao sistema de altofalantes.
6. Ligue o sistema de alto-falantes e verifique se tem comportamento inesperado. Por
exemplo, ajuste o volume e veja se os LEDs mudam.
7. Se o sistema de alto-falantes continua exibindo comportamento inesperado
(por exemplo, os LEDs não mudam quando você ajusta o volume), restaure as
configurações de fábrica:
A. Verifique se o sistema de alto-falantes Octiv650 está ligado.
B. Mantenha pressionado o botão
8. Reinstale o iPhone ou iPod no conector de encaixe.
alimentação pare de piscar.
no sistema de alto-falantes até que o LED de
66
Page 69

Garantia
GARANTIA LIMITADA DE UM ANO DA ALTEC LANSING
O que a garantia cobre?
A Altec Lansing garante que seus produtos estarão livres de defeitos de material e de
fabricação, com as exceções definidas abaixo.
Qual é o período de cobertura?
Esta garantia é válida por um ano a partir da data da compra. O prazo de quaisquer
garantias implícitas por lei vencerá quando a sua garantia limitada terminar. Alguns
estados e/ou Países Membros da União Européia não permitem limitações para a
duração de uma garantia implícita; portanto, as limitações acima poderão não ser
aplicáveis ao seu caso.
O que a garantia não cobre?
Esta garantia não cobre qualquer defeito, mau funcionamento ou falha que ocorra
como resultado de: instalação imprópria; mau uso ou uso não compatível com as
instruções do produto; abuso; ou uso com equipamento inadequado, imprevisto ou
defeituoso. (Para obter informações sobre a instalação, a operação e o uso adequados,
consulte o manual fornecido com o produto. Caso precise de uma nova cópia do
manual, você poderá fazer download no site www.alteclansing.com.) Além disso, danos
consequentes e incidentais não são recuperáveis nos termos desta garantia. Alguns
estados não permitem a exclusão ou limitação dos danos incidentais ou consequentes;
portanto, a limitação ou exclusão acima poderá não ser aplicável ao seu caso.
O que a Altec Lansing fará para corrigir o problema?
A Altec Lansing poderá, a seu critério, reparar ou substituir qualquer produto que
apresente um defeito comprovado de material ou manufatura. Se o produto não for
mais fabricado, ou estiver esgotado, a seu critério, a Altec Lansing poderá substituir o
seu produto com um produto Altec Lansing similar ou superior.
Como obter o serviço da garantia
Para obter que um produto coberto seja reparado ou substituído, você deve contatar
a Altec Lansing durante o período da garantia por email (csupport@alteclansing.com).
É necessário incluir no email: seu nome, endereço, endereço de email, telefone, data
da compra e uma descrição completa do problema que você está experimentando.
Nos Estados Unidos, você poderá contatar a Altec Lansing por telefone, no número
1-800-ALTEC88 – por favor, esteja preparado para fornecer as informações acima. Se
o problema aparenta ter relação com um defeito de material ou fabricação, mediante
comprovação de compra, a Altec Lansing fornecerá uma autorização de devolução e
instruções para remessa de devolução. As remessas de devolução serão às custas do
cliente. Providencie um seguro para a remessa, conforme apropriado, porque você é
responsável pelo produto até que ele chegue à Altec Lansing.
Como a lei estadual afetará os seus direitos?
Esta garantia determina direitos legais específicos e você também poderá ter outros
direitos, que variam em cada estado. Favor observar que, na União Européia, você,
como consumidor, poderá ter outros direitos legais nos termos da legislação nacional
dos Países Membros da União Européia que regem a venda dos produtos Altec
Lansing. Esses direitos não são afetados por esta garantia.
As garantias limitadas e reparações acima são as únicas garantias e reparações
disponíveis para o comprador, se e na extensão em que forem válidas e executáveis
nos termos da lei pertinente.
DESCARTE DE EQUIPAMENTOS ELÉTRICOS E ELETRÔNICOS USADOS
humana, que poderiam ser causadas por tratamento inadequado dos resíduos deste
produto. A reciclagem de materiais ajudará a economizar recursos naturais. Para obter
informações mais detalhadas sobre a reciclagem deste produto, entre em contato com
a prefeitura local ou com o serviço de coleta de lixo residencial.
Este símbolo no produto ou na embalagem indica que o produto não deve
ser tratado como resíduo doméstico. Ele deve ser entregue no ponto de
coleta aplicável para reciclagem de equipamento elétrico e eletrônico. Ao
garantir que este produto seja descartado corretamente, você ajudará a
evitar consequências negativas potenciais para o meio ambiente e a saúde
PT
67
Page 70

Page 71

Page 72

www.alteclansing.com
HEADQUARTERS 535 Rte. 6 & 209, Milford, PA 18337-0277 • 800-ALTEC-88. 570-296-4434. • Fax 570-296-6887
EUROPE Flexport 5th floor, Radarweg 60, 1043 NT, Amsterdam, The Netherlands
ASIA/PACIFIC 23/F, Office Tower, Shun Hing Square Diwang Commercial Centre, 5002 Shen Nan Dong Road, Shenzhen, China 518008
“Made for iPhone” and “Made for iPod” mean that an electronic accessory has been designed to connect specifically to iPhone and iPod players, and has been certified by the developer to meet Apple
performance standards. Apple is not responsible for the operation of this device or its compliance with safety and regulatory standards. Please note that the use of this accessory with iPhone or iPod may
affect wireless performance.
Product specifications and appearance are subject to change without notice.
©2010 Altec Lansing, LLC. All rights reserved.
ALTEC, ALTEC LANSING, the Altec Lansing logo, Hear What’s Next, and Octiv are trademarks or registered trademarks of Altec Lansing, LLC.
iPhone and iPod is a trademark of Apple Inc., registered in the U.S. and other countries. All other trademarks appearing herein are the property of their respective owners.
Designed by Altec Lansing in the USA. Made in China. A14095 R02
 Loading...