

Page 1

User’s guide Guia do Usuário
FX4021
Mode d’emploi Guía del usuario
Page 2

Page 3
The lightning flash with arrowhead, within an
equilateral triangle, is intended to alert the user to the
presence of uninsulated “dangerous voltage” within the
product’s enclosure that may be of sufficient magnitude
to constitute a risk of electric shock to persons.
Caution: To prevent the risk of electric shock, do not
remove cover (or back). No user-serviceable parts
inside. Refer servicing to qualified service personnel.
The exclamation point within an equilateral triangle is
intended to alert the user to the presence of important
operating and maintenance (servicing) instructions in
the literature accompanying the appliance.
CAUTION
To prevent electric shock do not use this (polarized) plug with an extension cord, receptacle
or other outlet unless the blades can be fully inserted to prevent blade exposure.
WARNING
T
O REDUCE THE RISK OF FIRE OR ELECTRIC SHOCK, DO NOT EXPOSE THIS APPLIANCE TO
RAIN OR MOISTURE.
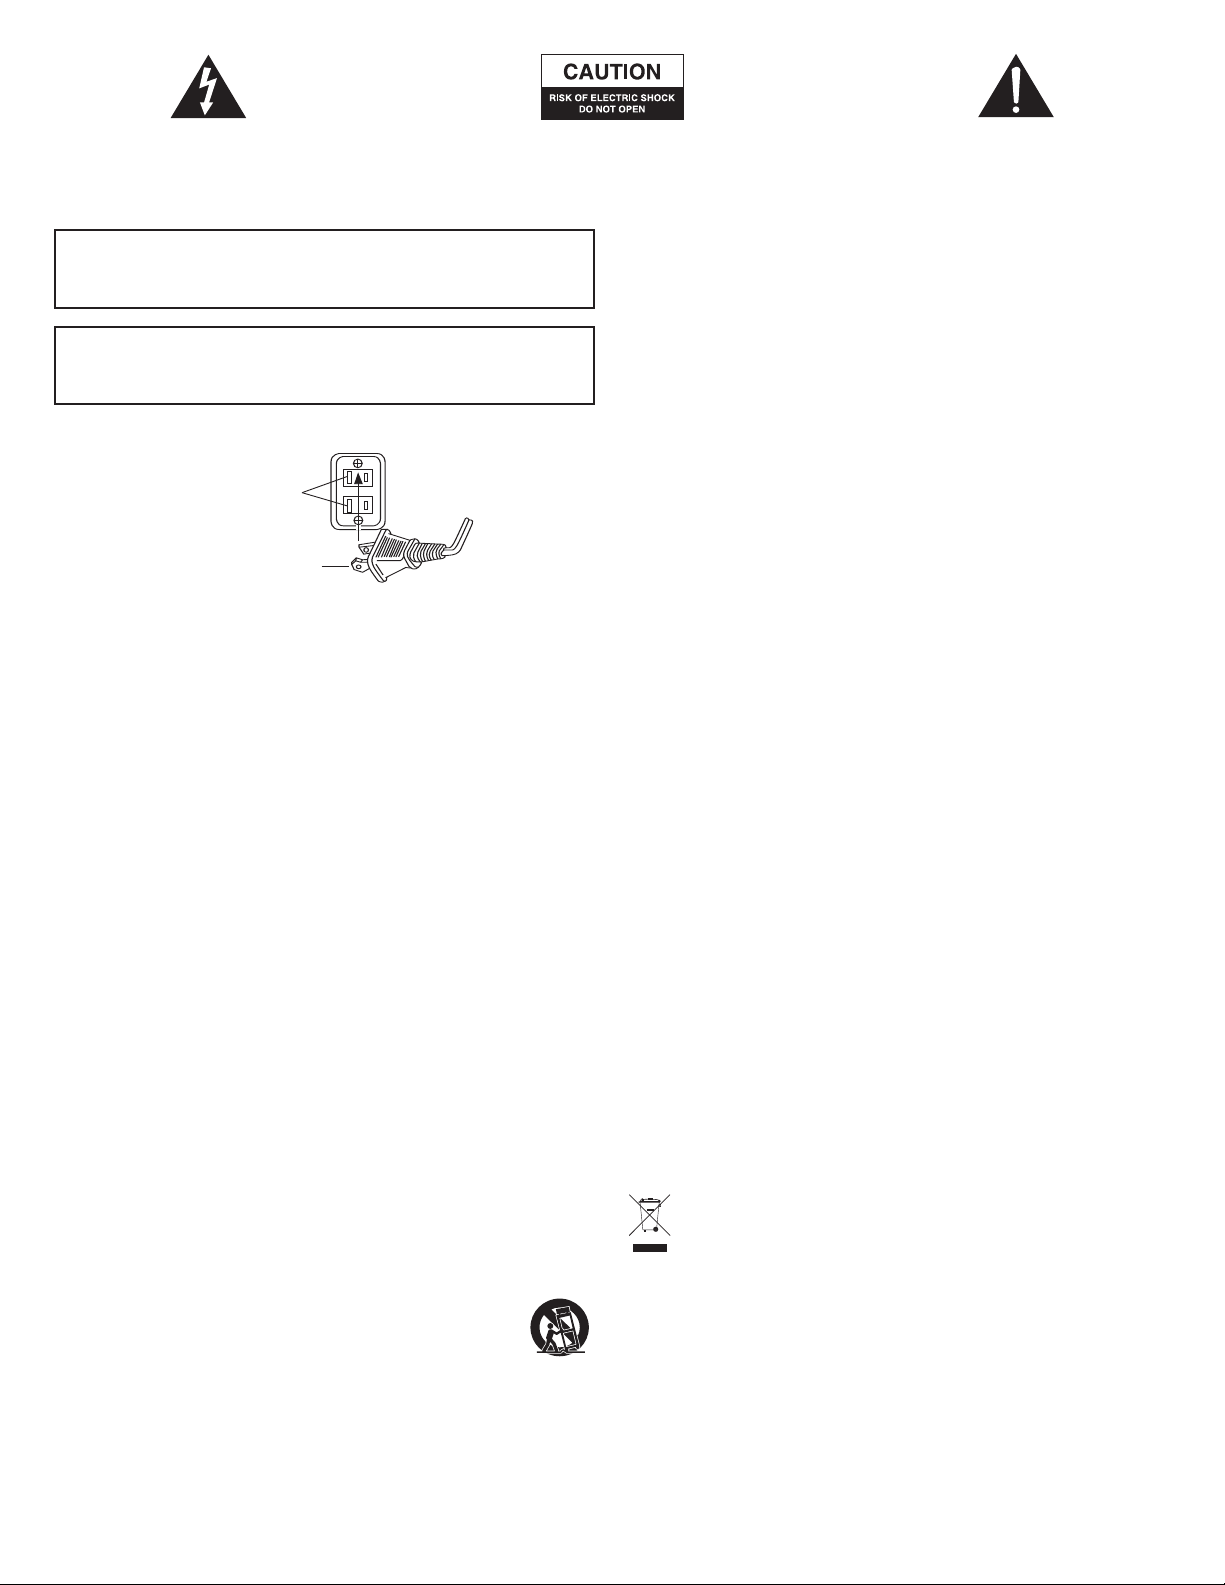
CONNECTING THE POWER CORD (AC WALL SOCKET)
Long slot is neutral
(ground) side.
Insert the wide blade into
t
he ground side slot.
MPORTANT SAFETY INSTRUCTIONS
I
1
. Read these instructions.
2. Keep these instructions.
3. Heed all warnings.
4. Follow all instructions.
5
. Do not use this apparatus near water — This apparatus shall not be exposed to dripping
or splashing, and no objects filled with liquids, such as vases, shall be placed on the
apparatus.
6. Clean only with dry cloth.
7. Do not block any ventilation openings. Install in accordance with the manufacturer’s
instructions. The apparatus should not be situated on a bed, sofa, rug or similar surface
that may block the ventilation openings. The apparatus must not be placed in a built-in
installation, such as a closed bookcase or cabinet that may impede the flow of air
through the ventilation openings. Ventilation should not be impeded by covering the
openings with items such as newspapers, tablecloths, curtains, etc.
8. Do not install near any heat sources such as radiators, heat registers, stoves, or other
apparatus (including amplifiers) that produce heat.
9. No naked flame sources, such as lighted candles, should be placed on the apparatus.
10. Do not defeat the safety purpose of the polarized or grounding-type plug. A polarized
plug has two blades with one wider than the other. A grounding type plug has two
blades and a third grounding prong. The wide blade or the third prong are provided for
your safety. If the provided plug does not fit into your outlet, consult an electrician for
the replacement of the obsolete outlet.
11. Protect the power cord from being walked on or pinched — particularly at plugs,
convenience receptacles, and the point where they exit from the apparatus.
Do not install in an ar
12.
power plug is the only way to completely r
readily accessible at all times.
Power source — Use only power supplies of the type specified in the operating
13.
uctions or as marked on the appliance. If a separate power supply is included with
instr
this apparatus, do not substitute with any other power supply
provided power supplies.
14. Unplug this apparatus during lightning storms or when unused for long periods of time.
15. Refer all servicing to qualified service personnel. Servicing is required when the apparatus
has been damaged in any way, such as power-supply cord or plug is damaged, liquid has
been spilled or objects have fallen into the apparatus, the apparatus has been exposed to
rain or moisture, does not operate normally, or has been dropped. For service, refer to
qualified ser
assistance.
16. For products which incorporate batteries, please refer to local regulations for proper
battery disposal.
17. Only use attachments/accessories specified by the manufacturer.
18. Use only with the cart, stand, tripod, bracket, or table specified by the
manufactur
when moving the cart/apparatus combination to avoid injury from tip-over.
ea which impedes the access to the power plug. Disconnecting the
vice personnel, r
er or sold with the apparatus. When a cart is used, use caution
eturn to the dealer, or call the Altec Lansing service line for
emove power to the pr
oduct and must be
use only manufactur
—
ALTEC LANSING TECHNOLOGIES, INC. ONE YEAR LIMITED WARRANTY
(TWO-YEAR LIMITED WARRANTY IN THE EUROPEAN UNION AND ASIA)
What Does The Warranty Cover?: Altec Lansing warrants that its products shall be free from
defects in materials or workmanship, with the exceptions stated below.
What Is The Period Of Coverage?: For units purchased in European Union or Asia, this
warranty runs for two years from the date of purchase. For units not purchased in Europe or
A
sia, this warranty runs for one year from the date of purchase. The term of any warranties
implied by law shall expire when your limited warranty expires. Some states and/or Member
States in the European Union do not allow limitations on how long an implied warranty lasts,
so the above limitation may not apply to you.
What Does The Warranty Not Cover?: This warranty does not cover any defect, malfunction or
failure that occurs as a result of: improper installation; misuse or failure to follow the product
directions; abuse; or use with improper, unintended or faulty equipment. (For information on
proper installation, operation and use consult the manual supplied with the product. If you
require a replacement manual, you may download a manual from www.alteclansing.com.)
Also, consequential and incidental damages are not recoverable under this warranty. Some
states do not allow the exclusion or limitation of incidental or consequential damages, so the
above limitation or exclusion may not apply to you.
What Will Altec Lansing Do To Correct The Problem?: Altec Lansing will, at its option, repair or
replace any product that proves to be defective in material or workmanship. If your product is
no longer being manufactured, or is out of stock, at its option, Altec Lansing may replace your
product with a similar or better Altec Lansing product.
How To Get Warranty Service: To get a covered product repaired or replaced, you must contact
Altec Lansing during the warranty period by email (csupport@alteclansing.com). You must
include in your email, your name, address, email address, telephone number, date of purchase
and a complete description of the problem you are experiencing. In the United States, you may
alternatively contact Altec Lansing by telephone at 1-800-ALT
provide the same information. If the problem appears to be related to a defect in material or
workmanship, Altec Lansing will provide you a return authorization and instructions for return
shipment. Return shipments shall be at the customer’s expense, and the return must be
a
ccompanied by the original proof of purchase. You should insure the shipment as appropriate
because you are responsible for the product until it arrives at Altec Lansing.
H
ill State Law Affect Your Rights?: This warranty gives you specific legal rights, and
ow W
you may also have other rights which vary from state to state. Please note that in the
European Union, you as a consumer might have other legal rights under national legislation of
European Union Member States governing the sale of Altec Lansing’s
n
ot affected by this guarantee.
The above limited warranties and remedies are sole warranties and remedies available to
purchaser, if, and to the extent, valid and enforceable under the applicable law.
— please be prepared to
EC88
goods. Those rights ar
CUSTOMER SERVICE
The answers to most setup and performance questions can be found in the Troubleshooting
guide. You can also consult the FAQs in the customer support section of our Web site at
www.alteclansing.com. If you live in North America and still can’t find the information you
need, please call our customer service team for assistance before returning the speakers to
your retailer under their return policy.
Tel: 800-258-3288
Email: csuppor
If you live outside of Nor
select your r
For the most up-to-date infor
t@alteclansing.com
egion to locate your countr
th America, please visit our website at
mation, be sure to check our Web site at
s distributor
y’
.alteclansing.com
.
www
www
INTERNATIONAL DISTRIBUTION
egarding the distribution of Altec Lansing products
Inter
-
er
in your country, please visit
national customers: For infor
mation r
www.alteclansing.com and click on your region.
DISPOSAL OF OLD ELECTRICAL & ELECTRONIC EQUIPMENT
This symbol on the product or on its packaging indicates that this product shall not
be treated as household waste. Instead it shall be handed over to the applicable
collection point for the recycling of electrical and electronic equipment. By ensuring
this product is disposed of correctly, you will help prevent potential negative
consequences for the environment and human health, which could otherwise be
caused by inappropriate waste handling of this product. The recycling of materials will help to
conserve natural resources. For more detailed information about recycling of this product,
please contact your local city office or your household waste disposal service.
and
.alteclansing.com
e
.
1
Page 4

FX4021
Three-Piece
Powered Audio System
Thank you for purchasing this Altec Lansing product. For generations, Altec
ansing has been first in audio innovation. Today, our line of powered speakers
L
as received more performance awards than any other brand. In all kinds of
h
environments, in every price range, Altec Lansing offers sound of distinction —
iving even the most demanding customers the audio enjoyment they seek. Just
g
isten to this!
l
B
ox Contents
• Two speakers
• One subwoofer
Control pod
•
• Wireless remote
• 3.5mm stereo cable
User’s guide and quick connect card
•
Placing Speakers
Subwoofer
ll stereo-encoded information is heard through the satellite speakers. The
A
subwoofer contains no stereo imaging, and its sound is non-directional. As a
result, the subwoofer doesn’t have to be placed in any particular relationship to
he satellites. However, placing the subwoofer on the floor close to a wall or
t
oom corner provides better bass efficiency and optimum sound.
r
arning: The subwoofer is not magnetically shielded. As such, it SHOULD be
W
placed at least 2 feet (0.6m) from TVs, computer monitors, computer hard drives
or any other magnetic media (e.g. floppy disks, Zip disks, computer or audio
tapes, etc.).
Satellite Speakers
Arrange the satellite speakers to suit your listening tastes — from right next to
the monitor to as far apart as the speaker cords allow.
For optimum sound, satellite speakers should be placed in a left/right
configuration, preferably apart and at equal distance from the center of the
listening area. This will offer the best stereo imaging and provide the most
satisfying results.
Note: The satellite speakers ARE magnetically shielded and can be placed close to
video displays such as TVs and computer monitors without distorting the image.
Making Connections
Warning: Do not insert the speaker system’s power plug into a wall outlet until
all connections are made. Also, turn off the audio source (e.g., your PC, MP3
player, TV, DVD player, video gaming console, etc.) before connecting the outputs
to the speaker system’s inputs.
To ensure first-time operation as expected, please carefully follow the connection
sequences described below in the order indicated.
Speaker System
• Connect the right satellite speaker RCA jack to the input labeled RIGHT on the
back of the subwoofer.
• Connect the left satellite speaker RCA jack to the input labeled LEFT on the back
of the subwoofer.
Connect the contr
•
the input marked DIN on the back of the subwoofer.
Connect one end of the audio input cable (with lime gr
•
end) to the matching lime green input plug on the back of the subwoofer,
labeled INPUT. Connect the other end of the audio input cable to your desired
audio sour
ol pod to the subwoofer by plugging the gr
ce.
Inputs
arious connection schemes between your audio sour
V
are available. Determine if you’ll be setting up the speaker system for PC
audio/PC gaming, DVD playback, console gaming or with portable audio devices
(such as MP3 or por
table CD players), then skip to the appr
ey DIN connector to
een connectors at each
ce and the speaker system
opriate section.
PC
All PC sound cards have audio outputs. Typically, the outputs will be marked as
front output” and “rear output.” In some cases, slightly different terminology
“
ay be used. The sound card’s documentation should help you determine which
m
outputs to use with your speaker system.
Locate the 3.5mm stereo cable.
•
Connect the 3.5mm stereo cable to the lime green input labeled “FRONT” on
•
your sound card.
TV/DVD Player or Video Gaming Console
o connect your Altec Lansing speaker system to your TV, DVD player, or video
T
gaming console follow the steps below:
Make sure the power to your audio source is turned off.
•
Locate the following elements:
•
A TV/DVD Player adapter (3.5mm to RCA), available on
•
or your local electronics store. This RCA adapter features a lime green
.5mm stereo jack on one end and two RCA jacks on the other — one red and
3
one white.
• The included 3.5mm stereo cable. This cable features a lime green 3.5mm
tereo jack on both ends.
s
• A red and white RCA cable. This cable should feature a red and white RCA
jack on both ends.
Connect one end of the red and white RCA cable to your audio source, and the
•
other end to the matching r
adapter.
Connect one end of the 3.5mm stereo cable to the lime green input on the
•
TV/DVD Player adapter
f the subwoofer.
o
ote: If your video gaming console does not feature RCA outputs, consider
N
connecting the speaker system to the TV instead.
ed and white RCA jacks on the TV/DVD Player
, and the other end to input labeled “INPUT” on the back
ww.alteclansing.com
w
Portable Audio Devices (CD Players, IPods and other
MP3 players, etc.)
Connect the 3.5mm stereo cable to the headphone jack on your portable audio
device.
POWERING ON
1. After all other connections are made, plug the AC power cord (on the back of
subwoofer) into a wall outlet. The speaker system is now ready to operate.
2. Turn on the audio source.
3. Turn on the speaker system by pressing the stand-by button on the control
pod or wireless remote. An LED will light on the control pod when the power
is ON.
4. Install the supplied battery in the remote’s battery compartment.
CAUTION: Danger of explosion if battery is incorrectly replaced. Replace only
with the same or equivalent type.
Note: To avoid hearing a popping sound when you turn on your Altec Lansing
speaker system, always turn on your audio source first.
Master Volume
y dial on the control pod controls the master volume. Rotate the dial to
otar
The r
the right to increase the volume, or to the left to decrease it.
The “+” and “–“ buttons on the wireless remote also control the master volume.
Press the “+” button to increase the volume, or the “–“ button to decrease it.
LEDs on the control pod will indicate the volume level.
Treble and Bass
To control treble or bass levels using the control pod, press the “TREBLE” or
“BASS” buttons on the contr
responding level, or to the left to decrease it.
the cor
o control treble or bass levels using the wireless remote, press the “TREBLE” or
T
“BASS” or buttons on the wireless remote and press the “+” button to increase
esponding level, or the “–“ button to decr
r
the cor
LEDs on the control pod will indicate the corresponding level.
Note: After three seconds, the control pod and wireless remote will automatically
eset to “Master V
r
olume.”
ol pod and r
otate the dial to the right to incr
ease it.
ease
2
Page 5

Loudness
he loudness function contours the high and low frequencies to maximize the
T
perceived audio. Press the “LOUDNESS” button on the control pod or “LOUD”
utton on the wireless remote to turn it on. Press either button again to turn
b
t off.
i
SFX Technology™
Sound Field Xpander™ technology allows your speaker system to deliver a wider
tereo image for bigger sound at the touch of a button. Press the “SFX” button
s
on the control pod or wireless remote to turn it on. Press it again to turn it off.
Note: This feature does not work when using headphones.
Reset
he button marked with the word “reset” on the wireless remote restores
T
volume, bass, treble, loudness and SFX controls to original factory settings.
IPod/MP3 Player Jack
he iPod or MP3 player jack is located on the side of the control pod. Use it to
T
onnect any audio source that has a stereo 3.5mm plug (i.e. headphone style
c
plug.)
aution: Make sure the audio source features a line-out jack. This will ensure that
C
the output is not amplified. Check the owner’s manual for your audio device for
more information.
Stand-By/Mute
o mute the speaker system, press the button located on the control pod or
T
wireless remote. The LED on the control pod will turn off. To un-mute, perform
ither command again.
e
ote: While in stand-by or mute mode, the system continues to receive power. To
N
completely shut down the unit unplug the unit from the wall.
Headphones
he headphone jack is located on the side of the control pod. Use it to connect
T
any stereo headphones with a 3.5mm plug.
ote: When headphones are connected, the speaker system is muted.
N
System Specifications*
Altec Lansing’s superior sound comes from our patented Dynamic EQ technology, which utilizes custom-built, high-fidelity drivers, state-of-the-art equalization circuitry,
and a harmonious mix of the following specifications:
Sound Pressure Level (SPL): 92 dB
Total Continuous Power: 46 Watts RMS
• Front Speakers: 11 Watts/channel @ 4 ohms
@ 10% THD @ 180 Hz – 20 kHz
2 Channels Loaded
• Subwoofer: 24 Watts @ 8 ohms
@ 10% THD @ 32 Hz – 180 Hz
Single Channel Loaded
System Response: 32 Hz – 20 kHz (-10 dB)
Signal to Noise Ratio
@ 1 kHz input: > 85 dB
Drivers (per satellite): One 40mm mid-range driver and
one 18mm high-end tweeter
Subwoofer: Two 5.25" long-throw woofers
in isobaric configuration
*Power rating conforms to FTC Amplifier Rule #16 C.F.R. Part 432.
Troubleshooting
Sy
mpt
om Possible Problem Solution
No LEDs are lit.
Power isn’
AC power cor
ge pr
Sur
Wall outlet not functioning.
ned on.
t tur
t connected to the wall outlet.
d isn’
otector (if used) isn’
t power
ed on.
Turn on the speaker system by pressing the button on the control pod or
wir
After all other connections are made, plug the AC power cord (on the back of
subwoofer) into a wall outlet.
If the AC power cord is plugged into a surge protector, make sure the surge
protector is switched on.
Plug another device into the wall outlet (same jack) to verify the wall outlet
is working.
emote. An LED will light on the contr
eless r
ol pod when the power is ON.
3
Page 6

Symptom Possible Problem Solution
fter all other connections are made, plug the AC power cord (on the back of
o sound
N
from one or
ore speakers.
m
Crackling sound
rom speakers.
f
ound is
S
istorted.
d
Radio
interference.
No sound
from subwoofer.
Low hum
from subwoofer.
Loud hum
from subwoofer.
ted monitor
Distor
ower isn’t turned on.
P
Volume is set too low.
he color-coded 3.5mm stereo cables are not properly
T
onnected to the audio source.
c
roblem with audio source device.
P
Bad connection.
Volume level in computer operating system is set too
igh.
h
A problem with your audio source device.
Volume level set too high.
Computer operating system volume level is set too
high.
Sound source is distorted.
Too close to a radio tower.
Bad connection.
Sound source has little low-frequency content.
The AC in your house is at 60 cycles per second, which is
within the audio frequency of the subwoofer.
Bad connection.
Bass level set too high.
Volume or bass level on your audio source device is set
too high.
.
Subwoofer too close to monitor.
A
subwoofer) into a wall outlet.
urn on the speaker system by pressing the stand-by button on the control
T
pod or wireless remote. An LED will light on the control pod when the power
s ON.
i
The rotary dial on the control pod controls the master volume. Rotate the dial
o the right to increase the volume.
t
heck volume level on the computer sound card or alternate audio source
C
evice, and set at mid-level.
d
heck the plug connections on the audio source. Make sure the signal cables
C
re inserted firmly into the correct jacks.
a
est the speakers on another audio device. Remove the 3.5mm stereo cable
T
rom the audio source device and connect it to “line-out,” “audio-out,” or the
f
headphone jack of another audio source.
Check all cables. Make sure they are connected to “line-out” or “audio-out”
jack on your sound card or other audio source — NOT “speaker-out.”
Check the computer operating system volume level and decrease it if necessary.
Unplug the stereo cable from the audio source. Then plug it into the headphone
ack of an alternate audio source (e.g., Walkman, Discman or FM radio).
j
The rotary dial on the control pod controls the master volume. Rotate the dial
o the left to decrease the volume.
t
Adjust the computer operating system volume and balance levels to the
s a starting point, then adjust the level on the speaker using the
center a
olume control.
v
WAV files are often of poor quality. So distortion and noise are easily noticed
with high-powered speakers. Try a different sound source such as a music CD.
Move your speakers until the interference goes away.
Check to make sure that all cables are connected properly and are making a
clear connection.
Many .WAV and .MID files often have little low-frequency content and sound
flat when you listen to them on a computer. Try a song with more bass–
something from your CD collection.
Some low hum may be detected when your speaker system is powered on
without an audio source playing, or when the volume is set at an extremely
low level.
Unplug the AC power cord from the surge protector (if used), and plug directly
into an AC wall outlet.
Move your cables. Check to ensure they are making a clear connection.
To control the bass, press the “Bass” button on the control pod and rotate the
dial to the left to decrease it.
Disconnect your 3.5mm stereo cable from the audio source. If the loud hum
goes away, lower the volume on the audio source.
Lower the volume or bass level on your computer, portable device, etc.
Because the subwoofer is not magnetically shielded, it can cause distortion if
it’s too close to your monitor. Move the subwoofer so it’s at least 2 feet from
your monitor
.
4
Page 7

Le symbole figurant un éclair dans un triangle
équilatéral est destiné à attirer l’attention de l’utilisateur
sur la présence d’une “tension dangereuse” non isolée
pouvant être d’amplitude suffisante pour constituer un
risque d’électrocution.
Attention : Pour prévenir tout risque d’électrocution,
ne retirez pas le couvercle (ou le dos) de l’appareil. Il
ne se trouve à l’intérieur aucune pièce susceptible
d’être réparée par l’utilisateur. Confiez la réparation et
l’entretien à un personnel qualifié.
Le point d’exclamation à l’intérieur d’un triangle
équilatéral est destiné à prévenir l’utilisateur qu’il
trouvera d’importantes instructions concernant
l’utilisation et la maintenance (entretien) dans la
documentation jointe à l’appareil.
ATTENTION
Pour éviter tout risque d’électrocution, n’utilisez pas cette fiche (polarisée) avec une
rallonge électrique, une prise de courant ou une autre sortie, si les lames ne peuvent pas
être insérées complètement, afin d’éviter qu’elles ne soient exposées.
AVERTISSEMENT
AFIN DE LIMITER LE RISQUE D’INCENDIE OU D’ÉLECTROCUTION, N’EXPOSEZ PAS CET
APPAREIL À LA PLUIE OU À L’HUMIDITÉ.
CONNEXION DU CÂBLE D’ALIMENTATION (PRISE MURALE CA)
L
a fente longue cor
a
u côté neutre (terre).
Insérez la lame la plus large
d
ans la borne côté terre.
ONSIGNES DE SÉCURITÉ IMPORTANTES
C
1. Lisez ces instructions.
2. Conservez ces instructions.
3. Suivez l’ensemble des avertissements.
4. Respectez l’ensemble des instructions.
5. N’utilisez pas l’appareil à proximité d’un point d’eau. Cet appareil ne doit pas être exposé
à des gouttes ou des éclaboussures. Aucun objet rempli de liquide (vase, par exemple) ne
doit être placé sur l’appareil.
6. Nettoyez uniquement l’appareil à l’aide d’un chiffon sec.
7. N’obstruez pas les orifices de ventilation. Installez l’appareil conformément aux
instructions du fabricant. L’appareil ne doit pas être placé sur un lit, un divan, un tapis ou
une surface similaire pouvant obstruer les orifices de ventilation. L’appar
être inséré dans une installation intégrée, telle qu’une armoire ou une étagère fermée.
Le flux d’air via les orifices de ventilation risquerait d’être bloqué. Les orifices ne doivent
pas être recouverts avec des objets tels que des journaux, des nappes, des rideaux, etc. La
ventilation risquerait d’être bloquée.
8. N’installez pas l’appareil à proximité de sources de chaleur telles que des radiateurs, des
registres de chaleur, des fourneaux ou autres appareils produisant de la chaleur
(amplificateurs inclus).
Aucune sour
9.
l’appareil.
10. N’allez pas à la rencontre des objectifs de sécurité de la fiche polarisée ou mise à la terre.
Les fiches polarisés disposent de deux lames (une plus lar
mise à la ter
lar
votre prise électrique, consultez un électricien afin de remplacer la prise obsolète.
Faites-en sor
11.
aux points d’entrée et de sor
12. N’installez pas l’appareil dans une zone où l’accès à la fiche d’alimentation n’est pas
garanti. Le débranchement de la fiche d’alimentation est la seule manièr
pr
tout moment.
13. Source d’alimentation — utilisez uniquement des blocs d’alimentation du type défini
dans les instr
d’alimentation distinct est four
d’alimentation. Utilisez uniquement les blocs d’alimentation four
14. Débranchez l’appareil en cas d’orage ou lorsque vous ne l’utilisez pas pendant des
périodes de temps pr
15. Confiez l’ensemble des travaux d’entretien à du personnel d’entretien qualifié. Des
travaux d’entretien sont nécessaires lorsque l’appareil est endommagé (la fiche ou le
cordon d’alimentation est endommagé, du liquide s’est renversé ou des objets sont
tombés dans l’appareil, l’appareil a été exposé à la pluie ou à l’humidité, l’appareil ne
fonctionne pas nor
d’entretien, adressez-vous à du personnel d’entretien qualifié, retournez l’appareil au
distributeur ou contactez la ligne d’assistance Altec Lansing.
Pour les produits comportant des piles, veuillez vous reporter aux régulations locales pour
16.
mettr
17. Utilisez uniquement les accessoires spécifiés par le fabricant.
Utilisez uniquement le chariot, le présentoir
18.
spécifié(e) par le fabricant ou vendu(e) avec l’appareil. Si vous utilisez un
chariot, déplacez avec précaution l’ensemble chariot-appareil afin d’éviter
toute blessure en cas de chavirage.
ce de flammes nues (bougies allumées, par exemple) ne doit être placée sur
e disposent de deux lames et d’une broche de mise à la terre. La lame plus
r
ge ou la br
oduit complètement hors tension. V
oche est four
te que le cor
uctions de fonctionnement ou indiqué sur l’appar
e les piles au r
r
espond
nie pour votr
don d’alimentation ne puisse êtr
tie des fiches et des prises.
olongées.
malement ou l’appar
ebut de manière adaptée.
e sécurité. Si la fiche four
ous devez pouvoir accéder facilement à la fiche à
ni avec l’appar
eil est tombé). Dans le cadr
ge que l’autre). Les fiches de
nie ne cor
e piétiné ou plié, notamment
eil. Si un bloc
emplacez par aucun autr
eil, ne le r
, le pied, le support ou la table
nis par le fabricant.
e des travaux
eil ne doit pas
espond pas à
r
e de mettre le
e bloc
GARANTIE ALTEC LANSING TECHNOLOGIES, INC. LIMITÉE D’UN AN
(GARANTIE LIMITÉE DE DEUX ANS EN UNION EUROPÉENNE ET EN ASIE)
Quels éléments sont couverts par la garantie ? Altec Lansing garantit que ses produits sont
dépourvus de défauts au niveau des matériaux ou de la main d’oeuvre, à l’exception des
conditions détaillées ci-dessous.
Q
uelle est la durée de la garantie ?Pour les appareils achetés en Union européenne ou en
Asie, cette garantie est valable pendant deux ans à compter de la date d’achat. Pour les
appareils non achetés en Union européenne ou en Asie, cette garantie est valable pendant un
an à compter de la date d’achat. Les conditions des garanties légales implicites prennent fin à
l’issue de la période de validité de la garantie limitée. Certains états et/ou états membres de
l’Union européenne n’acceptent pas les restrictions relatives à la durée des garanties implicites.
Il est donc possible que la restriction susmentionnée ne s’applique pas à votre cas.
Quels éléments ne sont pas couverts par la garantie ? Cette garantie ne couvre pas les défauts,
mauvais fonctionnements ou anomalies qui peuvent survenir à l’aide des événements suivants :
installation incorrecte, utilisation incorrecte ou non-respect des instructions se rapportant au
produit, utilisation abusive ou utilisation avec un équipement incorrect, inadapté ou
défectueux (pour obtenir des informations relatives à l’installation, au fonctionnement et à
l’utilisation du produit, consultez le manuel fourni avec le produit). Si vous avez besoin d’un
manuel de remplacement, vous pouvez télécharger un manuel sous
outre, les dommages consécutifs ou secondaires ne sont pas pris en charge par cette garantie.
C
ertains états n’autorisent pas l’exclusion ou la restriction des dommages consécutifs ou
secondaires, il est donc possible que l’exclusion ou la restriction susmentionnée ne s’applique
pas à votre cas.
Que fera Altec Lansing pour corriger le problème ? Altec Lansing réparera ou remplacera, à sa
discrétion, les produits qui s’avèrent défectueux au niveau des matériaux ou de la main d’oeuvre.
Si votre produit n’est plus fabriqué ou n’est plus disponible en stock, Altec Lansing remplacera à
sa discrétion votre produit par un produit Altec Lansing similaire ou de meilleure qualité.
Comment obtenir un service de garantie : pour obtenir la réparation ou le remplacement
d’un produit sous garantie, vous devez contacter Altec Lansing par courrier électronique
(csupport@alteclansing.com) au cours de la période de garantie. Le courrier électronique doit
inclure votre nom, votre adresse, votre adresse électronique, votre numéro de téléphone, la
date d’achat ainsi qu’une description détaillée du problème rencontré. Aux Etats-Unis, vous
pouvez également contacter Altec Lansing par téléphone au 1-800-ALTEC88 — soyez prêt à
fournir les mêmes informations. Si le problème s’avère lié à une anomalie au niveau des
matériaux ou de la main d’oeuvre, Altec Lansing vous enverra une autorisation de retour et
des instructions relatives au retour du produit. Le retour du produit s’effectue aux frais du
client et le retour doit être accompagné de la preuve originale d’achat. Vous devez assurer
l’expédition de manière adaptée : vous êtes en effet responsable du produit jusqu’à ce qu’il
parvienne à Altec Lansing.
Dans quelle mesure les lois nationales affectent vos droits ? Cette garantie vous accorde des
droits légaux spécifiques. Vous pouvez également disposer de droits qui varient d’un état à
l’autre. Veuillez noter qu’au sein de l’Union européenne, vous, en tant que consommateur,
pouvez disposer d’autres droits légaux selon la législation nationale des états membres de
l’Union européenne gouvernant la vente des marchandises Altec Lansing. Ces droits ne sont
pas affectés par cette garantie.
Les garanties et remèdes limités détaillés ci-dessus sont les seuls garanties et remèdes disponibles
à l’acheteur si et dans la mesure où ils sont valables et applicables selon la loi en vigueur.
www.alteclansing.com. En
SERVICE CLIENTÈLE
Les réponses à la plupart des questions relatives à la configuration et aux performances sont
disponibles dans le guide de dépannage. Vous pouvez également consulter la foire aux
questions de la section ser
vivez en Amérique du Nord et ne parvenez pas à trouver les informations dont vous avez
besoin, veuillez demander l’aide de notre équipe d’assistance clientèle avant de renvoyer
l’unité au détaillant selon la politique de retour en vigueur.
el: 800-258-3288
T
Courrier électronique : csupport@alteclansing.com
Si vous ne vivez pas en Amérique du Nord, veuillez consulter notre site Internet
(
www.alteclansing.com) et sélectionnez le pays dans lequel vous vivez pour localiser le
distributeur de votre pays.
Pour obtenir les informations les plus récentes, veuillez consulter notre site Internet à l’adresse
suivante
www.alteclansing.com.
vice clientèle de notr
e site Internet (
.alteclansing.com
www
). Si vous
DISTRIBUTION INTERNATIONALE
Clients inter
Lansing dans votr
sur votr
nationaux : pour plus d’informations au sujet de la distribution des produits Altec
e pays, veuillez consulter le site Inter
e pays.
net (
.alteclansing.com
www
) et cliquez
ÉLIMINATION DE L’ÉQUIPEMENT ÉLECTRIQUE ET ÉLECTRONIQUE OBSOLÈTE
Ce symbole sur le produit ou sur son emballage indique que ce produit ne sera pas
traité en tant que déchet ménager. Ledit produit sera remis au point de collecte
applicable au recyclage de l’équipement électrique et électronique. En vous assurant
oduit est éliminé correctement, vous contribuerez à la prévention des
que ce pr
conséquences néfastes potentielles pour l’environnement et la santé de l’homme qui
sont susceptibles d’être engendrées par une mise au rebut inadéquate de ce produit dans le
cas contraire. Le recyclage des matériaux contribuera à la préservation des ressources
naturelles. Pour toute information complémentaire concernant le recyclage de ce produit,
veuillez contacter votre mairie ou votre service local de traitement des déchets.
5
Page 8

FX4021
Système audio
amplifié en trois parties
erci d’avoir acheté ce produit Altec Lansing. Depuis des générations, Altec
M
Lansing est le pionnier de l’innovation audio. Aujourd’hui, notre gamme
’enceintes amplifiées est celle qui a reçu le plus de récompenses en matière de
d
erformances. Dans tous les types d’environnement, dans toutes les gammes de
p
rix, Altec Lansing offre un son remarquable et donne satisfaction aux clients les
p
plus exigeants en leur offrant l’expérience audio plaisante qu’ils recherchent.
Écoutez ça!
Contenu de l’emballage
Deux enceintes
•
• Un caisson de basses
Un boîtier de commande
•
Une télécommande
•
• Un câble stéréo 3,5 mm
• Un guide d’utilisation et une carte de raccordement rapide
Mise en place des enceintes
Caisson de basses
Toutes les informations codées en stéréo sont diffusées par les enceintes
satellites. Le caisson de basses ne contient aucune image stéréophonique et
roduit un son omnidirectionnel. Le caisson de basses ne requiert donc aucun
p
ositionnement particulier par rapport aux satellites. Cependant, si vous le placez
p
ur le sol, près d’un mur ou dans un coin, vous obtiendrez un effet maximum des
s
basses et un son optimal.
Avertissement : le caisson de basses ne possède pas de blindage anti-magnétique.
our cette raison, il DOIT être placé à au moins 60 cm des télévisions, moniteurs
P
et disques durs d’ordinateur ou de tout autre support magnétique (disquettes,
disques Zip, bandes audio ou PC, etc.).
Enceintes satellites
Disposez les enceintes satellites en fonction de vos préférences d’écoute —
directement à côté du moniteur ou aussi loin que les cordons des enceintes le
permettent.
Pour obtenir un son optimal, les enceintes satellites doivent être placées dans
une configuration gauche/droite, de préférence à l’écart l’une de l’autre et à
égale distance du centre de la zone d’écoute. Cette configuration offrira la
meilleure image stéréo et fournira les résultats les plus satisfaisants.
Remarque : les enceintes satellites SONT dotées d’un blindage magnétique et
peuvent être placées à proximité d’écrans vidéo, de télévision notamment, et de
moniteurs sans que l’image ne soit déformée
Branchements
vertissement : n’insérez pas la fiche d’alimentation électrique du système
A
d’enceintes dans une prise murale avant d’avoir effectué tous les branchements.
De plus, éteignez la source audio (votre PC, lecteur MP3, TV, lecteur DVD, console
de jeux vidéo, etc.) avant de relier les sorties aux entrées du système d’enceintes.
Pour assurer un fonctionnement satisfaisant dès la première utilisation, veuillez
suivre attentivement et dans l’ordre indiqué les différentes étapes de branchement décrites ci-dessous.
Système d’enceintes
• Connectez la prise RCA de l’enceinte satellite droite à l’entrée portant l’indication
RIGHT (DROITE) à l’ar
Connectez la prise RCA de l’enceinte satellite gauche à l’entrée por
•
l’indication LEFT (GAUCHE) à l’ar
Connectez le boîtier de commande au caisson de basses en r
•
DIN gris à l’entrée marquée DIN à l’arrière du caisson de basses.
• Connectez une extrémité du câble d’entrée audio (disposant de connecteurs de
couleur vert jaune à chaque extrémité) à la prise de couleur vert jaune
espondante, située à l’arrière du caisson de basses et portant l’indication
r
cor
INPUT (ENTRÉE). Connectez l’autre extrémité du câble d’entrée audio à la source
audio souhaitée.
Entrées
Il existe plusieurs schémas de connexion possibles entr
le système d’enceintes. Déterminez si vous installerez le système d’enceintes pour
l’audio sur PC, les jeux sur PC, la lecture de DVD, les jeux sur console ou pour des
dispositifs audio portables (tels que les lecteurs de CD portables ou les lecteurs
MP3), puis passez à la section correspondante.
e du caisson de basses.
rièr
rière du caisson de basses.
eliant le connecteur
e dispositif audio et
e votr
tant
PC
outes les cartes son PC sont dotées de sorties audio. En général, les sorties
T
ortent l’indication « front output » (sortie avant) et « rear output » (sortie
p
arrière). Il arrive parfois que la terminologie utilisée soit légèrement différente.
a documentation accompagnant la carte son doit vous aider à identifier les
L
orties à utiliser avec votre système d’enceintes.
s
• Localisez le câble stéréo 3,5 mm.
Connectez le câble stéréo 3,5 mm à l’entrée de couleur vert jaune portant
•
l’indication « FRONT » (AVANT) sur votre carte son.
TV/lecteur DVD ou console de jeux vidéo
Pour connecter votre système d’enceintes Altec Lansing à votre TV, votre lecteur
de DVD ou votre console de jeux vidéo, suivez les étapes ci-dessous :
• Assurez-vous que l’alimentation de votre source audio est éteinte.
Localisez les éléments suivants :
•
Un adaptateur lecteur DVD/TV (3,5 mm vers RCA), disponible sur
•
www.alteclansing.com ou dans votre magasin d’électronique local. Cet
adaptateur RCA est doté d’une prise stéréo 3,5 mm de couleur vert jaune à
ne extrémité et de deux prises RCA à l’autre (une rouge et une blanche).
u
• Le câble stéréo 3,5 mm fourni. Ce câble est doté d’une prise stéréo 3,5 mm
de couleur vert jaune à chaque extrémité.
Un câble RCA rouge et blanc. Ce câble doit être doté d’une prise RCA rouge
•
et blanche à chaque extrémité.
Connectez une extrémité du câble RCA rouge et blanc à votre source audio et
•
’autre extrémité aux prises RCA correspondantes (une rouge et une blanche) sur
l
l’adaptateur lecteur DVD/TV.
• Connectez une extrémité du câble stéréo 3,5 mm à l’entrée de couleur vert jaune
ur l’adaptateur lecteur DVD/TV et l’autre extrémité à l’entrée portant l’indication
s
INPUT » à l’arrière
«
Remarque : Si votre console de jeux vidéo n’est pas dotée de sorties RCA,
nvisagez de connecter le système d’enceintes à votre TV à la place.
e
du caisson de basses.
Dispositifs audio portables (lecteurs de CD, IPods
et autres lecteurs MP3, etc.)
Connectez le câble stéréo 3,5 mm à la prise casque sur votre dispositif audio
portable.
Mise sous tension
1. Une fois que toutes les autres connexions ont été effectuées, branchez le cordon
d’alimentation CA (à l’arrière du caisson de basses) dans une prise murale. Le
système d’enceintes est maintenant prêt à fonctionner.
2. Mettez la source audio sous tension.
3. Mettez le système d’enceintes sous tension en appuyant sur le bouton de veille
sur le boîtier de commande ou la télécommande. Une diode électroluminescente
s’allumera sur le boîtier de commande lorsque l’appareil sera SOUS TENSION.
4. Installez la pile fournie dans le compartiment à piles de la télécommande.
TTENTION : il existe un risque d’explosion si la pile n’est pas remplacée
A
correctement. Remplacez uniquement la pile par une pile de même type ou de
type équivalent.
Remarque : pour éviter d’entendre un son saturé lorsque vous mettez votre
système d’enceintes Altec Lansing sous tension, commencez toujours par allumer
votre source audio.
Volume général
Le disque mobile sur le boîtier de commande contrôle le volume général. Tournez
le disque vers la droite pour augmenter le volume ou vers la gauche pour le
diminuer.
Les touches « + » et « – » situées sur la télécommande per
commander le volume général. Appuyez sur la touche « + » pour augmenter le
volume et sur la touche « – » pour le diminuer.
Les diodes électroluminescentes sur le boîtier de commande indiquent le niveau
du volume.
sses
gus et b
Ai
Pour commander le niveau des aigus ou des basses à l’aide du boîtier de
commande, appuyez sur le bouton « TREBLE » ou « BASS » sur le boîtier de
commande et tournez le disque vers la droite pour augmenter le niveau
correspondant ou vers la gauche pour le diminuer.
Pour commander le niveau des aigus ou des basses à l’aide de la télécommande
sans fil, appuyez sur le bouton « TREBLE » ou « BASS » de la télécommande puis
sur le bouton « + » pour augmenter le niveau cor
pour le diminuer
Les diodes électroluminescentes sur le boîtier de commande indiquent le niveau
respondant.
cor
Remarque : Au bout de trois secondes, le boîtier de commande et la
télécommande reviendront automatiquement sur le volume général.
a
.
mettent également de
respondant ou le bouton « – »
6
Page 9

Contour
La fonction LOUDNESS détermine les fréquences maximales et minimales de
anière à optimiser le son perçu. Appuyez sur la touche « LOUDNESS » sur le
m
oîtier de commande ou sur la touche « LOUD » sur la télécommande pour activer
b
la fonction. Appuyez de nouveau sur l’une des touches pour désactiver la fonction.
Technologie SFX™
a technologie Sound Field Xpander™ permet à votre système d’enceintes de
L
délivrer une image stéréo plus grande pour un son plus puissant d’une simple
ression. Appuyez sur la touche « SFX » sur le boîtier de commande ou la
p
élécommande pour activer cette fonction. Appuyez de nouveau sur la touche
t
pour désactiver la fonction.
emarque : cette fonction ne fonctionne pas lorsque vous utilisez un casque
R
’écoute.
d
Veille/Sourdine
Pour mettre le système d’enceintes en sourdine, appuyez sur la touche située
ur le boîtier de commande ou la télécommande. La diode électroluminescente
s
sur le boîtier de commande s’éteint. Pour annuler la mise en sourdine, appuyez
e nouveau sur les touches correspondantes.
d
emarque : lorsque le mode veille ou sourdine est activé, le système continue
R
d’être alimenté. Pour éteindre complètement l’unité, débranchez l’unité de la
prise murale.
Réinitialisation
La touche de la télécommande portant l’indication « RESET » rétablit les réglages
olume, basses, aigus, contour et SFX originaux.
v
Prise lecteur MP3/IPod
La prise lecteur MP3/iPod est située sur le côté du boîtier de commande. Utilisez
elle-ci pour connecter toute source audio dotée d’une fiche stéréo 3,5 mm (par
c
xemple une fiche type casque).
e
Attention : veillez à ce que la source audio dispose d’une prise sortie de ligne.
ne telle prise permet de garantir que la sortie ne sera pas amplifiée. Pour plus
U
’informations, consultez le manuel d’utilisation de votre dispositif audio.
d
Casque
La prise casque est située sur le côté du boîtier de commande. Utilisez celle-ci
our connecter tout casque stéréo doté d’une fiche 3,5 mm.
p
emarque : Une fois le casque d’écoute connecté, le système d’enceintes devient
R
silencieux
Spécifications du système*
Le son supérieur de Altec Lansing provient de notre technologie Dynamic EQ brevetée qui utilise des haut-parleurs de fabrication spéciale, haute-fidélité, des circuits
d’égalisation de pointe ainsi que les spécifications suivantes, utilisées de manière harmonieuse :
Pression sonore (SPL) : 92 dB
Puissance totale en continu : 46 watts (RMS)
• Enceintes avant : 11 watts/canal à 4 ohms
taux d’harmonique à 10%
à 180 Hz – 20 kHz, 2 canaux chargés
• Caisson de basses : 24 watts à 8 ohms
taux d’harmonique à 10%
à 32 Hz – 180 Hz, 1 canal chargé
*Puissance nominale conforme à la réglementation n°16 C.F.R. de la FTC relative aux amplificateurs, section 432.
annage
Dép
mptôme Problème possible Solution
Sy
Toutes les diodes
électroluminescen
tes sont éteintes.
L’appareil n’est pas sous tension.
Le cordon d’alimentation CA n’est pas relié à la prise
murale.
Le parasurtenseur n’est pas sous tension (le cas
échéant).
La prise murale ne fonctionne pas.
Réponse du système : 32 Hz – 20 kHz (-10 dB)
Rapport signal/bruit
à l’entrée de 1 kHz : > 85 dB
Amplificateurs (par satellite) : Un amplificateur bande intermédiaire 40 mm et
un haut-parleur d’aigus 18 mm haut de gamme
Caisson de basses : Deux haut-parleurs de basses 5,25" longue
connexion à configuration isobarique
Mettez le système d’enceintes sous tension en appuyant sur la touche
située sur le boîtier de commande ou la télécommande. Une diode
oluminescente s’allumera sur le boîtier de commande lorsque l’appar
électr
sera SOUS TENSION.
Une fois que toutes les autres connexions ont été effectuées, branchez le
cordon d’alimentation CA (à l’arrière du caisson de basses) dans une prise
murale.
Si le cordon d’alimentation CA est branché à un parasurtenseur, assurez-vous
que celui-ci est bien allumé.
Branchez un autr
assurer que la prise fonctionne.
e appareil dans la prise murale (même prise) afin de vous
eil
7
Page 10

Symptôme Problème possible Solution
ne fois que toutes les autres connexions ont été effectuées, branchez le
ucun son
A
n’est émis par
ne ou plusieurs
u
enceintes.
es enceintes
L
résillent.
g
e son est
L
déformé.
Interférence
radio.
Le caisson de
basses n’émet
aucun son.
Le caisson de
basses émet
un faible
bourdonnement.
Le caisson de
basses émet un
bourdonnement
tant.
impor
Le moniteur
est déformé.
’appareil n’est pas sous tension.
L
e réglage du volume est trop faible.
L
Les câbles stéréo 3,5 mm à code de couleurs ne sont pas
eliés correctement à la source audio.
r
roblème au niveau de la source audio.
P
Mauvais branchement.
e volume paramétré au niveau du système
L
d’exploitation de l’ordinateur est trop élevé.
blème au niveau de votre source audio.
Pro
e niveau du volume est trop élevé.
L
Le volume paramétré au niveau du système
d’exploitation de l’ordinateur est trop élevé.
Le son de la source est déformé.
Un pylône radio se trouve à proximité.
Mauvais branchement.
La source sonore a un faible contenu basse fréquence.
Le courant alter
équivalent à 60 cycles par seconde, ce qui correspond à
la plage de fréquence audio de votre caisson de basses.
Mauvais branchement
Le niveau des basses est tr
Le volume de votr
op élevé.
est tr
Le caisson de basses est situé trop près du moniteur.
natif de votre installation électrique est
op élevé.
ce audio ou le niveau de basses
e sour
U
cordon d’alimentation CA (à l’arrière du caisson de basses) dans une prise
murale.
Mettez le système d’enceintes sous tension en appuyant sur le bouton de
eille sur le boîtier de commande ou la télécommande. Une diode
v
lectroluminescente s’allumera sur le boîtier de commande lorsque l’appareil
é
sera SOUS TENSION.
Le disque mobile sur le boîtier de commande contrôle le volume général.
ournez le disque vers la droite pour augmenter le volume.
T
Vérifiez le niveau du volume sur la carte son de l’ordinateur ou sur une autre
ource audio et réglez le volume à mi-niveau.
s
Vérifiez les connexions au niveau de la source audio. Assurez-vous que les
âbles d’interface sont fermement insérés dans les prises adaptées.
c
Testez les enceintes sur une autre source audio. Retirez le câble stéréo de
,5 mm de la source audio et branchez-le sur la prise « line-out » (sortie ligne),
3
sur la prise « audio-out » (sortie audio) ou sur la prise du casque d’écoute d’une
autre source audio.
Vérifiez tous les câbles. Assurez-vous qu’ils sont connectés à la prise « line-out »
sortie ligne) ou « audio-out » (sortie audio) de votre carte son ou d’une autre
(
ource audio et NON à la prise « speaker-out. » (sortie enceinte).
s
érifiez le volume paramétré au niveau du système d’exploitation de
V
l’ordinateur et diminuez-le si nécessaire.
ébranchez le câble stéréo de la source audio. Branchez-le ensuite dans la prise
D
pour casque d’écoute d’une autre source audio (telle qu’un baladeur ou une
radio FM).
e disque mobile sur le boîtier de commande contrôle le volume général.
L
Tournez le disque vers la gauche pour diminuer le volume.
Réglez le volume du système d’exploitation de l’ordinateur, équilibrez les
niveaux au milieu pour commencer et réglez ensuite le niveau sur les enceintes
à l’aide de la commande du volume.
Les fichiers .WAV sont souvent de mauvaise qualité. Il est donc facile de
détecter les déformations et les bruits avec des enceintes puissantes. Essayez
une autre source audio, telle qu’un CD musical, par exemple.
Déplacez vos enceintes jusqu’à ce que les interférences disparaissent.
Vérifiez que tous les câbles sont branchés correctement et qu’ils établissent une
bonne connexion.
La plupart des fichiers.WAV et .MID ont un faible contenu basse fréquence et
leur son peut paraîtr
morceau contenant plus de basses — un CD de votre collection, par exemple.
ous pouvez entendre un faible bourdonnement lorsque votr
V
d’enceintes est allumé alors qu’aucune source audio ne fonctionne ou lorsque le
volume est extrêmement faible.
Débranchez le cordon d’alimentation CA du parasurtenseur (le cas échéant) et
branchez le caisson de basses directement dans une prise murale CA.
Déplacez vos câbles. Vérifiez qu’ils établissent une bonne connexion.
Pour commander le niveau des basses, appuyez sur la touche « Bass » sur le
boîtier de commande et tournez le disque vers la gauche pour le diminuer.
Débranchez le câble stéréo de 3,5 mm de la sour
disparaît, réduisez le volume de la source audio.
Baissez le volume ou le niveau des basses sur votr
audio portable, etc.
Étant donné que le caisson de basses ne dispose pas de blindage anti-
magnétique, il peut provoquer des déformations lorsqu’il est placé trop près de
e moniteur
votr
60 cm de votre moniteur.
e terne lorsqu’il provient d’un ordinateur. Essayez un
ce audio. Si le bour
dinateur
e or
. Déplacez le caisson de basses de manièr
e à le placer à au moins
e système
donnement
e système
, votr
8
Page 11

La figura de relámpago que termina en punta de flecha
y se encuentra dentro de un triángulo equilátero, tiene
por finalidad alertar al usuario de la presencia de
“voltaje peligroso” sin aislamiento en el interior del
producto que podría tener potencia suficiente para
constituir riesgo de choque eléctrico para las personas.
Precaución: Para evitar el riesgo de choque eléctrico,
no retire la cubierta (o parte posterior). En su interior
hay piezas que no debe manipular el usuario. El
servicio debe realizarlo personal de servicio calificado.
El signo de exclamación que se encuentra dentro de un
triángulo equilátero tiene por finalidad alertar al
usuario de la presencia de importantes instrucciones de
operación y mantenimiento (servicio) en la literatura
que viene incluida con el artefacto.
PR
ECAUCIÓN
Para evitar choques eléctricos no utilice este enchufe (polarizado) con una extensión,
receptáculo u otra toma de corriente a menos que se pueda insertar completamente
las cuchillas para evitar que estas queden expuestas.
ADVERTENCIA
PARA REDUCIR EL RIESGO DE INCENDIO O CHOQUE ELÉCTRICO, NO EXPONGA EL
ARTEFACTO A LA LLUVIA O HUMEDAD.
CONEXIÓN DEL CORDÓN DE ALIMENTACIÓN (RECEPTÁCULO DE CA
DE LA PARED)
La ranura larga es el
lado neutro (de tierra).
Inserte la cuchilla ancha en
la ranura del lado de tierra.
N
UCCIONES IMPORTANTES DE SEGURIDAD
I
STR
1. Lea estas instrucciones.
2. Guarde estas instrucciones.
3. Preste atención a todas las advertencias.
4. Siga todas las instrucciones.
5. No use este aparato cerca del agua — El aparato no debe estar expuesto a goteo o
salpicaduras, y no se deben colocar encima objetos llenos de agua, como jarrones.
6. Limpie únicamente con un paño seco.
7. No bloquee ninguna abertura de ventilación. Efectúe la instalación según las instrucciones del
fabricante. No coloque el aparato sobre una cama, sofá, alfombra o superficie similar que
pueda bloquear las aberturas de ventilación. El aparato no se debe colocar en una instalación
empotrada, como un estante o armario cerrado que pueda impedir el flujo de aire a través de
las aberturas de ventilación. No impida la ventilación cubriendo las aberturas con artículos
como periódico, manteles, cortinas, etc.
8. No instale el aparato cerca de fuentes de calor como radiador
u otros aparatos (incluyendo amplificadores) que produzcan calor.
9. Las fuentes de llama descubierta, como velas encendidas, no se deben colocar sobre el
aparato.
10. No anule el propósito de seguridad del enchufe tipo conector a tierra o polarizado. Un
enchufe polarizado tiene dos puntas, una más ancha que la otra. Un enchufe de tipo
conexión a tierra tiene dos cuchillas y una tercera cuchilla que se conecta a tierra. La
cuchilla ancha o ter
proporcionado no encaja en su tomacorriente, consulte con un electricista para
reemplazar el tomacorriente obsoleto.
11. Proteja el cordón de alimentación para que no lo pisen o prensen — especialmente en los
puntos de enchufes, receptáculos, y el lugar donde salen del aparato.
No lo instale en un ár
12.
de impedir completamente el ingr
enchufe de alimentación que debe estar accesible en todo momento.
Fuente de alimentación
13.
14.
15. Para realizar el servicio técnico acuda al personal de servicio calificado. Es necesario que se
16.
17.
18. Use solamente con el carro, plataforma, trípode, soporte o mesa
ucciones de operación o como se indique en el ar
las instr
alimentación separada con este aparato no la sustituya con ninguna otra fuente de
alimentación — use únicamente fuentes de alimentación suministradas por el fabricante.
Desenchufe el aparato durante las tor
gos periodos de tiempo.
lar
efectúe el ser
ejemplo, cuando el cor
ramado líquido o se hayan caído objetos dentr
der
estado expuesto a la lluvia o humedad, no funcione nor
Para efectuar el servicio técnico, envíe el artefacto al personal de servicio calificado,
devuélvalo al distribuidor o llame a la línea de servicio de Altec Lansing para solicitar ayuda.
Para los pr
de manera adecuada.
Use solamente dispositivos/accesorios especificados por el fabricante.
especificados por el fabricante o que se vendan con el aparato. Cuando use
un carro, tenga precaución al mover la combinación carro/aparato para
evitar lesionarse si el sistema se da vuelta.
cera cuchilla se proporciona para su seguridad. Si el enchufe
ea que impida el acceso al enchufe de alimentación. El único medio
vicio técnico cuando el aparato se haya dañado de alguna for
dón o enchufe de alimentación esté dañado o cuando se haya
oductos que usan baterías, r
eso de suministr
Use únicamente fuentes de alimentación del tipo especificado en
—
mentas eléctricas o cuando per
o del aparato, o que el mismo haya
efiérase a las nor
es, termorregistradores, hornos
o eléctrico al pr
oducto es desconectar el
tefacto. Si se incluye una fuente de
manezca sin uso por
ma, como por
malmente o se haya dejado caer
mas locales para disponer de ellas
ALTEC LANSING TECHNOLOGIES, INC. GARANTÍA LIMITADA DE UN AÑO
(GARANTÍA LIMITADA DE DOS AÑOS EN LA UNIÓN EUROPEA Y ASIA)
¿Qué cubre la garantía?: Altec Lansing garantiza que sus productos no tendrán defectos de
material o de mano de obra, con las excepciones que se indican a continuación. ¿Cuál es el
periodo de cobertura? Para las unidades adquiridas en la Unión Europea o Asia, la garantía es
d
e dos años, contados a partir de la fecha de compra. Para las unidades no adquiridas en la
Unión Europea o Asia, la garantía es de un año, contado a partir de la fecha de compra. El
término de cualquiera de las garantías de acuerdo a ley deberá expirar al vencimiento de la
garantía limitada. Algunos estados y/o Estados Miembros de la Unión Europea no permiten
limitaciones en el periodo de vigencia de la garantía, por lo tanto, las limitaciones antes
mencionadas pueden no aplicarse a su caso.
¿Qué es lo que no cubre la garantía? La presente garantía no cubre cualquier defecto, mal
funcionamiento o falla que resulte de: instalación inadecuada, mal uso o incumplimiento de
las instrucciones del producto; abuso o uso con equipo inadecuado, no correspondiente o
defectuoso. (Para obtener información sobre la instalación, operación y uso adecuado consulte
el manual proporcionado con el producto. Si necesita un manual de reemplazo, puede
descargar un manual visitando www.alteclansing.com). Asimismo, los daños incidentales e
indirectos no son recuperables de acuerdo con esta garantía. Algunos estados no permiten
exclusiones o limitaciones por daños incidentales o indirectos, por lo tanto, dicha limitación o
exclusión es posible que no sea aplicable a su caso.
¿Qué hará Altec Lansing para corregir el problema? Altec Lansing, de acuerdo a su criterio,
reparará o reemplazará cualquier producto que presente defectos en el material o en la mano
de obra. Si su producto ya no se fabrica más, o está agotado, de acuerdo a su criterio, Altec
Lansing puede reemplazarlo con otro producto similar o mejor de Altec Lansing.
Cómo obtener servicio de garantía: Para obtener el reemplazo o reparación de un producto
engarantía, debe ponerse en contacto con Altec Lansing durante el periodo de garantía vía
correo electrónico a (csupport@alteclansing.com). En su correo electrónico debe colocar su
nombre, dirección, dirección de correo electrónico, número de teléfono, fecha de compra y
una descripción completa del problema experimentado. En los Estados Unidos, también puede
comunicarse con Altec Lansing llamando al teléfono 1-800-ALTEC88 — por favor esté listo para
proporcionar la misma información. Si el problema aparenta ser un defecto en el material o
mano de obra, Altec Lansing le proporcionará una autorización de devolución y las
instrucciones para el envío de la misma. Los envíos de devolución deberán ser pagados por el
cliente, y el envío deberá incluir el comprobante de compra original. Deberá asegurar el envío
en forma adecuada puesto que usted es el responsable del producto hasta que éste llegue a
Altec Lansing.
¿Cómo afectará la legislación estatal sus derechos? Esta garantía le brinda derechos legales
específicos, y además puede contar con otros derechos que pueden variar de estado a estado.
Tome nota que en la Unión Europea, en su calidad de consumidor, podría tener otros derechos
de ley de acuerdo a la legislación nacional de los Estados Miembros de la Unión Europea que
rigen la venta de mercadería de Altec Lansing. Esos derechos no se verán afectados por la
presente garantía.
Las garantías y recursos limitados antes mencionados constituyen las garantías y recursos
exclusivos disponibles para el comprador, siempre y cuando, y en la medida en que tengan
validez y sean exigibles bajo la ley aplicable.
SERVICIO AL CLIENTE
En la Guía de solución de pr
configuración y r
e
sobr
eguntas y r
(Pr
América del Nor
nuestr
parlantes a su distribuidor en virtud de la política de devolución.
eléfono: 800-258-3288
T
Correo electrónico: csupport@alteclansing.com
Si no vive en América del Nor
selecciones su r
y
Para obtener la información más actualizada, asegúrese de visitar nuestro sitio Web en
www
espuestas fr
te y todavía no puede encontrar la infor
o equipo de ser
egión para ubicar al distribuidor de su país.
.alteclansing.com
oblemas encontrará r
endimiento. De igual manera, puede consultar la sección de las F
ecuentes) de nuestro sitio Web en
vicio al cliente para que le pr
te, por favor visite nuestr
.
espuestas a la mayoría de las preguntas
.alteclansing.com
www
mación que necesita, comuníquese con
cione ayuda antes de devolver los
opor
eb en
o sitio W
www
DISTRIBUCIÓN INTERNACIONAL
Clientes inter
Lansing en su país, visite www.alteclansing.com y haga clic en su región.
CÓMO DISPONER DE EQUIPO ELÉCTRICO Y ELECTRÓNICO ANTIGUO
.
que de otra manera pudiera causar el manejo incor
oducto. El r
pr
infor
oficina local de la ciudad o ser
nacionales: Para obtener infor
Este símbolo en el producto o en su empaque indica que este producto no debe
tratarse como un desecho doméstico. Por el contrario, debe entregarse en el punto
ecolección apr
de r
asegurar que este producto se deseche correctamente, ayudará a prevenir
consecuencias potencialmente negativas para el medio ambiente y la salud humana
eciclado de materiales ayudará a conser
mación más detallada sobr
opiado para el r
e el r
vicio de desecho doméstico de desper
mación sobre la distribución de los productos Altec
eciclado de equipo eléctrico y electrónico. Al
ecto en la disposición apr
r
ecursos naturales. Para obtener
var los r
eciclado de este pr
oducto, póngase en contacto con su
dicios.
AQ
. Si vive en
.alteclansing.com
opiada de este
9
Page 12

FX4021
Sistema de audio
amplificado de tres piezas
Gracias por comprar este producto de Altec Lansing. Por generaciones, Altec
ansing ha ocupado el primer puesto en innovación de audio. Hoy día, nuestra
L
ínea de parlantes amplificados ha recibido más premios por rendimiento que
l
cualquier otra marca en el mercado. En todos los ámbitos, en cualquier rango de
recio, Altec Lansing ofrece el sonido de distinción — brindando aun a los
p
lientes más exigentes el placer de audio que ellos buscan. ¡Sólo escuche esto!
c
C
ontenido de la caja
• Dos parlantes
• Un parlante secundario para graves
Compartimiento de control
•
• Control remoto inalámbrico
• Cable estéreo de 3.5mm
Guía de usuario y tarjeta de conexión rápida
•
Cómo ubicar los parlantes
Parlante secundario para graves
oda la información codificada en estéreo se escucha a través de los parlantes
T
satélite. El parlante secundario para graves no contiene imágenes estéreo, y no se
puede identificar la dirección del sonido. Por este motivo, no es necesario colocar
l parlante secundario para graves en una relación especial con respecto a los
e
arlantes satélite. Sin embargo, colocar el parlante secundario para graves sobre
p
l piso cerca de una pared o en una esquina de la habitación proporciona una
e
mejor eficiencia de graves y sonido óptimo.
Advertencia: El parlante secundario para graves no cuenta con blindaje
magnético. Por lo tanto, se DEBE ubicar por lo menos a 2 pies (0.6m) de los
televisores, monitores de computadora, discos duros de computadora o de
cualquier otro medio magnético (por ejemplo disquetes, discos zip, cintas para
computadora o de audio, etc.).
Parlantes satélite
Disponga los parlantes satélite de manera que se adapten a sus gustos de
escucha — desde la derecha al lado del monitor hasta tan alejados como
permitan los cordones de los parlantes.
Para un sonido óptimo, los parlantes satélite deben colocarse en una
configuración izquierda/derecha, de preferencia separados y equidistantes del
área de escucha. Esto ofrecerá las mejores imágenes estéreo y proporcionará los
resultados más satisfactorios.
Nota: Los parlantes satélite CUENTAN con blindaje magnético y se pueden colocar
cerca de pantallas de vídeo como televisores y monitores de computadora sin que
causen distorsión de imagen.
Cómo hacer las conexiones
Advertencia: No introduzca el enchufe de alimentación del sistema de parlantes
en un tomacor
Asimismo, apague las fuentes de audio (es decir, su computadora, reproductor
MP3, TV, reproductor de DVD, consola de juegos de vídeo, etc.) antes de conectar
las salidas a las entradas del sistema de parlantes.
Para asegurar que la primera operación se lleve a cabo de la manera esperada,
siga cuidadosamente las secuencias de conexión que se describen a continuación
en el orden indicado.
riente de par
Sistema de parlantes
• Conecte la clavija RCA del parlante satélite derecho a la entrada rotulada RIGHT
(Derecha) en la parte posterior del parlante secundario para graves.
• Conecte la clavija RCA del parlante satélite izquierdo a la entrada rotulada LEFT
(IZQUIERDA) en la par
• Conecte el compartimiento de control al parlante secundario para graves
enchufando el conector DIN de color gris a la entrada marcada DIN ubicada en la
parte posterior del parlante secundario para graves.
Conecte un extr
•
cada extremo) al enchufe verde lima de entrada correspondiente en la parte
posterior del parlante secundario para graves, r
el otro extremo del cable de entrada de audio a la fuente de audio deseada.
emo del cable de entrada de audio (con conector
ed, hasta haber realizado todas las conexiones.
te posterior del parlante secundario para graves.
es ver
otulado INPUT (Entrada). Conecte
de limón a
Entradas
Hay disponibles diferentes esquemas de conexión entre su fuente de audio y el
istema de parlantes. Determine si instalará el sistema de parlantes para audio y
s
uegos de la computadora, reproducción de DVD, juegos de consola o dispositivos
j
de audio portátiles (como reproductores MP3 o reproductores de CD portátiles),
uego pase a la sección correspondiente.
l
PC
Todas las tarjetas de sonido de las computadoras tienen salidas de audio. Por lo
eneral, las salidas estarán marcadas como “front output” (salida frontal) y “rear
g
utput” (salida posterior). En algunos casos, podría utilizarse una terminología
o
ligeramente diferente. La documentación de la tarjeta de sonido lo ayudará a
eterminar qué salidas utilizar con su sistema de parlantes.
d
Ubique el cable estéreo de 3.5mm.
•
• Conecte el cable estéreo de 3.5 mm a la entrada de color verde lima rotulada
FRONT” (Frente) en su tarjeta de sonido.
“
TV/Reproductor de DVD o consola de juego de video
Para conectar su sistema de parlantes Altec Lansing a su TV, reproductor de DVD
o consola de juego de video, siga los siguientes pasos:
Asegúrese que el suministro de potencia a su fuente de audio se encuentre
•
apagado.
Ubique los siguientes elementos:
•
Un adaptador de TV/Reproductor de DVD (3.5mm a RCA), disponible en
•
www.alteclansing.com o en su tienda local de artículos electrónicos. El
adaptador RCA presenta una clavija estéreo de 3.5 mm de color verde lima
n extremo y dos clavijas RCA ?una roja y una blanca en el otro.
n u
e
• El cable estéreo de 3.5mm incluido. Este cable presenta una clavija estéreo
olor verde lima de 3.5 mm en ambos extre
de c
• Un cable RCA rojo y blanco. Este cable debe presentar una clavija RCA roja
y blanca en ambos extremos.
• Conecte un extremo del cable RCA rojo y blanco a su fuente de audio, y el otro
extremo a las clavijas roja y blanca correspondientes de su adaptador de
TV/Reproductor de DVD.
• Conecte un extremo del cable estéreo de 3.5mm a la entrada color verde lima
al adaptador de TV/Reproductor de DVD, y el otro extremo a la salida rotulada
“INPUT” (“Salida”) ubicada en la parte posterior del parlante secundario para
graves.
Nota: Si su consola de juegos de video no presenta las salidas RCA, considere
conectar el sistema de parlantes a su TV.
mos.
Dispositivos portátiles de audio (Reproductores
de CD,
Conecte el cable estéreo de 3.5mm a la clavija de audífono de su dispositivo de
audio portátil.
IPods y otros reproductores MP3, etc.)
Encendido
Después de haber realizado todas las demás conexiones, enchufe el cordón de
1.
alimentación de CA (de la parte posterior del parlante secundario para graves),
en un tomacorriente de pared. El sistema de parlantes está ahora listo para
.
funcionar
2. Encienda la fuente de audio.
3. Encienda el sistema de parlantes presionando el botón en espera en el
4. Instale la batería suministrada en el compartimiento para baterías del control
PRECAUCIÓN Peligro de explosión por colocación incorrecta de la batería.
Reemplace solo con un tipo igual o equivalente.
Nota: Para evitar escuchar un r
Altec Lansing, siempre encienda primero la fuente de audio.
timiento de control o control remoto inalámbrico. Un indicador LED se
compar
iluminará en el compartimiento de control cuando el sistema se encuentre
ENCENDIDO.
remoto.
uido seco cuando encienda su sistema de parlantes
Volumen maestro
La perilla giratoria ubicada en el compartimiento de control controla el volumen
maestr
izquierda para disminuirlo.
Los botones “+” y “–“ en el control remoto inalámbrico también controlan el
volumen maestro. Pulse el botón “+” para aumentar el volumen o el botón “–“
para disminuirlo.
Los indicadores LED en el compartimiento de control indicarán el nivel de
volumen.
e la perilla hacia la der
o. Gir
echa para aumentar el volumen o hacia la
10
Page 13

Agudos y graves
Para controlar los niveles de agudos o graves usando el compartimiento de
ontrol, pulse los botones “TREBLE” o “BASS” en el compartimiento de control y
c
ire la perilla hacia la derecha para aumentar el volumen correspondiente o a la
g
izquierda para disminuirlo.
ara controlar los niveles de agudos o graves usando el control remoto
P
inalámbrico, pulse los botones “TREBLE” o “BASS” o los botones en el control
remoto inalámbrico y pulse el botón “+” para aumentar el nivel correspondiente
el botón “–“ para disminuirlo.
o
Los indicadores LED en el compartimiento de control indicarán el nivel
orrespondiente.
c
ota: Después de tres segundos, el compartimiento de control y el control
N
emoto inalámbrico se restaurarán automáticamente a “Master Volume”
r
(Volumen maestro).
En espera/Silencio
Para silenciar el sistema de parlantes, presione el botón ubicado en el
ompartimiento de control o en el control remoto inalámbrico . El indicador LED
c
n el compartimiento de control se apagará. Para eliminar el silencio, ejecute
e
cualquiera de los dos comandos nuevamente.
ota: Mientras permanezca en el modo de espera o modo silencio, el sistema
N
igue recibiendo energía. Para apagar completamente la unidad desconéctela
s
el tomacorriente de pared.
d
Restaurar
l botón marcado con la palabra “reset” en el control remoto inalámbrico
E
reestablece los controles de volumen, graves, agudos, intensidad sonora y SFX
a las configuraciones de fábrica originales.
Intensidad sonora
a función intensidad sonora regula las frecuencias altas y bajas para maximizar
L
el audio percibido. Pulse el botón “LOUDNESS” (“Intensidad sonora”) en el
ompartimiento de control o el botón “LOUD” (Alto) en el control remoto
c
inalámbrico para activarla. Vuelva a presionar cualquiera de los botones para
esactivarla.
d
SFX Technology™
a tecnología Sound Field Xpander™ permite que su sistema de parlantes brinde
L
una imagen estéreo más amplia para sonido más potente con sólo tocar un
otón. Pulse el botón “SFX” en el compart
b
remoto inalámbrico para encenderla. Vuelva a presionarlo para apagarla.
Nota: Esta característica no funciona cuando se usan los audífonos.
imiento de control o en el control
Clavija para IPod/Reproductor MP3
a clavija para iPod o reproductor MP3 se encuentra ubicada al lado del
L
compartimiento de control. Úsela para conectar cualquier fuente de sonido que
enga un enchufe estéreo de 3.5mm (por ejemplo un enchufe tipo audífono).
t
Precaución: Asegúrese de que la fuente de audio tenga una clavija de línea de
salida. Esto asegurará que la salida no esté amplificada. Revise el manual del
suario para obtener mayor información sobre su dispositivo de audio.
u
Audífonos
La clavija de audífono se encuentra ubicada al lado del compartimiento
ontrol. Úsela para conectar cualquier audífono estéreo con un enchufe
e c
d
de 3.5mm.
Nota: Cuando los audífonos están conectados, el sistema de parlantes está
n silencio.
e
Ficha técnica*
El sonido superior de Altec Lansing proviene de nuestra tecnología patentada Dynamic EQ, que utiliza amplificadores a medida de alta fidelidad, circuitería de
ecualización de última generación y una mezcla armoniosa de las siguientes especificaciones técnicas:
Nivel de presión acústica (SPL): 92 dB
Potencia total continua: Vatios 46 RMS
• Parlantes frontales: 11 Vatios/canal @ 4 ohmios
@ 10% THD @ 180 Hz – 20 kHz
2 canales cargados
• Parlante secundario 24 vatios @ 8 ohmios
para graves:
@10% THD @ 32 Hz – 180 Hz
Un canal cargado
Respuesta del sistema: 32 Hz – 20 kHz (-10 dB)
Proporción señal/ruido
@ entrada de 1 kHz: > 85 dB
Amplificadores (por satélite): Un amplificador de rango medio de
40mm y un altavoz de calidad de 18mm
Parlante secundario para graves: Dos parlantes para graves de carrera
ga de 5.25" en configuración isobárica
lar
*La especificación de potencia concuerda con la Norma #16 C.F.R. de la FTC, Punto 432 sobre amplificadores.
s
a
blem
o
ución d
l
So
oma Posible problema Solución
Sínt
Ningún indicador
LED está
encendido.
e pr
El sistema no está encendido.
El cordón de CA no está conectado al tomacorriente
de pared.
El supresor de picos (si se utiliza) no está encendido.
El tomacorriente de pared no funciona.
Para encender el sistema de parlantes, presione el botón ubicado en el
compartimiento de control o en el control remoto inalámbrico. Un indicador
LED se iluminará en el compar
encuentre ENCENDIDO.
Después de haber realizado todas las demás conexiones, enchufe el cordón de
alimentación de CA (de la parte posterior del parlante secundario para graves),
en un tomacorriente de pared.
Si el cordón de alimentación de CA está enchufado a un supresor de picos,
ese que éste se encuentr
asegúr
Enchufe otr
verificar si está funcionando.
o dispositivo en el tomacorriente de pared (la misma clavija) para
11
timiento de contr
e encendido.
ol cuando el sistema se
Page 14

Síntoma Posible problema Solución
espués de haber realizado todas las demás conexiones, enchufe el cordón de
no o más
U
de los parlantes
o emite
n
sonido alguno.
os parlantes
L
emiten un sonido
repitante.
c
El sonido está
distorsionado.
Interferencia
de radio.
El parlante
secundario para
graves no emite
sonido alguno.
El parlante
secundario para
graves emite un
zumbido bajo.
El parlante
secundario para
graves emite un
zumbido alto.
Monitor
distorsionado.
l sistema no está encendido.
E
l volumen está fijado demasiado bajo.
E
Los cables estéreo codificados por color de 3.5mm no
e encuentran conectados correctamente a la fuente
s
de audio.
ay un problema con el dispositivo de la fuente de
H
audio.
ala conexión.
M
El nivel de volumen del sistema operativo de la
computadora está fijado demasiado alto.
ay un problema con su dispositivo de fuente de audio.
H
El nivel de volumen está fijado demasiado alto.
El nivel de volumen del sistema operativo de su
computadora está fijado demasiado alto.
La fuente de sonido está distorsionada.
Se encuentra demasiado cerca de una torre de radio.
Mala conexión.
La fuente de sonido tiene poco contenido de baja
frecuencia.
El suministro de CA de su hogar es de 60 ciclos por
segundo, lo cual está dentro de la frecuencia de audio
del parlante secundario para graves.
Mala conexión.
El nivel de graves está fijado demasiado alto.
El volumen o el nivel de graves del dispositivo de la
fuente de audio está fijado demasiado alto.
El parlante secundario para graves está demasiado cerca
del monitor.
D
alimentación de CA (de la parte posterior del parlante secundario para graves),
en un tomacorriente de pared.
Encienda el sistema de parlantes presionando el botón en espera en el
ompartimiento de control o control remoto inalámbrico. Un indicador LED se
c
luminará en el compartimiento de control cuando el sistema se encuentre
i
ENCENDIDO.
La perilla giratoria ubicada en el compartimiento de control controla el
olumen maestro. Gire la perilla hacia la derecha para aumentar el volumen.
v
Verifique el nivel de volumen de la tarjeta de sonido de la computadora o
ispositivo de fuente de audio alternativo y fíjelo a un nivel medio.
d
Verifique las conexiones del enchufe en la fuente de audio. Asegúrese que los
ables de señal estén firmemente insertados en las clavijas correctas.
c
ruebe los parlantes en otro dispositivo de audio. Retire el cable estéreo de
P
3.5mm del dispositivo de la fuente de audio y conéctelo a “line-out” (línea
de salida), “audio-out” (salida de audio) o clavija de audífono de otra fuente de
udio.
a
evise todos los cables. Asegúrese que estén conectados a “line-out” (línea de
R
alida) o “audio-out” (salida de audio) de la clavija de su tarjeta de sonido u
s
otra fuente de audio — y NO en “speaker-out” (salida de parlante).
Verifique el nivel de volumen del sistema operativo de la computadora y
disminúyalo si fuera necesario.
Desconecte el cable estéreo de la fuente de audio. A continuación enchúfelo en
la clavija de audífono de una fuente de audio alterna (por ejemplo, un
lkman, Discman o radio FM).
Wa
La perilla giratoria ubicada en el compartimiento de control controla el
volumen maestro. Gire la perilla hacia la izquierda para disminuir el volumen.
Ajuste los niveles de volumen y equilibrio acústico del sistema operativo de la
computadora en el centro como punto de inicio, a continuación ajuste el nivel
del parlante usando el control de volumen.
Por lo general los archivos WAV son de calidad deficiente. Es por este motivo
que se nota fácilmente la distorsión y el ruido con parlantes de alta potencia.
Inténtelo con otra fuente de sonido como un CD de música.
Cambie la posición de sus parlantes hasta que la interferencia desaparezca.
Verifique que todos los cables estén conectados adecuadamente y proporcionen
una conexión sin interferencias.
Con fr
ecuencia, muchos archivos .WAV y .MID tienen poco contenido de baja
frecuencia y producen un sonido plano cuando los escucha en una
computadora. Inténtelo con una canción con más graves — algún tema de su
colección de CD.
Se puede detectar un zumbido bajo cuando su sistema de parlantes está
encendido sin que se esté reproduciendo una fuente de audio, o cuando el
volumen está fijado a un nivel extremadamente bajo.
Desenchufe el cordón de alimentación de CA del protector de picos (si se
utiliza), y enchúfelo dir
Mueva los cables. Verifique para asegurar que estén haciendo una conexión
sin interferencias.
Para contr
de control y gire la perilla hacia la izquierda para disminuirlos.
Desconecte el cable estér
desaparece, baje el volumen de la fuente de audio.
Baje el volumen o nivel de graves de su computadora, dispositivo portátil, etc.
Debido a que el parlante secundario para graves no tiene blindaje magnético,
puede provocar distorsión si se coloca demasiado cerca del monitor. Cambie la
posición del parlante secundario para graves de manera que se encuentre por
lo menos a 2 pies del monitor.
olar los graves, pulse el botón “Bass” ubicado en compar
ectamente a un tomacorriente de CA de pared.
timiento
eo de 3.5 mm de la fuente de audio. Si el zumbido alto
12
Page 15

O relâmpago com cabeça em seta, dentro de um
triângulo eqüilátero, tem o objetivo de alertar o usuário
sobre a presença de “voltagem perigosa” não isolada
dentro do gabinete do produto, a qual pode ser de
magnitude suficiente para constituir um risco de choque
elétrico para as pessoas.
Cuidado: Para evitar o risco de choque elétrico, não
remova a cobertura (ou a traseira). Não há peças que
possam ser trocadas pelo usuário dentro do produto.
Encaminhe o atendimento técnico para equipe de
pessoal de serviço qualificado.
O ponto de exclamação dentro do triângulo eqüilátero
tem o propósito de alertar o usuário sobre a presença
de instruções importantes de operação e manutenção
(atendimento técnico) na literatura que acompanha o
equipamento.
CUIDADO
Para evitar choque elétrico, não use esta tomada (polarizada) com um cabo de extensão,
receptáculo ou outra saída, a menos que os pinos da tomada possam ser totalmente
inseridos para evitar sua exposição.
ADVERTÊNCIA
PARA REDUZIR O RISCO DE INCÊNDIO OU CHOQUE ELÉTRICO, NÃO EXPONHA ESTE
EQUIPAMENTO À CHUVA OU UMIDADE.
CONECTANDO O CABO DE FORÇA (SOQUETE DE PAREDE CA)
A ranhura longa é o
lado neutro (terra).
Inserir o pino largo na
ranhura lateral do terra.
INSTRUÇÕES DE SEGURANÇA IMPORTANTES
1. Leia estas instruções.
2. Guarde estas instruções.
3. Preste atenção a todos os avisos.
4. Siga todas as instruções.
5. Não use este aparelho perto de água — Este aparelho não deve ser exposto a pingos ou
entornamentos de água, e nenhum objeto com líquidos (por exemplo, vasos) deve ser
colocado sobre o aparelho.
6. Limpe apenas com um pano seco.
7. Não bloqueie as aberturas de ventilação. Instale de acordo com as instruções do
fabricante. O aparelho não pode ficar situado sobre uma cama, sofá, tapete ou superfície
semelhante que possa bloquear as aberturas de ventilação. O aparelho não pode ser
colocado numa instalação embutida, como uma estante fechada ou gabinete, que possa
impedir o fluxo de ar através das aberturas de ventilação. A ventilação não deve ser
impedida com o bloqueio das aberturas com itens como jornais, toalhas, cortinas, etc.
8. Não instale próximo a fontes de calor, como radiadores, registros de aquecimento, fogões
ou outros aparelhos (inclusive amplificadores) que produzam calor.
9. Nenhuma fonte de chamas desprotegida, como uma vela acesa, pode ser colocada sobre
o aparelho.
10. Não anule a proteção da tomada polarizada ou aterrada. Uma tomada polarizada tem
dois pinos, com larguras diferentes. Uma tomada aterrada tem dois pinos e um terceiro
pino de aterramento. O pino mais largo ou o terceiro pino é fornecido para sua
segurança. Se a tomada fornecida não se encaixar na sua tomada de parede, consulte um
eletricista para substituir a tomada obsoleta.
11. Proteja o cabo de alimentação, para que não seja pisado ou amassado — especialmente
em conexões, receptáculos de conveniência e no ponto em que saem do aparelho.
12. Não instale em uma área que impeça o acesso ao cabo de alimentação. Desconectar o
cabo de alimentação é a única forma de remover completamente a alimentação do
oduto e deve estar pr
pr
13. Fonte de alimentação — Use apenas fontes de alimentação do tipo especificado nas
instruções de operação ou conforme assinalado no aparelho. Se uma fonte de
alimentação separada estiver incluída com o aparelho, não substitua com qualquer outra
fonte de alimentação
14. Desconecte este aparelho da tomada durante tempestades de raios ou quando não for
usado durante longos períodos de tempo.
15. Encaminhe todo atendimento técnico para pessoal de serviço qualificado. O atendimento
técnico é necessário quando ocorrer qualquer tipo de dano no aparelho. Por exemplo,
quando um cabo de fonte de alimentação ou tomada estiver danificado, se ocorrer
derramamento de líquido ou queda de objetos no aparelho, ou caso o aparelho tenha
sido exposto a chuva ou umidade, não opere normalmente ou tenha caído. Para reparos,
encaminhe a pessoal de serviço qualificado, devolva ao representante ou telefone para a
linha de serviços da Altec Lansing para obter assistência.
16. Para produtos com baterias, consulte a regulamentação local sobre o descarte adequado
de baterias.
17. Use apenas acessórios de fixação especificados pelo fabricante.
18. Use apenas com carrinho, pedestal, tripé, suporte ou mesa especificados
pelo fabricante ou vendidos com o aparelho. Ao usar um carrinho, cuidado
ao mover o conjunto de carrinho/aparelho para evitar danos decorrentes
de tombamento.
ontamente acessível em todas as ocasiões.
use apenas fontes de alimentação fornecidas pelo fabricante.
—
ALTEC LANSING TECHNOLOGIES, INC. GARANTIA LIMITADA DE UM ANO
(GARANTIA LIMITADA DE DOIS ANOS NA UNIÃO EUROPÉIA E NA ÁSIA)
O que a garantia cobre? A Altec Lansing garante que seus produtos estarão livres de defeitos
de material e de manufatura, com as exceções definidas abaixo.
Qual é o período de cobertura? Para unidades adquiridas na União Européia e na Ásia, esta
garantia é válida por dois anos a partir da data da compra. Para unidades não adquiridas na
E
uropa e na Ásia, esta garantia é válida por um ano a partir da data da compra. O prazo de
quaisquer garantias implícitas por lei vencerá quando a sua garantia limitada terminar. Alguns
estados e/ou Estados Membros da União Européia não permitem limitações para a duração de
uma garantia implícita; portanto, as limitações acima poderão não ser aplicáveis ao seu caso.
O que a garantia não cobre? Esta garantia não cobre qualquer defeito, mau funcionamento ou
falha que ocorra como resultado de: instalação imprópria; mau uso ou uso não compatível com
as instruções do produto; abuso; ou uso com equipamento inadequado, imprevisto ou
defeituoso. (Para obter informações sobre a instalação, a operação e o uso adequados,
c
onsulte o manual fornecido com o produto. Caso precise de uma nova cópia do manual, você
poderá fazer download no site www.alteclansing.com.) Além disso, danos conseqüentes e
incidentais não são recuperáveis nos termos desta garantia. Alguns estados não permitem a
exclusão ou limitação dos danos incidentais ou conseqüentes; portanto, a limitação ou exclusão
acima poderá não ser aplicável ao seu caso.
O que a Altec Lansing fará para corrigir o problema? A Altec Lansing poderá, a seu critério,
reparar ou substituir qualquer produto que apresente um defeito comprovado de material ou
m
anufatura. Se o produto não for mais fabricado, ou estiver esgotado, a seu critério, a Altec
Lansing poderá substituir o seu produto com um produto Altec Lansing similar ou superior.
Como obter o serviço da garantia: Para obter que um produto coberto seja reparado ou
substituído, você deve contatar a Altec Lansing durante o período da garantia por email
(csupport@alteclansing.com). É necessário incluir no email: seu nome, endereço, endereço de
email, telefone, data da compra e uma descrição completa do problema que você está
experimentando. Nos Estados Unidos, você poderá contatar a Altec Lansing por telefone, no
número 1-800-ALTEC88 — por favor, esteja preparado para fornecer as informações acima. Se
o problema aparenta ter relação com um defeito de material ou manufatura, a Altec Lansing
f
ornecerá uma autorização de devolução e instruções para remessa de devolução. As remessas
de devolução serão às custas do cliente e a devolução deverá ser acompanhada do
comprovante de compra original. Providencie um seguro para a remessa, conforme apropriado,
porque você é responsável pelo produto até que ele chegue à Altec Lansing.
C
omo a lei estadual afetará os seus direitos?Esta garantia determina direitos legais específicos
e você também poderá ter outros direitos, que variam em cada estado. Favor observar que, na
União Européia, você, como consumidor, poderá ter outros direitos legais nos termos da
legislação nacional dos Estados Membros da União Européia que regem a venda dos produtos
Altec Lansing. Esses direitos não são afetados por esta garantia.
As garantias limitadas e reparações acima são as únicas garantias e reparações disponíveis
para o comprador, se e na extensão em que forem válidas e executáveis nos termos da lei
pertinente.
ATENDIMENTO AO CLIENTE
As respostas para a maioria das perguntas de ajuste e desempenho podem ser encontradas no
guia de Diagnóstico de Falhas. Você também pode consultar as FAQs (Perguntas Freqüentes)
em nosso site na Web, em www.alteclansing.com. Se você mora na América do Norte e não
puder localizar a informação de que precisa, por favor, telefone para a nossa equipe de
atendimento ao cliente para obter assistência antes de devolver os alto-falantes ao seu
revendedor nos termos da política de devolução.
Tel: 800-258-3288
E-mail: csupport@alteclansing.com
Se você mora fora da América do Norte, visite o nosso site na Web no endereço
www.alteclansing.com e selecione a sua região para localizar o distribuidor em seu país.
Para informações mais atualizadas, não deixe de consultar nosso site na Web, no endereço
www.alteclansing.com.
DISTRIBUIÇÃO INTERNACI
Clientes internacionais: Para obter informações sobre a distribuição dos produtos Altec Lansing
em seu país, visite www.alteclansing.com e clique em sua região.
ONAL
DESCARTE DE EQUIPAMENTOS ELÉTRICOS E ELETRÔNICOS USADOS
Este símbolo no produto ou na embalagem indica que o produto não deve ser
tratado como resíduo doméstico. Ele deve ser entregue no ponto de coleta aplicável
para reciclagem de equipamento elétrico e eletrônico. Ao garantir que este produto
seja descartado corretamente, você ajudará a evitar conseqüências negativas
potenciais para o meio ambiente e a saúde humana, que poderiam ser causados
por tratamento inadequado dos resíduos deste produto. A reciclagem de materiais ajudará
a economizar recursos naturais. Para obter informações mais detalhadas sobre a reciclagem
deste produto, entre em contato com a prefeitura local ou com o serviço de coleta de lixo
residencial.
13
Page 16

FX4021
Sistema de Áudio
Potencializado de Três Peças
Obrigado por adquirir este produto Altec Lansing. Por gerações a Altec Lansing
em sido a primeira em inovações de áudio. Hoje, nossa linha de alto-falantes
t
otencializados recebeu mais prêmios de desempenho do qualquer outra marca.
p
Em todos os tipos de ambientes, em toda a gama de preços, a Altec Lansing
ferece qualidade sonora com distinção — proporcionando mesmo aos clientes
o
ais exigentes o prazer do áudio que procuram. Escute só isso!
m
C
onteúdo da caixa
• Dois alto-falantes
• Um subwoofer
Controle destacável
•
• Controle remoto sem fio
• Cabo estéreo de 3,5 mm
Guia do Usuário e instruções para conexão rápida
•
Posicionamento dos alto-falantes
Subwoofer
odas as informações codificadas em estéreo são ouvidas através dos alto-falantes
T
satélites. O subwoofer não contém imagem estéreo e seu som não é direcional.
Como resultado, o subwoofer não precisa ser colocado em nenhum
elacionamento específico com os satélites. Contudo, a colocação do subwoofer
r
o piso próximo à parede ou no canto da sala fornece melhor eficiência em
n
raves e otimiza o som.
g
Advertência: O subwoofer não é magneticamente blindado. Portanto, DEVE ser
colocado a no mínimo 60 cm de distância de TVs, monitores de computador,
discos rígidos de computador ou qualquer outra mídia magnética (por exemplo,
discos flexíveis, discos Zip, fitas de computador ou de áudio, etc.).
Alto-falantes satélites
Disponha os alto-falantes satélites de acordo com sua preferência de audição —
desde ao lado do monitor até a distância máxima que os cabos do alto-falante
permitirem.
Para otimizar o som, os alto-falantes satélites devem ser colocados em uma
configuração esquerda/direita, de preferência afastados um do outro e à mesma
distância do centro da área de audição. Isso fornece a melhor imagem estéreo e
os resultados mais satisfatórios.
Observação: Os alto-falantes satélites SÃO magneticamente blindados e podem
ser colocados perto de monitores de vídeo, como TVs e monitores de
computador, sem distorcer a imagem.
nexões
azendo a
F
Advertência: Só insira o pino de alimentação do sistema de alto-falantes em uma
tomada de par
fonte de áudio (ou seja, seu computador, player de MP3, TV, aparelho de DVD,
console de videogame, etc.) antes de conectar as saídas às entradas do sistema de
alto-falantes.
Para garantir que a operação ocorra conforme esperado, siga cuidadosamente as
seqüências de conexão descritas abaixo na ordem indicada.
Sistema de alto-falantes
• Conecte a tomada RCA do alto-falante satélite direito à entrada rotulada como
RIGHT na parte posterior do subwoofer.
• Conecte a tomada RCA do alto-falante satélite esquerdo à entrada rotulada
como LEFT na par
• Conecte o controle destacável ao subwoofer conectando o conector DIN cinza à
entrada marcada como DIN na parte posterior do subwoofer.
• Conecte uma extremidade do cabo de entrada de áudio (com conectores verde
limão nas duas extremidades) à entrada verde limão correspondente na parte
posterior do subwoofer, rotulada como INPUT. Conecte a outra extremidade do
cabo de entrada de áudio à fonte de áudio desejada.
Entradas
Estão disponíveis diversos esquemas de conexão entr
sistema de alto-falantes. Determine se irá configurar o sistema de alto-falantes
para áudio PC/jogos PC, reprodução de DVD, console de jogos ou com
dispositivos de áudio por
seguida, passe para a seção apropriada.
s co
ede depois de fazer todas as conexões. Além disso, desligue a
te posterior do subwoofer
táteis (como apar
.
e a fonte de áudio e o
elhos de CD ou MP3 portáteis). Em
Computador
Todas as placas de som para PC possuem saídas de áudio. Geralmente, as saídas
erão indicadas como “front output” e “rear output”. Em alguns casos, pode
s
er utilizada uma terminologia ligeiramente diferente. A documentação da placa
s
de som deve ajudá-lo a determinar quais saídas utilizar com seu sistema de
lto-falantes.
a
• Localize o cabo estéreo de 3,5 mm.
• Conecte o cabo estéreo de 3,5 mm à entrada verde limão rotulada “FRONT” em
ua placa de som.
s
TV, aparelho de DVD ou console de videogame
Para conectar o sistema de alto-falantes Altec Lansing à televisão, ao aparelho de
DVD ou ao console de videogame, siga as etapas abaixo:
Certifique-se de que a alimentação da fonte de áudio esteja desligada.
•
Localize os seguintes elementos:
•
• Um adaptador para TV/DVD (3,5 mm para RCA), disponível em
ww.alteclansing.comou na loja de produtos eletrônicos local. Esse
w
adaptador RCA possui uma tomada estéreo de 3,5 mm verde limão em uma
xtremidade e duas tomadas RCA na outra — uma vermelha e uma branca.
e
O cabo estéreo de 3,5 mm incluído. Esse cabo possui uma tomada estéreo de
•
3,5 mm verde limão nas duas extremidades.
• Um cabo RCA vermelho e branco. Esse cabo possui uma tomada RCA vermelha
branca nas duas extremidades.
e
Conecte uma extremidade do cabo RCA vermelho e branco à fonte de áudio,
•
e a outra extremidade às tomadas RCA vermelhas e brancas correspondentes no
daptador para TV/DVD.
a
Conecte uma extremidade do cabo estéreo de 3,5 mm à entrada verde limão no
•
daptador para TV/DVD e a outra extremidade à entrada rotulada como “INPUT”
a
na parte posterior do subwoofer.
ação: Se o seu console de videogame não tem saídas RCA, considere
Observ
onectar o sistema de alto-falantes à TV.
c
Dispositivos de áudio portáteis (aparelhos de CD,
IPods e outros players de MP3, etc.)
Conecte o cabo estéreo de 3,5 mm à tomada de fones de ouvido em seu
dispositivo de áudio portátil.
Ligando
1. Depois de fazer todas as conexões, conecte o cabo de força CA (na traseira do
subwoofer) à tomada da parede. O sistema de alto-falantes está pronto para
operar.
2. Ligue a fonte de áudio.
3. Ligue o sistema de alto-falantes, pressionando o botão Stand-by no controle
destacável ou no controle remoto sem fio. Um LED irá se acender no controle
destacável quando a força estiver LIGADA.
Instale a pilha for
4.
CUIDADO: Há risco de explosão se a pilha for substituída incorretamente.
Substitua apenas com uma pilha igual ou equivalente.
Observação: Para evitar ouvir sons de estalidos ao ligar o sistema de alto-falantes
Altec Lansing, sempre ligue a fonte de áudio primeiro.
me prin
u
l
Vo
O controle rotatório no controle destacável controla o volume principal. Gire
ole para a dir
o contr
r
eduzi-lo.
Os botões “+” e “–” no controle remoto sem fio também controlam o volume
principal. Pressione o botão “+” para aumentar o volume ou o botão “–” para
diminuir o volume.
Os LEDs no controle destacável indicarão o nível de volume.
necida no compar
al
cip
eita para aumentar o volume ou para a esquerda para
timento de pilha do controle remoto.
Graves e agudos
Para controlar os níveis de agudos ou graves usando o controle destacável,
essione os botões “TREBLE” ou “BASS” no contr
pr
para a direita para aumentar o nível correspondente, ou para a esquerda para
reduzi-lo.
Para contr
pressione os botões “TREBLE” ou “BASS” no controle remoto sem fio, e pressione o
botão “+” para aumentar o nível cor
Os LEDs no controle destacável indicarão o nível correspondente.
Observação: Após três segundos, o controle destacável e o controle remoto sem
fio serão redefinidos automaticamente para “Master Volume”.
olar os níveis de agudos ou graves com o contr
respondente, ou o botão “–” para reduzi-lo.
ole destacável e gir
emoto sem fio,
ole r
e o controle
14
Page 17

Intensidade
função de intensidade ajusta as freqüências altas e baixas para maximizar o
A
áudio percebido. Pressione o botão “LOUDNESS” no controle destacável ou o
otão “LOUD” no controle remoto sem fio para ativá-la. Pressione o botão
b
ovamente para desativá-la.
n
Tecnologia SFX™
A tecnologia Sound Field Xpander™ permite que seu sistema de alto-falantes
presente uma imagem estéreo mais ampla para sonoridade aprimorada ao
a
toque de um botão. Pressione o botão “SFX” no controle destacável ou controle
emoto sem fio para ativá-la. Pressione-o novamente para desativá-la.
r
bservação: Este recurso não funciona ao utilizar fones de ouvido.
O
Restaurar
botão marcado com a palavra “reset” no controle remoto sem fio restaura
O
o volume, os graves, os agudos, a intensidade e os controles de SFX com as
onfigurações originais de fábrica.
c
Conector para IPod/player de MP3
conector para iPod ou player de MP3 está localizado na lateral do controle
O
destacável. Use-o para conectar qualquer fonte de áudio que tenha um pino
stéreo de 3,5 mm (ou seja, um pino de fone de ouvido).
e
Cuidado: Verifique se a fonte de áudio inclui uma tomada de “line-out” (saída
de linha). Isso garantirá que a saída não seja amplificada. Consulte o manual do
roprietário do dispositivo de áudio para obter mais informações.
p
Stand-By/Silencioso
Para silenciar o sistema de alto-falantes, pressione o botão localizado no
ontrole destacável ou controle remoto sem fio. Um LED no controle destacável
c
erá apagado. Para reativar o som, execute o comando novamente.
s
Observação: Em modo stand-by ou silencioso, o sistema continua a receber energia.
ara desativar completamente a unidade, desconecte-a da tomada de parede.
P
Fones de ouvido
O pino de fone de ouvido está localizado na lateral do controle destacável. Use-o
ara conectar qualquer fone de ouvido estéreo com um conector de 3,5 mm.
p
bservação: Quando os fones de ouvido estiverem conectados, o sistema de
O
alto-falantes emudecerá.
Especificações do sistema*
A sonoridade superior da Altec Lansing advém de nossa tecnologia patenteada Dynamic EQ, que utiliza drivers integrados personalizados de alta fidelidade, o mais
avançado circuito de equalização e uma combinação harmoniosa das seguinte especificações:
Nível de Pressão de Som (SPL): 92 dB
Potência Contínua Total: 46 Watts RMS
• Alto-Falantes Frontais: 11 Watts/canal @ 4 ohms
@ 10% THD @ 180 Hz – 20 kHz
2 Canais Carregados
• Subwoofer: 24 Watts @ 8 ohms
@ 10% THD @ 32 Hz – 180 Hz
Canal Único Carregado
*Classificação de potência de acordo com a Norma de Amplificadores da FTC No 16 C.F.R. Parte 432.
Resposta do Sistema: 32 Hz – 20 kHz (-10 dB)
Razão Sinal/Ruído
@ 1 kHz de entrada: > 85 dB
Drivers (por satélite): Um driver mid-range de 40mm e um
tweeter high-end de 18 mm
Subwoofer: Dois woofers de 5,25" de longo alcance
em configuração isobárica
Diagnóstico de Falhas
Sint
o
ma Possível Problema Solução
Nenhum LED
está aceso.
A alimentação não está ligada.
O cabo de alimentação CA não está conectado à
tomada da parede.
O estabilizador contra picos de tensão (se usado) não
está ligado.
A tomada de saída da par
ede não está funcionando.
Ative o sistema de alto-falantes, pressionando o botão no controle
destacável ou contr
destacável quando a força estiver LIGADA.
Depois de fazer todas as conexões, conecte o cabo de força CA (na traseira do
subwoofer) à tomada da par
Se o cabo de força estiver conectado a um estabilizador, verifique se o
estabilizador está ligado.
Ligue outro dispositivo à tomada da parede (mesma tomada) para confirmar se
ela está funcionando.
emoto sem fio. Um LED irá se acender no contr
ole r
ede.
15
ole
Page 18

Sintoma Possível Problema Solução
epois de fazer todas as conexões, conecte o cabo de força CA (na traseira do
enhum som
N
em um ou mais
lto-falantes.
a
Sons de estalidos
os alto-falantes.
n
O som está
ido.
distorc
Interferência
de rádio.
Nenhum som
no subwoofer.
Zumbido baixo
no subwoofer.
Zumbido alto
no subwoofer.
Monitor
distorcido.
alimentação não está ligada.
A
O volume está ajustado muito baixo.
s cabos estéreo de 3,5 mm codificados por cores não
O
stão conectados adequadamente à fonte de áudio.
e
roblema com o dispositivo-fonte de áudio.
P
Má conexão.
nível de volume no sistema operacional do
O
computador está alto demais.
á um problema com seu dispositivo-fonte de áudio.
H
nível de volume ajustado está muito alto.
O
volume do sistema operacional do computador está
O
ajustado muito alto.
A fonte de som está distorcida.
Proximidade de uma torre de rádio.
Má conexão.
A fonte de som tem pequeno conteúdo de baixa
freqüência.
A CA em sua casa está em 60 ciclos por segundo, o que
está dentro da freqüência de áudio do subwoofer.
Má conexão.
O nível de graves ajustado está muito alto.
O volume ou o nível de graves no dispositivo-fonte de
áudio está muito alto.
O subwoofer está muito próximo do monitor.
D
subwoofer) à tomada da parede.
igue o sistema de alto-falantes, pressionando o botão Stand-by no controle
L
destacável ou no controle remoto sem fio. Um LED irá se acender no controle
estacável quando a força estiver LIGADA.
d
O controle rotatório no controle destacável controla o volume principal. Gire o
ontrole para a direita para aumentar o volume.
c
erifique o nível de volume na placa de som do computador ou no dispositivo-
V
onte de áudio alternativo e ajuste em nível médio.
f
erifique as conexões do pino na fonte de áudio. Verifique se os cabos de sinal
V
stão inseridos firmemente nas tomadas de pino corretas.
e
este os alto-falantes em outro dispositivo de áudio. Retire o cabo estéreo de
T
,5 mm do dispositivo-fonte de áudio e conecte-o à “line-out”, à “audio-out”
3
ou à tomada de fone de ouvido de outra fonte de áudio.
Verifique todos os cabos. Verifique se estão conectados à tomada de “line-out”
(saída de linha) ou “audio-out” (saída de áudio) em sua placa de som ou em
utra fonte de áudio — NÃO em “speaker-out” (saída de alto-falante).
o
erifique o nível de volume do sistema operacional do computador e diminua,
V
e necessário.
s
esconecte o cabo estéreo da fonte de áudio. Em seguida, conecte o pino na
D
tomada de fone de ouvido de uma fonte alternativa (por exemplo, Walkman,
Discman ou rádio FM).
O controle rotatório no controle destacável controla o volume principal. Gire o
controle para a esquerda para reduzir o volume.
juste o volume do sistema operacional do computador e os níveis de equilíbrio
A
para o centro como ponto de partida. Em seguida, ajuste o nível no alto-falante
utilizando o controle de volume.
Com freqüência, os arquivos WAV têm baixa qualidade. Desta forma, distorção
e ruído são notados facilmente com alto-falantes de alta potência. Tente outra
fonte de som; por exemplo, um CD de música.
Desloque os alto-falantes até que a interferência desapareça.
Verifique se todos os cabos estão conectados adequadamente e fazendo uma
conexão segura.
Muitos arquivos .WAV e .MID costumam ter pequeno conteúdo de baixa
freqüência e som plano quando escutados em um computador. Tente uma
música com sons mais graves — algo de sua coleção de CDs.
Pode ser detectado um zumbido baixo quando seu sistema de alto-falantes
estiver ligado sem uma fonte de áudio tocando ou quando o volume estiver
ajustado em um nível extr
Desconecte o cabo de força do estabilizador (se utilizado) e conecte
diretamente em uma tomada de parede.
Mude seus cabos de lugar. Verifique se fazem uma conexão “limpa”.
Para controlar os graves, pressione o botão “Bass” no controle destacável e gire
o controle para a esquerda para reduzi-lo.
Desconecte seu cabo estéreo de 3,5 mm da fonte de áudio. Se o zumbido baixo
desaparecer, abaixe o volume na fonte de áudio.
Abaixe o volume ou o nível de graves em seu computador, dispositivo portátil,
etc.
Como o subwoofer não é magneticamente blindado, pode causar distorção se
estiver muito per
de distância do monitor.
emamente baixo.
to do monitor
. Desloque o subwoofer para no mínimo 60 cm
16
Page 19

Page 20

This Class B digital apparatus complies with Canadian ICES-003.• Cet appareillage digital de Classe B est conforme au ICES-003 canadien.
ate Headquarters
r
rpo
o
C
sia/P
A
6 & 209,
.
535 Rte
Europe 13 Rue Beaumont, L-1219 Luxembourg,Luxembourg
acifi
c
25 Canton Road,
Engineered in USA.
PA 18337-0277,USA • 866-570-5702 • 570-296-4434 • Fax 570-296-6887
Milford,
ong
Hong K
owloon,
K
Tsui,
Tsim Sha
Made in China
A11389
 Loading...