


AUSTRALIAN HIGH DEFINITION PVR9600 TRIPLE TUNER PERSONAL VIDEO RECORDER
PVR9600 User Manual
Record up to 6 programs
at once*
*Refer to page 38

For assistance: |
Page 2 of 52 |
|
support@uec.com.au |
||
|
||
www.uec.com.au |
|
USER GUIDE |
|
Table of Contents |
|
Important Safety Information, Contents, Quick Help Table.................................................................................... |
4 |
Front and Back Panels .......................................................................................................................................................... |
6 |
The Power Adapter................................................................................................................................................................. |
7 |
Install & Connect the PVR9600 Set top box .................................................................................................................. |
8 |
The Remote Control .............................................................................................................................................................. |
11 |
PVR9600 Set top box Menu................................................................................................................................................ |
14 |
PVR9600 Set top box Features........................................................................................................................................... |
29 |
Software Upgrade.................................................................................................................................................................. |
35 |
PVR Functionality.................................................................................................................................................................... |
37 |
Set top box specifications, Troubleshooting................................................................................................................. |
43 |
Warranty..................................................................................................................................................................................... |
45 |
Legal Matters ........................................................................................................................................................................... |
46 |
Help and Information ............................................................................................................................................................ |
48 |
The PVR9600 Basic Viewer’s Guide is the subject |
|
of intellectual property rights, including copyright, |
|
under domestic law and international conventions. |
|
All rights are reserved. The PVR9600 Basic Viewer’s |
|
Guide supplements the information supplied |
|
with the packaging of the set top box as well |
|
as the detailed information available |
|
on our website. |
|
Due to software upgrades, the features |
|
and functionalities in this Basic Viewer’s Guide |
|
may differ from those on your set top box. |
|
Please visit www.uec.com.au for the latest |
|
Viewer’s Guide. |
|
For assistance: |
Page 3 of 52 |
|
support@uec.com.au |
||
|
||
www.uec.com.au |
|

IMPORTANT SAFETY INFORMATION
The PVR9600 set top box meets applicable Australian and International Safety Standards.
Please read the following recommended safety precautions carefully before operating the product.
Mains Supply
The power pack is supplied with this set top box. It operates within the range 100-240 V AC 50-60 Hz mains supply only. Connect the power cable to the set top box before connecting the other end
to the power outlet. Disconnect the set top box from the power outlet before connecting
or disconnecting the set top box from any other equipment. A well-regulated 12V DC supply is essential for this unit to operate efficiently, contact Altech UEC for the recommended DC regulators.
Liquids and Spillage
Keep liquids away from the set top box and do not put anything on top of the set top box which may spill (example: lit candles or containers of liquid). Do not use the set top box in extreme temperature and humidity conditions.
Cleaning
Before cleaning the set top box, first disconnect the set top box from the mains. Use a dry cloth to clean the exterior.
Ventilation and Installation
Do not block the ventilation holes and ensure that sufficient free airflow is maintained around the set top box. Never stand the set top box on soft furnishings or on carpet. Do not use or store the set top box near a heater or where it is exposed to direct sunlight. Never stack other heat generating electronic equipment on top of, or below the set top box and always stand the product in a horizontal plain.
Servicing
Do not attempt to repair or modify the set top box yourself. Do not remove the top cover of the set top box. Any tampering with the set top box will invalidate the warranty. Refer all servicing to Altech UEC Australia, Tel. +61 2 9425 5777.
Lightning
If the set top box is installed in a location that is subject to extensive lightning activity, Altech UEC recommends that a surge protection device is installed for the set top box mains supply.
Earthing
The earth/grounding system must comply with local regulations.
For assistance: |
Page 4 of 52 |
|
support@uec.com.au |
||
|
||
www.uec.com.au |
|
Contents
PVR9600 set top box
Remote control
2 x AAA batteries
12V DC Power supply adapter with power lead
AV Cable
User manual
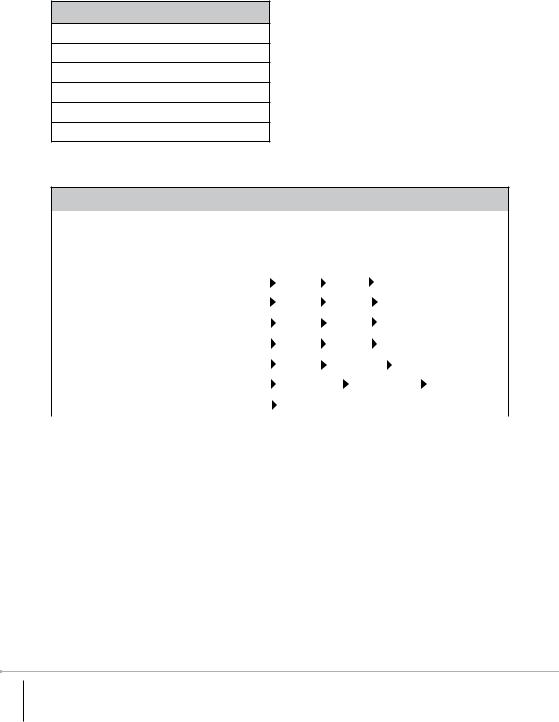
Quick Help
Description |
Information |
|
|
|
|
|
|
|
|
|
|
|
|
|
|
|
|
|
|
|
|
|
|
|
|
|
|
|
|
|
|
|
|
|
|
|
|
|
|
|
|
PG PIN (default) |
1234 |
|
|
|
|
|
|
|
|
|
|
|
|
|
|
|
|
|
|
|
|
|
|
|
|
|
|
|
|
|
|
|
|
|
|
|
|
|
|
|
|
Settings PIN (default) |
1234 |
|
|
|
|
|
|
|
|
|
|
|
|
|
|
|
|
|
|
|
|
|
|
|
|
|
|
|
|
|
|
|
|
|
|
|
|
|
|
|
|
Reset to Factory Default |
Go to: Menu |
|
|
|
Settings |
|
|
|
General Factory Defaults |
|||||||||||
|
|
|||||||||||||||||||
|
|
|
|
|
|
|
|
|
|
|
|
|
|
|
|
|
|
|
|
|
Change PG PIN |
Go to: Menu |
|
|
|
|
Settings |
|
|
|
General |
|
|
|
Change PG PIN |
||||||
|
|
|
|
|
|
|||||||||||||||
|
|
|
|
|
|
|
|
|
|
|
|
|
|
|
|
|
|
|
|
|
Change Settings PIN |
Go to: Menu |
|
|
|
Settings |
|
|
|
General |
|
|
Change Settings PIN |
||||||||
|
|
|
|
|
|
|||||||||||||||
|
|
|
|
|
|
|
|
|
|
|
|
|
|
|
|
|
|
|
|
|
Restart set top box |
Go to: Menu |
|
|
|
Settings |
|
|
|
General |
|
|
Restart |
||||||||
|
|
|
|
|
|
|||||||||||||||
|
|
|
|
|
|
|
|
|
|
|
|
|
|
|
|
|
|
|
|
|
Software update |
Go to: Menu |
|
|
|
Settings |
|
|
|
Device info |
|
Check for updates |
|||||||||
|
|
|
|
|
|
|||||||||||||||
|
|
|
|
|
|
|
|
|
|
|
|
|
|
|
|
|
|
|
|
|
Format Hard Disk Drive |
Go to: Menu |
|
|
|
PVR Content |
|
HDD Manager |
|
Format HDD |
|||||||||||
|
|
|
|
|||||||||||||||||
|
|
|
|
|
|
|
|
|
|
|
|
|
|
|
|
|
|
|
|
|
Help info |
Go to: Menu |
|
|
|
Help |
|
|
|
|
|
|
|
|
|
|
|
|
|
|
|
|
|
|
|
|
|
|
|
|
|
|
|
|
|
|
|
|
||||
|
|
|
|
|
|
|
|
|
|
|
|
|
|
|
|
|
|
|
|
|
For assistance: |
Page 5 of 52 |
|
support@uec.com.au |
||
|
||
www.uec.com.au |
|
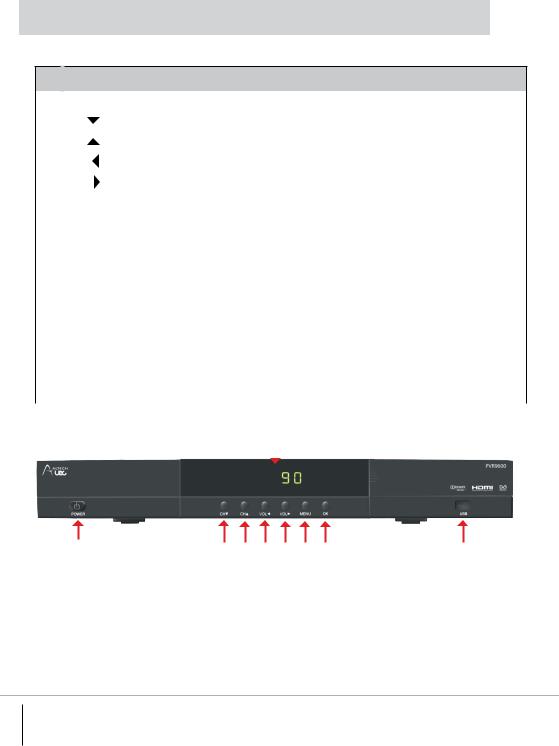
FRONT AND BACK PANEL
Front Panel
1 |
Standby Button |
Switches the set top box between ON and STANDBY |
|||
|
|
|
|
|
|
2 |
CH |
Changes to the previous available channel or navigates in menu mode |
|||
|
|
|
|
|
|
3 |
CH |
Changes to the next available channel or navigates in menu mode |
|||
|
|
|
|
|
|
4 |
VOL |
Decreases the volume level or navigates in menu mode |
|||
|
|
|
|
|
|
5 |
VOL |
Increases the volume level or navigates in menu mode |
|||
|
|
|
|
|
|
6 |
MENU |
Selects the Menu system |
|||
|
|
|
|
|
|
7 |
OK |
Accepts a selection |
|||
|
|
|
|
|
|
8 |
USB |
USB port provision for Wi-Fi / External Hard Drive / USB upgrade |
|||
|
|
and/or future use |
|||
|
|
|
|
|
|
9 |
Front panel LED Display |
Displays the time (when in Standby Mode) or displays the selected |
|||
|
|
TV channel number being viewed |
|||
|
3 x LED status |
Left LED: BLUE – internet connection detected; |
|||
|
indicators |
RED – no internet connection |
|||
|
|
Middle LED: RED – recording in progress |
|||
|
|
Right LED: RED – flashes when remote control signal is received |
|||
|
|
|
|
|
|
|
|
9 |
|
||
|
|
|
|
|
|
|
|
|
|
|
|
|
|
|
|
|
|
|
|
|
|
|
|
1 |
2 |
3 |
4 |
5 |
6 |
7 |
8 |
For assistance: |
Page 6 of 52 |
|
support@uec.com.au |
||
|
||
www.uec.com.au |
|

Back Panel
1 |
Antenna IN |
Connects to the TV terrestrial antenna |
|
|
|
2 |
Antenna OUT |
Antenna loop through connection to other devices such as TV |
|
|
or another STB / PVR / VCR |
|
|
|
3 |
Internet |
Ethernet port for internet connectivity |
4Composite Video Connects to the video inputs on TV
5Audio Left & Right Connects to the analogue inputs on TV
6 |
Optical |
|
Connects to the Digital Audio optical input on TV |
||||||
|
|
|
or AV Home Theatre System |
|
|
|
|||
|
|
|
|
||||||
7 |
HDMI |
|
Connects to the high definition (HDMI) input on TV |
||||||
|
|
|
or AV Home Theatre System |
|
|
|
|||
|
|
|
|
||||||
8 |
2 x USB ports |
|
USB port provision for Wi-Fi / External Hard Drive / USB upgrade |
||||||
|
|
|
and/or future use |
|
|
|
|
|
|
|
|
|
|
|
|||||
9 |
Power |
|
+12 VDC input from the supplied power pack |
|
|||||
|
|
|
|
|
|
|
|
|
|
|
1 |
2 |
3 |
4 |
5 |
6 |
7 |
8 |
9 |
The Power Adapter
•Model: RJ-AS120400E003
•Input: 100–240V~, 2.0A Max, 50/60Hz
•Output: DC 12V DC/4A DC
•SAA Approval: SGS-130179-EA
•Approval Date: 2013-03-20
For more information, please visit www.uec.com.au for a list of power supplies and regulators.
For assistance: |
Page 7 of 52 |
|
support@uec.com.au |
||
|
||
www.uec.com.au |
|
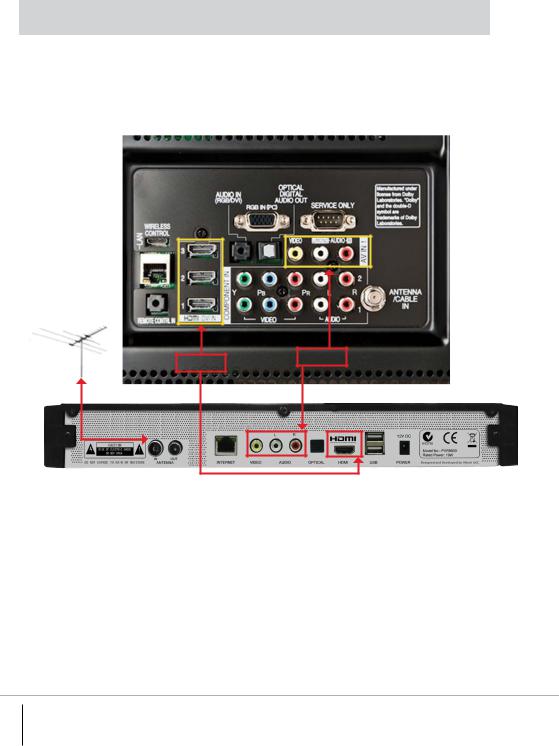
INSTALLATION & CONNECTION OF THE PVR9600
Carefully remove set top box from the packaging. Insert the supplied batteries into the remote control paying attention to the +/- indicators. Connection options are listed below, it is important to ensure that all connections are secure before connecting the set top box and power pack to the mains.
Direct to TV connection
HDMI Inputs
AV Inputs
Option 1
Option 2
Option 1: HDMI Connection (High Definition TV)
•Connect the terrestrial antenna to the Antenna IN on the set top box.
•Connect a HDMI cable to the HDMI connector on the set top box and then connect the other end of the cable to the HDMI input on the TV.
Option 2: AV Connection (Standard Definition TV)
•Connect the terrestrial antenna to the Antenna IN on the set top box.
•Connect the Audio / Video (AV) cables to the Audio (Red and White) and Video (Yellow) outputs on the set top box and the other end to the audio and video (AV) inputs on the TV.
For assistance: |
Page 8 of 52 |
|
support@uec.com.au |
||
|
||
www.uec.com.au |
|

Connection via Amplifier/Home Theatre System
HDMI Inputs
AV Inputs
Option 2 & 3 |
|
Option 1 |
|
Option 2 |
|
Option 1 |
Option 3 |
HDMI out
HDMI Inputs
Optical Inputs
AV Inputs
For assistance: |
Page 9 of 52 |
|
support@uec.com.au |
||
|
||
www.uec.com.au |
|

Amplifier/Home Theatre System with HDMI inputs/output and a High Definition TV)
Option 1: Digital audio connection via HDMI
•Connect the terrestrial antenna to the Antenna IN on the set top box.
•Connect a HDMI cable to the HDMI connector on the set top box and then connect the other end
of the cable to the HDMI input connector of the Amplifier/Home Theatre system. Then connect another HDMI cable to the output HDMI of the Amplifiier/Home Theatre System and connect the other end
to the HDMI input on the TV.
Option 2: Digital audio connection via optical cable
•Connect the terrestrial antenna to the Antenna IN on the set top box.
•Connect the optical cable to the OPTICAL connector on the set top box and then connect the other end of the cable to the OPTICAL input of the Amplifier / Home Theatre system.
•Connect a HDMI cable to the HDMI connector on the set top box and then connect the other end of the cable to the HDMI connector on the TV.
Option 3: AV connection
•Connect the terrestrial antenna to the Antenna IN on the set top box.
•Connect the audio cables (RED and WHITE) to the AUDIO connectors on the set top box and then connect the other end of the cable to the AUDIO inputs (RED and WHITE) of the Amplifier /HomeTheatre System.
•Connect a HDMI cable to the HDMI connector on the set top box and then connect the other end
of the cable to the HDMI connector on the TV.
IMPORTANT: There are other possible connections available depending on your amplifier/home theatre system’s available inputs and outputs. Please consult your amplifier’s/home theatre system’s user manual for more information.
For assistance: |
Page 10 of 52 |
|
support@uec.com.au |
||
|
||
www.uec.com.au |
|
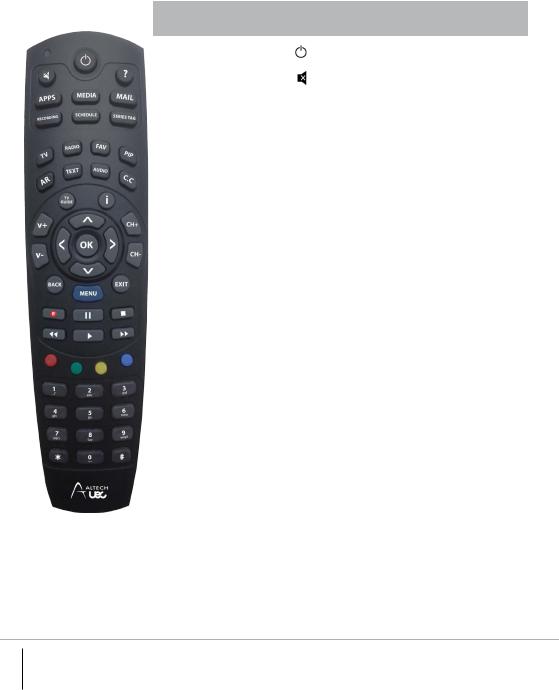
THE REMOTE CONTROL
Remote Control Unit
The Remote Control Unit (RCU) might not operate properly if the RCU is operated beyond the following conditions.
1. Distance – up to 6 meters in front of the decoder 2. Angle – up to 30 degrees to the left or right from
the centre of the decoder
Refer to the image on the left.
For assistance: |
Page 11 of 52 |
|
support@uec.com.au |
||
|
||
www.uec.com.au |
|
Button Name |
Button |
Function |
|
Identification |
|
Standby |
|
Switches the set top box between ON |
|
|
and STANDBY. |
|
|
|
Mute |
|
Turns the sound ON/OFF |
|
|
|
Help |
? |
Launches the Help function |
|
|
where supported |
Apps |
APPS |
Not available |
|
|
|
Media |
MEDIA |
Launches the Media functionality |
|
|
for playback of supported Media files. |
|
|
|
Select to view received messages |
||
|
|
|
Recording |
RECORDING |
Hot Key to access recordings |
Schedule |
SCHEDULE |
Hot Key to access the list |
|
|
of scheduled recordings |
Series Tag |
SERIES TAG |
Hot Key to access the list of series tag |
|
|
settings |
TV |
TV |
Tunes to TV channels |
|
|
|
Radio |
RADIO |
Tunes to RADIO channels |
|
|
|
Favourite |
FAV |
Launches Favourite channels set |
|
|
in the Channels Menu |
|
|
|
Picture in Picture |
PIP |
Not available |
Aspect Ratio |
AR |
Not available |
|
|
|
Text |
TEXT |
Not available |
|
|
|
Audio Control |
AUDIO |
For future support of multiple sound |
|
|
tracks |
|
|
|
Closed Caption |
CC |
Turns ON/OFF subtitles and closed |
|
|
captions (available only to programs |
|
|
that contain subtitle/closed caption |
|
|
information) |
|
|
|
TV Guide |
TV GUIDE |
Launches Electronic Program Guide |
|
|
(EPG) |
For assistance: |
Page 12 of 52 |
|
support@uec.com.au |
||
|
||
www.uec.com.au |
|
Button Name |
Button |
|
Function |
|
|
Identification |
|
||
Info |
|
i |
|
Launches I-plate & extended I-plate |
|
|
|
|
for program information |
|
|
|
|
|
Navigation |
|
|
|
Menu navigation and selection |
Arrows (4) |
|
OK |
|
|
and OK |
|
|
|
|
|
|
|
||
Channel Up/ |
CH+/CH- |
Allows channel up and down |
||
Down |
|
|
|
navigation |
Volume Up/ |
V+/V- |
Adjusts volume up and down |
||
Down |
|
|
|
|
Back |
BACK |
Goes back to previous menu |
||
|
|
|
|
or channel |
|
|
|
||
Menu |
MENU |
Launches menu system |
||
|
|
|
||
Exit |
EXIT |
Leaving a menu or function |
||
|
|
|
|
|
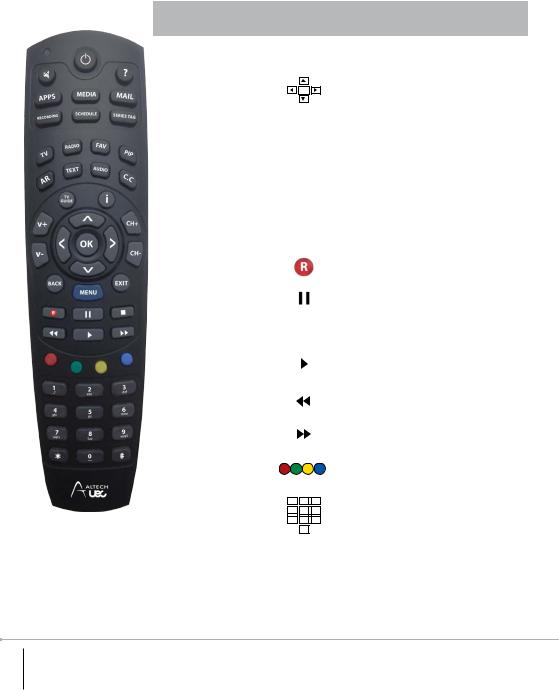
Record |
|
|
|
Records selected program |
|
|
|
|
|
Pause |
|
|
|
Pauses live TV or recorded programs |
|
|
|
|
|
Stop |
|
|
|
Stops the recorded program |
|
|
|
||
|
|
|
|
and jumps to live TV |
|
|
|
|
|
|
|
|
|
|
Play |
|
|
|
Starts playing recorded program |
|
|
|
|
or resumes playing back behind live |
|
|
|
|
TV program |
|
|
|
|
|
Rewind |
|
|
|
Rewinds a recorded program or when |
|
|
|
|
time-shifting |
|
|
|
|
|
Fast Forward |
|
|
|
Fast forward a recorded program |
|
|
|
|
or when time-shifting |
|
|
|
|
|
4 coloured |
|
|
|
Functions as required by application |
buttons |
|
|
|
or context of help information. |
0 - 9 Digits |
1 |
2 |
3 |
Numerical data entry of channel |
|
number, PIN, etc. |
|||
|
4 |
5 |
6 |
|
|
7 |
8 |
9 |
|
|
|
0 |
|
|
|
|
|
|
|
Asterisk |
|
* |
|
Functions as required by application |
|
|
|
|
or context |
Hashtag |
|
# |
|
Functions as required by application |
|
|
|
|
or context |
For assistance: |
Page 13 of 52 |
|
support@uec.com.au |
||
|
||
www.uec.com.au |
|

PVR9600 SET TOP BOX MENU
Main Menu
Main Menu
Launch the menu by pressing the MENU button on the remote to set up
the set top box for the user’s preferences. Navigate through the different menus using: 


 OK
OK 


Press OK button to launch sub menu of the selected menu. Press BACK to go back to the previous menu or press EXIT to resume channel viewing.
Settings
Scan
Press OK or > buttons to navigate to sub menu options.
This menu allows you to:
• Scan channels automatically
• Scan channels manually by entering the desired channel frequency
Press button to initiate scan.
Press BACK to scroll to other menu options or press EXIT to resume channel viewing.
For assistance: |
Page 14 of 52 |
|
support@uec.com.au |
||
|
||
www.uec.com.au |
|
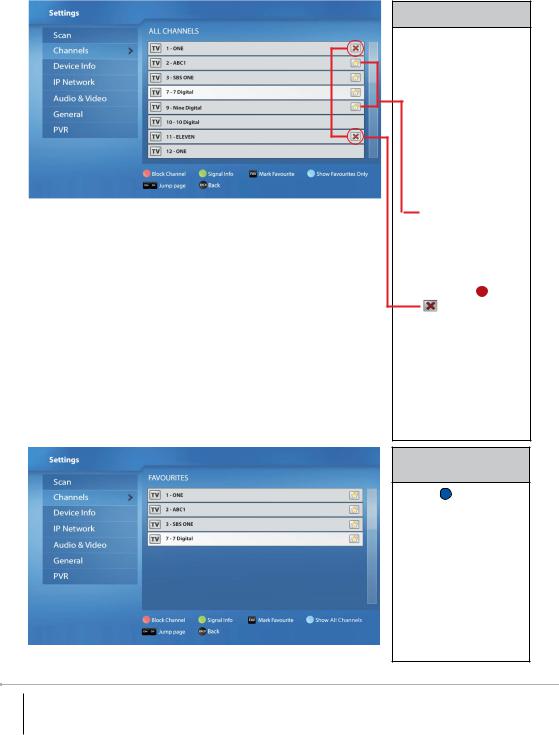
Channels
Press OK or > buttons to navigate to sub menu options.
This menu allows you to:
• Navigate the channel list and tune to a channel by selecting
a channel and pressing
OK
•Create favourite channels by pressing
the FAV button
(  appears next to the channel selected). Press the FAV button again to undo favourite channel setting.
•Block channels by pressing the  button
( appears next to the channel selected). Press the  button again to undo channel blocking.
NOTE: blocked channels need a PG PIN to view.
Press BACK to scroll to other menu options or press EXIT to resume channel viewing.
Favourites /
All Channels
Press the button to alternately show the Favourite channels and All channels listings. This menu allows you to:
•View favourite channels listing as previously set / All channels listing
Press BACK to scroll to other menu options or press EXIT to resume channel viewing.
For assistance: |
Page 15 of 52 |
|
support@uec.com.au |
||
|
||
www.uec.com.au |
|
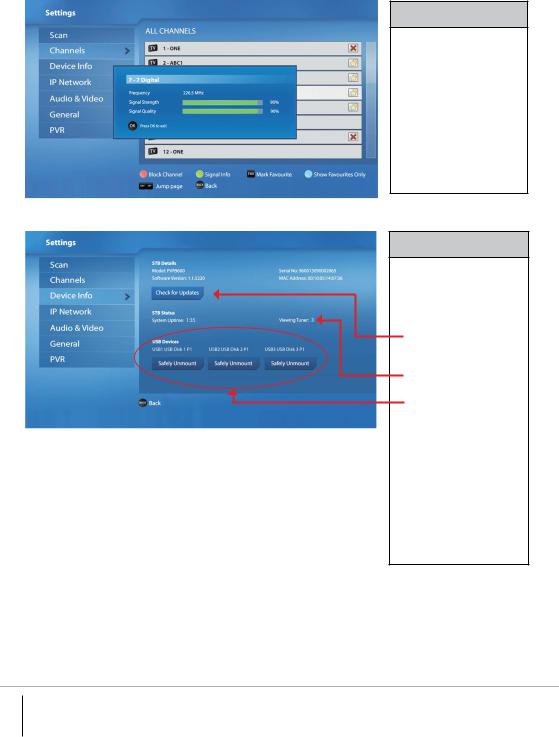
Signal info
This menu allows you to:
• View the selected channel frequency, signal strength and quality by selecting a channel and
pressing the button.
Press BACK to scroll to other menu options or press EXIT to resume channel viewing.
Device Info
Press OK or > buttons to navigate to sub menu
options.
This menu allows you to:
• Check and upgrade the software of the set top box
• Check which tuner is currently being viewed
• List the USB devices connected to the set top box (If no USB device
is connected, this section will indicate: No devices connected)
• Safely unmount (disconnect) connected USB device/s
Press BACK to scroll to other menu options or press EXIT to resume channel viewing.
For assistance: |
Page 16 of 52 |
|
support@uec.com.au |
||
|
||
www.uec.com.au |
|
 Loading...