


2 | P a g e
© Copyright 2012 Altech UEC (Pty) Ltd
TABLE OF CONTENTS
1 |
INTRODUCTION ............................................................................. |
8 |
|
|
1.1 |
CONTENTS...................................................................................................... |
8 |
2 |
FRONT PANEL ............................................................................... |
9 |
|
3 |
BACK PANEL ................................................................................ |
10 |
|
4 |
INSTALLING AND CONNECTING THE PVR ............................... |
11 |
|
|
4.1 |
LOOP THROUGH CONNECTION: ( IMPORTANT ) .............................................. |
11 |
|
WITHOUT THIS LOOPED CONNECTION THE PVR WILL NOT FUNCTION. ............................... |
11 |
|
|
NOW CONNECT TO TV SET VIA THE FOLLOWING CONNECTION OPTIONS ............................ |
12 |
|
|
4.2 |
OPTION A: AV CONNECTORS (STANDARD DEFINITION TV) ............................... |
12 |
|
4.3 |
OPTION B: HDMI CONNECTOR (HIGH DEFINITION TV) ..................................... |
12 |
4.4OPTION C: HDMI CONNECTOR (AV HOME THEATRE SYSTEM AND
A HIGH DEFINITION TV) ................................................................................................ |
12 |
4.5QUICK START GUIDE FOR EXISTING AURORA/ DSD4121 OR
|
OTHER VAST INSTALLATION ......................................................................................... |
13 |
|
5 |
SMART CARD............................................................................... |
13 |
|
6 |
RESTORING TO FACTORY DEFAULTS ..................................... |
13 |
|
|
6.1 |
PIN NUMBER ................................................................................................. |
13 |
7 |
REMOTE CONTROL..................................................................... |
14 |
|
|
7.1 |
PVR REMOTE CONTROL BUTTON FUNCTIONS ................................................... |
15 |
|
NOTE: WHEN KEYS ARE PRESSED IT IS ASSUMED THEY WILL BE PRESSED |
|
|
|
ON THE REMOTE UNLESS OTHERWISE STATED. ............................................................... |
15 |
|
8 |
DSR4639 DECODER FEATURES AND MENU............................ |
16 |
|
|
8.1 |
I-PLATE ........................................................................................................ |
16 |
|
8.2 |
CHANGING CHANNELS ................................................................................... |
16 |
|
8.3 |
I-PLATE EXTENDED MODE ............................................................................. |
17 |
|
8.4 |
REMINDER POPUP ......................................................................................... |
17 |
|
8.5 |
HOW TO SET A REMINDER............................................................................... |
17 |
|
8.6 |
HOW TO DELETE A REMINDER ......................................................................... |
18 |
|
8.7 |
EXAMPLE OF A BANNER REMINDER ................................................................. |
18 |
|
8.8 |
EXAMPLE OF AN AUTO-TUNE REMINDER.......................................................... |
18 |
3 | P a g e
© Copyright 2012 Altech UEC (Pty) Ltd

9 |
VOLUME AND MUTE.................................................................... |
19 |
|
|
9.1 |
VOLUME UP AND DOWN .................................................................................. |
19 |
|
9.2 |
VOLUME MUTE .............................................................................................. |
19 |
10 SUBTITLES AND CLOSED CAPTIONS ....................................... |
20 |
||
|
10.1 |
TURNING ON SUBTITLES/CLOSED CAPTIONS .................................................... |
20 |
|
10.2 |
TURNING OFF SUBTITLES OR CLOSED CAPTIONS.............................................. |
20 |
11 |
TV GUIDE...................................................................................... |
21 |
|
|
11.1 |
8 DAYS OF INFORMATION................................................................................ |
21 |
|
11.2 |
DATA LOADING.............................................................................................. |
22 |
|
11.3 |
MOVING AROUND THE EPG............................................................................ |
22 |
12 |
MENU ............................................................................................ |
22 |
|
|
12.1 |
LAUNCHING THE MENU .................................................................................. |
22 |
|
12.2 |
MOVING AROUND THE MENU .......................................................................... |
22 |
|
12.3 |
CHANGE MENU SETTINGS .............................................................................. |
23 |
|
12.4 |
DISH INSTALLATION MENU ............................................................................. |
23 |
|
12.5 |
TO CONFIGURE THE LNB ............................................................................... |
24 |
|
12.6 |
TO RESCAN .................................................................................................. |
24 |
|
12.7 |
TV INSTALLATION .......................................................................................... |
24 |
|
12.8 |
USER SETTINGS ............................................................................................ |
25 |
|
12.9 |
TIME ZONE .................................................................................................... |
25 |
|
12.10 |
RESET TO FACTORY DEFAULTS ....................................................................... |
26 |
|
12.11 |
USB UPGRADE ............................................................................................. |
26 |
|
12.12 |
INFORMATION................................................................................................ |
27 |
|
12.13 |
PARENTAL CONTROL ..................................................................................... |
28 |
|
12.14 |
CHANGE PARENTAL PIN ................................................................................. |
29 |
|
12.15 |
PVR SETTINGS ............................................................................................. |
30 |
|
12.16 |
TIME-SHIFT OPTION ....................................................................................... |
30 |
|
12.17 |
RECORDING OFFSETS ................................................................................... |
30 |
|
12.18 |
JUMP SETTINGS ............................................................................................ |
31 |
|
12.19 |
FORMAT HARD DRIVE .................................................................................... |
31 |
|
12.20 |
HARD DRIVE INFORMATION ............................................................................ |
32 |
4 | P a g e
© Copyright 2012 Altech UEC (Pty) Ltd

13 |
RECORDING MODES .................................................................. |
33 |
|
|
13.1 |
INSTANT RECORD .......................................................................................... |
33 |
|
13.2 |
TV GUIDE (EPG) RECORD ............................................................................. |
34 |
|
13.3 |
CHAIN RECORD ( EPISODE CHAIN RECORDING ) ............................................... |
34 |
|
13.4 |
TIMEBASED RECORD ...................................................................................... |
35 |
|
13.5 |
TO SCHEDULE A TIME BASED RECORDING:....................................................... |
36 |
14 |
CONFLICTS .................................................................................. |
37 |
|
|
14.1 |
2 RECORDINGS AT A TIME MAXIMUM ............................................................... |
37 |
15 |
TIME SHIFTING ............................................................................ |
38 |
|
|
15.1 |
ON PAUSE .................................................................................................... |
38 |
|
15.2 |
ALWAYS ON.................................................................................................. |
38 |
|
15.3 |
VIEWING PAUSE BUFFER AND RECORDING ...................................................... |
39 |
16 |
PLAYLIST ...................................................................................... |
40 |
|
|
16.1 |
PLAYBACK .................................................................................................... |
40 |
|
16.2 |
DELETE EVENT ............................................................................................. |
41 |
|
16.3 |
SORTING ...................................................................................................... |
41 |
|
16.4 |
GROUPING.................................................................................................... |
41 |
17 |
SCHEDULED LIST........................................................................ |
42 |
|
|
17.1 |
VIEWING ....................................................................................................... |
42 |
|
17.2 |
DELETE EVENT ............................................................................................. |
42 |
|
17.3 |
SORTING ...................................................................................................... |
42 |
|
17.4 |
GROUPING.................................................................................................... |
43 |
|
17.5 |
TIMEBASED RECORDING ................................................................................ |
43 |
18 |
TIME-SHIFT LIST.......................................................................... |
43 |
|
|
18.1 |
VIEWING ....................................................................................................... |
43 |
|
18.2 |
SAVING TIME-SHIFT PROGRAMS ..................................................................... |
43 |
|
18.3 |
DELETE EVENT ............................................................................................. |
43 |
|
18.4 |
SORTING ...................................................................................................... |
43 |
|
18.5 |
GROUPING.................................................................................................... |
44 |
19 ETHERNET ................................................................................... |
44 |
5 | P a g e
© Copyright 2012 Altech UEC (Pty) Ltd

20 MHEG-5......................................................................................... |
44 |
20.1NOTE: A POTENTIAL APPLICATION THAT MAYBE AVAILABLE ON
THE PLATFORM ............................................................................................................ |
44 |
21 TROUBLESHOOTING .................................................................. |
44 |
21.1 HARD DRIVE IS FULL...................................................................................... |
44 |
21.2TIME BASED RECORDING WON’T SCHEDULE BECAUSE OF
INVALID VALUES .......................................................................................................... |
45 |
|
21.3 |
MY CHAIN RECORDING DOESN’T RECORD....................................................... |
45 |
22 FREQUENTLY ASKED QUESTIONS........................................... |
45 |
|
22.1 |
HOW MANY HOURS CAN I RECORD?............................................................... |
45 |
22.2 |
HOW DO I ERASE ALL THE PROGRAMS IN THE PLAYLIST?................................ |
45 |
22.3 |
CAN I VIEW SUBTITLES ON A PLAYBACK? ....................................................... |
46 |
6 | P a g e
© Copyright 2012 Altech UEC (Pty) Ltd

7 | P a g e
© Copyright 2012 Altech UEC (Pty) Ltd

1 INTRODUCTION
1.1CONTENTS
1.1.1An Altech UEC remote control.
1.1.22 x AA batteries.
1.1.312 V Power supply adapter with fig 8 power lead.
1.1.4AV cable
1.1.5Component video (YPbPr) cable
1.1.6F-F loop through cable.
1.1.7User manual
8 | P a g e
© Copyright 2012 Altech UEC (Pty) Ltd
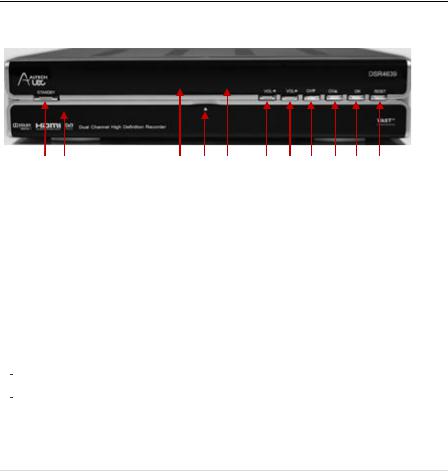
2 FRONT PANEL
|
1 |
2 |
3 |
4 |
5 |
6 |
7 |
8 |
9 |
10 |
11 |
|
|
|
|
|
|
||||||||
|
|
|
|
|
|
|
|
|
|
|
|
|
1 |
|
STANDBY Button |
Switches the decoder between ON and STANDBY modes. |
|||||||||
2 |
|
Smartcard Slot |
Behind the Front Panel Cover. ( see 4 ) |
|
|
|
|
|||||
3 |
|
LEDs |
Indicates response to remote control commands and/or error mode |
|||||||||
|
|
Bi-colour |
RED = Decoder in standby mode or an error condition has occurred. |
|||||||||
|
|
RED/GREEN |
GREEN = Normal operation. |
|
|
|
|
|
|
|||
|
|
AMBER GREEN |
Flashes = when there are incoming messages |
|
|
|
||||||
|
|
|
|
|
|
|||||||
|
|
|
Flashes = when RCU command received. |
|
|
|
|
|||||
|
|
|
|
|
|
|
|
|
||||
4 |
|
Front Panel Release |
Opens the front panel when pulled. |
|
|
|
|
|
||||
5 |
|
Front Panel |
Displays the time (Standby Mode) or displays the selected |
|||||||||
|
|
LED Display |
TV channel. Front panel with display “REC” if there is a recording |
|||||||||
|
|
|
in progress |
|
|
|
|
|
|
|
|
|
|
|
|
|
|
|
|
|
|
|
|||
6 |
|
VOL< |
Decreases the volume level. |
|
|
|
|
|
|
|||
7 |
|
VOL˃ |
Increases the volume level. |
|
|
|
|
|
|
|||
8 |
|
CH˃ |
Changes to the next available channel. |
|
|
|
|
|||||
9 |
|
CH˃ |
Changes to the previous available channel. |
|
|
|
|
|||||
10 |
|
OK |
Accepts the selection. |
|
|
|
|
|
|
|
||
11 |
|
RESET |
Press to Reboot the decoder, i.e. if decoder freezes etc. |
|||||||||
9 | P a g e
© Copyright 2012 Altech UEC (Pty) Ltd

3 BACK PANEL
|
|
1 |
2 |
3 |
2 |
4 |
5 |
6 |
7 |
8 |
9 |
10 |
11 |
|
|
|
|
|
|
|
|
|
|||||||||
|
|
|
|
|
|
|
|
|
|
|
|
|
|
|
|
1 |
Power Input connector |
|
Connect to your home AC mains outlet via the supplied power pack |
|
|
||||||||||
|
|
|
|
|
|
||||||||||
2 |
LNB IN |
|
Connect to the satellite signal from the dish via the F-connector |
||||||||||||
|
|
|
|
|
|
|
|
|
|
|
|
||||
3 |
LNB Out |
|
Loop out for connecting |
to LNB IN ( 2 ) |
|
|
|
|
|
|
|||||
|
|
|
|
|
|
|
|
||||||||
4 |
R J45 |
|
Connects to Ethernet (currently disabled in this version) |
|
|
|
|||||||||
|
|
|
|
|
|
||||||||||
5 |
S/PDIF (Coaxial |
|
Connects to the Digital Audio coaxial input on TV or AV Home Theater System |
||||||||||||
|
connector) |
|
|
|
|
|
|
|
|
|
|
|
|
|
|
|
|
|
|
|
|
||||||||||
6 |
TOSLINK (Optical |
|
Connects to the Digital Audio optical input on TV or AV Home Theater System |
||||||||||||
|
connector) |
|
|
|
|
|
|
|
|
|
|
|
|
|
|
|
|
|
|
|
|
|
|
|
|
||||||
7 |
USB |
|
Connects to USB device (for software upgrade) |
|
|
|
|
|
|||||||
|
|
|
|
|
|
||||||||||
8 |
|
|
|
Connects to the high definition (HDMI) input on TV or AV home theatre |
|||||||||||
|
HDMI |
|
system |
|
|
|
|
|
|
|
|
|
|
|
|
|
|
|
|
|
|
|
|
|
|
||||||
9 |
Audio = Left & Right |
|
Connects to the analog audio inputs on TV |
|
|
|
|
|
|||||||
|
|
|
|
|
|
|
|
||||||||
10 |
Video =YPbPr |
|
Connects to the YPbPr inputs on TV ( Component Video ) |
|
|
|
|||||||||
|
(Red/Green/Blue) |
|
|
|
|
|
|
|
|
|
|
|
|
|
|
|
|
|
|
|
|
|
|
|
|
|
|||||
11 |
Composite Video ( yellow ) |
|
Connects to the video inputs on TV |
|
|
|
|
|
|
||||||
|
|
|
|
|
|
|
|
|
|
|
|
|
|
|
|
10 | P a g e
© Copyright 2012 Altech UEC (Pty) Ltd
4 INSTALLING AND CONNECTING THE PVR
4.1LOOP THROUGH CONNECTION: ( IMPORTANT )
4.1.1Connect the Loop through F-F connector on LNB1 out to LNB 2 in –see the below picture
WITHOUT THIS LOOPED CONNECTION THE PVR WILL
NOT FUNCTION.
FOR ASSISTANCE EMAIL - SUPPORT@UEC.COM.AU
11 | P a g e
© Copyright 2012 Altech UEC (Pty) Ltd

NOW CONNECT TO TV SET VIA THE FOLLOWING
CONNECTION OPTIONS
4.2OPTION A: AV CONNECTORS (STANDARD DEFINITION
TV)
4.2.1Connect the satellite signal to the LNB IN input (#2) on the decoder
4.2.2Connect the Audio / Video cables to the audio (#9) and video (#11) outputs on the decoder and then to the audio and video inputs on the TV or home theatre system.
4.3OPTION B: HDMI CONNECTOR (HIGH DEFINITION TV)
4.3.1Connect the satellite feed to the LNB input (#2) on the decoder
4.3.2Connect a High Definition cable to the HDMI connector (#8), and then connect the other end of the cable to the HDMI connector on the TV.
4.4OPTION C: HDMI CONNECTOR (AV HOME THEATRE
SYSTEM AND A HIGH DEFINITION TV)
4.4.1Connect the satellite feed to the LNB IN input (#2) on the decoder
4.4.2Connect a High Definition cable to the HDMI connector (#8), and then connect the other end of the cable to the HDMI input connector of the AV home theatre system.
4.4.3Then connect the output HDMI of the AV home theatre system to the TV.
FOR ASSISTANCE EMAIL - SUPPORT@UEC.COM.AU
12 | P a g e
© Copyright 2012 Altech UEC (Pty) Ltd

4.5 QUICK START GUIDE FOR EXISTING AURORA/ DSD4121 OR OTHER VAST INSTALLATION
4.5.1Remove decoder from packaging.
4.5.2Insert supplied batteries into the remote control.
4.5.3Ensure you have connected the loop cable as per 4.1.1
4.5.4Connect to existing TV and satellite dish to the back of the PVR.
4.5.5Power up the PVR and wait while the PVR starts up.
4.5.5If the PVR does not scan first time, Press help & follow installation prompts to change LNB settings.
4.5.6PVR should lock to service and display video.
5 SMART CARD
The smart card is paired to this PVR which means that this smart card cannot be used in any other PVR. The smart card is owned & controlled by the network operator. Activation of a smart card is subject to conditions set out by the operator.
6 RESTORING TO FACTORY DEFAULTS
Resetting to factory defaults can be useful if you have changed some settings and lost some functions. Resetting will restore the decoder back to its original configuration and all personalised settings will be reversed. The only setting that is not reset is the LNB setting. Please manually edit this setting to the desired value. Refer to Page 25
6.1PIN NUMBER
6.1.1The default pin number is 1234.
13 | P a g e
© Copyright 2012 Altech UEC (Pty) Ltd
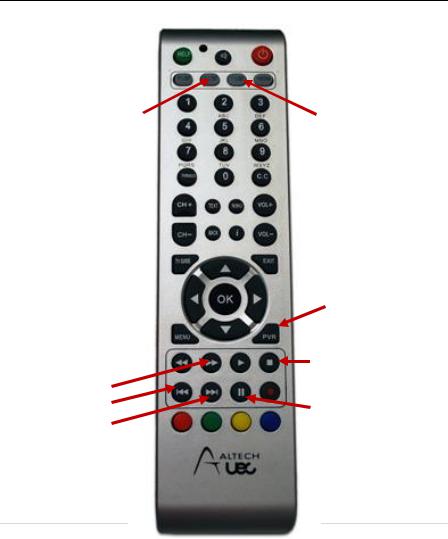
7 REMOTE CONTROL
Playlist hot key
Scheduled list hot key
TV/Radio
Rewind Fast forward
Jump back Jump forward
 Standby
 Media hot key
Time-shift list hot key
 Closed captions/ Subtitles
PVR menu
 Play
Play
Stop
 Record
Pause
14 | P a g e
© Copyright 2012 Altech UEC (Pty) Ltd

7.1PVR REMOTE CONTROL BUTTON FUNCTIONS
NOTE: WHEN KEYS ARE PRESSED IT IS ASSUMED THEY WILL BE PRESSED ON THE REMOTE UNLESS OTHERWISE STATED.
BUTTON |
FUNCTION |
PVR |
Launches the PVR Menu. From here you can access the |
|
Playlist, Scheduled List and Time-shift list. |
RECORD |
Pressing the record button when watching live TV will record |
|
the current program. The recording will automatically stop |
|
when the program finishes. |
FAST FORWARD |
Use this button to fast forward a recorded program or when |
|
viewing behind live. |
|
Pressing the button repeatedly will increase the speed to a |
|
maximum of 30x speed. |
REWIND |
Use this button to rewind a recorded program or when |
|
viewing behind live. |
|
Pressing the button repeatedly will increase the speed to a |
|
maximum of 30x speed. |
JUMP BACKWARDS |
Use this button to jump backwards when watching a |
|
recorded program or viewing behind live. |
|
The jump settings are configurable in the PVR Setup menu. |
JUMP FORWARD |
Use this button to jump forward when watching a recorded |
|
program or viewing behind live. |
|
The jump settings are configurable in the PVR Setup menu. |
STOP |
STOP will end the viewing of a recorded program and return |
|
you to the playlist. |
|
STOP can also be used to jump back to live if you are |
|
viewing behind live. |
PLAY |
Press the button to resume playing back behind live. |
PAUSE |
Pressing this button will pause live TV. This button is also |
|
used to pause while watching a recorded program. |
CLOSED CAPTIONS |
This button turns on subtitles. Subtitles will be displayed on |
|
programs that contain subtitle information. |
TV/RADIO |
Press this button once to switch between TV and radio |
|
services. Hold the button down to launch the bouquet popup |
|
(if available) |
15 | P a g e
© Copyright 2012 Altech UEC (Pty) Ltd
 Loading...