

Page 1

R
01GB00TMEM740BT.book Page 1 Tuesday, January 30, 2007 3:32 PM
TME-M740BT
R
EN
BLUETOOTH INTEGRATED VGA MONITOR
• OWNER'S MANUAL
Please read before using this equipment.
• 用户说明书
使用设备前请阅读本说明书。
ALPINE ELECTRONICS MARKETING, INC.
1-1-8 Nishi Gotanda,
Shinagawa-ku,
Tokyo 141-0031, Japan
Phone 03-5496-8231
ALPINE ELECTRONICS OF AMERICA, INC.
19145 Gramercy Place, Torrance,
California 90501, U.S.A.
Phone 1-800-ALPINE-1 (1-800-257-4631)
ALPINE ELECTRONICS OF CANADA, INC.
777 Supertest Road, Toronto,
Ontario M3J 2M9, Canada
Phone 1-800-ALPINE-1 (1-800-257-4631)
ALPINE ELECTRONICS OF AUSTRALIA PTY. LTD.
161-165 Princes Highway, Hallam
Victoria 3803, Australia
Phone 03-8787-1200
ALPINE ELECTRONICS GmbH
Frankfurter Ring 117,
80807 München, Germany
Phone 089-32 42 640
ALPINE ELECTRONICS OF U.K. LTD.
Fletchamstead Highway, Coventry CV4 9TW, U.K.
ALPINE ELECTRONICS FRANCE S.A.R.L.
98, Rue de la Belle Etoile, Z.I. Paris Nord Il,
B.P. 50016, 95945 Roissy Charles de Gaulle
Alpine House
Phone 0870-33 33 763
(RCS PONTOISE B 338 101 280)
Cedex, France
Phone 01-48638989
ALPINE ITALIA S.p.A.
Viale C. Colombo 8, 20090 Trezzano
Sul Naviglio (MI), Italy
Phone 02-484781
ALPINE ELECTRONICS DE ESPAÑA, S.A.
Portal de Gamarra 36, Pabellón, 32
01013 Vitoria (Alava)-APDO 133, Spain
Phone 945-283588
ALPINE ELECTRONICS (BENELUX) GmbH
Leuvensesteenweg 510-B6,
1930 Zaventem, Belgium
Phone 02-725-13 15
CS
YAMAGATA (Wuxi) Co., Ltd.
Block 28-25, Changjiang Nanlu, WND, jiangsu, China
01GB01TMEM740BT.fm
Designed by ALPINE Japan
Printed in China (Y-B)
ALPINE TME-M740BT_ENCS (EN)
Page 2

01GB00TMEM740BT.book Page 2 Tuesday, January 30, 2007 3:32 PM
01GB02TMEM740BT.fm
ALPINE TME-M740BT_ENCS (EN)
Page 3
01GB00TMEM740BT.book Page 1 Tuesday, January 30, 2007 3:32 PM
ENGLISH
Contents
Operating
Instructions
WARNING
WARNING ................................................. 2
CAUTION .................................................. 2
PRECAUTIONS ........................................ 2
Getting Started
Location of Controls ........................................ 3
Turning Power On or Off ................................. 4
Adjusting the Volume ....................................... 4
Switching the Source ........................................ 4
Auxiliary Device Operation
DVD Video Player Operation (Optional) ......... 5
DVD Menu Operations ................................. 5
TUE-T200DVB Operation (Optional) ............. 5
Menu Operations ........................................... 6
TV Operation (Optional) .................................. 6
Hands-Free Phone (Optional)
About Hands-Free Phone ................................. 7
Connect a Mobile Phone .................................. 7
Receiving a Call ............................................... 8
Hanging up ....................................................... 8
Placing a Call ................................................... 8
Placing a Call by Inputting a Telephone
Number (DIAL INPUT) ............................ 8
Placing a Call by the Telephone Book
(PHONE BOOK) ....................................... 8
Placing a Call by History (RECEIVED
CALLS/DIALED CALLS/MISSED
CALLS) ..................................................... 9
Placing a Call by QUICK CALLS
(QUICK CALLS) ......................................... 9
Placing a Call by SPEED DIAL
(SPEED DIAL) ............................................. 9
Registering a Telephone Book ......................... 9
Bluetooth Audio Function (Optional)
Bluetooth Audio Operation .............................10
Setting Bluetooth Audio Output Interruption
(INT BT AUDIO) ........................................10
Setup
Display Setup Operation ..............................11
GENERAL Setup ........................................12
SYSTEM Setup ...........................................12
Bluetooth Setup ...........................................12
REAR SELECT Setup .................................13
Information
In Case of Difficulty .......................................14
Specifications ..................................................14
Installation and
Connections
Warning .................................................. 15
Caution ................................................... 15
Precautions ........................................... 15
Installation ......................................................16
Attaching the monitor and stand ..................16
Mounting an external Microphone for
Hands-Free Calling ..................................17
Connections ....................................................18
System Example .............................................19
01GB03TMEM740BTTOC.fm
1-EN
ALPINE TME-M740BT_ENCS (EN)
Page 4
01GB00TMEM740BT.book Page 2 Tuesday, January 30, 2007 3:32 PM
Operating Instructions
WARNING
USE THE CORRECT AMPERE RATING WHEN REPLACING
FUSES.
Failure to do so may result in fire or electric shock.
WARNING
This symbol means important instructions.
Failure to heed them can result in serious injury
or death.
INSTALL THE PRODUCT CORRECTLY SO THAT THE DRIVER
CANNOT WATCH TV/VIDEO UNLESS THE VEHICLE IS
STOPPED AND THE EMERGENCY BRAKE IS APPLIED.
It is dangerous for the driver to watch TV/Video while driving a
vehicle. Installing this product incorrectly enables the driver to
watch TV/Video while driving. This may cause a distraction,
preventing the driver from looking ahead, thus causing an accident.
The driver or other people could be severely injured.
DO NOT WATCH VIDEO WHILE DRIVING.
Watching the video may distract the driver from looking ahead of
the vehicle and cause an accident.
DO NOT OPERATE ANY FUNCTION THAT TAKES YOUR
ATTENTION AWAY FROM SAFELY DRIVING YOUR VEHICLE.
Any function that requires your prolonged attention should only be
performed after coming to a complete stop. Always stop the vehicle
in a safe location before performing these functions. Failure to do
so may result in an accident.
KEEP THE VOLUME AT A LEVEL WHERE YOU CAN STILL
HEAR OUTSIDE NOISES WHILE DRIVING.
Excessive volume levels that obscure sounds such as emergency
vehicle sirens or road warning signals (train crossings, etc.) can be
dangerous and may result in an accident. LISTENING AT LOUD
VOLUME LEVELS IN A CAR MAY ALSO CAUSE HEARING
DAMAGE.
MINIMIZE DISPLAY VIEWING WHILE DRIVING.
Viewing the display may distract the driver from looking ahead of
the vehicle and cause an accident.
DO NOT DISASSEMBLE OR ALTER.
Doing so may result in an accident, fire or electric shock.
USE ONLY IN CARS WITH A 12 VOLT NEGATIVE GROUND.
(Check with your dealer if you are not sure.) Failure to do so may
result in fire, etc.
KEEP SMALL OBJECTS SUCH AS BATTERIES OUT OF THE
REACH OF CHILDREN.
Swallowing them may result in serious injury. If swallowed,
consult a physician immediately.
USE THIS PRODUCT FOR MOBILE 12V APPLICATIONS.
Use for other than its designed application may result in fire,
electric shock or other injury.
DO NOT INSTALL THE MONITOR NEAR THE PASSENGER
SEAT AIR BAG.
If the unit is not installed correctly the air bag may not function
correctly and when triggered the air bag may cause the monitor to
spring upwards causing an accident and injuries.
CAUTION
This symbol means important instructions.
Failure to heed them can result in injury or
material property damage.
HALT USE IMMEDIATELY IF A PROBLEM APPEARS.
Failure to do so may cause personal injury or damage to the
product. Return it to your authorized Alpine dealer or the nearest
Alpine Service Centre for repairing.
PRECAUTIONS
Product Cleaning
Use a soft dry cloth for periodic cleaning of the product. For more
severe stains, please dampen the cloth with water only. Anything
else has the chance of dissolving the paint or damaging the plastic.
Temperature
Be sure the temperature inside the vehicle is between +45°C
(+113°F) and 0°C (+32°F) before turning your unit on.
Maintenance
If you have problems, do not attempt to repair the unit yourself.
Return it to your Alpine dealer or the nearest Alpine Service
Station for servicing.
Installation Location
Make sure the TME-M740BT will not be installed in a location
subjected to:
• Direct sun and heat
• High humidity and water
• Excessive dust
• Excessive vibrations
2-EN
01GB04TMEM740BT.fm
ALPINE TME-M740BT_ENCS (EN)
Page 5
01GB00TMEM740BT.book Page 3 Tuesday, January 30, 2007 3:32 PM
• After turning the system off, a slight ghost of the image will
remain temporarily. This is an effect peculiar to LCD technology
and is normal.
• In cold temperature conditions, the screen may lose contrast
temporarily. After a short warm-up period, it will return to
normal.
Operation of some of the functions of this unit is very complex.
Because of this, it was deemed necessary to place these functions
into a special screen. This will restrict operation of these functions
to times when the vehicle is parked. This ensures the focus of the
driver’s attention will be on the road and not on the TME-M740BT.
This has been done for the safety of the driver and passengers.
The setup operation cannot be made if the car is moving. The car
must be parked and the parking brake must be engaged for the
procedure described in the Owner’s Manual to be valid. The
warning “Operation is not allowed while driving,” will be displayed
if any attempts are made to perform these operations while driving.
Getting Started
Location of Controls
DIMMER Sensor
Senses the brightness of the car interior
Volume button
Adjust the volume level by pressing the or button.
Remote Sensor
Point the optional remote control transmitter toward the
remote sensor within a range of 2 m.
SOURCE button
Each time you press the SOURCE button, SOURCE is
switched.
If the button is pressed and held for at least 3 seconds, the
Vehiclehub Pro VPA-B222R’s (optional) power is turned on/
off.
(POWER) button
Turns the power on and off.
If the button is pressed and held for at least 3 seconds, the
Vehiclehub Pro VPA-B222R’s (sold separately) V.SEL is
turned on/off.
Bluetooth Indicator
Lights up when “Setting the Bluetooth Connection
(Bluetooth)” (page 12) is set to ON. Blinks when a handsfree phone is used to receive, place a call or while calling.
Mobile Phone Microphone
If the received signal is not strong, use the supplied external
microphone for hands-free phone operation.
Mobile Phone external Microphone jack
If an external microphone is connected, the internal
microphone cannot be used.
01GB04TMEM740BT.fm
3-EN
ALPINE TME-M740BT_ENCS (EN)
Page 6
01GB00TMEM740BT.book Page 4 Tuesday, January 30, 2007 3:32 PM
Turning Power On or Off
1
Press POWER to turn on the unit.
2
Press POWER to turn off the unit.
• Some operation of the unit cannot be performed while the vehicle is
in motion. In this case, be sure to first stop your vehicle and apply the
parking brake, then perform the operation.
• In low ambient temperature conditions, the display may be dark for a
short period of time immediately after the power is turned on. Once
the LCD has warmed up, the display returns to normal.
• If the voltage of the vehicle's battery power is low, the screen may
blink. This is normal and not a malfunction.
Adjusting the Volume
Adjust the volume level by pressing or .
• If “Change Sound Output (VOLUME CONTROL)” (page 12) is set
to SYSTEM, you can adjust the optional Vehiclehub Pro VPA-B222R
volume by controlling this unit volume.
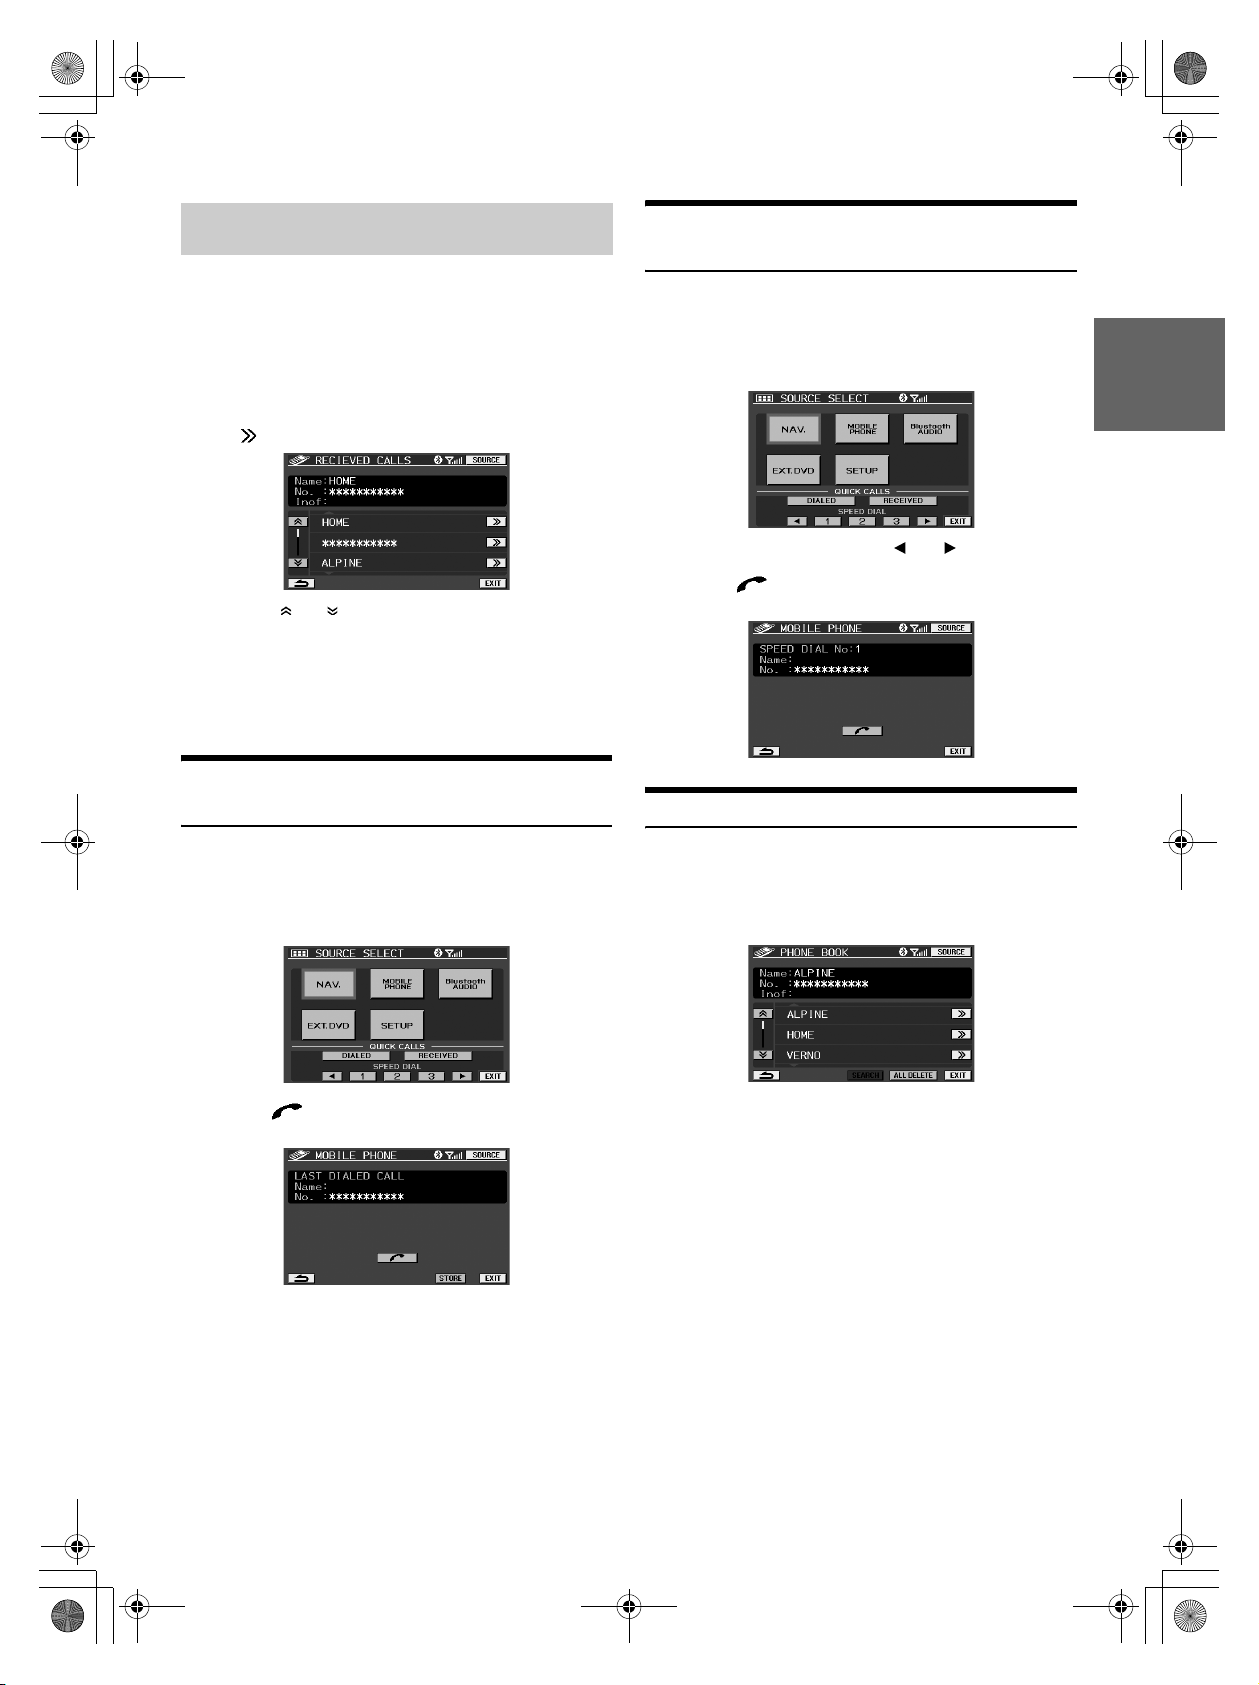
MOBILE PHONE
The MOBILE PHONE screen is displayed.
• For details, refer to “Hands-Free Phone (Optional)” (page 7).
Bluetooth AUDIO
The Bluetooth AUDIO mode screen is displayed.
• For details, refer to “Bluetooth Audio Operation” (page 10).
Switching the Source
1
Press SOURCE.
The source selection screen is displayed.
2
Touch the desired source.
The main source screen is displayed.
Display example for source selection screen
Nav. (Navigation)
The Navigation screen is displayed. If an optional Alpine
Navigation System is connected to the TME-M740BT, the
Navigation screen can be displayed on this unit.
• For navigation operation, refer to the Owner's Manual of the
navigation system.
• If the NAV. is not displayed on the source selection screen, set NAV.
MODE to NAV. by following “Setting the Navigation Mode (NAV.
MODE)” (page 12).
AUX
The external input screen is displayed.
Screen Example:EXT. DVD
• The name which is given as the source name in “External Input
Name Setting (AUX NAME)” on page 12 is displayed.
• For details, refer to “DVD Video Player Operation (Optional)”
(page 5).
• For details, refer to “TUE-T200DVB Operation (Optional)”
(page 5).
• For details, refer to “TV Operation (Optional)” (page 6).
SETUP
The SETUP selection screen is displayed.
• For details, refer to “Setup” (page 10).
4-EN
01GB05TMEM740BT.fm
ALPINE TME-M740BT_ENCS (EN)
Page 7
01GB00TMEM740BT.book Page 5 Tuesday, January 30, 2007 3:32 PM
Auxiliary Device
Operation
If an ALPINE device is connected to AUX, the device is controllable
from the unit. The following explains how to operate representative
devices.
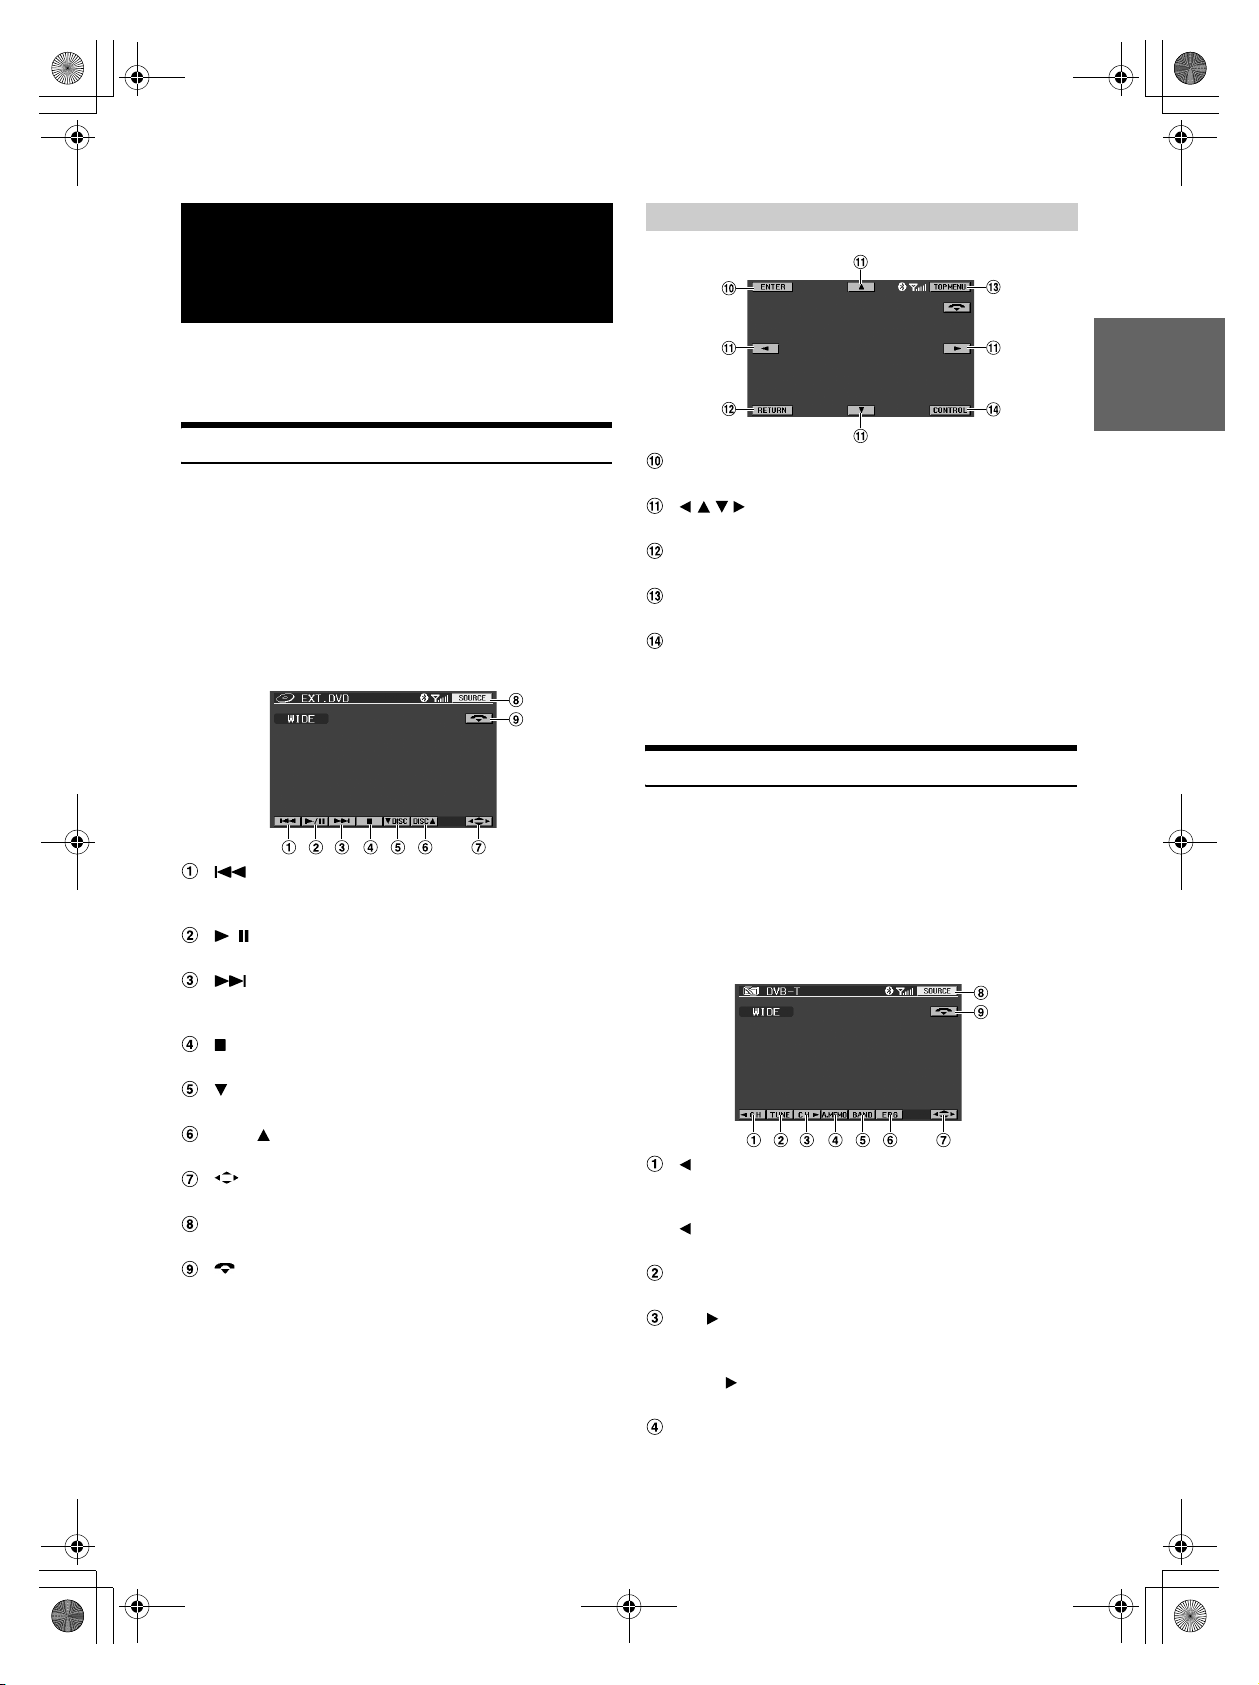
DVD Video Player Operation (Optional)
Operable when optional DVD Video Player
(DVA-5210/DVE-5207/DHA-S680E) is connected.
When EXT. DVD is selected in “External Input Name Setting (AUX
NAME)” (page 12), the source is displayed in SOURCE selection
screen.
Touch the display panel to display the operation screen.
• The operation screen changes to the visual screen in the DVD mode
for 5 seconds after an operation has been performed. Touch the
display panel to display the operation screen again.
DVD Menu Operations
ENTER
Enters the selected item.
Moves an item displayed on the screen.
RETURN
Returns to the previous screen.
TOP MENU
The DVD top menu screen is displayed.
CONTROL
Displays the main operation screen.
• Operation may differ depending on the connected device. Refer to
owner's manual of the connected device.
TUE-T200DVB Operation (Optional)
Finds the beginning of track/chapter. Touching and holding
plays fast- reverse.
/
Pauses and plays back.
Finds the beginning of a track/chapter. Touching and
holding plays fast- forward.
PRE- STOP/STOP
DISC
Switch DISC (DHA-S680E only)
DISC
Switch DISC (DHA-S680E only)
Displays the DVD menu operation screen.
SOURCE
Displays the source selection screen.
Hangs up the mobile phone connection. The indication is
displayed only during a call.
Operable when optional TUE-T200DVB is connected.
When DVB-T is selected in “External Input Name Setting (AUX
NAME)” (page 12), the source is displayed in SOURCE selection
screen.
Touch the display panel to display the operation screen.
• The operation screen changes to the visual screen in the DVB-T mode
for 5 seconds after an operation has been performed. Touch the
display panel to display the operation screen again.
CH
Decreases channels one by one. Touching and holding
changes continuously.
P. DN
Decreases preset channels.
TUNE
Changes the tuning way (channel and preset channel).
CH
Increases channels one by one. Touching and holding
changes continuously.
P. UP
Increases preset channels.
A. MEMO
Memorizes automatically.
01GB05TMEM740BT.fm
5-EN
ALPINE TME-M740BT_ENCS (EN)
Page 8
01GB00TMEM740BT.book Page 6 Tuesday, January 30, 2007 3:32 PM
BAND
Switches source of digital TV.
EPG
Displays EPG screen.
Displays the menu operation screen.
SOURCE
Displays the source selection screen.
Hangs up the mobile phone connection. The indication is
displayed only during a call.
Menu Operations
ENTER
Enters the selected item.
Moves an item displayed on the screen.
RETURN
Returns to the previous screen.
TOP MENU
Displays the menu screen.
CONTROL
Displays the main operation screen.
• For detail, refer to the Owner's Manual of the TUE-T200DVB sold
separately.
TV Operation (Optional)
Operable when optional TV Tuner is connected.
When TV is selected in “External Input Name Setting (AUX NAME)”
(page 12), the source is displayed in SOURCE selection screen.
Touch the display panel to display the operation screen.
• The operation screen changes to the visual screen in the TV mode for
5 seconds after an operation has been performed. Touch the display
panel to display the operation screen again.
CH
Decreases channels one by one.
P. DN
Decreases the preset numbers one by one.
TUNE
Changes the tuning way (manual mode, auto seek mode
and preset number).
CH
Increases channels one by one.
P. UP
Increases the preset numbers one by one.
A. MEMO
Memorizes automatically.
BAND
Changes the band.
SOURCE
Displays the source selection screen.
6-EN
Hangs up the mobile phone connection. The indication is
displayed only during a call.
• Operation may differ depending on the connected device. Refer to
owner's manual of the connected device.
01GB05TMEM740BT.fm
ALPINE TME-M740BT_ENCS (EN)
Page 9
01GB00TMEM740BT.book Page 7 Tuesday, January 30, 2007 3:32 PM
Hands-Free Phone
(Optional)
About Hands-Free Phone
The unit is compatible with Bluetooth® international standard wireless
communication technology. You can place a hands-free call* using a
Bluetooth compatible mobile phone.
* To make a hands-free call, your mobile phone needs to conform to
HPF (Hands-Free Profile).
• Avoid performing a hands-free call in a city where traffic is
congested, or in the narrow street.
• When you place a call, speak loudly and clearly.
• Shut the windows before calling.
• If both persons use a hands-free call to each other, or you make a call
in a noisy location, you may have difficulty hearing the other
person’s voice, or transmitting to the other person.
• Certain voices may sound unnatural, depending on the person using
the telephone, or on telephone line conditions.
• Depending on the mobile phone, you may not be able to use a handsfree phone.
Connect a Mobile Phone
If a mobile phone is connected for the first time, register a mobile phone
by doing the following.
Registration
Bluetooth Setting
Refer to “Setting the Bluetooth Connection (Bluetooth)”
(page 12).
Refer to “Sending Name Information of the Unit (VISIBLE
MODE)” (page 13).
➧
Searching for a Mobile Phone
Refer to “Searching for Connectable Bluetooth Device
(Bluetooth Search) (SEARCH DEVICE)” (page 12).
➧
Selection for a Mobile Phone
Touch [PAIR] of the mobile phone to be registered.
➧
Inputting a pass code
Input a 4-digit to 10-digit number.
* When a pass code is input, enter the number within 30 seconds
to ensure security.
➧
Input a pass code on the Mobile Phone.
Input the same pass code number (4-digit to 10-digit) as the
unit.
* When a pass code is input, enter the number within 30 seconds
to ensure security
➧
Registration is complete.
➧
Connection
Connection for a Mobile Phone
Refer to “Setting the registered Bluetooth Device (PAIRED
DEVICE)” (page 13).
➧
Touch [CONNECT] of the mobile phone to be registered.
Selection for a Mobile Phone
➧
The connection is made.
• The Bluetooth setting is required for a mobile phone. See the
Owner’s Manual of the mobile phone.
• To input a pass code in the mobile phone, see the Owner’s Manual of
the mobile phone.
• Perform the operations observing the screen of the mobile phone
until the connection has completed.
01GB05TMEM740BT.fm
7-EN
ALPINE TME-M740BT_ENCS (EN)
Page 10
01GB00TMEM740BT.book Page 8 Tuesday, January 30, 2007 3:32 PM
• If ON is set in “Setting a Connection automatically (AUTO
CONNECT)” (page 13), automatic connection of the previously
connected mobile phone will start when power is turned on.
• If you previously registered a mobile phone in the unit, select the
mobile phone you want from the registration device setting list. Refer
to “Setting the registered Bluetooth Device (PAIRED DEVICE)”
(page 13).
Receiving a Call
When a call is received, a received call sound rings, and the received
call is announced in the display.
Touch [ ].
The call starts.
• If ON is set in “Receiving a Received Call automatically (AUTO
ANSWER)” (page 13), an incoming call is answered automatically 5
seconds after it is received.
• You can set whether full-screen is displayed while a call is placed.
For details, refer to “Setting the Screen to be Displayed while
Calling (CALLING DISPLAY)” (page 11).
Hanging up
Touch [ ].
The call finishes.
3
Touch [ ].
The telephone is placing a call.
• If you input a telephone number and place a call, this screen is not
displayed.
• If [STORE] is touched, you can register in SPEED DIAL.
• Depending on the mobile phone, some functions may not work.
Placing a Call by Inputting a Telephone
Number (DIAL INPUT)
Input the destination number, starting with the area
code, and touch [DONE].
• If [DELETE] is touched, delete a character one by one. If [ALL
DEL.] is touched, all characters are deleted.
• If [STORE] is touched, you can register in SPEED DIAL.
Placing a Call by the Telephone Book
(PHONE BOOK)
You can select a person and place a call from a telephone book list
downloadable to the unit from a mobile phone.
Placing a Call
1
Touch [MOBILE PHONE] on the SOURCE SELECT
screen.
The MOBILE PHONE screen is displayed.
2
Select the desired method.
Touch [ ] of the person to whom you want to place a
call.
• If you touch [ ] or [ ], you can change the list page.
• If [ALL DELETE] is touched, you can delete all the telephone book.
• If you connect a mobile phone to another one, a list of received calls,
dialed calls and missed calls previously recorded in your connected
mobile phone are automatically deleted.
8-EN
01GB05TMEM740BT.fm
ALPINE TME-M740BT_ENCS (EN)
Page 11
01GB00TMEM740BT.book Page 9 Tuesday, January 30, 2007 3:32 PM
Placing a Call by History (RECEIVED
CALLS/DIALED CALLS/MISSED CALLS)
You can place a call by selecting a person from a list of received
calls, dialed calls or missed calls.
RECEIVED CALLS:A telephone number list of previously received
calls.
DIALED CALLS: A telephone number list of previously dialed calls.
MISSED CALLS: A telephone number list of persons whose calls
you received but missed.
Touch [ ] of the person you wish to call.
• If you touch [ ] or [ ], you can change the list page.
• A maximum of 20 numbers can be stored in each call history. If a call
history exceeds 20, the call history will be deleted in order from the
oldest.
• If you connect a mobile phone to another one, a list of received calls,
dialed calls and missed calls previously recorded in your connected
mobile phone are automatically deleted.
Placing a Call by QUICK CALLS (QUICK
CALLS)
Placing a Call by SPEED DIAL (SPEED
DIAL)
You can register up to 9 telephone numbers you frequently call in
SPEED DIAL for easy dialing any time.
1
Touch the number you want to call by SPEED DIAL
on the SOURCE SELECT screen.
• You can scroll a number by touching [ ] or [ ].
2
Touch [ ].
The call is placed.
Registering a Telephone Book
You can place a call quickly to a telephone number you last dialed or
received.
1
Touch [DIALED] or [RECEIVED] of QUICK CALLS on
the SOURCE SELECT screen.
2
Touch [ ].
The call is placed.
• If [STORE] is touched, you can register in SPEED DIAL.
You can place a call by registering the telephone book registered in a
mobile phone to the unit.
Touch [SEARCH] on the telephone book screen.
Registering of the telephone book starts.
• The maximum number that can be registered in the telephone book of
the unit is 205.
• You may need to send a telephone book from another mobile phone if
this is not possible.
• If a telephone book is rewritten, touch [ALL DELETE], and delete
the existing telephone book, then register the telephone book again.
• To place a call by a telephone book, refer to “Placing a Call by the
Telephone Book (PHONE BOOK)” (page 8).
01GB05TMEM740BT.fm
9-EN
ALPINE TME-M740BT_ENCS (EN)
Page 12
01GB00TMEM740BT.book Page 10 Tuesday, January 30, 2007 3:32 PM
Bluetooth Audio
Function
(Optional)
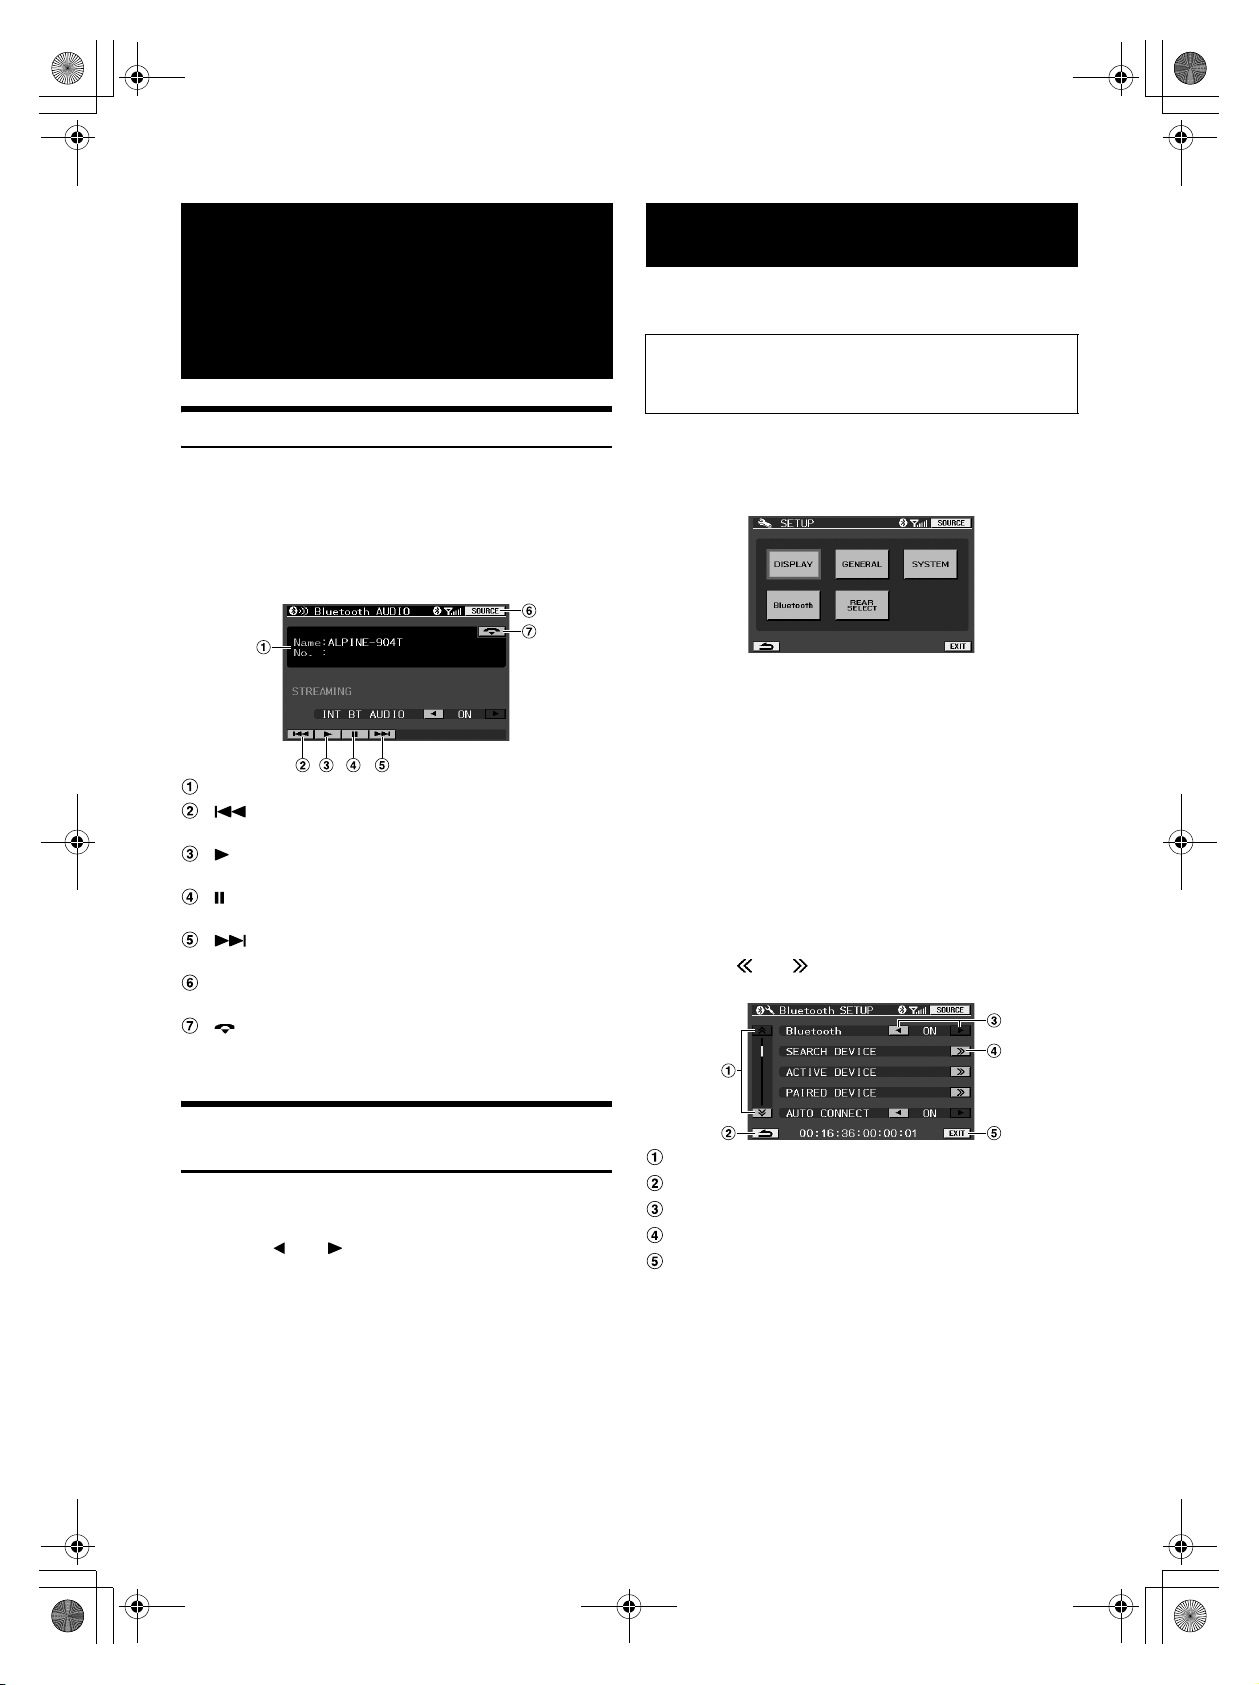
Bluetooth Audio Operation
Audio information of a Bluetooth compatible mobile phone, portable
player, etc., is by wireless controllable/playable* from the unit.
Refer to “Connect a Mobile Phone” (page 7) to connect Bluetooth
Audio devices.
* To play back audio, a mobile phone or portable player that conforms
to A2DP (Advanced Audio Distribution Profile) is required. Video
playback is not supported.
Displays the device name
Finds the beginning of the current track.
Playback
Pause
Finds the beginning of the next track.
SOURCE
Displays the source selection screen.
Setup
You can flexibly customize the unit to suit your own preferences and
usage.
Use steps 1 to 4 to select one of the SETUP modes to modify. See
the applicable section below for details about the selected
SETUP item.
1
Touch [SETUP] on the source select screen.
The SETUP selection screen is displayed.
2
Touch the desired setup item.
DISPLAY
DIMMER/DIMMER HIGH/DIMMER LOW/CALLING DISPLAY/
DISPLAY MODE/SCREEN ALIGNMENT/VISUAL EQ
GENERAL
BEEP/LED BRIGHTNESS/VOLUME CONTROL
SYSTEM
INT MUTE/AUX NAME/NAV. MODE/CAMERA INT
Bluetooth
Bluetooth/ SEARCH DEVICE/ACTIVE DEVICE/PAIRED DEVICE/
AUTO CONNECT/VISIABLE MODE/AUTO ANSWER/REFUSED
CALL/PHONEBOOK/MIC GAIN
REAR SELECT
REAR SELECT
3
Touch [ ] or [ ], etc., of the desired item to
change its setting.
Hangs up a hands-free phone connection. The indicator is
displayed while the call is placed.
Setting Bluetooth Audio Output
Interruption (INT BT AUDIO)
The setting is made when Bluetooth Audio sound is output from an
external unit (Ai-NET compatible head unit or rear monitor, etc.).
1
Touch [ ] or [ ] of INT BT AUDIO to switch ON/
OFF.
ON / OFF (Initial Setting)
ON: ON is set when Bluetooth Audio sound is output from the
Audio Output Connector (AUX OUT) via Ai-NET to the Ai-NET
compatible head unit (DVA-9861E, etc.).
OFF: OFF is set when Bluetooth Audio sound is output from the
Audio Output Connector (AUX OUT) to the rear monitor.
• If audio is interrupted by a hands-free call or navigation guidance, the
hands-free call or navigation guidance will interrupt having priority.
• The “INT BT AUDIO” setting can be made only when the Bluetooth
audio screen is displayed. If you change to another source, the
setting cannot be made.
10-EN
01GB05TMEM740BT.fm
Switch page
Returns to the previous display.
Change the setting item.
Displays the detailed setting screen.
Exits the setting screen.
4
Touch [EXIT].
ALPINE TME-M740BT_ENCS (EN)
Page 13
01GB00TMEM740BT.book Page 11 Tuesday, January 30, 2007 3:32 PM
Display Setup Operation
Setting the Brightness of the Backlighting (DIMMER)
HIGH / LOW / AUTO (Initial Setting)
Backlighting is provided by a fluorescent light built into the liquid
crystal panel. The illumination control adjusts the brightness of the
backlighting based on the car ambient lighting for easier viewing.
HIGH: Sets the brightness of the screen to the same brightness that
was set in DIMMER HIGH in “Adjusting the Maximum Level of
Backlight (DIMMER HIGH)” (page 11).
LOW: Sets the brightness of the screen to the same brightness that
was set in DIMMER LOW in “Adjusting the Minimum Level of
Backlight (DIMMER LOW)” (page 11).
AUTO: Adjust the brightness of the background illumination of the
monitor automatically to the brightness of the car interior.
Adjusting the Maximum Level of Backlight
(DIMMER HIGH)
MIN(16) to MAX(31) (Initial Setting: MIN)
If HIGH is set in “Setting the Brightness of the Backlighting
(DIMMER)” (page 11), you can adjust the brightness of the
backlighting. This function can be used, for instance, to change
the screen brightness while traveling at night.
Adjusting the Minimum Level of Backlight
(DIMMER LOW)
MIN(0) to MAX(15) (Initial Setting: MIN)
If LOW is set in “Setting the Brightness of the Backlighting
(DIMMER)” (page 11), you can adjust the brightness of the
backlighting. This function can be used, for instance, to change
the screen brightness while traveling at night.
Setting the Screen to be Displayed while Calling
(CALLING DISPLAY)
TEL.(Initial Setting) / MAIN
While a call is placed by a hands-free phone, you can set whether
the telephone screen or the navigation screen, etc., is displayed.
TEL.: Displays the telephone screen.
MAIN: Displays the current source screen (navigation, etc.).
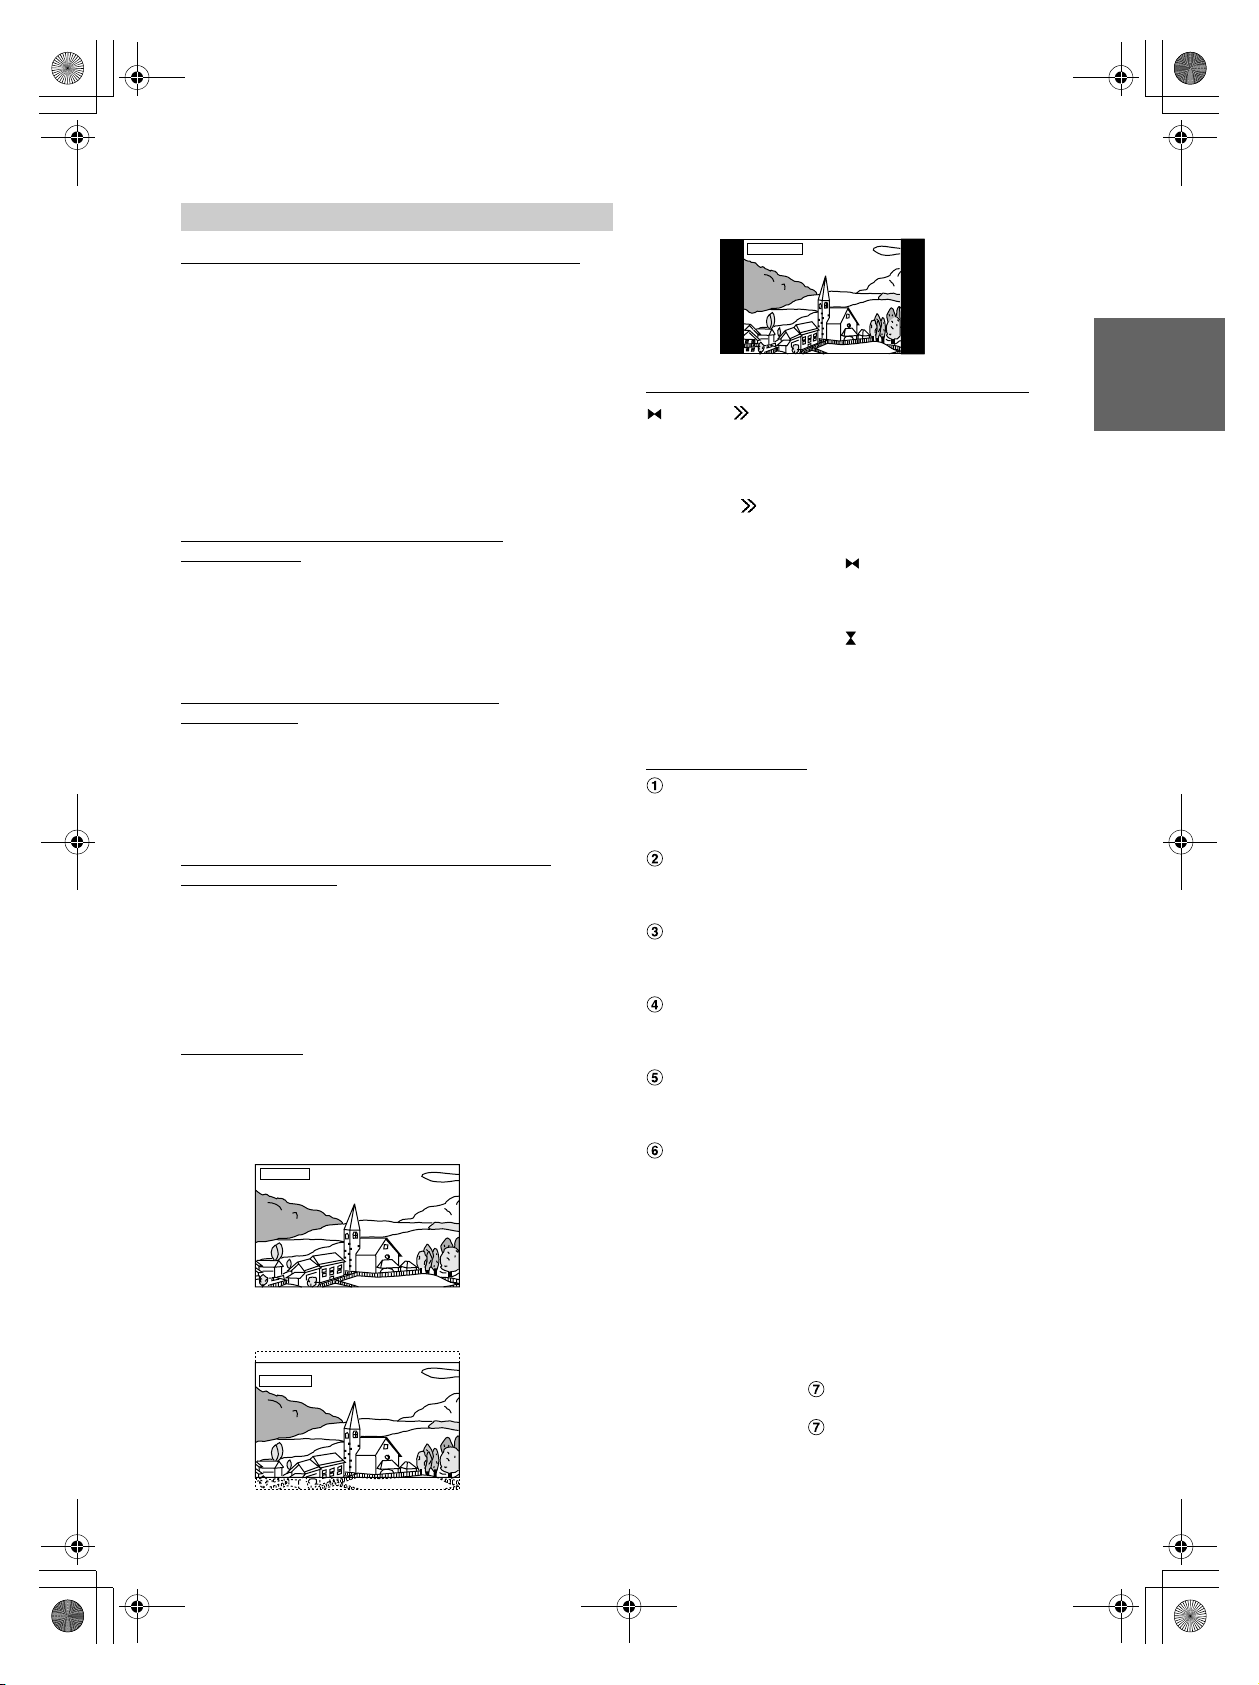
DISPLAY MODE
WIDE (Initial Setting) / CINEMA / NORMAL
WIDE: The monitor displays a normal picture wider to fit in a
wide-screen monitor by evenly stretching out the picture
horizontally.
WIDE
NORMAL: The monitor displays a normal picture at the centre of the
screen with a vertical black band at each side.
NORMAL
Adjusting the Touch Panel (SCREEN ALIGNMENT)
(RESET) / (SETUP)
Adjustment becomes necessary when the display position on
the LCD and the touch position on the touch panel do not match.
1
Touch [ ] of SCREEN ALIGNMENT.
The adjustment screen appears.
2
Accurately touch the [ ] mark provided in the lower
left corner of the screen.
The screen changes to the adjustment screen.
3
Accurately touch the [ ] mark provided in the upper
right corner of the screen.
This completes adjustment, and returns to the DISPLAY
setup mode screen.
• If the setting is cancelled half way, press SOURCE.
VISUAL EQ™ Setting
BRIGHT
MIN(-15) to MAX(+15) (Initial Setting: 0)
COLOR
MIN(-15) to MAX(+15) (Initial Setting: 0)
TINT
G MAX(G15) to R MAX(R15) (Initial Setting: 0)
CONTRAST
MIN(-15) to MAX(+15) (Initial Setting: 0)
SHARP
MIN(-15) to MAX(+15) (Initial Setting: 0)
VISUAL EQ MODE
OFF(Initial Setting) / NIGHT M / SOFT / SHARP / CONTRAST / P-1
/ P-2
CINEMA: The monitor displays a normal picture by stretching out
the picture vertically. This mode is good for displaying a
cinema type picture at the 16 : 9 ratio.
CINEMA
01GB05TMEM740BT.fm
OFF : Initial Setting
NIGHT M: Suitable for movies in which dark scenes frequently
appear.
SOFT: Suitable for CGs and animated films.
SHARP: Suitable for old movies where images are not clearly
shown.
CONTRAST: Suitable for recent movies.
P-1: Recalls the VISUAL EQ mode being stored on preset
No.P-1 from " USER MEMORY" (page 12).
P-2: Recalls the VISUAL EQ mode being saved on preset
No.P-2 from " USER MEMORY" (page 12).
11-EN
ALPINE TME-M740BT_ENCS (EN)
Page 14
01GB00TMEM740BT.book Page 12 Tuesday, January 30, 2007 3:32 PM
USER MEMORY
P-1 (Initial Setting) / P-2
You can store the settings made for “ BRIGH, COLOR,
TINT, CONTRAST and SHARP.”
After adjusting BRIGH, COLOR, TINT,
CONTRAST and SHARP, select the preset number (P-
1) or (P-2) and store it by touching [WRITE].
• You can recall the VISUAL EQ mode stored here from P-1 or P-2 of
“ VISUAL EQ MODE” (page 11).
GENERAL Setup
Sound (Beep) Guide Function (BEEP)
ON (Initial Setting) / OFF
ON: Activate the Sound Guide mode.
OFF: Deactivate the Sound Guide mode. The sound guide beep will
not be produced when a button on the unit is pressed.
Adjusting the Brightness of the LED (LED BRIGHTNESS)
HIGH / NORMAL (Initial Setting) / LOW / OFF
You can set LED brightness (POWER indicator, etc.).
HIGH: Makes LED brighter.
NORMAL: Normal LED brightness.
LOW: Makes LED darker.
OFF: Turns LED off.
Change Sound Output (VOLUME CONTROL)
MONITOR (Initial Setting) / SYSTEM
If the unit is connected to the Vehiclehub Pro (VPA-B222R), set to
ON.
MONITOR: Outputs sound through the built-in speakers.
SYSTEM: Volume is adjustable from this unit if compatible devices
are connected to the VPA-B222R.
External Input Name Setting (AUX NAME)
OFF / DVB-T / TV / DVD HU / EXT. DVD / GAME / AUX (Initial
Setting)
Select the name from the following list, to be used for the product
using the external input mode. This will apply to the touch switch
name at source selection time and the source name during
playback change.
Setting the Navigation Mode (NAV. MODE)
NAV. (Initial Setting) / EXT. / OFF
OFF: Navigation source is not displayed. The settings related to the
navigation can not be changed from this unit.
NAV.:Navigation source is displayed.
EXT.: The source name is displayed as an external RGB input source
(Vehicle Hub).
Setting of the Rear Camera (CAMERA INT)
ON (Initial Setting) / OFF
When the rear camera is connected, rear pictures are output on
the screen.
OFF: The CAMERA source is not displayed on the SOURCE selection
screen.
ON: Even if the shift lever is not set to reverse (R), the rear pictures
are output by selecting the CAMERA source.
• By shifting to reverse (R), the rear pictures are output. This function
is effective when the reverse wire is properly connected.
Bluetooth Setup
Setting the Bluetooth Connection (Bluetooth)
ON (Initial Setting) / OFF
The setting is made when a hands-free phone or Bluetooth
Audio is used. Be sure to set to ON.
ON: The Bluetooth function can be used.
OFF: The Bluetooth function cannot be used.
SYSTEM Setup
Hands-Free Phone Interruption Setting (INT MUTE)
ON (Initial Setting) / OFF
You can set a hands-free phone call to interrupt the head unit
(DVA-9861E, etc.).
ON: The received call or placed call interrupts the head unit. Audio
of the head unit is muted at this time.
OFF: The received call or placed call does not interrupt the head unit.
• IN-INT cable connected devices should be connected to the OUT-INT
cable of the unit.
* To make voice interruption of the mobile phone to the head unit,
perform the following setting at the same time. If the settings are not
performed, voice cannot be interrupted to the unit.
Set to ON in “Making effective use of Refused Call (REFUSED
CALL)” (page 13) and Bluetooth AUDIO in “REAR SELECT Setup”
(page 13).
12-EN
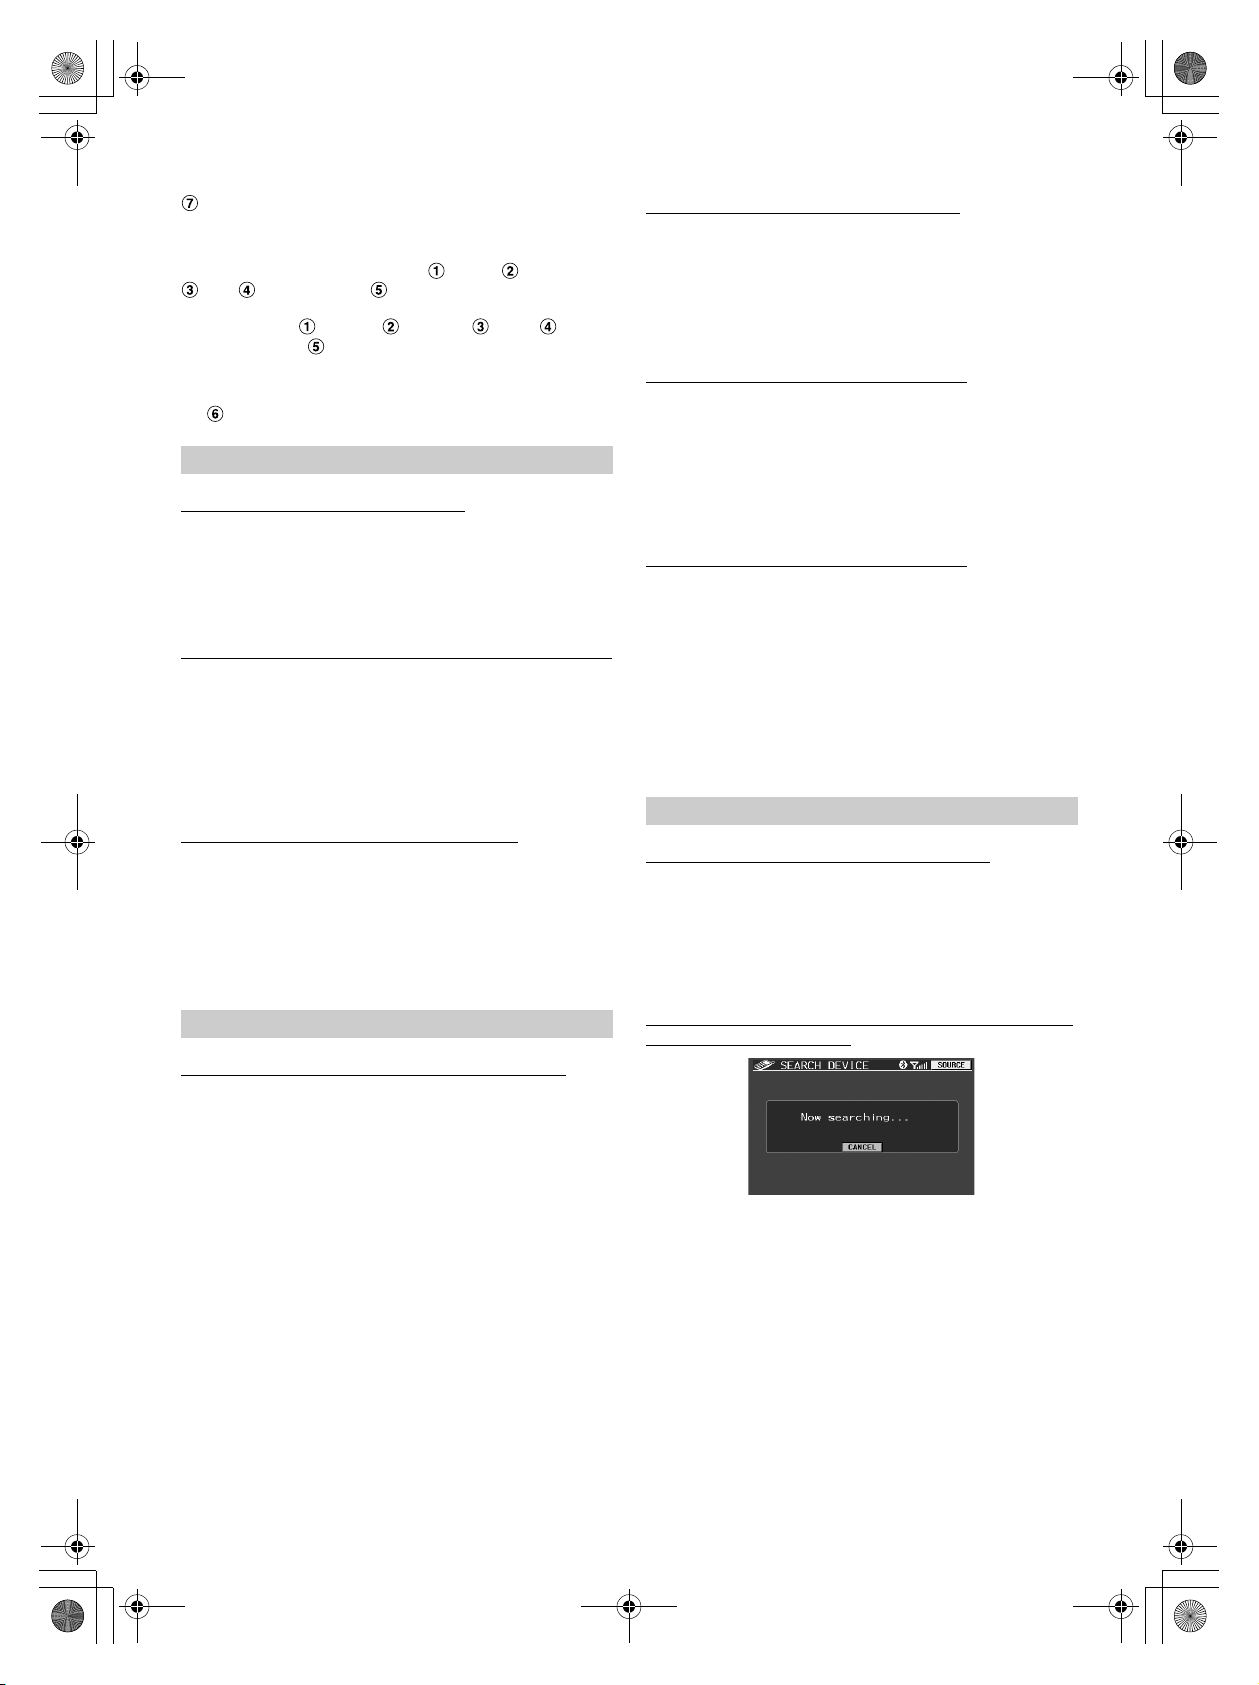
Searching for Connectable Bluetooth Device (Bluetooth
Search) (SEARCH DEVICE)
• If [CANCEL] is touched, search of the Bluetooth device is
terminated.
• When a search is complete, a device selection list is displayed. If you
touch [PAIR] of a Bluetooth device to be connected, the pass code
input screen is displayed. Input the same pass code on the screen for
the unit and the Bluetooth device. Refer to “Connect a Mobile
Phone” (page 7).
01GB05TMEM740BT.fm
ALPINE TME-M740BT_ENCS (EN)
Page 15

01GB00TMEM740BT.book Page 13 Tuesday, January 30, 2007 3:32 PM
Observing Bluetooth Device Information (ACTIVE
DEVICE)
You can check the details of a currently connected Bluetooth
device.
• If you connect a mobile phone to another one, be sure to touch
[DISCONNECT], and cancel the currently connected mobile phone.
Setting the registered Bluetooth Device (PAIRED
DEVICE)
Previously up to 8 connected mobile phones to the unit were
registered. Select the one you wish to use.
• If [CONNECT] is touched, the Bluetooth device is connected.
• If [DELETE] is touched, the Bluetooth device is deleted. If [ALL
DELETE] is touched, all Bluetooth devices are deleted.
• If a Bluetooth device which is not registered in the list is connected,
search for a Bluetooth device by touching [SEARCH].
Setting a Connection automatically (AUTO CONNECT)
ON (Initial Setting) / OFF
The setting can be made whether previously connected mobile
phone is automatically recognized and connected or not.
ON: The previously connected mobile phone will be automatically
connected.
OFF: Select a mobile phone by using [SEARCH DEVICE].
• Depending on the mobile phone, it may require setting. Refer to the
Owner's Manual of the mobile phone.
Sending Name Information of the Unit (VISIBLE MODE)
ON (Initial Setting) / OFF
The setting can be made whether unit name information is sent
to the Bluetooth device (mobile phone, etc.) or not.
ON: Name information of the unit (TME-M740BT) is sent to the
Bluetooth device.
OFF: Name information of the unit is not sent to the Bluetooth device.
Receiving a Received Call automatically (AUTO
ANSWER)
ON / OFF (Initial Setting)
The setting can be made whether the call is automatically
received or not when a call is received.
ON: When receiving a call, you can automatically call after approx. 5
seconds.
OFF: When receiving a call, the call will not be automatically
received. Receive the call by touching [ ].
Making effective use of Refused Call (REFUSED CALL)
ON / OFF (Initial Setting)
If you do not wish to accept a received call while driving, you
can set to not receive that call by hands-free operation.
ON: When a call is received, nothing appears in the display, and you
can neither receive the call by hands-free operation, or
automatically receive it.
OFF: You can receive a call by hands-free operation.
• If “REFUSED CALL” is set to ON when a call is received, a mobile
phone will still be received.
Setting the Telephone Book to be used (PHONEBOOK)
UNIT (Initial Setting) / CARD
You can set whether to use a mobile phone or SIM card from
which to download a telephone book to the unit.
UNIT: The telephone book of a mobile phone is used.
CARD: The telephone book of a SIM card, etc., is used.
Setting Volume of the Call (MIC GAIN)
MIN(1) to MAX(7) (Initial Setting:5)
The volume of a call can be set at one of 7 levels.
REAR SELECT Setup
Rear Monitor Select Function
AUX* (Initial Setting) / Bluetooth AUDIO / OFF
If another monitor (Rear) is connected to the unit, image/audio of
the rear monitor can be changed from the unit, so you can enjoy
separate image/audio in the rear seats.
* The name which is given as the source name in “External Input
Name Setting (AUX NAME)” on page 12 is displayed.
You cannot control from the rear monitor.
Setting Output of the Navigation Guidance Interruption
(INT NAV. GUIDE)
ON / OFF (Initial Setting)
When a navigation guidance signal is sent to the rear output
(AUX OUT), you can send the navigation guidance interruption
to the rear output.
ON: When the setting is made other than OFF in “REAR SELECT
Setup,” the navigation guidance interruption will be sent to rear
output (AUX OUT).
OFF: The navigation guidance interruption cannot be sent to rear
output (AUX OUT), regardless of the setting in “REAR SELECT
Setup.”
01GB05TMEM740BT.fm
• When OFF is set in “REAR SELECT Setup,” the navigation guidance
interruption will not be sent to the rear output (AUX OUT), even if
INT NAV. GUIDE is set to ON.
• If a hands-free call and navigation guidance interrupt at the same
time, the hands-free call will take priority.
13-EN
ALPINE TME-M740BT_ENCS (EN)
Page 16

01GB00TMEM740BT.book Page 14 Tuesday, January 30, 2007 3:32 PM
Information
In Case of Difficulty
If you encounter a problem, please turn the power off, then on again.
If the unit is still not functioning normally, please review the items
in the following checklist. This guide will help you isolate the
problem if the unit is at fault. Otherwise, make sure the rest of your
system is properly connected, or then consult your authorized
Alpine dealer.
Basic
No function or display.
• Vehicle’s ignition is off.
- If connected according to the instructions, the unit will not
operate with the vehicle’s ignition off.
• Improper power lead connections.
- Check power lead connections.
•Blown fuse.
- Check the fuse on the battery lead of the unit; replace with the
proper value if necessary.
No sound or unnatural sound.
• Connections are not properly or securely made.
- Check the connections and firmly connect.
Screen not displayed.
• Brightness control is set at the minimum position.
- Adjust the Brightness control.
• Temperature in the vehicle is too low.
- Increase the vehicle’s interior temperature to operation
temperature range.
• Connections to the DVD, navigation system are not securely
made.
- Check the connections and firmly connect.
Unclear or noisy display.
• Fluorescent plate is worn out.
- Replace the fluorescent plate.
Navigation system inoperative.
• Connections to the navigation system are incorrect.
- Check the connections with the navigation system and connect
the cables correctly and firmly.
Unclear picture display.
• Fluorescent tube is exhausted.
- Replace the fluorescent tube*.
* The fluorescent tube replacement is not free of charge even within the
warranty period, for the tube is an article of consumption.
Unit does not operate.
• Monitor’s power is not turned on.
- Turn on the monitor’s power.
No picture is produced.
• Monitor’s mode is not switched to the mode you want to see.
- Switch to the mode you want to see.
• Monitor’s parking brake lead is not connected.
- Connect the monitor’s parking brake lead and set the parking
brake.
(For details, refer to the monitor’s instructions.)
• Monitor’s parking brake is not set.
- Connect the monitor’s parking brake lead and set the parking
brake.
(For details, refer to the monitor’s instructions.)
Picture is unclear or noisy.
• Vehicle’s battery power is weak.
- Check the battery power and wiring.
(The unit may malfunction if the battery power is under 11
volts with a load applied.)
• Monitor’s fluorescent tube is worn.
- Replace the monitor’s fluorescent tube.
Spots or dotted lines/stripes appear.
• Caused by neon signs, high-voltage power lines, CB transmitter,
other vehicle's ignition plugs, etc.
- Change the location of your vehicle.
Hands-free phone voice does not interrupt to the head
unit.
• Interruption is not correctly set.
- Set INT MUTE to ON (page 12).
- Set REFUSED CALL to OFF (page 13).
- Set REAR SELECT to Bluetooth AUDIO (page 13).
• Interruption on the head unit is not correctly set.
- Set INT MUTE to OFF (refer to the Owner's Manual of the
head unit).
Specifications
MONITOR SECTION
Screen Size 6.95-type
LCD Type Transparent type TN LCD
Operation System TFT active matrix
Number of Picture Elements 1,152,000 pcs.
Effective Number of Picture Elements
99.99% or more
Illumination System Cold cathode fluorescent tube
GENERAL
Power Requirement 14.4 V DC
(11–16 V allowable)
Weight (Monitor Section) 283 g
(10 oz)
CHASSIS SIZE (Monitor section)
Width 178 mm (7")
Height 100 mm (3-15/16")
Depth 36 mm (1-7/16")
• Due to continuous product improvement, specifications and design
are subject to change without notice.
• The LCD panel is manufactured using an extremely high precision
manufacturing technology. Its effective pixel ratio is over 99.99%.
This means that there is a possibility that 0.01% of the pixels could
be either always ON or OFF.
14-EN
01GB06TMEM740BT.fm
ALPINE TME-M740BT_ENCS (EN)
Page 17

01GB00TMEM740BT.book Page 15 Tuesday, January 30, 2007 3:32 PM
Installation and Connections
Before installing or connecting the unit, please read the
following and pages 2 to 3 of this manual thoroughly for
proper use.
Warning
MAKE THE CORRECT CONNECTIONS
Failure to make the proper connections may result in fire or product
damage.
USE ONLY IN CARS WITH A 12 VOLT NEGATIVE GROUND.
(Check with your dealer if you are not sure.) Failure to do so may
result in fire, etc.
BEFORE WIRING, DISCONNECT THE CABLE FROM THE
NEGATIVE BATTERY TERMINAL.
Failure to do so may result in electric shock or injury due to
electrical shorts.
DO NOT ALLOW CABLES TO BECOME ENTANGLED IN
SURROUNDING OBJECTS.
Arrange wiring and cables in compliance with the manual to
prevent obstructions when driving. Cables or wiring that obstruct or
hang up on places such as the steering wheel, shift lever, brake
pedals, etc. can be extremely hazardous.
DO NOT SPLICE INTO ELECTRICAL CABLES.
Never cut away cable insulation to supply power to other
equipment. Doing so will exceed the current carrying capacity of
the wire and result in fire or electric shock.
DO NOT DAMAGE PIPE OR WIRING WHEN DRILLING
HOLES.
When drilling holes in the chassis for installation, take precautions
so as not to contact, damage or obstruct pipes, fuel lines, tanks or
electrical wiring. Failure to take such precautions may result in fire.
DO NOT USE BOLTS OR NUTS IN THE BRAKE OR STEERING
SYSTEMS TO MAKE GROUND CONNECTIONS.
Bolts or nuts used for the brake or steering systems (or any other
safety-related system), or tanks should NEVER be used for
installations or ground connections. Using such parts could disable
control of the vehicle and cause fire etc.
KEEP SMALL OBJECTS SUCH AS BOLTS OR SCREWS OUT
OF THE REACH OF CHILDREN.
Swallowing them may result in serious injury. If swallowed,
consult a physician immediately.
DO NOT INSTALL IN LOCATIONS WHICH MIGHT HINDER
VEHICLE OPERATION, SUCH AS THE STEERING WHEEL OR
SHIFT LEVER.
Doing so may obstruct forward vision or hamper movement etc.
and results in serious accident.
Caution
HAVE THE WIRING AND INSTALLATION DONE BY EXPERTS.
The wiring and installation of this unit requires special technical
skill and experience. To ensure safety, always contact the dealer
where you purchased this product to have the work done.
USE SPECIFIED ACCESSORY PARTS AND INSTALL THEM
SECURELY.
Be sure to use only the specified accessory parts. Use of other than
designated parts may damage this unit internally or may not
securely install the unit in place. This may cause parts to become
loose resulting in hazards or product failure.
ARRANGE THE WIRING SO IT IS NOT CRIMPED OR
PINCHED BY A SHARP METAL EDGE.
Route the cables and wiring away from moving parts (like the seat
rails) or sharp or pointed edges. This will prevent crimping and
damage to the wiring. If wiring passes through a hole in metal, use
a rubber grommet to prevent the wire’s insulation from being cut by
the metal edge of the hole.
DO NOT INSTALL IN LOCATIONS WITH HIGH MOISTURE OR
DUST.
Avoid installing the unit in locations with high incidence of
moisture or dust. Moisture or dust that penetrates into this unit may
result in product failure.
Precautions
• Be sure to disconnect the cable from the (–) battery post before
installing your TME-M740BT. This will reduce any chance of
damage to the unit in case of a short-circuit.
• Be sure to connect the color coded leads according to the
diagram. Incorrect connections may cause the unit to
malfunction or damage to the vehicle’s electrical system.
• When making connections to the vehicle’s electrical system, be
aware of the factory installed components (e.g. on-board
computer). Do not tap into these leads to provide power for this
unit. When connecting the TME-M740BT to the fuse box, make
sure the fuse for the intended circuit of the TME-M740BT has
the appropriate amperage. Failure to do so may result in damage
to the unit and/or the vehicle. When in doubt, consult your
ALPINE dealer.
• The TME-M740BT uses female RCA-type jacks for connection
to other units having RCA connectors. You may need an adaptor
to connect other units. If so, please contact your authorized
ALPINE dealer for assistance.
• The Display must be completely retracted in the casing when
installing. If it is not, problems may occur.
IMPORTANT
Please record the serial number of your unit in the space provided
below and keep it as a permanent record. The serial number plate is
located on the bottom of the unit.
01GB07TMEM740BT.fm
SERIAL NUMBER:
INSTALLATION DATE:
INSTALLATION TECHNICIAN:
PLACE OF PURCHASE:
15-EN
ALPINE TME-M740BT_ENCS (EN)
Page 18

01GB00TMEM740BT.book Page 16 Tuesday, January 30, 2007 3:32 PM
Installation
Accessory List
Monitor. . . . . . . . . . . . . . . . . . . . . . . . . . . . . . . . . . . . . . . . . . . . . . . . .1
Display cable (2.5m)/Power Cable. . . . . . . . . . . . . . . . . . . . . . . . . . . .1
Microphone . . . . . . . . . . . . . . . . . . . . . . . . . . . . . . . . . . . . . . . . . . . . .1
Cord clamp . . . . . . . . . . . . . . . . . . . . . . . . . . . . . . . . . . . . . . . . . . . . . .3
Monitor stand . . . . . . . . . . . . . . . . . . . . . . . . . . . . . . . . . . . . . . . . . . . . 1
Fixing Screw (M4×12) . . . . . . . . . . . . . . . . . . . . . . . . . . . . . . . . . . . . . 3
Cloth. . . . . . . . . . . . . . . . . . . . . . . . . . . . . . . . . . . . . . . . . . . . . . . . . . . 1
Bracket Center . . . . . . . . . . . . . . . . . . . . . . . . . . . . . . . . . . . . . . . . . . .1
Bracket Side (L/R) . . . . . . . . . . . . . . . . . . . . . . . . . . . . . . . . . . . . . . . .2
Screw (M5×8) . . . . . . . . . . . . . . . . . . . . . . . . . . . . . . . . . . . . . . . . . . .8
Owner's Manual . . . . . . . . . . . . . . . . . . . . . . . . . . . . . . . . . . . . . . . . . .1
3
Check the sticking position.
ATemporarily fasten the stand with gum tape.
BLoosen the adjustment screws, and adjust to a safe,
viewable position.
The fixed arm tilts towards the seat side.
Angle
adjustment
screw
Attaching the monitor and stand
CAUTION
Do not install the monitor near the front passenger
seat air bag system.
1
Remove the main unit attachment fitting.
Pull this part to release.
Main unit
attachment fitting
2
Loosen the main unit attachment fitting with a coin
etc., slide it into the track on the rear of the main unit
and temporarily fasten it. Then fix it to the stand.
Seat side Front glass side
Main unit
Line of sight
Dashboard
In order to use safely, attach to the following places.
• Stable and secure places.
• Places that will not have your view blocked by the main
unit when driving.
• Places that you will not hit against if you lean forward
while you wearing your seatbelt.
• Places where the main unit cannot hit against the steering
wheel while driving.
If the main unit
invades your line
of sight then it will
block your view.
16-EN
01GB07TMEM740BT.fm
Slide in an
upward direction.
• Be aware that if the surface of the dashboard is leather, wooden
panel, stretched fabric or any non-resin based product, then the
surface will be damaged when you remove the stand.
• Do not place the main unit directly in front of the air conditioner
vents.
4
Remove the main unit from the stand.
ALPINE TME-M740BT_ENCS (EN)
Page 19

01GB00TMEM740BT.book Page 17 Tuesday, January 30, 2007 3:32 PM
5
Remove the mount from the stand and stick it to the
dashboard etc.. Remove any dirt on the place to
install, using the supplied cloth.
Fixing screws
(M4 x 12 Supplied)
If the place of
attachment is
curved, then
bend this
part to match
the shape.
• If the temperature in the car is low (Winter), then first heat up the
place where you are going to stick the mount with a hairdryer etc.
• Do not apply force to the mount, or expose to humidity, within 24
hours after attaching.
• If the mount is not firmly stuck, then we recommend that you attach
with the supplied fixing screws.
Mount
Mounting an external Microphone for
Hands-Free Calling
For the sake of safety, mount the microphone in the following location.
• In a stable and secure location.
• In a location where there is no interference of driver operation.
• Mount the external microphone used for the hands-free phone in a
location where the driver’s voice can easily be picked up. Mount the
microphone in consideration of its direction and distance from the
driver so that the voice can easily be picked up with no driver
movement, which may otherwise cause driver distraction.
• If an external microphone is connected, an internal microphone
cannot be used.
1
Peel off the paper seal on the base of the external
microphone, and stick it on the dashboard.
Using the supplied cleaner, clean the mounting surface
area thoroughly, and then stick the microphone in place.
6
Attach the main unit to the stand as shown in step 2.
Use the cable clamps to fix the cables.
• Before using, check that the main unit and the stand, and the stand
and the place where it is attached to the car are fixed securely.
Mounting the Monitor on the Indash using a Bracket
1
Mount the bracket using the supplied screws
(M5 x 8).
2
Mount the bracket on the monitor using the supplied
screws (M5 x 8).
\
3
Mount the monitor with bracket attached in the car.
To prevent external noise from entering the audio system.
• Locate the unit and route the leads at least 10 cm away
from the car harness.
• Keep the battery power leads as far away from other
leads as possible.
• Connect the ground lead securely to a bare metal spot
(remove any paint, dirt or grease if necessary) of the car
chassis.
• If you add an optional noise suppressor, connect it as far
away from the unit as possible. Your Alpine dealer carries
various noise suppressors, contact them for further
information.
• Your Alpine dealer knows best about noise prevention
measures so consult your dealer for further information.
01GB07TMEM740BT.fm
17-EN
ALPINE TME-M740BT_ENCS (EN)
Page 20

01GB00TMEM740BT.book Page 18 Tuesday, January 30, 2007 3:32 PM
Connections
AUX IN (White)
AUX IN (Red)
AUX IN (Yellow)
AUX OUT (White)
AUX OUT (Red)
AUX OUT (Yellow)
CAMERA IN (Yellow)
OUT INT
(Pink/Black)
REMOTE OUT (AUX IN)
(White/Brown)
M. CONT
(White/Pink)
REVERSE
(Orange/White)
PARKING/HAND BRAKE
(Yellow/Blue)
FOOT BRAKE
(Yellow/Black)
ACC
(Red)
FUSE
GND
(Black)
(2A)
Audio Input Connector (AUX IN) (White)
Left input the audio.
Audio Input Connector (AUX IN) (Red)
Right input the audio.
Video Input Connector (AUX IN) (Yellow)
Input the video.
Audio Output Connector (AUX OUT) (White)
Left output the audio.
Audio Output Connector (AUX OUT) (Red)
Right output the audio.
Video Output Connector (AUX OUT) (Yellow)
Output the video.
Camera Input Connector (Yellow)
Use when connecting a back-up camera.
Audio Interrupt Out Lead (Pink/Black)
Remote Control Output Lead (AUX IN) (White/Brown)
Connect this lead to the remote control input lead. This lead
outputs the controlling signals from the remote control.
Monitor Control Lead (White/Pink)
Connect this to the Monitor Control Lead of a touch panel
compatible product.
Reverse Lead (Orange/White)
Use only when a back-up camera is connected. Connect to
the plus side of the car's reverse lamp that lights when the
transmission is shifted into reverse (R).
Switches the video picture to the back-up camera. This is
linked with putting the car into reverse (R).
Parking/Hand Brake Lead (Yellow/Blue)
Connect this lead to the power supply side of the parking
brake switch to transmit the parking brake status signals to
the TME-M740BT.
Foot Brake Lead (Yellow/Black)
Not Used.
Switched Power Lead (Ignition) (Red)
Connect this lead to an open terminal on the vehicle's fuse
box or another unused power source which provides (+)
12V only when the ignition is turned on or in the accessory
position.
Ground Lead (Black)
Connect this lead to a good chassis ground on the vehicle.
Make sure the connection is made to bare metal and is
securely fastened using the sheet metal screw provided.
RGB Input Connector
Connect this to the RGB output terminal of the Navigation
System or Vehiclehub Pro System.
Main monitor
Display cable / Power cable
Fuse Holder (2A)
18-EN
01GB07TMEM740BT.fm
ALPINE TME-M740BT_ENCS (EN)
Page 21

01GB00TMEM740BT.book Page 19 Tuesday, January 30, 2007 3:32 PM
System Example
Connect the Navigation system, DVB-T or DVD Player
REMOTE OUT (AUX IN) REMOTE IN (White/Brown)
(White/Brown)
Digital TV Receiver
(DVB-T)
TUE-T200DVB
or
DVD Player
DVE-5207
(Sold separately)
Navigation
NVE-N900C
(Sold separately)
Video Input Connector (AUX IN) (Yellow)
Audio Input Connector (AUX IN) (Red)
Audio Input Connector (AUX IN) (White)
Remote Control Output Lead (AUX IN) (White/Brown)
Connect this lead to the remote control input lead. This lead
outputs the controlling signals from the remote control.
Connect the Navigation system and DVD Head Unit
REMOTE OUT (AUX IN) REMOTE IN (White/Brown)
(White/Brown)
RGB Input Connector
RCA Extension Cable (Sold separately)
Remote Control Input Lead (White/Brown)
RGB Cable (Included with Navigation)
To Video Output terminal
DVD Head Unit
DVA-9861E, etc.
(Sold separately)
Navigation
NVE-N900C
(Sold separately)
Video Input Connector (AUX IN) (Yellow)
Audio Output Connector (AUX OUT) (Red)
Audio Output Connector (AUX OUT) (White)
Remote Control Output Lead (AUX IN) (White/Brown)
Connect this lead to the remote control input lead. This lead
outputs the controlling signals from the remote control.
01GB07TMEM740BT.fm
RGB Input Connector
RCA Extension Cable (Sold separately)
Ai-RCA Connector KCA-121B (Sold separately)
Remote Control Input Lead (White/Brown)
RGB Cable (Included with Navigation)
19-EN
ALPINE TME-M740BT_ENCS (EN)
Page 22

01GB00TMEM740BT.book Page 20 Tuesday, January 30, 2007 3:32 PM
Connect the Vehiclehub Pro, Navigation system, DVB-T
and DVD Player
Vehiclehub Pro
VPA-B222R
(Sold separately)
Navigation
NVE-N900C
(Sold separately)
REMOTE OUT (AUX 1)
(White/Brown)
Rear Monitor
(Sold separately)
REMOTE IN
(White/Brown)
Ai-NET DVD Player
DVA-5210, etc.
(Sold separately)
Digital TV Receiver
(DVB-T)
TUE-T200DVB
(Sold separately)
RGB Cable (Included with Navigation)
RGB Input Connector
RGB Cable (Sold separately)
RCA Extension Cable (Sold separately)
Remote Control Output Lead (AUX 1) (White/Brown)
Connect this lead to the remote control input lead. This lead
outputs the controlling signals from the remote control.
REMOTE OUT (AUX 2)
(White/Brown)
REMOTE IN (White/Brown)
Remote Control Input Lead (White/Brown)
Ai-NET Cable (Included with DVD Head Unit)
Remote Control Output Lead (AUX 2) (White/Brown)
Connect this lead to the remote control input lead. This lead
outputs the controlling signals from the remote control.
Remote Control Input Lead (White/Brown)
20-EN
01GB07TMEM740BT.fm
ALPINE TME-M740BT_ENCS (EN)
Page 23

01GB00TMEM740BT.book Page 1 Tuesday, January 30, 2007 3:32 PM
中文(简)
目录
操作说明
警告
警告 ........................................................... 2
注意 ........................................................... 2
使用须知 .................................................... 2
准备工作
控制装置的位置 .............................................. 3
开启或和关闭电源 .......................................... 4
调节音量 .......................................................... 4
切换音源 .......................................................... 4
辅助设备操作
DVD 视频播放机操作 (选购件) ................ 5
DVD 菜单操作 ............................................. 5
TUE-T200DVB 的操作 (选购件) ............... 5
菜单操作 ...................................................... 6
TV 操作 (选购件) ....................................... 6
免提电话 (选购件)
关于免提电话 .................................................. 7
连接手机 .......................................................... 7
接听电话 .......................................................... 8
挂断 .................................................................. 8
拨打电话 .......................................................... 8
通过输入电话号码来拨打电话
(DIAL INPUT) ....................................... 8
利用电话簿来拨打电话
(PHONE BOOK) ................................... 8
利用历史记录拨打电话 (RECEIVED
CALLS/DIALED CALLS/MISSED
CALLS) ................................................... 9
利用快速呼叫拨打电话
(QUICK CALLS) ...................................... 9
利用速拨拨打电话 (SPEED DIAL) ........... 9
登录电话簿 ...................................................... 9
蓝牙音频功能 (选购)
蓝牙音频操作 ................................................10
设定蓝牙音频输出中断
(INT BT AUDIO) .....................................10
设定
显示设定操作 .............................................11
GENERAL 设定 .........................................12
SYSTEM 设定 ............................................12
蓝牙设定 .....................................................12
REAR SELECT 设定 ..................................13
信息
出现问题时 ....................................................14
规格 ................................................................14
安装与连接
警告 ......................................................... 15
注意 ......................................................... 15
使用前请注意 .......................................... 15
安装 ................................................................16
安装显示器和支座 .....................................16
安装外部麦克风以便进行免提通话 .........17
连接 ................................................................18
系统示例 ........................................................19
01CS03TMEM740BTTOC.fm
1-CS
ALPINE TME-M740BT_ENCS (CS)
Page 24

01GB00TMEM740BT.book Page 2 Tuesday, January 30, 2007 3:32 PM
操作说明
警告
警告
此标志表示重要说明。如果未能注意,可能会造成
人员严重受伤或死亡。
更换保险丝时须选用正确安培值的保险丝。
否则可能引起火灾或触电。
请在 12V 的车用电压上使用本产品。
如果使用其它电压,可能导致火灾、触电或其它伤害。
请勿将显示器安装在靠近乘客座椅安全气囊的地方。
如果设备安装不正确,安全气囊就不能正确地发挥作用。触
发安全气囊时会使监视器向上弹起,导致意外事故和伤害。
请正确安装该产品,使得驾驶员无法观看电视 / 录像,
除非已停车并启用紧急刹车。
驾驶员开车时看电视 / 录像是危险的。如果该产品安装不正
确,驾驶员就可以在开车时看电视 / 录像,这会分散观察汽车
前方的注意力而导致意外事故。驾驶员或其他人员可能会受
到严重伤害。
驾驶中请勿观看录像。
观看录像会分散驾驶员观察汽车前方的注意力进而导致意外
事故。
请勿使用会使您在驾车时分心的任何功能。
任何会影响您注意力的功能应该仅在汽车完全停下后使用。
若要使用这些功能,请先把车辆停放在安全地带。否则将可
能导致意外事故。
驾驶中必须将音量保持在还能听到车外噪声的水平。
音量过大导致紧急车辆警报声和道路警告信号 (火车交叉口
等)听不清是非常危险的,并且可能会导致事故发生。另外,
在汽车中以大音量收听还可能导致听力损害。
驾驶中请尽可能少看显示屏幕。
看显示屏幕可能会分散驾驶员观察汽车前方的注意力进而导
致意外事故。
请勿拆卸或改装。
否则可能导致意外事故、火灾或触电。
请只用于 12 伏负极接地的汽车。
(如果您无法确定 , 请向代理商确认。)否则可能引起火灾等
事故。
电池等小物体应放在儿童不易触及的地方。
吞下小物体可能导致严重伤害。一旦误吞,请立即就医。
注意
此标志表示重要说明。如果未能注意,可能会造成
人员受伤或设备损坏。
出现问题时,请立即停止使用。
否则可能导致人身伤害或本产品损坏。请将本产品送回到授
权的 Alpine 经销商或就近的 Alpine 服务中心修理。
使用须知
产品清洁
请使用柔软干燥的布定期清洁本产品。若污物较难清除,请
仅用水将布稍微润湿后再擦拭。其它任何溶剂都可能会溶解
涂漆或损坏塑料部分。
温度
打开本机之前,请确认车子内部的温度是否处于 +45°C 至
0°C 范围内。
维修保养
若遇到任何问题,请勿自行修理。请将本产品送回到 Alpine
经销商或就近的 Alpine 服务站修理。
安装位置
切勿将 TME-M740BT 安装在受如下因素影响的场所:
• 阳光直射和热源附近
• 湿度很高的地方和水源附近
• 多尘场所
• 剧烈振动的场所
2-CS
01CS04TMEM740BT.fm
ALPINE TME-M740BT_ENCS (CS)
Page 25

01GB00TMEM740BT.book Page 3 Tuesday, January 30, 2007 3:32 PM
• 关闭本系统后,还会暂时有轻微的幻影残留。这是 LCD 技
术特有的现象,属于正常现象。
• 在低温情况下,显示屏可能会暂时丧失对比度。经过短暂
的暖机之后,便会恢复正常。
本机某些功能的操作十分复杂。因此,有必要将这些功能放
在特定画面中。这样,就可以将这些功能的操作限制在泊车
后的时间段内。这可保证驾驶员的注意力集中在路况上而不
是 TME-M740BT 上。这样做是为了确保驾驶员和乘客的安
全。
当汽车正在移动时无法进行安装设定操作。为了让使用手册
中介绍的操作程序生效,必须先泊车并拉上手刹车。在驾驶
过程中若试图进行这些操作,将显示 “驾驶时禁止操作”的
警告信息。
准备工作
控制装置的位置
DIMMER (调光)传感器
检测汽车内的亮度。
音量按钮
通过按 或 按钮可调节音量。
遥控传感器
在 2m 范围内将选购的遥控器对准遥控传感器。
SOURCE (音源)按钮
每按一次 SOURCE (音源)按钮,将切换一次 SOURCE
(音源)。
若按住该按钮并至少保持 3 秒钟,将打开 / 关闭 Vehiclehub
Pro VPA-B222R (选购件)的电源。
(POWER)按钮
用来开启和关闭电源。
若按住该按钮并至少保持 3 秒钟,将打开 / 关闭 Vehiclehub
Pro VPA-B222R (另售)的 V. S E L 。
蓝牙指示灯
当将 “设定蓝牙连接 (Bluetooth)”(第 12 页)设定为 ON
时会亮灯。当用免提功能接听、拨打电话或正在通话时会闪
烁。
手机麦克风
若收到的信号不强,请使用附带的外部麦克风来执行免提电
话操作。
手机的外部麦克风接口
若连接外部麦克风,将无法使用内置麦克风。
01CS04TMEM740BT.fm
3-CS
ALPINE TME-M740BT_ENCS (CS)
Page 26

01GB00TMEM740BT.book Page 4 Tuesday, January 30, 2007 3:32 PM
开启或和关闭电源
1
按 POWER 打开本机。
2
按 POWER 关闭本机。
•
当汽车正在行进时,不能执行本机的某些操作。此时,请务必
首先停车,拉好手刹车,然后再执行该操作。
•
在周围环境温度很低的条件下,刚打开电源后很短的时间内,
显示屏可能较暗。一旦
•
当汽车电瓶电源的电压很低时,显示屏会闪烁。这是正常现
象,不是故障。
LCD
暖机后,显示屏便会恢复正常。
调节音量
通过按 或 可调节音量。
•
若将 “变更声音输出 (
定为 “
SYSTEM
Vehiclehub Pro VPA-B222R
VOLUME CON TROL
”,通过控制本机的音量,可调节选购件
的音量。
)”(第12页)设
切换音源
MOBILE PHONE
将显示 MOBILE PHONE 画面。
详细情况请参考 “免提电话 (选购件)”(第7页)。
•
蓝牙 AUDIO
将显示蓝牙 AUDIO 模式画面。
详细情况请参考 “蓝牙音频操作”(第10页)。
•
1
按 SOURCE。
将显示音源选择画面。
2
触摸所需要的音源。
将显示主音源画面。
音源选择画面的显示示例
Nav. (导航)
将显示导航画面。若将选购的 Alpine 导航系统连接到
TME-M740BT,将在本机上显示导航画面。
关于导航操作,请参考导航系统的使用手册。
•
•
若在音源选择画面未显示 “
为“
NAV.
(第12页)。
”,操作方法请参考 “设定导航模式 (
NAV.
” ,请将 “
NAV. MODE
NAV. MODE
”设定
)”
AUX
将显示外部输入画面。
画面示例:EXT. DVD
将显示在第12页 “外部输入名称设定 (
•
的音源名称。
•
详细情况请参考 “
(第5页)。
•
详细情况请参考 “
(第5页)。
•
详细情况请参考 “TV操作 (选购件)”(第6页)。
SETUP
将显示 SETUP 选择画面。
详细情况请参考 “设定”(第10页)。
•
DVD
视频播放机操作 (选购件)”
TUE-T200DVB
AUX NAM E
的操作 (选购件)”
)”中设定
4-CS
01CS05TMEM740BT.fm
ALPINE TME-M740BT_ENCS (CS)
Page 27

01GB00TMEM740BT.book Page 5 Tuesday, January 30, 2007 3:32 PM
辅助设备操作
若将 ALPINE 设备连接到 AU X,则可用本机控制该设备。以下将
说明如何操作代表性设备。
DVD 视频播放机操作 (选购件)
当连接了选购的 DVD 视频播放机 (DVA-5210/DVE-5207/
DHA-S680E)时可进行该操作。
当在 “外部输入名称设定 (AUX NAME)”( 第 12 页)中选择
了 EXT. DVD 时,将在 SOURCE 选择画面显示该音源。
触摸显示面板,显示操作画面。
•
执行该操作5秒钟后,操作画面将切换到
面。触摸显示面板,再次显示操作画面。
DVD
模式中的显示画
DVD 菜单操作
ENTER
输入所选择的项目。
移动显示在该画面上的项目。
RETURN
返回到上一个画面。
TOP MENU
将显示 DVD 顶层菜单画面。
CONTROL
显示主操作画面。
所连接的设备不同,操作也会不同。请参考所连接设备的使用
•
手册。
查找曲目 / 章节的开头。触摸并保持可快倒播放。
/
暂停和播放。
查找曲目 / 章节的开头。触摸并保持可快进播放。
PRE- STOP/STOP
DISC
切换 DISC (仅限于 DHA-S680E)
DISC
切换 DISC (仅限于 DHA-S680E)
显示 DVD 菜单操作画面。
SOURCE
显示音源选择画面。
挂断手机连接。仅在通话期间显示该指示。
TUE-T200DVB 的操作 (选购件)
当连接了选购的 TUE-T200DVB 时可执行该操作。
当在 “外部输入名称设定 (AUX NAME)”( 第 12 页)中选择
了 DVB-T 时,将在 SOURCE 选择画面显示该音源。
触摸显示面板,显示操作画面。
•
执行该操作5秒钟后,操作画面将切换到
画面。触摸显示面板,再次显示操作画面。
CH
逐个减少频道。触摸并保持可连续变化。
P. DN
减少预设的频道。
TUNE
改变调频方式 (频道和预设频道)。
CH
逐个增加频道。触摸并保持可连续变化。
P. UP
增加预设的频道。
A. MEMO
自动记忆。
DVB- T
模式中的显示
01CS05TMEM740BT.fm
5-CS
ALPINE TME-M740BT_ENCS (CS)
Page 28

01GB00TMEM740BT.book Page 6 Tuesday, January 30, 2007 3:32 PM
BAND
切换数字 TV 的音源。
EPG
显示 EPG 画面。
显示菜单操作画面。
SOURCE
显示音源选择画面。
挂断手机连接。仅在通话期间显示该指示。
菜单操作
ENTER
输入所选择的项目。
移动显示在该画面上的项目。
RETURN
返回到上一个画面。
TOP MENU
显示菜单画面。
CONTROL
显示主操作画面。
有关详细情况,请参考
•
TUE-T200DVB
(另售)的使用手册。
TV 操作 (选购件)
当连接了选购的 TV 调频接收器时可执行该操作。
当在 “外部输入名称设定 (AUX NAME)”( 第 12 页)中选择
了 TV 时,将在 SOURCE 选择画面显示该音源。
触摸显示面板,显示操作画面。
•
执行该操作5秒钟后,操作画面将切换到TV模式中的显示画
面。触摸显示面板,再次显示操作画面。
CH
逐个减少频道。
P. DN
逐个减少预设值。
TUNE
改变调频方式 (手动模式、自动搜索模式和预设值)。
CH
逐个增加频道。
P. UP
逐个增加预设值。
A. MEMO
自动记忆。
BAND
改变波段。
SOURCE
显示音源选择画面。
6-CS
挂断手机连接。仅在通话期间显示该指示。
所连接的设备不同,操作也会不同。请参考所连接设备的使用
•
手册。
01CS05TMEM740BT.fm
ALPINE TME-M740BT_ENCS (CS)
Page 29

01GB00TMEM740BT.book Page 7 Tuesday, January 30, 2007 3:32 PM
免提电话 (选购件)
关于免提电话
本机与 Bluetooth®国际标准无线通讯技术兼容。可用与 Bluetooth
技术兼容的手机来拨打免提电话 *。
为了进行免提通话,您的手机必须支持
*
件)。
•
请勿在交通拥挤的城市、很窄的街道进行免提通话。
•
当拨打电话时,请以清晰而响亮声音通话。
•
通话前请关上车窗。
•
当两人都使用免提功能进行通话时,或在很嘈杂的地方进行通
话时,可能很难听清对方的声音或难以将自己的声音传递给对
方。
•
根据使用电话的个人特点或电话线路的状况,某些声音可能听
起来不自然。
•
根据不同的手机,可能无法使用免提电话功能。
HPF
(免提系统文
连接手机
如果手机是首次连接,请按照如下步骤登录该手机。
登录
请参考 “设定蓝牙连接 (Bluetooth)”( 第 12 页)。
请参考 “发送本机的名称信息 (VISIBLE MODE)”( 第 13
页)。
Bluetooth 设置
➧
搜索手机
请参考 “搜索可连接的蓝牙设备 (蓝牙搜索)(SEARCH
DEVICE)”( 第 12 页)。
➧
选择手机
触摸要登录手机的 [PAIR]。
➧
输入密码
输入 4 位至 10 位数。
*
当输入密码时,请在30秒钟内输入数字以确保安全。
➧
在手机上输入密码。
输入与本机相同的密码数字 (4 位至 10 位 )。
*
当输入密码时,请在30秒钟内输入数字以确保安全
➧
登录完成。
➧
连接
连接手机
请参考 “设定已登录的蓝牙设备 (PAIRED DEVICE)”( 第
13 页)。
触摸要登录手机的 [CONNECT]。
➧
选择手机
➧
连接完成。
需要对手机进行
•
•
若要在手机中输入密码,请参考手机的使用手册。
•
按照手机屏幕指示进行操作,直到完成连接为止。
Bluetooth
设定。请参考手机的使用手册。
01CS05TMEM740BT.fm
7-CS
ALPINE TME-M740BT_ENCS (CS)
Page 30

01GB00TMEM740BT.book Page 8 Tuesday, January 30, 2007 3:32 PM
•
若在 “设定自动连接 (
了ON,当打开电源时,将自动连接上次连接的手机。
•
若此前已经在本机中登录手机,请从登录设备设定列表中选择
所需要的手机。请参考 “设定已登录的蓝牙设备 (
DEVICE
)”( 第13页)。
AUTO CONNECT
)”(第13页)中设定
PAI R ED
接听电话
当收到电话时,电话铃声响起,并在显示屏上提示来电。
触摸 []。
通话开始。
3
触摸 []。
电话正在拨号。
当输入电话号码并拨打电话时将不显示该画面。
•
•
若触摸
[STORE]
,可在
•
根据具体的手机,有些功能可能不能使用。
SPEED DIAL
中登录。
通过输入电话号码来拨打电话
(DIAL INPUT)
输入以区号打头的目的地号码,然后触摸 [DONE]。
若在 “自动接听所收到的呼叫 (
•
中设定了ON,收到来电时将在5秒钟后自动应答来电。
•
可设定当拨打电话时是否进行全屏显示。详细情况请参考 “设
定通话时显示的画面 (
CALLING DISPLAY
AUTO ANSWER
)”( 第11页)。
)”(第13页)
挂断
触摸 []。
通话结束。
拨打电话
1
触摸 SOURCE SELECT 画面上的 [MOBILE PHONE]。
将显示 MOBILE PHONE 画面。
2
选择所需要的方式。
•
若触摸
除所有字符。
•
若触摸
[DELETE]
[STORE]
,将逐个删除字符。若触摸
,可在
SPEED DIAL
中登录。
[ALL DEL.]
,将删
利用电话簿来拨打电话 (PHONE BOOK)
可从手机下载到本机上的电话簿清单中选择对象并拨打该电话。
触摸通话对象所对应的 []。
•
若触摸[]或[],可翻页。
•
若触摸
•
[ALL DELETE]
若将一部手机连接到另一部手机,将自动删除此前记录在所连
接手机中的已接听电话、已拨打电话和未接听电话的清单。
,将删除电话簿中所有内容。
8-CS
01CS05TMEM740BT.fm
ALPINE TME-M740BT_ENCS (CS)
Page 31

01GB00TMEM740BT.book Page 9 Tuesday, January 30, 2007 3:32 PM
利用历史记录拨打电话 (RECEIVED CALLS/
DIALED CALLS/MISSED CALLS)
可从已接听电话、已拨打电话或未接听电话的清单中选择对象并
拨打该电话。
RECEIVED
CALLS:
DIALED CALLS: 此前已拨打电话的电话号码清单。
MISSED CALLS: 未接听电话的电话号码清单。
触摸通话对象所对应的 []。
•
若触摸[]或[],可翻页。
•
在每个历史记录中最多可保存20个号码。当某个历史记录中的
号码超过20个时,将从最早的记录开始删除。
•
若将一部手机连接到另一部手机,将自动删除此前记录在所连
接手机中的已接听电话、已拨打电话和未接听电话的清单。
此前已接听电话的电话号码清单。
利用快速呼叫拨打电话
(QUICK CALLS)
可通过上次拨打或接听过的电话号码快速呼叫。
1
触摸 SOURCE SELECT 画面上 QUICK CALLS 的
[DIALED] 或 [RECEIVED]。
利用速拨拨打电话 (SPEED DIAL)
最多可在 SPEED DIAL 中登录 9 个经常拨打的电话号码以便随时
方便地拨打。
1
利用 SOURCE SELECT 画面上的 SPEED DIAL,触摸要
拨打的号码。
•
通过触摸
2
[]或[]
触摸 []。
拨打电话。
可滚动显示号码。
登录电话簿
可通过将登录在手机中的电话簿登录在本机上来拨打电话。
触摸电话簿画面上的 [SEARCH]。
开始登录电话簿。
2
触摸 []。
拨打电话。
若触摸
•
01CS05TMEM740BT.fm
[STORE]
,可在
SPEED DIAL
中登录。
•
在本机的电话簿中最多可登录
•
若无法登录,可能需要从其它手机上发送电话簿。
•
若要覆盖电话簿,请触摸
后再次登录电话簿。
•
若要利用电话簿来拨打电话,请参考 “利用电话簿来拨打电话
(
PHONE BOOK
)”( 第8页)。
205
个电话号码。
[ALL DELETE]
,删除现有电话簿,然
9-CS
ALPINE TME-M740BT_ENCS (CS)
Page 32

01GB00TMEM740BT.book Page 10 Tuesday, January 30, 2007 3:32 PM
蓝牙音频功能
(选购)
蓝牙音频操作
支持蓝牙技术的手机或便携式播放机等设备的音频信息都可通过
本机进行无线控制 / 播放 *。
请参考 “连接手机”(第 7 页),连接蓝牙音频设备。
*
若要播放音频信息,必须使用支持
件)的手机或便携式播放机。不支持视频播放。
显示设备名称
查找当前曲目的开头。
播放
暂停
查找下一首曲目的开头。
SOURCE
显示音源选择画面。
A2DP
(高级音频分配文
设定
可根据自己的喜好和用途灵活地自定义设定本机。
利用步骤 1 至 4 从 SETUP 模式中选择一个模式进行调整。关
于所选 SETUP 项目的详细情况,请参考以下相应章节。
1
触摸音源选择画面上的 [SETUP]。
将显示 SETUP 选择画面。
2
触摸所需要的设定项目。
DISPLAY
DIMMER/DIMMER HIGH/DIMMER LOW/CALLING DISPLAY/
DISPLAY MODE/SCREEN ALIGNMENT/VISUAL EQ
GENERAL
BEEP/LED BRIGHTNESS/VOLUME CONTROL
SYSTEM
INT MUTE/AUX NAME/NAV. MODE/CAMERA INT
Bluetooth
Bluetooth/SEARCH DEVICE/ACTIVE DEVICE/PAIRED DEVICE/
AUTO CONNECT/VISIABLE MODE/AUTO ANSWER/REFUSED
CALL/PHONEBOOK/MIC GAIN
REAR SELECT
REAR SELECT
3
触摸所需项目中的 []或 []等以变更其设定值。
挂断免提电话连接。正在拨打电话时将显示该指示。
设定蓝牙音频输出中断
(INT BT AUDIO)
当蓝牙音频声音从外接装置 (Ai-NET 兼容主机或后监视器等)
输出时进行设定。
1
触摸 INT BT AUDIO 的 []或 []来切换 ON/OFF。
ON / OFF
ON:当蓝牙音频声音经过 Ai-NET 从音频输出连接器 (AUX OUT)
OFF:当蓝牙音频声音从音频输出连接器 (AUX OUT)输出至后监
•
•
(初始设定)
输出至 Ai-NET 兼容主机 (DVA-9861E 等)时设定至 ON。
视器时设定至 OFF。
如果音频被免提电话或导航指引中断,则免提电话或导航指引
将优先中断。
只有在显示蓝牙音频画面时才能进行 “
如果您改到其它音源,则无法进行设定。
INT BT AUDIO
”设定。
10-CS
切换页
返回到上一个显示画面。
改变设定项目。
显示详细设定画面。
退出设定画面。
4
触摸 [EXIT]。
01CS05TMEM740BT.fm
ALPINE TME-M740BT_ENCS (CS)
Page 33

01GB00TMEM740BT.book Page 11 Tuesday, January 30, 2007 3:32 PM
显示设定操作
设定背光灯的亮度 (
HIGH / LOW / AUTO
背光灯是由内置于液晶面板的荧光灯提供的。照明控制将根据汽
车周围照明情况调节背光灯的亮度以便于查看。
HIGH:将显示屏亮度设定为与 “调节背光灯的最高亮度 (DIMMER
HIGH)”( 第 11 页)中的 DIMMER HIGH 所设定的亮度相
同。
LOW:将显示屏亮度设定为与 “调节背光灯的最低亮度 (DIMMER
LOW)”( 第 11 页)中的 DIMMER LOW 所设定的亮度相同。
AUTO:将根据汽车内的亮度自动设定显示器背景照明的亮度。
调节背光灯的最高亮度 (DIMMER HIGH)
MIN(16)至MAX(31
若已在 “设定背光灯的亮度 (DIMMER)”(第 11 页)中设定为
HIGH,可调节背光灯的亮度。例如,当在夜晚旅行时可用该功能
改变显示屏的亮度。
调节背光灯的最低亮度 (DIMMER LOW)
MIN(0)至MAX(15
若已在 “设定背光灯的亮度 (DIMMER)”(第 11 页)中设定为
LOW,可调节背光灯的亮度。例如,当在夜晚旅行时可用该功能
改变显示屏的亮度。
设定通话时显示的画面 (CALLING DISPLAY)
TEL.
(初始设定值)
当用免提电话拨打电话时,可设定是显示电话画面还是导航画面
等。
TEL.: 显示电话画面。
MAIN
:显示当前音源画面 (导航等)。
DISPLAY MODE
WIDE
(初始设定值)
WIDE: 显示器会以沿水平方向平滑拉伸图像的方式,将正常图像
显示得更宽以填满整个宽屏屏幕。
DIMMER)
(初始设定值)
)(初始设定值:
)(初始设定值:
/ MAIN
/ CINEMA / NORMAL
MIN
MIN
)
)
NORMAL:
显示器将在屏幕中央显示正常图像,并将画面两侧显示为
垂直黑带。
NORMAL
调节触摸面板 (SCREEN ALIGNMENT)
(RESET) / (SETUP)
当 LCD 液晶显示屏上的显示位置与触摸面板上的触摸位置不一致
时需要进行调节。
1
触摸 SCREEN ALIGNMENT 中的 [ ]。
将显示调节画面。
2
准确触摸画面左下角的 []标记。
画面将变为调节画面。
3
准确触摸画面右上角的 []标记。
完成调节,同时返回到 DISPLAY 设定模式画面。
•
若要中途取消设定操作,请按
SOURCE
。
VISUAL EQ™ 设定
BRIGHT
MIN(-15)至MAX(+15
)(初始设定值:0)
COLOR
MIN(-15)至MAX(+15
)(初始设定值:0)
TINT
G MAX(G15)至R MAX(R15
)(初始设定值:0)
CONTRAST
MIN(-15)至MAX(+15
)(初始设定值:0)
SHARP
MIN(-15)至MAX(+15
)(初始设定值:0)
CINEMA:
01CS05TMEM740BT.fm
显示器将通过沿垂直方向拉伸图像的方式显示正常图像。
该模式适合用于以 16:9 的长宽比显示电影类型的图像。
WIDE
CINEMA
VISUAL EQ MODE
OFF
(初始设定值)
/ P-2
OFF :
NIGHT M:
SOFT:
SHARP:
CONTRAST:
P-1:
P-2:
初始设定值
适用于经常出现较暗场景的电影。
适用于 CG 和动画片。
适用于图像不很清晰的老电影。
适用于最近的电影。
从保存在 “ USER MEMORY”的预设 No.P-1 中调用
VISUAL EQ 模式 (第 12 页)。
从保存在 “ USER MEMORY”的预设 No.P-2 中调用
VISUAL EQ 模式 (第 12 页)。
/ NIGHT M / SOFT / SHARP / CONTRAST / P-1
11-CS
ALPINE TME-M740BT_ENCS (CS)
Page 34

01GB00TMEM740BT.book Page 12 Tuesday, January 30, 2007 3:32 PM
USER MEMORY
P-1
(初始设定值)
可保存 “ BRIGH、 COLOR、 TINT、 CONTRAST 和
SHARP”的设定值。
/ P-2
调节 BRIGH、 COLOR、 TINT、 CONTRAST 和
SHARP 的设定值后,选择预设编号 (P-1)或 (P-2),
然后触摸 [WRITE] 保存这些设定值。
•
也可从“
VISUAL EQ
VISUAL EQ MODE”的P-1或P-2
模式 (第11页)。
中调用在此保存的
GENERAL 设定
声音 (按键鸣声)指引功能 (BEEP)
ON
(初始设定值)
ON:
启动声音指引模式。
OFF:
关闭声音指引模式。当在本机上按某一按钮时不会发出指引声
音。
调节指示灯的亮度 (LED BRIGHTNESS)
HIGH / NORMAL
可设定指示灯的亮度 (电源指示灯等)。
HIGH: 使指示灯更亮。
NORMAL:
LOW: 使指示灯更暗。
OFF:
变更声音输出 (VOLUME CONTROL)
MONITOR
若本机被连接在 Vehiclehub Pro (VPA-B222R)上,请设定为
ON。
MONITOR:
SYSTEM:若在VPA-B222R 上连接了可兼容设备,则可通过本机调
/ OFF
(初始设定值)
正常指示灯亮度。
关闭指示灯。
(初始设定值)
通过内置扬声器输出声音。
节音量。
/ LOW / OFF
/ SYSTEM
外部输入名称设定 (AUX NAME)
OFF / DVB-T / TV / DVD HU / EXT. DVD / GAME / AUX
值)
利用外部输入模式,从如下清单中选择将要用于该产品的名称。
该名称将用作音源选择时的触摸开关名称和播放变更时的音源名
称。
(初始设定
设定导航模式 (NAV. MODE)
NAV.
(初始设定值)
OFF :
不显示导航音源。无法通过本机变更与导航有关的设定。
NAV.:
将显示导航音源。
EXT.:
音源名称显示为外部 RGB 输入源 (Vehicle Hub)。
/ EXT. / OFF
设定倒车摄像机 (CAMERA INT)
ON
(初始设定值)
当连接了倒车摄像机时,将在画面上输出后方影像。
OFF :
不会在 SOURCE 选择画面显示 CAMERA 音源。
ON:
通过选择 CAMERA 音源,即使未将档位拨杆切换到倒车档
(R),也将输出后方影像。
•
通过切到倒车档 (R),将输出后方影像。当正确连接了倒车
/ OFF
电线时,该功能有效。
蓝牙设定
设定蓝牙连接 (Bluetooth)
ON
(初始设定值)
当使用免提电话或蓝牙音频功能时进行该设定。请务必将它设定
为 ON。
ON:
可使用蓝牙功能。
OFF:
不能使用蓝牙功能。
搜索可连接的蓝牙设备 (蓝牙搜索)(SEARCH DEVICE)
/ OFF
SYSTEM 设定
免提电话中断设定 (INT MUTE)
ON
(初始设定值)
可设定免提电话来中断主机 (DVA-9861E 等)。
ON:
接收到的来电或拨打电话操作将中断主机。此时主机的音频播放
进入静音状态。
OFF:
接收到的来电或拨打电话操作不会中断主机。
•
连接在
/ OFF
IN-INT
电缆上的设备将被连接在本机的
上。
*
为了使主机中的手机声音中断,请同时执行如下设定。若未执
行该设定,将无法在本机中中断该声音。
请将 “有效利用拒绝来电 (
“
REAR SELECT
设定”中的蓝牙
REFUSED CALL
AUDIO
设定为ON(第
页)。
12-CS
01CS05TMEM740BT.fm
OUT-INT
电缆
)”( 第13页)和
13
•
若触摸
•
[CANCEL]
完成搜索后,将显示设备选择列表。若触摸要连接的蓝牙设备
对应的
[PAIR]
,将中止蓝牙设备的搜索。
,将显示密码输入画面。输入与本机和蓝牙设备
画面中相同的密码。请参考 “连接手机”(第7页)。
ALPINE TME-M740BT_ENCS (CS)
Page 35

01GB00TMEM740BT.book Page 13 Tuesday, January 30, 2007 3:32 PM
查看蓝牙设备的信息 (
可检查当前所连接的蓝牙设备的详细情况。
若要将一部手机连接到另一部手机,请务必触摸
•
[DISCONNECT]
ACTIVE DEVICE)
取消当前连接的手机。
设定已登录的蓝牙设备 (PAIRED DEVICE)
之前本机最多登陆八部所连接的手机。选择想使用的一部。
若触摸
•
•
若触摸
[CONNECT]
[DELETE]
,将连接蓝牙设备。
,将删除蓝牙设备。若触摸
[ALL DELETE]
将删除所有蓝牙设备。
•
若连接了未登录在列表中的蓝牙设备,通过触摸
[SEARCH]
可搜
索蓝牙设备。
设定自动连接 (AUTO CONNECT)
ON
(初始设定值)
该设定可决定是否自动识别并连接之前连接的手机。
ON:
将自动连接之前连接的手机。
OFF:
利用 [SEARCH DEVICE] 选择手机。
根据具体的手机,可能需要进行设定。请参考手机的使用手
•
/ OFF
册。
发送本机的名称信息 (VISIBLE MODE)
ON
(初始设定值)
该设定可决定是否向蓝牙设备 (手机等)发送本机的名称信息。
ON:
本机 (TME-M740BT)的名称信息将被发送到蓝牙设备。
OFF:
不将本机的名称信息发送到蓝牙设备。
/ OFF
自动接听所收到的呼叫 (AUTO ANSWER)
ON / OFF
该设定可决定收到来电时是否自动接听。
ON:
OFF:
(初始设定值)
当收到来电时,可在约 5 秒钟后自动应答。
当收到来电时,不能自动应答。必须触摸 []后再应答。
有效利用拒绝来电 (REFUSED CALL)
ON / OFF
当正在驾驶时若不想接听来电,可通过免提操作设定为不接听来
电。
ON:
OFF:
•
(初始设定值)
当收到电话时,显示屏不会出现任何显示,既不会通过免提方式
接听来电,也不会自动接听来电。
可通过免提方式接听来电。
如果在收到来电时将 “
REFUSED CALL
”设定为ON,仍会收
到手机电话。
设定要使用的电话簿 (PHONEBOOK)
UNIT
(初始设定值)
可设定是从手机上还是 SIM 卡上将电话簿下载到本机上。
UNIT:
,
将使用手机的电话簿。
CARD:
将使用 SIM 卡等上的电话簿。
/ CARD
设定通话音量 (MIC GAIN)
MIN(1)至MAX(7
可将通话音量设定为 7 档中的某一档。
)(初始设定值:5)
REAR SELECT 设定
后排显示器选择功能
AUX*
(初始设定值)
若在本机上连接上另一个显示器 (后排),可通过本机变更后排
显示器的图像 / 音频,这样就可坐在后排欣赏独立的图像 / 音频。
将显示在第12页 “外部输入名称设定 (
*
的音源名称。
无法在后排显示器上进行控制操作。
设定导航指引中断的输出 (INT NAV. GUIDE)
ON / OFF
当导航指引信号被发送到后输出 (AUX OUT)时,您可以将导航
指引中断发送到后输出。
ON:
OFF:
(初始设定值)
如果在 “REAR SELECT 设定”中没有设定 OFF,则导航指引中
断将被发送到后输出 (AUX OUT)。
无论 “REAR SELECT 设定”中的设定如何,导航指引中断都无
法发送到后输出 (AUX OUT)。
/ Bluetooth AUDIO / OFF
AUX NAM E
)”中设定
01CS05TMEM740BT.fm
当“
REAR SELECT
•
INT NAV. GUIDE
(
AUX OUT
•
如果免提电话和导航指引同时中断,则免提电话优先。
设定”中设定了
OFF
,则即使
设定为ON,导航指引中断也不发送到后输出
)。
ALPINE TME-M740BT_ENCS (CS)
13-CS
Page 36

01GB00TMEM740BT.book Page 14 Tuesday, January 30, 2007 3:32 PM
信息
出现问题时
若遇到问题,请先关闭电源,然后重新打开。若本机仍无法正
常工作,请对照如下检查清单检查有关项目。若本机出现故
障,本手册可帮您分析出问题所在。另外,请确认您的系统是
否连接正确或咨询您的 Alpine 授权经销商。
基本问题
无法使用功能或无显示。
• 汽车点火开关处于关闭状态。
- 如果按照说明连接,当汽车点火开关处于关闭状态时本机
将不会运行。
• 电源线连接不正确。
- 请检查电源线的连接。
• 保险丝熔断。
- 检查本机电瓶端上的保险丝;如果需要请更换为合适规格
的保险丝。
无任何声音或声音异常。
• 连接不正确或不牢固。
- 检查连接,并连接牢。
未显示画面。
• 亮度控制被设定在最小位置。
- 调节亮度控制。
• 汽车中的温度太低。
- 将汽车内温度升高到可正常操作范围。
• 与 DVD 、导航系统的连接不牢固。
- 检查连接,并连接牢。
显示不清晰或有噪点。
• 荧光灯板已坏。
- 请更换荧光灯板。
导航系统工作不正常。
• 与导航系统的连接不正确。
- 检查与导航系统的连接,并牢固、正确地连接电缆。
图像显示不清晰。
• 荧光灯管寿命到了。
- 请更换荧光灯管 *。
*
即使在保修期内,荧光灯管的更换也是收费的,因为灯管属于
消耗品。
本机无法正常工作。
• 显示器的电源未打开。
- 请打开显示器电源。
未产生图像。
• 显示器的模式未切换到想看的模式。
- 请切换到想看的模式。
• 未连接显示器的泊车刹车导线。
- 请连接显示器的泊车刹车导线并采取泊车刹车。
(详细情况请参考显示器说明。)
• 未设定显示器的泊车刹车。
- 请连接显示器的泊车刹车导线并采取泊车刹车。
(详细情况请参考显示器说明。)
图像不清晰或有噪点。
• 汽车电瓶电量太低。
- 检查电瓶电量和接线。
(加载状态下若电瓶电压低于 11V,本机可能无法正常工
作。)
• 显示器的荧光灯管已坏。
- 请更换显示器的荧光灯管。
出现点、虚线 / 条纹。
• 是由霓虹灯招牌、高压电源线、 CB 发射器、和其它汽车点
火火花塞等引起的。
- 移动汽车位置。
免提电话的声音不会中断主机。
• 未正确设定中断。
- 请将 INT MUTE 设定为 ON (第 12 页)。
- 请将 REFUSED CALL 设定为 OFF (第 13 页)。
- 请将 REAR SELECT 设定为 Bluetooth AUDIO(第 13 页)。
• 未正确设定主机的中断功能。
- 请将 INT MUTE 设定为 OFF (请参考主机的使用手册)。
规格
显示器部分
显示屏尺寸 6.95 型
LCD 类型 透明型 TN LCD
操作系统 TFT 有源矩阵
总像素 1,152,000 像素
有效像素数 99.99% 或以上
照明系统 冷阴极荧光灯管
一般部分
电源要求
重量 (显示器部分) 283g
梁架尺寸 (显示器部分)
宽度
高度
深度
•
因产品不断改进,产品规格和外形设计若有变更恕不另行通
知。
•该LCD
面板是用超高精密的制造技术生产的。有效像素比率超
过
99.99%
状态。
。这意味着可能有
14.4V DC
(允许范围 11-16V)
178 mm
100 mm
36 mm
0.01%
的像素始终处于ON或
OFF
14-CS
01CS06TMEM740BT.fm
ALPINE TME-M740BT_ENCS (CS)
Page 37

01GB00TMEM740BT.book Page 15 Tuesday, January 30, 2007 3:32 PM
安装与连接
安装或连接本机之前,请通读下列内容以及本手册的第 2 至 3
页,以确保正确使用本机。
注意
警告
请进行正确的连接。
连接不正确可能引起火灾或本产品损坏。
请只用于 12 伏负极接地的汽车。
(如果您无法确定 , 请向代理商确认。)否则可能引起火灾等
事故。
在进行配线之前,请将连接在电池负极端子上的电缆
拆下。
否则可能会因短路导致触电或受伤。
请勿让电缆缠上周围物体。
请按说明书排布电缆和电线以防驾驶中受阻碍。任由电缆或
电线阻碍或悬垂于方向盘、变速杆、刹车踏板等处之上是很
危险的。
请勿切开电缆。
切勿通过剥除电缆绝缘层向其它设备供电。否则将因超过电
线的额定负荷而导致火灾或触电。
钻孔时请注意勿损伤配管或电线。
当在底盘上钻安装孔时,请特别注意勿接触、损伤或阻塞配
管、油路、油箱或电线。否则可能导致火灾。
请勿使用刹车或转向系统上的螺栓或螺母进行接地连
接。
刹车或转向系统 (或任何其它与安全有关的系统),或油箱
上使用的螺栓或螺母,绝对不能用于安装或连接接地线。否
则会使汽车控制失灵,或引起火灾等。
电池等小物体应放在儿童不易触及的地方。
吞下小物体可能导致严重伤害。一旦误吞,请立即就医。
请勿安装在妨碍汽车驾驶的位置,例如方向盘或变速
杆附近。
否则可能会阻碍前方的视野或影响驾驶,并导致严重事故。
请专业人员进行配线和安装。
本装置的配线和安装需要专业技术和经验。为了安全起见,
请联系您所购买产品的经销商进行安装。
请使用指定的附件并进行安全安装。
请务必使用指定的附件。使用其它零件可能损坏设备内部或
不能牢固安装到位。这会导致零件松动从而发生危险或使产
品出现故障。
请合理排布配线以免被锋利的金属边压到或夹到。
电缆、电线的安装线路应远离可活动的部件 (例如座椅滑
轨)或锋利尖锐的金属边缘,以防配线受损。如果配线须穿
过金属孔,请用橡皮垫圈套住以防配线的绝缘层被金属孔的
边缘割伤。
请勿安装在极潮湿或多灰尘的位置。
避免将机器安装在极易受潮或积尘的位置。湿气或灰尘侵入
机器内部可能导致机器故障。
使用前请注意
• 在安装您的 TME-M740BT 前,请确认从电瓶 (-)极上断
开电缆。这将减少因出现短路而损坏本机的机率。
• 请确认已按图示连接了彩色标志的导线。错误的连接会导
致本机故障甚至车辆电气系统的损坏。
• 在与车辆电气系统连接时,请注意工厂安装的器件 (例
如,板载电脑)。请勿搭接这些导线向本机供电。在将
TME-M740BT 接到保险丝盒上时,请确认用于
TME-M740BT 的电路上的保险丝具有正确的安培值。否则
会损坏本机和 / 或车辆。如果有疑问,请咨询您的 ALPINE
经销商。
• TME-M740BT使用 RCA 型雌插座与其它带RCA 连接器的设
备进行连接。您可能需要一个适配器与其它设备连接。如
果进行此操作,请与您的 ALPINE 授权经销商联络以获取
援助。
• 安装时,显示器必须完全收至机箱内。否则,即可能导致
故障发生。
重要
请将您主机上的序列号记录到下面的空格中,并将其作为永久记
录保存。序列号标牌位于本机底部。
01CS07TMEM740BT.fm
序列号:
安装日期:
安装技术员:
购买地点:
15-CS
ALPINE TME-M740BT_ENCS (CS)
Page 38

01GB00TMEM740BT.book Page 16 Tuesday, January 30, 2007 3:32 PM
安装
附件列表
显示器 . . . . . . . . . . . . . . . . . . . . . . . . . . . . . . . . . . . . . . . . . . . . . . . . .1
显示屏电缆 (2.5m) / 电源线 . . . . . . . . . . . . . . . . . . . . . . . . . . . . . 1
麦克风 . . . . . . . . . . . . . . . . . . . . . . . . . . . . . . . . . . . . . . . . . . . . . . . . .1
电线夹 . . . . . . . . . . . . . . . . . . . . . . . . . . . . . . . . . . . . . . . . . . . . . . . . .3
显示器支座 . . . . . . . . . . . . . . . . . . . . . . . . . . . . . . . . . . . . . . . . . . . . .1
固定螺丝 (M4 × 12) . . . . . . . . . . . . . . . . . . . . . . . . . . . . . . . . . . .3
布 . . . . . . . . . . . . . . . . . . . . . . . . . . . . . . . . . . . . . . . . . . . . . . . . . . . . . 1
支架中心 . . . . . . . . . . . . . . . . . . . . . . . . . . . . . . . . . . . . . . . . . . . . . . .1
支架侧边 (L/R). . . . . . . . . . . . . . . . . . . . . . . . . . . . . . . . . . . . . . . . 2
螺丝 (M5 × 8) . . . . . . . . . . . . . . . . . . . . . . . . . . . . . . . . . . . . . . . .8
用户说明书 . . . . . . . . . . . . . . . . . . . . . . . . . . . . . . . . . . . . . . . . . . . . .1
3
检查粘贴位置。
A 用胶带暂时固定支座。
B 松开调节螺丝,然后将它调节到安全、
便于观看的位置。
固定臂倾向于座位侧。
角度调节螺
丝
安装显示器和支座
注意
请不要将显示器安装在前乘客座位的气囊系统附近。
1
卸下主机安装固定件。
拉该零件解除锁定。
主机安装固定件
2
用硬币等松开主机安装固定件,将它滑入主机后面的导
轨并暂时拧紧。然后将它固定到支座上。
座位侧 前挡风玻璃侧
主机
视线
仪表板
为了安全使用,请固定在如下位置。
• 稳定、安全的位置。
• 在驾驶过程中主机不会挡住视线的位置。
• 系安全带向前倾斜时不会碰到的位置。
• 驾驶过程中主机不会碰到方向盘的位置。
请注意,若仪表板表面为皮革、木质面板、拉伸纤维或其
•
它非树脂产品,当拆卸支座时会损伤仪表板表面。
•
请不要让主机正对着空调排风口。
如主机处在视线上,
将会挡住您的视线。
16-CS
01CS07TMEM740BT.fm
向上方滑动。
4
从支座上拆下主机。
ALPINE TME-M740BT_ENCS (CS)
Page 39

01GB00TMEM740BT.book Page 17 Tuesday, January 30, 2007 3:32 PM
5
将安装座从支座上卸下,然后将它粘贴到仪表板等位置。
使用附带的抹布将安装位置的脏物擦干净。
固定螺丝
(M4 × 12,附带 )
若安装位置呈
弧线,请弯曲
该部件让它与
安装部位形状
相吻合。
安装座
安装外部麦克风以便进行免提通话
为了安全,请将麦克风安装在如下位置。
•
稳定、安全的位置。
•
不会干扰驾驶操作的位置。
•
将用于免提通话的外部麦克风安装在很容易接收驾驶员声音的
位置。安装麦克风时,要考虑与驾驶员的距离和方向,以便驾
驶员无需移动身体就可将声音很方便地传到麦克风,因为驾驶
员身体的移动可能会分散精力。
•
若连接外部麦克风,将无法使用内置麦克风。
1
撕下外部麦克风底部的纸封,然后将它贴在仪表板上。
用附带的清洁剂彻底清洁安装表面区域,然后将麦克风粘贴
到位。
•
若汽车内温度很低 (冬天),请首先用电吹风机等加热要粘贴
安装座的位置。
•
粘贴后24小时内不要向安装座施加外力或使之受潮。
•
若安装座没有粘贴牢,建议用附带的固定螺丝进行固定。
6
按照步骤 2 所述将主机安装到支座上。
用电缆夹固定电缆。
•
使用之前,请确认主机与支座之间、支座与要安装到汽车上的
位置之间是否固定牢。
使用支架将显示器安装在仪表板上。
1
用附带的螺丝 (M5 × 8) 安装支架。
2
用附带的螺丝 (M5 × 8) 将支架安装在显示器上。
\
防止外部噪音进入音频系统。
• 将本机以及导线布置在距离汽车线束至少 10 cm 的地方。
• 要尽量让电瓶电源导线远离其它导线。
• 将接地线牢固地连接在汽车底盘裸露的金属点 (根据需要
清除油漆、污渍或油脂)。
• 若添加选购的降噪器,请将它尽量连接在远离本机的位
置。 Alpine 经销商同时经营各种降噪器,请与他们联系了
解更详细情况。
• Alpine 经销商最了解预防噪音的各种措施,请与他们联系
了解更详细情况。
3
将带有支架的显示器装入车内。
01CS07TMEM740BT.fm
17-CS
ALPINE TME-M740BT_ENCS (CS)
Page 40

01GB00TMEM740BT.book Page 18 Tuesday, January 30, 2007 3:32 PM
连接
AUX IN (白色)
AUX IN (红色)
AUX IN (黄色)
AUX OUT (白色)
AUX OUT (红色)
AUX OUT (黄色)
CAMERA IN (黄色)
OUT INT
(粉红 / 黑色)
REMOTE OUT (AUX IN)
(白色 / 棕色)
M. CONT
(白色 / 粉红)
REVERSE
(橙色 / 白色)
PARKING/HAND BRAKE
(黄色 / 蓝色)
FOOT BRAKE
(黄色 / 黑色)
音频输入连接器 (AUX IN)(白色)
左音频输入。
音频输入连接器 (AUX IN)(红色)
右音频输入。
视频输入连接器 (AUX IN)(黄色)
输入视频。
音频输出连接器 (AUX OUT)(白色)
左音频输出。
音频输出连接器 (AUX OUT)(红色)
右音频输出。
视频输出连接器 (AUX OUT)(黄色)
输出视频。
摄像头输入连接器 (黄色)
当连接了倒车摄像头时使用。
音频中断输出导线 (粉红 / 黑色)
遥控输出导线 (AUX IN)( 白 色 / 棕色)
将该导线连接到遥控输入导线。该导线用来输出遥控器的控
制信号。
显示器控制导线 (白色 / 粉红)
将该导线连接到与触摸面板兼容产品的显示器控制导线。
倒车导线 (橙色 / 白色)
仅当连接了倒车摄像头时使用。连接到汽车倒车灯的正极
端,当变速箱切换到倒车档 (R)时倒车灯亮灯。
将视频图像切换到倒车摄像头。当将汽车切换到倒车档
(R)会自动连接。
泊车 / 手刹导线 (黄色 / 蓝色)
将该导线连接到泊车手刹开关的电源侧,以便将泊车手刹状
态信号传输到 TME-M740BT。
脚踏刹车导线 (黄色 / 黑色)
不使用。
切换电源导线 (点火)(红色)
将该导线连接到汽车保险丝盒或其它未使用电源的开放端子
上,仅当打开点火开关或连接到附件位置时提供 (+) 12V
的电源。
接地线 (黑色)
将该导线连接到汽车底盘上状态良好的接地点。请务必将接
地线连接在裸露的金属上,并用附带的板金螺丝固定牢。
RGB 输入连接器
将该连接器连接到导航系统或 Vehiclehub Pro 系统的 RGB
输出端子。
主显示器
显示屏电缆 / 电源线
保险丝座 (2A)
18-CS
01CS07TMEM740BT.fm
ACC
(红色)
GND
(黑色)
FUSE
(2A)
ALPINE TME-M740BT_ENCS (CS)
Page 41

01GB00TMEM740BT.book Page 19 Tuesday, January 30, 2007 3:32 PM
系统示例
连接导航系统、 DVB-T 或 DVD 播放机
遥控输出 (AUX IN) 遥控输入 (白色 / 棕色)
(白色 / 棕色)
数字 TV 接收机
(DVB-T)
TUE-T200DVB
或
DVD 播放机
DVE-5207
(另售)
导航
NVE-N900C
(另售)
视频输入连接器 (AUX IN)(黄色)
音频输入连接器 (AUX IN)(红色)
音频输入连接器 (AUX IN)(白色)
遥控输出导线 (AUX IN)( 白 色 / 棕色)
将该导线连接到遥控输入导线。该导线用来输出遥控器的控
制信号。
连接导航系统和 DVD 主机
遥控输出 (AUX IN) 遥控输入 (白色 / 棕色)
(白色 / 棕色)
RGB 输入连接器
RCA 延长电缆 (另售)
遥控输入导线 (白色 / 棕色)
RGB 电缆 (包含在导航系统中)
至视频输出端子
DVD 主机
DVA-9861E 等
(另售)
导航
NVE-N900C
(另售)
视频输入连接器 (AUX IN)(黄色)
音频输出连接器 (AUX OUT)(红色)
音频输出连接器 (AUX OUT)(白色)
遥控输出导线 (AUX IN)( 白 色 / 棕色)
将该导线连接到遥控输入导线。 该导线用来输出遥控器的控
制信号。
01CS07TMEM740BT.fm
RGB 输入连接器
RCA 延长电缆 (另售)
Ai-RCA 连接器 KCA-121B (另售)
遥控输入导线 (白色 / 棕色)
RGB 电缆 (包含在导航系统中)
19-CS
ALPINE TME-M740BT_ENCS (CS)
Page 42

01GB00TMEM740BT.book Page 20 Tuesday, January 30, 2007 3:32 PM
连接
Vehiclehub Pro、导航系统、 DVB-T 和 DVD 播放机
Vehiclehub Pro
VPA-B222R
导航
NVE-N900C
(另售)
(另售)
遥控输出 (AUX 1)
(白色 / 棕色)
后座显示器
(另售)
遥控输入
(白色 / 棕色)
Ai-NET DVD 播放机
DVA-5210 等
(另售)
数字 TV 接收机
(DVB-T)
TUE-T200DVB
(另售)
RGB 电缆 (包含在导航系统中)
RGB 输入连接器
RGB 电缆 (另售)
RCA 延长电缆 (另售)
遥控输出导线 (AUX 1)(白色 / 棕色)
将该导线连接到遥控输入导线。该导线用来输出遥控器的控
制信号。
遥控输出 (AUX 2)
(白色 / 棕色)
遥控输入 (白色 / 棕色)
遥控输入导线 (白色 / 棕色)
Ai-NET 电缆 (包含在 DVD 主机中)
遥控输出导线 (AUX 2)( 白 色 / 棕色)
将该导线连接到遥控输入导线。该导线用来输出遥控器的控
制信号。
遥控输入导线 (白色 / 棕色)
20-CS
01CS07TMEM740BT.fm
ALPINE TME-M740BT_ENCS (CS)
Page 43

01GB00TMEM740BT.book Page 21 Tuesday, January 30, 2007 3:32 PM
01CS07TMEM740BT.fm
ALPINE TME-M740BT_ENCS (CS)
Page 44

01GB00TMEM740BT.book Page 22 Tuesday, January 30, 2007 3:32 PM
产品中有毒有害物质或元素的名称及含量
部件名称
有毒有害物质或元素
铅
(Pb)
电路板组件 *
软性电路板组件 *
○:表示该有毒有害物质在该部件所有均质材料中的含量均在 SJ/T 11363-2006 《电子信息产品中有毒有害物质的限量
要求标准》规定的限量要求以下。
×:表示该有毒有害物质至少在该部件的某一均质材料中的含量超出 SJ/T 11363-2006 《电子信息产品中有毒有害物质
的限量要求标准》规定的限量要求;但是上表中打
术。
* 电路板组件包括印刷电路板及其构成的零部件,如电阻、电容、集成电路、连接器等。
×
×
汞
(Hg)
镉 (Cd) 六价铬
(Cr(VI))
多溴联苯 (PBB) 多溴二苯醚
(PBDE)
〇〇 〇 〇 〇
〇〇 〇 〇 〇
“×”的部件,其含量超出是因为目前业界还没有成熟的可替代的技
22-CS
01CS07TMEM740BT.fm
ALPINE TME-M740BT_ENCS (CS)
 Loading...